
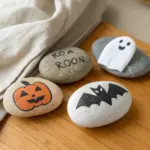
There’s something ridiculously satisfying about turning an ordinary stone into a little ghost character with just a few simple brushstrokes. Here are my favorite ghost rock ideas—from classic sheet-ghost cuties to more unexpected spooky scenes—so you can paint a whole tiny haunting of your own.
Classic Sheet Ghost Silhouette
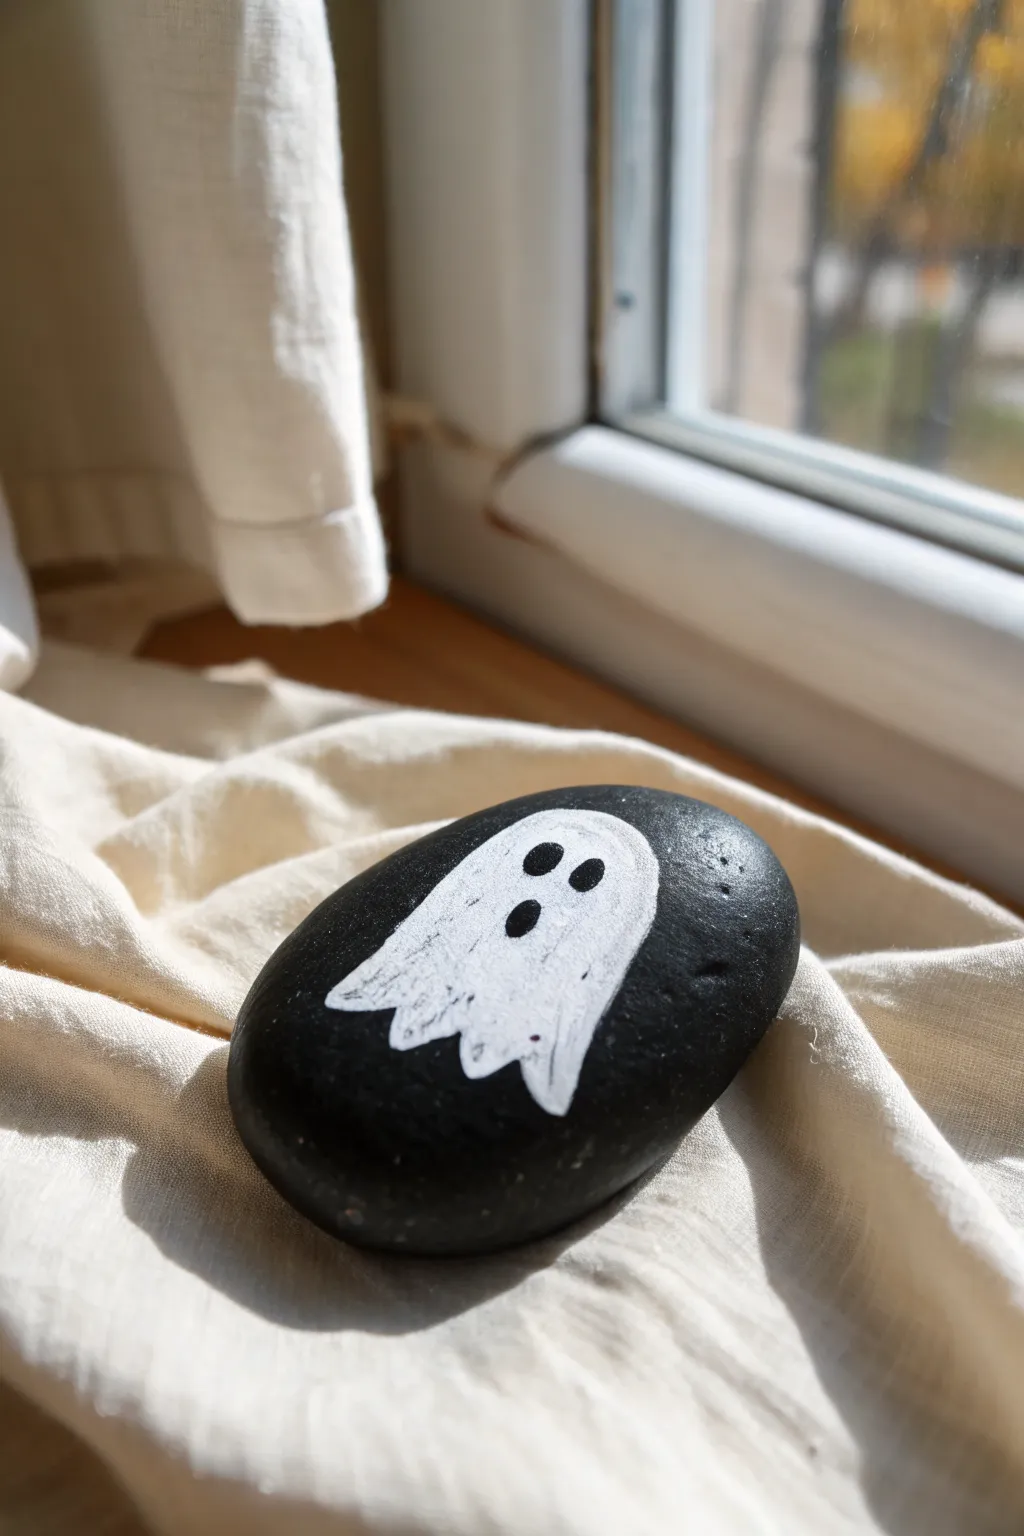
This classic Halloween craft transforms a simple smooth river rock into a charmingly spooky decoration. With its stark contrast between the matte black stone and the bright white ghost silhouette, it’s a perfect minimalistic accent for your autumn display.
How-To Guide
Materials
- Smooth river stone (palm-sized)
- Black acrylic paint (matte finish)
- White acrylic paint or white paint pen
- Small round paintbrush
- Detail paintbrush or fine-point black marker
- Clear matte sealant spray (optional)
- Water cup and paper towels
Step 1: Preparing the Canvas
-
Clean the stone:
Start by washing your river stone with warm soapy water to remove any dirt or oils. Let it dry completely before you begin painting to ensure the base coat adheres properly. -
Apply base coat:
Paint the entire surface of the stone with black acrylic paint. You want a solid, opaque background, so don’t be afraid to apply a generous amount. -
Let it dry:
Allow the first layer of black paint to dry to the touch. This usually takes about 15-20 minutes depending on the thickness of the paint. -
Second coat:
Apply a second coat of black paint to cover any streaks or bare spots. This creates a deep, rich background that will make your ghost really pop. -
Final dry:
Let the black base coat dry completely. I like to leave it for at least an hour to ensure the surface is hard enough to paint over without lifting the black layer.
Fixing Mistakes
If you accidentally smudge black paint onto the white ghost, wait for it to dry completely, then dab a tiny bit of white paint over the smudge to cover it up seamlessly.
Step 2: Painting the Ghost
-
Outline the shape:
Using a small round brush dipped in white acrylic paint, gently outline the ghost shape. Start with a rounded arch for the head near the center-top of the rock. -
Extend the body:
Extend lines down from the head to form the body. Don’t worry about perfect symmetry; a slight wobble adds to the floating sheet effect. -
Create the jagged edge:
At the bottom of the shape, paint a jagged or wavy line to represent the bottom of the sheet. Create three or four distinct points or scallops. -
Fill it in:
Fill in the outline with white paint. Use smooth strokes to keep the texture even. -
Check opacity:
The black background might show through the first layer of white. Let it dry briefly, then apply a second layer of white paint to make the ghost bright and opaque. -
Add texture (optional):
For a slightly rustic look like the example, use a slightly drier brush on the final white layer to leave gentle bristle marks that mimic fabric folds.
Glow Up
Use glow-in-the-dark acrylic paint for the white ghost body. It will look like a normal painted rock during the day but reveal a glowing spooky surprise when the lights go out.
Step 3: Adding Face Details
-
Position the face:
Visualize where the face should go. It should be placed in the upper third of the ghost shape. -
Paint the eyes:
Using a very fine detail brush and black paint (or a black paint marker), create two small, vertical oval shapes for the eyes. -
Add the mouth:
Paint a slightly larger vertical oval centered below the eyes for the surprised mouth. Keep the edges smooth and rounded. -
Refine edges:
If your black face details wobbled, you can carefully touch up the surrounding white paint once the black is dry to sharpen the edges.
Step 4: Finishing Touches
-
Dry completely:
Allow the entire rock to dry for several hours, or overnight if possible. -
Seal the artwork:
To protect your ghost rock from scratches or weather (if placing outside), spray a light coat of clear matte sealant over the entire stone in a well-ventilated area.
Place your finished ghost rock on a windowsill or shelf to add a touch of handmade spirit to your home

Tiny Boo With a Speech Bubble
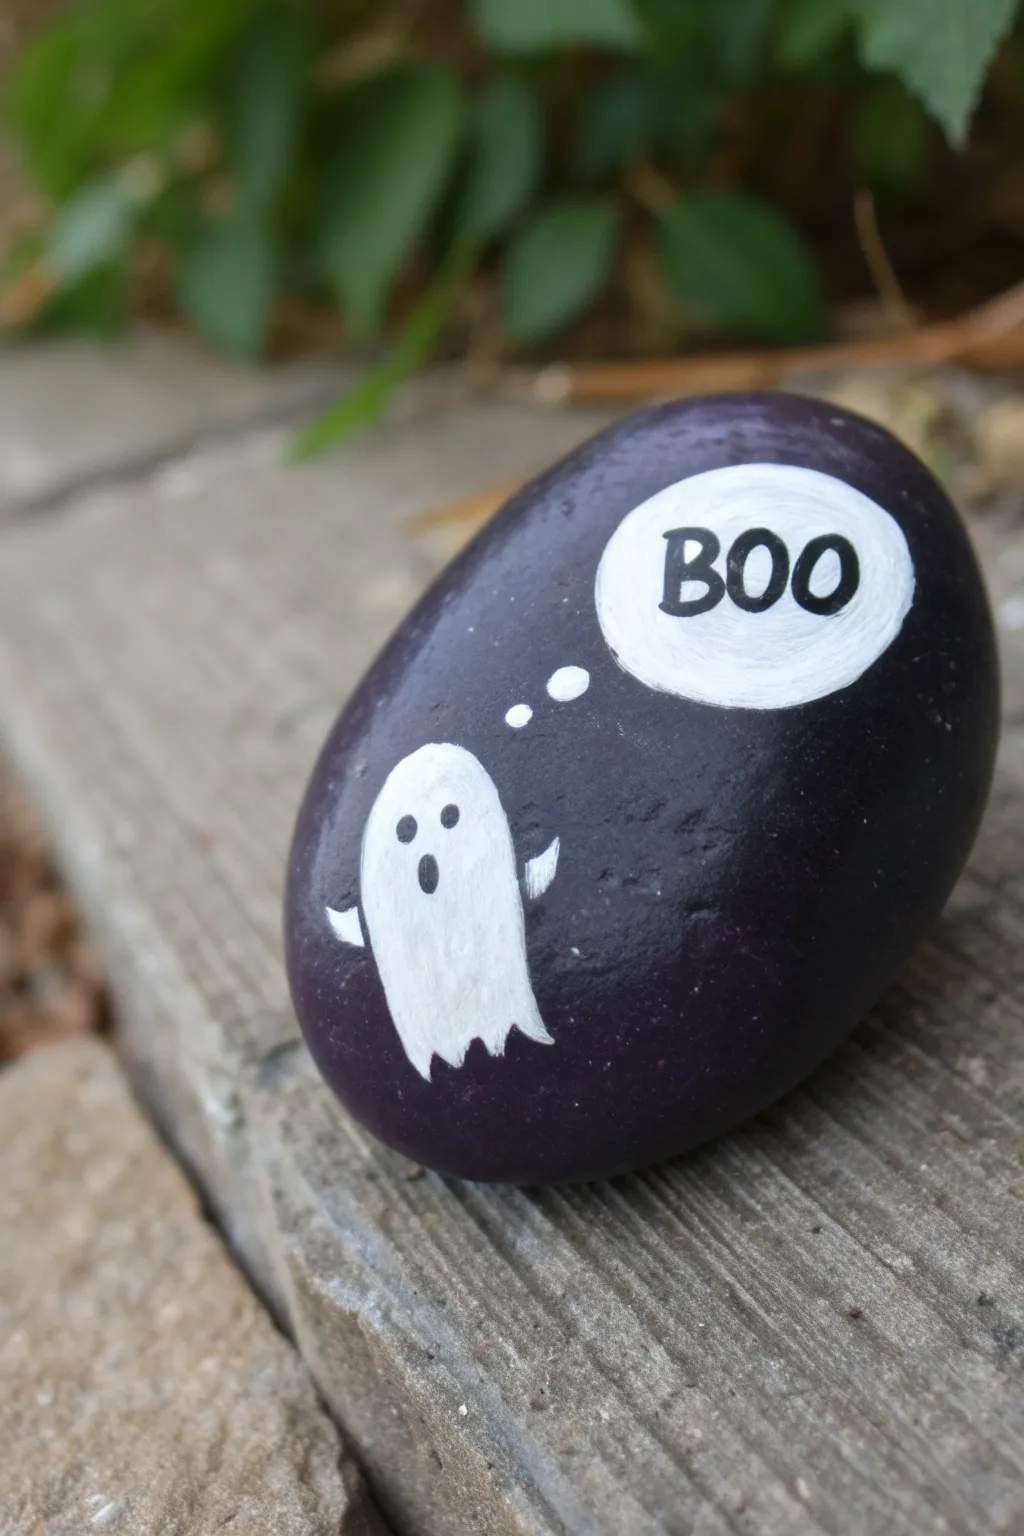
This miniature masterpiece features a tiny, startled ghost thinking its spooky thoughts on a smooth, dark pebble. The deep purple background really makes the white paint pop, creating a high-contrast Halloween decoration perfect for hiding in planters.
Step-by-Step Tutorial
Materials
- Smooth, oval-shaped river rock
- Deep purple acrylic paint (or black)
- Titanium white acrylic paint
- Black acrylic paint or extra-fine Posca pen
- Medium flat paintbrush
- Fine detail paintbrush (liner brush)
- Dotting tool or toothpick
- Matte or satin spray sealer
Step 1: Setting the Night Scene
-
Clean the canvas:
Start by scrubbing your river rock with warm soapy water and letting it dry completely. Dust or dirt will prevent the paint from sticking properly. -
Base coat application:
Using a medium flat brush, paint the entire top surface of the rock with a deep purple acrylic paint. I find this color adds more warmth than plain black. -
Smooth coverage:
Let the first coat dry for about 15 minutes, then apply a second coat to ensure the color is solid and opaque with no rock showing through. -
Full drying time:
Allow the purple base to cure fully before moving on. If it’s tacky, your white paint might drag and mix with the purple.
Clean Lines Tip
If you struggle painting the word ‘BOO’ with a brush, a fine-point permanent marker works great over dry acrylic paint for precise lettering.
Step 2: Painting the Ghost
-
Ghost outline:
Load a fine detail brush with titanium white paint. Near the bottom left of the rock, paint a small, rounded arch shape for the ghost’s head. -
Filling the body:
Extend the white shape downward, filling it in completely. Wiggle your brush slightly at the bottom edge to create the tattered, wavy hem of the sheet. -
Adding arms:
Paint two tiny, triangular nubs sticking out from the sides of the ghost’s body to represent its arms waving in the air. -
Opacity check:
White over dark purple often looks streaky at first. Once the first white layer is dry, carefully paint a second layer right on top to make it bright and solid.
Step 3: The Speech Bubble
-
Thought dots:
Using the tip of a small brush or a dotting tool, place two small white dots rising diagonally from the ghost’s head toward the upper right. -
Bubble shape:
Paint a larger white oval shape in the upper right quadrant of the rock. This will be the main speech bubble. -
Refining edges:
Go around the edge of your white oval with the detail brush to smooth out any bumps, making it a clean, cartoonish shape.
Glow Up
Mix glow-in-the-dark medium into your white paint for the ghost body so your little spooky friend lights up when the sun goes down.
Step 4: Details & Lettering
-
Ghost face:
Dip a fine dotting tool or the very end of a toothpick into black paint. Dot two small eyes near the top of the ghost’s head. -
Spooky mouth:
Create an oval-shaped mouth just below the eyes using the black paint. It should look like a surprised ‘O’. -
Lettering preparation:
Ensure the white speech bubble is 100% dry before attempting to write on it, otherwise the ink will bleed. -
Writing BOO:
Using an extra-fine black paint pen or a liner brush with thinned black paint, carefully write ‘BOO’ inside the bubble. Keep the letters blocky and bold. -
Sealing the deal:
Once all paint is fully cured (give it a few hours), spray the rock with a matte or satin sealer to protect it from the elements if you plan to hide it outdoors.
Now you have a charmingly spooky pocket ghost ready to haunt your garden path or desk


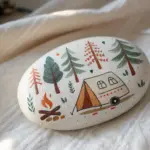
Ghost With a Bright Pumpkin
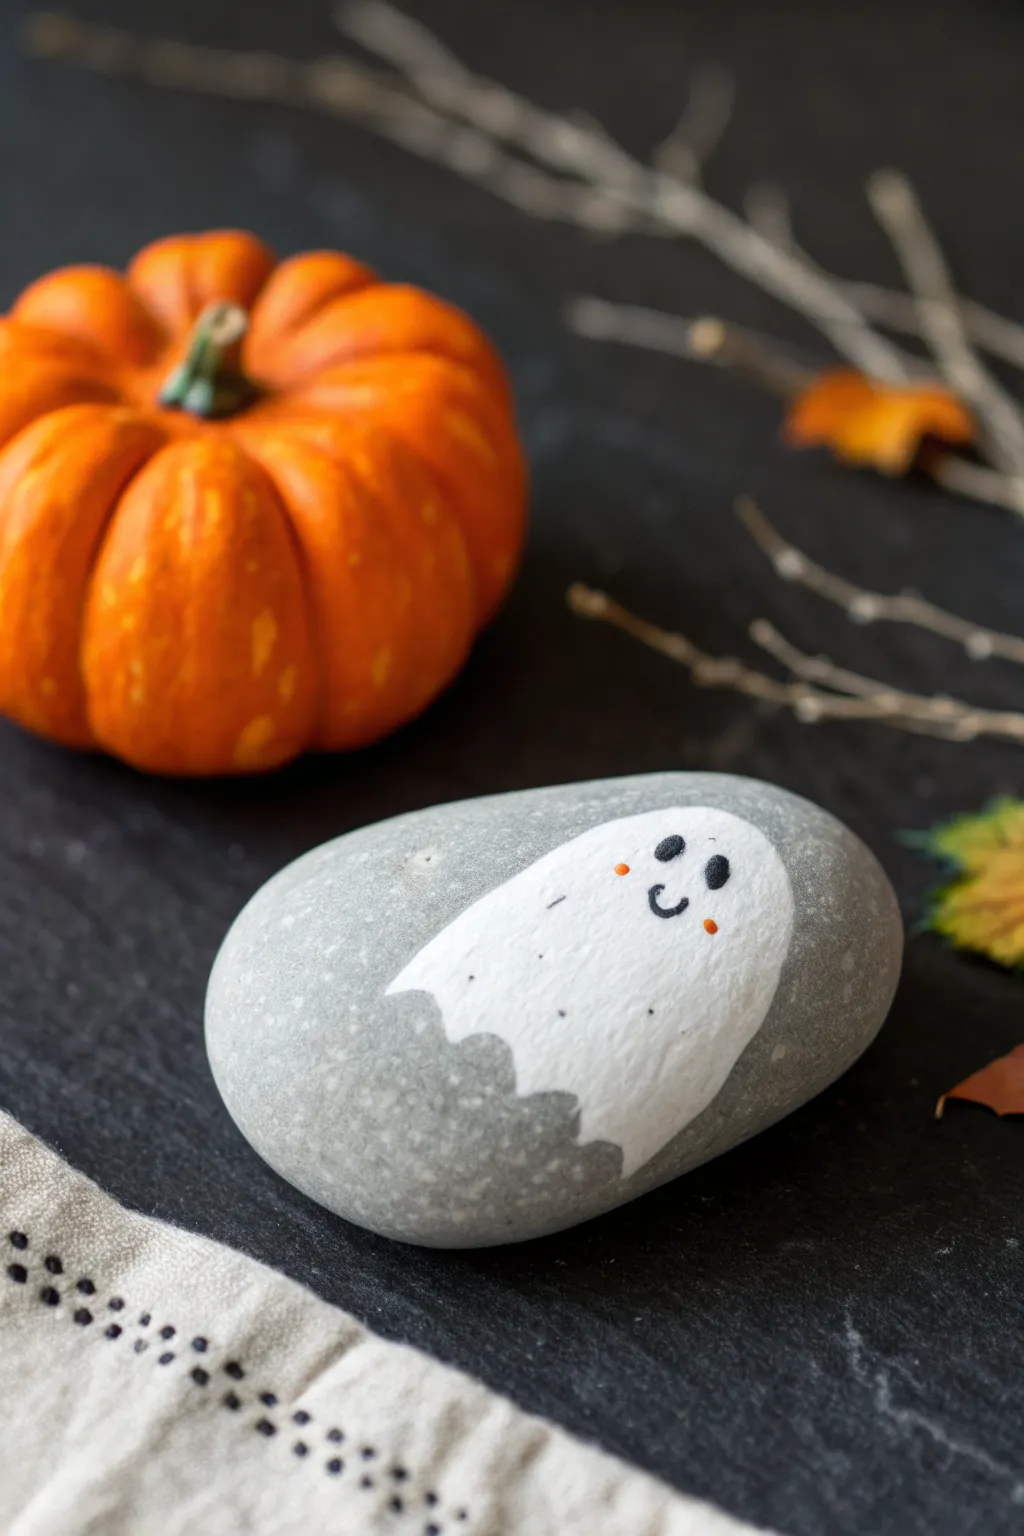
This charming project turns a simple grey river stone into a spooky-sweet ghost with just a few dabs of paint. It’s a minimalist design that lets the natural texture of the stone shine through while creating a high-contrast character perfect for autumn decor.
Step-by-Step
Materials
- Smooth, grey river rock (oval shape preferred)
- White acrylic paint
- Black acrylic paint or fine-tip paint pen
- Orange acrylic paint
- Small round paintbrush (size 2 or 4)
- Very fine detail brush (size 000) or dotting tool
- Water cup and paper towel
- Scrubbing brush and soap (for cleaning the rock)
- Matte or satin sealant spray (optional)
Step 1: Preparation
-
Clean the canvas:
Before putting brush to stone, take your grey river rock and give it a good scrub with soap and water to remove any dirt or oils. -
Dry completely:
Let the rock dry fully in the sun or use a hairdryer to speed the process up; paint won’t stick well if moisture is trapped in the porous surface.
Uneven Paint?
If your white paint looks streaky, don’t overload the brush. Two thin layers are always better than one thick, gloopy layer.
Step 2: Painting the Ghost Shape
-
Outline the top curve:
Using your small round brush and white acrylic paint, draw a smooth, rounded arch near the top-right third of the stone to form the ghost’s head. -
Define the sides:
Paint two lines flowing down from the arch. Curve the left line outward slightly to give the ghost a bit of movement. -
Create the scalloped bottom:
Instead of a straight line across the bottom, paint small, wavy scallops or zig-zags to create the ‘floating sheet’ effect. -
Fill in the shape:
Fill the entire ghost outline with white paint. Use smooth strokes to avoid ridges. -
Evaluate opacity:
If the grey stone shows through significantly, wait for the first layer to dry and apply a second coat for a solid, bright white.
Glow Up
Swap the standard white acrylic for glow-in-the-dark paint. Your ghost will charge in the sun and eerie glow on the porch at night.
Step 3: Adding the Face
-
Position the eyes:
Dip the handle end of a paintbrush or a dotting tool into black paint. I like to place these slightly higher up on the head to make it look cute. -
Dot the eyes:
Press two small, vertical ovals or round dots onto the dried white paint for the eyes. -
Paint the smile:
Using a very fine detail brush or a black paint pen, draw a small ‘U’ shape right between and below the eyes for a happy mouth. -
Add the cheeks:
Dip the very tip of a toothpick or smallest brush into orange paint. -
Apply blush dots:
Place two tiny orange dots just outside the corners of the smile to give the ghost rosy cheeks.
Step 4: Finishing Touches
-
Add motion lines:
For a little extra character, use a dry brush with a tiny amount of black paint (or a fine pen) to add two very faint, short dash lines on the ghost’s body. -
Clean edges:
If any white paint went outside your lines, use a damp Q-tip or a brush with grey paint to neaten the edges. -
Let it cure:
Allow the face details to dry completely for at least an hour. -
Seal the artwork:
To protect your ghost from chipping, especially if it will live outside, spray a light coat of matte sealer over the entire rock.
Place your little stone spirit near a pumpkins or on a windowsill for a subtle touch of Halloween magic


Floating Ghost on a Color-Blocked Background
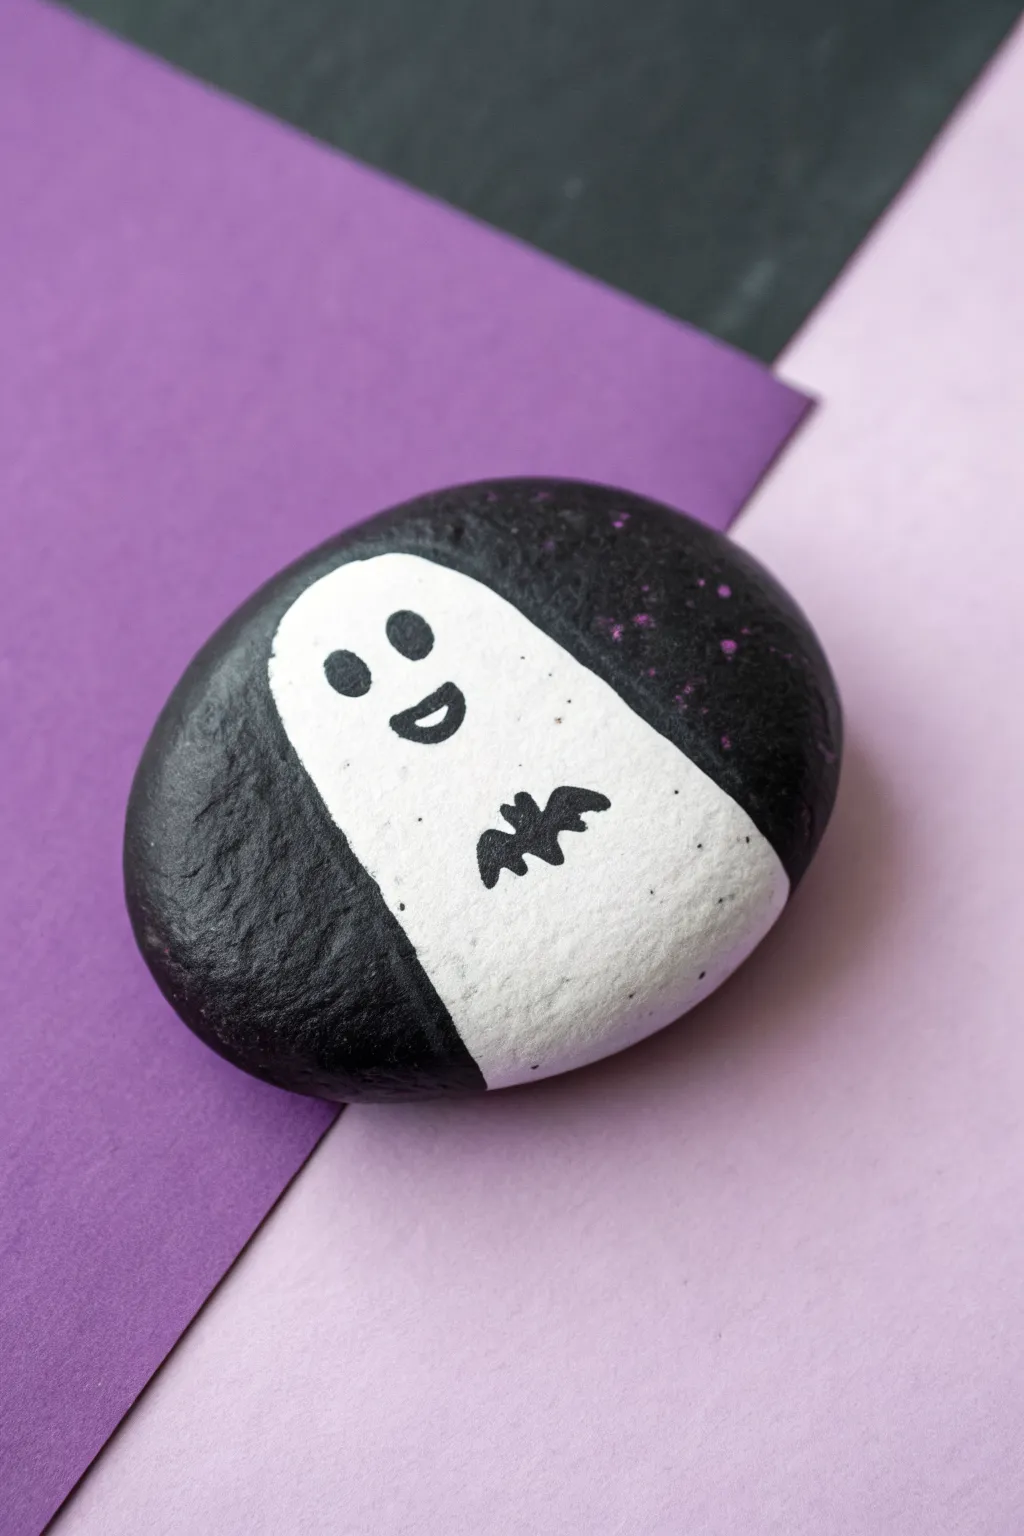
This charming project transforms a simple smooth stone into a friendly painted ghost floating against a midnight sky. With its clean lines and subtle speckled details, this modern Halloween decoration is perfect for hiding around the neighborhood or displaying on a shelf.
Step-by-Step Tutorial
Materials
- Smooth oval river rock
- Black acrylic paint
- White acrylic paint
- Purple acrylic paint (or magenta)
- Medium flat paint brush
- Fine detail brush or liner brush
- Old toothbrush (for speckling)
- Pencil for sketching
- Matte sealer or varnish
Step 1: Base Coat and Background
-
Clean the Stone:
Begin by washing your rock with warm soapy water to remove any dirt or oils. Let it dry completely in the sun or with a cloth. -
Outline the Shape:
Using a pencil, lightly sketch a long, rounded ghost shape in the center of the rock. The shape should resemble a tall arch or a rounded tombstone. -
Paint the Background:
Mix your black acrylic paint. Using your medium flat brush, carefully paint the area outside of your pencil line, covering the sides and back of the rock. -
Refine the Edge:
Go back with a smaller brush to tidy up the edge where the black paint meets your sketched ghost line. You want a crisp, clean curve. -
Add Texture:
While the black is drying, take an old toothbrush and dip it lightly into purple or magenta paint. Run your thumb over the bristles to flick tiny specks onto the black areas. -
Clean Up:
If any purple specks land inside the ghost outline, quickly wipe them away with a damp cotton swab before they set.
Clean Lines Pro-Tip
For a perfect curve on the ghost’s head, use the edge of a curved household item (like a spoon) as a guide for your pencil sketch.
Step 2: Painting the Ghost
-
Fill the Ghost:
Once the black border is dry to the touch, load your flat brush with opaque white acrylic paint. -
First Layer:
Paint inside the ghost outline. Don’t worry if it looks streaky at first; white often needs multiple coats over dark stone. -
Let it Dry:
Allow the first coat of white to dry completely. This prevents the paint from pulling up and creating lumps. -
Second Layer:
Apply a second (and potentially third) coat of white until you have a solid, bright finish that completely hides the stone underneath.
Step 3: Details and Finishing
-
Sketch the Face:
Lightly sketch the ghost’s face and the small bat using a pencil directly on the dry white paint to guide your hand. -
Paint the Eyes:
Using your finest detail brush and black paint, fill in two small oval eyes. Place them slightly high on the ghost’s ‘face’. -
Add the Smile:
Paint a small, D-shaped mouth below the eyes. Leave a tiny sliver of white unpainted at the top of the mouth for teeth, or paint it black and add a white line later. -
Create the Bat:
Carefully paint the small bat silhouette on the lower section of the ghost. Start with the body shape, then pull the paint out to form the pointed wings. -
Final Touches:
Check your edges. If the white paint ran over the black background, touch it up with a little black paint for a sharp contrast. -
Seal the Work:
Once absolutely everything is dry, apply a coat of matte varnish or sealer to protect your artwork from chipping and weather.
Glow Up Idea
Swap the standard white paint for glow-in-the-dark acrylic paint. Your ghost will charge up during the day and spookily shine at night.
Now you have a spooky little companion ready to haunt your garden or desk
BRUSH GUIDE
The Right Brush for Every Stroke
From clean lines to bold texture — master brush choice, stroke control, and essential techniques.
Explore the Full Guide
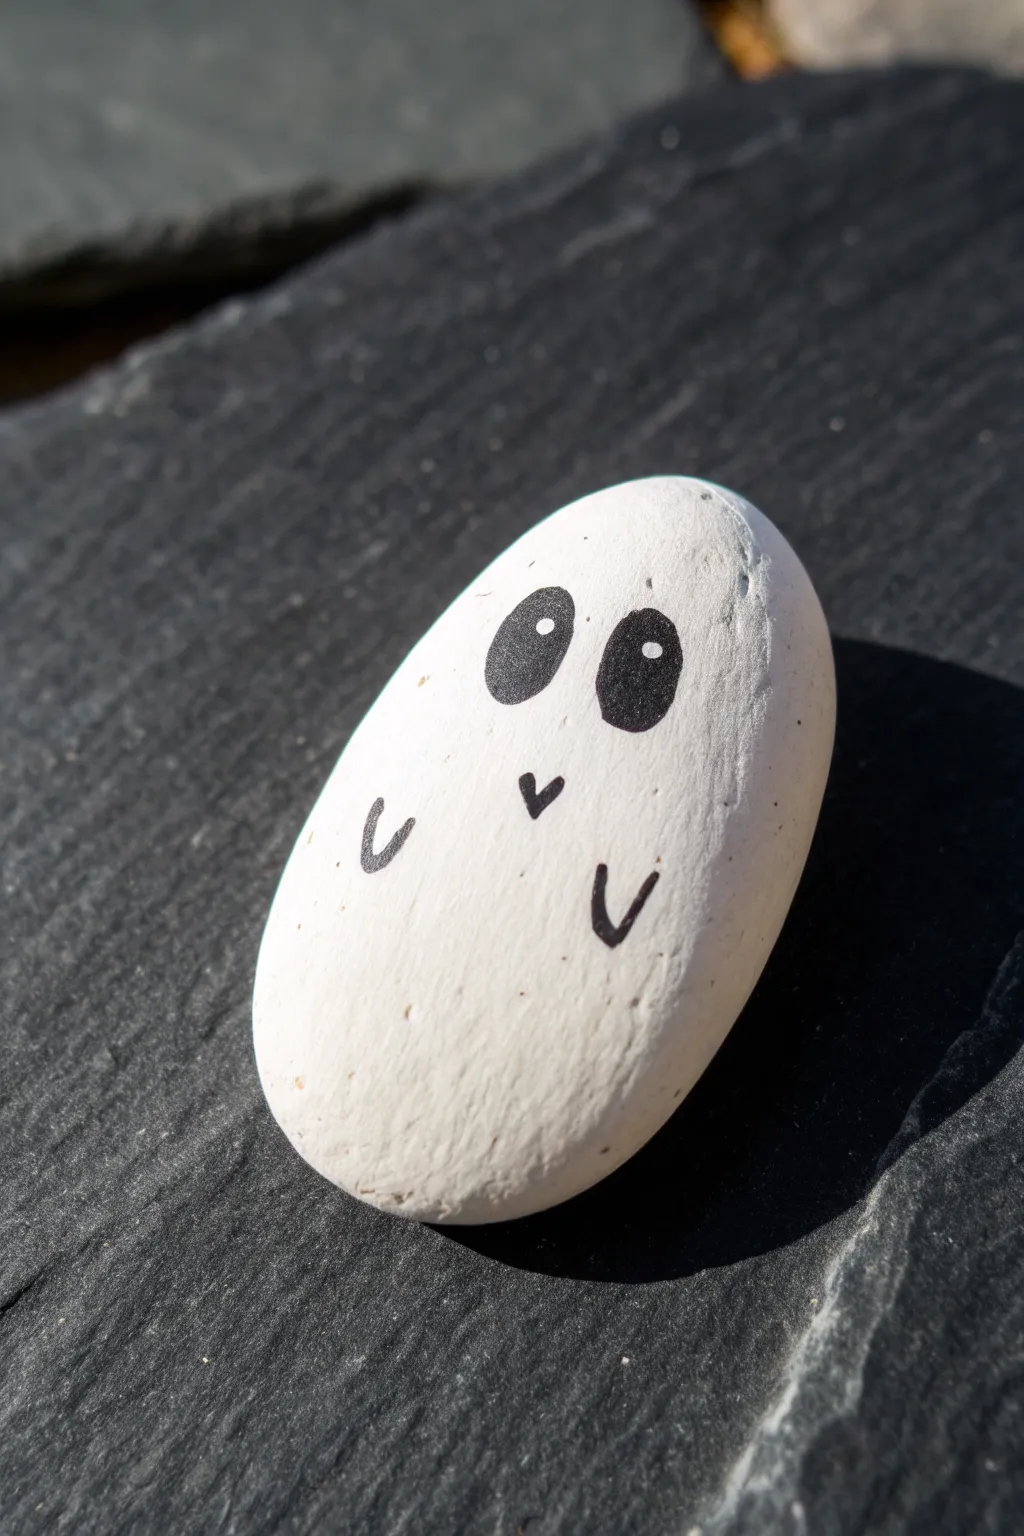
Pocket-Size Ghost in Your Palm
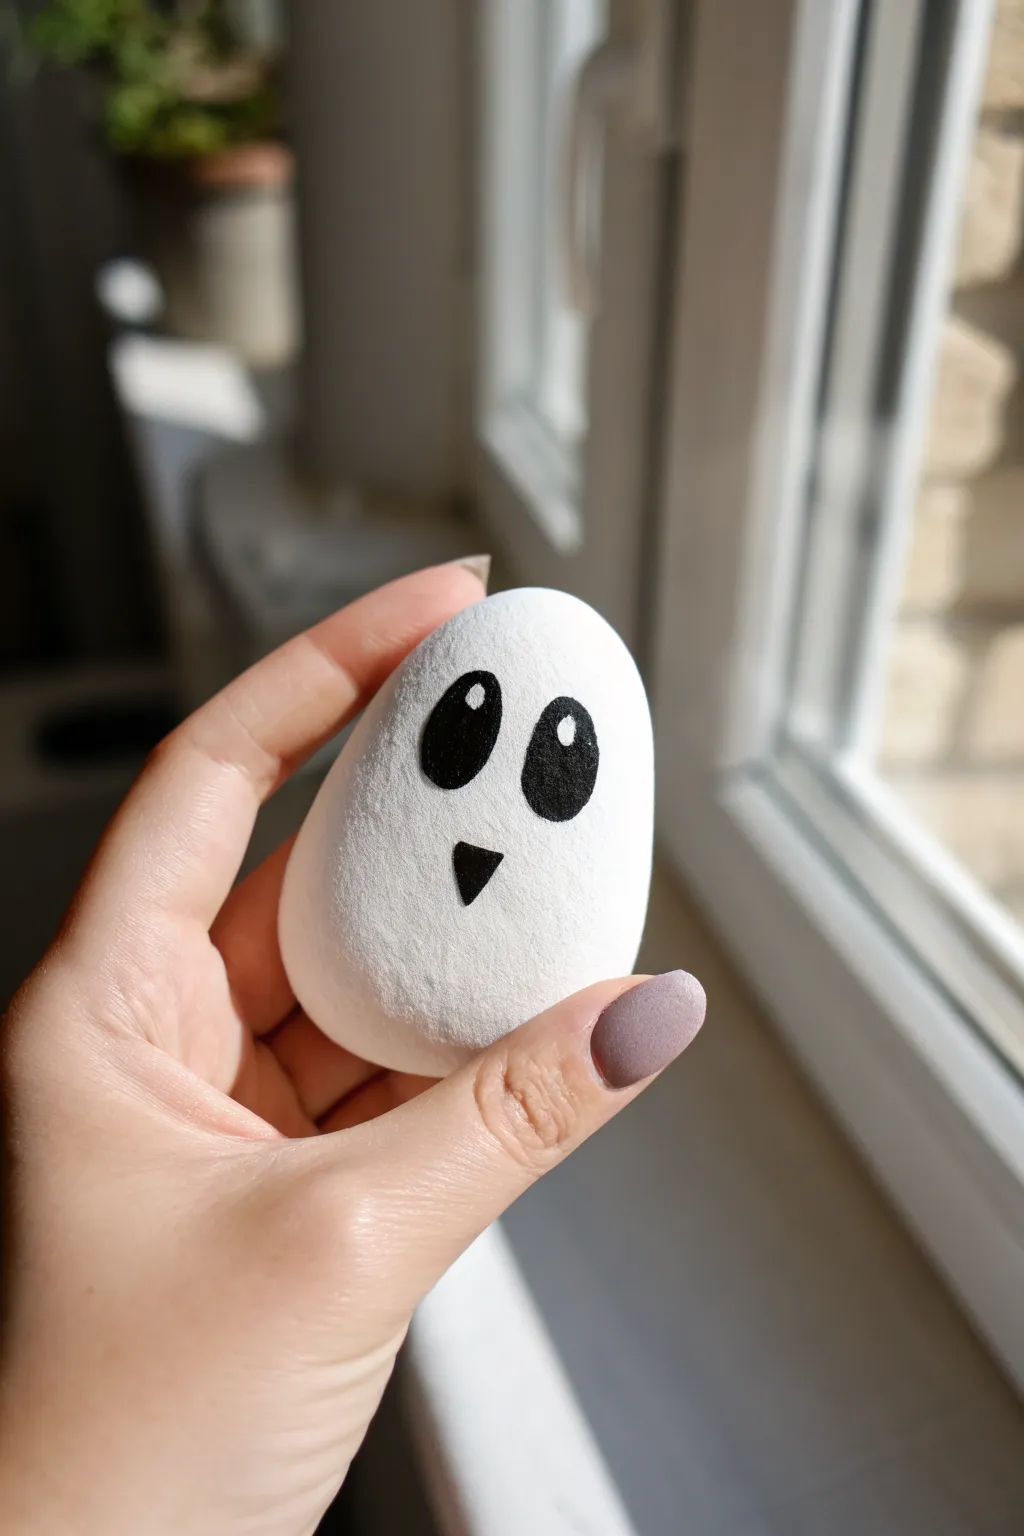
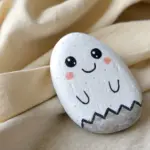
Turn a simple smooth stone into a friendly little apparition that fits perfectly in your hand. This minimalist ghost design relies on clean lines and stark contrast to create a charming, wide-eyed expression.
Detailed Instructions
Materials
- Smooth, egg-shaped river rock (palm-sized)
- White acrylic paint (high opacity)
- Black acrylic paint or black paint marker
- Wide flat paintbrush
- Fine detail paintbrush (if painting faces by hand)
- Matte spray sealant
- Soap and water
- Pencil (optional)
Step 1: Preparation and Base Coat
-
Select your stone:
Find a rock that is naturally smooth and roughly egg-shaped. The shape is crucial here, as a taller, rounded form mimics the classic sheet-ghost silhouette perfectly. -
Clean the surface:
Scrub the rock thoroughly with warm soapy water to remove any dirt or oils. Rinse it well and let it dry completely, perhaps in the sun, to ensure no moisture is trapped inside. -
Apply the first layer:
Using a wide flat brush, coat the entire top surface of the rock with white acrylic paint. Don’t worry about full coverage yet; just get a base down. -
Let it dry:
Allow the first coat to dry to the touch. This usually takes about 15-20 minutes, depending on how thick your paint application was. -
Build opacity:
Apply a second coat of white paint. To avoid brush strokes showing through, brush in a different direction than your first layer (cross-hatching). Repeat with a third coat if the rock’s natural color is still peeking through. -
Check texture:
Inspect the surface. If you see bumps or lumps of paint, you can lightly sand them down with fine-grit sandpaper once dry, then apply a final thin topcoat for a porcelain-like finish.
Smoother Coverage
Use a makeup sponge instead of a brush to dab the white paint onto the rock. This creates an egg-shell texture without visible brushstrokes.
Step 2: Creating the Face
-
Position the face:
Visualize where the face should sit. For this cute look, the features are placed slightly higher than the center of the rock, leaving plenty of white space at the bottom. -
Draft the eyes:
Lightly sketch two tall, oval shapes with a pencil. They should angle slightly inward toward each other at the top, like an inverted V shape, which gives the ghost a curious expression. -
Draft the mouth:
Sketch a small, inverted triangle centered below the eyes. It should be significantly smaller than the eyes to maintain the cute factor. -
Fill the eyes:
Using black acrylic paint on a fine detail brush, or a black paint marker, carefully fill in the oval eye shapes. I find paint markers offer cleaner edges for beginners. -
Fill the mouth:
Fill in the small triangle mouth with solid black. Ensure the corners are sharp for a crisp look. -
Add the highlights:
Once the black paint is completely dry, dip the handle end of a paintbrush into white paint. Dot a large highlight in the upper left of each black oval. -
Add secondary highlights:
Use a smaller tool, like a toothpick, to add a second, tinier white dot just below the first highlight. This ‘sparkle’ brings the ghost directly to life.
Paint Peeling?
If the white paint peels off the stone, the surface may have been too smooth. Lightly sand the raw stone first to give the paint ‘tooth’ to grip onto.
Step 3: Finishing Touches
-
Clean up edges:
If your black lines wobbled, use a very small brush with white paint to ‘erase’ mistakes by painting over the edges once the black is dry. -
Seal the artwork:
Take the rock to a well-ventilated area. Apply a light coat of matte spray sealant. A glossy finish works too, but matte preserves the soft, chalkboard-like aesthetic shown in the photo. -
Let it cure:
Let the sealant cure fully according to the can’s instructions before handling the rock, ensuring your ghost stays smudge-free.
Now you have a pint-sized spectral friend ready to haunt your windowsill or garden path.
Ghost Family Set on Matching Stones
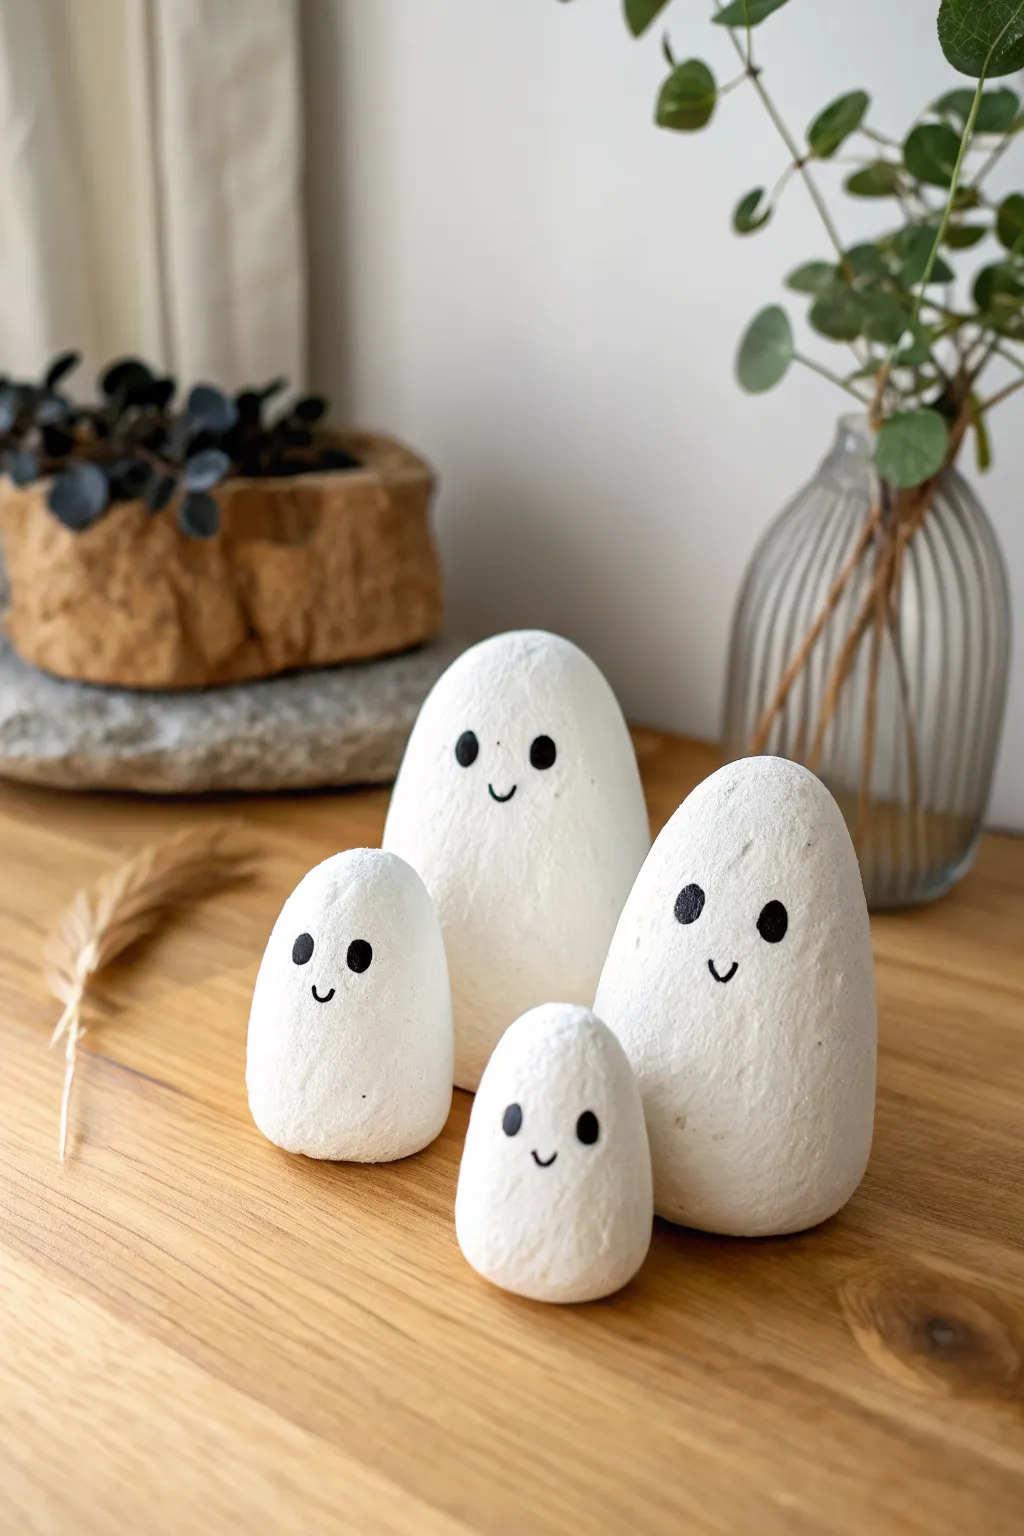
Transform ordinary river rocks into a charming family of friendly spirits with this incredibly simple yet striking project. The result is a clean, modern Halloween decoration featuring opaque white stones with darling minimalist expressions.
Step-by-Step
Materials
- 4 smooth river rocks in graduated sizes (large to small)
- White acrylic paint (high opacity) or white chalk paint
- Wide flat paintbrush
- Fine-grit sandpaper (optional)
- Black acrylic paint or a black paint pen (medium tip)
- Small round detail brush (if using tubed paint)
- Matte spray sealant
Step 1: Preparing the Canvas
-
Stone Selection:
Begin by selecting four stones that naturally stand upright on their own flat bases. You want a clear size progression to represent a ‘family’ unit—one large tall one, one medium-round one, and two smaller ones. -
Cleaning:
Wash your stones thoroughly with warm soapy water and a scrub brush to remove any dirt, moss, or grit. Let them dry completely, ideally in the sun, as moisture trapped inside can ruin the paint later. -
Surface Prep:
If your stones are particularly glossy or slick, lightly scuff them with fine-grit sandpaper. This gives the surface a bit of ‘tooth’ for the white paint to grab onto.
Paint Pen Troubleshooting
If your paint pen runs or bleeds into the white base, the base coat likely wasn’t dry enough. Ensure the rock is bone-dry before drawing details.
Step 2: Creating the Ghostly Form
-
Base Coat:
using your wide flat brush, apply the first layer of white acrylic or chalk paint. Don’t worry about full coverage yet; just get a thin, even layer down. -
Drying Time:
Allow this first coat to dry fully. It should feel chalky rather than tacky to the touch. This usually takes about 20-30 minutes. -
Building Opacity:
Apply a second coat of white paint. To avoid brush strokes, I prefer to dab the paint on with a sponge or stipple it with the brush tip for a slight texture, resembling the stone’s natural surface. -
Checking the Base:
Flip the stones over carefully and paint the bottom surface as well. This ensures no raw rock shows through if they are tipped over. -
Final White Layer:
Inspect your coverage. If using standard acrylics, you may need a third coat to achieve that solid, stark white look shown in the photo. Let this cure for at least an hour.
Step 3: Adding Personality
-
Planning the Faces:
Before painting, visualize where the faces should go. They sit slightly higher than the vertical center of the rock to give them a cute, expectant look. -
Painting the Eyes:
Using a black paint pen or a small round brush loaded with black acrylic, dab two small ovals for eyes. Keep them relatively close together. -
Eye Orientation:
Notice the slight tilt in the eyes on the larger rocks—make them lean slightly inward toward each other to create a friendly, non-threatening expression. -
The Smile:
Draw a tiny, simple ‘u’ shape right between and slightly below the eyes. The lines should be thin and delicate, not thick and bold. -
Correction Technique:
If you smudge a black line, don’t wipe it. Let it dry completely, then dot over the mistake with your white base paint to act as an eraser.
Upgrade: Glow Effect
Mix glow-in-the-dark pigment powder into your final layer of white paint. By day they are cute white rocks, but at night they will emit a spooky green glow.
Step 4: Finishing Touches
-
Curing the Details:
Allow the black facial features to dry completely. Paint pens can sometimes smear if sealed too quickly, so give it ample time. -
Sealing:
Take the stones to a well-ventilated area. Apply a light mist of matte spray sealant. We want to avoid a glossy finish to keep the natural, stone-like aesthetic. -
Arrangement:
Once the sealant is dry, arrange your family in a cluster to display on a shelf or mantle.
Now you have an adorable, permanent family of ghosts ready to haunt your home securely

PENCIL GUIDE
Understanding Pencil Grades from H to B
From first sketch to finished drawing — learn pencil grades, line control, and shading techniques.
Explore the Full Guide
Ghost With a Witch Hat
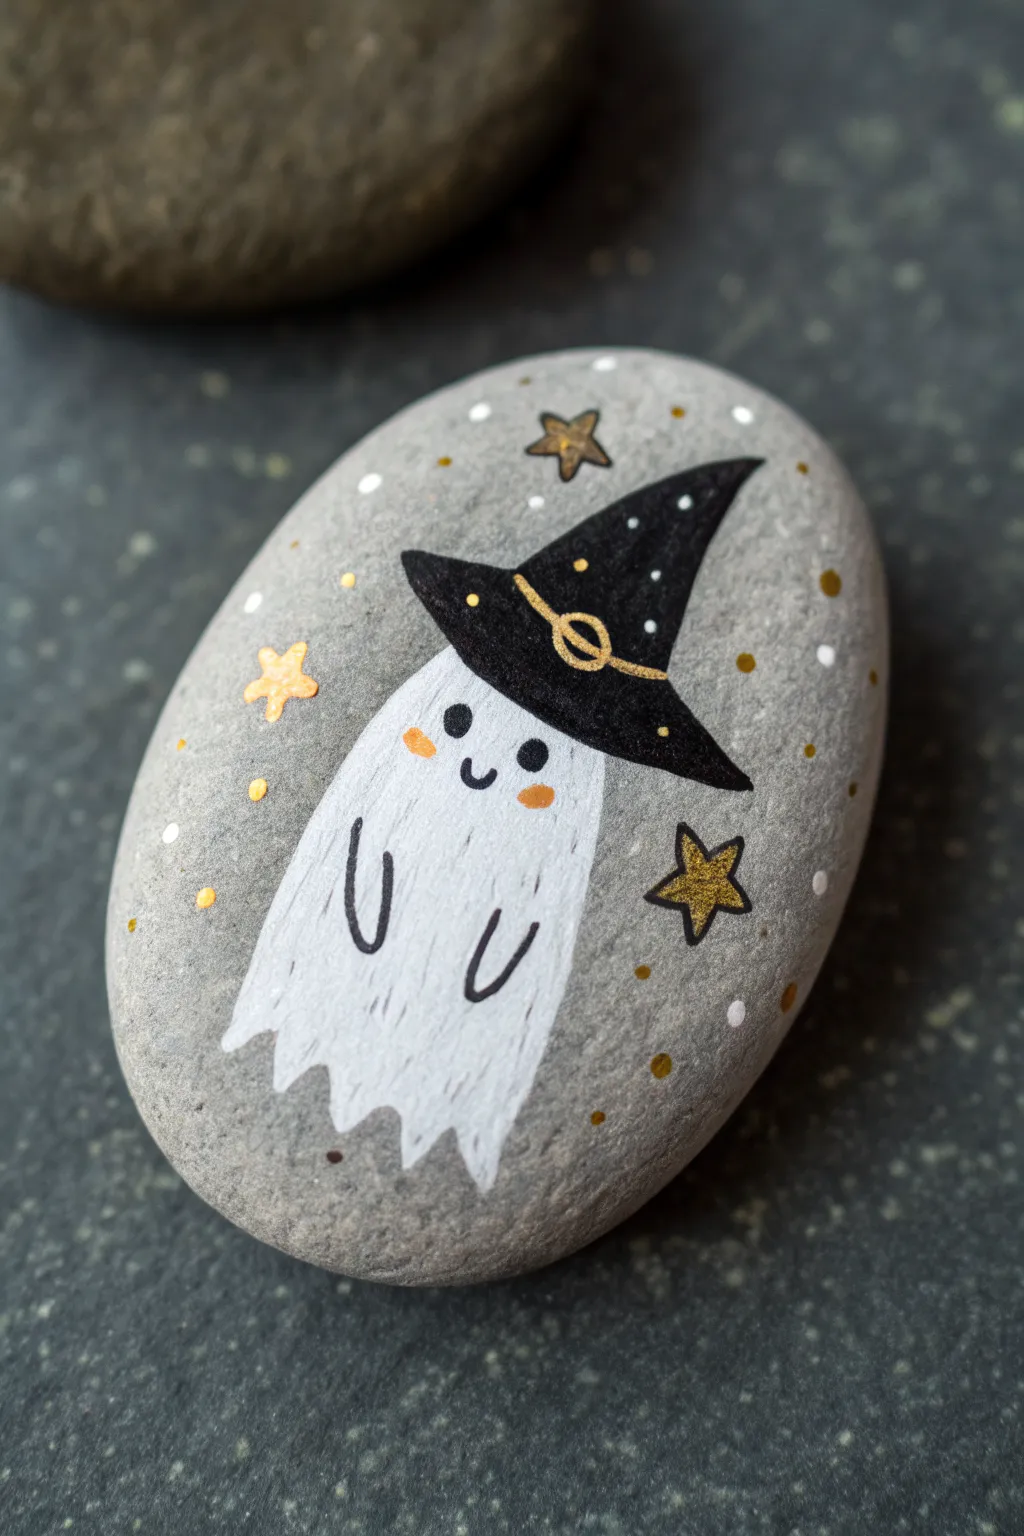
This adorable little phantom is ready for Halloween with his stylish witch hat and starry surroundings. Painted on a smooth river stone, this design balances slightly spooky vibes with undeniable cuteness, making it perfect for hiding in your neighborhood or decorating a desk.
Detailed Instructions
Materials
- Smooth oval river rock (grey)
- White acrylic paint or paint pen
- Black acrylic paint or extra-fine paint pen
- Gold metallic paint pen or acrylic paint
- Orange acrylic paint or paint pen
- Pencil for sketching (optional)
- Fine detail paint brush
- Matte or satin sealant spray
Step 1: Base and Body
-
Clean the surface:
Begin by washing your stone with warm soapy water and drying it completely to ensure the paint adheres properly. -
Sketch the outline:
Lightly sketch the ghost’s teardrop shape and the large triangular witch hat sitting on its head with a pencil. Don’t press too hard, as graphite can sometimes smudge into lighter paint colors. -
Paint the ghost body:
Fill in the ghost’s body using white acrylic paint. Start near the top under the brim and pull your brush downward in vertical strokes. -
Create the tattered edge:
At the bottom of the ghost, finish your brushstrokes in uneven, jagged points to create a floating, sheet-like hem. -
Add a second coat:
White paint on dark rocks often looks streaky at first. Once the first layer is dry, I like to apply a second coat to make the ghost look opaque and bright.
Step 2: The Witch Hat
-
Outline the hat:
Using black paint or a black paint pen, carefull outline the wide brim and the tall, pointed cone of the hat. -
Fill in the black:
Fill the entire hat shape with solid black paint. Be careful where the brim meets the white ghost body to keep that line crisp. -
Dry completely:
Let the black paint dry fully before adding any decorations on top of it, or the colors will muddy together. -
Add the hat band:
Use a gold metallic pen or fine brush to draw a curved line across the base of the cone for the hat band. -
Draw the buckle:
Add a small oval loop in the center of the gold band, with a line striking through it, to create a buckle detail. -
Detail with stars:
Dot tiny specks of gold and white onto the black hat to look like a starry night sky pattern.
Paint Pen Precision
For the crispest lines on the stars and hat buckle, use extra-fine tip paint pens (0.7mm) instead of a brush. They offer much better control for tiny details.
Step 3: Face and Atmosphere
-
Paint the eyes:
Using a dotting tool or the back end of a brush, place two small black dots for the eyes high on the ghost’s face. -
Add the smile:
Paint a tiny, U-shaped mouth right between the eyes using an extra-fine black liner brush or pen. -
Blush the cheeks:
Dab two soft oval spots of orange paint just below the eyes to give him a rosy, friendly glow. -
Draw arms:
Add two simple black U-shapes on the body for little arms. Keep the lines thin and delicate. -
Paint background stars:
Draw a few five-pointed stars around the ghost using gold paint. Outline them with a very thin black line to make them pop against the grey stone. -
Add floating dots:
Scatter small dots of white, gold, and orange around the empty grey space to create a magical, confetti-like atmosphere. -
Seal the stone:
Once everything is absolutely dry, spray a coat of matte sealant over the rock to protect your artwork from the elements.
Glow in the Dark
Swap the standard white paint for glow-in-the-dark acrylic on the ghost’s body. Your rock look cute by day, but will hauntingly glow green at night.
Now you have a charming little pocket ghost ready to bring some spirit to your day
Ghost With a Bowtie or Hair Bow
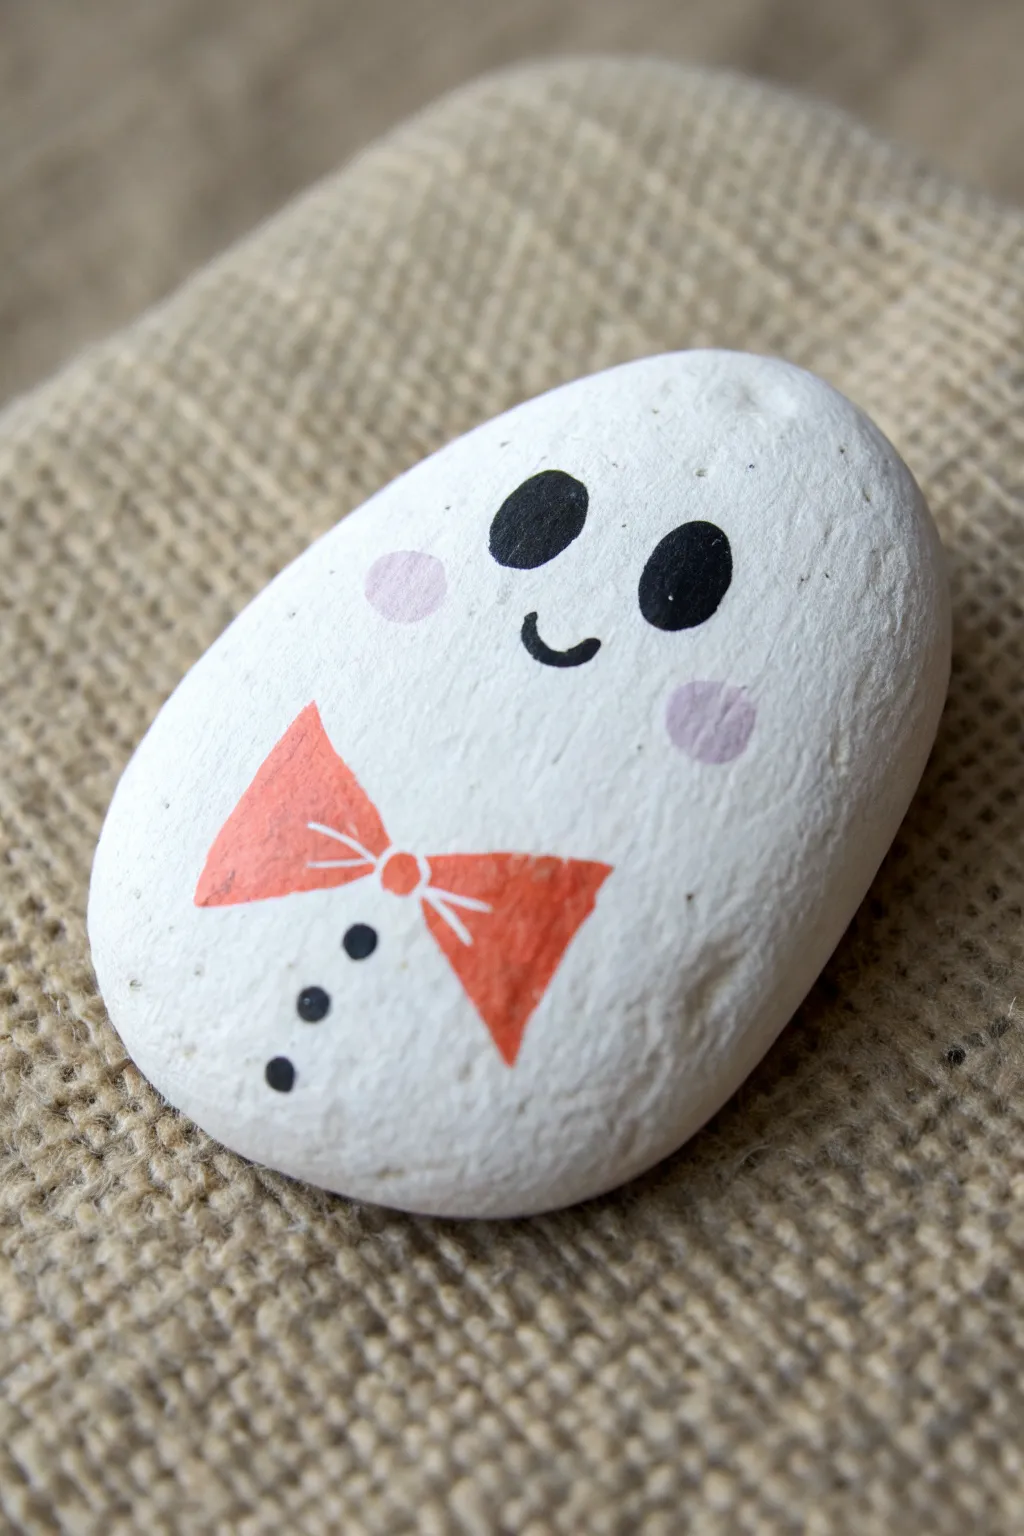
Transform an ordinary garden rock into a charming ghostly character complete with a festive bowtie. This smooth, white-painted stone makes for a delightful Halloween decoration that is more cute than spooky.
Step-by-Step
Materials
- Smooth, oval-shaped river rock
- White acrylic paint
- Black acrylic paint
- Orange or coral acrylic paint
- Light pink acrylic paint
- Flat paintbrush (medium)
- Small round detail brush
- Dotting tool or toothpick
- Clear sealant spray (matte or gloss)
- Palette or paper plate
- Water cup and paper towels
Step 1: Base Preparation
-
Clean the canvas:
Begin by thoroughly washing your rock with warm soapy water to remove any dirt or grit. Scrub gently with a brush if needed, then let it dry completely in the sun or with a towel. -
Prime with white:
Using your flat paintbrush, apply a base coat of white acrylic paint to the top surface of the rock. Don’t worry about full coverage yet; thin, even layers are best. -
Build opacity:
Allow the first layer to dry to the touch, which usually takes about 10-15 minutes. Apply a second coat of white, stroking in the opposite direction to minimize brush marks. -
Create a solid finish:
Depending on your paint quality, you may need a third coat. The goal is to have a completely opaque, bright white surface where the rock’s natural color doesn’t peek through. -
Dry completely:
Let the white base dry thoroughly for at least an hour. Painting details on a wet base will cause the colors to muddy and bleed.
Uneven Cheeks?
If your pink paint looks too opaque or harsh, quickly dab it with a clean, damp paper towel while wet to soften the edges for a lighter blush.
Step 2: Painting the Face
-
Position the eyes:
Dip your small round brush into black paint. I find it easiest to visually divide the rock into thirds and place the eyes in the top third. -
Paint the eye shapes:
Create two vertical ovals for the eyes. Start small and gradually widen them until they are even in size and slightly tilted inwards. -
Add a smile:
Using a very fine liner brush or the very tip of your round brush, paint a tiny, curved ‘u’ shape directly between and below the eyes for the mouth. -
Create rosy cheeks:
Mix a small amount of pink paint. Dip the tip of your pinky finger or a round sponge dabber into the paint and gently press it onto the rock below each eye to create soft, circular blush marks.
Texture Play
Instead of painting the bowtie, glue on a real mini satin bow or a small felt cutout for a fun 3D mixed-media effect.
Step 3: Adding the Bowtie Details
-
Outline the bowtie:
Switch to your orange or coral paint. In the lower third of the rock, below the face, paint two triangles pointing toward each other with a small gap in the middle. -
Fill the color:
Fill in the triangles carefully with the orange paint to create the wings of the bowtie. -
Add the center knot:
Connect the two triangles by painting a small circle in the gap between them. This forms the knot of the tie. -
Detail the bowtie:
Once the orange paint is dry, define the shape using a very fine brush and white paint to add thin crease lines inside the bowtie triangles. -
Make the buttons:
Dip a dotting tool or the blunt end of a paintbrush handle into black paint. Press three dots in a vertical line beneath the bowtie to create the shirt buttons. -
Final dry:
Allow all the painted details to dry completely, preferably overnight, to ensure no moisture is trapped. -
Seal the artwork:
Spray the rock with a clear acrylic sealer. Use light mists rather than a heavy soaking to prevent the paint from running.
Place your handsome little ghost in a flower pot or on a windowsill to greet guests with a smile


Shy Ghost Peeking From the Edge
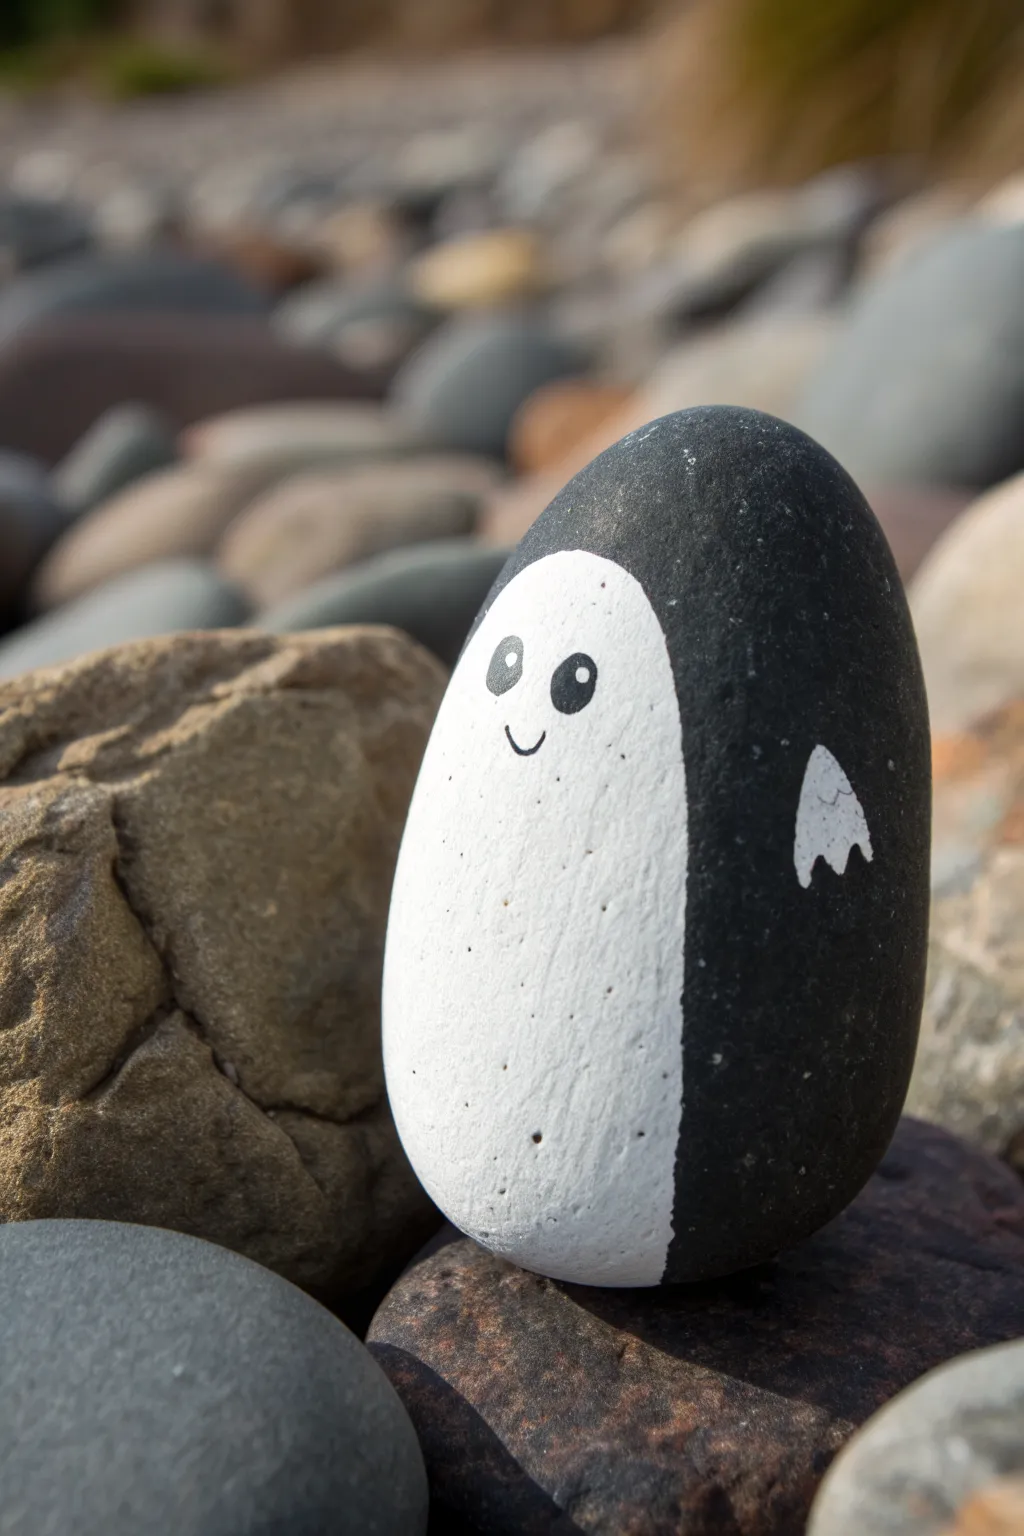
Transform a simple river stone into this charming monochromatic character that sits perfectly among your garden pebbles. With a stark black body and a bright white belly, this little ghost (or penguin-like spirit) brings a friendly, wide-eyed smile to any outdoor space.
How-To Guide
Materials
- Smooth, oval-shaped river rock (cleaned and dried)
- Black acrylic paint
- White acrylic paint
- Medium flat paintbrush
- Small round detail brush (size 0 or 1)
- Black paint pen or ultrafine brush
- Matte or satin spray sealant
- Cup of water
- Paper towels
Step 1: Setting the Stage
-
Rock Selection:
Begin by finding a rock that stands upright on its own if possible. An oblong, egg-shaped stone works best to mimic that classic ghost or penguin silhouette. -
Clean Slate:
Wash your stone thoroughly with warm soapy water to remove any dirt or oils. Let it dry completely in the sun, as moisture trapped inside can ruin the paint later. -
Outline the Shape:
Using a pencil sketch a large oval shape on the flattest side of the rock. This will be the white belly area, leaving plenty of room around the sides and top for the black background.
Paint Slipping?
If acrylic paint beads up or slides off the rock surface, the stone might be too smooth or polished. Lightly scuff the surface with fine-grit sandpaper to give the paint some tooth.
Step 2: Painting the Body
-
Black Base Coat:
Load your medium flat brush with black acrylic paint. Carefully paint around the outside of your penciled oval, covering the back, sides, and top of the rock. -
Smoothing the Edges:
Work carefully near the pencil line to create a smooth, clean curve where the black meets the future white section. I like to rest my pinky finger on the dry part of the rock for stability here. -
Base Drying:
Allow the black paint to dry significantly. A second coat is usually needed to make the stone look truly opaque and dark. -
White Belly Layer:
Using a clean brush, fill in the center oval with white acrylic paint. Start from the center and push the paint outward toward the black edge without crossing over it. -
Build Opacity:
White paint on dark rocks can look streaky at first. Apply 2-3 thin layers, letting each dry fully in between, until you have a solid, bright white surface.
Glow Up
Swap the standard white acrylic paint for glow-in-the-dark paint on the belly section. Charge it in the sun all day, and your ghost will spookily illuminate your garden path at night.
Step 3: Adding Personality
-
Little Wing:
On the right side of the black body, paint a small white triangle shape pointing downward with a jagged bottom edge. This creates a tiny wing or hand. -
Drafting the Face:
Once the white belly is bone-dry, lightly visualize where the eyes will go. They should be placed in the upper third of the white oval. -
Painting Eyes:
Using a paint pen or a very fine detail brush with black paint, draw two solid black circles. Space them relatively wide apart to give it that cute, innocent look. -
Eye Shine:
Dip the very tip of a toothpick or the handle end of a small brush into white paint. Add a tiny dot to the upper right corner of each black eye pupil for a ‘sparkle’ effect. -
The Smile:
With your finest black tool (pen or brush), draw a tiny ‘u’ shape right between and slightly below the eyes. Keep the line thin and delicate. -
Cleanup:
If any lines look wobbly, use a tiny bit of the background color (black or white) to carefully touch up the edges once dry. -
Sealing:
Take the rock outside and spray it with a matte or satin sealant. This protects your character from rain and UV fading if he’s going to live in the garden.
Place your finished rock nestled among other natural stones for a fun hidden surprise
Ghost With Simple Starry Night Dots
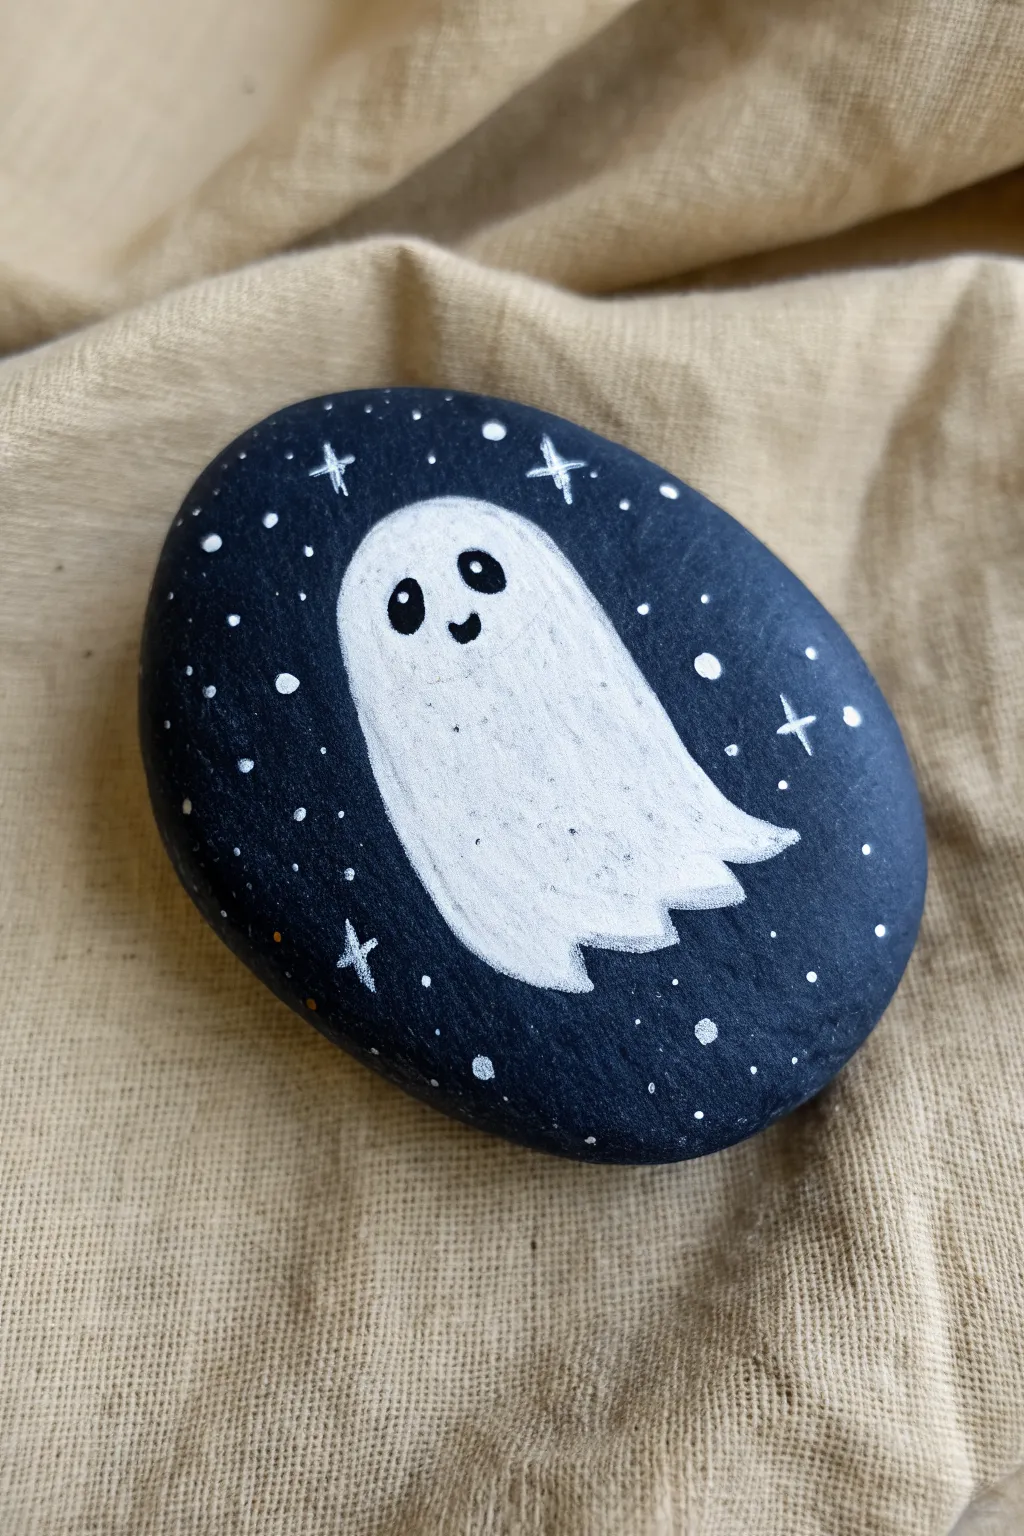
This adorable little phantom floats effortlessly through a deep cosmic void. The contrast of the bright white ghost against the stark black background creates a striking look that is surprisingly simple to achieve.
Step-by-Step
Materials
- Smooth, oval river rock
- Black acrylic paint (matte or satin)
- White acrylic paint or a white Posca paint pen (medium tip)
- Small round detail brush
- Very fine liner brush or toothpick
- Black fine-tip paint pen or permanent marker
- Clear acrylic sealant spray (matte or glossy)
Step 1: Setting the Scene
-
Clean the canvas:
Begin by washing your rock with soap and warm water to remove any dirt or oils. Let it dry completely before starting, as moisture can prevent the paint from sticking properly. -
Base coat application:
Paint the entire top surface of the rock with black acrylic paint. You want a deep, solid black, so apply a second coat if the first one looks streaky or translucent. -
Dry thoroughly:
Allow the black base coat to dry completely. A hairdryer on a cool setting can speed this up if you are eager to get to the fun part.
Opacity Secret
If your white paint looks gray against the black rock, paint the ghost shape in light gray first. Once dry, add the white on top for a brighter pop.
Step 2: Summoning the Ghost
-
Outline the shape:
Using a thin brush with white paint or a white paint pen, lightly sketch the outline of your ghost. Draw a rounded dome for the head near the top center. -
Form the body:
Extend the lines down from the head, curving slightly to the right to give the ghost a floating motion. Don’t worry about perfect symmetry; organic shapes look friendlier. -
Add the tail:
Finish the bottom of the ghost with a wavy, jagged line to imply a tattered, spectral sheet. -
Fill in the white:
Fill the entire ghost shape with white paint. This will likely require 2-3 layers to get a solid, opaque white against the dark black background. I usually let each layer dry for a few minutes before adding the next to avoid pulling up wet paint.
Step 3: Facial Features
-
Paint the eyes:
Once the white paint is bone dry, use a small detail brush or black paint pen to draw two oval eyes near the top of the head. Position them slightly tilted inward to create a cute expression. -
Add a smile:
Paint a small, U-shaped mouth right between and slightly below the eyes. -
Eye highlights:
Using a toothpick or the very tip of a fine brush, place a tiny dot of white paint in the upper right corner of each black eye. This ‘catchlight’ brings the character to life immediately.
Glow Up
Use glow-in-the-dark acrylic paint for the final top coat of the ghost. During the day it looks white, but at night it will eerily shine green.
Step 4: The Cosmic Background
-
Create main stars:
Dip a fine liner brush into white paint. Draw small ‘plus signs’ or crosses scattered randomly around the ghost to represent twinkling stars. vary their sizes slightly for interest. -
Add distant planets:
Use the non-brush end of a paintbrush handle or a dotting tool to create a few larger, perfect circles of white paint in the empty black spaces. -
Sprinkle star dust:
Fill the remaining black voids with tiny specks or dots using the very tip of a brush or a toothpick. Keep the density random to mimic a real night sky. -
Final sealing:
Once the entire artwork is fully dry, take the rock outside and spray it with a clear acrylic sealer. This protects the paint from chipping and makes the black background look even deeper.
Now you have a spooky little friend ready to haunt your garden or bookshelf
Ghost With a Candy Bucket Story
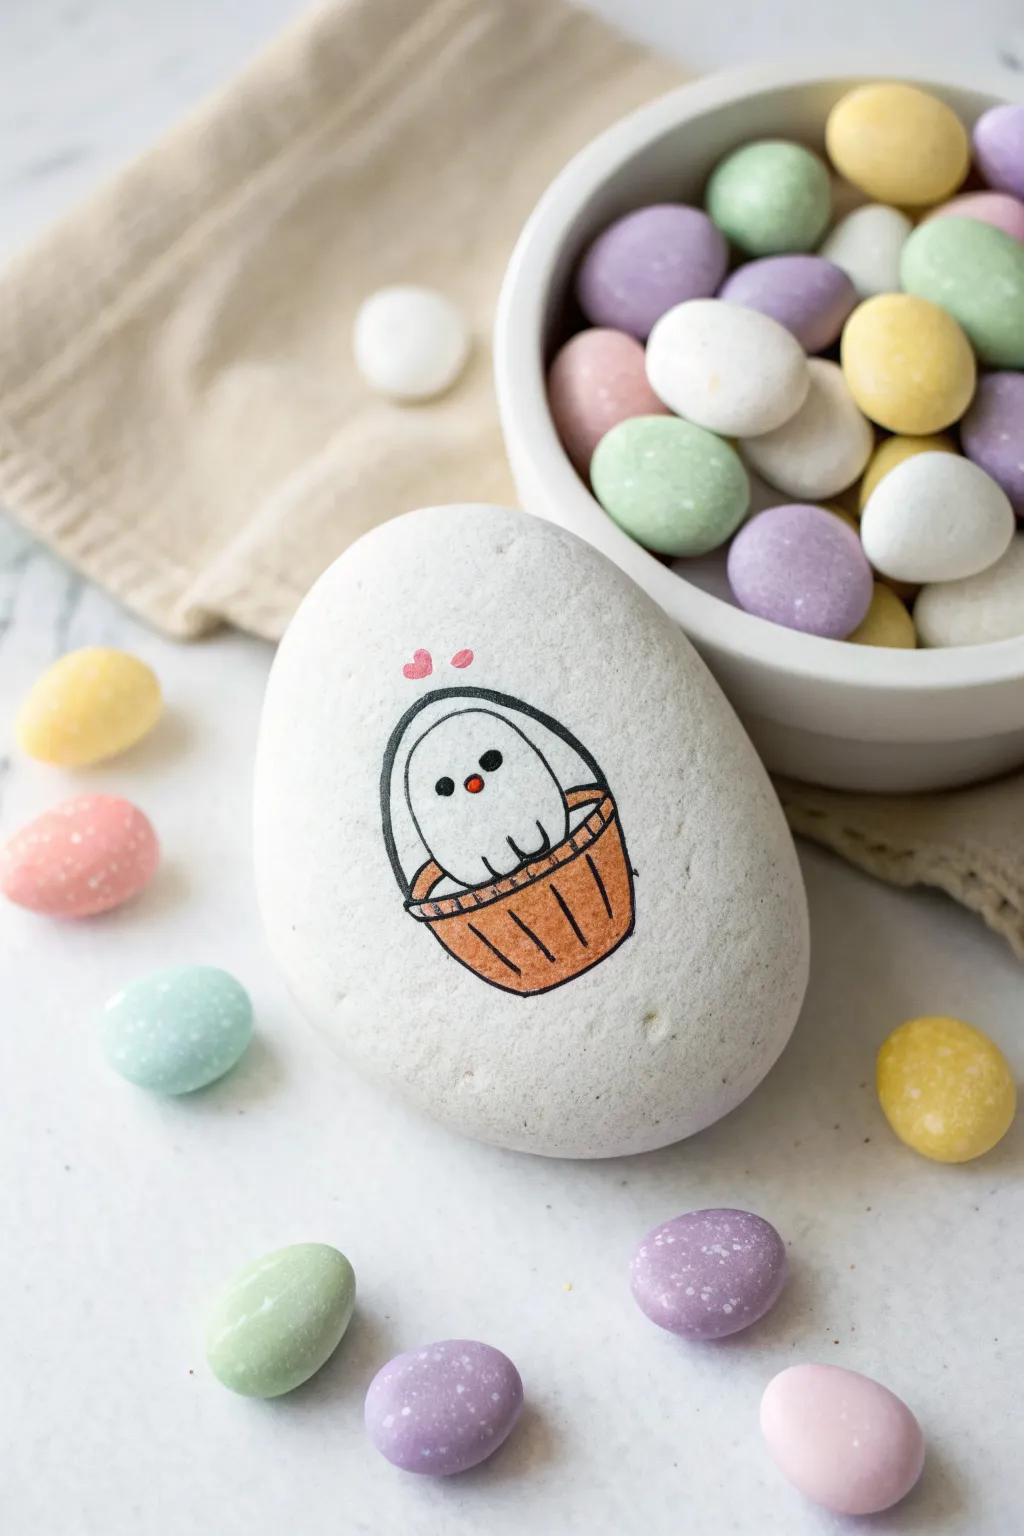
This charming little rock captures the sweetness of the season with a simple illustration of a ghost tucked inside a woven basket. It’s an easy, low-mess project that results in a clean, minimalist decoration perfect for hiding or gifting.
Step-by-Step Guide
Materials
- Smooth, egg-shaped rock (white or very light grey)
- Fine-point black permanent marker or paint pen (e.g., 0.5mm or 0.7mm)
- Brown alcohol marker or colored pencil
- Orange fine-point marker or paint pen
- Pink fine-point marker or paint pen
- Pencil and eraser
- Matte spray sealer (optional)
Step 1: Preparation and Sketching
-
Clean the surface:
Before starting, ensure your rock is completely clean and dry. A quick wash with soap and water removes any oils or dust that might stop the ink from adhering properly. -
Sketch the basket outline:
Use a pencil to lightly draw a semi-circle or bowl shape on the lower third of the rock. This will serve as the base of your basket. -
Add the handle:
Draw a large arch extending from one side of the bowl shape to the other. Make sure the arch is tall enough to fit your ghost inside comfortably. -
Sketch the ghost:
Inside the arch of the handle, draw a simple, rounded hump shape for the ghost’s body. The bottom of the ghost should look like it’s resting inside the basket rim. -
Detail the ghost’s hands:
Add two small, rounded nub shapes resting on the rim of the basket to represent the ghost’s little paws holding on.
Ink Bleeding?
If your markers bleed into the rock’s grain, prep the surface with a thin layer of clear matte medium or white acrylic paint first to seal the stone’s pores.
Step 2: Inking the Outline
-
Trace the main lines:
Using your fine-point black marker or paint pen, carefully trace over your pencil lines. Start with the ghost first, as it sits ‘in front’ of the back of the basket handle. -
Thicken the handle:
Go over the handle line again or draw a second parallel line very close to the first to give the handle rim some visible thickness. -
Define the basket rim:
Draw a horizontal band across the top of the basket bowl. Add small vertical tick marks inside this band to simulate the woven texture of the rim. -
Add vertical weave lines:
Draw angled vertical lines down the body of the basket bowl. They should slightly curve towards the center to give the basket a rounded, energetic appearance. -
Erase pencil marks:
Wait a few moments for the ink to dry completely to avoid smudging, then gently erase all visible pencil sketch lines.
Step 3: Adding Color and Character
-
Color the basket:
Use a brown alcohol marker or colored pencil to fill in the body of the basket. I find colored pencils work beautifully on porous rocks for a softer, textured look. -
Draw the face:
Using the black fine-point marker, place two small dots for the eyes. Keep them widely spaced for a cute expression. -
Add the nose:
Take your orange marker and place a tiny dot right between the eyes for a pop of color on the nose. -
Create the love:
Draw two tiny, floating hearts just above and to the left of the ghost’s head using a pink marker. -
Add blush (optional):
If you have a very light hand, you can add faint pink circles under the eyes, though the original design keeps the face very clean. -
Seal the artwork:
To protect your drawing from fading or moisture, finish by applying a very light coat of matte spray sealer. Do this outside and keep the can 12 inches away to prevent the ink from running.
Add Dimension
Use a white gel pen to add a tiny highlight dot to the ghost’s eyes or the hearts. It makes the character look instantly more alive and shiny.
Your adorable basket ghost is now ready to sit on a desk or be hidden in the garden for someone to find
Ghost With Soft Shadow for Depth
Bring a little spooky charm to your garden or desk with this minimal ghost rock painting. The design relies on a solid, opaque white base and simple black features to create an adorable character that pops against dark backgrounds.
Step-by-Step Guide
Materials
- Smooth, oval river rock
- White acrylic paint (high opacity)
- Black acrylic paint or black paint pen (fine tip)
- Wide flat paintbrush
- Small fine-point liner brush
- Dotting tool or toothpick
- Matte or satin varnish (optional, for sealing)
- Small cup of water
- Paper towels
Step 1: Preparing the Base
-
Clean the surface:
Begin by washing your stone thoroughly with warm soapy water to remove any dirt or oils. Let it dry completely before starting, as moisture will prevent the paint from adhering properly. -
First coat of white:
Using your wide flat brush, apply an even coat of white acrylic paint over the entire top surface of the rock. Don’t worry if it looks streaky at first; building coverage takes time. -
Let it dry:
Allow the first layer to dry fully to the touch. This usually takes about 10-15 minutes depending on how thick your application was. -
Build opacity:
Apply a second coat of white paint perpendicular to your first coat to help smooth out brush strokes. If your paint is thin, a third coat might be necessary to get that solid, porcelain-like finish. -
Check coverage:
Hold the rock up to the light to ensure no dark gray stone is showing through. The background needs to be totally opaque for the ghost effect to work best.
Smoother Coverage Tip
For the smoothest white base, mix a tiny drop of water into your acrylic paint. It will require more layers, but it eliminates brush ridges for a polished look.
Step 2: Painting the Features
-
Outline the eyes:
Switch to your fine liner brush or a black paint pen. Lightly sketch two tall, oval shapes near the top third of the rock. They should be tilted slightly inward toward each other for a cute expression. -
Fill the eyes:
Carefully fill in the eye ovals with solid black paint. Take your time to keep the edges smooth and rounded. -
Add the mouth:
In the center, just below the level of the eyes, paint a distinct, small ‘V’ shape. Make the lines slightly thick so the mouth is visible from a distance. -
Create the arms:
Paint two small, curved ‘U’ shapes lower down on the rock on either side of the mouth. Angle these slightly outward to mimic little ghost arms raised in a ‘boo’ gesture. -
Refine the lines:
Check your black lines for any fuzziness. If needed, carefully smooth them out with the very tip of your fine brush.
Step 3: Highlights and Finishing
-
Prepare the highlight:
Dip a dotting tool, the back of a paintbrush, or a toothpick into fresh white paint. -
Add eye sparkles:
Place a single small white dot in the upper right quadrant of each black eye. This reflection creates the ‘depth’ mentioned in the title and brings the ghost to life. -
Final drying check:
Let the black details dry completely. If you seal it too soon, the black paint might smear across the white face. -
Sealing the rock:
Apply a coat of matte or satin varnish over the entire rock. A glossy finish works too, but matte often looks more ghost-like and velvety. -
Curing time:
Allow the varnish to cure fully according to the bottle instructions before placing your spooky friend outside or handling it excessively.
Shaky Hands?
If painting fine details with a brush is difficult, let the white base cure overnight and use a fine-tip permanent marker or acrylic paint pen for the face instead.
Now you have a charming little phantom ready to haunt your garden path or windowsill
Glow-Style Ghost on a Dark Base
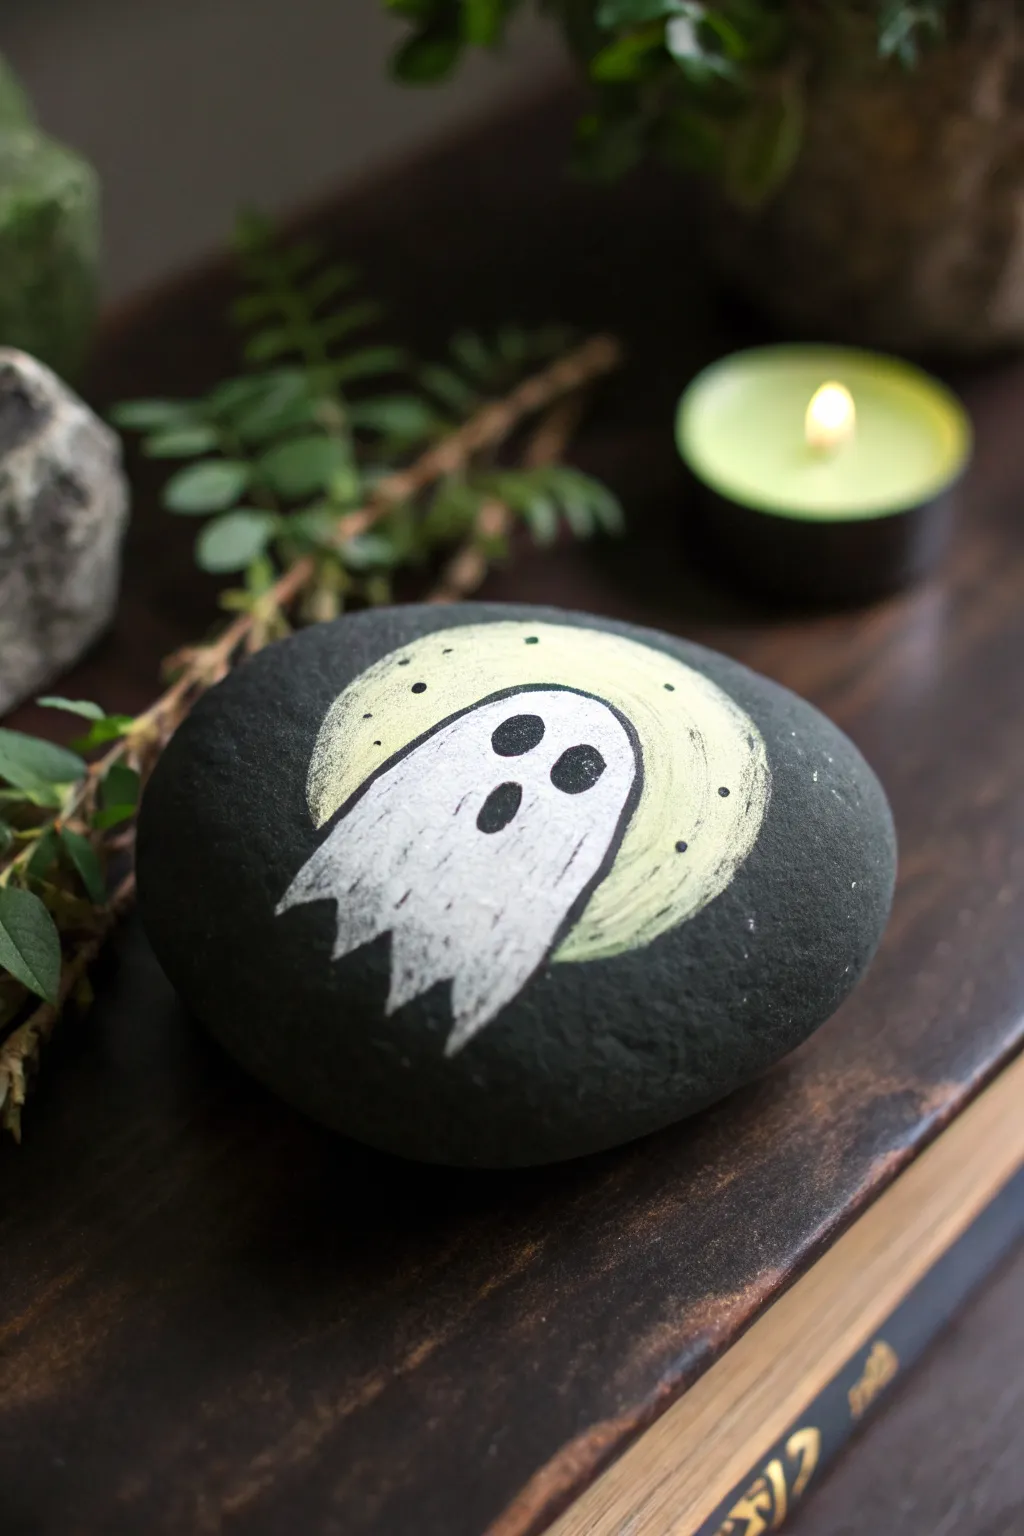
Create a subtle, eerie effect using a dark base stone and a contrasting pale yellow halo. This design features a classic sheet ghost floating in front of a glowing moon, perfect for a moody Halloween display.
Step-by-Step
Materials
- Smooth, dark river rock (naturally dark or painted black)
- Black acrylic paint (matte)
- White acrylic paint or paint pen
- Pale yellow or glow-in-the-dark acrylic paint
- Small round brush
- Fine detail brush
- Pencil or white chalk pencil
- Matte sealant/varnish spray
Step 1: Preparation & Base
-
Prep the surface:
Begin by washing your stone thoroughly with warm soapy water to remove any dirt or oils. Let it dry completely before starting. -
Create the dark background:
If your rock isn’t naturally charcoal or black, apply a coat of matte black acrylic paint over the entire surface. If the rock is naturally dark grey, you can skip this step to keep the natural texture. -
Sketch the layout:
Use a white chalk pencil to lightly sketch a large circle in the center for the moon. Inside that circle, draw the basic outline of your ghost shape, letting the bottom edges raggedly drip down past the circle’s boundary.
Pro Tip: Texture Trick
Use a dry bristle brush for the ghost’s tail. Drag the white paint downward lightly to create a fading, translucent ‘wispy’ effect at the bottom.
Step 2: Painting the Moon
-
Mix the moon color:
Mix a small amount of white with yellow to get a very pale, creamy moonlight color. If you have glow-in-the-dark paint, this is the perfect time to use it. -
Fill in the circle:
Using a small round brush, carefully fill in the circular area behind the ghost. Don’t worry about being perfectly neat near the ghost outline, as you’ll paint over that next. -
Soften the edges:
While the paint is still slightly wet, I like to gently feather the outer edges of the moon just a tiny bit so it looks more like a glow than a sticker. -
Second coat:
Allow the first layer to dry completely, then apply a second coat of the pale yellow to ensure it stands out bright against the dark rock. -
Add texture:
For a cratered moon look, use a mostly dry brush to dab a tiny bit of darker yellow or diluted black in random spots within the circle.
Step 3: The Ghost
-
Base white layer:
Load your brush with titanium white acrylic paint. Fill in the ghost shape, covering any yellow overlap. The bottom edge should be jagged and uneven like a torn sheet. -
Refine the shape:
Use a second coat of white to make the ghost opaque. Ensure the white visually pops forward against the pale yellow background. -
Draft facial features:
Once the white is bone-dry, lightly mark three oval shapes for the eyes and mouth using a pencil. -
Paint the face:
Using a fine detail brush and black paint, fill in the three ovals. The mouth should be the largest, vertical oval to create that classic moaning expression. -
Add detail dots:
Take the finest tip of your brush or a toothpick, dip it in black paint, and add tiny random speckles around the outer edge of the moon for a gritty, magical texture.
Troubleshooting: Sheer White
If the white paint looks grey or streaky over the dark rock, stop painting. Let it dry fully, then sponge on the next layer instead of brushing.
Step 4: Finishing Touches
-
Clean up outline:
If your ghost edges look fuzzy, use a thin black line or a black paint pen to outline the ghost where it overlaps the moon to sharpen the separation. -
Dry time:
Set the rock aside in a dust-free area and allow all layers to cure fully for at least an hour. -
Seal the stone:
Spray the rock with a matte varnish. This protects the paint from chipping and unifies the sheen of the different paint layers without making it too shiny.
Place your finished moody ghost rock near a candle to let the flickering light enhance the spooky atmosphere
Ghost Portal Scene With Swirling Background

This eerie painted stone captures a little phantom emerging from a celestial swirl, perfect for Halloween decor or a fun spooky gift. The contrast between the deep black space background, the vibrant purple vortex, and the stark white ghost creates a striking mini-mural.
Detailed Instructions
Materials
- Smooth, oval-shaped river rock
- Black acrylic paint (matte base)
- White acrylic paint or paint pen
- Purple, magenta, and teal acrylic paints
- Fine detail paintbrush (size 0 or 00)
- Small flat paintbrush
- Dotting tool or toothpick
- Spray sealant (matte or glossy)
Step 1: Setting the Scene
-
Clean the canvas:
Before you begin, wash your rock with soap and water to remove any dirt or oils. Let it dry completely so the paint adheres properly. -
Base coat:
Using a flat brush, paint the entire front surface of the rock black. You may need two coats for solid opacity; let the first coat dry fully before applying the second. -
Draft the ghost:
Once the black base is bone-dry, use a very light pencil sketch or a thin layer of watered-down white paint to outline the ghost shape in the center. Give it a classic sheet shape with a wavy bottom edge. -
Fill the phantom:
Fill in the ghost outline with white acrylic paint. This will definitely take 2-3 layers to get a bright, opaque white against the black background. Allow drying time between layers to prevent streakiness.
Step 2: Creating the Vortex
-
Start the swirl:
Mix a medium purple shade. Using a fine liner brush, start a spiral shape to the right of the ghost’s head, curving outward and over top of the ghost. -
Add dimension:
Add streaks of magenta or dark pink within the purple spiral lines. Follow the same curve, letting the colors sit side-by-side rather than fully blending them. -
Extend the tails:
Continue painting curved lines sweeping from the spiral center out toward the left edge of the rock, creating a comet-tail effect behind the ghost. -
Highlight the portal:
Mix a tiny bit of white into your purple to create a lavender tint. Add very thin highlights to the center of the spiral and the top edges of the sweeping curves to make them glow.
Fixing Opacity
If your white paint looks grey or transparent over the black base, don’t glob it on thick. Apply multiple thin layers, drying well in between each.
Step 3: Atmosphere & Details
-
Teal mist:
At the bottom right and beneath the ghost, paint fluffy, cloud-like shapes using teal paint. Use a dabbing motion to give them a misty texture. -
Mist highlights:
While the teal is still slightly tacky, mix a little white in and highlight the tops of the cloud bumps to give them volume. -
Ghostly face:
Using your smallest detail brush or a black paint pen, carefull add three oval shapes to the ghost’s face—two eyes and a slightly larger, open mouth. -
Starry night:
Dip a dotting tool or a toothpick into white paint. Add tiny dots scattered across the black background areas to represent distant stars. -
Brighten stars:
I like to pick three or four specific stars and make them slightly larger or add a tiny cross shape to make them twinkle. -
Veil details:
Mix a very watery grey (mostly water, tiny drop of black). Paint very subtle curved lines on the white ghost body to suggest folds in the fabric.
Glow Effect
To make the vortex really pop, add a very thin line of pure white along the absolute center of the purple spiral for a neon-like glow.
Step 4: Final Touches
-
Check opacity:
Look over the rock. If the black showing through the ghost or the colors look dull, add one final thin layer of pigment to those specific spots. -
Seal the deal:
Once the entire artwork is completely dry (give it at least an hour), take it outside and spray it with a clear acrylic sealer to protect your painting from chipping.
Your cosmic ghost is now ready to haunt your garden or bookshelf


Have a question or want to share your own experience? I'd love to hear from you in the comments below!