
Barns are basically the perfect painting subject: bold shapes, tons of texture, and instant countryside charm. Here are my favorite barn painting ideas—starting with the classics and moving into more playful, artsy twists as you go.
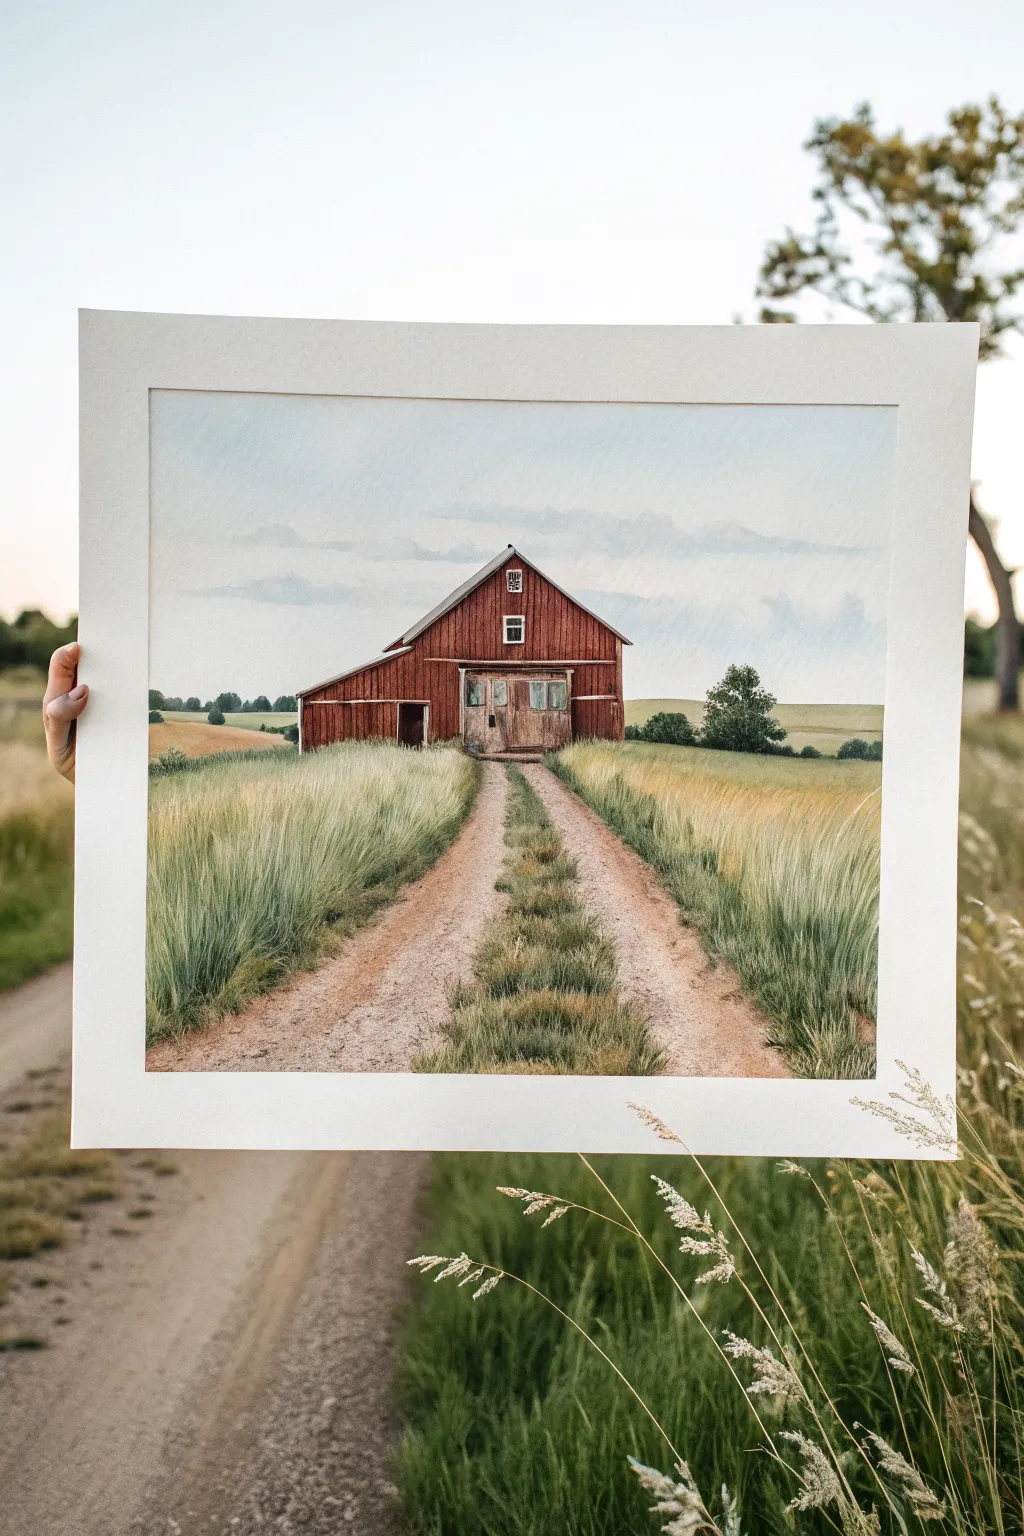
Classic Red Barn and Blue Sky
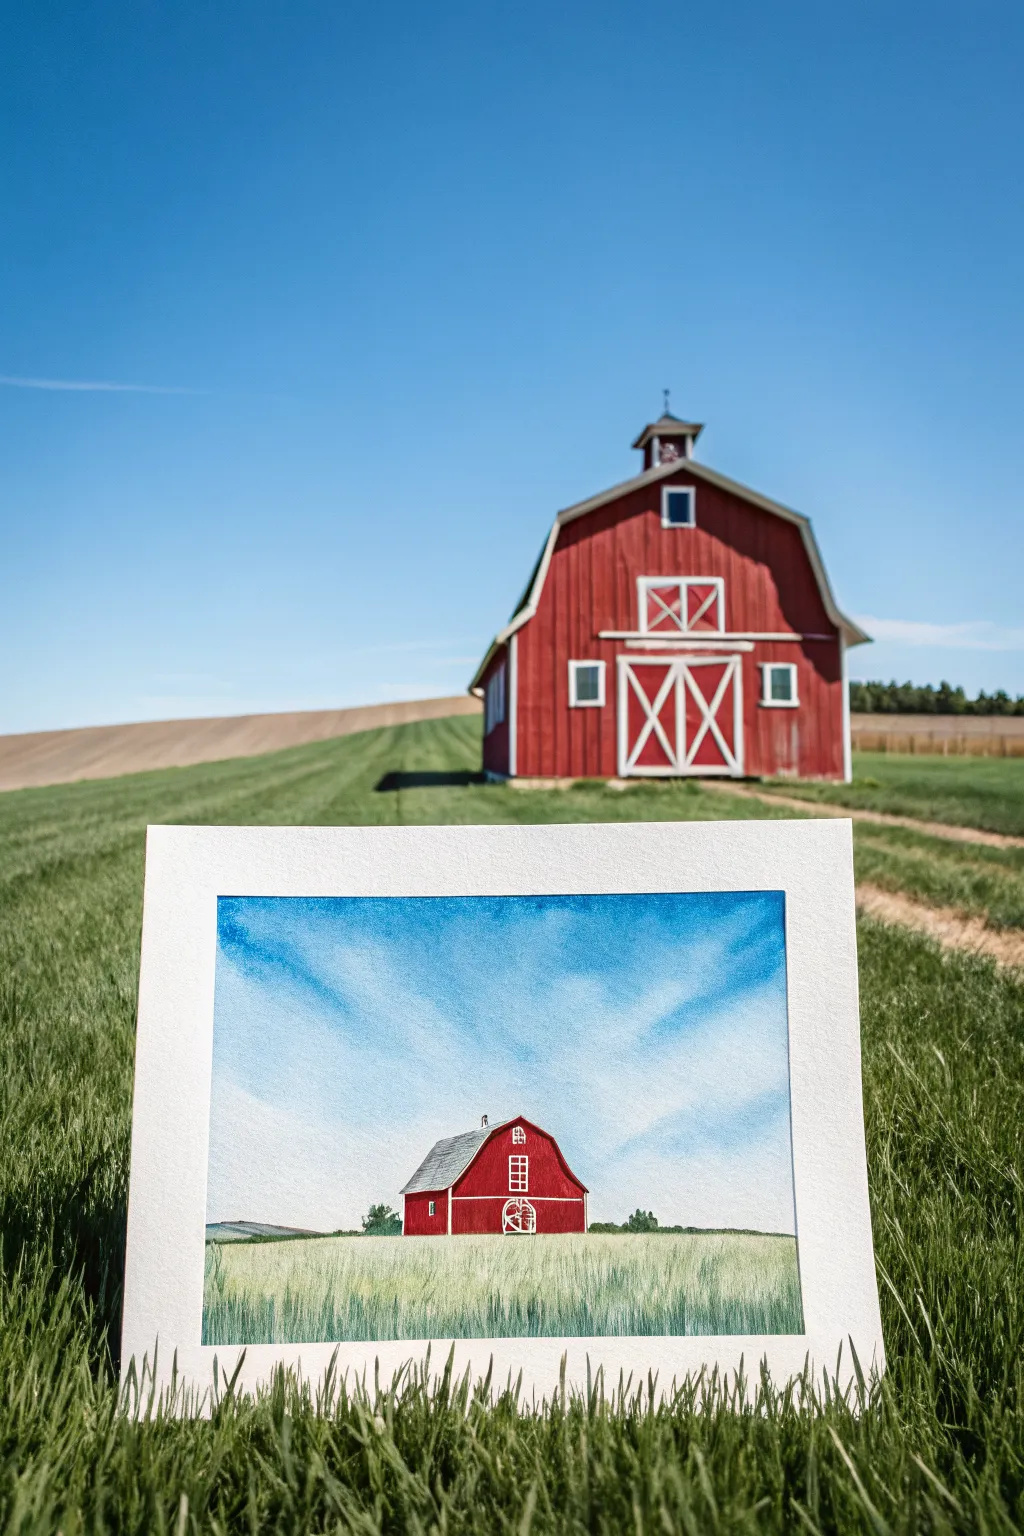
Capture the nostalgic charm of rural life with this vibrant watercolor landscape featuring a classic red barn under a sweeping blue sky. The scene balances the crisp architectural lines of the barn with the soft, flowing textures of the grassy field and clouds.
Step-by-Step Tutorial
Materials
- Cold press watercolor paper (140lb/300gsm)
- Masking fluid
- Painter’s tape or washi tape
- Watercolor paints (Cobalt Blue, Alizarin Crimson, Cadmium Red, Sap Green, Yellow Ochre, Burnt Umber)
- Flat wash brush (3/4 inch)
- Round brushes (sizes 4 and 8)
- Fine liner brush
- Pencil (2H or HB)
- Kneaded eraser
- Jar of clean water
- Proportionate ruler (optional)
Step 1: Preparation and Sketching
-
Prepare the paper:
Begin by taping down the edges of your watercolor paper to a board. This creates that crisp white border seen in the photo and prevents buckling when the paper gets wet. -
Establish the horizon:
Lightly sketch the horizon line about one-third of the way up from the bottom of the page. It doesn’t need to be perfectly straight; a slight undulation looks more natural for a field. -
Outline the barn:
Sketch the barn’s structure in the center. Start with the main box shape, then add the angled rooflines typical of classic barns. Keep your pencil pressure very light so the graphite doesn’t show through the paint later. -
Mask the details:
Use a fine applicator or an old brush to apply masking fluid over the areas that need to remain stark white. This includes the window frames, the door trim, and the decorative ‘X’ patterns on the barn doors.
Bleeding Lines?
If paint bleeds under your masking fluid, wait for it to fully dry. Then, use a stiff, damp brush to gently scrub and lift the unwanted paint away, restoring the white.
Step 2: Painting the Sky
-
Wet the sky area:
Once the masking fluid is bone dry, apply clean water to the entire sky area above the horizon line using your large flat brush. -
Apply the blue wash:
Load the brush with a diluted Cobalt Blue. Start at the top corners and sweep inward and downward. I like to lift the brush as I move toward the center to leave lighter areas that suggest wispy clouds. -
Create texture:
While the paper is still damp, you can drop in slightly more saturated blue in the upper corners to create depth, simulating the vastness of the atmosphere. -
Let it dry completely:
Allow the sky to dry fully before moving on. The paper should be flat and warm to the touch before you paint near the horizon again.
Step 3: The Red Barn
-
Base red layer:
Mix Alizarin Crimson with a touch of Cadmium Red for a rich, traditional barn color. Paint the walls of the barn, painting right over the dried masking fluid. -
Add shadows:
While the red is still slightly wet, add a tiny bit of Burnt Umber to your red mix and glaze the side of the barn that would be in shadow to give the building dimension. -
Roof details:
Paint the roof using a diluted Burnt Umber mixed with a touch of blue for a slate grey tone. Use the tip of your round brush to suggest shingle textures with quick, short strokes. -
Removing the mask:
Once the red paint is completely dry, gently rub off the masking fluid with your finger or a rubber cement pickup tool to reveal the crisp white trim underneath.
Sky Pro Tip
For realistic clouds, use a crumpled tissue to blot up wet blue paint while the sky wash is still damp. This lifts color organically, creating soft, fluffy white shapes.
Step 4: The Foreground Field
-
Underpainting the grass:
Apply a pale wash of Yellow Ochre mixed with a lot of water to the field area. This provides a warm, sunlit base for the grass. -
Layering greens:
Mix Sap Green with a little Cobalt Blue. Using vertical, flicking strokes with your size 4 round brush, start painting individual grass blades over the dried ochre wash. -
Varying the height:
Make the grass strokes shorter near the horizon line and taller as you move toward the bottom of the paper to create perspective and depth. -
Darker accents:
Mix a darker green using Sap Green and Burnt Umber. Add specific clumps of darker grass near the bottom edge and right at the base of the barn to ground the structure. -
Distant hills:
With a very pale, watery mix of blue and green, paint a small, low-lying hill shape on the far left horizon line to push the distance back further.
Step 5: Final Touches
-
Refine the barn trim:
If the white lines revealed by the masking fluid look too stark or rough, use a damp liner brush to gently soften the edges or straighten them out. -
Add windows:
Use a dark grey (mixed from blue and brown) to fill in the window panes inside the white frames. -
Remove tape:
Slowly peel away the painter’s tape at a 45-degree angle to reveal your clean, professional borders.
Frame your pastoral masterpiece and enjoy the peaceful view.
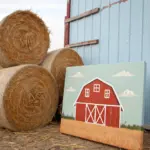

Autumn Barn With Pumpkins and Golden Trees
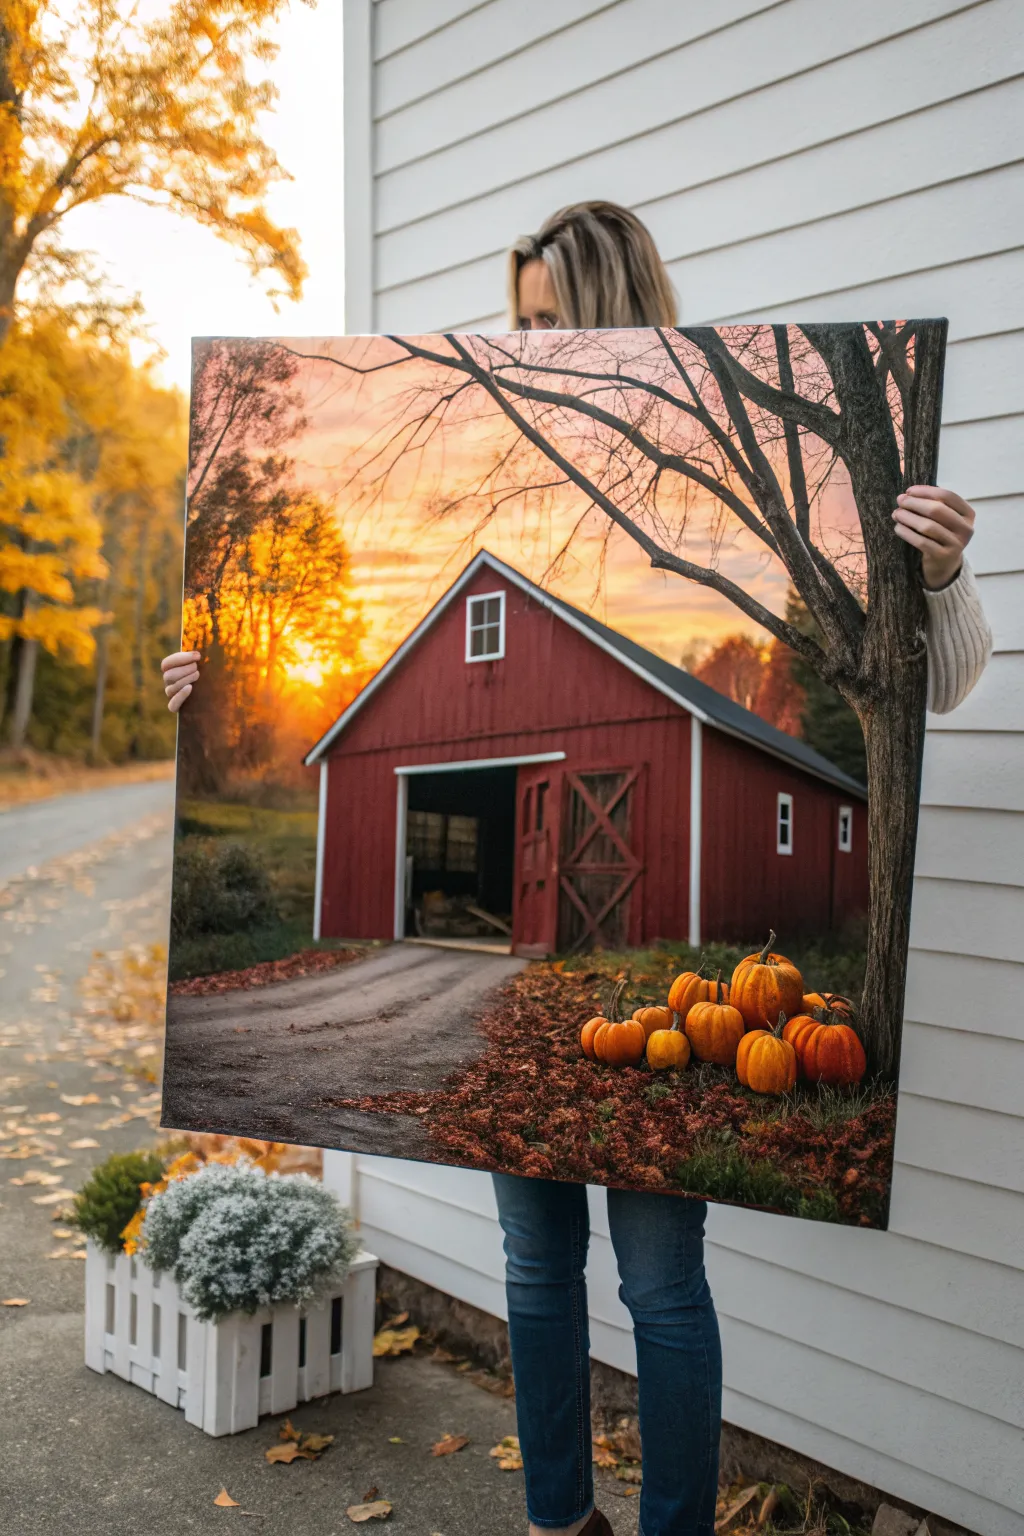
Capture the warmth of a crisp autumn evening with this vibrant acrylic painting, featuring a classic red barn and glowing sunset. This project focuses on layering warm tones to create depth and a nostalgic rural atmosphere perfect for fall decor.
How-To Guide
Materials
- Large stretched canvas (24×30 inches or similar)
- Acrylic paints (Titanium White, Mars Black, Cadmium Red, Burnt Umber, Yellow Ochre, Cadmium Orange, Sap Green)
- Wide flat brush (2-inch)
- Medium filbert brush
- Small round detail brush
- Palette knife (optional for texture)
- Water cup and paper towels
- Easel
Step 1: Sky and Background
-
Prime the sky:
Begin by dampening your wide flat brush. Load it with Titanium White and a touch of Cadmium Yellow to create a pale base for the sky area, covering the upper two-thirds of the canvas with broad, horizontal strokes. -
Blend the sunset:
While the white layer is still tacky, introduce Cadmium Orange and Yellow Ochre near the horizon line. Blend these upwards into the pale yellow, creating a soft gradient that mimics the glow of a setting sun. -
Add distant trees:
Mix a muddy orange-brown using Burnt Umber and Cadmium Orange. Using the medium filbert brush, stipple in a tree line along the horizon, keeping the shapes soft and slightly out of focus to suggest distance. -
Create the sun flare:
Identify where the sun sits just behind the trees on the left. Dab a concentrated spot of pure Titanium White mixed with a tiny bit of yellow there, then gently dry-brush outward rays to create a diffused light effect.
Muddy Colors?
If your orange sunset turns brown while blending into the trees, let the sky layer dry completely before painting the tree line over it. Wet-on-wet mixing often causes muddiness.
Step 2: The Barn Structure
-
Sketch the outline:
Using a thin wash of Burnt Umber and a small round brush, sketch the basic geometric shape of the barn. Focus on the perspective of the roofline and the large central opening. -
Block in the red siding:
Mix Cadmium Red with a touch of Burnt Umber to deepen it slightly. Fill in the main barn walls with the medium flat brush, painting vertically to mimic wood siding direction. -
Define the shadows:
Add a small amount of black to your red mix. Apply this darker shade under the eaves and on the side of the barn facing away from the light source to give the structure three-dimensional weight. -
Paint the trim:
Using pure Titanium White and a steady hand (or a ruler), paint the thick trim around the doorframe, roof edges, and the small loft window. I find using a flat edge of a small brush works best here for crisp lines. -
Detail the interior:
Fill the open barn door area with almost-black paint. Scumble in vague shapes of hay bales or equipment using grey tones to hint at contents without over-detailing the shadows.
Add Realistic Texture
Mix a small amount of modeling paste or sand into your paint when creating the foreground leaves and dirt path. This physical texture creates a crunchy look typical of fall.
Step 3: Foreground and Details
-
Lay the path:
Mix Titanium White, Burnt Umber, and a speck of black to make a grey-brown road color. Paint the path leading from the bottom left into the barn door, narrowing it as it recedes. -
Plant the main tree:
Using a liner brush and dark brown mixed with black, paint the large tree trunk on the right side. Ensure the branches reach up and across the sky, tapering as they extend outward. -
Texture the bark:
Lightly highlight the right side of the tree trunk with a lighter grey-brown to show the texture of the bark catch the ambient light. -
Scatter the leaves:
Load a stippling brush or sponge with distinct autumn colors—reds, oranges, and deep browns. Tap these around the base of the tree and along the path edges to create fallen leaves. -
Form the pumpkins:
Paint several oval shapes near the tree base using bright orange. Vary the sizes and ensure they overlap slightly to look like a natural pile. -
Highlight the pumpkins:
Mix a light yellow-orange for highlights on the tops of the pumpkins and use a burnt sienna for the vertical ribs. Add tiny brown stems to finish each one. -
Final adjustments:
Step back and check your contrast levels. Add a final glaze of yellow-orange over the left side of the canvas if the sunset needs more warmth, and sharpen any white trim on the barn that got messy.
Hang this piece in a well-lit room to let those golden hues truly warm up your space

Barn With Silo and Windmill Accents
This charming project captures the nostalgic beauty of American farmland using watercolor and fine ink details. The soft washes of red and green contrast beautifully with the crisp architectural lines of the barn and windmill structure.
Step-by-Step Tutorial
Materials
- High-quality cold press watercolor paper (deckled edge optional)
- Pencil (HB) and kneaded eraser
- Waterproof fine liner pens (0.1, 0.3, and 0.5 sizes)
- Watercolor paints (Alizarin Crimson, Burnt Sienna, Sap Green, Paynes Grey, Yellow Ochre)
- Round brushes (sizes 2, 6, and 10)
- Ruler
- Masking fluid (optional)
- Paper towels and water cup
Step 1: Sketching the Structure
-
Establish the horizon:
Begin by lightly drawing a horizon line across the lower third of your paper. This anchors your barn and gives the landscape context. -
Block in the barn shape:
Using your ruler and pencil, draw the main body of the barn. Start with the large rectangular base, then add the gambrel roof shape (the classic two-sloped barn roof) on top. -
Add the lean-to and cupola:
Extend a slanted roofline off the right side of the main barn body. Then, center a small square cupola on the ridge of the main roof, topping it with a tiny pyramid roof and a weather vane. -
Draw the windmill structure:
To the left of the barn, sketch the tall, tapering tower of the windmill. Keep the lines light as this structure is delicate. Add the fan blades at the very top, facing slightly towards the viewer. -
Detail doors and windows:
Pencil in the large double doors at the bottom center with their recognizable ‘X’ bracing. Add the hayloft door above it and smaller windows along the sides.
Uneven Roof Color?
If your roof wash looks splotchy, re-wet the entire roof shape with clean water and drop in pigment. This helps the color spread evenly without hard edges.
Step 2: Inking the Foundation
-
Outline the main structure:
Switch to a 0.3 waterproof pen. Carefully go over your pencil lines for the barn’s walls and roof. Use a ruler for the straightest edges, but allow slight imperfections for character. -
Detail the siding:
With a finer 0.1 pen, draw vertical lines along the face of the barn to mimic wooden plank siding. Don’t make them perfectly continuous; broken lines look more weathered. -
Ink the windmill:
Using the 0.1 pen again, ink the windmill tower. Focus on the cross-bracing and the intricate fan blades. This needs a steady hand, so take your time. -
Add roof shingles:
Sketch rows of faint horizontal lines on the roof sections to suggest shingles. You don’t need to draw every individual shingle; suggestion is key here.
Step 3: Watercolor Application
-
Paint the barn red:
Mix Alizarin Crimson with a touch of Burnt Sienna to get a weathered barn red. Use your size 6 brush to wash this color over the siding, carefully painting around the white trim of the doors and windows. -
Deepen the shadows:
While the red is still slightly damp, drop a more concentrated mix of the same red into the areas under the eaves and along the left side of the barn to create depth. -
Color the roof:
Mix Paynes Grey with a lot of water for a soft slate color. Wash this over the roof sections. Once dry, add a second, darker layer near the top ridges to show dimension. -
Highlight the windmill:
The windmill is mostly defined by ink, but add a very faint wash of watered-down Paynes Grey to the fan blades to give them metallic weight without overpowering the lines. -
Paint the landscape:
Mix Sap Green and Yellow Ochre for the foreground grass. Use horizontal strokes with the size 10 brush. Leave the dirt path unpainted or use a very pale Burnt Sienna wash. -
Add background foliage:
For the distant trees behind the windmill, use a wet-on-wet technique with muted yellows and greens to keep them soft and out of focus. -
Plant the shrubs:
Using a size 2 brush and concentrated Sap Green, dab in the texture of the small evergreen bushes flanking the barn doors and the right corner.
Pro Tip: White Trim
For crisp white door frames, apply thin masking tape or masking fluid over those areas before painting the red siding. Peel it off only when the paint is bone dry.
Step 4: Final Touches
-
Intensify shadows:
Mix a dark grey/purple tone. Carefully paint the interior of the open windows and the cast shadows under the door frames to make the white trim pop. -
Review and refine:
Once everything is completely dry, you might want to re-ink any lines that got lost under heavy paint or erase any stray pencil marks still visible on the white paper.
Frame your piece with a wide mat to let the spacious composition breathe

Corner View in Two-Point Perspective

Capture the quiet charm of rural architecture with this mixed-media piece featuring a classic corner-view barn. The combination of delicate ink lines and soft watercolor washes creates a timeless, illustrative style perfect for deckled-edge paper.
Step-by-Step Tutorial
Materials
- Cold press watercolor paper (deckled edge preferred)
- Waterproof fine liner pens (black or sepia, sizes 01 and 03)
- Watercolor paints (Alizarin Crimson, Burnt Sienna, Yellow Ochre, Ultramarine Blue, Paynes Gray)
- Round watercolor brushes (size 4 and 8)
- Pencil (HB or 2H)
- Kneaded eraser
- Ruler
- Masking tape (optional)
Step 1: Drafting the Perspective
-
Establish the horizon line:
Lightly draw a horizontal line across the lower third of your paper using a ruler. This will anchor your barn to the ground. -
Define the corner edge:
Draw a vertical line slightly to the left of the center. This represents the corner of the barn closest to the viewer and sets the scale for the height. -
Set vanishing points:
Angle the roof and foundation lines from your vertical corner toward imaginary vanishing points off the page on both the left and right sides. This creates the two-point perspective look. -
Sketch the main structure:
Complete the basic box shape of the barn, adding the peaked roofline. Keep your pencil pressure very light so these lines can be erased later. -
Add architectural details:
Sketch the cupola on the roof ridge, the large sliding door on the front face, and the smaller windows along the side wall. Don’t forget the small lean-to shed structure attached to the side.
Step 2: Inking the Scene
-
Outline the barn:
Using a 03 waterproof pen, carefully trace your structural lines. Allow for slight wobbles or breaks in the line to mimic aged wood rather than using a ruler for the final ink. -
Detail the siding:
Switch to a finer 01 pen. Draw vertical lines for the wood siding, breaking them occasionally to suggest texture. Keep the lines closer together as they recede into the distance to enhance depth. -
add the winter tree:
On the left side, draw the trunk and branches of the bare tree. Use quick, jerky strokes to create organic, twiggy shapes that reach up into the sky. -
Sketch the foreground elements:
Ink the wooden fence posts on the left and the vague outlines of the grass and dirt road. Keep these lines much looser and more broken than the building. -
Erase pencil marks:
Once the ink is completely dry—wait at least 15 minutes to be safe—gently remove all underlying graphite sketches with a kneaded eraser.
Deckle Edge Charm
To get the torn paper look without buying expensive sheets, crease your watercolor paper deeply, lick the fold or run a damp brush along it, and slowly tear it against a ruler’s edge.
Step 3: Watercolor Application
-
Paint the barn red:
Mix a diluted wash of Alizarin Crimson with a touch of Burnt Sienna to knock back the brightness. Apply this to the barn walls, leaving tiny white gaps for highlights. -
Layer the shadows:
While the first layer is still damp, drop slightly more saturated red mixed with a tiny bit of blue into the shaded side of the barn (the right face) and under the eaves. -
Wash the roof:
Use a very watery mix of Paynes Gray and Burnt Sienna for the roof. Apply it in streaks moving downward to mimic the flow of the metal or shingles. -
Color the details:
Paint the sliding door white or very pale gray, adding darker gray shadows in the ‘X’ framing. Use a dark gray-blue for the window panes. -
Paint the ground and road:
Mix Yellow Ochre and Burnt Sienna for the dry grass. Use broad, sweeping horizontal strokes for the ground, and a cooler, pale gray-brown wash for the dirt road curving into the foreground. -
Add nature textures:
Dab a mix of Paynes Gray and green loosely behind the barn for the distant trees. I like to keep this very wet and blurry to push it into the background. -
Final tree shading:
Use a fine brush to add a pale gray shadow line along one side of the main tree trunk to give it volume. -
Strengthen contrasts:
Once dry, verify your contrast. If the barn feels too flat, add a distinct cast shadow on the ground using a transparent purple-gray mix.
Make It Seasonal
Change the season easily: leave the paper white on the roof and ground for snow, or add vibrant orange and yellow leaves to the bare tree for an autumn harvest scene.
Step back and enjoy the peaceful, rustic atmosphere you’ve created with just ink and a few colors
BRUSH GUIDE
The Right Brush for Every Stroke
From clean lines to bold texture — master brush choice, stroke control, and essential techniques.
Explore the Full Guide
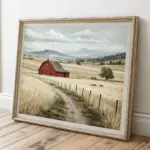
Dirt Path Leading Straight to the Barn
Capture the nostalgic charm of a countryside landscape with this detailed tutorial. You’ll learn to paint a weathered red barn sitting at the end of a long, textured dirt track, surrounded by soft, swaying fields of grain.
Step-by-Step Guide
Materials
- Heavyweight watercolor paper or mixed media board (140lb or higher)
- Pencil (HB or 2B) and kneaded eraser
- Gouache or acrylic paints (Titanium White, Burnt Sienna, Yellow Ochre, Sap Green, Ultramarine Blue, Alizarin Crimson, Burnt Umber)
- Set of synthetic brushes (3/4 inch flat, #6 round, #2 round, #00 liner)
- Masking tape
- Palette
- Two water containers
- Paper towels
Step 1: Sketching and Sky
-
Tape the borders:
Begin by taping down all four edges of your paper to a rigid board. This creates the crisp white border seen in the reference and prevents the paper from buckling when wet. -
Establish the horizon:
Lightly draw a horizontal line for your horizon about one-third of the way up from the bottom. This doesn’t need to be perfectly straight; a slight undulation suggests rolling hills. -
Draft the barn structure:
Center your barn on the horizon line. Draw a simple pentagon shape for the main face, then add the slanted shed roof extending to the left. Keep your lines faint so they don’t show through the paint later. -
Map the path:
Draw the dirt path starting wide at the bottom corners of the paper and narrowing dramatically as it meets the barn door. Sketch the central grassy strip running down the middle of the tire tracks. -
Wash in the sky:
Mix a very pale blue using Titanium White and a touch of Ultramarine Blue. Apply a wash across the entire upper section, introducing faint wisps of white clouds by lifting pigment out with a dry brush or adding thicker white paint while the blue is still damp.
Pro Tip: Perspective Trick
Make grass blades larger and distinct in the foreground, but blur them into solid shapes as they recede toward the barn to create effortless depth.
Step 2: Blocking in the Landscape
-
Paint the distant fields:
Using Yellow Ochre mixed with a tiny drop of brown, fill in the rolling hills behind the barn. Keep this color soft and muted to push the hills into the background. -
Underpaint the foreground grass:
Mix Sap Green with varying amounts of Yellow Ochre for the fields on either side of the path. Apply this loosely, using vertical brushstrokes to simulate the direction of growing grass. -
Base coat the path:
Mix Burnt Sienna with White and a touch of Yellow Ochre to create a sandy beige color. Fill in the two tire tracks, leaving the texture slightly rough to mimic dirt and gravel. -
Base coat the barn:
Paint the barn siding with a mix of Alizarin Crimson and Burnt Umber. Aim for a dusty, aged red rather than a bright fire engine red. Leave the window frames and door areas unpainted for now.
Step 3: Adding Texture and Detail
-
Weather the wood:
Once the red base is dry, use a dry-brush technique with a lighter, chalky red slightly mixed with white. Drag the brush vertically down the barn walls to create the look of faded, peeling paint. -
Define the boards:
Switch to your #00 liner brush. Use a dark mix of Burnt Umber and Blue to paint thin, vertical lines indicating the individual planks of wood on the barn siding. -
Paint the barn doors:
Fill in the large sliding doors with a weathered grey-brown wash. Add darker shadows along the edges and lighter highlights in the center of the panels to give them dimension. -
Texturize the path:
Spatter tiny droplets of watered-down Burnt Umber onto the path area using an old toothbrush or tapping a loaded brush. This creates the look of pebbles and loose dirt instantly. -
Create the center strip:
Paint the strip of grass running down the middle of the road. Use short, upward flicks of the brush with various shades of green, ensuring the bottom of the clumps blend naturally into the dirt.
Troubleshooting: Flat Barn?
If the barn feels 2D, darken the side wall (the shed addition) slightly more than the front face. This value change implies a light source hitting the front.
Step 4: Refining the Atmosphere
-
Layer the tall grass:
Work on the foreground fields again. Use your #2 round brush to paint distinct blades of long grass in the immediate foreground, using a mix of light yellow-greens and darker sap greens for depth. -
Add background trees:
Dab in the distant trees on the horizon using a dark, cool green. Keep the edges slightly soft so they don’t distract from the focal point of the barn. -
Highlight the roof:
Add a thin, bright line along the edge of the roof to catch the light. This small detail separates the building from the sky and adds architectural structure. -
Final touches:
Check your values. If the barn door feels too flat, I usually add a deep, almost black shadow just under the door jamb to ground the structure. -
Reveal the border:
Wait until the painting is completely bone-dry. Carefully peel away the masking tape at a 45-degree angle to reveal your crisp, clean edges.
Now mount your finished rural landscape in a mat to emphasize that beautiful white border.
Mixed Media Barn With Collaged Texture

Capture the rustic charm of the countryside with this mixed media barn project that combines painting with textural collage elements. By layering paper and acrylics, you’ll build a piece that feels as weathered and historic as a real century-old structure.
Step-by-Step Guide
Materials
- Heavyweight watercolor paper or mixed media board (11×14 or similar)
- Acrylic paints (Barn Red, Burnt Umber, White, Paynes Grey, Hansa Yellow, Orange)
- PVA glue or matte medium
- Tissue paper (white or light beige)
- Textured scrapbook paper or brown craft paper (for the roof)
- Flat shader brushes (various sizes)
- Fine liner brush
- Pencil and ruler
- Palette knife
- Water container and paper towels
Step 1: Texturing the Sky
-
Prepare the base:
Start with a clean sheet of heavyweight watercolor paper or a mixed media board. Roughly sketch out a horizon line about one-third up from the bottom. -
Create the sky texture:
Tear pieces of white tissue paper into irregular shapes. Apply a layer of matte medium or watered-down PVA glue to the sky area of your board. -
Layer the clouds:
Press the crumpled tissue paper onto the wet glue, allowing it to wrinkle intentionally. This creates the subtle, crackled texture seen in the sky. Brush another coat of medium over the top to seal it and let it dry completely. -
Base coat the sky:
Once dry, paint the sky area with white acrylic. You can add a tiny drop of grey or blue for depth, but keep it very pale to let the crumpled texture provide the visual interest.
Collage Depth Trick
Don’t press your roof papers perfectly flat. Letting corners adhere loosely creates natural shadows.
Step 2: Constructing the Barn
-
Sketch the structure:
Using a pencil and ruler, draw the outline of the barn. Focus on the gambrel roof shape (the classic two-slope roof) and the small cupola on top. Don’t worry about tiny details yet, just get the main proportions right. -
Block in the red siding:
Mix a classic Barn Red acrylic paint. If the red feels too bright, tone it down with a touch of Burnt Umber. Paint the main front face and the side wall of the barn, working around the window and door areas. -
Add vertical siding details:
While the red paint is still slightly tacky, use a pinstripe tool or the back of a brush to gently scratch vertical lines into the paint, mimicking wooden planks. Alternatively, wait for it to dry and paint these lines with a darker red wash. -
Create the collage roof:
For the roof, cut small rectangles from brown craft paper or textured scrapbook paper to resemble shingles or metal sheets. I like using slightly different shades of brown for variation. -
Apply the roof tiles:
Glue these paper rectangles onto the roof area, overlapping them slightly from bottom to top. Paint over them with a wash of Burnt Umber and Paynes Grey to unify the colors while letting the paper texture show through.
Paint Peeling?
If your acrylic peels off the glossy magazine clippings, lightly sand the paper surface before gluing and painting.
Step 3: Details & Landscape
-
Paint the trim:
Using a smaller flat brush and white acrylic, paint the thick white trim along the rooflines, corners, and fascia boards. You may need two coats to ensure opacity over the red. -
Define windows and doors:
Paint the window panes with a dark grey or deep blue. Once dry, use a fine liner brush and white paint to create the mullions (the grid lines) and frames. -
The iconic X-bracing:
Paint the large double doors in the center. Start with the white frames, then fill the negative space with red. Finally, carefully paint the large white ‘X’ and diagonal cross-bracing that gives the barn its character. -
Autumn foliage:
In the background on the left, stipple in trees using orange, yellow, and burnt sienna to suggest fall foliage. Keep the edges soft so they recede into the distance. -
Foreground grasses:
Paint the field in front of the yellow and ochre tones. Use short, upward brush strokes to simulate dry grass. -
Grounding the barn:
Mix a dark earth tone and paint the dirt path leading up to the barn doors. Add some darker shadows right at the base of the building to ‘plant’ it firmly on the ground. -
Final weathering:
Dilute some dark brown or grey paint with water until it’s very thin. Lightly glaze the white trim and parts of the red siding to make the barn look aged and weather-beaten rather than brand new.
Step back and admire your rural masterpiece as the layers of texture dry into a cohesive image

PENCIL GUIDE
Understanding Pencil Grades from H to B
From first sketch to finished drawing — learn pencil grades, line control, and shading techniques.
Explore the Full Guide
Abstract Color-Blocked Barn Silhouette
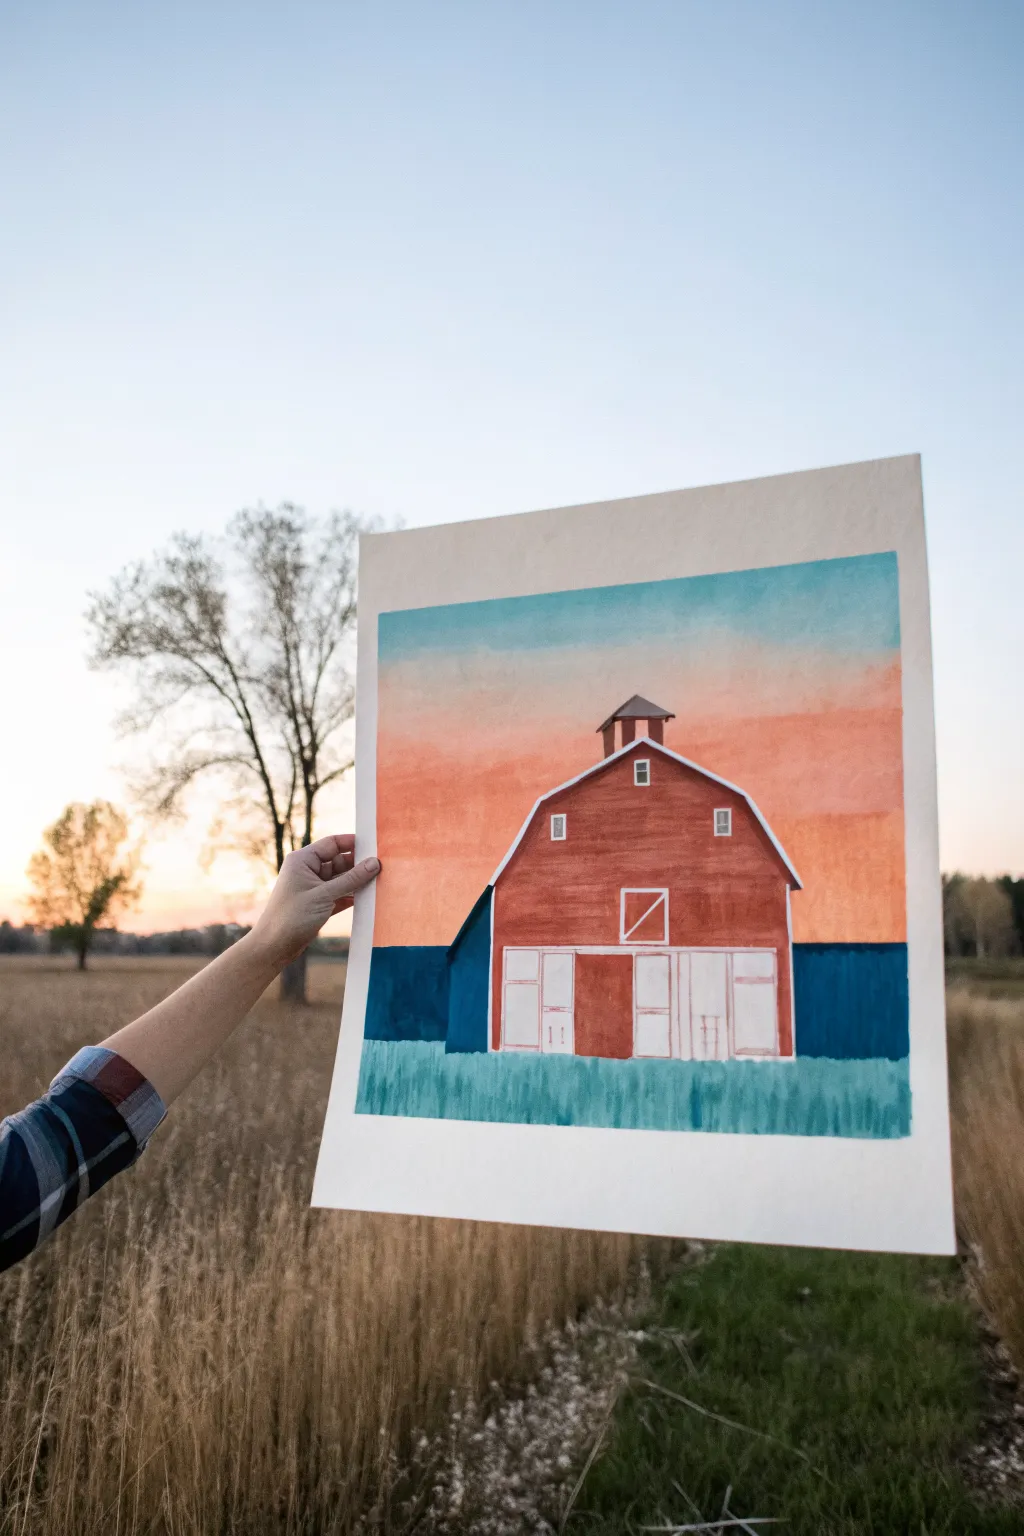
Capture the rustic charm of a red barn standing tall against a gradient sunset with this vibrant painting project. This stylized approach uses bold blocks of color and crisp white lines to create a striking, graphic interpretation of a classic rural scene.
Step-by-Step
Materials
- Heavyweight watercolor paper or mixed media paper (at least 140lb)
- Acrylic gouache or matte acrylic paints (colors: deep red, teal/dark blue, orange, light blue, white)
- Flat shader brushes (medium and large)
- Small round detail brush (size 0 or 1)
- White gel pen or fine white paint marker
- Pencil and ruler
- Painter’s tape or wash tape
- Palette for mixing
- Cup of water and paper towels
Step 1: Setting the Scene
-
Prepare your canvas:
Begin by taping down the edges of your watercolor paper to a hard surface. This creates that crisp, professional white border seen in the final piece and keeps the paper from buckling while wet. -
Sketch the outline:
Using a pencil and ruler, lightly sketch the basic shape of the gambrel-roof barn in the center of the paper. Keep the lines faint; you just need the main structure, the cupola on top, and the horizon line that splits the background. -
Paint the sky gradient:
Start with the sky. Mix a soft light blue for the top third of the sky area. Apply this using a large flat brush with horizontal strokes. -
Blend the sunset:
While the blue is still slightly tacky, introduce a soft coral or orange paint below it. Use a clean, slightly damp brush to blend the transition where the two colors meet, creating a hazy sunset effect. -
Paint the horizon:
Fill the bottom area directly behind the barn with a deep, dark teal or navy blue. This acts as the distant tree line or shadowed horizon. Keep the top edge of this shape straight across the paper.
Wobbly Lines?
If painting straight lines with a brush is difficult, let the background dry completely and use a ruler with a white gel pen or paint marker for the trim instead.
Step 2: Building the Barn
-
Base coat the barn:
Mix a rusty, deep red color. Using a medium flat brush, fill in the main body of the barn, being careful to paint around the large door areas if you sketched them, or simply paint the whole shape and layer the doors later. -
Add the shadow side:
For the left side of the barn that is in shadow (the lean-to section), mix a small amount of dark blue into your red to create a deep purple-maroon or dark blue shadow tone. Paint this triangular section to create dimension. -
Paint the grass:
Using a teal or green-blue shade, paint the foreground grass area. Use vertical, upward flickering strokes with a worn brush to mimic the texture of tall grass blades rather than a solid block of color. -
Layer grass texture:
Once the initial grass layer is dry, mix a slightly lighter teal shade. Add another layer of quick, vertical strokes over the bottom area to give the field depth and movement. -
Paint the doors:
If you painted over the door area, paint a large rectangle in white near the bottom center. If you left it blank, fill it in now. Allow this white layer to dry completely; since white paint can be translucent, I usually apply a second coat here for opacity.
Step 3: Fine Details
-
Outline the roof:
Using your fine detail brush and white paint, or a white paint marker, draw a thin, crisp line along the roof edges. This highlights the shape and separates the barn from the background. -
Detail the cupola:
Paint the small cupola on top of the roof. Use the red for the base and a dark gray or brown for its tiny roof. Add white highlights to the vents. -
Add windows:
Paint small rectangular windows on the upper face of the barn. Frame them with thin white lines to make them pop against the red siding. -
Define the barn doors:
Using the red barn color and a ruler, paint or draw the ‘X’ patterns and vertical lines onto the white door sections. This traditional cross-buck design is iconic for barns. -
Final touches:
Check for any uneven edges. If the grass needs to overlap the bottom of the barn slightly to ground it, add a few more teal strokes at the base of the red wall. -
Reveal the border:
Once the painting is 100% dry to the touch, slowly peel away the painter’s tape at a 45-degree angle to reveal your clean white frame.
Add Weathering
Dry brush a tiny bit of light grey or diluted white vertically down the red siding to make the wood look aged and sun-bleached for a vintage feel.
Now step back and admire how simple shapes came together to form a beautiful pastoral twilight scene.


Have a question or want to share your own experience? I'd love to hear from you in the comments below!