Picking a bench color is basically choosing the vibe of your whole outdoor corner—quiet and blended-in, or bold and can’t-miss. Here are my favorite bench color ideas (from classic to artsy) that instantly make a plain seat feel intentional and loved.
Crisp White Classic
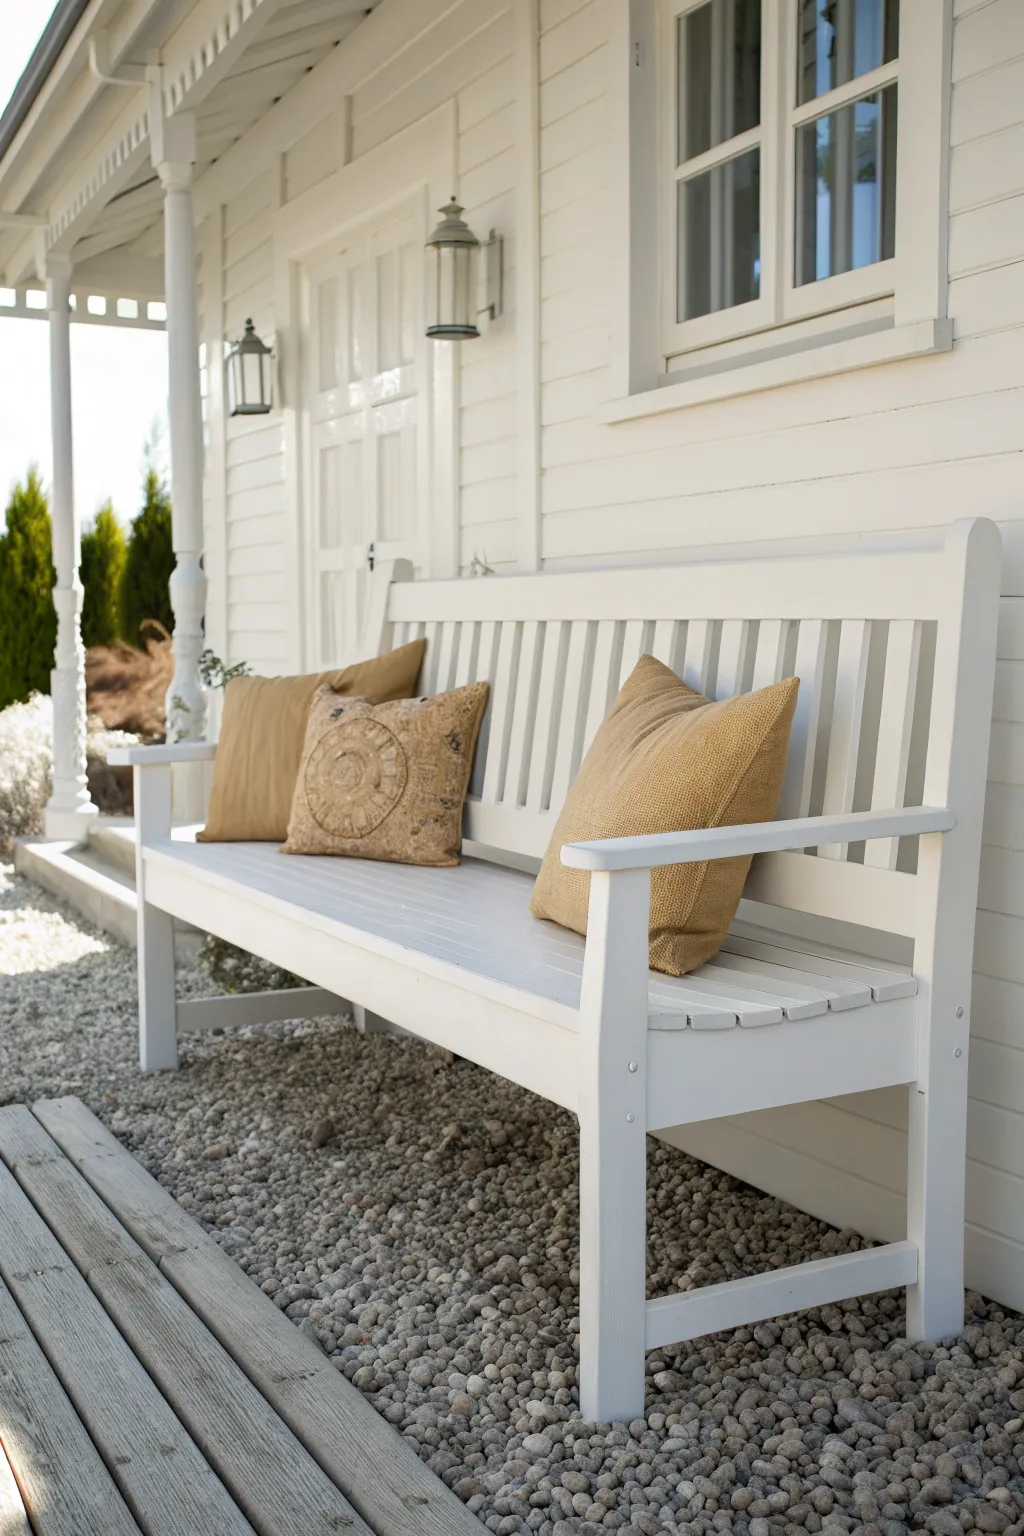
Transform a tired wooden bench into a timeless porch centerpiece with this bright, airy restoration project. The crisp white finish reflects natural light beautifully, creating a welcoming spot that pairs perfectly with neutral textiles and lush greenery.
Detailed Instructions
Materials
- Wooden garden bench (w/ vertical back slats)
- Exterior wood primer (white)
- Exterior satin or semi-gloss wood paint (Pure White)
- 80-grit sandpaper
- 120-grit sandpaper
- Orbital sander (optional)
- Tack cloth
- Wood filler
- Putty knife
- 2-inch synthetic bristle angle sash brush
- 4-inch foam roller and tray
- Drop cloth
- Painter’s tape
Step 1: Preparation & Repairs
-
Assess the Surface:
Begin by inspecting your wooden bench for any loose boards, protruding nails, or significant rot. Tighten screws where necessary to ensure the frame is sturdy before you start refinishing. -
Initial Cleaning:
Scrub the entire bench with a stiff brush and mild soapy water to remove accumulated dirt, moss, or algae. Let the wood dry completely for at least 24 hours. -
Rough Sanding:
Using 80-grit sandpaper (an orbital sander speeds this up significantly), sand the entire surface to remove the old finish. You want to get down to bare wood in peeling areas and scuff up any remaining paint to ensure adhesion. -
Fill Imperfections:
Take your putty knife and smooth wood filler into any deep gouges, screw holes, or cracks. Overfill slightly, as the filler will shrink when it cures. -
Smooth Sanding:
Once the filler is dry, switch to 120-grit sandpaper. Sand the filled areas flush with the surface and go over the entire bench again to create a smooth base for painting. -
Dust Removal:
Vacuum up the bulk of the sawdust, then wipe every nook and cranny with a tack cloth. This step is crucial for achieving that flawless factory-like finish.
Brush Technique Tip
For the vertical slats, hold check your brush angle. Painting ‘dry’ (less paint) near corners prevents drips from pooling 10 minutes later.
Step 2: Priming the Wood
-
Spot Prime Knots:
If you are working with bare pine or wood with dark knots, dab a little primer specifically on those knots first to prevent resin bleed-through later. -
Prime the Slats:
Using your 2-inch angle brush, apply exterior wood primer to the vertical back slats and the detailed areas between the seat boards. I find working from the top down prevents drips from ruining lower sections. -
Prime Flat Surfaces:
Use the foam roller to apply primer to the broad flat areas like the bench seat and armrests. The roller helps avoid brush marks. -
Sand the Primer:
Let the primer dry according to the can’s instructions. Once dry, lightly hand-sand with 220-grit paper to knock down any raised grain, then wipe away the dust.
Weatherproofing Upgrade
For benches in uncovered areas, apply a clear exterior water-based spar urethane over the white paint for maximum UV and rain protection.
Step 3: Applying the Finish
-
First Coat on Details:
Stir your Pure White exterior paint thoroughly. Start applying the first coat using the brush on the tricky spots: the spaces between slats, the underside of the arms, and the legs. -
Painting the Slats:
Paint the vertical back slats carefully. Don’t overload your brush; two thin coats are always better than one thick, runny coat. -
Rolling the Seat:
Switch to your foam roller for the seat slats and back rail. Roll with the grain of the wood for the smoothest possible texture. -
Drying Time:
Allow the first topcoat to cure fully. This usually takes about 4 to 6 hours depending on humidity, but check your specific product label. -
Second Coat Application:
Apply the second coat in the same order—brush work first, then rolling the flats. This coat provides the true opacity and crisp white color seen in the inspiration image. -
Final Inspection:
While the paint is still wet, check for any drips or runs, especially on the vertical legs and slat edges, and brush them out gently. -
Curing:
Let the bench cure for at least 48 hours before placing it on your porch or adding cushions. This hardening period prevents tacky paint from sticking to fabric. -
Styling:
Complete the look by adding texture. Place two solid camel-colored pillows and one patterned lumbar pillow in the center to replicate the cozy, classic aesthetic.
Now you have a stunning, freshly painted bench ready for morning coffees and relaxing afternoons

Matte Black Statement
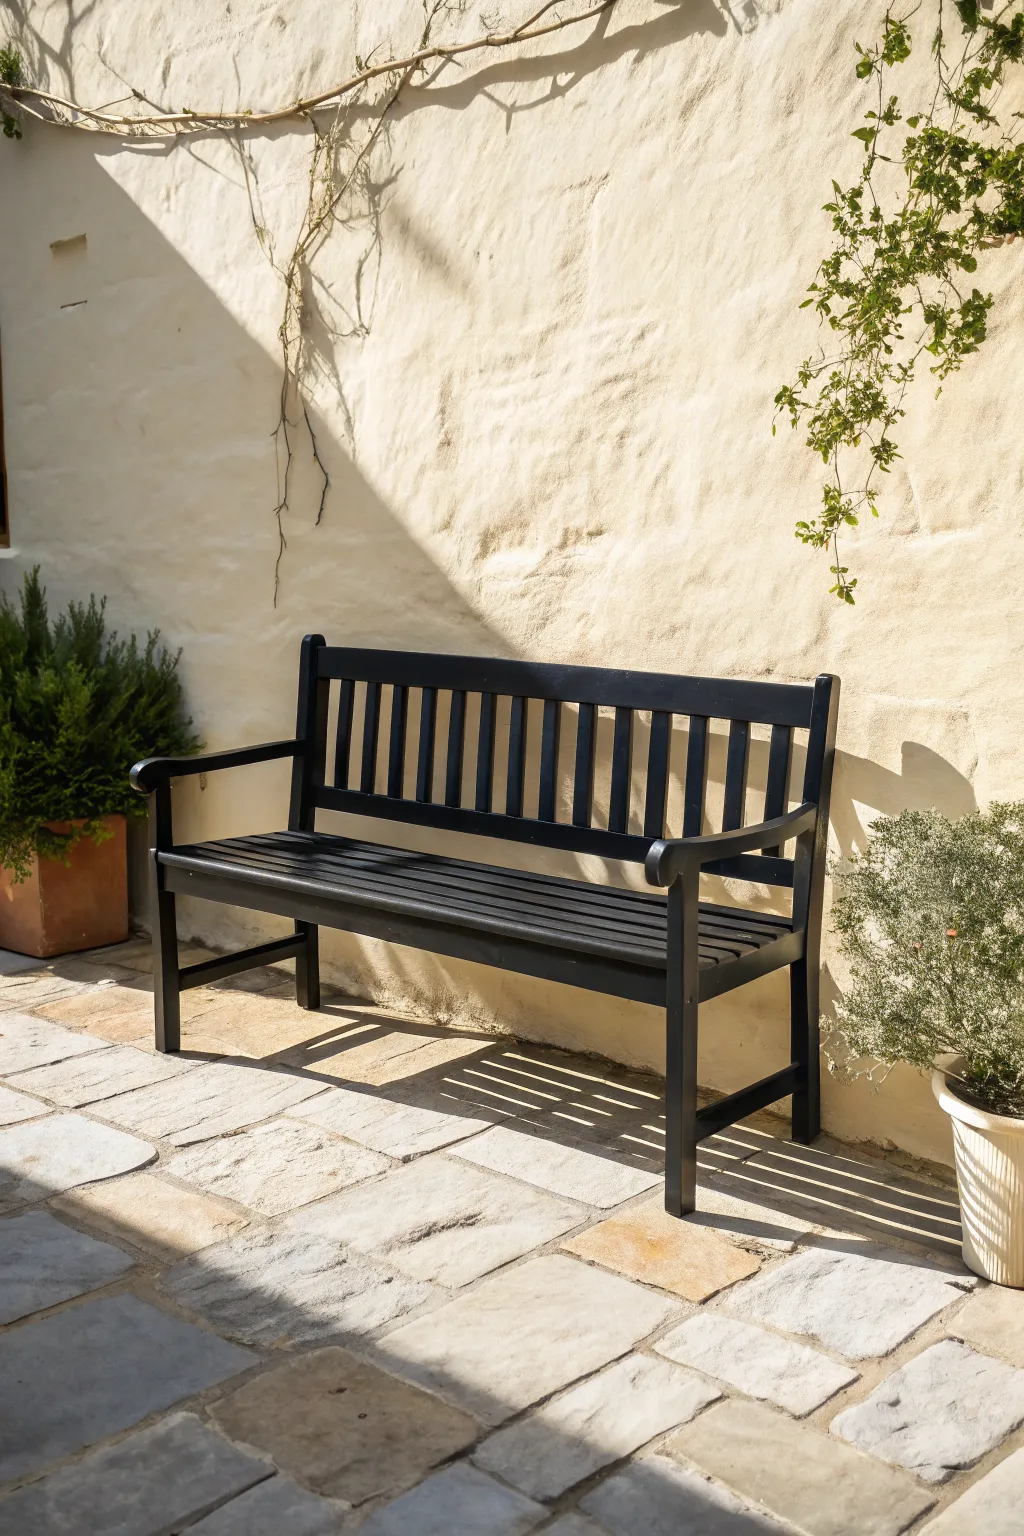
Transform a tired garden bench into a sophisticated outdoor centerpiece with this bold matte black finish. The deep, non-reflective color absorbs sunlight and creates a striking contrast against light walls and greenery, giving your patio an instant modern update.
Step-by-Step Guide
Materials
- Wooden garden bench (unfinished or previously painted)
- 80-grit sandpaper
- 150-grit sandpaper
- Random orbital sander (optional)
- Tack cloth or microfiber rags
- Exterior wood primer (grey or tinted dark)
- Matte black exterior paint (enamel or latex)
- 2-inch angled sash brush
- 4-inch foam roller
- Painter’s tape
- Drop cloths
- Wood filler (outdoor rated)
- Putty knife
- Mild detergent and scrub brush
Step 1: Preparation & Repairs
-
Clean the surface:
Begin by thoroughly washing the entire bench with mild detergent and water to remove dirt, mildew, and grease. Let it dry completely in the sun before moving on. -
Inspect for damage:
Check every slat and joint for rot or loose screws. Tighten any wobbly hardware now, as paint won’t fix structural issues later. -
Fill imperfections:
Use a putty knife to press outdoor-rated wood filler into deep scratches, gouges, or screw holes. Overfill slightly to account for shrinkage. -
Initial sanding:
Once the filler is cured, sand the repaired areas flush. Then, go over the entire bench with 80-grit sandpaper to strip peeling paint and rough up the old finish. -
Smooth the wood:
Switch to 150-grit sandpaper for a second pass. This ensures the wood fibers are smooth enough for a furniture-grade finish without polishing the surface too much. -
Remove dust:
Vacuum the bench thoroughly to pull dust from the crevices between slats. Wipe everything down with a tack cloth to catch the remaining fine particles.
Sticky Situation
If the paint feels tacky after drying, dust lightly with talcum powder. For future prevention, ensure humidity is low when painting and allow longer curing times.
Step 2: Priming
-
Protect the area:
Lay down drop cloths underneath the bench to catch drips. If you can’t move the bench, tape off the feet to prevent paint from staining your patio pavers. -
Spot prime knots based on wood type:
If you are working with raw pine or woods with heavy knots, hit those spots with a shellac-based primer first to prevent bleed-through. -
Apply base primer:
Coat the entire bench with an exterior wood primer. I prefer using a grey-tinted primer for black topcoats, as it helps achieve opacity faster than white primer. -
Work the crevices:
Use your angled sash brush to jam primer into the tight spaces between the backrest slats and where the arms meet the seat. -
Check for drips:
While the primer is wet, inspect the undersides of the slats and arms for hanging drips and smooth them out immediately.
Step 3: Painting & Finishing
-
Light sanding:
Once the primer is fully dry, lightly scuff the surface with fine sandpaper to knock down any raised grain. Wipe away the dust again. -
First coat application:
Begin applying the matte black paint. Start by painting the difficult areas first—the undersides, between slats, and elaborate joinery—using your brush. -
Roll the flat surfaces:
Use the 4-inch foam roller for the long slats of the seat and backrest. This prevents brush marks and provides that smooth, factory-like finish. -
Dry time:
Allow the first coat to dry according to the manufacturer’s instructions. Matte blacks can sometimes show humidity marks if recoated too soon. -
Second coat:
Apply a second full coat of matte black. This layer builds the true depth of color and ensures weather resistance. -
Final inspection:
Look at the bench from different angles in the sunlight to catch any missed spots or ‘holidays’ where the primer shows through. -
Curing:
Let the bench cure for at least 24 to 48 hours before placing cushions on it or sitting down, to prevent the paint from remaining tacky.
Metallic Accent
For a luxe touch, swap old hardware for brass bolts, or use a tiny artist brush to paint the exposed screw heads in gold leaf paint after the black dries.
Enjoy the dramatic elegance your new black bench brings to your garden space

Soft Greige Neutral
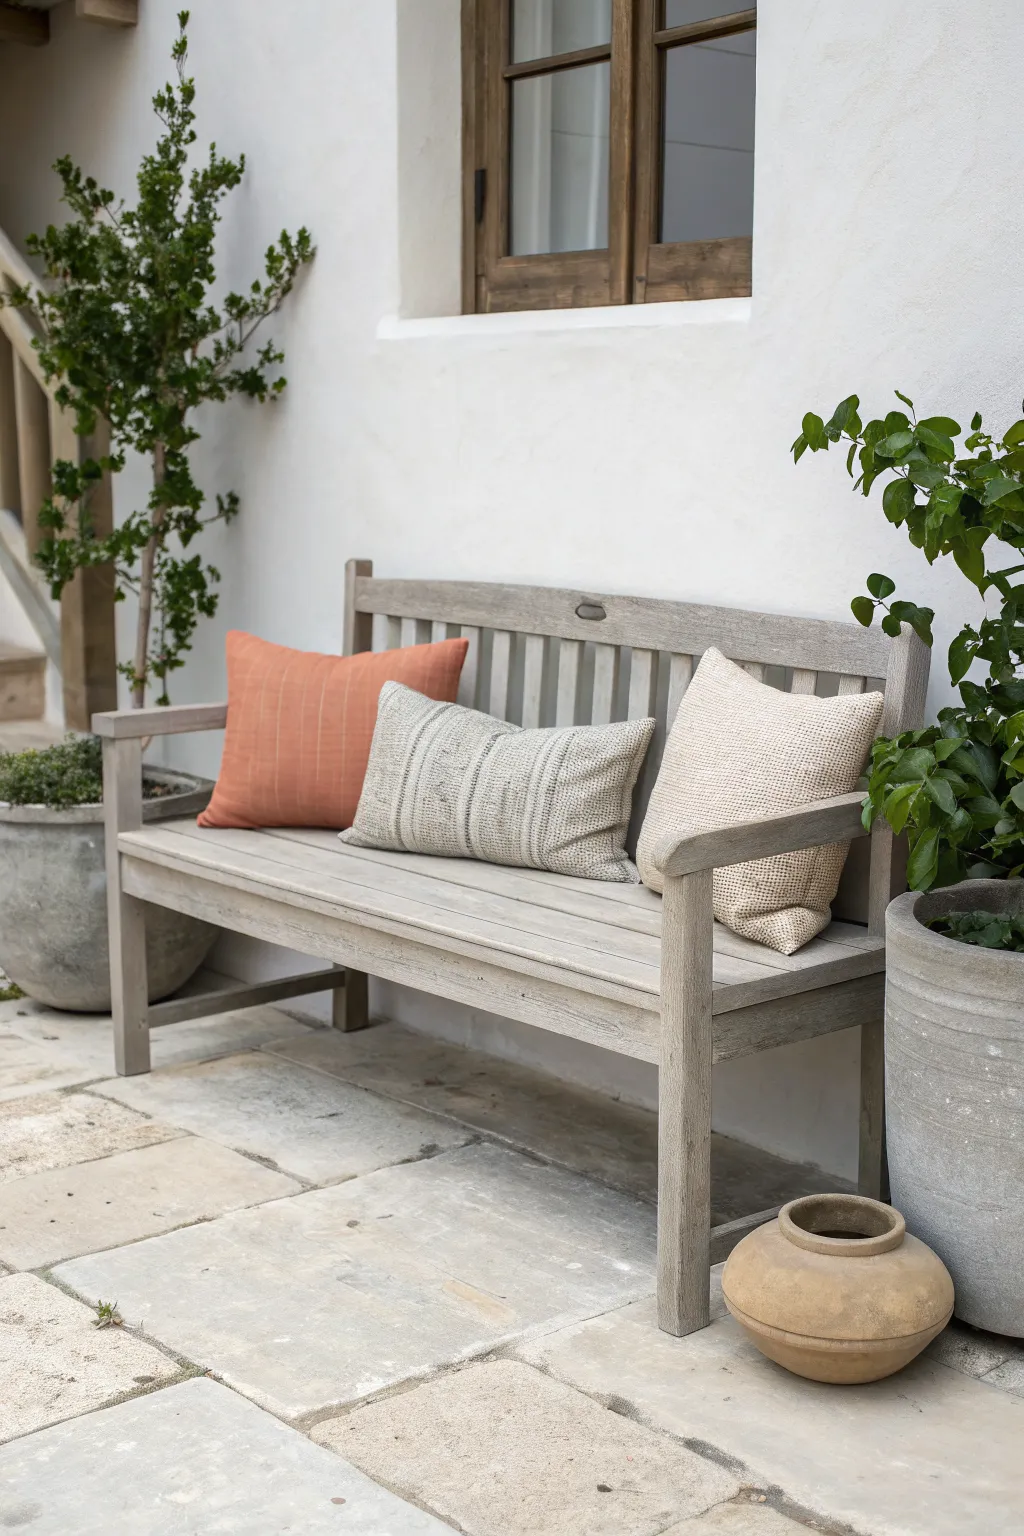
Transform an ordinary wooden bench into a coastal-inspired centerpiece with this soft greige finishing technique. This method layers subtle gray and beige washes to mimic the sophisticated look of naturally weathered teak.
How-To Guide
Materials
- Wooden garden bench (unfinished or stripped)
- Medium and fine grit sandpaper (120 and 220 grit)
- Tack cloth
- Water-based wood stain (weathered gray)
- Water-based wood stain (warm oak or beige)
- Matte outdoor spar urethane or wood sealer
- Clean lint-free rags
- 2-inch synthetic bristle brush
- Small mixing container
- Water for dilution
- Drop cloth
Step 1: Preparation and Cleaning
-
Prepare the workspace:
Set up your bench on a drop cloth in a well-ventilated area, preferably out of direct sunlight to prevent the stains from drying too quickly. -
Sand the surfaces:
Using 120-grit sandpaper, thoroughly sand the entire bench to remove any old finish or rough spots, ensuring you sand in the direction of the wood grain. -
Refine the texture:
Switch to 220-grit sandpaper for a second pass. This smooths the wood fibers effectively, allowing the wash to absorb evenly rather than blotching. -
Remove dust:
Wipe down every slat and leg with a tack cloth. It is crucial to remove all sawdust, as hidden particles will roughen your final smooth finish.
Step 2: Creating the Greige Wash
-
Mix the base wash:
In your mixing container, combine the weathered gray stain with water. I generally aim for a ratio of 1 part stain to 1 part water to keep it translucent. -
Apply the first wash:
Dip your rag into the diluted gray mixture and wipe it onto the wood. Work in small sections, wiping with the grain to push the pigment into the pores. -
Wipe back excess:
Immediately wipe off any excess liquid with a clean, dry rag. You want a hint of gray, not a solid painted look, so don’t let it pool. -
Let it dry:
Allow this first gray layer to dry completely according to the manufacturer’s instructions, usually about 1-2 hours for water-based stains. -
Prepare the warm wash:
While the first coat dries, mix your second wash using the warm oak or beige stain diluted with water (again, roughly 50/50).
Pro Tip: Dry Brushing
For a more aged look, use a dry brush with a tiny amount of undiluted gray stain on just the corners and high points to simulate years of patina.
Step 3: Layering and Sealing
-
Apply the warm layer:
Brush the diluted beige wash over the dry gray layer. This step neutralizes the cool gray tones, creating that signature ‘greige’ warmth. -
Blend the tones:
Wipe this layer back aggressively with a clean rag. The goal is to leave the warmth sitting on top of the gray without obscuring it entirely. -
Assess the color:
Step back and look at the bench. If it feels too gray, add another light pass of the beige wash; if it’s too brown, a very light dry-brush of the gray can correct it. -
Lightly sand:
Once fully dry, give the surfaces a very light scuff with 220-grit sandpaper to distress the edges slightly and mimic natural wear. -
Remove dust again:
Clean off any sanding residue thoroughly with a fresh tack cloth before moving to the sealing stage. -
Apply the sealer:
Using a synthetic brush, apply a coat of matte outdoor spar urethane. Long, even strokes will prevent bubbles and ensure a professional look. -
Final cure:
Let the sealer cure for at least 24 hours before placing your cushions or styling the bench.
Troubleshooting: Blotchy Wood
If the stain absorbs unevenly, apply a pre-stain wood conditioner before your gray wash. This helps soft woods like pine take color more consistently.
Enjoy the calm, sophisticated atmosphere your new greige bench brings to your outdoor space


Cool Gray Modern Wash
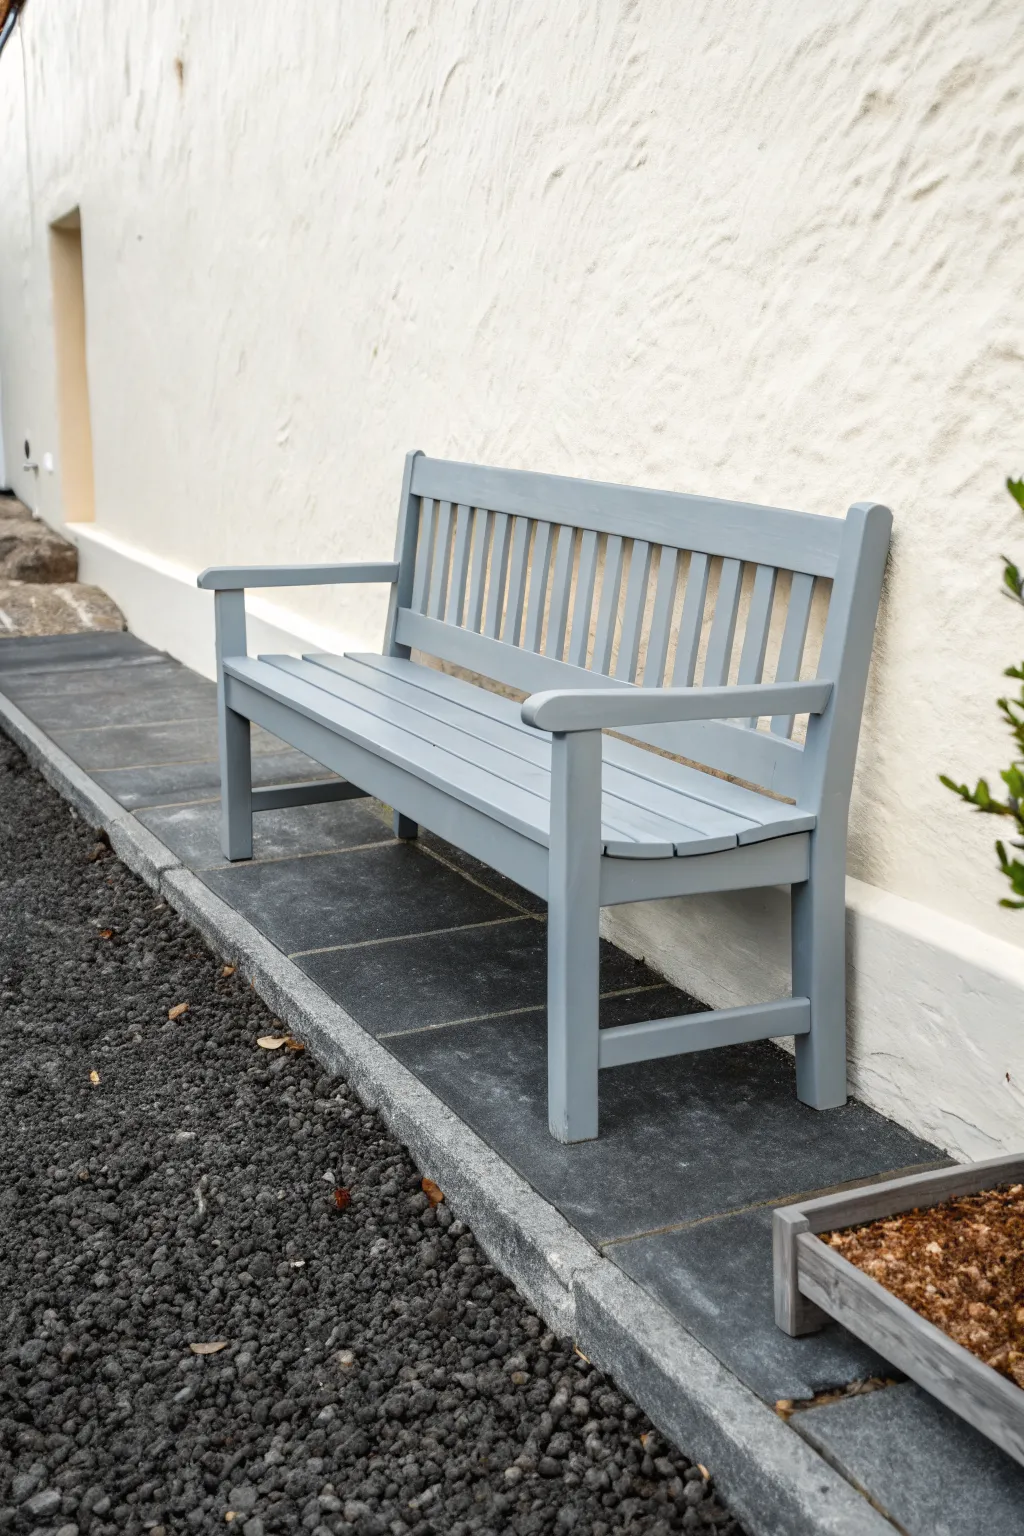
Transform a weathered wooden bench into a modern statement piece with a cool, slate gray finish that complements stone and stucco exteriors. This project focuses on achieving a solid, matte look that feels both classic and contemporary, perfect for calming garden corners.
Step-by-Step Tutorial
Materials
- Wooden garden bench
- Exterior wood primer (gray or white)
- Exterior satin or matte paint (Cool Slate Gray)
- Medium-grit sandpaper (120-grit)
- Fine-grit sandpaper (220-grit)
- Tack cloths or microfiber rags
- Degreaser or sugar soap solution
- Scrub brush
- 2-inch synthetic bristle sash brush
- 4-inch foam roller and tray
- Drop cloth
- Wood filler (exterior grade)
- Painter’s tape (optional)
Step 1: Preparation & Cleaning
-
Project Setup:
Choose a dry, overcast day for painting to prevent the paint from drying too quickly in direct sun. Lay down a drop cloth on a flat surface, ensuring you have plenty of space to walk around the entire bench. -
Deep Clean:
Mix a sugar soap or degreaser solution in a bucket of warm water. Scrub the entire bench vigorously with a stiff brush to remove moss, algae, dirt, and old flaking finish giving special attention to the slat crevices. -
Rinse and Dry:
Rinse the wood thoroughly with a hose or fresh water to remove all cleaning residue. Allow the bench to dry completely, which may take 24 hours depending on the weather; trapped moisture will ruin your new finish. -
Initial Sanding:
Once dry, use 120-grit sandpaper to sand the entire surface. You want to scuff up any remaining old finish and smooth out rough wood fibers to create a ‘key’ for the primer to stick to. -
Repair Imperfections:
Inspect the wood for deep gouges or rot. Apply exterior-grade wood filler to any holes, smoothing it over with a putty knife. Let it cure according to the package instructions. -
Smooth Sanding:
Sand the filled areas flush with the surface using 120-grit paper, then go over the whole bench again lightly with 220-grit paper for a silky smooth feel. -
Dust Removal:
This is crucial: wipe every inch of the bench with a tack cloth or slightly damp microfiber rag to remove all sanding dust.
Sticky Situation
If the bench feels tacky days after painting, humidity was likely too high during application. Move it to a dry, ventilated area and dust it with talcum powder to help cure the surface.
Step 2: Priming the Surface
-
flip and Prime:
I find it helpful to turn the bench upside down first. Use your 2-inch sash brush to work a coat of exterior wood primer into the underside of the slats and the bottom of the legs. -
Prime the Top:
Flip the bench right-side up. Continue applying primer to the visible surfaces, brushing in the direction of the wood grain. Ensure you get into the tight gaps between the backrest slats. -
Check for Drips:
Before the primer sets, run your brush lightly along the bottom edges of the seat and arms to catch any drips that may have formed. -
Light Sand:
Once the primer is fully dry, very lightly scuff the surface with fine 220-grit sandpaper to knock down any raised grain, then wipe away the dust.
Step 3: Current Application
-
First Coat – Edges:
Stir your Cool Slate Gray paint thoroughly. Start by using the sash brush to paint the difficult areas: in between the slats, the joints, and tight corners where a roller won’t fit. -
First Coat – Flat Areas:
Switch to a small 4-inch foam roller for the long, flat surfaces like the seat slats and backrest. This applies the paint evenly without brush marks. -
Dry Time:
Allow the first coat to dry completely. Although it might look patchy, resist the urge to touch it up while wet. -
Second Coat Application:
Apply the second coat using the same method: cut in with the brush first, then roll the flat areas. This layer usually provides the solid, opaque color depth seen in the photo. -
Inspect Coverage:
Check the finish in different lights. If the wood grain is still showing through more than you’d like, a third thin coat may be necessary for that ultra-modern, solid look. -
Final Cure:
Let the bench cure for at least 48 hours before placing it in the garden or sitting on it, allowing the paint to harden fully.
Metallic Accent
For a sleek industrial twist, paint just the metal hardware or boltheads in a matte black or copper paint before coating the wood, then tape them off.
Enjoy your renewed garden seating that brings a sense of calm sophistication to your outdoor space
BRUSH GUIDE
The Right Brush for Every Stroke
From clean lines to bold texture — master brush choice, stroke control, and essential techniques.
Explore the Full Guide
Slate Blue-Grey Upgrade
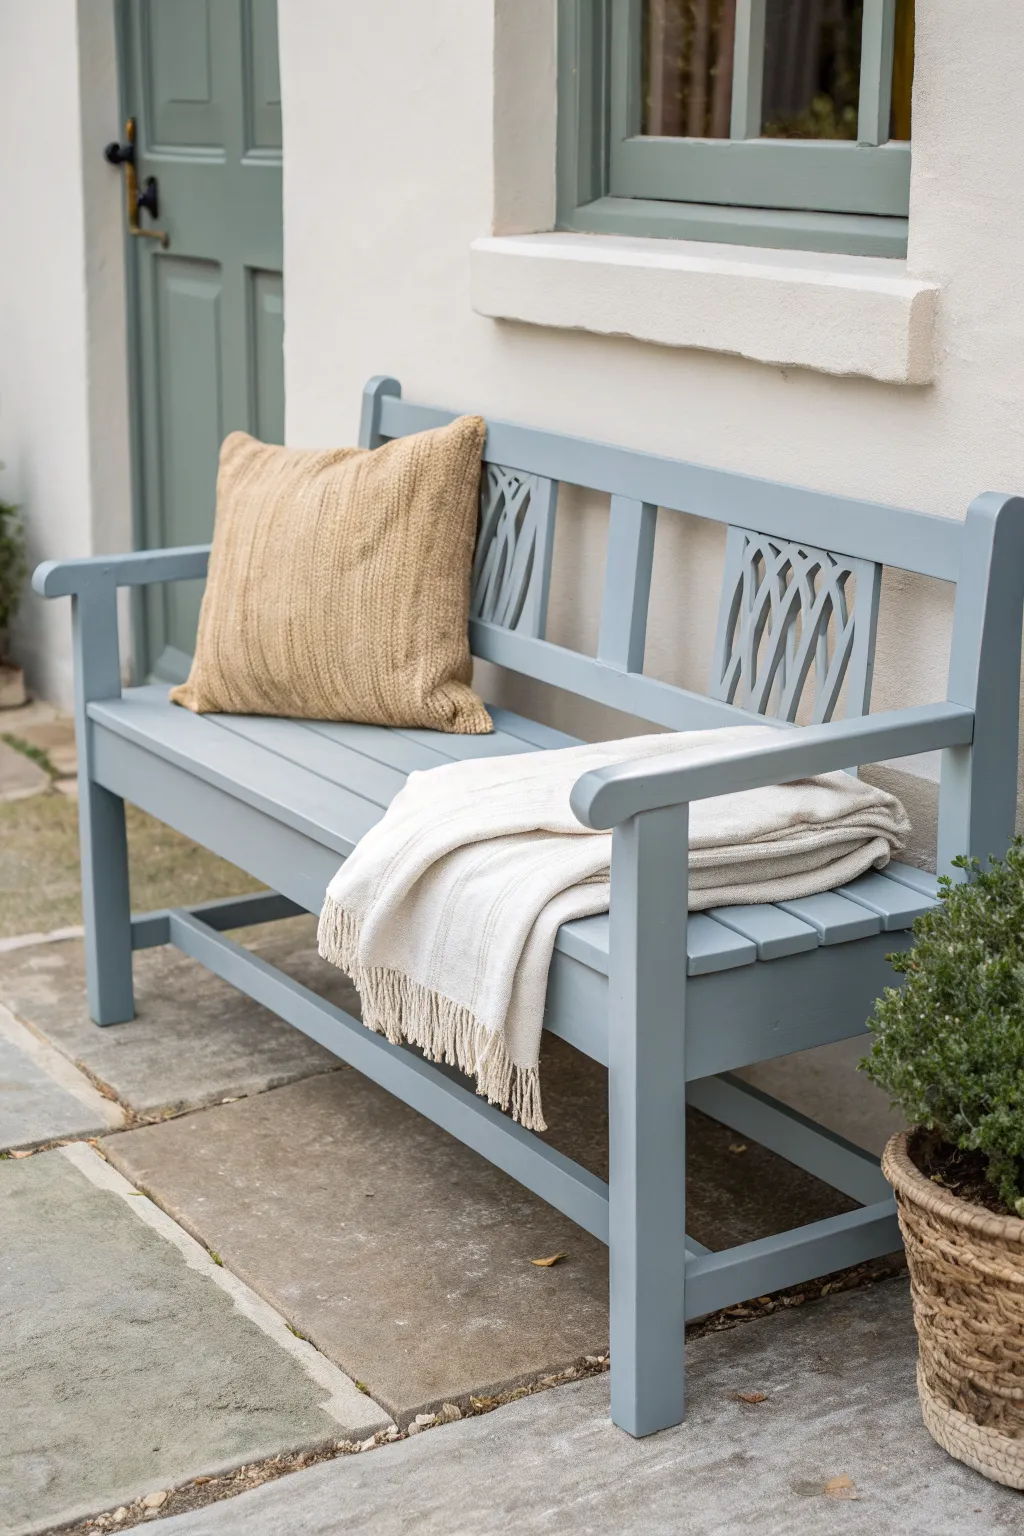
Transform a tired wooden bench into a sophisticated outdoor staple with this serene slate blue-grey finish. This cool-toned update brings a modern, calming presence to any patio or garden entrance, perfectly bridging the gap between classic and contemporary styles.
Step-by-Step
Materials
- Wooden garden bench (unfinished or previously painted)
- Exterior wood primer (if painting over bare wood or dark colors)
- Outdoor satin or semi-gloss paint in ‘Slate Blue-Grey’
- Coarse sandpaper (80-100 grit)
- Medium sandpaper (180-220 grit)
- Tack cloths or microfiber rags
- Mild detergent and water
- Scrub brush
- Painter’s tape
- 2-inch synthetic bristle angled brush
- Small artist brush or foam brush for tight slats
- Drop cloth
- Wood filler (optional)
Step 1: Preparation
-
Assess the Surface:
Begin by inspecting your bench for any structural issues. Tighten loose screws and check for rot. If there are deep gouges or cracks, fill them with wood filler now and let it cure completely. -
Clean Thoroughly:
Mix mild detergent with water and scrub the entire bench vigorously. Outdoor furniture accumulates a surprising amount of grime and algae that will prevent paint adhesion. Rinse well with a hose and allow it to dry fully, ideally in the sun. -
Initial Sanding:
Use coarse 80-100 grit sandpaper to remove any peeling old paint or rough patches. You don’t need to strip it to bare wood everywhere, but you need a sound surface. Always sand in the direction of the wood grain to avoid scratches. -
Smooth the Surface:
Follow up with medium 180-220 grit sandpaper to dull any remaining shiny finish and create a ‘tooth’ for the new paint. Pay special attention to the decorative lattice work on the backrest, as drips or rough spots hide easily here. -
Dust Removal:
Wipe down the entire piece with a tack cloth or damp microfiber rag. Any leftover dust will create a gritty finish, so I like to be extra thorough here.
Step 2: Priming
-
Apply Primer:
If your bench is bare wood or you’re making a drastic color change, apply a coat of high-quality exterior wood primer. Stir well and apply evenly. -
Focus on Joints:
Work the primer into joints and crevices where moisture tends to gather. This extra barrier helps prevent future rot. -
Let it Cure:
Allow the primer to dry according to the manufacturer’s instructions. Once dry, lightly sand any raised grain with fine sandpaper and wipe away the dust.
Sticky Situation
If the weather is too humid, the paint may remain tacky. Move the bench to a dry, well-ventilated area or use a fan to speed up the curing process rather than adding more paint.
Step 3: Painting
-
Stir the Paint:
Open your slate blue-grey paint and stir thoroughly. The pigments in grey-blue shades can separate, so ensure the color is consistent from the bottom of the can up. -
Start from the Bottom:
Flip the bench over or on its side to paint the underside and legs first. This ensures you don’t miss hidden spots that still need protection from the elements. -
Flip and Continue:
Turn the bench upright. Begin painting the backrest, working your way down. Use the 2-inch angled brush for the main slats and varying surfaces. -
Tackle the Details:
For the intricate lattice or cross-hatch design on the back, switch to a smaller brush or a foam brush. Apply thin coats here to avoid unsightly drips pooling in the corners. -
Paint the Seat:
Paint the seat slats using long, smooth strokes following the grain. Maintain a ‘wet edge’ by brushing back into the wet paint you just applied to avoid lap marks. -
First Coat Drying:
Let the first coat dry completely. This usually takes 4-6 hours depending on humidity, but check your can’s label. -
Light Sanding Between Coats:
Once dry, very lightly sand the surface with fine-grit paper. This knocks down any bumps or dust nibs and ensures a professional-smooth feel. -
Second Coat Application:
Apply the second coat of slate blue-grey paint just as you did the first. This coat provides the true depth of color and the necessary protective shell. -
Final Inspection:
While the paint is still wet, check for drips underneath the seat edge or arms and smooth them out immediately. -
Curing Time:
Allow the bench to cure for at least 24-48 hours before placing cushions or sitting on it. Paint may feel dry to the touch sooner, but it needs time to harden against wear.
Pro Tip: Elevate It
Hammer a large nail or screw into the bottom of each leg before painting. This lifts the wood off the drop cloth, letting you paint all the way to the bottom edge without sticking.
Enjoy your beautifully refreshed bench as the new focal point of your outdoor sanctuary
Navy Blue Coastal Calm
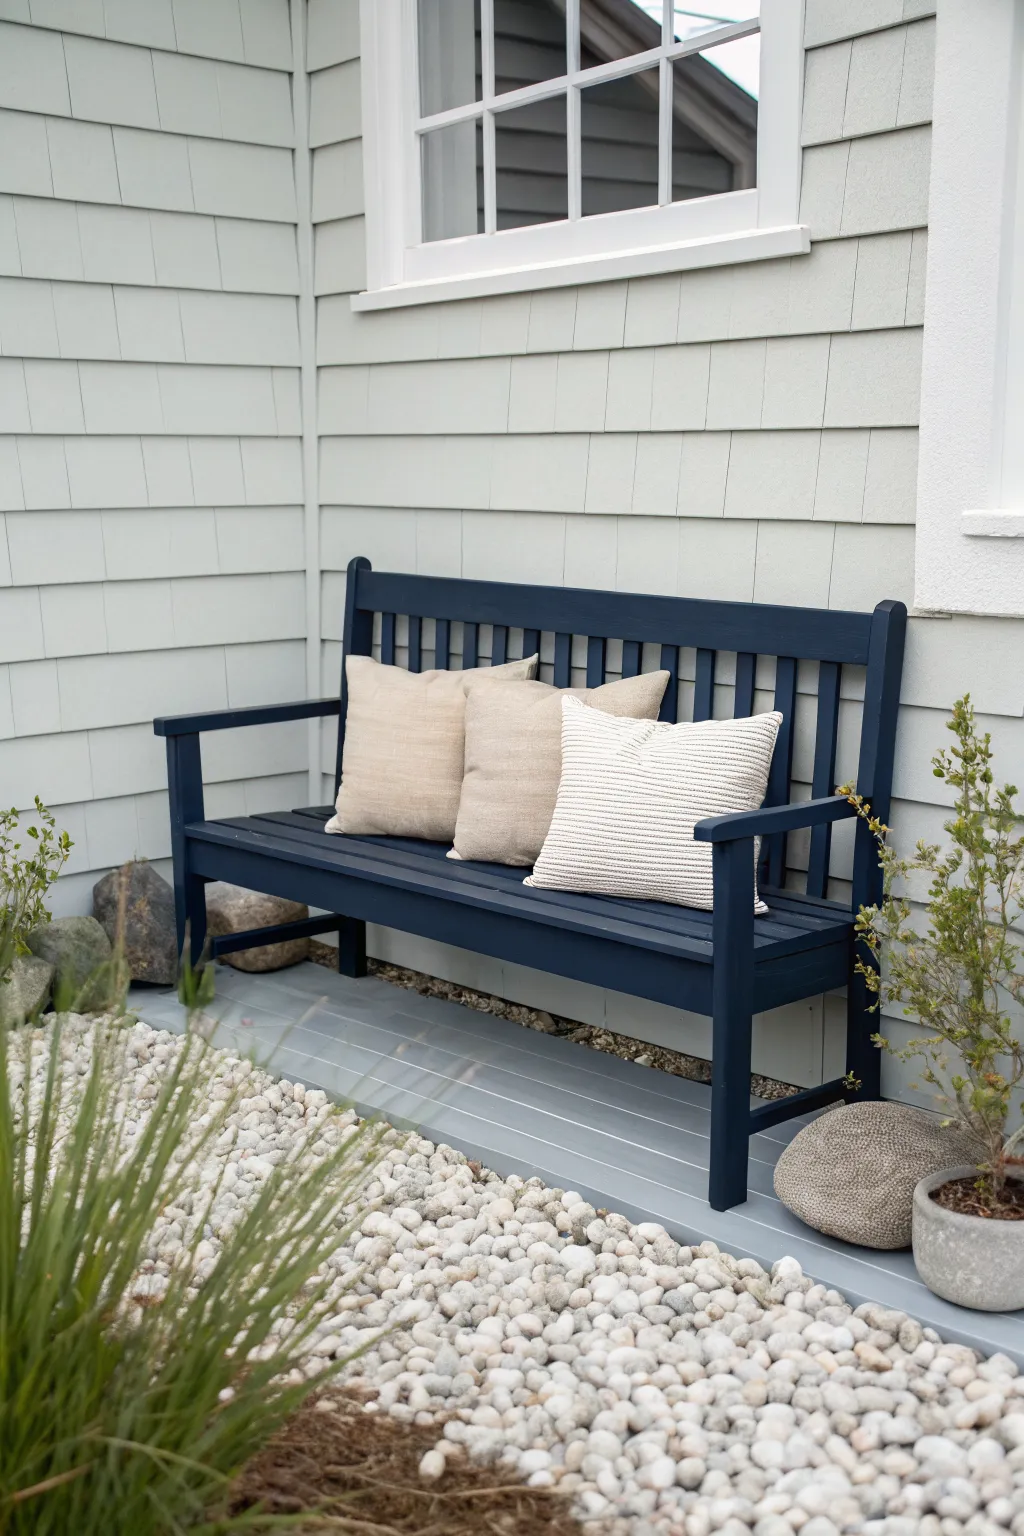
Transform a plain wooden bench into a coastal retreat with this deep navy finish that perfectly complements grey shingles and natural textures. This project brings a sophisticated, nautical touch to any porch or patio corner.
Step-by-Step Tutorial
Materials
- Wooden garden bench (unfinished or strictly sanded)
- Exterior wood primer (grey tinted preferred)
- Exterior paint in ‘Navy Blue’ or ‘Hale Navy’ (semi-gloss finish)
- Sandpaper assortment (80, 120, and 220 grit)
- Tack cloth or microfiber rags
- 2-inch angled sash brush (synthetic bristles)
- 4-inch foam roller and tray
- Drop cloth or cardboard
- Wood filler (if repairing an old bench)
- Painter’s tape
- Stir sticks
Step 1: Preparation & Sanding
-
Assess the surface:
Examine your bench for any rough spots, splinters, or old peeling paint. If you act as your own inspector now, you save headaches later. -
Fill imperfections:
If there are deep gouges or nail holes, use a putty knife to press exterior wood filler into them. Let this dry completely according to package instructions. -
Rough sanding:
Start with 80-grit sandpaper to remove old finish or rough up new wood. This initial scratch coat is vital for adhesion. -
Smooth the surface:
Progress to 120-grit sandpaper to smooth out the filler and the wood grain. This is where I like to really take my time to ensure a professional feel. -
Final polish:
Give everything a quick once-over with 220-grit sandpaper for an ultra-smooth base. -
Clean thoroughly:
Vacuum up the sawdust and wipe the entire bench down with a tack cloth to remove every last speck of dust.
Step 2: Priming & Painting
-
Apply primer:
Using your brush for corners and the foam roller for flat slats, apply a coat of exterior primer. A grey-tinted primer helps dark navy cover better than white primer. -
Check for drips:
While the primer is wet, inspect the crevices between slats where drips love to hide and smooth them out. -
Light sanding:
Once the primer is fully dry, lightly scuff it with 220-grit paper to knock down any raised grain, then wipe clean again. -
Mix the navy paint:
Stir your navy blue exterior paint thoroughly. Avoid shaking the can vigorously right before painting to prevent bubbles. -
Paint the difficult spots:
Flip the bench over if possible (or work from underneath) to paint the bottom of the legs and the underside of the slats first using the brush. -
Paint the slats:
Turn the bench upright. Use the foam roller to apply paint to the long, flat surfaces of the seat and backrest for a smooth, brush-mark-free finish. -
Detail work:
Use the angled sash brush to cut in the corners, the arms, and the vertical supports where the roller couldn’t reach. -
Let it cure:
Allow the first coat to dry for at least 4-6 hours, or as recommended by the manufacturer. Don’t rush this step. -
Apply second coat:
Repeat the painting process for a second coat to achieve that deep, rich opacity seen in the photo. -
Final inspection:
Look for any missed spots or uneven sheen while the paint is still wet and correct them gently with a feather-light brush stroke.
Sticky Situation?
If the paint feels tacky after drying, humidity is likely the culprit. Move the bench to a climate-controlled area or simply wait another 24 hours before sitting.
Nautical Upgrade
For extra coastal flair, wrap the armrests with natural jute rope. Secure the ends with strong glue on the underside for a tactile, seaside grip.
Once fully cured, style with neutral linen pillows to complete your peaceful coastal corner

PENCIL GUIDE
Understanding Pencil Grades from H to B
From first sketch to finished drawing — learn pencil grades, line control, and shading techniques.
Explore the Full Guide
Bold Red Focal Point
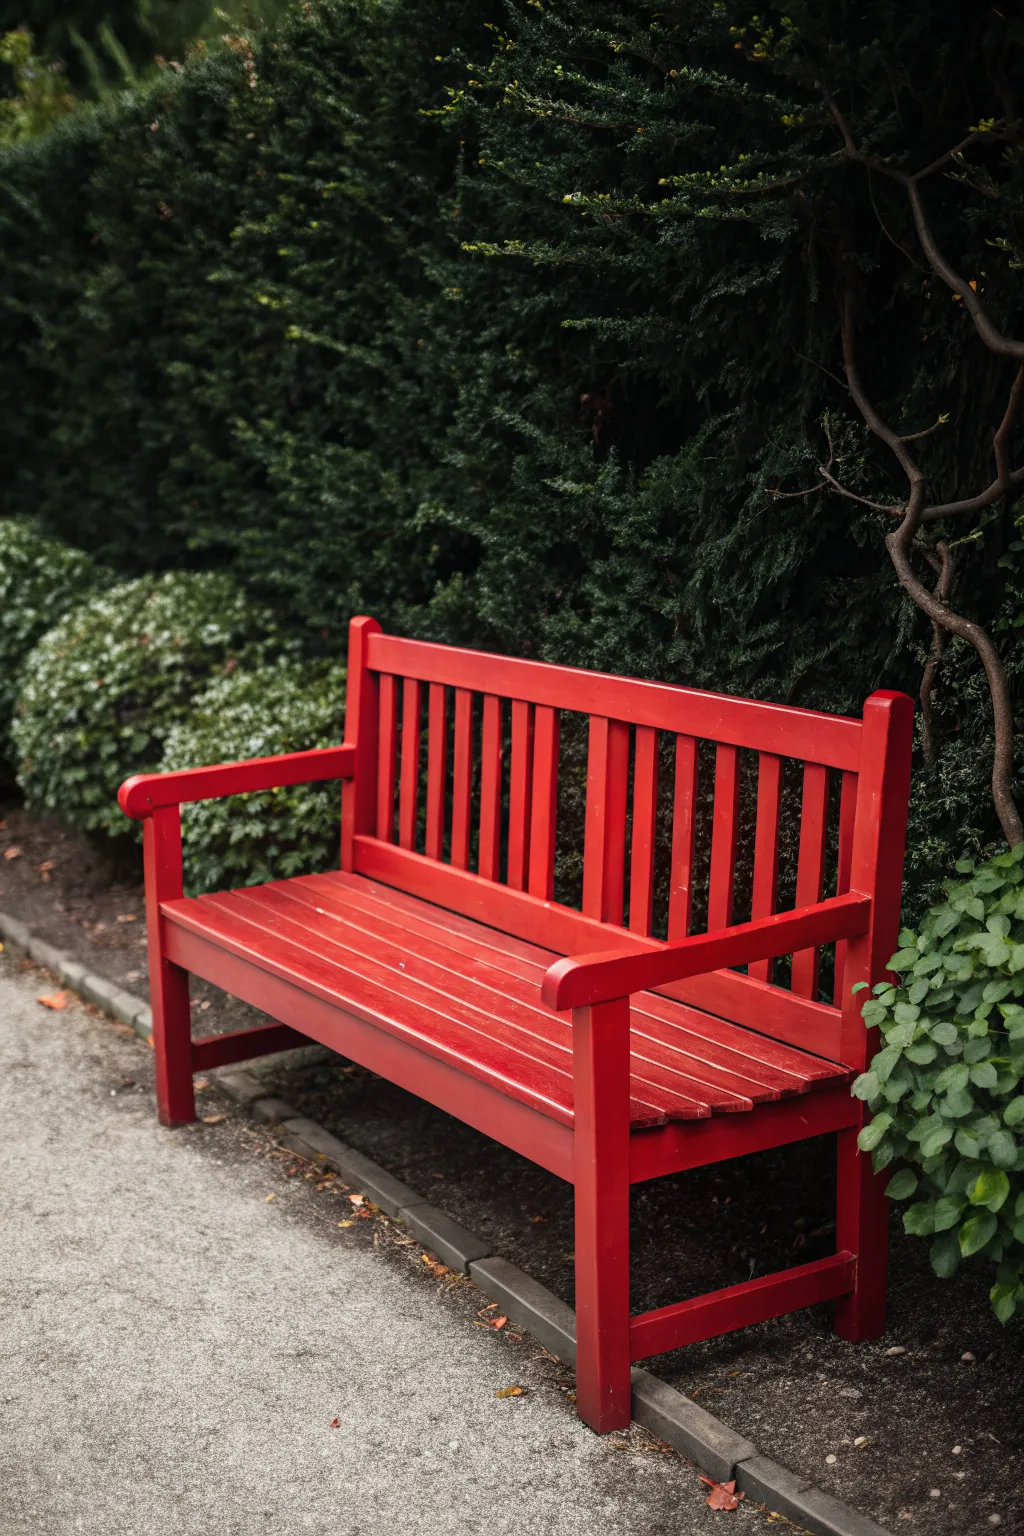
Transform a weathered or plain wooden garden bench into a striking focal point with a coat of vibrant, lipstick-red paint. This project revitalizes classic outdoor furniture, contrasting beautifully against deep green foliage for a year-round pop of color.
Step-by-Step
Materials
- Wooden garden bench (slatted style)
- Exterior wood primer (white or gray)
- Exterior semi-gloss or satin paint (Bright Red/Crimson)
- Sanding block (medium grit)
- Sandpaper (fine grit, 220)
- Tack cloth
- Painter’s tape
- Drop cloths
- 2-inch angled sash brush
- Small detail brush
- Wood filler (outdoor grade)
- Putty knife
- Screwdriver or wrench (for disassembly)
Step 1: Preparation & Repairs
-
Assess and Clean:
Begin by thoroughly cleaning the bench with soapy water and a stiff brush to remove moss, dirt, and loose paint. Let the wood dry completely in the sun for at least 24 hours. -
Tighten Hardware:
Check all bolts and screws. Tighten any that are loose to ensure the structure is stable before you begin painting. -
Fill Imperfections:
Inspect the slats and arms for deep gouges or cracks. Use a putty knife to press outdoor wood filler into these gaps, slightly overfilling them to account for shrinkage. -
Initial Sanding:
Once the filler is dry, sand the entire bench with medium-grit paper. You want to smooth out the filler and scuff up the old finish to help the new paint adhere. -
Dust Removal:
Wipe down every surface with a tack cloth. Even a small amount of sawdust can ruin the smooth finish we are aiming for.
Smooth Operator
Between coats, sand lightly with a generic brown paper bag. It acts like ultra-fine sandpaper, smoothing nibs without removing paint.
Step 2: Priming the Surface
-
Protect the Area:
Lay down drop cloths underneath the bench. If the bench is heavy, I usually slide cardboard under the legs to catch drips without having to lift the whole piece. -
Apply Primer to Slats:
Using your 2-inch brush, apply a coat of exterior wood primer. Start with the underside and the tricky spaces between the slats first. -
Prime Large Surfaces:
Move on to the seat, backrest, and arms. Apply the primer in long, even strokes following the grain of the wood. -
Dry and Light Sand:
Allow the primer to dry according to the manufacturer’s instructions. Once dry, lightly sand with fine 220-grit paper to knock down any raised grain, then wipe with a tack cloth.
Sticky Situation
If the bench feels tacky even after drying, the humidity is likely too high. Move it to a climate-controlled garage or space with a fan to help it cure.
Step 3: Painting the Bold Red
-
First Coat – Detail Work:
Stir your bright red exterior paint thoroughly. Use the small detail brush to get paint into the crevices between the vertical back slats and the horizontal seat slats. -
First Coat – Main Areas:
Switch to the angled sash brush. Apply the red paint to the long slats, working quickly to maintain a wet edge. Brush from one end of a slat to the other to avoid lap marks. -
Check for Drips:
Keep a close eye on the vertical slats and corners where paint tends to pool. Smooth out any runs immediately with the tip of your brush. -
Drying Time:
Let this first coat dry completely. Red pigment can be translucent, so don’t worry if the primer still shows through slightly at this stage. -
Second Coat Application:
Apply a second, full coat of red paint. This layer will provide the true depth of color and the solid coverage needed for that professional look. -
Legs and Feet:
Finish by painting the legs, working your way down to the feet. Lift each leg slightly to paint the very bottom, creating a seal against ground moisture. -
Final Cure:
Allow the bench to cure for several days before sitting on it or placing cushions, as the paint needs to harden fully to prevent tackiness.
Now step back and admire how this vibrant red addition completely transforms the energy of your garden space
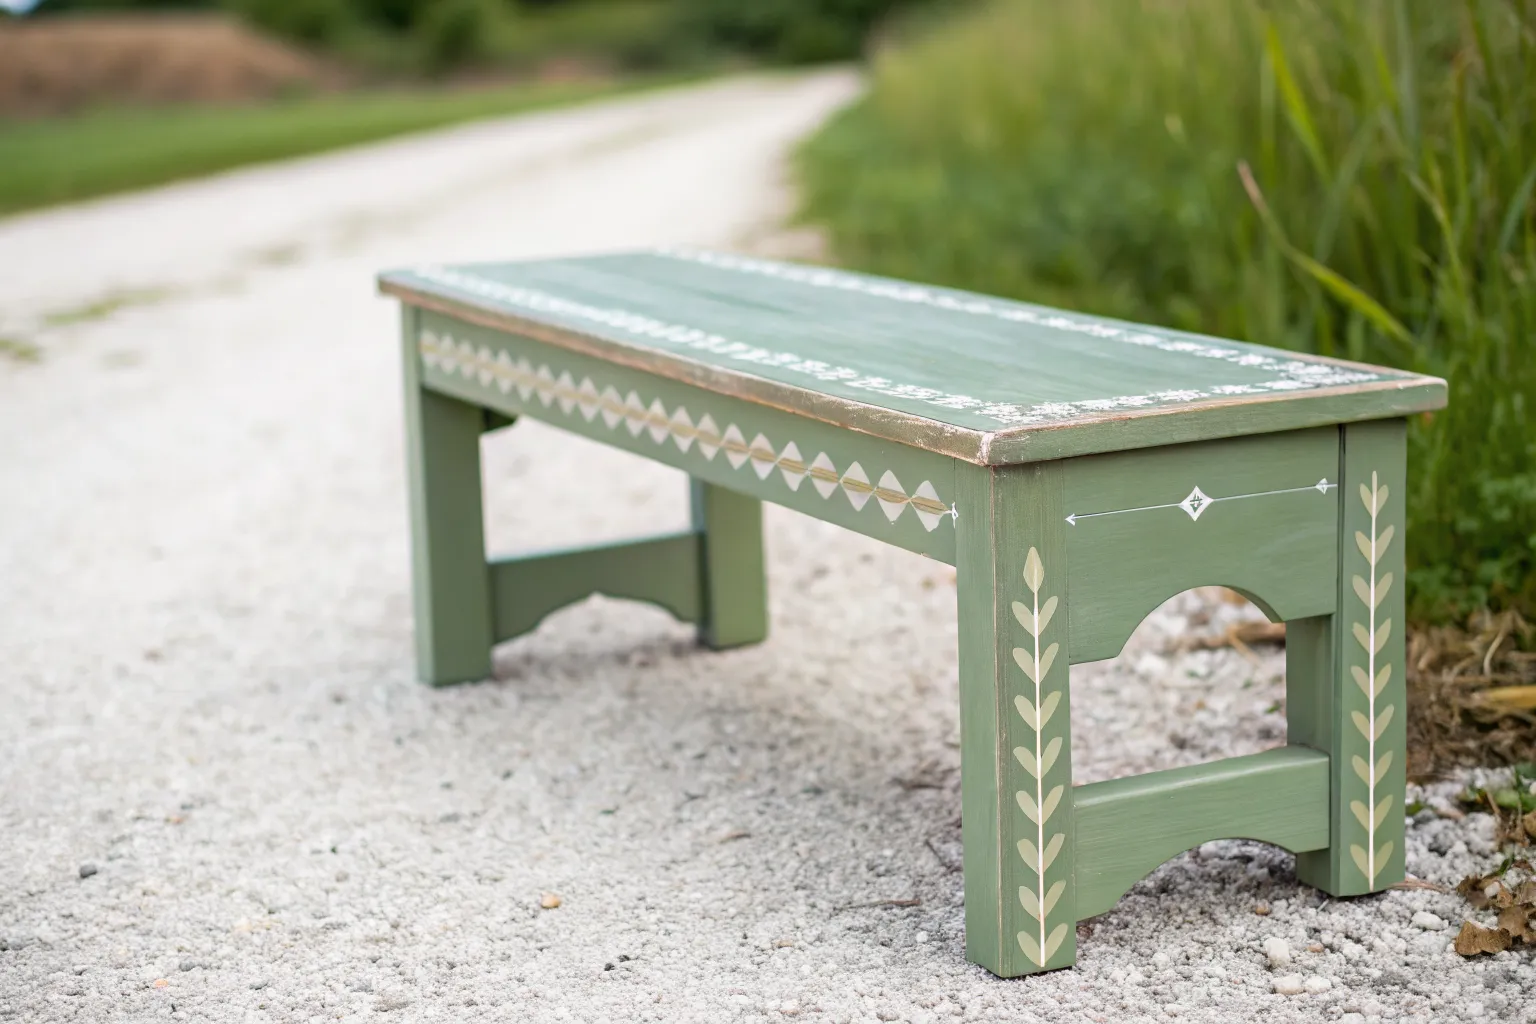
Deep Forest Green Blend-In

Transform a weathered or plain wooden bench into a seamless part of your garden landscape with this rich, monochromatic makeover. The deep hunter green hue allows the structure to recede visually, highlighting the lushness of surrounding ferns and foliage.
Step-by-Step Guide
Materials
- Wooden garden bench (slat-back style preferred)
- Exterior wood filler
- Medium-grit sandpaper (120-grit)
- Fine-grit sandpaper (220-grit)
- Clean rags or tack cloth
- Mild detergent and bucket
- Exterior primer (tintable if possible)
- Exterior satin or semi-gloss paint in Deep Hunter Green
- 2-inch synthetic angled sash brush
- 4-inch foam roller and tray
- Drop cloth or tarp
- Painter’s tape (optional)
Step 1: Preparation
-
Clean and Degrease:
Begin by thoroughly washing the bench with mild detergent and water to remove dirt, mold, or algae. Scrub well between the slats where debris tends to accumulate. -
Assess and Fill:
Once the wood is completely dry, inspect it for cracks or deep gouges. Apply exterior wood filler to these imperfections, smoothing it out with a putty knife. -
Broad Sanding:
Use 120-grit sandpaper to sand the entire bench. Focus on removing any loose, flaking old paint or rough patches to ensure a good mechanical bond for the new finish. -
Smoothing the Grain:
Switch to 220-grit sandpaper for a final pass. This smoothes the grain and creates a professional surface feel. -
Dust Removal:
Wipe down every survace with a damp rag or tack cloth. Even a small amount of sawdust can ruin the finish of your deep green paint.
Step 2: Priming
-
Select the Right Primer:
Choose a high-quality exterior primer. Since we are using a dark green topcoat, I like to have the hardware store tint the primer gray to help with coverage. -
Prime the Underside:
Flip the bench over or on its side. Apply primer to the legs and undersides of the slats first. These areas are often neglected but are crucial for moisture protection. -
Prime Top Surfaces:
Set the bench upright and prime the remaining visible surfaces. Use the brush to get into the crevices between the backrest slats. -
Check for Drips:
While the primer is wet, smooth out any drips, especially around the vertical slats of the backrest. -
Light Sanding:
Once the primer is fully dry, lightly scuff the surface with 220-grit sandpaper to knock down any raised grain or brush marks.
Tint Tip
Ask for a grey-tinted primer rather than white. It makes covering with dark forest green much easier and requires fewer top coats to get a rich color.
Step 3: Painting
-
Detailed Brushwork:
Dip your angled sash brush into the Deep Hunter Green paint. Start by painting the difficult areas: the gaps between the back slats and the joints where the arms meet the back. -
Painting the Slats:
Use the brush to paint the vertical slats of the backrest. Use long, vertical strokes to match the grain of the wood. -
Rolling the Seat:
For the flat seat slats, a foam roller works beautifully to apply an even coat without brush marks. Roll across the length of the slats. -
Finishing the Legs and Arms:
Brush the paint onto the legs and armrests. The armrests are high-touch areas, so ensure the coat is smooth and substantial. -
First Coat Dry Time:
Allow the first coat to dry according to the manufacturer’s instructions, usually 4-6 hours. Do not rush this, as tackiness will ruin the second coat. -
Apply Second Coat:
Repeat the painting process for a second coat. The deep green color will truly richness and depth with this layer, covering any streaky primer showing through. -
Final Inspection:
Look closely at the bench from different angles to spot missed spots or runs. Use the brush to feather out any imperfections while the paint is still workable. -
Curing:
Let the bench cure for at least 24-48 hours before placing it back in the garden or sitting on it to prevent the paint from staying sticky.
Botanical Touch
Before the final clear coat dries, lay a real fern leaf on the armrest and spray over it lightly with a lighter green for a subtle botanical silhouette.
Enjoy your renewed garden bench as it settles perfectly into its verdant surroundings


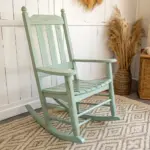
Soft Sage Cottage Look
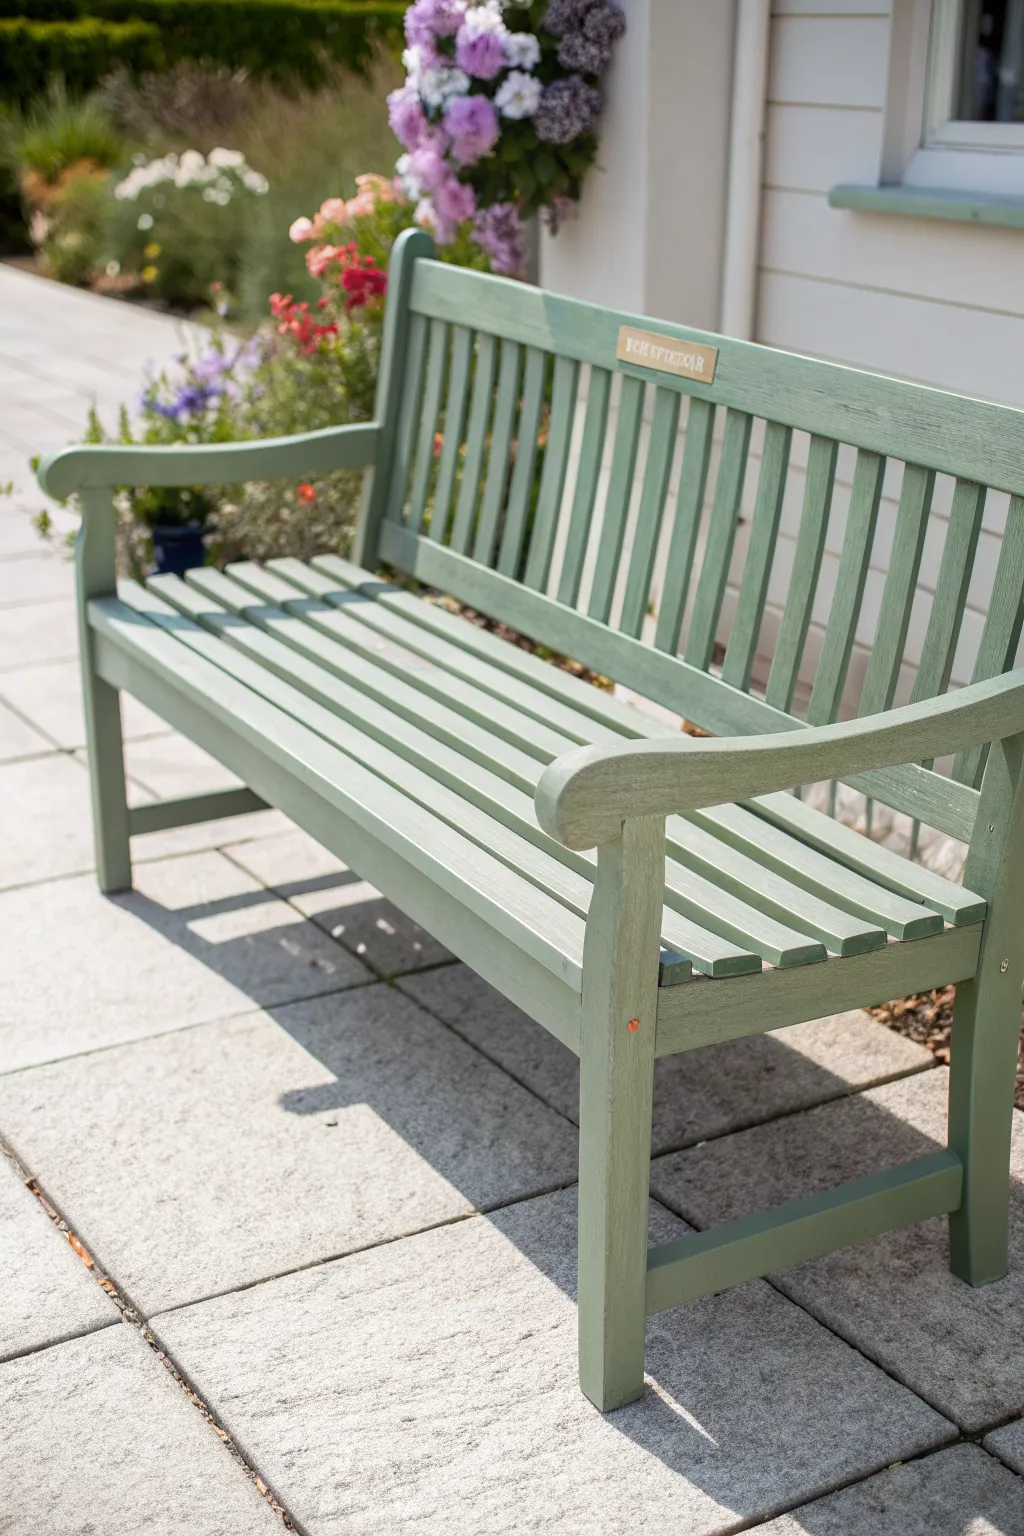
Transform a tired garden seat into a welcoming retreat with this soft sage green finish that perfectly complements natural stonework and blooming flowerbeds. This subtle, earthy tone brings a classic English cottage feel to your outdoor space without overwhelming the landscape.
Step-by-Step
Materials
- Wooden garden bench (cleaned)
- Medium-grit sandpaper (120-grit)
- Fine-grit sandpaper (220-grit)
- Tack cloth
- Exterior wood primer
- Exterior satin or eggshell paint in Sage Green (e.g., Farrow & Ball ‘Lichen’ or similar)
- 2-inch synthetic bristle sash brush
- 1-inch angled sash brush for tight spots
- Drop cloths
- Painter’s tape
- Small brass plaque (optional personalization)
- Screwdriver
Step 1: Preparation and Priming
-
Assess the surface:
Begin by inspecting your bench for any rough spots, splinters, or peeling old paint. If the wood is previously painted and flaking, you will need to scrape the loose paint away first. -
Clean thoroughly:
Wash the entire bench with soapy water to remove dirt, mildew, and grease. Let the wood dry completely in the sun before moving on to sanding. -
Sand for adhesion:
Using the 120-grit sandpaper, sand all surfaces of the bench. You aren’t trying to remove all previous finishes, just scuffing the surface to give the new paint ‘teeth’ to grip onto. -
Smooth the touch points:
Switch to the finer 220-grit sandpaper for the armrests and the front edge of the seat slats. These are the areas skin will touch most often, so I like to make sure they are extra smooth. -
Remove dust:
Wipe down the entire piece with a tack cloth. Any remaining dust will create bumps in your final finish, so be thorough here. -
Protect hardware:
If your bench has metal bolts or a plaque you want to keep paint-free, cover them carefully with painter’s tape. -
Apply primer:
Apply a coat of high-quality exterior wood primer. Use the 2-inch brush for the slats and legs, ensuring you get into the grain. Let this dry according to the manufacturer’s instructions.
Drip Patrol
Paint accumulates heavily between slats. Keep a dry brush handy to ‘wick’ away excess paint from tight corners 10 minutes after application to prevent sticky drips.
Step 2: Painting the Sage Finish
-
Start from the bottom:
Flip the bench upside down or on its side to paint the underneath of the slats and the inside of the legs first. This ensures no bare wood is visible from low angles. -
Paint the slats:
Flip the bench upright. Using long, even strokes, paint the seat slats. Work on two or three slats at a time to maintain a wet edge and avoid lap marks. -
Tackle the details:
Switch to the 1-inch angled brush to get into the tricky gaps between the backrest slats and where the arms join the frame. Drips love to hide here, so check back often. -
Coat the backrest:
Paint the vertical slats of the backrest. Brush from the top rail down to the seat to keep the paint flow natural. -
Finish the arms and legs:
Paint the armrests and front legs last. These are the most visible parts, so use long, confident strokes to get a smooth finish. -
Dry and sand lightly:
Allow the first coat to dry fully (usually 4-6 hours). Once dry, very lightly run fine sandpaper over the surface to knock down any raised grain, then wipe clean. -
Apply second coat:
Apply a second coat of sage green paint following the same order. This coat will provide the true depth of color and weather protection. -
Re-check for drips:
While the second coat is still wet, do a final inspection of the underside of the rails and corners for any paint accumulation and smooth it out. -
Adding the plaque:
If you are adding a personalized touch like in the image, center your brass plaque on the top back rail. Mark the holes with a pencil. -
Install hardware:
Once the paint has cured for at least 24 hours, screw the brass plaque into place to complete the memorial or decorative look.
Botanical Touch
For a true cottage vibe, gently distress the edges of the armrests with sandpaper after the final coat dries to reveal a hint of wood, then seal with clear exterior wax.
Place your newly refreshed bench near some pastel hydrangeas or lavender to complete the idyllic garden scene
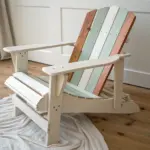
Dusty Pastel Mix
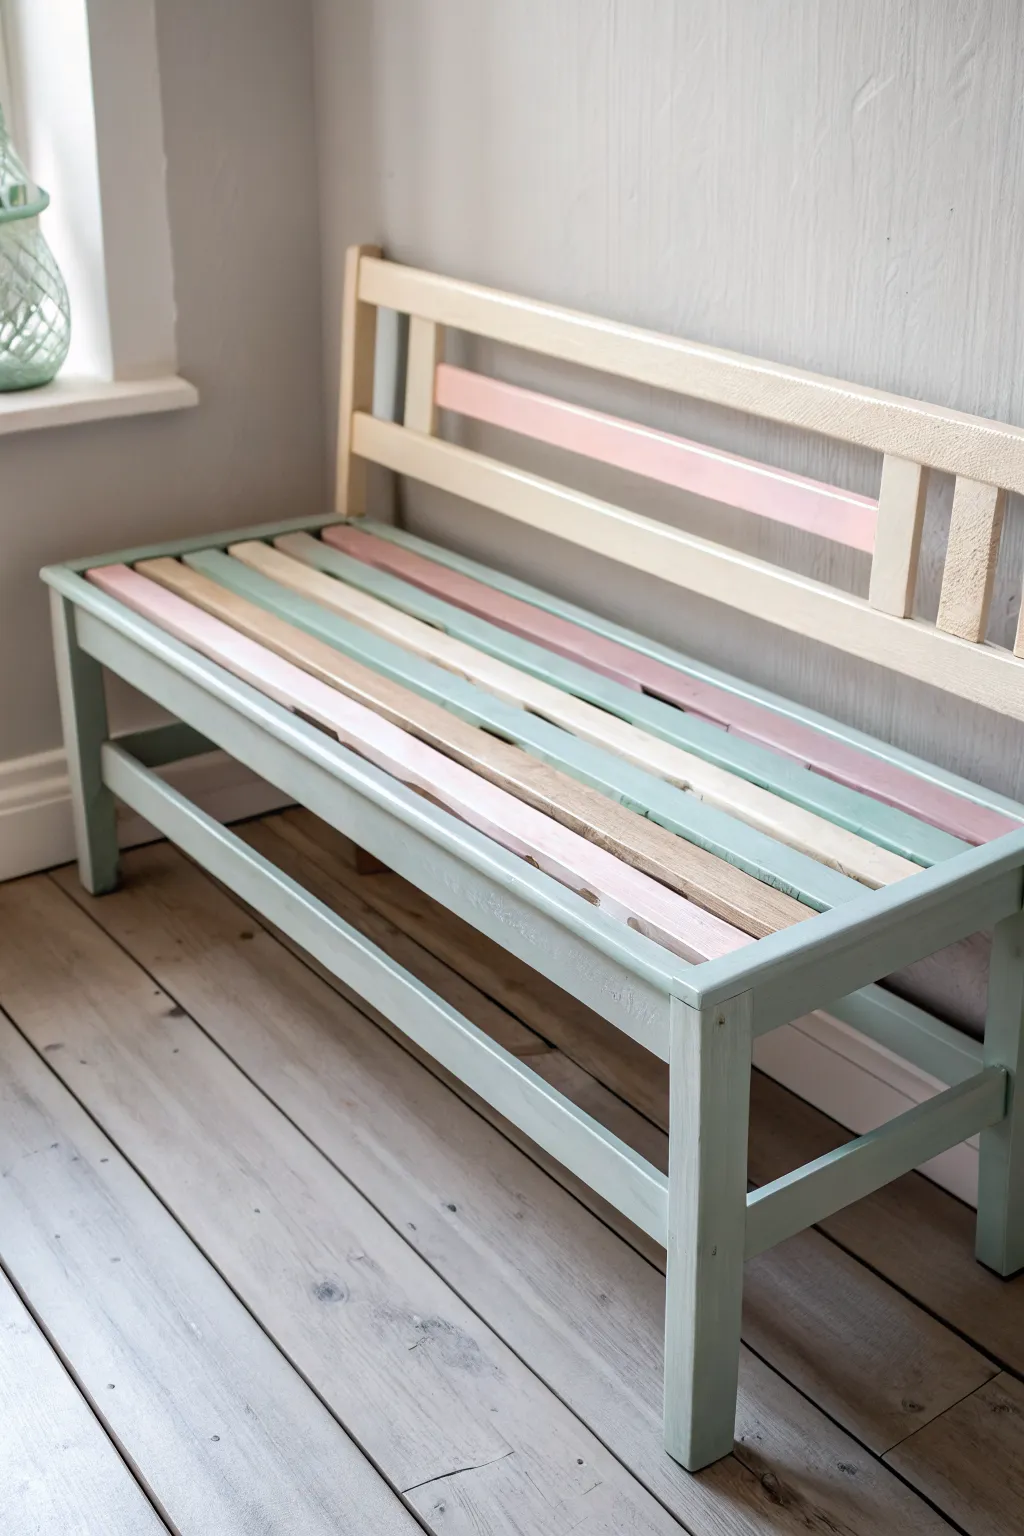
Give an old wooden bench a soft, confectionery-inspired makeover by mixing muted shades of mint, cream, and blush pink. This project combines full coverage painting with striped accents to create a charming, airy piece of furniture perfect for an entryway or sunroom.
Step-by-Step Tutorial
Materials
- Wooden slat bench (vintage or unfinished pine)
- Sandpaper (80, 120, and 220 grit)
- Clean tack cloths
- Primer (stain-blocking)
- Chalk or mineral paint (Dusty Mint)
- Chalk or mineral paint (Cream/Off-White)
- Chalk or mineral paint (Pale Blush Pink)
- Painter’s tape
- Small angled sash brush (1.5 inch)
- Medium flat synthetic brush (2 inch)
- Matte clear wax or polyurethane topcoat
- Lint-free rags
Step 1: Preparation & Sanding
-
Assess the surface:
Begin by inspecting your bench for any loose screws or wobbles. Tighten hardware now, because the painting process will seal some joints. -
Heavy sanding:
Using 80-grit sandpaper, remove the existing finish from the entire bench. You want to get down to raw wood, especially on the slats where the paint needs to adhere well. -
Smooth the grain:
Switch to 120-grit sandpaper to smooth out the scratches from the coarse paper. Follow up with 220-grit for a furniture-grade smooth finish. -
Clean thoroughly:
Vacuum up the bulk of the sawdust from the corners and slat gaps. Wipe everything down firmly with a tack cloth to ensure zero dust remains. -
Prime the frame:
Apply a coat of stain-blocking primer to the main frame legs and supports. I usually skip priming the top slats if I want the grain to show slightly, but prime the structural parts for solid coverage.
Clean Lines Hack
Slide a playing card or stiff index card between slats while painting. It acts as a movable shield to prevent the brush from accidentally staining the neighboring color.
Step 2: Painting the Base
-
Paint the main frame:
Using your medium flat brush, apply the Dusty Mint paint to the legs, lower cross-bracing, and the outer rim of the seat frame. Use long, smooth strokes. -
Get into the corners:
Switch to the smaller angled sash brush to push paint into the tricky joinery where the legs meet the seat. Watch for drips pooling in these corners. -
Second coat:
Once the first coat is dry (usually 1-2 hours for chalk paint), apply a second coat of mint to the frame for opaque, solid coverage.
Step 3: Painting the Slats
-
Plan your pattern:
Decide on your rhythm. This bench uses a random-looking but balanced mix: raw wood, pink, cream, mint, raw wood. Mark the ends of the slats lightly with pencil codes (P, C, M, W) so you don’t lose track. -
Isolate slats:
If your slats are close together, slide pieces of cardstock between them or use painter’s tape on the frame edges to keep your localized colors clean. -
Apply the Cream:
Paint the designated cream slats. Don’t forget the vertical backrest slat—the top rail is cream, so painting the vertical support cream ties it together. -
Apply the Pink:
Paint the selected seat slats and the middle horizontal backrest bar in Pale Blush Pink. Two thin coats are better than one thick one to avoid gummy edges. -
Apply the Mint accents:
Paint the few remaining designated seat slats in the same Dusty Mint used on the frame to integrate the seat with the base. -
Top rail detail:
Paint the very top horizontal backrest rail in Cream. This creates a nice ‘cap’ on the design and lightens the overall visual weight.
Ombré Variation
Instead of alternating colors randomly, arrange the slat colors in a gradient from dark mint on the left to pale pink on the right for a modern fade effect.
Step 4: Finishing Touches
-
Sand for distress (optional):
For a smoother feel and a slightly aged look, run a piece of 220-grit sandpaper very lightly over the painted slats once they are fully dry. -
Seal the wood:
For the slats you left raw/natural, apply a clear matte wax immediately to protect them from stains while keeping that pale, untreated look. -
Seal the paint:
Apply a clear matte wax or poly topcoat over the entire bench. Since people sit here, a polyurethane is more durable, but wax feels nicer. -
Buff to shine:
If you used wax, let it cure for 24 hours and then buff it vigorously with a clean lint-free rag to create a soft, satin sheen.
Place your newly refreshed bench in a sunny spot and enjoy the soft pop of color it brings to your space
Ombre Fade Across the Seat
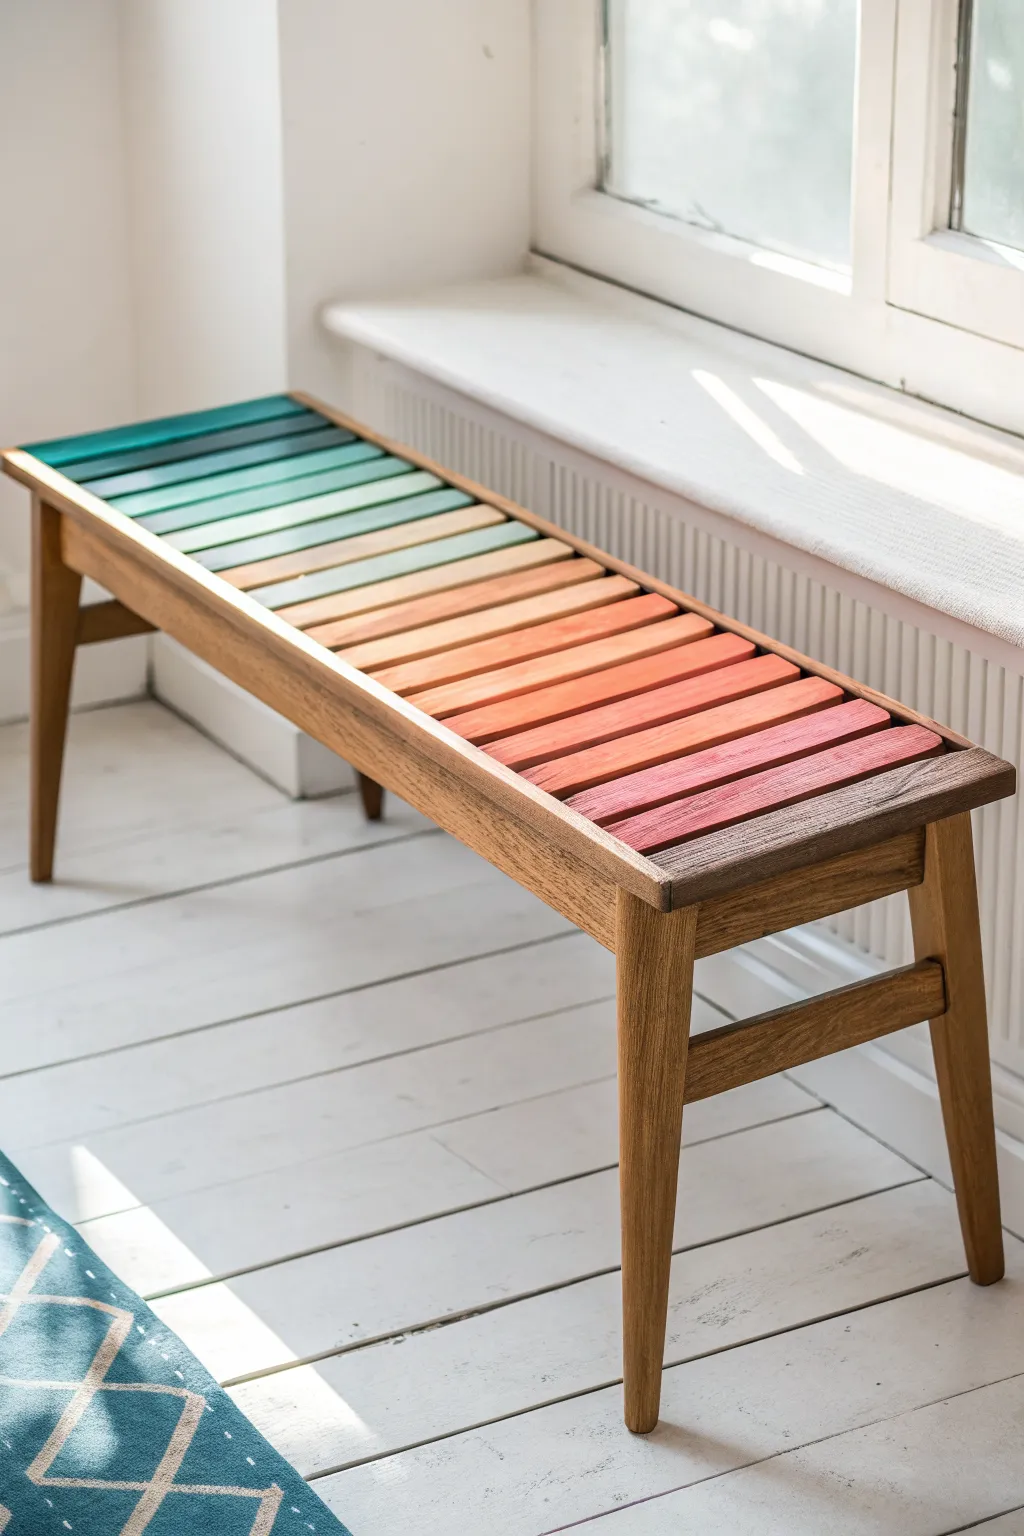
Transform a simple slatted bench into a functional piece of art by creating a smooth, sunset-inspired color transition across the seat. This ombre effect moves from cool teal to warm coral and deep mauve, adding a vibrant focal point to any entryway or window nook.
How-To Guide
Materials
- Wooden slatted bench (unfinished or sanded down)
- Sandpaper (120 and 220 grit)
- Painter’s tape
- Acrylic or chalk paints (Teal, mint, cream, peach, coral, mauve, dark brown)
- Small mixing cups or palette
- Flat synthetic paintbrushes (1-inch width)
- Clear matte or satin polyurethane topcoat
- Clean rags
- Drop cloth
Step 1: Preparation
-
Assess the surface:
Begin by inspecting your bench. If it has an existing finish, you will need to sand the slats down to raw wood using 120-grit sandpaper to ensure the paint adheres properly. -
Smooth it out:
Follow up with 220-grit sandpaper over the tops and sides of each slat to create a buttery smooth surface ready for the paint. -
Clean the dust:
Wipe down the entire bench with a tack cloth or a slightly damp rag to remove all sanding dust. Let it dry completely. -
Protect the frame:
Carefully apply painter’s tape along the interior edges of the bench frame where the slats meet the wood. This protects the legs and side rails from accidental paint swipes.
Smooth Transitions
For a ‘watered down’ translucent look that shows grain, dilute your acrylics with water (1:1 ratio) to create a colored stain instead of opaque paint.
Step 2: Color Planning & Mixing
-
Map your gradient:
Count the number of slats on your bench. Lay out your paint tubes in the order of the spectrum: dark teal, light teal, mint, cream, peach, coral, pink, mauve, and chocolate brown. -
Mix mid-tones:
To get a seamless transition, you’ll need custom shades for the ‘in-between’ slats. In small cups, mix adjacent colors together (e.g., mix teal with mint for the second slat) until you have a distinct color mix for every single slat. -
Test the swatches:
Paint a tiny swatch of each mixed color on a piece of scrap wood or paper and lay them next to the bench to verify the flow. I prefer to adjust the shades here before committing them to the furniture.
Step 3: Painting the Gradient
-
Start with the cool end:
Load your brush with the deepest teal shade and paint the first slat on the far left. Use long, even strokes with the grain of the wood. -
Paint the sides:
Don’t forget to push the brush gently into the gaps to coat the sides of the slat. You want the color to look solid from all angles. -
Progress color by color:
Move to the next slat with your teal-mint mix. Continue working slat by slat across the bench, rinsing your brush thoroughly between dramatic color shifts or using separate brushes for cool versus warm tones. -
Transition to neutrals:
As you reach the middle slats, apply the cream and light peach tones. These lighter colors may require a second thin coat to ensure full opacity over the wood grain. -
Apply the warm tones:
Continue painting the coral, pink, and mauve shades as you move right. Ensure the transition feels gradual; if a jump looks too harsh, soften the current color with a drop of the previous color. -
Finish with the anchor color:
Paint the final slat on the far right with the darkest brown-mauve mixture to ground the design. -
Dry and inspect:
Allow the paint to dry for at least 2-4 hours. Check for any thin spots or missed edges and touch them up with a small detail brush.
Add Texture
Before the final sealer, lightly dry-brush a metallic gold or copper over just the middle three slats to catch the light.
Step 4: Sealing and Finishing
-
Remove the tape:
Carefully peel away the painter’s tape while the paint is fully dry but before sealing, to ensure sharp lines. -
Apply the first topcoat:
Brush on a thin layer of clear matte or satin polyurethane over the painted slats. Work carefully to avoid dragging wet sealer from a dark slat onto a light one. -
Final sand:
Once dry, very lightly scuff the surface with high-grit sandpaper (400 grit) to knock down any raised grain or brush marks. -
Final seal:
Apply a second coat of polyurethane for durability. Let the bench cure for 24-48 hours before sitting on it or placing objects on top.
Place your bench in the sunlight and enjoy the beautiful spectrum of colors you have created.
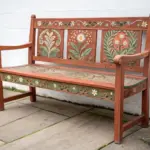
Hand-Painted Floral Bench Art
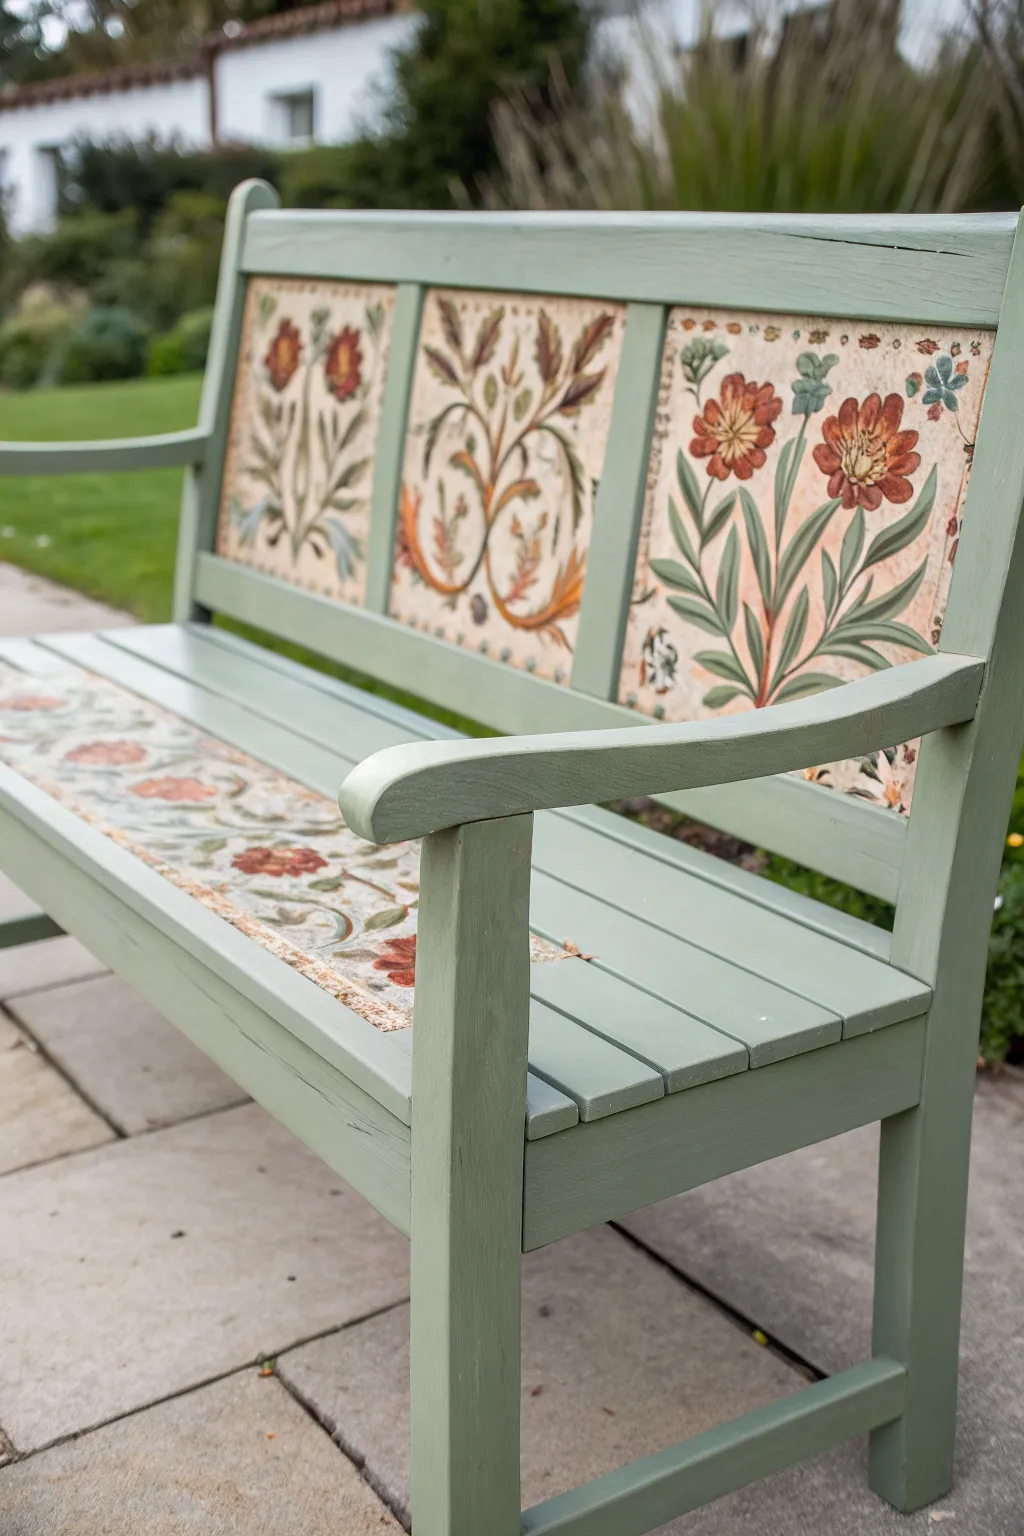
Transform a plain wooden bench into an heirloom-quality piece featuring intricate floral panels and a soft sage finish. This project combines decoupage or stenciling techniques with painting to achieve a look that feels both rustic and refined.
Detailed Instructions
Materials
- Wooden garden bench (unfinished or sanded)
- Sage green exterior wood paint (satin or semi-gloss)
- Botanical art prints, heavy decoupage paper, or custom stencils
- Decoupage medium (exterior grade like Mod Podge Outdoor)
- White or cream acrylic paint (for panel background)
- Sandpaper (120 and 220 grit)
- Painter’s tape
- Synthetic bristle brushes (2-inch for body, 1-inch for panels)
- Foam brushes
- Exterior clear varnish or polyurethane (satin finish)
- Rags and tack cloth
- Warm water and mild soap
Step 1: Preparation and Base Coat
-
Clean the surface:
Before doing anything else, scrub the bench thoroughly with warm soapy water to remove dirt, mildew, or old finish. Let it dry completely in the sun. -
Sand for adhesion:
Using 120-grit sandpaper, go over the entire bench to smooth rough spots and scuff the surface. If there’s old glossy paint, ensure it’s dulled down so the new primer sticks. -
Remove dust:
Wipe away all sanding dust with a tacky cloth or a slightly damp rag. A clean surface is crucial for a smooth paint job. -
Paint the main color:
Apply your sage green exterior paint to the legs, arms, and structural framing. I like to leave the backrest panels and the center slats of the seat unpainted at this stage to avoid paint buildup where the art will go. -
Second coat:
Allow the first coat to dry according to the manufacturer’s instructions (usually 2-4 hours). Apply a second coat of sage green for full, opaque coverage.
Step 2: Creating the Art Panels
-
Prime the art areas:
Paint the specific inset panels on the backrest and the designated runner area on the seat with a cream or off-white acrylic paint. This provides a bright background that makes the floral colors pop. -
Smooth the background:
Once the cream paint is dry, lightly sand it with 220-grit paper to create a super smooth surface for your artwork application. -
Prepare your imagery:
If using decoupage paper or prints, cut them to the exact dimensions of your back panels. For the seat, measure a long strip or multiple coordinating motifs. -
Apply base medium:
Brush a generous layer of outdoor decoupage medium onto the cream-painted wood of the first back panel. -
Position the art:
Carefully lay your botanical print onto the wet medium. Start from the center and gently smooth it outward with your fingers or a brayer to push out air bubbles. -
Repeat for all sections:
Continue this process for the remaining back panels and the seat runner. Ensure the orientation of the flowers looks natural and balanced. -
Seal the paper:
Once the paper is adhered and dry to the touch, apply a top coat of decoupage medium over the artwork to seal the fibers.
Wrinkle Rescue
If your decoupage paper bubbles or wrinkles, don’t panic. Prick the bubble with a sewing pin to release the air, then smooth it down with a little extra medium on your finger.
Step 3: Finishing and Sealing
-
Blend the edges:
Use a small artist’s brush and a bit of the sage green paint to carefully touch up the edges where the paper meets the wood frame, concealing any cut lines. -
Create an antique look (optional):
For a vintage vibe, mix a tiny drop of brown paint with water to create a glaze. Lightly brush this over the floral panels and wipe it back immediately with a rag to ‘age’ the bright paper. -
Apply final varnish:
Stir your exterior clear varnish gently to avoid bubbles. Apply a thin, even coat over the entire bench, paying extra attention to the decoupaged areas. -
Build protection:
Allow the varnish to cure fully, then lightly sand with 220-grit paper and apply 2-3 additional coats. This step is vital for protecting the paper art from UV rays and rain. -
Final cure:
Let the bench cure in a dry, dust-free area for at least 48 hours before exposing it to heavy weather or sitting on it.
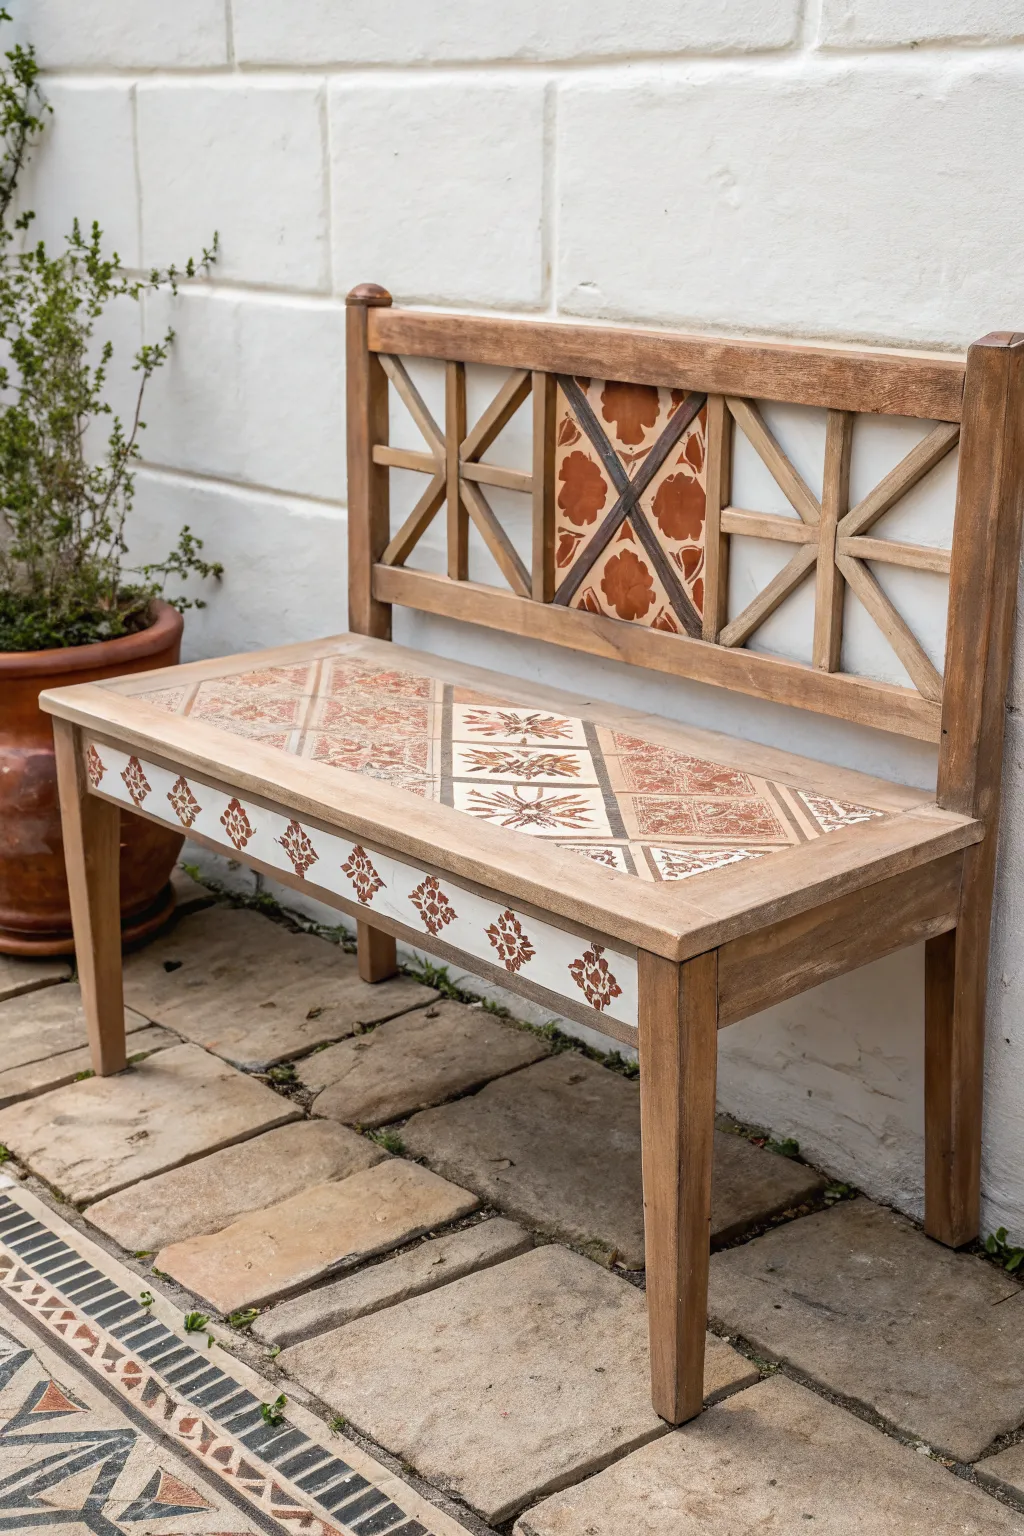
Tile Effect
Instead of paper, use tile stencils on the back panels. Use a dense foam roller with very little paint to create a crisp, hand-painted ceramic look that mimics real tiles.
Now you have a stunning, customized garden seat that invites you to relax among the flowers
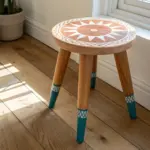
Mosaic-Inspired Color Tiles
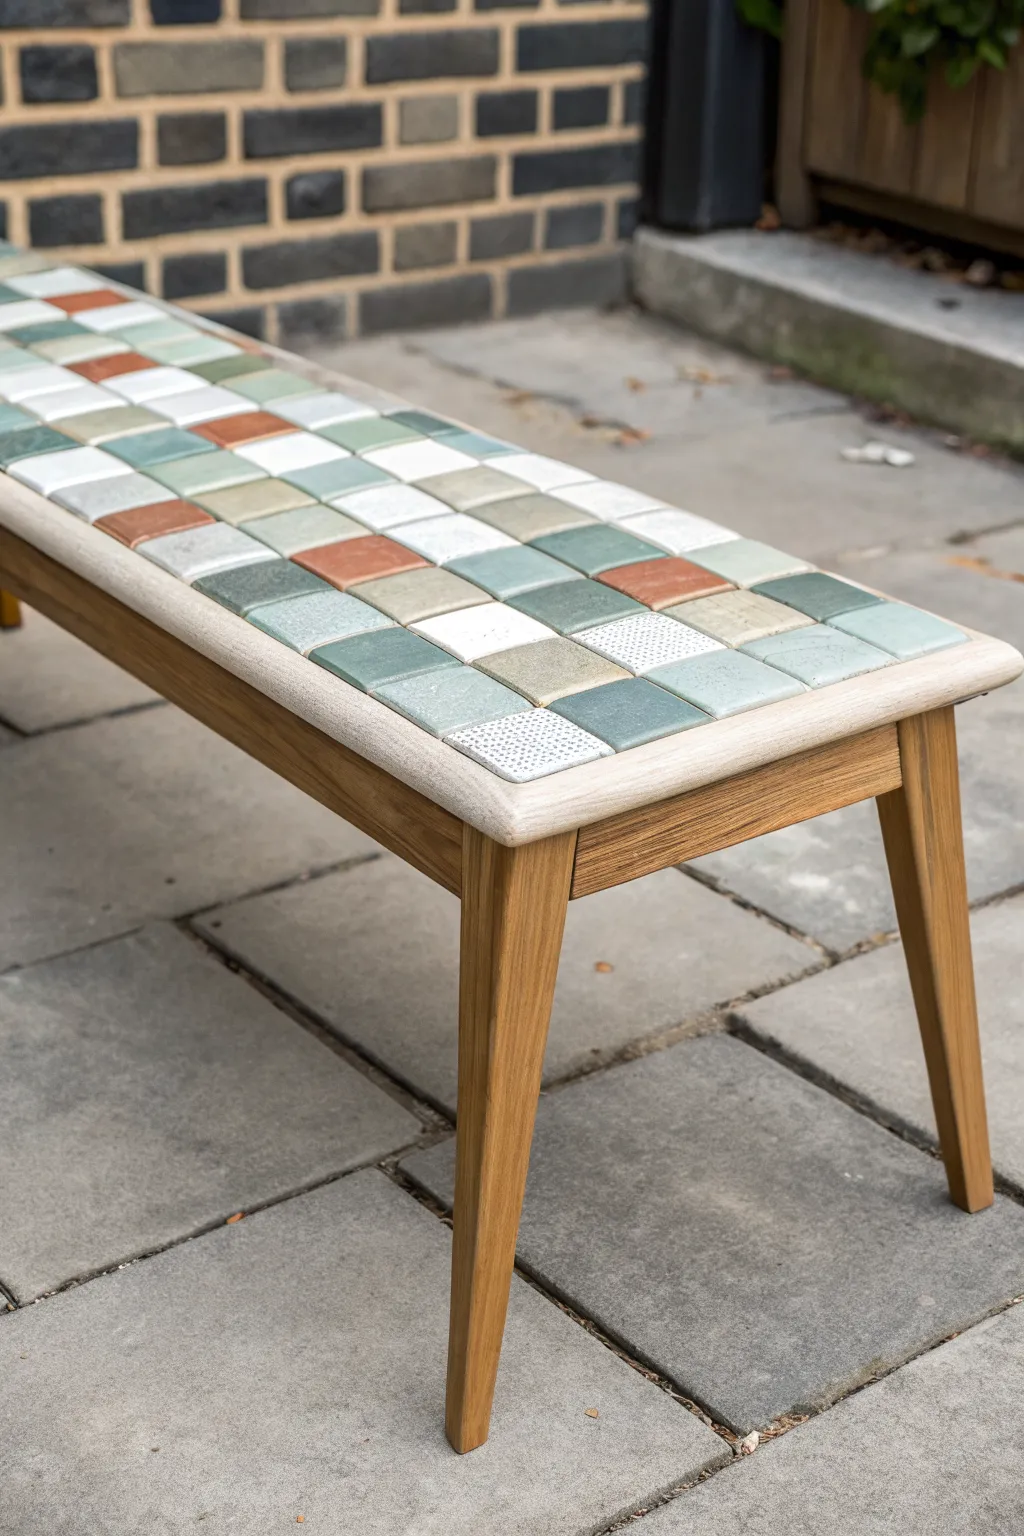
Transform a plain wooden bench into a stunning patio centerpiece using muted, earth-toned square tiles. This project combines mid-century modern furniture lines with the timeless textures of ceramic mosaic for a piece that feels both vintage and fresh.
Step-by-Step
Materials
- Wooden bench frame (mid-century style preferred)
- Square ceramic mosaic tiles (approx. 1×1 inch) in assorted earth tones (sage, terracotta, cream, speckled white)
- Tile adhesive (mastic or thin-set mortar)
- Sanded grout (light grey or off-white)
- Notched trowel (small V-notch)
- Grout float
- Tile nibppers (optional, for edges)
- Sponge and bucket
- Painter’s tape
- Clear polyurethane or outdoor wood sealer
- Sandpaper (120 and 220 grit)
- Clean rags
Step 1: Preparation and Planning
-
Assess the bench surface:
Begin by cleaning your bench thoroughly. If the top surface is recessed (like a tray), you are ready to tile. If it’s flat, you may need to add a small strip of wooden molding around the perimeter to create a lip that holds the tiles in place. -
Sand the frame:
Before any tiling begins, sand the wooden legs and the frame surrounding the tile area. Start with 120 grit to remove old varnish, then smooth it out with 220 grit. -
Plan the layout:
Dry fit your tiles on the bench surface without glue. I like to play around with the pattern here to ensure the colors—sage, terracotta, and cream—are distributed randomly but evenly, avoiding clumps of identical colors. -
Protect the wood:
Apply painter’s tape carefully along the inner edge of the wooden border. This prevents adhesive and grout from staining the visible wood grain later on.
Step 2: Setting the Tiles
-
Spread the adhesive:
Using a small V-notched trowel, spread a layer of tile adhesive onto one section of the bench top. Ideally, work in rows from one end to the other so the glue doesn’t dry out before you place the tiles. -
Place the first row:
Press your first row of tiles firmly into the adhesive against the short edge of the bench. Give them a little wiggle to ensure good contact. -
Continue the pattern:
Work your way down the bench, following your dry-fit design. Use plastic tile spacers if your tiles aren’t mounted on mesh sheets to keep the gap lines distinct and uniform. -
Check for level:
Periodically lay a flat board across the tops of the tiles and press down gently. This ensures all tiles are sitting at the same height, preventing uncomfortable sharp edges. -
Let it cure:
Once all tiles are placed, allow the adhesive to dry completely according to the manufacturer’s instructions, typically 24 to 48 hours.
Uneven Tiles?
If a tile sinks lower than its neighbors, pry it up immediately. Add a small dab of extra adhesive to the back, then press it back in until it sits flush with the surrounding surface.
Step 3: Grouting and Finishing
-
Mix the grout:
Mix your sanded grout with water until it reaches a consistency similar to peanut butter. Let it slake (rest) for about 10 minutes, then mix again briefly. -
Apply the grout:
Scoop the grout onto the surface. Using a grout float held at a 45-degree angle, spread the mixture diagonally across the tiles, forcing it deep into the joints. -
Remove excess grout:
Once the joints are filled, drag the float across the tile surface at a steep 90-degree angle to scrape off the bulk of the excess grout without digging it out of the seams. -
First sponge wipe:
Wait about 20 minutes for the grout to haze over. Dampen a sponge (wring it out very well so it’s not dripping) and gently wipe the tiles in a circular motion to shape the joints. -
Final haze removal:
After another hour or two, use a clean, dry microfiber cloth to buff away the remaining hazy film on the tiles. -
Seal the wood:
Remove the painter’s tape. Apply a clear outdoor sealer or polyurethane to the wooden legs and rim to protect them from moisture and UV rays. -
Seal the grout:
Once the grout has cured for at least 72 hours, apply a penetrating grout sealer to the joints to prevent staining and water absorption.
Make It Glossy
For a ‘wet look’ that deepens the tile colors, use a high-gloss stone enhancer sealer over the entire tiled surface after the grout is fully cured.
Now you have a durable, custom-designed seat ready for your garden or hallway
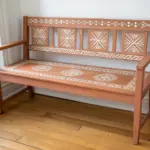
Stenciled Geometric Layers
Transform a plain wooden bench into a Mediterranean masterpiece using clever stenciling and paint techniques. This project mimics the look of aged, hand-painted tiles on both the seat and backrest for a warm, inviting entryway piece.
Step-by-Step Guide
Materials
- Wooden bench (unfinished or sanded)
- Sandpaper (120 and 220 grit)
- Wood stain (medium oak or walnut)
- Clean rag or staining pad
- Chalk paint (cream/off-white)
- Chalk paint (terracotta/rust orange)
- Chalk paint (dark brown)
- Geometric tile stencils (approx. 4-6 inches square)
- Painter’s tape
- Stencil brushes or high-density foam rollers
- Protective topcoat (matte polyurethane)
Step 1: Preparation and Base Treatment
-
Prepare the surface:
Begin by thoroughly sanding the entire bench. If the wood is previously finished, strip it down to raw wood; if it’s new, give it a quick scuff with 220-grit sandpaper to open the grain. -
Clean the wood:
Wipe down the entire piece with a tack cloth or a slightly damp rag to remove every speck of sawdust. This ensures the stain absorbs evenly without blotches. -
Apply the stain:
Using a lint-free rag, apply your medium warmth wood stain to the legs, arms, and the structural frame of the bench back. Leave the seat and the central back panel raw for now. -
Wipe off excess stain:
Let the stain sit for about 5-10 minutes, then wipe away any unabsorbed liquid. Allow this to dry completely according to the manufacturer’s instructions, usually overnight.
Step 2: Creating the Tiled Effect
-
Base coat the ’tiles’:
On the seat planks and the central square panel of the backrest, apply a solid coat of cream or off-white chalk paint. This serves as the ‘grout’ and background color. -
Paint the front apron:
Don’t forget the front-facing apron under the seat—paint this strip cream as well to create a cohesive border for the detailed work. -
Sand for distress:
Once the cream paint is dry, lightly sand the edges and corners with 220-grit sandpaper to let some wood peek through. I find this helps the ‘painted tile’ look feel more authentic and less like a sticker. -
Plan your grid:
Using a ruler and light pencil marks, divide the seat area into a grid that matches the size of your geometric stencil. If your bench has individual slats, use the slat width as your guide. -
Tape off sections:
Secure your first stencil in the center of the seat using painter’s tape. It’s best to start in the middle and work outward to ensure the pattern looks symmetrical. -
Apply the first color:
Load a stencil brush with the terracotta paint and offload most of it onto a paper towel until the brush is almost dry. Stipple the paint over the stencil using a vertical, pouncing motion. -
Detail the backrest:
Repeat the stenciling process on the central panel of the backrest. You can rotate the stencil 45 degrees here to create a diamond orientation for visual interest. -
Create the alternating pattern:
Move your stencil to adjacent squares to create a checkerboard or alternating pattern. Use the dark brown paint for varied geometric details if your stencil has multiple layers.
Pro Tip: Bleed Prevention
Before applying your terracotta paint, do a quick, light pass over the stencil with your cream base color. This seals the stencil edges and prevents color bleeding.
Step 3: Finishing Details
-
Stencil the apron:
On the front white strip (the apron), stencil small, repetitive floral or diamond motifs using the terracotta paint. Space them out by about 3-4 inches. -
Connect the design:
If your stencil leaves gaps between the ’tiles’ on the seat, use a thin artist’s brush and dark brown paint to hand-paint thin lines connecting them. This mimics the look of separating grout lines. -
Final distressing:
Once all stencil work is completely dry, take fine-grit sandpaper and lightly purposefully scuff the painted designs. Focus on the center of the ’tiles’ to simulate foot traffic wear. -
Dust off:
Wipe away the sanding dust carefully with a dry brush or vacuum attachment. -
Seal the project:
Apply a coat of matte polyurethane over the entire bench. The matte finish preserves the rustic, old-world aesthetic while protecting your work from moisture. -
Second coat for durability:
After the first coat dries, apply a second coat of sealer specifically to the seat area, as this will see the most wear and tear.
Level Up: Mix Your Patterns
Instead of identical tiles, buy a stencil pack with 3-4 coordinating designs. Alternate them randomly across the seat for a collected, eclectic hacienda vibe.
Place your newly finished bench in a sunny spot and enjoy the warmth it brings to your space
Metallic Accents on Details
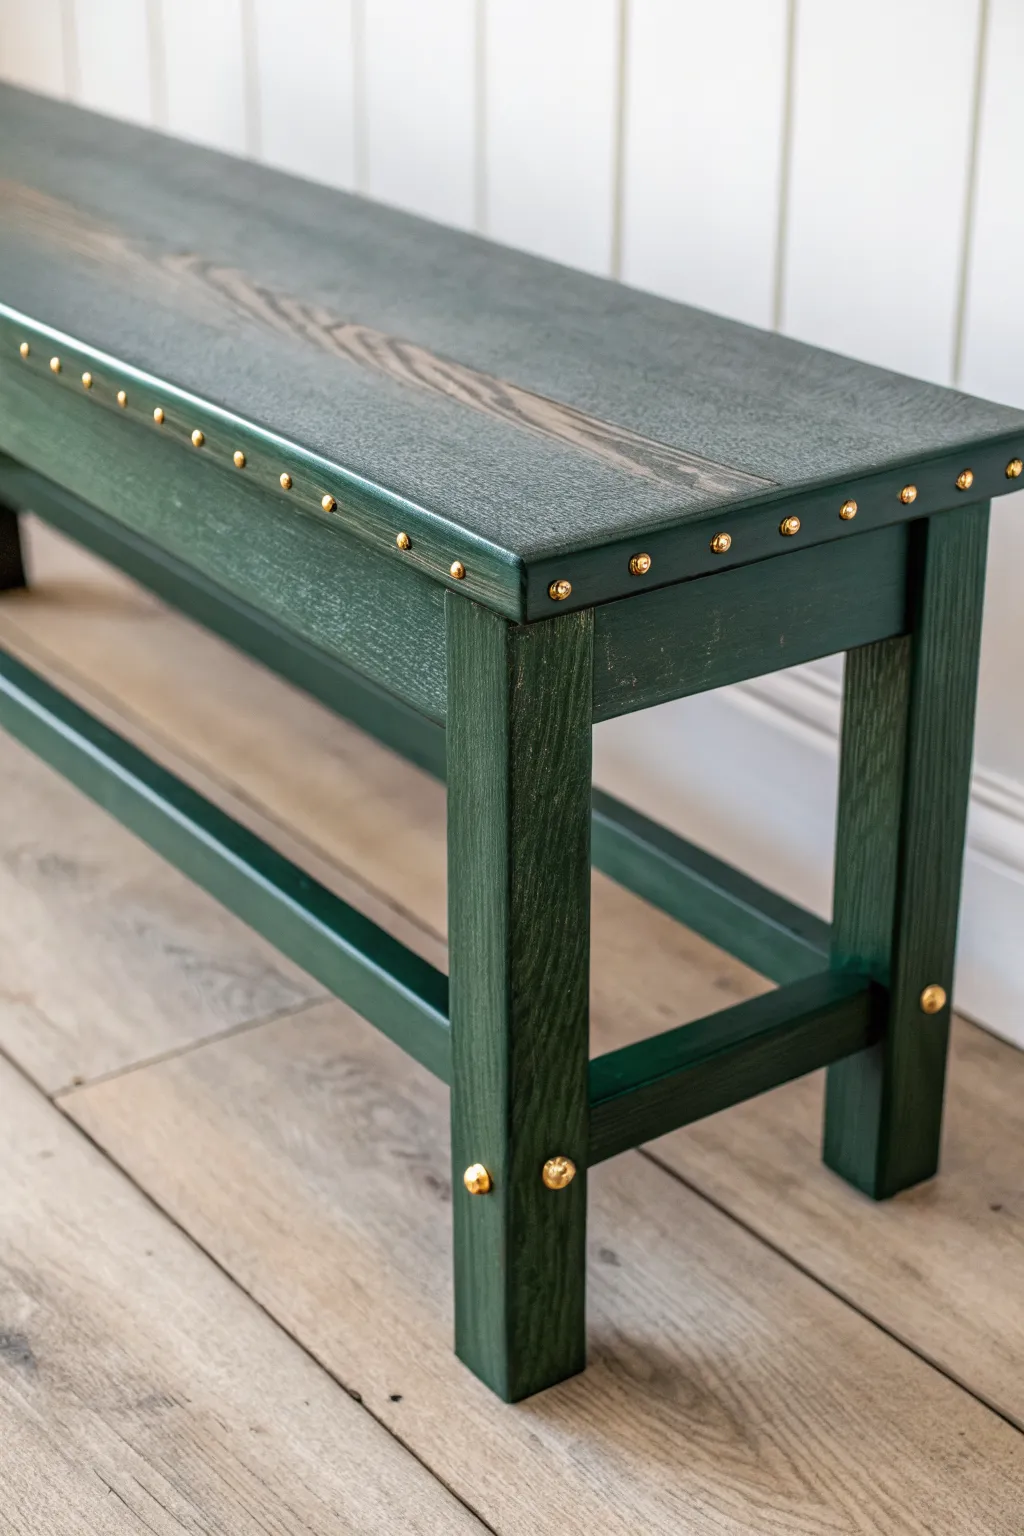
Transform a plain wooden bench into a sophisticated statement piece with a rich forest green stain and gleaming metallic details. The translucent finish allows the natural wood grain to shine through, creating a beautiful contrast against the bold brass accents.
Step-by-Step
Materials
- Unfinished wooden bench (pine or oak work well)
- Forest green wood stain or semi-transparent paint
- Water-based polyurethane sealant (matte or satin)
- Brass decorative upholstery tacks (approx. 1/2 inch diameter)
- Large brass upholstery tacks or carriage bolts (for legs)
- Sandpaper (120 and 220 grit)
- Tack cloth
- Foam brushes or staining pad
- Clean cotton rags
- Rubber mallet
- Tape measure or ruler
- Pency
- Painter’s tape or a spacing guide
Step 1: Preparation & Staining
-
Sand the surface:
Begin by sanding the entire bench with 120-grit sandpaper to remove any rough spots or previous finish. Follow up with 220-grit specifically on the top seat and legs for an ultra-smooth base. -
Clean the wood:
Wipe down the entire piece with a tack cloth to remove every speck of dust. This is crucial because any leftover sawdust will clump in your stain and ruin the smooth finish. -
Test the color:
Before committing to the main piece, test your forest green stain on the underside of the bench. If the color is too opaque, dilute it slightly with water (if water-based) or mineral spirits (if oil-based). -
Apply the first coat:
Using a staining pad or foam brush, apply the green stain in long, even strokes following the direction of the wood grain. Work in manageable sections regarding the legs and support beams. -
Wipe excess stain:
Let the stain sit for about 2-3 minutes to penetrate, then gently wipe away the excess with a clean cotton rag. This technique reveals the beautiful grain pattern shown in the photo. -
Build the color:
Allow the first coat to dry completely according to the manufacturer’s instructions. If you want a deeper, darker green like the example, apply a second coat using the same wipe-on, wipe-off method. -
Seal the wood:
Once the stain is fully cured, apply two thin coats of water-based polyurethane. I prefer a matte finish here to keep the look modern and let the metallic studs be the only shiny element.
Step 2: Adding Metallic Accents
-
Plan the spacing:
Use a tape measure to mark the placement for your brass studs. For the seat edge, space them approximately 1.5 to 2 inches apart along the top apron. -
Mark the spots:
Lightly mark each spot with a pencil. Ensure your line is perfectly straight relative to the top edge of the bench; a slightly crooked line of studs will be very noticeable. -
Create a pilot hole (optional):
If you are working with a hardwood like oak, tap a small nail partway in and remove it at each mark to create a starter hole. This prevents the decorative tacks from bending. -
Install seat studs:
Using a rubber mallet, gently tap the small brass upholstery tacks into your marked spots along the side apron of the bench seat. -
Avoid hammer marks:
Do not use a metal hammer directly on the studs. If you don’t have a rubber mallet, place a thick piece of fabric over the stud before striking it to protect the brass finish. -
Detail the legs:
Locate the structural joinery points near the bottom of the legs. This is visually where a bolt would naturally go. -
Install leg accents:
Install the larger brass tacks or purely decorative bolt heads at these lower points. Use one large accent on the front face and one on the side face of each leg for a hefty, industrial look. -
Final polish:
Wipe down the brass heads with a soft cloth to remove any fingerprints or oils from handling during installation.
Spacer Trick
Cut a small piece of cardboard to the exact width of your desired gap between studs. Use this physical spacer instead of a ruler for faster, consistent placement.
Bent Studs?
If a tack bends while hammering, don’t try to straighten it. Use pliers to pull it out gently, possibly fill the hole with a tiny bit of wood filler, and try again with a fresh tack.
Enjoy your customized bench that perfectly balances rustic texture with elegant metallic flair
Starry Night Splatter Finish
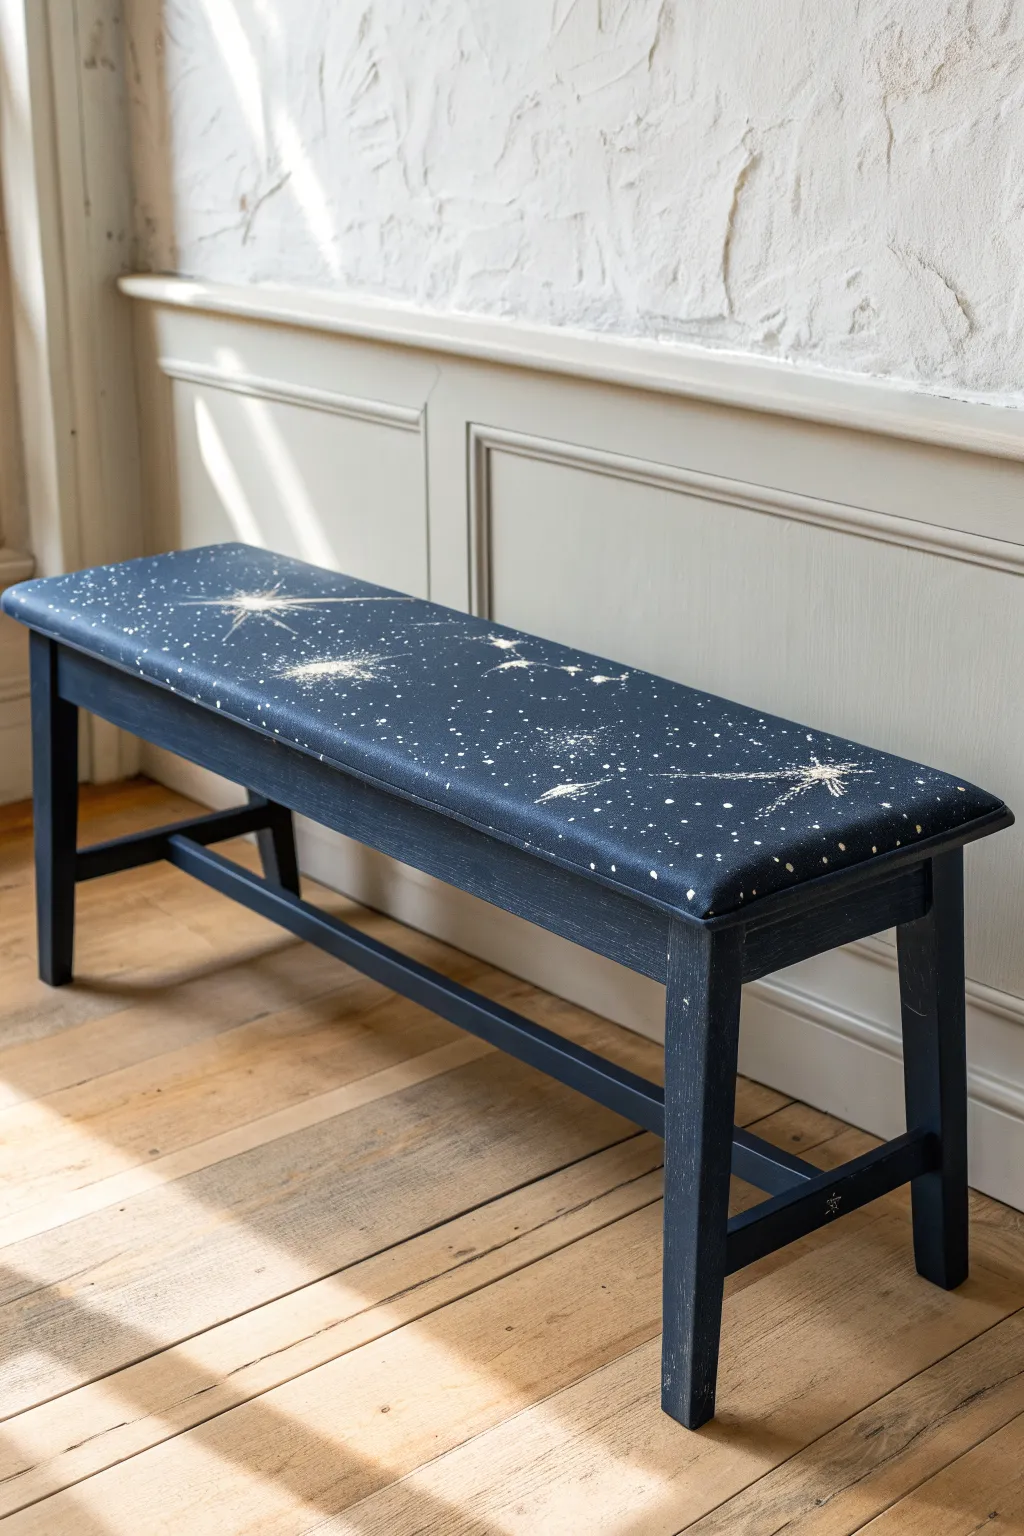
Turn an ordinary wooden bench into a piece of the night sky with this striking celestial makeover. By layering deep navy hues with strategic splatter effects, you’ll create a dreamy, starlit finish that feels both modern and magical.
Detailed Instructions
Materials
- Wooden bench (unfinished or needing refinishing)
- Sandpaper (120 and 220 grit)
- Tack cloth
- Primer suitable for wood
- Deep Navy Blue chalk or mineral paint
- White or cream acrylic paint
- Metallic silver or gold acrylic paint (optional for depth)
- Flat paintbrush (2-inch)
- Detail brush (fine tip)
- Old toothbrush
- Cardboard or drop cloth
- Clear matte or satin polyurethance sealer
Step 1: Preparation & Base Coat
-
Clean and Sand:
Begin by thoroughly cleaning your bench to remove any grease or grime. Once dry, sand the entire surface with 120-grit sandpaper to remove old finishes, followed by 220-grit for a smooth touch. -
Remove Dust:
Wipe down the entire piece with a tack cloth. Any leftover sawdust will create unwanted texture in your galaxy finish, so be thorough here. -
Apply Primer:
Apply a coat of high-quality wood primer. This ensures your dark navy color adheres well and provides true coverage. Let the primer dry completely according to the can’s instructions. -
First Navy Coat:
Using your flat paintbrush, apply the first coat of Deep Navy Blue paint. I find that long, even strokes following the wood grain give the best result. Allow this layer to dry fully. -
Second Navy Coat:
Apply a second coat of navy to ensure opaque, rich coverage. The base needs to be very dark to make the stars pop, so touch up any thin spots now.
Step 2: Creating the Galaxy
-
Prepare the Splatter Area:
Move your workspace to an area where you don’t mind a mess, or put down ample drop cloths. The splatter technique travels further than you might expect. -
Mix the Star Paint:
Dilute a small amount of white or cream acrylic paint with water. You want a consistency similar to heavy cream—thin enough to flick, but thick enough to stay opaque. -
Test Your Splatter:
Dip an old toothbrush into your thinned paint. use your thumb to flick the bristles over a piece of scrap cardboard first to test the splatter density and size. -
Apply Background Stars:
Flick the toothbrush over the bench seat to create a field of tiny, distant stars. vary your distance from the surface to create different sized dots. -
Add Larger Star Clusters:
Dip a larger brush into the paint and tap the handle against a stick or another brush over specific areas to create larger ‘planet’ droplets.
Control the Chaos
For directional ‘shooting stars’, flick the toothbrush while moving your arm quickly in one direction rather than keeping your hand stationary.
Step 3: Detailing & Sealing
-
Paint Starbursts:
Using your fine detail brush and undiluted white paint, create the focal points. Paint a small cross shape, then elongate the arms into thin, tapering points to mimic a twinkling starburst. -
Enhance the Center:
Add a tiny dot of pure white in the very center of your largest starbursts to make them appear like they are glowing intensely. -
Add Subtle Nebulas (Optional):
If you want more depth, lightly sponge a very transparent wash of metallic silver or lighter blue in a few patches, blotting most of it off for a cloudy, nebula effect. -
Dry Completely:
Let all your artwork dry for at least 24 hours. Acrylic splatters can sometimes be thicker than regular paint layers and need extra time to cure. -
Seal the Project:
Apply a clear matte or satin polyurethane topcoat. A glossy finish can reflect too much light and hide the details, so matte works best for the night sky look. -
Light Sanding Between Topcoats:
Once the first coat of sealer is dry, very lightly sand with fine grit paper to knock down any high points from the paint splatters, then wipe clean. -
Final Coat:
Apply a final durable coat of sealer to protect your seat from daily wear and tear. Let it cure fully before using the bench.
Glow in the Dark
Mix phosphorescent powder into your white paint for the final layer of stars. During the day it looks normal, but at night your seat will softly glow.
Now you have a stunning, cosmic seating area that invites you to daydream.


Have a question or want to share your own experience? I'd love to hear from you in the comments below!