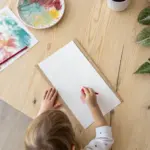
Toddler canvas painting can be delightfully simple and still come out looking like real, frame-worthy art. These ideas are all about letting tiny hands do their thing while you quietly guide the result into a cute little keepsake.
Classic Toddler Handprint Keepsake Canvas
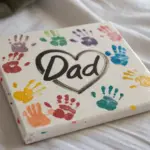
Capture a moment in time with this clean and vibrant handprint display that turns little palms into modern art. The varying colors create a playful yet structured look, perfect for brightening up a window sill or nursery shelf.
Step-by-Step Guide
Materials
- Small stretched canvas (approx. 8×10 or 9×12 inches)
- Acrylic craft paints (red, teal, magenta/purple, yellow)
- Wide foam paintbrush for applying paint
- Paper plates or palette
- Baby wipes or damp paper towels
- Newspaper or drop cloth for surface protection
Step 1: Preparation & First Print
-
Prepare your workspace:
Lay down newspaper or a drop cloth on a flat, stable surface. A lower table works best so your toddler can reach the canvas easily without stretching too far. -
Set up your palette:
Squeeze a generous dollop of the red paint onto a paper plate. You want enough to coat a hand fully, but not so much that it’s gloopy. -
Apply the red paint:
Using the foam brush, paint your toddler’s palm and fingers. Applying it with a brush ensures even coverage and tickles less than dipping directly, which helps keep squirming to a minimum. -
Position the first print:
Guide their hand to the top-left quadrant of the canvas. Aim to angle the fingers slightly outward toward the corner for a dynamic look. -
Press and lift:
Gently press down on each finger and the center of the palm to ensure a solid print. Lift the hand straight up quickly to avoid smudging the edges. -
Quick clean:
Immediately wipe the hand clean with baby wipes before the paint dries on the skin. This prevents color transfer to the next print.
Smudge Control
If a print smudges, don’t panic. Use a damp Q-tip to gently wipe away the wayward paint while it’s wet, or wait for it to dry and touch up the white background with white acrylic.
Step 2: Adding Cool Tones
-
Prepare the teal paint:
On a clean section of your palette, squeeze out the teal or blue-green paint. I find mixing a tiny bit of white into standard blue creates this softer teal shade. -
Coat the hand:
Apply the teal paint to the clean hand using a fresh or washed foam brush, ensuring you get paint all the way to the fingertips. -
Create the second print:
Position the hand in the top-right quadrant. Try to mirror the angle of the first print slightly, pointing the fingers toward the top right corner. -
Lift and clean:
Press firmly, lift straight up, and thoroughly clean the hand to remove all traces of blue before moving to the lighter colors.
Add a Personal Touch
Once the paint is fully dry, use a fine-tip black permanent marker or a small paint brush to write the child’s name and the date along the side edge of the canvas.
Step 3: Completing the Quad
-
Apply magenta paint:
Use the magenta or purple paint next. Coat the hand fully, checking for any missed spots between fingers. -
Stamp the bottom left:
Place this print in the bottom-left corner, directly below the red one. Keep the spacing consistent with the row above. -
Wipe clean again:
Do another thorough wipe down. It’s crucial here because the final color is yellow, which is easily muddied by darker leftovers. -
Prepare the yellow print:
Load up your foam brush with bright yellow paint and coat the hand one last time. -
Final placement:
Guide the hand to the bottom-right corner. Press firmly on the palm center, as yellow can sometimes be more transparent than other pigments. -
Final lift:
Remove the hand swiftly to reveal the last print. -
Drying:
Set the canvas in a safe, dust-free spot to dry completely for at least 2-3 hours before displaying.
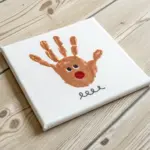
Once dry, this charming quartet of prints is ready to be a treasured snapshot of their childhood
Fingerprint Heart Fill-In Canvas
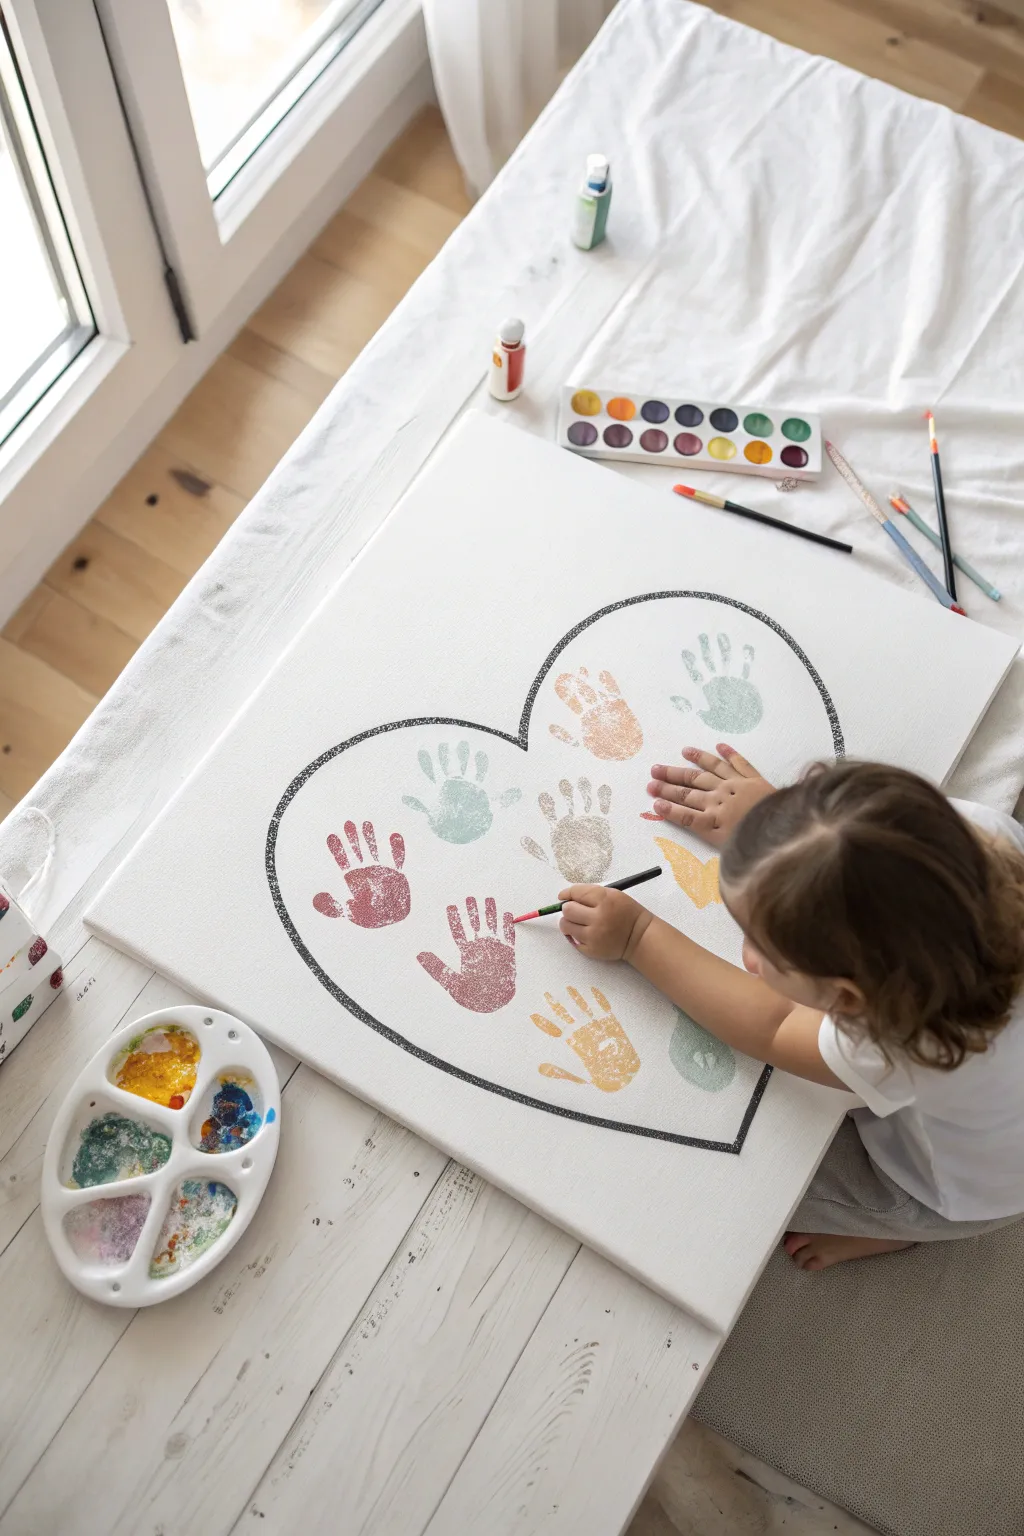
Capture a moment in time with this heartwarming canvas project that transforms messy playtime into cherished wall art. Using a simple outline and a rainbow of acrylics, your little one will fill a heart shape with their own unique handprints.
Step-by-Step Guide
Materials
- Large square canvas (approx. 20×20 inches recommended)
- Black permanent marker or black acrylic paint with a fine liner brush
- Assorted acrylic paints (muted pastels or preferred colors)
- Palette or paper plates for paint
- Paintbrushes (medium size for application)
- pencil (optional for sketching)
- Baby wipes or damp cloth (essential for quick cleanup)
Step 1: Preparation & Outline
-
Clean the canvas:
Start by wiping down your canvas lightly with a dry cloth to remove any dust or lint that might interfere with the paint adhesion. -
Sketch the heart:
Lightly sketch a large heart shape in the center of the canvas using a pencil. Aim to fill most of the space, leaving a consistent border of white space around the edges. -
Define the border:
Go over your pencil line with a thick black permanent marker or use black acrylic paint and a liner brush. Create a slightly textured, sketch-like line rather than a perfectly smooth one for a more artistic look. -
Let the outline dry:
If you used paint for the outline, allow it to dry completely—about 15 to 20 minutes—before moving on to prevent smudging black ink into the colorful handprints.
Smear Control
If a handprint smudges badly, don’t panic. Use a damp Q-tip to wipe away the mistake while the paint is wet, or let it dry and paint over it with white acrylic before trying again.
Step 2: Creating the Handprints
-
Prepare your palette:
Squeeze out quarter-sized dollops of your chosen acrylic colors onto your palette or paper plate. I find that muting bright primary colors with a touch of white creates that lovely soft look seen in the photo. -
First color application:
Use a paintbrush to apply a generous, even layer of paint to the child’s palm and fingers. Painting the hand is often ticklish but ensures better coverage than simple dipping. -
First test print:
Do a quick test print on a scrap piece of paper to ensure the paint isn’t too thick or too gloopy, which helps you get clearer definition of the fingers. -
Place the first print:
Guide the child’s hand to the canvas, staying inside the black heart outline. Press down firmly on the palm and each finger to ensure a good transfer. -
Lift carefully:
Lift the hand straight up off the canvas without sliding to avoid smearing the print. -
Clean and switch:
Thoroughly wipe the hand clean with a baby wipe or wash with soap and water before switching to the next color. -
Continue placement:
Repeat the painting and printing process with different colors. Place the handprints randomly within the heart, rotating the orientation slightly for visual interest. -
Fill the gaps:
Look for larger white spaces within the heart and direct the next few handprints there. It’s okay if prints slightly overlap or touch the border line. -
Check for consistency:
Step back occasionally to balance the colors. If you have a lot of blue on the left, try placing a blue print on the right side to even it out.
Step 3: Finishing Touches
-
Touch ups:
If a specific finger didn’t print clearly, you can dip your own finger in a tiny bit of paint and gently dab the missing area to complete the shape. -
Add artistic details:
Once the handprints are semi-dry, offer the child a small brush to add tiny extra strokes or dots inside the heart if they want to contribute more freely. -
Dry completely:
Allow the canvas to dry flat for at least 24 hours to ensure thicker globs of paint solidify. -
Seal the work:
For longevity, especially if this will hang in a sunny room, apply a clear acrylic varnish spray over the entire canvas once fully cured.
Date It
Use a fine-point black marker to write the child’s name and age, or the current year, in small script along the bottom curve of the heart outline for a true time-capsule effect.
Hang your masterpiece proudly and enjoy seeing those tiny hands preserved forever

Tape-Resist Stripes for Toddler Abstract Art
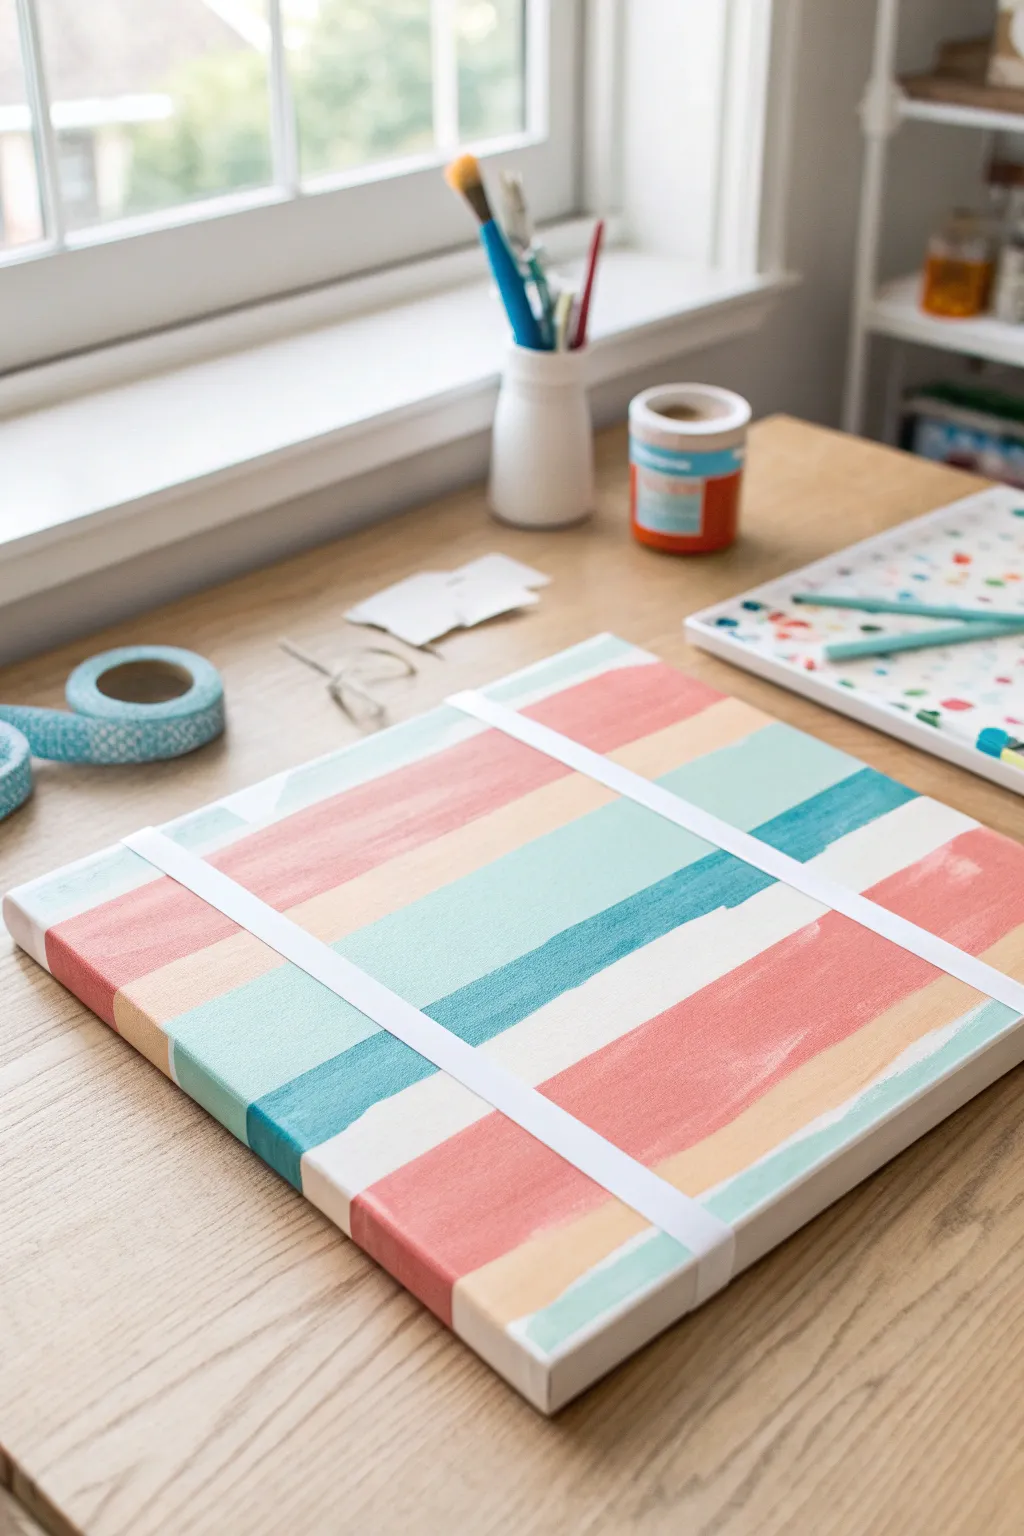
Let your little one explore color and movement while you guarantee a structured result with this clever tape-resist method. The soft coral, aqua, and cream palette creates a modern, breezy look that is surprisingly chic for toddler art.
Detailed Instructions
Materials
- Square stretched canvas (12×12 inches suggested)
- Painter’s tape or masking tape (1 inch width)
- Acrylic craft paints (Coral, Aqua, Cream)
- Wide flat paintbrush
- Palette or paper plate
- Drop cloth or newspaper to protect surfaces
Step 1: Preparation and Taping
-
Prepare your canvas:
Start with a clean, dry stretched canvas. Wipe it down swiftly with a dry cloth to remove any dust that might prevent the tape from sticking properly. -
Apply the first tape line:
Run a strip of painter’s tape diagonally across the canvas. Press it down firmly, smoothing it with your finger to seal the edges tight against the fabric. -
Add intersecting lines:
Place a second strip of tape perpendicular to the first, creating a large ‘X’ or cross shape. You can position this off-center for a more dynamic, modern composition. -
Seal the edges:
Double-check that every inch of tape is fully adhered to the canvas. I like to run a fingernail along the edges to prevent any paint from seeping underneath later. -
Wrap the sides:
Extend the tape ends over the sides of the canvas and secure them to the back. This ensures the white negative space continues around the artwork’s edge for a professional finish.
Bleeding Lines?
If paint bleeds under the tape, wait for it to dry fully. Then, use a small brush and white paint to touch up the lines, or scrape gently with a craft knife.
Step 2: Painting
-
Set up the palette:
Squeeze generous dollops of coral, aqua, and cream paint onto a palette. Keeping the colors separate helps teach your toddler about distinct color blocking. -
Paint the first section:
Guide your toddler to paint one of the triangular sections created by the tape. Using the wide brush, fill the space completely with the coral paint. -
Rotate and switch colors:
Turn the canvas slightly and choose a new section. Clean the brush (or grab a fresh one) and fill this adjacent area with the aqua paint, brushing right over the tape edges. -
Fill remaining areas:
Continue filling the remaining white spaces with your cream and coral paints. Encourage brushing in the direction of the tape lines for a smoother texture. -
Create stripes within sections:
For the look in the photo, paint broad stripes of alternating colors within the larger taped sections. Don’t worry about perfection; the wobbliness adds charm. -
Cover the tape:
Remind the little artist that it is okay to get paint on the tape. In fact, painting boldly over the tape ensures crisp, clean lines when it is removed. -
Check for gaps:
Look closely at the canvas texture. Dab a little extra paint into any woven spots that look white or empty to ensure solid coverage.
Step 3: Finishing Touches
-
Paint the sides:
Don’t forget the deep edges of the canvas. Extend your brush strokes around the sides, matching the color of the adjacent front section. -
Let it tack up:
Allow the painting to dry until it feels tacky to the touch but not fully hardened. This usually takes about 20 to 30 minutes depending on paint thickness. -
Peel the first strip:
Find the end of the tape on the back of the canvas. Slowly and gently pull the tape back on itself at a 45-degree angle, revealing the crisp white line beneath. -
Remove remaining tape:
Continue peeling off the intersecting tape strip carefully. If the paint seems to be lifting, wait a few more minutes before trying again. -
Final cure:
Set the canvas aside in a safe, dust-free spot to dry completely overnight before displaying your modern art piece.
Texture Play
Mix a little baking soda or sand into the acrylic paint before applying. This adds a cool, tactile grit that toddlers love to explore while painting.
Hang this bright, geometric artwork in the playroom for a pop of color your child can be proud of


Sticker-Resist Shape Surprise Canvas
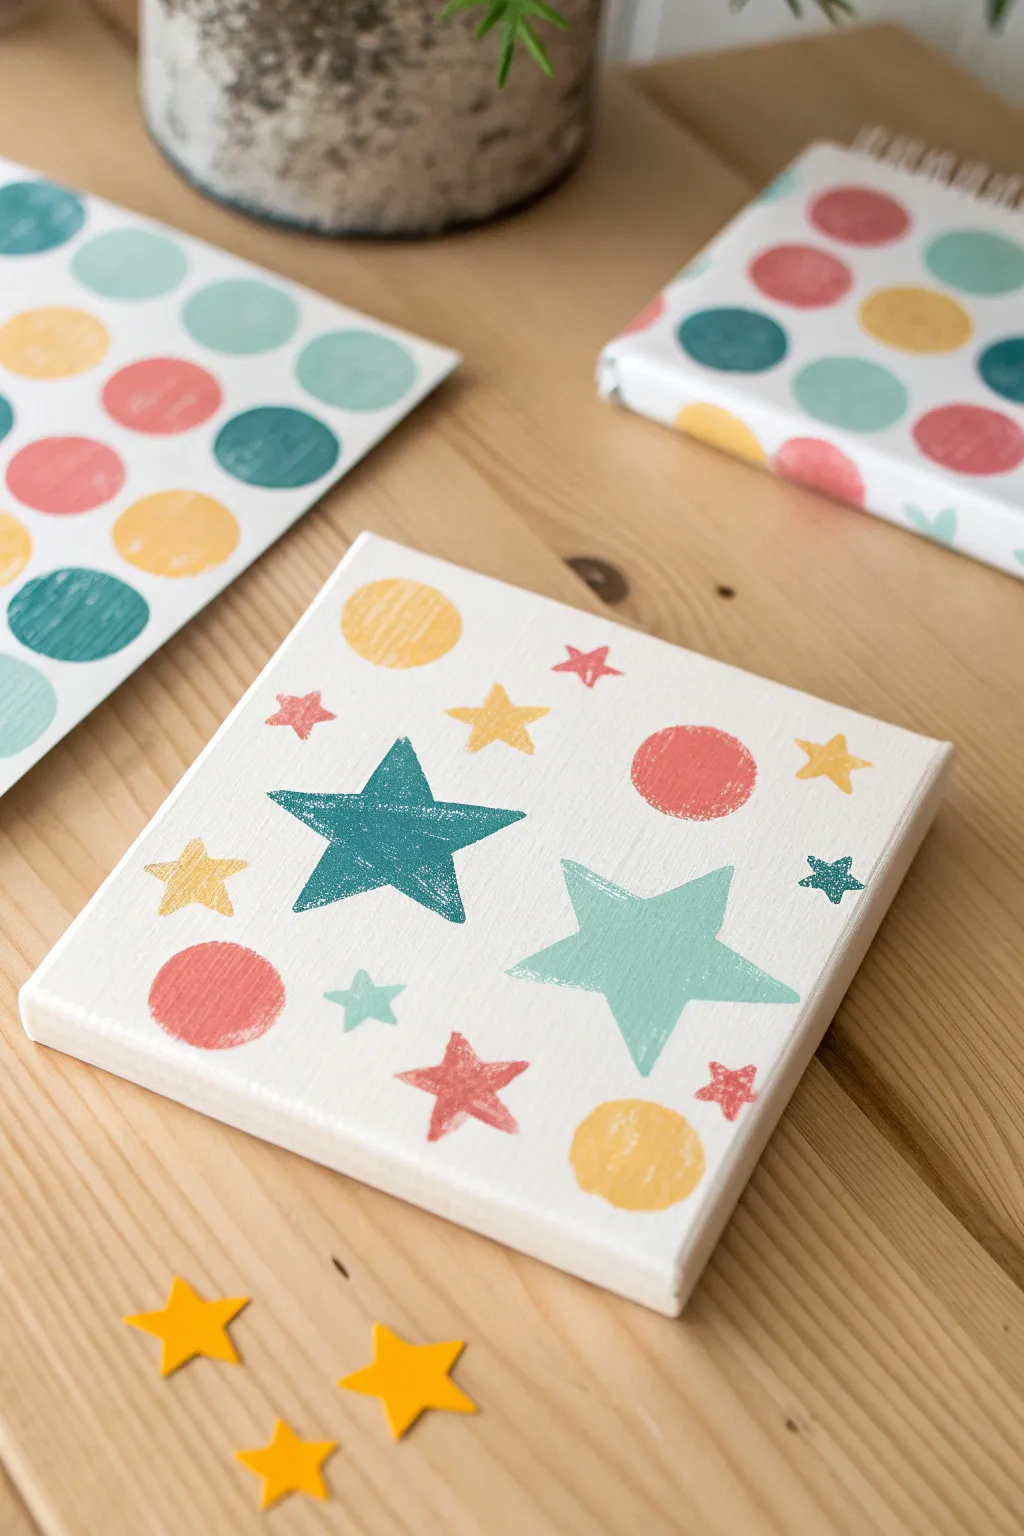
This cheerful canvas brings together a playful mix of stars and circles in a soft, muted color palette. It’s a fantastic introduction to stamping for little hands, creating a clean yet whimsical design perfect for a nursery or playroom.
Step-by-Step
Materials
- Small square canvas (approx. 8×8 inches)
- Acrylic craft paints (teal, mint green, coral pink, mustard yellow)
- Foam shape stamps (stars and circles of various sizes)
- Paper plate or palette
- Paper towels or baby wipes
Step 1: Setting the Scene
-
Prepare your workspace:
Lay down a protective covering on your table. Since we are working with acrylics, it helps to have damp paper towels nearby for quick cleanups of stray paint. -
Organize your palette:
Squeeze a quarter-sized amount of each paint color—teal, mint green, coral pink, and mustard yellow—onto a paper plate. Space them out so the colors don’t accidentally mix before you’re ready. -
Test your stamps:
Before touching the canvas, practice stamping on a scrap piece of paper. This helps you figure out how much pressure is needed to get a solid shape without the paint squishing out the sides.
Stamp Master Tip
Don’t overload your foam stamp with paint. A thin, even layer prevents the shape from sliding around and keeps the edges crisp.
Step 2: Stamping the Stars
-
Start with the main feature:
Choose a large star foam stamp. Dip it into the teal paint, ensuring the surface is evenly coated but not dripping. -
Place the first star:
Press the stamp firmly onto the left-center area of the white canvas. Lift straight up to avoid smudging the edges. -
Switch colors:
Wipe your large star stamp clean or grab a second large star stamp. Dip this one into the mint green paint. -
Add the second large star:
Stamp this mint green star in the lower right area. I like to rotate the stamp slightly so the stars aren’t all pointing the exact same way, adding a bit of movement. -
Incorporate medium stars:
Using a slightly smaller star stamp, dip into the mustard yellow paint. Place one near the center top and another near the right edge. -
Add small star accents:
With your smallest star stamp, add a few tiny accents. Use coral pink for a star near the top right and teal for a tiny one on the far right edge. -
Fill the gaps:
Stamp a small mint green star in the empty space on the bottom left and a small coral pink star near the bottom right corner.
Texture Twist
For a cool effect, lightly press a piece of burlap or textured fabric into the wet paint on the stamp before pressing it to the canvas.
Step 3: Adding the Circles
-
Select your circle stamps:
Pick a medium-sized circle foam stamp. We want these to balance out the pointy stars with some soft round shapes. -
Stamp a coral circle:
Dip the circle stamp into the coral pink paint. Place a bold circle in the bottom left corner to anchor that side of the design. -
Add a yellow circle:
Clean the stamp and switch to mustard yellow. Place a circle near the top left corner to balance the pink one below. -
Create a focal circle:
Stamp another coral pink circle in the upper middle-right section, filling the space between the stars. -
Finish the bottom edge:
Stamp a final mustard yellow circle near the bottom center edge. Step back and look at the composition to ensure the colors feel balanced across the canvas.
Step 4: Finishing Touches
-
Check for coverage:
Look closely at your stamped shapes. If any look too faint, use a small paintbrush with a tiny bit of matching paint to carefully touch up the interiors without ruining the stamped texture. -
Dry completely:
Let the canvas sit flat to dry for at least an hour. Acrylic paint dries relatively fast, but thick stamped areas might take a little longer. -
Clean up tools:
Wash your foam stamps immediately with warm soapy water so they are fresh and ready for your next art session.
Now you have a charming piece of starry art ready to brighten up any wall
BRUSH GUIDE
The Right Brush for Every Stroke
From clean lines to bold texture — master brush choice, stroke control, and essential techniques.
Explore the Full Guide
Cotton Swab Dot Burst on Canvas
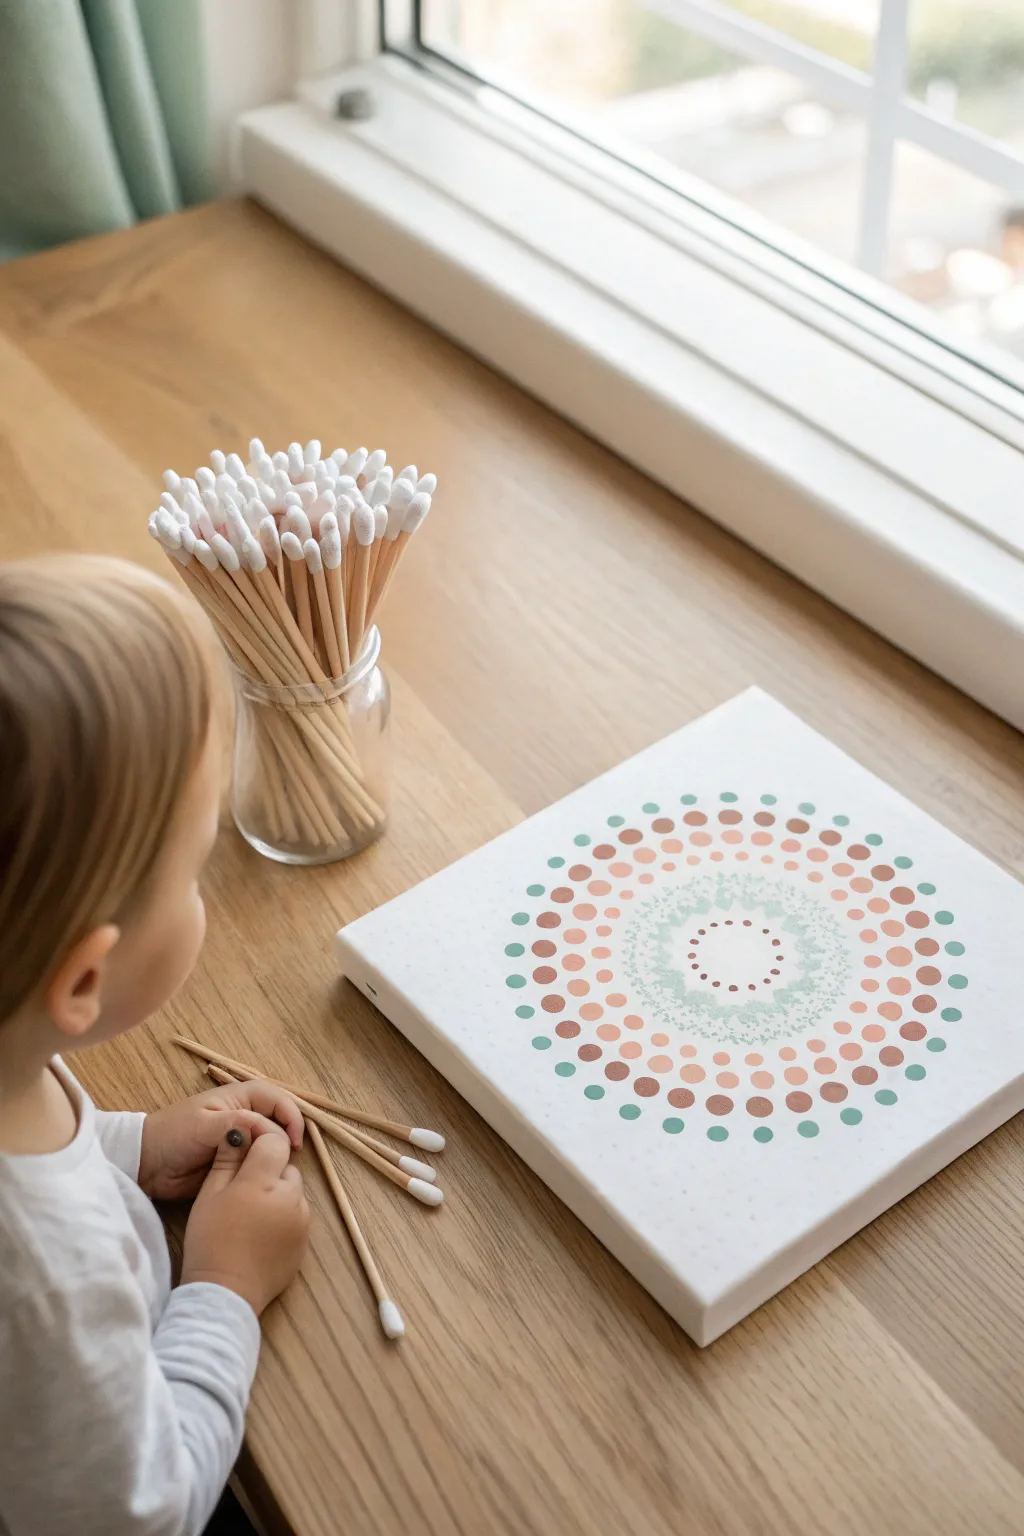
Create a soothing, geometric mandala that is surprisingly simple for little hands to master. By using cotton swabs instead of brushes, you achieve perfectly uniform circles in a calming palette of sage, terracotta, and soft peach.
Step-by-Step
Materials
- Square white canvas (8×8 or 10×10 inches)
- Acrylic paints (Sage green, terracotta, peach, mint green)
- Cotton swabs (Q-tips) – about 15-20
- Paper plate or painting palette
- Pencil (optional for guidelines)
Step 1: Preparation & Setup
-
Prepare the palette:
Squeeze small dollops of sage green, terracotta, peach, and mint green paint onto your paper plate. Keep the colors separated to avoid accidental mixing. -
Find the center:
Help your toddler find the approximate center of the canvas. You can lightly mark a tiny dot with a pencil if they need a target to start from, though eyeballing it works just fine for a freeform look. -
Ready the tools:
Set out a handful of cotton swabs. Explain that each color gets its own swab to keep the dots clean and crisp.
Clean Dabs Only
Teach your toddler to lift the swab straight up after stamping. Dragging it creates streaks, but a vertical lift ensures perfectly round circles.
Step 2: Creating the Core
-
The first ring:
Dip a fresh cotton swab into the terracotta paint. Press gently to create a small ring of dots right in the center of the canvas. Aim for a small circle about the size of a coin. -
Expanding outward:
Switch to a light mint green or pale sage. Create a second ring of dots surrounding the first terracotta circle. I like to space these slightly further apart to give the design breathing room. -
Add texture:
For the third ring, dab the swab multiple times lightly without reloading paint. This creates a softer, more textured ‘faded’ effect, contrasting with the solid dots.
Step 3: Building the Pattern
-
Color shift:
Move to the peach color for the next concentric circle. Press firmly to make these dots bold and opaque. -
Alternate colors:
Continue building rings outward, alternating between your rust/terracotta and sage green tones. The repetition of colors is what gives the mandala its satisfying rhythm. -
Check spacing:
Encourage your toddler to keep the dots in each ring relatively close to their neighbors, maintaining a consistent gap between the rings themselves. -
Varying sizes:
To add visual interest, try pressing harder on the outer rings. A firm press smooshes the cotton tip slightly, creating a larger dot compared to a light tap.
Double-Ended Fun
Cut the cotton swabs in half! This doubles your tool count and makes them shorter and easier for small toddler hands to control.
Step 4: Finishing Touches
-
The outer border:
For the final, largest ring near the edge of the canvas, choose your darkest or boldest color (like the deep sage green). Make these dots distinct to frame the artwork. -
Fill gaps:
Step back and look at the whole piece. if there are large empty spaces between rings that look uneven, you can add tiny accent dots in a contrasting color. -
Clean up edges:
If any paint smudged, dip a clean wet cotton swab in water and gently wipe it away before the paint dries. -
Dry completely:
Let the canvas sit flat to dry for at least an hour. Because the dots can be thick globs of paint, they take longer to dry than a brushed layer.
Once dry, this modern dot art makes a beautiful, sophisticated addition to any playroom wall
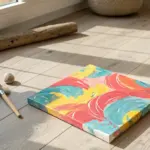
Plastic-Wrap Squish Painting on Canvas
This genius painting technique allows toddlers to squish and mix colors directly on a canvas without getting a single drop of paint on their hands. The result is a beautiful, abstract textured piece created entirely through the layer of protective plastic wrap.
Detailed Instructions
Materials
- Stretched canvas (any size)
- Acrylic paints (various colors)
- Clear plastic wrap (cling film)
- Scissors
- Painter’s tape or masking tape
Step 1: Preparation
-
Choose your palette:
Select 3-5 colors of acrylic paint that mix well together. Since they will blend on the canvas, sticking to analogous colors (like blues and greens) or warm tones often yields the best results. -
Apply paint dollops:
Squeeze generous dollops of paint directly onto the blank white canvas. You can scatter them randomly or place them in a specific pattern, but ensure there is enough paint to spread across the surface. -
Add white space:
Leave some areas of the canvas empty. This negative space allows the colors to move and marble rather than becoming a single muddy brown color.
Muddy Colors?
If the colors are mixing into an ugly brown, you’ve likely over-squished or chosen too many contrasting colors. Peel the wrap early to save the marble effect.
Step 2: Applying the Wrap
-
Measure the plastic:
Pull out a sheet of plastic wrap that is significantly larger than your canvas. You want enough excess to wrap around the back of the frame completely. -
Cover the canvas:
Gently lay the plastic wrap over the paint-covered canvas. Do not press down yet; just let it float on top of the paint dollops. -
Secure the back:
Flip the canvas carefully (or work around the edges) to pull the excess plastic tight around to the back of the wooden frame. -
Tape it down:
Use painter’s tape to secure the plastic wrap firmly to the back of the frame. This step is crucial to prevent the plastic from sliding off during the squishing process. -
Check the seal:
Ensure there are no gaps where paint could squeeze out. The plastic should be taut but flexible enough to push the paint around.
Step 3: The Squish Phase
-
Begin squishing:
Let your toddler use their hands to push, squish, and slide the paint dollops underneath the plastic layer. This is the main sensory activity. -
Spread the color:
Encourage spreading the paint to the edges and corners of the canvas. They can use fingers to draw lines or palms to smash colors together. -
Mix gently:
Watch as the colors marble and blend. Tell them to stop before everything turns one uniform color, preserving the beautiful swirls.
Add Sparkle
Mix glitter into your paint dollops or sprinkle dry glitter onto the wet paint *before* adding the plastic wrap for a shimmering finish.
Step 4: The Reveal
-
Peel back carefully:
Once the painting is complete, locate the tape on the back and remove it. Gently peel the plastic wrap off the wet paint. -
Create texture:
As you lift the plastic, it will create interesting peaks and textures in the thick acrylic paint, adding dimension to the artwork. -
Dry thoroughly:
Place the wet canvas in a safe, flat spot to dry. Because the paint is often applied thickly in this method, it may take 24 hours or more to cure completely.
Once dry, this textured masterpiece is ready to hang on the wall and brighten up the playroom

PENCIL GUIDE
Understanding Pencil Grades from H to B
From first sketch to finished drawing — learn pencil grades, line control, and shading techniques.
Explore the Full Guide
Bagged Sensory Canvas Painting for No-Mess Toddlers
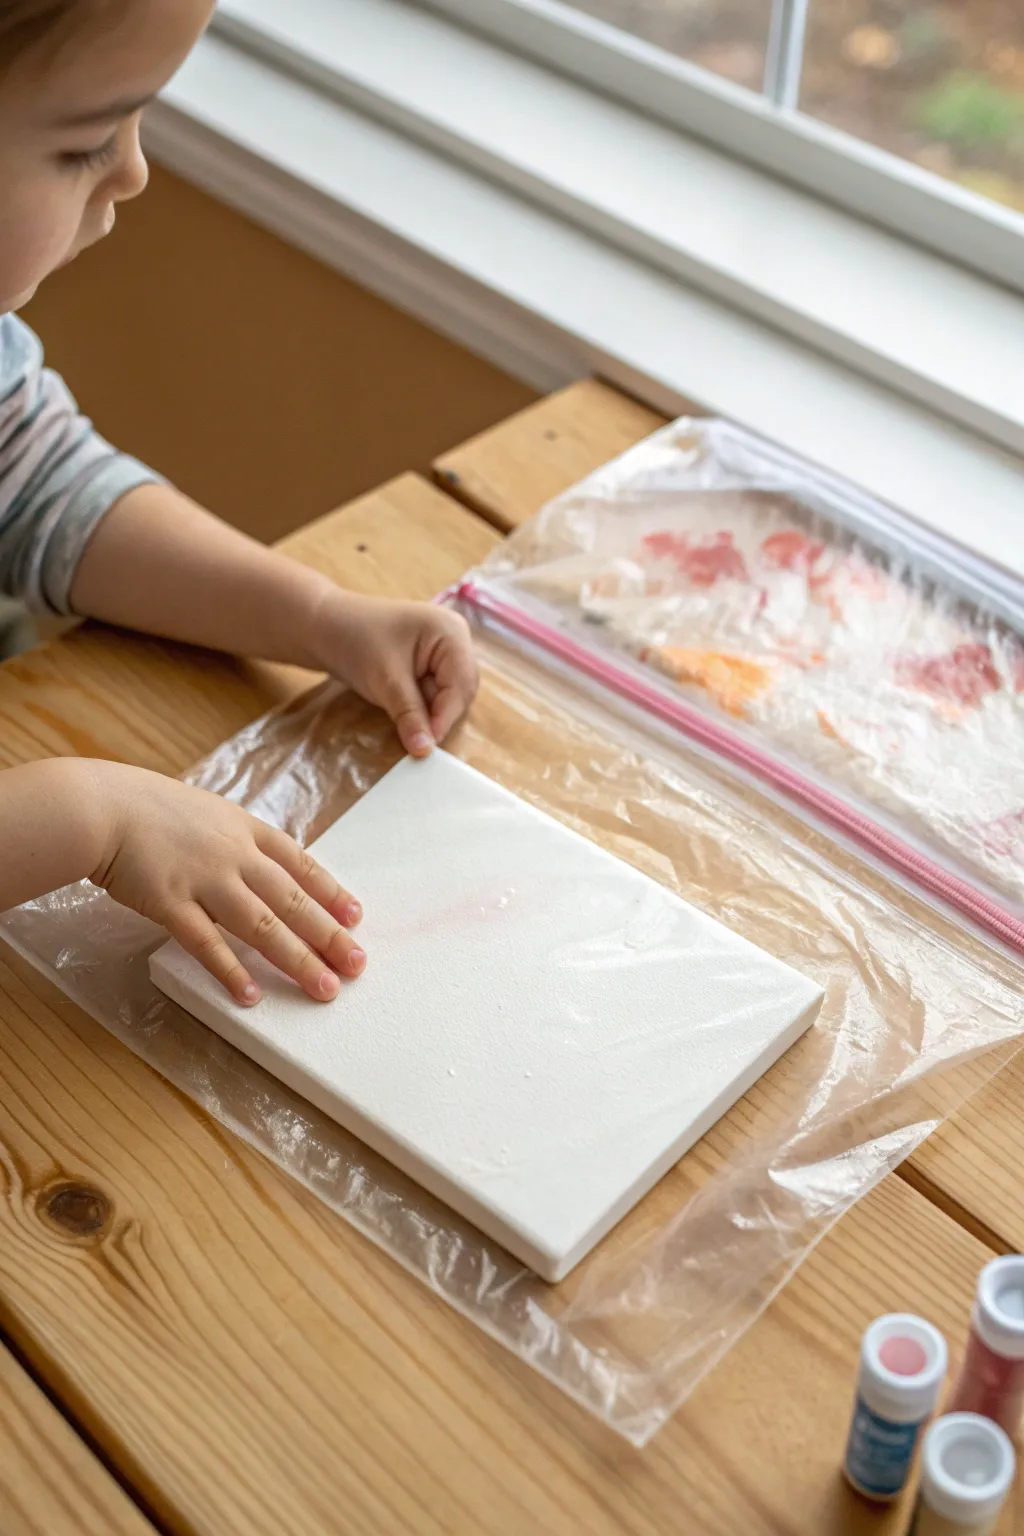
This genius painting technique lets toddlers explore color mixing and sensory play without a single drop of paint touching their hands or your table. The result is a beautiful, abstract canvas created entirely through the magic of squishing and pressing.
Step-by-Step Tutorial
Materials
- Small stretched canvas (8×10 inches or similiar)
- Large gallon-sized zip-top freezer bag
- Washable tempera or acrylic paints (various colors)
- Painter’s tape or masking tape (optional)
- Scissors
Step 1: Preparation
-
Choose your canvas:
Select a canvas size that fits comfortably inside your chosen plastic bag. An 8×10 inch canvas usually fits perfectly into a standard gallon slider bag. -
Prepare the bag:
Open a large gallon-sized zip-top bag. Freezer bags are often best because the plastic is slightly thicker and more durable against enthusiastic toddler hands. -
Apply paint dollops:
Squeeze generous dollops of paint directly onto the front face of the canvas. You can create a pattern, random blobs, or lines. -
Color strategy:
I recommend choosing 3-4 colors that mix well together, like blues and yellows or reds and oranges, to prevent the final art from turning a muddy brown. -
Insert the canvas:
Carefully slide the paint-covered canvas into the plastic bag. Try to do this slowly so you don’t smear the paint against the plastic before it’s fully inside. -
Seal it tight:
Press as much air out of the bag as possible without squishing the paint yet. Seal the zipper mechanism securely.
Step 2: The Fun Part
-
Secure the bag:
For younger toddlers, you might want to tape the edges of the bag down to the table using painter’s tape so it doesn’t slide around. -
Squish and spread:
Encourage your child to use their hands, fingers, or palms to press down on the plastic. -
Cover the white space:
Guide them to push the paint blobs toward the corners and edges of the canvas until most of the white surface is covered. -
Experiment with texture:
Show them how using fingernails (gently) or different hand movements can create swirls versus flat areas of color. -
Check for gaps:
Lift the bag up occasionally to see if there are big empty spots that need a little more squishing attention.
Tape for Safety
For extra security against accidental openings, place a strip of clear packing tape over the bag’s zipper seal before handing it to your child.
Step 3: The Reveal
-
Cut the bag open:
Once the painting is finished, don’t try to pull the wet canvas out through the opening. Instead, use scissors to carefully cut along the seams of the plastic bag. -
Peel back the plastic:
Gently peel the top layer of plastic off the wet paint. This often creates a cool, textured effect on the surface. -
Touch up edges:
If the sides of the canvas are still white, you can use a brush or finger to smooth excess paint over the edges for a finished look. -
Let it dry:
Place the canvas in a safe spot to dry completely. Because the paint layers can be thick, this might take 24 hours or more.
Paint Not Moving?
If the paint is too thick to spread easily under the plastic, try adding a tiny drop of water to your paint blobs before sealing the bag.
Now you have a vibrant piece of abstract art ready to hang on the wall, with zero cleanup required
Toy Car Track Painting on Toddler Canvas
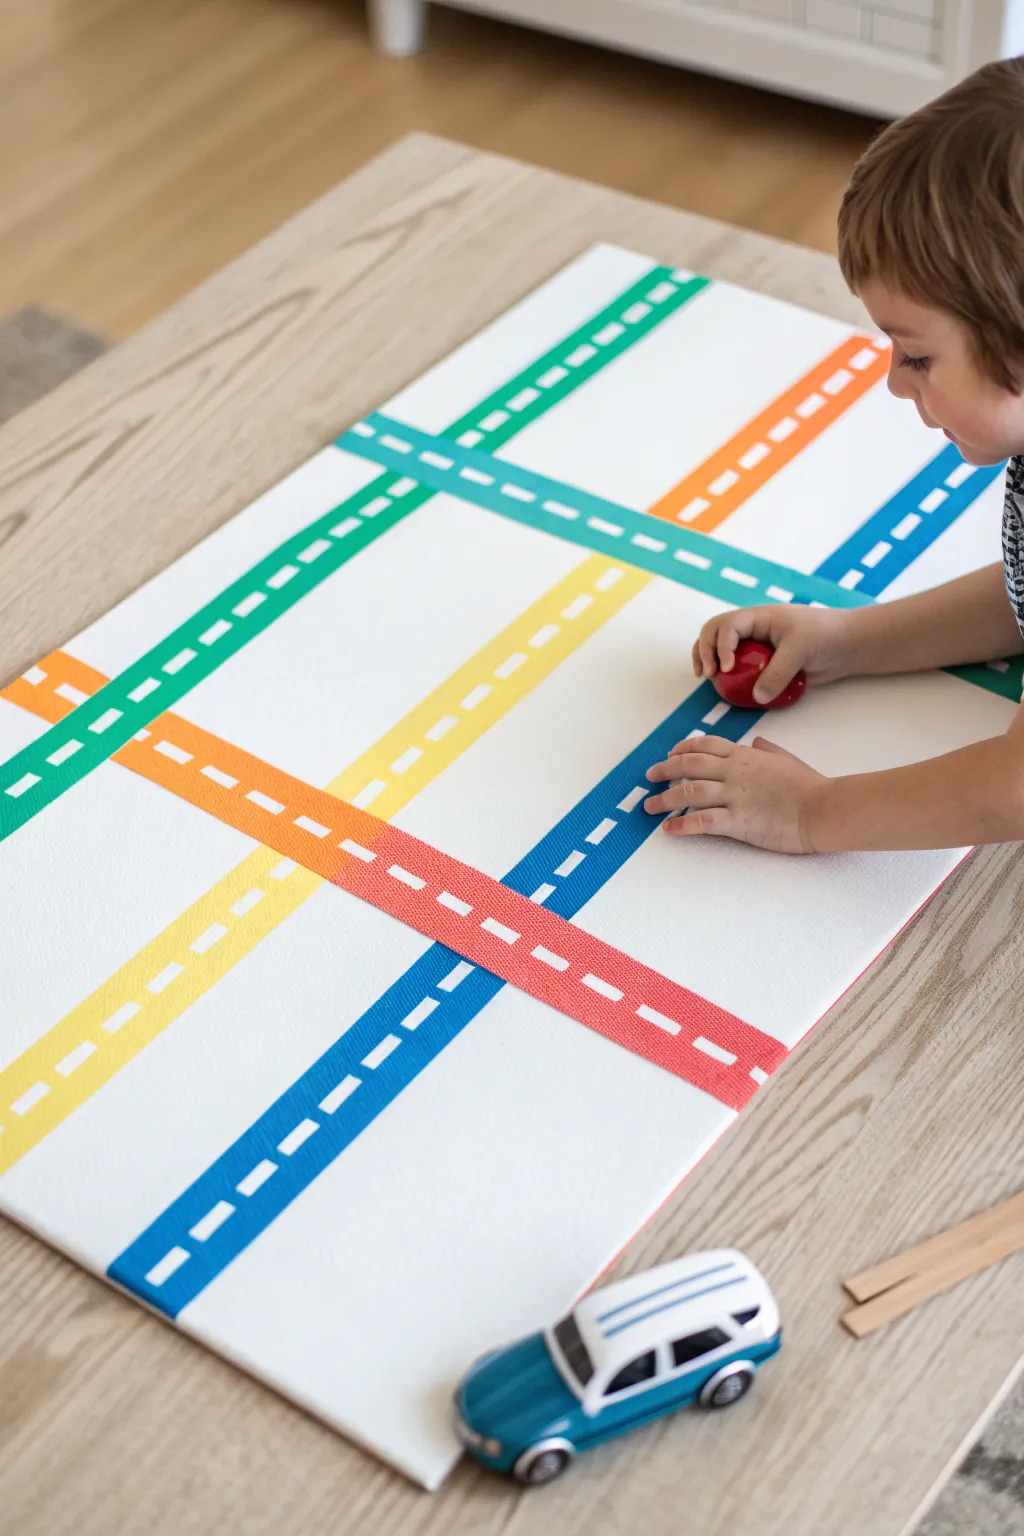
Turn a simple white canvas into an interactive cityscape for toy cars with this engaging tape-resist painting project. The result is a vibrant, clean-lined network of roads that doubles as both art and a durable play surface.
Step-by-Step
Materials
- Large rectangular canvas (approx. 24×36 inches)
- Painter’s tape or masking tape (1 inch width)
- Painter’s tape or masking tape (1/4 inch width or Washi tape)
- Acrylic paints (various bright colors like red, blue, yellow, green, orange, teal)
- Medium-sized flat paintbrush
- Small foam pouncer or detail brush
- Toy cars for testing
Step 1: Preparation & Mapping
-
Clean canvas:
Before starting, ensure your canvas is free of dust or lint by wiping it down gently with a dry cloth. -
Plan the layout:
Visualize where you want your roads to go. The example uses a mix of horizontal, vertical, and diagonal lines for interest. -
Layout the first road border:
Take your standard 1-inch painter’s tape and lay down a long strip across the canvas to define one edge of your first road. -
Create the road width:
Place a second strip of tape parallel to the first one, leaving a gap of about 2 to 3 inches between them. This gap will be the paintable road surface. -
Add intersections:
Repeat this process to create crossing roads. I find that overlapping the tape strips fully is fine; we will paint inside the gaps.
Bleed-Proof Lines
Paint a thin layer of white acrylic over the tape edges first. This seals the tape so any bleeding is invisible, keeping your colored lines super crisp.
Step 2: Creating the Dashed Lines
-
Apply the center line tape:
Using the thinner 1/4 inch tape (or Washi tape), run a strip right down the absolute center of each road gap you created. -
Create the dashes:
Now, place small pieces of tape perpendicular to or over the thin center line at regular intervals, or just press the long thin strip down firmly. Actually, the easiest method for the look in the image is to apply small, individual rectangular stickers or cut pieces of tape down the center line *after* painting the color but *before* removing the stencil. Wait, looking closely at the result, this is a negative space technique. -
Correct technique for dashes:
Let’s refine that: Apply small, rectangular pieces of tape (about 1 inch long) down the center of your road channel, spacing them about an inch apart. These pieces of tape will preserve the white canvas underneath to create the dashed line effect. -
Seal the edges:
Firmly run your fingernail or a credit card along the edges of all the tape strips to prevent paint from bleeding underneath.
Step 3: Painting & Reveal
-
Select your palette:
Pour out small amounts of your bright acrylic paints. You’ll want a different color for each road segment to create that vibrant look. -
Paint the first road:
Dip your flat brush into your first color (e.g., green) and paint the open canvas space between the border tapes, painting right over the center dash tapes. -
Continue painting:
Switch colors for the next road segment (e.g., orange or blue). Be careful at intersections; decide which color ‘crosses over’ the other or create a hard stop where the tapes meet. -
Ensure coverage:
Apply a second coat if your paint looks streaky, ensuring the white of the canvas is fully covered in the road areas. -
Let it tack up:
Allow the paint to dry until it feels tacky but not fully hardened. This usually takes about 10-15 minutes depending on thickness. -
Remove center dashes:
Carefully use a craft knife tip or your fingernail to lift and peel off the small rectangular pieces of tape in the center of the roads to reveal the white dashed lines. -
Remove border tape:
Slowly peel away the long border strips of tape at a 45-degree angle. This reveals the crisp edges of your colorful roads. -
Final cure:
Let the entire canvas dry completely, ideally overnight, before letting any toy cars drive on the surface to prevent tire tracks in the paint.
City Planner
Before removing the tape, paint small houses, trees, or stop signs in the white negative spaces to build a whole town around the roads.
Once dry, this custom track is ready for hours of imaginative play on the floor or table


Nature Print Canvas With Leaves and Flowers
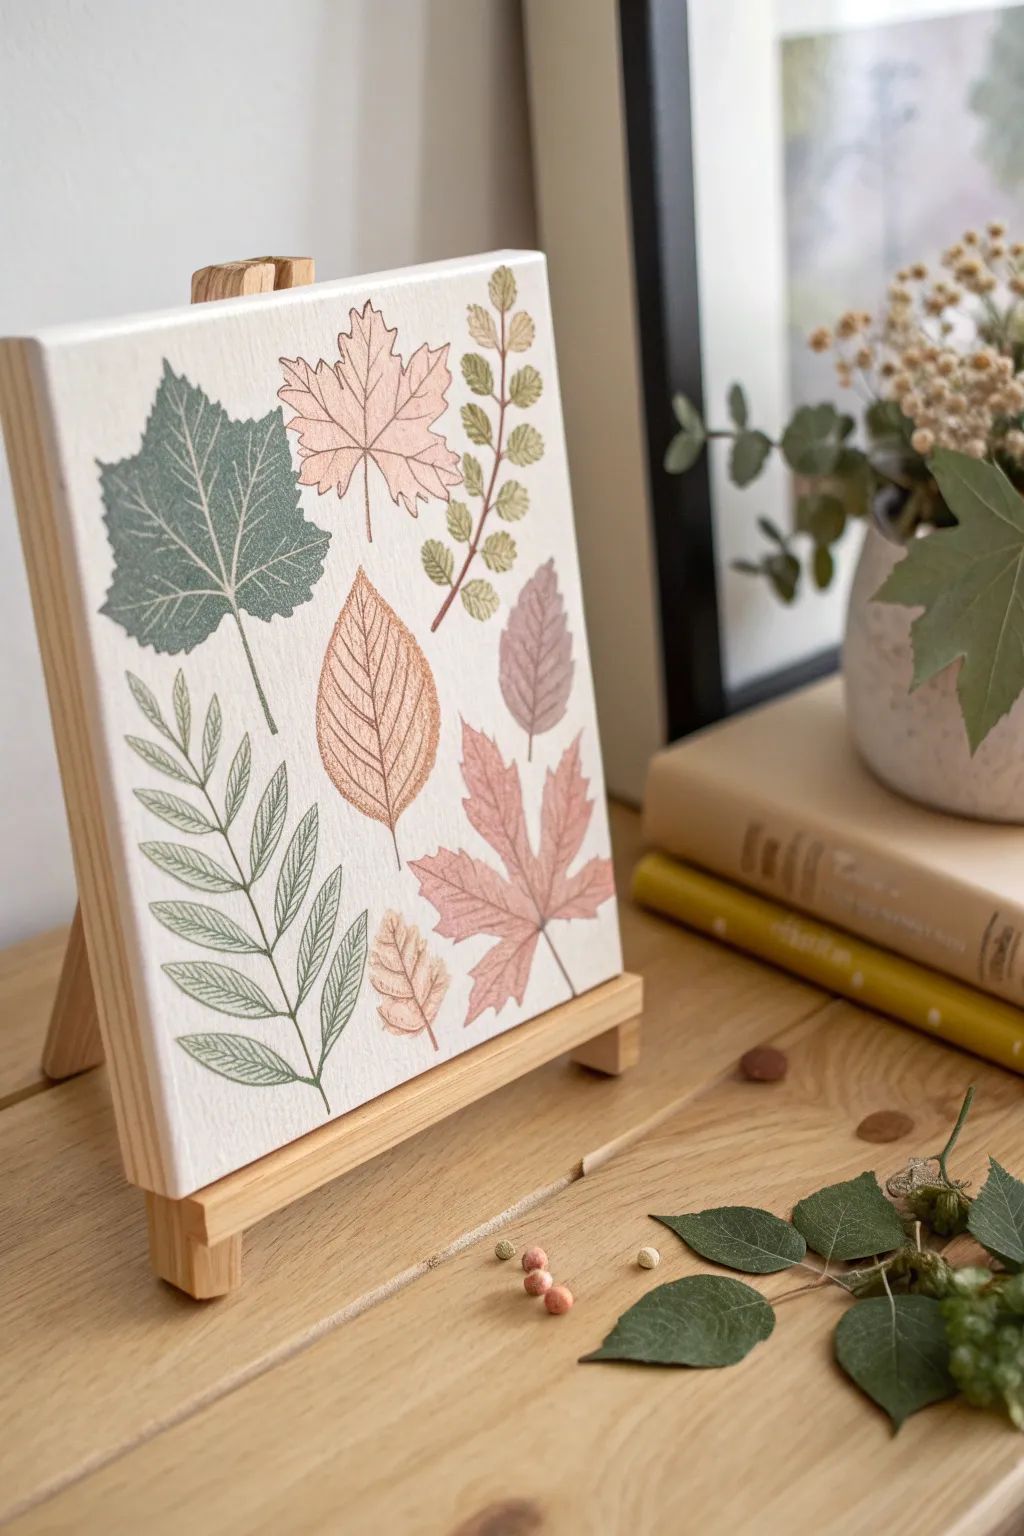
This elegant project captures the fine details of nature by transferring leaf textures directly onto a canvas board. The result is a botanical study with soft, muted tones of sage, rust, and dusty rose that looks lovely displayed on a mini easel.
How-To Guide
Materials
- Small square canvas board or stretched canvas (approx. 8×8 inches)
- Mini wooden display easel
- Assorted fresh leaves with distinct veins (fern, maple, beech, etc.)
- Acrylic craft paints (sage green, forest green, dusty pink, rust orange, beige)
- Foam sponge brushes or cosmetic wedges
- Scrap paper or newspaper
- Paper towels
- Heavy book (optional)
- Matte spray varnish (optional)
Step 1: Preparation
-
Gather and press leaves:
Collect a variety of leaves from your garden or park. Look specifically for leaves with prominent, raised veins on the backside, as these create the crispest prints. If your leaves are very curly, press them under a heavy book for about 30 minutes to flatten them slightly without drying them out completely. -
Prepare the palette:
Squeeze small amounts of your acrylic paints onto a palette or paper plate. To achieve that vintage look shown in the photo, stick to earthy, muted tones rather than bright primaries. You might need to mix a little white or brown into your colors to soften them. -
Plan the layout:
Before using any paint, arrange your dry leaves on the blank canvas to determine the best composition. I like to take a quick photo of this arrangement with my phone to use as a reference guide once I start printing.
Smudge Prevention
Use a clean paper towel for pressing every single leaf. If you reuse a towel that has paint bleed-through on it, you will accidentally stamp unwanted smudges onto your white background.
Step 2: Printing the Leaves
-
Apply paint to the first leaf:
Select your largest leaf first, such as the maple shape. Place it vein-side up on a piece of scrap paper. -
Dab, don’t brush:
Dip a foam sponge or cosmetic wedge into your sage green paint. Dab off the excess on a paper towel—you want a thin, even coat, not a gloppy one. -
Coat the leaf surface:
Gently dab the paint over the entire surface of the leaf. Ensure you cover the stem and the outer edges, but try not to let paint pool in the crevices between veins. -
Position the leaf:
Carefully pick up the leaf by its stem or edge and hover it over the canvas. Once you are happy with the placement, lower it down. Commit to the placement immediately—do not shift it once it touches the canvas. -
Press for transfer:
Place a clean paper towel over the painted leaf. Press down firmly with the palm of your hand. gently rub your fingers over the entire area of the leaf to ensure the veins make contact. -
Reveal the print:
Lift the paper towel, then carefully peel the leaf off the canvas by the stem. Reveal your print and let it dry for a few minutes before moving to the next one.
Step 3: Building the Composition
-
Add contrasting colors:
Choose a different leaf shape and a contrasting heavy color, like the rust orange or dusty pink. Repeat the painting and pressing process. -
Layering lighter elements:
For the fern-like or smaller branch leaves, use a lighter touch with the sponge. These delicate shapes often look best in softer greens or beige tones. -
Fill the gaps:
Continue adding leaves to fill the white space. Vary the angles so some leaves gently tilt left and others tilt right, creating a natural, organic flow. -
Address missed spots:
If a print comes out too faint, you can try to re-align the leaf and press again, but often the imperfect, faded look adds to the charm. You can use a very fine liner brush to touch up a missing stem if absolutely necessary.
Textured Dimension
For a 3D effect, mix a tiny amount of modeling paste into your acrylic paint before sponging it on. The leaf veins will leave a physically raised texture on the canvas.
Step 4: Finishing Touches
-
Dry completely:
Allow the canvas to dry uninterrupted for at least one hour. Acrylics dry quickly, but thicker areas of paint might need more time. -
Seal the artwork:
To protect the prints from dust and fading, take the canvas to a well-ventilated area and apply a light coat of matte spray varnish. -
Display:
Once the varnish is dry, set your canvas onto the mini wooden easel to complete the rustic, artistic presentation.
Now you have a serene piece of botanical art that preserves the beauty of the outdoors
Scraper Swipe Canvas for Toddler Color Layers
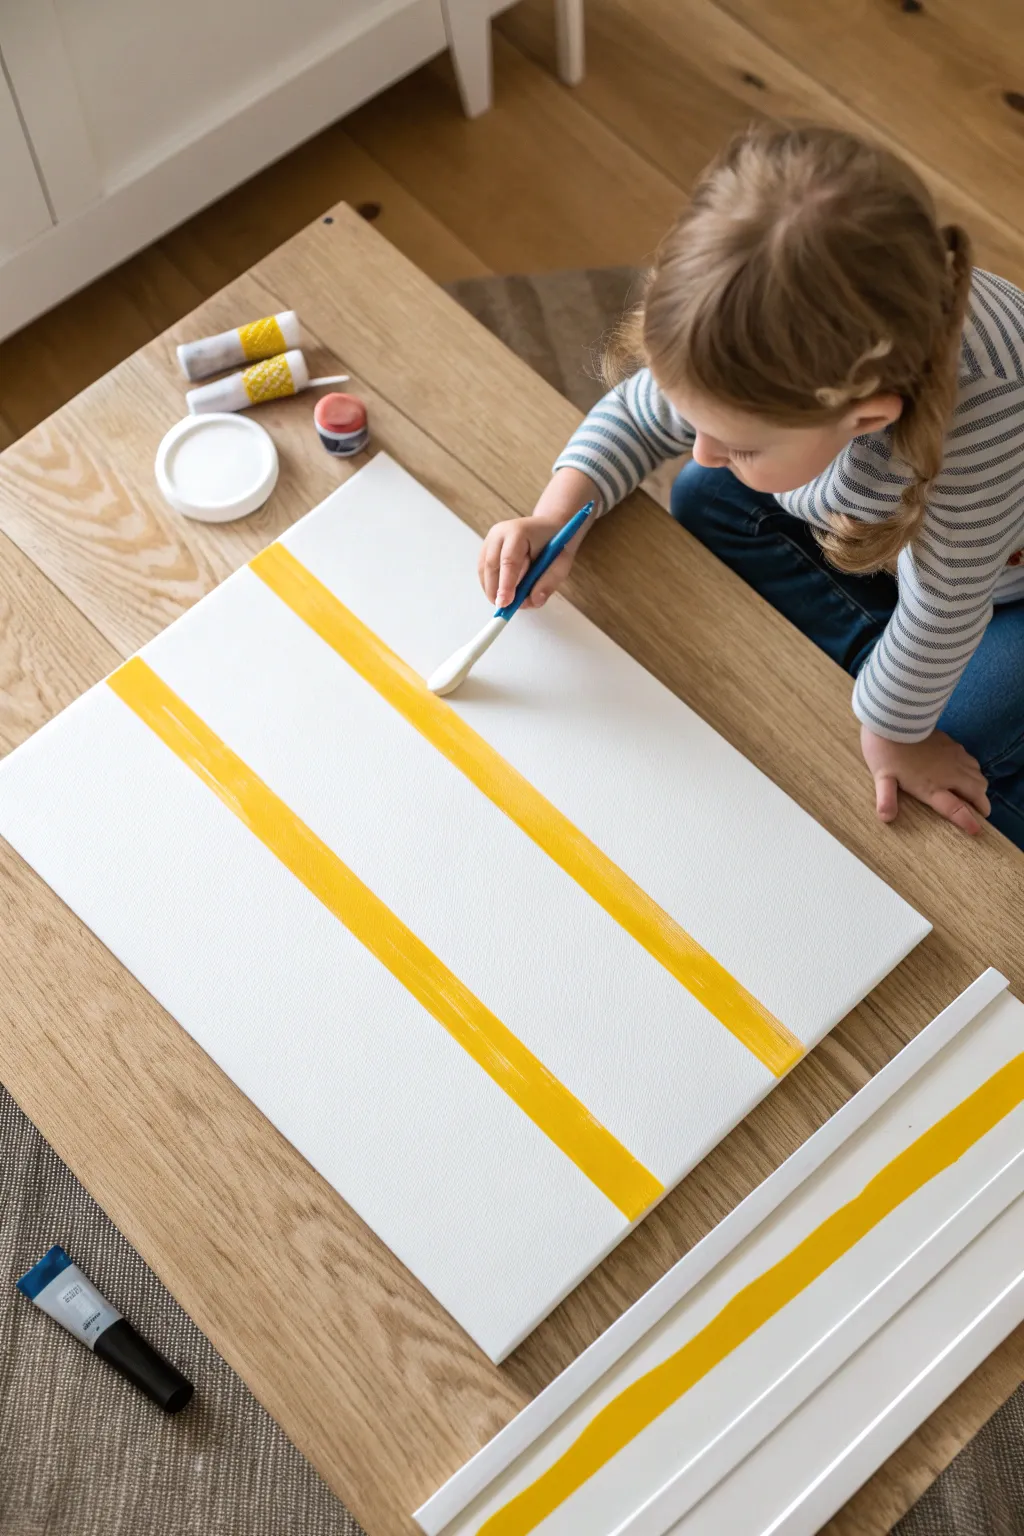
Create a bold, geometric masterpiece with this simple yet striking stripe technique. Using bright yellow against a crisp white background, toddlers can explore straight lines and color saturation in a controlled, satisfying way.
Step-by-Step Guide
Materials
- Rectangular stretched canvas (medium size)
- Acrylic paint (bright yellow and white)
- Wide flat paintbrush (synthetic bristles work best)
- Painter’s tape or masking tape (optional for guidance)
- Palette or paper plate
- Floor covering or drop cloth
Step 1: Setting the Stage
-
Prepare the workspace:
Since this project uses bright acrylics, lay down a drop cloth or old sheet on the floor or table to catch any drips. -
Position the canvas:
Place the canvas flat on your work surface. Working on a flat plane rather than an easel gives toddlers better control over their downward pressure when making stripes. -
Base coat considerations:
If your canvas isn’t brilliantly white or has a rough texture, you might want to apply a quick coat of white gesso or acrylic first and let it dry completely. This ensures the yellow pop later.
Wobbly Lines?
If the stripes look messy, wait for the yellow to dry completely. Then, use white paint and a straight edge (like a ruler) to tidy up the sides of the stripes.
Step 2: Creating the Guides
-
Plan the layout:
Visualize where the stripes will go. For the look in the image, aim for three thick diagonal bands. -
Mark loose guides:
For younger toddlers who need boundaries, lightly place strips of painter’s tape to mark the edges of where the yellow stripes should go. This is a “safe zone” for them to paint within. -
Prepare the paint:
Squeeze a generous amount of bright yellow acrylic paint onto a palette. You want enough paint on the brush to make a solid streak without constantly reloading.
Add Texture
Mix a little sand or flour into the yellow paint before applying. This adds a cool, gritty texture to the stripes that contrasts with the smooth canvas.
Step 3: Painting the Stripes
-
Load the brush:
Help your child saturate the wide flat brush with yellow paint. I prefer to coat both sides of the bristles evenly for a smoother application. -
Start the first stripe:
Encourage the child to place the brush near the top edge of the canvas. Guide their hand gently if needed to start the motion. -
The swipe technique:
Instruct them to pull the brush down in one long, continuous motion if possible. This creates that clean, ‘scraper’ look where the paint is thick and uniform. -
Refine the line:
If the first pass is too streaky, go over the same line again immediately. The goal is a solid band of color. -
Space it out:
Move the brush a few inches down the canvas to start the second stripe. Leave a good amount of white space between the yellow bands to keep the design airy. -
Paint the middle stripe:
Repeat the swiping motion for the central stripe. Try to keep this line parallel to the first one for a cohesive geometric look. -
Add the final stripe:
Create the third stripe near the bottom corner. It’s okay if the spacing isn’t mathematically perfect; the handmade variations add charm. -
Clean up edges:
Check the edges where the paint meets the white space. If paint has smudged outward, use a damp cloth or a clean brush with white paint to tidy it up while wet.
Step 4: Finishing Touches
-
Remove tape guides:
If you used painter’s tape, peel it off carefully while the paint is still slightly tacky but not fully dry to prevent peeling chunks of color. -
Check for coverage:
Look for any spots in the yellow stripes where the canvas shows through too much. Dab a little extra paint there to make the color solid. -
Dry flat:
Leave the artwork flat to dry completely. This prevents the thick yellow paint from running or dripping down the white sections.
Hang this bright, sunny artwork in a play area to add a splash of cheerful color
Stencil Silhouette Canvas With Toddler Brush Marks
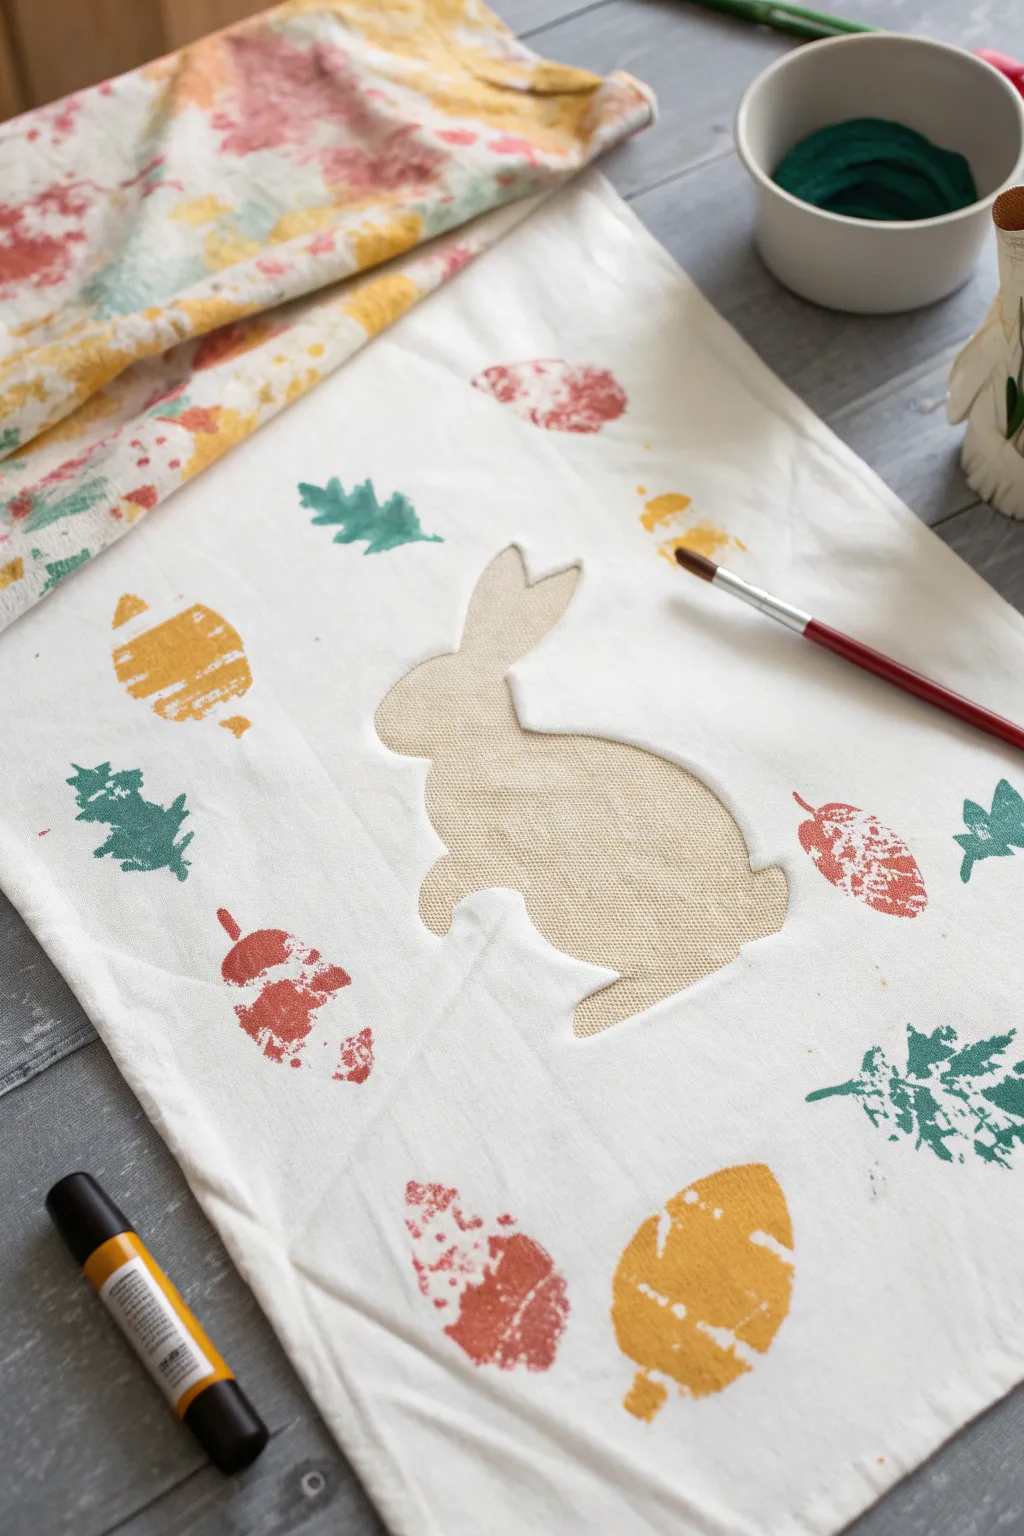
Create a charming woodland scene with this clever negative-space technique that turns chaotic toddler painting into polished art. By using a simple contact paper stencil, you can preserve a crisp bunny silhouette while letting your little one have freedom with fall-themed stamps and colors.
Step-by-Step Guide
Materials
- White cotton tote bag or canvas panel
- Self-adhesive contact paper or vinyl
- Pencil and scissors
- Fabric paints (muted red, forest green, mustard yellow)
- Small painting sponges or sponge stamps (leaf and acorn shapes)
- Paintbrush (for touch-ups)
- Paper plate or palette
- Cardboard insert (to prevent bleed-through)
Step 1: Preparing the Canvas
-
Prepare the fabric:
Wash and dry your tote bag or canvas fabric if it is new to remove any sizing. Iron it flat to ensure a smooth printing surface. -
Protect the layers:
Slip a piece of thick cardboard or a few layers of newspaper inside the tote bag. This is crucial to prevent paint from seeping through to the back side of the bag. -
Draft the bunny:
On the backing side of your contact paper, draw the outline of a bunny. You can draw this freehand or print a simple clipart silhouette to trace. -
Cut the stencil:
Carefully cut out the bunny shape with scissors. You will be using the actual bunny shape (the positive sticker), not the surrounding paper. -
Adhere the silhouette:
Peel the backing off the bunny shape and press it firmly onto the center of your canvas. Smooth out the edges well, especially around the ears and paws, to stop paint from sneaking underneath.
Bleeding Edges?
If paint is seeping under the sticker, try applying a thin layer of clear medium or white paint over the sticker edges first to seal them before adding color.
Step 2: Stamping and Painting
-
Set up the palette:
Squeeze small dollops of red, green, and yellow fabric paint onto a paper plate. Space them out so the colors don’t get muddy immediately. -
Load the sponge:
Dip a leaf-shaped sponge stamp into the green paint. Dab it on a clean part of the plate once or twice to remove excess paint, ensuring a cleaner print. -
Start stamping:
Have your toddler press the sponge stamp onto the canvas. Encourage them to stamp primarily around the edges of the bunny sticker, but also scattered across the white space. -
Switch shapes:
Repeat the process with an acorn-shaped sponge and the reddish-brown paint. I like to rotate the stamps slightly each time so the pattern looks natural and organic. -
Add golden accents:
Use a round or oval sponge with the mustard yellow paint to add contrast. These bright pops of color balance out the darker red and green tones. -
Check the perimeter:
Ensure there are plenty of stamped shapes overlapping the edge of the contact paper bunny. This concentration of color defines the silhouette clearly once the sticker is removed. -
Fill empty spots:
Look for large white gaps in the background and add a few more small stamps to balance the composition, keeping the density light and airy.
Step 3: Finishing Touches
-
Let it dry partially:
Allow the paint to dry for about 15 to 20 minutes. It should be tacky but not wet to the touch. -
Reveal the bunny:
Carefully peel up the contact paper bunny, starting from the ears and pulling slowly towards the feet to maintain a sharp edge. -
Touch up edges:
If any paint bled under the sticker, you can gently scrape it away with a craft knife or dab a tiny bit of white paint over the mistake using a fine brush. -
Heat set the paint:
Once the paint is completely dry (usually 24 hours), follow the manufacturer’s instructions for heat setting, which typically involves ironing the reverse side of the fabric. -
Clean up:
Wash brushes and sponges immediately with warm soapy water to preserve them for your next crafting session.
Add Texture
Once the bunny sticker is removed, glue a small fluffy pom-pom in place for a 3D tail, or embroider a simple outline around the shape for definition.
Now you have a custom, seasonally festive tote bag ready for library trips or grocery runs
Tape-Grid Toddler Canvas in a Limited Palette
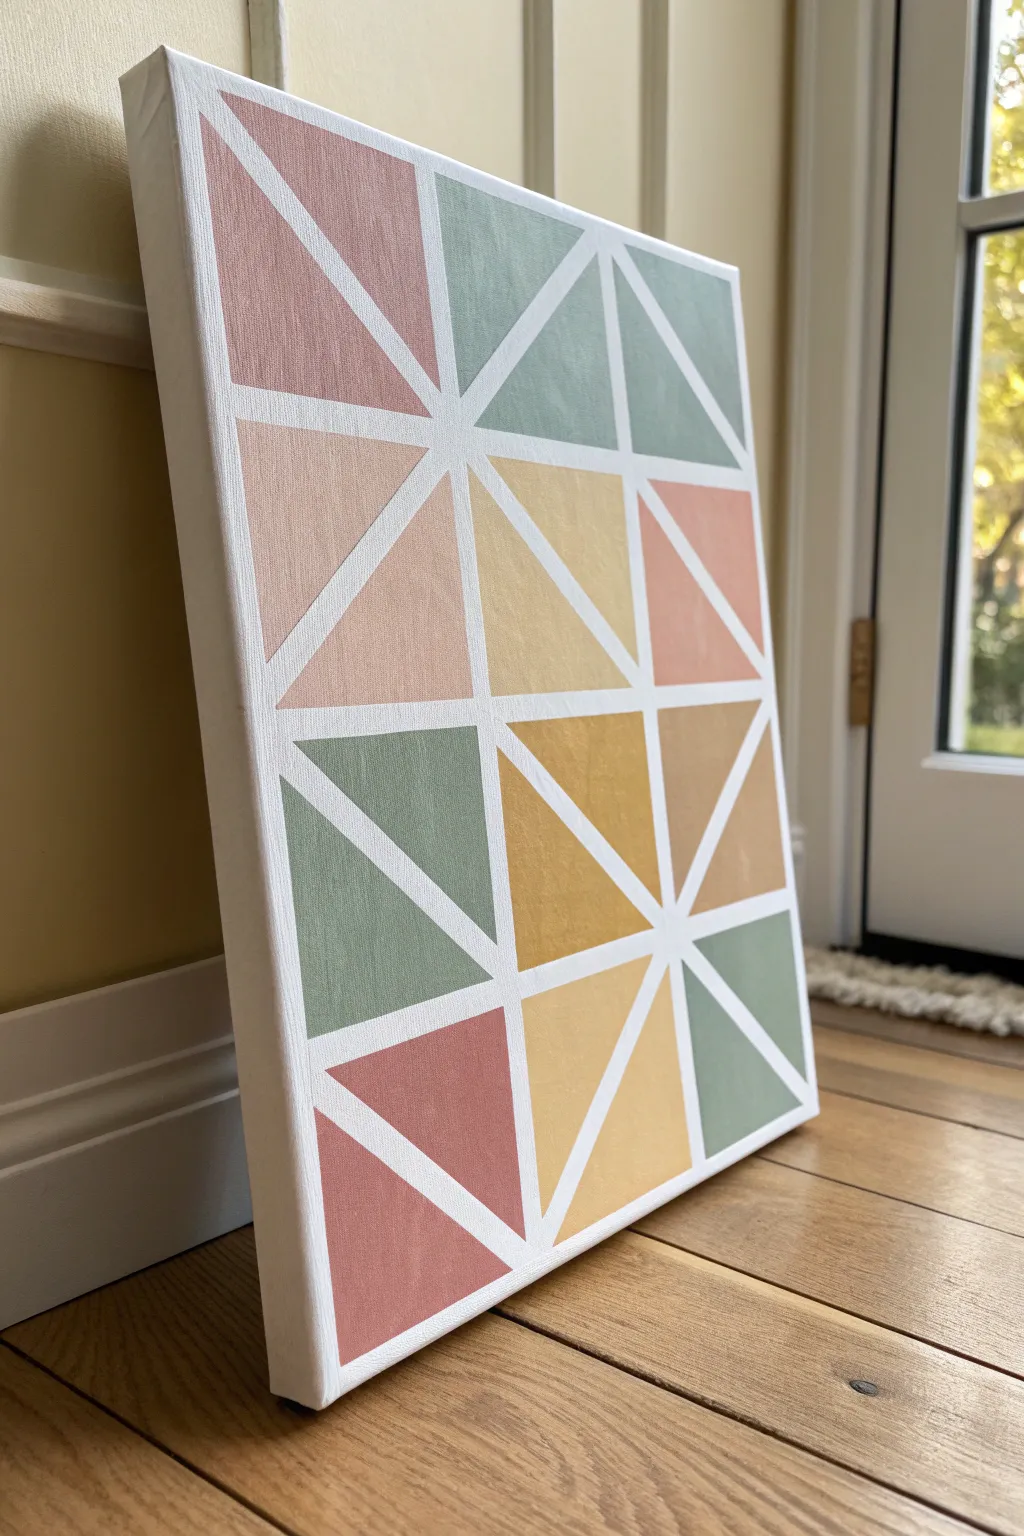
Transform a plain white canvas into a sophisticated geometric masterpiece using a simple tape-resist technique perfect for little hands. With a muted, earthy palette of dusty pinks, sage greens, and warm mustards, this project creates striking modern art that looks professional but is toddler-friendly.
Detailed Instructions
Materials
- Stretched white canvas (square or rectangular)
- Painters tape or masking tape (approx. 1/4 to 1/2 inch width)
- Acrylic paints (dusty pink, sage green, mustard yellow, terracotta)
- Paintbrushes (various sizes suitable for toddlers)
- Paper plate or palette
- Newsprint or drop cloth for surface protection
- Scissors
Step 1: Setting the Grid
-
Prep your surface:
Begin by laying down newsprint or a drop cloth on your work area to catch any spills. Place your clean, white canvas in the center. -
Create the main structure:
Apply long strips of painter’s tape across the canvas vertically and horizontally to create a basic grid of squares or rectangles. Press the tape down firmly to ensure a good seal. -
Add diagonal dynamism:
Within each square or rectangle of your grid, place pieces of tape diagonally. You can choose to make ‘X’ shapes or single diagonal lines to create various triangle sizes. -
Secure the edges:
Run your finger or a clean cloth along all edges of the tape. This is crucial to prevent paint from bleeding underneath and ensures those crisp white lines later. -
Check the corners:
Double-check where pieces of tape overlap. Press these intersections down extra firmly so they stay flat during the painting process.
Step 2: Applying Color
-
Prepare the palette:
Squeeze small amounts of your chosen acrylic colors onto a paper plate. Limiting the palette to 3-4 cohesive colors helps maintain the sophisticated look shown in the example. -
Select a starting zone:
Encourage your toddler to pick one specific triangle to start with. This helps them focus on filling shapes rather than scrubbing paint across the whole board. -
Fill the shapes:
Paint inside the taped-off triangles. It’s perfectly fine to paint over the tape itself; in fact, painting over the edges ensures full coverage of the shape. -
Rotate colors:
Try not to put the same color in adjacent shapes. I like to guide the process gently by asking, ‘Shall we put green here since pink is next door?’ -
Manage paint thickness:
Ensure the paint isn’t applied too thickly. Thick globs can peel up with the tape later, so aim for a smooth, even coat. -
Touch up weak spots:
Look for any white canvas showing through within the triangles and dab a little extra paint there to make the color solid.
Bleeding Edges?
If lines aren’t crisp, paint a layer of white over the tape edges first. Let it dry, then paint the colors. This seals the tape perfectly.
Step 3: The Reveal
-
Let it dry completely:
This is the hardest part—patience! Allow the painting to dry fully. Acrylics usually take about 20-30 minutes depending on thickness. -
Start the peel:
Once dry to the touch, begin peeling the tape. Start from an outer edge and pull slowly at a 45-degree angle away from the paint. -
Remove the layers:
Continue peeling the tape strips. You may need to help your toddler here, as pulling too fast can sometimes rip the canvas texture or lift paint. -
Clean up lines:
If you notice any small bleeds where paint sneaked under the tape, you can touch them up carefully with a tiny brush and some white paint. -
Final inspection:
Check the edges of the canvas. If the design wraps around the sides, ensure those are painted; otherwise, keep the sides clean white for a framed look. -
Sign the work:
Have your little artist sign their name or add the date on the back of the canvas frame to commemorate their geometric creation.
Color Harmony
Limit the palette to 3 muted tones plus one ‘pop’ colour. This ensures the random placement still looks cohesive and stylish.
Hang your new geometric art in a well-lit spot to admire those satisfyingly crisp lines and beautiful colors
Collaborative Mega-Canvas Painting for Toddlers
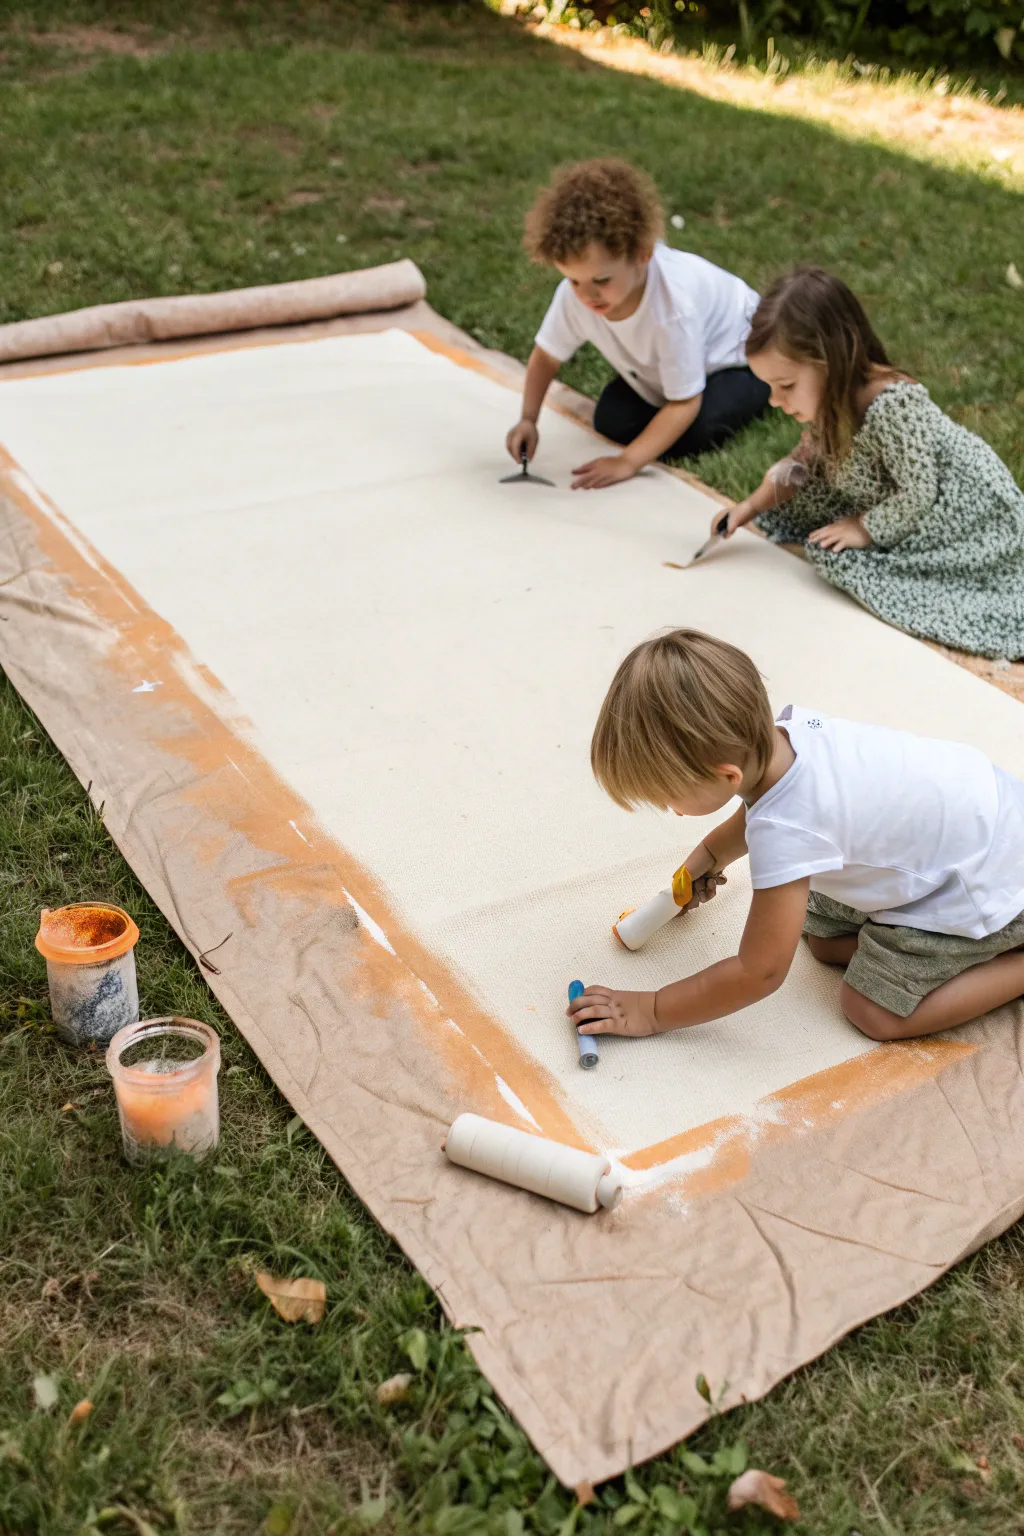
Transform your backyard into an open-air studio with this large-scale collaborative art project designed for little hands. Using a massive canvas sheet and toddler-friendly tools like rollers and scrapers, this activity invites free expression while creating a stunning, modern abstract piece full of texture.
How-To Guide
Materials
- Large canvas drop cloth (heavy-duty cotton) or painter’s canvas runner (approx. 4ft x 10ft)
- Non-toxic tempera or acrylic paints (white, light beige/tan, warm ochre)
- Foam rollers with handles (3-4 inch width)
- Plastic putty knives or paint scrapers (dull edges for safety)
- Large plastic jars or buckets for paint
- Heavy rocks or weights (to secure canvas corners)
- Old sheet or tarp (to go underneath the canvas, optional)
- Blue painter’s tape or masking tape (optional for creating borders)
Step 1: Setting the Stage
-
Prepare the workspace:
Find a large, flat grassy area in your yard. Lay down a protective tarp first if the grass is damp, then roll out your large canvas drop cloth on top of it, ensuring it creates a smooth surface. -
Secure the canvas:
Since this is an outdoor project, wind can be a factor. While you can use rocks, I prefer placing heavy items or even small tent stakes at the very edges to pull the canvas taut so it doesn’t bunch up while the kids are working. -
Create a border:
To achieve the clean, framed look seen in the image, apply a strip of painter’s tape or masking tape about 6-8 inches from the edge around the entire perimeter of the canvas. -
Mix the base colors:
In your large jars, prepare a generous amount of white paint mixed with just a tiny drop of beige or cream. You want a very light, almost white base that mimics the look of primed canvas. -
Prepare the accent colors:
In separate containers, pour out the warm ochre or terra cotta paint. This will be used for the vibrant border and subtle highlights.
Step 2: The Painting Process
-
Apply the primer layer:
Invite the toddlers to start with the foam rollers dipped in the white/cream mixture. Encourage them to roll back and forth, covering the large central area inside the tape border. -
Ensure full coverage:
Help them spread the paint so it soaks into the fabric weave. The goal isn’t perfect opacity, but rather a uniform, primed texture. -
Start the border work:
Once the center is mostly covered, guide them to the outer edges. Using rollers or brushes, have them apply the warm ochre paint to the area outside the tape border (or directly on the edge if you skipped taping). -
Blend the transition:
Allow the border color to messy-meet the central white area. It doesn’t need to be a hard line; a little blending adds to the organic feel. -
Introduce texture tools:
Hand out the plastic putty knives or scrapers. Show the children how to drag the tool across the wet paint. -
Scrape and smooth:
Let them practice ‘squeegeeing’ the paint. This technique pushes the pigment into the canvas grain and removes excess blobs, creating that professional, flat-matte finish. -
Add gentle highlights:
Dip a scraper lightly into the beige or ochre paint and have them drag it sporadically across the white center. This creates faint, wispy streaks of color without overwhelming the brightness. -
Refine the edges:
If paint has pooled too thickly on the borders, use a clean roller to smooth it out, creating a cohesive frame for the artwork. -
Final texture check:
Look for areas where the canvas weave is completely hidden by thick paint. Use a clean dry roller or scraper to lift that paint slightly, revealing the beautiful fabric texture underneath. -
Remove the tape:
If you used tape for a sharp border, peel it away carefully while the paint is still slightly tacky, not fully dry, to prevent chipping. -
Let it cure:
Leave the mega-canvas in the sun to dry completely. Because heavy canvas absorbs a lot of moisture, this might take a few hours or even a full afternoon.
Sun-Kissed Drying Tip
Let the canvas dry flat in direct sunlight. The heat helps tighten the fabric fibers, pulling the canvas taut and reducing wrinkles for a smoother finish.
Paint Too Thick?
If the paint feels too gloopy or sits on top like plastic, mist the canvas slightly with water. This thins the paint so it soaks into the fibers better.
Once dry, you can stretch this massive collaborative piece onto a wooden frame or hang it tapestry-style for a dramatic playroom feature


Have a question or want to share your own experience? I'd love to hear from you in the comments below!