There’s something ridiculously satisfying about turning a smooth stone into a plump little chicken rock—the shape does half the work for you. I pulled together my favorite chicken rock painting ideas that feel beginner-friendly but still look charming enough to display anywhere.
Classic Yellow Spring Chick

Brighten up your windowsill with this delightfully simple yellow chick rock. Its charming expression comes from just a few well-placed details, making it a perfect beginner project that captures the essence of spring in a palm-sized pebble.
Step-by-Step
Materials
- Smooth, egg-shaped rock (roughly palm-sized)
- Yellow acrylic paint (bright, sunny shade)
- Orange acrylic paint
- Black acrylic paint
- White acrylic paint
- Wide flat paintbrush
- Fine detail paintbrush or liner brush
- Dotting tool or toothpick
- Clear acrylic sealer (matte or flossy)
- Water cup and paper towels
Step 1: Base Coat
-
Clean the surface:
Begin by washing your rock with warm soapy water to remove any dirt or oils. Scrub it gently, rinse well, and let it dry completely before painting. -
Apply the first layer:
Squeeze out your bright yellow acrylic paint. Using your wide flat brush, coat the entire top surface of the rock. Don’t worry about the bottom just yet; focusing on the visible area makes handling easier. -
Let it dry:
Allow this first coat to dry to the touch. Yellow pigments can sometimes be translucent, so waiting is key. -
Add a second coat:
Apply a second layer of yellow paint to ensure solid, opaque coverage. If you can still see the greyness of the stone, a third coat might be necessary for that vibrant, sunny look. -
Smooth the texture:
If your rock has natural divots, dab a little extra paint into them to create a smoother visual surface, then let the yellow base cure completely.
Uneven Coverage?
If your yellow looks streaky, try painting the rock with a coat of white primer first. This makes the yellow pop instantly with fewer layers.
Step 2: Facial Features
-
Outline the beak:
Switch to your fine detail brush. Load it with orange paint and carefully paint a small, inverted triangle in the center of the rock face. This will be the beak. -
Fill the beak:
Fill in the orange triangle. I find that doing two thin layers here prevents the orange from looking muddy against the yellow background. -
Position the eyes:
Visualize where the eyes should go—slightly above the beak and spaced apart. You want them high enough to make the chick look cute and alert. -
Paint the eye shape:
Using black paint and your detail brush (or a medium-sized dotting tool), create two solid black ovals or circles. Keep the edges as crisp as possible. -
Refine the edges:
If the black paint looks streaky, carefully dab a tiny bit more paint on top to make the eyes look deep and solid. -
Dry the features:
Allow the black and orange paint to dry completely. This step is crucial so the final highlights don’t smear into grey or peach swirls.
Fuzzy Feathers
For a softer look, dab a dry sponge with a slightly lighter yellow shade around the edges to mimic fluffy chick down texture.
Step 3: Highlights and Sealing
-
Add the spark:
Dip a toothpick or a very fine dotting tool into white acrylic paint. Place a small white dot in the upper right quadrant of each black eye. -
Double check the look:
Ensure both white dots are positioned on the same side (e.g., both on the right) to give the chick a focused gaze rather than a cross-eyed look. -
Final drying time:
Let the entire rock dry for several hours or overnight to ensure all layers of paint have fully hardened. -
Apply sealer:
Take your clear acrylic sealer and apply a thin, even coat over the painted surface. This protects the paint from chipping and makes the colors pop. -
Finish up:
once the top sealer is dry, you can flip the rock over and paint the bottom yellow if you wish, or leave it natural.
Place your finished chick near a light source to show off that cheerful yellow glow
Simple White Hen With Red Comb
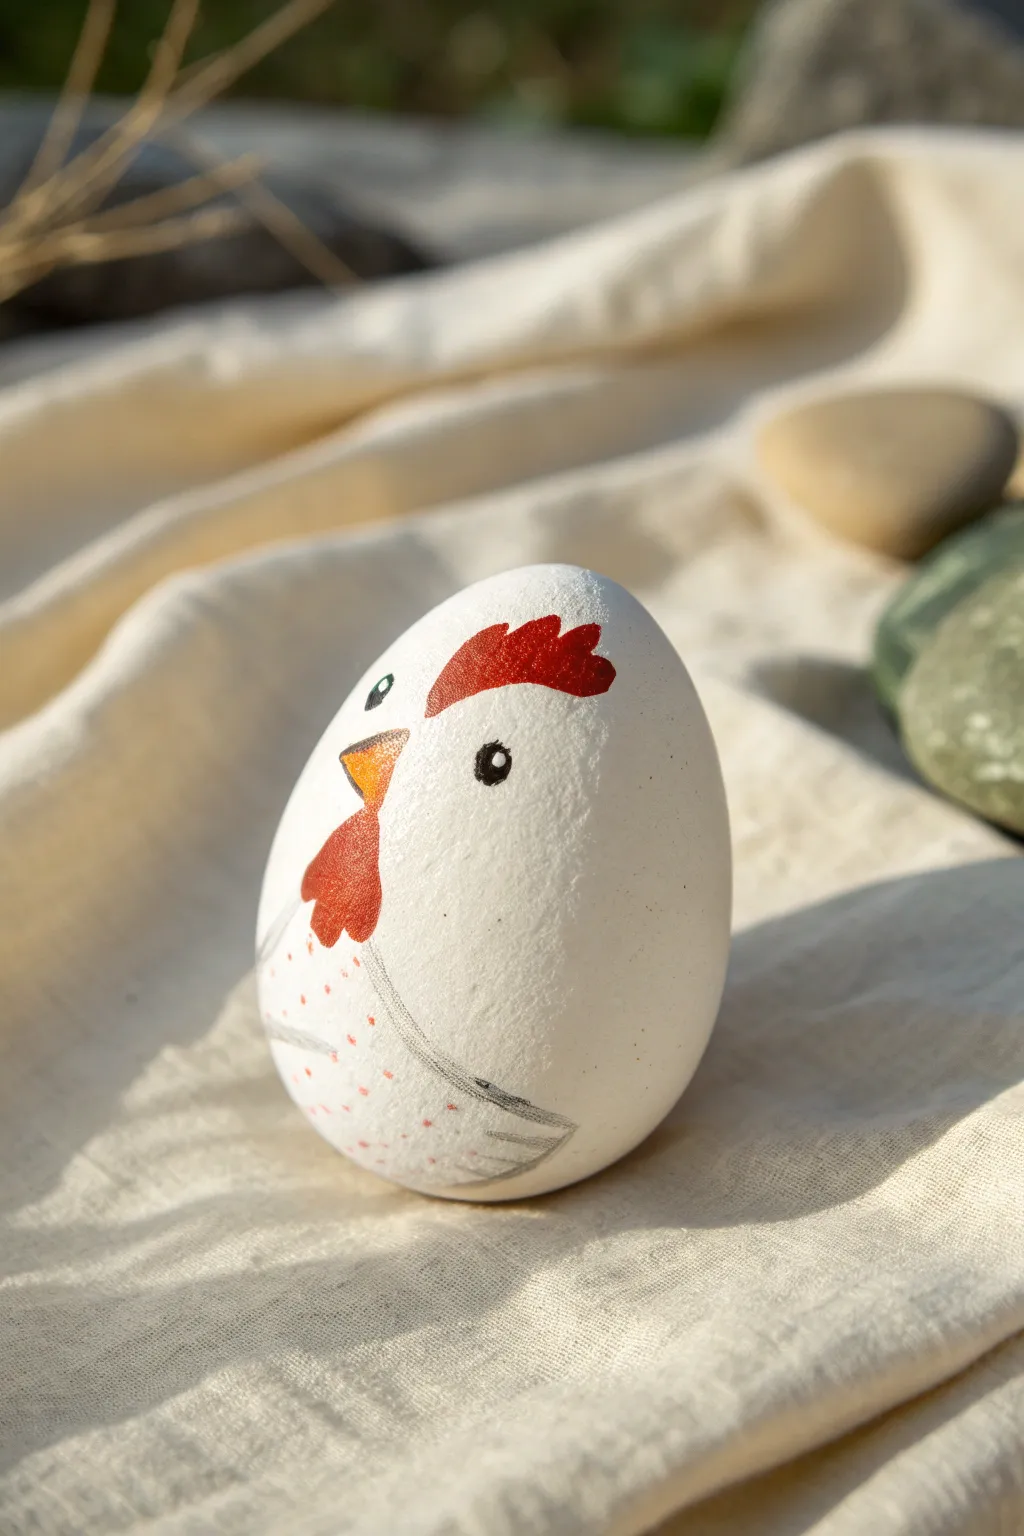
Embrace simplicity with this charming project that transforms a smooth, egg-shaped rock into a folk-art style hen. The clean white background makes the vibrant red comb and thoughtful little details pop, perfect for farmhouse decor or Easter baskets.
How-To Guide
Materials
- Smooth, egg-shaped rock (or wooden egg)
- White acrylic paint (matte finish)
- Red acrylic paint
- Orange acrylic paint
- Black fine-tip paint pen or detail brush
- Grey fine-tip paint pen (optional)
- Small flat brush
- Small round detail brush
- Pencil with eraser
- Matte sealant/varnish (spray or brush-on)
Step 1: Base Preparation
-
Clean and Dry:
Begin by thoroughly washing your rock with warm, soapy water to remove any dirt or oils. Let it dry completely in the sun or use a hairdryer to speed things up. -
Prime with White:
Using a flat brush, apply a coat of white acrylic paint over the entire surface of the rock. Don’t worry if it looks streaky at first. -
Build Opacity:
Once the first coat is dry to the touch, apply a second and possibly third coat of white paint. You want a solid, eggshell-like finish where the underlying stone color doesn’t peek through. -
Smooth the Canvas:
Inspect your white base for any brush strokes or bumps. If needed, very lightly sand it with high-grit sandpaper for a porcelain-smooth finish before proceeding.
Wobbly Lines?
If your hand shakes while painting details, rest your pinky finger on a dry part of the rock to stabilize your brush strokes.
Step 2: Drafting the Design
-
Orient the Rock:
Hold the rock vertically like an egg. Identify the slightly narrower end which will serve as the top of the hen’s head. -
Sketch the Face Placement:
Lightly sketch the position of the beak about one-third of the way down from the top. It should be slightly off-center to give the hen a side profile look. -
Outline the Comb:
Draw a wavy crest shape on the very top of the ‘head’. It should curve slightly backward, resembling three or four connected scallops. -
Mark the Wing:
Near the bottom third of the rock, sketch a simple curved line that sweeps up and back to suggest a folded wing.
Make It a Flock
Paint rocks of different sizes to create a whole family, using slightly different comb shapes or beak colors for each hen.
Step 3: Adding Color & Details
-
Paint the Comb:
Using a small round brush and bright red paint, carefully fill in the comb shape on top. You may need two thin coats to get a vibrant, solid red. -
Add the Wattle:
paint an inverted teardrop or heart shape directly below where the beak will go, using the same red paint. This is the wattle. -
Fill the Beak:
Paint the small triangular beak using orange paint. A fine detail brush works best here to keep the corners sharp. -
Draw the Eye:
Once the base paint is fully dry, use a black fine-tip paint pen to draw a small circle for the eye. Leave a tiny white dot in the center for a sparkle, or paint it solid. -
Outline the Eye:
Add a tiny, curved eyebrow line above the eye to give your hen a gentle expression. -
Create the Wing Line:
Using a grey paint pen or a brush with watered-down black paint, trace over your pencil sketch for the wing. Keep the line thin and delicate. -
Add Feather Texture:
Inside the wing shape, draw a few short, horizontal lines to suggest layers of feathers without getting too detailed. -
Dapple the Chest:
Dip the very tip of a clean brush or a toothpick into watered-down red paint. Gently tap tiny, random dots onto the chest area below the wattle for a speckled texture. -
Refine the Edges:
If any paint went outside the lines, use a little white paint to clean up the edges around the comb or beak for a crisp look.
Step 4: Finishing Touches
-
Erase Guide Lines:
Check for any visible pencil marks that weren’t covered by paint. Gently erase them, being careful not to rub off any fresh paint work. -
Seal the Artwork:
Protect your hen with a coat of matte spray varnish or sealant. This will keep the white paint from yellowing and protect the delicately painted details from chipping.
Now you have a serene little hen that brings a touch of country charm to any corner of your home


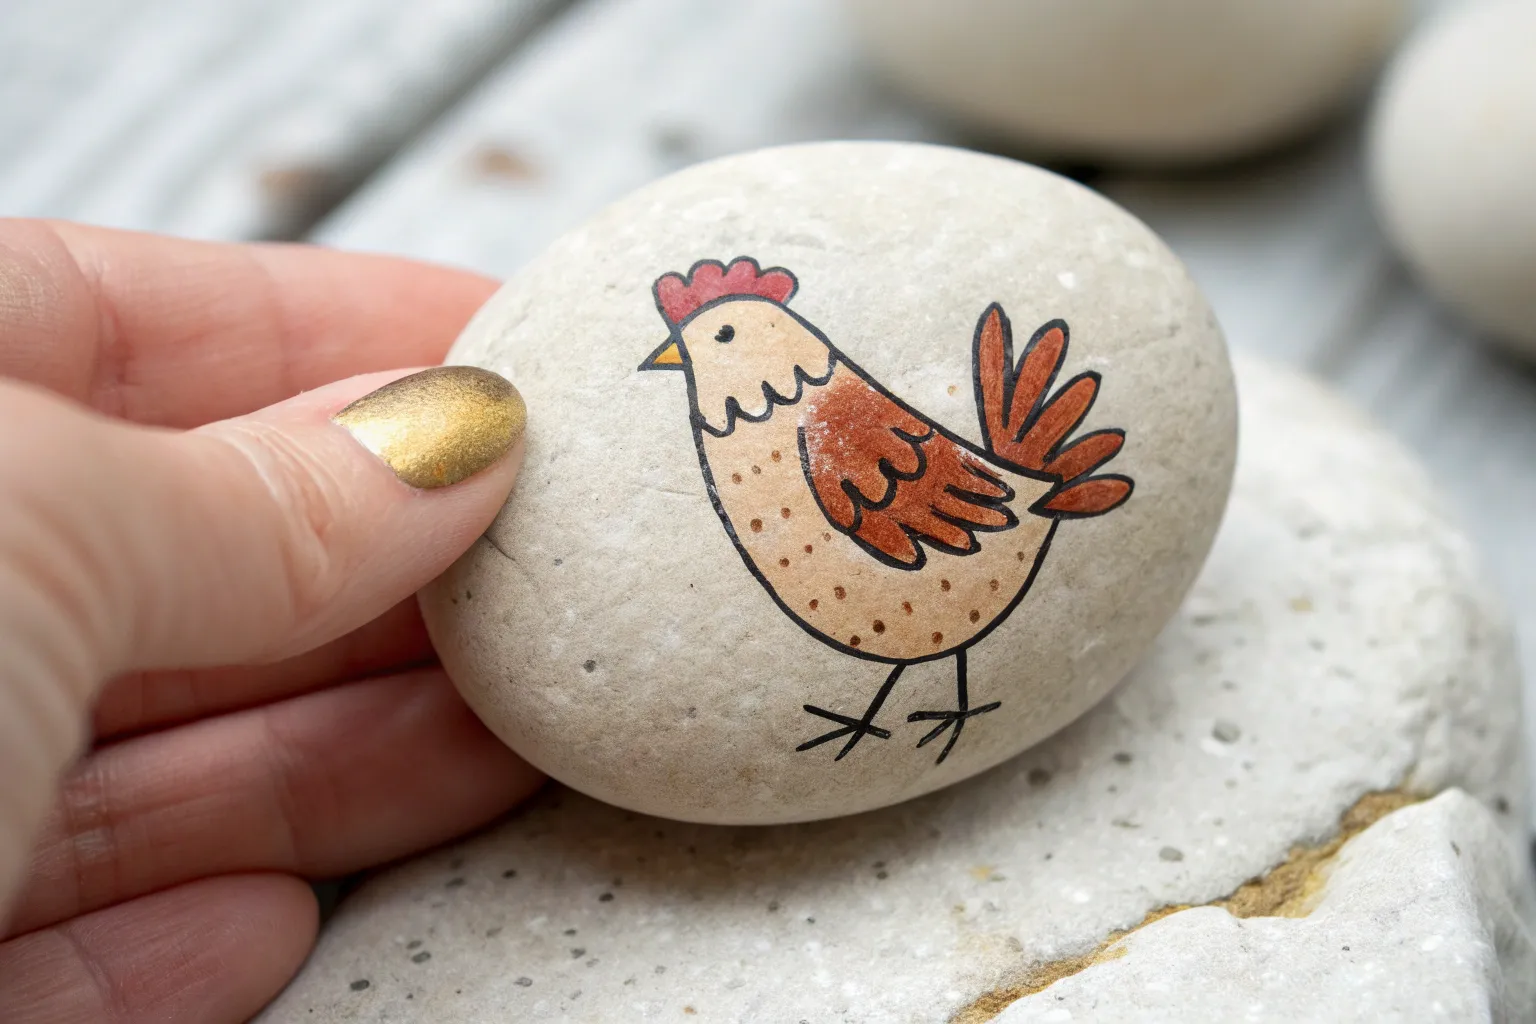
Polka Dot Chicken With Bright Comb
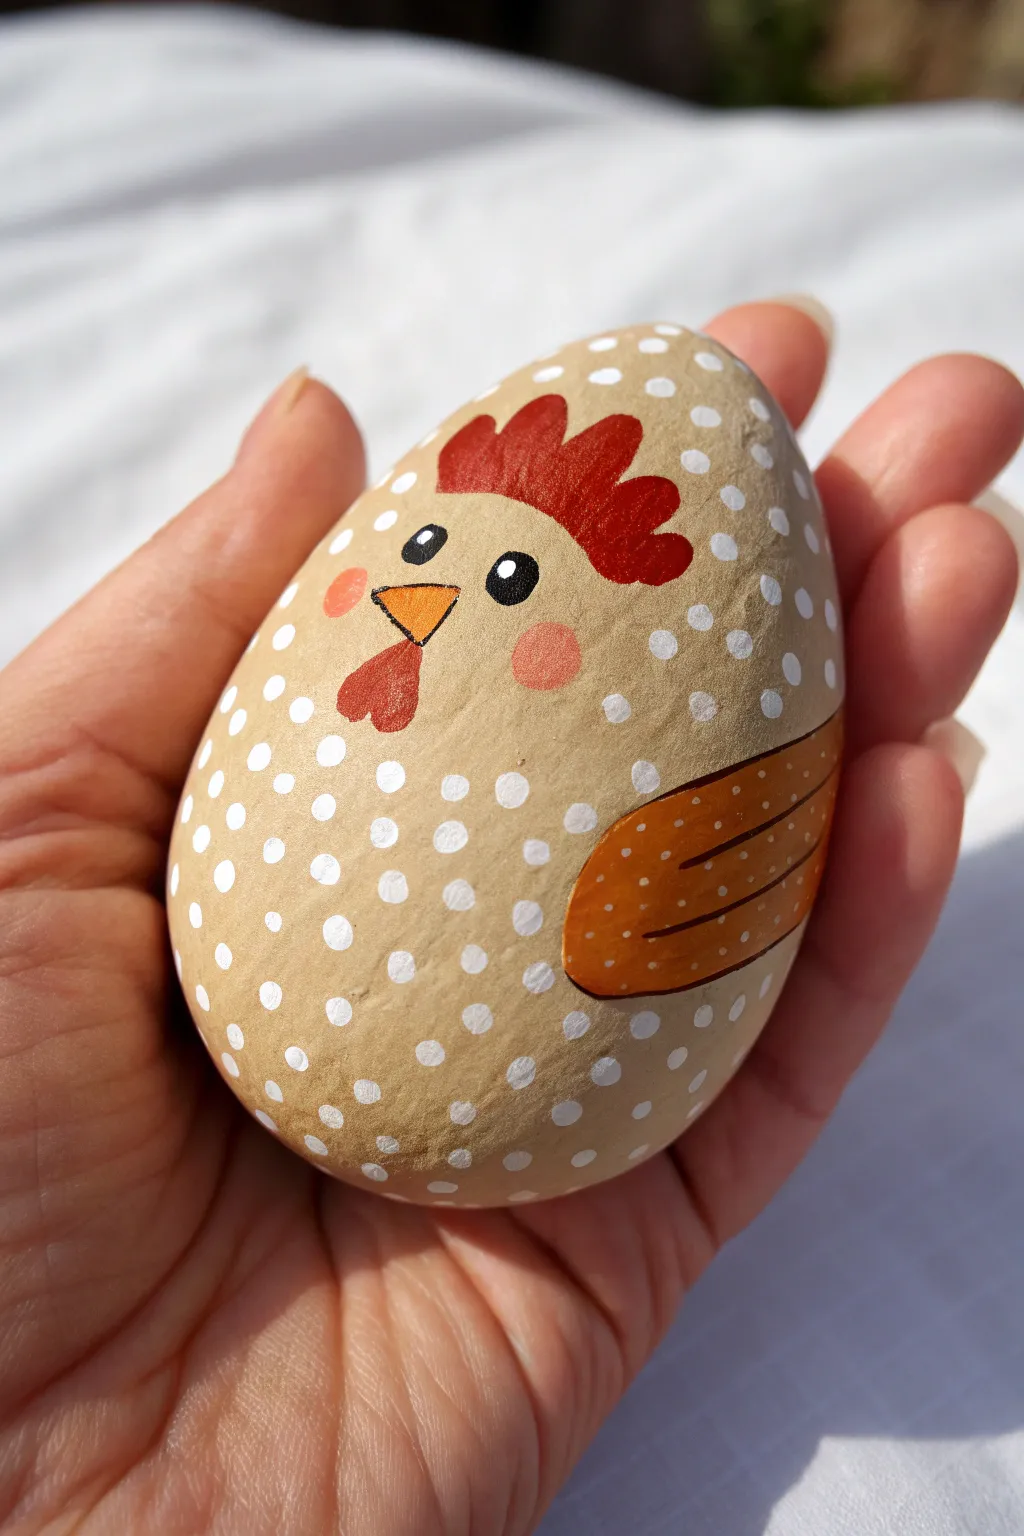
This delightful rock painting transforms a simple stone into an adorable hen character with just a few colors and patterns. The natural polka dot texture against a tan background gives it a folk-art charm perfect for Easter decor or garden accents.
Step-by-Step Tutorial
Materials
- Smooth, egg-shaped rock (river stone)
- Acrylic paints (Tan/Beige, White, Red, Black, Orange, Burnt Sienna/Deep Orange, Pink)
- Flat paint brushes (medium and small)
- Fine liner brush or detail brush
- Dotting tool (or the handle end of a paintbrush)
- Matte or satin sealant spray or varnish
- Palette or paper plate
- Water cup and paper towels
Step 1: Base Coat and Preparation
-
Clean Your Canvas:
Begin by washing your stone with warm water and soap to remove any dirt or grease. Dry it thoroughly before starting. -
Apply the Base Color:
Mix a warm tan or beige acrylic paint. Using a medium flat brush, coat the entire top surface of the rock. You may find that two coats are necessary for solid, opaque coverage. -
Dry Completely:
Allow the base coat to dry completely. This prevents your detailed work from blending into the background color.
Dotting Consistency
Reload your dotting tool after every single dot for perfectly uniform circles. If you want varied sizes, you can dot twice before reloading.
Step 2: Adding the Polka Dots
-
Prepare the Dots:
Dip a medium-sized dotting tool or the back of a paintbrush handle into white acrylic paint. It helps to have a generous puddle of paint on your palette. -
Pattern the Body:
Stamp white dots evenly across the entire tan surface of the rock. Try to keep the spacing relatively uniform, but don’t worry about perfection; the handmade look adds character. -
Leave Face Space:
While dotting, keep in mind where the face will go. You can dot over the whole thing and paint over it later, but the finish is smoother if you leave the upper central area slightly less crowded or be prepared to paint the features thickly over the dots.
Uneven Coverage?
If the tan base coat looks streaky, let it dry completely and apply a second coat in the opposite direction (cross-hatching) for a solid finish.
Step 3: Painting the Features
-
Paint the Comb:
Using a small flat brush and bright red paint, create the chicken’s comb at the very top. Paint three or four rounded, scalloped shapes extending upward. -
Add the Beak:
In the center of the face area, use orange paint and a small detail brush to paint a small triangle pointing downward for the beak. -
Create the Wattle:
Directly below the beak, paint an upside-down heart shape or teardrop shape using a dark red or burnt sienna color for the wattle. -
Paint the Wing:
On the lower right side of the rock, paint a curved, wing-like shape using a deep orange or burnt sienna paint. It should curve upwards slightly toward the back. -
Outline the Wing:
Once the wing color is dry, use a very fine liner brush and black paint (or a fine tip paint pen) to outline the wing shape. Add two internal curved lines to suggest feathers. -
Wing Details:
Use your smallest dotting tool to add tiny white dots purely inside the painted wing area for texture.
Step 4: Facial Details
-
Draw the Eyes:
Using black paint and a dotting tool or small brush, place two solid black circles above the beak. Position them slightly wide apart for a cute expression. -
Add Eye Highlights:
Once the black paint is dry, use a toothpick or a tiny dotting tool to add a single small white speck to the upper right corner of each black eye. -
Outline Beak and Wattle:
Use your fine liner brush and thinned black paint to carefully outline the orange beak triangle. -
Add Rosy Cheeks:
Mix a sheer pink or water down some red paint. Gently dab circular pink cheeks on either side of the beak area. If the paint is too opaque, blot it with your fingertip to soften the look. -
Final Retouches:
Check your white background dots. If any look faded or were accidentally painted over, refresh them now with a quick dab of white.
Step 5: Finishing Touches
-
Seal the Artwork:
Allow the rock to dry for at least 24 hours to ensure all layers are cured. -
Apply Varnish:
Spray the rock with a clear matte or satin sealer. This protects the paint from chipping and makes the colors pop without adding too much distracting glare.
Now you have a charming little chicken friend ready to brighten up your desk or flowerpot


Bold Rooster Portrait With Big Beak

Transform a simple egg-shaped stone into a proud rooster portrait featuring vibrant red plumage and intricate feather detailing. This striking design uses the natural white of the stone as a highlight, making the bold reds and blacks pop beautifully.
Step-by-Step Guide
Materials
- Smooth, egg-shaped white river rock
- Acrylic paints (bright red, dark red, crimson, yellow, ochre, black, white, grey)
- Pencil for sketching
- Fine liner brushes (sizes 0 and 00)
- Small flat brush
- Spray sealer or varnish (matte or gloss)
Step 1: Planning and Sketching
-
Stone Selection:
Choose a stone that stands upright on its own if possible, with a smooth, white or light-colored surface. The shape should resemble an egg, which perfectly mimics the silhouette of the rooster’s chest. -
Initial Outline:
Using a light pencil, sketch the outline of the rooster’s head in profile. Draw the jagged comb on top, the triangular beak, and the fleshy wattle hanging below the beak. -
Defining Areas:
Mark the separation between the red face area and the white neck feathers. Then, draw a curved line near the bottom quarter of the rock where the black chest feathers will begin.
Natural Texture Tip
Don’t completely cover the stone’s surface with paint in the neck area. Letting the natural rock texture show through adds organic depth to feathers.
Step 2: Painting the Base Colors
-
Intense Red Layer:
Load a small brush with bright red acrylic paint. Fill in the comb on top of the head and the wattle area below the beak. You may need two coats to get a truly opaque, vibrant red. -
Beak Coloring:
Paint the beak with a bright yellow. Once dry, add a touch of ochre or light brown along the bottom edge of the upper beak part to create a shadow and separation. -
Facial Features:
Paint the face area around the eye with a slightly darker red or crimson to differentiate it from the bright comb. Leave a small circular space unpainted for the eye. -
The Black Base:
Use a flat brush and black paint to fill in the bottom section of the rock. Curve the upper stroke upward slightly to suggest the roundness of the bird’s chest.
Step 3: Detailing the Face
-
Painting the Eye:
Carefully paint the iris of the eye with yellow/ochre. Once dry, use your finest brush or a dotting tool to add a black pupil in the center. -
Eye Highlight:
Add a tiny speck of white paint to the black pupil at the top right (the 2 o’clock position). This ‘catchlight’ instantly brings the rooster to life. -
Defining the Eye:
Outline the yellow eye with a very thin black line, and add a small white patch just behind the ear area (the earlobe) for contrast against the red skin. -
Adding Depth to the Comb:
Mix a tiny bit of black into your red to create a deep maroon. Paint thin lines or strokes at the base of the comb spikes and the wattle to create texture and shadow.
Level Up: 3D Gloss
After sealing the whole rock, add a drop of dimensional glaze or glossy varnish specifically to the eye. It creates a realistic, wet-look shine.
Step 4: Feather Texture
-
Neck Feather Base:
If your rock isn’t naturally bright white, paint the neck area white now. If it is, you can use the natural stone color. Begin painting thin, sweeping grey lines starting from under the red wattle, moving downwards. -
Adding Warmth:
Intersperse some very pale yellow or cream-colored strokes among the white neck feathers. This adds warmth and realism to the plumage. -
Deepening Shadows:
Use a diluted black or dark grey paint on your finest brush to add sharp, feathery strokes. Pay special attention to the area right under the red neck feathers to show shadow. -
Transitioning to Body:
Where the white neck meets the black body, use short, flicking strokes of black paint upward into the white area. This creates a jagged, feathery transition rather than a straight line. -
Chest Highlights:
On the solid black body section, mix a dark grey and paint short, curved dashes to suggest the texture of dark feathers catching the light.
Step 5: Final Touches
-
Clean Up:
Check your outlines. Use a fine black liner brush to sharpen the edge of the beak and the separation between the comb and the surrounding air. -
Sealing:
Allow the paint to dry completely—I usually wait a few hours to be safe. Finish with a spray sealer to protect your detailed work from chipping.
Place your finished rooster in a garden pot or on a sunny windowsill where he can crow silently all day long
BRUSH GUIDE
The Right Brush for Every Stroke
From clean lines to bold texture — master brush choice, stroke control, and essential techniques.
Explore the Full Guide
Mother Hen and Chick Rock Set
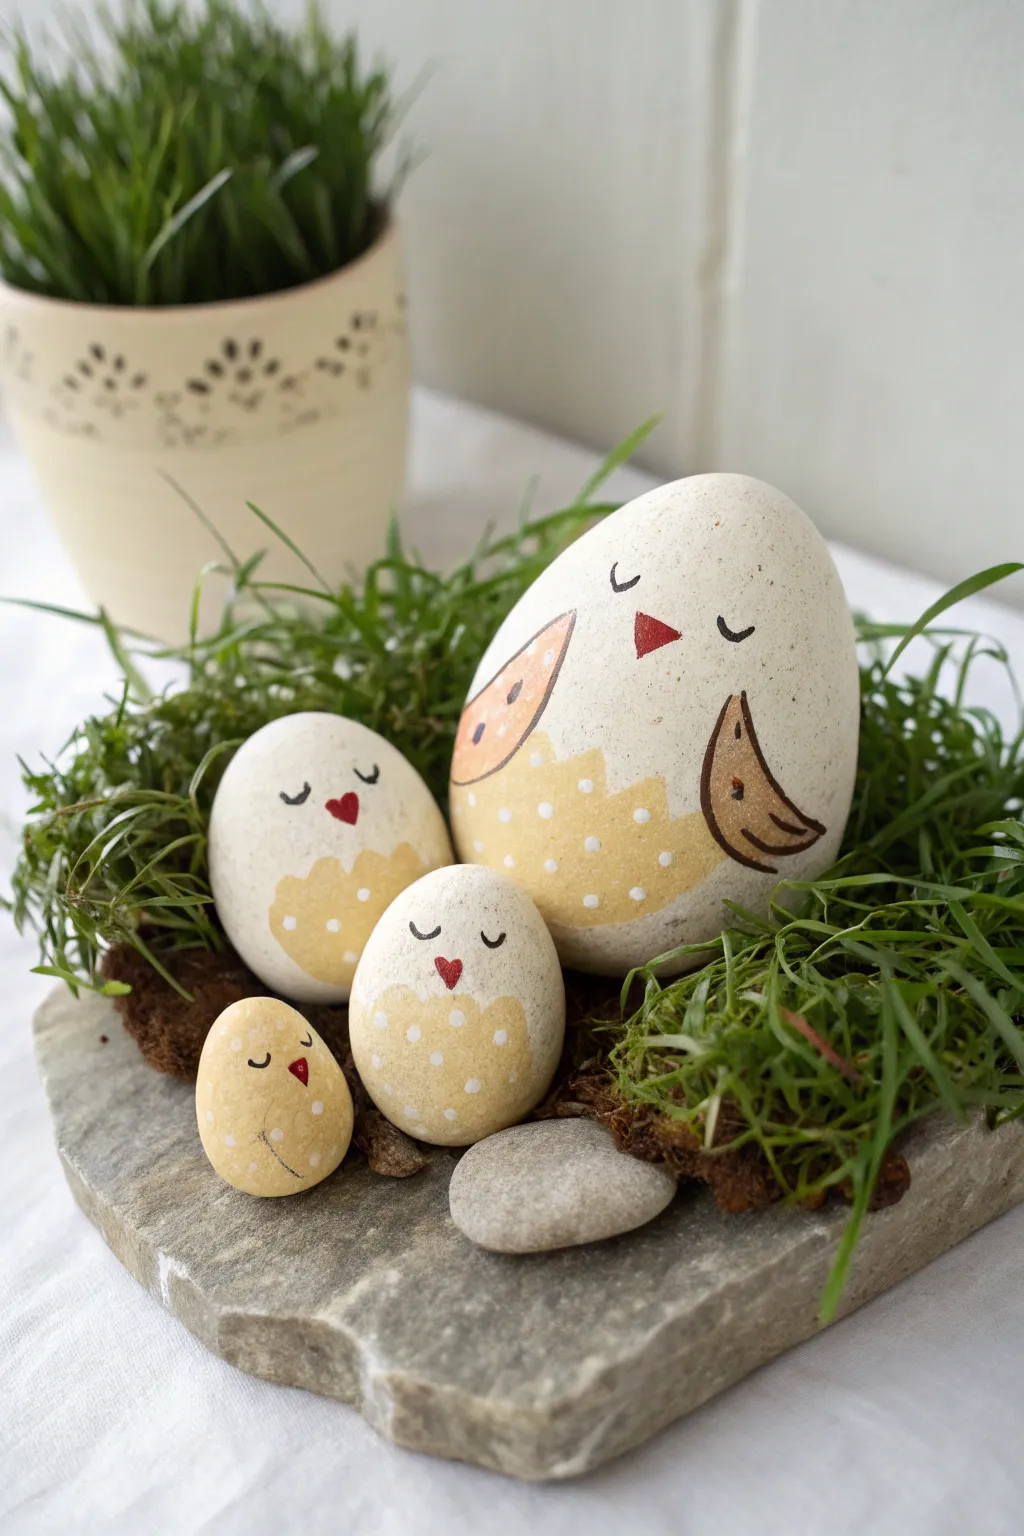
Bring a touch of farmhouse charm to your home with this adorable painted rock family, featuring a large mother hen and her three little chicks nestled in moss. The natural stone texture shines through in this minimalist design, using soft earth tones and simple geometric shapes to create sweet, sleeping expressions.
Detailed Instructions
Materials
- 4 smooth, oval river rocks of graduating sizes (1 large, 2 medium, 1 small)
- Pencil and eraser
- Yellow ochre or mustard yellow acrylic paint
- Burnt orange or terracotta acrylic paint
- Bright red acrylic paint
- Black acrylic paint or fine-point POSCA marker
- White acrylic paint
- Small flat brush
- Fine liner brush
- Dotting tool or toothpick
- Matte spray sealant
Step 1: Cleaning and Planning
-
Prepare the stones:
Before you begin, scrub your chosen rocks with warm, soapy water to remove any dirt or grit. Let them dry completely, preferably in the sun, to ensure the paint adheres properly. -
Select your orientation:
Examine your rocks to find the flattest side for the bottom so they stand or lie securely. The narrowest end of the oval should generally face upward to represent the head. -
Sketch the outlines:
Using a pencil, lightly sketch the curved line for the wings on the mother hen’s sides. For the chicks, sketch a gentle curve across the bottom third of the stone to mark their fuzzy bodies.
Step 2: Painting the Bodies
-
Paint the wings:
On the largest stone (the mother hen), paint the tear-drop shaped wings on either side using your burnt orange or terracotta paint. You might need two coats for opaque coverage. -
Color the chicks:
For the smaller stones, fill in the bottom area you sketched earlier with yellow ochre or mustard paint. This creates the illusion of their fluffy down feathers. -
Add the hen’s belly:
Paint a scalloped or curved section at the very bottom of the mother hen using the same yellow ochre used for the chicks, bridging the space between her orange wings. -
Let it dry:
Allow the base colors to dry fully. If the natural stone color is showing through too much, apply a second thin layer of paint.
Natural Texture Tip
Don’t paint the background! Leaving the raw, speckled grey/white stone visible acts as the chickens’ white feathers and adds rustic character.
Step 3: Adding the Details
-
Create the polka dots:
Dip a mechanical pencil tip, toothpick, or small dotting tool into white paint. Gently press small dots onto the yellow bellies of the chicks and the mother hen. -
Detail the wings:
Switch to your burnt orange paint and add a few larger dots to the mother hen’s wings for texture contrast. -
Paint the beaks:
Using a fine liner brush and red paint, create small inverted triangles for the beaks in the center of each face. On the medium chicks, you can shape these slightly more like small hearts for extra cuteness. -
Draft the eyes:
Once the face area is completely dry, lightly visualize where the eyes should go. They should be level with the top of the beak. -
Line the eyes:
With black paint and a very fine liner brush (or a permanent marker), draw two small U-shapes for sleeping eyelids. Add tiny lashes on the outer corners. -
Outline the wings:
Use the fine brush or marker to outline the orange wings on the mother hen. Make the lines slightly sketchy or loose rather than perfectly rigid to keep the organic feel. -
Define the feathers:
Draw one or two simple curved lines inside the mother hen’s wings to suggest layers of feathers.
Level Up: 3D Elements
Glue a tiny triangle of orange felt over the painted beak for texture, or attach a small red feather to the top of the mother hen’s head.
Step 4: Finishing Up
-
Final check:
Look over your family of rocks. If any black lines look too faint, carefully retrace them once the first layer is dry. -
Seal the artwork:
Take the rocks to a well-ventilated area and apply a light coat of matte spray sealant. I prefer matte over glossy here because it keeps the natural look of the stone. -
Arrange your scene:
Once sealed and dry, arrange your rock chickens on a piece of slate or in a planter, surrounding them with bits of moss or faux grass to complete the nest effect.
Arranging this little stone family in a sunny spot will brighten your day every time you walk by
Cozy Nesting Hen With Eggs
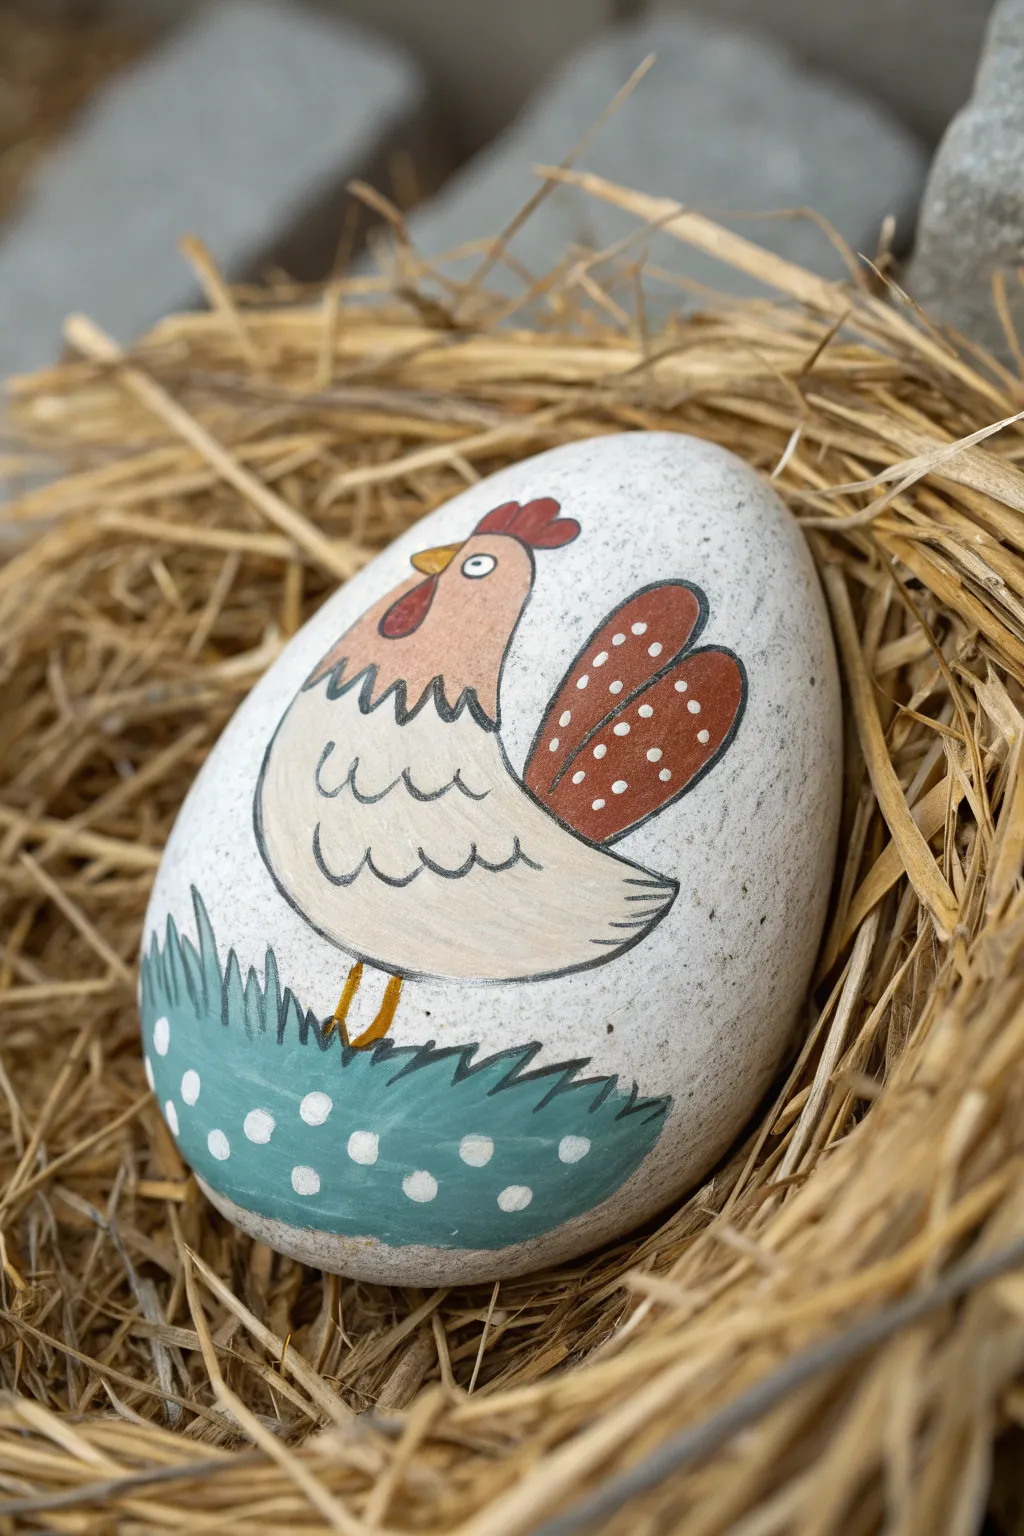
Transform a smooth, egg-shaped stone into a charming rustic chicken with this delightful painting guide. This folk-art inspired hen, resting on a bed of polka-dotted grass, makes for perfect garden decor or a sweet handmade gift.
How-To Guide
Materials
- Smooth, egg-shaped river rock (cleaned and dried)
- White acrylic paint (base coat)
- Acrylic paints: beige/cream, terra cotta/rust, teal/sage green, red, yellow-orange, black
- Fine liner brush (00 or 000 size)
- Small flat brush
- Medium round brush
- Dotting tool or toothpick
- Pencil and eraser
- Matte or satin spray sealant
Step 1: Base Coat & Sketch
-
Prepare the canvas:
Begin by washing your stone thoroughly with soap and water to remove any dirt or oils. Once completely dry, paint the entire surface with white acrylic paint. You may need two or three coats to get a solid, opaque coverage, letting each layer dry in between. -
Draft the outline:
Using a light pencil, sketch the basic shape of the chicken onto the white rock. Draw a large teardrop shape for the body, angling the pointed end upward for the tail. -
Add the details:
Sketch the head details: a comb on top, a beak, and a wattle. Draw a wing shape on the side of the body and add a wavy line near the bottom of the rock to stake out the grassy area.
Smooth Surface Secret
If your rock has tiny pits, mix a little wood filler or heavy gel medium with your white base coat to create a perfectly smooth, egg-like canvas.
Step 2: Blocking Colors
-
Paint the body:
Mix a warm beige or cream color. Paint the lower body of the chicken with this shade, following the curve of your sketch but stopping before you reach the head area. -
Color the head:
For the head and neck, use a slightly darker, peachier beige tone to create subtle contrast with the body paint. Blend the transition area gently if the paint is still wet, or create a jagged ‘feather’ line where the two colors meet. -
Fill the tail feathers:
Paint the tail section (the large wing-like shape at the back) with a terra cotta Or rust-red color. This same color will be used for the heart-shaped wing section later. -
Add red details:
Use a bright red for the comb on top of the head and the wattle hanging below the beak area. -
Paint the beak and legs:
Use a yellow-orange hue to fill in the small triangular beak. Paint two thin lines descending from the body for legs. -
Create the grassy base:
Paint the bottom section of the rock—below the wavy line you sketched—with a teal or soft sage green. Let this dry completely before moving to the next step.
Shaky Hands?
If using a brush for outlines is too difficult, swap it for an extra-fine tip permanent marker or acrylic paint pen after the base colors are 100% dry.
Step 3: Line Work & Texture
-
Outline the chicken:
Using your finest liner brush and black paint (or a black paint pen if you prefer more control), carefully outline the entire chicken shape. -
Define the feathers:
Add a scalloped or zig-zag line separating the neck color from the body color to suggest neck feathers. Draw U-shaped scallops across the cream body to create the look of fluffy plumage. -
Outline interior details:
Outline the wing, the tail feathers, the comb, wattle, and beak. Draw a small circle for the eye, adding a tiny black pupil in the center. -
Detail the grass:
Use the liner brush to paint quick, upward flicking strokes along the top edge of the green section to simulate blades of grass overlapping the chicken’s feet.
Step 4: Final Touches
-
Add polka dots:
Dip your dotting tool or the non-brush end of a paintbrush into white paint. Add a pattern of dots across the green grass area. -
Decorate the tail:
Using a smaller dotting tool or toothpick, add delicate white dots to the rust-colored tail feathers for a folk-art feel. -
Dry and seal:
Allow the paint to cure for at least 24 hours. Because rocks are porous, I always finish with a spray sealant to protect the design from chipping or fading outdoors.
Now you have a whimsical little hen ready to nest in your garden or windowsill

PENCIL GUIDE
Understanding Pencil Grades from H to B
From first sketch to finished drawing — learn pencil grades, line control, and shading techniques.
Explore the Full Guide
Upright Chicken With Painted Feet
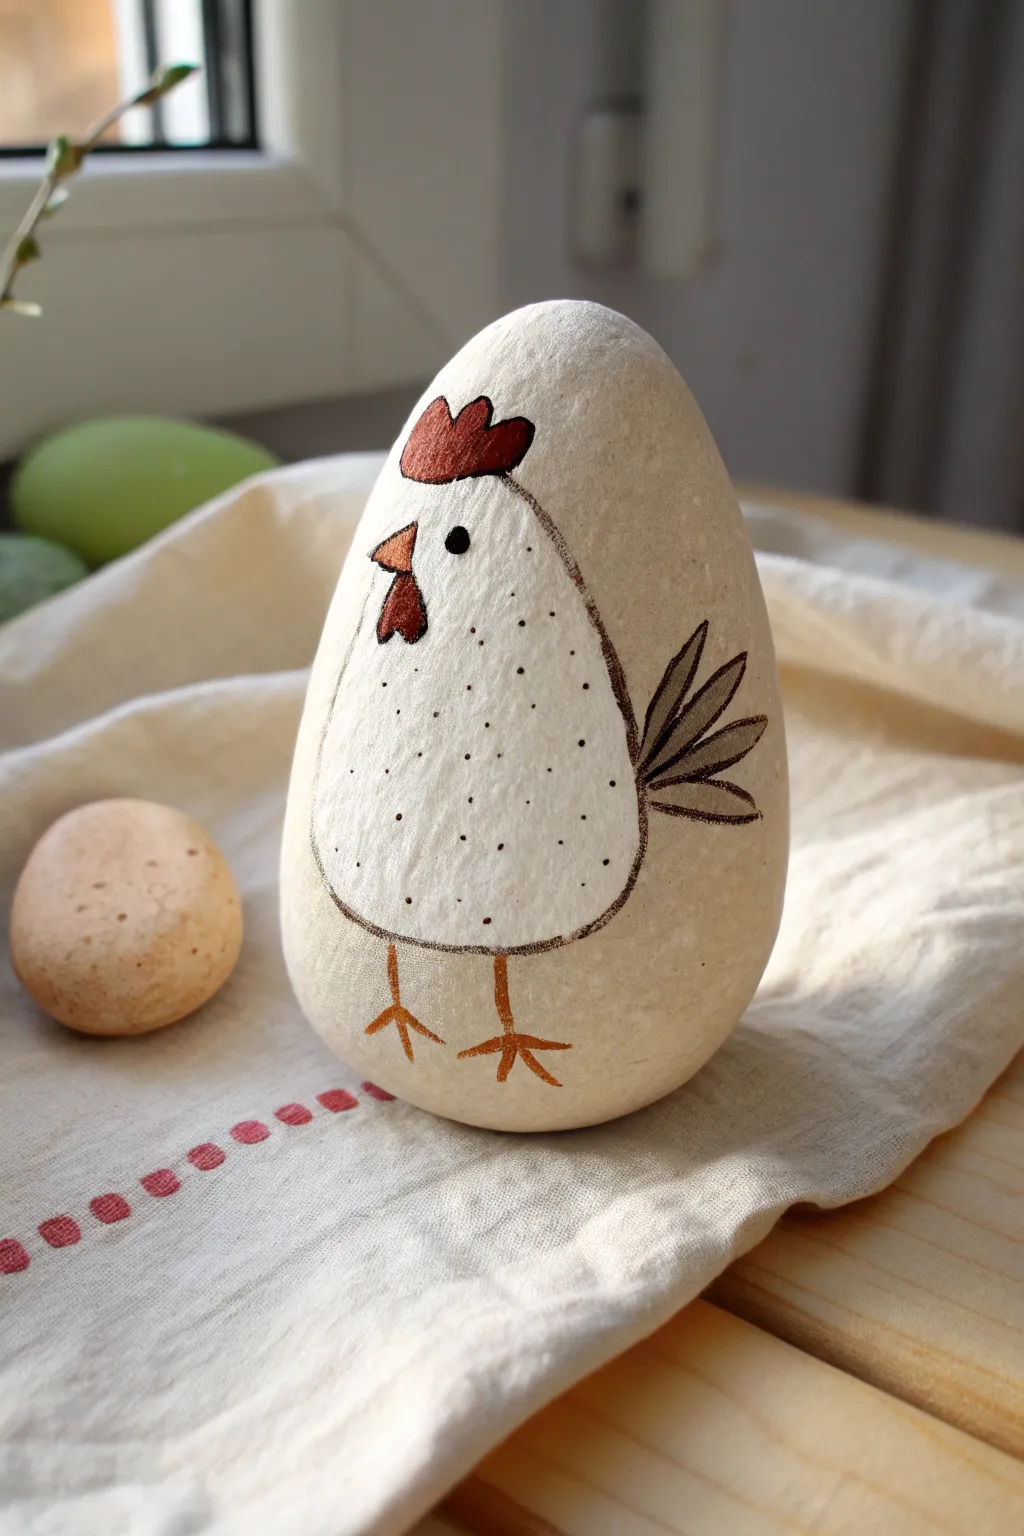
Transform a simple egg-shaped stone into a charming rustic hen that stands upright on its own. This project relies on the natural color of the stone for the background, using minimal paint for a clean, folk-art aesthetic.
Step-by-Step
Materials
- Smooth, egg-shaped river rock (preferably light beige or grey)
- White acrylic paint
- Dark brown or black fine-tip acrylic paint pen (or liner brush)
- Red acrylic paint
- Orange-brown acrylic paint
- Small round paintbrush
- Pencil for sketching
- Matte spray varnish
Step 1: Preparation & Sketching
-
Select the perfect canvas:
Find a smooth, oval rock that can stand upright on its blunter end. This natural stability mimics the shape of a sitting hen perfectly. -
Clean surface:
Wash the rock thoroughly with soap and water to remove any dirt or oils, then let it dry completely to ensure the paint adheres well. -
Outline the body:
Using a pencil, lightly sketch a large teardrop shape in the center of the rock. This will be the main white body of the chicken. -
Add features:
Sketch a small triangular beak on the left side of the ‘face’ and draw the comb on top of the head area. -
Define the tail:
On the right side of the teardrop shape, lightly mark where the tail feathers will extend outward.
Paint Pen Trick
If your paint pen feels too stark, gently smudge the wet ink with your finger or a dry brush immediately after drawing to soften the lines.
Step 2: Painting the Base
-
Fill the body:
Use your white acrylic paint to fill in the main teardrop body shape. You may need two coats for opaque coverage, letting the first dry before applying the second. -
Paint the comb:
Carefully paint the comb on top of the chicken’s head using red acrylic paint. I find a small detail brush works best for these curves. -
Add the wattle:
Paint a small, teardrop-shaped wattle hanging directly under the beak area using the same red paint. -
Color the beak:
Fill in the small triangular beak using an orange-brown shade. -
Let it cure:
Allow all the base colors to dry completely. If the paint is wet, your outlining pen might snag or bleed.
Natural Nest
Make a trio of chickens in different sizes and display them sitting on a bed of raffia or dried moss to create a complete farmhouse vignette.
Step 3: Detailing & Finishing
-
Outline the body:
Take your fine-tip dark brown pen and trace the outline of the white body shape. Keep the line slightly sketchy or broken for a rustic look. -
Draw the tail feathers:
Draw three or four long loops extending from the back of the chicken to form the tail feathers. You can lightly shade inside them with the pen for texture. -
Outline facial features:
Trace the beak and comb to define them against the stone background. -
Add the eye:
Place a solid black dot near the beak for the eye. Position is key here; placing it slightly lower gives a cute expression. -
Texture the feathers:
Add tiny, random dots inside the white body area using your fine-tip pen. This stippling effect mimics the texture of fluffy feathers. -
Create the feet:
Near the bottom of the white body, draw two stick-legs extending downward. Add three toes to each leg using the same orange-brown paint or pen. -
Seal the artwork:
Once all ink and paint is bone dry, spray the rock with a clear matte varnish to protect your hen from scratches and fading.
Your little stone hen is now ready to perch on a windowsill or shelf
Scalloped Feather Wings Technique
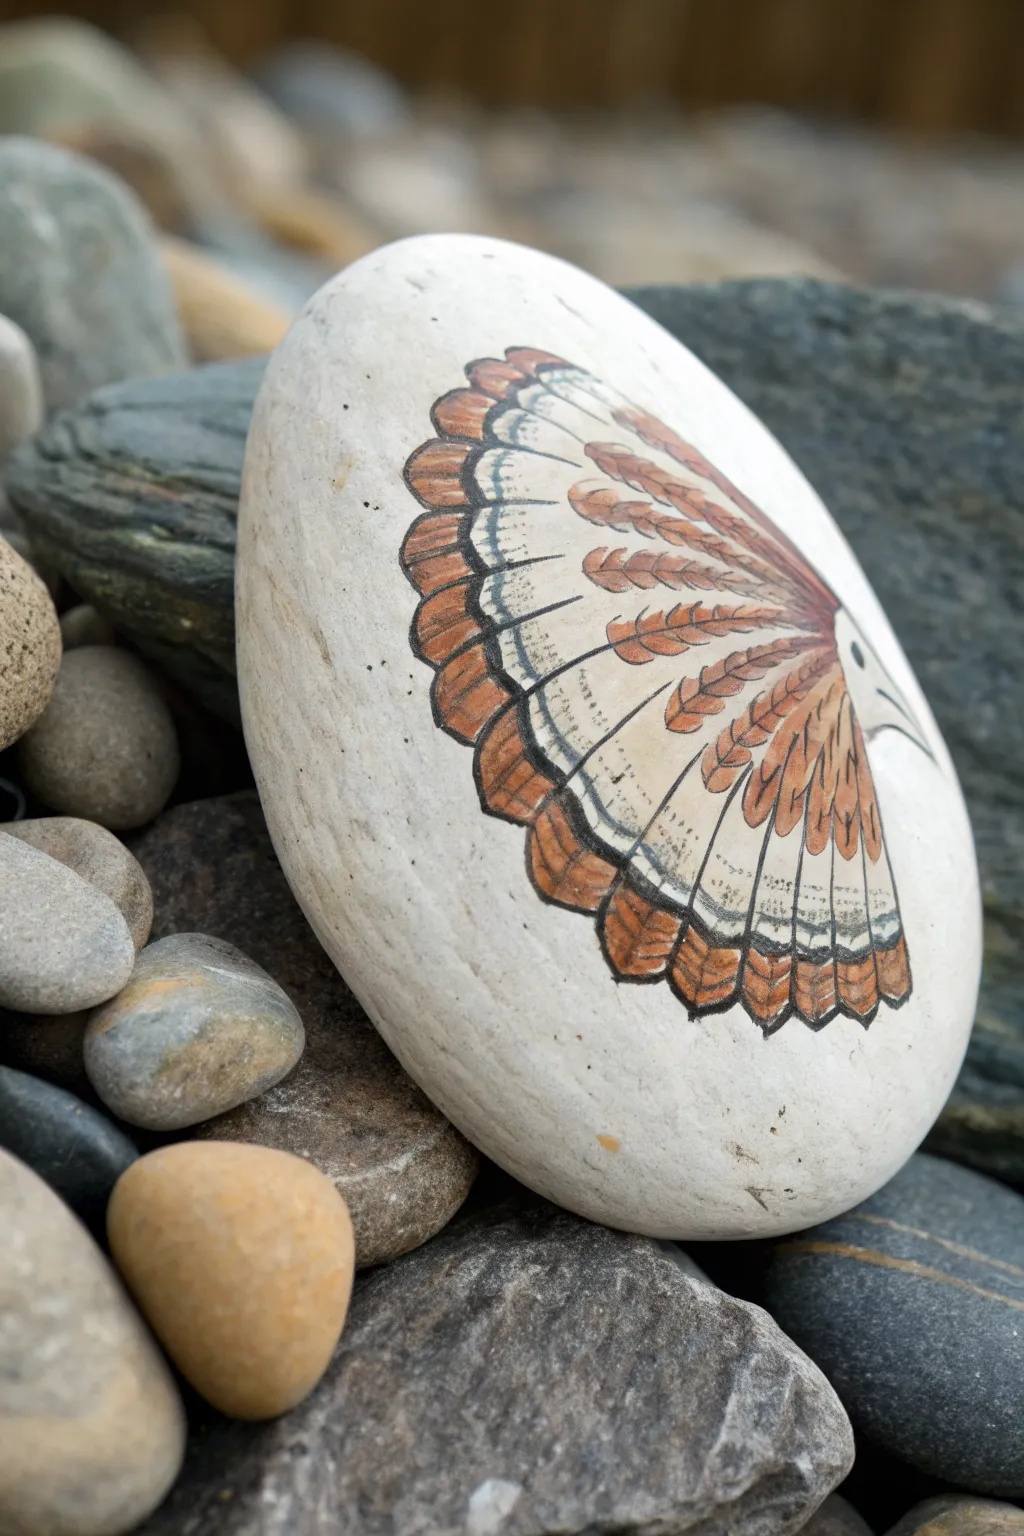
Transform a smooth river rock into a piece of rustic art with this detailed feather wing design. The scallop-edged pattern combined with earthy browns and oranges creates a stunning, natural look that mimics the texture of actual plumage.
Step-by-Step Guide
Materials
- Smooth, oval-shaped white or light cream river rock
- Fine grit sandpaper (optional for smoothing)
- Pencil (HB or lighter)
- Black fine-point permanent marker or liner pen (0.1mm and 0.5mm)
- Acrylic paints: Burnt Sienna, Raw Umber, White, Yellow Ochre
- Small fine-detail paintbrushes (size 0 and 00)
- Matte or satin spray varnish
Step 1: Preparation and Sketching
-
Prepare the canvas:
Begin by washing your stone with warm soapy water to remove any dirt or oils. If the surface feels rough, gently rub it with fine-grit sandpaper to create a smoother painting surface. Let it dry completely. -
Establish the wing shape:
Using a pencil, lightly sketch a large crescent or semi-circle shape that takes up about two-thirds of the stone’s face. This will be the outer boundary of the wing. -
Draw the scalloped edges:
Along the curved outer edge of your crescent, draw a series of U-shapes or scallops. Try to keep them relatively uniform in size, as these represent the tips of the primary feathers. -
Create the inner tiers:
Sketch a second, smaller curve inside the first one, mirroring the outer shape. Add a second row of smaller scallops along this line to create tiers of feathers, moving inward toward where the ‘shoulder’ of the wing would be. -
Add the spine lines:
From the center point of each scallop, draw a faint line extending inward toward the center of the design. These lines act as guides for the feather quills and separating notche. -
Detail the head:
At the top right edge of the wing curve (where the wing attaches), sketch a very simple, small triangular beak and a tiny circle for the eye to suggest a bird profile peering out.
Ink Control Pro-Tip
If your black pen tip keeps drying out over the acrylic paint, scribble on a piece of scrap paper every few strokes to clear the nib of dried acrylic resin.
Step 2: Inking the Outline
-
Outline the main shapes:
Take your 0.5mm black liner pen and carefully trace over the main scalloped edges and the long structural lines of the feathers. Keep your hand steady but allow for slight organic variations. -
Add texture lines:
Switch to the finer 0.1mm pen. Inside the feather shapes, add tiny, broken hatching lines or small dots near the scalloped edges to suggest texture. -
Draft the inner feather details:
Draw the small, leafy shapes inside the middle section of the wing. These should look like elongated tear-drops or wheat grains, following the radial curve of the wing. -
Erase pencil marks:
Once the ink is thoroughly dry (wait at least 10 minutes to avoid smearing), gently erase all visible pencil sketches.
Step 3: Painting the Feathers
-
Mix the base brown:
On your palette, water down a bit of Burnt Sienna so it acts like a glaze rather than opaque paint. I find this transparency helps keep the drawing visible underneath. -
Paint the outer tips:
Fill in the outer scalloped edges with the diluted Burnt Sienna. Apply the color heaviest at the very edge and let it fade slightly as you move inward. -
Add depth with Umber:
Mix a tiny amount of Raw Umber or dark brown. Carefully paint the very bottom curves of the scallops and the lines separating the feathers to add shadow and definition. -
Color the inner feathers:
Use a mix of Yellow Ochre and a touch of Burnt Sienna to paint the tear-drop shapes in the middle band of the wing. These should be lighter and warmer than the outer tips. -
Highlighting:
Mix a very pale cream using White and a dot of Yellow Ochre. Add tiny highlights to the upper curve of each feather segment to make them look rounded and dimensional.
Make It Metallic
For a magical twist, use metallic copper or gold paint for the highlights on the feathers. It will catch the light beautifully when the stone is turned.
Step 4: Final Details and Sealing
-
Re-ink the lines:
Painting often dulls the black ink. Go back over the primary structural lines and the eye with your black pen to make the design pop crisp and clear. -
Add finishing dots:
Use the 0.1mm pen to add stippling (tiny dots) along the spine of the feathers where the brown paint meets the lighter stone color for a smooth visual transition. -
Seal the artwork:
Allow the rock to dry for several hours. Once cured, spray with a matte or satin varnish in light, even coats to protect the paint and ink from chipping.
Place your finished feathered stone in a garden pot or on a sunny windowsill to enjoy the earthy charm


Rustic Earth-Tone Farmyard Hen
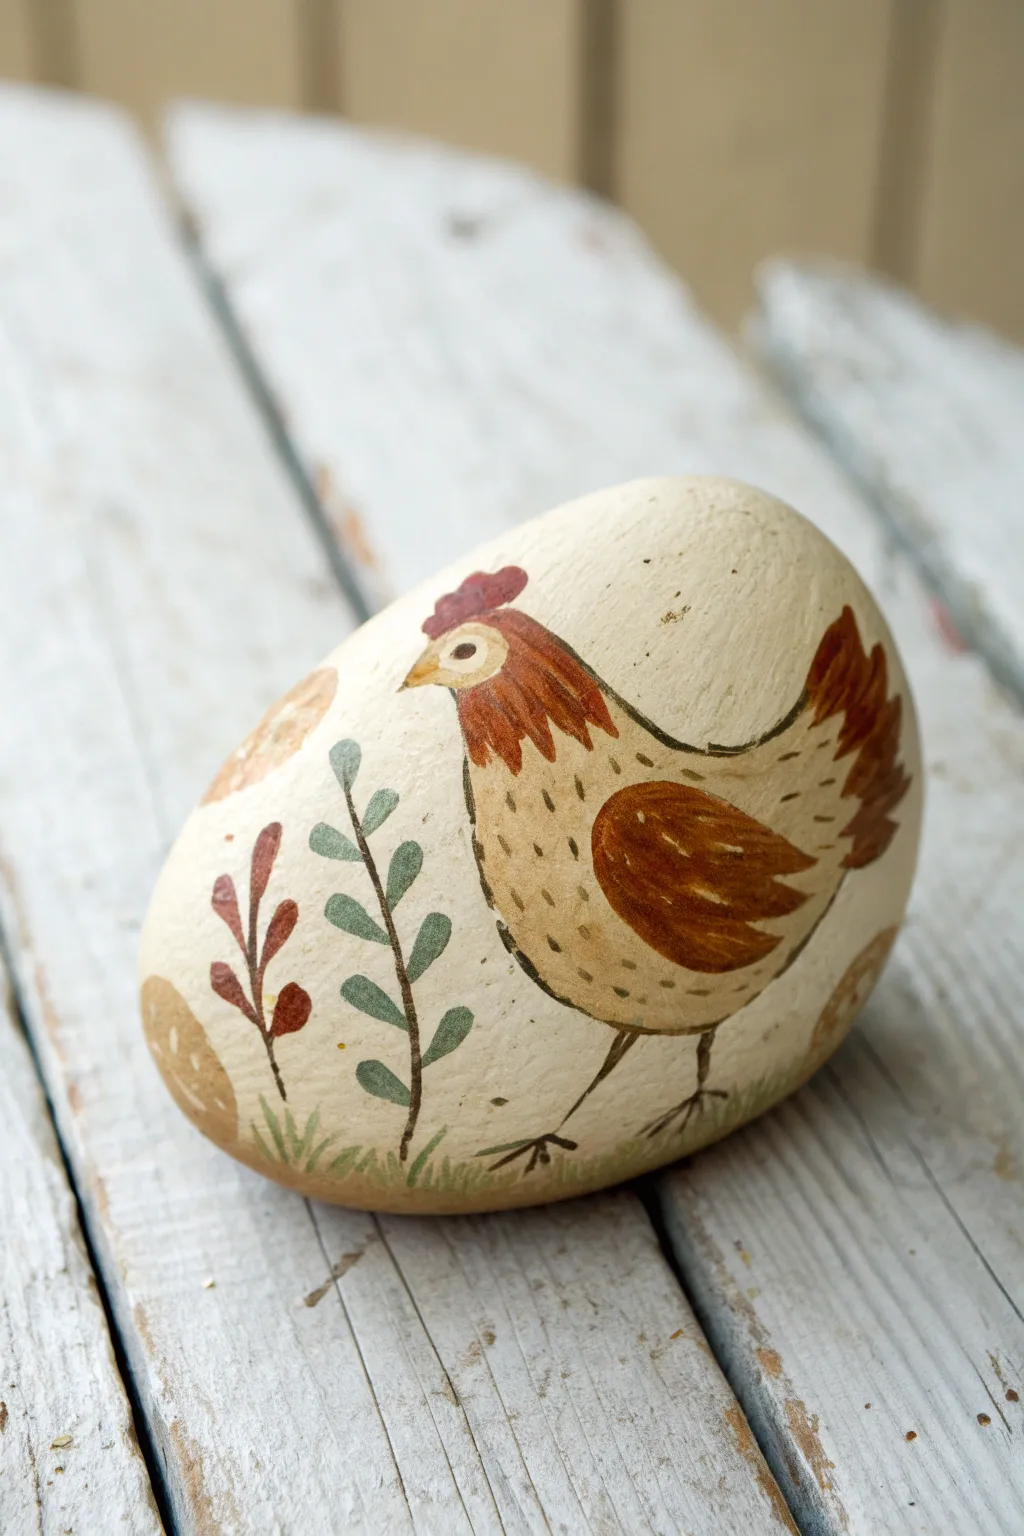
Bring a touch of farmhouse charm to your garden or desk with this lovely earth-toned hen painted on smooth stone. The design features a warm, folk-art style with simple botanical accents that celebrate rustic simplicity.
Step-by-Step
Materials
- Medium-sized smooth river rock (oval or egg-shaped)
- Acrylic paints (Cream/Off-white, Burnt Sienna/Rust, Dark Brown, Olive Green, Deep Red, Golden Yellow)
- Fine grit sandpaper
- Pencil
- Flat brush (medium size)
- Round detail brush (size 1 or 0)
- Fine liner brush
- Matte spray sealant
Step 1: Preparation & Base Coat
-
Clean the Stone:
Begin by washing your rock thoroughly with soap and water to remove any dirt or oils. Let it dry completely before starting. -
Smooth the Surface:
If your rock has rough patches, lightly sand them with fine grit sandpaper to create a better painting surface. -
Apply the Base:
Mix a cream or off-white acrylic paint. Cover the entire top surface of the rock using a flat brush. Apply a second coat if necessary to ensure opaque coverage. -
Sketch the Outline:
Once the base is bone dry, use a pencil to lightly sketch the oval shape of the hen’s body, the curved neck, and the tail feathers.
Step 2: Painting the Hen
-
Color Block the Body:
Using a mix of cream with a tiny drop of brown (to make it slightly darker than the background), fill in the main body shape of the chicken. -
Paint the Wing:
While the body dries, mix a burnt sienna or rust color. Paint a teardrop shape in the center of the body to form the wing. -
Add Tail Feathers:
Use the same rust color to paint the tail feathers sweeping upward at the back of the proper right side. -
Detail the Neck:
With a small round brush and the rust creates vertical, slightly jagged strokes on the neck area to suggest neck feathers. -
Face and Comb:
Using deep red, paint the comb on top of the head and the wattle under the beak. Switch to golden yellow for the small beak triangle. -
Define the Eye:
Paint a small white circle for the eye area, let it dry, then place a tiny dark brown dot in the center.
Clean Lines Tip
Thin your dark brown liner paint with a drop of water until it has an inky consistency. This helps the paint flow smoothly off the brush for crisp outlines.
Step 3: Details & Botanicals
-
Outline Work:
Switch to your finest liner brush and dark brown paint (thinned slightly with water works best for smooth lines). Carefully outline the hen’s body, wing, and neck. -
Wing Texture:
Add small, light cream dashes inside the rust-colored wing to suggest feather texture. -
Body texture:
Add tiny brown dashed vertical lines across the cream body area to give the hen a fluffy, feathered appearance. -
Legs and Feet:
Paint thin, stick-like legs extending downward using the dark brown liner brush. Add three toes to each foot. -
Paint Plant Stems:
To the left of the hen, paint two curving vertical lines in dark brown for plant stems. -
Add Leaves:
Dip a small round brush in olive green. Press and lift along the stems to create simple leaf shapes. Add some rust-colored leaves to the smaller stem for variety. -
Grounding Grass:
Use the liner brush with olive green to paint quick, short upward strokes at the bottom of the rock to simulate grass. -
Seal the Art:
Allow the paint to cure for at least 24 hours. Finish with a matte spray sealant to protect the design without making it too shiny.
Fixing Smudges
If you smudge a line, don’t wipe it! Let it dry completely, then paint over the mistake with your cream base color before trying the line again.
Now you have a charming rustic hen to overlook your garden or keep your papers tidy
Farmhouse Plaid Chicken Pattern
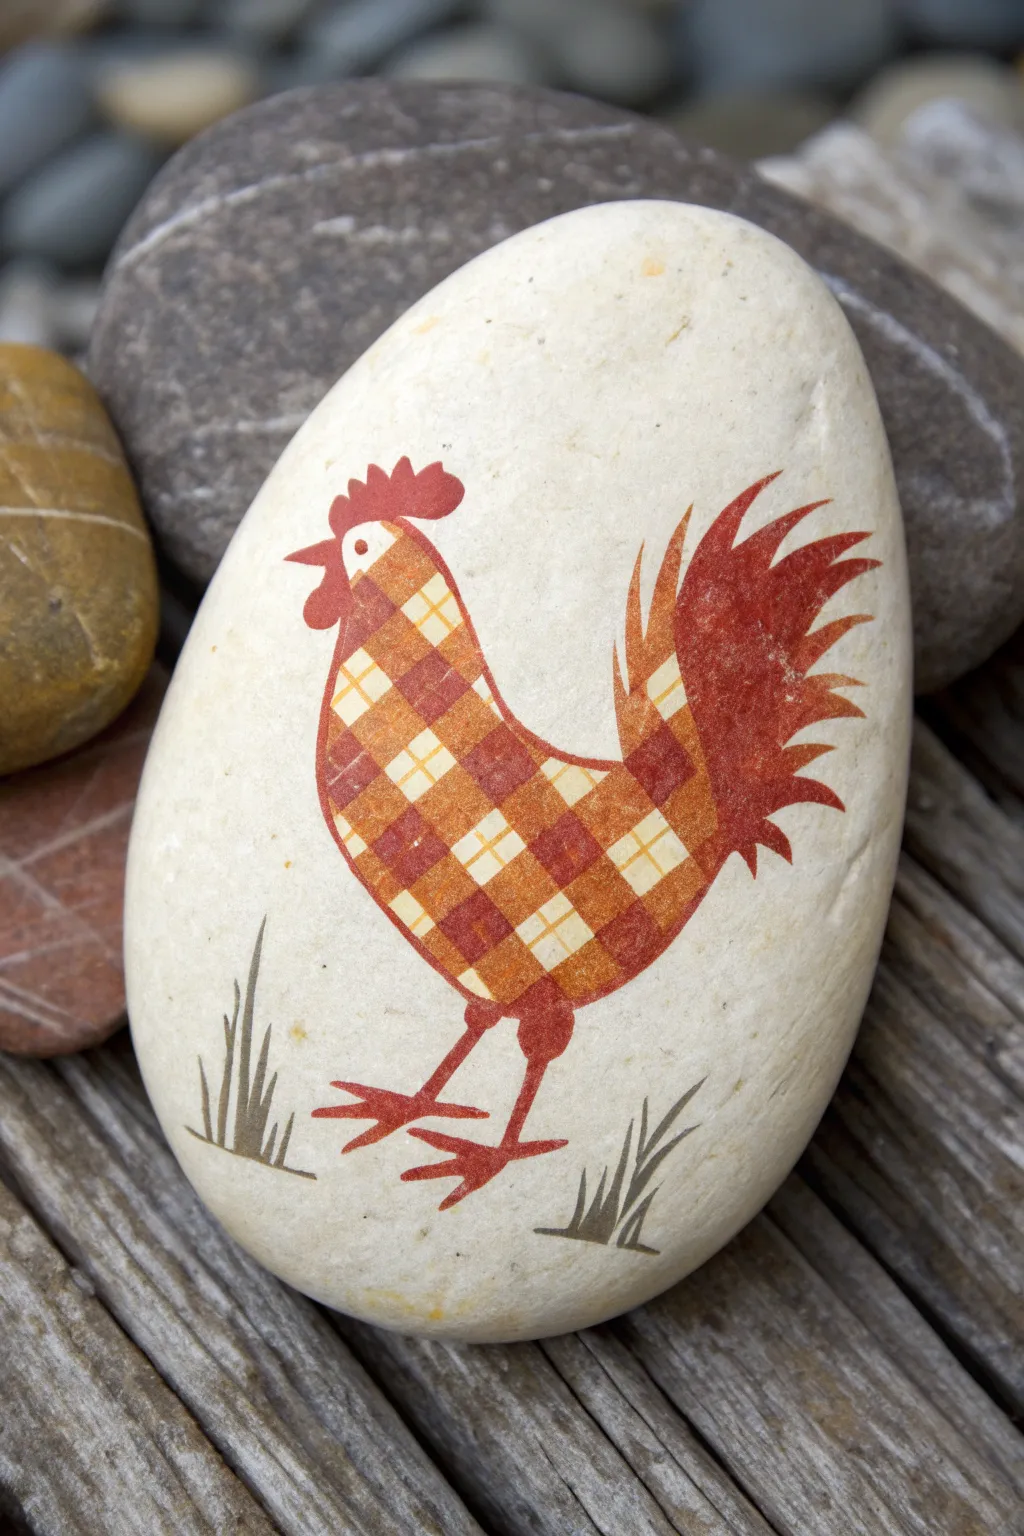
This charming project brings rustic farmhouse flair to a simple river stone by turning it into a piece of folk art. The painted rooster features a clever gingham pattern created with translucent layering, giving it a cozy, fabric-like texture.
Detailed Instructions
Materials
- Smooth, egg-shaped river rock (cleaned and dried)
- Acrylic paints: Cream/Off-White, Burnt Orange, Deep Rust Red, Olive Green
- Pencil for sketching
- Fine liner brush (size 0 or 00)
- Small flat shader brush (size 2 or 4)
- Matte varnish or sealant
Step 1: Base and Sketch
-
Prepare the Canvas:
Begin by scrubbing your rock with soapy water and letting it dry completely. If your rock isn’t naturally light, paint the entire surface with a coat or two of cream acrylic paint to create a clean, uniform background for your design. -
Outline the Shape:
Lightly sketch the rooster’s silhouette using a pencil. Start with a teardrop shape for the body, curving up into a neck and head. Don’t press too hard, as graphite can sometimes smudge into yellow paint later. -
Define the Features:
Add the details to your sketch, including the jagged comb on top of the head, the wattle under the beak, the beak itself, and the sweeping, curved shape of the tail feathers.
Step 2: Blocking in Color
-
Paint the Base Body:
Using your flat brush, fill in the main body area (excluding the tail, head, and feet) with a wash of cream paint if you want it brighter than the rock, or leave it natural if you pre-painted the background. -
Create the Checkered Grid:
Mix a semi-transparent glaze using Burnt Orange and a tiny drop of water. With your liner brush, carefully paint diagonal lines across the body in one direction, spacing them about an eighth of an inch apart. -
Cross-Hatch the Pattern:
Once the first set of lines is dry, paint a second set of diagonal lines going the opposite direction to create diamond shapes. Keep the paint thin so the background color shows through. -
Deepen the Overlaps:
To create the true gingham effect, use slightly thicker or darker Burnt Orange paint to fill in the small diamond intersections where the lines cross. This makes those spots appear darker, simulating woven fabric.
Steal This Trick
Use masking tape or thin striping tape to mask the body before painting the grid. This ensures your diagonal lines are perfectly straight and evenly spaced.
Step 3: Details and Finishing
-
Paint the Tail Feathers:
Switch to Deep Rust Red. Using the liner brush, fill in the tail feathers with sweeping, curved strokes that taper to sharp points at the tips. I like to flick the brush slightly at the end of the stroke to keep it looking sharp. -
Add Head Details:
Paint the comb and wattle with the same Deep Rust Red. Fill in the beak with a touch of Burnt Orange. -
Connect the Neck:
Where the plaid body meets the solid neck color, lightly feather the Deep Rust Red paint downward into the check pattern so there isn’t a harsh line separating the two sections. -
Paint the Legs:
Using the very tip of your fine liner brush and the Deep Rust Red, draw thin stick legs extending downward, finishing with three splayed toes for feet. -
Add the Eye:
Dip the back of your paintbrush handle into white paint and dot an eye onto the head. Once dry, add a tiny pinprick of black or brown for the pupil. -
Ground the Rooster:
Mix a thin Olive Green paint. At the base of the rock near the feet, paint simple, vertical grass blades using quick, upward flicks of your liner brush. -
Final Cleanup:
Check your edges. If any paint went outside the lines, use a clean brush with a bit of the cream background color to tidy up the silhouette. -
Seal the Artwork:
Allow the rock to dry for at least 24 hours. Apply a coat of matte varnish to protect the paint from chipping without adding an unnatural shine.
Make It Yours
Try a blue and white “delftware” pottery style instead of orange, or paint a tiny black chalkboard sign next to the chicken for a personalized message.
Your rustic rooster is now ready to add a welcoming touch to a porch step or kitchen windowsill
Chicken Pecking at Colorful Corn
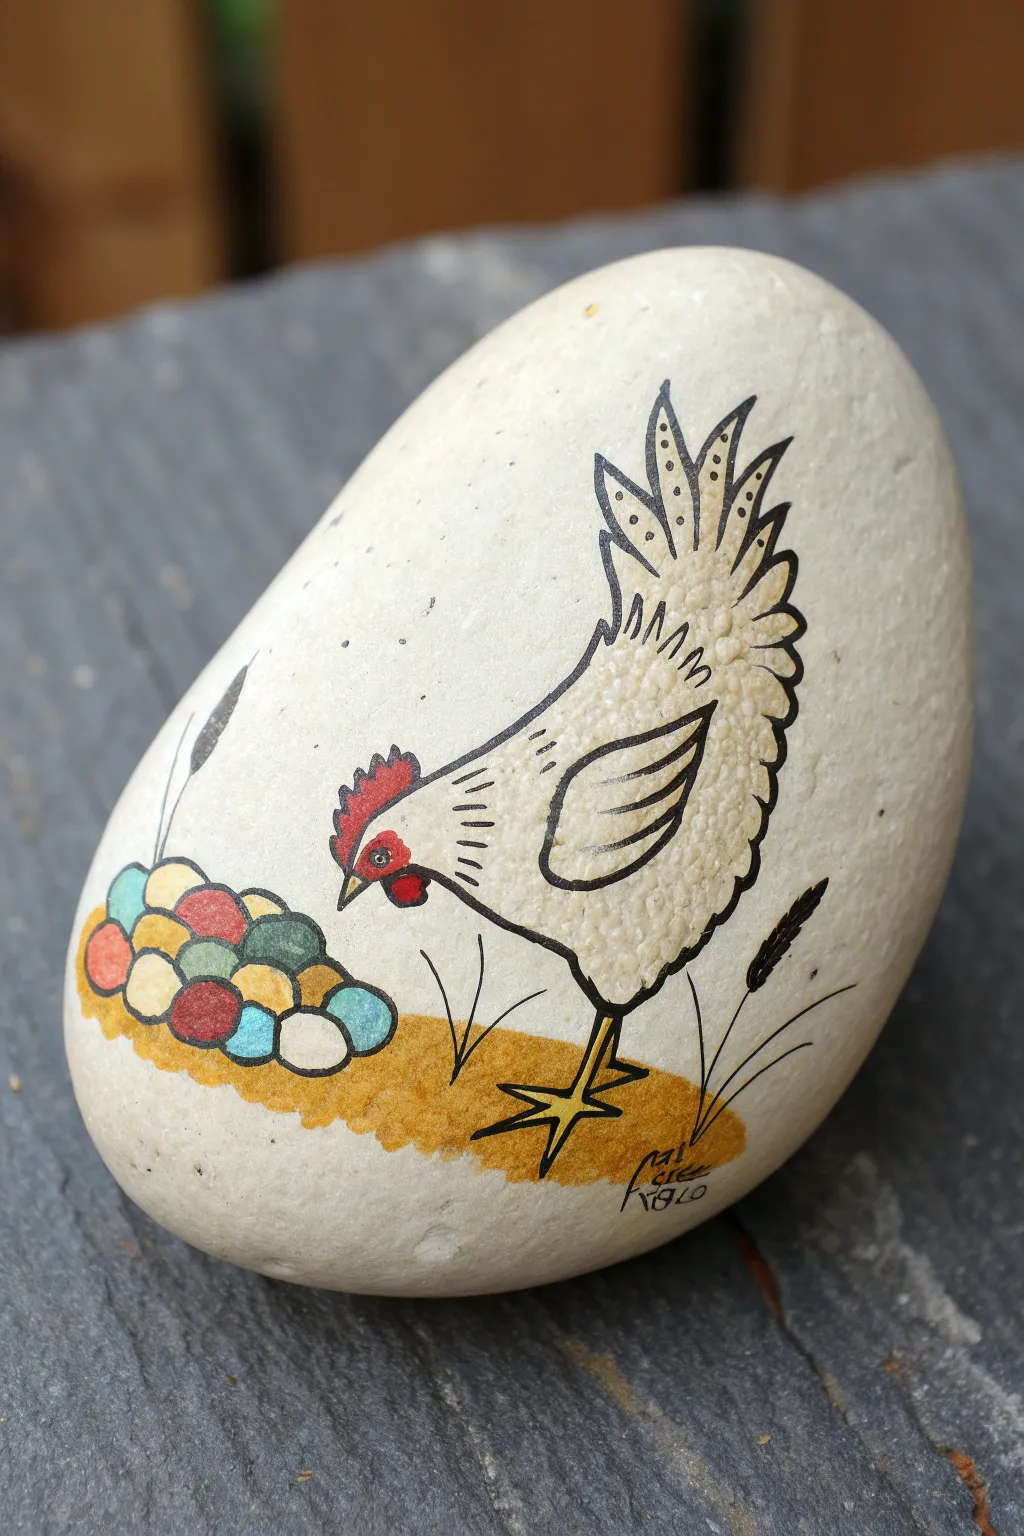
Capture the charm of farm life with this delightful painted rock featuring a stylized white hen discovering a treasure trove of colorful corn. The design uses crisp black outlines and soft washes of color on a naturally smooth, egg-shaped stone for a clean, illustrative look.
Step-by-Step
Materials
- Smooth, egg-shaped white or light grey rock
- Pencil and eraser
- Fine point black paint pen (0.5mm or 0.7mm)
- Acrylic paints: Yellow ochre, bright yellow, red, orange, teal, green, white
- Small round detail brush (size 0 or 1)
- Clear matte varnish sealer
Step 1: Sketching and Outlining
-
Choose the right stone:
Select a stone that naturally resembles the shape of an egg. Wash it thoroughly with soap and water to remove any dirt or oils, then let it dry completely before starting. -
Draft the chicken body:
Using a light pencil, sketch a large, curved teardrop shape for the chicken’s body. Position it slightly to the right so there is room on the left for the pile of corn. -
Add key features:
Sketch the tail feathers flairing upwards at the back and define the wing shape in the middle of the body. Draw the head, beak, cone, and wattle on the front, angling the beak downwards. -
Sketch the corn pile:
To the left of the beak, draw a cluster of small, irregular circles and ovals to represent the colorful corn kernels. Make sure they are piled realistically. -
Ground the scene:
Sketch an uneven horizon line underneath the chicken’s feet and the corn pile to suggest the ground. Add a few vertical lines for grass blades. -
Ink the main outlines:
Go over your pencil lines with a fine-point black paint pen. Use confident, steady strokes for the body, wing, and corn kernels. Don’t worry about the tiny details like feather texture just yet.
Smudged Ink?
If your black pen smears when you paint over it, switch the order: paint the colors first using the pencil sketch as a guide, let dry, then add the black outlines last.
Step 2: Adding Color
-
Paint the ground:
Mix a warm yellow ochre acrylic paint. Carefully fill in the ground area beneath the chicken and corn, feathering the edges slightly so it doesn’t look like a solid block. -
Color the chicken’s features:
Using a small detail brush, paint the comb and wattle with a vibrant red. Use a touch of yellow for the beak. -
Fill the corn kernels:
Now for the fun part involving the corn. Paint individual kernels in varied colors: teal, bright red, yellow, orange, and slate blue. Leave white outlines or gaps if possible, or just paint carefully inside your black lines. -
Paint the legs:
Use a bright yellow to paint the simple stick-figure legs and feet. Ensure the feet are planted firmly on your yellow ochre ground. -
Enhance the white feathers:
Even though the rock is light, mix a very watery white paint or use a white paint pen to lightly color the chicken’s body. This makes the chicken pop against the natural stone color.
Make it Sparkle
Mix a tiny amount of metallic gold paint into the yellow ochre for the ground, or use metallic markers for some of the corn kernels to catch the light.
Step 3: Detailing and Sealing
-
Add feather texture:
Once the base white is dry, use your black pen to add small ‘U’ shapes and tick marks on the neck and body to simulate ruffled feathers. -
Define the tail:
Draw dots and small lines inside the tail feathers to give them decorative texture, mimicking the reference style. -
Refine the corn:
If your paint covered any black lines on the corn, retrace them now. You can also add tiny dots on the corn kernels for extra texture. -
Add grass accents:
Draw thin, black lines springing up from the yellow ground to represent grass. Add a small ‘wheat’ stalk shape to the right and a cattail shape to the left for balance. -
Final check:
Look over the entire piece. Clean up any stray pencil marks with an eraser once the paint is 100% dry. -
Seal the artwork:
To protect your painting from chipping, apply a coat of clear matte varnish. I find a spray varnish works best to avoid smearing the black ink.
Now you have a charming piece of rustic art that brings a little country flair wherever you place it
Chicken in a Vegetable Garden Scene
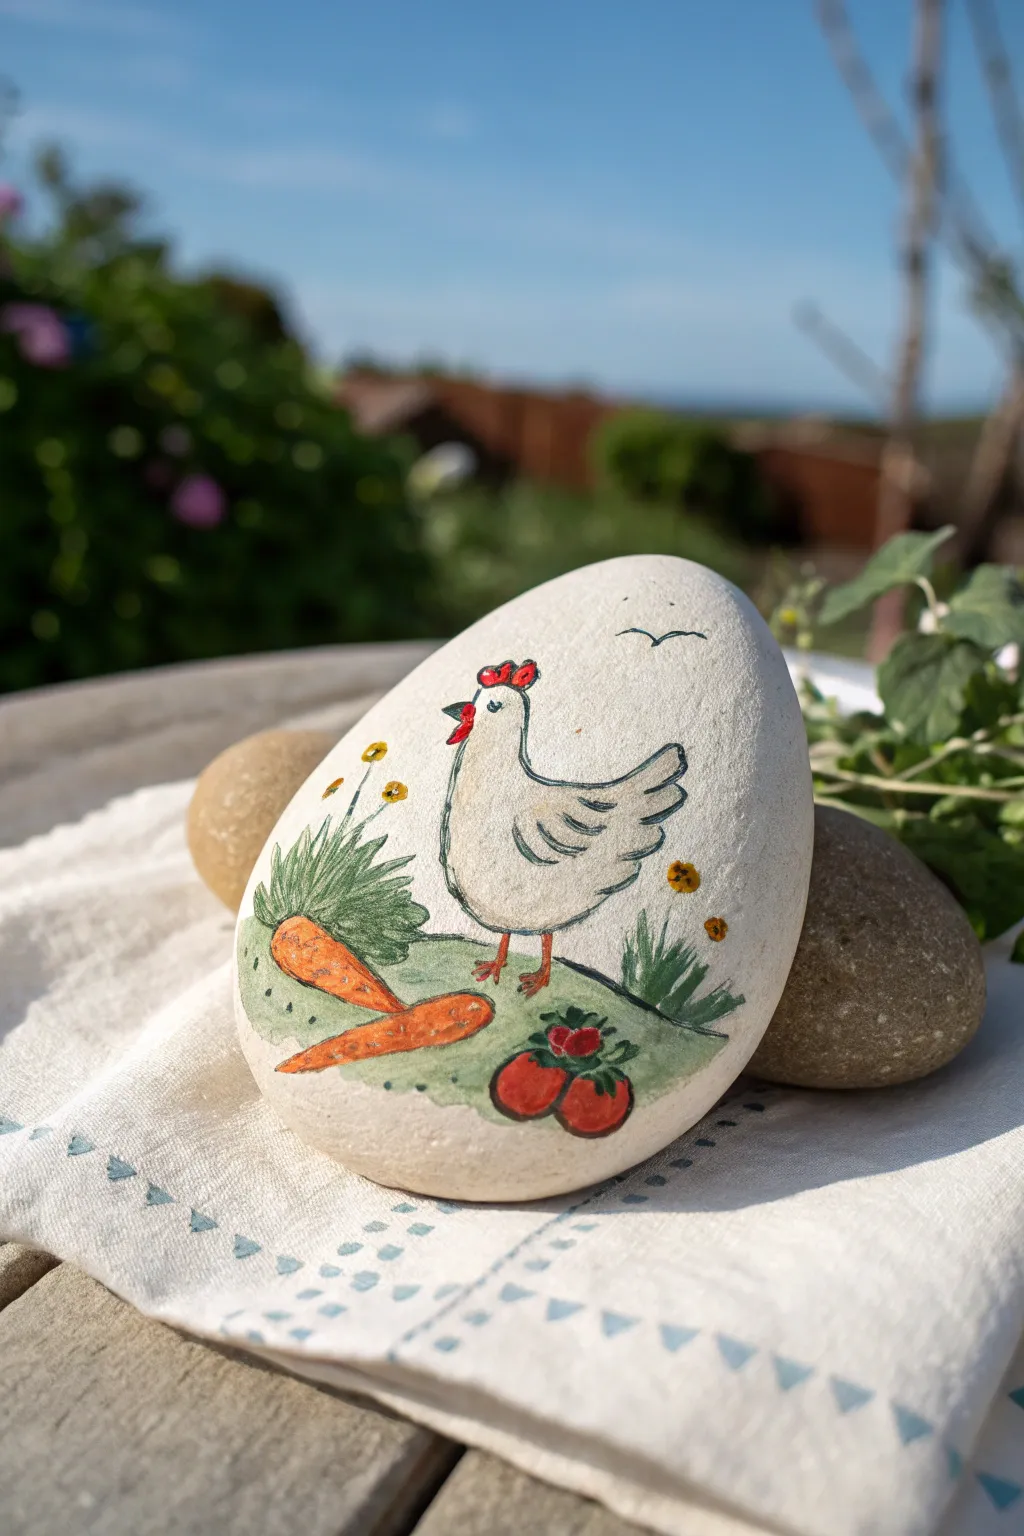
Transform a smooth garden pebble into a charming decorative piece with this simple rural scene. This design features a quirky white hen surrounded by fresh carrots and tomatoes, rendered with a light, illustrative touch that lets the natural stone texture shine through.
Detailed Instructions
Materials
- Smooth, oval river rock (light or white color preferred)
- Acrylic paints (primary colors, white, brown, green)
- Fine liner brushes (size 00 or 000)
- Small flat brush (size 2-4)
- Pencil for sketching
- Spray varnish or sealant
Step 1: Sketching the Layout
-
Prepare the surface:
Begin by washing your stone thoroughly with soapy water and drying it completely. If your rock works better with a base, you can paint a very thin layer of white or cream, but this particular design looks lovely directly on a naturally pale stone. -
Outline the chicken:
Using a pencil, lightly sketch the chicken’s body in the center of the rock. Draw a simple tear-drop shape for the body, with a smaller rounded head at the top. -
Add the garden elements:
Sketch a gentle hill shape below the chicken for the ground. On the left, draw two carrots lying down. On the right, sketch a cluster of two round tomatoes. -
Detail the features:
Lightly mark where the comb, wattle, beak, and wing feathers will go. Add a tiny dot for the eye and a simple ‘v’ shape in the upper right sky for a distant bird.
Wobbly Lines?
If your hand shakes while outlining, rest your wrist on a steady object (like a heavy book) placed next to the rock. This anchors your hand for smoother strokes.
Step 2: Painting the Base Colors
-
Fill the body:
Use your flat brush to paint the main body of the chicken with white acrylic. It might need two thin coats to be opaque. Leave the beak and comb areas bare. -
Paint the ground:
Mix a muted olive green. Paint the ground area under the chicken’s feet, sweeping the brush horizontally to create uneven, grassy textures rather than a solid block of color. -
Color the vegetables:
Paint the carrots a vibrant orange. For the tomatoes, use a bright red. Apply these colors carefully, staying within your pencil lines. -
Add greenery:
Using a liner brush and darker green, paint vertical flicks above the carrots to look like carrot tops. Add some bushy leaves around the tomatoes.
Step 3: Adding Details and Outlines
-
Chicken details:
Paint the comb and wattle with a bright red. Use a tiny dot of yellow or orange for the beak. Let these small areas dry briefly before moving on. -
Create the outline:
Mix a very thin, watery grey or black paint. Using your finest liner brush, carefully outline the chicken’s body. The line doesn’t need to be perfect; a slightly shaky, hand-drawn look adds to the charm. -
Wing feathers:
With the same thin grey/black, paint three or four curved lines on the side of the body to suggest a wing. I like to keep these strokes quick and light. -
Legs and feet:
Switch to an orange-brown mix. Paint two simple stick legs extending from the body, adding three toes on each foot. -
Vegetable outlines:
Loosely outline the carrots and tomatoes with your fine liner brush and the grey/black mix. Add tiny textural dashes on the carrots for realism. -
Final nature touches:
Paint thin stems rising from the grass on the left and add small yellow dots for wildflowers. Outline the distant bird in the sky. -
Seal the rock:
Once absolutely everything is dry, spray the rock with a clear varnish to protect your garden scene from the elements.
Make Colors Pop
For brighter veggies, paint a layer of white on the carrot and tomato shapes first. Once dry, paint the orange and red on top for maximum vibrancy.
Now you have a delightful little garden scene that captures the cozy feeling of a country homestead
Minimal Geometric Chicken Design
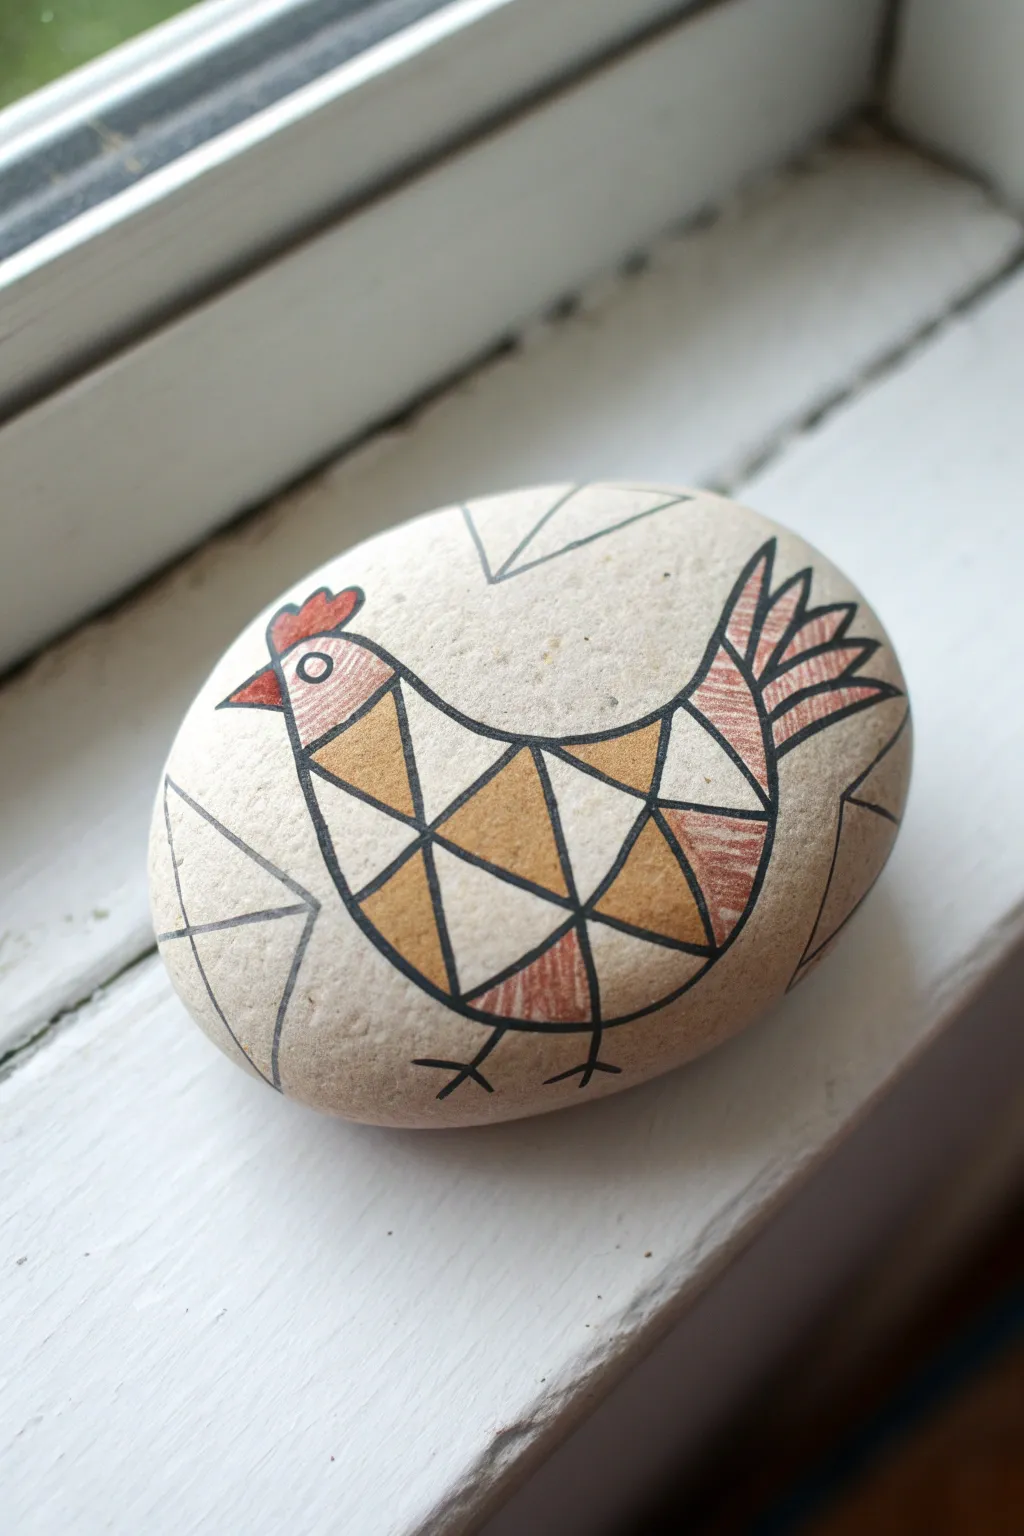
This rustic yet modern design transforms a simple stone into a piece of geometric folk art. Using crisp black lines and muted earth tones, you’ll create a stylized chicken that fits perfectly with minimalist or farmhouse decor.
Step-by-Step Guide
Materials
- Smooth, rounded river rock (light beige or off-white)
- Pencil and eraser
- Fine-point black permanent marker (e.g., Micron or Sharpie Ultra Fine)
- Colored pencils (terracotta/rust, mustard yellow/gold)
- Matte spray sealer or varnish
Step 1: Preparation & Sketching
-
Clean the canvas:
Start by scrubbing your rock with warm, soapy water and a brush to remove any dirt or oils. Let it dry completely in the sun or with a cloth. -
Visualize the shape:
Hold the rock horizontally. Identify the center area where the chicken’s body will sit. The natural curve of the stone often dictates the best placement for the bird’s back. -
Sketch the body outline:
Using a pencil very lightly, draw the main curve of the chicken’s body. It should look like a flattened tear-drop or a boat shape, curving up at the right for the tail and slightly up at the left for the head. -
Add the head and tail:
Sketch a small circle for the head at the top left of your curve. On the opposite side, flare out a fan shape for the tail feathers. -
Divide the interior:
Inside the body shape, draw a series of intersecting lines to create triangles. Start with a central vertical line and create zig-zag patterns connecting to the outline. -
Sketch the background details:
Lightly draw a few random geometric triangles floating in the background space around the chicken to balance the composition.
Sharpen Up
Keep your colored pencils extremely sharp. The stone texture can quickly dull the point, making it hard to stay inside small triangle lines.
Step 2: Inking the Lines
-
Trace the main outline:
Take your fine-point black marker and carefully go over your pencil sketch of the chicken’s outer silhouette. Rest your hand on the table to keep the line steady. -
Draw the interior geometry:
Inking the internal lines requires precision. Trace the triangles inside the body, ensuring all corners meet cleanly without overshooting. -
Detail the tail feathers:
Draw the individual feathers in the tail fan. Make these lines radiate outward from the body, closing them off at the tips to form distinct segments. -
Add facial features:
Draw a small circle for the eye with a tiny dot in the center. Add the triangular beak and the rounded comb on top of the head. -
Ground the bird:
Draw two simple stick legs extending downward. Add three small lines at the bottom of each leg for the feet. -
Ink the background:
Trace the floating triangles in the background. Keep these lines just as crisp as the main subject. -
Erase pencil marks:
Wait at least 15 minutes for the ink to fully set, then gently erase all visible pencil sketches.
Go Metallic
For a modern twist, replace the mustard yellow sections with gold leaf or a metallic gold paint pen.
Step 3: Adding Color
-
Select your palette:
Choose a rust redness and a mustard yellow colored pencil. These earthy tones complement the natural stone color, which serves as your ‘white’ or negative space. -
Color the body triangles:
Fill in specific triangles within the body using the mustard yellow. Apply varied pressure to get a solid fill, but leave alternating triangles uncolored to maintain the pattern. -
Add accent colors:
Switch to the rust-colored pencil. Color in the comb, beak, and select sections of the tail feathers. I like to add a subtle shading to some of the body triangles with this red as well. -
Fill background shapes:
Lightly shade inside the floating background triangles using the same colors to tie the whole piece together, but keep the application softer than the main bird. -
Seal the artwork:
Once you are happy with the color saturation, take the rock to a well-ventilated area. Spray a light coat of matte sealer over the top to protect the pencil and prevent the ink from fading.
Place your warm geometric chicken on a windowsill or desk for a peaceful, creative accent
Rainbow-Feather Fantasy Chicken
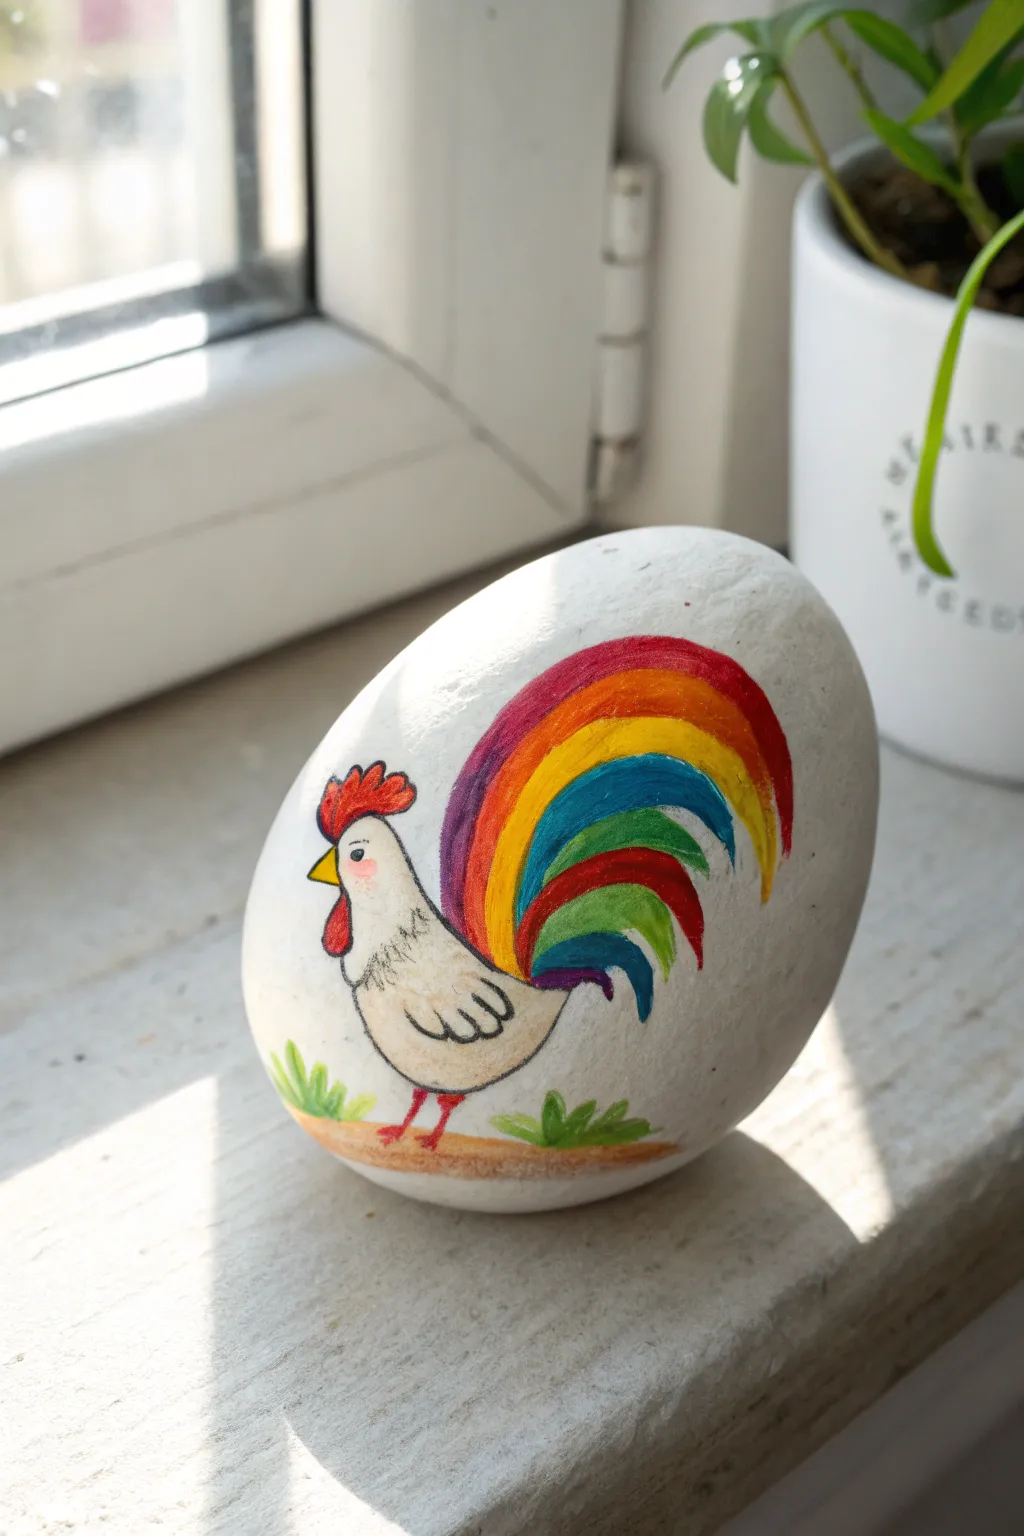
Brighten up your garden or windowsill with this cheerful rooster painted on a smooth white stone. The design features a charming white chicken with a spectacular, oversized rainbow tail that curves dramatically for a whimsical touch.
Detailed Instructions
Materials
- Smooth, egg-shaped white rock (river stone)
- Pencil and eraser
- Acrylic paints (primary colors, white, black, orange, purple, green)
- Fine liner brushes (size 0 and 00)
- Small flat brush
- Clear acrylic sealer (matte or gloss)
- Palette or paper plate
- Water cup and paper towels
Step 1: Preparation and Sketching
-
Clean the stone:
Wash your rock thoroughly with soap and water to remove any dirt or grease, then let it dry completely. A clean surface ensures the paint adheres properly. -
Rough sketch:
Using a pencil, lightly sketch the outline of the chicken. Start with a small pear shape for the body. -
Outline the tail:
Draw a large, curving swoosh coming off the back of the chicken. Divide this shape into arched bands to represent the rainbow feathers. -
Add features:
Sketch the comb on top of the head, the beak, the wattle under the beak, and the small wing on the side of the body.
Step 2: Base Colors
-
Paint the body:
Fill in the chickens body with a creamy white or very light beige paint. You may need two coats for solid coverage. -
Base the tail – Red:
Start painting the tail stripes from top to bottom. Paint the topmost outer arch with bright red acrylic. -
Orange stripe:
Paint the next stripe down with orange. Creating a clean edge between colors is easier if you use a square-tipped brush. -
Yellow and Green stripes:
Continue working downward, painting the next band yellow, followed by a band of green. Let the colors touch without blending. -
Blue and Purple stripes:
Finish the tail fan with a stripe of blue, and finally a small purple section at the very bottom, closest to the feathers. -
Comb and wattle:
Paint the rooster’s comb and the wattle under the chin with a vibrant red. -
Beak and legs:
Use a golden yellow for the small triangle beak. While you have the yellow out, mix a tiny bit of red in to make an orange-red for the stick-legs.
Wobbly Lines?
If brush outlining is too hard, use an extra-fine tip black Posca marker or permanent ink pen after the paint is 100% dry for crisp lines.
Step 3: Details and Outline
-
Wing definition:
Re-paint the wing shape on the body using a slightly darker cream or very light tan to distinguish it from the main body feathers. -
Rosy cheek:
Mix a tiny amount of pink paint with a lot of water to create a glaze. Dab a small, soft circle on the chicken’s face for a blushing cheek. -
Main outlining:
Switch to your thinnest liner brush (or a black paint pen). Carefully outline the entire chicken body, the individual tail feathers, and the comb. -
Feather texture:
Using short, wispy strokes with the black liner, add small texture lines on the neck and the wing to suggest fluffy feathers. -
Facial features:
Dot the eye with black. Add the legs and feet with thin red-orange lines. -
Grounding the image:
Mix a light brown and paint a thin, uneven line under the feet for the ground. Add simple green tufts of grass on either side.
Glitter Upgrade
Mix fine iridescent glitter into your sealer or paint a layer of glitter glaze over just the rainbow tail for extra sparkle in the sunlight.
Step 4: Finishing Touches
-
Enhance colors:
If any tail colors look dull after drying, add a second coat to make them pop against the white stone. -
Seal the rock:
Once the paint is absolutely dry—I like to wait at least an hour—apply a coat of clear acrylic sealer to protect your artwork from chipping.
Now you have a colorful pocket-sized friend to brighten up your desk or hide in a park for someone to find


Have a question or want to share your own experience? I'd love to hear from you in the comments below!