
Every December, I find myself craving Christmas winter scenes that feel quiet, sparkly, and a little nostalgic. Here are my favorite scene ideas to paint or draw when you want snowy calm plus that cozy holiday warmth.
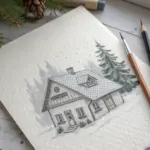
Cozy Cabin With Glowing Windows
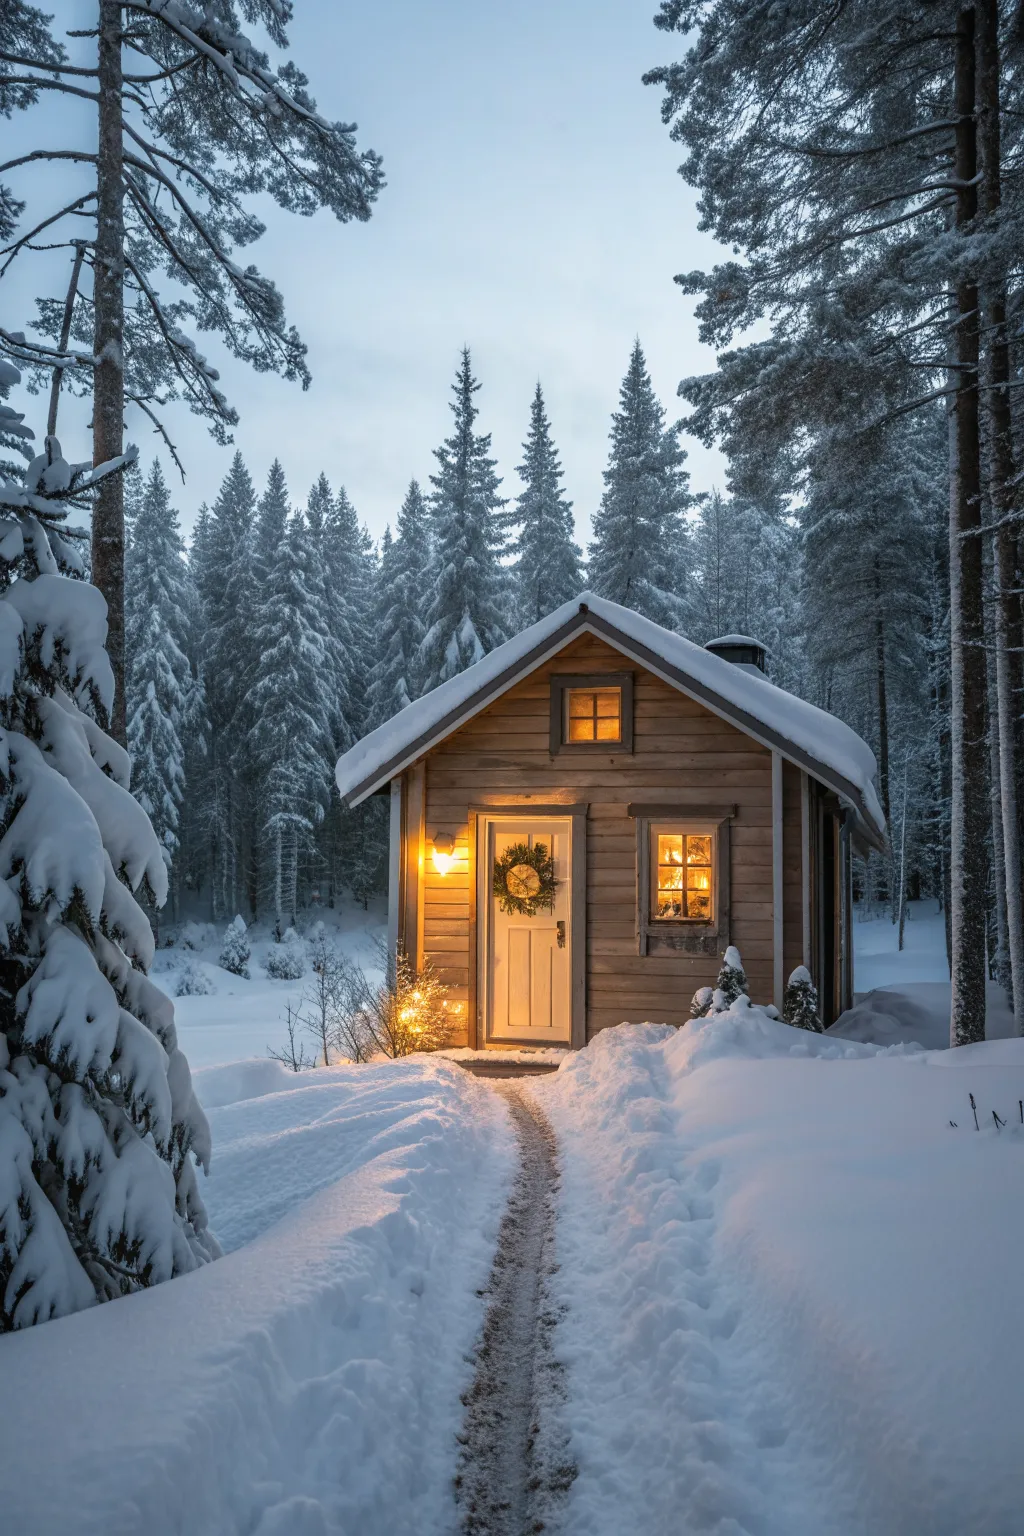
Capture the serene beauty of a snowy forest retreat with this acrylic painting tutorial, focusing on the dramatic interplay between cool twilight shadows and the warm, inviting glow of cabin lights. You’ll layer rich blues and crisp whites to build a frosty atmosphere before bringing the scene to life with golden illumination.
Detailed Instructions
Materials
- Canvas panel or stretched canvas (11×14 or similar)
- Acrylic paints: Phthalo Blue, Ultramarine Blue, Titanium White, Burnt Umber, Yellow Ochre, Cadmium Orange, Burnt Sienna, Black
- Assorted brushes: 1-inch flat, medium filbert, lush round, fine liner
- Palette knife (optional for texture)
- Water container and paper towels
- Chalk or pastel pencil for sketching
Step 1: Setting the Atmosphere
-
Prepare the Background:
Begin by covering the entire canvas with a mix of Titanium White and a touch of Ultramarine Blue to create a pale, icy sky base. Keep the strokes horizontal and smooth. -
Establish the Tree Line:
While the sky is drying, mix Phthalo Blue with a little Black and Burnt Umber for a deep, cool forest green-black. Using a rugged filbert brush, stipple in the distant tree shapes, making them taller on the sides to frame the composition. -
Underpainting the Snow:
Block in the foreground snow using a mix of White and a tiny drop of Phthalo Blue. Create the suggestion of the path leading up the middle by using slightly darker blue-grey tones for the trodden areas.
Step 2: Constructing the Cabin
-
Sketch the Structure:
Once the background is dry, use a chalk pencil to lightly outline the cabin’s shape. Focus on the perspective of the roofline and the vertical placement of the door and windows. -
Base Coat the Wood:
Mix Burnt Umber with a little White and burnt Sienna to get a weathered wood color. Paint the siding of the cabin with vertical strokes, leaving the window and door spaces blank for now. -
Adding the Roof Snow:
Using pure Titanium White on a loaded round brush, paint the thick blanket of snow on the roof. Apply the paint generously to create physical texture, letting it overhang the eaves slightly. -
Shadows and Planks:
Mix a darker brown using Burnt Umber and Black. With a fine liner brush or a distinct edge of a flat brush, paint thin horizontal lines to separate the wooden planks on the cabin siding.
Light Bloom Technique
To make Windows glow, keep the center brightest (white/yellow) and darken to orange/red at the edges. Don’t over-blend the frames.
Step 3: Illuminating the Scene
-
Interior Glow Base:
Inside the window and door frames, paint a solid layer of Cadmium Orange mixed with a little Yellow Ochre. This serves as the mid-tone for the light. -
Intensifying the Light:
In the center of the window panes and the middle of the door glass, blend in pure White mixed with Lemon Yellow (or just bright yellow) while the orange layer is still slightly tacky to create a radiant ‘hot spot’. -
Defining the Frames:
Use a steady hand and your liner brush with dark brown paint to create the window mullions (grids) and the door frame outline over the glowing light. -
The Porch Light:
Paint a small orb of bright white-yellow next to the door for the sconce. Dry brush a soft halo of yellow-orange around it on the wooden wall to show the light casting heavily nearby.
Make It Sparkle
Once fully dry, sprinkle iridescent glitter over wet touches of white paint on the roof and path for a magical, glittering snow effect.
Step 4: Refining the Winter Wonderland
-
Foreground Trees:
Paint the large tree trunks on the left and right using a mix of dark brown and grey. Their texture should look rough, so don’t smooth the paint too much. -
Snow-Laden Branches:
I like to use a fan brush or a worn flat brush here. Tap heavy clusters of Titanium White onto the dark branches of the foreground trees, mimicking the weight of fresh powder. -
Path Details:
Refine the path leading to the door. Add crisp white highlights on the edges of the snowbanks and deepen the blue shadows in the footprints to create depth. -
Cast Light on Snow:
Glaze a very thin, watery layer of orange/yellow paint on the snow immediately in front of the door and path to show the warm light spilling out onto the cold ground. -
Final Frosty Details:
For the finishing touch, take a liner brush with watered-down white and add tiny highlights to the very tops of the distant trees and the edges of the cabin siding.
Step back and admire how the warm heart of the cabin contrasts with your cool winter landscape.


Town Square Tree Lighting Moment
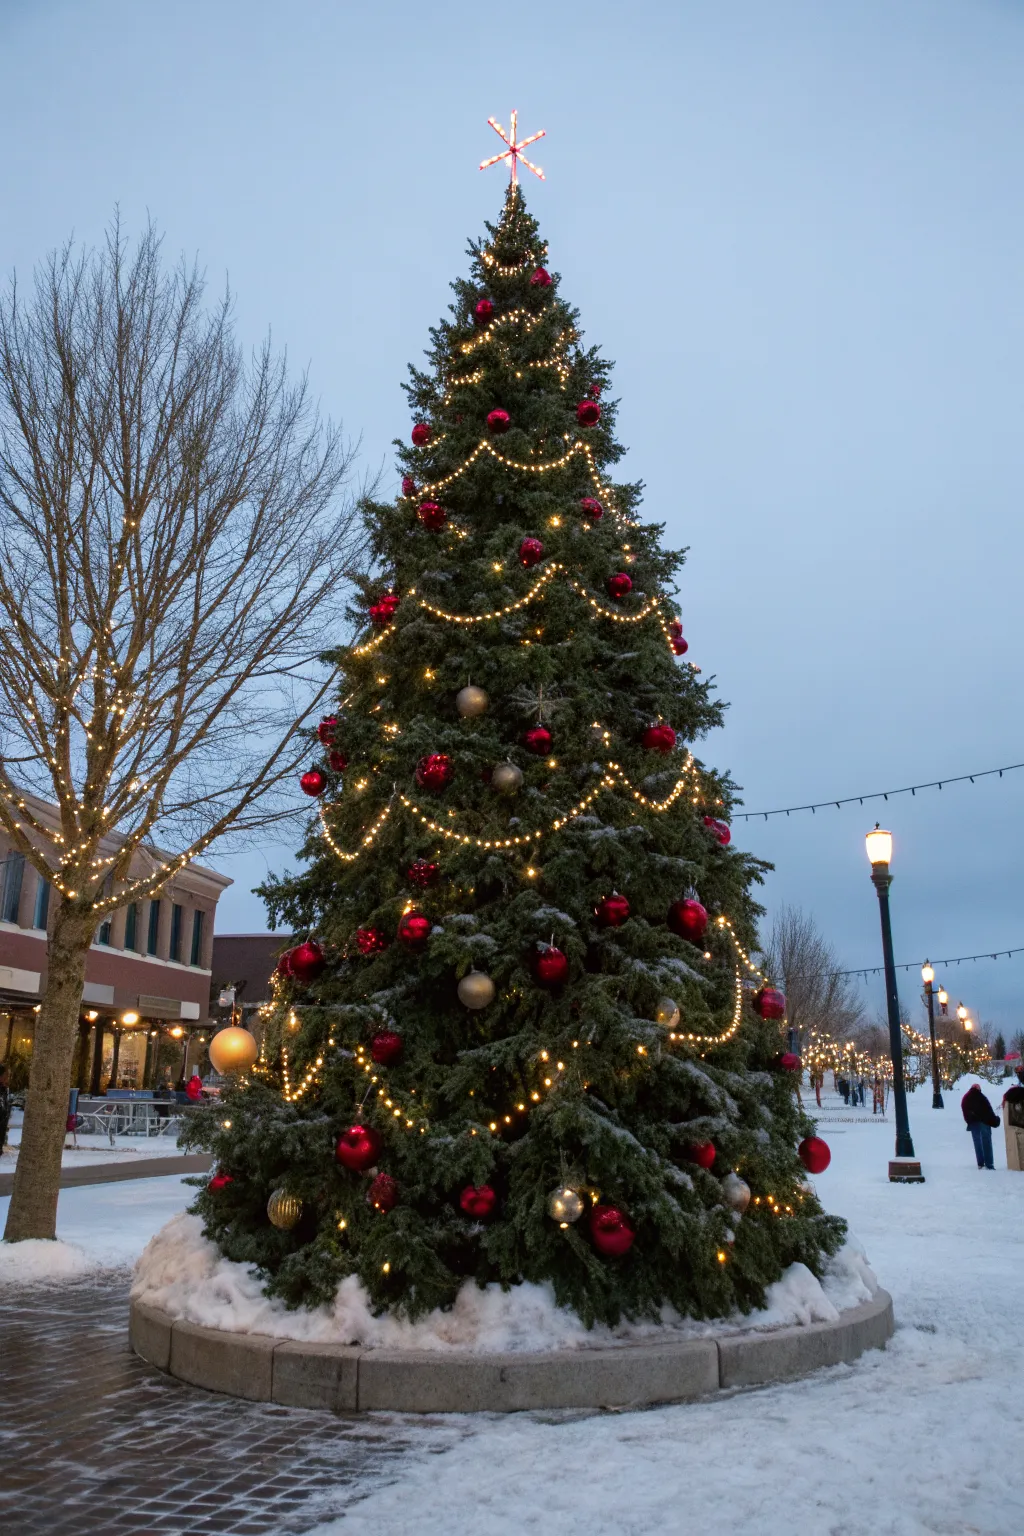
Capture the magic of the holiday season by photographing a towering town square Christmas tree against a twilight sky. This tutorial guides you through composing and editing a shot that balances the warmth of festive lights with the cool, crisp tones of a winter evening.
Step-by-Step Tutorial
Materials
- DSLR or Mirrorless Camera
- Wide-angle lens (16-35mm or similar)
- Tripod
- Remote shutter release or timer
- Warm winter clothing (gloves are essential)
- Adobe Lightroom or similar editing software
Step 1: Planning and Setup
-
Timing is everything:
Arrive at the location about 30 minutes before sunset. This ‘blue hour’ window provides the perfect balance where the sky isn’t pitch black yet, allowing the tree lights to glow without being blown out. -
Find the perfect angle:
Scout for a composition that includes context. Position yourself low to emphasize the height of the tree, ensuring interesting foreground elements like a snowy path or brickwork are visible. -
Secure your camera:
Set up your tripod on stable ground. If shooting on snow or ice, push the legs firmly down to prevent slipping. Stability is crucial for the longer exposures needed in low light. -
Dial in the settings:
Set your ISO low (around 100-200) to minimize noise. Choose an aperture between f/8 and f/11; this ensures the entire tree remains sharp and creates lovely starburst effects on the brighter lights.
Step 2: Capturing the Shot
-
Incorporate supporting elements:
Frame the shot to include the dormant tree on the left wrapped in lights. This adds depth and frames the main subject beautifully against the twilight sky. -
Lead the eye:
Utilize the brick path or the curve of the snow bank at the base of the tree as a leading line to draw the viewer’s eye into the center of the frame. -
Check your exposure:
Take a test shot. The histogram should show data across the range without clipping the highlights of the bulbs or crushing the shadows of the tree branches. -
Focus carefully:
Use manual focus with live view magnification to ensure the texture of the pine needles and ornaments is razor-sharp. Autofocus can struggle in low contrast twilight. -
Shoot the exposure:
Use a 2-second timer or remote release to trigger the shutter. This prevents camera shake from your hand pressing the button, keeping those details crisp. -
Bracket your shots:
Capture one exposure for the sky and a second, brighter exposure for the dark green details of the tree. You can blend these later if the dynamic range is too high.
Starburst Secret
To get distinct starburst points on stronger lights, use a smaller aperture like f/16, though watch for diffraction softening.
Step 3: Post-Processing Magic
-
Global adjustments:
Import your photo into Lightroom. Start by slightly cooling the white balance to enhance the wintery blue tones of the snow and sky, contrasting with the warm lights. -
Recover highlights:
Pull the ‘Highlights’ slider down significantly. This restores the color in the red ornaments and prevents the string lights from looking like white blobs. -
Open the shadows:
Gently boost the shadows to reveal the texture of the tree branches, making sure the dark green foliage doesn’t turn into a solid black mass. -
Enhance the reds:
Go to the HSL panel and slightly increase the saturation and luminance of the red channel. I like to do this to make the ornaments really pop against the green. -
Sharpen and detail:
Apply sharpening with a masking value (hold Alt/Option while sliding) to target edges only, avoiding increased noise in the smooth sky areas. -
Final touches:
Add a very subtle vignette to darken the corners, keeping the viewer’s attention firmly on the glowing star and the magnificent tree.
Add Falling Snow
If no snow is falling, use a ‘Dust & Scratches’ filter on a noise layer in Photoshop to create faux flakes.
With these techniques, you’ll have a stunning holiday capture ready to print for cards or display.


Red Barn in Fresh Christmas Snow
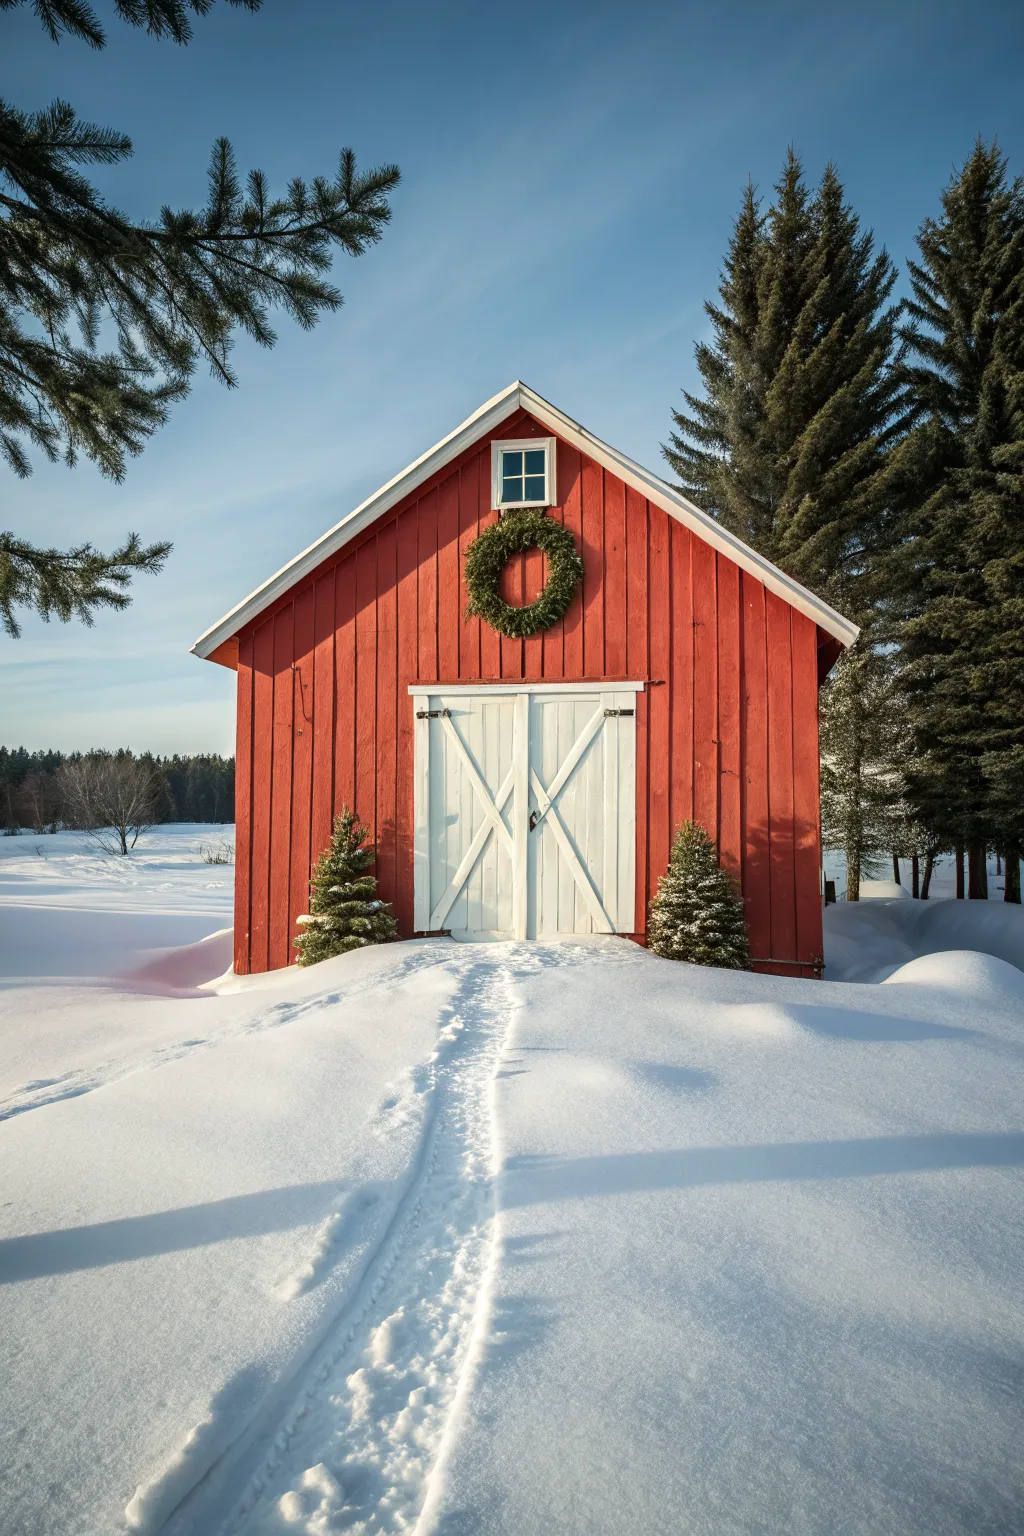
Transport yourself to a peaceful winter countryside by painting this vibrant red barn set against crisp white snow and deep green pines. This acrylic painting project focuses on balancing bold architectural shapes with the soft, organic textures of freshly fallen snow.
Detailed Instructions
Materials
- Stretched canvas or canvas board (11×14 or 16×20 inches)
- Acrylic paints: Titanium White, Mars Black, Cadmium Red, Burnt Sienna, Phthalo Blue, Sap Green, Burnt Umber
- Flat brushes (large and medium)
- Round brushes (small for details)
- Rigger or liner brush
- Palette knife
- Graphite pencil (HB or H)
- Ruler
- Water cup and paper towels
Step 1: Planning and Underpainting
-
Sketch the horizon:
Begin by lightly sketching the horizon line just below the center of your canvas. Keep it slightly uneven to represent rolling snowdrifts rather than a perfectly flat field. -
Draft the barn structure:
Use your ruler to draw the main pentagon shape of the barn right in the center. Add the vertical lines for the siding and sketch the large double doors and small upper window. -
Map the trees:
Lightly outline the positions of the large pine trees on the right and the framing branches in the upper left corner. Don’t worry about needles yet; just get the conical shapes and trunks placed. -
Paint the sky gradient:
Mix Titanium White with a touches of Phthalo Blue. Start painting the top of the canvas with a deeper blue mixture, gradually adding more white as you work downward toward the horizon to create a faded, atmospheric look.
Straight Lines Trick
If your hand is shaky, use drafting tape or painter’s tape to mask off the edges of the barn and the door frames. This guarantees crisp, architectural lines.
Step 2: Building the Red Barn
-
Base coat the siding:
Mix Cadmium Red with a tiny amount of Burnt Sienna to tone down the brightness. Paint the entire wooden siding area of the barn, carefully painting around the white door and window trim areas. -
Add vertical texture:
Once the red base is dry, mix a slightly darker version of your red using a touch of Burnt Umber. Use a thin round brush or the edge of a flat brush to paint vertical stripes, simulating the board-and-batten siding boards. -
Create shadows:
Identify where the roof overhang casts a shadow. Glaze a thin layer of deep red-purple (mix red and a tiny bit of blue) under the eaves to give the building dimension. -
Paint the trim:
Use pure Titanium White to paint the door frames, the ‘X’ cross-bracing on the doors, and the window trim. You may need two coats to ensure the red doesn’t show through. -
Detail the hardware:
With a small brush and black paint, add the hinges, door handles, and the dark panes of glass in the upper window.
Step 3: Texturing the Winter Landscape
-
Block in the evergreens:
Mix Sap Green with Burnt Umber and a touch of Phthalo Blue for a deep, dark forest green. Using a fan brush or an old rough flat brush, dab in the foliage of the trees on the right and the branches in the top left. -
Layer the trees:
I like to mix a slightly lighter green and tap it onto the sun-facing sides of the trees to create volume, leaving the deep darks in the recesses. -
Add the snowy ground:
Paint the bulk of the snow using Titanium White. While wet, blend in very faint streaks of light blue-grey (white + simplest touch of blue/black) to suggest shadows and undulations in the snow drifts. -
Paint the path:
Paint the trodden path leading to the door. Use increased blue-grey shadowing in the indentations where footprints would be, keeping the ridges bright white to show depth. -
Define the tree line:
In the distant background on the left, use a pale grey-purple mix to paint faint, small tree shapes along the horizon line, pushing them into the distance.
Make It Sparkle
Once the painting is fully dry, mix a tiny pinch of white iridescent glitter into a clear varnish and glaze just the snow areas for a magical morning frost effect.
Step 4: Final Festive Details
-
Hang the wreath:
Using your dark green mixture and a small round brush, stipple a circle shape onto the upper center of the barn wall. Highlight it with lighter green touches to make it look leafy. -
Add snow to trees:
Load a detailed brush with thick white paint. Carefully dab snow onto the top edges of the evergreen branches and the two small flanking trees near the barn doors. -
Frost the roof:
Paint the roof pure white. If you want it to look thick, use a palette knife to lay the paint on heavily, letting it hang slightly over the edge. -
Refine the shadows:
Strengthen the long shadows cast by the trees across the foreground snow using a watered-down blue wash. This ties the lighting together.
Enjoy the crisp, calm atmosphere of your winter barn scene as it brings a touch of rustic holiday charm to your wall.


Evergreen Forest Path With Lantern Glow
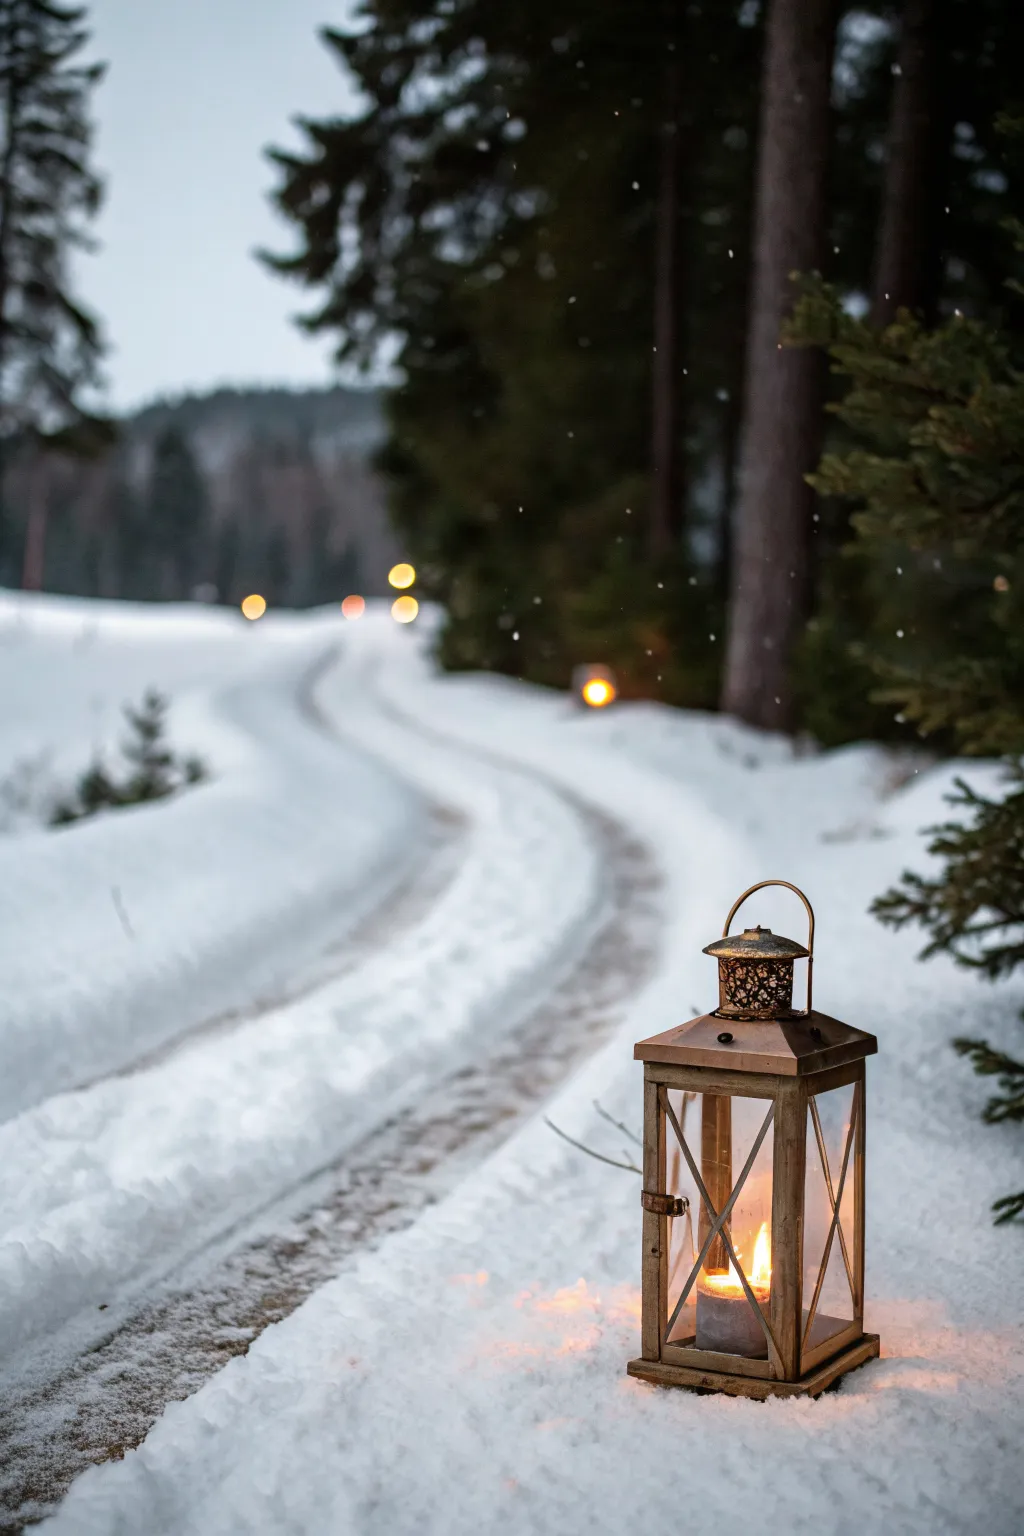
Capture the serene magic of a snowy evening walk with this atmospheric acrylic painting. You’ll learn to create convincing depth through soft focus backgrounds and glowing warm light against cool winter shadows.
Step-by-Step Tutorial
Materials
- 11×14 inch stretched canvas
- Acrylic paints: Titanium White, Mars Black, Prussian Blue, Burnt Umber, Raw Sienna, Cadmium Yellow, Cadmium Orange
- Large flat wash brush (1 inch)
- Medium filbert brush (#6)
- Small round detail brush (#1 or #0)
- Fan brush
- Palette knife
- Water container and paper towels
- Circular sponge or pouncer (optional)
Step 1: Setting the Atmospheric Background
-
Sky gradient:
Begin by missing Prussian Blue with a touch of Mars Black and plenty of White. Paint the top third of the canvas in a soft, downward gradient, getting lighter and cooler as you reach the horizon line to mimic a grey winter sky. -
Distant trees:
Mix a dark, desaturated green using Prussian Blue, Black, and a tiny bit of Burnt Umber. Using the large flat brush, block in vertical shapes for the background forest. Keep the edges extremely soft and blurred to push them into the distance. -
Background bokeh:
While the background is still slightly tacky, use a clean finger or a circular sponge to dab soft spots of yellow and orange mixed with white near the center horizon. These are your distant, out-of-focus streetlights.
Muddy Snow?
Clean your brush thoroughly! If you mix warm lantern colors into your cool blue shadows without cleaning, the snow will turn green or grey. keep brushes separate.
Step 2: Creating the Snowy Path
-
Base snow layer:
Mix a large amount of Titanium White with a hairline of Prussian Blue to create a very cool, pale blue-white. Cover the entire lower two-thirds of the canvas with sweeping, curved strokes that narrow as they travel toward the vanishing point. -
Establishing the tracks:
Using the medium filbert brush and a slightly darker grey-blue mix, paint the two parallel tire ruts. Follow the S-curve of your road, making the tracks wider in the foreground and converging in the distance. -
Adding texture:
Load your palette knife with pure Titanium White. Gently scrape it over the ‘high points’ of the snow between the tracks and on the banks to create the texture of undisturbed powder. -
Shadows and dirt:
Mix a thin wash of Burnt Umber and tap it lightly into the deepest parts of the tire ruts where mud might show through the ice. Keep this subtle.
Golden Hour Glow
add a thin glazing medium mixed with iridescent gold paint over the candle flame area once it’s fully dry for a magical, shimmering light effect.
Step 3: Painting the Foreground Elements
-
Right-side trees:
Switch to a darker mix of Burnt Umber and Black. Paint the thick trunk of the foreground pine tree on the right edge. It should be sharp and distinct compared to the background. -
Pine needles:
Use the fan brush (or the corner of a flat brush) to tap in evergreen branches extending from the right. Use a dark green-black mix first, then highlight the tops of the branches with a green-white mix to show snow accommodation. -
Lantern structure:
Sketch the lantern shape in the bottom right corner with thin Raw Sienna paint. Build the boxy frame, the crisscross window panes, and the looped handle on top. -
Metallic texture:
Fill in the lantern frame with a mix of Burnt Umber and Raw Sienna. Add highlights with Unbleached Titanium on the edges facing the candle to simulate a metal finish.
Step 4: The Lantern Glaze and Finishing Touches
-
Candle flame:
Paint a small, bright teardrop shape inside the lantern using Cadmium Yellow and White. Center the hottest white part at the wick. -
Inner glow:
Glaze the glass panels of the lantern with a transparent wash of Cadmium Orange. This makes the interior look warm and lit. -
Cast light:
I like to take a dry brush with a tiny amount of Orange and Yellow and lightly scumble the snow immediately around the base of the lantern. This reflects the warm light onto the cold ground. -
Final snow details:
Using a splatter technique or a fine detail brush, add falling snowflakes across the scene. Make the flakes in front of the dark trees larger and those in the distance mere specks. -
Rim lighting:
Add a final crisp line of white highlight on the metal handle and the top roof of the lantern to show where the snow has settled and frozen.
Step back and admire how the warm lantern light invites the viewer into your wintry landscape
BRUSH GUIDE
The Right Brush for Every Stroke
From clean lines to bold texture — master brush choice, stroke control, and essential techniques.
Explore the Full Guide
Wooden Sled With Presents in the Snow
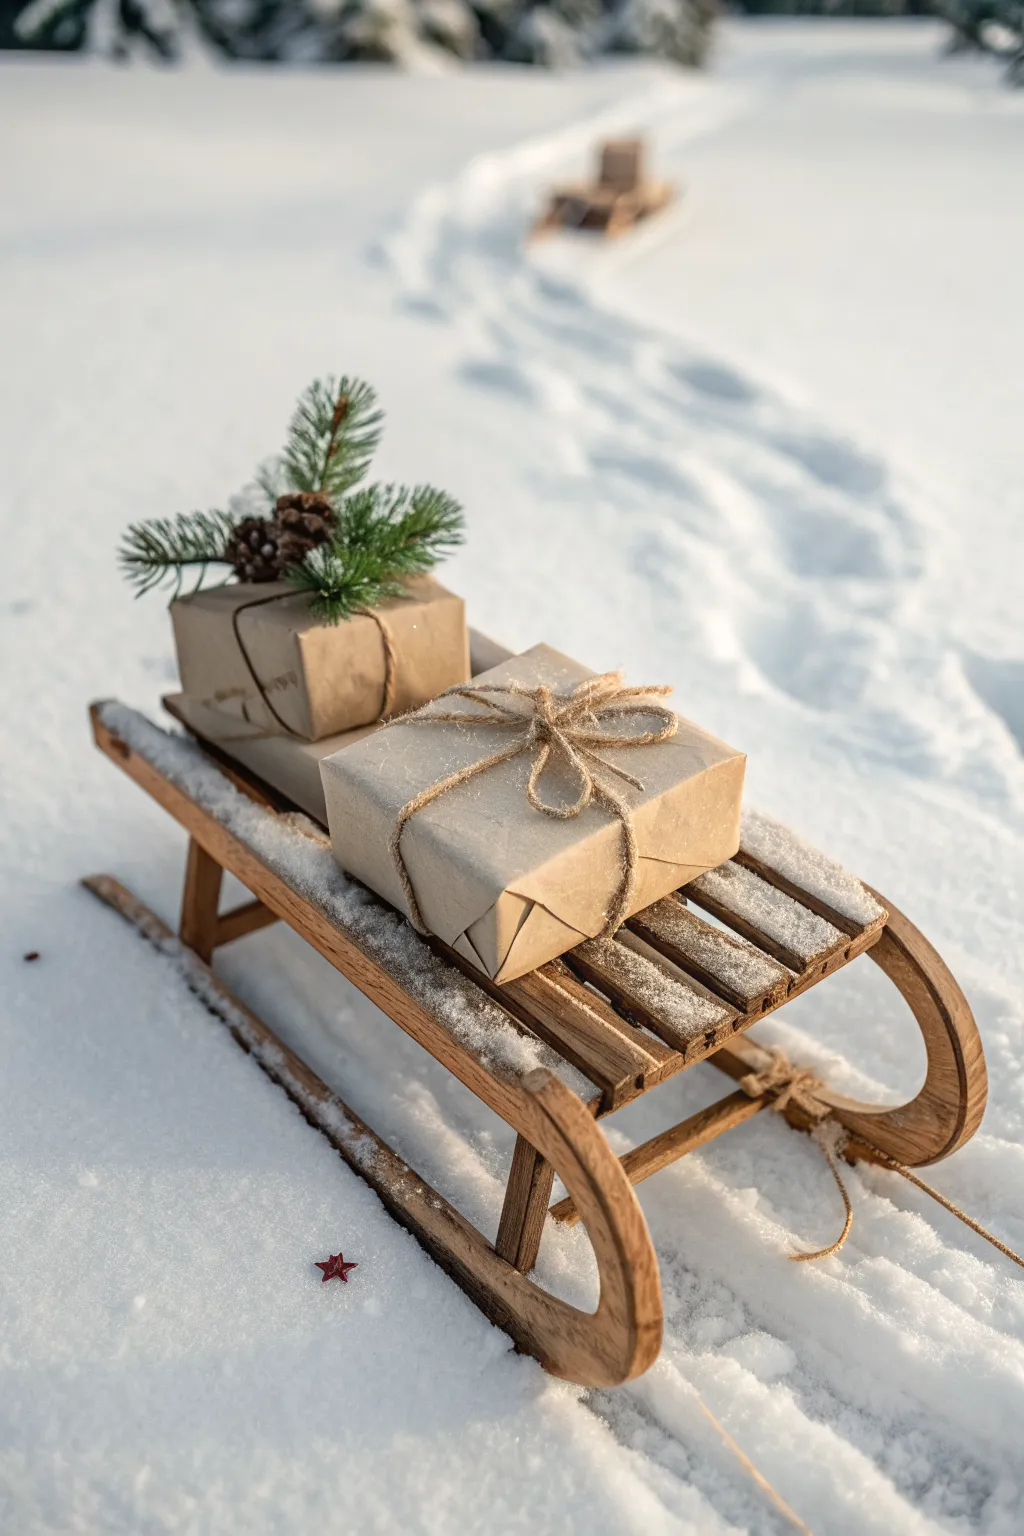
Create a nostalgic outdoor Christmas vignette perfect for holiday photography or greeting cards using a vintage-style wooden sled and classic brown paper packages. The natural textures of wood, snow, and twine combine for a timeless and cozy aesthetic.
Step-by-Step
Materials
- Small wooden sled (vintage or reproduction)
- Two sturdy boxes (for wrapping)
- Brown kraft paper
- Jute twine or hemp cord
- Fresh or faux pine branches (frosted effect optional)
- Small pinecones
- Double-sided tape
- Scissors
- White faux snow spray (optional)
- Hot glue gun and glue sticks
Step 1: Preparing the Gifts
-
Select your boxes:
Choose two boxes of different sizes—one slightly larger and flatter for the base, and a smaller, boxier one for the top. Empty boxes work best as they are light to transport, but adding a little weight inside (like a stone or bag of rice) helps keep them stable outdoors. -
Wrap with kraft paper:
Cut your brown kraft paper to size. Wrap each box cleanly, using double-sided tape for invisible seams. I prefer crisp creases on the edges to give that professional, old-fashioned parcel look. -
Tie the base package:
For the bottom present, wrap the jute twine simply. A single or double pass around the width is sufficient since this box will mostly be covered by the top one. -
Add the twine bow:
For the top present, create a more elaborate tie. Wrap the twine around the box multiple times in both directions (cross-style) to build texture. Finish with a rustic, slightly floppy bow right in the center.
Snow Protection
If the snow is wet, stick a piece of clear plastic wrap to the bottom of the gifts. This prevents the kraft paper from soaking up water and darkening.
Step 2: Adding Natural Embellishments
-
Prepare the greenery:
Take your pine branches and trim them into small sprigs. If your greenery is too vibrantly green, lightly mist it with a touch of white spray paint or artificial snow spray to mimic frost. -
Arrange the topper:
Cluster two or three pine sprigs together with a couple of small pinecones. Use a dab of hot glue or a piece of wire to secure this little bouquet together. -
Attach to the gift:
Tuck the stem of your pine cluster under the twine of the top gift. For security during transport, you can add a small dot of hot glue to hold it in place against the paper.
Step 3: Setting the Scene
-
Scout the location:
Find a pristine patch of snow with clean, untouched white space in the foreground. Look for good natural light, ideally during the ‘golden hour’ for soft shadows. -
Create the tracks:
Before placing your main sled, I suggest dragging a second sled or a board through the snow in the background to create leading lines or trails, adding depth to your composition. -
Position the sled:
Place your wooden sled gently onto the snow surface. Angle it slightly diagonally to the camera angle rather than straight on for a more dynamic look. -
Stack the gifts:
Place the larger, simpler gift on the sled slats first. Stack the smaller, decorated gift on top, slightly offset or angled. -
Dust with snow:
Take a handful of real snow and very lightly sprinkle it over the sled runners and the tops of the packages. You want it to look like it has been sitting there for a few minutes while snow fell. -
Clear the foreground:
Check the snow immediately in front of the sled. Smooth over any of your own footprints to ensure the snow looks undisturbed. -
Add a final detail:
If you have a small red star or berry ornament, drop it casually in the snow near the sled runner for a tiny pop of contrasting color.
Pro Tip: Texture
Crumple the kraft paper into a ball and then smooth it out before wrapping. This breaks the fibers and gives the paper a softer, vintage fabric-like texture.
Step back and capture your charming winter scene while the light is perfect
Moonlit Christmas Eve Over Silent Pines
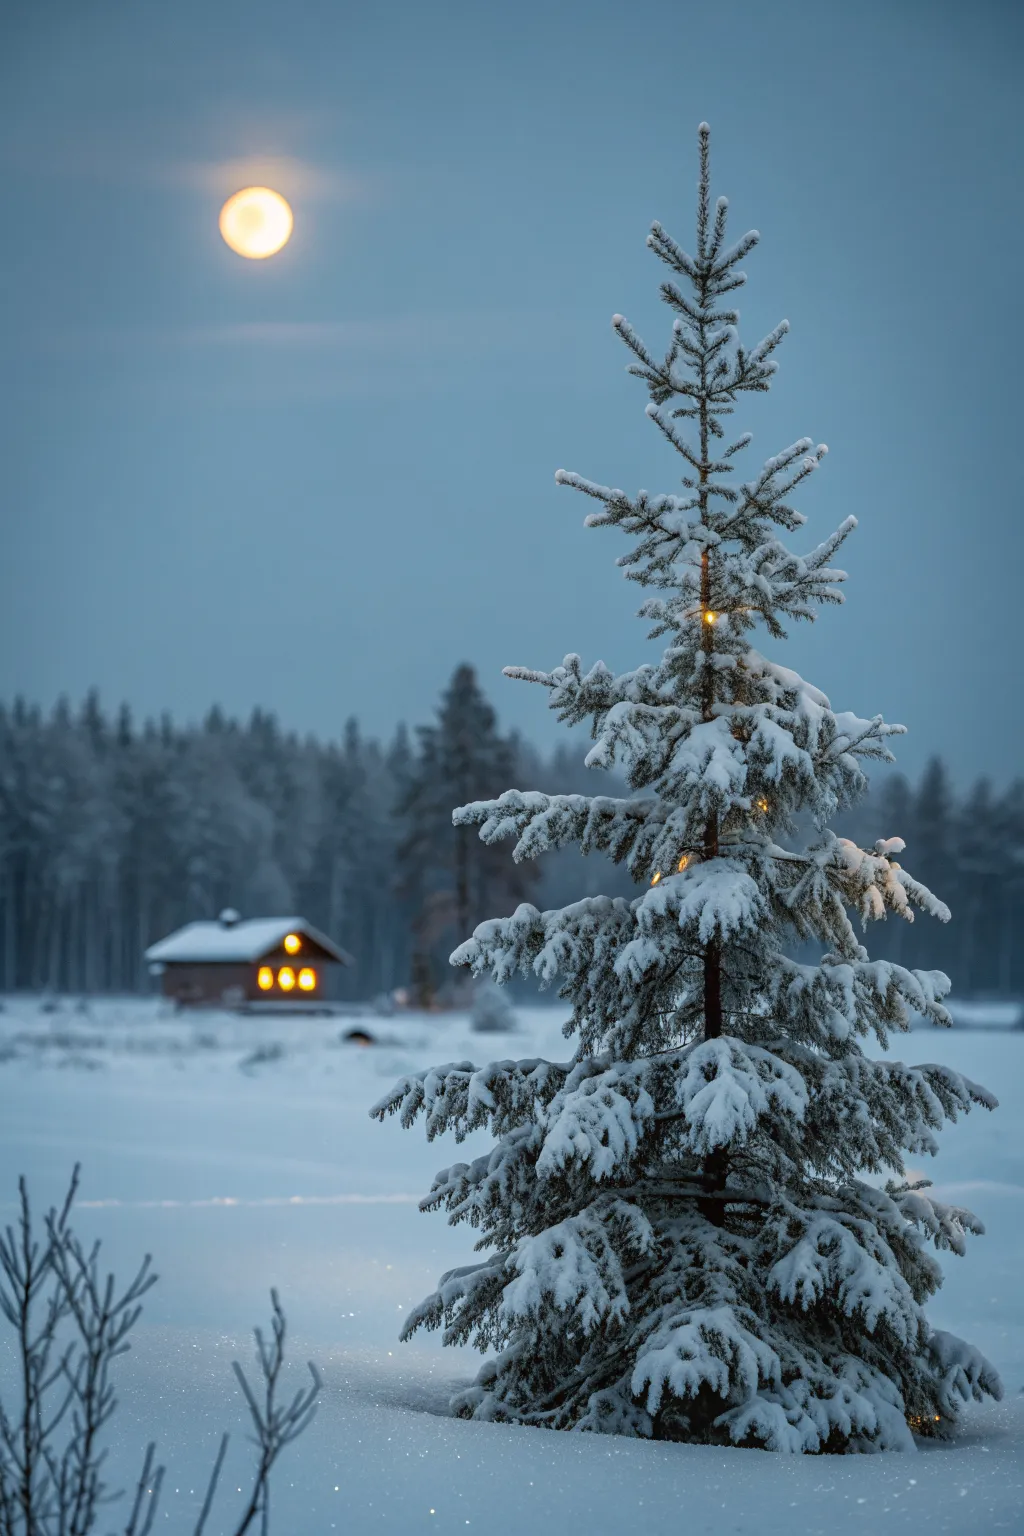
Capture the serene magic of a Scandinavian winter evening with this acrylic painting tutorial. You will learn to create a glowing moonlit atmosphere, distant cozy lights, and realistic heavy snow on evergreen branches.
Detailed Instructions
Materials
- Stretched canvas or canvas board (11×14 or similar)
- Acrylic paints: Phthalo Blue, Ultramarine Blue, Titanium White, Mars Black, Burnt Umber, Cadmium Yellow, Cadmium Orange
- Flat brushes (large and medium)
- Round brushes (small and detail liner)
- Fan brush (optional, for trees)
- Palette knife
- Water cup and paper towels
- Table salt (for texture tricks)
Step 1: Setting the Atmosphere
-
Create the gradient sky:
Start by mixing Phthalo Blue with a touch of Mars Black and plenty of Titanium White to create a dusky, muted grey-blue. Paint the entire upper two-thirds of the canvas, making the top darker and gradually adding more white as you move downward to simulate the horizon glow. -
Adding the snowy base:
For the ground, mix Titanium White with a tiny speck of your sky blue mixture so it isn’t pure stark white. Paint the bottom third of the canvas, blending the horizon line softly into the sky colors while the paint is still wet to create a misty distance. -
The glowing moon:
While the sky is tacky but not fully dry, use a clean finger or a dry brush to wipe away a small circle of paint where the moon will go. Paint a solid circle of Titanium White mixed with a tiny drop of Cadmium Yellow. softly blend the edges outward into the blue sky to create a halo effect.
Soften the Distance
To make the background trees look truly far away, mix a glazing medium or water into your paint to make it semi-transparent. This pushes those elements back visually.
Step 2: Building the Background
-
Painting the distant forest:
Mix a cool greyish-blue using Ultramarine Blue, a little Burnt Umber, and White. It should be darker than the sky but lighter than the foreground. Paint vertical, uneven strokes along the horizon line to suggest a dense forest. Keep the edges soft and blurry. -
Refining tree shapes:
Use a smaller flat brush to tap in slightly more defined tree shapes within that distant forest block, suggesting pine tops. Don’t add detail; these should look out of focus. -
The cozy cabin silhouette:
Using a mix of Burnt Umber and a touch of Black, paint the small, simple shape of the cabin in the middle distance. Keep it small to emphasize the grandeur of the landscape and the foreground tree. -
Adding the cabin glow:
Once the cabin shape is dry, use a small detail brush with pure Cadmium Orange mixed with Yellow to paint the window squares. Add a tiny dot of White in the center of the windows to make them look brightly lit.
Step 3: The Hero Pine Tree
-
Structuring the trunk:
Mix a dark brown-black using Burnt Umber and Black. Paint a vertical line for the trunk of the main tree on the right side of the canvas. It doesn’t need to be perfectly straight; natural curves look better. -
Roughing in branches:
Switch to a medium round brush or a fan brush. Using the dark mix, tap in the branches starting from the top. Keep the top branches short and angle them slightly upward, making them wider and heavier as you move down the trunk. -
Adding depth to the greenery:
Mix a deep forest green using your blue, yellow, and black. Stipple this color over your dark branch structure to give the tree volume before adding the snow. Let this layer dry completely. -
First layer of snow:
Mix Titanium White with a tiny touch of Phthalo Blue to create a shadow snow color. Using a palette knife or a firm brush, apply this to the tops of the branches. I prefer loading the knife and gently pressing it down to create an organic, heavy look. -
Highlighting the snow:
Now use pure Titanium White. Apply this only to the very tops of the snow clumps you just painted, imagining the moonlight hitting them from above. This creates a fluffy, 3D effect. -
Foreground twigs:
In the bottom left corner, use a liner brush with the dark brown mix to paint a few thin, scraggly twigs poking out of the snow, balancing the composition.
Sparkle Effect
While the white snow highlights on the tree are still wet, sprinkle a tiny pinch of clear or iridescent glitter onto them for a genuine snowy shimmer.
Step 4: Final Magical Details
-
Adding the fairy lights:
Mix Cadmium Yellow, Orange, and plenty of White. Using the tip of a small round brush, dot small lights randomly within the dark pockets of the pine tree branches. -
Creating the light bloom:
Wash your brush and dry it well. Gently glaze a very thin, watery layer of yellow-orange around each light dot to make them appear to be glowing against the dark needles. -
Foreground snow texture:
Mix a watery white paint and flick it off a stiff brush or toothbrush onto the finished painting to create the look of falling snow or frost dust. Focus some splatters near the bottom for textured ground snow.
Step back and enjoy the peaceful silence of your winter creation

PENCIL GUIDE
Understanding Pencil Grades from H to B
From first sketch to finished drawing — learn pencil grades, line control, and shading techniques.
Explore the Full Guide
Sunrise on a Frozen River With Holiday Greenery
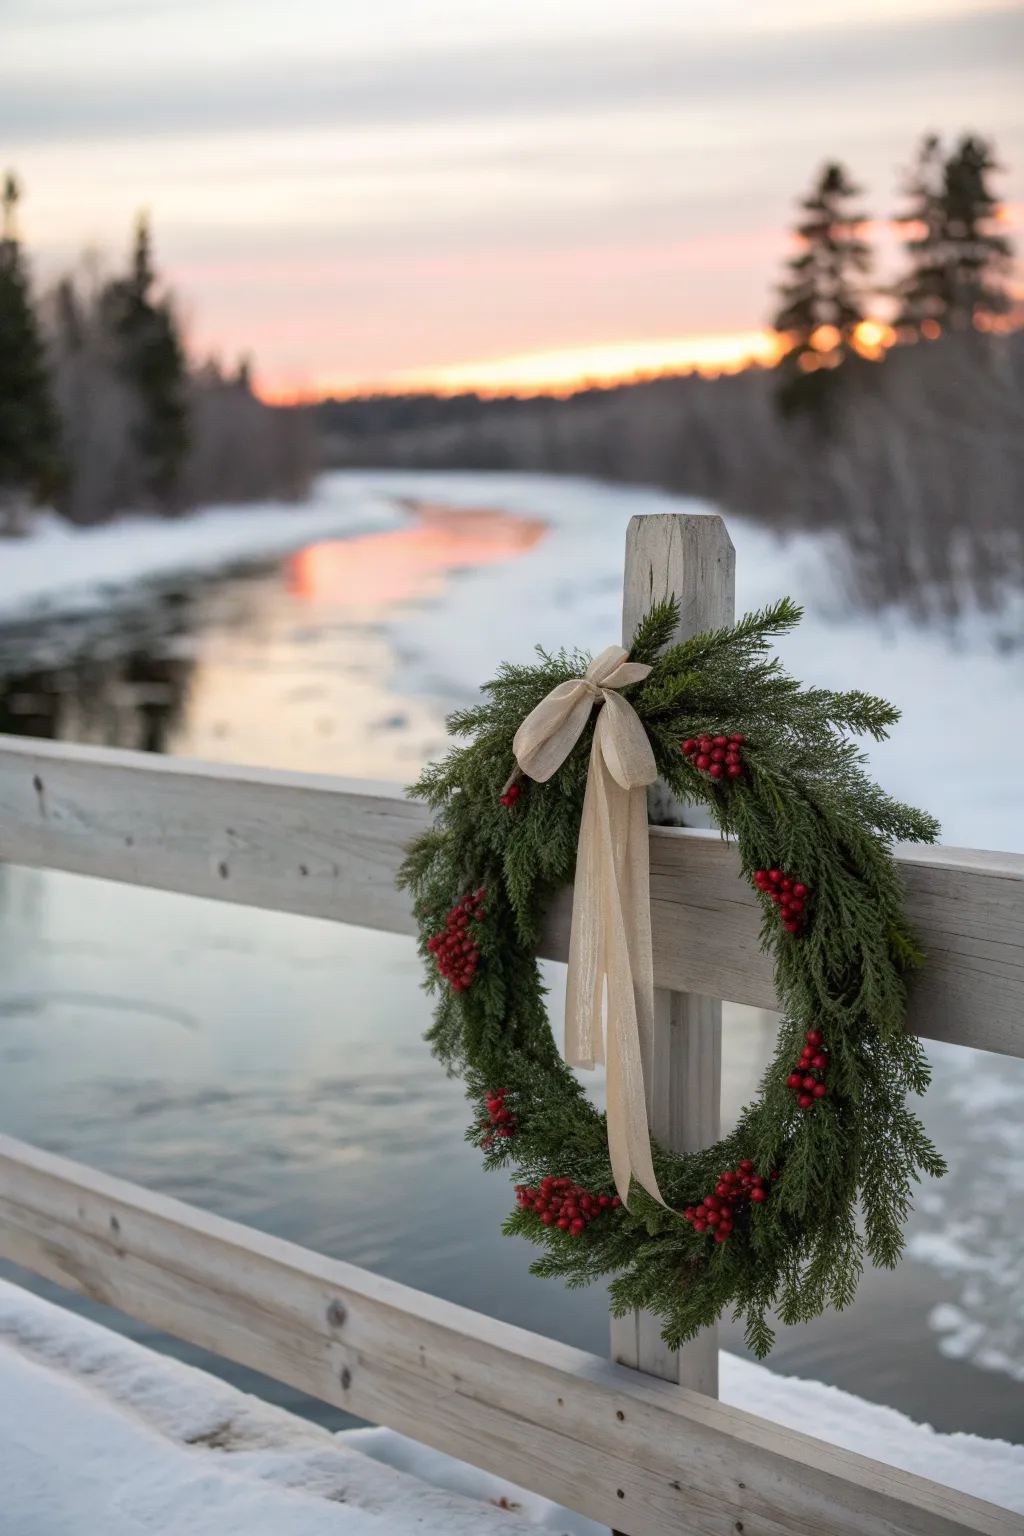
Capture the serene beauty of a winter sunrise with this rustic evergreen wreath, designed to bring a touch of holiday warmth to outdoor wooden structures. Using natural cedar and bright red berries, this project mirrors the quiet elegance of a frozen riverside landscape.
Step-by-Step Guide
Materials
- 18-inch wire wreath frame
- Floral paddle wire (green)
- Fresh cedar boughs (several large bundles)
- Artificial or fresh red berry sprigs (holly or winterberry)
- Wide beige or cream linen ribbon (2.5 inches wide)
- Pruning shears
- Wire cutters
- Hot glue gun and glue sticks (optional, for securing berries)
- Heavy-duty scissors
Step 1: Building the Green Foundation
-
Prepare the cedar:
Begin by processing your cedar boughs. Using your pruning shears, cut the larger branches into smaller, manageable sprigs, each about 6 to 8 inches long. Aim for pieces that have nice, fan-like foliage at the tips. -
Secure the wire:
Take your wire wreath frame and attach the end of the paddle wire to one of the crossbars. Twist it tightly several times to ensure it won’t slip as you work. -
Create the first bundle:
Gather 3 or 4 cedar sprigs into a small bunch. Hold them against the wire frame, angling them slightly outward to cover the edges of the form. -
Wrap tightly:
Wrap the paddle wire tightly around the stems of the cedar bunch and the frame three times. Pull the wire taut each time—tension is key to a durable outdoor wreath. -
Layer the next bunch:
Create a second bunch of cedar. Place this bunch over the stems of the first one, overlapping them by about half. This shingling technique hides the wire and builds volume. -
Continue securely:
Repeat the layering process, moving continuously in one direction around the frame. I find it helpful to occasionally step back and check for bare spots before moving too far ahead. -
Finish the circle:
When you reach the starting point, tuck the stems of your final bunch underneath the foliage of your very first bunch. Wire it securely and tie off the wire on the back of the frame.
Freshness Keeper
Before assembling, soak your fresh cedar clippings in a bucket of water for 24 hours. The wood absorbs moisture, keeping the needles green and pliable for weeks longer.
Step 2: Adding the Snowy Accents
-
Position the berries:
Take your red berry sprigs and plan their placement. You want 5 to 7 clusters evenly spaced around the circle, nestled deep into the greenery to look natural. -
Insert the stems:
If the berry stems are long enough, push them through the cedar into the wire frame structure. Bend the stems on the back of the wreath to hook them in place. -
Glue for security:
For extra hold against winter winds, apply a dab of hot glue to the berry stems before inserting them into the greens. This helps keep them stable without visible wires. -
Adjust the foliage:
Fluff the cedar branches around the berries so they look like they are growing out from the greenery, rather than just sitting on top.
Step 3: The Finishing Touch
-
Measure the ribbon:
Cut a long length of your beige linen ribbon—approximately 2 yards. You want enough length for a generous bow and long, trailing tails. -
Tie the bow:
Form a simple looped bow. Make two loops, cross them, and tie, keeping the knot relatively loose at first to adjust the size of the loops. Aim for a relaxed, drooping look rather than a stiff, perfect shape. -
Secure the center:
Once you are happy with the shape, tighten the knot. Thread a piece of floral wire through the back of the knot to create a mounting point. -
Attach to wreath:
Attach the bow to the top center of the wreath using the wire. Twist it firmly around the frame structure on the back so the bow sits proudly at the 12 o’clock position. -
Trim the tails:
Let the ribbon tails hang down through the center of the wreath. Trim the ends at a sharp angle or a fishtail cut for a polished finish. -
Final fluff:
Give the entire wreath a gentle shake to dislodge loose needles and make final adjustments to the ribbon tails so they drape elegantly.
Frosty Effect
Lightly mist the tips of the cedar with white spray paint or artificial snow spray to mimic the frost seen in the background landscape.
Hang your creation on a fence post or front door to welcome guests with the peaceful spirit of the season


Have a question or want to share your own experience? I'd love to hear from you in the comments below!