If you’re craving fresh kite drawing ideas, you’re in the perfect headspace—kites are basically permission to play with simple shapes and bold color. I’m sharing my favorite ways to draw kites, from classic designs you can nail in minutes to more imaginative twists that feel like pure studio fun.
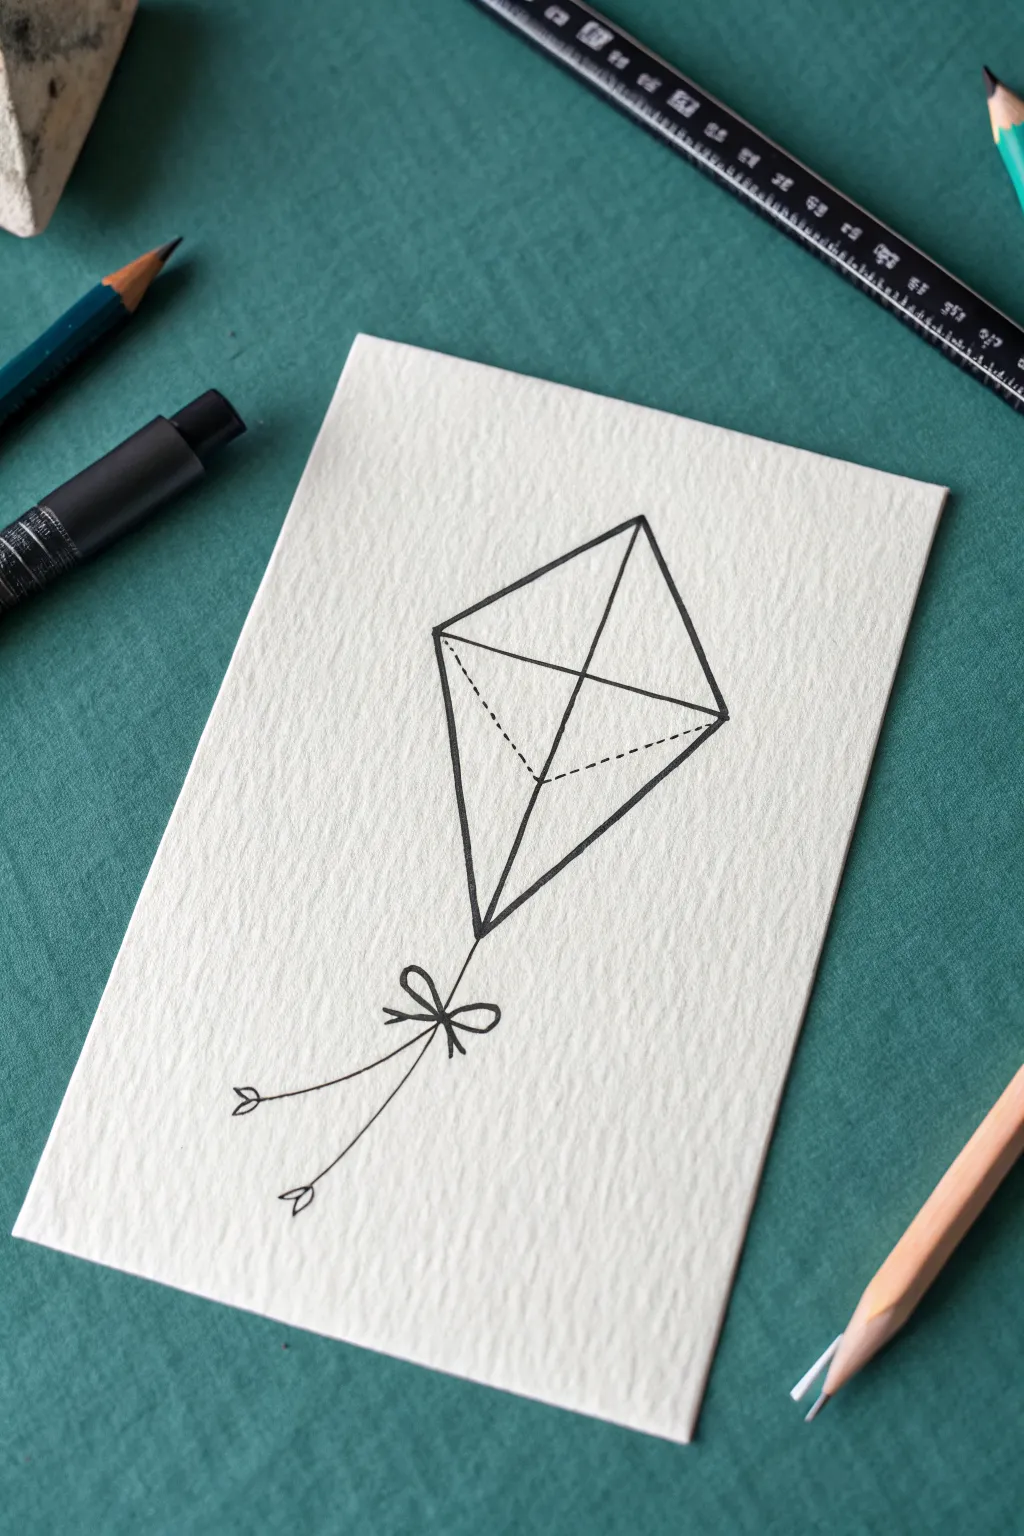
Easy Delta Kite Design
Capture the breezy joy of a summer day with this soft and charming watercolor illustration. Using warm, earthy pinks and simple geometric lines, this project creates a lovely minimalist piece perfect for a greeting card or wall art.
How-To Guide
Materials
- Cold press watercolor paper (textured)
- Watercolor paints (burnt sienna, rose madder, or terracotta shades)
- Fine liner brush or a 00 round brush
- Small round brush (size 2 or 4)
- Pencil (HB or H)
- Ruler
- Eraser
- Jar of water
- Paper towel
Step 1: Sketching the Shape
-
Draw the main axis:
Start by using your ruler to draw a vertical line lightly in pencil down the center of your paper. This will be the spine of the kite and helps keep everything symmetrical. -
Add the crossbar:
Draw a horizontal line crossing the spine near the top third of the vertical line. This forms the classic cross shape. Keep your pencil pressure very light so the graphite doesn’t show through the paint later. -
Connect the points:
Use your ruler to connect the four endpoints of your cross. Draw lines from the top point to the side points, and from the bottom point to the side points to complete the diamond shape. -
Add the tail triangle:
At the very bottom point of the diamond, draw a tiny freehand triangle pointing downward. This acts as the connector for the kite’s tail. -
Refine the lines:
Lightly erase your guide lines just enough so they are faint but still visible. If the graphite is too dark, it might smudge when wet.
Step 2: Painting the Panels
-
Mix your palette:
Prepare a watery wash of reddish-brown or dusty pink watercolor. I like to mix a little Burnt Sienna with a touch of Alizarin Crimson to get that warm, nostalgic clay color seen in the photo. -
Paint the top left section:
Using your small round brush, fill in the top-left triangle of the kite. Let the color pool naturally on the textured paper to create variation. -
Paint the bottom right section:
While the first section is wet, move diagonally and paint the large bottom-right triangle. Working in non-touching sections prevents the colors from bleeding into each other immediately. -
Let it dry uniquely:
Wait specifically for these two sections to dry completely. This is crucial for achieving that segmented, crisp look where the lines meet. -
Fill remaining sections:
Once the first set is dry, paint the top-right and bottom-left triangles. You can vary the water-to-paint ratio slightly here to make these panels a shade lighter or darker, adding depth to the drawing. -
Paint the tail connector:
Fill in the tiny triangle at the bottom with a fairly concentrated amount of paint so it stands out as an anchor point.
Wet Edge Technique
To get the darker edges seen in the panels, drop a tiny bit of concentrated pigment along the wet edge of a drying wash. It will naturally bloom inward.
Step 3: Adding Details
-
Draw the frame structure:
Wait until the paint is bone dry to the touch. Using a very fine liner brush or a fine-tip pen, carefully trace over the internal cross and the perimeter lines. This defines the kite’s frame. -
Sketch the string:
Starting from the bottom tip of the small triangle connector, draw a long, curving line that swoops gently toward the bottom right of the page. Let your hand relax to keep the curve organic. -
Form the bow:
Near the end of your string line, sketch a simple bow. Draw two loops and two tail ends. Keep the shapes loose and rounded rather than stiff. -
Paint the bow:
Dilute your paint mix significantly so it is very pale. Gently fill in the loops of the bow, leaving the center knot unpainted or very light to suggest transparency. -
Add the trailing string:
Extend a faint, thin pencil or painted line from the right corner of the kite, curving downward loosely, to suggest a loose stabilizing string or just a whimsical motion line.
Textured Skies
Before the kite dries, sprinkle a few grains of table salt on the wet paint. Brush it off when dry for a weathered, fabric-like texture.
Allow your finished artwork to dry completely before framing or gifting this gentle reminder of windy days


Polka Dot Kite Drawing
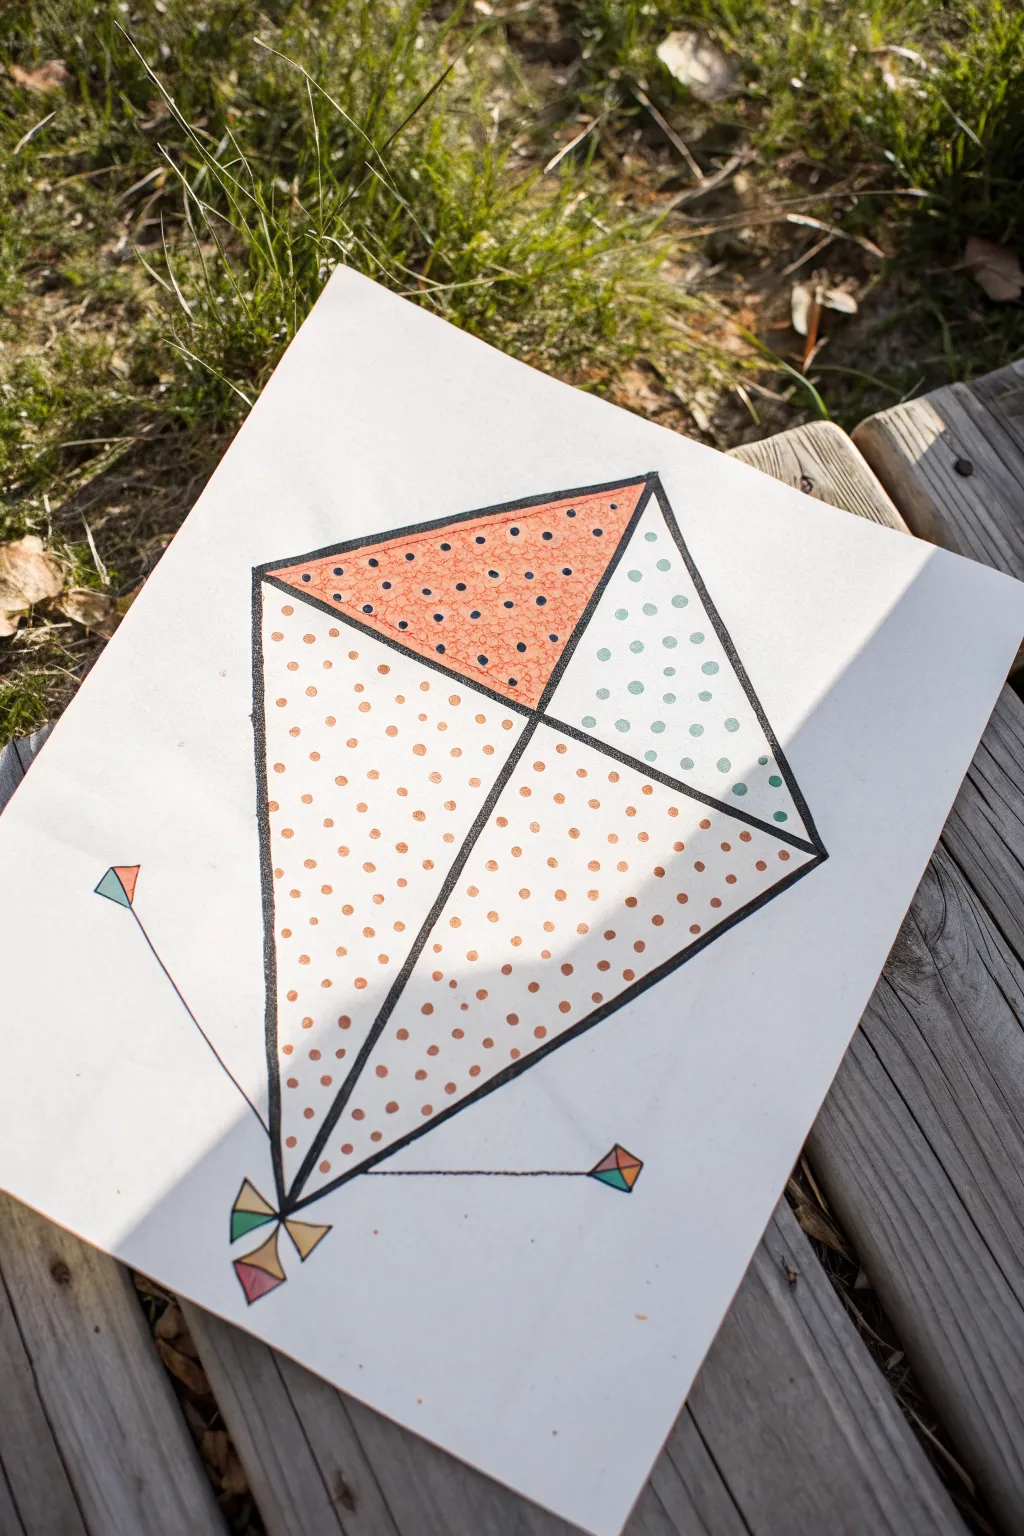
Capture the breezy joy of a perfect spring day with this clean, geometric kite illustration. Using simple shapes and a playful dot pattern, you’ll create a charming piece of art that balances bold lines with delicate details.
Step-by-Step Guide
Materials
- White drawing paper or cardstock
- Pencil and eraser
- Ruler
- Fine-liner black pen or marker
- Colored markers or gel pens (coral, teal, peach, yellow)
- Black marker (medium tip) for outlining
Step 1: Constructing the Framework
-
Draw the central cross:
Start by drawing a vertical line down the center of your paper using your ruler. Cross it with a horizontal line near the top third, creating a classic ‘t’ shape. -
Connect the diamond:
Use your ruler to connect the four endpoints of your cross. Draw straight diagonal lines from the top point to the side points, and from the side points down to the bottom point to form the diamond shape. -
Position the structure:
Ensure the bottom triangle section is significantly longer than the top triangle section to give it that traditional kite silhouette. -
Add the spine:
Lightly re-trace over your initial center cross lines to define the internal frame that separates the kite into four distinct triangular panels.
Dotting Perfection
To keep your polka dots uniform in size, press the marker tip straight down rather than drawing circles. Count to two for each press to ensure consistent ink flow.
Step 2: Adding Details and Color
-
Ink the main outline:
Go over your exterior diamond shape and the internal cross lines with a medium-tip black marker. Use the ruler to keep these lines crisp and bold. -
Color the top-left panel:
Fill the top-left triangle with a warm coral or dark orange hue. I find that coloring in consistent diagonal strokes helps avoid streak marks. -
Color the top-right panel:
Leave the background of the top-right triangle white or color it a very faint, airy blue if you prefer a subtle tint. -
Color the bottom panels:
The two large bottom triangles remain white for this design, allowing the polka dots we’ll add later to really pop against the clean background. -
Add the tail string:
Draw three straight lines extending outward from the corners: one long one from the bottom point, and two shorter ones from the side corners. -
Draw the tail bows:
At the end of each string line, draw small geometric bows. These look like two small triangles touching at their points. -
Color the bows:
Fill in the small tail bows with alternating colors like yellow, teal, and pink to add a contrasting pop of fun.
Smudge Alert
If your ruler drags ink across the page, stick a penny or small piece of cardboard under the ruler’s edge. This lifts it off the paper just enough to prevent smearing.
Step 3: Patterning the Kite
-
Dot the top-left:
Using a dark blue or black fine-liner, stipple small, dense dots over the coral-colored section. Keep the spacing somewhat random but evenly distributed. -
Dot the top-right:
Switch to a teal or light blue marker. Create slightly larger, evenly spaced polka dots in the top-right triangle. -
Pattern the bottom-left:
For the large bottom-left section, use an orange or peach marker to create a regular grid of polka dots. Try to keep them aligned in diagonal rows. -
Pattern the bottom-right:
In the final bottom-right triangle, use a rust or brown marker to create a similar grid of dots, mirroring the pattern on the left side but with a deeper tone. -
Refine the edges:
Check your black outlines. If the coloring process made any edges fuzzy, re-trace them carefully with your black marker to restore sharpness. -
Clean up:
Once the ink is fully dry, gently erase any remaining pencil sketches underneath your marker lines to leave the artwork looking pristine.
Hang this delightful drawing up to remind yourself that clear skies are ahead


Stained-Glass Triangle Kite
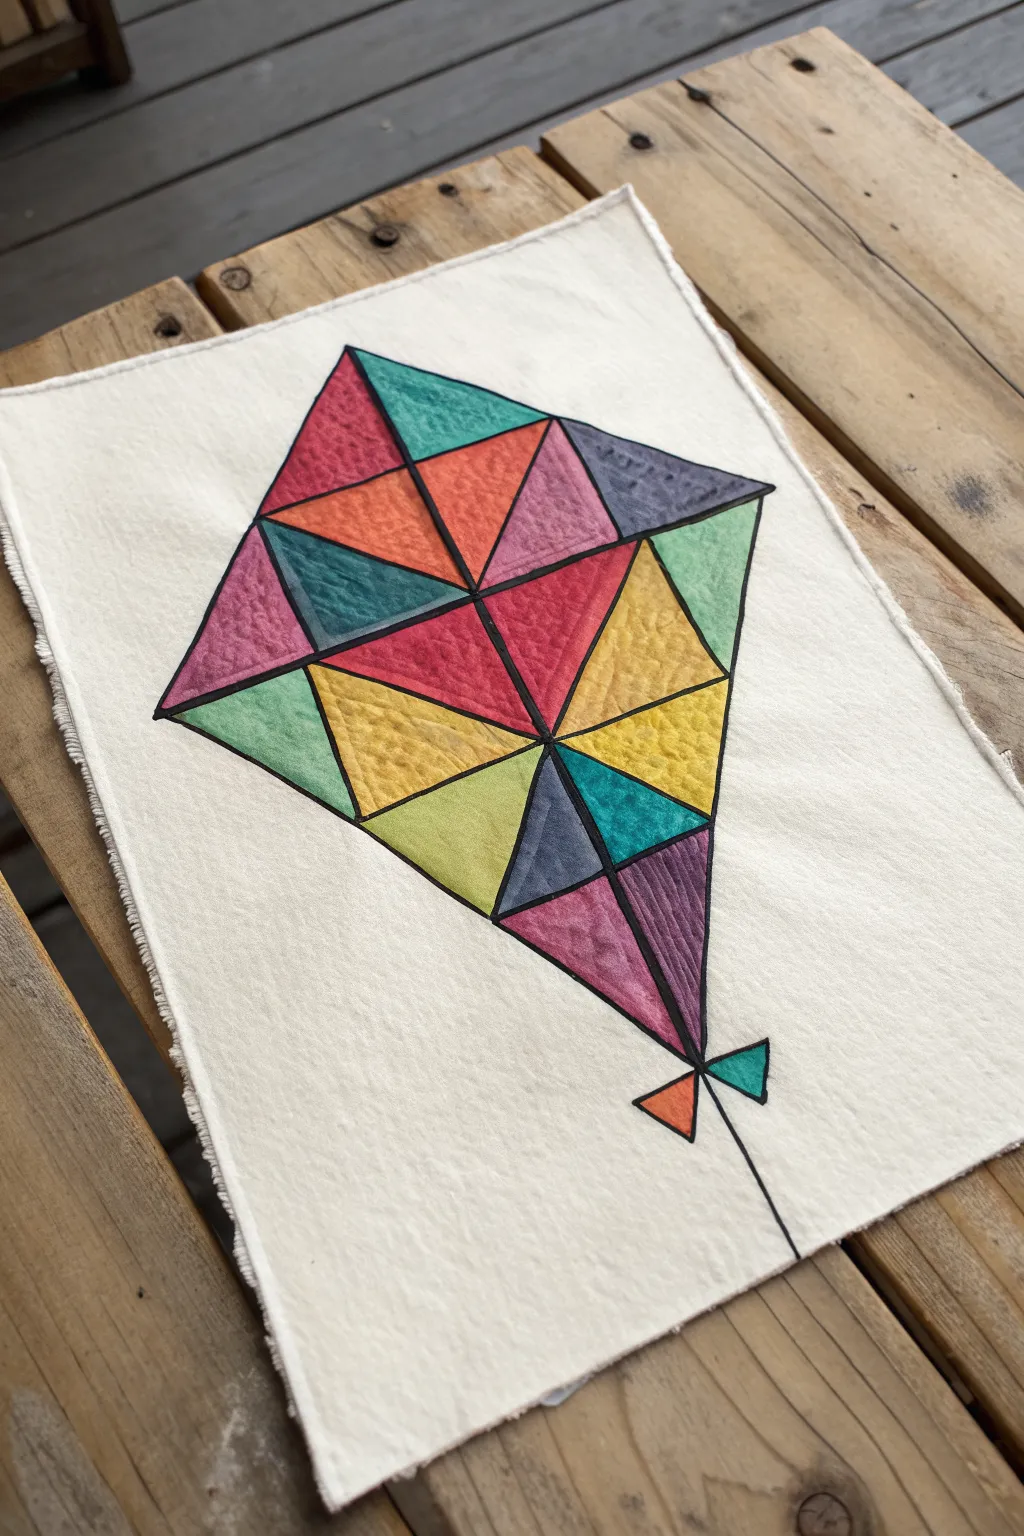
Capture the whimsical charm of a stained-glass window with this kite illustration drawn on beautiful textured paper. By breaking the standard kite shape into smaller geometric triangles, you create a complex, vibrant design that feels both modern and traditional.
Detailed Instructions
Materials
- Heavyweight textured paper (watercolor or handmade paper)
- Pencil and eraser
- Ruler
- Fine-tip black permanent market (0.5mm or 0.8mm)
- Watercolor paints or fluid acrylics
- Small round paintbrush (size 2 or 4)
- Water cup and paper towels
Step 1: Drafting the Framework
-
Establish the kite shape:
Begin by lightly sketching a standard diamond shape in the center of your textured paper. Use a ruler to ensure your lines are straight and the symmetry is pleasing, leaving plenty of white space around the edges. -
Draw the crossbars:
Draw the classic kite structure by running a vertical line straight down the center from the top point to the bottom point. Then, add a horizontal line across the widest part of the diamond. -
Subdivide into triangles:
Now, turn the four large quadrants into smaller triangles. Start by drawing diagonal lines from the center intersection point out to the edges of the diamond. -
Add more complexity:
Continue splitting the larger triangles. You can draw lines from the midpoint of an outer edge back to the center spine, or connect points randomly. The goal is to fill the kite with a variety of triangular facets. -
Draft the tail:
Extend a single line down from the bottom point of the kite for the string. Just above the end of this string, draw two small opposing triangles to create a little bow tie shape.
Bleeding Lines?
If paint bleeds under the black lines, your ink might not be waterproof. Re-line the black borders *after* painting instead, once the paper is fully dry.
Step 2: Inking the Outline
-
First pass outlining:
Take your black permanent marker and ruler. Carefully trace over every pencil line you want to keep. I find it helpful to rotate the paper rather than contorting my hand to reach awkward angles. -
Thicken the lead lines:
To mimic the look of lead came in stained glass, go over the lines a second time to thicken them slightly. The intersection points where multiple lines meet can be made just a tiny bit thicker for a realistic joint look. -
Clean up sketch lines:
Once the ink is completely dry—give it a minute or two to settle into the paper texture—gently erase the original pencil marks so they don’t muddy your colors later.
Step 3: Painting the Panels
-
Prepare your palette:
Select a palette of about 5-6 distinct colors. For the look in the image, choose slightly desaturated tones like mauve, mustard yellow, sage green, and terra cotta. -
First color application:
Load your brush with the first color (e.g., the terra cotta red). Paint scattered triangles across the design, ensuring no two adjacent triangles share the same color. -
Control the moisture:
Since the paper is textured, tap the brush to push pigment into the little valleys of the paper grain. Don’t use too much water, or the colors might bleed under your black lines. -
Filling the pattern:
Switch to your next color (perhaps the mustard yellow) and fill in another set of non-touching triangles. Continue this process with the sage green and mauve. -
Adding dark accents:
Use a darker color, like a slate blue or deep purple, for a few smaller triangles. These darker values add depth and anchor the lighter, brighter colors. -
Painting the bow:
Don’t forget the small bow tie at the bottom. Paint one side orange and the other teal (or colors of your choice) to give it a nice pop against the white paper.
Color Planning
Mark each triangle with a tiny pencil dot representing its color before painting. This prevents accidental adjacent same-color triangles.
Step 4: Finishing Touches
-
Check for gaps:
Inspect your work closely. If you see tiny white speckles where the paint didn’t quite reach the black line or sink into the texture, touch them up with a semi-dry brush. -
Optional texture wash:
If you want the glass to look aged or textured, you can dab a clean, slightly damp paper towel over a painted section just as it’s almost dry to lift a tiny bit of pigment. -
Final dry:
Let the piece dry completely flat. If the heavy water usage caused the paper to buckle slightly, you can place it under a heavy book overnight once it is bone dry.
Display your geometric kite drawing on a clipboard or frame it to add a splash of color to your wall


Marker Outline With Pencil Shading
This minimalist kite drawing pops off the page thanks to a clever 3D perspective trick. Using clean marker lines and subtle dotted details, you’ll create a structured, geometric design that feels both playful and precise.
Step-by-Step Guide
Materials
- Textured drawing paper (cold press watercolor or mixed media)
- Pencil (HB or H for sketching)
- Fine black liner pen (0.5mm or 0.8mm)
- Ruler
- Eraser
Step 1: Sketching the Framework
-
Draw the central spine:
Start by drawing a vertical line down the center of your paper using your ruler and pencil. This will be the main spine of the kite. -
Add the crossbar:
Draw a horizontal line crossing the spine about one-third of the way down from the top. Make the line slightly shorter on the left side than the right to begin establishing the perspective. -
Connect the perimeter:
Connect the four endpoints of your cross geometry to create the classic diamond shape. This forms the front face of your kite. -
Create the depth point:
To make the kite look 3D, mark a point slightly to the left and below the intersection of your crossbar and spine. This represents the back corner of the structure. -
Draw the back edges:
From that new depth point, lightly sketch three lines connecting to the top point, left point, and bottom point of your original diamond.
Step 2: Inking the Structure
-
Review your lines:
Before inking, double-check your perspective. The inner lines should make the kite look like a hollow pyramid lying on its side. -
Ink the outer perimeter:
Using your fine black liner and ruler, trace the four outer edges of the main diamond shape. Use a confident, steady hand for crisp lines. -
Ink the solid inner lines:
Trace the vertical spine and horizontal crossbar lines located on the ‘front’ face of the kite. Keep these solid. -
Create the dotted lines:
For the lines connecting to that inner depth point you sketched earlier, use a dotted or dashed technique. This visual language tells the viewer these lines are ‘inside’ or behind the front face. -
Erase pencil marks:
Once the ink is fully dry—I usually give it at least five minutes to be safe—gently erase all the underlying graphite sketch lines.
Clean Lines Pro Tip
When using a ruler with a fineliner, wipe the ruler’s edge with a tissue after every few lines. This prevents ink buildup that can smudge onto your paper.
Step 3: The Tail and Details
-
Draw the string start:
From the very bottom point of the kite, draw a single straight line extending downwards about an inch. -
Sketch the bow:
At the end of that short line, draw a simple bow loops. Draw two teardrop shapes for the loops and a small knot in the center. -
Add the tails:
Extend two long, curved lines flowing downward from the bow knot. Let them curve naturally to suggest movement. -
Finish the tails:
At the end of each curved tail line, draw a tiny V-shape or arrow tip to give the tail ends a finished, decorative look. -
Optional shading:
If you want extra dimension, take your pencil and very lightly shade the ‘interior’ triangle sections created by the dotted lines to enhance the 3D effect.
Level Up: Color Pop
Use watercolor to fill the different distinct triangles. Paint the ‘back’ panels (near dotted lines) in a darker shade than the front panels for realism.
Now you have a crisp, engineered kite illustration ready to fly off the paper
BRUSH GUIDE
The Right Brush for Every Stroke
From clean lines to bold texture — master brush choice, stroke control, and essential techniques.
Explore the Full Guide
Smiley Face Character Kite
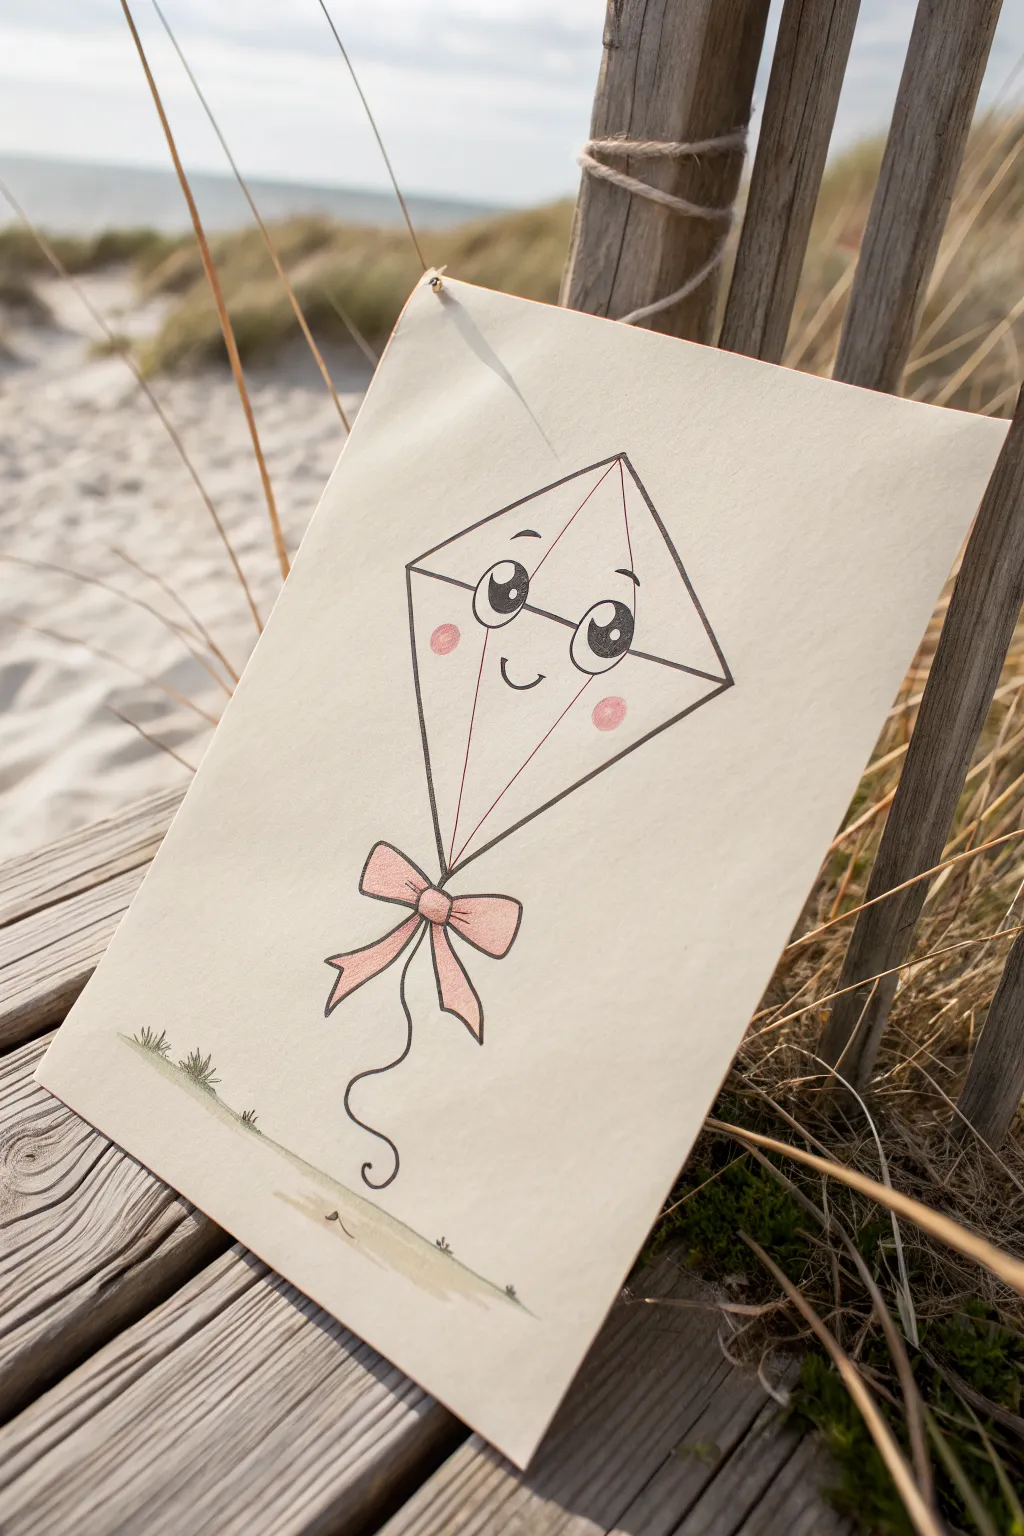
Bring a little joy to your sketchbook with this adorable kite character drawing. This project combines simple geometric shapes with cute facial features to create a friendly illustration perfect for a breezy day.
Step-by-Step Tutorial
Materials
- High-quality drawing paper or watercolor paper
- Pencil (HB or 2H)
- Eraser
- Black fine-liner pen (approx. 0.3mm to 0.5mm)
- Pink colored pencil or pastel
- Pale green watercolor or colored pencil (optional for grass)
- Ruler
Step 1: Drawing the Base Shape
-
Establish the centerline:
Start by lightly sketching a vertical line down the center of your paper. This will serve as the spine of your kite and help keep everything symmetrical. -
Mark the crossbar:
Draw a horizontal line crossing the vertical spine. Place it slightly above the midpoint of the spine so the top section is shorter than the bottom tail section, creating that classic diamond kite proportion. -
Connect the corners:
Using a ruler, connect the four endpoints of your cross. Draw straight lines from the top tip to the side tips, and from the side tips down to the bottom point to form the diamond shape.
Keep it clean
When filling in the pupils with ink, work slowly around the white highlight first. It’s easier to fill the black space once the white circle is safely preserved.
Step 2: Adding Character Details
-
Sketch the structural lines:
Lightly draw lines connecting opposite corners inside the diamond if you haven’t already, representing the kite’s frame. These lines will actually help you center the face later. -
Place the eyes:
Draw two large ovals in the upper half of the kite, resting just on or slightly above the horizontal crossbar line. Angle them slightly inward toward the center spine. -
Refine the eyes:
Inside each oval, draw a smaller circle near the top for a highlight, and a curved line below it to define the pupil. This ‘anime-style’ eye adds instant cuteness. -
Add the smile:
Draw a small, simple U-shaped curve halfway between the eyes and the bottom point of the kite, centered on the vertical spine. -
Draw the eyebrows:
Place two small, short curved lines floating above the eyes to give the kite a happy, surprised expression.
Step 3: The Tail and Accessories
-
Sketch the bow:
At the very bottom point of the diamond, sketch a small rectangle for the knot. Then, add two loops extending outward and two ribbon tails hanging down. -
Add the string:
Draw a wavy, squiggly line extending from the bottom of the bow. Let it curl at the end to suggest it’s loose and free-flowing. -
Suggest the ground:
Very lightly sketch a horizontal patch near the bottom of the page with a few tufts of grass to ground your character in a scene.
Make it yours
Instead of a plain background, draw fluffy clouds or little birds around the kite to show it flying high in the sky.
Step 4: Inking and Coloring
-
Outline the main shape:
Using your black fine-liner, carefully trace over the outer diamond shape and the internal crosslines. Keep your hand steady for clean, crisp lines. -
Ink the face:
Go over the pencil lines for the eyes, mouth, and eyebrows. Fill in the pupils with solid black, being careful to leave the small highlight circles completely white. -
Detail the bow and string:
Trace the bow and the wavy string line. I like to vary the line weight slightly on the ribbon to make it look softer. -
Erase pencil marks:
Once the ink is completely dry—give it a minute or two—gently erase all the underlying pencil sketches. -
Add rosy cheeks:
Take your pink colored pencil and lightly shade two circular blush spots on the kite’s cheeks, just below the outer corners of the eyes. -
Color the bow:
Use the same pink pencil to gently fill in the bow loops and ribbons. You can press a bit harder near the knot to create shadow depth. -
Ground the drawing:
If you sketched grass, add a very faint wash of green watercolor or a light scribble of green pencil at the bottom to suggest the earth.
Hang your finished drawing up to remind yourself that creativity can always soar
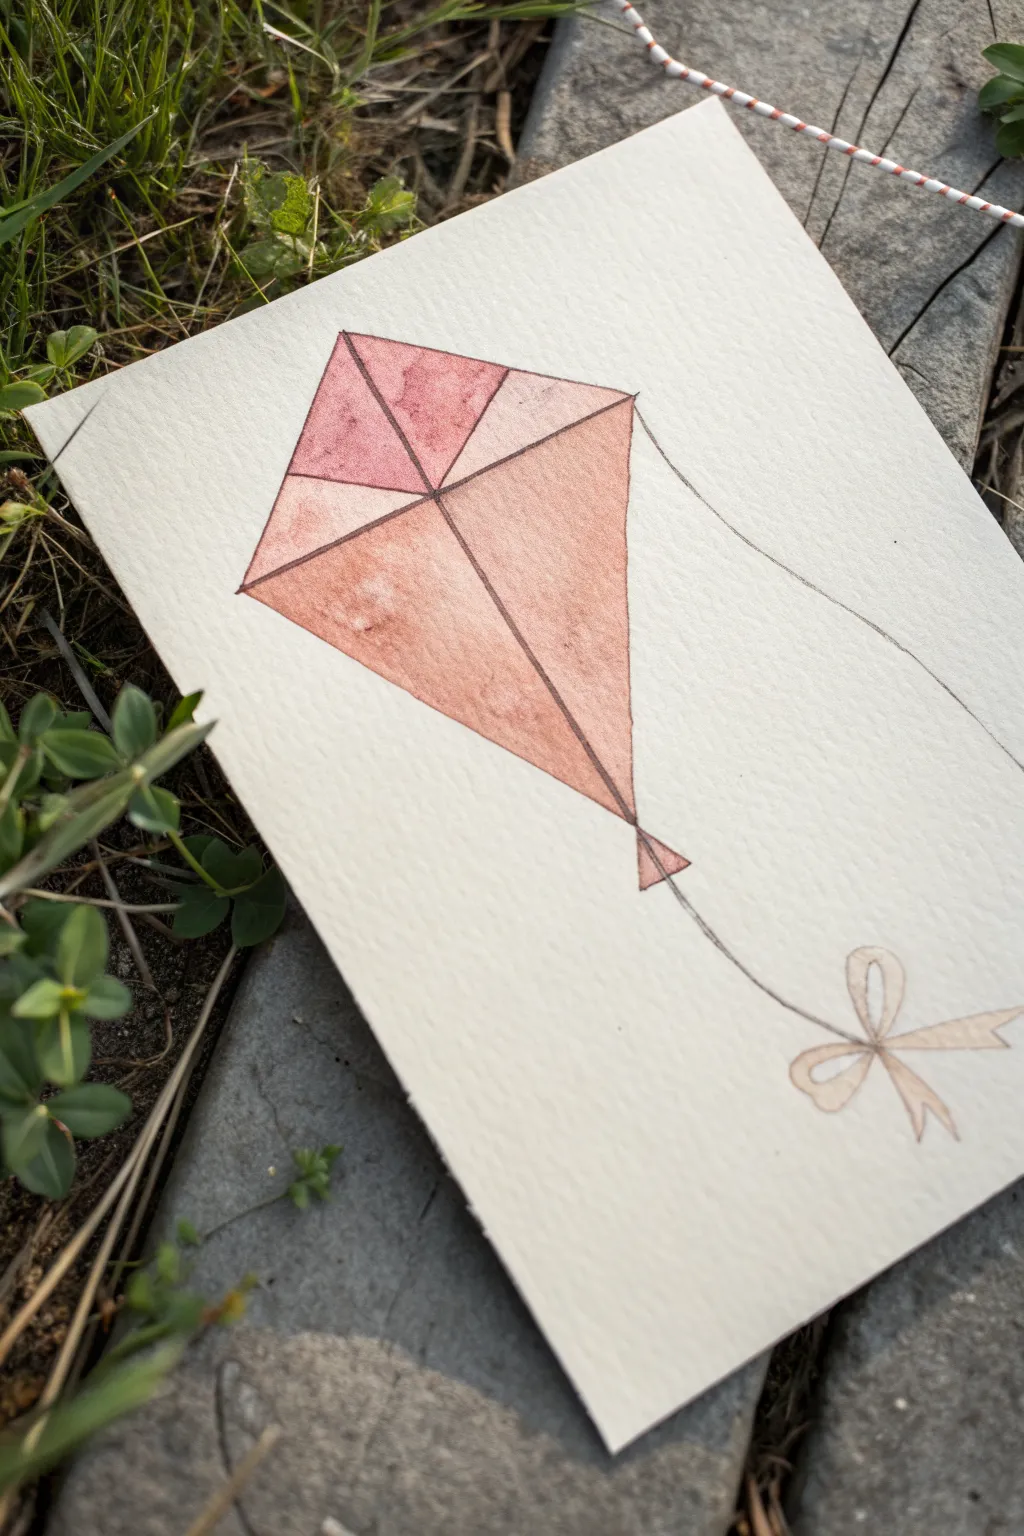
Bow Chain Kite Tail
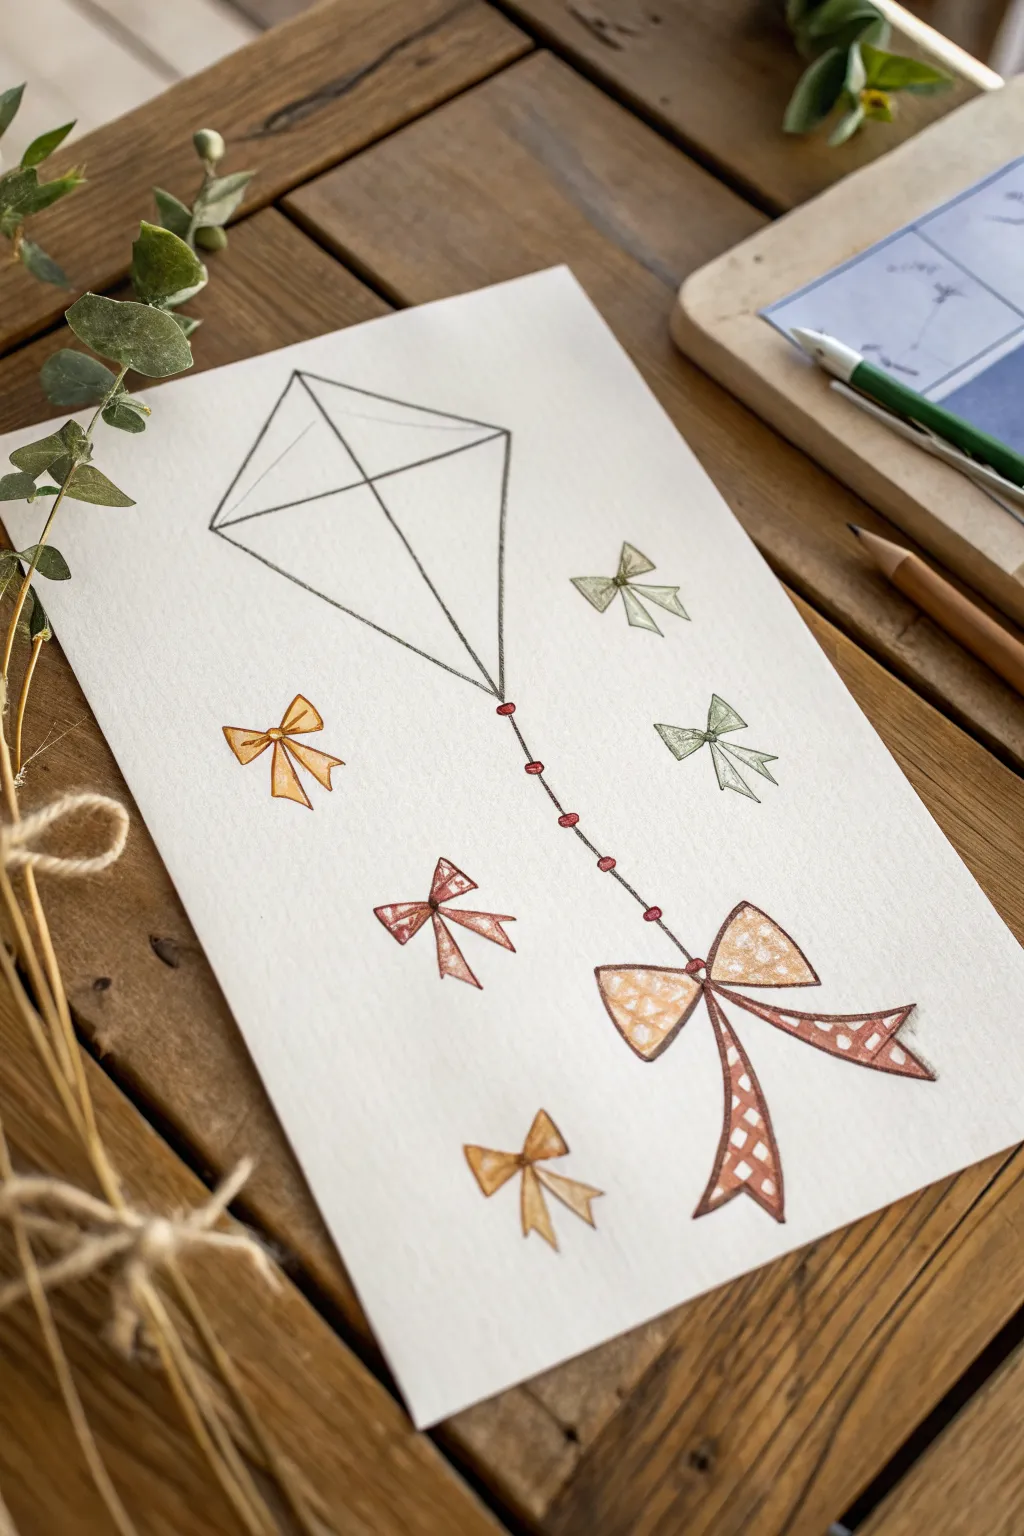
Capture the lightness of a breezy day with this delicate drawing of a classic diamond kite. The trailing tail isn’t just a string, but a collection of beautifully patterned bows and beads.
How-To Guide
Materials
- Cold press watercolor paper (A5 or A4 size)
- HB or H graphite pencil
- Fine liner pen (black or dark grey, 0.1mm)
- Colored pencils (muted orange, rust red, sage green, mustard yellow)
- Pencil sharpener
- Eraser
- Ruler
Step 1: Drafting the Structure
-
Position the kite:
Start by lightly sketching the main diamond shape of the kite in the upper left quadrant of your paper. Leave plenty of room below and to the right for the tail. -
Draw the cross:
Use your ruler to draw the internal structure. Place a vertical line down the center of the diamond and a horizontal line crossing it about one-third of the way down. -
Add depth:
To give the kite dimension, draw the framing lines slightly inside the diamond shape, creating a thin border effect. -
Sketch the string path:
Lightly draw a curved, swooping guide line extending from the bottom point of the kite down towards the bottom right corner. This is where your tail will hang.
Uneven Bow Shapes?
Don’t stress about perfect symmetry. Real fabric bows tied by hand are rarely perfect. A slightly lopsided loop adds charm and movement.
Step 2: Designing the Bows
-
Place the beads:
Along the top portion of your tail string, sketch small circles at regular intervals to represent the beads connecting the string sections. -
Sketch the main bow:
At the end of your string guide, sketch a large, prominent bow. Give it two wide loops and two long, flowing ribbons hanging down. -
Add floating bows:
Sketch four or five smaller bows scattered around the tail area. Vary their angles so they look like they are fluttering in the wind. -
Refine bow shapes:
Go back over your bow sketches and add center knots. Make the ribbon ends jagged or V-shaped for a realistic fabric look. -
Add patterns:
Lightly pencil in different patterns on the bows. Try a checkered pattern for the large bottom bow, and stripes or solids for the smaller ones.
Step 3: Adding Color & Detail
-
Outline the kite:
Take a sharpened dark grey or black pencil (or a very fine pen) and outline the kite’s diamond shape and cross-bars. Keep the lines crisp. -
Color the beads:
Use a rust-red colored pencil to fill in the small beads along the string. Press firmly to make them stand out as dark accents. -
Connect the string:
Draw the string segments between the beads and bows using a fine, dark line. Ensure the line looks continuous even though it’s broken by the beads. -
Color the large bow:
For the main bow at the bottom, use a soft orange or peach pencil. I like to shade lightly first, then press harder on the shaded areas where the ribbon folds. -
Define the checkered pattern:
On the large bow’s ribbons, fill in alternating squares with a darker rust or brown pencil to create the gingham check effect. -
Color the orange bows:
Select two of the smaller floating bows and color them with a golden-yellow or mustard pencil. Leave small white highlights on the loops to show volume. -
Color the green bows:
Use a sage green pencil for the remaining floating bows. Keep the shading light and airy, focusing pigment near the center knots. -
Add the red bow:
Color one small bow in a reddish-brown tone, perhaps adding a simple stripe pattern across the wings of the bow. -
Clean up:
Gently erase any lingering graphite sketch lines that are visible beneath your colored pencil work, being careful not to smudge the color.
Level Up: Texture
Use the side of your pencil lead to lightly shade the background of the kite itself in a very pale grey or cream to make it look like fabric instead of empty paper.
Now you have a charming, vintage-style kite illustration ready to frame or give as a card

PENCIL GUIDE
Understanding Pencil Grades from H to B
From first sketch to finished drawing — learn pencil grades, line control, and shading techniques.
Explore the Full Guide
Kite Flying Over Simple Hills
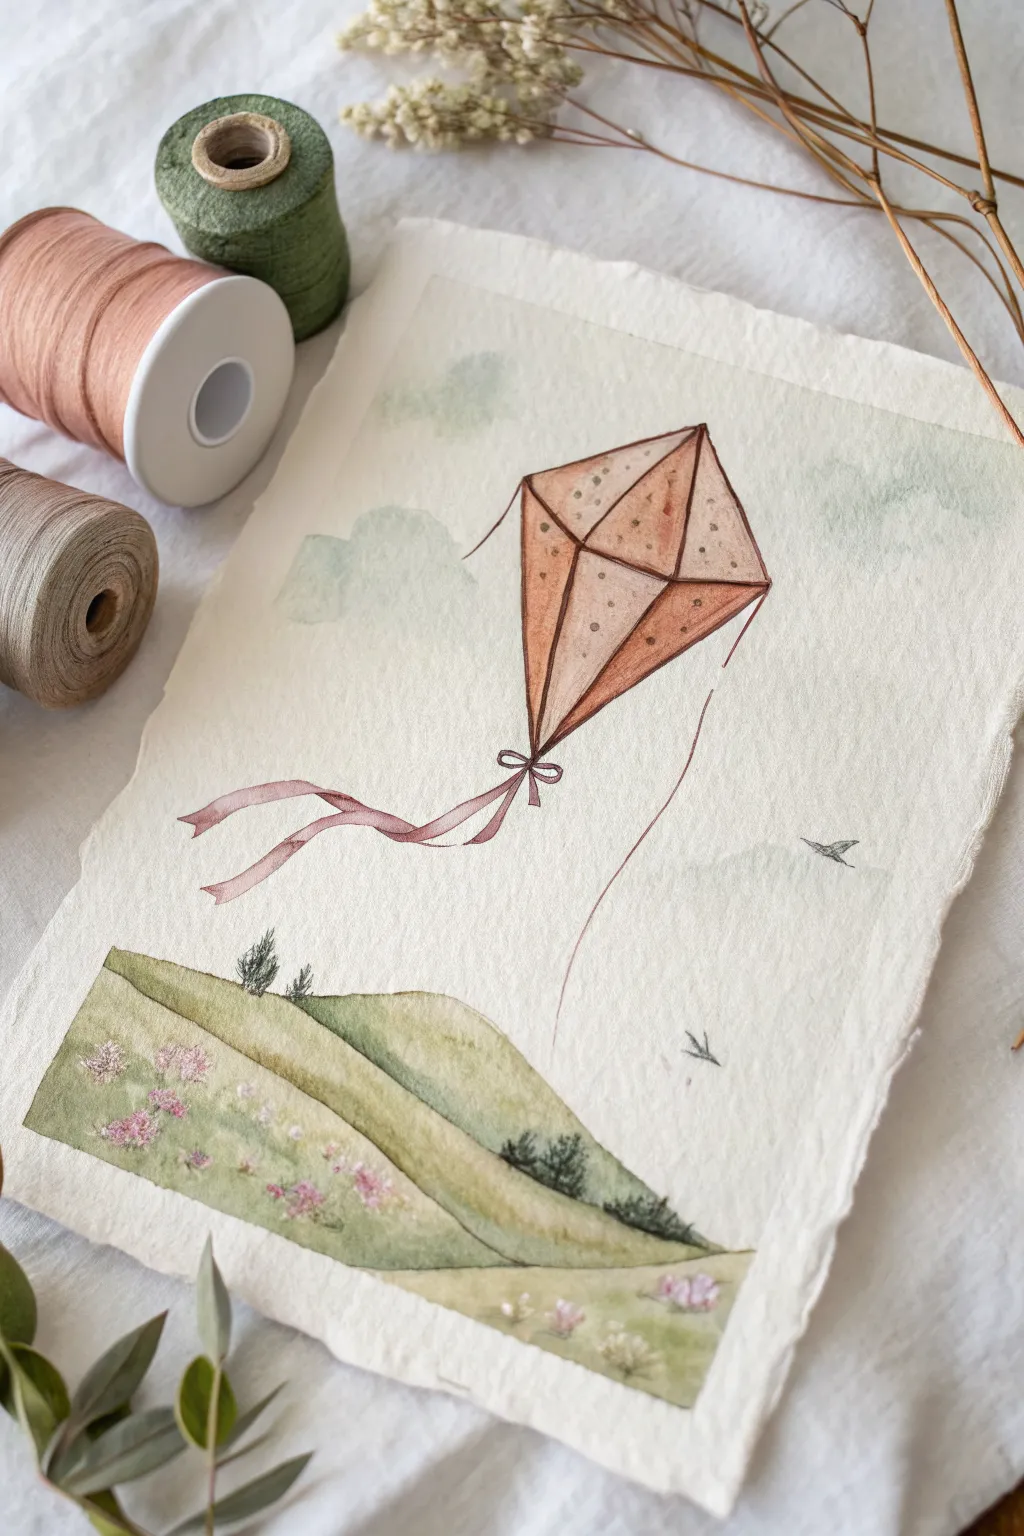
Capture the breezy joy of a sunny afternoon with this delicate watercolor illustration. The textured paper and soft, earthy palette give this piece a vintage, storybook charm.
How-To Guide
Materials
- Cold press watercolor paper (deckled edge optional)
- Watercolor paints (terracotta, olive green, sap green, cerulean blue, brown)
- Mechanical pencil (HB) and kneaded eraser
- Fine liner brush (size 0 or 00)
- Round brush (size 4 or 6)
- Cup of water and paper towels
Step 1: Sketching the Layout
-
Outline the hills:
Start near the bottom third of your paper. Lightly sketch two rolling hill shapes that overlap slightly. One should swoop down from the left, and the other should rise up to meet it from the right, creating a gentle v-shape where they intersect. -
Draw the kite shape:
In the center of the upper sky area, draw a classic diamond shape. It shouldn’t be perfectly flat; tilt it slightly to the right to suggest movement. -
Add kite structure:
Draw the crossbars of the kite. Connect the top corner to the bottom corner with a vertical collision line, and the left corner to the right with a horizontal line effectively dividing the diamond into four triangles. -
Sketch the tail:
From the bottom tip of the kite, sketch a flowing ribbon tail. Let it curve and twist to the left, adding a small bow right at the connection point.
Uneven Wash?
If your hill washes look blotchy, you might be working too slowly. Pre-wet the paper slightly with clean water before adding pigment to help the color flow smoothly.
Step 2: Painting the Landscape
-
Base wash for hills:
Mix a watery olive green. Using your round brush, apply a light wash to the front hill. While that dries, paint the back hill with a slightly cooler, sap green tone to create depth. -
Adding texture:
Once the first layer is damp (not soaking), dab in darker green spots near the valleys of the hills to suggest uneven terrain and shadows. -
Painting the meadow flowers:
Using the tip of your brush, stipple tiny dots of diluted pink and purple onto the grassy areas, concentrating them in the foreground for a wildflower effect. -
Tiny trees:
Mix a dark, concentrated green. With your fine liner brush, paint tiny vertical strokes to create miniature pine trees on the horizon line of the hills. -
Sky wash:
Very lightly wet the sky area. Drop in extremely faint touches of cerulean blue to suggest fluffy clouds, keeping plenty of whitespace.
Step 3: Bringing the Kite to Life
-
First kite layer:
Mix a warm terracotta or rust color. Carefully fill in the four panels of the kite. I like to keep one side slightly lighter to show where the sun is hitting it. -
Defining the frame:
Once the panels are dry, use a darker brown and your fine liner brush to trace over the central crossbars and the outer edges of the kite for definition. -
Painting the ribbon:
Use a diluted version of the terracotta color to paint the ribbon tail. If the ribbon twists, make the ‘back’ side of the ribbon a slightly darker shade. -
Adding polka dots:
Mix a creamy, opaque white or a darker rust tone (depending on your preference). Add tiny dots to the kite panels for a playful pattern.
Make It Antique
For that aged look, gently tear the edges of your watercolor paper (deckling) before painting, or give the finished piece a very light wash of tea or coffee.
Step 4: Final Details
-
The kite string:
With the finest brush you have and a steady hand, draw a very thin, faint line trailing down from the kite’s center toward the hills. -
Distant birds:
Add two or three tiny V-shapes in the distance to represent birds flying far below the kite. -
Refining outlines:
Go over the main contours of the kite and the prominent hill lines with a very fine brown watercolor stroke or a brown micropen if you prefer crisp edges.
Step back and admire how a few simple shapes can capture the feeling of a perfect breezy day
Tiny Figure Holding a Kite String
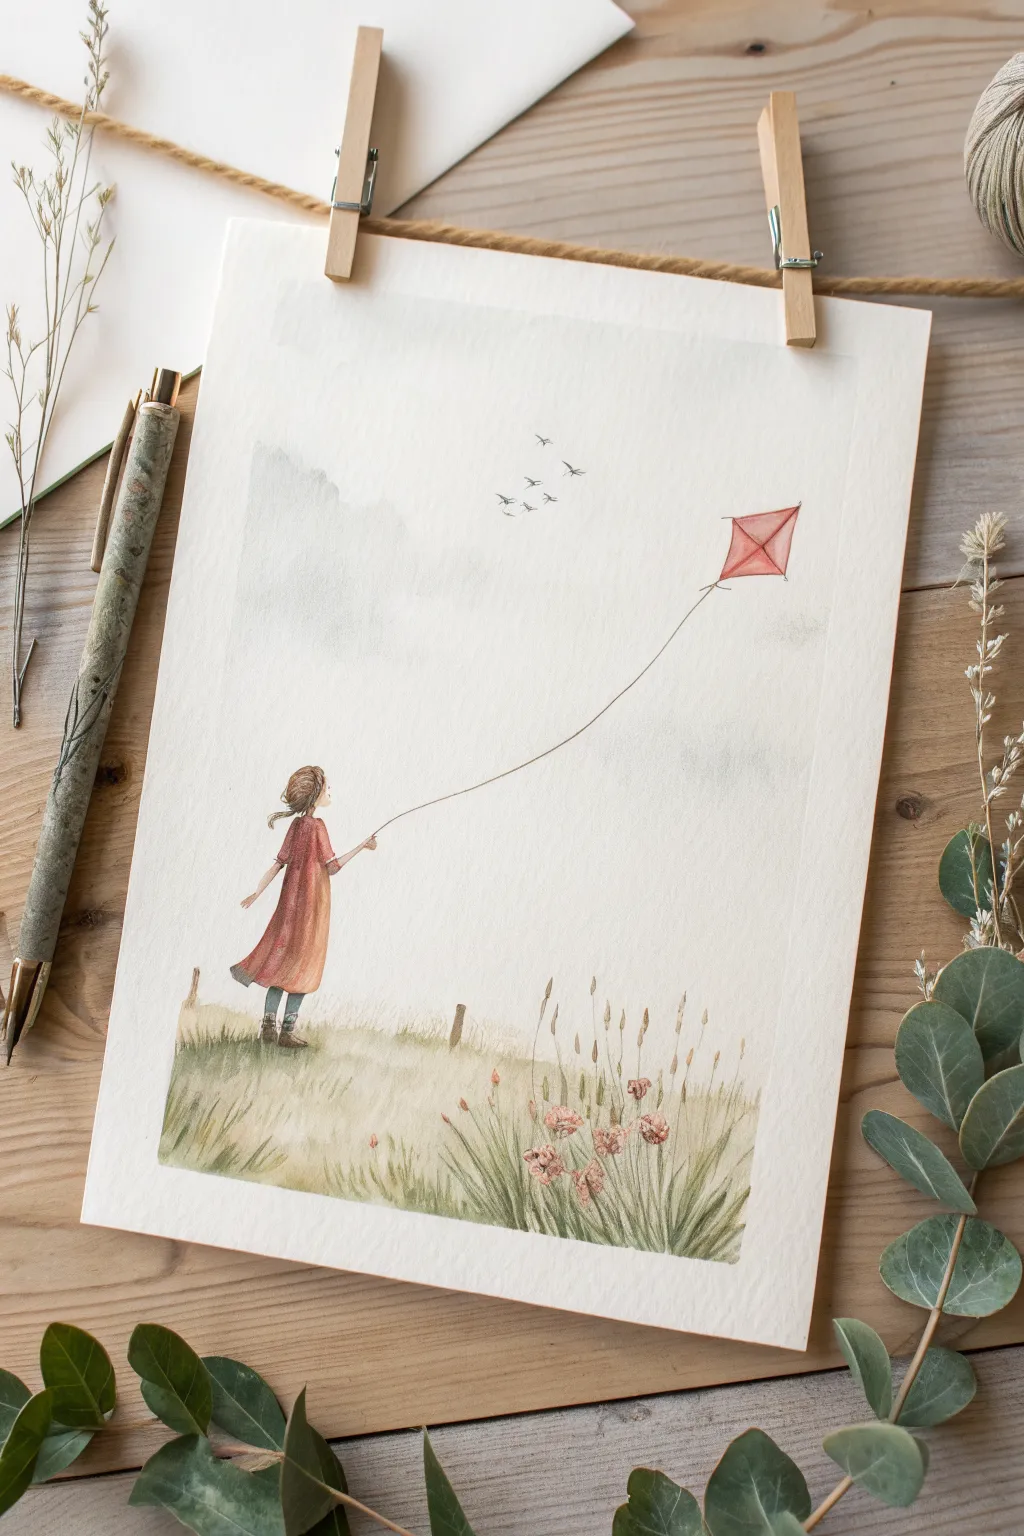
Capture the nostalgic feeling of a blustery afternoon with this delicate watercolor illustration. You’ll learn to balance soft, atmospheric washes with the fine details of a tiny figure braving the wind.
Step-by-Step Guide
Materials
- Cold press watercolor paper (300 gsm)
- Watercolor paints (Alizarin Crimson, Burnt Sienna, Sap Green, Ultramarine Blue, Yellow Ochre, Lamp Black)
- Round brushes (sizes 2, 4, and 00 for details)
- Pencil (HB or 2H)
- Kneadable eraser
- Masking fluid (optional)
- White gel pen (optional)
- Two jars of water
- Paper towels
Step 1: Sketching the Scene
-
Establish the Horizon:
Begin by lightly sketching a low horizon line about one-third of the way up the paper. It doesn’t need to be perfectly straight; a slight gentle slope suggests natural terrain. -
Position the Figure:
Draw the small figure on the left side of the composition. Sketch a simple A-line shape for the dress that billows backward to indicate wind direction, and add thin legs and arms. -
Place the Kite:
Sketch a diamond shape high in the upper right quadrant. Connect the kite to the girl’s hand with a single, curving line that sags slightly to show weight and distance. -
Add Foreground Elements:
Lightly mark vertical strokes in the foreground to indicate where tall grasses and fence posts will go, ensuring they don’t overpower the tiny figure.
Uneven Wash?
If your sky dries with unwanted ‘blooms’ or hard edges, wet the area again very gently with a clean brush and lift the pigment, or embrace it as part of the cloudy texture.
Step 2: Atmosphere and Sky
-
Prepare the Paper:
Lightly wet the sky area with clean water, avoiding the kite and the girl. You want the paper damp, not soaking wet. -
Paint a Cloudy Sky:
Mix a very dilute wash of Ultramarine Blue and a touch of Lamp Black to create a stormy grey. Drop this loosely into the wet paper, leaving plenty of white space for clouds. -
Softening Edges:
While the sky is still wet, use a clean, damp brush to soften any hard edges in your grey wash, creating a misty, overcast effect. -
Adding Birds:
Once the sky is bone dry, use your smallest brush (size 00) and a dark grey mix to paint tiny ‘V’ shapes for distant birds. Vary their sizes to suggest depth.
Pro Tip: String Theory
Instead of a brush, try dipping the edge of a piece of stiff card into paint and touching it to the paper to create the perfectly straight, thin line for the kite string.
Step 3: The Girl and the Kite
-
Base Color for the Dress:
Mix Alizarin Crimson with a tiny bit of Burnt Sienna. Paint the dress, letting the color be denser on the right side (shadow) and lighter on the left. -
Skin Tones and Hair:
Use a watery mix of Burnt Sienna and Yellow Ochre for the legs, arms, and face. For the hair, use a more concentrated Burnt Sienna, sweeping the brush strokes back to simulate wind blowing through it. -
Painting the Kite:
Use the same red mixture from the dress for the kite panels. Leave tiny slivers of white paper between the sections or lift a little color with a thirst brush to show the frame structure. -
Drawing the String:
With a steady hand and a rigger brush or a very fine micron pen, draw the kite string. It needs to be incredibly thin to look delicate.
Step 4: The Grassy Field
-
First Grass Wash:
Mix Sap Green with plenty of water. Apply a loose wash over the ground area, brushing upwards near the bottom to start suggesting grass blades. -
Deepening the Field:
While the first wash is damp, drop in touches of Yellow Ochre and a darker green mix to add variety to the terrain. -
Painting Textures:
Once the base green is dry, take a size 2 brush with less water and paint distinct grass blades in the foreground. Vary the height and lean them slightly to the right to match the wind direction. -
Floral details:
Mix a muted pink using Alizarin Crimson and a touch of white or water. Dot small flower heads onto the tallest grass stalks in the foreground. -
Fence Posts:
Paint small, vertical rectangles for fence posts using a light grey-brown warmth. Keep them loose and unrefined so they recede into the distance. -
Final Contrast:
Add the darkest shadows under the girl’s dress and boots to ground her in the scene.
Step back and admire how the wind seems to rush right off the paper.


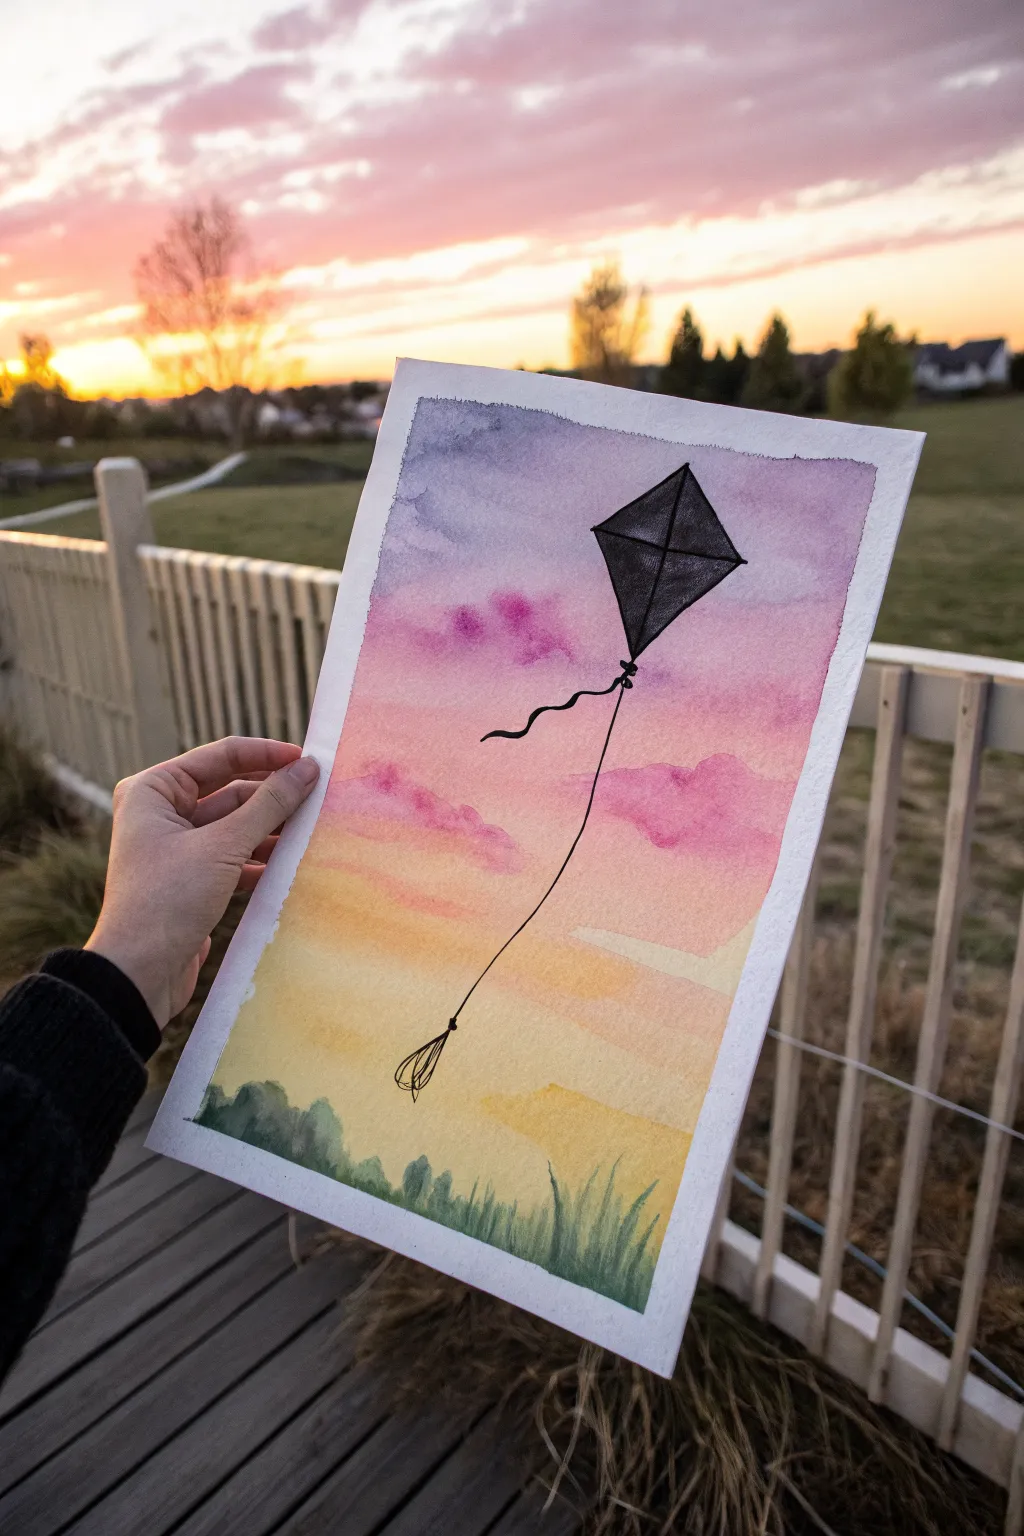
Sunset Sky Kite Silhouette

Capture the magic of flying a kite at dusk with this vibrant watercolor project. By combining a soft, blended sunset background with a crisp, high-contrast silhouette, you’ll create a striking piece that glows with warmth.
Step-by-Step
Materials
- Cold press watercolor paper (approx. A4 or 8×10)
- Watercolor paints (Purple, Pink/Magenta, Warm Yellow, Indigo/Green)
- Masking tape
- Flat wash brush (3/4 inch or similar)
- Round brush (size 6 or 8)
- Fine liner pen (black, waterproof) or fine brush with black ink
- Pencil and eraser
- Ruler
- Paper towels
- Clean water jar
Step 1: Preparing the Sky
-
Tape the edges:
Begin by taping down all four edges of your watercolor paper to a board or table. This creates that crisp white border seen in the example and keeps the paper flat while wet. -
Wet the paper:
Using your large flat brush, apply a clean coat of water across the entire sky area, stopping about two inches from the bottom edge. The paper should be glisten but not have puddles. -
Apply the purple:
Load your brush with a soft purple hue. Start at the very top edge and paint horizontally, letting the color bleed naturally downward into the wet paper. -
Blend in magenta:
Clean your brush and pick up a vibrant pink or magenta. Apply this right below the purple, slightly overlapping the wet edge so the two colors merge seamlessly. -
Add warm yellows:
Rinse well and switch to a warm yellow. Paint the lower section of the sky, blending it gently upwards into the pink to create a peachy transition tone. -
Create soft clouds:
While the pink sky layer is still damp but not soaking, dab in a few concentrated spots of darker magenta or violet to suggest fluffy clouds floating in the middle section.
Cloud Softness Tip
To get softer cloud edges, lift pigment off the wet paper using a crumpled tissue. This creates natural white highlights in your pink sky.
Step 2: Ground and Details
-
Paint the horizon:
Mix a muted green using your yellow and a touch of blue or indigo. Paint the bottom section of the paper while the yellow sky above is nearly dry to keep a mostly distinct horizon line. -
Add grassy texture:
Once the base green layer is damp-dry, use a smaller round brush to flick upward strokes in darker green. This creates the look of tall grass blades in the foreground. -
Let it dry completely:
This is crucial. Walk away and let the entire painting bone-dry before starting the kite sketch. If the paper is cool to the touch, it’s still wet. -
Sketch the kite:
Lightly use a pencil and ruler to draw a classic diamond shape in the upper right quadrant. Draw a cross in the center to mark the frame. -
Outline the silhouette:
Using your black waterproof fine liner or a very fine brush with black paint, carefully trace over your pencil lines for the main diamond body of the kite. -
Fill the silhouette:
Fill in the kite shape. I recommend using a textured stroke—like hatching or stippling—rather than a solid block of black, to give the kite some fabric-like transparency and texture. -
Draw the frame:
Go back over the cross-bars with a slightly thicker black line to make the structural frame stand out against the kite fabric. -
Add the tail:
Draw the kite string extending downward in a loose curve. Add a wavy ribbon tail attached to the bottom point of the diamond, floating freely in the ‘wind’. -
Create the handle:
At the end of the string, sketch a loose, scribbled loop or handle shape, suggesting the kite is being held or has just been let go. -
Reveal the border:
Once the ink is fully set, slowly peel off the masking tape at a 45-degree angle, away from the painting, to reveal your clean white edges.
Watercolor Blooming?
If ‘cauliflowers’ form in your sky, you added water to damp paint. Wait for it to dry completely, then lightly glaze over the area to smooth it out.
Hang your finished silhouette near a window to let the natural light complement your painted sunset


Have a question or want to share your own experience? I'd love to hear from you in the comments below!