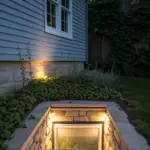
A bare slab can feel cold and unfinished, but a little floor paint can make it look intentional and seriously stylish. I pulled together my favorite DIY painted concrete floor ideas so you can pick a vibe that fits your space and actually feels doable.
Classic Faux-Tile Stencil Pattern
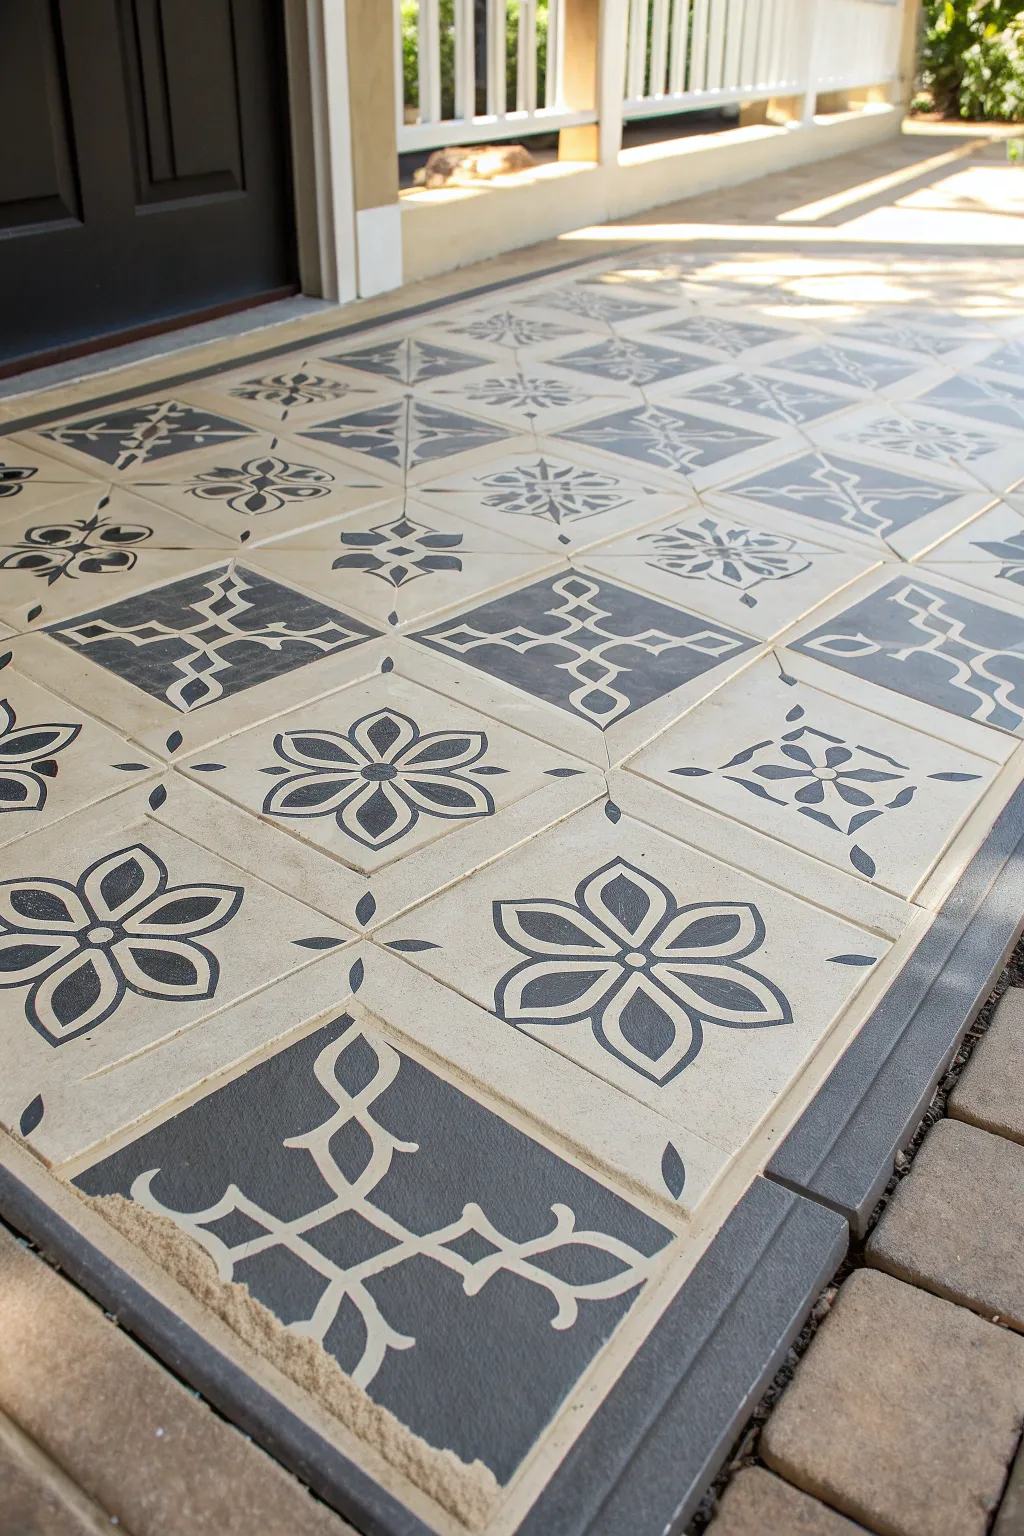
Transform a plain concrete slab into a sophisticated entryway with this classic faux-tile stencil technique. Using a high-contrast palette of creamy beige and slate grey, you can achieve the look of high-end ceramic tiles without the heavy lifting or cost.
Step-by-Step Tutorial
Materials
- Concrete cleaner/degreaser
- Pressure washer (optional but recommended)
- Concrete primer
- Base coat exterior porch/floor paint (Cream/Beige)
- Second color exterior porch/floor paint (Dark Slate Grey/Charcoal)
- Large tile stencil (approx. 12×12 or 16×16 inches)
- Painter’s tape (delicate surface)
- Stencil brush (large, flat-bottomed)
- Small foam roller
- Small artist brush (for touch-ups)
- Concrete sealer (matte or satin finish)
- Paper towels
- Knee pads
Step 1: Preparation & Base Coat
-
Clean the Surface:
Begin by thoroughly cleaning the concrete floor. Sweep away all loose debris, dirt, and dust. Scrub stains using a stiff brush and a concrete cleaner or degreaser to ensure the paint adheres properly. -
Rinse and Dry:
Rinse the area completely, ideally with a pressure washer for the best results. Allow the concrete to dry fully for at least 24 hours; trapped moisture can cause paint to peel later. -
Prime the Concrete:
Roll on a high-quality bonding primer designed for masonry or concrete surfaces. This seals the porous surface and provides a good foundation for your design. Let it dry according to the manufacturer’s instructions. -
Apply the Base Color:
Using a standard roller, apply your creamy beige base coat over the entire floor area. This lighter color will serve as the background for the dark stencil and the ‘grout’ lines. -
Second Coat Application:
Once the first coat is dry to the touch, apply a second coat of the beige base to ensure solid, opaque coverage without streaks. Let this cure for a full 24 hours before starting any stencil work.
Adhesion Pro-Tip
Use a specialized spray adhesive on the back of your stencil rather than just tape. It keeps intricate center details flat against the concrete for crisper lines.
Step 2: Stenciling the Pattern
-
Plan Your Layout:
Start from the center of the doorway or the most visible edge to ensure your pattern aligns symmetrically. Measure and make small pencil marks to guide your first stencil placement. -
Secure the Stencil:
Position your stencil on the first mark and use painter’s tape to hold all four corners firmly in place. Movement will smear your design, so ensure it lays completely flat. -
Load the Roller:
Pour a small amount of the dark slate grey paint into a tray. Load your small foam roller lightly, then offload excess paint onto a paper towel until the roller feels almost dry. This ‘dry rolling’ technique is crucial to prevent bleed-under. -
Apply the Stencil Color:
Gently roll over the stencil using light to medium pressure. I prefer to do two thin passes rather than one thick one to maintain crisp lines. -
Lift and Repeat:
Carefully lift the stencil straight up to avoid smudging. Wipe the back of the stencil with a damp cloth if paint has accumulated, then reposition it alongside the previous square, using the registration marks on the stencil to align the pattern. -
Working in Rows:
Continue working across the floor in rows. If you need to take a break, wash the stencil immediately so dried paint doesn’t distort the precise cutouts. -
Define the Border (Optional):
To recreate the framed look in the photo, tape off a solid border around the perimeter using wide painter’s tape after the main tiles are dry. Fill this area solid with the dark grey paint.
Fixing Paint Bleed
If paint bleeds under the stencil, don’t wipe it while wet! Let it dry completely, then touch it up with your base color and a tiny square-tipped brush.
Step 3: Finishing Touches
-
Detail and Touch-Up:
Inspect the floor for any bleeding or rough edges. Use a small artist brush and your base beige color to carefully paint over any mistakes, effectively ‘erasing’ them. -
Distress (Optional):
For a slightly aged, authentic tile look like the photo, you can lightly sand areas of the stencil with fine-grit sandpaper once dry, though this step is purely aesthetic. -
Seal the Deal:
Apply a clear concrete sealer over the entire floor. Use a matte or satin finish to keep the surface looking like natural stone rather than plastic. Apply two to three thin coats for maximum durability. -
Final Cure:
Allow the sealer to cure fully before placing welcome mats or walking on the surface with heavy shoes. This usually takes 24 to 48 hours depending on humidity.
With your new faux-tiled floor sealed and dry, you have created a welcoming, durable entrance that mimics the charm of artisan cement tiles


Timeless Checkerboard Squares
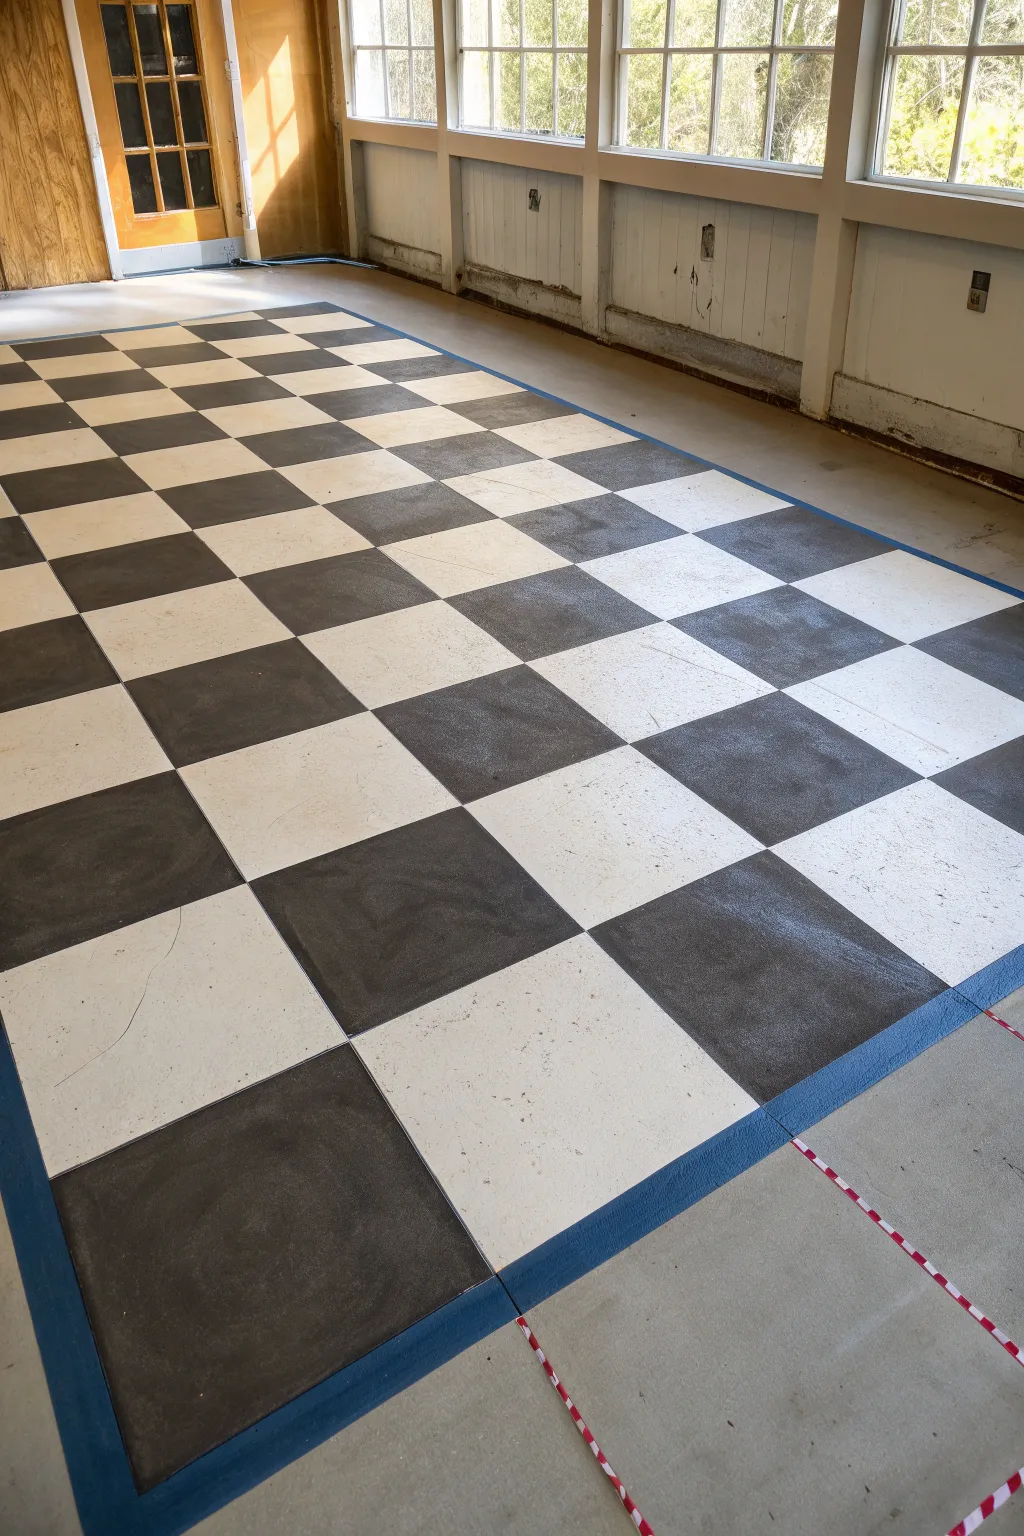
Transform a plain concrete slab into a classic statement piece with this bold, monochromatic checkerboard design. The crisp contrast between dark graphite and creamy white creates an upscale, timeless look perfect for sunrooms or enclosed porches.
Detailed Instructions
Materials
- Concrete floor cleaner/degreaser
- Concrete bonding primer
- Porch & Floor paint (Cream/Off-White)
- Porch & Floor paint (Dark Charcoal/Black)
- Blue painter’s tape (1.5 or 2 inch width)
- Measuring tape
- Chalk line tool
- Pencil
- Paint roller frame with extension pole
- 3/8 inch nap roller covers
- 2-inch angled sash brush
- Utility knife or razor blade
- Clear concrete sealer (water-based polyurethane)
Step 1: Preparation & Base Coat
-
Clean the surface:
Thoroughly sweep and vacuum the concrete floor to remove all loose debris. Scrub the surface with a concrete degreaser and a stiff bristle brush, then rinse well and let it dry completely for at least 24 hours. -
Prime the concrete:
Apply a coat of concrete bonding primer using a roller. This ensures your paint adheres properly and doesn’t peel later, especially if the concrete is smooth. -
Apply the light base color:
Roll on the lighter color (the cream or off-white shade) over the entire floor area. I prefer to do two thin coats rather than one thick one for better durability. -
Allow sufficient drying time:
Let the base coats cure for at least 24 to 48 hours. The paint must be hard enough to withstand the tape being pulled up later without peeling.
Bleed-Through Blues?
If paint bleeds under the tape, wait for it to fully dry. Then, use a small artist brush and the base floor color to carefully paint over the mistake, cleaning up the line.
Step 2: Measuring & Taping
-
Find the center point:
Measure the width and length of the room to locate the exact center. Mark this spot with a pencil as your starting anchor. -
Determine square size:
Decide on your square size (the squares in the image appear to be about 18-20 inches). Calculate how these will fit to ensure you don’t end up with tiny slivers of tile at the edges. -
Snap chalk lines:
Using a chalk line tool, snap a grid across the entire floor based on your measurements. These faint lines will be your guide for applying tape. -
Apply tape to the grid:
Lay down blue painter’s tape over your chalk lines. Crucially, pay attention to which side of the line you tape on—you want the tape to be on the ‘outside’ of the squares you intend to paint dark. -
Seal the tape edges:
Run a credit card or putty knife firmly along the edges of the tape to seal them down. This prevents paint bleed-under. -
The base coat trick:
To get perfectly crisp lines, lightly brush a small amount of your *base* color (the light cream) over the edges of the tape. This seals the tape edge so any bleed is the same color as the base.
Pro Tip: The Diagonal trick
For uneven rooms where walls aren’t perfectly square, lay your pattern on a diagonal (diamond shape). It tricks the eye and hides wonky wall angles better than a straight grid.
Step 3: Painting the Pattern
-
Mark the dark squares:
Before pouring any dark paint, place a small piece of tape or a light ‘X’ in the centers of the squares that need to be painted black. It is incredibly easy to get confused once you start painting. -
Cut in the edges:
Use an angled brush to carefully paint the perimeter of the dark squares, right along the tape line and any walls. -
Roll the dark squares:
Use a mini-roller or a standard roller to fill in the dark squares. Work methodically across the room so you don’t paint yourself into a corner. -
Apply a second coat:
Once the first dark coat is dry to the touch (usually 4-6 hours), apply a second coat for solid, opaque coverage.
Step 4: Revealing & Sealing
-
Remove the tape:
Slowly peel up the blue tape while the paint is still slightly tacky or just after it has dried. Pull the tape away from the fresh paint at a 45-degree angle. -
Clean up imperfections:
Use a small artist’s brush to touch up any spots where paint might have bled or where the tape pulled up a flake of the base coat. -
Apply clear sealer:
After the patterned floor has cured for at least 3 days, roll on two coats of water-based polyurethane sealer. This protects your hard work from scuffs and makes cleaning easier.
Now you have a durable, custom floor that adds architectural interest without the cost of real stone tiles


Easy Tape Stripes That Stretch a Space
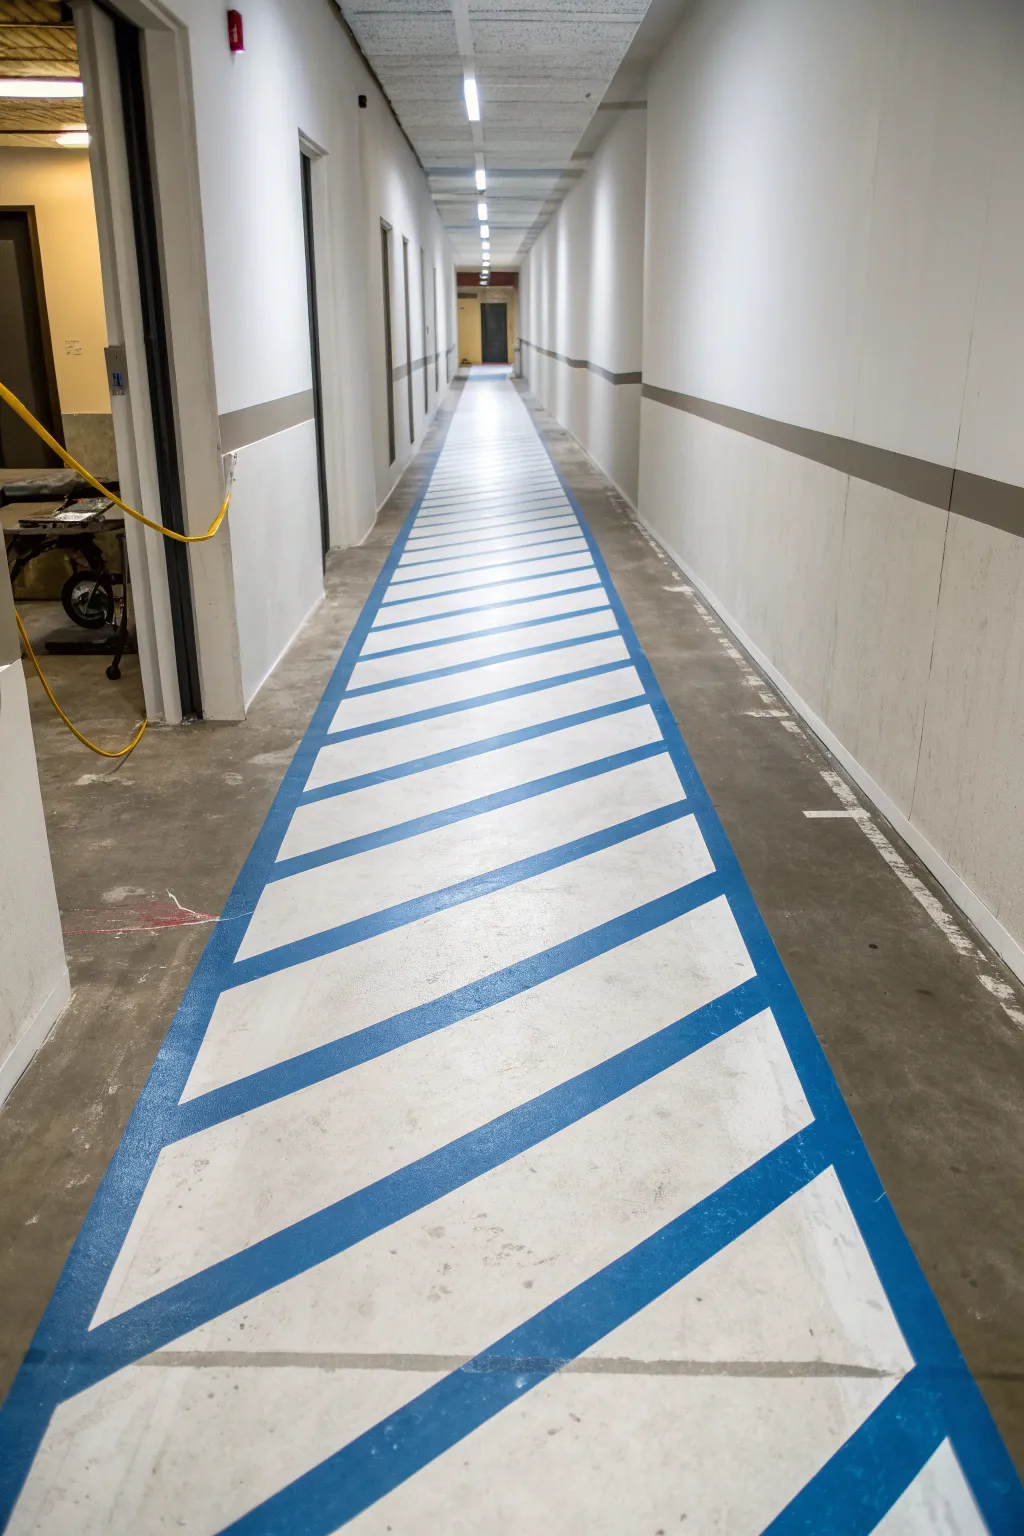
Transform a drab cement hallway into a vibrant walkway with this graphic painted runner. By using sharp diagonal lines and high-contrast colors, you can visually elongate the space while adding a durable, industrial-chic finish.
Step-by-Step
Materials
- Concrete floor cleaner/degreaser
- Concrete bonding primer
- White porch and floor paint
- Blue porch and floor paint (semi-gloss or satin)
- Painter’s tape (1-inch and 2-inch widths)
- Paint rollers and extension pole
- Paint tray and liners
- Measuring tape
- Chalk line
- Stiff bristle brush
- TSP (Trisodium Phosphate) substitute
Step 1: Cleaning and Prep
-
Clear the area:
Remove all furniture, rugs, and obstacles from the hallway. You need a completely open surface to ensure your lines stay straight from end to end. -
Deep clean the concrete:
Scrub the concrete floor thoroughly using a TSP substitute and a stiff bristle brush. This removes grease, dirt, and oils that could prevent the paint from bonding. -
Rinse and dry:
Mop the floor with clean water to remove any cleaning residue. Allow the concrete to dry completely for at least 24 hours. If the concrete is damp, the paint will peel.
Bleeding Lines?
If paint bleeds under the tape on rough concrete, don’t panic. Once dry, use a small artist’s brush and the base color to carefully paint over the bleeding for a clean edge.
Step 2: Establishing the Runner
-
Measure the width:
Determine how wide you want your painted runner to be. Measure the total width of the hallway, subtract your desired runner width, and divide by two to find the margin size for each side. -
Snap the guide lines:
Using a chalk line and a partner, snap two long, parallel lines down the entire length of the hallway to mark the outer edges of your runner. -
Tape the perimeter:
Apply painter’s tape along the outside edges of your chalk lines. Press the tape down firmly to seal the edge so the paint stays contained within the central runner area. -
Prime the runner:
Apply a coat of concrete bonding primer inside the tapped-off area. Let this dry according to the manufacturer’s instructions. -
Apply base color:
Roll on two coats of white porch and floor paint inside the taped runner area. Allow full drying time between coats to ensure a solid, opaque background.
Step 3: Creating the Stripes
-
Determine stripe angle:
Once the white base is fully cured (give it at least 24 hours), decide on the angle of your stripes. A 45-degree angle works best for creating visual movement. -
Mark the intervals:
Using a measuring tape, make small pencil marks along one side of the runner at equal intervals (e.g., every 12 inches) to guide your tape placement. -
Apply masking tape across:
Stretch 2-inch wide painter’s tape diagonally across the runner connecting your marks. I find it helpful to check the angle with a large drafting triangle for the first few lines. -
Seal the tape edges:
To get perfectly crisp lines on textured concrete, brush a tiny amount of the *base* white paint over the edges of the tape. This seals any gaps so the blue paint won’t bleed under. -
Roll the accent color:
Using a roller, apply the blue floor paint over the stencil area. Depending on the opacity of your blue, you may need a second coat for full coverage. -
Remove tape immediately:
While the final coat of blue paint is still wet, carefully peel back the painter’s tape at a 45-degree angle. Pulling while wet prevents the paint from chipping.
Add a Border
For a more defined rug look, tape off a 2-inch solid border around the entire runner after the stripes dry, and paint it a solid contrasting color like grey or black.
Step 4: Finishing Up
-
Remove perimeter tape:
Once the blue stripes are dry to the touch, slowly remove the long strips of tape that defined the edges of the runner. -
Touch up edges:
Inspect the edges for any small bleed-throughs or imperfections. clear them up with a small artist’s brush and the appropriate paint color. -
Let it cure:
Allow the floor to cure for several days before walking on it with heavy shoes or replacing furniture. Concrete paint takes longer to harden than wall paint.
Step back and admire how this dynamic pattern pulls the eye forward and energizes your hallway


Border Frame for a Clean, Finished Look
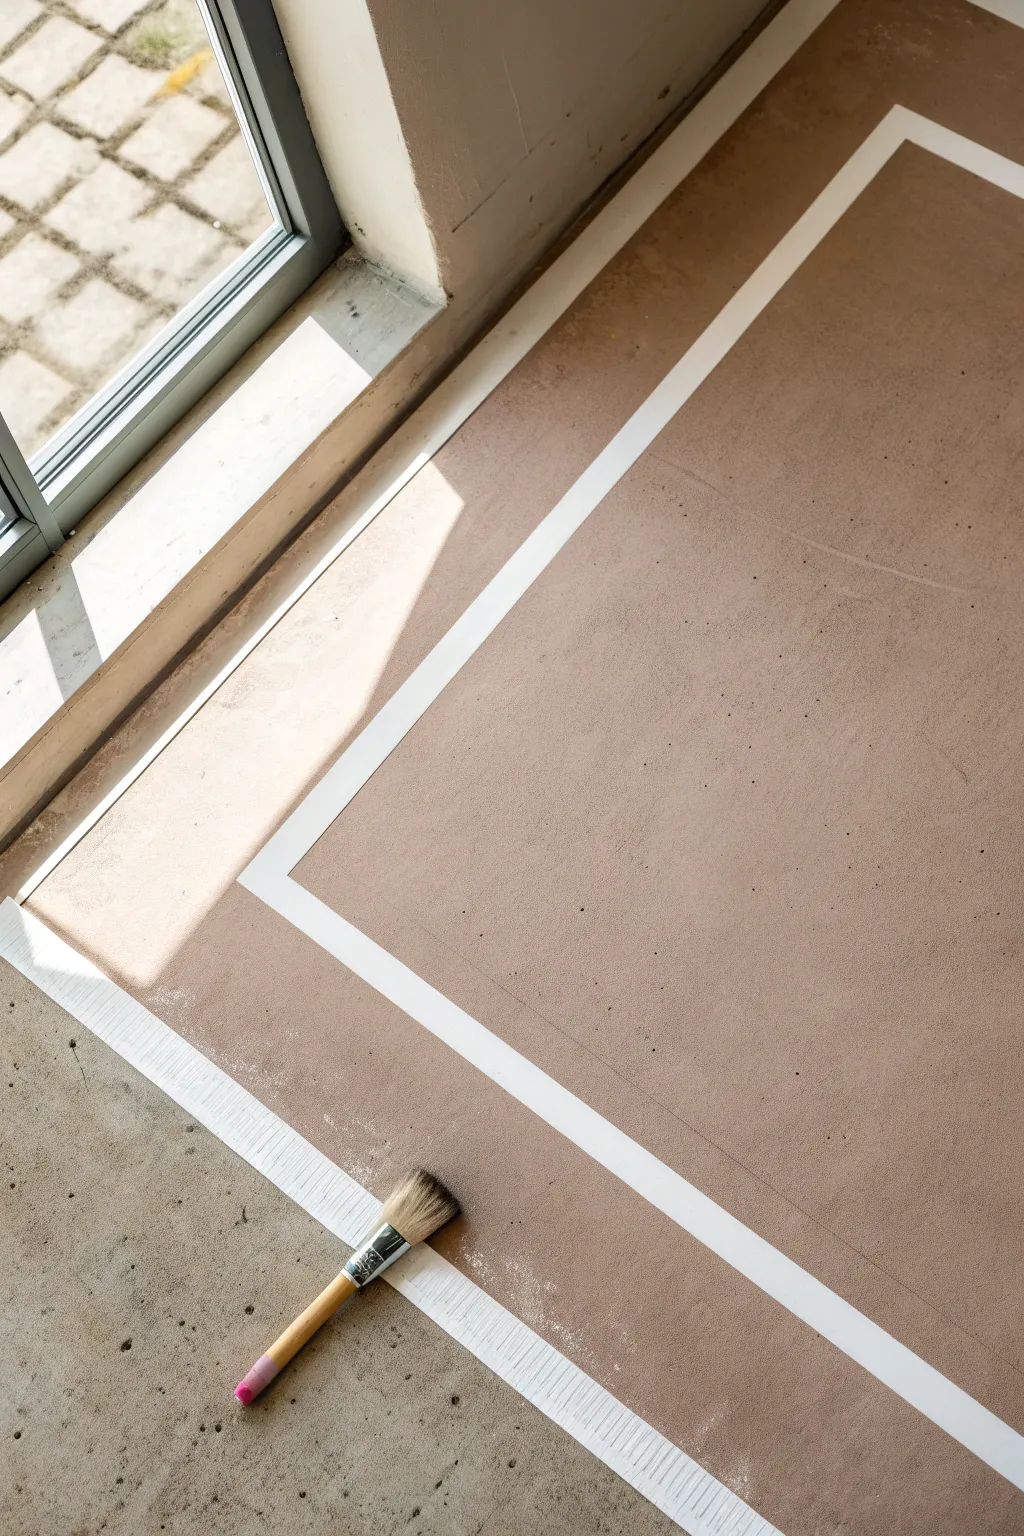
Transform a plain concrete floor into a structured design feature by adding a crisp, painted border. This technique creates a clean, rug-like effect directly on the ground, adding warmth and definition to any industrial-style space.
Detailed Instructions
Materials
- Concrete floor primer
- High-quality floor paint (beige/tan shade)
- Painter’s tape (wide width recommended)
- Measuring tape
- Chalk line or pencil
- Paint roller with extension pole
- Roller tray
- Angle sash brush (2-3 inch)
- Flat brush (for touch-ups)
- Concrete sealer (matte finish)
Step 1: Preparation & Mapping
-
Clean the surface:
Begin by thoroughly cleaning your concrete floor. Remove all dust, debris, and grease spots, then let it dry completely. Painting over dust will prevent adhesion. -
Measure your border:
Decide on the width of your unpainted border area near the wall and the thickness of the painted frame. Use your measuring tape to mark points equidistant from the wall. -
Snap lines:
Using a chalk line or a straight edge with a pencil, connect your marked points to create a guide for where your tape will go. This ensures your rectangle is perfectly square. -
Apply the first tape line:
Lay down your painter’s tape along the outer edge of your marked area. Press the edges down firmly with a putty knife or your finger to prevent paint bleed. -
Create the inner frame:
Measure inwards from your first tape line to determine the thickness of the white stripe. Apply a second parallel line of tape. The space between these two tape lines will remain unpainted (or painted white), creating the crisp border effect visible in the image. -
Seal the tape edges:
I like to brush a very thin layer of the base concrete color or a little clear matte medium along the tape edge that will receive paint. This locks the tape and ensures a razor-sharp line.
Tape Sealing Trick
To get a perfect edge on textured concrete, run a thin bead of clear acrylic caulk along the tape edge and smooth it flat before painting.
Step 2: Painting the Field
-
Cut in the edges:
Using your angle sash brush, carefully paint the beige floor paint along the inner edge of the tape border. Don’t worry about hitting the tape, but avoid globbing paint against it. -
Roll the main area:
Pour your floor paint into the tray. Load your roller and begin filling in the large rectangular ‘rug’ area inside the border. Work in sections to keep a wet edge. -
Apply second coat:
Allow the first coat to dry according to the manufacturer’s instructions. Apply a second coat for solid, opaque coverage, rolling perpendicular to your first pass if possible. -
Paint outside the border (optional):
If you are painting the surrounding floor a different color (or just sealing the raw concrete), apply that finish now on the outside of your tape perimeter.
Step 3: The Reveal & Finish
-
Remove tape while damp:
The most satisfying part is peeling the tape. Do this while the final coat is still slightly tacky but not wet. Pull the tape incorrectly at a 45-degree angle away from the painted edge. -
Inspect clean lines:
Check your white ‘negative space’ lines. If any paint bled under, carefully scrape it away with a razor blade while it’s fresh or touch up with a small brush. -
Clean off dust:
Use a soft dry brush to sweep away any loose chalk marks or debris from the peeling process, ensuring the raw concrete lines are clean. -
Apply sealer:
Once the paint has fully cured (often 24-48 hours), prepare your clear matte sealer. This protects both the painted section and the raw concrete border. -
Roll the sealer:
Using a clean roller, apply the sealer over the entire floor area. This unifies the sheen of the painted and unpainted sections. -
Final dry:
Let the sealer cure completely before walking on the surface or moving furniture back into the room.
Peeling Paint?
If paint lifts with the tape, you waited too long. Score the edge gently with a utility knife before pulling to separate the paint film.
Enjoy your sophisticated, custom-painted floor that anchors the room with style
BRUSH GUIDE
The Right Brush for Every Stroke
From clean lines to bold texture — master brush choice, stroke control, and essential techniques.
Explore the Full Guide
Two-Tone Geometric Triangles
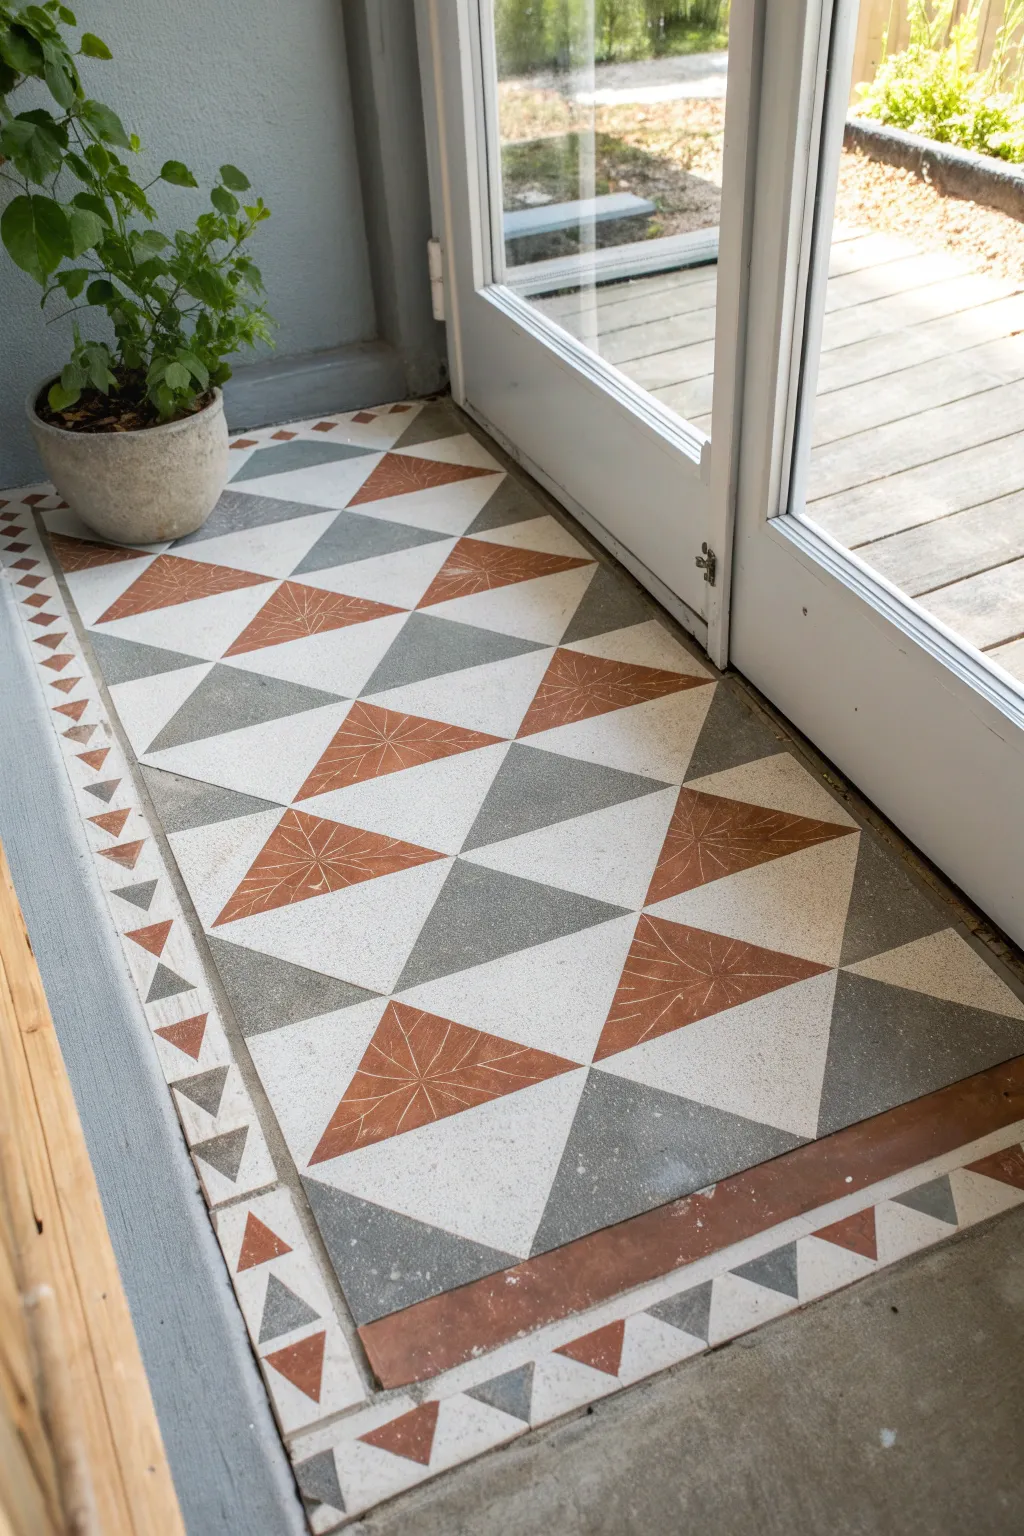
Transform a plain concrete entryway into a stunning focal point with this faux-tile painting project. By combining crisp geometric triangles with earthy terracotta and cool grey tones, you can achieve the high-end look of cement tiles for a fraction of the cost.
Step-by-Step Guide
Materials
- Concrete floor primer
- Concrete porch and floor paint (white base)
- Concrete porch and floor paint (terracotta/rust color)
- Concrete porch and floor paint (medium grey)
- Painter’s tape (various widths, 0.5-inch and 1-inch)
- Straight edge or long ruler
- Pencil for sketching
- Small foam rollers and tray
- Detail brushes (small angled sash brush)
- White paint pen or fine detail brush (for starbursts)
- Concrete sealer (polyurethane based)
- Cleaning supplies (tsp substitute, scrub brush)
Step 1: Prep and Base Coat
-
Clean the Surface:
Thoroughly clean your concrete area with a TSP substitute and a stiff scrub brush to remove dirt, grease, and any loose debris. Rinse well and allow the concrete to dry completely for at least 24 hours. -
Prime the Concrete:
Apply a coat of high-quality concrete primer using a roller. This step helps the paint adhere properly and ensures your colors pop. -
Apply the Base Coat:
Roll on two coats of your white base color. This will serve as the background for your geometric pattern and the ‘grout lines’ between shapes. Let this cure fully according to the can’s instructions, usually overnight.
Step 2: Mapping the Geometry
-
Measure the Grid:
Calculate the dimensions of your entryway. Mark a central vertical line to ensure symmetry, then measure and mark a grid of squares. For this design, 12-inch or 16-inch squares work well. -
Draw the Diagonals:
Use your straight edge to draw diagonal lines through your grid squares, creating a series of large triangles. Vary the direction of the diagonals to create the diamond-like quilt effect shown in the inspiration photo. -
Mark the Border:
Measure a 3-4 inch border around the main field. Inside this border, mark smaller triangles to create the decorative edge detail seen in the image. -
Tape the Design:
Apply painter’s tape along your pencil lines. Remember to tape *outside* the shape you intend to paint so the shape stays the correct size. I find it helpful to place a small piece of tape inside the triangles that need to stay white so I don’t accidentally paint them.
Bleed-Through Blues?
If paint bleeds under the tape, wait for it to dry completely. Re-tape along the original line and paint over the mistake with the background color (white) to erase it.
Step 3: Adding Color
-
Seal the Tape Edges:
Lightly brush a small amount of the white base paint over the edges of your tape. This seals the gap and prevents the colored paint from bleeding underneath, ensuring crisp lines. -
Paint the Grey Triangles:
Using a small foam roller or brush, fill in the designated grey triangles. Two thin coats are better than one thick coat for durability. -
Paint the Terracotta Triangles:
Fill in the remaining triangles with your terracotta or rust-colored paint. Keep a damp rag nearby to quickly wipe up any accidental drips on your white sections. -
Paint the Border:
Carefully paint the border strip in terracotta, and fill in the small decorative triangles in alternating grey and terracotta. -
Remove the Tape:
Slowly peel off the painter’s tape while the final coat is still slightly tacky. Pull at a 45-degree angle away from the painted edge.
Pro Tip: Planning
Before painting, mock up your pattern on graph paper. Or, take a photo of the space and draw on it digitally. This helps visualize how the partial triangles will hit the edges.
Step 4: Detailing and Sealing
-
Add the Starbursts:
Once the terracotta paint is fully dry, use a ruler and a white paint pen (or a very fine brush with white paint) to draw the thin starburst lines inside the terracotta triangles. All lines should converge at the center of the triangle’s long side. -
Touch Up:
Inspect your lines. Use a small artist’s brush and your base white paint to tidy up any bleeds or fuzzy edges. -
Let it Cure:
Allow the design to dry completely for at least 24 to 48 hours before walking on it. This ensures the paint hardens sufficiently. -
Seal the Floor:
Ideally, finish with 2-3 coats of a clear, non-yellowing concrete sealer. This protects your artwork from foot traffic and creates a wipeable surface.
Now you have a durable, custom entryway that brings artistic flair right to your doorstep
Herringbone Stencil That Feels Like Brick
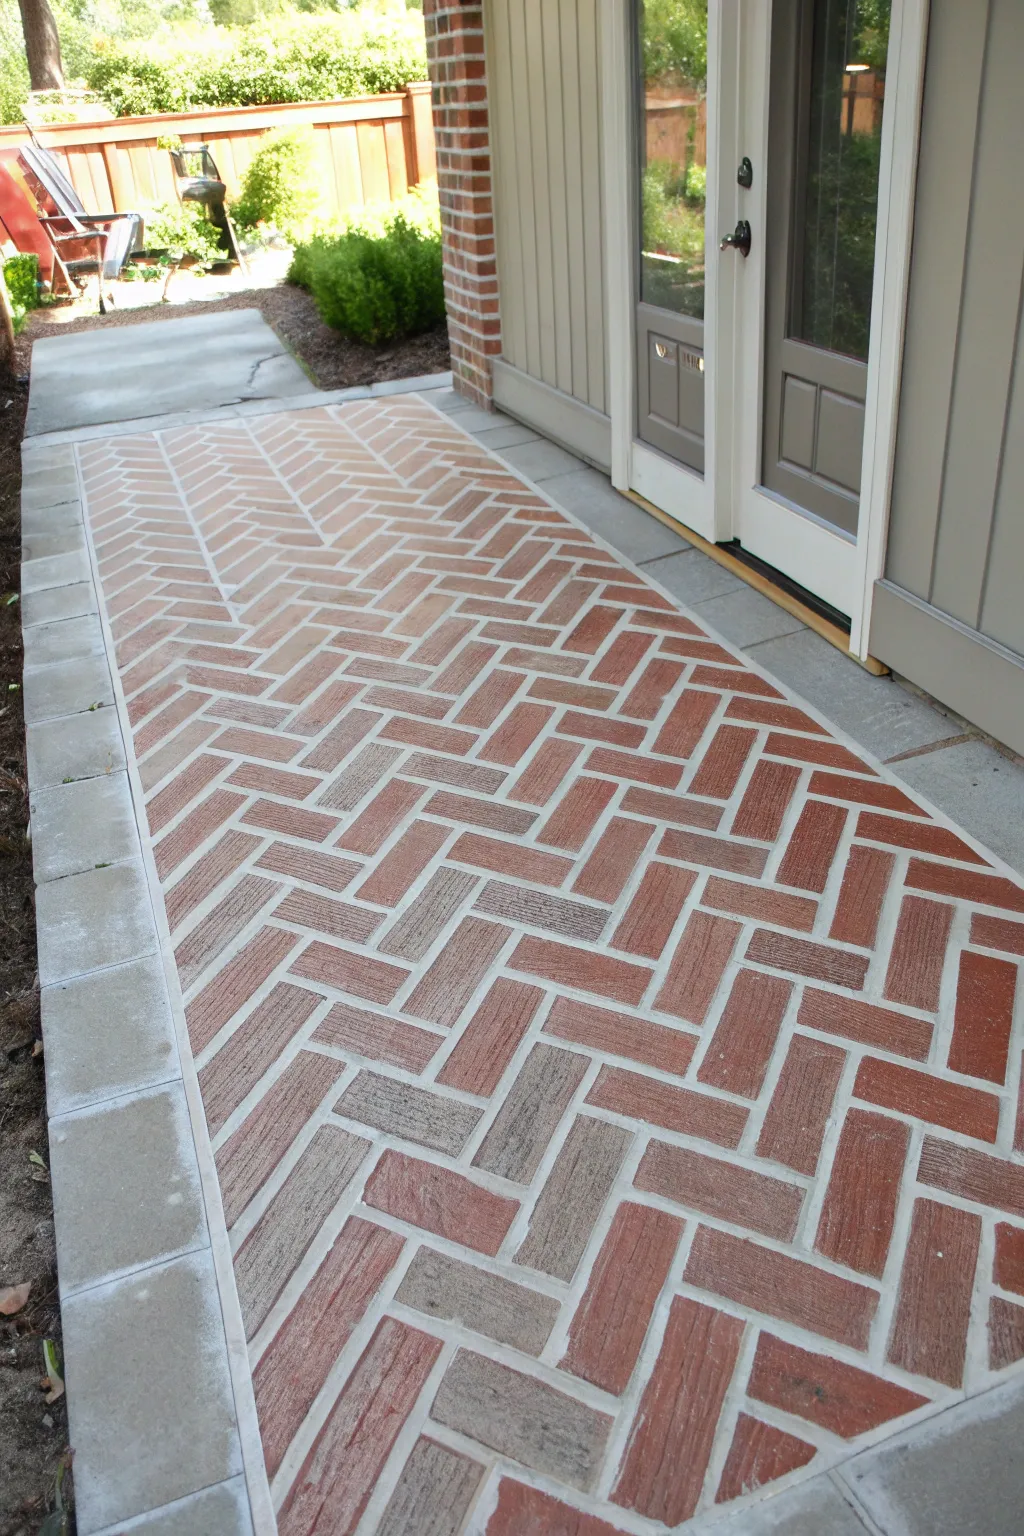
Transform a plain concrete slab into a charming, classic entryway with the look of weathered brick. This stencil project creates a stunningly realistic herringbone pattern that adds warmth and character to your outdoor space without the cost of real masonry.
How-To Guide
Materials
- Concrete cleaner/degreaser
- Pressure washer (optional but recommended)
- Exterior masonry primer
- Base coat masonry paint (grout color, e.g., light gray)
- Herringbone brick stencil (large format)
- Exterior porch/floor paint (brick colors: terracotta, burnt orange, charcoal)
- Painter’s tape
- High-density foam roller and tray
- Stippling brush or sea sponge
- Small artist brush
- Matte exterior concrete sealer
Step 1: Preparation & Base Coat
-
Clean the surface:
Begin by thoroughly cleaning the concrete. Sweep away loose debris and scrub with a degreaser to remove dirt or oil spots. If possible, pressure wash the entire area to ensure the best possible adhesion. -
Crack repair:
Inspect the concrete for any significant cracks or pits. Fill these with a concrete patch filler and smooth them out so they disappear under the paint. -
Prime the concrete:
Roll on a coat of high-quality exterior masonry primer. This step is crucial for longevity, especially for outdoor walkways exposed to the elements. -
Apply the grout color:
Paint the entire floor with your chosen ‘grout’ color. A light gray or sandy beige works best here. Apply two coats if necessary for solid coverage and let it cure fully according to the can’s instructions, usually at least 24 hours.
Natural Texture
Don’t aim for perfect opacity on every brick. Allowing some base coat to show through or varying paint pressure creates a much more convincing, aged brick appearance.
Step 2: Stenciling the Pattern
-
Plan your layout:
Determine your starting point. For a walkway, finding the center line and aligning the stencil there often looks best. Measure carefully to ensure your pattern will run straight. -
Secure the stencil:
Position your large herringbone stencil at the starting point. Use painter’s tape on the edges to hold it firmly in place so it doesn’t shift while you work. -
Load the roller:
Pour your main brick col—a terracotta or burnt orange—into a tray. Load a high-density foam roller lightly. Offload excess paint onto a paper towel; a ‘dry roller’ technique prevents paint from bleeding under the stencil. -
Roll the first section:
Gently roll over the stencil. Don’t press too hard. It’s better to do two light passes than one heavy, wet one. -
Add dimension:
While the stencil is still in place, create that realistic weathered look. Take a sea sponge or stippling brush dipped in a secondary color (like charcoal or a darker red) and lightly dab random bricks to create texture and variation. -
Move the stencil:
Carefully lift the stencil straight up to avoid smudging. Align the registration marks on the stencil with the previously painted section to continue the pattern seamlessly. -
Repeat the process:
Continue moving the stencil, taping, and painting until the main area is covered. I find it helpful to wipe the back of the stencil occasionally to prevent paint buildup.
Bleed-Through Blues?
If paint seeps under the stencil, don’t panic. Let it dry completely, then use a small angled brush and your base ‘grout’ color to touch up the lines crisp again.
Step 3: Edges & Finishing Touches
-
Handle the edges:
When you reach the walls or difficult corners, the stencil might not fit flat. You can bend flexible stencils into the crease, or simply stencil as close as possible and finish the partial bricks by hand later. -
Hand-paint corrections:
Once the stenciling is done and the stencil is removed, use a small artist brush to touch up any bleed-through on the grout lines with your original gray base color. -
Detail the perimeter:
If your patio has a concrete border (like the simple gray squares in the image), tape this area off separately. Paint it a solid gray or faux-stone color to frame your herringbone ‘rug’. -
Final dry time:
Allow the brick paint to dry completely. This usually takes another 24 hours depending on humidity. -
Seal the floor:
Apply two to three thin coats of a matte exterior concrete sealer. This protects your hard work from UV rays, foot traffic, and rain, keeping the colors vibrant for years.
Step back and admire how a little paint has completely completely upgraded your curb appeal

PENCIL GUIDE
Understanding Pencil Grades from H to B
From first sketch to finished drawing — learn pencil grades, line control, and shading techniques.
Explore the Full Guide
Faux Brick Paver Grid With “Grout” Lines
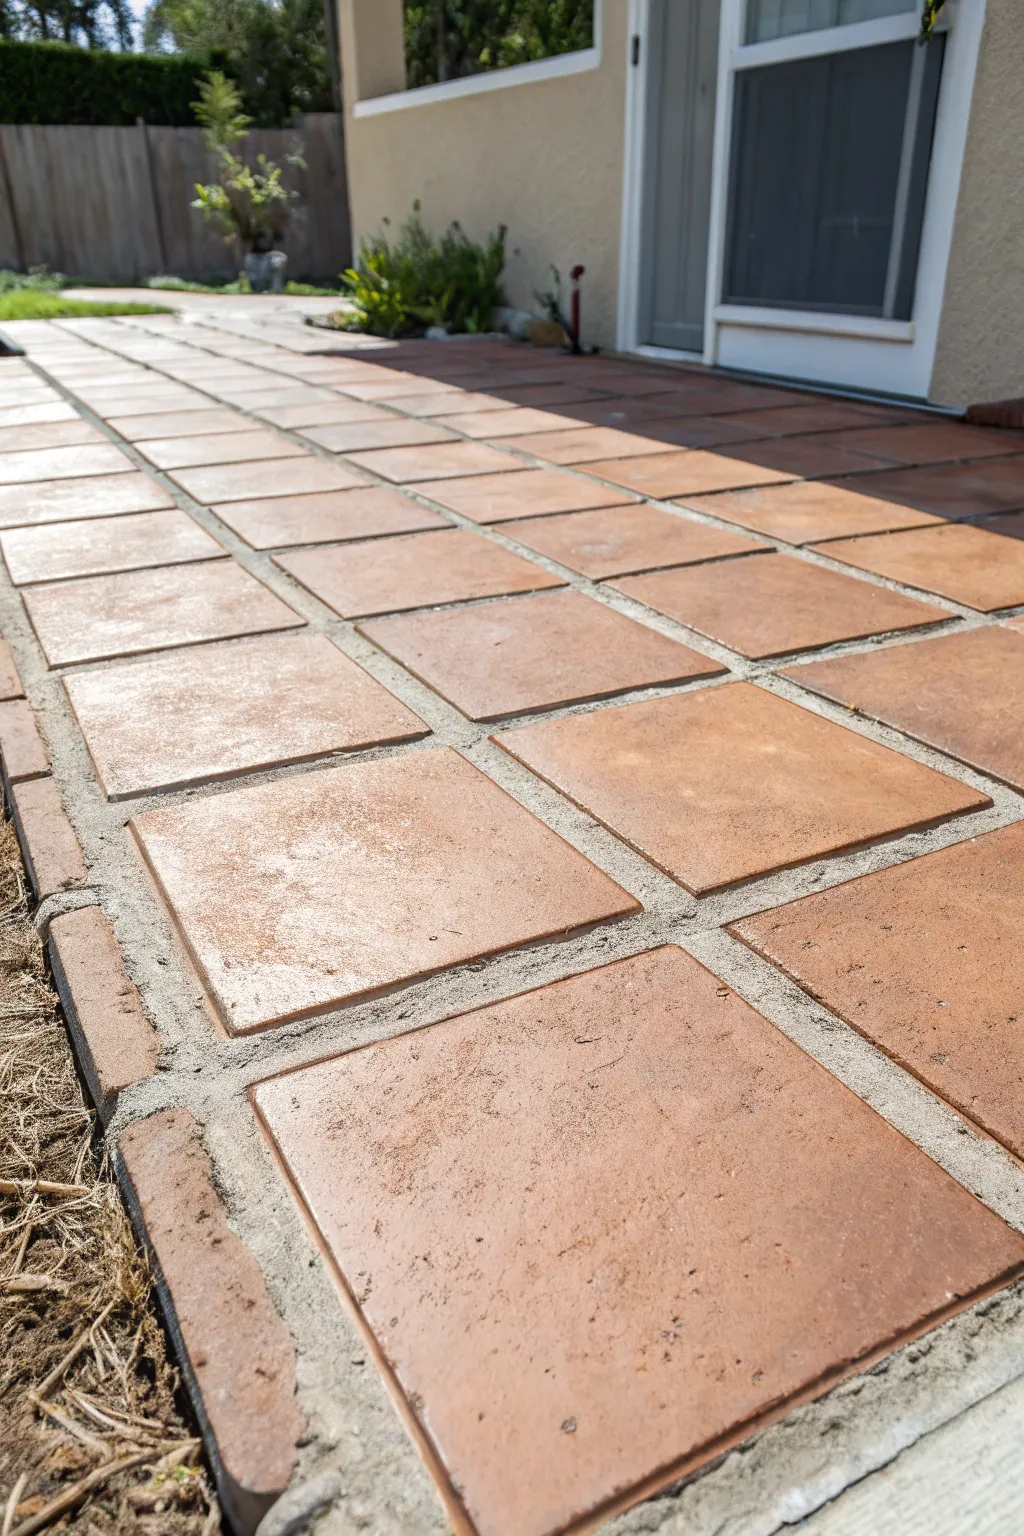
Transform a plain concrete slab into a warm, inviting terracotta patio without laying a single stone. This painting technique uses clever taping and layering to mimic the textured, sun-baked look of authentic clay pavers.
Step-by-Step
Materials
- Concrete cleaner/degreaser
- Pressure washer (optional)
- Exterior concrete primer
- 1/4″ or 1/2″ masking tape (for grout lines)
- Chalk line
- Measuring tape
- Terra cotta-colored porch/floor paint
- Lighter orange/tan exterior paint (for texture)
- Darker brown exterior paint (for shading)
- Sea sponge or rag
- Paint roller and extension pole
- Small artist brush
- Concrete sealer (matte or satin)
Step 1: Preparation & Grid Layout
-
Clean the surface:
Start by thoroughly cleaning your concrete slab. Use a stiff push broom and a specialized concrete cleaner or degreaser to remove dirt, oils, and moss. If there is old paint, scrape it away. -
Prime the slab:
Apply a coat of high-quality exterior concrete primer. This ensures your ‘grout’ and ’tile’ colors adhere properly and last through the seasons. -
Paint the grout base:
Roll on the base color you want your grout lines to be—typically a light grey or a sandy beige. You don’t need to be perfect, but cover the entire area where lines will appear. Let this dry completely, usually overnight. -
Measure your grid:
Decide on your tile size; 12×12 inches is a standard paver look. Use a measuring tape to mark intervals along the edges of your patio. -
Snap the lines:
With a partner, snap horizontal and vertical chalk lines connecting your marks to create a grid. This is your roadmap. -
Apply the tape:
Run your masking tape directly over the chalk lines. Press the tape down firmly, especially at the intersections, to prevent paint bleed. This tape preserves your grey base coat as the grout.
Burnish the Tape
After laying your masking tape, run a putty knife or the edge of a credit card firmly over it. This ‘burnishing’ seals the edges tight against the concrete to stop paint bleed.
Step 2: Creating the Faux Tiles
-
Apply the base terracotta:
Using a roller, apply your main terracotta color over the entire taped grid. Work in sections so you don’t paint yourself into a corner. -
Add first texture layer:
While the base coat is still slightly tacky, dip a sea sponge into your lighter orange/tan paint. Blot excess paint onto cardboard first, then lightly dab the center of random squares to simulate sun-fading. -
Add depth and shading:
Using the same sponge technique (or a crumpled rag), apply the darker brown paint sparingly. Focus on the edges and corners of the ’tiles’ to create a slightly aged, weathered effect. I find less is more here. -
Blend the textures:
If strong sponge marks are visible, lightly roll over the wet paint with a dry roller to soften the texture and blend the colors naturally. -
Remove the tape:
This is the crucial moment—carefully peel up the masking tape *before* the paint is rock hard. Pull the tape at a 45-degree angle to reveal your crisp grey grout lines.
Vary the Pattern
Instead of a direct grid, try offsetting the rows by 50% to create a running bond brick pattern, which often feels more traditional for exterior walkways.
Step 3: Finishing Touches
-
Touch up edges:
Once the tape is gone, inspect your grout lines. Use a small artist brush and your grout color to fix any spots where the terracotta paint might have bled under the tape. -
Create false edges:
To make the pavers look less flat, take a tiny brush with dark grey paint and add a very thin shadow line on two sides (bottom and right) of each square. This subtle trompe l’oeil trick creates 3D dimension. -
Dry thoroughly:
Allow the entire painted floor to cure for at least 24 to 48 hours. Don’t rush this step, as trapped moisture can ruin the finish. -
Seal the deal:
Finish by rolling on two coats of high-quality concrete sealer. A matte or satin finish looks most like real stone; high gloss tends to look artificial.
Step back and enjoy the warmth of your new faux-tile patio that looks authentic without the heavy lifting
Painted “Wood Planks” for Cozy Cabin Energy
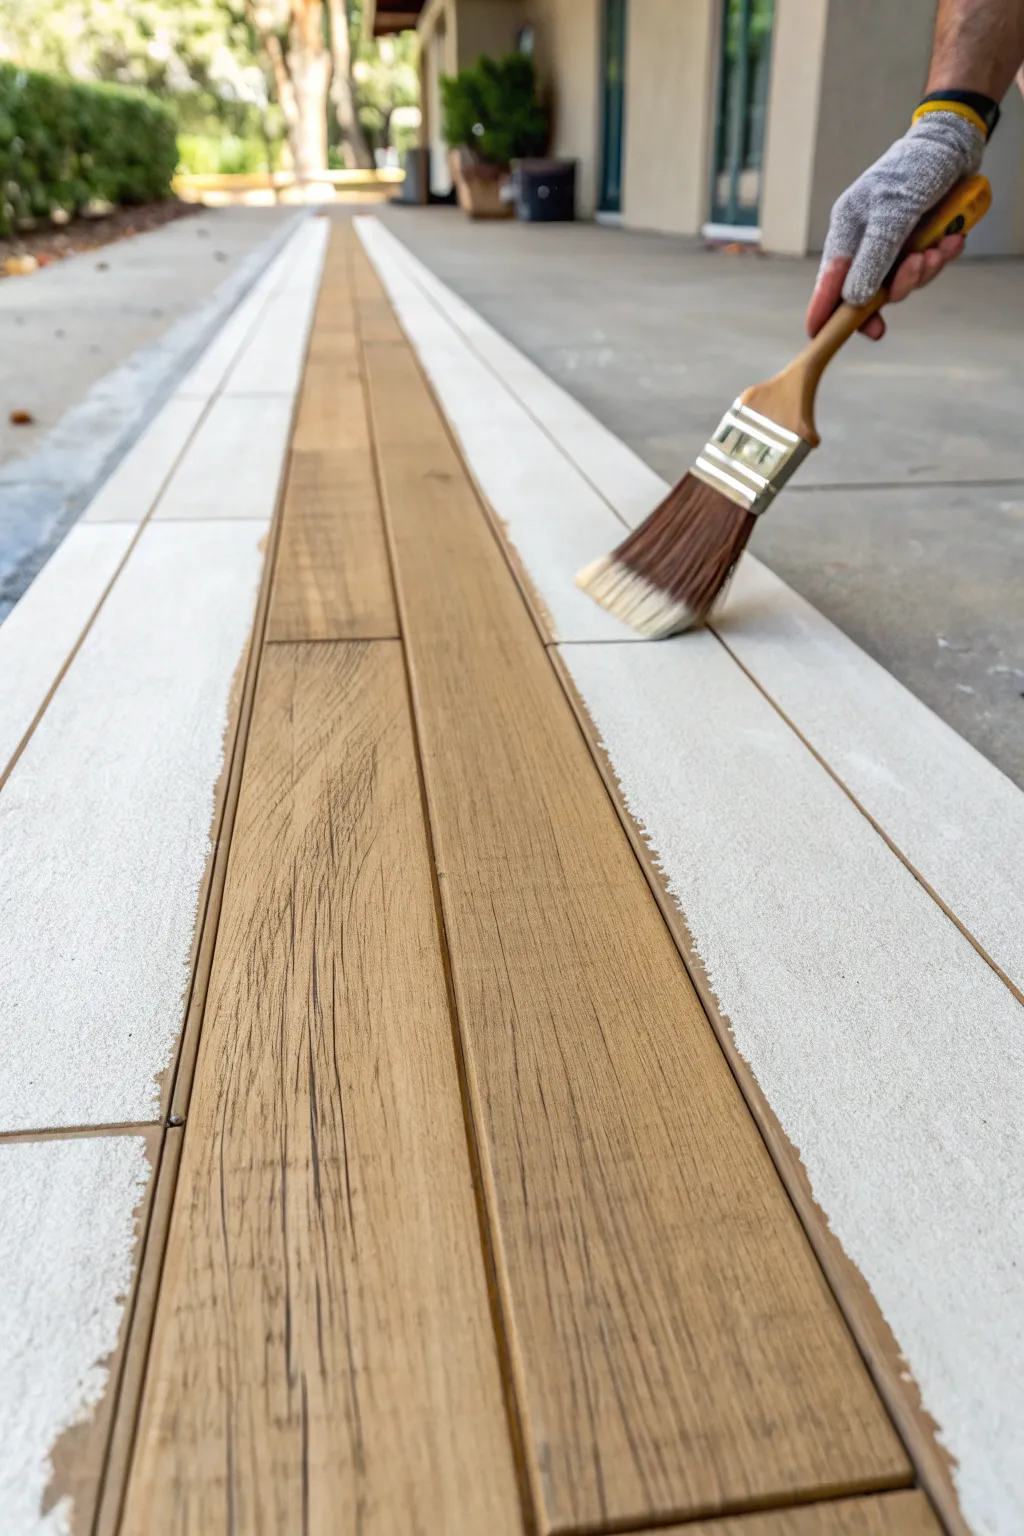
Transform a plain concrete slab into a warm, inviting walkway with this faux wood plank technique. By layering paint and stain, you can achieve a surprisingly realistic grain texture that adds instant cozy cabin vibes to your patio.
Step-by-Step Tutorial
Materials
- High-quality porch and floor paint (white or cream base)
- Gel stain or tinted glaze (medium oak or walnut tone)
- Painter’s tape (1-inch width)
- Wide bristle brush (3-4 inches)
- Chip brush (for graining)
- Measuring tape
- Chalk line or long straight edge
- Pencil
- Clear concrete sealer (matte or satin finish)
- Concrete cleaner/degreaser
Step 1: Prep and Base Coat
-
Clean the Surface:
Begin by thoroughly cleaning your concrete surface with a dedicated cleaner and degreaser. Scrub away any moss, dirt, or previous sealers to ensure the new paint adheres properly, then let it dry completely for at least 24 hours. -
Apply Base Color:
Roll on your base coat of white or cream porch paint. This lighter color will serve as the background that shows through the stain to create the wood look. You likely need two coats for solid opacity. -
Let it Cure:
Allow the base coat to dry thoroughly according to the can’s instructions. Do not rush this step; the paint needs to be hard enough to withstand tape removal later without peeling.
Sticky Situation?
If paint peels up with the tape, the base coat wasn’t fully cured or the concrete was damp. Let the area dry longer, sand the spot lightly, re-paint the base, and re-tape.
Step 2: Mapping the Planks
-
Measure Plank Widths:
Decide on your plank width—standard wood flooring is often 4 to 6 inches wide. Use your measuring tape to mark intervals across the width of your walkway. -
Snap Lines:
Using a chalk line or a long straight edge and pencil, draw long, parallel lines connecting your marks to define the long edges of the boards. -
Tape the Gaps:
Apply painter’s tape exactly over the pencil lines. The tape represents the ‘grout’ or gap between boards, so press it down firmly to prevent bleed-through. Leave the areas where the wood grain will go exposed.
Step 3: Creating the Wood Grain
-
Mix the Glaze:
Prepare your gel stain or tinted glaze. If the stain is too thick, thin it slightly with the appropriate solvent so that it is translucent. -
Apply Stain in Sections:
Working on one ‘plank’ section at a time, brush the stain onto the white base. Don’t worry about perfect coverage; variation is key to realism. -
Drag the Brush:
While the stain is still wet, take a clean, dry chip brush and drag it through the stain in one long, continuous motion. This dragging technique pulls off some stain, revealing the white base to look like wood grain. -
Add Knots and Imperfections:
To create a knot, wiggle the brush slightly or twist your wrist as you drag. I like to add a darker dab of stain in these spots for extra depth. -
Vary the Tone:
Make some planks slightly darker by applying a bit more stain, and keep others lighter. Real wood floors have natural variances in color. -
Repeat the Process:
Continue this process down the length of the walkway, moving plank by plank. wipe your dragging brush on a rag frequently to keep the bristles from getting saturated.
Knotty & Nice
Use a wood grain rocking tool for distinct knots. Drag the tool through wet glaze, rocking it slowly once per plank for a professional, distinct grain pattern.
Step 4: Finishing Touches
-
Remove Tape:
Once the stain is dry to the touch but not fully cured (usually about an hour), carefully peel up the painter’s tape at a 45-degree angle to reveal the crisp white lines between your faux boards. -
Inspect and Touch Up:
Check for any major bleeds or spots that look unnatural. You can use a small artist’s brush with the base color to clean up messy edges. -
Seal the Surface:
After the stain has cured for the recommended time (typically 24-48 hours), apply a high-quality clear concrete sealer. This protects your hard work from foot traffic and weather.
Now you have a durable, custom floor that brings rustic warmth to your outdoor space without the rot or maintenance of real wood


Speckled Terrazzo Look on a Budget
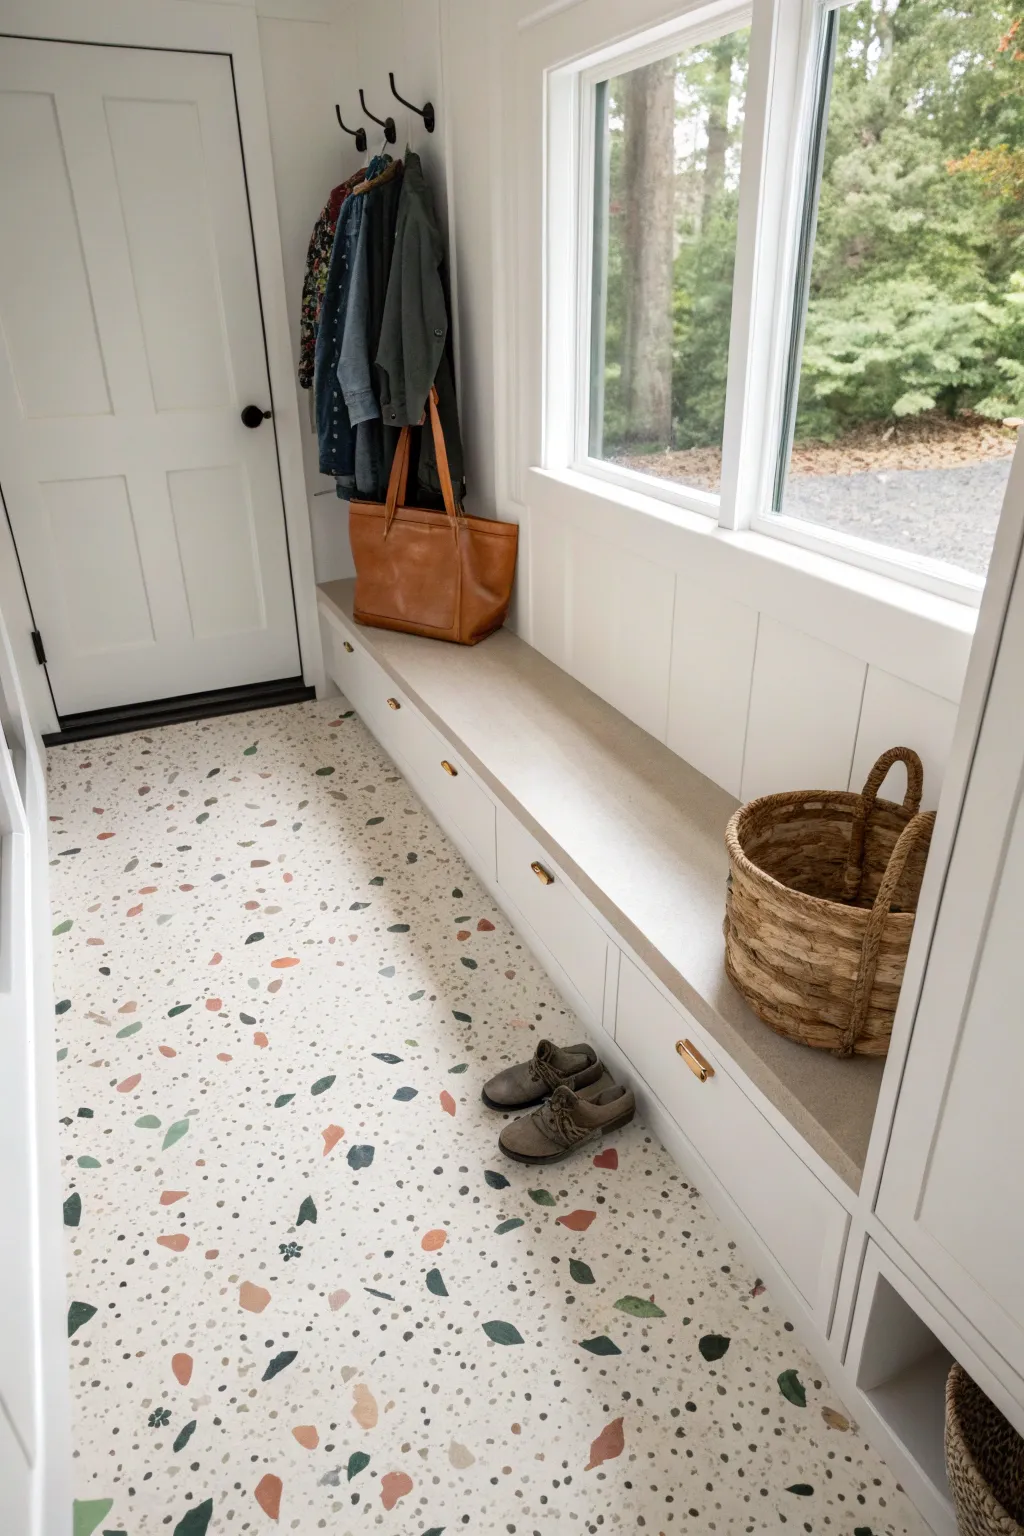
Achieve the high-end look of authentic terrazzo without the hefty price tag using paint and patience. This technique transforms plain concrete into a playful, speckled surface that hides dirt beautifully and adds instant character to any entryway.
Detailed Instructions
Materials
- High-quality porch and floor paint (white base)
- Acrylic craft paints (terracotta, hunter green, slate blue, blush pink)
- Concrete primer
- Concrete sealer (polyurethane or epoxy)
- Paint rollers and extension pole
- Various small flat artist brushes
- Small sponges (sea sponge or synthetic)
- Blue painter’s tape
- Floor cleaner/degreaser
- Sandpaper (120 grit)
Step 1: Preparation & Base Coat
-
Clean the Surface:
Begin by thoroughly cleaning your concrete floor. Use a degreaser to remove any oils or residue that could prevent paint adhesion, then scrub and rinse well. Let the floor dry completely, ideally overnight. -
Sand and Prime:
Lightly scuff the surface with 120-grit sandpaper to give the paint something to grip. Vacuum the dust, wipe with a damp cloth, and apply a coat of high-quality concrete primer. Allow this to dry according to the manufacturer’s instructions. -
Apply the Base Color:
Roll on your base color using the porch and floor paint. A creamy off-white or bright white works best to make the ‘chips’ pop. Apply two coats for solid coverage, letting the first coat dry fully before adding the second. -
Cure Time:
Resist the urge to start painting chips immediately. Let the white base cure for at least 24 hours so you are working on a hard, stable surface.
Randomize It
To avoid unintentional patterns, listen to a podcast or music while painting. It distracts your brain from trying to create order out of the chaos.
Step 2: Creating the Terrazzo Pattern
-
Plan Your Palette:
Select 3-5 colors that mimic stone chips. For this look, I chose muted earth tones like terracotta, sage green, deep forest green, and a soft blush. -
Start with Large Shapes:
Using a flat artist brush, hand-paint the largest ‘chips’ first. Create irregular, angular shapes rather than perfect circles. Distribute them randomly across the floor, leaving plenty of white space between them. -
Work in Sections:
To avoid stepping in wet paint, work from the furthest corner of the room backward toward the door. Paint a roughly 2×2 foot section at a time. -
Add Medium Shapes:
Switch to your second and third colors. Paint slightly smaller shapes, nestling them into the empty spaces. Rotate your brush angle constantly so the shapes don’t all look identical or directional. -
Sponge Technique:
For the smaller speckles, dip a small piece of torn sponge into your paint. Dab off most of the excess on a paper towel, then stamp light clusters of texture onto the floor. -
Add the Tiniest Specs:
Use a very fine brush or even a stiff bristle brush to flick or dot the smallest speckles in dark gray or black. These tiny dots add depth and make the faux stone look realistic. -
Step Back and Assess:
Periodically stand up and look at the floor as a whole. Fill in any noticeable gaps with medium-sized shapes to ensure the distribution feels balanced but random.
Step 3: Sealing and Protection
-
Dry Time:
Allow your painted terrazzo pattern to dry for at least 24 to 48 hours. The acrylic paints need to be completely moisture-free before sealing. -
First Coat of Sealer:
Apply a clear, non-yellowing polyurethane or water-based epoxy sealer. Use a high-density foam roller to apply it gently, ensuring you don’t drag the painted pattern. -
Sand Between Coats:
Once the first coat is dry, very lightly hand-sand with high-grit sandpaper to knock down any bumps. Wipe away the dust with a tack cloth. -
Final Seal:
Apply two or three more thin coats of sealer. This is crucial for a floor, as it needs to withstand foot traffic and cleaning. Let the final coat cure for several days before placing furniture or rugs back onto it.
Metallic Flakes
Mix in a few hand-painted shapes using gold or copper metallic paint. They will catch the light beautifully once the clear glossy sealer is applied.
Enjoy the durable beauty of your custom floor that looks like it cost a fortune to install
Soft Faux Marble Veining
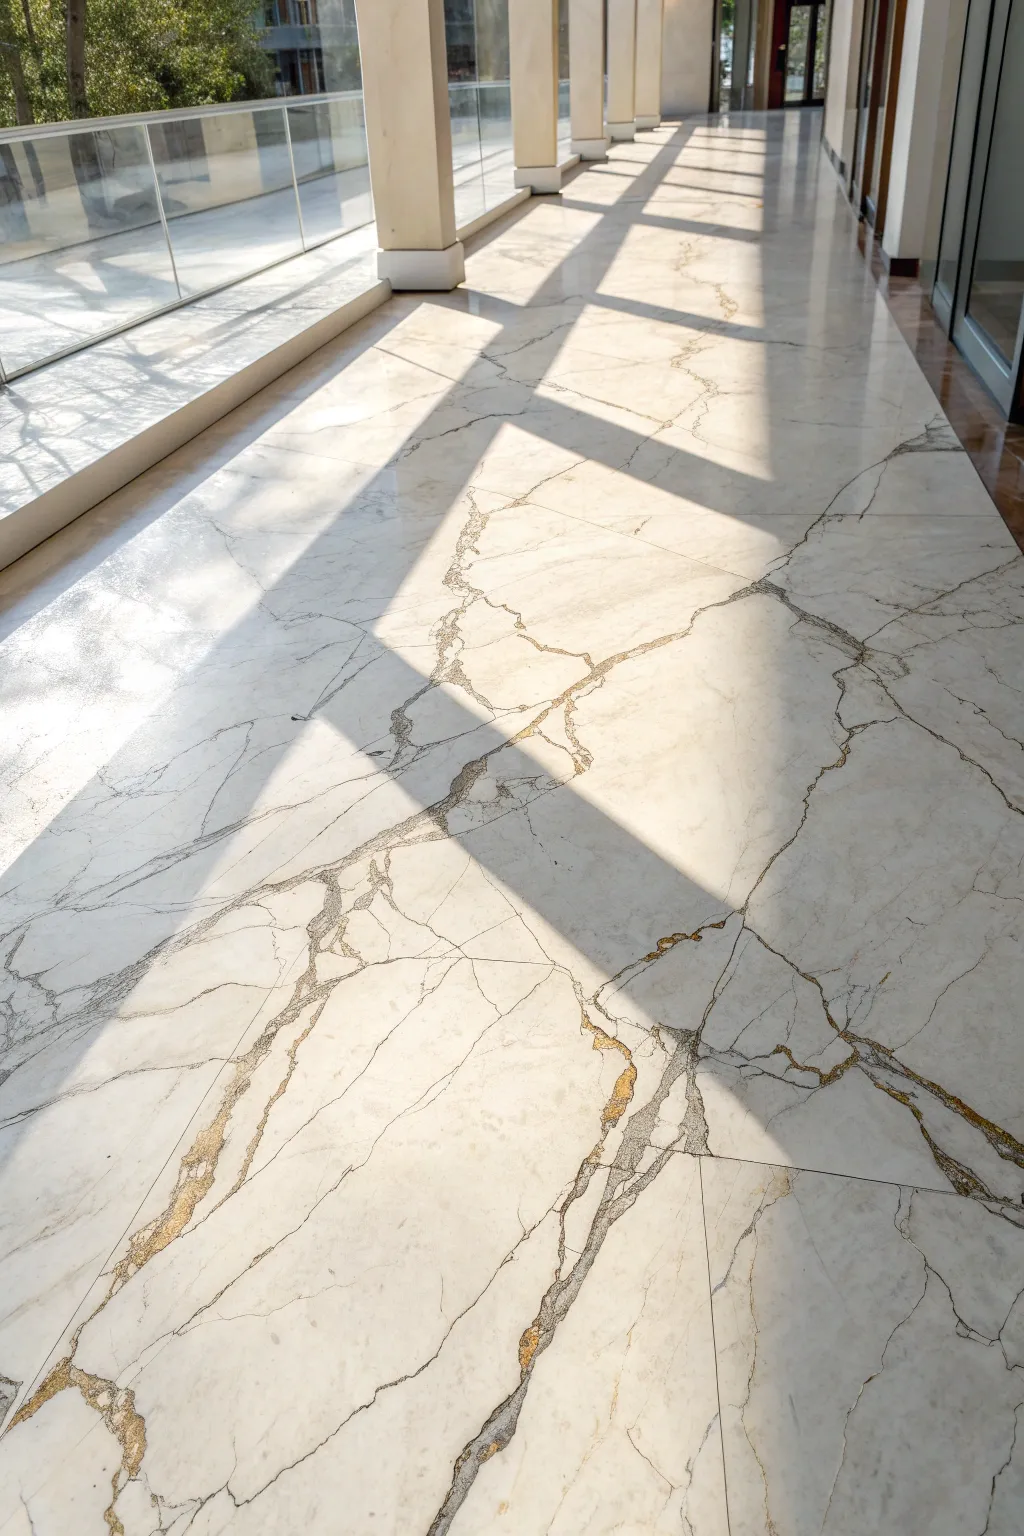
Transform plain concrete into a luxurious, high-end hallway that mimics the look of authentic Calacatta Gold marble. This technique layers sheer glazes and metallic accents to create depth, realism, and a stunning, light-reflective finish for a fraction of the cost of real stone.
Step-by-Step
Materials
- High-quality concrete primer
- Warm white epoxy floor paint (or masonry paint)
- Acrylic glaze medium
- High-gloss polyurethane topcoat
- Dark charcoal grey acrylic paint
- Metallic gold paint or gold leaf kit
- Sea sponge
- Feather or fine liner brushes
- Badger hair blending brush (or wide soft brush)
- Painter’s tape
- Water spray bottle
- Lint-free rags
Step 1: Base Preparation
-
Clean and Prime:
Thoroughly clean your concrete floor to remove all dust and grease. Apply a high-quality concrete primer to ensure adhesion and let it dry completely according to the manufacturer’s instructions. -
Apply Base Color:
Roll on two coats of warm white epoxy or masonry paint. This provides the creamy backdrop for your marble. Allow the first coat to dry fully before applying the second to ensure solid, opaque coverage. -
Create Tile Grid (Optional):
If you want the look of large tiles as shown in the image, measure and mark out a large grid using thin painter’s tape. Press the edges down firmly to prevent bleed-under.
Step 2: Veining Technique
-
Mix the Grey Glaze:
Mix dark charcoal acrylic paint with 4 parts glaze medium and 1 part water. You want a translucent, fluid consistency that moves easily but doesn’t run uncontrollably. -
Map the Major Veins:
Dip a feather or a long liner brush into your grey mix. Holding the brush loosely, drag it across the floor in jagged, organic diagonal lines. Let your hand shake slightly to create natural tremors in the line. -
Soften the Edges:
Immediately mist the wet vein lightly with water. Use a badger hair brush or soft dry brush to feather one side of the line, buffing it into the white background while keeping the other side of the vein relatively sharp. -
Add Secondary Ghost Veins:
Using the diluted grey glaze left on your blending brush, create very faint, wide ‘shadow’ veins that run parallel to or branch off from your main dark veins. This adds the illusion of depth below the surface. -
Sponge for Texture:
Dampen a sea sponge and dip it lightly into the grey glaze. Blot most of it off on a rag, then gently mottle the areas around the heavy veins to break up large white spaces.
Uneven Blending?
If your veins look too harsh or like stripes, mist them immediately with more water and blot with a damp sea sponge to lift the pigment and soften the transition to white.
Step 3: Detailed Accents
-
Intensify the Breaks:
Go back in with undiluted dark grey paint and a fine liner brush. Add thin, erratic darker lines right in the center of your blurred grey veins. This creates the ‘fissure’ look. -
Apply Gold Highlights:
I like to wait for the grey to be touch-dry before adding metallics. Using a fine brush, apply gold paint along the edges of the dark fissures, or interweave it where the veins split and branch. -
Create Gold Deposits:
For a more dramatic effect like the photo, pool small amounts of gold in the ‘intersections’ of veins. You can smear this slightly with a fingertip to make it look like a natural mineral deposit. -
Clean Up Grid Lines:
If you used tape for grout lines, carefully peel it up now while the paint is mostly dry but not fully cured to avoid chipping.
Feather Touch
Use an actual turkey or pheasant feather instead of a brush for the initial veins. Twisting the quill while dragging it creates unpredictable, organic lines.
Step 4: Sealing and Finish
-
Protect the Art:
Allow the painted faux finish to cure for at least 24 to 48 hours. Do not walk on it during this time. -
First Coat of Sealer:
Apply a clear, high-gloss polyurethane floor sealer using a smooth foam roller. Work gently to avoid over-working the product which can cause bubbles. -
Sand and Repeat:
Once the first coat is dry, lightly scuff it with fine-grit sandpaper (220 grit) to remove any dust nibs. Wipe clean with a tack cloth. -
Final Gloss Coat:
Apply a second or third coat of high-gloss sealer. The multiple layers of clear coat are essential for creating that wet, glass-like depth seen in polished marble.
Step back and admire how the light catches the golden details in your sophisticated new floors
Center Medallion for Instant Drama
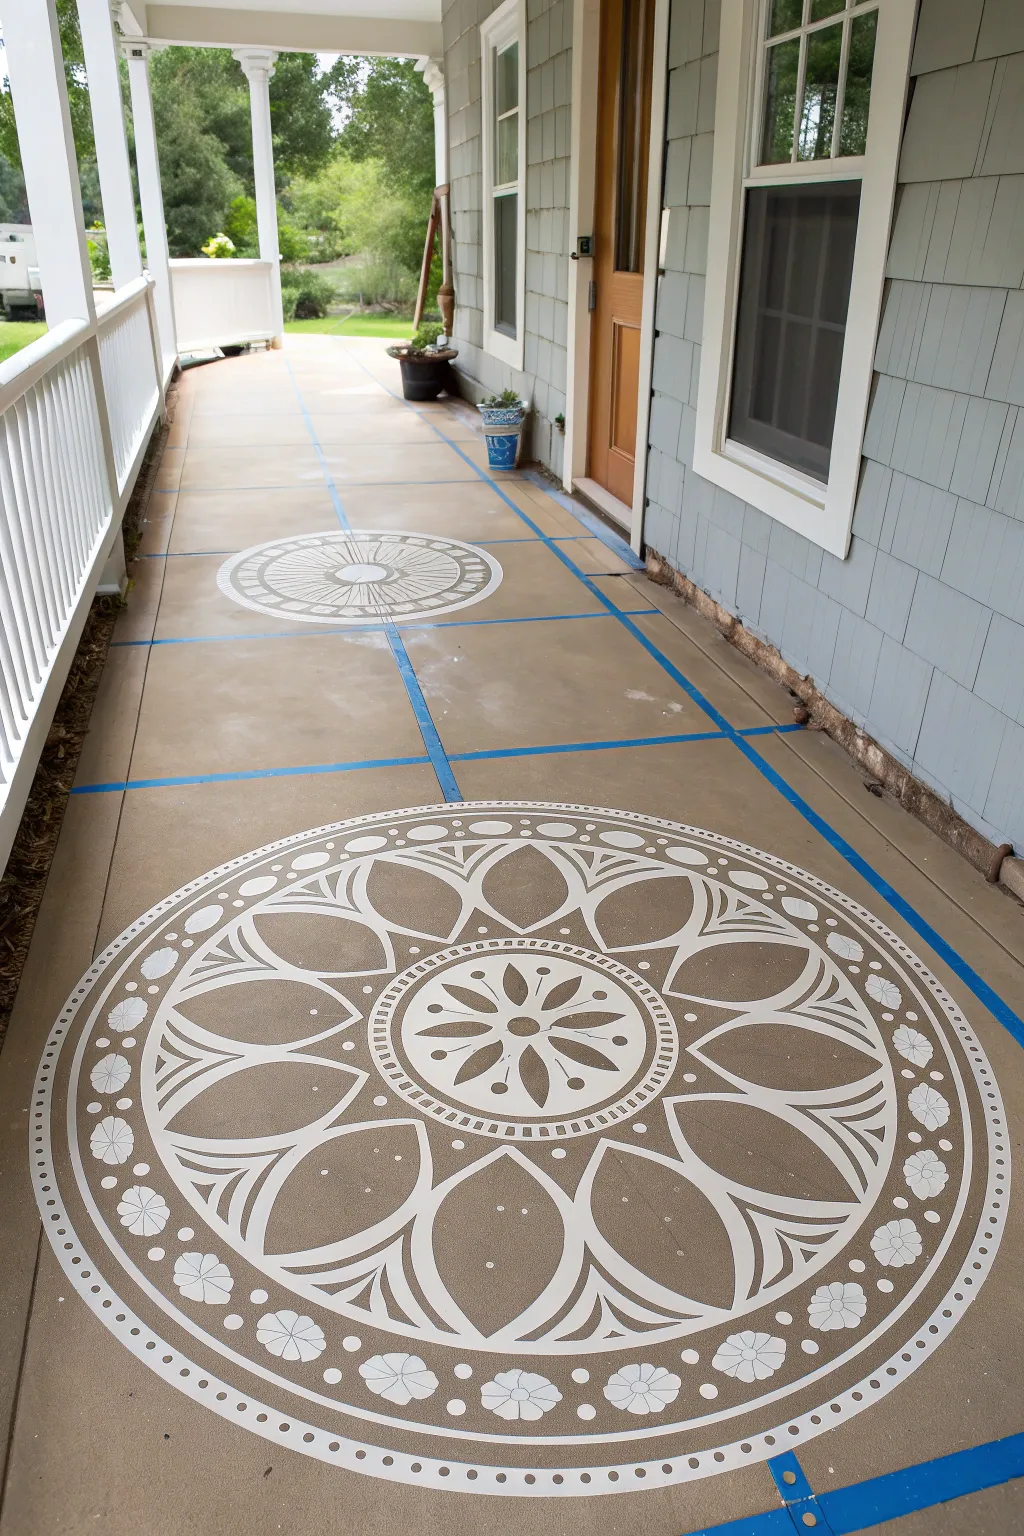
Transform a plain concrete porch into a stunning entryway feature with oversized mandala medallions. By using geometric spacing and crisp white paint against a warm tan base, you achieve a high-end tile look without the cost of stone.
How-To Guide
Materials
- Concrete cleaner and degreaser
- Pressure washer (optional but recommended)
- Concrete bonding primer
- Porch and floor paint (base color – tan/taupe)
- Porch and floor paint (accent color – bright white)
- Large mandala stencil (approx. 30-36 inch diameter)
- Blue painter’s tape (1.5 inch or 2 inch width)
- Chalk line or laser level
- Measuring tape
- Paint roller with extension pole
- 3/8 inch nap roller cover
- High-density foam roller (for stenciling)
- Stencil adhesive spray
- Small artist brush (for touch-ups)
- Clear concrete sealer (matte or satin finish)
Step 1: Preparation & Base Coat
-
Deep Clean the Surface:
Begin by thoroughly sweeping the porch to remove loose debris. Scrub the concrete with a specialized cleaner and degreaser to remove dirt and oils, then rinse completely. If possible, pressure wash the surface for the best adhesion. -
Inspect and Repair:
Check for cracks or pitting in the concrete. Fill any significant imperfections with concrete patch filler and smooth it out so your stencil will lay flat later. -
Prime the Concrete:
Once the concrete is bone dry (wait at least 24 hours after washing), roll on a coat of bonding primer. This ensures your paint won’t peel up under foot traffic. -
Apply the Base Color:
Using a roller on an extension pole, apply your tan or taupe base color. Work in sections to maintain a wet edge. -
Second Coat:
Allow the first coat to dry according to the can’s instructions, typically 4-6 hours. Apply a second coat to ensure solid, opaque coverage and let it cure for at least 24 hours before taping.
Clean Edges Tip
Does your stencil keep shifting? Use a “dry brush” technique instead of a roller for the edges of the stencil pattern. Stippling straight down prevents paint from slipping underneath.
Step 2: Layout & Taping
-
Measure the Center Line:
Find the exact center width of your porch walkway. Snap a chalk line down the entire length of the porch to act as your center guide. -
Determine Grid Spacing:
Decide on the size of your ‘faux tiles.’ Measure equal distances along your center line (e.g., every 4 feet) and mark them lightly with a pencil. -
Tape the Grid:
Apply blue painter’s tape across the width of the porch at your marked intervals to create the horizontal lines. Then, run tape down the length of the porch to create the vertical definition or borders if desired. Press the tape edges down firmly to prevent bleed-under. -
Seal the Tape Edges:
I like to lightly brush a tiny amount of the *base* color over the edges of the blue tape. This seals the tape line so if any paint bleeds, it matches the floor, keeping your future lines crisp.
Level Up: Faux Grout
Before removing the tape, sponge a slightly darker gray paint lightly over the tape lines. When you peel it up, the lines will have dimension, looking like realistic grout rather than just unpainted lines.
Step 3: Stenciling the Medallions
-
Position the Stencil:
Center your large mandala stencil within one of the taped-off squares. Use a measuring tape to ensure it is equidistant from the blue tape lines on all sides. -
Secure the Stencil:
Spray the back of the stencil with a light mist of repositionable stencil adhesive. Let it get tacky for a moment, then press it firmly onto the floor. Add a few pieces of tape on the corners for extra security. -
Load the Foam Roller:
Dip a high-density foam roller into your white paint, then offload almost all of it onto a paper towel. The roller should feel almost dry to the touch—too much paint causes bleeding. -
Roll the Design:
Gently roll over the stencil using light to medium pressure. Make multiple thin passes to build up the white color rather than one thick, goopy coat. -
Check and Repeat:
Carefully lift one corner to check coverage. If it looks good, peel the stencil up slowly. Clean the stencil if paint buildup occurs, then move to the next square section and repeat the process.
Step 4: Finishing Touches
-
Remove the Tape:
Once the stencils are dry to the touch, slowly peel up all the blue painter’s tape at a 45-degree angle to reveal your grid lines. -
Touch Up Details:
Inspect your work for any bleeds or smears. Use a small artist brush and your base color to tidy up any edges around the medallions or grid lines. -
Seal the Surface:
Allow the entire floor to cure for 48-72 hours. Apply two thin coats of clear concrete sealer to protect your artwork from UV rays, rain, and foot traffic.
Now you have a durable, custom runner layout that adds massive curb appeal without the masonry price tag
3D Cube Illusion That Stops People Mid-Step
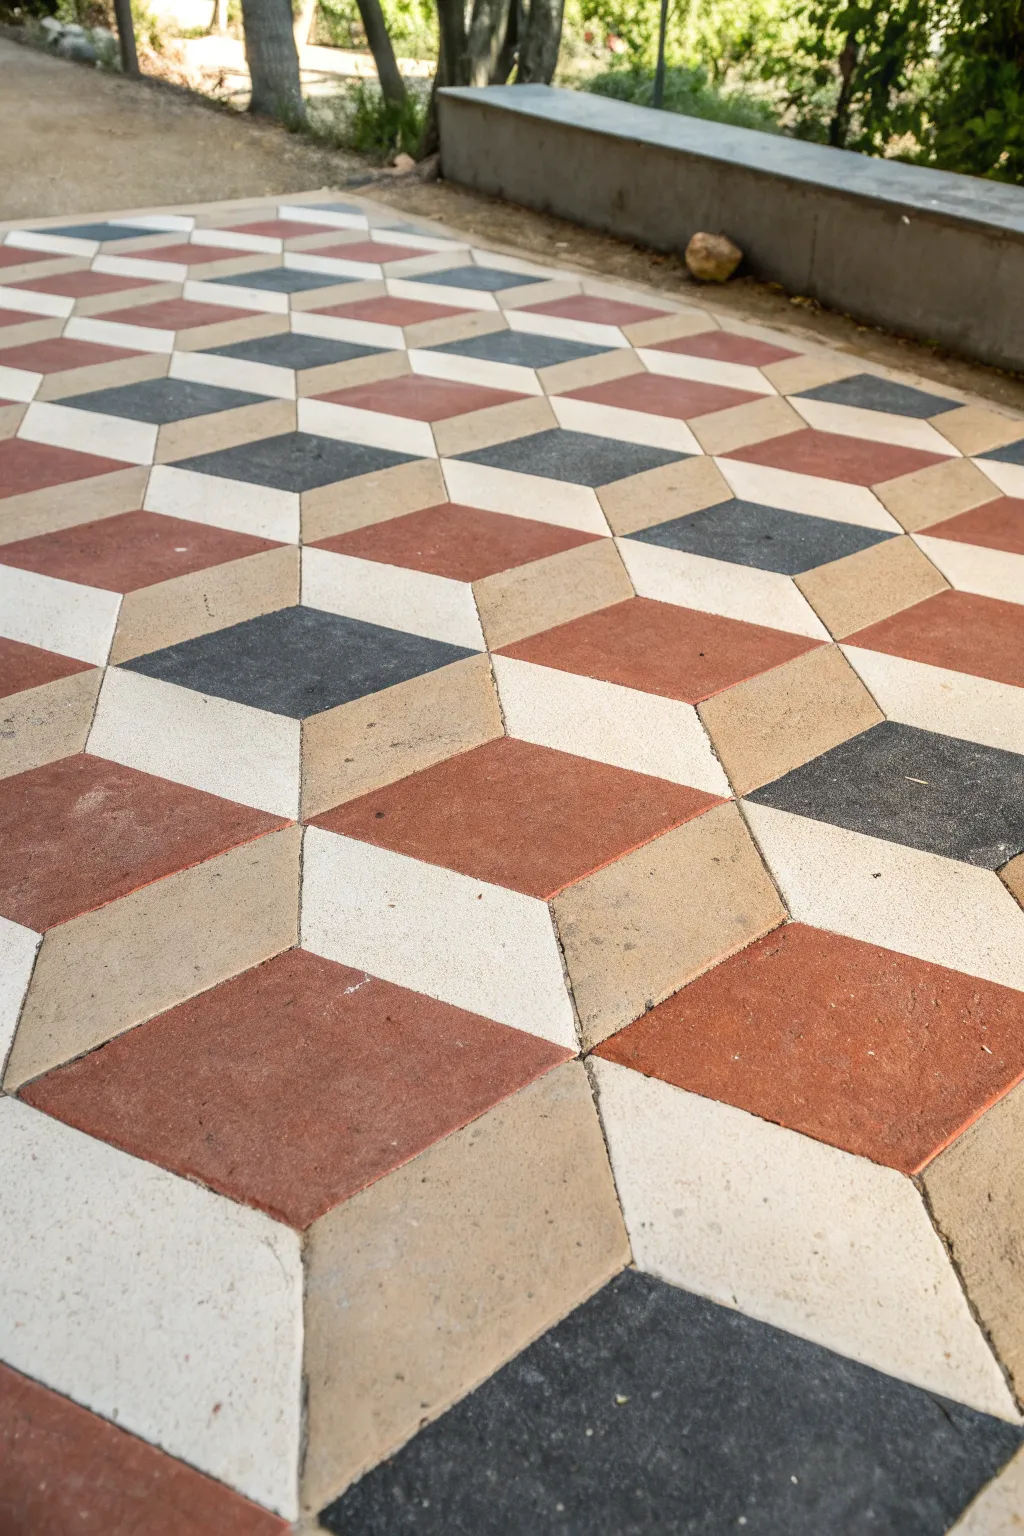
Transform a plain concrete slab into a stunning geometric masterpiece with this trompe-l’œil painting technique. By carefully arranging diamond shapes in three distinct colors, you’ll create a mesmerizing 3D cube effect that adds incredible depth and character to your patio or walkway.
Step-by-Step Guide
Materials
- Concrete porch and floor paint (White, Terracotta Red, Charcoal Grey, Sand/Tan)
- Concrete cleaner/degreaser
- Pressure washer (optional)
- Exterior painter’s tape (multi-surface)
- Chalk line reel (with blue chalk)
- Long straight edge or level
- Cardboard or stiff cardstock (for template)
- Utility knife
- Small foam rollers (4-inch)
- Angled sash brush (2-inch)
- Concrete sealer (matte finish)
- Paint tray and liners
Step 1: Preparation & Planning
-
Clean the Surface:
Begin by thoroughly cleaning the concrete surface using a stiff brush and concrete degreaser. If you have access to a pressure washer, give it a good blast to remove any deeply embedded dirt or moss. -
Let it Dry:
Allow the concrete to dry completely for at least 24 hours. Painting on damp concrete will trap moisture and cause the paint to peel prematurely. -
Prime the Base:
Roll a coat of quality concrete primer or base coat over the entire area. I find painting the whole floor in the lightest color of your design (in this case, white or the light tan) creates the easiest base to work from. -
Create a Diamond Template:
Cut a perfect diamond shape from heavy cardboard or cardstock. The diamond should be a rhombus where all four sides are equal length (e.g., 8 inches), with angles of 60 and 120 degrees. -
Test the Pattern:
Lay your template on a scrap piece of paper and trace it three times, rotating it around a central point to ensure they form a perfect hexagon (which looks like a cube). Adjust your template until the fit is seamless.
Step 2: Drafting the Design
-
Snap Reference Lines:
Using a chalk line, snap parallel lines across the width of your floor. The distance between these lines simulates the height of your cube rows. Make sure these are perfectly straight. -
Mark Intersecting Angles:
Use your diamond template to mark the angled lines. You’ll need diagonal lines running at 60-degree angles in both directions, creating a grid of diamonds across the floor. -
Tape the ‘Tops’:
This pattern works best in stages. Tape off all the diamonds that represent the ‘tops’ of the cubes first. It helps to lightly mark inside the diamonds with ‘T’ (top), ‘L’ (left), and ‘R’ (right) in pencil so you don’t get lost. -
Seal the Tape Edges:
Run a thin layer of your base color over the edges of the painter’s tape. This prevents the darker colors from bleeding underneath and ensures crisp, sharp lines.
Tape Tearing Trick
Pull the painter’s tape off while the paint is still slightly tacky, not fully dry. Pulling at a 45-degree angle prevents the dried paint skin from ripping up.
Step 3: Painting the Cubes
-
Paint the Cube Tops:
Fill in the taped ‘top’ diamonds with your lightest color, which appears to be white or off-white in this design. Use a small foam roller for a smooth, stone-like finish. -
Remove and Re-tape:
Once the white tops are dry to the touch, carefully peel up the tape. Re-tape to expose the right-hand faces of the cubes. -
Apply the Shade Face:
Paint the right-hand faces with your darkest color (Charcoal Grey). This acts as the shadowed side of the cube, which is crucial for the 3D illusion. -
Paint the Mid-Tone Face:
After the grey dries, re-tape for the final section: the left-hand faces. Paint these with the Terracotta Red. I like to do a second coat on these darker colors to ensure solid coverage. -
Fill the Accents:
Notice the occasional variation in the pattern? Randomly substitute a few of the white ‘tops’ with the Sand/Tan color to create visual texture and make the floor look like natural stone motley.
Pattern Drift
If your diamonds start drifting out of alignment across a large floor, stop relying solely on the stencil. Snap new chalk lines every 3-4 feet to realign your grid.
Step 4: Finishing Touches
-
Inspect and Touch Up:
Walk around the floor looking for any bleed-through or uneven edges. Use a small artist’s brush to touch up lines where colors meet. -
Clean Up Chalk:
Use a damp sponge to gently wipe away any visible chalk lines that weren’t covered by paint. -
Apply Sealer:
Once the paint has cured (check your can for cure times, usually 72 hours), apply a clear, matte concrete sealer. This protects your hard work from foot traffic and UV fading. -
Add Anti-Slip (Optional):
If this area gets wet often, mix a non-slip additive into the final coat of sealer to prevent the surface from becoming slippery.
Enjoy the double-takes from visitors as they step onto your intriguing new floor
Topographic Contour Lines for an Artsy Twist
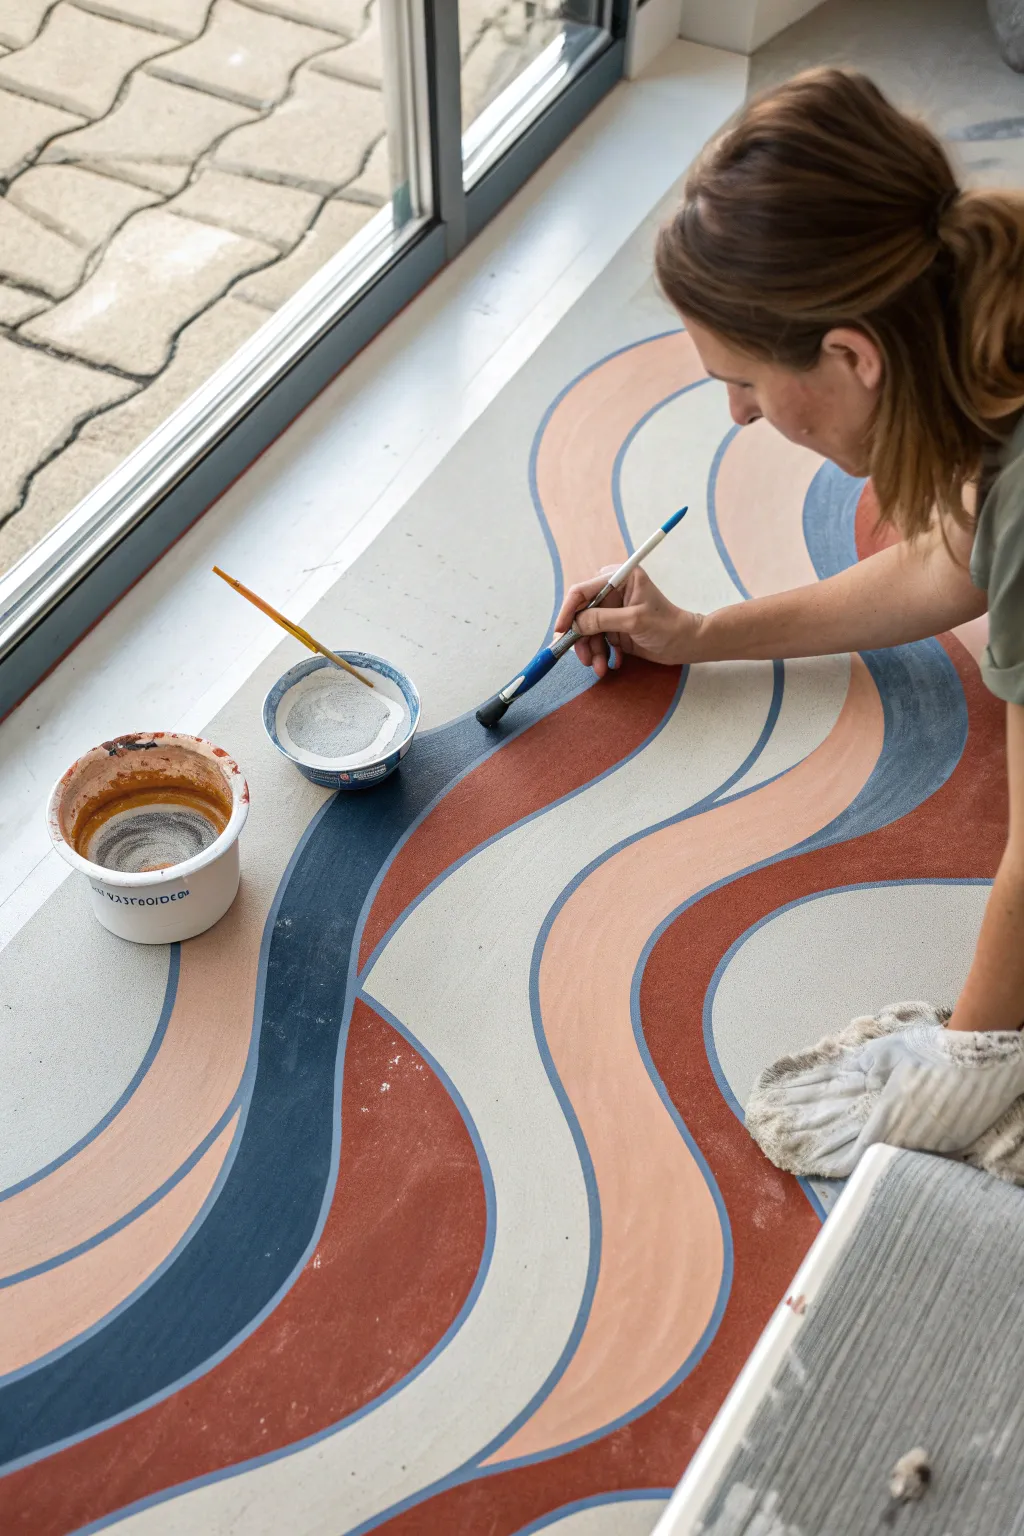
Transform a plain concrete slab into a stunning topographical art piece by painting organic, flowing ribbons of color. This design utilizes a soft, muted palette of rust, peach, and slate blue to create movement that mimics the natural curves of canyon landscapes or riverbeds.
Step-by-Step
Materials
- Concrete floor primer
- Porch and floor paint (rust/terracotta)
- Porch and floor paint (peach/sand)
- Porch and floor paint (slate blue/navy)
- Porch and floor paint (light grey/base color)
- Chalk or pastel pencil (light color)
- Angled sash brush (1.5 to 2 inch)
- Small round detail brush
- Mini foam roller and tray
- Paint cups or small plastic containers
- Protective knee pads or cushion
- Clear concrete sealer (matte or satin finish)
- Painter’s tape (for baseboards)
Step 1: Base Preparation
-
Clean and Prep:
Thoroughly sweep and vacuum the concrete surface to remove all dust and debris. Getting every speck of dirt up now prevents gritty paint later. -
Wash the Floor:
Mop the floor with a mild degreaser or TSP substitute to ensure proper adhesion. Let the concrete dry completely, preferably overnight. -
Prime the Surface:
Apply a high-quality concrete primer using a standard roller handle. This creates a uniform surface and prevents the porous concrete from soaking up too much colored paint. -
Apply Base Color:
Roll on two coats of your light grey base color, allowing adequate drying time between coats as per the can’s instructions. This neutral backdrop will make the colored ribbons pop.
Steady Hand Pro-Tip
Rest your pinky finger on a dry part of the floor as a stabilizer while painting detailed edges. It acts like a kickstand for your hand.
Step 2: Designing the Flow
-
Sketch Layout:
Using a light-colored chalk or pastel pencil, lightly sketch large, wavy ‘S’ curves across the floor. Don’t worry about perfection; organic irregularities make the topographic look more authentic. -
Define Zones:
Draw parallel lines following your initial curves to create ribbons of varying widths. Some sections can be wide and expansive, while others should be narrow to create visual tension. -
Plan Colors:
Mark each section lightly with a letter (R for rust, P for peach, B for blue) to plan your color distribution before you open any paint cans.
Step 3: Painting the Contours
-
Outline First:
Pour a small amount of your first color (let’s start with the rust tone) into a small cup. dipping your round detail brush, carefully paint the edges of your sketched shape to create a crisp boundary. -
Fill the Shape:
Switch to a slightly larger angled brush or a mini foam roller to fill in the center of the shape you just outlined. Maintain a wet edge to avoid streak marks. -
Rotate Colors:
Move on to the slate blue sections next. I find it helpful to work on non-adjacent sections first so wet colors don’t accidentally bleed into each other. -
Apply the Lighter Tones:
Fill in the peach or sand-colored bands last. These lighter tones often require a slightly thicker application or a second coat to achieve full opacity over the concrete. -
Detail Check:
Once the main blocks are filled, go back in with your smallest brush to sharpen up any wobbly lines or fix spots where the paint didn’t fully cover the texture of the concrete. -
Second Coats:
Assess the opacity once the first layer is dry. Apply a second coat to any dark or vibrant colors that look patchy.
Level Up: Texture
Mix a small amount of anti-slip additive into the sealer coat. It adds subtle texture and makes the smooth floor safer to walk on in socks.
Step 4: Protection
-
Cure Time:
Allow the design to cure for at least 24 to 48 hours. Foot traffic too early can scuff the fresh paint. -
Seal the Deal:
Apply a clear concrete sealer over the entire floor using a clean roller. A matte or satin finish usually looks best for this earthen aesthetic and will protect your hard work from scratches.
Step back and enjoy the organic rhythm your new floor brings to the entire room
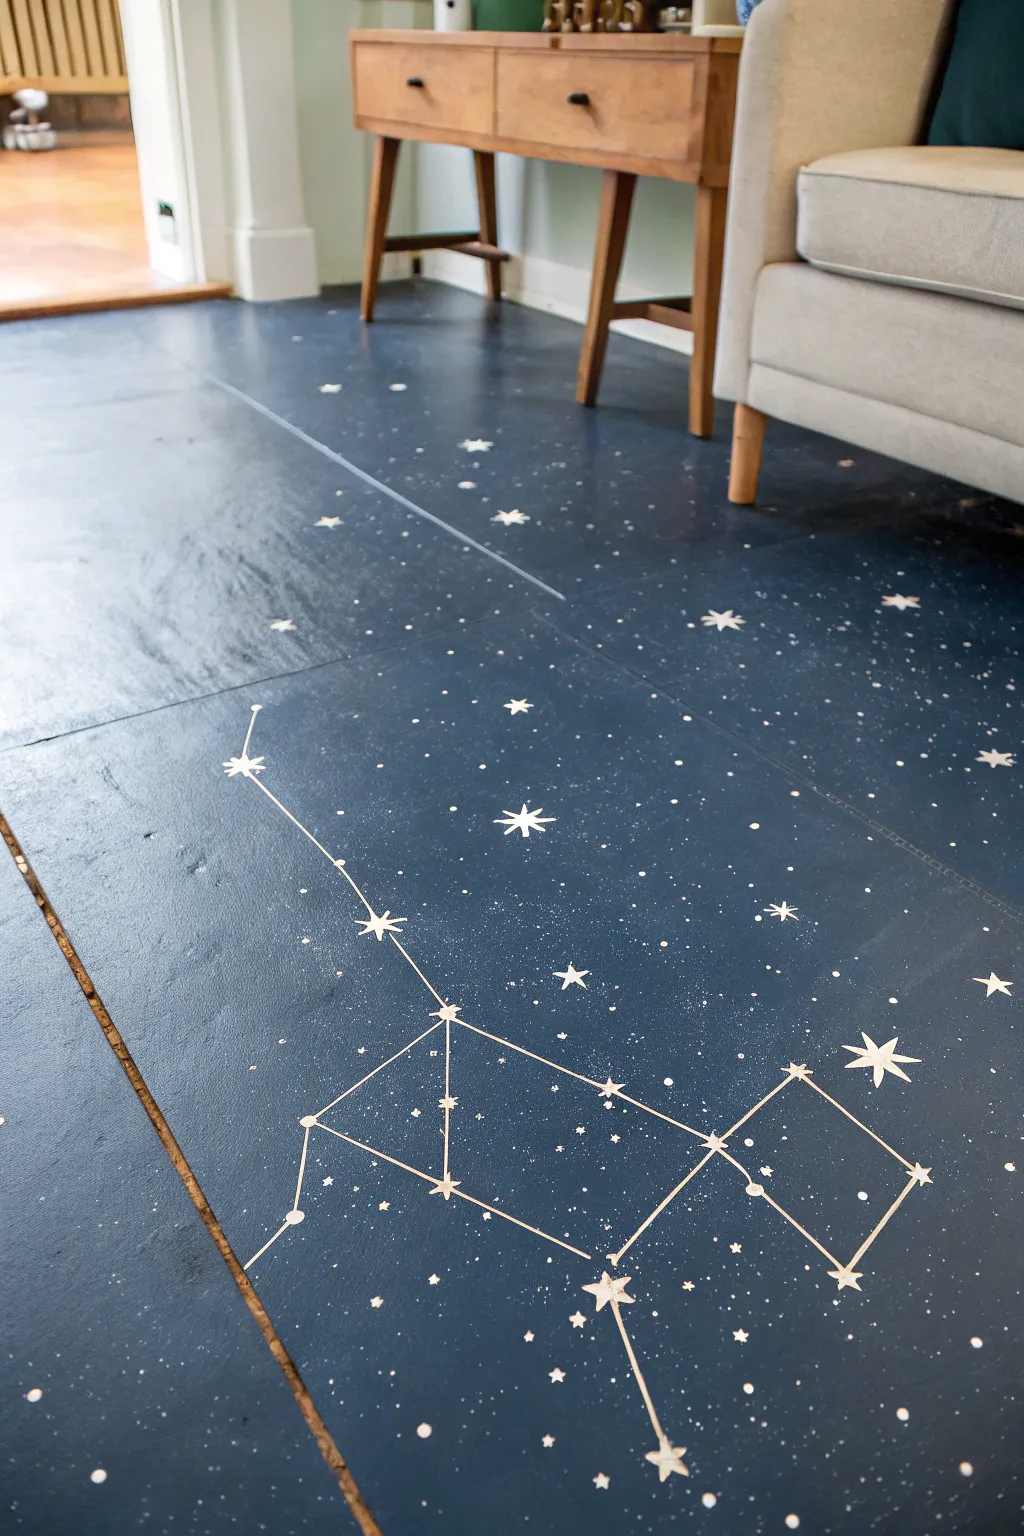
Night-Sky Constellations With Tiny Splatter Stars

Transform a plain concrete floor into a magical nighttime landscape with this stunning celestial design. Using a deep midnight blue base, delicate stenciled constellations, and a playful splatter technique, you can bring the wonder of the cosmos right into your living space.
Step-by-Step Tutorial
Materials
- Concrete floor primer
- Deep navy blue floor paint (latex or acrylic-based)
- White floor paint or high-adhesion craft paint
- Large paint roller and extension pole
- Paint tray and liners
- Stiff stencil brushes (assorted sizes)
- Fine liner brush
- Old toothbrush or stiff bristle brush
- Cardboard or drop cloth
- Ruler or straight edge
- Chalk or watercolor pencil (white)
- Constellation stencils (optional, or make your own)
- Clear polyurethane floor sealer (matte or satin finish)
Step 1: Preparation & Base Coat
-
Clean and Prime:
Begin with a thoroughly clean, dry surface. Vacuum any dust or debris, then apply a high-quality concrete floor primer with a roller to ensure your paint adheres perfectly. Allow this to dry completely according to the manufacturer’s instructions. -
Apply the Midnight Blue:
Pour your deep navy blue paint into a tray. Using a roller, apply the first coat of paint in smooth, even strokes, working from the furthest corner of the room towards the exit. Let this coat dry fully, usually for at least 4-6 hours. -
Second Coat for Depth:
Apply a second coat of navy blue to achieve a rich, opaque finish that mimics the depth of outer space. Ensure full coverage over any grout lines or texture variances in the concrete.
Galaxy Depth Tip
Mix a tiny drop of light grey or silver into your white paint for about 30% of your splatters. The slight color variation creates a realistic 3D depth to the starfield.
Step 2: Creating the Galaxy
-
Practice Your Splatter:
Before hitting the floor, practice your star splatter technique on a piece of cardboard. Dip an old toothbrush or stiff bristle brush into white paint, then run your thumb across the bristles to flick tiny droplets. -
Splatter the Stars:
Work in manageable sections across the floor. Create the background stars by splashing the white paint droplets over the blue base. Vary the density—some areas should have dense ‘Milky Way’ clusters, while others remain sparse. -
Add Distance Variance:
For a sense of depth, try flicking from standing height for tiny specks and closer to the ground for slightly larger, brighter stars. Let the splatter layer dry completely before moving on.
Glow Up
Mix glow-in-the-dark additive powder into your white paint or topcoat for the main constellation stars. The floor will look normal by day but softly illuminate the path at night.
Step 3: Drafting Constellations
-
Plan Your Sky:
Decide on the placement of your major constellations. I like to keep a printout of star charts handy for reference. Use white chalk or a watercolor pencil to lightly mark the positions of the main stars and the connecting lines. -
Mark Major Stars:
At the vertices (points) of your chalk constellations, use a small stencil brush to dab small white circles. These serve as the anchors for your star patterns.
Step 4: Painting the Details
-
Connect the Dots:
Using a fine liner brush and white paint effectively thinned with a tiny drop of water, paint the straight lines connecting your anchor stars. Use a ruler or straight edge to keep lines crisp and geometric. -
Add Starbursts:
Over your anchor dots, hand-paint or stencil larger starburst shapes. Create a simple four-point or eight-point star to make the main constellation stars shine brighter than the background splatter. -
Refine the Edges:
Check your lines for consistent opacity. If the blue shows through too much, carefully retrace the connecting lines with a second pass of white paint for a bold, graphic look. -
Clean Up Markings:
Once the white paint is completely cure-dry (give it plenty of time), gently wipe away any visible chalk guidelines with a damp cloth.
Step 5: Sealing and Protecting
-
Seal the Artwork:
Protect your masterpiece with a clear polyurethane floor sealer. Use a clean roller to apply a thin, even coat over the entire floor. A matte or satin finish usually looks best for a night sky effect as it reduces glare. -
Final Cure:
Apply a second and final coat of sealer for durability, especially in high-traffic areas. Allow the floor to cure fully for at least 24-48 hours before walking on it or moving furniture back in.
Enjoy the serene feeling of walking on starlight every time you enter the room


Have a question or want to share your own experience? I'd love to hear from you in the comments below!