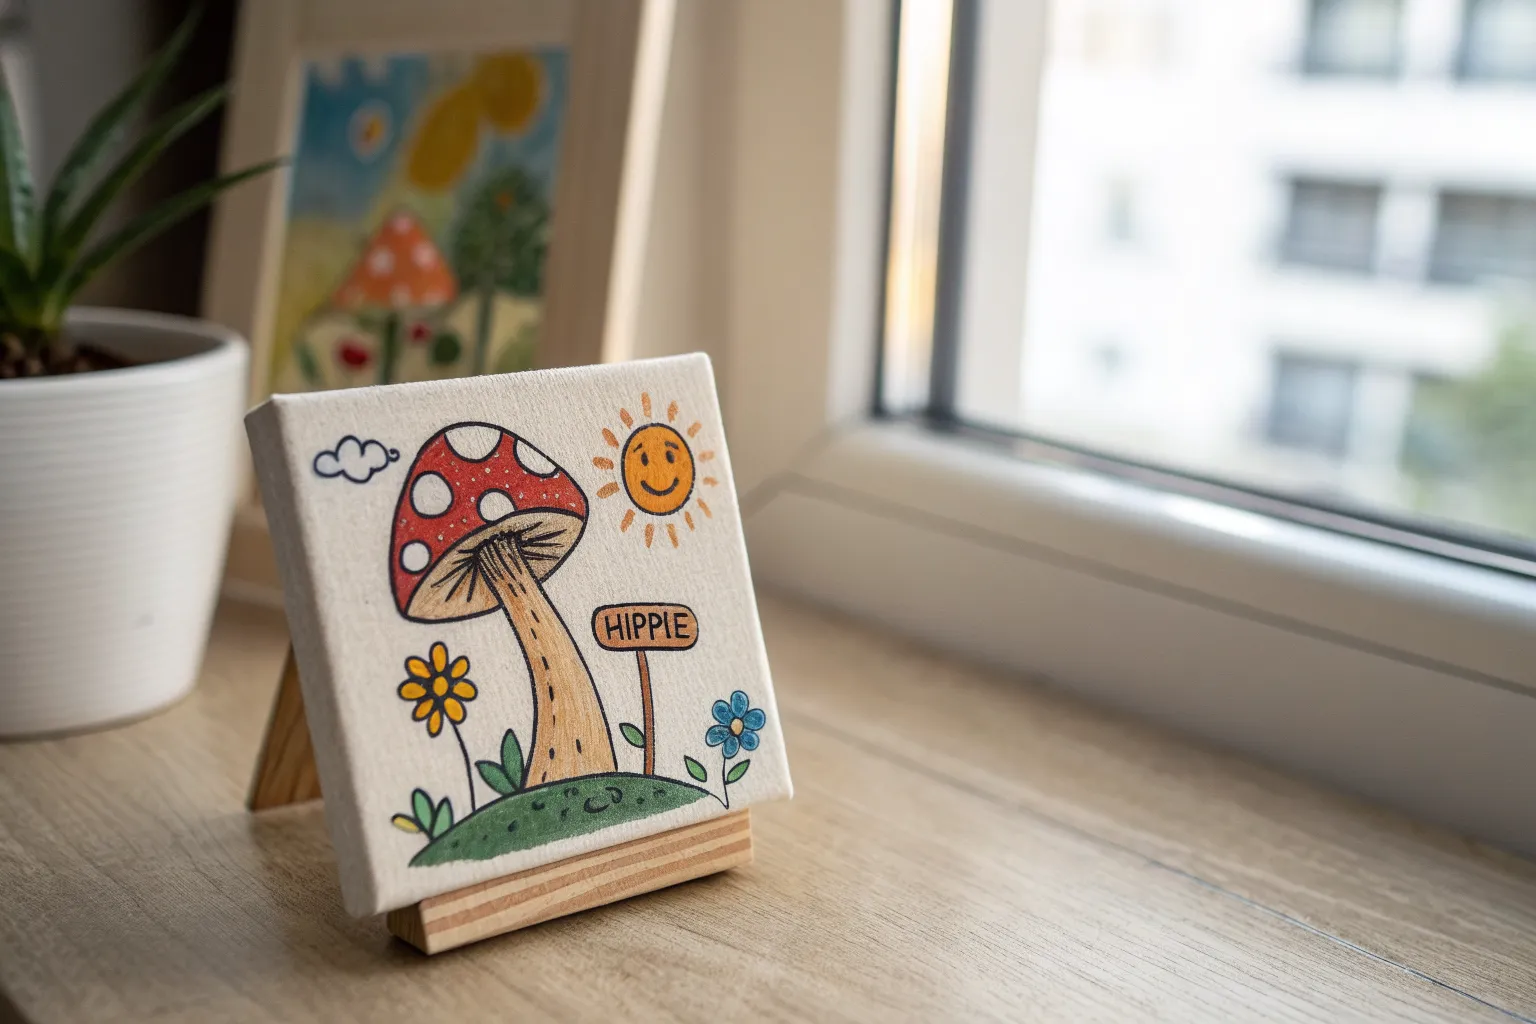
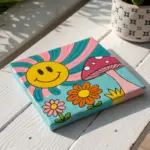
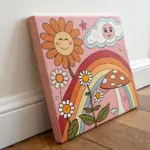
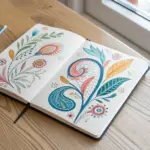
If you’re craving that laid-back hippie vibe on your canvas, you’re in the right headspace—think bold color, simple shapes, and happy imperfections. I’m sharing my favorite easy hippie painting ideas that feel instantly groovy, even if you’re just starting out.
Flower Power Daisies
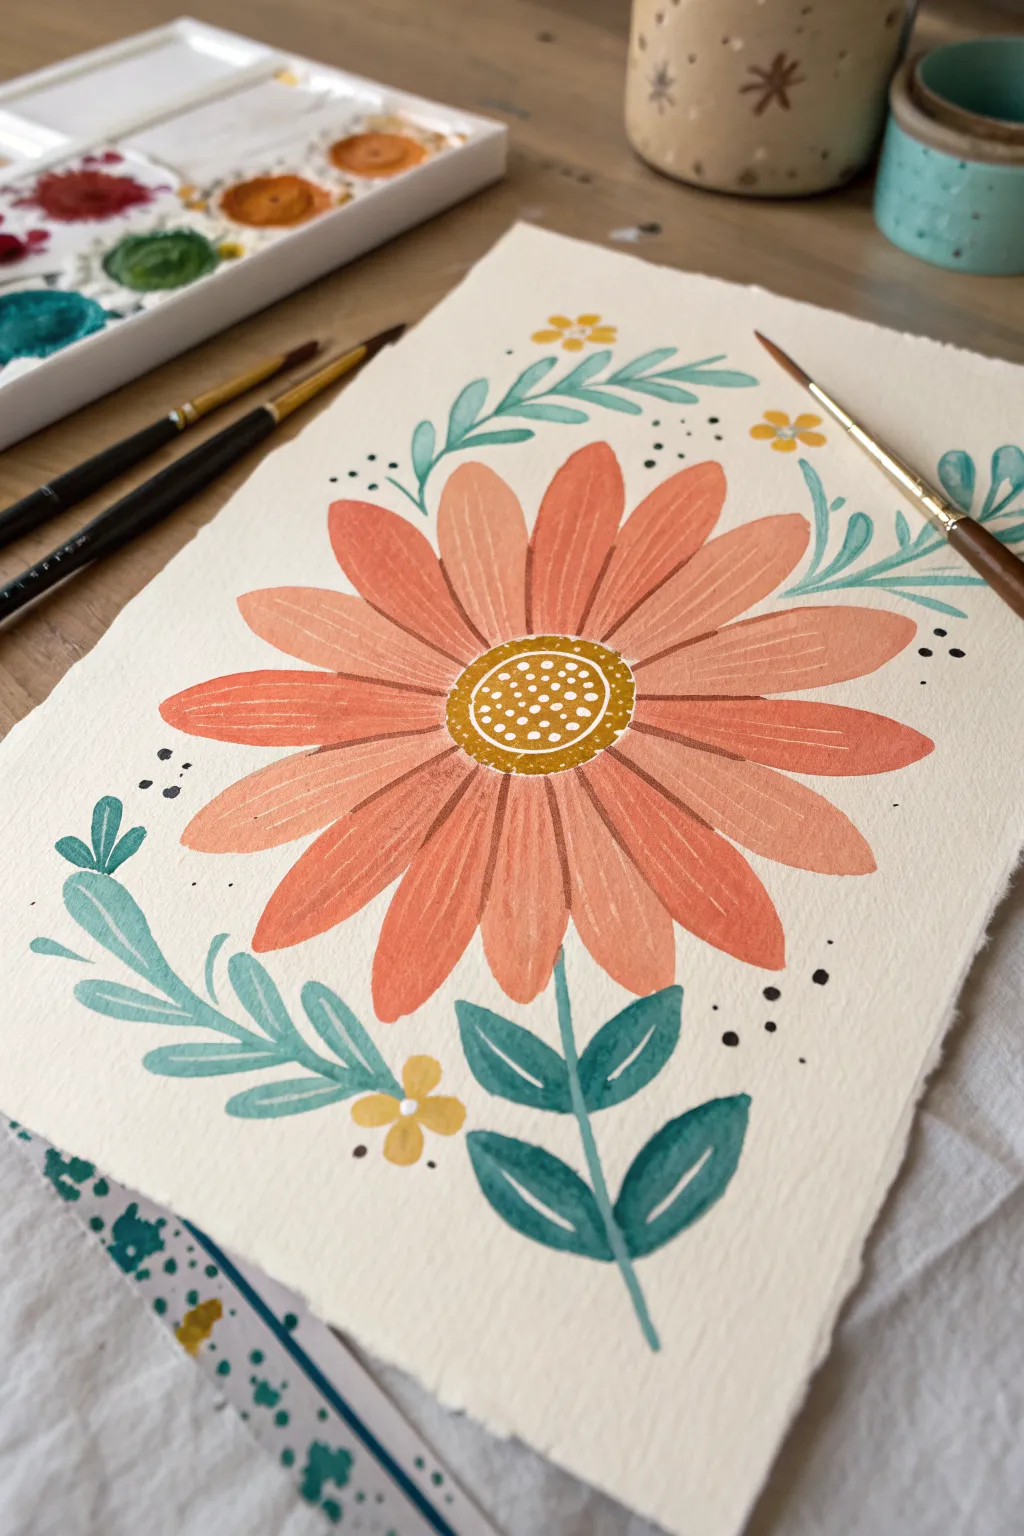
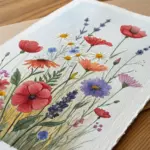
Embrace the vintage flower power aesthetic with this warm-toned floral illustration. Featuring a gently textured paper and a soothing palette of terracotta and sage, this painting captures the perfect balance between retro charm and modern simplicity.
How-To Guide
Materials
- Cold press watercolor paper (deckled edge optional)
- Watercolor paints (terracotta, burnt orange, golden yellow, sage green, teal)
- White gel pen or fine opaque white paint
- Round watercolor brushes (Size 2 and Size 6)
- Pencil and kneaded eraser
- Water cups and paper towels
- Black fine-liner pen (optional for dots)
Step 1: Sketching the Composition
-
Center placement:
Begin by lightly marking the center of your paper. Draw a circle roughly the size of a quarter to serve as the flower’s disk. Keep your pencil pressure extremely light so the graphite doesn’t show through the transparency of the paint later. -
Petal framework:
Sketch the petals radiating outward from the center circle. Aim for about 16-18 long, rounded petals. They don’t need to be perfectly symmetrical; a slight wobbliness adds organic character to the piece. -
Foliage layout:
Draw swooping curves for the stems and leaves. Place a curved vine at the top framing the flower, a leafy sprig on the bottom left, and a main stem with leaves at the bottom center. Add tiny circles for the smaller accent flowers.
Bleeding Petals?
If paints run together, you didn’t let the layers dry enough! Use a hairdryer on a low, cool setting to speed up drying between the petal steps.
Step 2: Painting the Daisy
-
First petal wash:
Mix a watery wash of terracotta or salmon pink. Using your Size 6 brush, fill in every other petal. This skipping technique prevents wet paint from bleeding into adjacent petals and turning into a blob. -
Second petal wash:
Once the first set of petals is completely dry to the touch, fill in the remaining petals with the same terracotta mixture. This creates crisp, defined edges between each petal. -
Adding texture:
While the petals are dry, load your brush with a slightly more saturated mix of the terracotta paint. Paint thin lines down the center of each petal to suggest veins and texture. -
The golden center:
Fill the center circle with a rich golden-yellow ochre paint. Let the color pool slightly for an uneven, textured look, but be careful not to touch the petals if they are still damp. -
Adding definition:
Once the petals are fully dry, use a slightly darker burnt orange to outline the shape of the petals loosely if you want more contrast, or simply deepen the tips.
Step 3: Adding Greenery and Details
-
Sage leaves:
Mix a muted sage green. Paint the bottom-left sprig using a ‘press and lift’ motion: press the belly of the brush down to create the wide part of the leaf, then lift as you pull away to create the tip. -
Teal accents:
For the top vine and the bottom-center leaves, mix a deeper teal or turquoise. Paint these leaves carefully, ensuring the stems connect fluidly. I find rotating the paper helps me get the best angle for these curves. -
Leaf details:
Wait for the green leaves to dry completely. Once dry, use a very fine brush with diluted white gouache or a white gel pen to draw simple center veins on the larger teal leaves. -
Small filler flowers:
Paint the small accent flowers using a bright yellow. Simple five-petal shapes work best here. Scatter a few around the main flower to balance the composition.
Pro Tip: Deckled Edges
To get that torn-paper look, fold your watercolor paper sharply, run a wet brush along the crease, wait a moment, and then gently tear it apart.
Step 4: Final Touches
-
Detailing the disk:
Using your white gel pen or opaque white paint, add a ring of small dots inside the golden center of the daisy. Add a few more random dots within that ring to create the look of seeds. -
Decorative dots:
Dip the very tip of a small brush into black or dark grey paint (or use a fine liner). Add tiny clusters of three dots around the petals and leaves to fill negative space. -
Final assessment:
Step back and look at your composition. If any area looks too empty, add a few more tiny black dots or a small yellow bud. -
Erase guidelines:
Once you are 100% certain the paint is bone dry, gently run your kneaded eraser over the edges to pick up any visible pencil marks.
Frame your new floral masterpiece in a simple wood frame to highlight those warm, earthy tones

Groovy Rainbow Arches
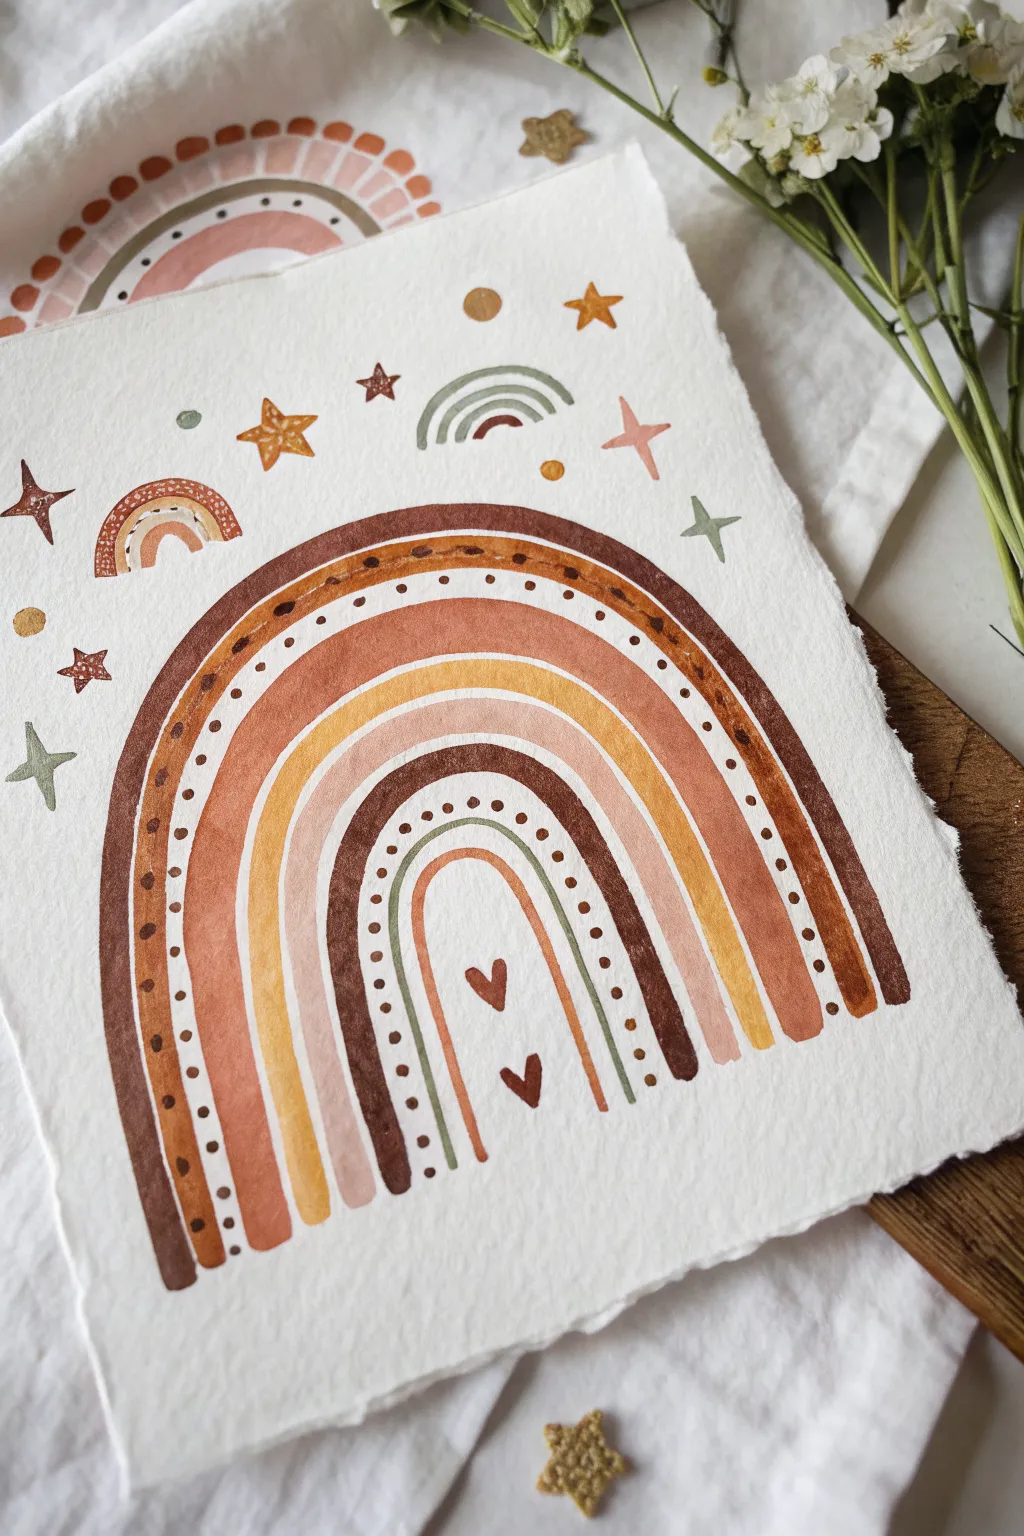
This charming project combines the free-spirited energy of the 70s with a modern, earthy color palette. Using simple watercolor techniques, you’ll create a textured, celestial-themed rainbow perfect for nursery decor or a thoughtful handmade gift.
Step-by-Step Tutorial
Materials
- Cold press watercolor paper (300gsm with deckle edge preferred)
- Watercolor paints (terracotta, ochre yellow, deep brown, sage green, muted pink)
- Round watercolor brushes (size 6 for arches, size 2 for details)
- Pencil and eraser
- Jar of water
- Paper towel
- Compass (optional, for guidelines)
Step 1: Drafting the Arches
-
Prepare your paper:
Start with a high-quality sheet of watercolor paper. If you want that rustic look shown in the photo, gently tear the edges of your paper against a ruler to create a soft, deckled effect. -
Sketch the baseline:
Lightly draw a straight horizontal line near the bottom third of your paper to ensure your rainbow sits flat and doesn’t look like it’s floating unevenly. -
Draw the guidelines:
Using a compass or by tracing round objects, lightly sketch the faint outlines of five concentric arches. Leave varied gaps between some arches, as shown in the inspiration image, to allow for decorative dot work later.
Steady Hand Trick
Rest your pinky finger on a dry part of the paper while painting the curves. This anchors your hand and acts as a pivot point for smoother arches.
Step 2: Painting the Main Layers
-
Paint the outer arch:
Load your size 6 brush with a deep brown watercolor. Paint the largest, outermost arch with a steady hand. The texture of cold press paper will give it that lovely, slightly rough edge. -
Add the terracotta layer:
Skip a small space (about 3-4mm) and paint the next arch inward using a warm terracotta or rust orange shade. Make this band quite thick and solid. -
Apply the ochre band:
Paint the third arch in a mustard or ochre yellow. Try to keep the paint consistency creamy rather than too watery to get solid, opaque coverage. -
Paint a pale pink arch:
For the fourth band, use a very watery, muted pink or beige. This lighter tone adds a nice softness to the earthy palette. -
Create the inner structure:
Paint the innermost structural arch in deep brown again. This frames your center space. Inside this, add two very thin lines: one in sage green and one in terracotta, following the same curve.
Step 3: Adding Details & Motifs
-
Add the dots:
Once your outer brown arch is dry, switch to your size 2 brush. Dip it in the deep brown paint and carefully dot a row of points into the white space between the brown and terracotta arches. -
Detail the inner arch:
Using the same small brush and brown paint, add a similar row of dots inside the white space of the innermost brown arch. -
Insert the center hearts:
In the very center empty space at the bottom of the rainbow, paint two small, floating hearts in the deep brown shade, arranged vertically. -
Paint celestial stars:
Scatter 5-pointed stars around the upper empty space of the paper. Use a mix of your terracotta and ochre paints. Don’t worry about them being perfectly symmetrical; a hand-drawn look fits the theme. -
Add sparkle stars:
Paint a few ‘sparkles’ (four-pointed stars with long vertical and horizontal lines) in sage green and pale pink to fill smaller gaps. -
Include mini rainbows:
Paint two or three miniature versions of your rainbow floating in the sky area. Use just 2-3 colors for these tiny motifs, like terracotta and green. -
Final texture check:
Look closely at the large terracotta arch. If it looks too flat, you can dry-brush a tiny bit of darker brown over it to mimic a subtle texture, though usually the paper grain does the work for you. -
Erase pencil lines:
Ensure the painting is 100% bone dry (touch it with the back of your hand to check temperature). Gently erase any visible pencil guidelines.
Make it Shimmer
Mix a tiny amount of gold gouache or metallic watercolor into your ochre yellow paint for the stars to give the piece a magical, light-catching finish.
Frame your earthy masterpiece in a simple wood frame or hang it using a wooden magnetic poster hanger for an instant style upgrade

Psychedelic Swirl Stripes
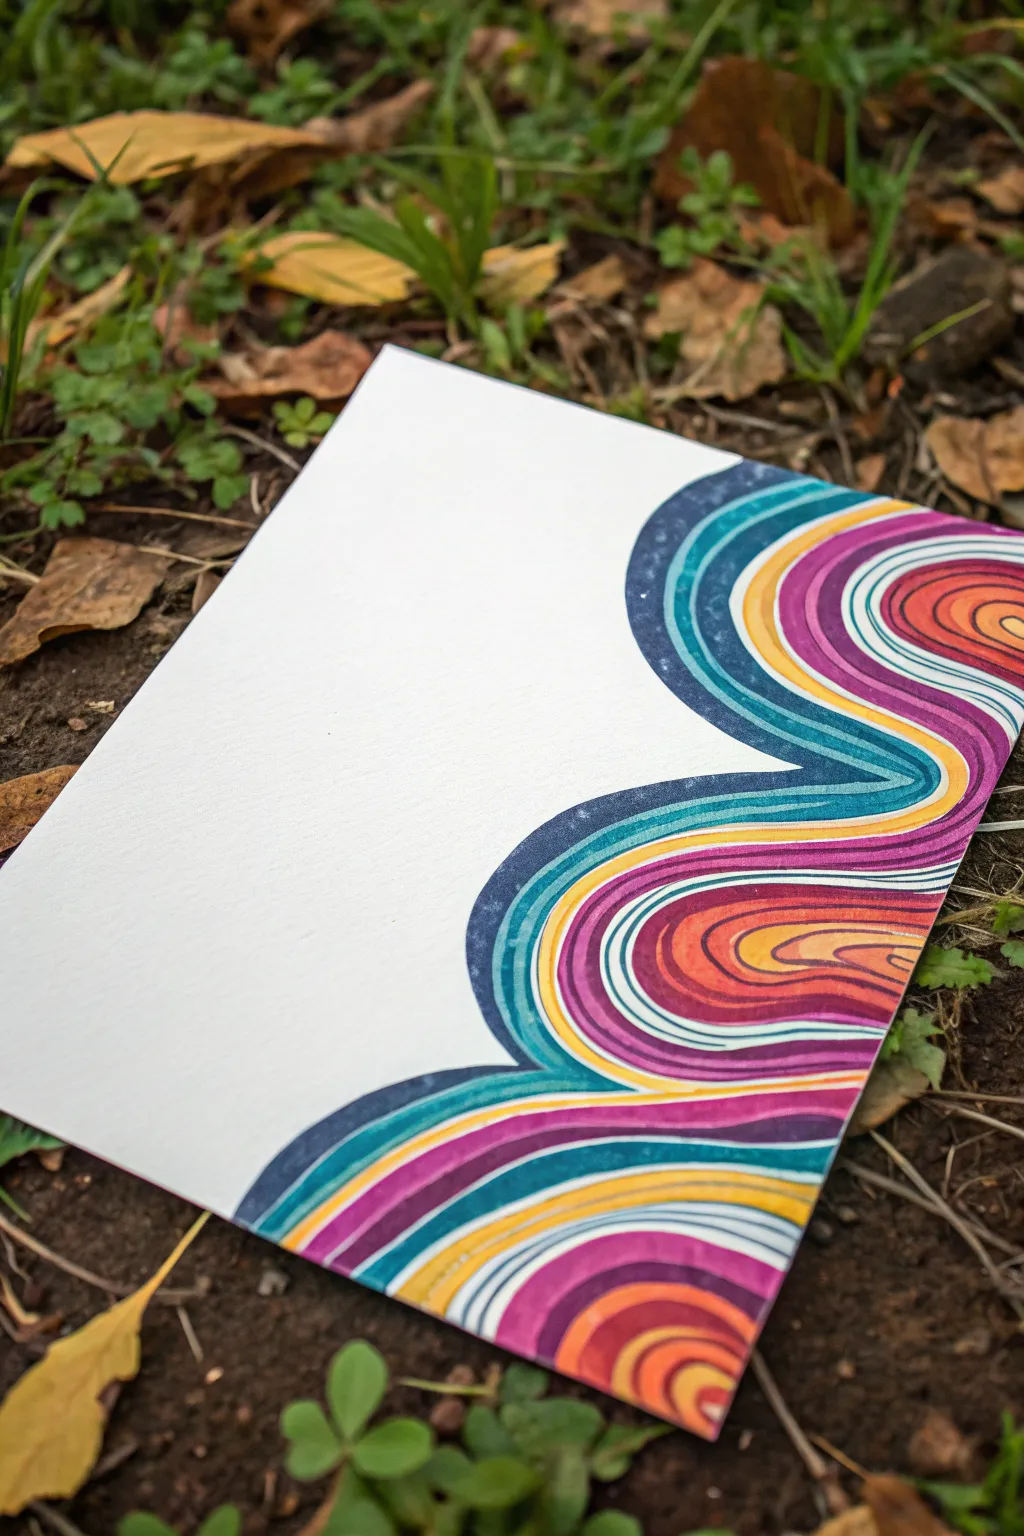
Channel the groovy spirit of the 60s and 70s with this bright psychedelic wave design. By layering concentric curved stripes in vibrant colors, you’ll create a mesmerizing ripple effect that flows across the page.
Step-by-Step Guide
Materials
- Thick white mixed-media or watercolor paper
- Fine-liner pens (black or dark blue)
- Alcohol-based markers or high-quality brush pens (navy, teal, yellow, magenta, orange)
- Pencil
- Eraser
- Ruler (optional, for edges)
Step 1: Drafting the Flow
-
Sketch the primary curve:
Start with a light pencil sketch on the right side of your paper. Draw a large, S-shaped wave that dips in from the edge and bows back out, establishing the main boundary where your color will meet the white space. -
Map the inner ripples:
Lightly sketch parallel lines following that first curve. Space them out slightly differently to create interest—some bands can be thick, others thin. -
Create the focal points:
Identify the ‘peaks’ of your waves—the rounded parts that jut out the furthest. Sketch concentric semi-circles or ovals inside these peaks to make them look like the center of a topographical map. -
Refine the composition:
Check your pencil lines. Ensure the curves flow smoothly into one another without sharp angles. The design should feel fluid, like oil floating on water.
Steady Curves
Draw curves by moving your whole arm from the shoulder, not just your wrist. This prevents shaky, jagged lines.
Step 2: Color Application
-
Start with the darkest tone:
Grab your navy blue marker. Carefully fill in the outermost band of the wave, the one touching the white space. This defines the high-contrast edge of the design immediately. -
Add the cool tones:
Follow the navy strip with a teal or turquoise band. Keep your hand steady and follow the curve slowly to maintain a crisp edge. -
Incorporate warmth:
Switch to a bright yellow marker for the next stripe. I find that placing yellow next to teal makes both colors pop more intensely. -
Layer in the pinks:
Add a stripe of magenta or deep pink next to the yellow. This color transition creates that classic sunset psychedelic palette. -
Fill the centers:
For the tightest curves inside the wave peaks, use orange and red tones to create a hot, glowing core effect. -
Repeat the pattern:
Continue filling in the remaining sketched bands, repeating your color order (Blue -> Teal -> Yellow -> Pink -> Orange) to maintain visual rhythm. -
Check for gaps:
Go back over any areas where the marker coverage looks streaky or uneven. You want solid, flat blocks of color.
Step 3: Defining Details
-
Outline the bands:
This step is crucial for the illustrative look. Take a very fine black or dark blue pen and trace the boundary lines between every single color stripe. -
Add spacing lines:
If you want extra definition, you can leave a tiny hairline of white paper between color bands, or draw double lines with your fine-liner to separate the colors distinctly. -
Clean up the edges:
Use your eraser to remove any visible pencil marks that weren’t covered by the ink or marker. -
Smooth the outer border:
Go over the very first curve (the border between the design and the blank paper) one last time with your fine-liner to make it bold and intentional.
Bleeding Colors?
If markers bleed into each other, wait for one color to dry completely before applying the neighbor color.
Step back and admire the fluid motion captured in your vibrant wave design


Radiating Sun With Bold Rays
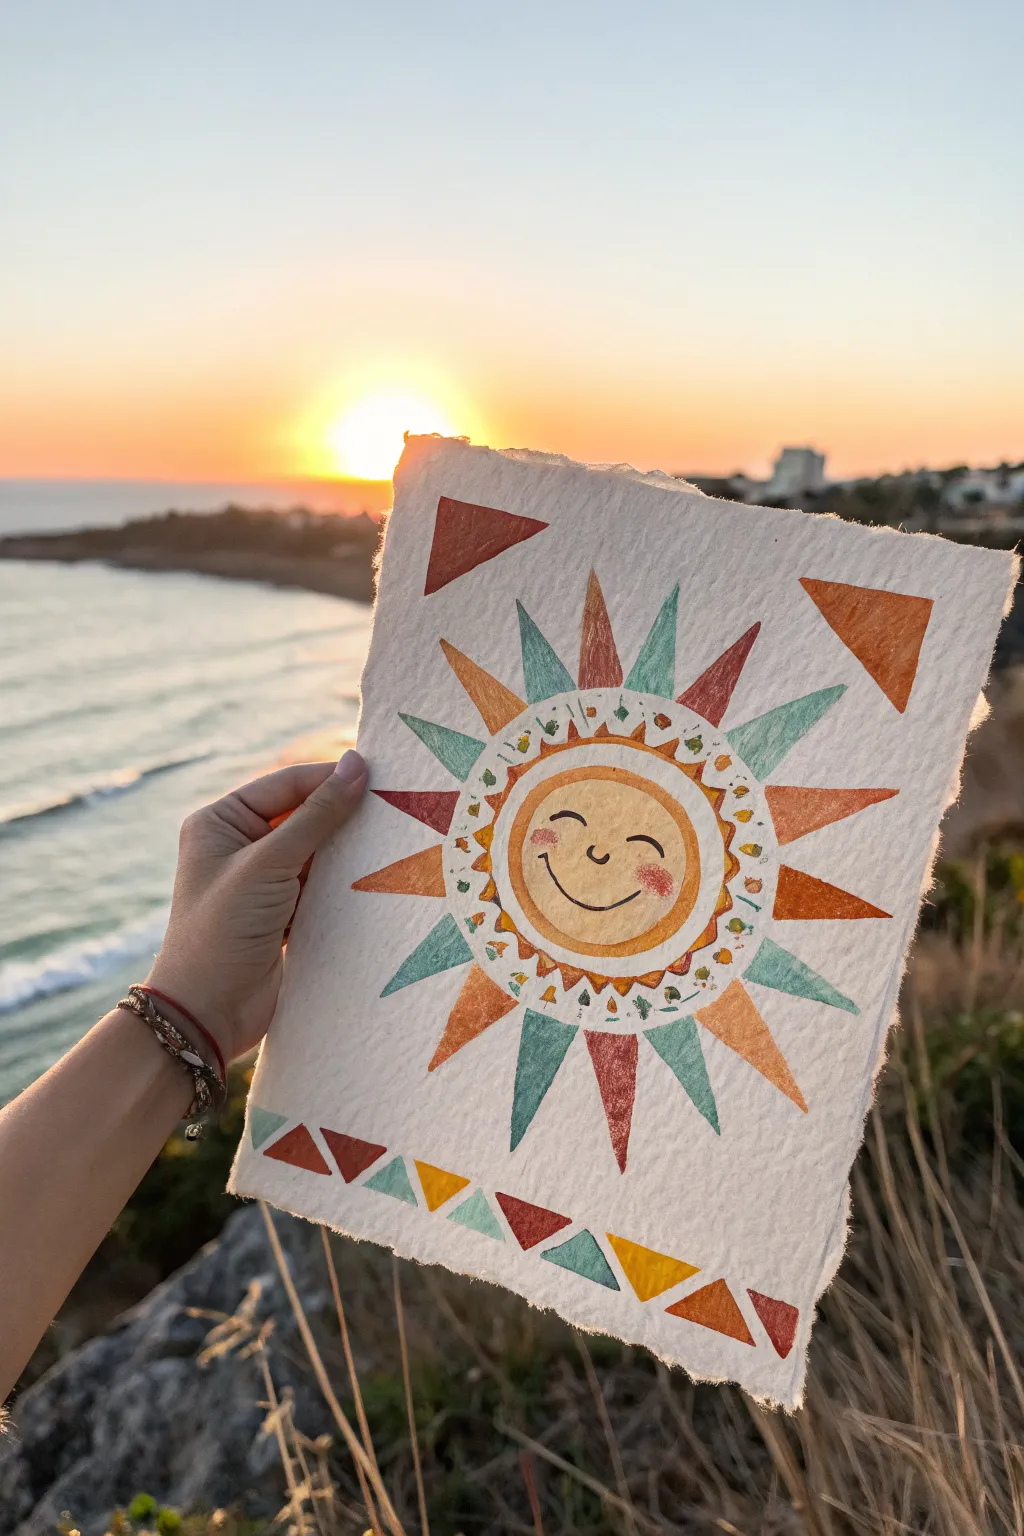
Capture the warmth of a setting sun with this charming, folk-art inspired painting on handmade paper. Using a muted, earthy palette and bold geometric shapes, you’ll create a cheerful sun face that radiates positive vibes.
Step-by-Step
Materials
- Thick handmade cotton rag paper (deckle edge, roughly A5 size)
- Watercolor or gouache paints (Teal, Burnt Orange, Rust Red, Yellow Ochre, Dark Brown)
- pencil
- Compass or circular objects for tracing
- Fine round paintbrush (size 2 or 4)
- Very fine detail brush (size 0 or 00)
- Ruler
- Palette for mixing
- Water cup and paper towels
Step 1: Drafting the Design
-
Find the center:
Begin by lightly marking the center of your handmade paper. Since the edges are irregular, trust your eye more than a ruler here. -
Draw the main circle:
Use a compass or trace a small bowl to draw the central circle for the sun’s face. Keep your pencil pressure very light so graphite doesn’t smudge into the porous paper. -
Sketch the inner ring:
Draw a slightly larger circle around the first one, leaving about a half-inch gap. This band will hold the decorative leaf details later. -
Plot the rays:
Using a ruler, lightly sketch a series of triangles radiating outward from the second circle. Aim for about 12-14 rays, keeping them roughly equal in size but embracing the slight imperfections of hand-drawing. -
Add corner details:
Sketch a single, large triangle floating in the top left and top right corners, pointing inward toward the sun. -
Draft the bottom border:
Along the bottom edge, draw a row of small, alternating triangles to create a geometric border pattern.
Bleeding Lines?
Handmade paper is very thirsty. If paint bleeds, blot instantly with a dry tissue. Use less water on your brush and thicker paint usage for finer lines.
Step 2: Painting the Sun
-
Base coat the face:
Mix a watery wash of Yellow Ochre and paint the central face circle. I find that keeping this layer translucent allows the beautiful paper texture to show through. -
Add blushing cheeks:
While the yellow base is still slightly damp, dab a small amount of watered-down Rust Red onto the cheek areas to create a soft, rosy bloom. -
Paint the decorative band:
Fill the ring surrounding the face with a very pale, watered-down wash of the Yellow Ochre or simply leave it the color of the paper if your paper is warm-toned. -
Outline the rings:
Using a mix of Burnt Orange and Rust Red, carefully paint a thin outline around the face and the outer edge of the decorative band. -
Paint the leaves:
Inside the decorative band, use your fine brush to paint tiny, alternating leaf shapes. Use Teal for some and Burnt Orange for others to create a rhythmic pattern. -
Define the face features:
With your smallest detail brush and Dark Brown paint, add the curved eyes, eyebrows, and a wide, friendly smile. Make the lines smooth and confident.
Pro Tip: Texture
Don’t fight the paper’s roughness. Let the brush ‘skip’ slightly over the deepest crevices for a vintage, weathered look suitable for this style.
Step 3: Filling the Rays & Borders
-
Color the rays:
Paint the triangular rays, alternating your colors. Use Teal, Rust Red, and Burnt Orange in a repeating sequence. Leave a tiny sliver of negative space between the ray base and the sun’s orange outline. -
Fill the corner triangles:
Paint the large corner triangles. Use Rust Red for the left one and Burnt Orange for the right one to balance the warmth. -
Complete the bottom border:
Fill in the row of triangles at the bottom, alternating between Teal, Yellow Ochre, and Rust Red to anchor the composition. -
Erase guidelines:
Once the paint is completely bone-dry, gently erase any visible pencil marks. Be careful not to scrub the textured paper surface too hard.
Display your cheerful sun on a small wooden stand or frame it without glass to appreciate the tactile quality of the paper
BRUSH GUIDE
The Right Brush for Every Stroke
From clean lines to bold texture — master brush choice, stroke control, and essential techniques.
Explore the Full Guide
Easy Tie-Dye Circles
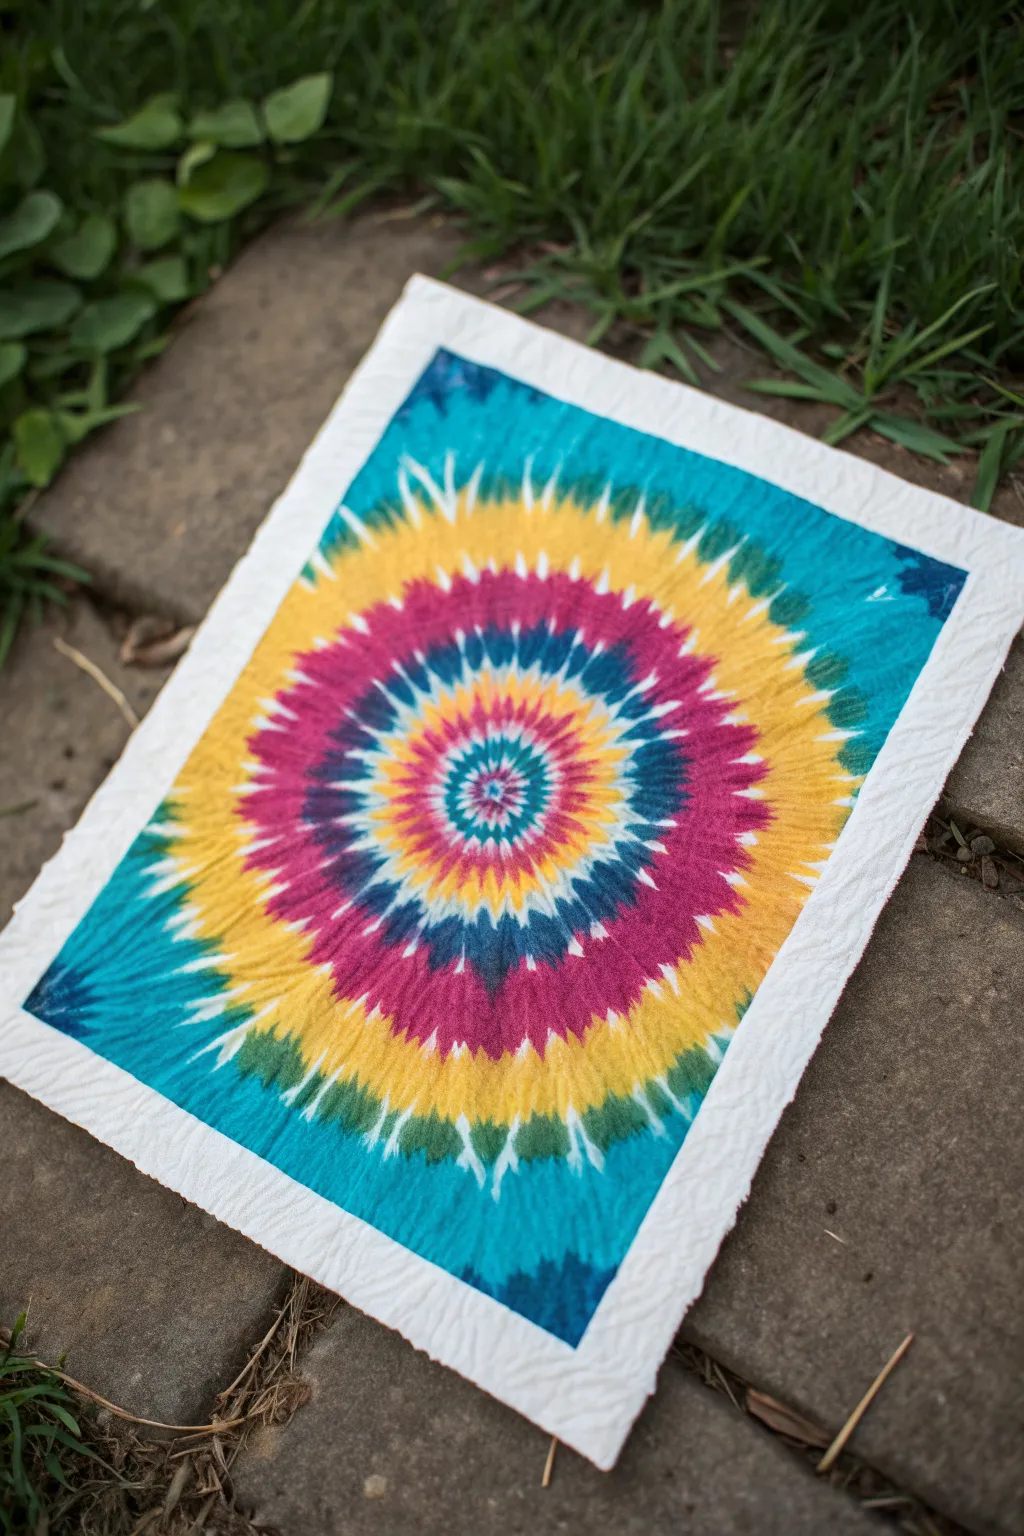
Create a stunning hippie-inspired sunburst without the mess of fabric dyes by using simple markers and absorbent paper. This project results in a vibrant, bleeding ink mandala that looks just like traditional tie-dye but is framed beautifully by crisp white edges.
Detailed Instructions
Materials
- High-quality, heavy-duty paper towel or watercolor paper (rectangular sheet)
- Washable markers (teal, yellow, magenta, dark blue/purple)
- Small spray bottle filled with water
- Plastic sheet or tray (to protect your surface)
- Masking tape or painter’s tape
- Paper towels (for blotting if needed)
Step 1: Preparation
-
Prepare your workspace:
Lay down a plastic sheet or tray on a flat surface. This project involves water, so protecting your table is essential. -
Secure the base:
Take your rectangular sheet of heavy-duty paper towel or watercolor paper. Place it flat on your protected surface. -
Create the border:
Use painter’s tape to tape down all four edges of the paper. This creates the crisp white frame you see in the final image and holds the paper taut while wet.
Step 2: Drawing the Pattern
-
Start the center:
Locate the exact center of your paper. Using your dark blue or purple marker, draw a small, dense circle or starburst shape right in the middle. -
Add the first ring:
Switch to your magenta marker. Draw a thick ring around the central blue dot. Instead of a solid line, try using short, outward dashed strokes to encourage a ‘burst’ effect later. -
Layer the yellow:
With the yellow marker, create a wide band surrounding the magenta ring. Make this band quite thick, as yellow often gets overpowered by darker colors. -
Create the outer teal field:
Fill the rest of the visible rectangle (up to the tape) with the teal/turquoise marker. Ensure you color heavily to deposit plenty of ink. -
Add radial details:
Go back over your rings and add thin, radiating lines of darker ink outward from the center into the yellow and teal sections. This mimics the folds of real fabric tie-dye.
Use Permanent Marker
For sharper details that don’t bleed, draw skinny lines with a permanent black marker over the washable marker design before spraying.
Step 3: Diffusion and Drying
-
Prepare to wet:
Set your spray bottle to a fine mist setting. You don’t want a heavy stream that will push the ink aggressively. -
Mist the center:
Gently spray the very center of the design once. Watch how the ink begins to bleed. -
Mist the rest:
Ideally, spray the rest of the paper until it is damp but not soaking wet. Aim for an even saturation so the colors bleed into each other softy. -
Create texture:
While the paper is wet, carefully pinch or slightly crinkle the center to create physical ridges, similar to the folds in the example image. I find this gives it that authentic 3D textile look. -
Let it spread:
Allow the project to sit undisturbed for about 5-10 minutes. The colors will continue to migrate and blend on their own. -
Drying process:
Let the paper air dry completely. This can take a few hours depending on humidity. Don’t use a hair dryer too close, or you might blow the ink around.
Salt Texture Hack
While the paper is still wet, sprinkle coarser kosher salt over the ink. As it dries, the salt absorbs pigment, creating unique starburst speckles.
Step 4: Finishing Up
-
Check for dryness:
Touch the center and edges gently to ensure there is no dampness remaining. -
Remove tape:
Very slowly peel back the painter’s tape at a sharp angle away from the art. This reveals the clean white border. -
Flatten if necessary:
If the paper has curled excessively, place it under a heavy book overnight once it is 100% dry.
Display your finished faux tie-dye masterpiece in a frame or mount it on a card for a groovy handmade gift
Retro Van Road Trip Scene
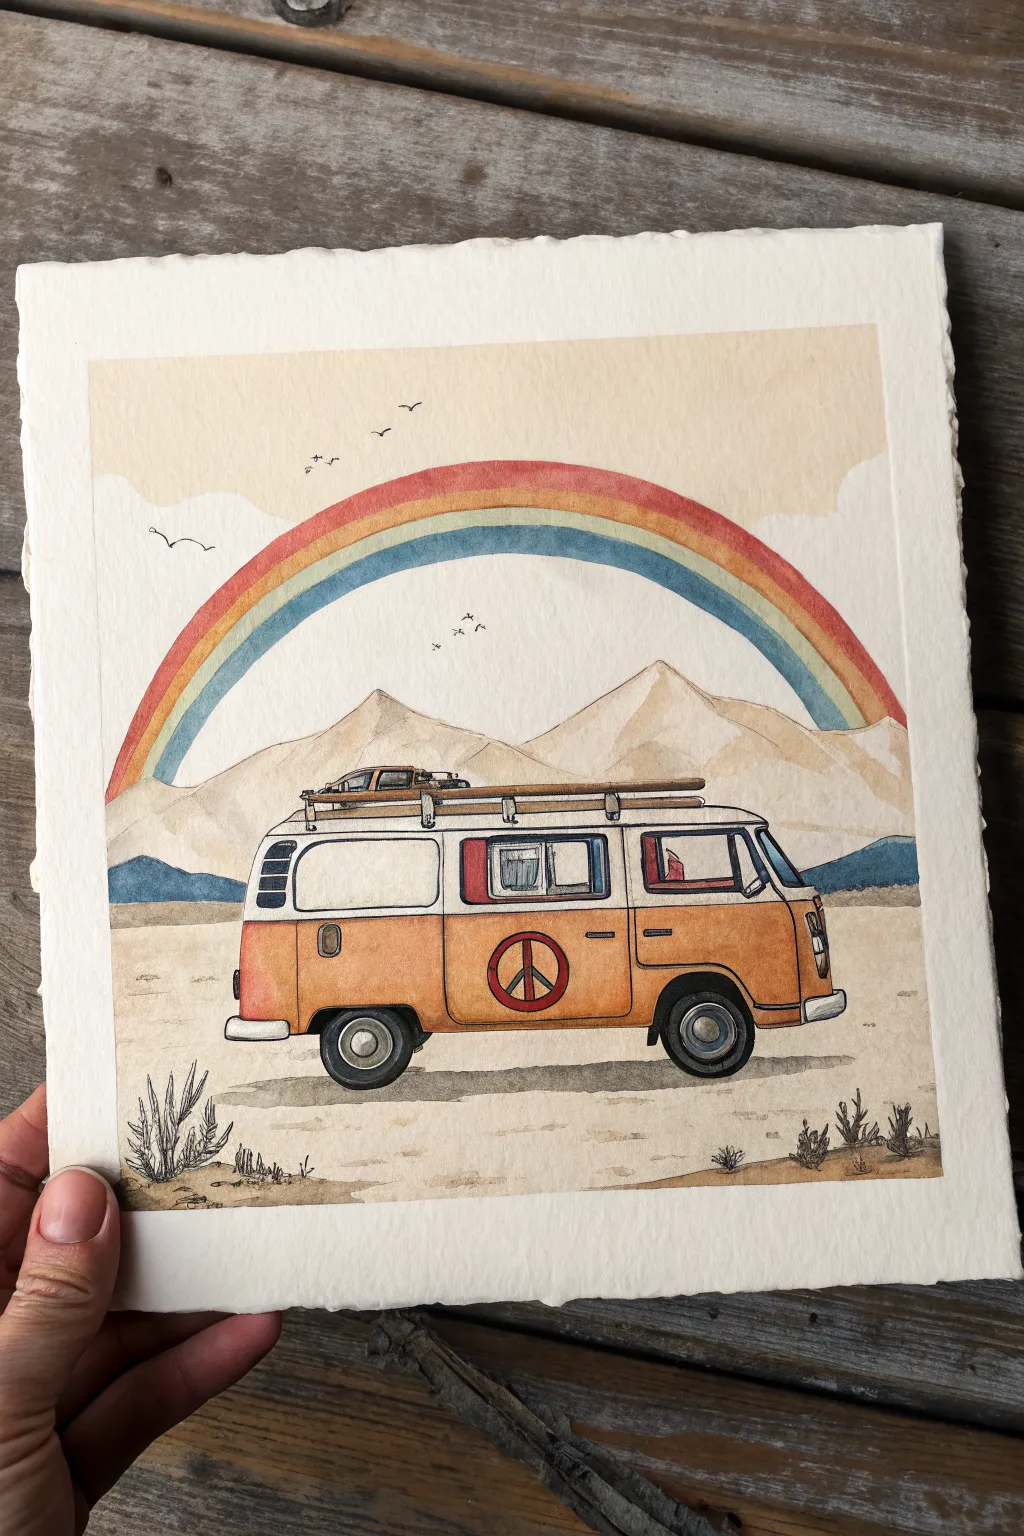
Capture the free-spirited energy of the 70s with this charming watercolor illustration features a classic orange bus cruising through a pastel desert landscape beneath a vibrant rainbow. The soft washes and delicate ink lines create a nostalgic, storybook feel perfect for any wall.
How-To Guide
Materials
- Cold-press watercolor paper (300 gsm)
- Watercolor paint set (pans or tubes)
- Micron pens (sized 01, 03, and 05) or waterproof fineliners
- Pencil (HB or H) and kneaded eraser
- Round brushes (sizes 2, 6, and 8)
- Ruler
- Jar of water and paper towels
- Masking tape (optional for edges)
Step 1: Sketching the Composition
-
Establish the horizon:
Begin by lightly drawing a horizon line across the lower third of your paper using a ruler. This will anchor your bus and the mountains. -
Outline the bus body:
Sketch the main boxy shape of the van in the center foreground. Focus on getting the proportions right—the long rectangular body, the rounded front nose, and the wheel wells cut into the bottom. -
Add bus details:
Draw in the windows, the bumpers, the circular headlights, and the spare tire on the front. Don’t forget the signature peace sign on the side door and the roof rack on top. -
Draw the landscape:
Sketch rolling mountains in the background behind the bus. They should be jagged but soft. Then, use a compass or a large round object to lightly trace the arch of the rainbow spanning over the entire scene. -
Map out foreground elements:
Lightly pencil in tufts of desert grass and small rocks in the immediate foreground to give the scene depth.
Bleeding Colors?
If your rainbow stripes are merging into a muddy mess, your paper is too wet. Wait for each stripe to be bone-dry before painting the next color right beside it.
Step 2: Applying the Ink
-
Inking the main lines:
Using a 03 waterproof fineliner, go over your pencil lines for the van and the mountains. Keep your hand relatively loose; a slightly wavering line adds to the vintage charm. -
Refining details:
Switch to a finer 01 pen for smaller details like the roof rack slats, the peace sign, and the birds flying in the distance. -
Erasing pencil marks:
Once the ink is completely dry—wait at least 15 minutes to be safe—gently erase all the visible pencil guidelines with your kneaded eraser.
Step 3: Watercolor Washes
-
Painting the sky:
Prepare a very watery, pale ochre or cream wash. Using your largest brush, paint the sky area, carefully painting around the rainbow arch and the mountains. Let this dry completely. -
Painting the rainbow:
Paint the rainbow stripes one by one. Start with a muted red, then orange, yellow, green, and blue. I find it helpful to let each stripe dry slightly before painting the neighbor to prevent bleeding. -
Mountain layers:
Mix a diluted brown for the mountains. Apply the wash, keeping the tops of the peaks lighter (almost the paper color) to suggest snow or light hitting them, and darken the wash as you move down towards the horizon. -
Painting the bus:
Use a vibrant orange paint for the lower half of the van. Carefully fill in the area around the peace sign and windows. Leave the top half of the van unpainted (the white of the paper). -
Adding darks and details:
Paint the tires with a dark grey or black, leaving the hubcaps white. Use a blue-grey for the bumpers and the side windows to suggest glass reflection. Add red details to the interior curtains if visible. -
Ground and shadows:
Paint the sandy ground with a light beige wash. While still damp, drop in slightly darker brown spots to create texture for sand and pebbles. -
Final shading:
Once everything is dry, mix a translucent grey-purple. Paint a cast shadow directly underneath the van to ground it. -
Foreground pop:
Use a size 2 brush and dark olive green to paint the small tufts of grass and shrubs in the foreground corners. This frames the composition nicely.
Vintage Vibe
To get that aged, retro look, mix a tiny bit of brown or ochre into all your colors—even the blue sky. It desaturates the brightness for an old-photo feel.
Now you have a peaceful travel scene that captures the wanderlust of the open road

PENCIL GUIDE
Understanding Pencil Grades from H to B
From first sketch to finished drawing — learn pencil grades, line control, and shading techniques.
Explore the Full Guide
Simple Yin-Yang With Waves
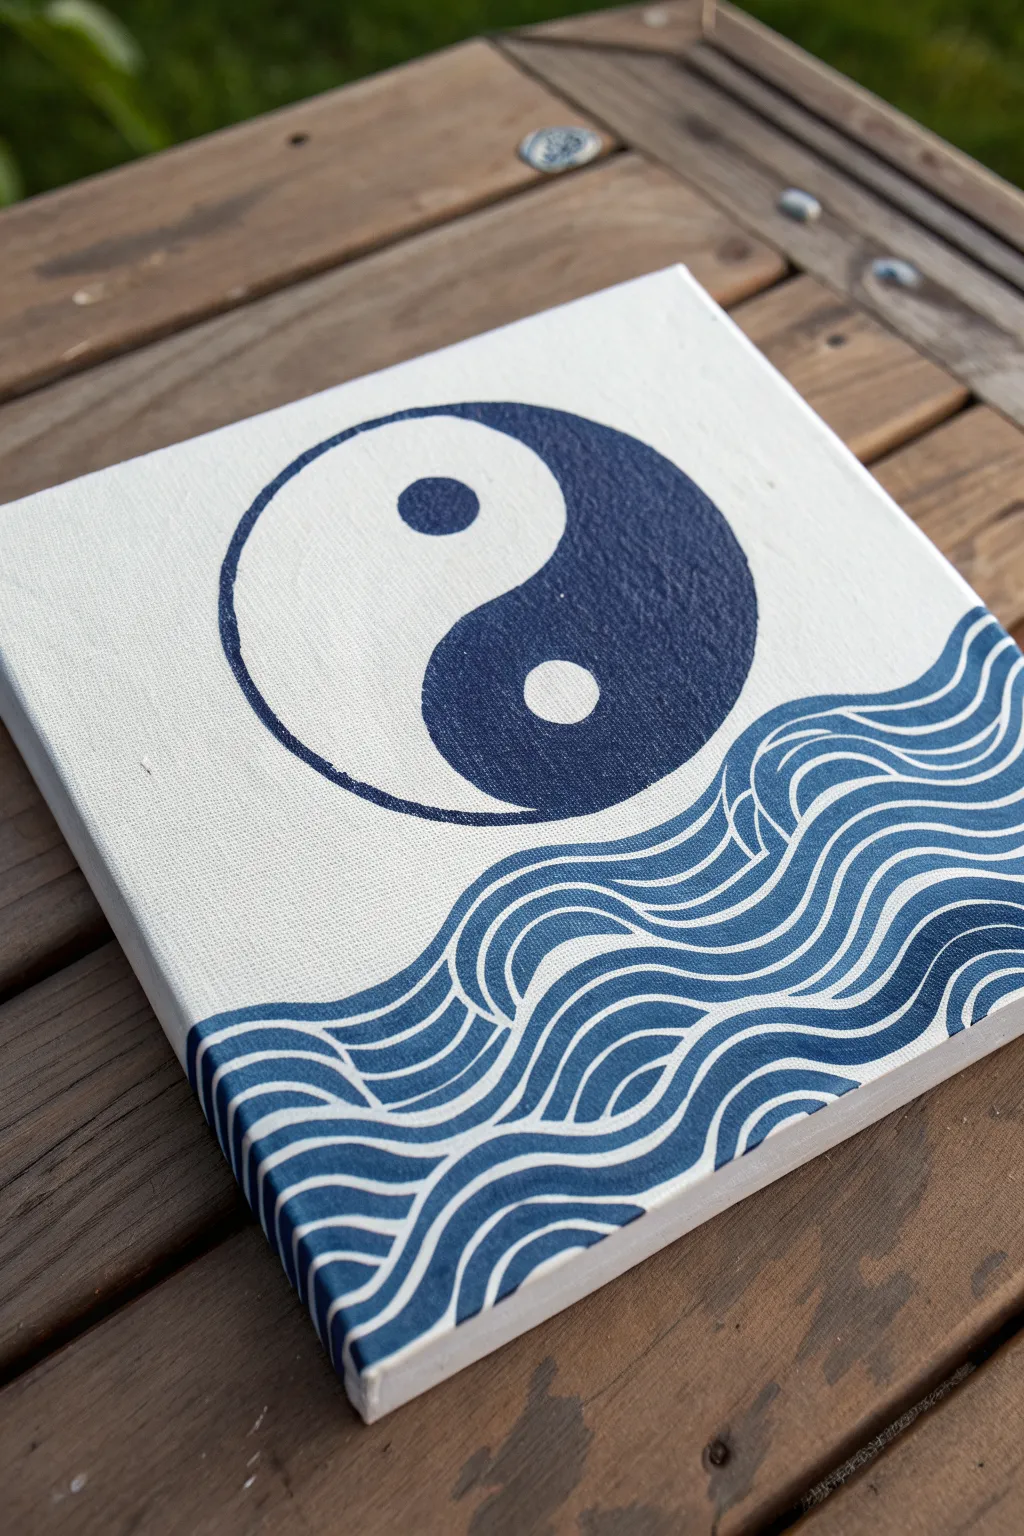
This peaceful project combines the spiritual balance of a yin-yang symbol with the rhythmic flow of ocean energy. Using just a single shade of deep blue against a crisp white background, it’s a perfect beginner-friendly study in precision and linework.
Step-by-Step Guide
Materials
- Square stretched canvas (e.g., 8×8 or 10×10 inches)
- White acrylic paint (or gesso for priming)
- Deep navy blue acrylic paint
- Paint pens (optional, for crisp outlines)
- Large compass or two round objects of different sizes
- Pencil and eraser
- Ruler
- Flat shader brush (medium)
- Fine liner brush (size 0 or 1)
- Palette or paper plate
- Cup of water and paper towels
Step 1: Preparation and Sketching
-
Prime the canvas:
Even if your canvas is pre-primed, apply a fresh coat of white acrylic paint to ensure a smooth, opaque surface. Let this dry completely before sketching. -
Mark the center:
Using a ruler, lightly mark the center point of your canvas. This will be the anchor for your yin-yang symbol. -
Draw the main circle:
Use a compass or trace a large bowl centered on your mark to create the outer circle of the yin-yang. Ensure it sits in the upper two-thirds of the canvas, leaving room for the waves below. -
Create the S-curve:
Lightly sketch the S-shaped line that divides the circle. Start at the top center, curv smoothly to the right, cross through the absolute center point, and curve left to the bottom center. -
Add the inner circles:
Draw the two smaller circles within the teardrop shapes. Use a small bottle cap or coins to trace these if you don’t want to adjust your compass.
Unsteady Hands?
If painting long, smooth lines is difficult with a brush, substitute the liner brush for a navy blue acrylic paint marker. You’ll get sharper edges.
Step 2: Painting the Yin-Yang
-
Outline the blue section:
Load your fine liner brush with navy blue paint. Carefully outline the right-side ‘swirl’ of the yin-yang (the yang side) and the small circle on the left side. -
Fill in the solid areas:
Switch to your flat shader brush to fill in the areas you just outlined. Apply the blue paint smoothly, ensuring solid coverage without visible brushstrokes. -
Define the outer ring:
Go back with your liner brush and carefully trace the entire round perimeter of the large circle to give it a clean, finished edge against the white background. -
Tidy the white side:
Use white paint to touch up the left swirl if any pencil marks are showing, or carefully paint the small circle on the blue side if you accidentally painted over it.
Add Texture
Mix a little bit of modeling paste into your white paint for the background before starting. It gives the canvas a subtle, sandy texture behind the smooth design.
Step 3: Creating the wave Pattern
-
Sketch the wave guidelines:
Below the yin-yang, use your pencil to draw flowing, horizontal wavy lines. Start from the left edge and ripple across to the right. Vary the heights slightly to create movement. -
Thicken the lines:
Instead of single pencil lines, sketch these as bands. You are essentially drawing ‘ribbons’ that will be painted blue, leaving white gaps in between. -
Extend to the bottom edge:
Continue drawing these wavy bands until you reach the bottom of the canvas. I like to let the bottom-most wave run right off the edge. -
Start painting the waves:
Using your fine liner brush or a blue paint pen, begin filling in the pencil-sketched bands with navy blue. -
Maintain consistent spacing:
Focus on keeping the white space between the blue waves relatively even. This negative space is what makes the pattern pop. -
Wrap the edges:
Don’t stop at the front face of the canvas! Carry the blue wave lines over the sides and bottom edge of the canvas for a professional gallery-wrap look. -
Refine the edges:
Once the blue paint is dry, you can use a small brush with white paint to crisp up any wiggly edges on your wave lines.
Allow your new artwork to dry fully before hanging it up to bring a sense of balance to your room
Groovy Bubble Letter Quote
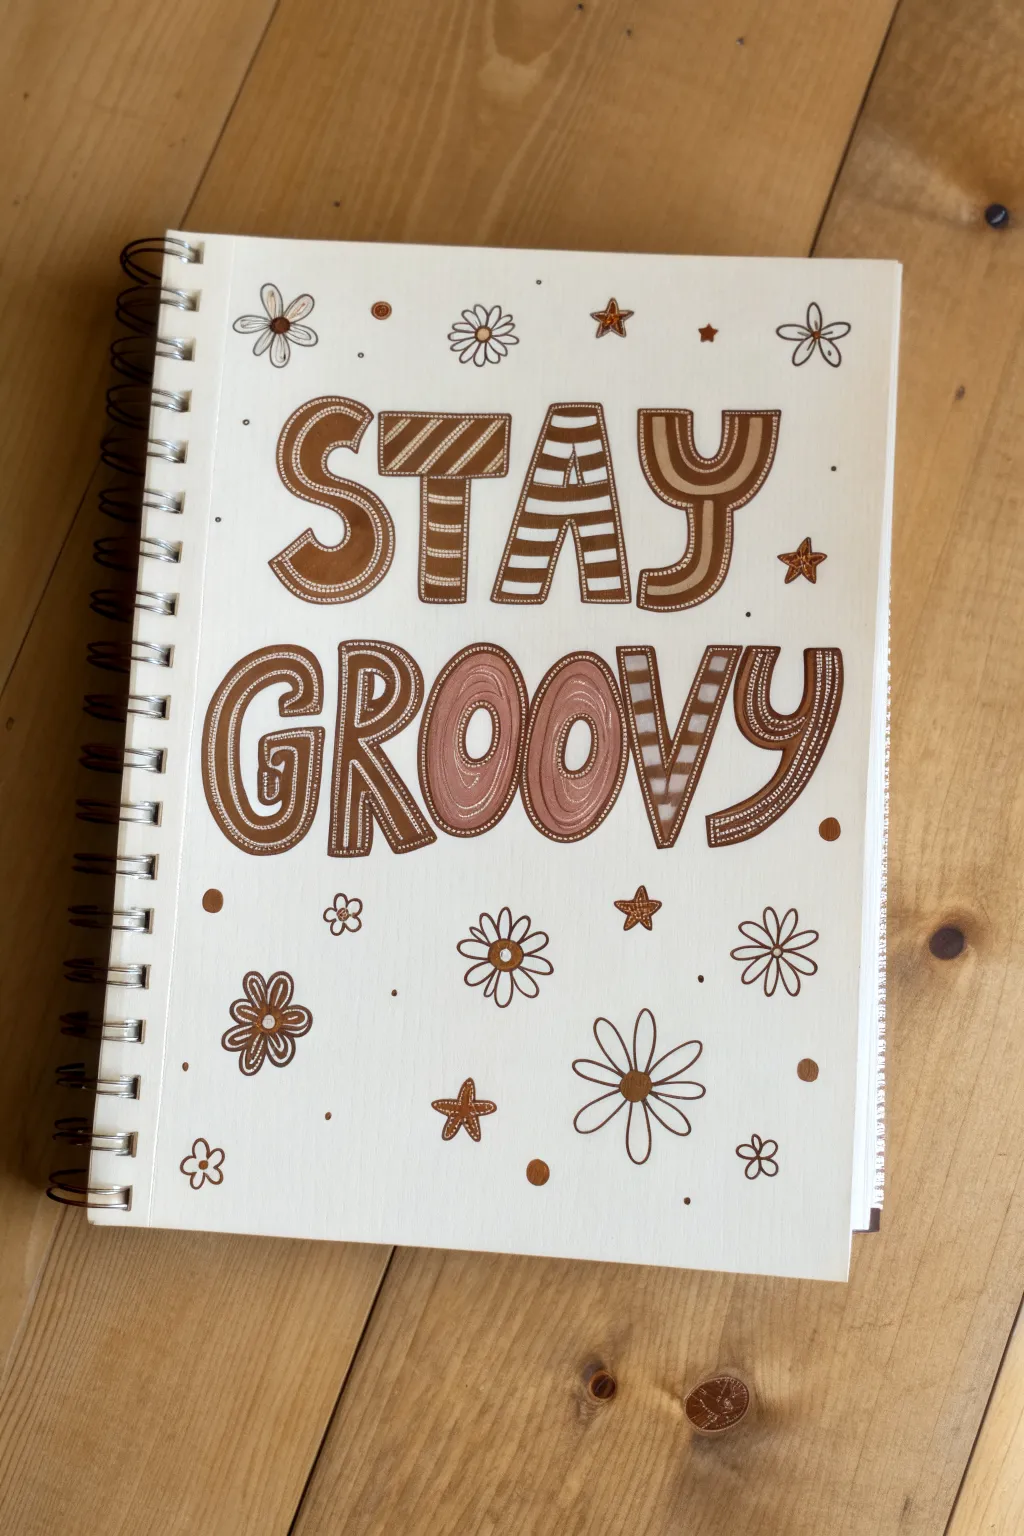
Channel the relaxed vibes of the 70s with this earthy, hand-lettered quote that turns a simple sketchbook page into a work of art. Using a warm monochromatic palette and playful patterns, you will create a typographic piece that feels both nostalgic and fresh.
How-To Guide
Materials
- Spiral-bound mixed media sketchbook
- Pencil (HB or similar light lead)
- Eraser
- Brown paint markers (medium and fine tip)
- Tan/Beige paint marker
- White gel pen or fine white paint marker
- Ruler (optional)
Step 1: Drafting the Layout
-
Sketch guides:
Begin by lightly drawing two horizontal guide lines for your text. Ensure there is plenty of space between the top word ‘STAY’ and the bottom word ‘GROOVY’ so the letters don’t feel crowded. -
Map out the letters:
Sketch the skeleton of each letter using a pencil. Focus on spacing first; center the four letters of ‘STAY’ on the top line and the six letters of ‘GROOVY’ on the bottom line. -
Thicken the forms:
Go back over your skeletons and bubble them out to create thick, blocky letters. Give them slightly curved edges rather than sharp corners to maintain that soft, retro feel. -
Refine the shapes:
Review your pencil sketch. Make sure the thickness is relatively consistent across all letters, erasing any stray lines that distract from the main forms.
Step 2: Inking & Patterning
-
Outline the text:
Using a medium-tip dark brown paint marker, carefully trace the outer edge of every letter. Keep your hand steady and pull the marker towards you for smoother curves. -
Erase pencil lines:
Once the outline is completely dry to the touch, gently erase the visible pencil marks from the drafting phase so the interior is clean for coloring. -
Fill the ‘S’ and ‘Y’:
For the ‘S’ inside ‘STAY’, color the bottom half solid brown and leave the top empty for now. For the ‘Y’, fill the main stem solid. -
Create stripes:
On the ‘T’, ‘A’, and ‘V’, draw horizontal bands. Alternate between thick brown stripes and thin white or tan stripes. I find it helpful to draw the brown bands first and fill the gaps later. -
Add detail to ‘GROOVY’:
For the ‘O’s and ‘G’, draw an internal outline shape inside the letter, creating a hollow effect. Fill the space between the inner and outer lines with a lighter tan color or fine stripes. -
Pattern mixing:
Mix up the fills on the remaining letters. Try vertical stripes for the final ‘Y’ in groovy, or checkered patterns for the ‘V’.
Paint Pen Flow
Store paint pens horizontally. If the ink flows too fast, blot the tip on a scrap paper piece before touching your artwork to avoid puddles.
Step 3: Finishing Touches
-
White highlighting:
Take your white gel pen or fine white paint marker. Add small dotted lines inside the dark brown sections of the ‘S’, ‘G’, and ‘R’ to create texture. -
Add highlights:
Draw thin white lines on one side of the solid letters to suggest a slight shine or dimension. -
Draw the main flowers:
In the open spaces around the text, use the dark brown marker to draw simple five-petal daisy shapes. Vary the sizes, placing larger ones at the bottom and smaller ones near the top. -
Add stars:
Draw small five-point stars scattered in the gaps. Color them solid brown or outline them with a darker center dot. -
Tiny details:
Fill the tiniest empty spaces with simple dots or tiny circles using the brown marker to balance the composition. -
Final centers:
Use the tan marker or white pen to add centers to your flowers, drawing small circles in the middle of each daisy.
Make it Pop
Add a drop shadow to the right of every letter using a light grey marker or a soft pencil hatch to make the quote lift off the page.
Now you have a groovy piece of typographic art that radiates vintage positivity


Third Eye In The Sky
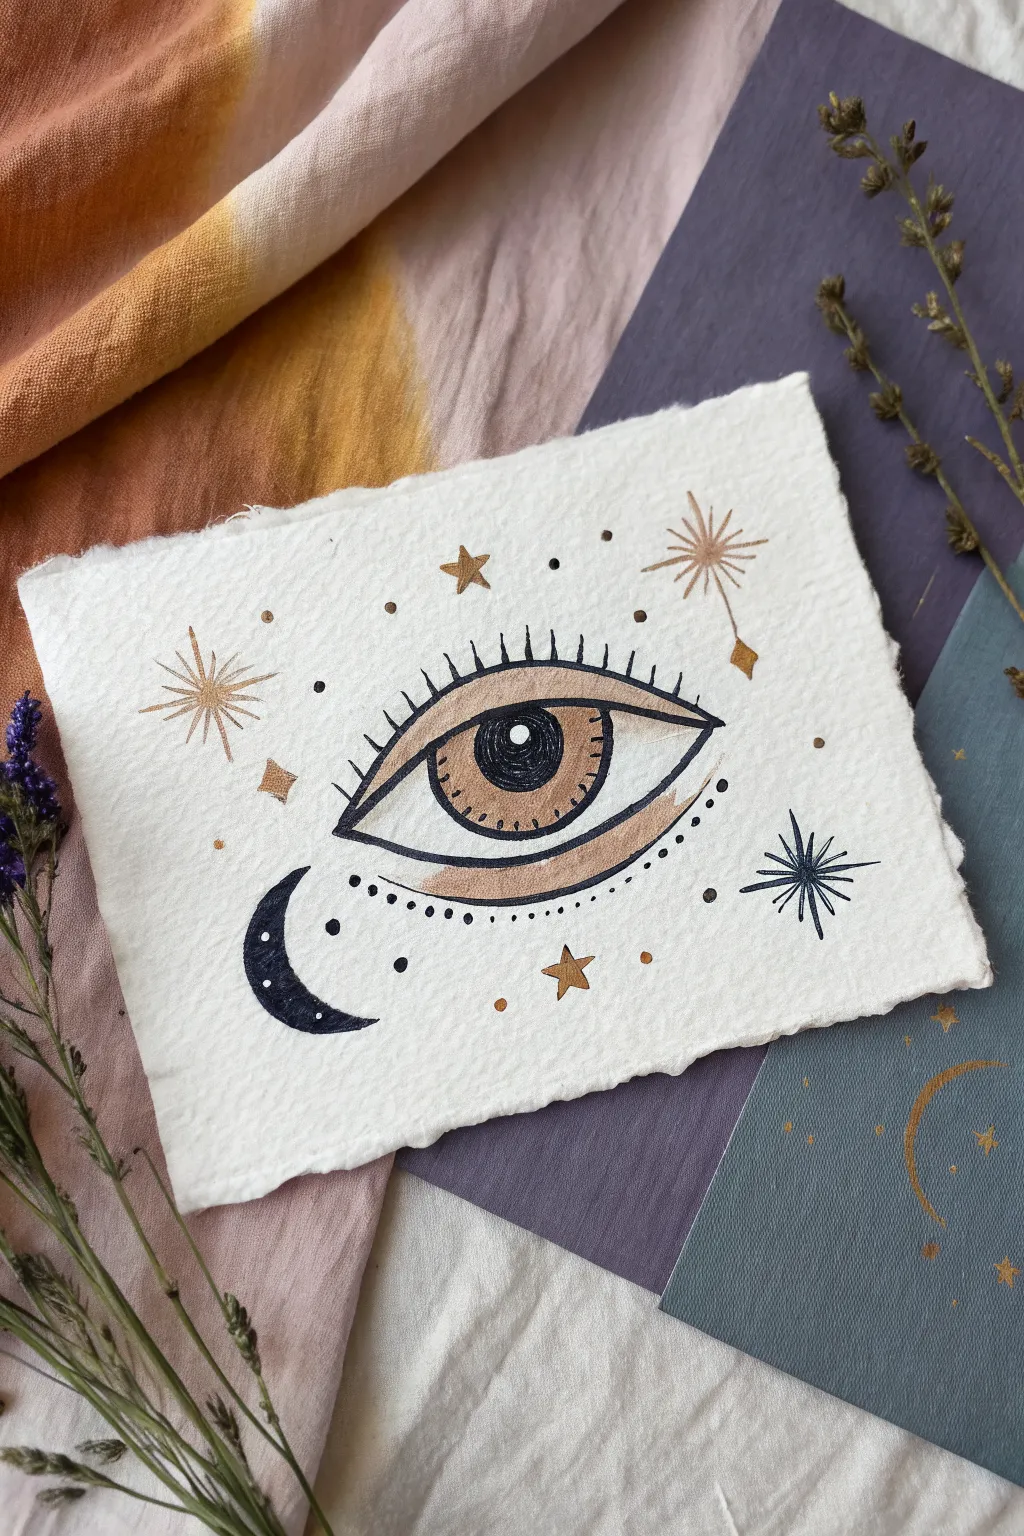
Channel mystic vibes with this delicate celestial eye illustration, featuring gold accents and fine linework on textured paper. The combination of warm metallic tones and sharp black ink creates a striking, modern bohemian piece perfect for a small art print or greeting card.
Step-by-Step Tutorial
Materials
- Heavyweight cold-press watercolor paper (deckle edge optional)
- Black fineliner pens (sizes 01 and 05)
- Watercolor paints (Metallic Gold/Bronze and Black/dark Indigo)
- Small round paintbrush (size 2 or 4)
- Pencil and eraser
- Ruler (optional)
- Paper towel and water cup
Step 1: Sketching the Layout
-
Center layout:
Begin by lightly marking the center of your paper with a pencil to position the main eye element. -
Outline the eye shape:
Sketch a classic almond-shaped eye in the center, ensuring the curves are smooth and symmetrical. -
Add the iris and pupil:
Draw a perfect circle in the middle of the eye for the iris, leaving a small gap at the top and bottom if you prefer a more relaxed gaze, or touching the lids for intensity. Draw a smaller circle inside for the pupil. -
Mark celestial elements:
Lightly sketch a crescent moon shape cupping result the bottom left specific of the eye. Place small stars and diamond shapes scattered around the composition to create balance.
Step 2: Adding Watercolor Washes
-
Paint the skin tint:
Mix a diluted wash of metallic gold or bronze watercolor. Using a small round brush, gently paint a stripe above the top eyelid (the crease) and a curved stripe under the bottom waterline. -
Fill the iris:
Using the same gold/bronze shade but slightly more concentrated, fill in the iris ring, leaving the pupil area blank for now. Let the paint pool slightly for texture. -
Paint the gold stars:
Carefully fill in your sketched stars and diamond shapes with the metallic gold paint. I like to keep the paint quite thick here so it shimmers when dry. -
Add detail dots:
Dip the tip of your brush or a dotting tool into the gold paint and add tiny random dots scattered across the background for a stardust effect. -
Create the dark moon:
Switch to black or a very dark indigo watercolor. Carefully fill in the crescent moon shape. Alternatively, you can use a thick black marker for a more opaque look once the paper is dry. -
Dry completely:
Wait until all paint is absolutely dry to the touch before moving to ink to prevent bleeding.
Deckle Edge Trick
To get that torn, vintage paper look without buying expensive sheets, paint a line of water where you want the edge, wait a moment, and gently tear the paper along the wet line.
Step 3: Inking and Details
-
Outline the eye:
Using a 05 black fineliner, trace over your main eye outline. Use a confident, sweeping motion to keep the lines clean. -
Detail the iris:
Switch to a finer 01 pen. Draw tiny lines radiating from the pupil outward toward the edge of the iris, stopping before you hit the gold border. Fill in the center pupil completely black. -
Draw the lashes:
With the 05 pen, draw vertical lashes on the top lid. Start with a firm pressure at the base and flick upward to taper the line. Add shorter, straighter lashes along the bottom lid. -
Outline the gold accents:
Depending on your preference, you can leave the watercolor shapes soft or outline the gold stripes around the eye with a very fine broken line for added definition. -
Create starbursts:
Draw fine lines radiating from the center of your gold stars. For some, add longer rays to create a ‘sparkle’ effect. -
Add the decorative dots:
Using the fineliner, place black dots around the illustration. Create a specific curved row of small dots under the eye to mirror the shape of the lower lid. -
Final touches:
Add white gel pen highlights to the pupil or the crescent moon if you want extra dimension, then erase any remaining visible pencil marks once the ink is fully set.
Shaky Lines?
If your hands are unsteady for the long curved lines of the eyelid, try moving your entire arm from the shoulder rather than just flicking your wrist. This creates smoother arcs.
Frame your mystical creation in a floating glass frame to show off those beautiful rough edges
Trippy Mushroom Patch
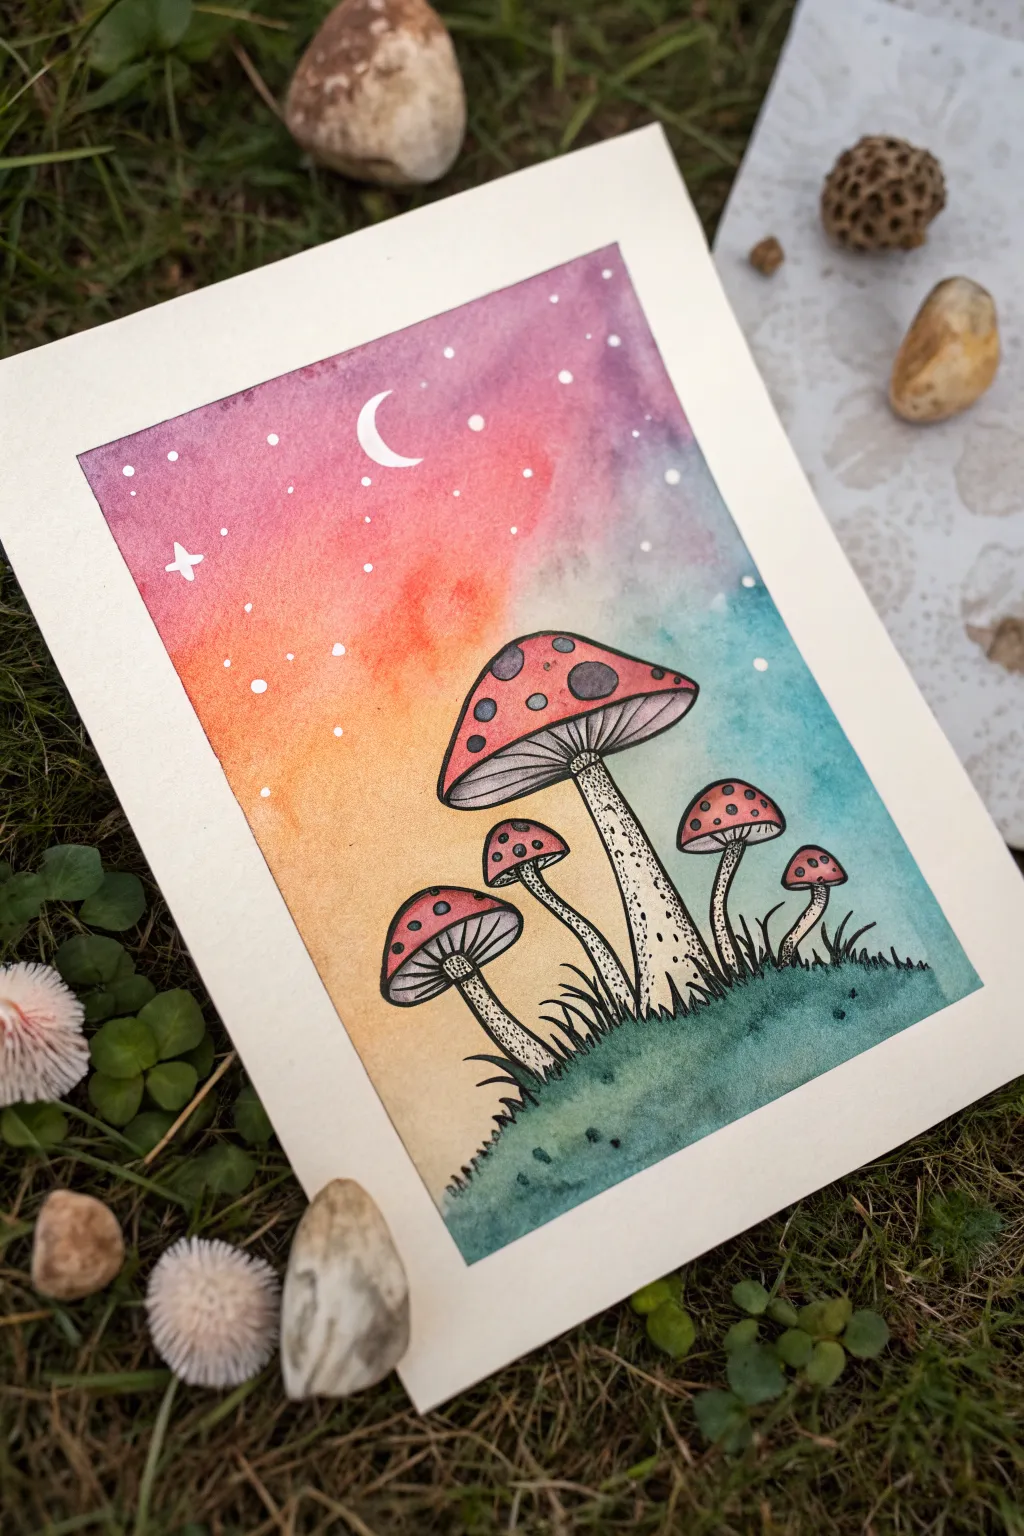
This whimsical watercolor project combines a vibrant, blending gradient sky with a quirky patch of illustrated mushrooms. It merges soft watercolor washes with crisp ink outlines for a trippy, celestial vibe perfect for any easy-going art session.
Step-by-Step Guide
Materials
- Cold press watercolor paper (approx. 5×7 inches)
- Watercolor paint set
- Fine tip black waterproof drawing pen (0.3mm or 0.5mm)
- White gel pen
- Masking tape
- Soft round watercolor brush (size 6 or 8)
- Pencil and eraser
- Jar of clean water
- Paper towels
Step 1: Preparation and Sketching
-
Secure the paper:
Tape down all four edges of your watercolor paper to a board or table. This creates that crisp white border you see in the final piece and prevents the paper from buckling when wet. -
Outline the composition:
Using a pencil, lightly sketch the horizon line near the bottom third of the paper. Keep it bumpy and uneven to look like a grassy hill. -
Sketch the mushroom shapes:
Draw five mushrooms of varying sizes. Start with a large central one, adding a wide cap and a thick stem. Place two smaller ones on the right and two on the left, varying their heights and tilts for a natural look. -
Add details lightly:
Sketch the spots on the caps and faint lines for the gills underneath. Keep pencil pressure light so it can be erased later.
Clean Lines Pro Tip
If your hand is shaky while outlining, try ghosting the line (hovering over the paper) a few times before committing the ink to paper.
Step 2: Painting the Gradient Sky
-
Wet the sky area:
With a clean brush and clear water, wet the entire sky area above the hill, carefully painting around the mushroom shapes. You want the paper damp but not soaking wet. -
Apply the purple tones:
Load your brush with a deep violet or purple watercolor. Dab it into the top corners and along the top edge, letting the color bleed downward into the damp paper. -
Blend into pink:
Rinse your brush slightly and pick up a vibrant magenta or pink. Apply this below the purple, allowing the two colors to touch and merge naturally. -
Create the orange glow:
Move lower into an orange hue, painting the middle section of the sky. Let it mix with the pink above to create a soft transition. -
Finish with teal:
For the area closest to the horizon and around the mushroom stems, switch to a soft teal or turquoise. Blend this slightly into the orange above for a dreamy effect. Let the sky dry completely.
Step 3: Painting the Foreground
-
Base layer for mushrooms:
Once the sky is dry, paint the mushroom caps with a diluted red. It doesn’t need to be solid; a wash looks nice here. -
Paint the stems:
Use a very watery, pale beige or diluted brown to fill in the stems. They should remain mostly light-colored. -
Color the hill:
Mix a muted dark green paint. Fill in the grassy hill area at the bottom, making it darker near the bottom edge and lighter near the top of the humps. -
Deepen the mushroom spots:
While the red caps are still slightly damp or fully dry, dab darker red or purple into the circular spots on the caps for contrast. Ensure everything is bone dry before the next phase.
Level Up: Galaxy Dust
Flick a toothbrush dipped in diluted white gouache or acrylic over the sky area to create a dense, realistic spray of tiny stars.
Step 4: Inking and Details
-
Outline the mushrooms:
Take your waterproof black pen and trace over your pencil lines for the mushrooms. Go over the caps, spots, and stems with a steady hand. -
Add stem texture:
Using a stippling technique (lots of small dots), add texture to the bottom of the stems and under the caps. This acts as shading. -
Draw the gills:
Draw fine, curved lines radiating from the stem to the edge of the cap underneath each mushroom head. -
Add grass blades:
Use quick, short upward strokes with the pen to draw grass growing out of the green hill, partially covering the base of the stems. -
Create the stars:
Finally, use the white gel pen to draw a crescent moon, a few four-pointed sparkle stars, and random dots throughout the sky gradient. -
The reveal:
Wait for all ink to dry, then slowly peel away the masking tape at a 45-degree angle to reveal your clean edges.
Now you have a serene little portal to a psychedelic world ready to display
Hamsa Hand With Simple Patterns
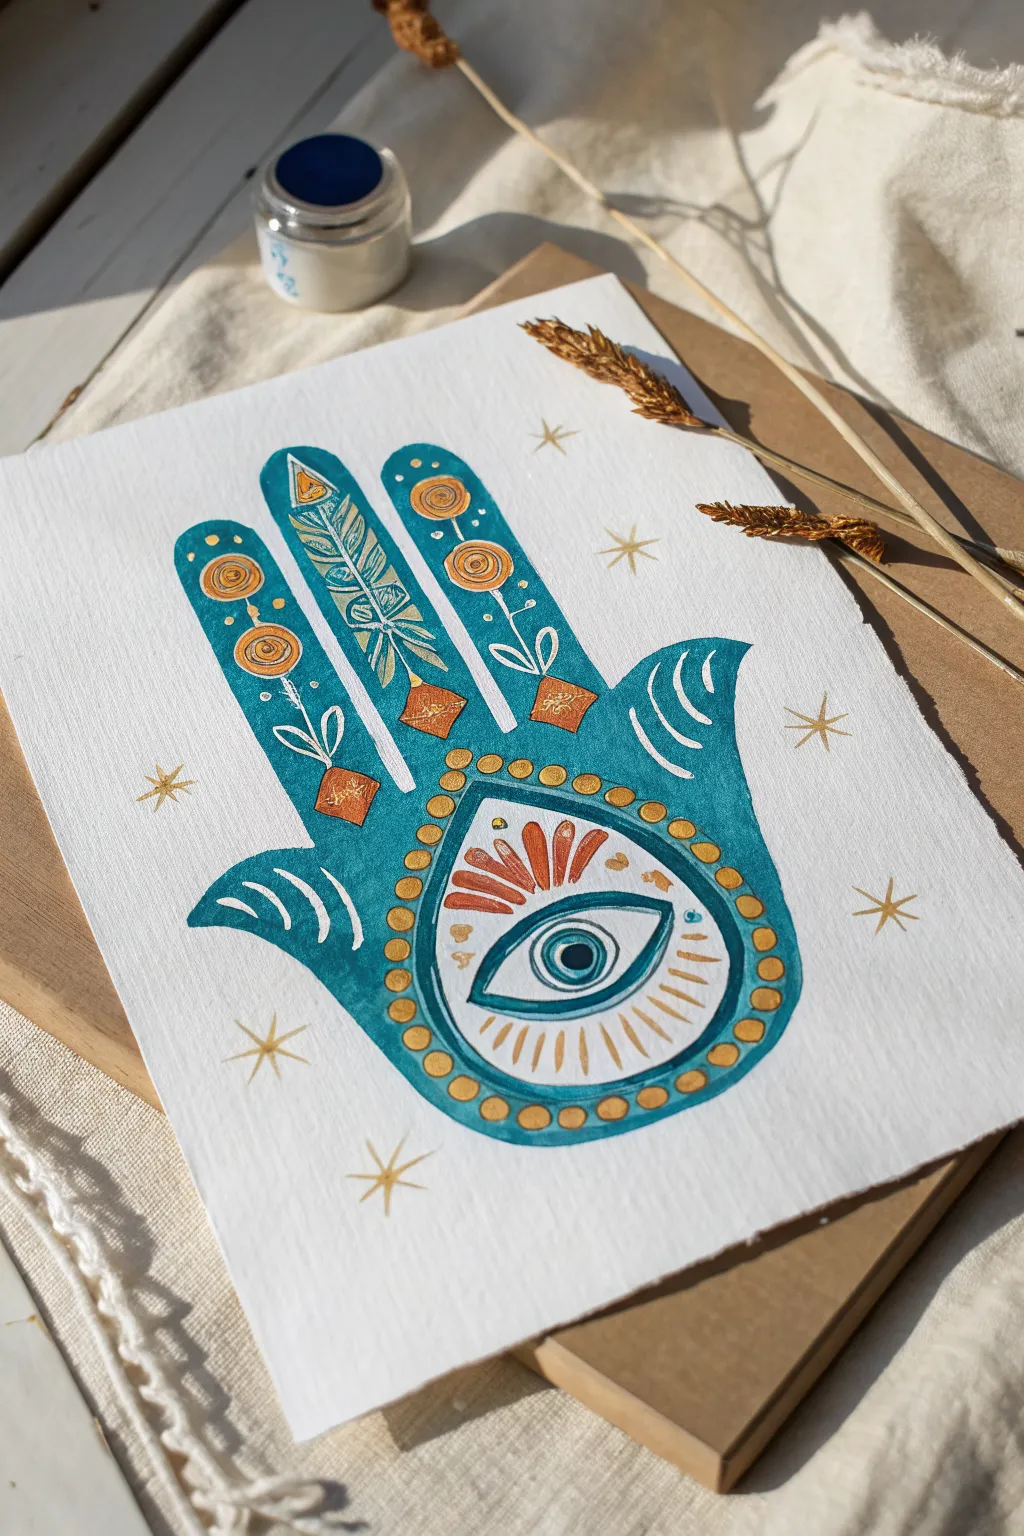
Capture the protective spirit of the Hamsa hand with this simple yet striking watercolor project. Combining deep turquoise washes with shimmering gold accents creates a piece that feels both earthy and magical.
Step-by-Step Tutorial
Materials
- Cold press watercolor paper (A5 or 5×7 inches)
- Pencil and eraser
- Turquoise or teal watercolor paint
- Gold metallic watercolor or acrylic paint
- Fine liner brushes (sizes 0 and 2)
- Medium round brush (size 6)
- Jar of clean water
- Paper towel
Step 1: Sketching the Shape
-
Outline the palm:
Begin by lightly sketching the central palm shape in the middle of your paper using a pencil. Aim for a symmetrical U-shape base. -
Draw the fingers:
Add the three central fingers extending fro the palm. The middle finger should be the tallest, with the index and ring fingers slightly shorter and equal in length. -
Add the thumbs:
Sketch the two curved thumbs on either side of the palm, pointing outwards. In a traditional Hamsa, these are often symmetrical. -
Draft the inner eye:
Draw a large teardrop shape inside the palm area. Within that, lightly sketch the almond shape of the eye and the circular iris.
Step 2: Painting the Base
-
Outline in teal:
Load your medium brush with turquoise paint. Carefully paint along the pencil outline of the entire hand shape to define the edges. -
Fill the color:
Fill in the rest of the hand with the turquoise paint, but leave the large central teardrop shape completely white (unpainted). -
Create negative space:
While the paint is wet, you can lift out small lines on the thumbs or fingers with a dry brush if you want varied texture, or simply paint around any specific details you sketched. -
Paint the eye details:
Switch to a smaller brush. Paint the outermost rim of the eye’s iris in turquoise, followed by a dark distinct pupil in the very center. -
Let it dry completely:
This is crucial; wait until the turquoise layer is bone dry before adding any metallic details to prevent bleeding.
Uneven Edges?
If your turquoise edges look shaky, wait for them to dry, then go over the perimeter with a gold paint pen for a clean, deliberate outline.
Step 3: Adding the Gold Accents
-
Border the eye:
Using your fine liner brush and gold paint, create a dotted border around the teardrop shape in the center of the palm. -
Add the eyelashes:
Paint radiating gold lines underneath the eye for lower lashes, and a decorative fan shape above the eye in rusted orange or gold. -
decorate the middle finger:
Paint a stylized feather inside the middle finger. Use fine strokes for the barbs and add small geometric diamonds at the tip and base. -
Add floral stems:
On the index and ring fingers, paint delicate vertical lines with small spirals or circles at the top to resemble abstract flowers. -
Detail the thumbs:
Add curved white or gold contour lines on the thumbs to emphasize their shape and movement.
Shimmer Boost
Mix a tiny drop of water into your metallic paint and let it sit for a minute before using. This softens the pigment for maximum shine.
Step 4: Final Flourishes
-
Enhance the background:
Paint simple eight-pointed stars and crossing sparkles scattered around the outside of the hand using the gold paint. -
Refine the lines:
I like to go back in with the finest brush to sharpen any gold details or add tiny dots inside the spirals for extra intricacy. -
Erase pencil marks:
Once the artwork is absolutely dry, gently erase any visible pencil lines that weren’t covered by paint.
Frame this piece in natural wood to accentuate the earthy vibes of your new creation
Cosmic Planets And Stars
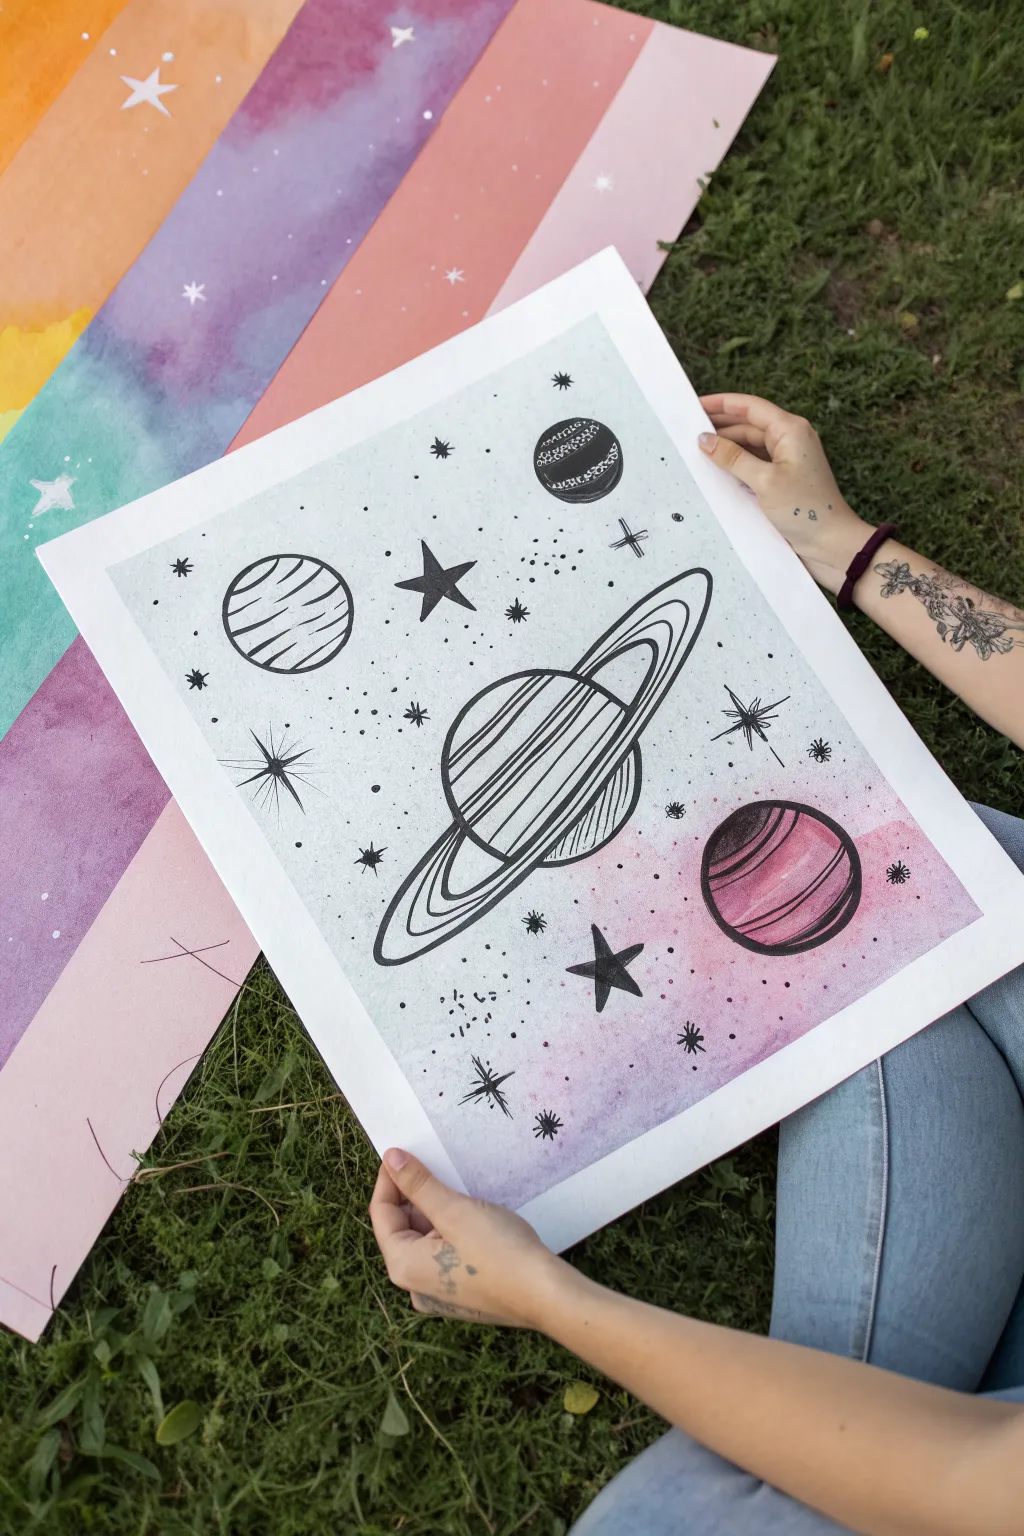
Blend soft watercolor washes with crisp ink linework to create this dreamy cosmic scene. This mixed-media project combines the unpredictability of fluid paint with the satisfying precision of doodle art for a result that looks out of this world.
How-To Guide
Materials
- Heavyweight watercolor paper (300 gsm recommended)
- Watercolor paint set
- Large flat wash brush
- Round watercolor brush (size 6 or 8)
- Fine tip black permanent marker or drawing pen (0.5mm)
- Thicker black permanent marker (0.8mm or 1.0mm)
- Pencil and eraser
- Jar of water
- Paper towels
- Ruler (optional)
Step 1: Setting the Atmosphere
-
Prepare the wash:
Begin by moistening your watercolor paints. You’ll need a pale gray-blue, a soft pink, and a muted purple. If your pink needs toning down, mix in a tiny touch of brown or gray. -
Paint the background wash:
Using your large wash brush, apply a very light wash of the gray-blue across the top two-thirds of the paper. Keep it uneven and cloudy; perfection isn’t the goal here. -
Add the cosmic horizon:
While the top is still slightly damp or just dry, paint the bottom third of the paper with your pink and purple shades. Let the colors bleed into each other naturally. -
Create the lower planet base:
Near the bottom right corner, within the pink/purple area, paint a distinct circle using a more saturated mix of reddish-pink. This will be the base color for the small striped planet later. -
Let it dry completely:
This is crucial. Walk away for a bit or use a hair dryer on a low setting. The paper must be bone dry before you switch to ink, or your pens will bleed.
Ink Bleed Prevention
Test your markers on a scrap piece of the same watercolor paper first. Some papers are very absorbent and can cause ink to feather even when dry.
Step 2: Drafting the Universe
-
Sketch the central planet:
With a pencil, lightly sketch a large circle in the middle of your page. Draw a large, swooping oval ring around it. Focus on getting the angle of the ring right so it feels dynamic. -
Position the smaller planets:
Sketch a smaller circle near the top right (above the ring), one to the left, and outline the pink circle you painted earlier in the bottom right. -
Place larger stars:
Mark the spots for a few prominent five-pointed stars. I usually place one distinct star near the center-left and another near the bottom center to balance the composition.
Adding Shimmer
Once the black ink is dry, use a metallic silver or gold gel pen to add highlights to the planet rings or to trace over some of the stars.
Step 3: Inking the Details
-
Outline the main planet:
Using your thicker black marker, trace over your pencil lines for the central planet. Draw the rings carefully, using multiple concentric lines to give the rings depth and thickness. -
Add stripes and texture:
Switch to the finer pen. Inside the main planet, draw diagonal stripes. Vary the spacing—some close together, some far apart—to create a distinct pattern. -
Ink the surrounding planets:
Outline the top right planet and give it a textured, stippled look with tiny dots. Outline the left planet and give it wavy stripes. Finally, outline the bottom pink planet and add curved horizontal bands. -
Draw the star types:
Ink your five-pointed stars, filling them in black. Then, scattered around the empty space, draw different star variations: simple asterisks, four-pointed sparkles, and tiny open circles. -
Create stardust clusters:
Using the fine pen, create small clusters of dots (stippling) in open areas. This mimics distant galaxies or dust clouds and connects the larger elements together. -
Add final cosmic debris:
Draw tiny solid black dots randomly throughout the piece to fill any awkward empty spaces. Don’t overthink placement; randomness looks more natural. -
Clean up:
Once the ink is 100% dry (give it a few minutes to be safe), gently erase any visible pencil marks to leave a crisp, high-contrast finish.
Frame your new galaxy and enjoy the peaceful vibes of your handmade universe
Desert Sunset With Dream Colors
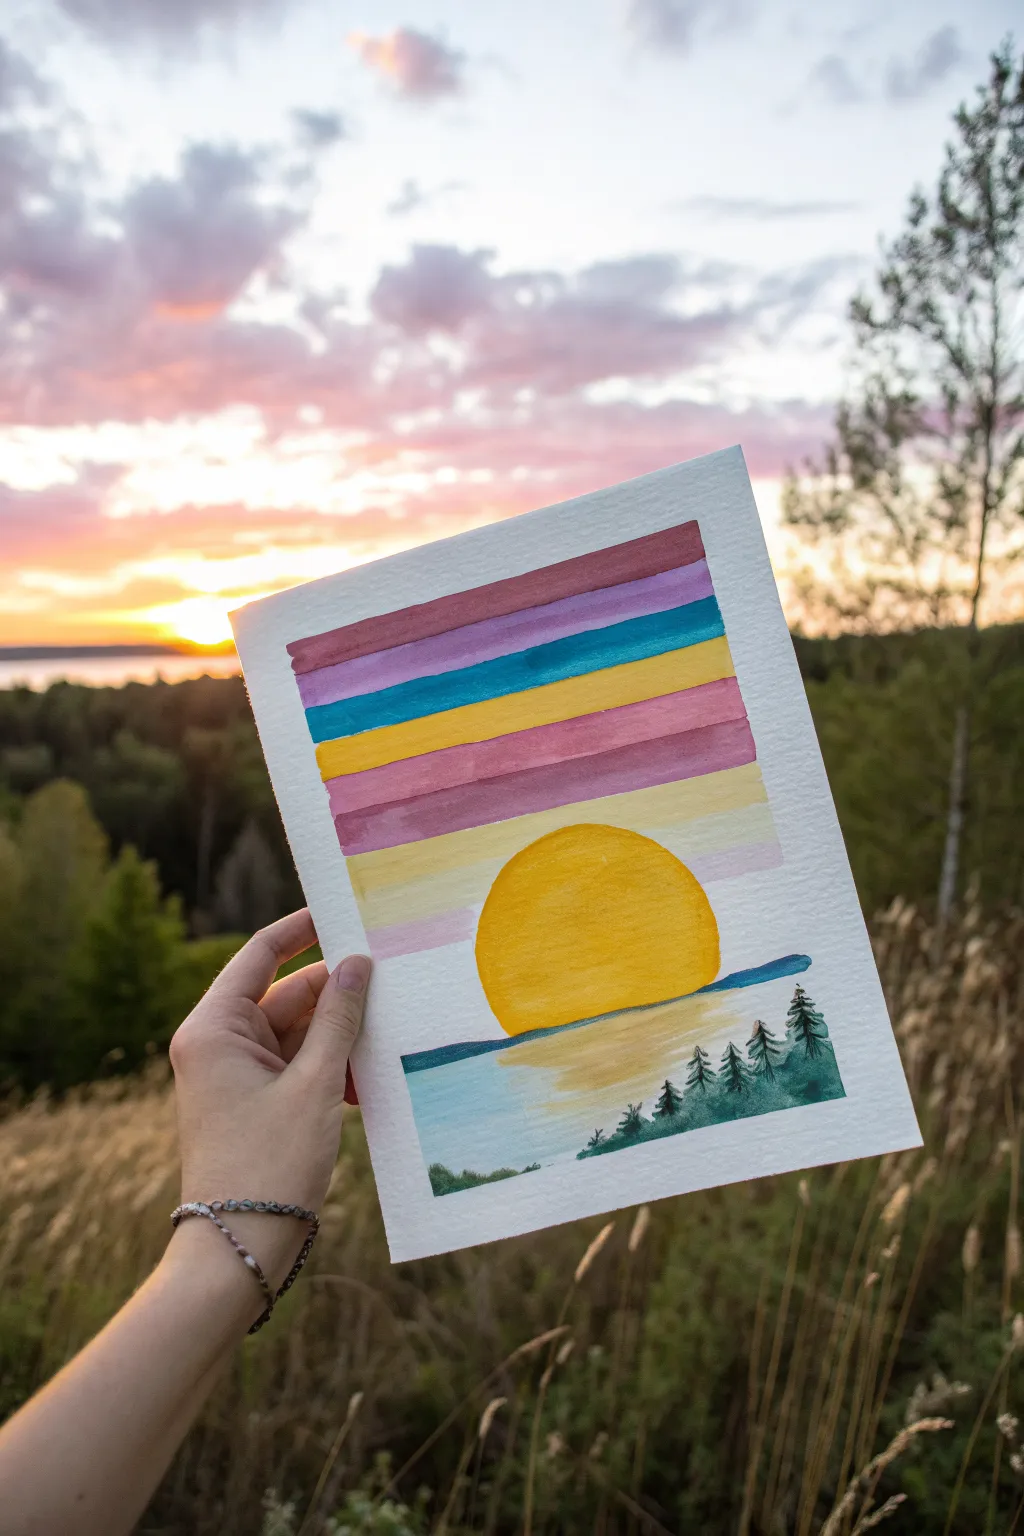
Capture the magic of golden hour with this simplified, graphic sunset painting that uses bold bands of color to create a serene landscape. The abstract stripes give it a modern, slightly retro feel that perfectly mirrors the peaceful vibe of ending the day in nature.
Detailed Instructions
Materials
- Cold press watercolor paper (approx. 5×7 or 6×8 inches)
- Watercolor paints (tube or pan)
- Flat shader brush (size 6 or 8)
- Round detail brush (size 2 or 4)
- Masking tape
- Jar of clean water
- Paper towels
- Compass or round object for tracing (optional)
Step 1: Preparation and Sketching
-
Paper Setup:
Begin by taping down all four edges of your watercolor paper to a board or table. This creates a crisp white border and prevents the paper from buckling when wet. -
Horizon Line:
Lightly sketch a horizontal line about one-third of the way up from the bottom of the paper. This will separate your sky from the water. -
Sun Outline:
Draw a large semi-circle resting on the horizon line. You can freehand this or trace a round object like a cup or lid to get a perfect curve. The sun should be prominent and central. -
Sky Bands:
Above the sun, lightly lightly sketch 4-5 horizontal lines to mark where your color bands will go. These don’t need to be perfectly straight; a hand-drawn feel adds charm.
Clean Lines Pro Tip
For perfectly straight bands of color in the sky, you can use masking fluid or extra strips of tape between the colors, but be sure the paper is 100% dry before taping.
Step 2: Painting the Sky
-
Top Band:
Load your flat brush with a muted mauve or dusty purple. Paint the topmost strip of sky using horizontal strokes, keeping the edges fairly distinct. -
Second Band:
Mix a lighter purple or lilac shade. Paint the band directly underneath the first one. It’s okay if they touch slightly and bleed a little—that’s the beauty of watercolor. -
Teal Accent:
Switch to a vibrant teal or turquoise color. Paint the third band down. This cool tone provides a striking contrast to the warm colors coming next. -
Yellow Stripe:
Wash your brush thoroughly. Paint the next band with a soft, warm yellow. If your teal paint is still very wet, leave a tiny sliver of white paper between them to prevent muddying the colors. -
Rose Band:
Paint the next stripe with a dusty rose or pink tone. I like to keep this layer slightly translucent to mimic the fading light. -
Haze Layer:
For the area immediately surrounding your sun outline, use a very watered-down yellow or cream color to create a sense of atmospheric glow.
Step 3: The Sun and Water
-
Painting the Sun:
Fill in the large sun shape with a bold, saturated yellow-orange. Use plenty of pigment here so it stands out as the focal point. -
Horizon Line:
Use a deep blue or teal to paint a thin, dark line right at the horizon, separating the sky elements from the water below. -
Water Base:
Paint the water section with a light wash of turquoise or light blue. Keep this layer relatively pale. -
Sun Reflection:
While the water layer is damp, dab in some horizontal strokes of watered-down yellow directly under the sun to create a reflection on the water’s surface.
Add Some sparkle
Once the painting is totally dry, use a metallic gold pen or thick gouache to outline the sun or add glimmering ripples to the water for a magical touch.
Step 4: Foreground Details
-
Tree Line Mixture:
Mix a dark, forest green using your green paint and a touch of black or deep blue to get a silhouette color. -
Distant Shore:
Paint a small, low strip of land on the left side of the composition using your dark green mix. -
Right Shoreline:
On the bottom right, paint a slightly larger landmass that slopes gently into the water. -
Small Pines:
Switch to your small round detail brush. On the right-hand landmass, paint tiny vertical lines to act as tree trunks. -
Pine Texture:
Using the tip of the brush, stipple or dab small branches moving outward from the trunks to create the jagged silhouette of pine trees. -
Final Dry:
Let the painting dry completely before carefully peeling off the masking tape at a 45-degree angle.
Now you have a serene sunset keepsake that captures the peaceful colors of dusk
Leaf Silhouette With Groovy Pattern
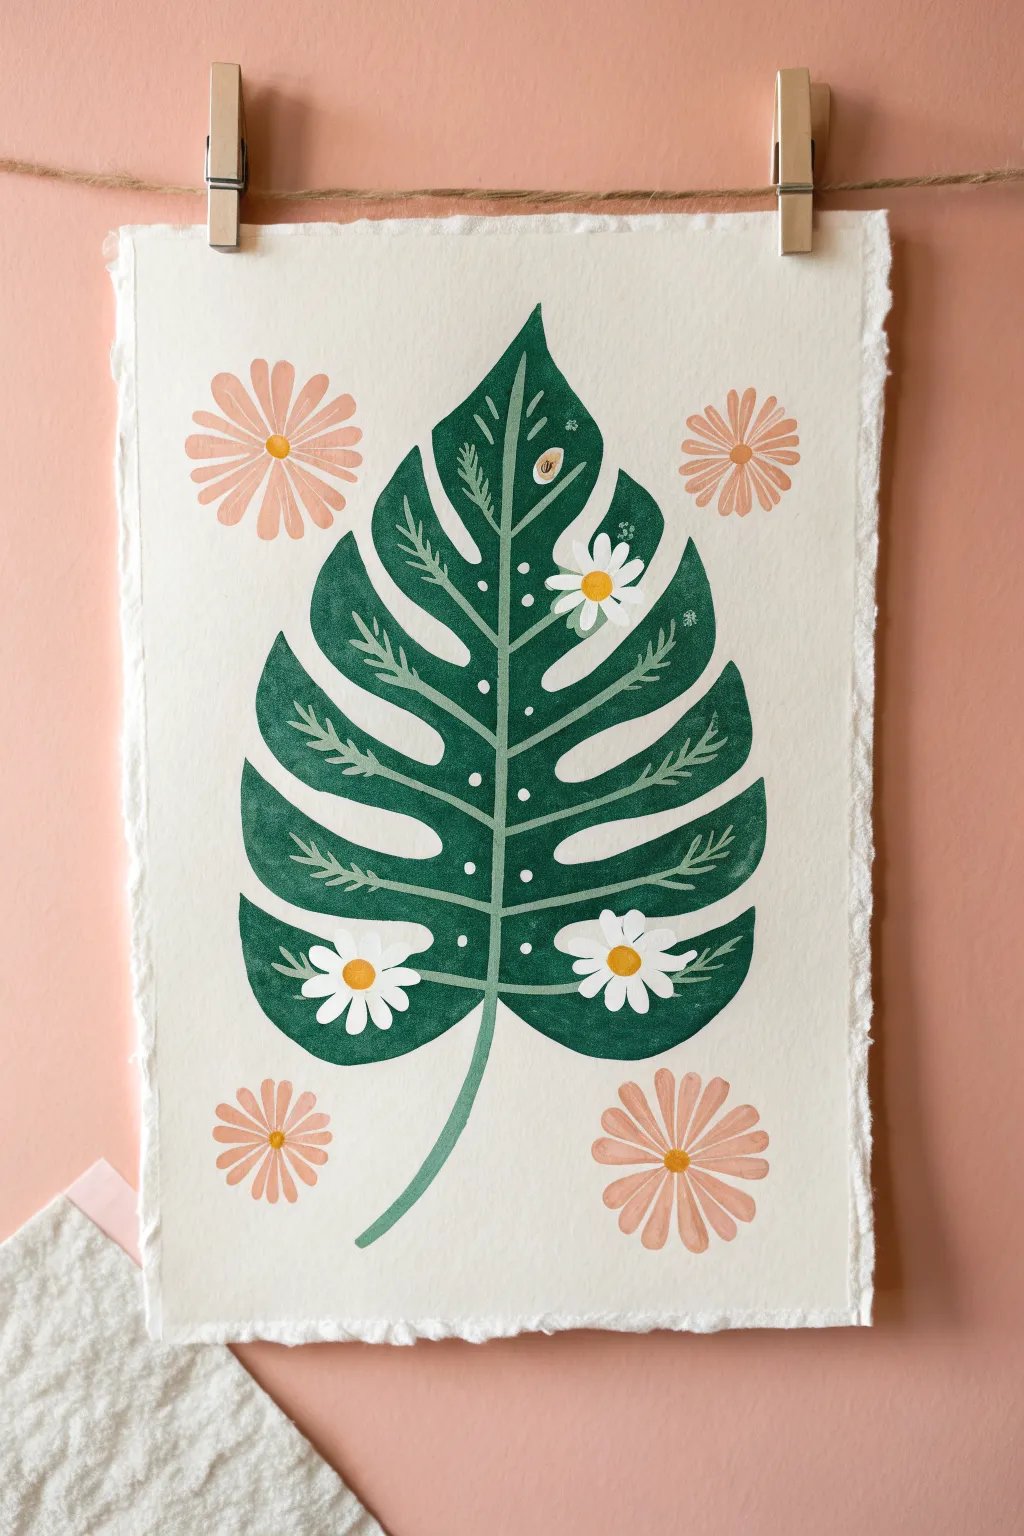
This charming painting combines the tropical vibe of a Monstera leaf with delicate folk-art details and cheerful daisies. Using gouache or acrylics on deckle-edge paper gives it that lovely, handmade vintage feel perfect for a hippie aesthetic.
Step-by-Step Guide
Materials
- Heavyweight watercolor or mixed media paper (deckle-edge preferred)
- Gouache or matte acrylic paints (Deep Green, Pale sage/Mint, White, Yellow, Pinch of Peach/Pink)
- Pencil and eraser
- Round brushes (sizes 4 and 6 for the leaf)
- Detail liner brush (size 0 or 00 for vines)
- Small flat brush (optional, for petals)
- Palette for mixing
- Water cup and paper towels
Step 1: Drafting the Silhouette
-
Center Your Subject:
Begin by lightly sketching a vertical line down the center of your paper to act as the stem and midrib guide. This ensures your leaf stays centered and symmetrical. -
Map the Leaf Shape:
Sketch a large heart shape around your center line. Then, draw the characteristic deep notches of a Monstera leaf, curving inwards toward the center vein but not touching it. Aim for about 4-5 leaf segments on each side. -
Refine the Edges:
Go over your sketch to round out the tips of each leaf segment. Erase your initial heart-shape guide lines so only the final leaf silhouette remains.
Opaque Layers
To ensure the light green vines show up clearly against the dark background, mix a tiny bit of white paint into your sage green. This increases opacity instantly.
Step 2: Blocking in Color
-
Prepare the Green:
Mix a deep forest green. If your green is too bright, add a tiny touch of red or brown to deepen it into a more natural, vintage shade. -
Paint the Base Layer:
Using your size 6 round brush, fill in the entire leaf silhouette with the deep green. Keep your edges crisp and smooth. Don’t worry about the stem just yet. -
Let it Dry:
Allow this base layer to dry completely. Gouache dries matte and quickly, but if you paint wet-on-wet for the next steps, the colors will muddy. -
Add the Stem:
Using a lighter sage or mint green, paint the central vein line straight down the middle. Extend it out the bottom to create a curved stem.
Step 3: Adding the Groovy Details
-
Paint the Inner Vines:
Switch to your fine detail liner brush. Using the same sage/mint green as the stem, paint delicate curved lines branching out from the center vein into each leaf segment. -
Add Leafy Texture:
Along these new sage branches, add tiny v-shaped dashes to mimic fern-like textures. I like to keep these strokes very loose and organic rather than perfectly uniform. -
Dot the Center:
Dip the tip of your brush handle or a dotting tool into white paint. Place a series of small dots running down the central vein for a decorative touch. -
The White Daisies:
Paint three small daisies directly on top of the green leaf. Place two near the bottom and one near the top right. Use quick, teardrop strokes for the white petals. -
Daisy Centers:
Once the white petals are dry, add a sunny yellow dot to the center of each flower.
Vintage Paper Hack
Can’t find deckle-edge paper? Tear the edges of standard watercolor paper against a ruler. The rough, fibrous edge mimics handmade paper perfectly.
Step 4: The Background Accents
-
Mix a Peach Tone:
Create a soft peach or terracotta pink color. It should be warm and muted to complement the deep green. -
Draft Floating Flowers:
Visualize where you want the four corner flowers. You don’t need to sketch heavily, just know their spacing to keep the composition balanced. -
Paint Corner Blooms:
Using the peach mixture, paint larger, star-burst style flowers in the four corners surrounding the leaf. Use long, thin strokes radiating from a center point. -
Final Yellow Details:
Add yellow centers to these peach flowers to tie everything together. Check your work for any needed touch-ups.
Now you have a piece of botanical art that feels both modern and retro, ready to hang on your wall
Cute Alien On A Color Splash

This adorable watercolor painting features a classic little green alien perched happily on a crescent moon, surrounded by a sky full of colorful twinkling stars. It’s a simple, charming project that uses clean lines and soft washes perfect for greeting cards or small wall art.
Step-by-Step
Materials
- Cold press watercolor paper (approx. 5×7 inches)
- Watercolor paint set (pan or tube)
- Small round fine-tip paintbrush (size 0 or 1)
- Medium round paintbrush (size 4 or 6)
- Pencil and eraser
- Waterproof fine liner pen (black, 0.3mm or 0.5mm)
- Jar of clean water
- Paper towel
Step 1: Sketching the Scene
-
Draw the crescent moon:
Start by lightly sketching a large ‘C’ shape in the center of your paper. Make the bottom part wider so the alien has a solid place to sit, tapering the ends into sharp points. -
Add the alien’s head:
Sketch an inverted teardrop shape resting on the lower curve of the moon. This will be the alien’s oversized head. -
Draw the body:
Below the head, draw a small, thin body. Imagine a little stick figure that has been thickened slightly; add two arms resting casually on the legs or moon, and legs hanging down over the edge. -
Sketch the face:
Draw two large, slanted oval eyes that take up most of the face. Add a tiny, simple curved smile right between the bottom of the eyes. -
Fill the sky:
Randomly scatter small star shapes around the moon. vary their sizes, drawing some as five-pointed stars and others as simple four-pointed sparkles.
Fixing Smudges
If you accidentally smudge black ink while erasing, turn it into a ‘cosmic dust’ patch by stippling tiny dots of purple or blue paint over the mistake.
Step 2: Inking the Outline
-
Trace with pen:
Using your waterproof black fine liner, carefully trace over your pencil lines. Try to keep your hand steady for smooth, confident curves. -
Detail the moon:
Add a few small dots or tiny circles on the moon’s surface to mimic craters and texture. This gives it a bit of character. -
Fill the eyes:
Color in the alien’s large eyes completely with the black pen, leaving tiny white circles or crescents near the top as ‘catchlights’ to make them look glossy. -
Erase pencil marks:
Wait a moment for the ink to dry completely, then gently erase all visible pencil sketches so your painting surface is clean.
Step 3: Applying Watercolor
-
Paint the alien skin:
Mix a watery pale green. Using your small brush, fill in the alien’s head and body. Keep the wash light and even. -
Add alien shadows:
While the green is still slightly damp, drop a tiny bit of slightly darker green or grey-green along the left side of the head and under the chin to create roundness. -
Paint the moon base:
Load your medium brush with a warm yellow ochre or pale orange. Paint the entire crescent shape. -
Shade the moon:
I like to add depth by brushing a darker orange or light brown along the inner curve of the crescent while the yellow is still wet, letting the colors blend naturally. -
Color the stars:
Use a variety of bright colors like yellow, pink, and blue to fill in the stars. Don’t worry about staying perfectly in the lines; a little looseness adds charm. -
Add final details:
Once the moon is dry, you can add very faint shadows under the alien where it sits, grounding the figure.
Glow Up
Use metallic watercolor or a glitter gel pen on the stars and the moon’s craters to make the artwork actually sparkle when it catches the light.
Let your painting dry fully before framing or sending it off to a space-loving friend


Have a question or want to share your own experience? I'd love to hear from you in the comments below!