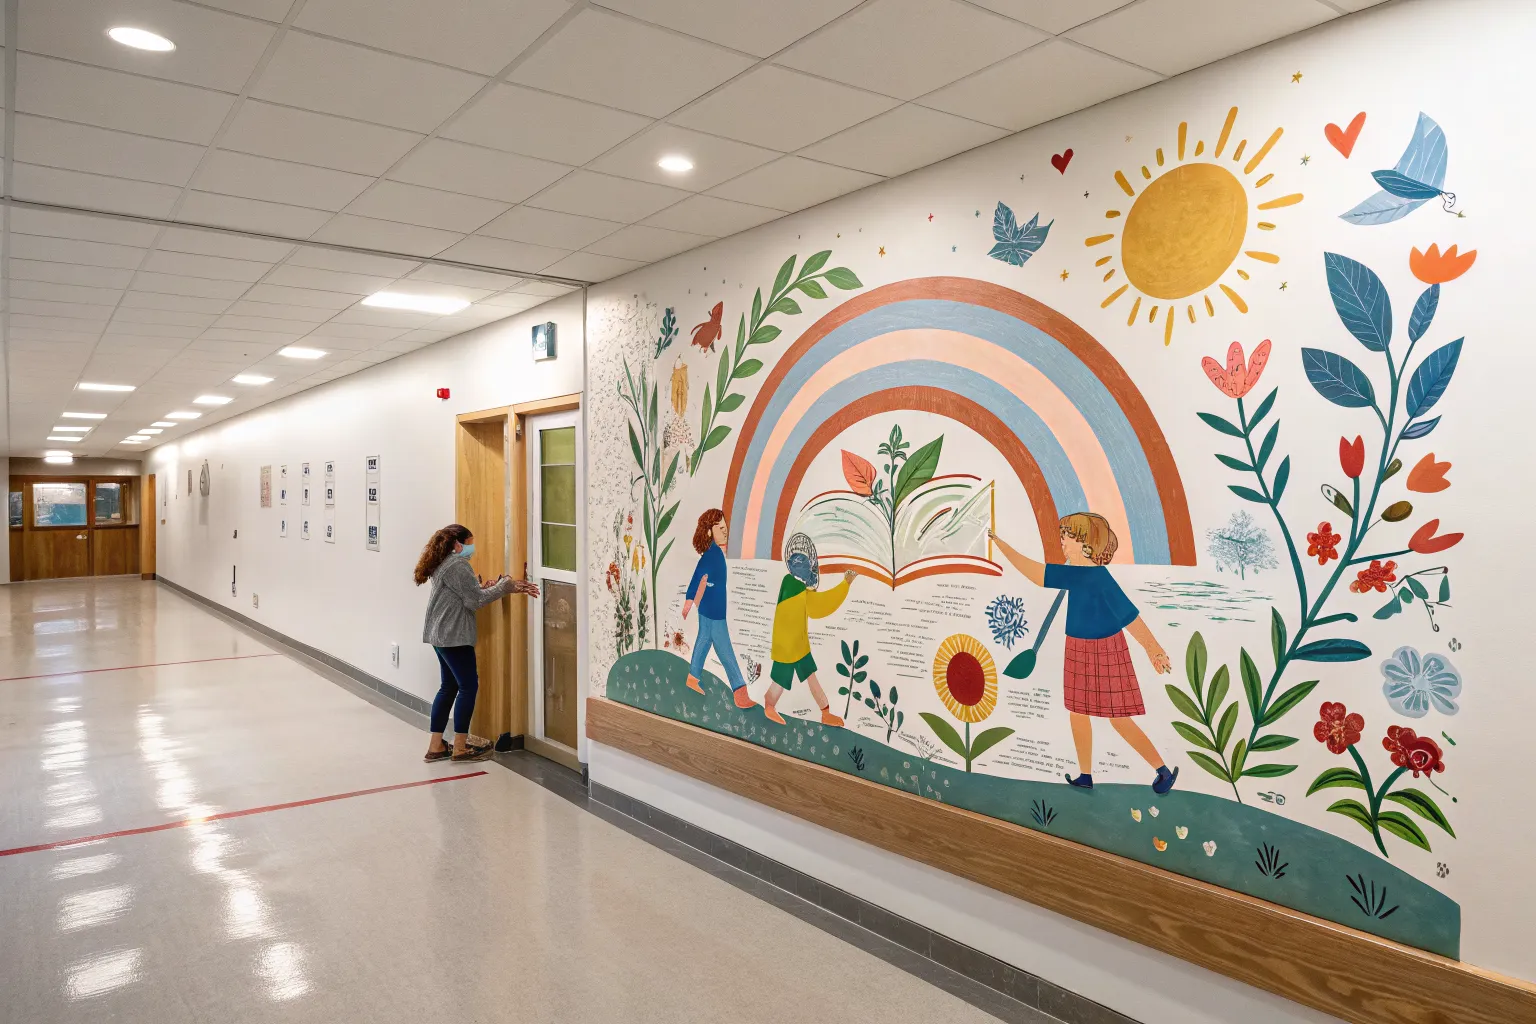
An elementary school mural can turn a plain hallway into a space that feels joyful, safe, and full of possibility. I pulled together my favorite elementary school mural ideas—starting with classic themes kids instantly connect with and ending with a few creative twists that make the walls feel interactive.
Be Kind Word Wall
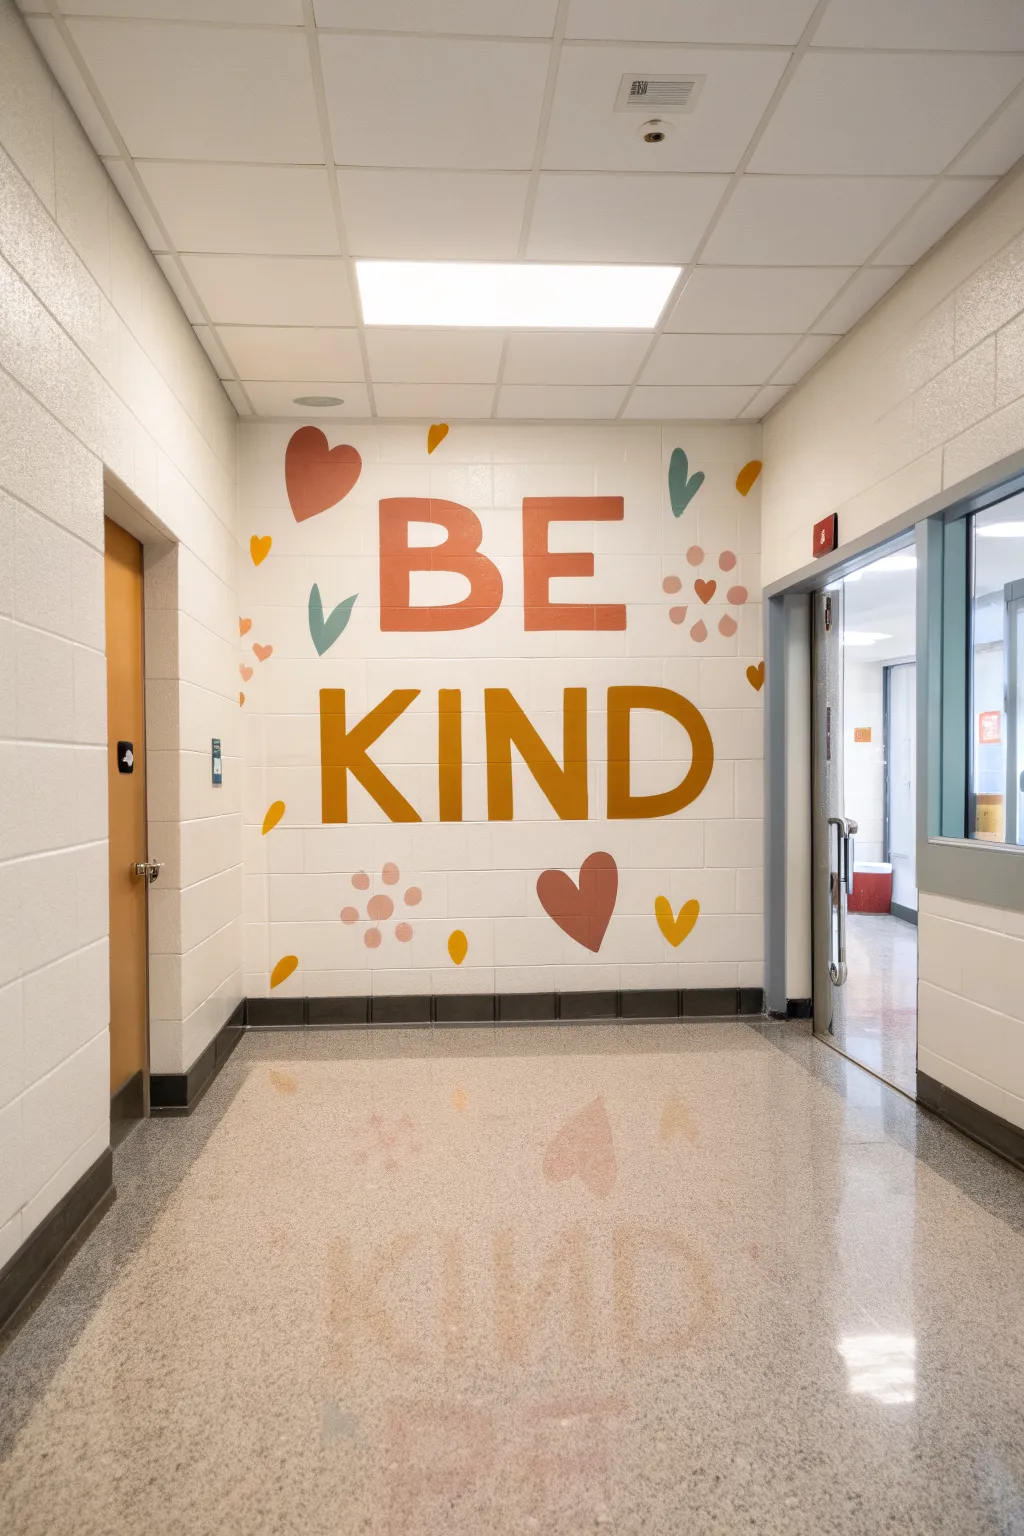
Transform a plain hallway wall into a daily affirmation with this inviting and simple typographic mural. Using a warm, earthy color palette and playful organic shapes, this project spreads a message of kindness that brightens up any school corridor.
Detailed Instructions
Materials
- Interior latex wall paint (Rust/Terracotta)
- Interior latex wall paint (Mustard Yellow)
- Interior latex wall paint (Muted Teal/Sage)
- Interior latex wall paint (Pale Peach/Pink)
- Painter’s tape (1.5 inch or wider)
- Level (2-foot or longer)
- Measuring tape
- Chalk or pencil
- Projector (optional but recommended)
- Angled sash brush (2 inch)
- Small flat artist brushes (for details)
- Small foam roller and tray
- Drop cloth
- Ladder or step stool
Step 1: Preparation and Layout
-
Clean the surface:
Before starting, wipe down the entire wall area with a damp cloth and mild detergent to remove dust and fingerprints. A clean surface ensures the paint adheres properly and lasts longer in a high-traffic area. -
Protect the area:
Lay down a drop cloth at the base of the wall. Use painter’s tape to mask off the baseboard, the adjacent wall corner, and the door frame trim to protect them from stray brushstrokes. -
Determine placement:
Measure the total width and height of your available wall space. Calculate the center point both vertically and horizontally, and mark this lightly with a pencil. -
Grid or project the text:
If you have a projector, cast the words ‘BE KIND’ onto the wall so they are centered. If working manually, use your level to draw faint horizontal guidelines for the top and bottom of each text line. The word ‘BE’ should sit comfortably above ‘KIND’. -
Draft the letters:
Trace the outline of the letters onto the wall using chalk or a light pencil. I find chalk is more forgiving if you need to wipe away mistakes. Aim for a bold, sans-serif font style that is easy to read.
Clean Lines Pro-Tip
For ultra-crisp letter edges, paint a thin layer of the existing wall color over your stencil or tape outline first. This seals the edge so your colored paint won’t bleed underneath.
Step 2: Painting the Typography
-
Outline ‘BE’:
Open your rust or terracotta colored paint. Using a 2-inch angled sash brush, carefully cut in the edges of the letters ‘B’ and ‘E’. Keep a steady hand to maintain crisp, straight lines. -
Fill the top letters:
Once outlined, use a small foam roller or continue with your brush to fill in the body of the letters. Apply two coats if necessary for solid opacity, letting the paint dry to the touch between coats. -
Outline ‘KIND’:
Switch to your mustard yellow paint. Just like before, use a clean angled brush to outline the perimeter of the letters K, I, N, and D. -
Fill the bottom letters:
Fill in the yellow letters completely. Yellow paint can sometimes be translucent, so be prepared to apply a third coat to get that rich, saturated look shown in the photo. -
Touch up edges:
Inspect your lettering. If any edges look wobbly, use a small flat artist brush to sharpen them up. Allow the lettering to dry completely before adding decorative elements.
Step 3: Adding Decorative Elements
-
Sketch organic shapes:
Lightly sketch the accompanying shapes around the text. Place a large heart near the top left and bottom right, and scatter smaller leaves and teardrop shapes to fill the negative space without overcrowding it. -
Paint the large hearts:
Using the rust color again, paint the large heart shapes. I like to use a medium round brush here to easily navigate the curves of the heart. -
Add teal leaves:
Dip a brush into your muted teal or sage paint. create the leaf-like shapes—specifically looks for the ‘V’ shaped double leaf on the left and the single leaf near the top right. -
Create yellow accents:
Using the mustard yellow, add small teardrop shapes or ‘falling petals’ near the corners and bottom. Keep these strokes fluid and slightly imperfect for an organic feel. -
Paint the flower dots:
With the pale peach paint, create the circular patterns. Group five or six small circles together to form abstract flower shapes, and add solid peach circles or small hearts elsewhere for balance. -
Final review:
Step back to the other side of the hallway to view the composition as a whole. If a spot looks too empty, add a small dot or heart to balance the weight. -
Clean up:
Once the paint is fully dry (usually after a few hours), slowly peel off the painter’s tape at a 45-degree angle to reveal your clean edges.
Level Up: Interactive Wall
Paint the larger hearts with chalkboard paint or dry-erase paint (tinted to match). This allows students or teachers to write daily kindness challenges or appreciations directly on the mural.
Now you have a vibrant, encouraging statement piece ready to inspire everyone who walks through the halls


Diversity Handprint Rainbow

Transform a plain white corridor wall into a vibrant celebration of diversity using simple handprints and a bright, textural rainbow. This large-scale mural combines structured painting with playful, personalized touches, making it a perfect community-building project for schools.
Step-by-Step
Materials
- White exterior/interior primer (if starting on bare wall)
- High-quality acrylic exterior latex paint (Red, Pink, Orange/Yellow, Green, Blue, Purple)
- Painter’s tape or painter’s masking paper
- Chalk or pencil for sketching
- String and a push pin (for making a compass)
- Assorted paintbrushes (large flat brushes for the rainbow, smaller ones for touch-ups)
- Paint rollers and trays
- Drop cloths
- Paper plates (for handprint stations)
- Baby wipes or a washing station
Step 1: Preparing the Canvas
-
Clean the surface:
Before laying down any color, ensure the stucco or concrete wall is thoroughly cleaned of dust and dirt. A quick wash with a hose or sponge and mild detergent works well, but let it dry completely. -
Prime the wall:
If the wall isn’t already a bright, clean white, roll on a coat of white primer. This ensures the rainbow colors and handprints will pop vividly against the background. -
Mark the center point:
Determine the center bottom point of where you want your rainbow to originate. Mark this spot low on the wall, near the floor or baseboard. -
Sketch the arcs:
Using the string-and-pin method, anchor a string at your center mark. Tie a piece of chalk to the other end and draw large, concentric semi-circles to outline the bands of the rainbow. Space them evenly, leaving a slightly wider white gap in the very center for text.
Clean Hands Fast
Keep a bucket of warm soapy water and a pile of old towels right next to the wall. Washing paint off immediately prevents smudges on the mural later.
Step 2: Painting the Rainbow
-
Paint the outer red band:
Start with the outermost arch using a deep red acrylic paint. Use a brush to carefully cut in the edges along your chalk lines, then fill the center with a roller or larger brush for speed. -
Add the pink layer:
Move inward to the next band, painting it a soft pink. I find that slightly overlapping the wet edges with the neighbor color can create a nice blended effect, but distinct bands work well here too. -
Yellow and green bands:
Continue filling in the arches, painting the next band yellow, followed by a vibrant green band. Apply two coats if the stucco texture is absorbing too much pigment. -
Blue and purple interior:
Finish the rainbow structure with a blue band and finally a purple or indigo band on the innermost curve. Allow the base coats of the rainbow to dry fully. -
Add texture details:
Once the base colors are dry, use a smaller brush and a slightly lighter shade (or white) to add scribbled, textural hatch marks over the rainbow bands. This gives it that drawn-on, artistic look rather than a flat block of color.
Texture Trick
For the scribbled texture on the rainbow, dry-brushing works best. Wipe most of the paint off your brush so the strokes look scratchy and uneven.
Step 3: The Handprint Finish
-
Set up print stations:
Prepare paper plates with dollops of various paint colors. It’s best to have students work in small groups to manage the mess. -
Apply floating handprints:
Have contributors dip their hands in paint and press them onto the white space surrounding the rainbow. Scatter them randomly—some high, some low—using different colors like purple, blue, green, yellow, and red to mimic falling confetti. -
Create the center motif:
In the white space under the rainbow arch, cluster several handprints closely together in a vertical arrangement to look like flowers or a bursting plant. -
Stencil the text:
Use a stencil or carefully freehand the school name or a quote in the center beneath the rainbow. Black paint provides the best contrast here. -
Seal the mural:
If this is an outdoor wall exposed to elements, apply a clear, non-yellowing masonry sealer over the entire mural once the paint has cured for at least 24 hours.
Step back and enjoy the colorful legacy your community has created together


Tree of Learning Leaves
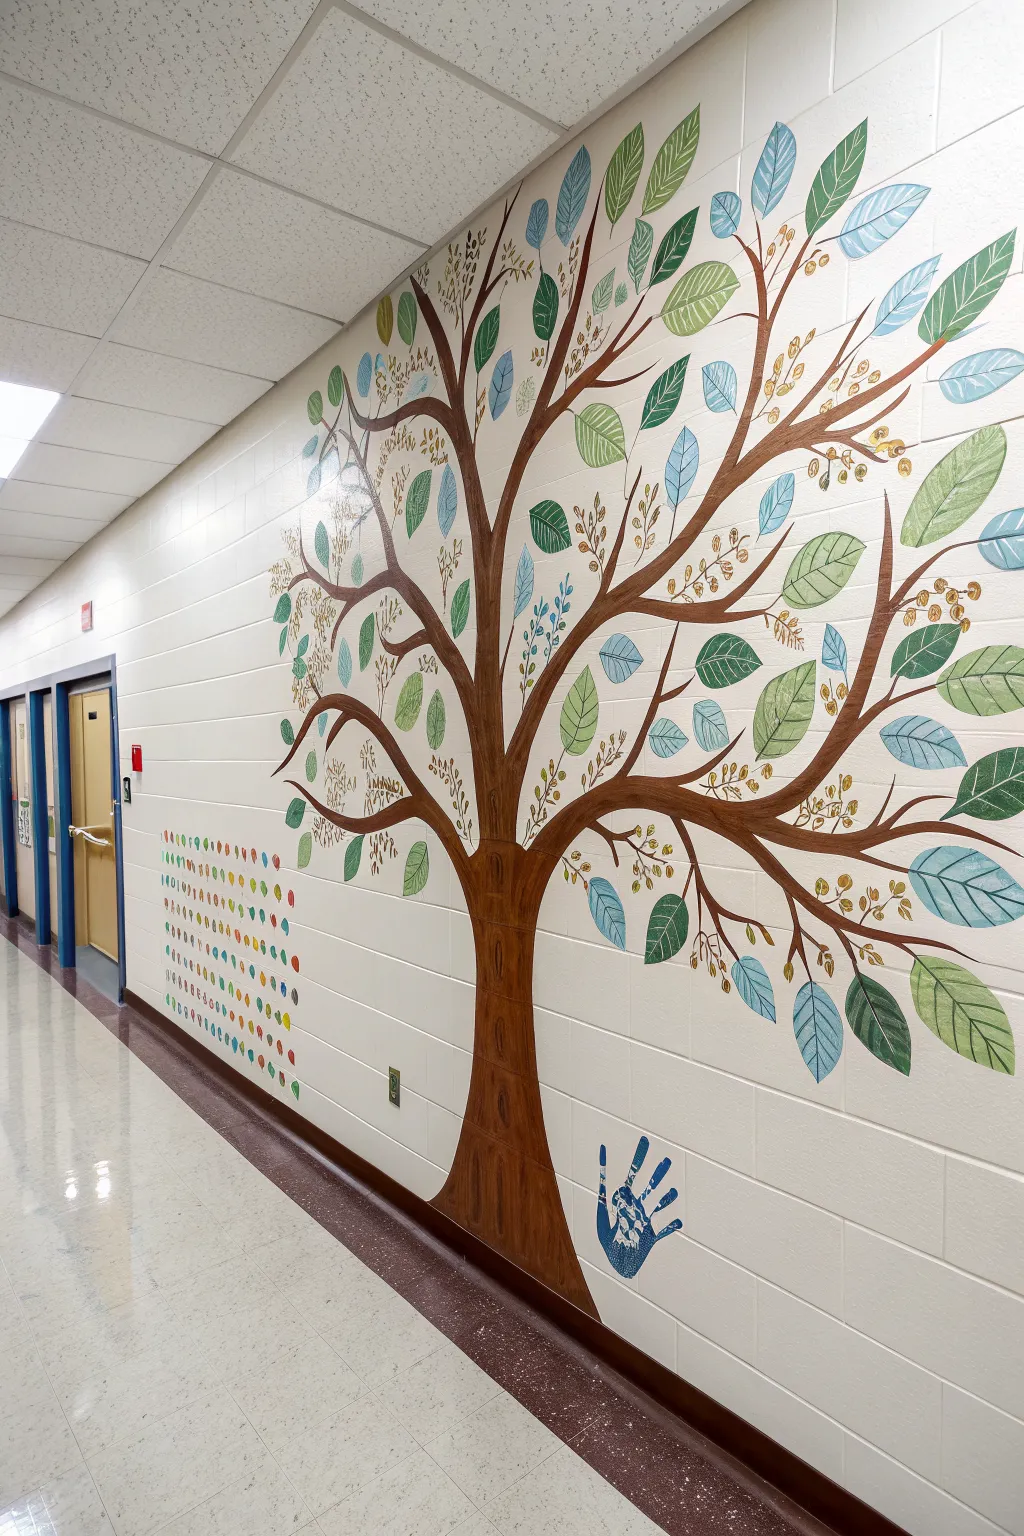
Transform a blank hallway wall into a flourishing symbol of growth with this stylized tree mural. By combining bold brown branches with a cool palette of patterned leaves, you’ll create an inviting and peaceful piece of art for students to admire.
Step-by-Step Guide
Materials
- Interior latex wall paint (dark brown, forest green, sage green, sky blue, navy blue)
- Pencil and large eraser
- Painter’s tape
- Angled sash brushes (2-inch and 1-inch)
- Small round detail brushes (sizes 4 and 6)
- Flat artist brushes (1/2-inch)
- Step ladder
- Drop cloth
- Projector (optional but recommended)
Step 1: Setting the Roots
-
Prepare the workspace:
Begin by cleaning the wall surface with a mild soap and water solution to remove any dust or school hallway grime. Lay down a drop cloth along the baseboard and secure it with painter’s tape to protect the floor. -
Draft the trunk:
Using a pencil, lightly sketch the outline of the tree trunk. Start wide at the bottom, mimicking the flare of roots, and taper it upward. I find it helpful to stand back frequently to ensure the trunk feels centered and balanced. -
Sketch the main branches:
Extend your pencil lines from the trunk to create the primary structural branches. Make them curvy and organic rather than straight, letting them reach out wide across the wall. -
Fill in smaller limbs:
Add secondary and tertiary branches that sprout from the main ones. Keep these lines thinner and lighter, ensuring they fill the negative space without looking cluttered.
Pro Tip: Smooth Curves
To get smooth, organic curves on branches, add a tiny splash of water to your brown paint. This improves flow and prevents the brush from dragging.
Step 2: Painting the Structure
-
Outline the bark:
Using a 1-inch angled sash brush loaded with dark brown paint, carefully trace over your pencil outlines for the trunk and main branches to establish a crisp edge. -
Fill the trunk:
Switch to a larger 2-inch brush to fill in the body of the trunk and the thickest branches. Apply two coats if necessary to get a solid, opaque coverage. -
Paint thin branches:
Use a round detail brush or a small flat artist brush to paint the thinner, winding branches at the ends. Taper your strokes at the very tips so they end in sharp points rather than blunt distinct lines. -
Add texture details:
Once the brown base is dry, take a slightly lighter brown or diluted version of your base color. Use a small brush to add vertical streaks and knots on the trunk to simulate the texture of bark.
Troubleshooting: Drips
If paint drips down the wall, don’t wipe it while wet! Let it dry completely, then sand it down gently with fine-grit sandpaper and touch up the spot.
Step 3: Cultivating the Foliage
-
Plan leaf placement:
Lightly sketch leaf shapes scattered along the branches. Aim for a mix of simple ovals and pointed ellipse shapes to create variety. -
Paint base leaves:
Start with your darkest forest green paint. Fill in about a third of the sketched leaves using a flat artist brush, distributing them evenly across the tree. -
Add varied tones:
Clean your brush and move on to the sage green color. Paint another third of the leaves, ensuring they don’t clump together with the first color. -
Introduce cool hues:
Finish the remaining leaf outlines with sky blue and navy blue paints. This cool color palette gives the mural a calm, modern feel compared to traditional bright greens. -
Detail the veins:
Mix a small amount of white paint into each leaf color to create a lighter tint. Use a size 4 round brush to paint delicate veins inside each leaf for added dimension.
Step 4: Finishing Touches
-
Add decorative seeds:
Using a golden-brown or ochre color, paint clusters of small dots or ‘seeds’ hanging from certain branches. This fills empty spaces and adds a whimsical touch. -
Incorporate the handprint:
Near the base of the trunk, paint a single handprint in blue or allow a student/teacher to place a real paint handprint there as a signature. -
Create a color grid:
To the left of the tree, paint a small grid of colorful thumbprint-sized dots using the palette colors. This acts as a decorative legend or growth chart element. -
Clean up:
Once all paint is fully dry, gently erase any visible pencil sketch lines. Peel up the painter’s tape slowly at a 45-degree angle to reveal your clean baseboards.
Step back and enjoy the lasting shade of your beautiful indoor tree


Growth Mindset Garden
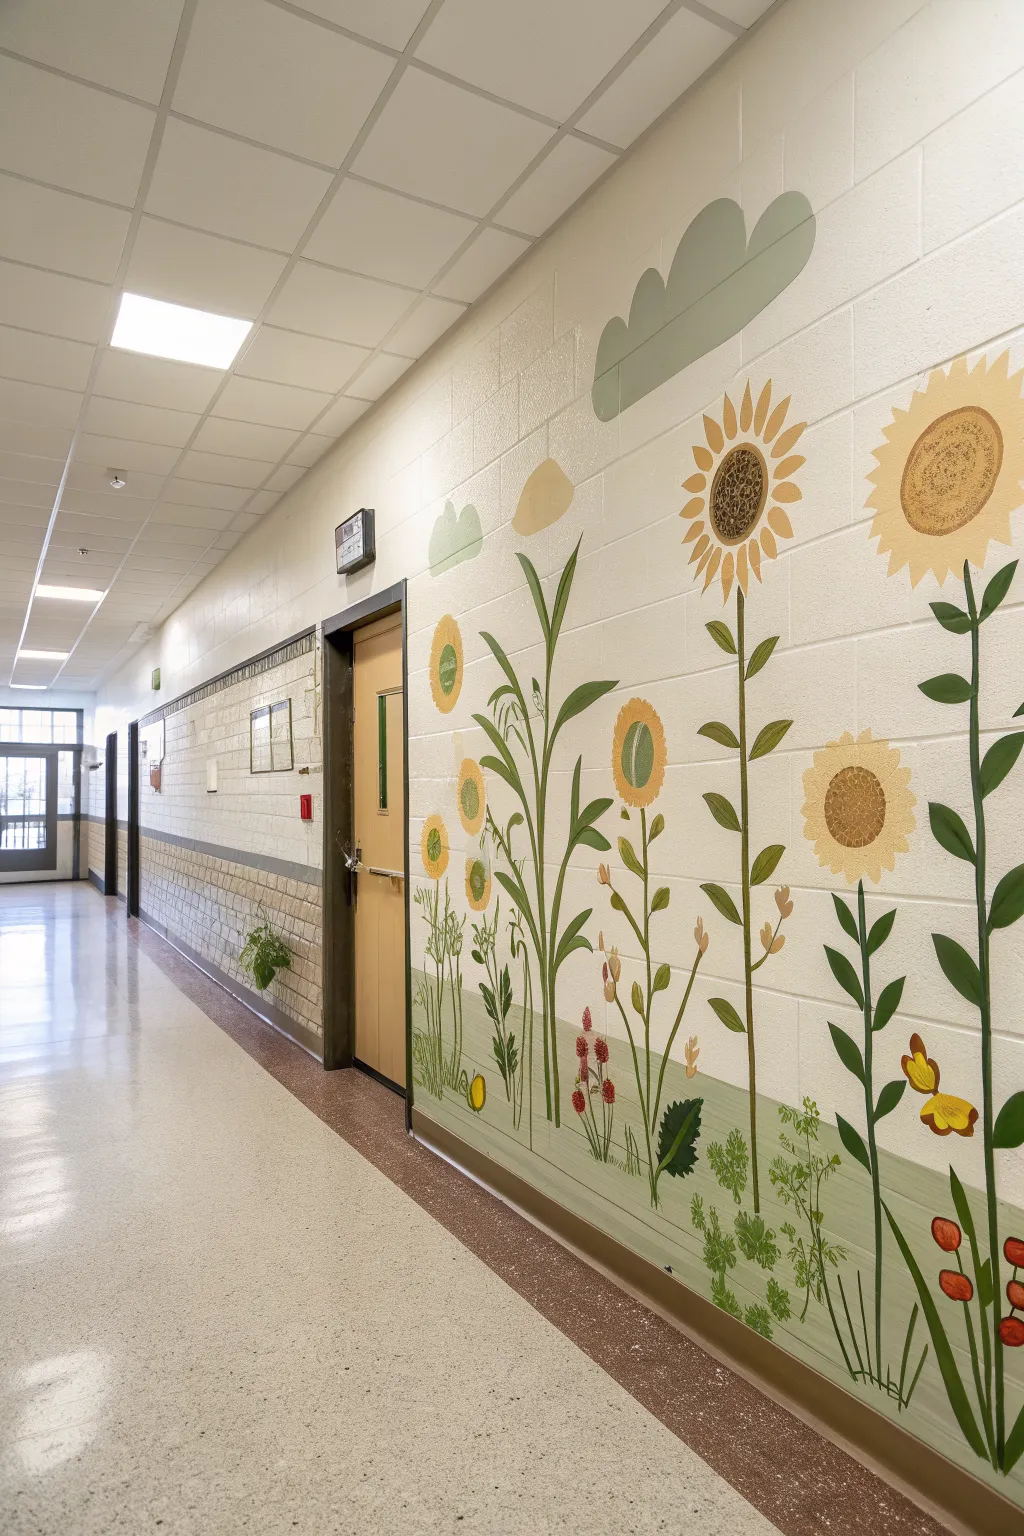
Transform a blank hallway corridor into a thriving garden scene with this large-scale mural project. Featuring towering sunflowers and corn stalks painted directly onto cinder block walls, this artwork adds warmth and a natural touch to institutional spaces.
Detailed Instructions
Materials
- Interior acrylic latex paint (eggshell or satin finish)
- Painter’s tape (various widths)
- Drop cloths
- Pencils and large erasers
- Chalk (white or yellow)
- Assorted paintbrushes (2-inch sash brushes, 1-inch flat brushes, various round detail brushes)
- Wall primer (if the wall is unpainted)
- Step ladder
- Mixing cups/containers
- Paper towels and water jars
Step 1: Preparation and Background
-
Clean the surface:
Begin by wiping down the cinder block wall with a damp cloth and mild detergent to remove dust and grime. If the wall has never been painted, apply a coat of white masonry primer first. -
Tape the horizon:
Create the ground line by running a long strip of painter’s tape horizontally along the lower portion of the wall, roughly 12-18 inches from the floor. -
Paint the ground layer:
Paint the area below the tape with a soft sage green. Since cinder blocks have texture, use a brush to stipple paint into the grooves rather than just rolling over the surface. -
Sketch the layout:
Using chalk, loosely sketch the placement of your main elements: three tall sunflowers, two corn stalks, and a few clouds near the top. Chalk is easier to wipe off the rough wall than pencil.
Rough Wall Trouble
Cinder blocks soak up paint avidly. If your colors look patchy, don’t press harder; let the first coat dry fully and apply a second layer for solid opacity.
Step 2: Painting the Main Stems
-
Draft the stems:
Mix a medium olive green. Paint the thick, vertical stems for the sunflowers first, ensuring they stand straight but have slight natural curves. -
Add corn stalks:
For the corn-like plants, paint thinner, central stalks. Add long, arching leaves that curve outward and downward, typical of maize growth patterns. -
Paint sunflower leaves:
Along the main sunflower stems, add large, heart-shaped leaves alternating sides as you move up the stalk. Keep the green consistent with your stems for now. -
Fill in the base:
While the greens are wet, paint some simpler, grassy blades shooting up from the bottom horizon line to fill the negative space between the main plants.
Pro Tip: Consistency
Keep a consistent color palette by premixing large batches of your main greens and yellows in separate jars so your touch-ups match perfectly later.
Step 3: Blossoms and Fruits
-
Block in flower centers:
Using a dark yellow ochre or light brown, paint large circular centers for the sunflowers near the top of your stems. I find it helps to make these slightly oval to suggest perspective. -
Paint the petals:
Mix a bright, sunny yellow. Using a flat brush, stroke outward from the center circles to create the sunflower petals. Make them slightly pointed at the tips. -
Add secondary flowers:
Paint smaller, lower flowers using shades of ochre and orange. Create simple circular shapes with small centers to represent varieties like zinnias or coneflowers. -
Paint the clouds:
Mix a soft, muted grey-green (or mix your green with plenty of white). Paint simple, rounded cloud shapes floating near the ceiling, keeping the edges soft.
Step 4: Detailing and Textures
-
Detail the sunflower centers:
Once the ochre centers are dry, stipple dark brown dots tightly in the middle of each flower face to mimic seeds. -
Highlight the leaves:
Mix a lighter green and add a vein line down the center of each large leaf. Add a few highlights to the tops of the curving corn leaves to give them dimension. -
Add lower vegetation details:
Use a small round brush to add fern-like textures and tiny red buds near the ground level using a crimson red paint. -
Incorporate insects:
Paint small butterflies or bees near the flowers. A simple yellow silhouette with brown outline works well for a butterfly resting on a leaf. -
Refine edges:
Check the edges of your petals and leaves. Since block walls can make lines bumpy, use a small liner brush to crisp up any fuzzy edges. -
Remove tape and touch up:
Carefully peel off the horizon line tape. If any green bled through, touch up the line with the original wall color for a sharp finish.
Step back and admire how this vibrant garden brings life and color to the school hallway.
BRUSH GUIDE
The Right Brush for Every Stroke
From clean lines to bold texture — master brush choice, stroke control, and essential techniques.
Explore the Full Guide
Friendly Animal Welcome Scene
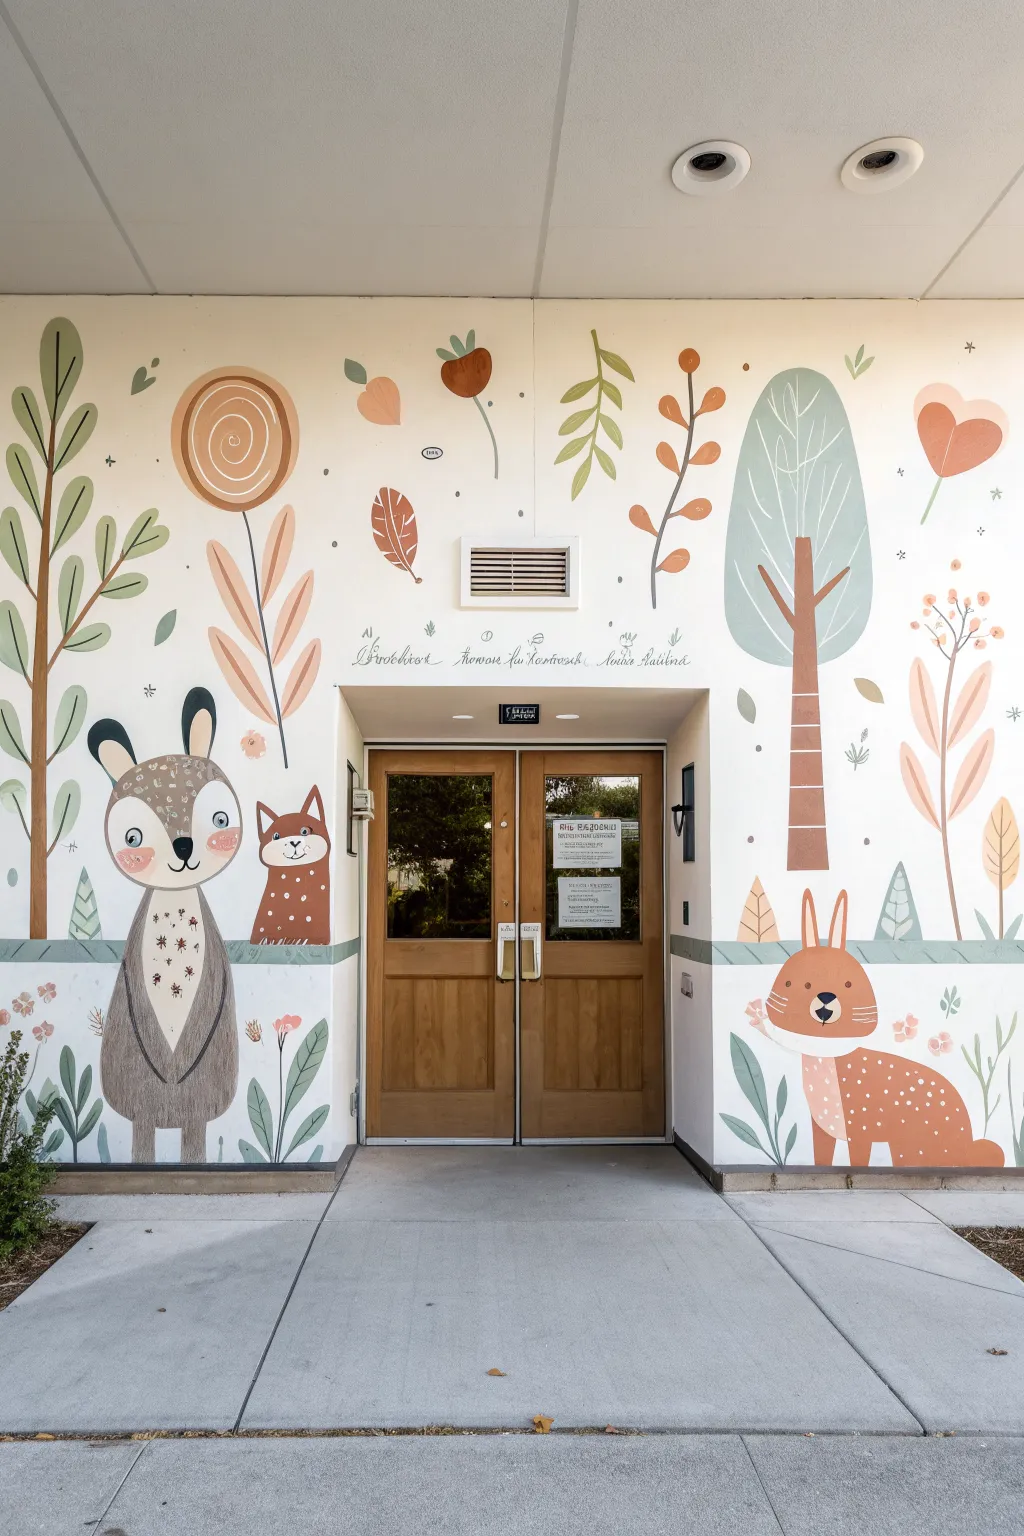
Transform a standard school entrance into a storybook forest with this charming nature-inspired mural. Utilizing soft earth tones and simplified shapes, this design features friendly woodland creatures and stylized botanical elements that create a warm, inviting atmosphere for students.
Step-by-Step
Materials
- Exterior or interior latex primer (white)
- High-quality acrylic mural paints (shades of sage green, terracotta, soft brown, cream, grey, and charcoal)
- Assorted paintbrushes (2-inch flat brushes for backgrounds, angled sash brushes, and fine liner brushes for details)
- Chalk or watercolor pencils for sketching
- Painter’s tape and drop cloths
- Stepladder
- Clear UV-protective topcoat (matte or satin finish)
Step 1: Preparation and Background
-
Prepare the surface:
Begin by cleaning the wall surface thoroughly to remove any dirt or oils. Tape off the door frame, baseboards, and any fixtures like the vent or light switch plates to ensure clean edges. -
Prime the wall:
Apply a solid coat of white primer over the entire wall area. This blank canvas is crucial for making the soft pastel colors pop without the original wall color bleeding through. -
Establish the horizon:
Measure about 2 to 3 feet up from the ground and use a level to lightly mark a horizon line. Paint a horizontal band in a muted teal or sage green to serve as the ground line where the animals will stand.
Clean Lines Pro-Tip
For the geometric hills and straight stems, use low-tack painter’s tape to mask off shapes. Paint over the tape edge with the background color first to seal it before applying your color.
Step 2: Sketching the Layout
-
Grid or project the design:
Because scale is important here, I find it helpful to project the design onto the wall if possible. Alternatively, sketch the large elements—the tall tree on the right and the tall plant on the left—first to frame the doors. -
Outline the characters:
Using a light-colored chalk or watercolor pencil, sketch the large grey rabbit on the left, the small fox behind it, and the rusty-orange rabbit on the right. Keep shapes simple and rounded. -
Place botanical elements:
Fill in the remaining negative space by sketching the floating leaves, the large spiral flower, and the stylized trees. Ensure these elements flow upwards and inwards to draw the eye toward the door.
Level Up: Interactive Text
Use a darker shade of the banner color to paint hidden words or positive affirmations inside the leaves or tree trunks for kids to discover.
Step 3: Painting Large Elements
-
Block in the rabbits:
Paint the left rabbit’s body with a warm grey acrylic, leaving the face and tummy areas for lighter cream creates later. For the right rabbit, use a terracotta or rust orange color for the body. -
Paint the large trees:
Fill in the large tree on the right using a pale sage green for the canopy and a medium brown for the trunk. For the tall plant on the far left, use a slightly darker olive green for the stem and leaves. -
Add secondary plants:
Working with a palette of soft pinks, ochres, and brownish-reds, paint the smaller leafy plants, the large spiral flower, and the mushroom-like shapes. Apply two coats if necessary for solid, opaque coverage. -
Detail the fox:
Paint the peeling-out fox behind the left rabbit using the same rust-orange palette, ensuring his head peeks just above the rabbit’s shoulder.
Step 4: Line Work and Details
-
Define the faces:
Once the base coats are fully dry, use cream paint to add the face patches and tummy areas on the animals. Let this layer dry completely before adding features. -
Add facial features:
Switch to a fine liner brush and charcoal or dark brown paint. Carefully paint the eyes, noses, and mouths. Add small white highlights in the eyes to bring the characters to life. -
Create texture details:
Use a small round brush to add decorative dots patterns: white dots on the fawn/fox’s back and the orange rabbit’s rear, and small star-burst patterns on the grey rabbit’s chest. -
Outline leaves and stems:
Add the thin stems connecting the floating leaves and flowers. You don’t need heavy black outlines; simply use a slightly darker shade of the object’s color to add veins to the leaves or definition to the tree trunks. -
Paint the text:
If including the script above the door, use a distinct grey or soft black paint. Use a very fine liner brush or a high-quality acrylic paint marker for better control over the lettering.
Step 5: Finishing Touches
-
Add floating accents:
Scatter small details like tiny dots, mini stars, or small floating leaves in the empty white spaces to balance the composition without cluttering it. -
Clean up edges:
Remove the painter’s tape carefully. Use a small angled brush and your white primer color to touch up any spots where the mural paint might have bled onto the trim. -
Seal the mural:
Allow the paint to cure for at least 24 hours. Apply a layer of clear, water-based UV-protective topcoat to protect the mural from fading and scuff marks, especially near the lower high-traffic areas.
This welcoming scene will greet students with a sense of calm and wonder every morning
Solar System Walk-Through
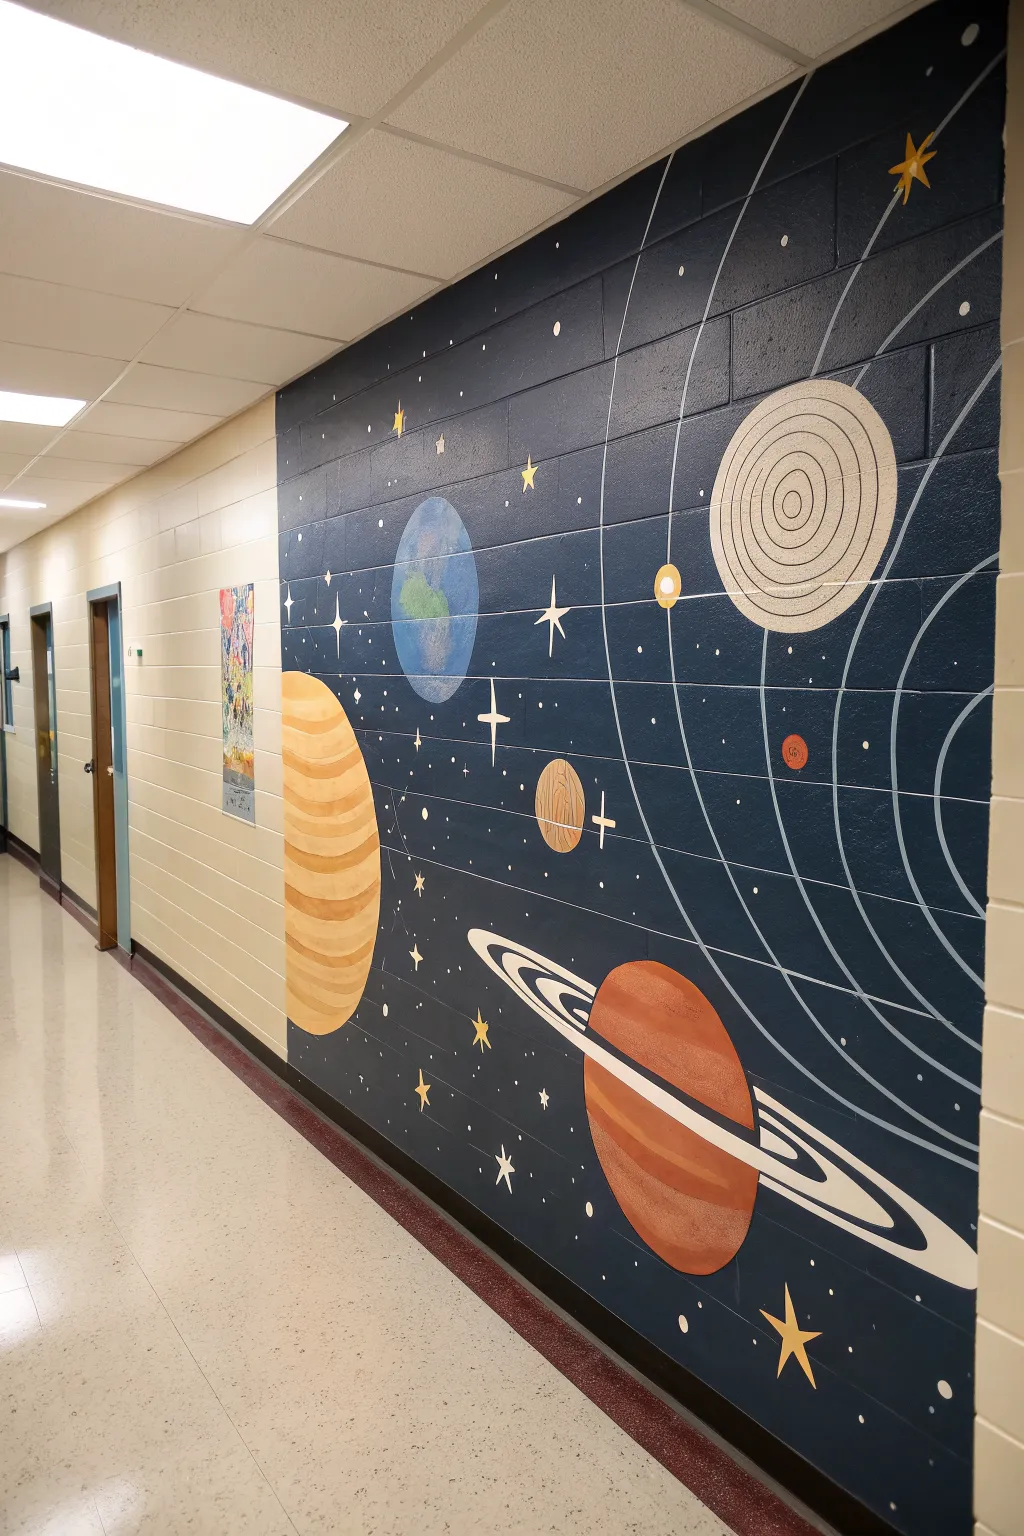
Transform a plain school corridor into an interstellar journey with this expansive solar system mural. Featuring bold, graphic planets against a deep navy expanse, this project uses clever concentric lines to create a sense of motion and depth on cinder block walls.
Step-by-Step Tutorial
Materials
- Interior semi-gloss latex paint (Deep Navy Blue for background)
- Acrylic mural paints (Yellow, Orange, Red, Brown, Light Blue, White, Black)
- Large paint rollers and extension pole
- Various sizes of bristle brushes (2-inch, 1-inch, and detail liners)
- Chalk or pastel pencil (white or light yellow)
- String and push pin (or tape) for compass method
- Painter’s tape
- Drop cloths
- Ladder
- Mixing cups/palettes
- Clear acrylic varnish (optional for sealing)
Step 1: Preparation & Background
-
Prep the surface:
Begin by cleaning the hallway wall thoroughly to remove dust and handprints. Tape off the baseboards, door frames, and ceiling edge with painter’s tape to ensure crisp lines. -
Lay the foundation:
Roll two generous coats of the Deep Navy Blue latex paint over the entire wall section. Let the first coat dry completely (usually 2-4 hours) before applying the second to ensure solid, opaque coverage without streaks. -
Map the orbits:
Once the blue base is bone-dry, use the ‘string compass’ method to sketch your orbital paths. Tape one end of a string to a focal point far to the right (off-camera in the reference), tie chalk to the other end, and swing large arcs across the wall. -
Sketch the celestial bodies:
Using your chalk, outline the circles for the planets. Place a large partial planet (Jupiter) on the left, Earth towards the middle, and Saturn lower down. Vary the sizes to create perspective, but don’t worry about perfect scale accuracy. -
Paint the orbital lines:
Use a thin liner brush with light gray or watered-down white paint to trace over your chalk orbit lines. Keep a steady hand, or use a mahl stick to stabilize your arm against the wall.
Step 2: Planetary Details
-
Block in base colors:
Fill in each planet outline with its dominant base color. Use a yellow-ochre mix for Jupiter, solid blue for Earth, and a terra-cotta orange for Saturn. Apply two coats if the dark background shows through. -
Texture Jupiter:
For the large planet on the left, mix lighter yellow and darker orange shades. Paint curved horizontal bands to mimic gas giant stripes. I find that blending the edges while the paint is still wet creates a softer, more realistic transition. -
Detail Earth:
On the blue sphere, paint rough green shapes for continents. Add swirls of white with a dry-brush technique to represent distinct cloud formations and atmosphere. -
Create the Sun or Star:
For the large striped sphere (top right), paint a cream base. Once dry, use a steady hand to paint concentric dark rings inside it, resembling a diagram or stylized sun. -
adding Saturn’s ring:
Paint a stark white oval ring around the terra-cotta planet. Make sure the ring passes ‘behind’ the planet by breaking the line where the planet body sits. -
Refine the rings:
Add a thin black or dark blue line down the center of the white ring to separate it into bands. Clean up the edges where the ring meets the dark background for a sharp, graphic look. -
Paint smaller moons:
Fill in the smaller celestial bodies like the reddish Mars and the cream-colored moon. Keeping these simpler helps the larger planets stand out.
Clean Circles Tip
Make cardboard templates for smaller planets. Tape them to the wall and trace around them with chalk. This ensures your smaller spheres don’t turn into ovals.
Step 3: Stars & Finishing Touches
-
Add major stars:
Paint several four-pointed or five-pointed stars using bright yellow or white. Distribute them in empty negative spaces to balance the composition. -
Create a galaxy field:
Dip the handle end of a small brush into white paint and dot it onto the wall to create perfect circular distant stars. Vary the pressure to create different sizes. -
Shooting star details:
Add a few ‘cross’ shaped glimmers and tiny clusters of dots to suggest distant galaxies or star clusters. -
Clean up:
Step back and check for any splashes of navy blue that need touching up on the planets, or vice versa. Remove the painter’s tape carefully while the final touches are fully dry. -
Seal the work:
For a high-traffic hallway, apply a clear water-based polyurethane varnish over the bottom half of the mural to protect it from backpacks and scuffs.
Glow in the Dark
Mix phosphorescent paint into your white star paint or glaze over the finished stars. The hallway will transform into a glowing galaxy when the lights go out.
Now you have an educational masterpiece that will inspire students every time they walk to class

PENCIL GUIDE
Understanding Pencil Grades from H to B
From first sketch to finished drawing — learn pencil grades, line control, and shading techniques.
Explore the Full Guide
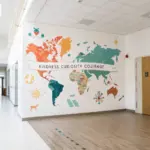
World Map With Animal Landmarks
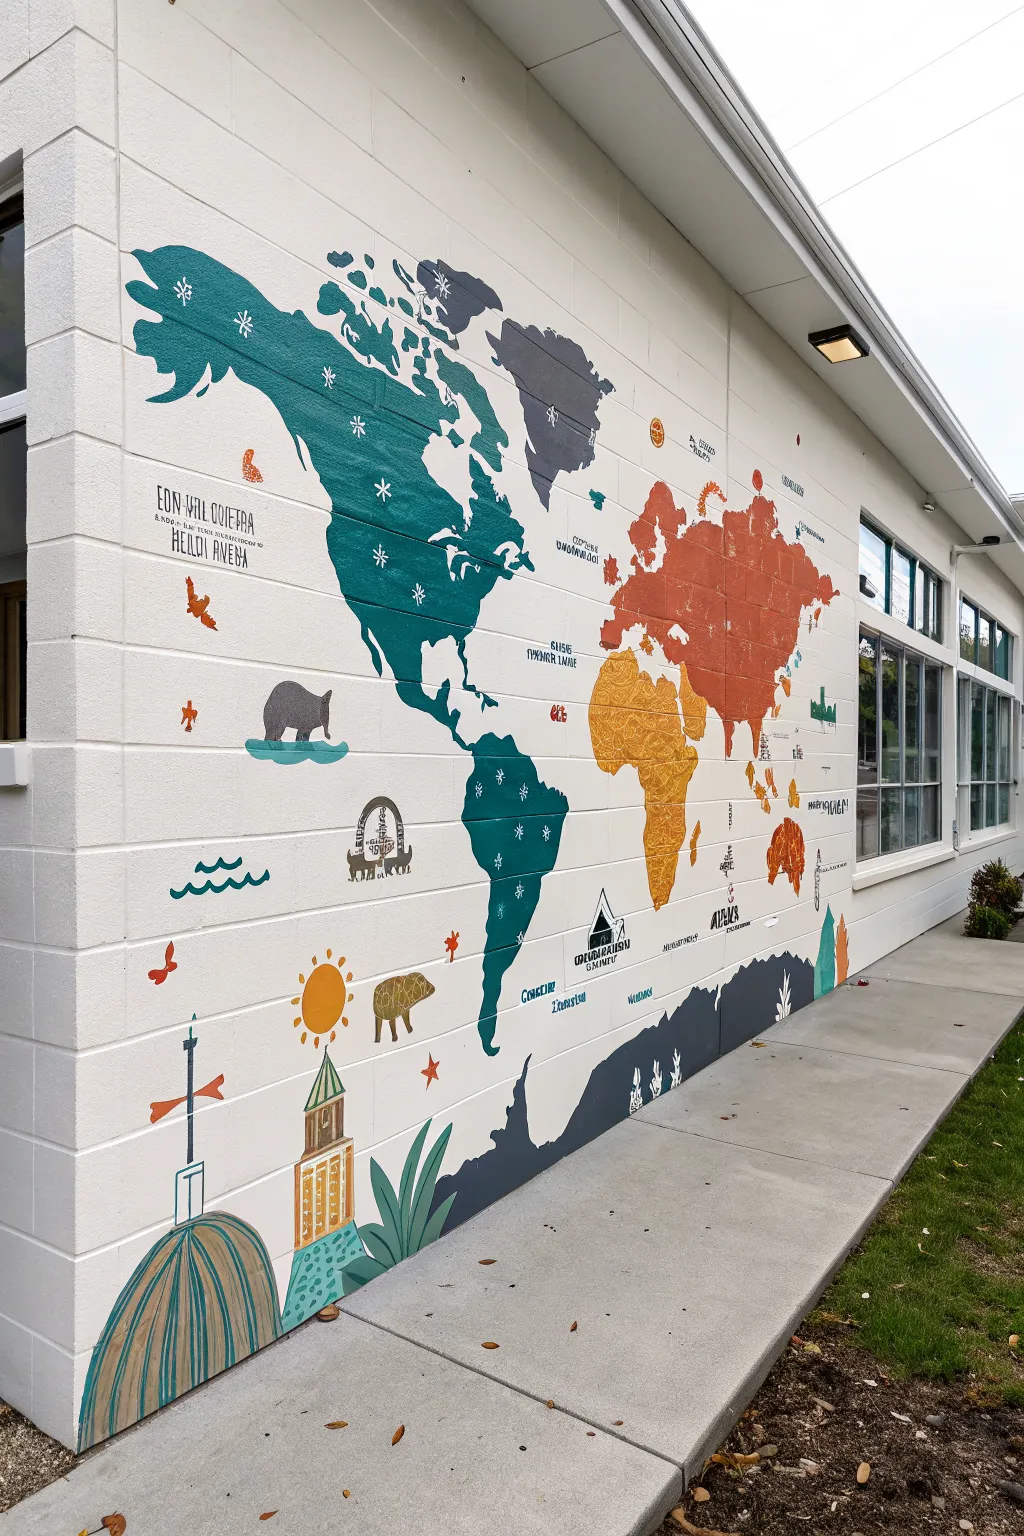
Transform a plain exterior or interior block wall into an engaging geography lesson with this stylized world map mural. Featuring simplified continents in bold, earthy tones and whimsical animal landmarks, this large-scale project combines education with clean, modern design.
Step-by-Step Guide
Materials
- Exterior masonry primer
- Exterior latex paints (Teal, Navy Blue, Burnt Orange, Mustard Yellow, Charcoal Grey, White)
- Projector or grid method supplies (chalk/pencil)
- Painters tape
- Assorted paintbrushes (large rollers, 2-inch angled sash brushes, small detail brushes)
- Drop cloths
- Ladder or step stool
- Computer with map design software
- Clear coat masonry sealer (optional)
Step 1: Preparation & Mapping
-
Prep the Surface:
Begin by thoroughly cleaning the brick or cinder block wall to remove dirt and debris. Once dry, apply a coat of high-quality masonry primer to ensure your colors pop and adhere properly to the textured surface. -
Set Up Projection:
Wait until evening or set up a dark enclosure to use a digital projector. Project your world map design onto the wall, adjusting the distance until the continents span the desired width and height. -
Trace the Outlines:
Using a piece of chalk or a soft pencil, carefully trace the outlines of the continents. Don’t worry about capturing every tiny coastline jaggedness; a stylized, smoother look works best for this graphic style. -
Mark Color Zones:
While the image is projected, lightly mark inside each continent which color it needs to be (e.g., ‘Teal’ for North America, ‘Orange’ for Asia) to avoid confusion later.
Step 2: Painting the Continents
-
Cut In Edges:
Start with North and South America using your deep teal paint. Use a 2-inch angled sash brush to carefully ‘cut in’ the edges of the continent, pressing the bristles into the grout lines of the blocks for a sharp line. -
Fill the Mass:
Use a small roller or a large brush to fill in the center of the teal landmasses. You may need two coats to get solid coverage over the porous block. -
Paint Eurasia:
Switch to your burnt orange or terracotta color for the European and Asian continent. I find it helpful to overlap the colors slightly where continents meet if your design style allows, but here, keep distinct boundaries. -
Paint Africa:
Apply the mustard yellow paint to the African continent. Pay attention to the Mediterranean sea gap to ensure separation from the orange section above. -
Add Accents:
Paint Greenland and other northern islands in the same teal or a lighter variation, and use charcoal grey for any specific stylized islands or landmasses you want to de-emphasize.
Rough Texture?
Painting on cinder blocks can chew up brushes. Use cheaper or older brushes for stabbing paint into deep pores, and save your high-quality tools for surface detail lines.
Step 3: Details & Graphic Elements
-
Bottom Landscape:
Create the stylized navy blue and charcoal mountain range along the bottom skirting of the wall. This grounds the mural and adds visual weight. -
Add Geographic Landmarks:
Using a small detail brush and white or black paint (depending on contrast), add the compass rose elements, specific text labels, or coordinate lines if your design calls for them. -
Paint the Waves:
In the open white spaces of your ‘ocean,’ paint stylized wave icons using a medium blue. Keep these simple—just a few curved lines grouped together. -
Illustrate Animals:
Now for the fun part: add the animal landmarks. Using stencils or freehand drawing, paint silhouettes like the grey bear in North America or the camel in Africa. Keep shapes simple and graphic. -
Architectural Icons:
Paint the stylized buildings, like the lighthouse tower or tents, near the bottom. Use a steady hand and a fine liner brush for vertical lines. -
Add Snowflakes and Trees:
On the darker landmasses (like the teal North America), use white paint to add small starburst snowflakes or tree icons to indicate climate sections.
Interactive Learning
Paint parts of the map with magnetic primer or chalkboard paint. This lets teachers add current event labels or let students mark places they’ve visited with chalk.
Step 4: Finishing Touches
-
Clean Up Lines:
Step back and inspect your edges. Use a small brush with your white background wall color to touch up any drips or wobbly lines on the continent borders. -
Grout Line Check:
Walk along the wall and check the deep grout lines between blocks. If paint missed these recesses, dab it in with an old brush to ensure no raw concrete shows through the design. -
Seal the Work:
If this is an exterior wall exposed to the elements, apply a clear, non-yellowing masonry sealer over the painted areas once completely dry to protect against UV fading and moisture.
Now you have a stunning, educational focal point that brings the whole world right to your school hallway.
Numbers and Shapes Math Trail
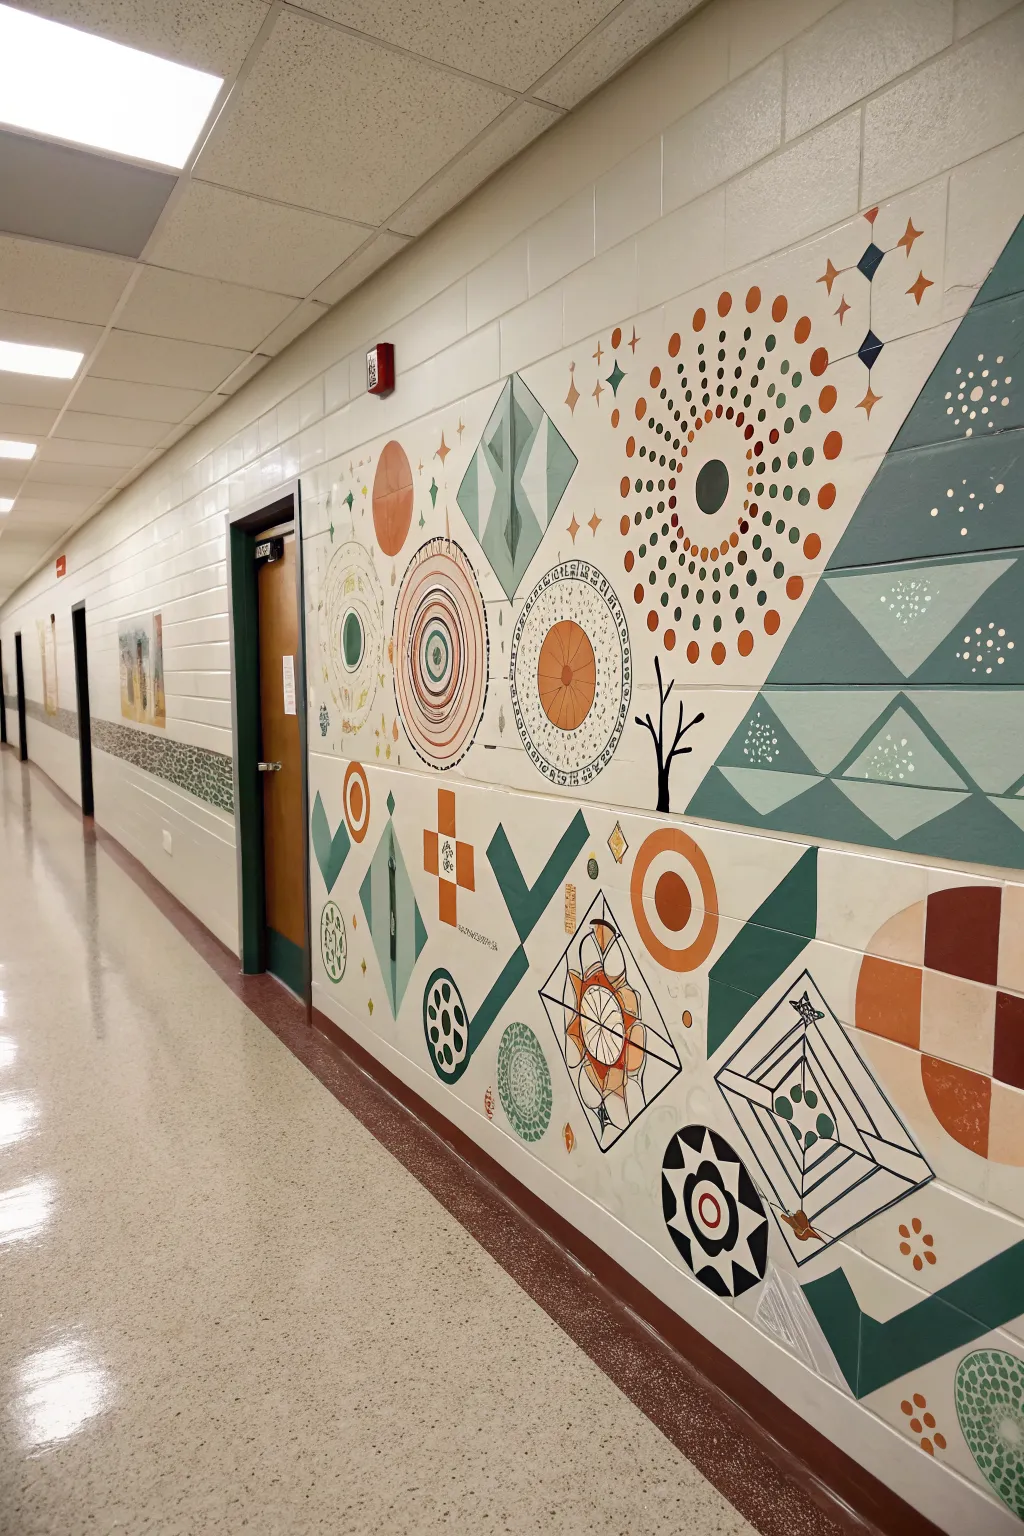
Transform a plain school hallway into an engaging educational landscape with this geometric mural featuring abstract shapes and patterns. Using a warm palette of terracotta, teal, and black, this design emphasizes mathematical concepts like symmetry, concentric circles, and tessellations.
How-To Guide
Materials
- Interior semi-gloss latex paint (white/base coat)
- Acrylic mural paints (Terracotta, Burnt Orange, Teal, Sage Green, Deep Green, Black)
- Painter’s tape (various widths: 1 inch, 2 inch)
- Chalk line for snapping grids
- Large T-square or straight edge level
- Pencil and eraser
- Circle templates or string compass (string, thumbtack, pencil)
- Assorted paintbrushes (1-inch flat, round detail brushes, angled sash brush)
- Small high-density foam rollers
- Drop cloths and paint trays
Step 1: Wall Preparation and Layout
-
Prepare the surface:
Clean the wall thoroughly to remove dust and handprints. If the existing color isn’t a clean white, apply a fresh base coat of white semi-gloss latex pant to ensure the geometric colors pop. -
Create horizontal guidelines:
This mural relies on a split composition. Use a long level or snap a chalk line horizontally across the entire length of the wall, roughly at waist height, to separate the upper and lower design fields. -
Establish the grid:
Since the wall is block construction, use the existing mortar lines as a natural guide. Lightly mark key vertical and horizontal intersection points with a pencil where major elemens like the large circles or triangles will sit.
Bleed-Proof Tape Lines
When painting geometric shapes, seal the edge of your painter’s tape with a thin layer of the *base wall color* first. This fills gaps so your colored paint sits perfectly on top with crisp lines.
Step 2: Blocking in Large Shapes
-
Draft the triangles:
On the right side of the wall, use painter’s tape to mark out the large, overlapping triangle sections. Press the edges of the tape down firmly to prevent paint bleed. -
Paint the geometric mountains:
Fill these taped triangular areas with your Teal and Sage Green hues. I find using a small foam roller here gives the smoothest finish without brush marks. -
Mark circular focal points:
While the triangles dry, move to the left and center sections. Use a string compass (a string tied to a pencil and anchored at the center) to lightly sketch the large concentric circles and radial bursts directly onto the wall. -
Paint solid circular elements:
Fill in the solid distinct circles—like the bold orange rings and the solid teal centers—using a steady hand and a flat 1-inch brush. Painting the perimeter first and then filling the center works best.
Step 3: Detailed Pattern Work
-
Create the radial dot burst:
For the large sunburst pattern near the top, load a round brush or a specialized round foam pouncer with paint. Start from the center ring and stamp or paint dots radiating outward, increasing the spacing slightly as you move away from the center. -
Draft the concentric rings:
For the spiral and concentric circle designs, carefully paint thin rings of alternating Terracotta and Black lines. A rigger brush (a long, thin liner brush) allows for smoother continuous curves than short standard brushes. -
Add the rhombus grid:
On the lower half, use a straight edge to draw the diamond and rhombus shapes. Tape off the edges if you aren’t confident with freehand lines, then fill them with alternating solid blocks of Burnt Orange and Teal. -
Execute the line drawings:
Using black paint and a fine detail brush, add the intricate line-work elements, such as the spiderweb-like geometric grids inside squares and the small tree branch silhouette near the center.
Pro Tip: Consistent Circles
For the perfectly round dots in the radial pattern, don’t use a brush. Use circular foam pouncers or even cut a household sponge into a circle. Load with paint, offload excess, and stamp.
Step 4: Finishing Touches
-
Stipple texture details:
Return to the large teal triangles on the right. Dip the end of a paintbrush or a Q-tip into white paint and add the snowy texture clusters and dot patterns inside specific triangular segments. -
Incorporate small distinct icons:
Paint the smaller floating elements, like the four-pointed stars and tiny diamond shapes, scattered around the upper -
Define the borders:
If any edges between shapes look messy, use the white background paint to carefully cut in and sharpen the lines, erasing any over-painting. -
Seal the mural:
In a high-traffic hallway, protection is key. Once the paint is fully cured (usually after 24-48 hours), apply a clear, water-based polyurethane topcoat to protect the work from scuffs and cleaning.
Step back and admire how the interplay of simple geometry and color creates a vibrant learning path for the students.


Music Notes Parade
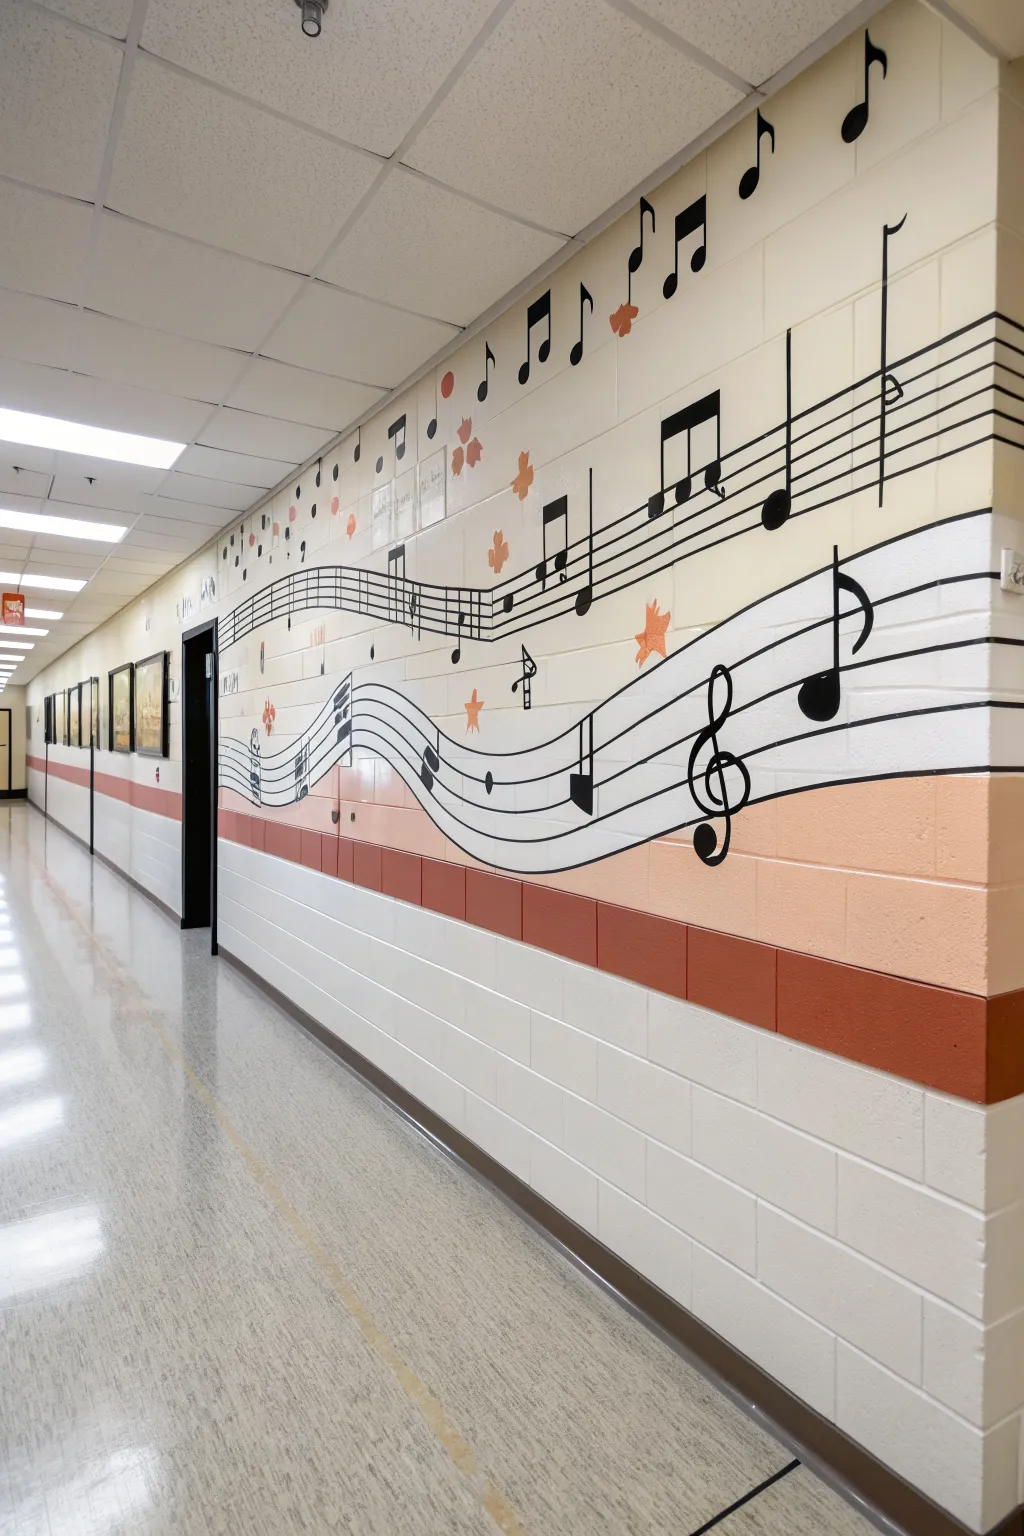
Transform a plain hallway into a rhythmic masterpiece with this flowing music staff mural. The design uses undulating lines and bold notes to create a sense of movement, perfect for guiding students down long corridors.
Step-by-Step Guide
Materials
- Interior latex paint (cream/off-white for the base)
- Interior latex paint (salmon/peach tone)
- Interior latex paint (rust red/terracotta tone)
- Black semi-gloss acrylic paint (for notes and lines)
- Orange acrylic paint (for accents)
- Roller brushes and trays
- Painter’s tape (various widths)
- Wide flat brush (1-2 inch)
- Fine detail brush or liner brush
- Pencil
- Long flexible ruler or yardstick
- Reference sheet of musical symbols
- Drop cloths
Step 1: Base Coat & Stripes
-
Prepare the wall:
Clean the corridor wall thoroughly to remove dust and handprints. Lay down drop cloths to protect the floor. -
Paint the upper section:
Roll on the main cream or off-white base color. Depending on the existing wall color, you might need two coats for opaque coverage. Let this dry completely overnight. -
Mark the stripe guidelines:
Measure up from the floor to create your horizontal bands. The bottom rust stripe looks to be about three cinder blocks high, and the salmon stripe above it is roughly two blocks high. -
Apply painter’s tape:
Use a level or follow the grout lines of the cinder blocks to apply long strips of painter’s tape to define the top edge of the salmon stripe and the boundary between the two colors. -
Paint the bottom stripes:
Fill in the bottom ection with the rust-red paint and the middle section with the salmon/peach paint. Remove the tape while the paint is still slightly tacky to ensure crisp lines.
Step 2: Staff Lines & Melody
-
Sketch the wave:
Using a pencil, lightly draw the undulating path of the musical staff. The staff should dip down into the salmon stripe and curve back up into the cream section. -
Draw the five lines:
Drawing parallel curved lines is tricky. I find it easiest to make a simple cardboard spacer tool to ensure the five lines of the staff remain equidistant as you trace the curve. -
Paint the staff lines:
Use a steady hand and a flat brush loaded with black paint to go over your pencil lines. For very long straight sections, you can use thin painter’s tape, but freehand looks more fluid on the curves. -
Outline the notes:
Sketch your musical notes (quarter notes, eighth notes, treble clef) onto the staff. Vary their height to simulate a real melody. -
Fill in the notes:
Paint the heads and stems of the notes with black semi-gloss paint. The gloss finish makes them pop against the matte wall. -
Add floating notes:
Paint larger, unattached notes floating above the main staff in the upper cream section to fill the negative space.
Wobbly Lines?
If your hand shakes while painting long staff lines, use a ‘mahl stick’ or simply rest your pinky finger against the dry wall to stabilize your brush hand.
Step 3: Accents & Details
-
Add orange accents:
Sketch small stars and maple leaf shapes interspersed among the notes. Keep these sparse to avoid clutter. -
Paint the accents:
Fill in these shapes with a pop of orange paint. This ties the design back to the warm tones of the lower wall stripes. -
Review and touch up:
Step back and check for any uneven lines or patchy black paint. Use a small detail brush to sharpen the corners of your music note stems and flags. -
Clean borders:
If any black paint dripped onto the colored stripes, use a small amount of the original wall color to carefully patch over the mistake.
School Spirit
Replace the generic music sheet with the actual notes from your school’s fight song or anthem for a hidden easter egg that music students will recognize.
Enjoy the rhythm your new artwork brings to the daily school commute
Sports and Teamwork Action Strip
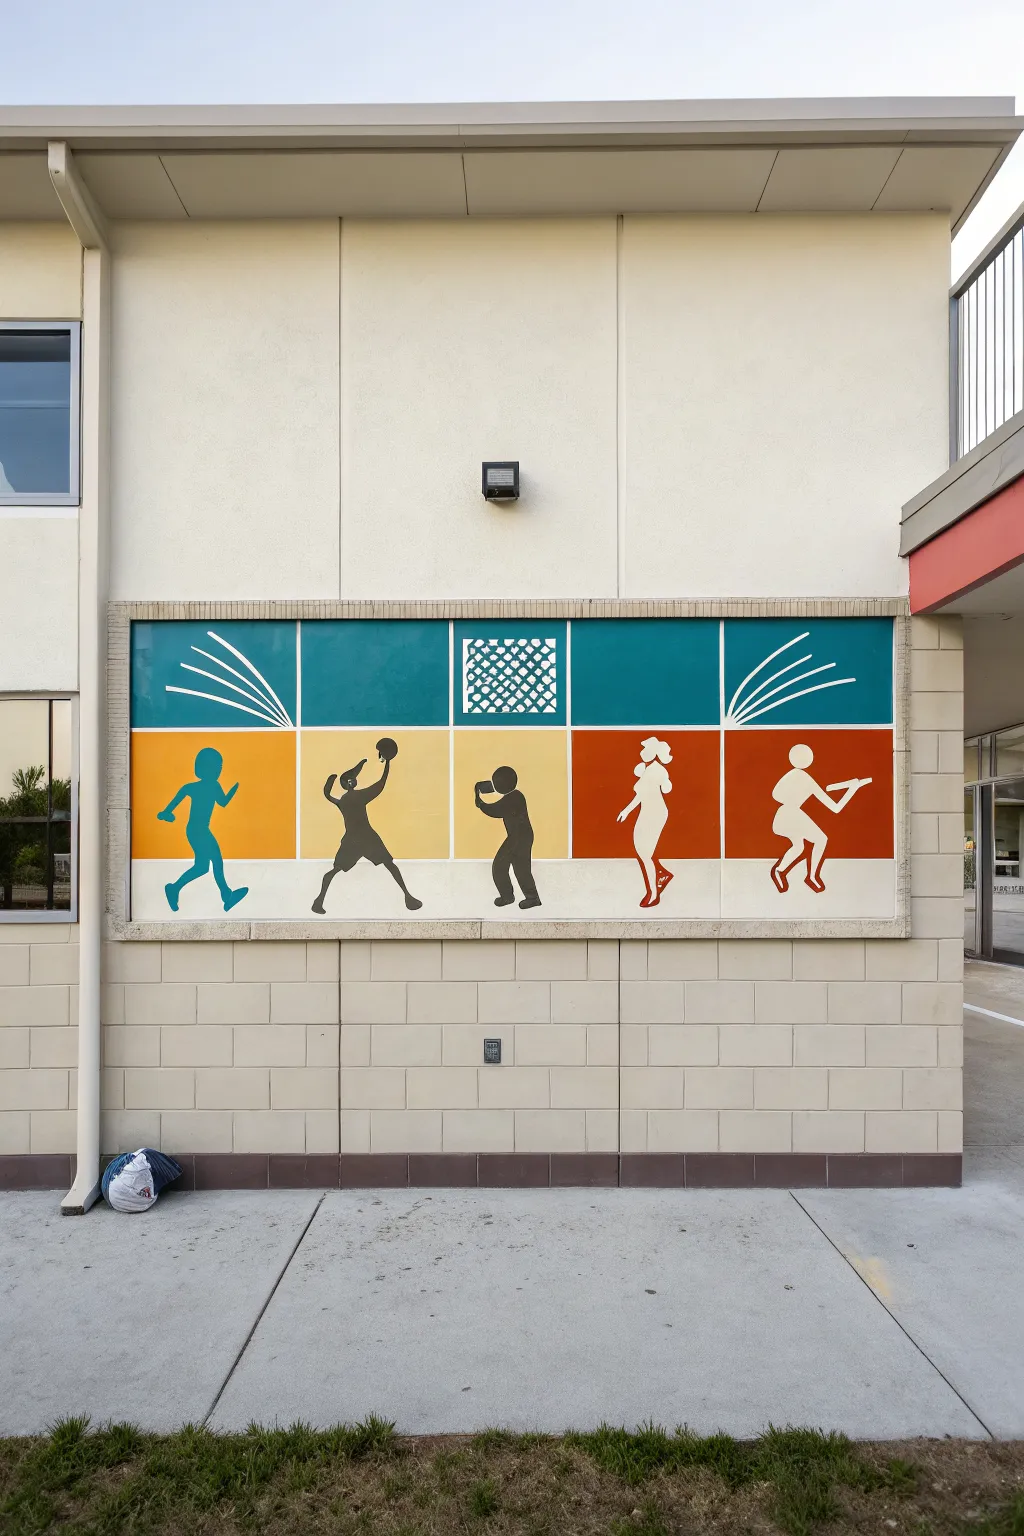
This vibrant outdoor mural captures the energy of student life through stylized silhouettes set against bold blocks of color. The design combines athletic motion, artistic expression, and abstract geometric patterns to create a dynamic frieze perfect for enlivening a plain school wall.
How-To Guide
Materials
- Exterior acrylic latex paint (Teal, Golden Yellow, Beige, Burnt Orange, Red-Orange, White, Dark Grey, Blue-Green)
- Primer (exterior masonry grade)
- Painter’s tape (various widths, including 1-inch and 2-inch)
- Chalk snap line
- Measuring tape
- Projector (for tracing figures)
- Chalk or pastel pencils for tracing
- Paint rollers (9-inch for large areas, 4-inch for smaller blocks)
- Angled sash brushes (2-inch and 1-inch)
- Small artist brushes for detail work
- Drop cloths
- Ladder or scaffolding (depending on height)
Step 1: Preparation and Grid Layout
-
Clean and Prime:
Begin by thoroughly cleaning the brick or stucco service to remove dirt and mildew. Once dry, apply a coat of high-quality masonry primer to the entire rectangular area where the mural will live, extending slightly beyond your final borders to ensure a clean edge later. -
Define the Perimeter:
Using a measuring tape and a level, mark the four corners of your long rectangular frieze. Use painter’s tape to mask off the outside border, creating a frame within the brickwork if one exists, or establishing your own straight edges on a flat wall. -
Establish the Horizontal Divide:
Measure exactly halfway down the height of your rectangle. Snap a chalk line horizontally across the entire width to separate the upper teal section from the lower color blocks. -
Mark Vertical Sections:
Divide the width of the mural into five equal vertical sections. Use a level and chalk to draw vertical lines that extend from the bottom edge up to the horizontal midway line, creating the five lower boxes. -
Tape the Grid:
Apply painter’s tape over your chalk lines. I prefer to tape *outside* the lines of the color blocks I’m about to paint so the blocks occupy the full measured space, but consistent placement is key.
Tape Removal Timing
Don’t let the paint fully cure before removing tape or it might peel. Pull tape when the paint is dry to the touch but still slightly flexible, usually about an hour after the last coat.
Step 2: Block Painting
-
Paint the Upper Section:
Fill the entire top half of the mural with a deep teal or turquoise exterior paint. Use a roller for the main areas and an angled brush to cut in sharply against the top tape border. Apply two coats for solid coverage. -
Paint the Lower Gradient:
Paint the five lower rectangular blocks in a warm gradient. Starting from the left, paint the first block golden yellow, the second beige/tan, the third a slightly darker beige, the fourth burnt orange, and the fifth a deep red-orange. Let these dry completely before removing any internal tape. -
Create White Gaps:
Once the color blocks are fully cured, carefully apply thin (1/4 inch or 1/2 inch) painter’s tape over the seams where the colors meet if you want crisp white separation lines. Alternatively, use a steady hand and a small flat brush to paint white grid lines over the color junctions.
Step 3: Figures and Details
-
Project the Silhouettes:
Wait until evening or use a high-lumen projector to cast the five figure designs onto the lower blocks. Center each figure within its colored square. Trace the outlines lightly with white chalk or a pastel pencil that will show up against the darker colors. -
Outline the Upper Graphics:
While projecting, also trace the white line designs in the upper teal section. These include the curved ‘book page’ lines on the far left and right, and the square cross-hatch pattern in the center. -
Paint the Figures:
Fill in the traced silhouettes. Use a blue-green paint for the runner on the far left. For the middle three figures (ball player, photographer, walker), use a dark charcoal or soft black. For the musician on the far right, use white paint to make it pop against the dark red background. -
Refine Edges:
Use a small, round artist brush to sharpen the edges of the figures, ensuring fingers, feet, and props (like the violin or camera) are distinct and readable. -
Paint Upper Details:
Using a liner brush and white exterior paint, carefully go over the curved lines and the central cross-hatch pattern in the teal section. Multiple thin coats are better here to avoid drips on the vertical surface. -
Final Touch-Ups:
Remove the perimeter tape slowly at a 45-degree angle. Walk the length of the mural with a small brush and the original background colors to touch up any spots where paint might have bled under the tape.
Drips on Brick?
If paint drips onto unpainted textured brick, don’t wipe it! Let it dry completely, then try to pick it off with a stiff wire brush. Wiping wet paint drives it deeper into the pores.
Step back and admire how the distinct color blocks and lively figures transform the building into a celebration of student activity.
Healthy Choices Cafeteria Wall
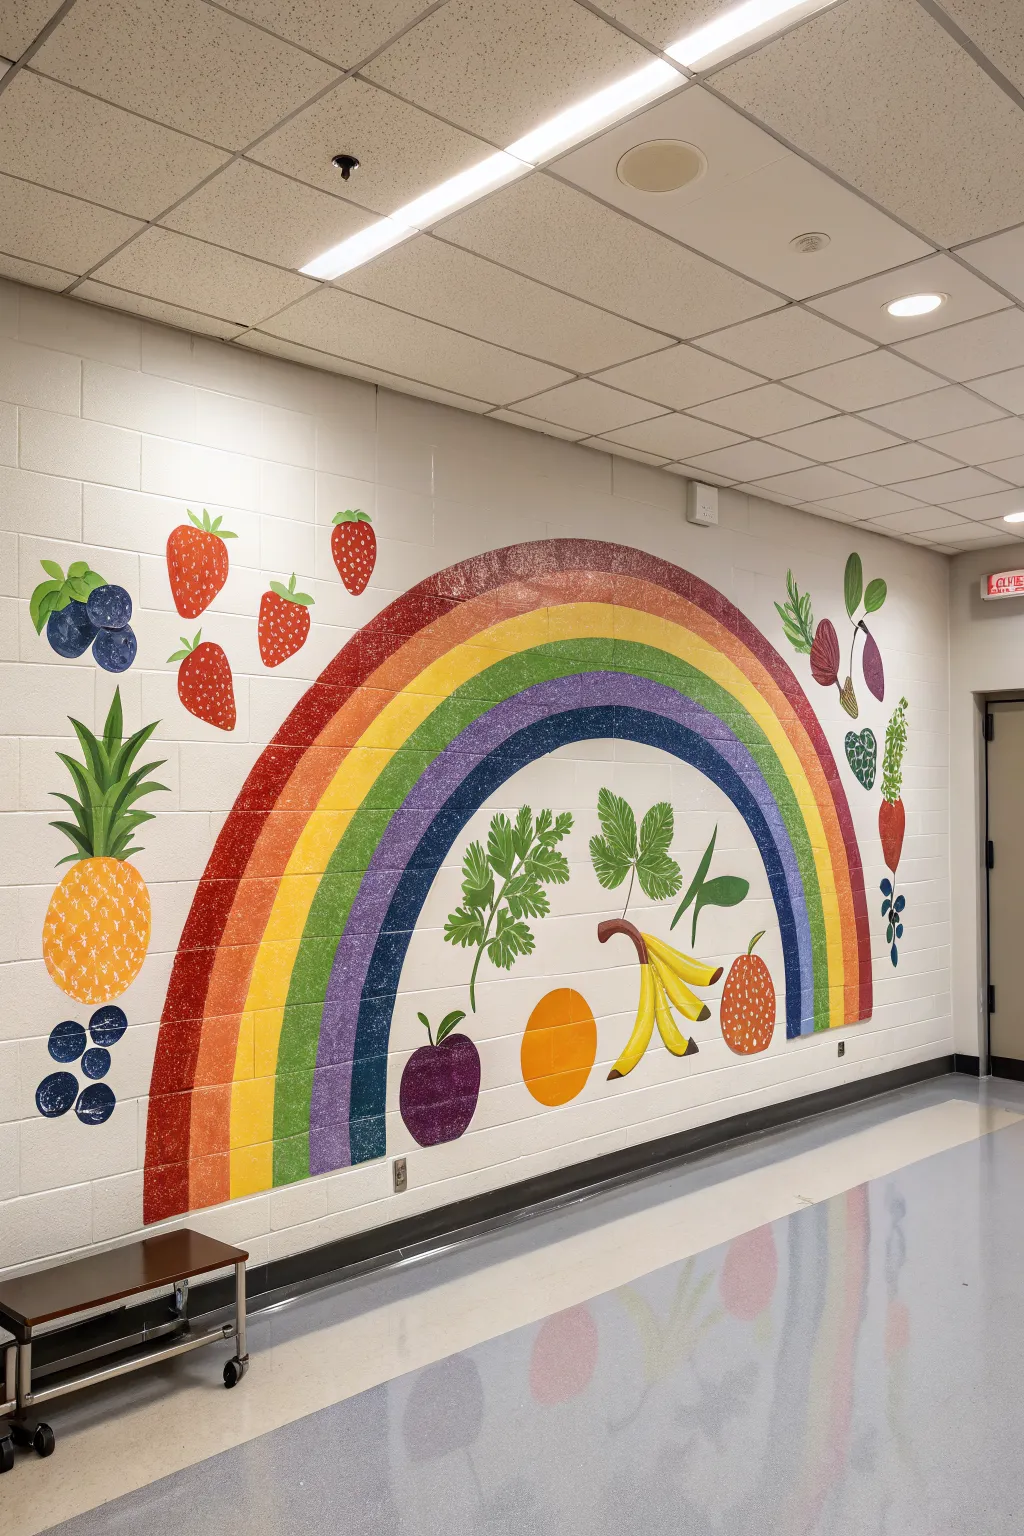
Transform a plain cafeteria wall into a vibrant celebration of healthy eating with this large-scale mural featuring a textured rainbow arch and an assortment of fresh produce. Using sponge painting techniques creates a unique, organic texture that adds depth and visual interest to the fruits and veggies.
Detailed Instructions
Materials
- Interior semi-gloss or satin wall paint (white base)
- Acrylic mural paints (red, orange, yellow, green, blue, purple, black, white)
- Projector
- Pencil or chalk
- Large and medium natural sea sponges
- Assorted paintbrushes (flat brushes for edges, fine liners for details)
- Painter’s tape
- Drop cloth
- Step ladder
- Paper plates or palettes
- Sealer or clear topcoat (water-based)
Step 1: Preparation and Outline
-
Prepare the workspace:
Clear the area against the wall, lay down a drop cloth to protect the floor from drips, and clean the wall surface with a mild detergent to ensure the paint adheres properly. -
Project the design:
Set up a projector facing the wall and cast your digital design onto the surface. Adjust the distance until the rainbow arch spans the desired width and the floating produce elements are proportionate. -
Trace the outline:
Using a pencil or light chalk, carefully trace the outlines of the rainbow bands and every individual fruit and vegetable shape. Include the major details, like the leaves on the pineapple and the stems of the strawberries. -
Mask the edges:
Apply painter’s tape along the floorboards and any adjacent wall trim to keep lines crisp. If you are worried about keeping the rainbow bands perfect, you can tape off alternating bands, but freehand painting often looks more organic for this style.
Sponge Technique Tip
Don’t drag the sponge! Use a consistent up-and-down dabbing motion. Rotate your wrist slightly between dabs so the sponge pattern doesn’t look repetitive.
Step 2: The Rainbow Arch
-
Mix the rainbow colors:
Prepare pots of red, orange, yellow, green, blue, and purple paint. If you want the specific textured look shown in the photo, stick to slightly transparent acrylics or thin your wall paint slightly with a glaze medium. -
Sponge the texture:
Dip a dampened natural sea sponge into your red paint. Dab off excess on a paper plate, then press it onto the wall for the outer arch. This creates that mottled, airy texture rather than a solid blocks of color. -
Complete the bands:
Clean your sponge or grab a fresh one for each color, working your way inward through the spectrum—orange, yellow, green, blue, purple. Leave a tiny sliver of white space between bands if you want to avoid muddy blending. -
Define the edges:
Once the sponge texture is dry, use a small flat brush with the corresponding color to tidy up the outer and inner edges of the arch, making sure the distinct curve is readable against the white block wall.
Level Up: 3D Shadows
Mix a translucent grey glaze and paint faint ‘drop shadows’ slightly below and to the right of the fruit to make them look like they are floating off the wall.
Step 3: Painting the Produce
-
Base coat the pineapple:
Start on the left with the pineapple body. Sponge on a warm yellow-orange base. While wet, stipple in darker orange spots to suggest the rough skin texture. -
Paint the leafy greens:
For the pineapple top and the herb bundles under the arch, mix a vibrant leafy green. Use a brush for the stems to get sharp lines, but switch back to a small piece of sponge for the leafy areas to keep the texture consistent with the rainbow. -
Create the strawberries:
Fill in the strawberry shapes with a bright red. I prefer to do two thin coats here for vibrancy. Once red is dry, use a fine tip brush to dab small white or yellow seeds on the surface. -
Detail the blueberries:
Paint the round blueberry shapes in dark blue. Mix a lighter blue-grey and add a small crescent shape on the top right of each berry to simulate a highlight and roundness. -
Paint the banana bunch:
Under the right side of the arch, fill in the bananas with bright yellow. Use a brown paint mix to add the stem connection and the small tips at the bottom of the fruit. -
Add the root vegetables:
On the far right, paint the radish or beet shapes using dragging strokes of deep magenta or purple, extending upward into thin green stems. -
Refine with stems:
Go back to the strawberries and other floating fruits to add their green caps and stems. Use a steady hand and a liner brush for these delicate connections.
Step 4: Finishing Touches
-
Review and touch up:
Step back about ten feet to view the whole composition. Look for any areas where the brick texture prevented paint coverage and dab a little extra color into those mortar grooves if necessary. -
Clean up outlines:
If any pencil lines are still visible through lighter colors like yellow or orange, carefully erase them or paint a final thin layer over them. -
Seal the mural:
Since this is a high-traffic school hallway, apply a coat of clear, water-based polyurethane sealer over the entire painted area. This protects the art from backpacks and allows it to be wiped down easily. -
Clean up:
Remove the painter’s tape slowly at a 45-degree angle to avoid peeling any paint, and clean your sponges thoroughly before the acrylic dries inside them.
Enjoy the bright, healthy atmosphere your new artwork brings to the space
Community Helpers Hallway
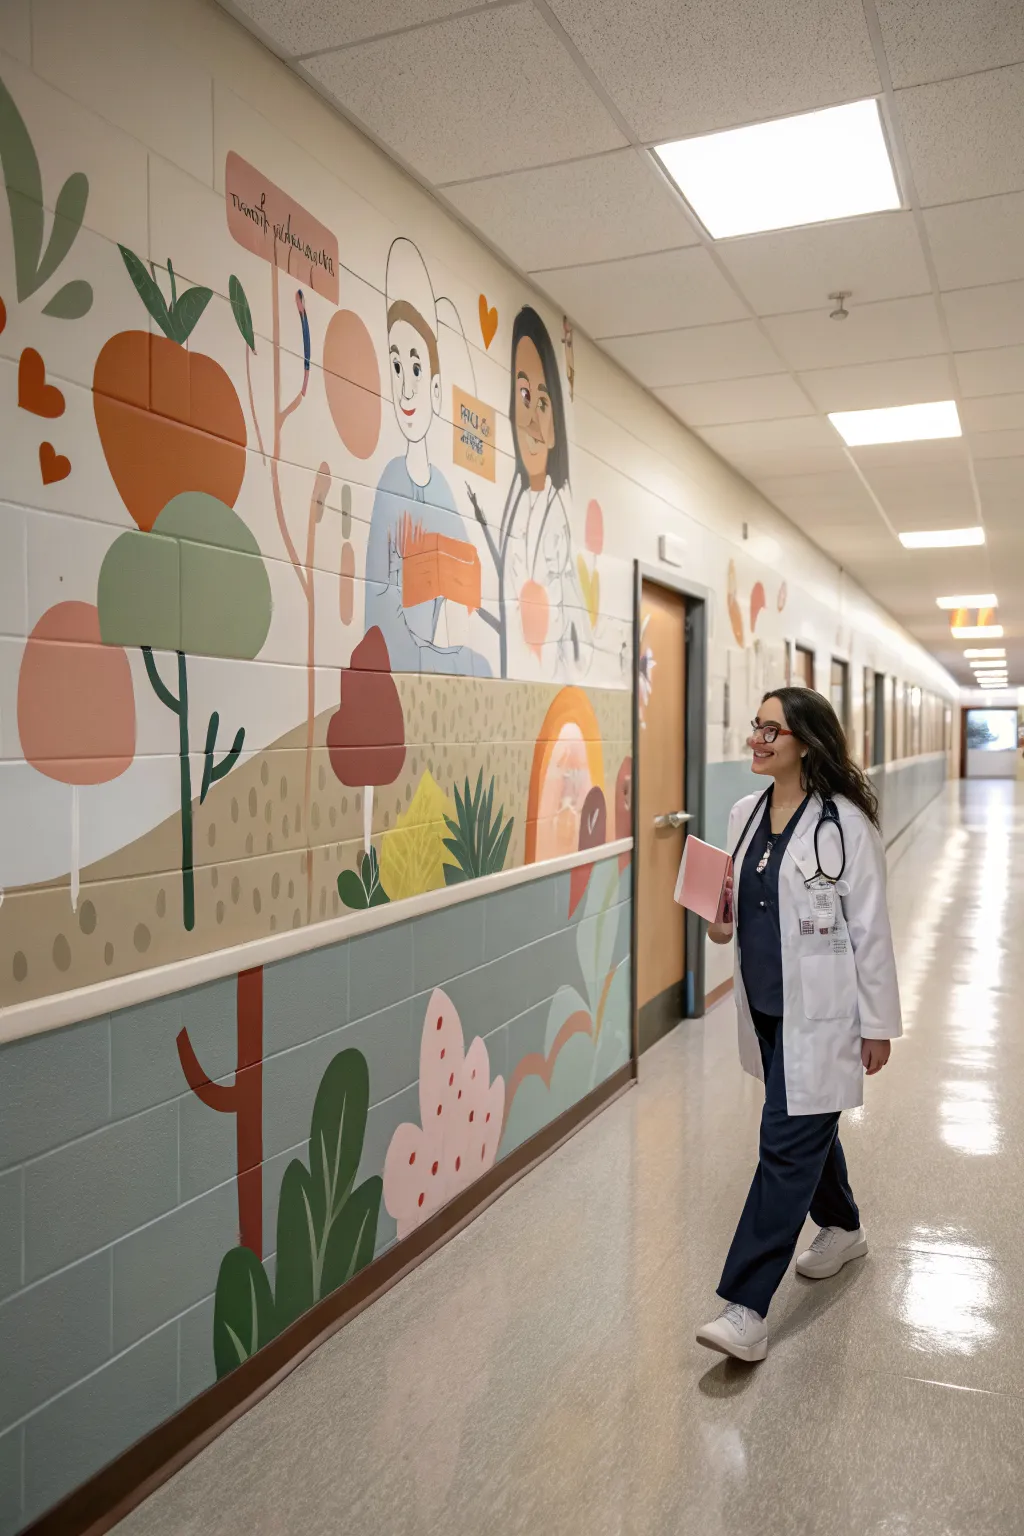
Transform a plain corridor into a tribute to local heroes with this large-scale mural, perfect for inspiring students about careers in healthcare and community service. This project features flat, stylized illustrations of medical professionals amidst abstract botanical elements, utilizing a warm, earthy color palette of terracotta, sage, and cream.
Step-by-Step
Materials
- Interior acrylic latex paint (eggshell or satin finish)
- Colors: Terracotta, sage green, mustard yellow, peach, cream, slate blue, charcoal gray
- Primer (high-quality masonry primer)
- Projector (for tracing)
- Chalk or graphite pencils
- Painter’s tape (various widths)
- Drop cloths
- Paint rollers (medium nap for brick texture)
- Assortment of brushes (angle sash for cutting in, rounds for detail)
- Ladders or step stools
- Clear acrylic topcoat (optional for high-traffic areas)
Step 1: Preparation and Planning
-
Surface Cleaning:
Begin by thoroughly cleaning the brick wall with a mild detergent and water solution to remove dust and oils. Let it dry completely for 24 hours. -
Prime the Surface:
Apply a coat of high-quality masonry primer over the entire wall. This is crucial for brick surfaces to ensure the paint adheres well and the colors pop. -
Base Color Application:
Roll on the background color for the upper section (a warm cream or off-white) and a distinct color for the lower wainscoting section (a muted slate blue or teal) as seen in the reference. Let this base layer cure overnight. -
Set the Horizon Line:
Use painter’s tape to create a crisp separation between the upper wall and the lower wainscoting section if your wall doesn’t have a physical chair rail. Seal the tape edge with a little base paint to prevent bleeding.
Step 2: Drafting the Design
-
Project the Image:
Set up your digital projector to cast the ‘Community Helpers’ design onto the wall. Adjust the size so the figures are life-sized or slightly larger than life. -
Trace the Outlines:
Using chalk or a soft graphite pencil, lightly trace the main shapes—the doctors, the large abstract fruit/vegetable shapes, and the rolling hill lines. Don’t worry about tiny details yet; just get the major zones mapped out. -
Mark Color Zones:
I find it helpful to put a tiny dot of paint or a written code (like ‘SG’ for sage green) in each outlined section so you don’t lose track of the color plan once the projector is off.
Brick Wall Pro-Tip
Painting on block walls can be tricky due to the deep grooves. When tracing, use a piece of chalk filed to a point to get into the mortar joints without skipping lines.
Step 3: Blocking in Color
-
Paint the Large Shapes:
Start with the largest abstract elements, like the oversized terracotta apple shapes and the sage green trees. Use a small roller or a large brush to fill these areas quickly. -
Fill the Landscape:
Paint the rolling hills in the background using muted earth tones like sand, beige, or pale mustard. Use a brush to work the paint into the mortar grooves of the brick. -
Paint the Figures:
Block in the medical professionals’ uniforms (blues and whites) and skin tones. Keep the shapes flat and graphical; this style relies on clean silhouettes rather than realistic shading. -
Lower Wall Elements:
Move to the lower wainscoting section and paint the abstract plant life—large leafy shapes in deep greens and coral pinks that seem to grow up from the floor.
Level Up: Interactive Elements
Add a QR code sticker near the text bubbles in the mural. When scanned, it could play a recorded interview with a local nurse or doctor for an educational twist.
Step 4: Refining and Detailing
-
Adding Facial Features:
Using a smaller round brush and charcoal gray paint, carefully add the simple line-work for eyes, noses, and smiles. Keep the lines minimal and expressive. -
Line Work and Stems:
Paint the thin, dark stems connecting the fruit and leaves. A rigger brush works wonders here for creating long, fluid lines. -
Texture and Pattern:
Add subtle textures, like the dashed lines on the hills or the small dots on the pink plant forms. These small patterns add visual interest without cluttering the design. -
Cleaning Edges:
Take a small angled brush and your background wall color to touch up any areas where the paint might have strayed outside the lines. Crisp edges are key to this graphic style. -
Protective Coating:
Once the mural is fully dry (give it at least 48 hours), allow the paint to cure. For a high-traffic hallway, consider rolling on a clear matte acrylic varnish to protect your work from scuffs and handprints.
Step back and admire how this vibrant, meaningful artwork brings new life and inspiration to your school hallway
Book Doorway Portal
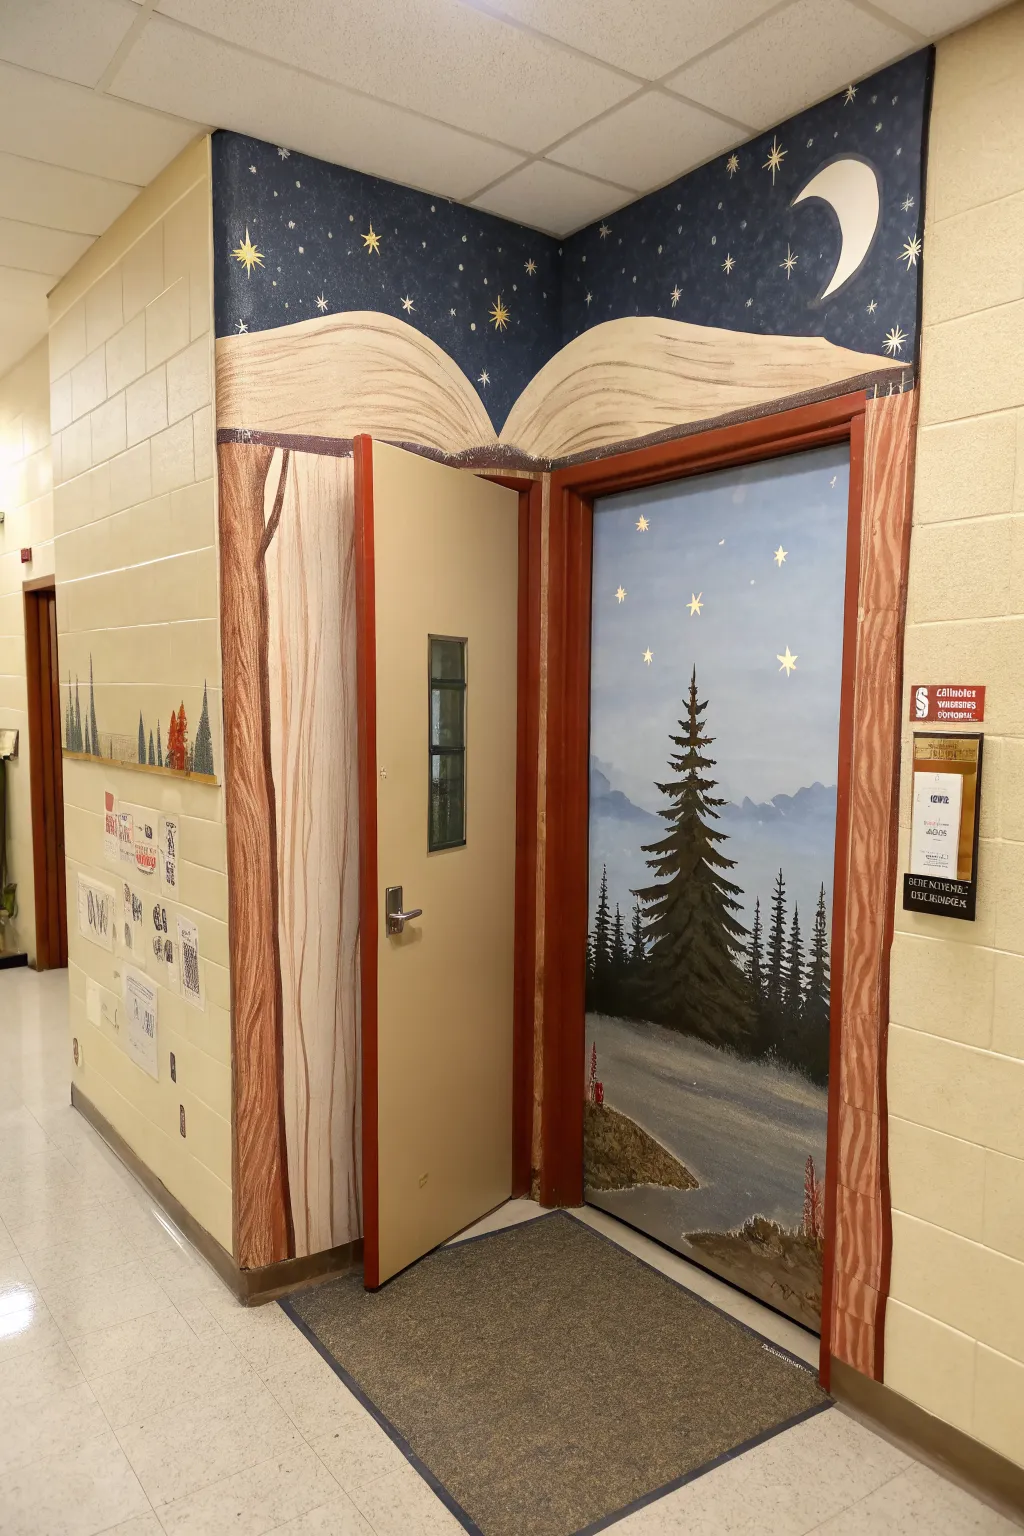
Transform an ordinary classroom entrance into a magical gateway with this immersive mural. By utilizing a hallway corner and door frame, you’ll create the illusion of a giant open book inviting students to step inside a world of imagination.
Step-by-Step Guide
Materials
- Acrylic indoor wall paint (or latex)
- Painter’s tape and drop cloths
- Primer (especially for the door surface)
- Wide wall brushes (2-3 inch)
- Angle sash brushes
- Fine detail brushes
- Chalk or pencil for sketching
- Colors: Deep navy blue, black, off-white/cream, metallic gold, burnt sienna, various greens, light blue, grey
Step 1: Preparation & Foundation
-
Prepare the surfaces:
Begin by cleaning both the wall and the door thoroughly to remove dust and oils. If the door has a glossy finish, lightly sand it to help the paint adhere. -
Prime the door:
Apply a coat of high-quality primer specifically to the door, as door materials often resist standard wall paint. Let this cure completely. -
Sketch the layout:
Using chalk, sketch the outline of the open book pages spanning across the corner above the door frame. Draw the vertical book spine down the side of the door jamb. -
Block in the night sky:
Paint the wall area above your ‘book pages’ with a deep navy blue. Bring this color all the way to the ceiling tiles to create a seamless night sky backdrop.
Uneven Surfaces?
If painting on cinder blocks, use a thick-nap roller to get paint into the grooves before using brushes for detail work. You may need extra coats for full opacity.
Step 2: The Book Pages & Binding
-
Paint the page wash:
Fill in the open book shape with an off-white or cream color. Don’t worry about texture yet; just get a solid base coat down to cover the existing wall color. -
Create the wood grain frame:
Paint the vertical door frame and the wall immediately left of the opening with a base of burnt sienna. This represents the book’s cover or spine standing upright. -
Add wood variations:
While the brown is still tacky, streak in darker brown and lighter tan lines to mimic wood grain or the texture of an old leather binding. -
Detail the page edges:
Using a smaller brush and a diluted grey-brown mix, paint sweeping, curved lines on the cream base to simulate the individual pages fanning out from the spine.
Add 3D Magic
Glue small, lightweight wooden stars or plastic glow-in-the-dark moon shapes onto the ‘sky’ portion for an interactive texture that pops.
Step 3: The Celestial Sky
-
Add the moon:
In the upper right corner of the navy sky, paint a crisp white crescent moon. I find it helps to use a stencil or trace a circular object first for a clean curve. -
Create glowing stars:
Use a fine liner brush and metallic gold or light yellow paint to create four-point stars scattered across the navy blue section. Vary their sizes for depth. -
Splatter faint stars:
Dip a toothbrush in watered-down white paint and flick it gently over the navy area to create distant, galaxy-like star dust clusters.
Step 4: The Door Landscape
-
Paint the sky gradient:
On the door panel itself, paint a gradient sky starting with light blue at the top and fading into a hazy white-grey near the middle. -
Lay down distant mountains:
Mix a hazy blue-grey color and paint the silhouette of distant mountains across the middle of the door. Keep the edges soft to show atmospheric distance. -
Paint the water base:
Fill the bottom third of the door with horizontal strokes of greyish-blue to represent a calm lake or river reflecting the sky. -
Add the main pine tree:
Using black mixed with deep green, paint a large, dominant pine tree silhouette off-center. Start with a vertical line for the trunk, then tap your brush outward to create jagged branches. -
Fill in the forest:
Add smaller pine trees in the background and to the sides using a slightly lighter, more greyed-out green to push them visually behind the main tree. -
Detail the foreground:
Paint a small landmass in the bottom left corner using earth tones, tapping in texture for grass and perhaps a few red wildflowers or mushrooms for a pop of color. -
Protect the work:
Once everything is fully dry (give it at least 24 hours), apply a clear, water-based polyurethane sealer, especially on the door where hands will touch it frequently.
Step back and admire how a simple corner has become an adventurous entry point for learning
Stair Risers With Counting and Colors
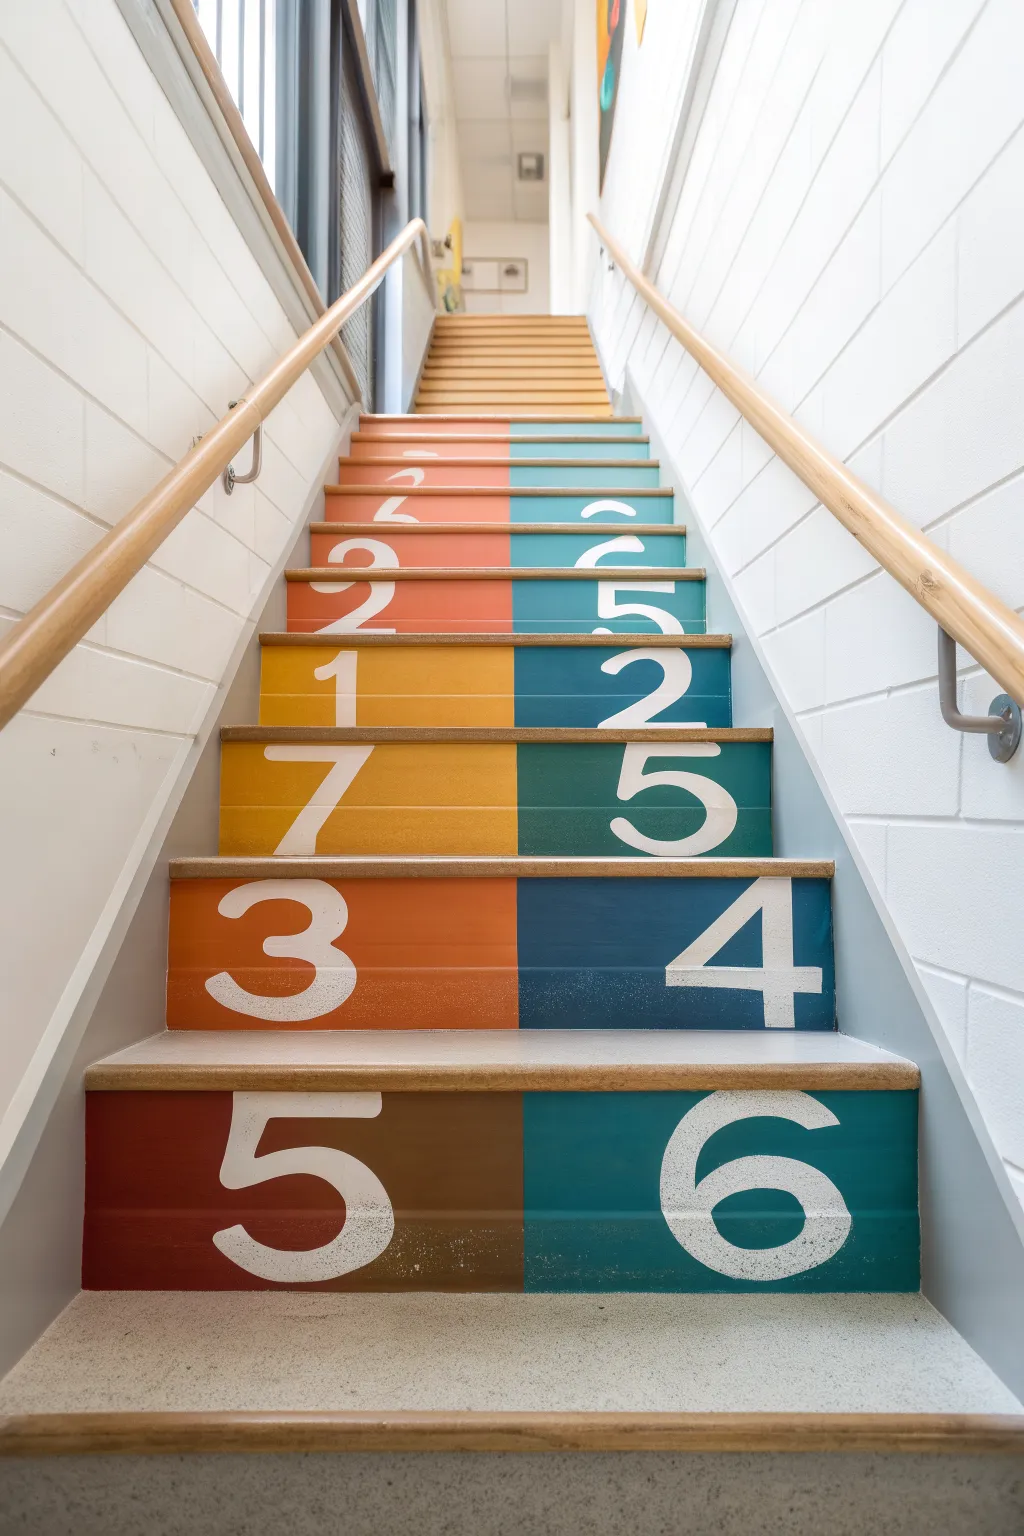
Transform an ordinary school staircase into a vibrant learning tool with this split-design number mural. By painting alternating warm and cool blocks on each riser, you create an engaging pathway that encourages counting skills with every step.
Step-by-Step Tutorial
Materials
- High-traffic floor & porch paint (various colors)
- Painter’s tape (1-inch width)
- Measuring tape
- Pencil
- Bubble level
- Large number stencils (6-8 inches tall)
- Stencil adhesive spray
- Small foam roller
- Dense foam pouncers or stencil brushes
- Cleaning supplies (degreaser, scrub brush)
- Sandpaper (120-grit)
- White or light gray paint for numbers
- Clear protective polyurethane sealer (floor-grade)
Step 1: Preparation & Layout
-
Clean thoroughly:
Begin by scrubbing the stair risers aggressively with a heavy-duty degreaser to remove scuff marks, dirt, and oils. Any residue will cause the paint to peel later. -
Sand the surface:
Lightly sand each riser with 120-grit sandpaper to rough up the existing finish. This helps the new paint adhere strongly. -
Wipe down:
Use a damp tack cloth or microfiber rag to remove all sanding dust. Let the risers dry completely before moving on. -
Find the center:
Measure the width of your stair riser to find the exact midpoint. Mark this center point with a pencil at the top and bottom of every riser. -
Tape the divide:
Run a vertical strip of painter’s tape exactly down the center of each riser, using your pencil marks as a guide. Use a level to ensure the line is perfectly vertical.
Step 2: Painting the Backgrounds
-
Plan your palette:
Select your color scheme. For this project, you’ll want a gradient of warm tones (browns, reds, oranges, yellows) for the left side and cool tones (teals, blues) for the right side. -
Paint the left side:
Start with the bottom riser. Paint the left section with your darkest warm tone (like the deep reddish-brown shown). I like to use a small foam roller for a smooth, brush-stroke-free finish. -
Continue the gradient:
Working your way up the stairs, switch to lighter warm colors every few steps—moving from deep red to terra cotta, then golden yellow. -
Paint the right side:
Repeat the process on the right half of the stairs using your cool tones. Start with a deep teal at the bottom and transition to lighter blues as you ascend. -
Apply second coats:
Let the first coat dry according to the manufacturer’s instructions, then apply a second coat to ensure solid, opaque coverage. -
Remove center tape:
Carefully peel off the vertical tape while the paint is still slightly tacky to get a crisp edge. Let the base coats cure fully (usually 24 hours) before stenciling.
Bleed-Proof Borders
Before painting your main color, seal the tape edge with a thin layer of the *existing* base wall color or a clear matte medium. This locks the tape ensuring a razor-sharp line.
Step 3: Stenciling the Numbers
-
Prep the stencils:
Spray the back of your number stencils with a light mist of repositionable stencil adhesive. This prevents paint bleed by keeping the stencil tight against the riser. -
Position the numbers:
Place odd numbers (5, 3, 7, 1) on the left (warm) side and even numbers (6, 4, 2) on the right (cool) side. Center them visually within their color block. -
Load the pouncer:
Dip a foam pouncer or stencil brush into white paint. Offload almost all the paint onto a paper towel until the brush feels dry—this ‘dry brush’ technique is crucial for crisp lines. -
Apply the paint:
Dab the paint gently over the stencil using an up-and-down motion. Do not drag or brush side-to-side, or paint will sneak under the edges. -
Build coverage:
Apply the white paint in thin layers. It’s better to do three light coats than one thick, gloppy one that bleeds. -
Reveal the number:
Peel the stencil away immediately while the paint is wet. Lift it straight back to avoid smudging the edges. -
Seal the work:
Once the numbers are fully dry (give them at least 48 hours), apply two coats of clear, floor-grade polyurethane to protect your artwork from scuffing feet.
Uneven Surfaces?
If the risers are textured or bumpy, stencils won’t seal perfectly. Skip the roller and use a stippling brush exclusively, tapping vertically to prevent underspray.
Now your school hallway has a durable, educational feature that brightens up the daily climb
Column Storybook Spines
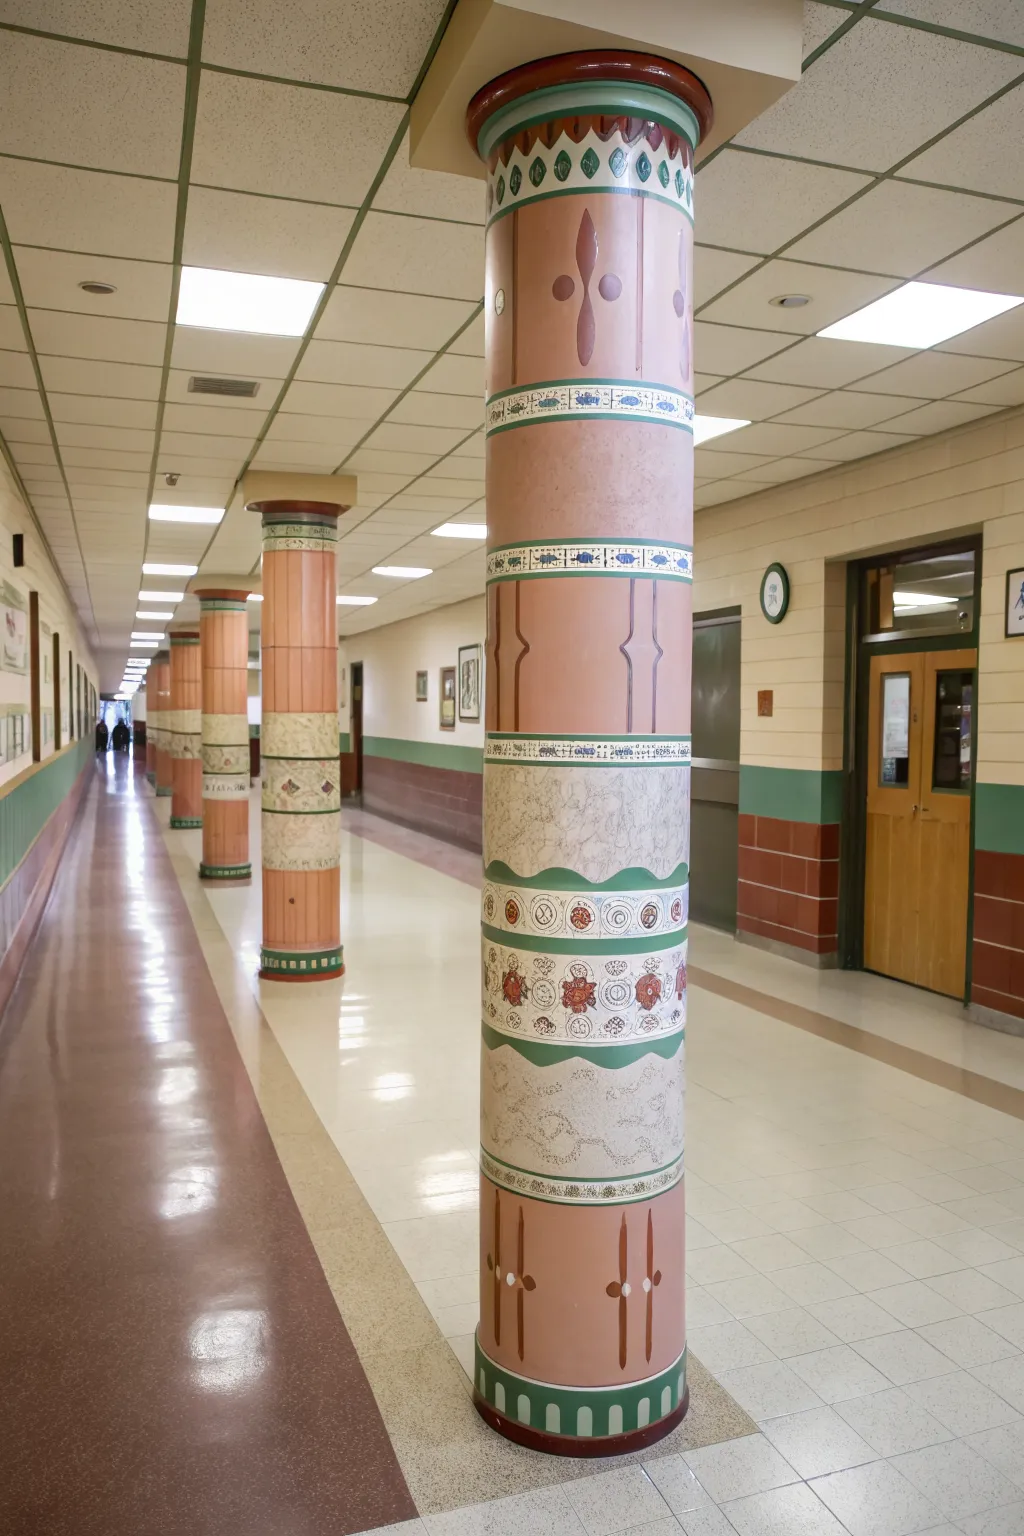
Transform standard hallway pillars into striking architectural features using detailed stenciling and motif painting. This project layers geometric bands, stylized floral elements, and faux-finish techniques to create a sophisticated, historic look.
Step-by-Step Guide
Materials
- Latex wall paint (terracotta/peach base, cream, dark green, deep red)
- Acrylic craft paints for details
- Large foam rollers and tray
- Painter’s tape (various widths including 1/4 inch)
- Custom stencils (floral medallions, geometric waves)
- Stencil brushes and sponges
- Fine liner brushes
- Faux marble glaze medium
- Drop cloths
- Lead pencil and string (for measuring circumference)
- Laser level
Step 1: Base Preparation
-
Cleaning:
Scrub the entire column surface with a degreaser to ensure good adhesion, then wipe clean with water and let dry completely. -
Priming:
Apply a coat of high-adhesion primer suitable for the column’s material, usually concrete or plaster, and allow it to cure overnight. -
Base Coating:
Paint the entire column with two coats of your main terracotta or peach-toned latex paint. This warmth will peek through later layers.
Bleeding Lines?
If paint bleeds under your tape, wait for it to dry completely. Re-apply tape over the mistake, then touch up with the original base color to erase the error perfectly.
Step 2: Mapping the Design
-
Measuring Zones:
Decide on the height of your bands. Use a laser level to mark precise horizontal rings around the column where the different design sections will change. -
Taping Off:
Apply painter’s tape along your pencil lines to separate the zones. Press the edges down firmly to prevent bleed-under. -
Painting Cream Bands:
Paint the designated middle sections in a soft cream color. You’ll likely need three coats to cover the terracotta base completely.
Add Metallic Flair
For a ‘Level Up’ effect, use metallic gold paint for the thin pin-striping between the color sections. It catches the overhead light and adds a regal finish.
Step 3: Marbling and Texture
-
Glaze Mixing:
Mix a clear glaze medium with a small amount of grey and dark cream paint to create a translucent marbling mixture. -
Sponge Application:
Dampen a sea sponge and dip it into the glaze. Lightly dab it over the dry cream painted sections to create a subtle, stony texture. I like to twist my wrist slightly with each dab to avoid a repetitive pattern. -
Veining:
While the glaze is still tacky, use a feather or a fine liner brush to drag faint, vibrating lines through it, simulating marble veins.
Step 4: Geometric Details
-
Green Wave Borders:
Once the marbling is fully dry, use a wave-pattern stencil or careful freehand taping to paint the dark green scallop borders at the top and bottom of the central cream section. -
Vertical Accents:
On the upper terracotta section, use a long straightedge to pencil in vertical lines. Paint these with a deep red or brown using a flat brush to create the stylized arrow or spear shapes. -
Adding the ‘Coins’:
Stencil or hand-paint circles overlapping your vertical lines to create the decorative bead-and-reel effect shown in the original design.
Step 5: Intricate Stenciling
-
Medallion Band:
Position your detailed floral medallion stencil around the center of the cream band. Use a dense stencil brush and a ‘dry brush’ technique—wiping off most paint on a paper towel first—to stipple the red and blue designs without bleeding. -
Blue Hieroglyph Strip:
Tape off the narrow bands above and below the main sections. Paint a base of white, then use a small repeating stencil or stamp with blue paint to add the row of small symbolic figures. -
Base Ornamentation:
At the very bottom of the column, use a heavy stencil to apply the bold green architectural fluting pattern, grounding the design.
Step 6: Finishing Touches
-
Detail Lines:
Using a very fine liner brush and black or dark brown paint, outline the major sections and the wave patterns to make the design ‘pop’ and look crisp. -
Sealant:
Protect your work in high-traffic hallways by rolling on two coats of clear, matte, water-based polyurethane sealant.
Step back and admire how these pillars now anchor the hallway with a sense of history and grandeur
Class Puzzle Piece Collaboration Wall
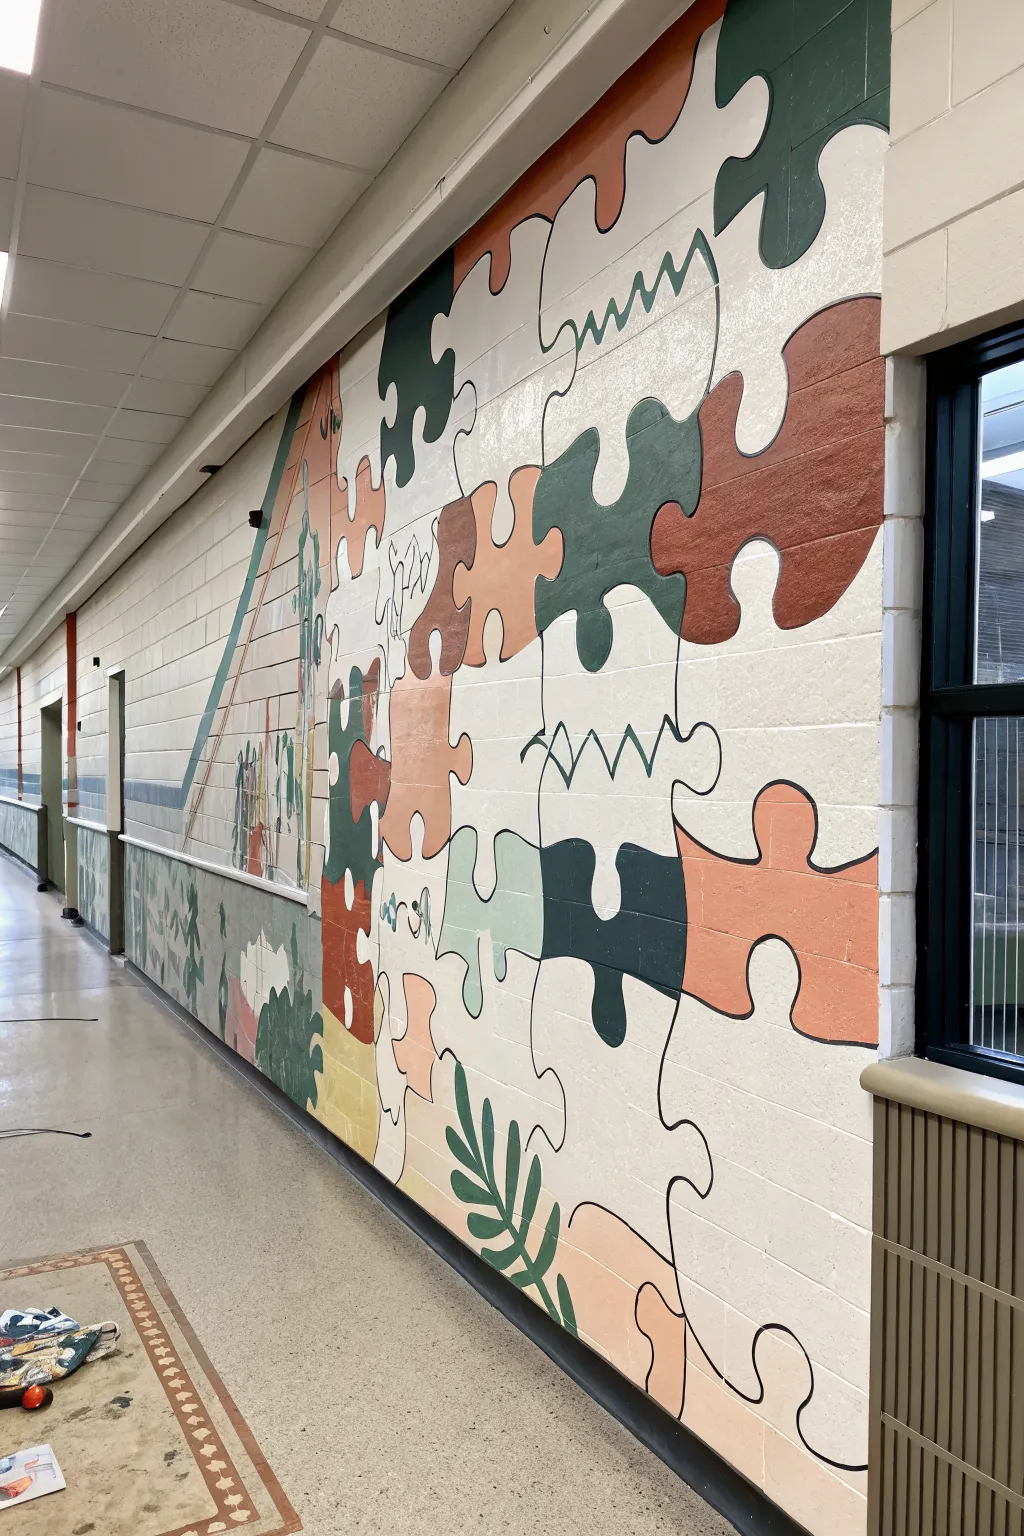
Transform a blank hallway into a permanent symbol of connection with this large-scale puzzle mural. Using earthy tones and bold organic lines on cinder block, this project combines cohesive design with opportunities for individual artistic expression within the interlocking shapes.
How-To Guide
Materials
- Interior semi-gloss or satin latex paint (various earth tones: rust, sage, terracotta, cream)
- Black acrylic paint or paint markers (broad tip)
- Chalk or pastel pencils (for sketching)
- Painter’s tape (blue or green)
- Assorted paintbrushes (2-inch angled sash brushes for cutting in, roller covers for large areas)
- Small round brushes (for line work)
- Drop cloths
- Ladder or step stool
- Cardboard or poster board (for templates)
- Projector (optional but recommended)
Step 1: Preparation and Layout
-
Clean the Surface:
Begin by thoroughly wiping down the cinder block wall with a damp cloth and mild detergent to remove dust and handprints. Let it dry completely before starting any work. -
Protect the Area:
Lay down drop cloths along the base of the wall. Use painter’s tape to mask off the trim, ceiling line, and any door frames or windows adjacent to your mural space. -
Create Templates:
Cut several large, unique puzzle piece shapes out of cardboard or poster board. Making them roughly 1-2 feet wide works best for a wall of this scale. -
Map the Design:
Using your chalk or pastel pencil, trace the templates onto the wall. Interlock them organically, allowing some pieces to drift apart or ‘float’ near the edges for a dynamic look. I find it helpful to vary the orientation of the shapes so the pattern doesn’t look too rigid. -
Refine the Lines:
Step back to review the composition. If using a projector, you can project a pre-made grid or design now to ensure the overall flow works around obstacles like windows.
Step 2: Painting the Base Colors
-
Plan the Palette:
Assign colors to your puzzle pieces before opening paint cans. Mark each drawn shape with a small dab of its intended color or a letter code (e.g., ‘G’ for Green) to avoid confusion later. -
Cut in Edges:
Starting with the lightest colors (like the cream or off-white sections), use an angled sash brush to carefully paint the outline of the shape, working the bristles into the grout lines of the cinder blocks. -
Fill the Shapes:
Use a small roller or a larger brush to fill in the body of the puzzle pieces. Cinder block is thirsty, so you will likely need two coats to get solid, opaque coverage. -
Paint Darker Tones:
Once the light sections are dry to the touch, move on to your mid-tones (terracotta, rust) and finally the darkest shades (forest green). Let the colors touch directly or leave a tiny gap if you plan to outline them thickly later. -
Add Decorative Elements:
If your design includes foliage or distinct patterns (like the leaves at the bottom), paint these shapes now in blocking colors.
Fixing Bleeds
If paint bleeds under tape on textured block, wait for it to dry. Then, use a small artist brush and the base wall color to touch up the edge, effectively ‘erasing’ the mistake.
Step 3: Detailing and Outlining
-
Draft the Doodles:
Once the base paint is fully cured, lightly sketch any internal line art—like the zig-zags, leaves, or abstract squiggles seen in the white spaces—using chalk. -
Black Line Work:
Using black acrylic paint and a steady hand with a small round brush, go over your internal sketches. For the sharpest control on rough cinder block, paint markers can be a lifesaver here. -
Outline the Puzzle Pieces:
Create the signature ‘puzzle’ look by painting a confident black line tracing the contour of every interlocking piece. This defines the shapes and hides any messy transitions between colors. -
Touch Ups:
Inspect the grout lines. If the black outline skipped over the deep grooves of the cinder block, dab a little extra paint into those recesses to ensure the line looks continuous from a distance. -
Clean Up:
Remove the painter’s tape slowly at a 45-degree angle. Wipe away any remaining chalk marks with a damp sponge once the paint is completely dry.
Class Collaboration
Assign specific white puzzle pieces to different classes. Let them brainstorm symbols or patterns to fill their designated piece, making the mural a true school-wide signature.
Step back and admire how individual shapes come together to form a unified, vibrant masterpiece on your school walls
Butterfly Wings Photo Spot
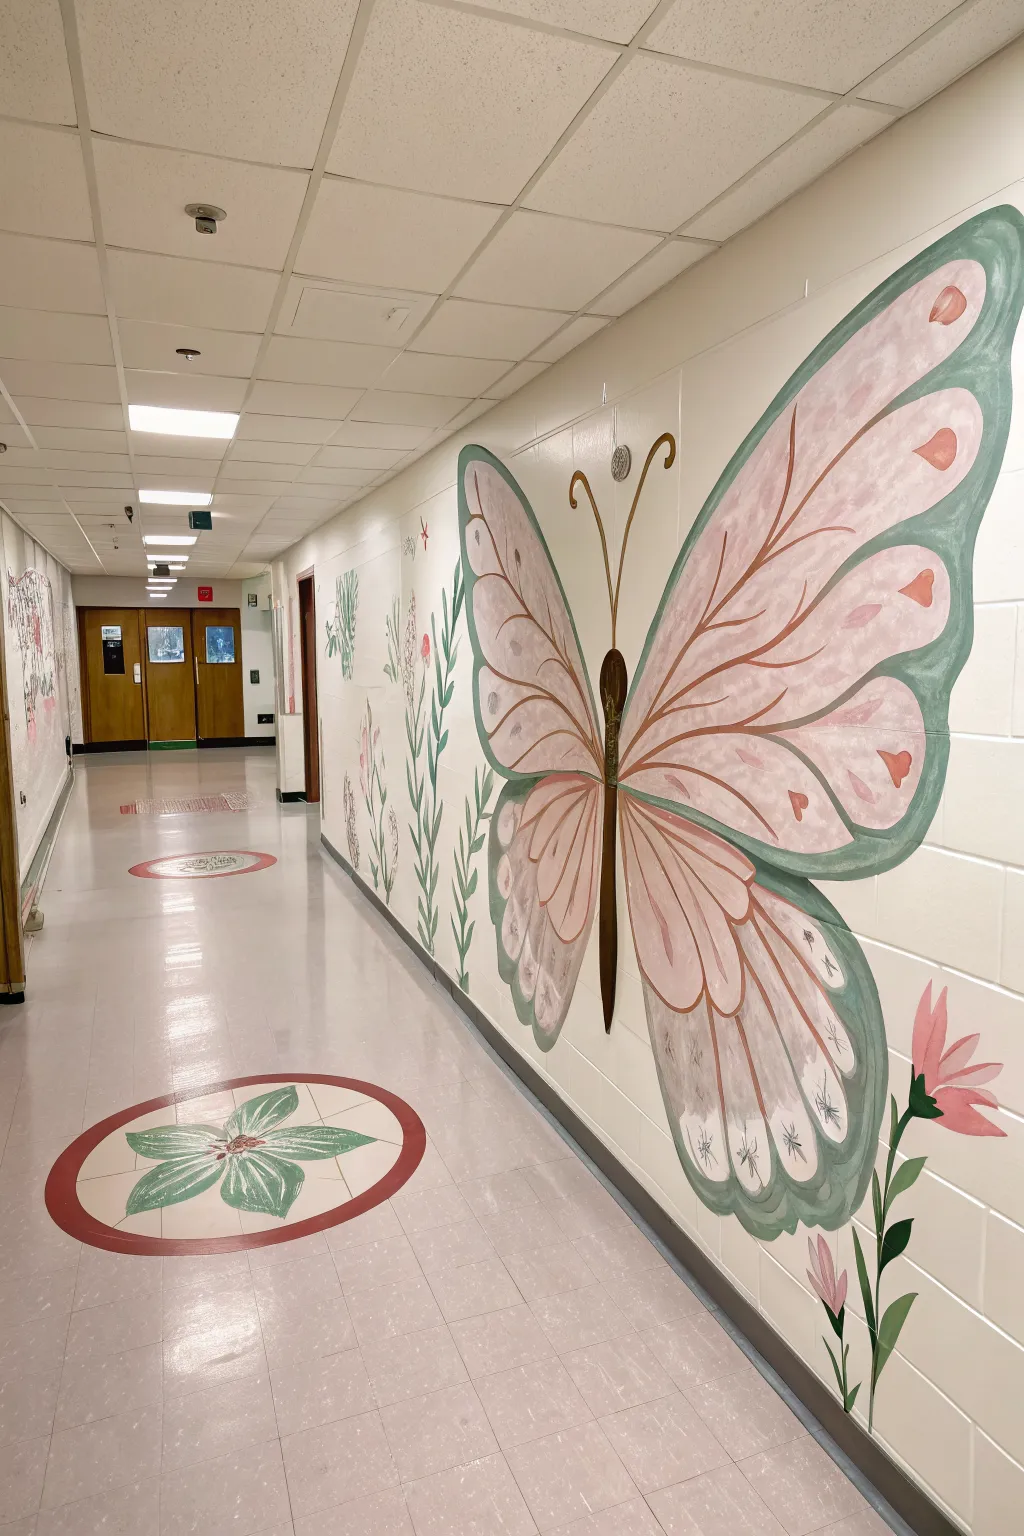
Transform a plain school hallway into an interactive photo destination with this oversized butterfly wing mural. The design features soft pastel hues and organic, flowing lines that create a welcoming atmosphere while offering the perfect backdrop for student photos.
Step-by-Step
Materials
- Interior semi-gloss acrylic latex paint (white, light pink, rose, teal/sage green, brown)
- Painter’s tape
- Drop cloth
- Chalk or pastel pencil (for sketching)
- Assorted sash brushes (2-inch and 1-inch)
- Round detail brushes (size 4 and 8)
- Step ladder
- Damp rags for cleanup
- Clear acrylic topcoat (optional)
Step 1: Preparation and Outline
-
Clean surface:
Begin by thoroughly wiping down the hallway wall to remove fingerprints and dust, ensuring a clean surface for the paint to adhere to; let it dry. -
Establish center:
Measure the wall vertically to find the ideal height for students to stand in the middle; mark a center point where the butterfly’s body will go. -
Sketch the body:
Using a light-colored chalk or pastel pencil, sketch the vertical, elongated teardrop shape for the butterfly’s thorax and abdomen, ensuring it sits at the right height for kids’ backs. -
Outline the wings:
Draw the expansive wing shapes extending outward from the body, making the upper wings larger and sweeping upward, while the lower wings curve gently downward. -
Refine the edges:
Go back over your chalk lines to create the scalloped, wavy edges of the wings that give them a natural, organic feel.
Step 2: Painting the Base Layers
-
Paint the body:
Fill in the central body shape with a medium brown acrylic paint, using a 1-inch sash brush for smooth coverage. -
Create the wing border:
Using a sage green or muted teal paint, carefully outline the entire wing perimeter, creating a thick band roughly 2-3 inches wide. -
Fill the borders:
Continue with the green paint to fill in the outer edges of the wings, keeping your brushstrokes long and fluid to match the wing’s curve. -
Block in the wing interior:
Paint the large interior sections of the wings with a very pale pink or off-white base color, bringing it right up to the green border. -
Add the antennae:
While you have the brown paint handy, paint two long, curling antennae extending from the top of the body, adding gold or yellow teardrop shapes at the tips.
Symmetry Check
Step back often! To ensure the wings look balanced, snap a photo with your phone and flip the image horizontally. This reveals lopsidedness you might miss with the naked eye.
Step 3: Detailing and Veining
-
Draft the veins:
Once the pink base is dry, lightly sketch the vein pattern with chalk, radiating lines outward from the body toward the wing edges. -
Paint major veins:
Use a darker rose or mauve paint mixed with a little glazing medium to paint the thickest primary veins that separate the wing sections. -
Add secondary details:
Switch to a smaller round brush to paint the thinner, branching veins, keeping the touch light so line weights vary naturally. -
Layer wing spots:
Paint teardrop-shaped accents near the outer edges of the wings in a darker coral or orange-pink tone to add dimension. -
Include texture marks:
Add small, rhythmic dash marks or starburst patterns in the lower wing sections using a fine liner brush and dark grey or black paint.
Pro Tip: Height Adjustment
Since this is for an elementary school, mark three different height levels (K, 3rd, 5th grade) during planning. Aim the center of the butterfly body at the average 3rd grader’s shoulder height.
Step 4: Final Touches
-
Highlight the border:
Mix a lighter version of your green paint and add subtle highlights along the top curves of the wing borders to make them look rounded. -
Soft blending:
I like to use a nearly dry brush to feather some of the pink vein colors into the pale background, softening any harsh lines. -
Add floral elements:
Paint simple stems and flower buds emerging from the bottom corner of the wall to ground the mural and integrate it with the environment. -
Wipe away chalk:
Once the paint is completely cured (wait at least 4-6 hours), gently wipe away any visible chalk guidelines with a damp cloth. -
Seal (optional):
In high-traffic hallways, apply a clear water-based sealer over the mural to protect it from backpacks and rubbing shoulders.
Now you have a stunning, interactive piece of art that invites students to become part of the hallway beauty
Hidden “I Spy” Learning Wall
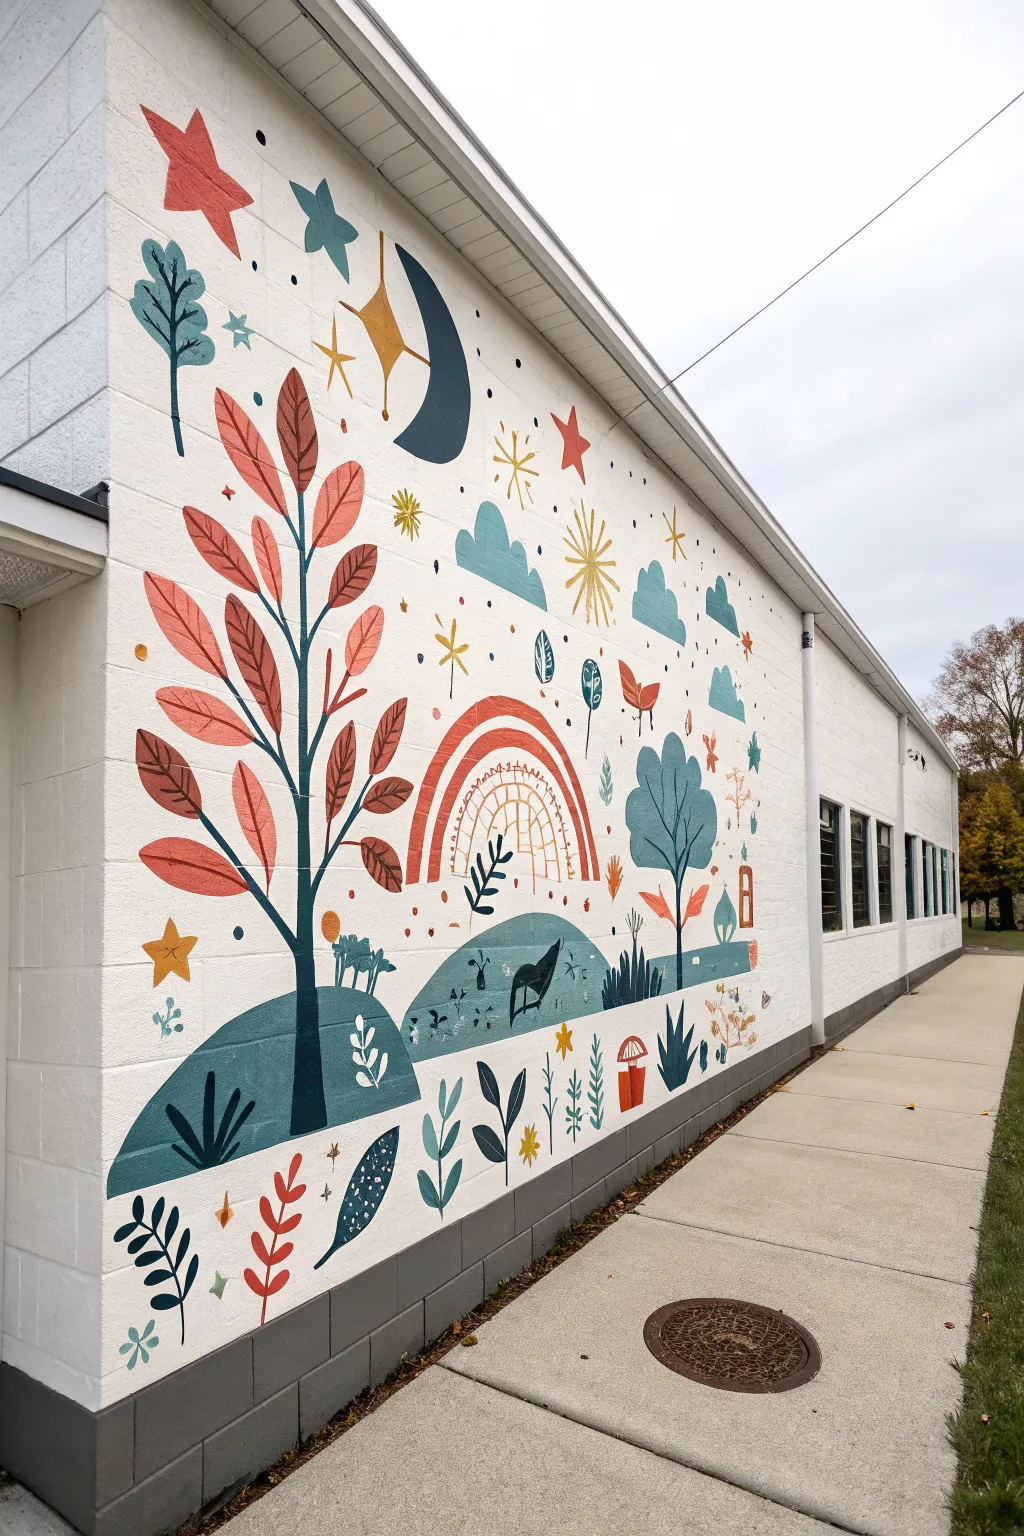
Transform a plain exterior brick wall into an engaging landscape of stylized flora and fauna, perfect for sparking curiosity during recess. This project uses a warm, earthy color palette and simple geometric shapes to create a seek-and-find game that doubles as beautiful outdoor art.
Detailed Instructions
Materials
- Exterior masonry primer (white)
- Exterior acrylic latex paint (matte or satin finish)
- Colors: Teal blue, dark navy, coral red, salmon pink, mustard yellow, cream/off-white
- Assorted paintbrushes (large rollers, 2-inch angled sash brushes, assorted round detail brushes)
- Painter’s tape
- Chalk or pastel crayons (for sketching)
- Drop cloths
- Ladder or scaffolding
- Clear outdoor masonry sealer (optional)
Step 1: Preparation & Base Layer
-
Prepare the surface:
Begin by thoroughly cleaning the brick wall with a pressure washer or stiff brush and soapy water to remove dirt and mildew. Let the masonry dry completely for at least 24 hours before applying any product. -
Protect the area:
Lay down heavy-duty drop cloths along the sidewalk or ground to catch drips. Tape off any adjacent trim, soffits, or gutters that you want to keep paint-free. -
Prime the wall:
Apply a generous coat of high-quality white masonry primer using a thick-nap roller. This ensures your colors will pop and creates a uniform canvas on the textured brick. Allow this to cure fully according to the can’s instructions. -
Sketch the layout:
Using chalk or a light pastel crayon, lightly sketch the main composition onto the primed wall. Start with the large rolling hills at the bottom, place the central rainbow, and mark the position of the large tree on the left.
Masonry Texture Tip
When painting on deep grout lines or textured brick, use a ‘stippling’ motion (dabbing the brush straight on) rather than brushing, to ensure paint gets into every crevice.
Step 2: Painting Large Elements
-
Paint the hills:
Mix a deep teal green and fill in the rolling hill shapes at the bottom of the mural. Use a smaller roller for speed, then cut in the edges with an angled sash brush for a crisp line against the white background. -
Create the main tree trunk:
Using a dark navy or almost-black paint, paint the tall, slender trunk of the large tree on the left. Extend the branches upward and outward in a V-shape pattern. -
Add the rainbow arch:
Paint the thick outer arch of the rainbow in a warm coral red. Leave a gap of white space, then paint the inner arch instructions with thin lines to suggest structure, almost like a cage or grid. -
Block in celestial shapes:
Locate your sketch marks for the moon and larger stars. Paint the crescent moon in dark navy and use the coral red and mustard yellow for the larger, five-pointed stars scattered near the top. -
Add floating clouds:
Using a lighter shade of teal or a soft blue, paint the simple, scalloped cloud shapes drifting above the rainbow and to the right side of the composition.
Make it Interactive
Paint a small legend or key at the bottom corner of the wall (at child height) listing the shapes to find, like ‘3 Red Mushrooms’ or ‘5 Yellow Stars’.
Step 3: Flora & Foliage Details
-
Paint large leaves:
Returning to the main tree, paint large, almond-shaped leaves attached to the branches. Alternate between coral red and a softer salmon pink to create visual depth and variety. -
Add ground vegetation:
Along the bottom strip, paint various plant shapes. Use navy blue for spiky aloe-like plants and teal for rounded shrubs. This area is perfect for hiding small details for the ‘I Spy’ game. -
Paint secondary trees:
On the right side, add the smaller, lollipop-shaped trees using teal for the foliage and navy for the thin trunks. I like to vary the heights here to keep the composition dynamic. -
Insert floating leaves:
Scattered around the main tree and rainbow, paint smaller, individual floating leaves and botanical sprigs in navy, teal, and mustard yellow to fill empty negative space.
Step 4: Fine Details & The ‘I Spy’ Elements
-
Add starbursts and celestial details:
Switch to a thin round brush. Using mustard yellow, paint fine line starbursts and small four-pointed aesthetic stars throughout the upper sky area. -
Paint specific hidden objects:
Now, focus on the ‘I Spy’ elements. Paint small, discoverable items like a tiny butterfly, a mushroom, a specific flower, or a hidden animal silhouette within the hills or leaves. Keep these relatively small so children have to search for them. -
Detail the rainbow interior:
Using a fine brush and mustard yellow or diluted coral, add the grid lines or brick-like pattern inside the lower arch of the rainbow. -
Add final botanical textures:
Go back over your large teal hills and add small tufts of grass or tiny flower stems in contrasting colors like white or yellow to break up the solid color. -
Clean up edges:
Step back and inspect the mural. Use a small brush with your white primer paint to touch up any ragged edges or drips, sharpening the silhouettes of your shapes. -
Seal the work:
Once the paint has cured for at least 48 hours (or as recommended by your paint manufacturer), apply a clear, non-yellowing UV-resistant masonry sealer to protect the colors from sun fading and weather.
Now your schoolyard wall is a vibrant canvas ready for years of imaginative play


Have a question or want to share your own experience? I'd love to hear from you in the comments below!