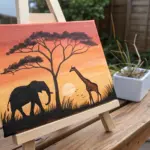
If you’re craving elephant acrylic painting ideas that feel bold and doable, you’re in the right headspace. I’m sharing a mix of classic favorites (hello, sunset silhouettes) and a few creative twists that let you play with texture, color, and mood.
Classic Elephant Silhouette at Sunset
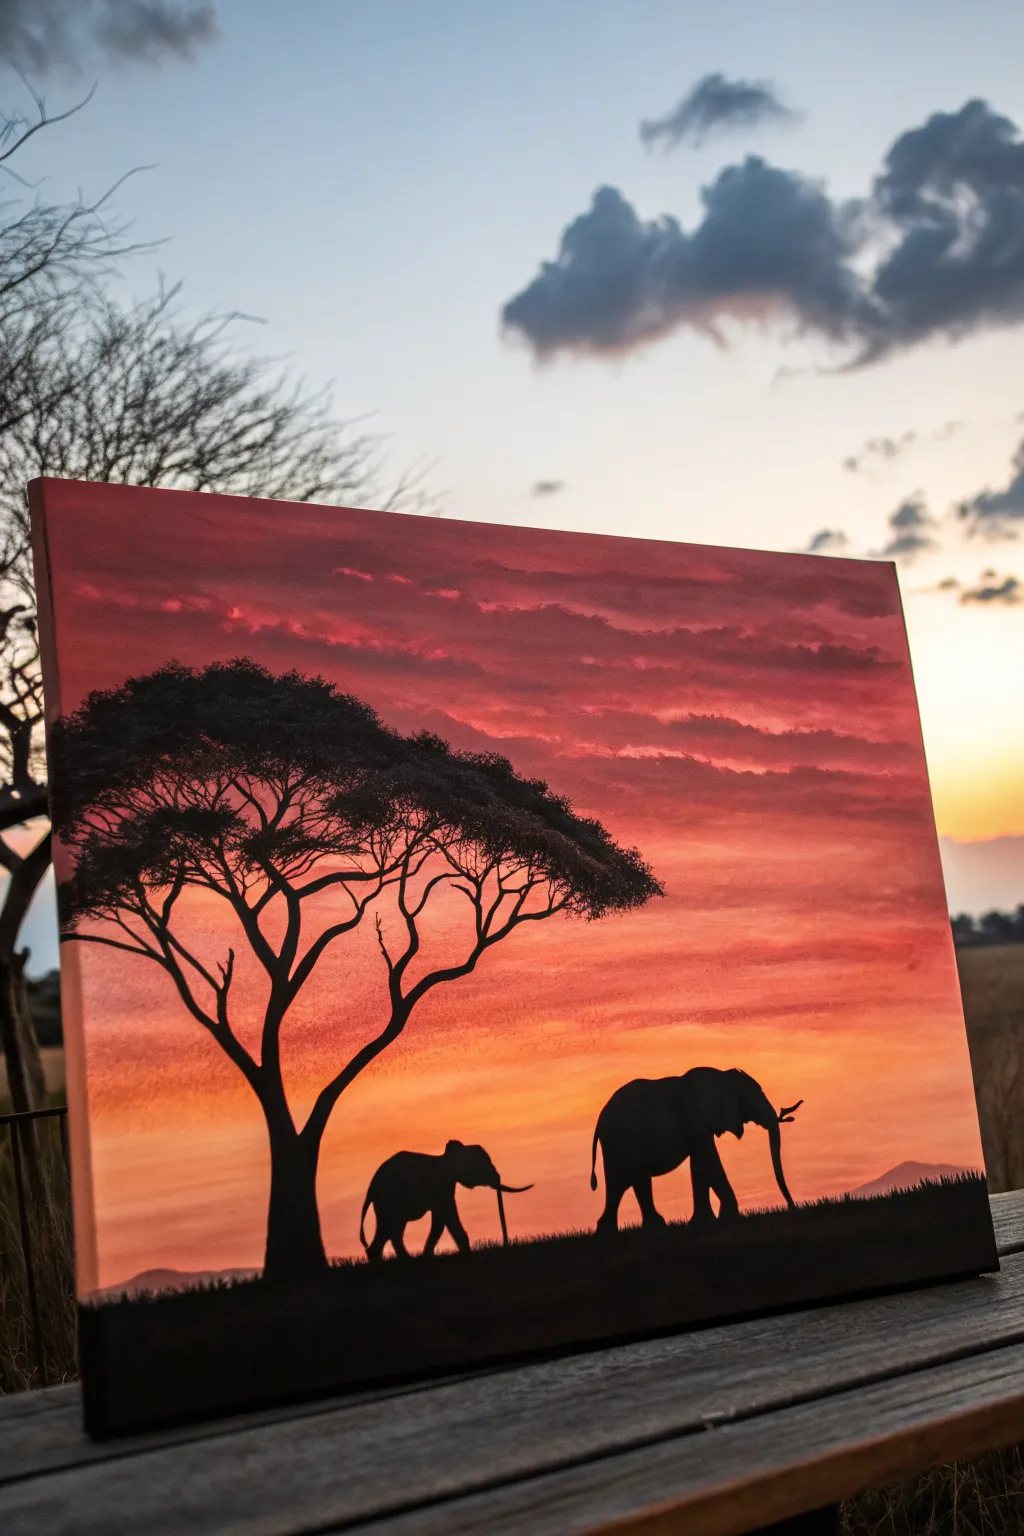
Capture the serene beauty of the African plains with this stunning acrylic painting featuring a majestic elephant silhouette against a vibrant sunset. This project focuses on blending warm sky gradients and creating distinct silhouettes to achieve a realistic yet atmospheric scene.
Step-by-Step Guide
Materials
- Stretched canvas (approx 16×20 or 24×36 inches)
- Acrylic paints: Titanium White, Cadmium Yellow, Cadmium Orange, Alizarin Crimson, Dioxazine Purple, Ultramarine Blue, Mars Black, Burnt Umber
- Large flat brush (2 inch) for the sky
- Medium flat brush (1 inch)
- Small round brushes (size 2 and 4) for details
- Fine liner brush (size 0 or 00)
- Palette knife (optional for mixing)
- Water container and paper towels
- Pencil for sketching
- Slow-drying medium (optional)
Step 1: Painting the Sunset Sky
-
Prepare the gradient:
Begin by dampening your large flat brush slightly. Load it with Titanium White and a touch of Cadmium Yellow to create the brightest part of the sky, painting a horizontal band just below the middle of the canvas where the horizon will be. -
Intensity the yellow:
As you move upward, gradually mix more pure Cadmium Yellow into your white. Keep your brush strokes horizontal and smooth to create a seamless transition. -
Transition to orange:
Introduce Cadmium Orange into the yellow mix as you work your way up the canvas. Blend the wet edges carefully where the colors meet to avoid harsh lines. I find creating a soft transition here is key to the glowing effect. -
Add the pinks and purples:
For the upper sky, mix Alizarin Crimson with a little White to make a soft pink, blending it into the orange. Finally, at the very top, blend in a mix of Dioxazine Purple and Alizarin Crimson for the darker, cooler evening sky. -
Create distant clouds:
Using a smaller flat brush and a mix of Purple, Ultramarine Blue, and White, dab in loose, horizontal cloud formations across the pink and purple sections. Keep the bottom edges of the clouds softer and slightly illuminated with a touch of orange to reflect the setting sun.
Sticky Brush?
If blending the sky is tough because the paint dries too fast, mist the canvas lightly with water or mix a slow-drying medium into your paint.
Step 2: Creating the Landscape Base
-
Establish the horizon:
Mix a muted purple-grey using Ultramarine Blue, Alizarin Crimson, and a touch of White. Paint a low, uneven mountain range along the horizon line, keeping it quite faint to suggest atmospheric perspective. -
Paint a dark underlayer for the foreground:
Mix a dark base color using Mars Black and Burnt Umber. Paint the entire bottom third of the canvas with this dark tone to serve as the shadow for the grassy plain. Let this dry completely. -
Start the grass texture:
Switch to a medium brush. Mix your dark base color with a tiny bit of Yellow or Ocher to lighten it slightly. Dry brush vertical strokes over the dark foreground, suggesting tall grasses catching the failing light.
Golden Hour Glow
Glaze a very thin layer of transparent yellow over the grass closest to the horizon line after it dries to make the sunlight look like it’s glowing.
Step 3: The Main Subjects
-
Sketch the silhouette:
Once the background is dry, use a pencil to lightly outline the shape of the elephant on the left and the acacia tree on the right. Focus on the distinct hump of the elephant’s back and the curve of the trunk. -
Block in the elephant:
Fill in the elephant shape with solid Mars Black. Use a round brush to carefully define the edges of the trunk, legs, and ears. The silhouette needs to be crisp against the bright sunset. -
Add subtle dimension:
While silhouettes are mostly black, mix a very dark grey (Black plus a tiny dot of Blue and White) and dry brush just a hint of texture on the elephant’s shoulder and flank to suggest wrinkled skin catching the ambient light. -
Paint the tusks:
Using a fine liner brush and dirty white (White with a speck of Umber or Black), carefully paint the curved tusk. It should stand out clearly against the dark body. -
Create the acacia tree:
On the right side, paint the tree trunk and main branches in solid black. Use the tip of your round brush to stipple small leaf clusters on top of the branches, creating that classic flat-topped acacia shape.
Step 4: Final Details
-
Refine the grass:
Use a liner brush or a fan brush with slightly lighter brown-gold paint to flick individual blades of grass in the immediate foreground. Overlap these slightly with the elephant’s feet to ground the animal in the scene. -
Check the horizon:
Ensure the feet of the elephant and the base of the tree feel planted in the grass, not floating. Add a little extra dark shadow directly underneath them if necessary. -
Final varnish:
Allow the painting to dry for at least 24 hours before applying a coat of gloss or satin varnish to protect the surface and deepen the dark colors.
Hang your finished piece in a well-lit spot to let those sunset colors truly shine

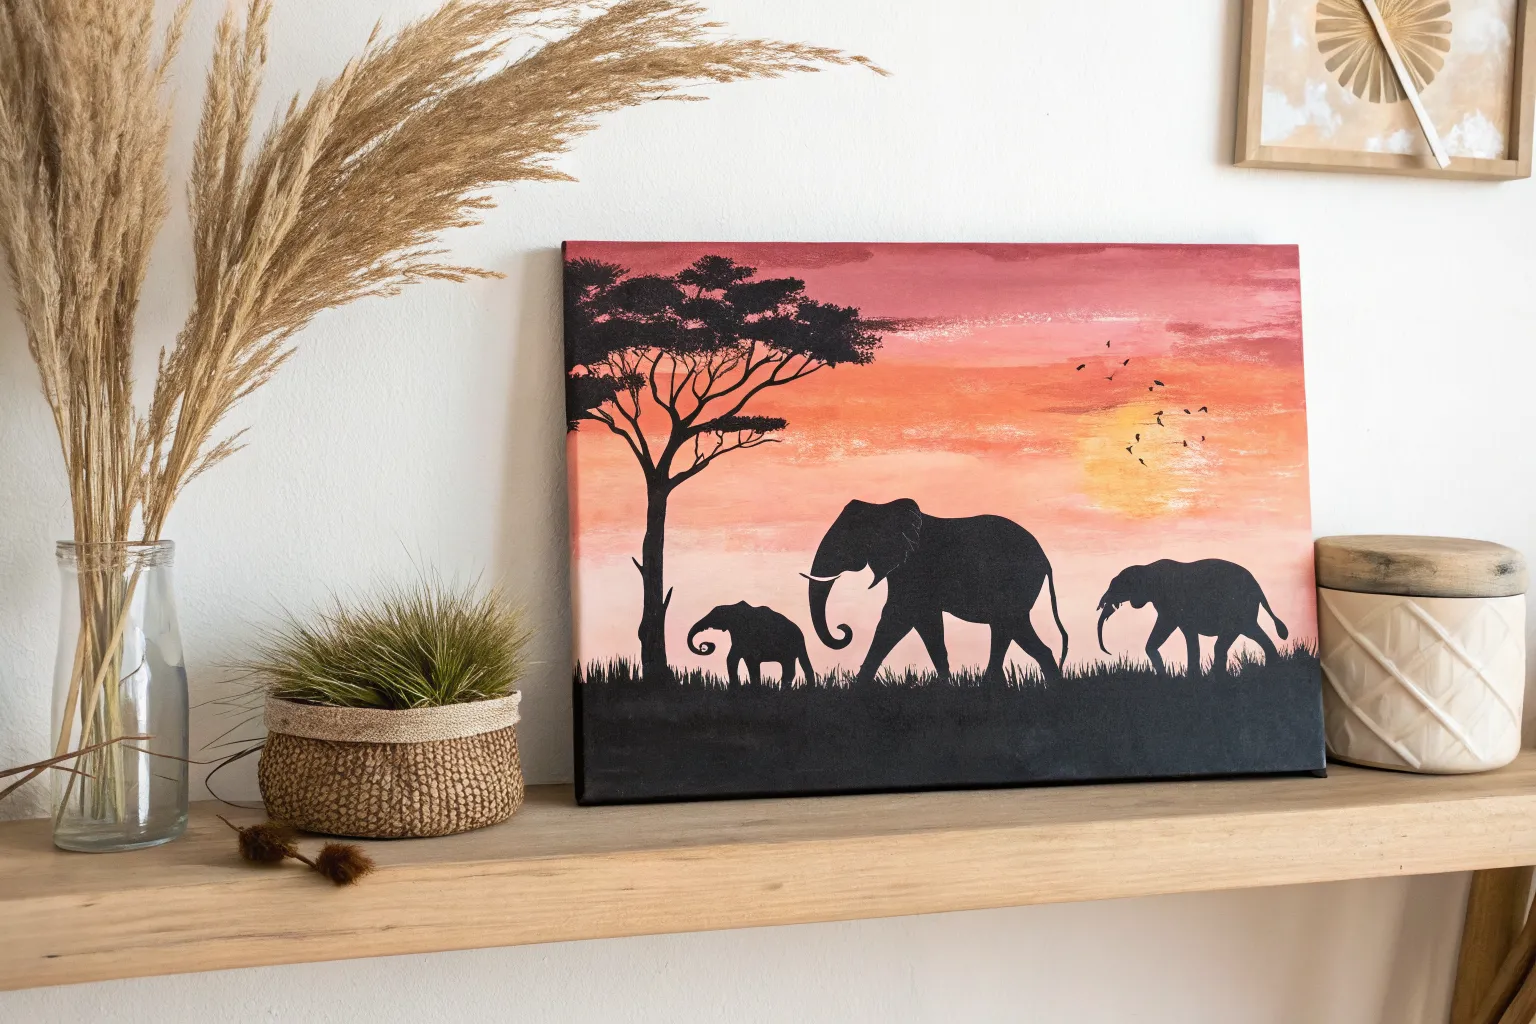
Parent and Calf Walking in a Line
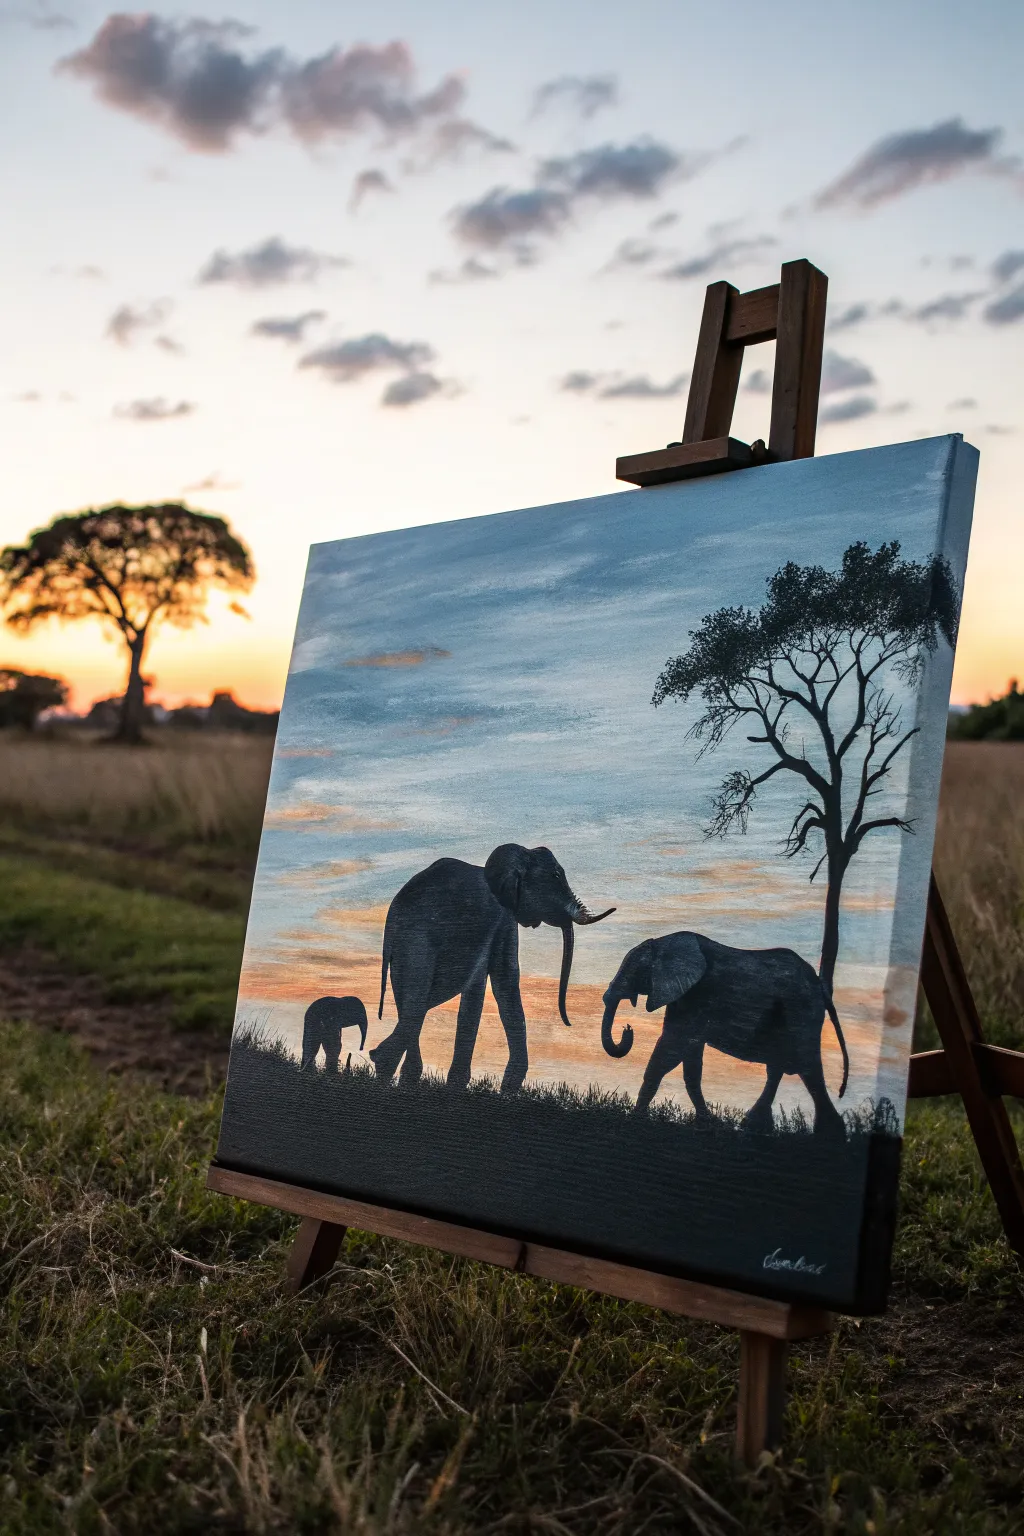
Capture the serene beauty of the African plains with this evocative acrylic painting featuring a trio of elephants silhouetted against a fading sky. The piece combines a soft, gradient sunset background with bold, detailed silhouettes to create a scene full of depth and tranquility.
How-To Guide
Materials
- Stretched canvas (16×20 inches or similar)
- Acrylic paints: Titanium White, Cerulean Blue, Ultramarine Blue, Yellow Ochre, Cadmium Orange, Burnt Umber, Mars Black
- Large flat brush (1-2 inch)
- Medium filbert brush
- Small round brush (size 2 or 4)
- Fine liner brush (size 0 or 00)
- Palette
- Water cup and paper towels
- Chalk or pastel pencil for sketching
Step 1: Painting the Sky
-
Prime the top:
Start by mixing Titanium White with a touch of Cerulean Blue to create a very pale, airy blue. Using your large flat brush, apply this to the top third of the canvas, brushing horizontally back and forth to ensure a smooth application. -
Deepen the blue:
While the first layer is still wet, introduce a slightly darker mix of Cerulean and a hint of Ultramarine Blue into the very top edge, blending it downwards to create a subtle gradient. -
Introduce sunset warmth:
Clean your brush thoroughly. Mix Titanium White with a small amount of Yellow Ochre and Cadmium Orange to get a soft peach tone. Apply this in the middle third of the canvas, blending the top edge carefully into the pale blue sky. -
Intensify the horizon:
For the lower sky area just above where the ground will be, strengthen your orange mix. Add a touch more Cadmium Orange and perhaps a tiny speck of Burnt Umber to dull it slightly, creating a warm, glowing horizon line. -
Create soft clouds:
Using a dry, medium filbert brush with a small amount of the pale blue-grey mix, verify the paint is mostly off the bristles. Scumble (rub gently) subtle cloud shapes horizontally across the sky, letting the orange poke through to suggest thin, stretching clouds.
Pro Tip: Perspective
Make the grass strokes smaller and thinner near the elephants’ feet and larger/wider at the very bottom edge of the canvas. This creates an instant illusion of depth and distance.
Step 2: Establishing the Ground
-
Block in the foreground:
Mix Mars Black with a little Burnt Umber to create a very deep, dark brown. Using a medium flat brush, paint the bottom fifth of the canvas solid dark, creating an uneven, slightly grassy top edge for the horizon line. -
Texture the grass:
With a smaller flat brush turned vertically or a fan brush, flick short, upward strokes along the horizon line using the black mix to simulate tall grasses silhouetted against the bright sunset.
Troubleshooting: Hard Lines
If your sky gradient looks stripy, re-wet the area with a clean, slightly damp brush and gently work back and forth over the transition line while the paint is still tacky.
Step 3: Drafting the Silhouettes
-
Sketch the placement:
Once the background is fully dry, use a piece of white chalk to lightly outline the three elephants walking from right to left. Place the largest elephant in the center, a medium one to the right, and the baby trailing on the left. -
Outline the tree:
On the right side of the canvas, sketch the skeleton of an acacia tree. Start with a twisted trunk that splits into a wide V-shape, extending branches outward nicely to frame the elephants.
Step 4: Painting the Details
-
Fill the elephant shapes:
Using Mars Black and a round brush, carefully fill in the bodies of the elephants. Ensure the edges are smooth but distinct, paying attention to the shape of their rounded backs and trunk positions. -
Refine the legs:
Switch to a smaller round brush to define the legs. Capture the motion of walking by having some legs lifted or bent at the knee, rather than standing stiffly straight. -
Add texture to the hides:
I like to mix a dark grey (Black + White) and dry-brush it very lightly over the center of the elephants’ bodies. This subtle highlight suggests the rough texture of their skin catching the fading light. -
Detail the tusks:
With your fine liner brush and pure Titanium White, paint the curved tusks on the adult elephants. A single, confident stroke works best here. -
Paint the tree trunk:
Use the black paint to fill in the acacia tree trunk. Make the lines organic and slightly jagged, thickening the base where it meets the ground. -
Create canopy foliage:
For the leaves, use an old, splayed bristle brush or a sea sponge. Dip it in black paint and dab it onto the ends of the branches to create distinct, flattened clusters of leaves typical of acacia trees. -
Add final grass:
Using the liner brush and black paint, add a few taller, sharper blades of grass in the immediate foreground to cover the elephants’ feet slightly, grounding them in the scene.
Step back and admire your peaceful twilight scene before signing your name in the corner


Elephants Under an Acacia Tree
Capture the warmth of the African savanna with this striking silhouette study, featuring a glowing gradient sky and iconic wildlife. The contrast between the fiery background and the deep black foreground creates a dramatic, professional-looking piece that is surprisingly beginner-friendly.
Step-by-Step Tutorial
Materials
- Rectangular stretched canvas (16×20 or similar)
- Acrylic paints: Deep Burgundy, Cadmium Red, Orange, Cadmium Yellow, Titanium White, Mars Black
- Large flat wash brush (2 inch)
- Medium flat brush
- Small round brush (size 2 or 4)
- Detail liner brush (size 0 or 00)
- Palette or paper plate
- Cup of water and paper towels
- Pencil for sketching
Step 1: Painting the Sunset Gradient
-
Prepare the warm palette:
Squeeze out generous amounts of your sunset colors: burgundy, red, orange, yellow, and white. You want these ready to go because acrylics dry fast, and blending requires wet paint. -
Start with the darkest sky:
Using your large flat wash brush, paint the top third of the canvas with the deep burgundy mixed with a touch of red. Use long, horizontal strokes across the full width. -
Transition to mid-tones:
While the top is still wet, introduce the pure red, blending it into the burgundy edge. Move down the canvas, gradually adding orange to your brush without washing it out completely to ensure a smooth transition. -
Paint the horizon glow:
For the bottom third, mix yellow with a little orange and white. Blend this upwards into the orange section. The area just above the bottom edge should be the brightest, mimicking the sun dipping below the horizon. -
Add subtle cloud textures:
Before the background dries completely, take a dry, medium flat brush with a tiny amount of burgundy paint. Gently streak horizontal, wispy clouds across the upper red and orange sections to create depth. -
Let it dry completely:
This is crucial. The background must be bone-dry before you add the black silhouettes, or the colors will muddy. I usually give it at least 30 minutes to an hour.
Muddy Skies?
If your gradient blends look brown or muddy, wash your brush more often between colors. Don’t mix purple/burgundy directly into yellow without a transition color like red or orange.
Step 2: Sketching the Composition
-
Plan the horizon line:
Lightly sketch a low horizon line about 2 inches from the bottom of the canvas. It doesn’t need to be perfectly straight; a little unevenness looks like natural terrain. -
Outline the tree structure:
On the left side, sketch the trunk of the acacia tree. It should be thick at the base and split into major Y-shaped branches as it reaches up. Keep the canopy wide and flat-topped. -
Position the elephants:
Sketch the outline of the large elephant walking toward the right side. Add the smaller baby elephant following behind. Focus on the main shapes (rounded back, head, trunk position) rather than tiny details.
Step 3: Painting the Silhouettes
-
Fill the ground:
Load your medium flat brush with Mars Black. Paint the ground strip at the bottom solid black, covering your pencil line. -
Create the grass texture:
Using the tip of a smaller brush or an old fan brush, flick tiny upward strokes from the black ground line to simulate tall savanna grass protecting the animals’ feet. -
Paint the tree trunk:
Switch to your round brush and fill in the tree trunk with solid black. Ensure the lines flow smoothly upward, tapering as the branches get higher. -
Develop the branches:
Extend the branches outward. Acacia branches are twisted and thorny somewhat erratic. Use the tip of your brush to make the ends very fine. -
Stipple the leaves:
For the foliage, use an old, stiff brush with black paint. Dab or stipple the paint onto the ends of the branches. Keep these clusters flat and horizontal to mimic the distinct acacia canopy shape.
Distant Hills
Before painting the black foreground, mix a dark purple-grey and paint low, rolling hills along the horizon. This creates a mid-ground layer for extra depth.
Step 4: Adding the Elephants
-
Block in the bodies:
Use the round brush to fill in the main body shapes of the elephants with black paint. Ensure the paint is opaque; you may need a second coat if the sunset shows through. -
Detail the trunks and tusks:
Switch to your detail liner brush. Carefully paint the trunks, giving them a slight curve for movement. If you want tusks, leave them unpainted (silhouette style) or add a tiny stroke of grey/white if the light would catch them, but pure black is safer for a true silhouette. -
Refine the legs:
Paint the legs, remembering that elephants have thick, pillar-like legs. Define the separation between the legs carefully so the walking motion is clear. -
Final touches:
Check for any uneven edges or patches where the background peeks through the black. Smooth out the silhouette lines with your liner brush to finish the piece.
Now step back and admire the warm, tranquil mood you have created on your canvas


Watering Hole Reflection Scene
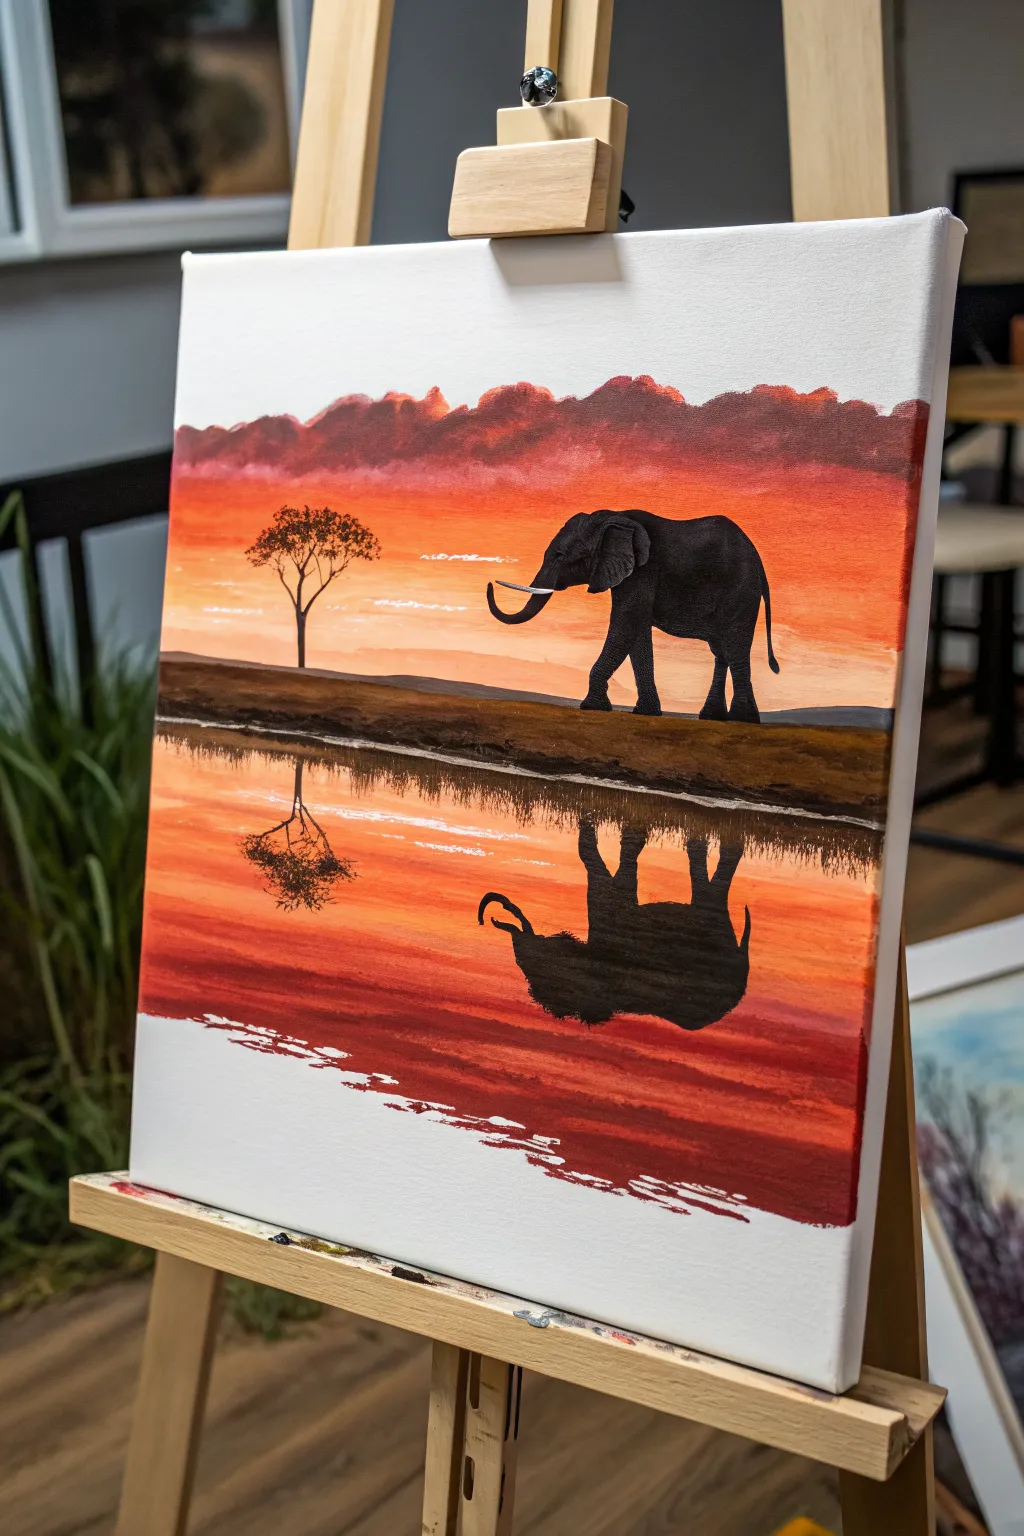
Capture the serene beauty of the savanna with this striking acrylic painting featuring a high-contrast silhouette against a fiery sunset. The reflected symmetry creates a calming balance, making this an impressive yet approachable project for painters of all levels.
How-To Guide
Materials
- Canvas (stretched or panel, vertical orientation)
- Acrylic paints (Titanium White, Cadmium Yellow, Cadmium Orange, Cadmium Red, Burnt Umber, Mars Black)
- Flat paintbrushes (large for background, medium for land)
- Small round detail brush (size 0 or 1)
- Palette knife (optional, for mixing)
- Cup of water and paper towels
- Ruler or painter’s tape (optional, for horizon line)
Step 1: Painting the Sky and Water Gradient
-
Establish the Horizon:
Locate a point slightly below the vertical center of your canvas. You can lightly mark a straight horizontal line here with a pencil or a piece of painter’s tape to separate the sky from the water. -
Start with the Brightest Sky:
Using a large flat brush, mix Titanium White with a small amount of Cadmium Yellow. Paint a horizontal band just above your horizon line. This will be the glowing light source of the sunset. -
Blend Upward to Orange:
While the yellow is still wet, introduce Cadmium Orange above it. Use long, horizontal strokes to blend the orange into the yellow, creating a smooth transition. -
Deepen the Sky Color:
Transition into pure Cadmium Red near the top third of the sky area. Continue blending downward into the orange so there are no harsh lines between the colors. -
Create the Clouds:
Mix Burnt Umber with a touch of Red to make a dark reddish-brown. With a smaller brush, dab in a rugged, uneven line of distant mountains or low clouds across the top portion of the red sky. -
Mirror the Gradient for Water:
Now, repeat the process below the horizon line but in reverse order. Paint the pale yellow band just below the horizon, followed by orange, and then red as you move toward the bottom of the canvas. -
Add Texture to the Reflection:
Because the water isn’t a perfect mirror, use slightly more horizontal, broken brushstrokes in the reflection area to suggest ripples.
Paint Consistency Tip
For sharp, opaque silhouettes, don’t add water to your black paint. Use it straight from the tube so the background color doesn’t show through.
Step 2: Land and Silhouettes
-
Paint the Riverbank:
Using Burnt Umber mixed with a tiny bit of Black, paint a thick horizontal strip across the middle of the canvas—covering your original horizon line. This acts as the solid ground. -
Add the Reflection Base:
Immediately below the dark riverbank, paint a slightly lighter reflection of the land using thinned brown paint. Use vertical downward strokes that fade out quickly to simulate the shadow hitting the water. -
Sketch the Elephant:
Once the background is fully dry, use a small round brush with very watered-down black paint to lightly outline the elephant’s shape. I prefer to start with two simple ovals for the body and head before connecting them. -
Fill in the Elephant Silhouette:
Switch to pure Mars Black and fill in the elephant shape. Focus on the distinct hump of the back and the trunk shape. -
Add Subtle Highlights:
While the black is wet, or using a dry-brush technique later, add a tiny touch of grey to the elephant’s ear and shoulder to give it dimension, so it isn’t purely flat black. -
Paint the Acacia Tree:
On the left side, paint a thin, winding black trunk. At the top, stipple small dots of black to create the flat-topped canopy characteristic of acacia trees.
Step 3: Detailed Reflections and Finishing Touches
-
Start the Mirror Image:
Carefully paint the reflection of the elephant and the tree in the water section. Remember to invert the shapes—the elephant’s feet should touch the ‘feet’ of the reflection. -
Distort the Water Reflection:
As you paint the reflected elephant and tree, use horizontal zig-zag strokes or slightly uneven lines. The reflection should look wobbly, not sharp like the real object. -
Add the Tusk:
Use a detail brush with Titanium White to add the small curved tusk on the main elephant. -
Add the Reflected Tusk:
Don’t forget a small white dash in the water reflection for the tusk, keeping it slightly blurry. -
Highlight the River Edge:
Paint a very thin, broken line of white or pale yellow right along the waterline where the land meets the reflection to suggest light catching the edge of the bank. -
Final Water Ripples:
Using your background colors (red or white), add a few thin horizontal streaks cutting through the black silhouette reflections to show the water’s surface current.
Fixing Wobbly Horizons
If your horizon line got crooked, fix it when you paint the dark riverbank land mass. Make that strip slightly thicker to cover any uneven background seams.
Let your masterpiece dry completely before displaying this peaceful moment in nature
BRUSH GUIDE
The Right Brush for Every Stroke
From clean lines to bold texture — master brush choice, stroke control, and essential techniques.
Explore the Full Guide
Starry Night Elephant Silhouette
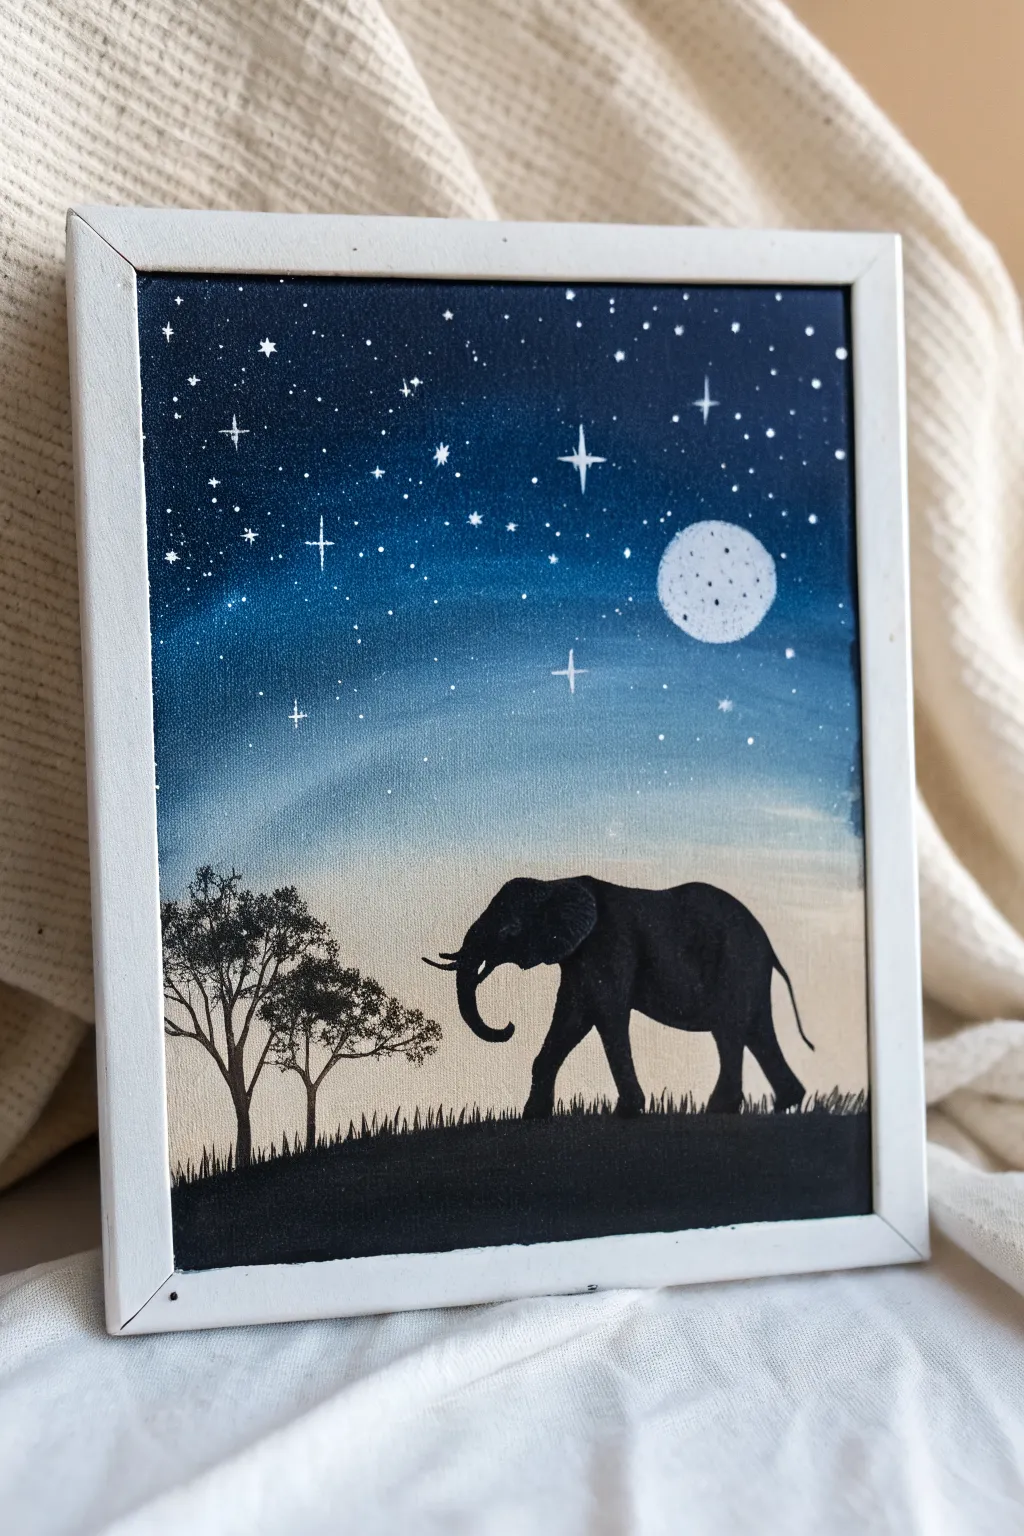
Capture the serene beauty of the African savannah with this striking acrylic painting featuring a bold elephant silhouette against a transition sky. This project combines a dreamy gradient background with crisp black details, perfect for beginners and intermediate painters alike.
Step-by-Step
Materials
- Small stretched canvas (e.g., 5×7 or 8×10)
- Acrylic paints: Navy Blue, Phthalo Blue (or True Blue), White, Black, Cream/Light Beige
- Wide flat brush (for blending)
- Small round detail brush (size 0 or 1)
- Medium round brush
- Pencil (optional)
- Water cup and paper towels
- White or silver paint pen (optional for stars)
- Old toothbrush (for spatter effect)
Step 1: Painting the Gradient Sky
-
Prepare the Horizon:
Start by identifying where your horizon line will be. For this composition, leave the bottom quarter of the canvas blank for the ground, but paint a base layer of cream or light beige just above that line, blending upward about two inches. -
Add the Mid-Tone Blue:
Mix a lighter blue using your Phthalo Blue and plenty of White. Apply this right above the cream section while the paint is still wet, using long horizontal strokes to create a soft transition where they meet. -
Deepen the Sky:
Moving upward, introduce pure Phthalo Blue. Blend this down into the lighter blue section, keeping your brush strokes smooth and horizontal to avoid streakiness. -
Create the Night Ceiling:
For the very top of the canvas, use your Navy Blue (or mix Black with Blue) to create the darkest part of the night sky. Blend this downward into the mid-tone blue to complete the gradient. -
Dry Completely:
Allow the entire background to dry fully. This is crucial because painting a crisp moon or stars over wet paint will result in a muddy mess.
Smooth Blends Tip
Keep your brush slightly damp (not dripping!) when blending the sky gradient. This helps the acrylics flow into each other without drying too fast.
Step 2: Adding Celestial Details
-
Paint the Moon Base:
Using a medium round brush and white paint, carefully dab a circle in the upper right quadrant. It doesn’t need to be geometrically perfect; a slightly organic edge looks more natural. -
Texture the Moon:
While the white is slightly tacky, tap a tiny amount of grey or diluted black onto the moon’s surface to create crater textures. -
Create the Star Field:
Dip an old toothbrush into slightly watered-down white paint. Run your thumb across the bristles to flick a fine mist of stars across the darker blue sections of the sky. -
Highlight Major Stars:
Use your smallest detail brush (or a silver paint pen) to add larger, cross-shaped stars. Place a few specifically around the moon and in the upper corners for balance.
Step 3: Drafting the Silhouette
-
Establish the Ground:
Use black paint to fill in the bottom quarter of the canvas. Make the top edge of this ground layer slightly uneven to mimic terrain, rather than painting a straight line. -
Sketch the Elephant:
If you aren’t confident painting freehand, lightly sketch the elephant’s outline with a pencil. Focus on the large curved back and the distinct shape of the trunk raised slightly upward. -
Fill the Elephant Shape:
Load your medium brush with black paint and fill in the elephant’s body. Ensure the paint is opaque; you may need a second coat to prevent the background light from showing through. -
Refine the Limbs:
Pay attention to the legs—they should look like they are walking. Position the back leg lifted slightly mid-step to add a sense of movement to the silhouette. -
Detail the Trunk and Tail:
Switch to your fine liner brush. Carefully paint the tail with a thin, wispy stroke, and refine the trunk’s curve and the tusks. Note that the tusks should be painted in the silhouette black, not white, as they are shadowed.
Level Up: 3D Moon
Mix a tiny amount of heavy structure gel or modeling paste into your white paint for the moon to give it actual raised texture and crater depth.
Step 4: Painting the Vegetation
-
Add Grass Texture:
Using the tip of your smallest brush or a fan brush turned vertically, flick tiny upward strokes along the horizon line to create grass blades growing out of the black ground. -
Structure the Trees:
On the left side, paint thin, branching lines extending upward for the tree trunks. Acacia trees typically have a distinctive ‘V’ shape branching structure. -
Add Foliage:
Stipple (dab repeatedly) the ends of the branches with black paint to create the leafy canopy. Keep these clusters somewhat flat and spread out, characteristic of savannah trees. -
Final Touches:
Check your edges. If any black paint looks thin, do a quick touch-up to ensure the silhouette is solid and stark against the glowing background.
Once the black paint is fully dry, you will have a peaceful savannah night scene ready to display.
Close-Up Elephant Face Portrait
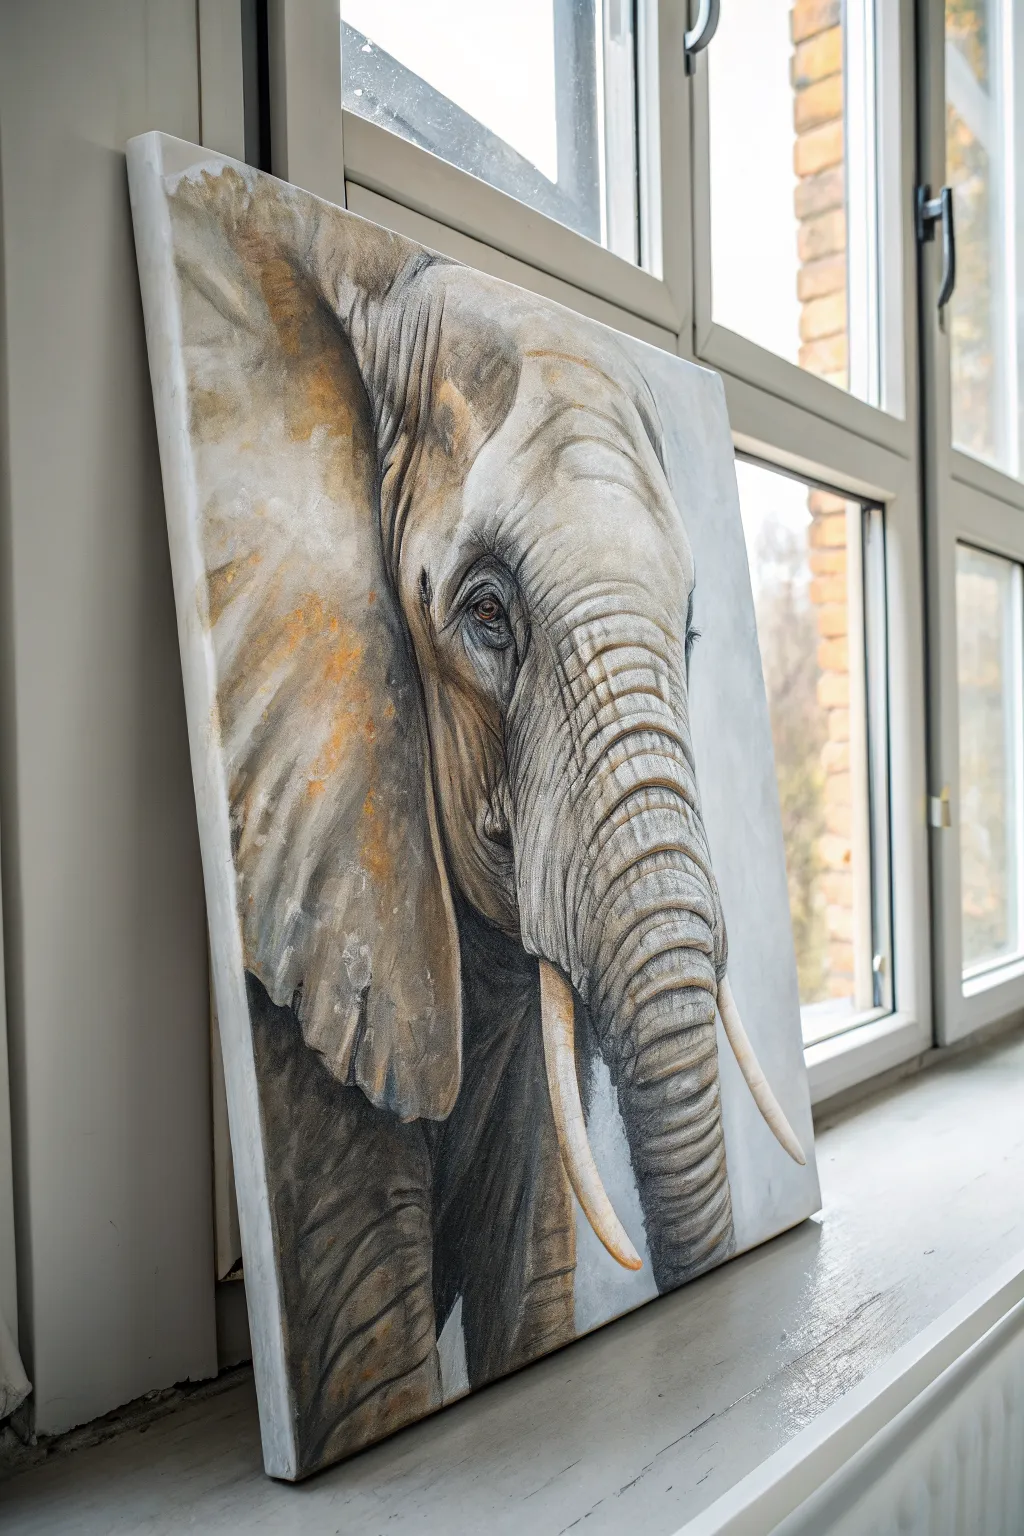
Capture the wise, weathered elegance of a gentle giant with this close-up acrylic portrait. You will build layers of warm greys and rusty ochres to create realistic skin texture and depth without needing photorealistic precision.
Step-by-Step Tutorial
Materials
- Large rectangular canvas (approx. 24×36 inches)
- Acrylic paints: Titanium White, Mars Black, Burnt Umber, Yellow Ochre, Burnt Sienna, Raw Sienna
- Large flat brush (2-inch) for background
- Medium filbert brushes (sizes 6-8)
- Small round brushes (sizes 0-2) for details
- Palette knife (optional for texture)
- Water cup and paper towels
- Graphite pencil or charcoal stick for sketching
- Easel or flat work surface
Step 1: Blocking the Composition
-
Prepare the canvas:
Start by applying a subtle wash of pale grey across the entire canvas to kill the stark white. Mix a tiny drop of Mars Black with Titanium White and plenty of water. Let this dry completely before sketching. -
Sketch the main shapes:
Using a pencil or charcoal stick, lightly outline the elephant’s head. Focus on the large curve of the ear on the left, the domed skull, and the central trunk. Don’t worry about wrinkles yet; just get the placement right so the trunk flows down the center-right. -
Position the features:
Mark the location of the eye—this is the focal point. Place it deep within the socket area. Sketch the two tusks emerging near the bottom, ensuring they curve naturally. Draw the basic outline of the ear flap.
Wrinkles look flat?
Ensure you have three distinct values for every wrinkle: a dark line for the crease, a mid-tone for the skin, and a highlight on the raised ridge right next to the dark line.
Step 2: Establishing Base Layers
-
Mix your base greys:
Create three piles of grey on your palette: a dark shadow grey (Black + Burnt Umber), a mid-tone warm grey (White + Black + touch of Raw Sienna), and a light highlight grey. -
Paint the shadows:
Using the dark shadow mix and a medium filbert brush, fill in the deepest areas: the hollow beneath the ear, the creases around the eye, the dark side of the trunk, and the area under the chin. This establishes your contrast map. -
Apply the mid-tones:
Block in the main skin areas of the forehead, trunk, and ear with your warm mid-tone grey. Don’t smooth it out too much; visible brushstrokes help suggest the rough texture of elephant skin. -
Underpaint the background:
While the elephant dries, paint the background with a very pale, cloudy white-grey. Keep it simple and slightly blurred so it doesn’t compete with the detailed portrait.
Step 3: Developing Texture and Form
-
Add warmth to the ear:
Mix Yellow Ochre with a bit of Burnt Sienna and glaze it thinly over parts of the large ear flap and the top of the head. This suggests dirt or sun-bleached skin and breaks up the monotony of the grey. -
Define the trunk rings:
Switch to a smaller brush. Paint the horizontal ridges down the trunk. Use a lighter grey for the top of each ridge and a darker grey for the recess between them to make them look uniform and cylindrical. -
Detail the eye:
Paint the eye using dark brown and black. Add the surrounding eyelids with heavy wrinkles, layering lighter grey over dark creases. Place a small, sharp dot of white in the eye for the reflection—this brings the animal to life. -
Enhance the ear texture:
Dry brush some lighter grey and white over the dried ochre sections of the ear. Let the brush skip over the canvas tooth to create a naturally rugged, weathered appearance. -
Paint the tusks:
Fill the tusks with a creamy white (White + tiny touch of Yellow Ochre). Add shadows on the underside with diluted brown to make them look round rather than flat.
Build Realistic Skin
Don’t over-blend your paint. Unlike smooth human portraits, leaving choppy, unblended brushstrokes actually mimics the rough, leathery texture of elephant skin perfectly.
Step 4: Final Details and Highlights
-
Deepen the contrast:
Revisit your darkest shadows. If the paint has dried lighter, add a second layer of black/brown mix into the deepest crevices, particularly where the ear meets the neck and under the trunk. -
Refine the wrinkles:
I like to use a small round brush here to crisply define the major cracks on the forehead and trunk. Don’t make them straight lines; let them wobble and break to look organic. -
Add rust accents:
Scumble (dry brush in a circular motion) a little pure Burnt Sienna or rust color onto the high points of the ear and cheeks. This warmth adds distinct character to the piece. -
Brighten the highlights:
Use nearly pure Titanium White to hit the highest points: the ridge of the brow, the tops of the trunk rings, and the curve of the tusks. This makes the form pop forward. -
Soften edges:
Check the outer edges of the elephant. If they look too like a cutout, gently smudge them with a clean damp brush to integrate the subject slightly with the pale background.
Step back and admire the soulful expression and rich texture of your finished elephant portrait

PENCIL GUIDE
Understanding Pencil Grades from H to B
From first sketch to finished drawing — learn pencil grades, line control, and shading techniques.
Explore the Full Guide
Colorful Expressive Elephant Close-Up
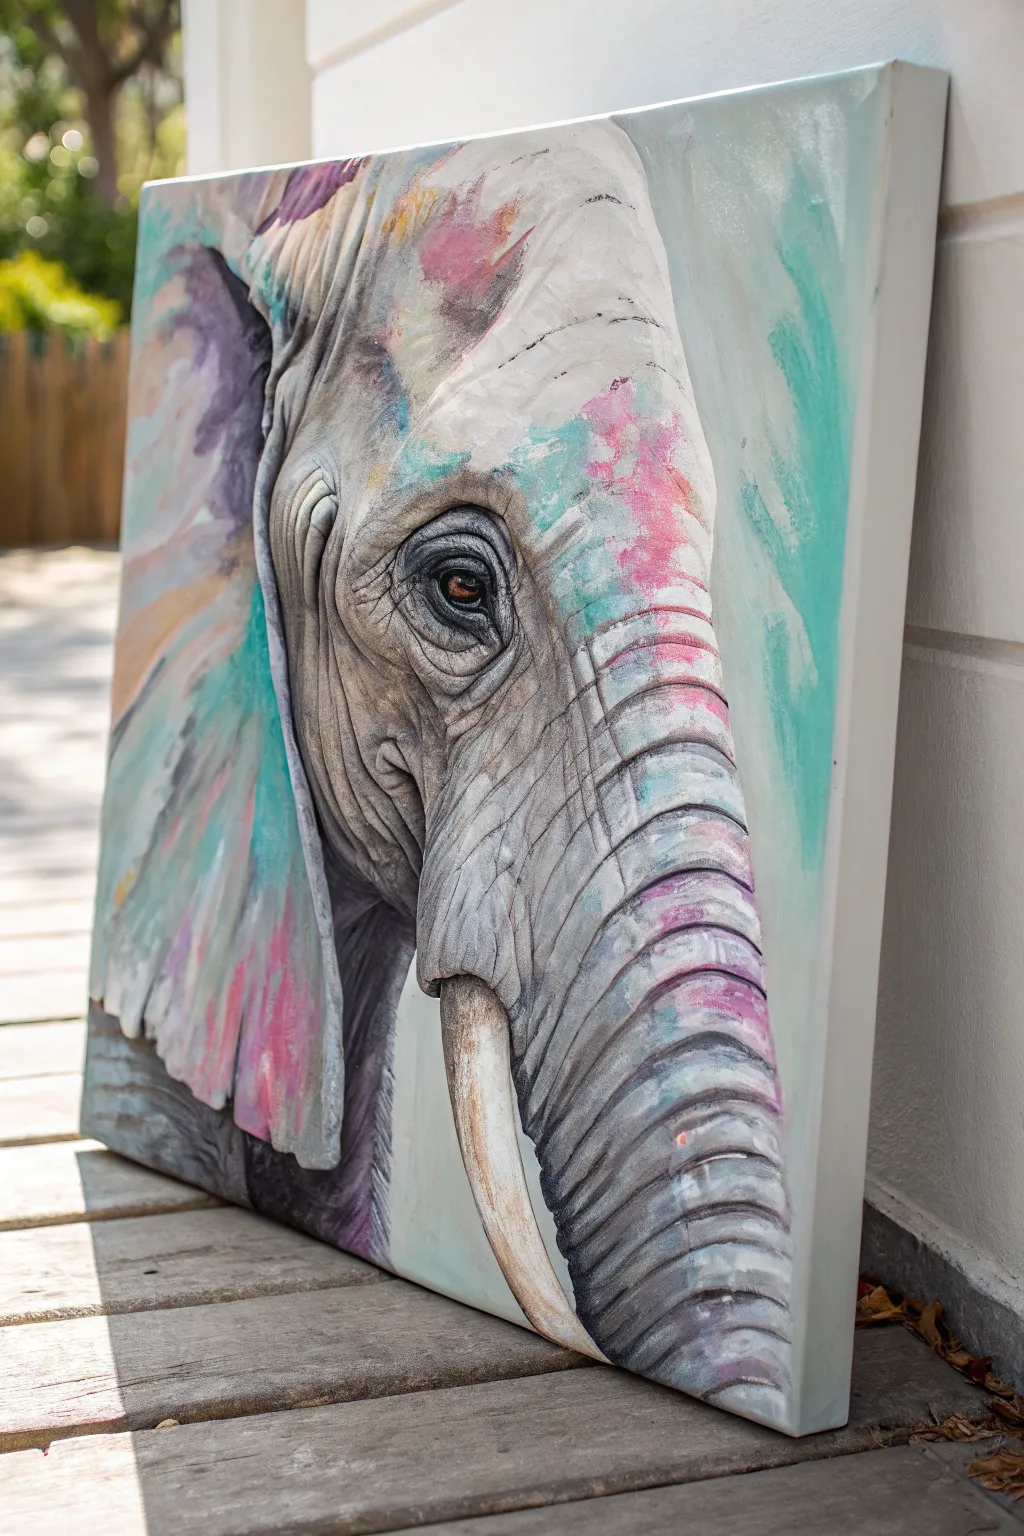
Capture the gentle majesty of an elephant in this vibrant close-up that blends realistic detailing with playful splashes of pastel color. By layering acrylic washes over textured brushwork, you’ll create a piece that feels both sculpturally deep and dreamily abstract.
Detailed Instructions
Materials
- Square stretched canvas (approx. 24×24 inches)
- Heavy body acrylic paints (titanium white, mars black, burnt umber, raw sienna)
- Fluid or soft body acrylics (turquoise, magenta, violet, soft yellow)
- Gesso (optional for priming)
- Assorted synthetic brushes (large flat, medium filbert, fine liner)
- Palette knife
- Water container and paper towels
- Gray charcoal or pastel pencil for sketching
- Modeling paste (optional for extra texture)
Step 1: Planning and Underpainting
-
Prime the Surface:
Begin with a clean white canvas. If you want a smoother starting point, apply a fresh coat of gesso, but the raw texture of the canvas works well here too. -
Sketch the Composition:
Using a gray charcoal or pastel pencil, lightly sketch the elephant’s head profile. Focus on the placement of the eye (roughly the upper third) and the sweeping curve of the trunk extending off the bottom edge. Don’t worry about tiny details yet; just get the big shapes of the ear and trunk correct. -
Block in Shadows:
Mix a dark gray using Mars Black and a touch of Burnt Umber. With a medium filbert brush, paint the deepest shadow areas—the heavy folds under the eye, the deep crevices of the trunk, and the shadowed area under the ear flap. -
Establish the Mid-Tones:
Create a warm gray by adding Titanium White and a dot of Raw Sienna to your dark mix. Apply this to the main skin areas, scrubbing the paint in loosely to suggest the leathery texture of the skin rather than blending it perfectly smooth.
Step 2: Adding Form and Texture
-
Sculpt the Wrinkles:
Using a smaller round brush, go back into your gray areas and define the characteristic wrinkles. Use Titanium White to highlight the raised ridges of the trunk and skin folds found around the eye socket. -
Deepen the Contrast:
Reinforce the darkest crevices with a thin glaze of black. This high contrast between the deep recesses and the highlighted ridges creates the illusion of three-dimensional skin texture. -
Paint the Eye:
The eye is the soul of the painting. Paint the iris a warm amber using Raw Sienna and Burnt Umber. Add a sharp black pupil and, crucially, a tiny, crisp white reflection dot to give it life and wetness. -
Detail the Tusk:
Paint the tusk with a creamy mix of Titanium White and Raw Sienna. Add vertical textural streaks using watered-down brown to mimic the natural grain and aging of ivory.
Pro Tip: Dry Brushing
For the trunk ridges, wipe most paint off your brush before applying highlights. This ‘dry brush’ technique catches only the raised canvas texture.
Step 3: The Colorful Washes
-
Prepare the Glazes:
Dilute your teal, magenta, and violet paints with water or a glazing medium until they are semi-transparent. You want the gray underpainting to show through slightly. -
Apply the Turquoise Wash:
Brush the turquoise glaze onto the right side of the canvas (the background) and let it spill naturally over the forehead and down the trunk. Use a large brush and loose, vertical strokes. -
Introduce Pink and Purple:
While the paint is still tacky or dry (depending on how much blending you want), scumble bright magenta and violet onto the ear and the top of the head. I like to let these colors overlap the gray skin textures to show the elephant is part of the atmosphere. -
Soften the Edges:
Take a clean, damp brush and soften the edges where the color meets the realistic gray skin. This creates that dreamy, watercolor-like effect on the acrylic surface. -
Add Colorful Highlights:
Mix a tiny amount of your colored paints with white to make pastels. Dry brush these pastel tints onto the tops of the trunk ridges and ear folds to make the color feel embedded in the skin.
Level Up: Impasto Pop
Mix modeling paste into your white highlights before applying them to the trunk. This physically raises the paint for a true 3D tactile effect.
Step 4: Final Touches
-
Enhance the Whites:
Use pure Titanium White to re-establish the brightest highlights on the forehead and the bridge of the nose, which may have gotten muddied during the glazing process. -
Refine the Background:
Clean up the background edges. If you want the elephant to pop more, add a thicker, more opaque layer of pale teal or white to the negative space on the right side. -
Textural Splatter:
For a bit of grit, flick a stiff toothbrush loaded with watered-down white or gray paint across the ear area. This adds organic noise that mimics skin pores. -
Final Assessment:
Step back and check the balance. Ensure the eye remains the focal point; if necessary, darken the eyelashes or brighten the reflection one last time.
Hang your masterpiece in a brightly lit spot where the colors can truly shine and spark conversation
Palette Knife Wrinkle Texture Study
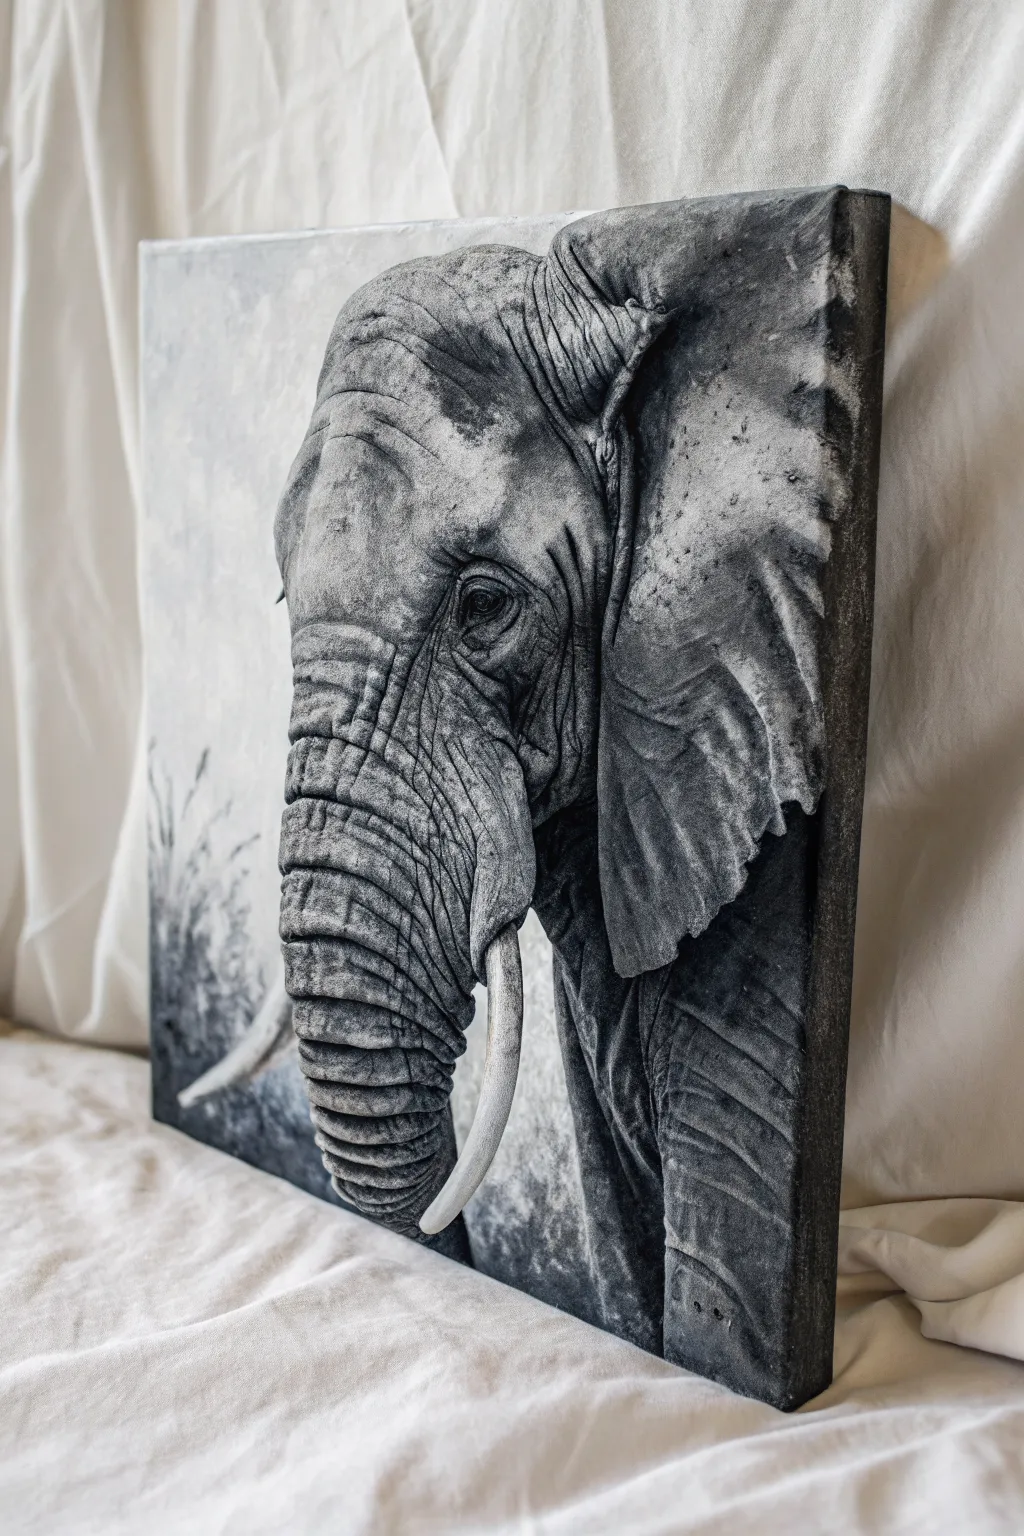
Capture the majestic ruggedness of an elephant’s skin using acrylic heavy body paints and palette knives. This monochromatic study focuses on building physical texture to mimic deep wrinkles, resulting in a piece that feels as three-dimensional as the subject itself.
How-To Guide
Materials
- Stretched canvas (square or rectangular portrait)
- Heavy body acrylic paints (Mars Black, Titanium White, Raw Umber)
- Modeling paste or texture gel
- Set of palette knives (trowel shape, tear-drop shape, and narrow detail knife)
- Wide flat synthetic brush
- Small round or liner brush
- Charcoal pencil or graphite for sketching
- Paper towels and water container
- Mixing palette
Step 1: Planning and Underpainting
-
Establish the drawing:
Begin by sketching the main contours of the elephant’s head, trunk, and ears onto the canvas with a charcoal pencil. Focus on the big shapes first—the curve of the trunk, the triangular flop of the ear, and the dome of the head—before marking the major directional lines of the deepest wrinkles. -
Create a mid-tone base:
Mix a medium grey using Mars Black and Titanium White with a touch of water to thin it out. Cover the entire canvas with this wash using your wide flat brush to eliminate the white canvas texture and establish a neutral background. -
Block in the darkest shadows:
While the base is drying, mix a dark charcoal grey (nearly black). Using a smaller flat brush, paint in the deep recesses: the inner ear, beneath the tusk, inside the eye socket, and the shadowy side of the trunk. This creates your roadmap for contrast.
Muddy Textures?
If your knife strokes are blending into a mess, wipe your knife clean after *every* single stroke. Old paint on the blade destroys clear texture.
Step 2: Building the Texture
-
Prepare the modeling paste mix:
On your palette, mix equal parts modeling paste with a light grey acrylic paint. You want a consistency thick enough to hold peaks, like stiff frosting. -
Apply the first texture layer:
Using a trowel-shaped palette knife, apply the paste mixture to the sunlit areas of the elephant—the forehead, the bridge of the trunk, and the ear top. Don’t smooth it out; let the knife skip and drag to create natural roughness. -
Carve the major wrinkles:
While the paste is still wet, use the edge of a clean, narrow palette knife to slice through the texture, creating the deep, horizontal cracks across the trunk and the directional folds on the forehead. -
Build the ear texture:
For the large ear, use a broader sweeping motion with the knife, pushing the paste outward to mimic the fanning veins. Allow the paste to build up thicker on the outer edges to separate the ear from the neck behind it. -
Dry completely:
This is crucial: Let the texture layer dry completely, likely for several hours or overnight. If you paint over wet paste, you will muddy your colors and lose the ridge definition.
Pro Tip: Randomize It
Elephants aren’t perfect! Occasionally twist your wrist while dragging the knife to create irregular, organic skin patterns rather than straight lines.
Step 3: Painting the Form
-
Darken the deep cracks:
Once dry, mix a fluid black wash (watered down slightly). Use a fine liner brush to paint into the deep recesses and cracks you carved earlier. The thin paint will naturally settle into the texture, emphasizing the depth. -
Dry brush the mid-tones:
Load a dry, stiff brush with medium grey paint and wipe most of it off on a paper towel. Lightly drag the brush over the raised textured areas. This technique catches only the high points of your modeling paste, instantly revealing the skin texture. -
Refine the eye:
Paint the eye using pure black, leaving a tiny spot of raw canvas or painting a crisp white dot for the catchlight. Add detailed wrinkles around the eyelids with a small round brush to give the gaze wisdom and weight. -
Sculpt the trunk highlights:
Switch back to a small palette knife with pure Titanium White mixed with a tiny bit of grey. Scrape this highlight color onto the very top ridges of the trunk wrinkles to make them pop forward.
Step 4: Final Details
-
Define the tusks:
Paint the tusks using a warm off-white (mix white with a speck of Raw Umber). Keep the edges relatively clean but add subtle striations to show age, rather than making them polished ivory. -
Soften the background:
Using a clean, large brush, paint the background area around the elephant with a soft, misty grey-white. Keep strokes loose and indistinct to ensure the sharp details of the elephant remain the focal point. -
Suggest foreground grass:
At the bottom left, use quick, upward flicks of a palette knife with dark grey to suggest blurred grass or foliage, adding depth without distraction. -
Final contrast check:
Step back and look for the darkest darks. Re-apply Mars Black to the deepest shadows (like under the ear flap) to ensure maximum contrast against the textured highlights.
Hang your finished piece where angled light can hit the canvas, making those raised textures cast their own natural shadows.


Soft Gray Elephant With Warm Highlights
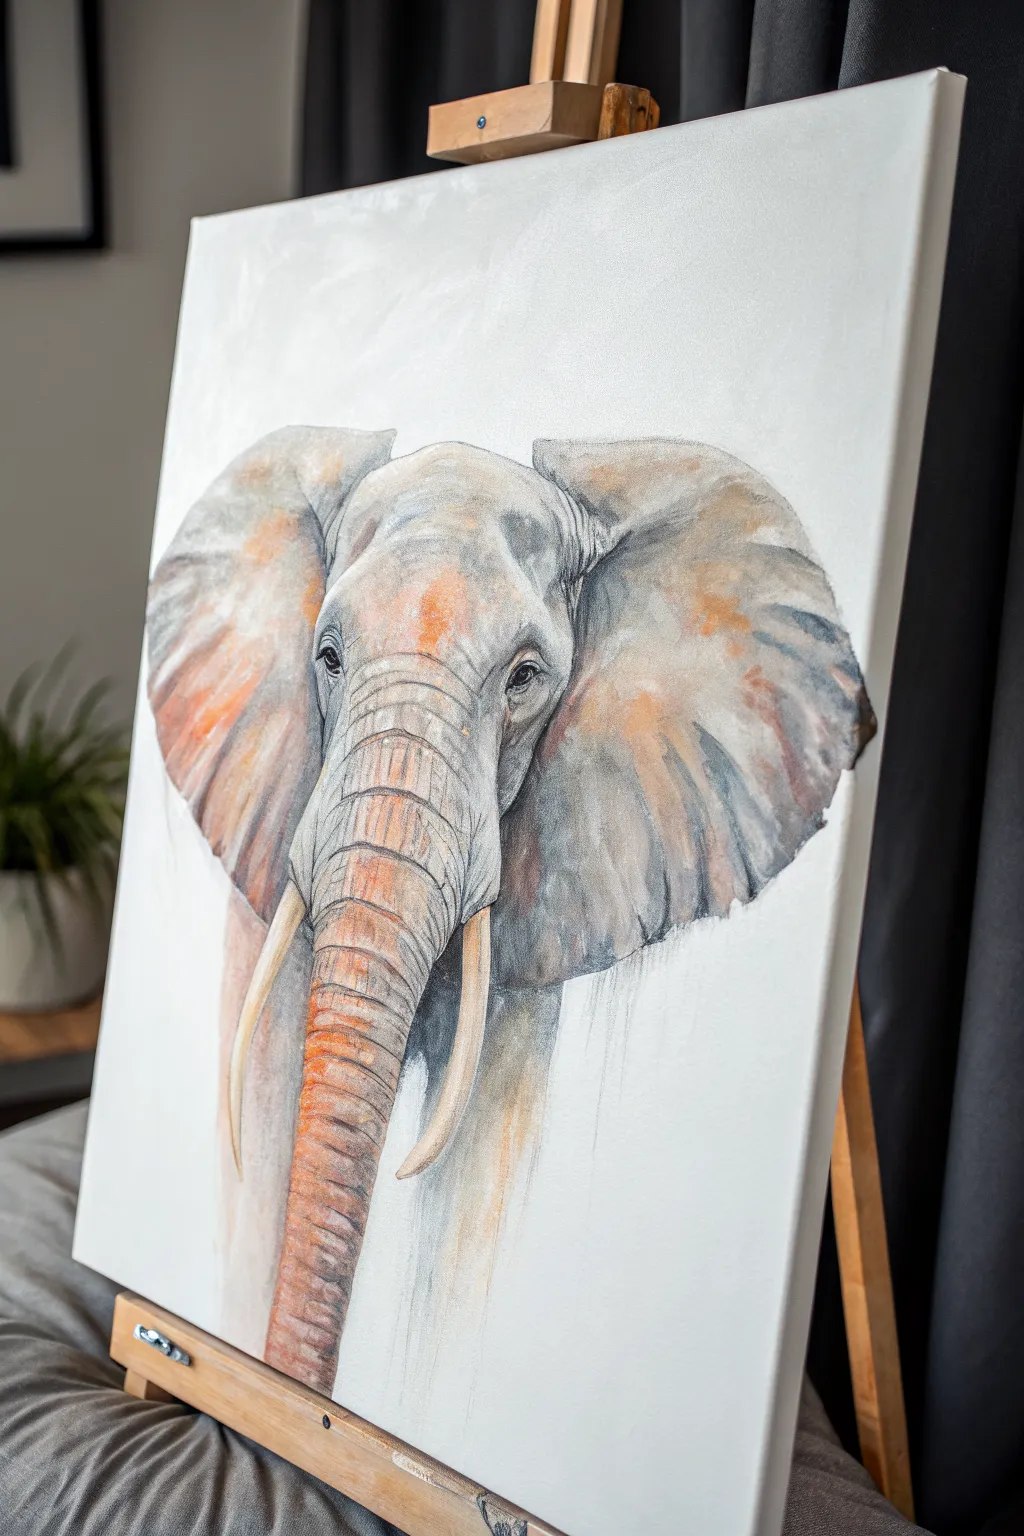
This striking acrylic painting captures the majestic presence of an elephant emerging from a stark white background. With its soft gray tones contrasted against warm, rusty orange highlights, the piece feels both modern and deeply organic.
Step-by-Step
Materials
- Stretched canvas (16×20 or larger)
- Acrylic paints (Titanium White, Mars Black, Payne’s Gray, Burnt Sienna, Yellow Ochre, Raw Umber)
- Large flat brush (1-2 inch)
- Medium filbert brush
- Small round detail brush
- Palette knife (optional for mixing)
- Water cup and paper towels
- Graphite pencil or charcoal stick
Step 1: Sketching the Foundation
-
Establish the Composition:
Start with a clean, white canvas. Using a light graphite pencil or a charcoal stick, lightly sketch the large T-shape formed by the elephant’s trunk and brow line. Keep the head centered, leaving plenty of negative space around the ears. -
Map the Ears:
Draw the large, fan-shaped outlines of the ears. Notice how the left ear (viewer’s left) flares out slightly wider, while the right ear tucks in a bit. Don’t worry about perfect symmetry; organic irregularities make it look more realistic. -
Define Features:
Refine the shape of the trunk, tapering it gently as it moves down. Mark the position of the tusks, curving them inward slightly. Sketch the almond-shaped eyes, ensuring they are level with the top of the trunk bridge.
Dry Brush Magic
Use an old, stiff brush with very little paint to create the ‘scratchy’ skin texture. Drag it lightly over the canvas weave without pressing down.
Step 2: Blocking in Base Tones
-
Mix Your Grays:
On your palette, create a mid-tone gray using Titanium White and a touch of Mars Black. Create a second, cooler gray by adding a small amount of Payne’s Gray. You want these to be fairly diluted or fluid for a soft wash effect. -
Apply the First Wash:
Using a large flat brush, apply the mid-tone gray loosely over the shadow areas of the ears and the sides of the trunk. I like to keep the paint thin here so the texture of the canvas shows through slightly. -
Suggesting the Wrinkles:
While the paint is still damp, switch to a medium filbert brush and use the darker Payne’s Gray mix to begin indicating the horizontal wrinkles across the trunk and the deep folds in the ears. Use sweeping, curved motions. -
Preserve the Tusks:
Be careful to leave the tusk areas unpainted for now, or paint them with pure white if your sketch lines are getting messy. This high contrast is crucial later.
Make It Pop
For a bolder look, swap the white background for a pale blue-gray wash or a deep charcoal color to make the warm orange tones on the skin vibrate intensely.
Step 3: Adding Warmth and Dimension
-
Mixing the Rust Tone:
Mix Burnt Sienna with a tiny bit of Yellow Ochre and White. This creates the ‘dusty’ orange look, simulating the mud elephants throw on themselves for sun protection. -
Applying Warm Highlights:
With a relatively dry brush (scumbling technique), apply this warm mixture to the forehead, the center of the trunk, and the upper lobes of the ears. Don’t cover the gray entirely; let the colors overlap and interact. -
Deepening Shadows:
Mix Raw Umber with Payne’s Gray for a deep, brownish-black. Apply this to the darkest recesses: inside the folds of the ears, under the chin, and directly beneath the tusks to push them forward visually. -
Eye Detail:
Use a small round brush and black paint to fill in the eyes. Leave a tiny speck of white paper or add a dot of white paint later for the ‘catchlight’ reflection, which brings the animal to life.
Step 4: Refining and Finishing
-
Texture on the Trunk:
Use a small brush to delineate the rings of the trunk more clearly. Alternate between your warm rust color and dark gray to create a ribbed, three-dimensional appearance. -
Painting the Tusks:
Mix a creamy off-white using Titanium White and the tiniest dot of Raw Umber. Paint the tusks smoothly, adding a faint shadow on the underside to make them look cylindrical rather than flat. -
Softening Edges:
Check the outer edges of the ears. If they look too sharp or ‘cut out,’ use a clean, slightly damp brush to soften the paint into the white background, creating a gentle, atmospheric transition. -
Drip Effect (Optional):
For an artistic touch, you can water down some gray paint and let a few subtle drips run down from the bottom of the ears or trunk, enhancing the painterly feel shown in the reference. -
Final Highlights:
Take pure Titanium White on a small brush and add final accents to the top of the head and the prominent ridges of the trunk wrinkles to suggest strong overhead lighting.
Step back and admire how the warm earth tones breathe life into your gentle giant
Baby Elephant With Playful Splatter Background
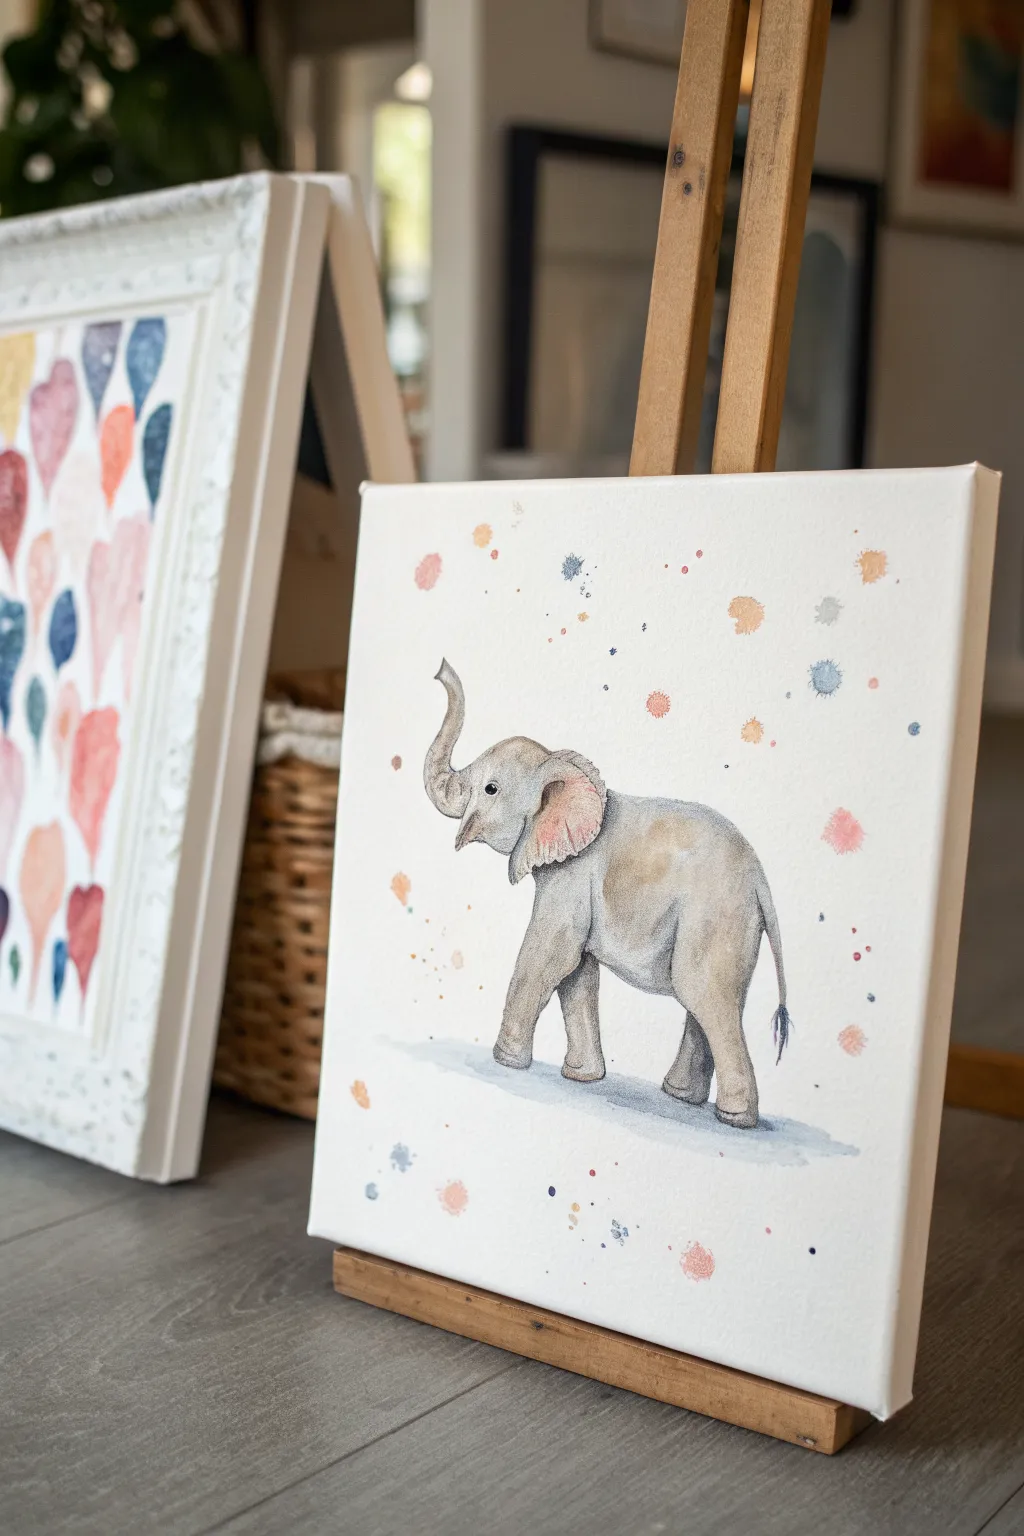
Capture the innocent charm of a baby elephant with this delightful acrylic painting project. Combining soft, realistic shading with a playful, abstract splatter background creates a modern piece perfect for a nursery or playroom.
Step-by-Step
Materials
- Square stretched canvas (approx. 12×12 inches)
- Acrylic paints (Titanium White, Mars Black, Burnt Umber, Raw Sienna)
- Pastel acrylic paints (Soft Pink, Baby Blue, Peach)
- Round synthetic brushes (sizes 2, 6, and 10)
- Detail liner brush (size 0 or 00)
- Old toothbrush (for splattering)
- Palette or mixing plate
- Pencil and eraser
- Water cup and paper towels
Step 1: Sketching the Outline
-
Map out the shape:
Begin by lightly sketching the baby elephant in the center of your canvas using a pencil. Start with a large oval for the body and a smaller circle for the head to get the proportions right. -
Refine the details:
Draw the trunk curving upward in a joyful trumpet shape. Add the legs, making sure they look sturdy, and sketch the large, floppy ear. Keep your pencil lines light so they don’t show through the pale paint later. -
Mark the shadows:
Lightly outline where the main shadows will fall—under the chin, behind the ear, and on the underbelly. This will act as a roadmap when you start painting.
Step 2: Painting the Elephant base
-
Mix the grey base:
On your palette, mix Titanium White with a very small touch of Mars Black and a tiny dot of Burnt Umber. You want a warm, light grey, not a cold, metallic one. -
Apply the first layer:
Using a size 6 round brush, fill in the entire elephant body with this light grey mix. Use smooth strokes following the curve of the animal’s form. Don’t worry if it looks flat right now; we are just building coverage. -
Add warmth:
While the grey is still slightly tacky, mix a little Raw Sienna into your grey. Glaze this warmer tone onto the shoulder and hip area to suggest the dusty texture of elephant skin. -
Paint the inner ear:
Mix a soft, fleshy pink using White, a touch of Burnt Umber, and Soft Pink. Fill in the inner ear area, blending the edges slightly into the grey skin so there isn’t a harsh line.
Pro Tip: Masking
If you are nervous about splattering paint near your finished elephant, you can paint liquid masking fluid over the dried elephant before splattering, then peel it off at the very end.
Step 3: Shading and Texture
-
Deepen the shadows:
Create a darker grey by adding more Black and Umber to your base mix. Use the size 2 brush to paint the shadows under the trunk, behind the front leg, and along the tummy. -
Create skin wrinkles:
Using the dark grey mix, paint thin, curved lines on the trunk and knees to represent wrinkles. Keep these lines broken and organic rather than perfect stripes. -
Highlight the form:
Clean your brush and pick up pure Titanium White. Dry-brush highlights onto the top of the head, the curve of the trunk, and the rounded part of the back to make the elephant look 3D. -
Detail the face:
Switch to your liner brush. Paint the eye using solid Black, adding a tiny white reflection dot once dry. Use a watery dark grey to outline the mouth and trunk tip delicately. -
Tail tassel:
Use the liner brush to flick a few dark grey hairs at the end of the tail. -
Anchor the figure:
Mix a watery blue-grey wash. Paint a soft, horizontal shadow under the elephant’s feet so it doesn’t look like it’s floating in mid-air.
Level Up: Metallic Touch
Mix a tiny bit of metallic gold or silver paint into your splatter colors. It adds a magical shimmer that catches the light beautifully when hung in a nursery.
Step 4: The Playful Background
-
Prepare the splatter paint:
Mix your pastel colors (pink, blue, peach) with a few drops of water. The consistency should be like heavy cream—fluid enough to fly off a brush, but thick enough to hold its color. -
Protect the subject:
I usually cut a piece of scrap paper roughly the shape of the elephant and lay it loosely over the finished painting to protect the main subject from stray drops. -
Flick the brush:
Load a size 6 brush with watery paint. Hold it over the canvas and tap the handle against a second brush or your finger to send droplets down. Alternate colors, cleaning the brush between each one. -
Use the toothbrush technique:
For a finer mist of color, dip the old toothbrush into the paint and run your thumb across the bristles. -
Add intentional dots:
Remove the paper cover. If you feel a spot is too empty, use the back end of a brush handle dipped in paint to place a perfectly round dot exactly where you want it. -
Final dry:
Let the entire canvas dry flat for at least an hour to ensure the thickest splatters don’t run.
Once the paint is fully cured, you have a sweet, custom piece of art ready to brighten any room
Boho Patterned Elephant Silhouette
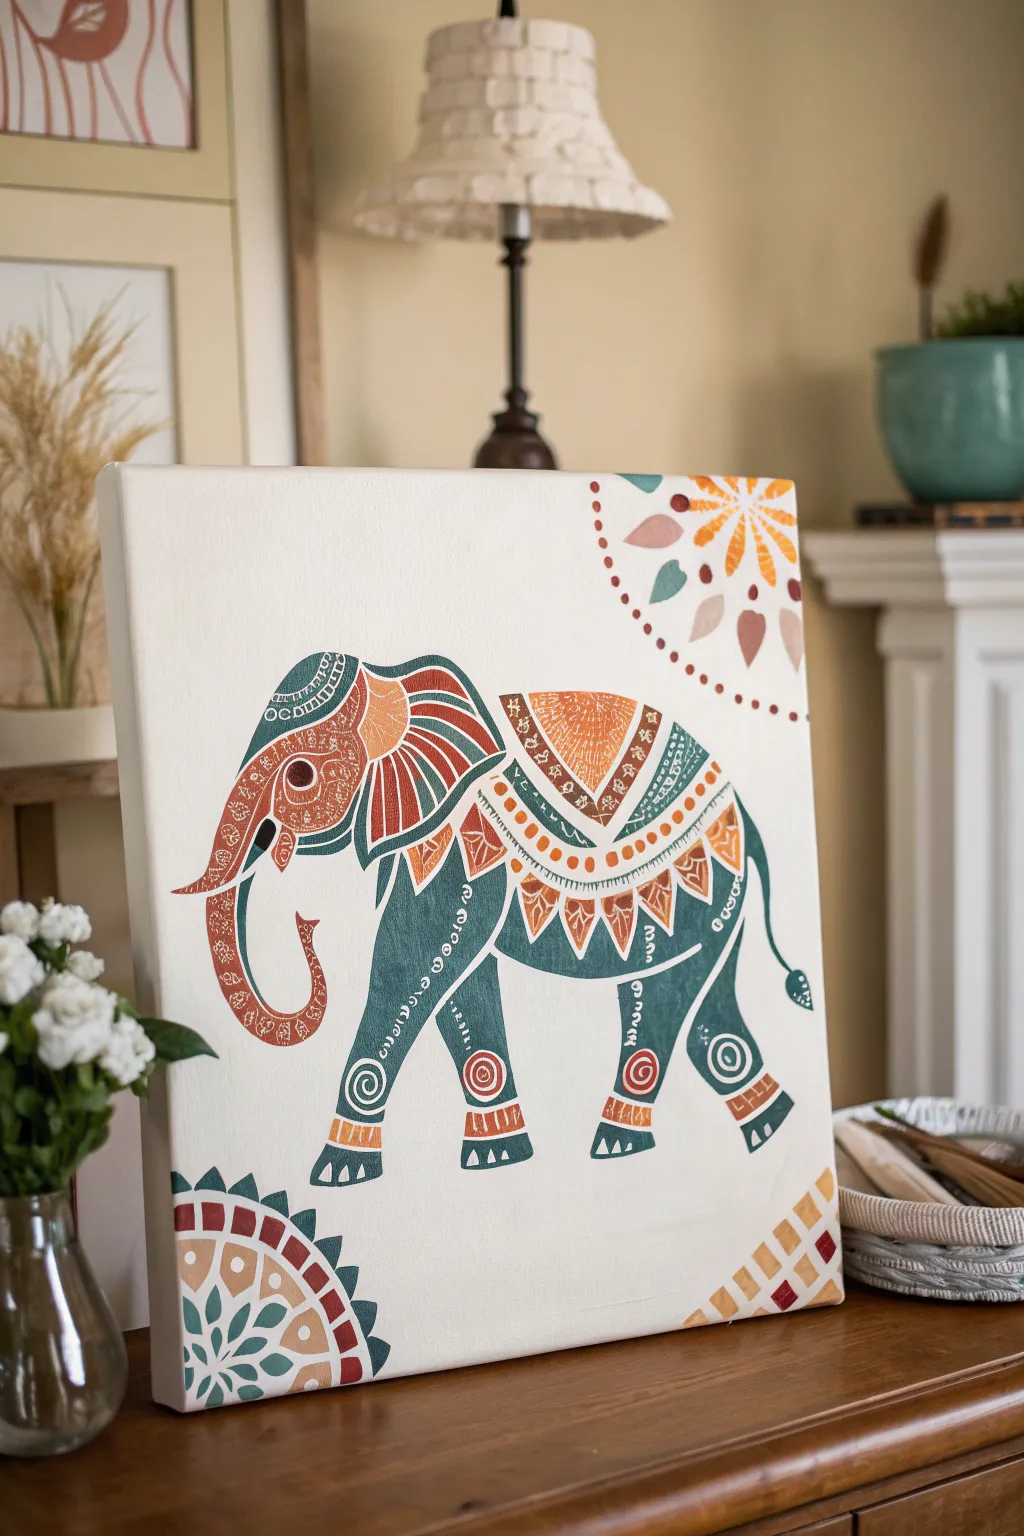
This project combines the majestic silhouette of an elephant with the playful freedom of bohemian patterns, resulting in a piece that feels both grounded and whimsical. Using a muted, earthy color palette of teal, rust, and cream, you will create a stunning focal point that fits perfectly in modern rustic or eclectic home decor.
Step-by-Step Guide
Materials
- Square stretched canvas (12×12 or 16×16 inches)
- Acrylic paints (Teal/Dark Green-Blue, Rust/Terracotta, Cream/Off-White, Deep Brown)
- Pencil and eraser
- Flat brush (medium)
- Round brushes (small and fine liner)
- Carbon transfer paper (optional)
- Palette or paper plate
- Water cup and paper towels
Step 1: Sketching the Foundations
-
Map out the elephant:
Begin by lightly sketching the outline of the elephant in the center of your canvas. Focus on the large shapes first: the rounded back, the sturdy legs, and the curved trunk. Don’t press too hard with your pencil so lines remain easy to cover. -
Add the corner details:
In the bottom-left and top-right corners, sketch out partial mandala-style circles. These don’t need to be perfectly symmetrical, but use a compass or a round object if you want cleaner curves for the outer rings. -
Define the internal sections:
Inside the elephant’s body, draw light dividing lines to separate the head, the ear, the saddle area, and the leg cuffs. This ‘paint-by-numbers’ approach will make block-in much easier later.
Clean Lines Hack
If your hand is shaky on long lines (like the trunk), mix a tiny drop of water into your paint. Inky-consistency paint flows smoother from a liner brush.
Step 2: Blocking in Color
-
Paint the main body:
Mix a deep, slightly muted teal color. Using your medium flat brush, fill in the main body, the legs, and parts of the trunk. Be careful to paint around the ear and the decorative ‘saddle’ blanket area on the back. -
Fill the ear and trunk sections:
Switch to a rust or terracotta shade. Paint the inner shape of the ear and the segmented parts of the trunk. I find that applying two thin coats here gives a smoother finish than one thick globs of paint. -
Create the decorative blanket:
Use a lighter orange or mixed terracotta shade to fill in the triangular saddle shape on the back. Paint the decorative triangular fringe hanging below it in alternating teal and rust colors. -
Block in the corner patterns:
Move to the corners of the canvas. Paint the petal shapes in the top right with rust and yellow-ochre tones. For the bottom left, use teal for the flower center and rust for the outer geometric rings.
Step 3: Adding Intricate Details
-
Detail the head and trunk:
Using a fine liner brush and cream paint, add the small details to the rust-colored head and trunk areas. Focus on small dots, tiny swirling spirals, and thin contour lines that follow the curve of the trunk. -
Decorate the ear:
Add cream stripes to the ear flap. Paint fine lines that radiate outward like fan folds inside the ear shape to give it texture and movement. -
Embellish the saddle:
With your smallest brush, add a dotted border to the saddle blanket. Inside the main orange triangle of the saddle, easy scribbles or cross-hatching in cream can mimic the look of woven fabric. -
Paint the leg ornaments:
Add the cuff details near the elephant’s feet. Paint horizontal bands of rust and cream, then add small triangles or zig-zags to simulate anklets. -
Draw the spiral motifs:
On the teal body sections, particularly the thigh and shoulder, paint prominent cream spirals. These ancient-looking symbols help tie the boho theme together. -
Connect with dot work:
Use the handle end of a paintbrush dipped in cream or rust paint to ‘stamp’ perfect dots. Place these along the spine of the elephant and around the mandala shapes in the corners.
Make It 3D
Use ‘puff paint’ or dimensional fabric paint for the white dots and spirals. This creates a raised, tactile texture that mimics beads or embroidery.
Step 4: Final Touches
-
Refine the edges:
Check the silhouette against the white background. If any teal or rust edges look messy, use white paint (or the color of your background) to carefully clean up the outline. -
Add the eye:
Paint the eye using a dark brown or black circle with a white highlight. Outline the eye with a almond-shaped cream line to make it stand out against the rust-colored face. -
Enhance the corner mandalas:
Return to the corner designs and add final line work. Outline petals in a darker shade or add cream dots between the shapes to make the patterns pop off the canvas. -
Dry and seal:
Allow the painting to dry overnight. Once fully cured, apply a matte varnish to protect the acrylics and unify the sheen of the different paint colors.
Now you have a serene, culturally inspired piece of art ready to bring warmth to your living space
Mandala-Inspired Elephant Design
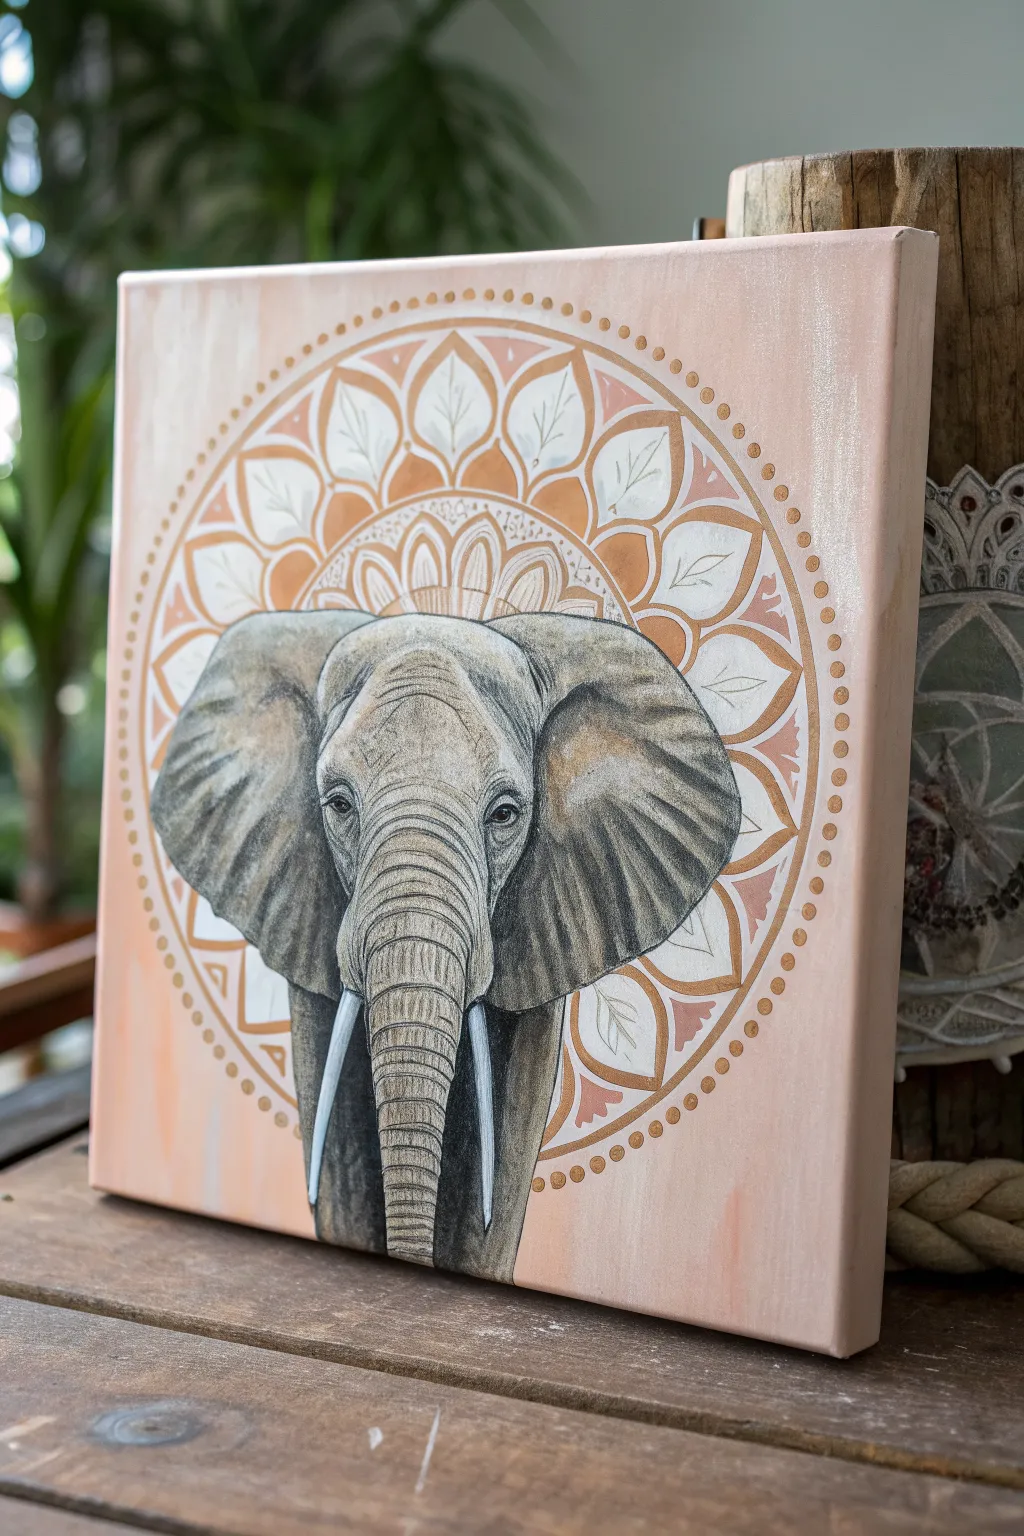
Blend realism with sacred geometry in this striking acrylic project featuring a detailed elephant portrait set against a warm, peach-toned mandala. The contrast between the soft, painterly background and the charcoal-like texture of the elephant creates a captivating focal point for any room.
Step-by-Step Tutorial
Materials
- Square stretched canvas (approx. 12×12 or 16×16 inches)
- Acrylic paints: Titanium White, Burnt Sienna, Yellow Ochre, Raw Umber, Mars Black
- Metallic gold acrylic paint or paint pen
- Graphite pencils (HB and 4B)
- Compass and ruler
- Fine liner brush (size 0 or 00)
- Flat shader brush (size 4 or 6)
- Large flat wash brush (1 inch)
- Carbon transfer paper (optional)
- Masking tape
Step 1: Setting the Background
-
Prepare the wash:
Mix a large amount of Titanium White with a tiny touch of Burnt Sienna and a drop of Yellow Ochre. You want a very pale, creamy peach tone. Dilute this slightly with water to improve flow. -
Apply the base coat:
Using the large flat wash brush, cover the entire canvas with your peach mixture. Use long, vertical strokes to create a subtle, streaky texture rather than a perfectly flat color. Let this dry completely. -
Establish the center:
Measure and mark the absolute vertical center of your canvas. Gently draw a vertical line with a ruler; this will help align the elephant’s face and the mandala later.
Step 2: Constructing the Mandala
-
Draw the circles:
Using a compass, draw three concentric circles radiating from the center point. The largest should leave about an inch of negative space at the canvas edges. -
Sketch the petal shapes:
Sketch lotus-style petals within the rings. The outer ring gets large, leaf-shaped petals, while the inner rings get smaller, simpler scallops. Keep your pencil lines light. -
Block in background colors:
Mix a terracotta shade using Burnt Sienna and White. Paint the negative space between the outer petals, leaving the petals themselves the pale background color. -
Add petal details:
Inside the large outer petals, paint a delicate vein line using a thin mix of Rawlings Umber. Outline the petals with a slightly darker version of your peach background color. -
Paint the decorative dots:
Using the back end of a brush or a dotting tool, dip into metallic gold or a dark tan mix. Place a ring of consistent dots around the outermost circle edge to frame the mandala.
Geometry Helper
Struggling with mandala symmetry? Cut a paper template of one petal shape, trace it repeatedly around your circle, then refine the lines. It guarantees perfect repetition.
Step 3: The Elephant Portrait
-
Outline the subject:
Sketch the elephant’s outline directly over the mandala, centering the trunk on your vertical guide line. If drawing isn’t your strong suit, print a reference photo and use carbon paper to transfer just the main shapes. -
Base layer for the skin:
Mix a medium grey using White, Black, and a tiny touch of Burnt Sienna to warm it up. Paint the entire elephant shape with a thin wash of this grey, letting the underlying mandala sketch show through faintly if possible. -
Establishing shadows:
The lighting in this piece is soft but directional. Use a darker grey mixture to paint the deep shadows inside the ears, under the trunk, and around the eyes. -
Creating skin texture:
This is where patience pays off. Using a fine liner brush and a dark charcoal grey, paint fine, broken horizontal lines down the trunk to mimic wrinkles. I find short, curved strokes work best here. -
Highlighting the ears:
Dry brush a lighter grey mixed with a bit of the background peach color onto the high points of the ears. This ties the subject to the background palette. -
Detailing the eyes:
Paint the eyes with pure Mars Black. Add a tiny dot of white for the reflection, and use a dark grey to delineate the heavy eyelids and wrinkles surrounding them. -
Painting the tusks:
Paint the tusks with Titanium White. While wet, blend a tiny amount of light grey at the base where they emerge from the mouth to give them roundness and dimension. -
Refining the trunk:
Add more contrast to the trunk wrinkles. Deepen the dark cracks with near-black paint, and highlight the ridges between wrinkles with a pale grey. -
Final outlines:
Give the elephant’s edges a crisp, sketchy feel by going over crucial contours with a sharp 4B pencil or a very fine brush with watered-down black paint.
Metallic Accent
For a luxe touch, trace the primary mandala rings with gold leaf adhesive and apply gold foil. The shine adds a beautiful spiritual element.
Step 4: Finishing Touches
-
Enhance the mandala:
Go back to the background. Use a white paint pen or fine brush to add crisp white outlines to the inner mandala petals to make them pop behind the grey elephant. -
Add subtle highlights:
Mix a transparent glaze of White and water. lightly glaze the center of the large background petals to make them look illuminated. -
Clean up canvas edges:
Paint the sides of the canvas with the peach background color for a finished, gallery-ready look without a frame.
Step back and admire the serene balance between the geometric background and the organic beauty of your elephant
Floral Crown Elephant Portrait
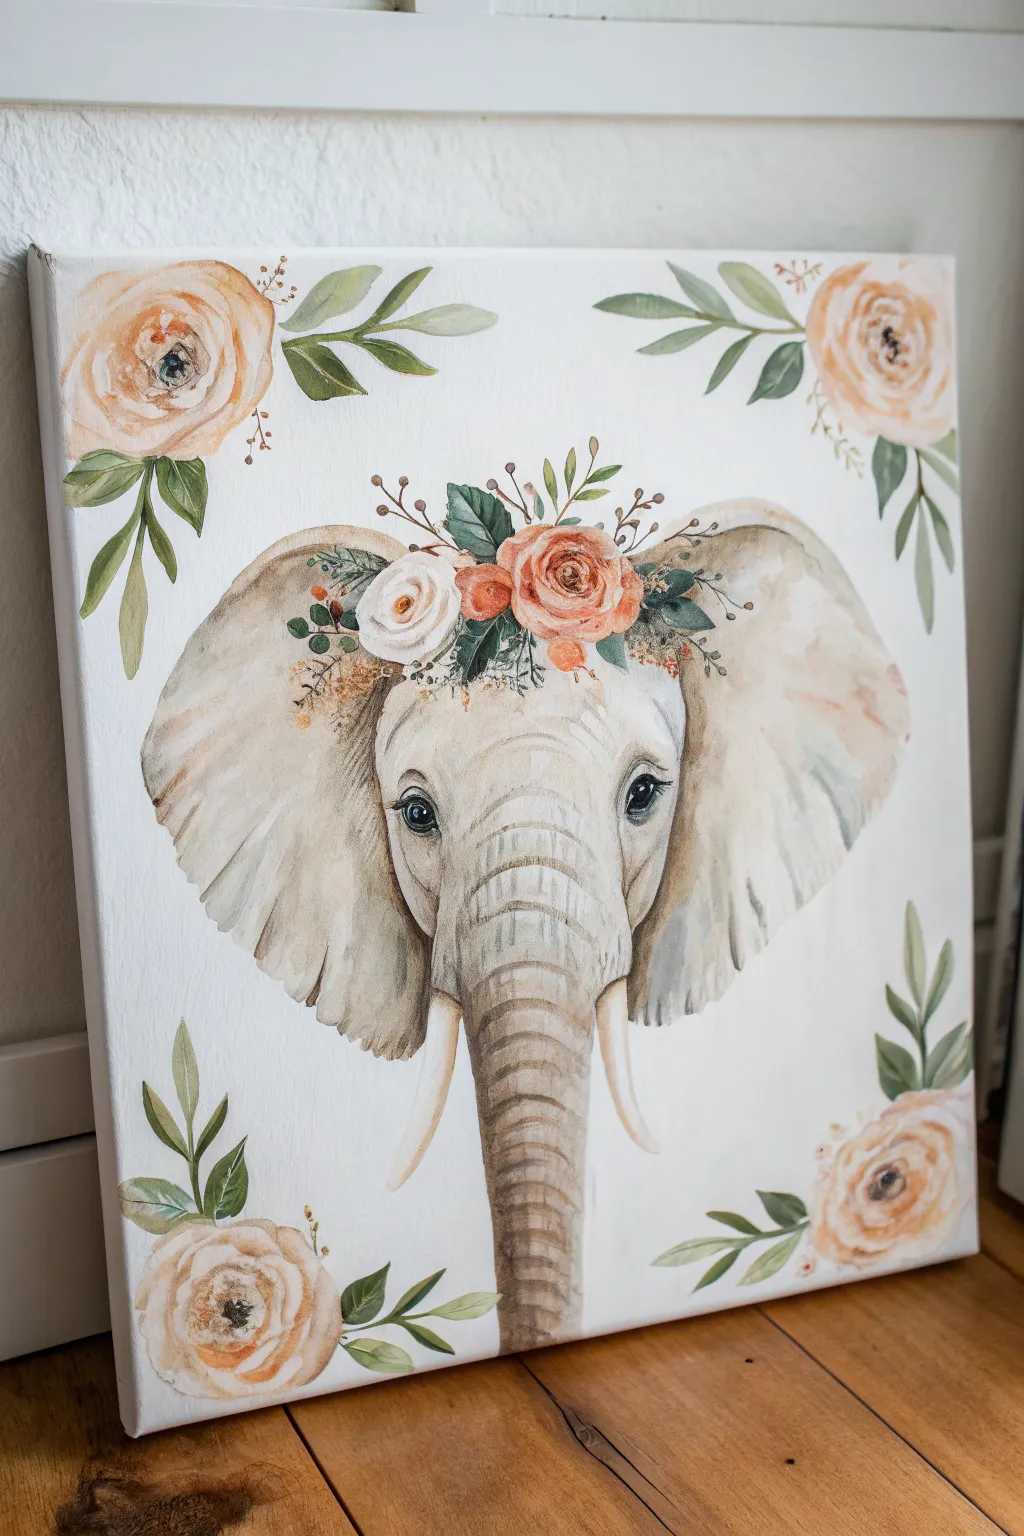
Capture the serene beauty of this majestic creature with a soft, watercolor-inspired acrylic painting on canvas. The delicate floral crown adds a whimsical touch to the elephant’s wise gaze, making it perfect for nursery decor or a calming art piece.
Step-by-Step
Materials
- Square stretched canvas (12×12 or similar)
- Acrylic paints: Titanium White, Burnt Umber, Yellow Ochre, Lamp Black, Sap Green, Burnt Sienna, Payne’s Grey, Alizarin Crimson
- Soft-bristle synthetic brushes (Flat shader, Round #4, Liner #0)
- Water container and mixing palette
- Pencil and eraser
- Acrylic glazing medium (optional but recommended for watercolor effects)
Step 1: Sketching the Composition
-
Establish the center:
Begin by lightly marking the center of your canvas. Draw a large oval shape slightly below the midpoint for the elephant’s head, leaving plenty of room at the top for the ears and crown. -
Outline the features:
Sketch two large, uneven outlines for the ears flaring out to the sides. Draw the trunk extending straight down from the oval, tapering slowly. Add two curved tusks flanking the trunk. -
Detail the face:
Place the eyes carefully on either side of the trunk’s bridge—they should be almond-shaped and gentle. Sketch the basic shapes of the floral crown resting on the forehead, using circles for roses and simple leaf shapes. -
Corner accents:
Lightly sketch large rose blooms and leafy sprays in the top and bottom corners to frame the central portrait. Keep these lines faint so they don’t show through later.
Step 2: Painting the Elephant Base
-
Mix a warm grey wash:
Combine Titanium White with a tiny touch of Burnt Umber and a speck of Lamp Black. Dilute this with water or glazing medium until it’s semi-transparent. I like to keep this very fluid to mimic watercolor. -
First layer of skin:
Wash this pale grey mixture over the entire elephant face and ears, avoiding the tusks, eyes, and flower crown area. Let the brushstrokes follow the contours of the ears for texture. -
Deepening the shadows:
While the first layer is barely tacky, mix a slightly darker grey using more Payne’s Grey and Burnt Umber. Apply this to the inner ear folds, under the chin, and along the sides of the trunk to create dimension. -
Create wrinkle texture:
Using a smaller round brush and a thicker grey-brown mix, paint horizontal curved lines down the trunk to simulate wrinkles. Keep the pressure light so the lines aren’t too stark.
Water Control
To get that airy watercolor look with acrylics, keep a spray bottle handy. Mist your canvas lightly before applying thin washes to help the paint bleed and soften naturally.
Step 3: Facial Details
-
Painting the eyes:
Use a dark mix of Lamp Black and Burnt Umber for the eyes. Paint the pupil solid black, leaving a tiny dot of white for the catchlight to bring them to life. Add a thin line of darkness around the eye rim. -
Defining the tusks:
Paint the tusks with a creamy mix of Titanium White and a dot of Yellow Ochre. Add a faint shadow on the undersides using your diluted grey mix. -
Refining the ears:
Enhance the fraying edges of the ears with short, feathery strokes of your base grey color. Dry brush a little pinkish-brown (White + Burnt Sienna) onto the inner ear areas for warmth.
Level Up: Texture
For realistic skin texture, dab a scrunched-up paper towel or natural sea sponge into your grey paint and lightly stamp it over the ears before the paint fully dries.
Step 4: Floral Elements
-
Blocking in the roses:
For the corner flowers and the crown, start with a base shape of pale peach (Titanium White + tiny bit of Burnt Sienna + Yellow Ochre). Paint rough circles as placeholders. -
Adding petal definition:
Mix a deeper coral or terra cotta color. Using a round brush, paint ‘C’ shaped strokes starting from the center of each flower and working outward to create the illusion of unfurling petals. -
Painting the leaves:
Mix Sap Green with a little Burnt Umber for a muted, natural green. Paint the leaves using a double-loading technique: dip one side of the brush in green and the tip in white for natural highlighting. -
Connecting the crown:
Use your smallest liner brush to paint thin stems and tiny filler flowers (small dots or dabs) in the crown to connect the main roses. Add darker green veins to the larger leaves. -
Final touches:
Step back and look for balance. Use a watery grey mix to add subtle cast shadows on the forehead under the flower crown, anchoring it to the elephant’s head.
Hang your gentle masterpiece in a well-lit spot to enjoy the soft, enchanting gaze of your new friend
Geometric Color-Block Elephant
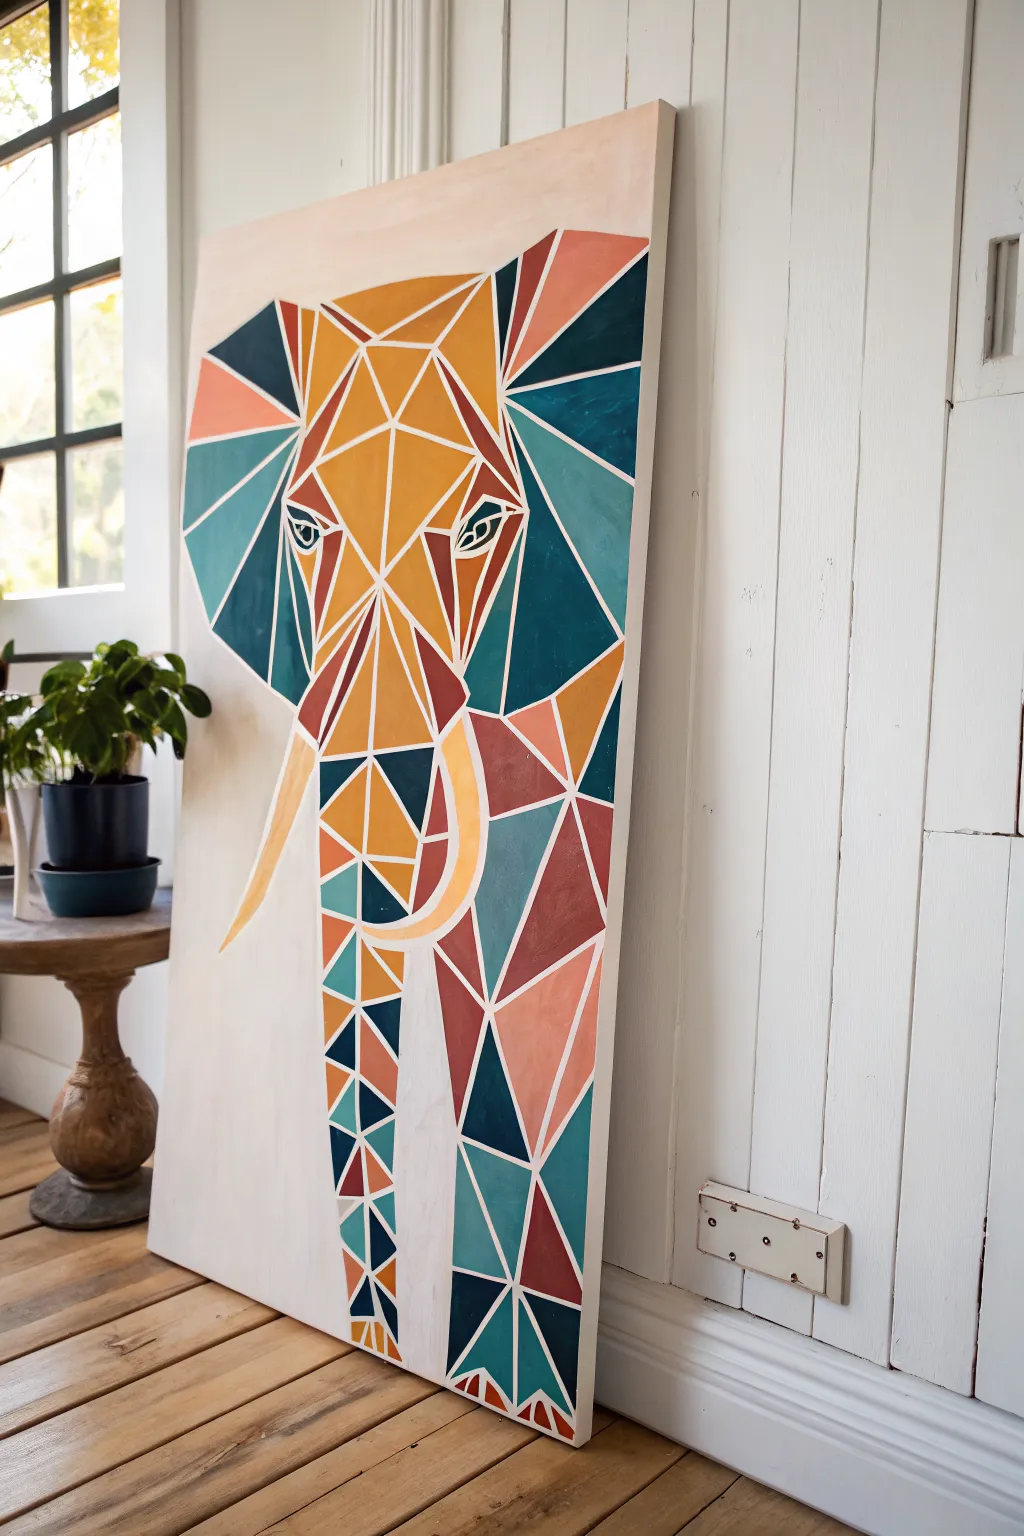
Transform a blank canvas into a striking statement piece with this angular, color-blocked interpretation of an elephant. Using a precise taping method and a sophisticated palette of teals, ochres, and corals, you’ll build a geometric masterpiece that feels both modern and organic.
Step-by-Step Guide
Materials
- Large stretched canvas (24×36 inches or larger recommended)
- Painter’s tape (1/4 inch or 1/8 inch width for best results)
- Acrylic paints (Teal, Navy Blue, Ochre/Mustard Yellow, Coral/Salmon, White)
- Flat shader brushes (assorted sizes)
- Pencil and eraser
- Ruler or straight edge
- Palette or mixing plate
- White Gesso (optional, for priming)
- Matte varnish (for sealing)
Step 1: Design & Preparation
-
Canvas Prep:
Start with a clean, white canvas. If your canvas isn’t pre-primed, apply one or two coats of gesso to ensure a smooth surface, letting it dry completely between layers. The background white will eventually become your crisp lines, so ensure it is bright and clean. -
Mapping the Skeleton:
Lightly sketch the basic outline of the elephant’s head, ears, and trunk using a pencil. Don’t worry about the geometric triangles yet; just get the main proportions right. Ideally, center the head near the top third so the trunk can extend downwards comfortably. -
Designing the Geometry:
Using a ruler, begin breaking down the organic shapes into triangles and polygons. Draw straight lines connecting key points—for example, from the forehead to the corner of the eye. Aim for variety in triangle sizes to create visual interest. -
Refining the Tusk and Eye:
Pay special attention to the eyes and tusk. The tusk should be a long, curved shape defined by segmented angles rather than a smooth curve. For the eyes, keep the shapes relatively simple but distinct so they don’t get lost in the abstraction.
Step 2: Taping the Grid
-
Applying the Tape:
This is the most critical step. Carefully apply your thin painter’s tape over every pencil line you drew. Press the edges down firmly with your fingernail or a specialized burnishing tool to prevent paint bleed. -
Sealing the Lines:
Here is a trick I always use: paint a thin layer of white acrylic (or matte medium) over the edges of the tape. This seals the tape, meaning if any paint bleeds underneath, it will just be clear or white, keeping your final color lines razor-sharp. -
Double Check Intersections:
Inspect where strips of tape cross each other. Ensure these intersections are pressed flat so paint doesn’t sneak into the corners.
Tape Sealing Secret
Paint a layer of clear matte medium over the tape before adding color. This creates an invisible barrier that guarantees 100% crisp, bleed-free lines every time.
Step 3: Painting the Mosaic
-
Planning the Palette:
Squeeze out your four main colors: Teal, Navy, Ochre, and Coral. You can create softer tints of each by mixing in a little white. This variation adds depth to the geometric facets. -
Color Blocking – Center:
Start painting the central face shapes with your Ochre and Coral tones. Use a flat shader brush to fill each geometric “cell” completely. Try not to put two identical colors right next to each other, though similar shades like ochre and light yellow work well as neighbors. -
Adding Contrast:
Move to the outer ears and lower trunk areas using the cooler tones—Teal and Navy. The dark Navy works exceptionally well on the outer edges of the ears to create a shadow effect or visual weight. -
The Eyes and Tusk:
Paint the eye shapes carefully. A dark navy or black center with a small white highlight brings life to the face. For the tusk, use a very pale yellow or cream mixture to distinguish it from the ochre face segments. -
Second Coat:
Acrylics can sometimes look streaky after one coat. Apply a second layer to each colored section once the first feels dry to the touch to ensure solid, opaque coverage.
Metallic Level Up
Swap the white separating lines for gold! After removing the tape, use a gold paint marker or fine liner brush to trace the white gaps for a luxurious finish.
Step 4: The Reveal
-
Removing the Tape:
Wait until the paint is ‘touch dry’ but not fully cured—usually about 20-30 minutes after your last stroke. Gently peel the tape away at a 45-degree angle. This is the magic moment where the chaotic paint blobs transform into crisp geometry. -
Touch Ups:
Inevitably, a tiny spot might peel or bleed. Use a small detail brush with white paint to clean up the lines, or the specific color to fill in any gaps. -
Final Varnish:
Once the painting has cured for at least 24 hours, apply a coat of matte varnish. This unifies the sheen of different paint colors and protects your artwork from dust and UV light.
Hang your new geometric masterpiece in a well-lit spot where those crisp lines can really shine
Negative Space Elephant With Jungle Leaves
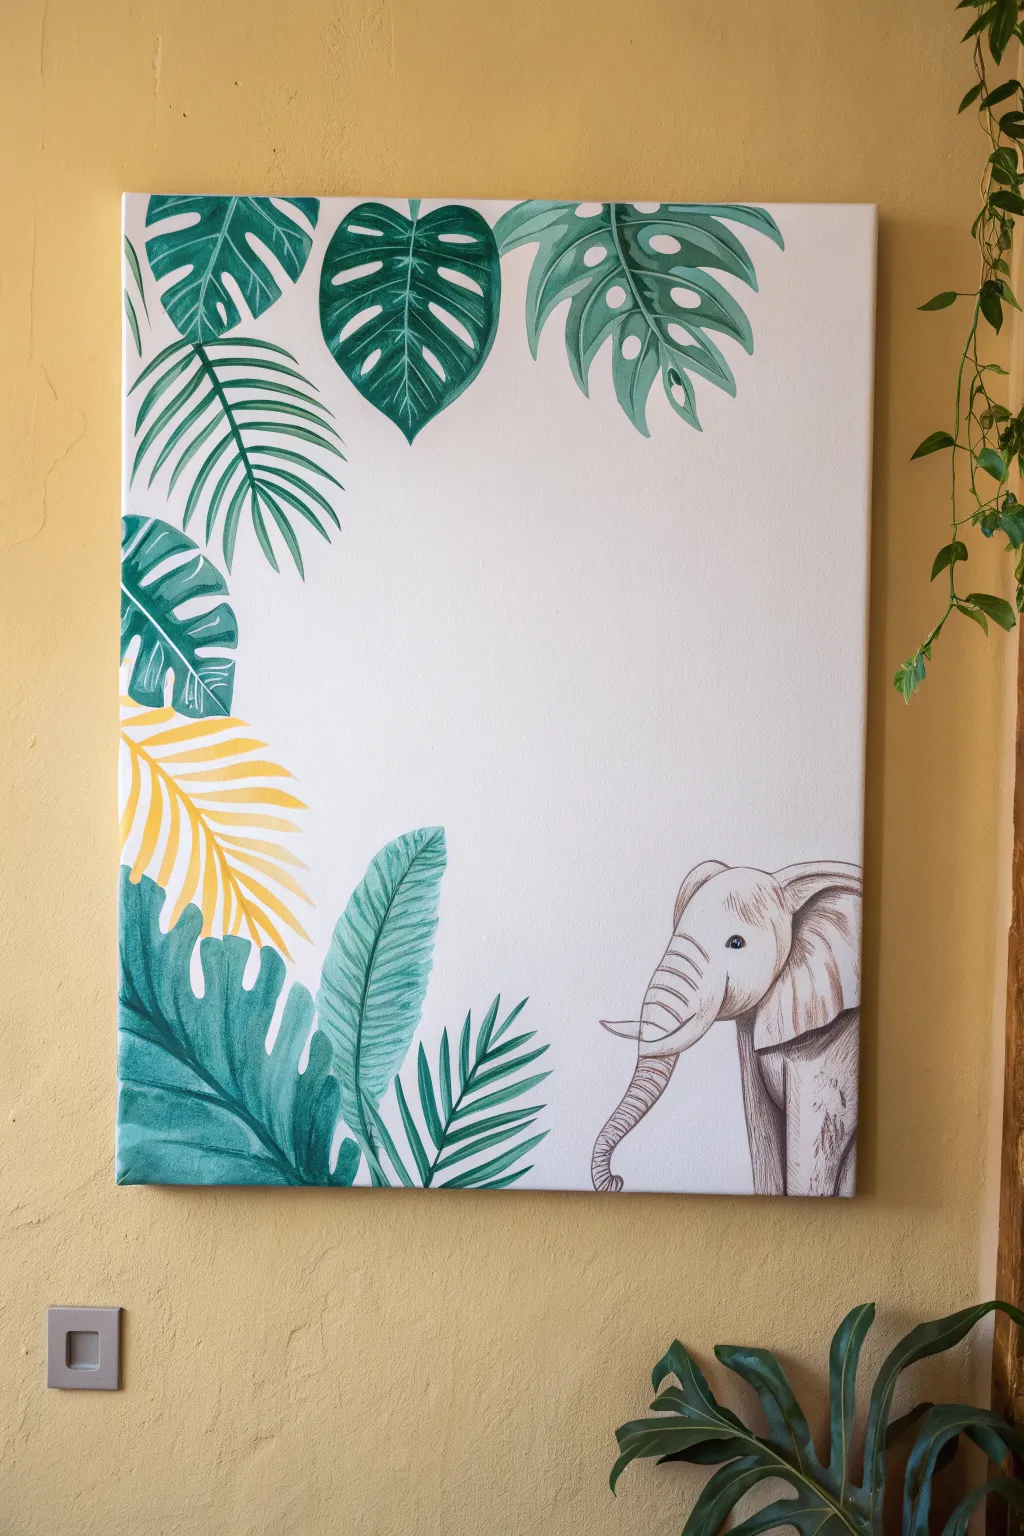
This elegant mixed-media style painting combines vibrant tropical foliage with a delicate, sketch-like elephant portrait. The clever use of negative white space creates a modern, airy composition perfect for a nursery or contemporary living space.
Step-by-Step Tutorial
Materials
- Rectangular stretched canvas (e.g., 18×24 inches)
- Acrylic paints: Sap Green, Viridian, Deep Green, Yellow Ochre, Lemon Yellow, Titanium White
- Soft graphite pencil (HB or 2B)
- Fine liner marker or charcoal pencil (grey/black)
- Flat shader brushes (sizes 6 and 10)
- Round detail brush (size 2)
- Eraser
- Palette
- Water cup and paper towels
Step 1: Planning and Sketching
-
Map out the composition:
Visualize the canvas as a frame. You want to cluster leaves in the top-left corner and bottom-left corner, leaving the center open. Lightly mark the boundaries where your foliage will stop. -
Sketch the top foliage:
Using your graphite pencil, lightly draw the outlines of the top leaves. Include a large monstera leaf, a broad fan palm, and a few smaller split-leaf philodendrons draping downwards. -
Sketch the bottom foliage:
Repeat the process for the bottom left corner. Draw a large, broad tropical leaf as the anchor, flanked by a tall, thin feather palm and a prominent palm frond that will eventually be yellow. -
Draw the elephant:
In the bottom right corner, sketch the baby elephant. Focus on the head and trunk, letting the body fade off the right edge. Keep the lines light and gestural, capturing the curve of the trunk and the large ear.
Fixing Smudges
If you smudge graphite on the white background, use a clean kneaded eraser to dab (not rub) it away. If paint smears, cover it with opaque Titanium White.
Step 2: Painting the Greenery
-
Mix your base greens:
On your palette, create three shades of green: a dark shadow green (Deep Green + verify small touch of black), a mid-tone jungle green (Sap Green + Viridian), and a light leaf green (Sap Green + White). -
Paint the top monstera:
Start with the large top-center leaf. Use your darkest green for the veins and center, blending out to the mid-tone green towards the edges. Let the white canvas show through slightly for highlights. -
Add palm texture:
For the palm leaf in the top left, use the flat brush. Paint long, sweeping strokes from the center vein outward. I find that alternating between mid-tone and light green here creates natural depth. -
Paint the draping leaves:
Fill in the remaining top leaves using varied green mixtures. Ensure each leaf has a slightly different hue to distinguish them from one another. -
Anchor the bottom corner:
Paint the large, broad leaf at the bottom in a cool, bluish-green tone (Viridian + White). Use long, vertical strokes to mimic the leaf’s structure, adding darker shading where it overlaps other leaves. -
Add the spiky palm:
For the tall, thin palm frond next to it, use your detail brush and a dark green mix. Paint sharp, distinct leaflets branching off a central stem.
Level Up: Texture
Use a dry brush technique with pure white paint lightly over the green leaves to create a slightly distressed, canvas-texture look that softens the vibrant colors.
Step 3: The Yellow Accent & Elephant Detail
-
Paint the yellow frond:
Mix Lemon Yellow with a tiny bit of Yellow Ochre. Paint the bottom-left palm frond with solid, confident strokes. This pop of warm color balances all the cool greens. -
Define the elephant outline:
Once the paint is dry, move to the elephant. Use a fine liner marker or a sharpened charcoal pencil to go over your initial pencil sketch. Use quick, scratchy lines to simulate wrinkled skin. -
Shade the elephant:
Ideally, use a very watery wash of grey acrylic or smudge your charcoal pencil to create soft shadows under the ear, around the eye, and along the trunk segments. -
Add the eye highlight:
Paint the eye a solid dark grey or black, leaving a tiny pinprick of white (or painting it in later) to bring the character to life. -
Refine leaf details:
Go back to your dried green leaves. Use a fine brush with white or very pale green to add thin veins and crisp up any edges that look messy. -
Erase guidelines:
Once absolutely everything is dry, gently erase any visible graphite lines from your initial sketch phase.
Hang your new artwork in a well-lit spot to let the clean white space brighten the room
Dripping Paint Elephant Pop Style
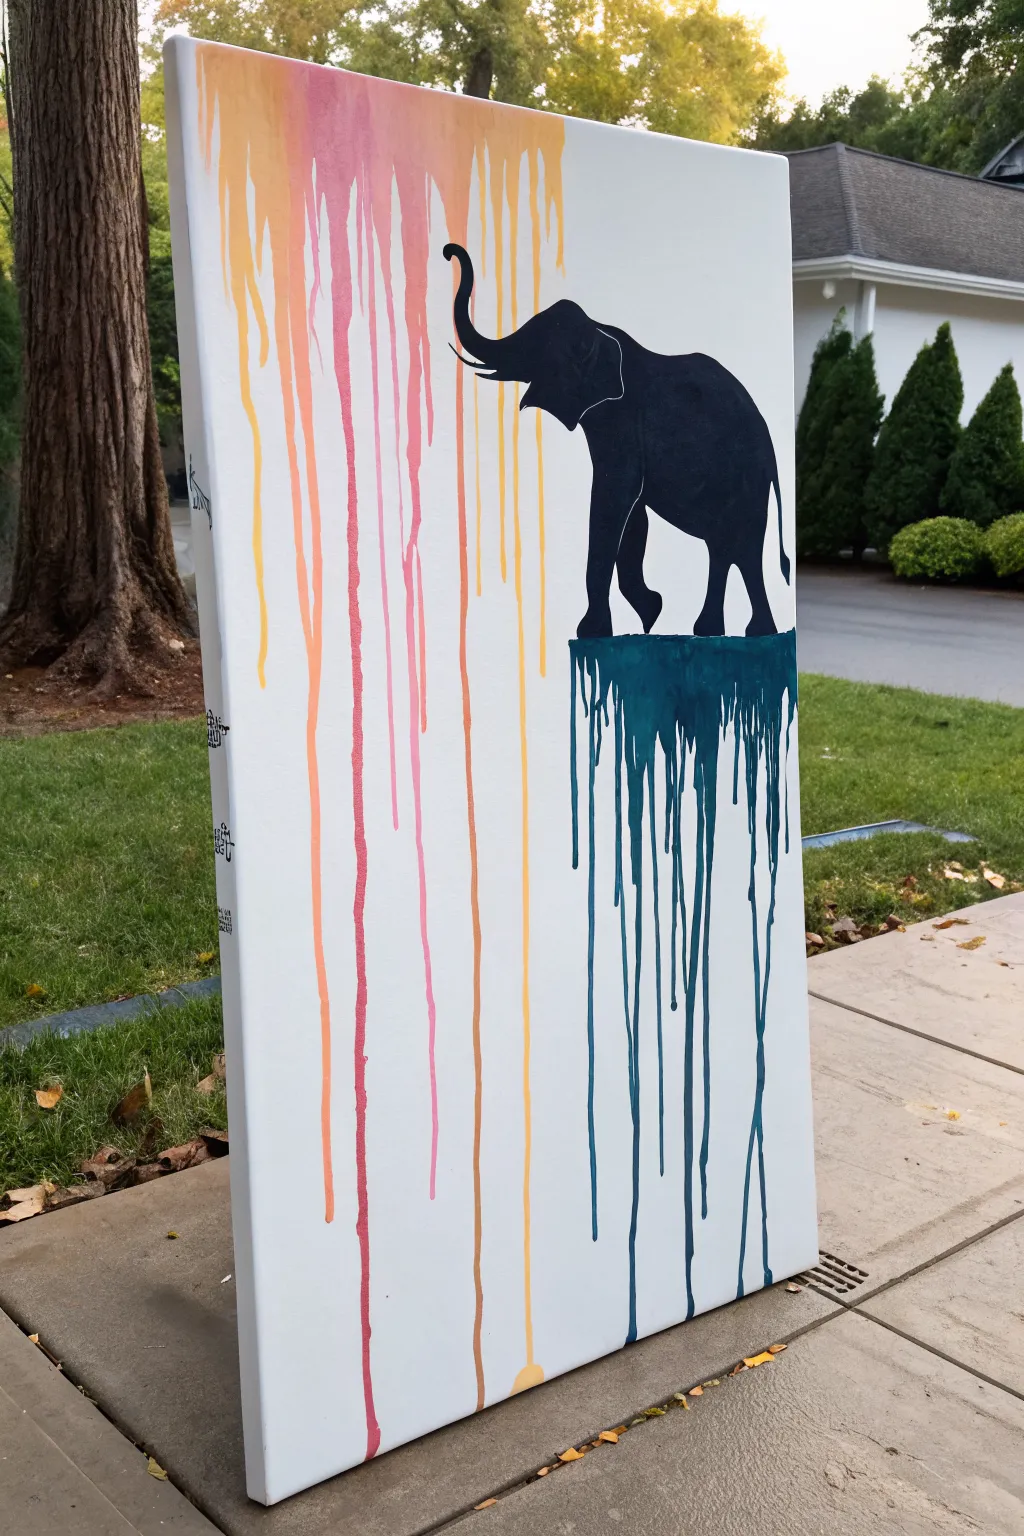
Combine crisp silhouette work with the fluid chaos of drip painting in this striking canvas project. The contrast between the sleek black elephant and the vibrant, melting colors creates a modern pop-art aesthetic.
Step-by-Step Guide
Materials
- Large rectangular canvas (e.g., 24×36 inches)
- Acrylic paints (Black, Teal, Turquoise, Yellow, Orange, Pink, White)
- Pencil for sketching
- Flat brush (medium)
- Detail round brush (small)
- Paint palette or disposable cups
- Water spray bottle or pipette
- Easel or wall mount (essential for drips)
- Drop cloth or plastic sheeting
Step 1: Preparation & Sketching
-
Protect your space:
This project gets messy by design. Lay down a generous drop cloth or plastic sheeting on the floor where you plan to work, as paint will run off the canvas. -
Set up the canvas:
Place your canvas vertically on an easel. It needs to be upright for gravity to help with the drip effect later on. -
Sketch the elephant:
Lightly draw the outline of an elephant in profile on the right side of the canvas. Focus on the trunk raised high and the legs in a walking motion. -
Define the ground line:
Draw a jagged horizontal line beneath the elephant’s feet. This shouldn’t be a straight horizon line; make it look like a chunk of earth or rock that ends abruptly.
Step 2: Painting the Silhouette
-
Outline in black:
Using your small round brush and black acrylic paint, carefully trace over your pencil lines for the elephant and the top edge of the ground. -
Fill the shape:
Switch to a medium flat brush to fill in the elephant’s body with solid black. Work in thin, even layers to avoid texture buildup. -
Refine the edges:
Go back with the small brush to sharpen the details of the trunk, tusk, and tail. The edges need to be very crisp to contrast with the messy drips later. -
Paint the ground base:
Fill in the ground area beneath the elephant’s feet with a dark teal or turquoise color. Don’t worry about the bottom edge of this shape yet.
Drip Control
If a drip runs too fast or crooked, don’t wipe it! Let it dry, paint over it with white, and retry. Wiping creates smudges that are hard to hide.
Step 3: Creating the Sky Drips
-
Prepare the warm colors:
Mix shades of yellow, orange, and pink with a small amount of water in separate cups. The consistency should be fluid, like heavy cream. -
Apply the top band:
Paint a thick, wet band of these warm colors along the very top edge of the canvas, roughly above where the elephant’s trunk is pointing. -
Initiate the drips:
Dip a brush into the watered-down paint and press it against the top of the canvas, letting the excess run down. Use a spray bottle to mist water lightly if gravity needs a little help. -
Control the flow:
I like to guide some drips manually. If a drip is heading toward the black elephant, you can tilt the canvas slightly or wipe it quickly, but the goal is to let them fall naturally behind the silhouette area. -
Layer the colors:
Alternate between pink, orange, and yellow drips so they overlap and mix slightly as they travel down the white space.
Make it Metallic
For a glamorous twist, mix gold or copper metallic medium into your warm ‘sky’ paint colors to catch the light.
Step 4: Creating the Ground Drips
-
Mix the cool tones:
Prepare a watery mix of your teal, turquoise, and perhaps a deep phthalocyanine blue. -
Load the ground edge:
Apply a heavy amount of this fluid paint to the bottom edge of the ground shape you painted earlier. -
Release the bottom drips:
Encourage the paint to run down from the earth shape to the bottom of the canvas. You can use a pipette to add more water/paint mix directly to the drip lines for length. -
Final touches:
Check the opacity of your black silhouette once everything is dry. A second coat of black might be needed to ensure it looks solid against the white background.
Allow the intricate drips to dry completely flat if possible, or leave upright if you want them to extend to the very bottom edge
Galaxy Double-Exposure Elephant
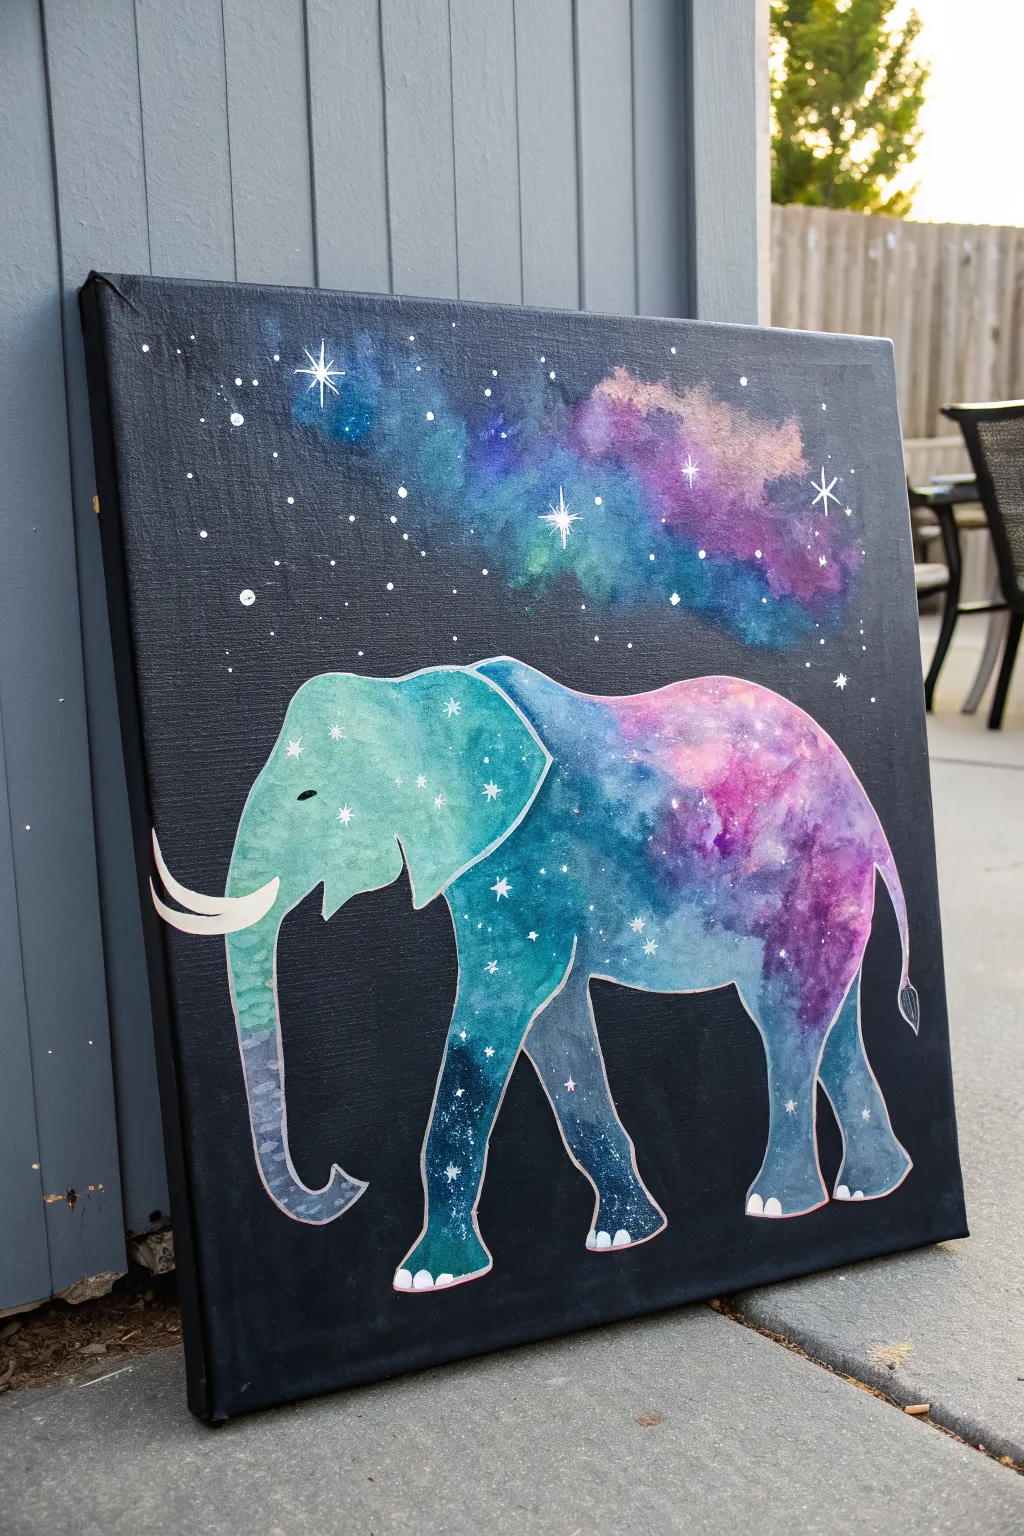
Capture the magic of the universe within a majestic silhouette with this stunning galaxy double-exposure painting. By blending vibrant cosmic colors inside the elephant and creating a stark, starry void around it, you’ll create a piece that feels both grounded and ethereal.
Step-by-Step Tutorial
Materials
- Square canvas (stretched)
- Black acrylic paint (heavy body or opaque matte)
- Acrylic paints (teal, purple, magenta, white, dark blue)
- Sponge or sea sponge (optional but recommended)
- Round brushes (small detail brush, medium round)
- Small flat brush
- Pencil and eraser
- Paper cutout of an elephant silhouette (stencil)
- Masking tape or low-tack painter’s tape
- Cup of water and paper towels
- Palette or paper plate
Step 1: Planning the Silhouette
-
Prepare the stencil:
Find an elephant silhouette image online that fits your canvas size. Print it out on sturdy paper or cardstock and carefully cut it out. You want the shape of the elephant itself, not the negative space. -
Trace the shape:
Center your cutout elephant on the canvas. Lightly trace the outline with a pencil. Don’t press too hard; you just need a guide for where the galaxy ends and space begins. -
Protect the shape:
This is a key step for crisp lines. You can either mask off the inside of the elephant with masking fluid (if you have it) or carefully apply painter’s tape along the inside edges of your pencil line. Alternatively, for this specific look, simply painting carefully around the line in the next phase works best to get that distinct white outline effect later.
Step 2: Creating the Inner Galaxy
-
Base layer:
Inside your traced elephant shape, paint patches of teal, magenta, and dark blue. While the paint is still wet, use a damp brush to blend the edges where colors meet, creating a soft, cloudy transition. -
Building depth:
Once the first layer is tacky, add darker blues and purples to the lower legs and trunk to suggest shadow. Keep the upper head and back lighter with teals and pinks to create a glowing effect. -
Sponge texture:
Dip a small piece of sponge into a mix of white and pale pink paint. Dab off most of the paint on a towel, then lightly sponge ‘nebula’ clouds over the dried galaxy layers inside the elephant body to add texture. -
Inner stars:
Using a toothbrush or a stiff brush loaded with watered-down white paint, flick tiny specks of ‘stars’ onto the dry galaxy paint within the elephant. Add a few larger, hand-painted four-point stars for emphasis.
Clean Lines?
If you struggle with the thin white border, use a white paint marker or gel pen at the very end to draw the outline over the dried acrylics. It offers more control than a brush.
Step 3: Painting the Void
-
The black background:
Load a flat brush with heavy body black acrylic. Carefully paint the entire background outside of your elephant outline. Leave a very thin (approx. 1-2mm) gap between the black paint and the colorful interior to create a delicate white border. -
Smoothing the dark:
Continue painting the rest of the canvas black, ensuring solid, opaque coverage. You may need a second coat of black to make sure no canvas weave shows through. Let this dry completely. -
Top nebula:
At the top of the canvas, visualize a cloud floating in the night sky. Using the sponge technique again, lightly dab teal, purple, and magenta over the dry black paint to create a floating galaxy cloud above the elephant. -
Blending the cloud:
Use a dry, soft brush to feather out the edges of your sponged nebula so it fades naturally into the black background rather than having hard edges.
Cosmic Colors
Swap the galaxy palette! Try a ‘sunset’ version using oranges and deep yellows inside the elephant, or a monochromatic version using only shades of icy blue and white.
Step 4: Finishing Details
-
Background stars:
Protect your finished elephant shape with a piece of paper. Splatter white paint over the black background and the top nebula cloud to create a starfield. -
Highlight stars:
With your smallest detail brush and pure white paint, add specific bright stars to the black sky. Paint a few ‘cross’ shapes to represent twinkling stars, placing some directly inside the nebula cloud. -
The tusks:
Paint the tusks a solid creamy white or very pale beige. Ensure the curve is smooth and sharp against the black background. -
Refining the outline:
Inspect the thin white gap between the elephant and the background. If you accidentally painted over it, use a fine liner brush with white paint to re-establish that crisp, glowing edge. -
Final touches:
Add the eye using black paint—a simple curved line or small filled almond shape adds character. Finally, paint the toenails on the elephant’s feet in white or pale pink.
Step back and admire your celestial giant as it seemingly walks through the fabric of space
Surreal Underwater Elephant Dream Scene
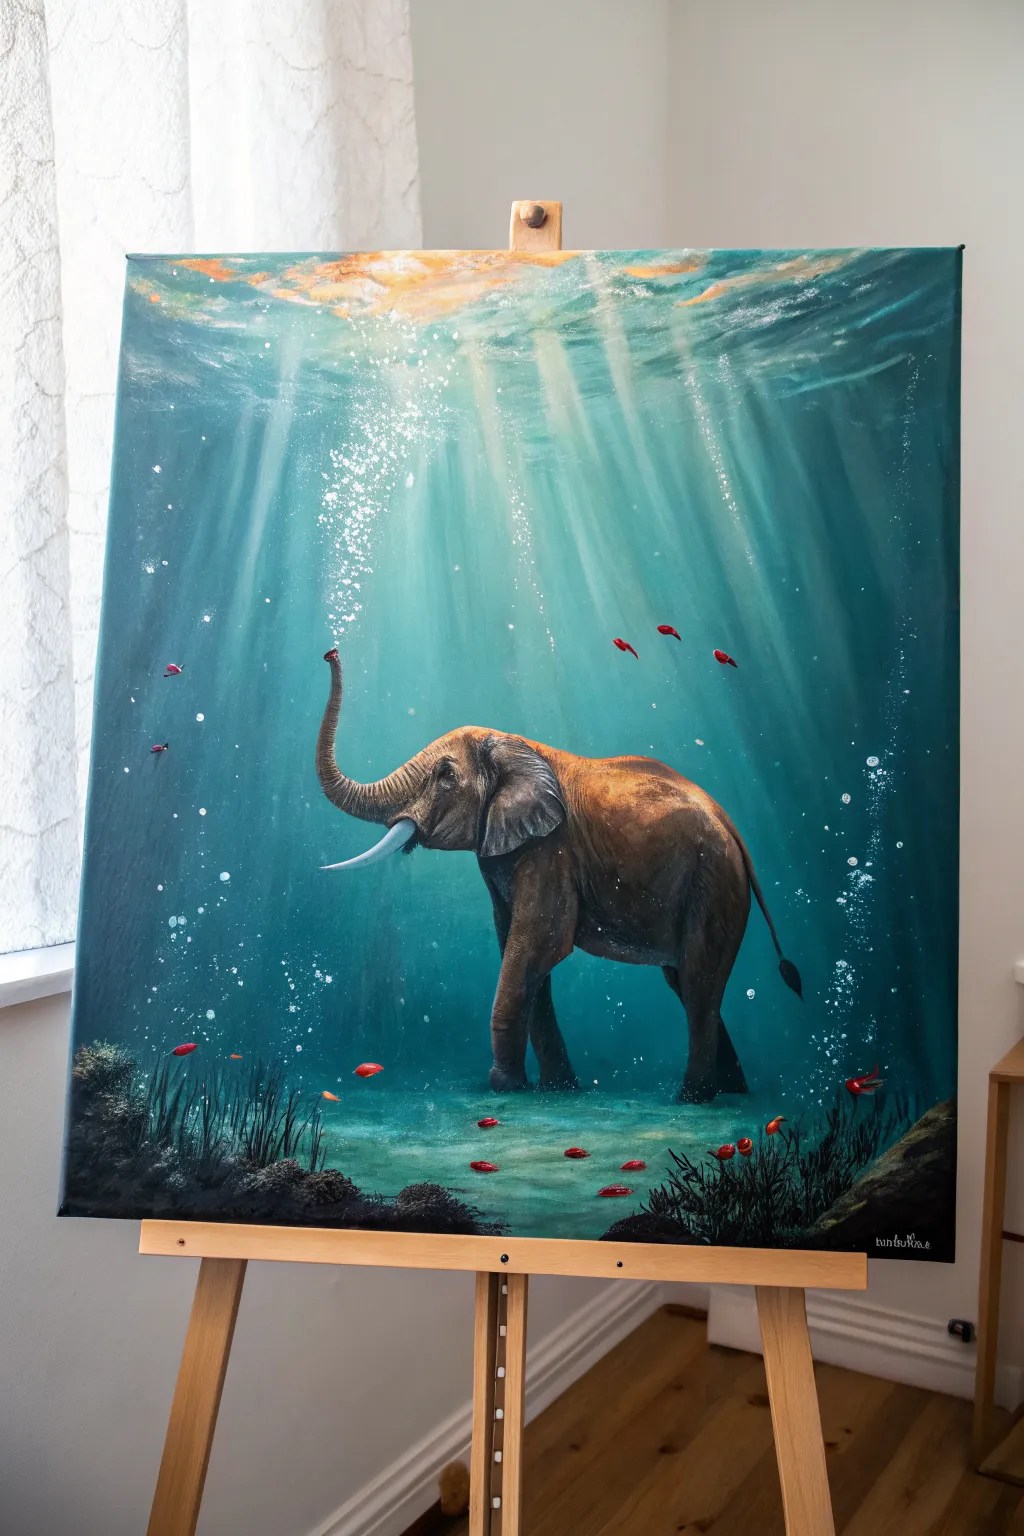
Dive into a dreamlike world by painting a majestic elephant walking along an ocean floor bathed in filtered sunlight. This acrylic painting captures the serene contrast between earthy animal textures and the ethereal, light-dappled depths of the sea.
How-To Guide
Materials
- Large stretched canvas (vertical orientation)
- Acrylic paints: Phthalo Blue, Phthalo Green, Titanium White, Burnt Umber, Burnt Sienna, Yellow Ochre, Lamp Black, Cadmium Red (small amount)
- Large flat brushes for background
- Medium filbert brush for elephant base
- Small round and liner brushes for details
- Old toothbrush for splatter effects
- Palette knife
- Glazing medium
- Water cups and paper towels
Step 1: Creating the Underwater Atmosphere
-
Background base coat:
Begin by covering the entire canvas with a deep teal mixture. Combine Phthalo Blue, a touch of Phthalo Green, and a tiny bit of Black. Keep the bottom darker and gradually add a bit more White as you move toward the top, creating a vertical gradient. -
Establishing the light source:
While the background is still slightly tacky, mix Titanium White with a hint of Yellow Ochre. Paint the very top section of the canvas where the water meets the air, blending it downwards to create a glowing surface area. -
Painting sunbeams:
Using a dry, wide flat brush and a watery glaze of Titanium White, drag long, diagonal strokes from the top light source down toward the bottom left. These ‘god rays’ should be translucent, so wipe off excess paint before touching the canvas. -
Adding water texture:
Dab small, horizontal marks of lighter turquoise and white near the top surface to simulate ripples seen from below. Soften these edges with a clean, dry brush to make them look out of focus.
Sunbeam Secret
Make your sunbeams wider at the top and narrower as they go deep. Use a dry brush and very little paint to keep them soft and misty, not solid stripes.
Step 2: Painting the Elephant
-
Sketch the silhouette:
Using a small round brush and thinned Burnt Umber, lightly sketch the outline of the elephant in the center. Position the trunk raised upwards, aiming towards the light. -
Block in the body color:
Fill the elephant shape with a base mix of Burnt Umber and Burnt Sienna. Don’t worry about texture yet; just aim for solid coverage. -
Establishing shadows:
Mix Burnt Umber with a touch of Phthalo Blue (to cool it down) and paint the shadowed areas: under the belly, the back legs, and under the ear. This anchors the figure in the deep water. -
Adding highlights:
Mix Yellow Ochre and White into your brown base. Apply this lighter tone to the top of the elephant’s back, the forehead, and the top of the trunk where the sunbeams would hit. -
Creating skin texture:
Switch to a small round brush. Using a mix of dark brown and lighter tan, paint fine, directional wrinkles on the trunk, knees, and circular folds around the eye. I find that layering thin, erratic lines builds the best leathery look. -
Painting size and tusks:
Paint the tusk using Titanium White mixed with a very small amount of Blue to reflect the water. Add a pure white highlight on the top curve of the tusk to make it shine.
Step 3: Atmospheric Details & Bubbles
-
Trunk bubbles core:
At the tip of the trunk, paint a dense cluster of small white dots. Use a small detail brush to create the main stream of air rising straight up. -
Splatter effect:
Dilute Titanium White with water until it’s ink-like. Load an old toothbrush, aim it at the bubble stream area, and flick the bristles to create a spray of tiny, organic bubbles rising toward the surface. -
Scattered ambient bubbles:
Paint random, larger individual bubbles throughout the water using a small loop of white. Add a tiny dot of shadow on the bottom right of each bubble to give them dimension. -
Floating debris:
Flick extremely tiny specks of white and light blue throughout the sunbeams to represent ‘marine snow’ or dust motes catching the light.
Make it Magical
Paint the elephant’s eye with a tiny glint of reflected light. You can also add a faint, ghostly jellyfish or a manta ray silhouette in the far background distance.
Step 4: The Sea Floor & Foreground
-
Darkening the bottom:
Glaze the very bottom edge of the canvas with a mix of Phthalo Blue and Black to suggest the deep ocean floor fading into darkness. -
Adding distant fish:
With a small brush and bright Cadmium Red mixed with a little white, paint tiny, simple fish shapes swimming around the elephant. Keep them small to emphasize the elephant’s massive scale. -
Painting sea grass:
Using a liner brush and black-green paint, flick upward strokes along the bottom edge to create silhouetted seaweed and underwater plants. -
Plant highlights:
Add subtle teal highlights to the tips of the swaying grass on the left side where the light hits the floor. -
Rocks and sediment:
Dab uneven blobs of dark grey-brown at the very bottom corners to suggest rocks. Highlight the top edges of these rocks with a muddy green to simulate moss or algae. -
Final light glaze:
Once everything is fully dry, apply a very thin wash of translucent yellow-white glaze over the top left corner (over the water and elephant’s back) to unite the scene with warm sunlight.
Step back and admire your surreal seascape, where the heavy weight of an elephant floats weightlessly in the blue


Have a question or want to share your own experience? I'd love to hear from you in the comments below!