If you’ve been craving that cozy, magical feeling of a hidden fairy garden, you’re in the right headspace to paint something truly charming. I pulled together a mix of classic, must-paint scenes and a few more unexpected twists to help you build a whole little world on your page.
Fairy Ring of Mushrooms and Daisies
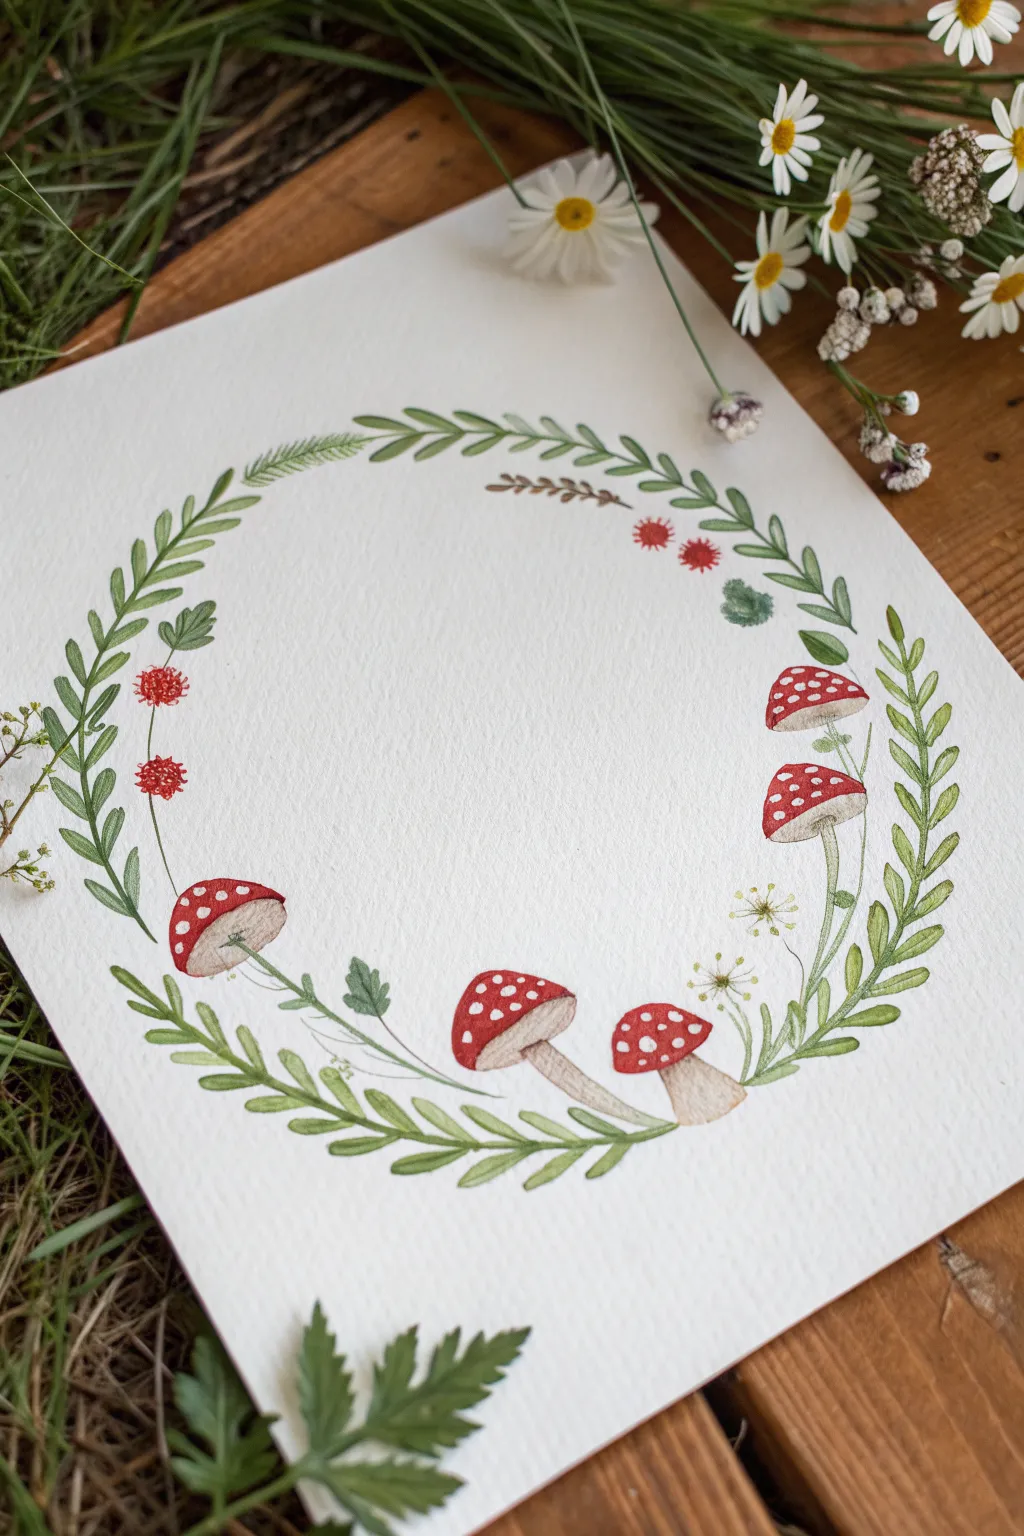
Capture the magic of the forest floor with this delicate watercolor wreath featuring vibrant fly agaric mushrooms and trailing greenery. The circular composition creates a natural frame, perfect for adding a touch of fairytale charm to any room.
Step-by-Step Guide
Materials
- Cold press watercolor paper (300 gsm)
- Watercolor paints (red, brown, sap green, olive green, yellow ochre)
- Round watercolor brushes (sizes 2 and 6)
- Fine liner brush or white gouache (optional)
- Pencil and eraser
- Compass or round object for tracing
- Palette for mixing
- Jar of water
Step 1: Planning the Composition
-
Create a Guide:
Begin by lightly tracing a circle onto your watercolor paper using a compass or a round plate. This will serve as the spine for your wreath. -
Sketch the Mushrooms:
Visualize the wreath as a clock face. Sketch five clusters of mushrooms at the bottom half, specifically around the 4, 5, 6, 7, and 8 o’clock positions. Vary their heights and tilt the caps slightly for a natural look. -
Outline the Foliage:
Lightly sketch the main leafy vines reaching up the sides from the 9 o’clock and 3 o’clock positions, curving towards the top but leaving a small gap at the very peak.
Uneven Watermark Edges?
If your mushrooms have hard, dark edges (blooms), your brush was too wet. Blot your brush on paper towel before touching the paper to control the moisture better.
Step 2: Painting the Mushrooms
-
Base Red Layer:
Mix a bright, warm red. Paint the caps of the mushrooms, carefully leaving tiny white circles unpainted for the spots. If you find this difficult, you can paint the whole cap red and add white gouache spots later. -
Add Shadows:
While the red is still slightly damp, drop a tiny amount of darker red or brown into the bottom edge of the caps to create a rounded, 3D volume. -
Paint the Stems:
Mix a diluted wash of brown and yellow ochre. Paint the stems, keeping them pale. Add a slightly darker brown stroke just under the cap for a shadow. -
Detail the Gills:
Once the stems are bone dry, use your smallest brush to paint very faint, thin lines under the caps to represent the mushroom gills.
Step 3: Adding Greenery
-
Main Vine Structure:
Load your size 6 brush with sap green. Paint the main stems following your pencil circle, using a confident, sweeping motion. -
Fern-like Leaves:
On the right side of the wreath, paint small, elongated oval leaves paired along the stem. Press the belly of the brush down and lift up to create the leaf shape. -
Varied Foliage:
On the left side, switch to a slightly bluer olive green. Paint smaller, more rounded leaves to create visual interest and asymmetry. -
Pine Needles:
Near the top left (around 10 o’clock), use the tip of your brush to flick tiny, thin lines outward, creating a small sprig of pine needles.
Add Some Magic
Mix a tiny amount of iridescent medium into your red paint or spatter a little gold watercolor over the finished piece for a true fairy-dust shimmer.
Step 4: Finishing Touches
-
Filler Flowers:
Using a reddish-brown mix, dab small clusters of dots between the leaves on the left side to create berry-like flowers. -
Delicate Dandelions:
With a very pale green or yellow-green mix, paint thin, spindly stems rising between the mushrooms on the right. Add tiny star-burst shapes at the ends for seed heads. -
Refining Spots:
If you reserved whites for the mushroom spots, check their edges. If you painted solid red caps earlier, now use opaque white gouache to dot them on. -
Erase Guides:
Wait until the painting is completely dry—I usually give it at least 20 minutes to be safe. Gently erase any visible pencil lines from your initial circle guide.
Frame your circular forest scene in a wooden hoop or a square frame to highlight the organic shape

Twilight Garden With Firefly Glow
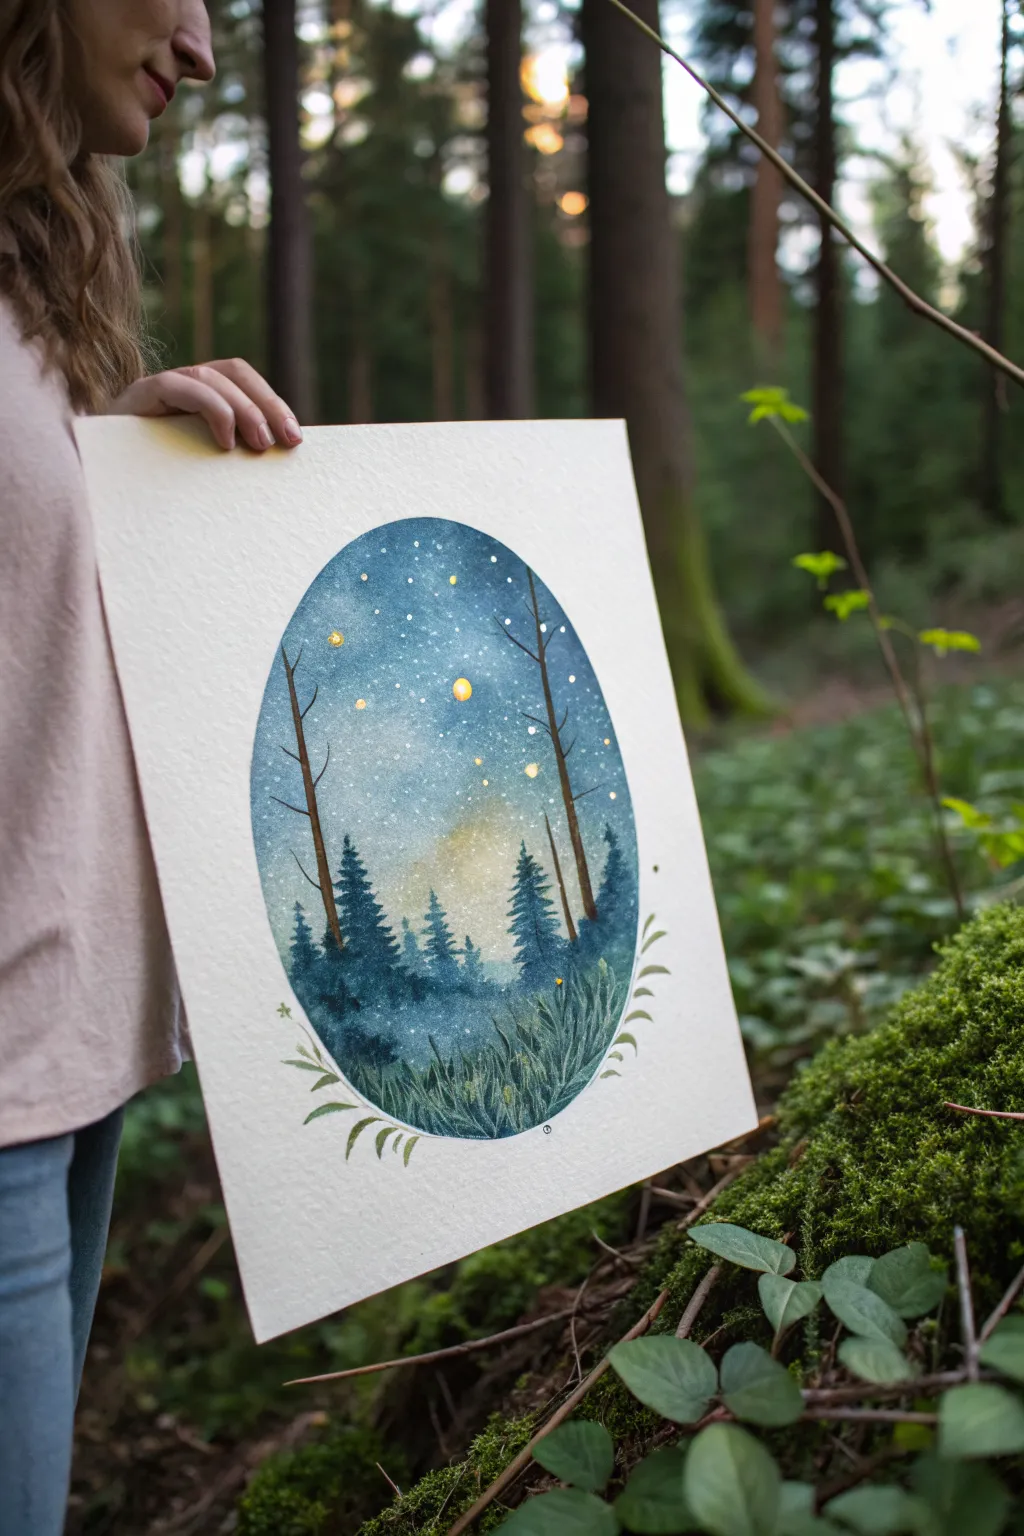
Capture the magic of a forest at dusk with this enchanting watercolor vignette, featuring silhouetted pines and glowing fireflies held within a soft oval frame. The interplay of deep teal blues and warm yellow lights creates a cozy, mystical atmosphere perfect for bringing a touch of fairy magic indoors.
How-To Guide
Materials
- Cold press watercolor paper (300 gsm or heavier)
- Watercolor paints (Indigo, Prussian Blue, Sap Green, Lemon Yellow, Hooker’s Green, White Gouache)
- Oval stencil or compass
- Pencil and kneaded eraser
- Masking tape or masking fluid
- Flat wash brush (1 inch)
- Round brushes (sizes 2, 4, and 6)
- Old toothbrush (for splattering)
- Paper towels
- Jar of clean water
Step 1: Preparation and Sky Layer
-
Define the shape:
Begin by lightly tracing a large oval shape in the center of your paper using a stencil or very light pencil sketching. This will serve as the boundary for your entire painting. -
Wet the paper:
Using your flat wash brush and clean water, dampen the area inside the oval. Be careful to stay within the lines, as the paint will only flow where the paper is wet. -
Establish the light source:
While the paper is still wet, drop a small amount of watered-down Lemon Yellow near the bottom center of the oval. This will represent the faint glow of the sun just below the horizon. -
Paint the twilight sky:
Starting from the top of the oval, apply a wash of Indigo and Prussian Blue. As you move downward, dilute the paint with more water to create a gradient that fades into the yellow light source, blending softly where the colors meet. -
Add texture and depth:
While the blue wash is still damp, dab in slightly more concentrated Indigo near the very top edges to create a sense of the night closing in. Let this layer dry completely before moving on.
Step 2: Trees and Foreground
-
Paint the distant tree line:
Mix a watery, pale blue-grey shade. Using a size 4 round brush, paint vague, soft tree shapes along the horizon line, overlapping the yellow glow slightly. These should look misty and far away. -
Add the main pine silhouettes:
Prepare a thicker, darker mix of Indigo and Sap Green. With a size 2 or 4 brush, paint decisive pine tree shapes in the mid-ground. Use a dabbing motion to create the texture of jagged pine boughs. -
Create the tall framing trees:
Using a fine liner or the tip of a size 2 brush and a dark brown-black mix to paint two slender, tall tree trunks that extend from the bottom up past the top of the oval. Add thin, reaching branches that stretch across the sky. -
Detail the grassy foreground:
Switch to your Hooker’s Green mixed with a touch of Indigo. Using a size 2 brush, paint individual blades of tall glass at the very bottom of the oval, curving them slightly to look natural and windswept. -
Deepen the shadows:
Add a second layer of dark blue-green wash at the very base of the grass and trees to ground the composition and add dimension.
Muddy Gradient?
If your yellow and blue mix into a dull green, let the layers dry completely between applications. Or, initiate the blend with clean water first, introducing colors from opposite ends.
Step 3: Magical Details
-
Add the stars:
Dilute a small mount of white gouache with water. Load an old toothbrush or stiff brush with the mixture and gently flick specific speckles onto the dry sky area to create a starry night effect. -
Paint the fireflies:
Using a clean, fine-point brush and opaque Lemon Yellow or gold watercolor, dot small circles randomly throughout the dark areas of the trees and sky. I like to vary the sizes slightly to show distance. -
Enhance the glow:
Once the yellow dots are dry, carefully glaze a tiny, watery ring of yellow around the largest fireflies to make them appear as if they are glowing warmly against the dark background. -
Clean up the edges:
If your paint bled outside the oval, use a damp stiff brush or white gouache to tidy up the perimeter, ensuring a crisp, clean edge. -
Add the decorative border:
With a steady hand and a size 2 brush, paint delicate green fern-like fronds growing upwards along the bottom curve of the oval on the outside, framing the scene gently.
Paper Choice Matters
Use 100% cotton paper for this project. It holds water much better than wood pulp paper, allowing for those smooth, dreamy gradients essential for twilight skies.
Step back and admire your little window into a magical twilight world, ready to frame or display

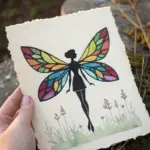
Fairy Silhouette in a Moonlit Clearing
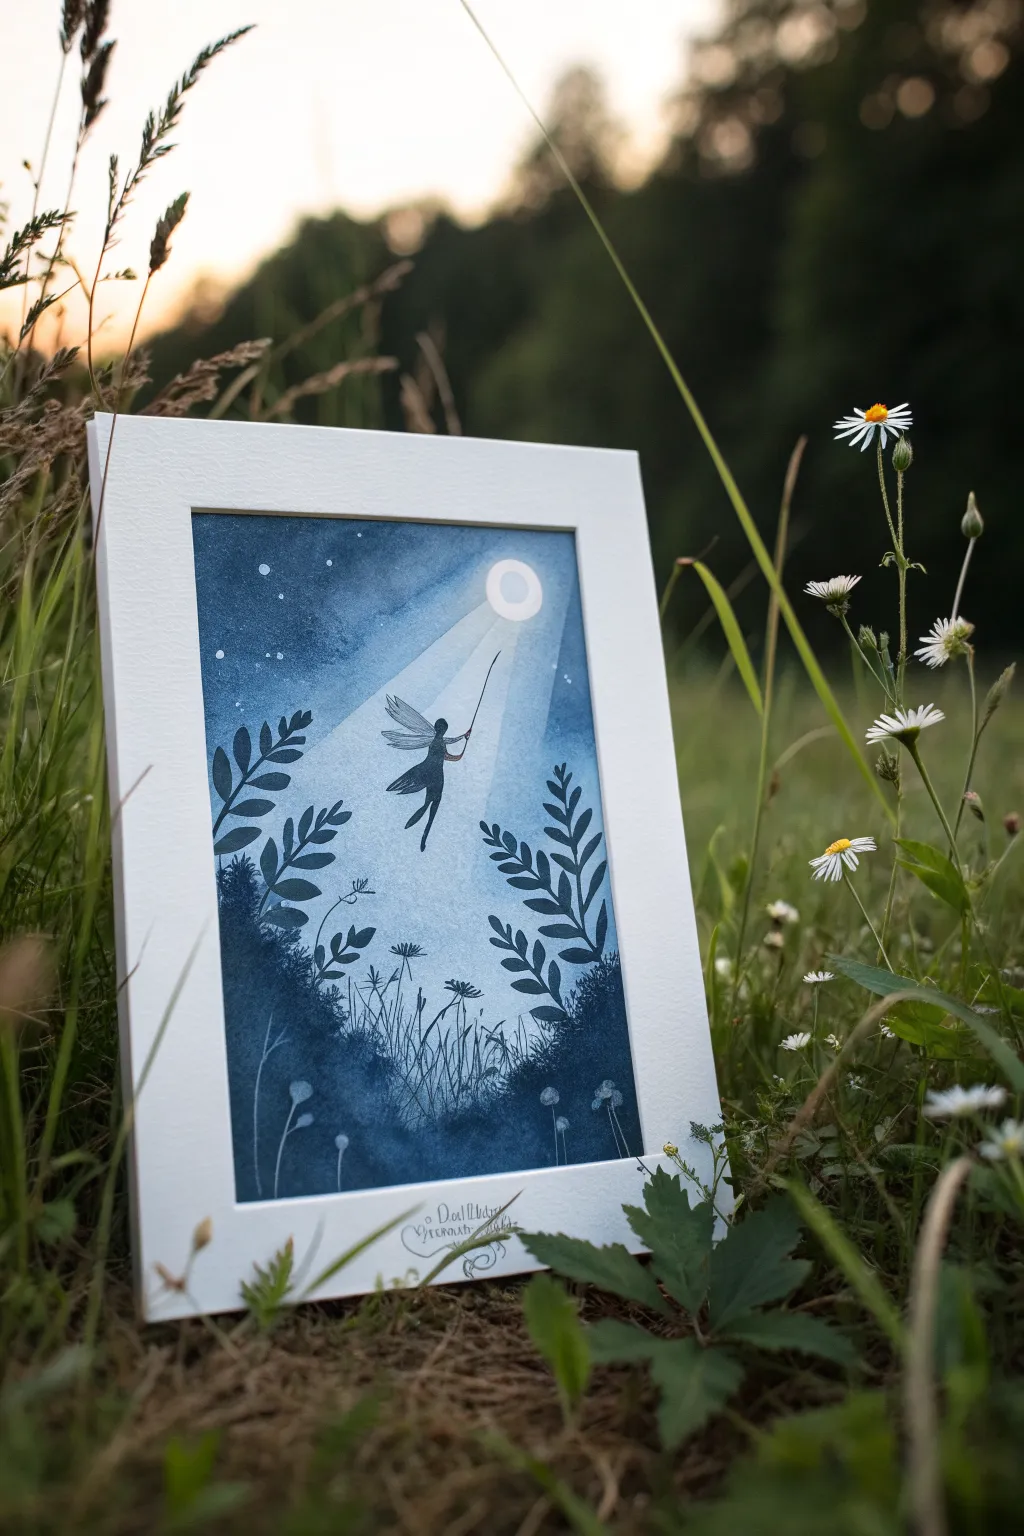
Capture the magic of a midnight forest with this monochromatic watercolor piece featuring a delicate fairy silhouette drawn to the light. By using a limited palette of indigo and Prussian blue, you will create a dreamy, atmospheric depth that feels both enchanting and serene.
Step-by-Step Guide
Materials
- Cold press watercolor paper (300gsm)
- Pencil and kneadable eraser
- Masking tape
- Masking fluid (drawing gum) and an old brush
- Watercolor paints: Indigo, Prussian Blue, Titanium White
- Round brushes (sizes 2, 6, and 10)
- Fine liner brush or size 0 detail brush
- Two jars of water
- Paper towels
- White gel pen (optional)
- Ruler
Step 1: Preparation and Masking
-
Secure the paper:
Tape your watercolor paper down to a board using masking tape on all four sides. This creates a clean white border and prevents the paper from buckling during the wet-on-wet stages. -
Sketch the layout:
Lightly sketch a circle for the moon in the upper right quadrant. Draw an angled cone shape beaming down from it to represent the light shaft. Then, sketch the rough outline of the fairy floating in the center of that light. -
Apply masking fluid:
Using an old brush (one you don’t mind ruining) or a silicone applicator, carefully fill in the moon circle with masking fluid. This will keep the paper pristine white while we paint the dark sky. -
Protect the beam:
Instead of masking the whole light beam, just run a thin line of masking fluid along the straight edges of the light shaft to keep them crisp. Or, you can carefully paint around these lines later. -
Let it dry completely:
Wait until the masking fluid is entirely touch-dry and rubbery. If you paint over it while wet, it will permanently bond to the paper.
Step 2: Painting the Atmosphere
-
Wet the sky area:
Using your largest round brush and clean water, wet the entire paper surface excluding the triangular light beam area. Work carefully around your pencil lines. -
Drop in the deep blue:
Load your brush with a saturated Indigo and Prussian Blue mix. Start at the outer corners of the paper, dropping the pigment onto the wet paper and letting it bloom inward. -
Create a gradient:
As you move closer to the light beam area, dilute your paint slightly. You want the deep night sky at the edges to fade into a softer blue near the light source. -
Paint the light beam:
Once the dark surroundings are semi-dry, use a very watery wash of pale blue to fill in the light beam triangle. It should be significantly lighter than the surrounding sky to look glowing. -
Add texture:
While the paint is still damp but losing its sheen, splatter a tiny amount of clean water or salt on the dark areas to create organic ‘starry’ textures. -
Dry thoroughly:
Let this foundational layer dry completely. This is crucial—if the paper is cool to the touch, it’s still wet.
Bleeding Edges?
If paint is bleeding under your tape, ensure you press the tape edge firmly with a bone folder or fingernail before starting. For extra safety, clear-coat the tape edge first.
Step 3: Silhouettes and Details
-
Remove the mask:
Gently rub away the masking fluid from the moon to reveal the crisp white paper underneath. -
Paint the fairy silhouette:
Using your smallest detail brush and pure, concentrated Indigo (almost black), carefully fill in your fairy sketch. Focus on the sharp points of the wings and the delicate curves of the legs. -
Anchor the wings:
For the fairy wings, I prefer to use a slightly more diluted blue rather than solid black, so they look translucent and light against the beam. -
Paint foreground foliage:
At the bottom corners, paint large, leafy fern shapes using the concentrated Indigo. Make these shapes bold and solid to frame the scene. -
Add delicate grasses:
Switch to your liner brush. With quick, upward flicking motions, add fine blades of grass rising from the bottom edge towards the light. -
Include floral details:
Dot the ends of some grass blades to suggest seed heads or tiny wildflowers. These small details add intricate variety to the heavy bottom silhouette. -
Enhance the stars:
Use Titanium White gouache or a white gel pen to dot specific stars in the dark blue sections of the sky. Add a tiny halo around the brightest ones for a glowing effect. -
Final touches:
Review your contrast. If the light beam needs to stand out more, you can glaze a very thin layer of white gouache over it to increase the ‘misty’ look.
Add Some sparkle
For a magical finish, mix a tiny pinch of iridescent medium or mica powder into the paint used for the fairy’s wings to make them shimmer when the light hits the artwork.
Peel off your tape slowly at an angle to reveal those crisp white borders and admire your captured moment of fairy magic


Fairy on a Leaf Swing
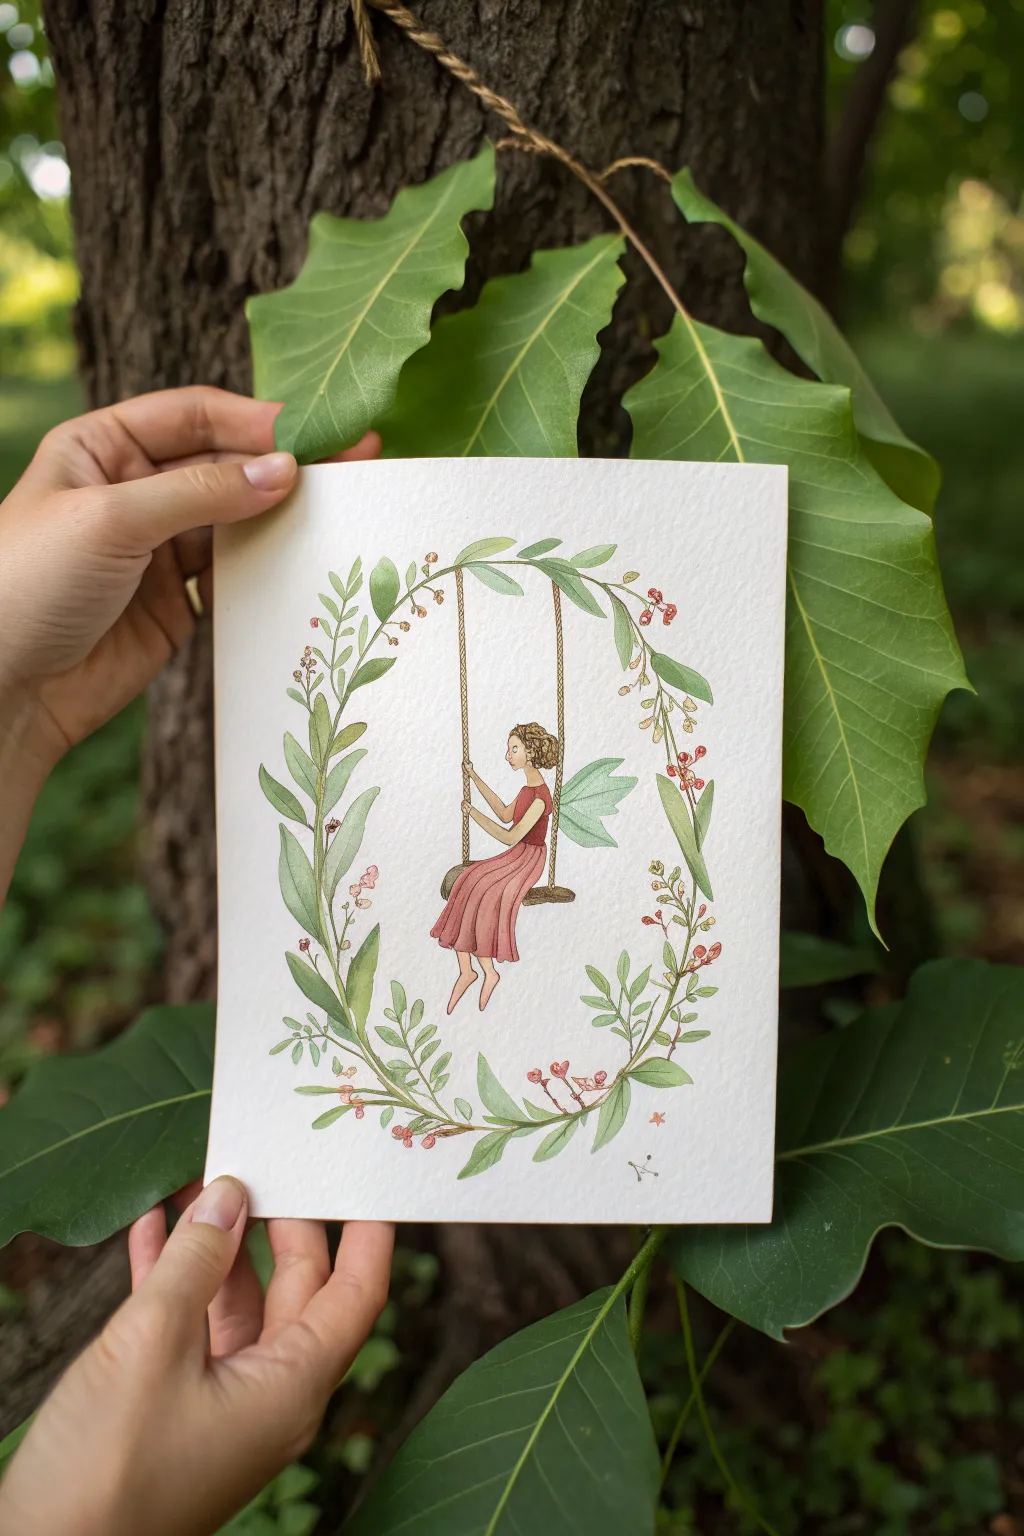
Capture the magic of an enchanted forest with this delicate watercolor illustration featuring a fairy gently swinging within a leafy bough. The combination of soft washes and fine ink lines creates a charming, storybook quality perfect for a nursery or garden room.
Step-by-Step
Materials
- Cold press watercolor paper (300 gsm)
- H pencil and kneadable eraser
- Waterproof technical pen (0.1mm, sepia or brown)
- Watercolor paints (Sap Green, Olive Green, Alizarin Crimson, Yellow Ochre, Burnt Sienna)
- Round watercolor brushes (size 2 and 4)
- Palette for mixing
- Jars of clean water
Step 1: Penciling the Composition
-
Lightly sketch the oval shape:
Begin by lightly tracing a large oval shape in the center of your paper to serve as the guide for your wreath. Keep your pencil pressure extremely light so lines can be erased later. -
Position the swing:
Draw two vertical lines coming down from the top arc of your oval, slightly wider at the top than the bottom, connected by a rectangular seat plank near the center. -
Draft the fairy figure:
Sketch the fairy sitting on the plank. Start with simplified shapes: an oval for the head, a gentle curve for the spine, and legs dangling freely. Add the triangle shape of her dress flowing downward. -
Add leafy details:
Along your initial oval guide, sketch twisting vines and leaves. Vary the leaf sizes—larger ones near the bottom and sides, trailing off into delicate stems at the top.
Uneven Watercolors?
If you get ‘blooms’ or hard edges in your paint, your brush might be too wet. Blot excess water on a paper towel before touching the paper to keep washes smooth.
Step 2: Inking the Outline
-
Outline the fairy:
Using your sepia technical pen, carefully trace over your fairy sketch. Give her hair a little texture with wavy lines and define the folds in her dress. -
Ink the swing ropes:
Draw the ropes using a twisting line pattern to suggest texture. Ensure the lines connect firmly to the wooden seat and disappear naturally into the foliage above. -
Trace the foliage:
Ink the leaves and vines. Don’t worry about closing every single line; small gaps can make the drawing feel more organic and airy. -
Erase pencil marks:
Wait until the ink is completely dry to the touch, then gently use your kneadable eraser to lift away all the graphite guidelines.
Step 3: Watercolor Washes
-
Paint the skin tones:
Mix a very dilute wash of Yellow Ochre and a tiny touch of Alizarin Crimson. Apply this to the fairy’s face, arms, and legs. Let this layer dry completely. -
Color the dress:
Load your size 4 brush with Alizarin Crimson diluted to a soft rose hue. Paint the dress, adding a slightly more concentrated pigment in the shadow areas where the fabric folds. -
Base layer for leaves:
Mix a light wash of Sap Green. Paint the majority of the leaves in the wreath, varying the water amount slightly as you go to create natural tonal shifts. -
Add fairy wings:
Use a very watery pale green or blue wash for the wings. Keep this incredibly transparent so they look ethereal.
Wing Transparency
Paint the green background leaves first. Once dry, paint the translucent wings directly over them. The underlying leaves will show through, creating a see-through effect.
Step 4: Adding Depth and Detail
-
Deepen the greenery:
I like to mix a bit of Olive Green or add a touch of brown to my green mix for variety. Paint the second layer on some leaves, or add darker shading where leaves overlap. -
Paint the swing and hair:
Use Burnt Sienna mixed with a little water for the wooden seat and the fairy’s hair. You can add texture to the wood with a second, drier pass of paint once the first is dry. -
Add floral accents:
Using the tip of your size 2 brush, dab small dots of red or pink along the vines to create the berries and tiny flower buds shown in the reference. -
Grounding shadows:
Add a very faint shadow under the seat plank and where the fairy’s legs cross to give the figure weight.
Frame your finished piece with a simple mat to highlight the delicate details of your woodland creation
BRUSH GUIDE
The Right Brush for Every Stroke
From clean lines to bold texture — master brush choice, stroke control, and essential techniques.
Explore the Full Guide
Dragonfly Ride Over Garden Blooms
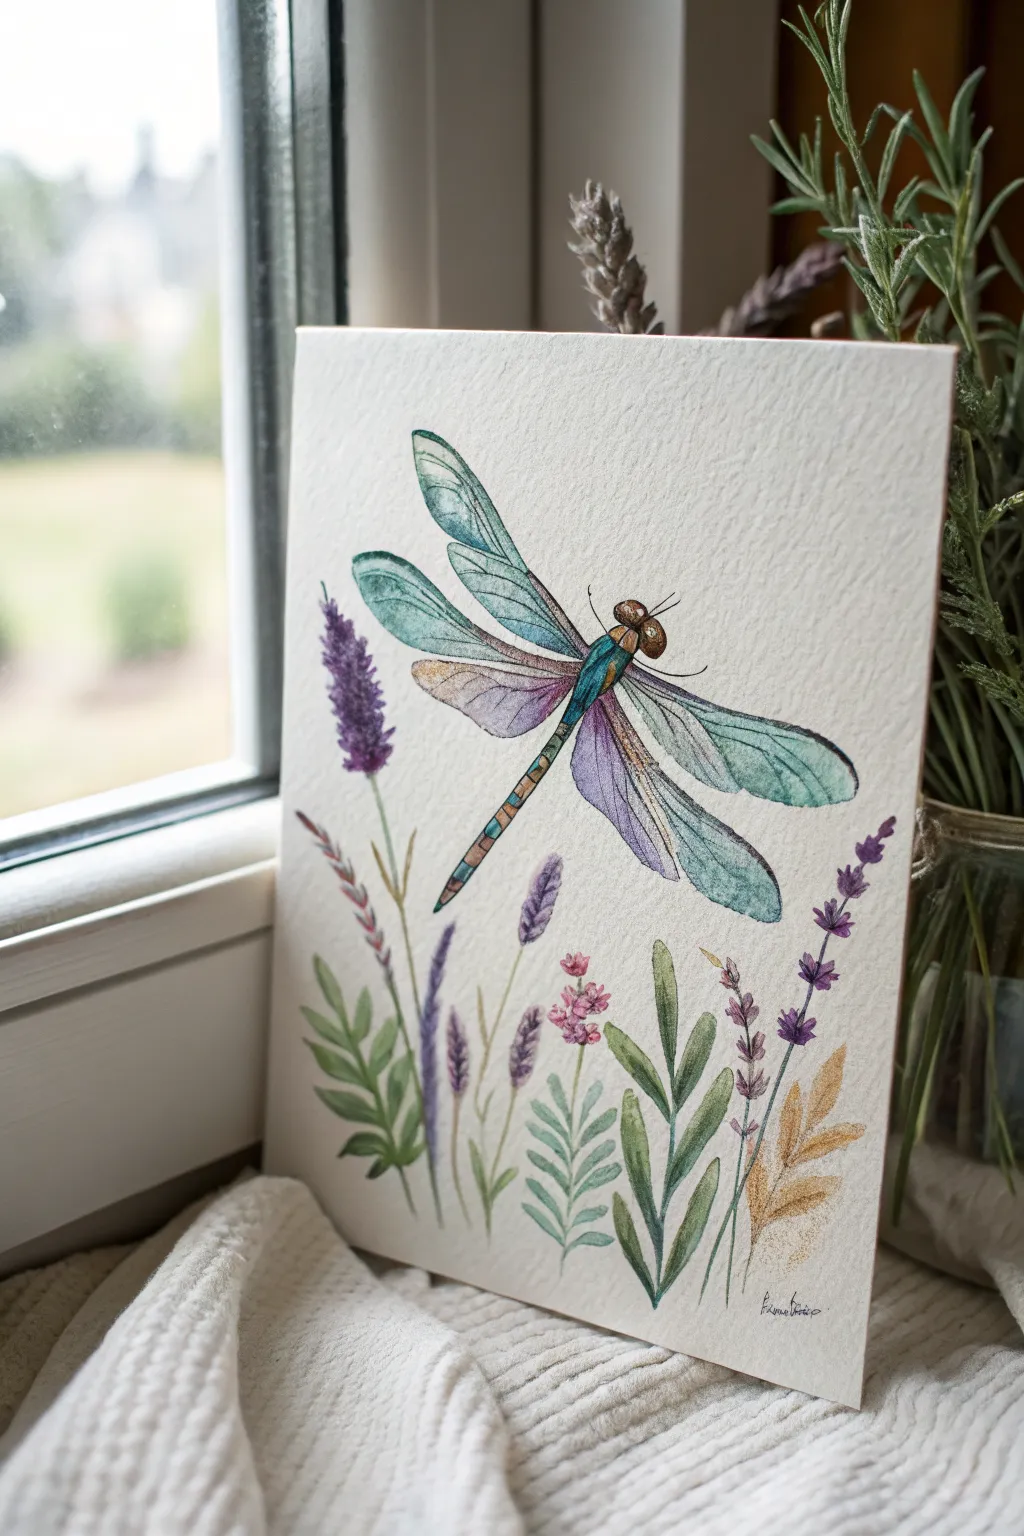
This charming project captures the delicate beauty of a dragonfly hovering over a meadow of lavender and wild blooms. Using watercolor techniques and fine liner details, you’ll create a soft, ethereal piece perfect for adding a touch of magic to any room.
Step-by-Step Tutorial
Materials
- Cold-pressed watercolor paper (300 gsm)
- Watercolor paints (teal, violet, indigo, burnt sienna, sap green, olive green)
- Round watercolor brushes (size 4 and 0)
- Fine liner pen (black or sepia, 0.1mm)
- Gold ink or metallic watercolor (optional)
- HB pencil and eraser
- Paper towels
- Water jar
Step 1: Sketching the Layout
-
Outline the dragonfly:
Begin by lightly sketching the dragonfly’s body near the center-top of your paper. Draw a long, segmented abdomen, a thicker thorax, and a rounded head with prominent eyes. -
Add the wings:
Extend four large wings from the thorax. The top pair should angle slightly upwards, while the bottom pair angles downwards. Keep your lines very faint so they disappear under the paint later. -
Sketch the flora:
At the bottom of the page, draw vertical stems of varying heights. To recreate the reference, sketch lavender spikes on the left and right, and add leafy fern-like plants in the center ground.
Wing Translucency
To make wings look transparent, paint the background stem stems right ‘through’ the wings first, then glaze the teal wing color over top once the stems remain totally dry.
Step 2: Painting the Dragonfly
-
Base wash for wings:
Mix a very watery teal blue. Using your size 4 brush, paint the upper sections of the wings, keeping the wash transparent. While still wet, drop in a tiny hint of violet near the body for a gradient effect. -
Lower wing details:
For the lower wings, switch to a soft violet wash that fades into the teal at the tips. I like to let this dry briefly before adding a second layer to intensify the colors near the wing veins. -
Painting the body:
Use a mix of teal and sap green for the thorax. For the long abdomen, paint alternating segments of teal and burnt sienna, leaving tiny gaps of white paper between segments for highlights. -
Detailing the eyes:
Fill the large eyes with burnt sienna. While the paint is wet, lift a tiny spot of pigment with a clean, damp brush to create a reflection highlight.
Muddy Watercolors?
If your purple and green areas are bleeding together into brown, ensure the green stems are 100% dry before painting the purple flowers that touch them.
Step 3: Painting the Garden
-
Lavender buds:
Using the tip of your brush and a rich violet color, dab small, clustered dots along the top of your lavender stems. Let the dots vary in saturation to create depth. -
Leafy greens:
Mix sap green with a touch of olive. Paint the leaves using a ‘press and lift’ motion: start at the stem, press down to widen the stroke, and lift up to create a pointed tip. -
Accenting with pink:
Add the small central flower sprigs using a soft rose or diluted red paint. Keep these shapes loose and organic, rather than strictly defined petals. -
Golden foliage:
On the far bottom right, paint the fern-like leaf using a yellow ochre or gold metallic paint to add warmth and contrast to the cool purples.
Step 4: Refining and Inking
-
Dry completely:
Ensure the entire painting is bone dry before proceeding. If the paper is cool to the touch, it still holds moisture. -
Outline the wings:
With your 0.1mm fine liner, carefully trace the outline of the wings. Draw delicate veins inside the wings, radiating from the body outward. -
Define the body:
Outline the dragonfly’s body segments and eyes. Add small antennae to the head for a realistic touch. -
Stem definitions:
Lightly outline the stems and leaves. You don’t need to enclose every shape fully—broken lines often look more artistic and lively. -
Final texture:
Add tiny stippling dots to the lavender buds and the dragonfly’s thorax to suggest texture.
Now step back and admire the delicate balance of color and line you have created on the page
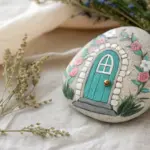
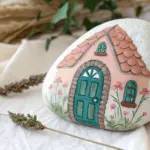
Painted Rock Fairy Houses Collection

Transform a smooth, egg-shaped stone into a delightful miniature dwelling perfect for a tiny fairy garden. This project uses soft, earthy tones and fine line work to create a cozy, storybook cottage feel.
Step-by-Step Guide
Materials
- Smooth, egg-shaped river rock (cleaned and dried)
- White gesso or acrylic primer
- Acrylic paints (Warm white/cream, terracotta/burnt orange, sage green, dark brown, grey, pink)
- Fine liner brushes (size 00 or 000)
- Small flat brush
- Pencil and eraser
- Matte spray sealant or brush-on varnish
- Palette or small dish for mixing
- Water cup and paper towels
Step 1: Preparation & Base Coat
-
Prime the Surface:
Start by ensuring your rock is completely clean of dirt or oil. Using a flat brush, apply a coat of white gesso or primer over the entire surface. This helps the subsequent colors pop and provides a ‘tooth’ for the pencil sketch. -
Apply the Base Color:
Once the primer is dry, mix a creamy, warm white acrylic paint. Apply two even coats over the whole stone, allowing the first to dry fully before adding the second. You want a matte, eggshell-like finish. -
Sketch the Design:
Lightly sketch your cottage features with a pencil. Draw a central arched door at the bottom, two arched windows flanking it, and a smaller window above. Sketch a wavy, leaf-like roofline near the top and add a chimney on the right side.
Step 2: Painting the Structure
-
Block in the Door:
Mix a soft terracotta or peach-brown shade. Fill in the arched door shape carefully. Don’t worry about wood grain details yet; just get a solid, warm color down. -
Base the Windows:
Paint the inner shapes of all three windows with a very light grey or off-white to represent glass reflecting the sky. Keep this layer thin. -
Create the Stone Surround:
For the arch around the door, mix a pale sage green or grey-green. Paint a thick band following the curve of the door. Do the same for the window frames, keeping the lines steady. -
Paint the Roof Line:
Using a burnt orange or rust color, paint the wavy roof shape. I like to dab the brush slightly to mimic the texture of overlapping autumn leaves or rough shingles. -
Add the Chimney:
Fill in the rectangular chimney shape with a light grey or beige, letting it slightly overlap the roof line you just painted.
Brush Control Tip
For the finest lines on wood grain or window panes, hold the brush perpendicular to the rock surface and use only the very tip, resting your pinky on the table for stability.
Step 3: Refining Details
-
Add Wood Grain:
Using your finest liner brush and thinned brown paint, draw delicate vertical lines on the door to look like wooden planks. Add a tiny heart shape near the top center of the door. -
Detail the Stone Arch:
With a slightly darker green or grey, paint horizontal lines across the door surround to separate the individual ‘stones’ or ‘bricks’ of the archway. -
Outline the Windows:
Use the dark brown or black paint to outline the windows. Paint a grid (muntins) inside each window—a simple cross for the bottom ones and a vertical line for the top one works well. -
Texturize the Roof:
Go back to the roof area with a dark brown liner. Outline the leaf shapes and add a central vein line to each section to clarify that the roof is made of oversized foliage. -
Finish the Chimney:
Outline the chimney in dark brown and add horizontal lines to suggest brickwork. Make these lines slightly wobbly for a rustic, handmade look.
Glow in the Dark
Mix a tiny amount of glow-in-the-dark medium into the light grey used for the window glass. At night, it will look like someone is home inside your cottage.
Step 4: Garden Accents & Finishing
-
Paint Floral Accents:
Near the base of the house, paint simple flower stems using green. Top them with small circles of pink or orange for blooms. Keep them loose and sketchy. -
Add Decorative Dots:
Dip the non-brush end of your paintbrush into thinned terracotta paint. Dot small clusters floating around the roofline and sides to add a touch of magical whimsy or pollen. -
Final Outlines:
If any edges feel too soft, go over them one last time with your finest brush and very dark paint to make the features pop against the cream background. -
Seal the Rock:
Once absolutely dry (give it at least an hour), spray the rock with a matte sealant. This protects your hard work from moisture if it lives outdoors.
Nestle your new stone cottage into a bed of moss and enjoy the tiny world you’ve created

PENCIL GUIDE
Understanding Pencil Grades from H to B
From first sketch to finished drawing — learn pencil grades, line control, and shading techniques.
Explore the Full Guide
Rainy Fairy Garden With Puddle Reflections
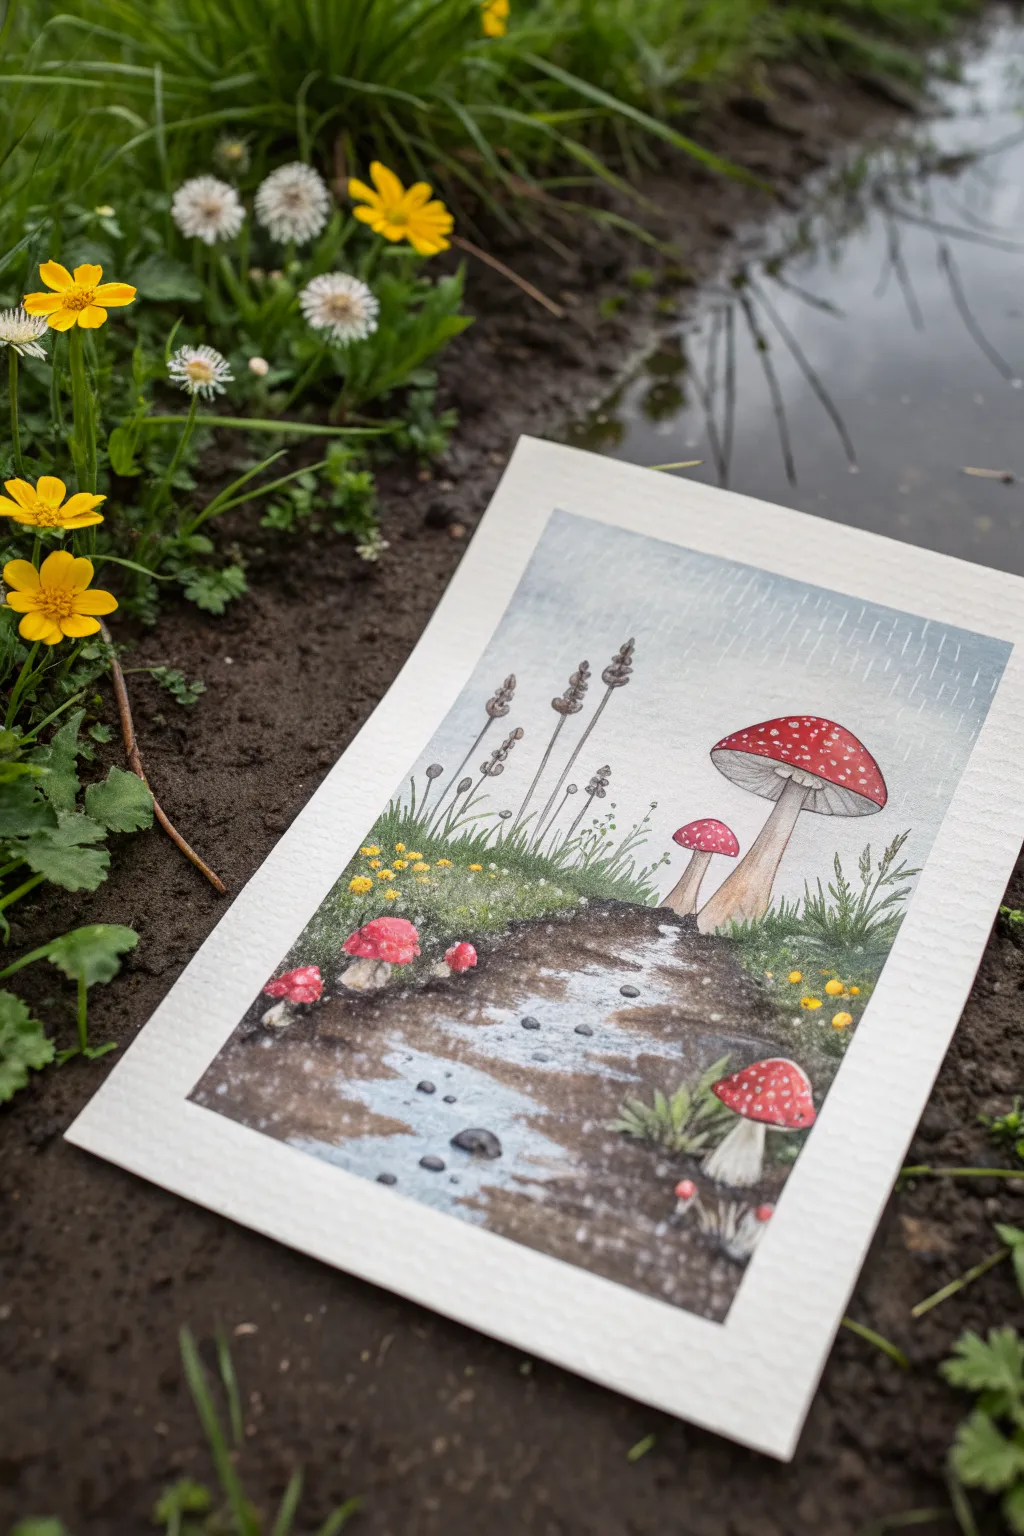
Capture the cozy magic of a rainy afternoon with this charming watercolor and gouache illustration. You’ll create a misty atmosphere complete with red-capped mushrooms and a reflective puddle that brings the wet earth to life.
Detailed Instructions
Materials
- Cold press watercolor paper (300 gsm)
- Watercolor paints (Payne’s Grey, Sap Green, Burnt Umber, Yellow Ochre, Scarlet Red, Ivory Black)
- White gouache or white gel pen
- Pencil for sketching
- Masking fluid (optional)
- Round brushes (size 2, 4, and 8)
- Fine liner brush
- Paper towels
- Two jars of water
Step 1: Sketching and Sky
-
Sketch the Base:
Lightly pencil in the horizon line slightly below the middle of the paper. Sketch the winding dirt path, the main large mushroom on the right, and the smaller mushrooms scattered on the left. -
Wet the Sky:
Using your largest round brush, apply clean water to the sky area above your horizon line. You want the paper to be damp but not soaking wet. -
Paint a Misty Wash:
Drop in a very dilute wash of Payne’s Grey mixed with a touch of blue. Let the color fade as it gets closer to the horizon to create a misty, atmospheric perspective. -
Add Rain Texture:
While the sky is drying but still slightly tacky, use a dry brush to lift out faint vertical streaks, suggesting rain. If it’s already dry, we will add crisp rain lines later with white gouache.
Pro Tip: Lifting for Light
To make the puddle look truly reflective, use a clean, damp brush to ‘lift’ paint away from the center of the water. This reveals the white paper, creating a bright shine.
Step 2: Path and Puddles
-
Base Ground Layer:
Paint the grassy areas on either side of the path with a light wash of Sap Green. For the path itself, use a watery Burnt Umber. -
Deepen the Soil:
While the path is still damp, drop in darker brown and a touch of black along the edges of the path and the bottom corners to create muddy depth. -
Define the Puddle:
Leave the center of the path mostly white or extremely pale blue-grey to represent the water reflection. The edges of the puddle should be dark brown to show where the water meets the dirt. -
Reflections:
In the puddle area, paint hazy, inverted shapes using diluted colors from the sky and surrounding grass. Keep edges soft here—wet-on-wet technique works best.
Step 3: painting the Mushrooms
-
Mushroom Stems:
Paint the stems of the mushrooms using a mix of Yellow Ochre and a tiny bit of brown. Leave the tops of the stems near the cap slightly lighter for dimension. -
Vibrant Caps:
Fill in the mushroom caps with Scarlet Red. I like to let the red bleed slightly into a darker crimson at the bottom edges of the caps to show shadow. -
Cap Details:
Once the red paint is bone dry, use white gouache or a gel pen to add the characteristic white spots. Vary the size of the dots to make them look organic. -
Gills and Skirts:
Using a fine liner brush and very diluted light grey, gently stroke in the lines for the gills under the main mushroom cap and add the skirt on the stem.
Troubleshooting: Muddy Colors
If your ground colors are mixing with the puddle blue and turning grey, wait for the brown earth sections to dry completely before painting the blue water reflections next to them.
Step 4: Details and Atmosphere
-
Grass Texture:
Switch to your smallest brush or liner. Flick upward strokes of Sap Green and darker forest green to create blades of grass growing over the edge of the path. -
Wildflowers:
Dot in tiny yellow flowers among the grass on the left side using opaque yellow gouache or thick watercolor. -
Tall Weeds:
Paint the tall, spindly seed heads rising above the grass using a sepia tone. These should be delicate and thin. -
Defining Stones:
Paint small, dark grey shadows for little pebbles in the path, then add a highlight on top of each with white gouache to make them look wet and shiny. -
Final Rain Effect:
Use a ruler and a white gel pen or thin white gouache to draw precise, vertical dashed lines across the upper half of the painting to simulate falling rain.
Peel off your tape to reveal a crisp border and enjoy your rainy little world.
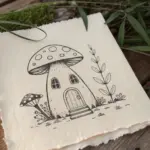
Vintage Storybook Fairy Garden Palette
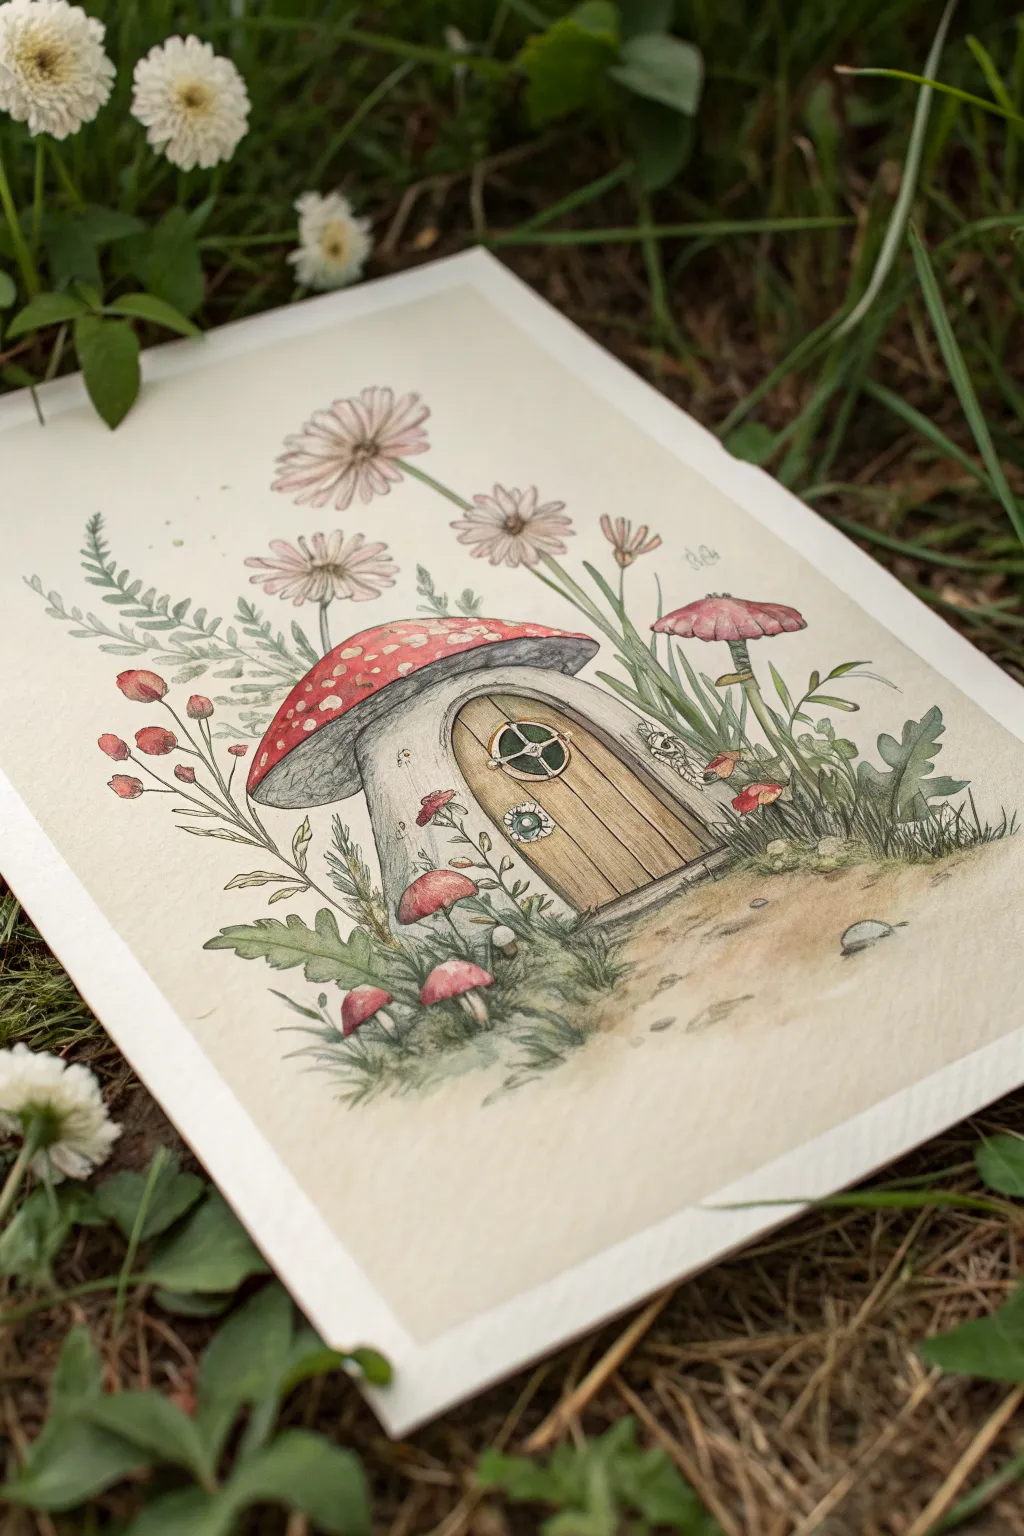
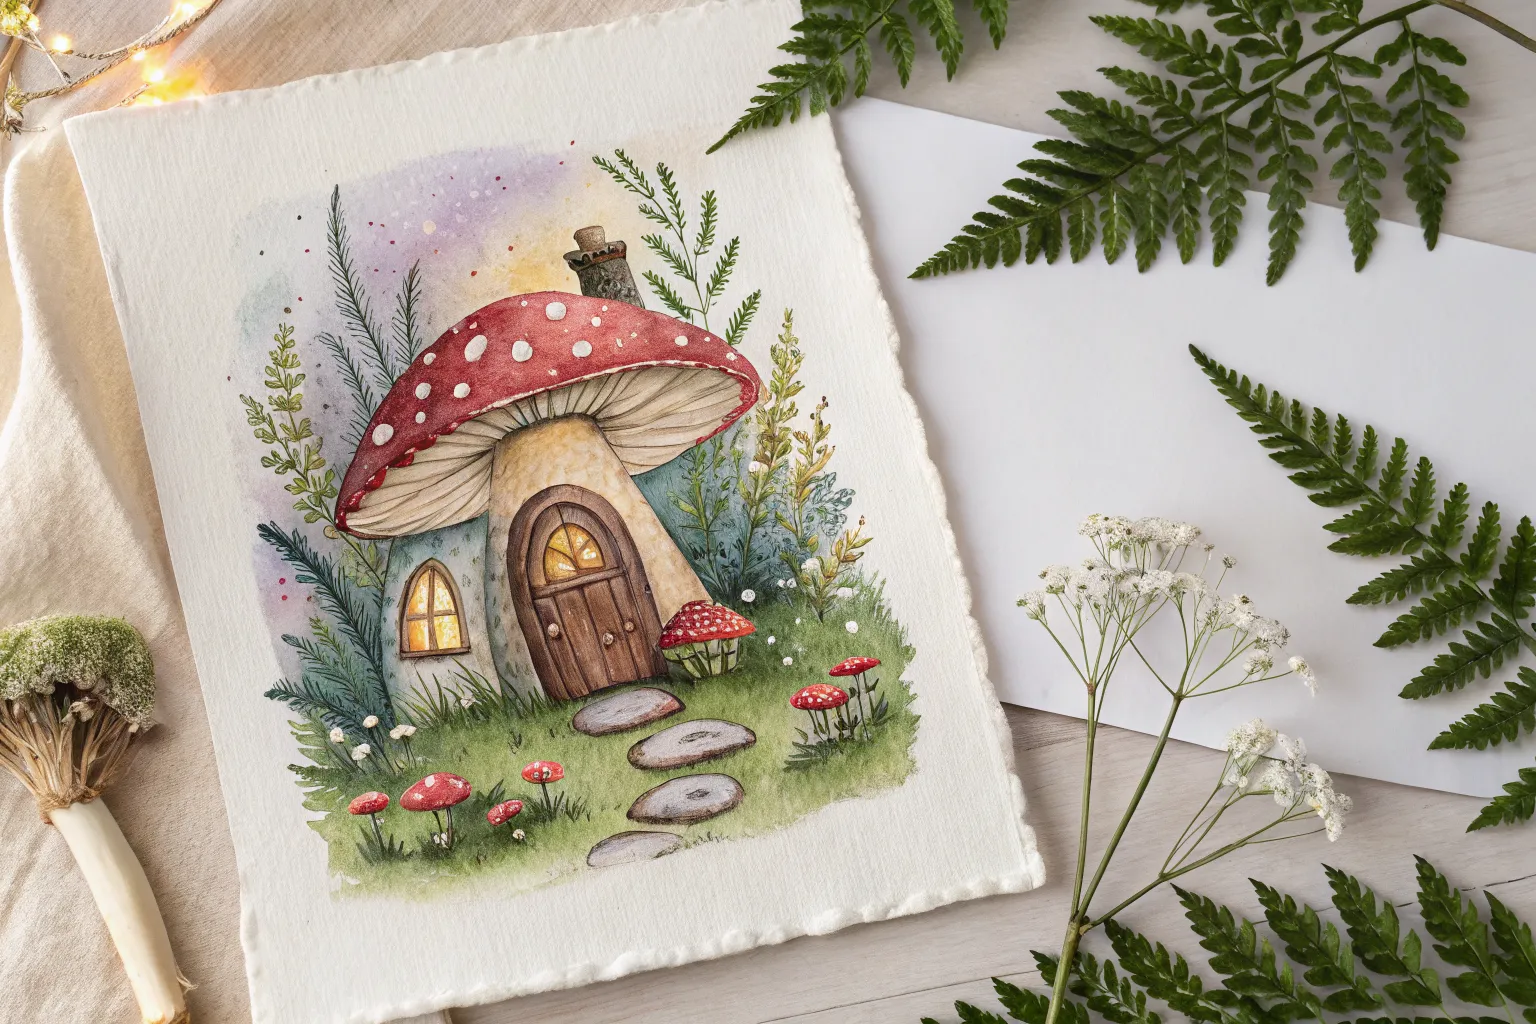
Transport yourself into a vintage storybook with this charming watercolor and ink illustration featuring a cozy mushroom home nestled among wildflowers. The muted palette and delicate linework create a nostalgic, fairy-tale atmosphere perfect for framing or gifting.
Detailed Instructions
Materials
- Cold press watercolor paper (300 gsm)
- Pencil (HB or H) and kneaded eraser
- Waterproof fine liner pens (sepia or dark brown, sizes 0.1 and 0.3)
- Watercolor paints (Alizarin Crimson, Sap Green, Yellow Ochre, Burnt Umber, Payne’s Grey, Raw Sienna)
- Round watercolor brushes (sizes 2, 4, and 6)
- White gouache or white gel pen
- painter’s tape and pure water
Step 1: Sketching the Composition
-
Map out the shapes:
Start by lightly sketching a large, rounded mushroom cap slightly off-center. Draw a thick, curving stalk beneath it to form the house’s walls. -
Add architectural details:
Sketch a large arched doorway into the stalk. Draw a round window on the upper part of the door and a small lantern or doorbell feature on the left side. -
Surround with flora:
Draw three tall, daisy-like flowers looming behind the mushroom. Add sprigs of fern-like leaves on the left and various blades of grass and clovers around the base. -
Detailing the foreground:
Sketch a small dirt path leading to the door. Add tiny clusters of smaller mushrooms and rocks near the base of the cottage to ground the structure.
Vintage Vibe
To get that old-book look, wash the entire paper with weak tea or very dilute yellow ochre before you start painting and let it dry completely.
Step 2: Inking the Outline
-
Basic outlining:
Using a 0.3 sepia fine liner, trace over your main pencil lines. Use a broken or unsteady line technique for the mushroom cap and stem to give it an organic, aged texture. -
Wood grain texture:
Switch to a 0.1 pen to draw vertical wood grain lines on the door. Keep these lines fine and slightly wavy to mimic natural timber. -
Delicate floral details:
Use the finest pen tip for the flower petals and fern fronds. Add tiny stippling dots on the flower centers and small circles on the mushroom cap for spots. -
Erase guidelines:
Wait until the ink is completely dry—I usually give it at least 15 minutes to be safe—then gently erase all visible pencil marks with the kneaded eraser.
Level Up: Magic Dust
Mix a tiny amount of iridescent medium or shimmering watercolor into the paint for the window or the fairy path to give it a subtle, magical glow.
Step 3: Watercolor Washes
-
The mushroom cap:
Mix a watery Alizarin Crimson with a touch of Burnt Umber for a muted red. Paint the mushroom cap, carefully painting around the circular spots to keep them white for now. -
Cottage walls:
Use a very dilute wash of Payne’s Grey and a tiny bit of Yellow Ochre to shade the mushroom stalk. Focus the pigment under the cap edge where shadows would naturally fall. -
Wooden door:
Paint the door with Raw Sienna. While it’s still damp, drop in a little Burnt Umber at the bottom and edges to create a weathered look. -
Greenery base layers:
Paint the leaves and stems using varied mixes of Sap Green and Yellow Ochre. Make the background grasses slightly paler than the foreground plants to create depth. -
Flower petals:
Use a highly diluted wash of Alizarin Crimson for the flower petals, keeping them barely tinted to maintain that vintage, faded appearance.
Step 4: Shading and Final Touches
-
Deepening shadows:
Once the first layers are dry, mix a darker grey-brown shade. Glaze this under the mushroom cap rim, under the flower heads, and in the deep grass clumps. -
Texture on the cap:
Add a few deeper red strokes to the mushroom cap to suggest roundness, keeping the highlight area near the top lighter. -
The dirt path:
Wash Raw Sienna and Burnt Umber loosely in the foreground to create the path. Splatter tiny droplets of brown paint here to mimic dirt and pebbles. -
Highlights:
Use white gouache or a gel pen to add tiny highlights to the window pane, the door handle, and the very tops of the mushroom spots to make them pop.
Now you have a charming little woodland scene that looks like it was plucked straight from a classic fairy tale


Have a question or want to share your own experience? I'd love to hear from you in the comments below!