When the air gets crisp, I love swapping perfection for play and letting fingertips do the work. These fall finger painting ideas are cozy, colorful, and perfectly messy in the best way.
Handprint Fall Tree
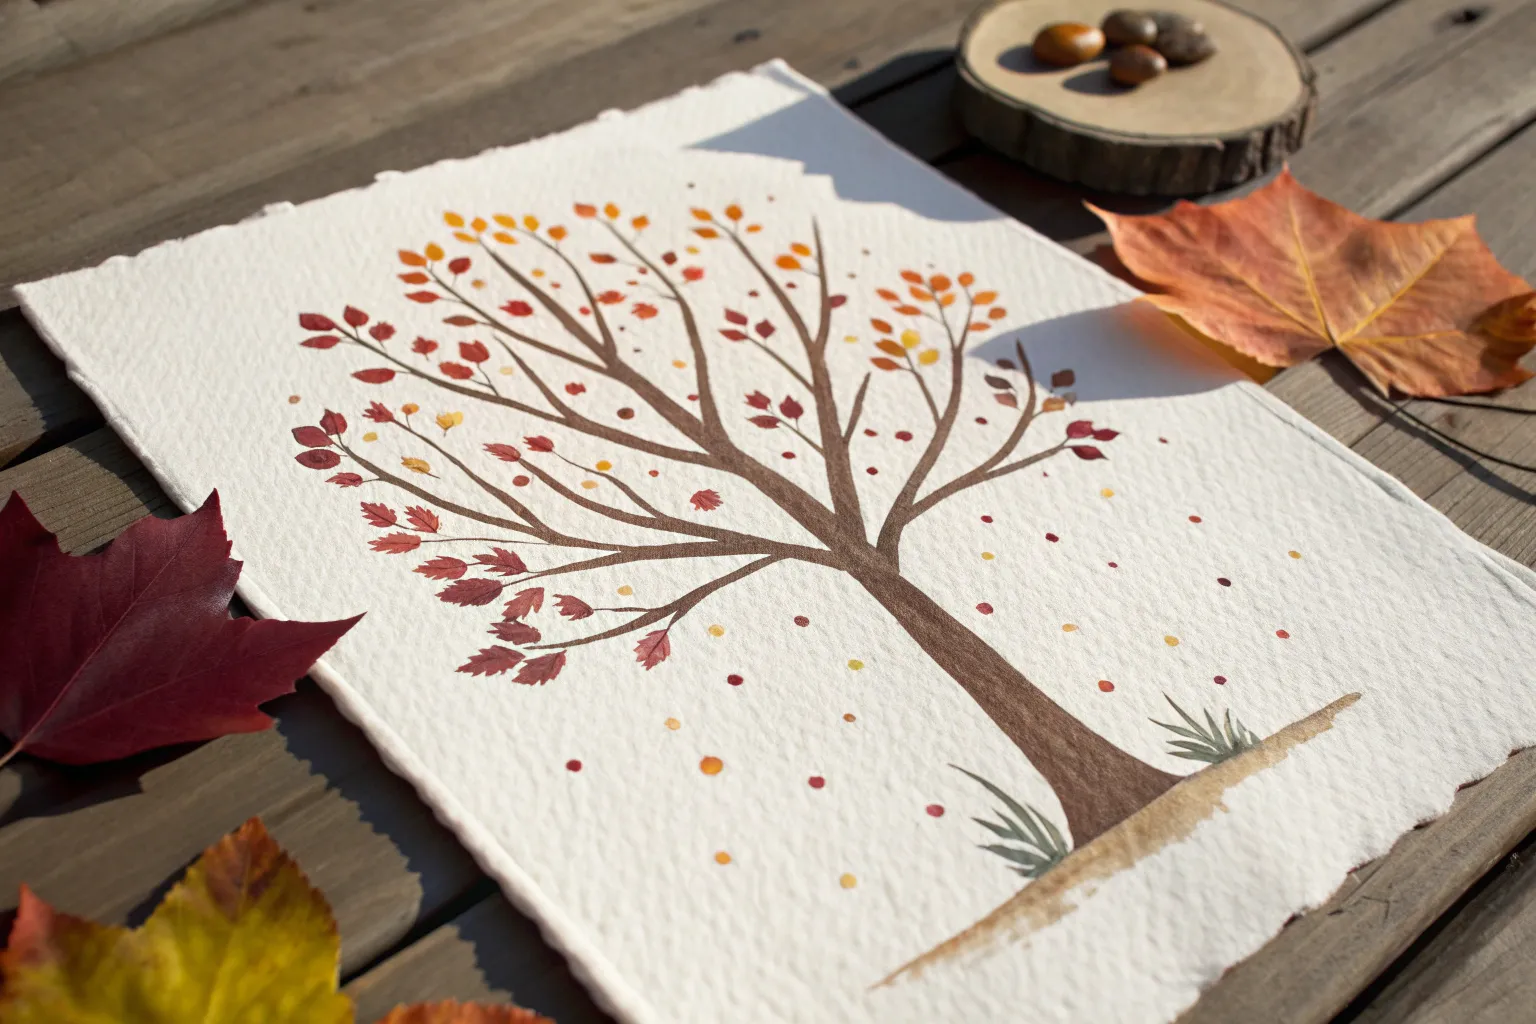
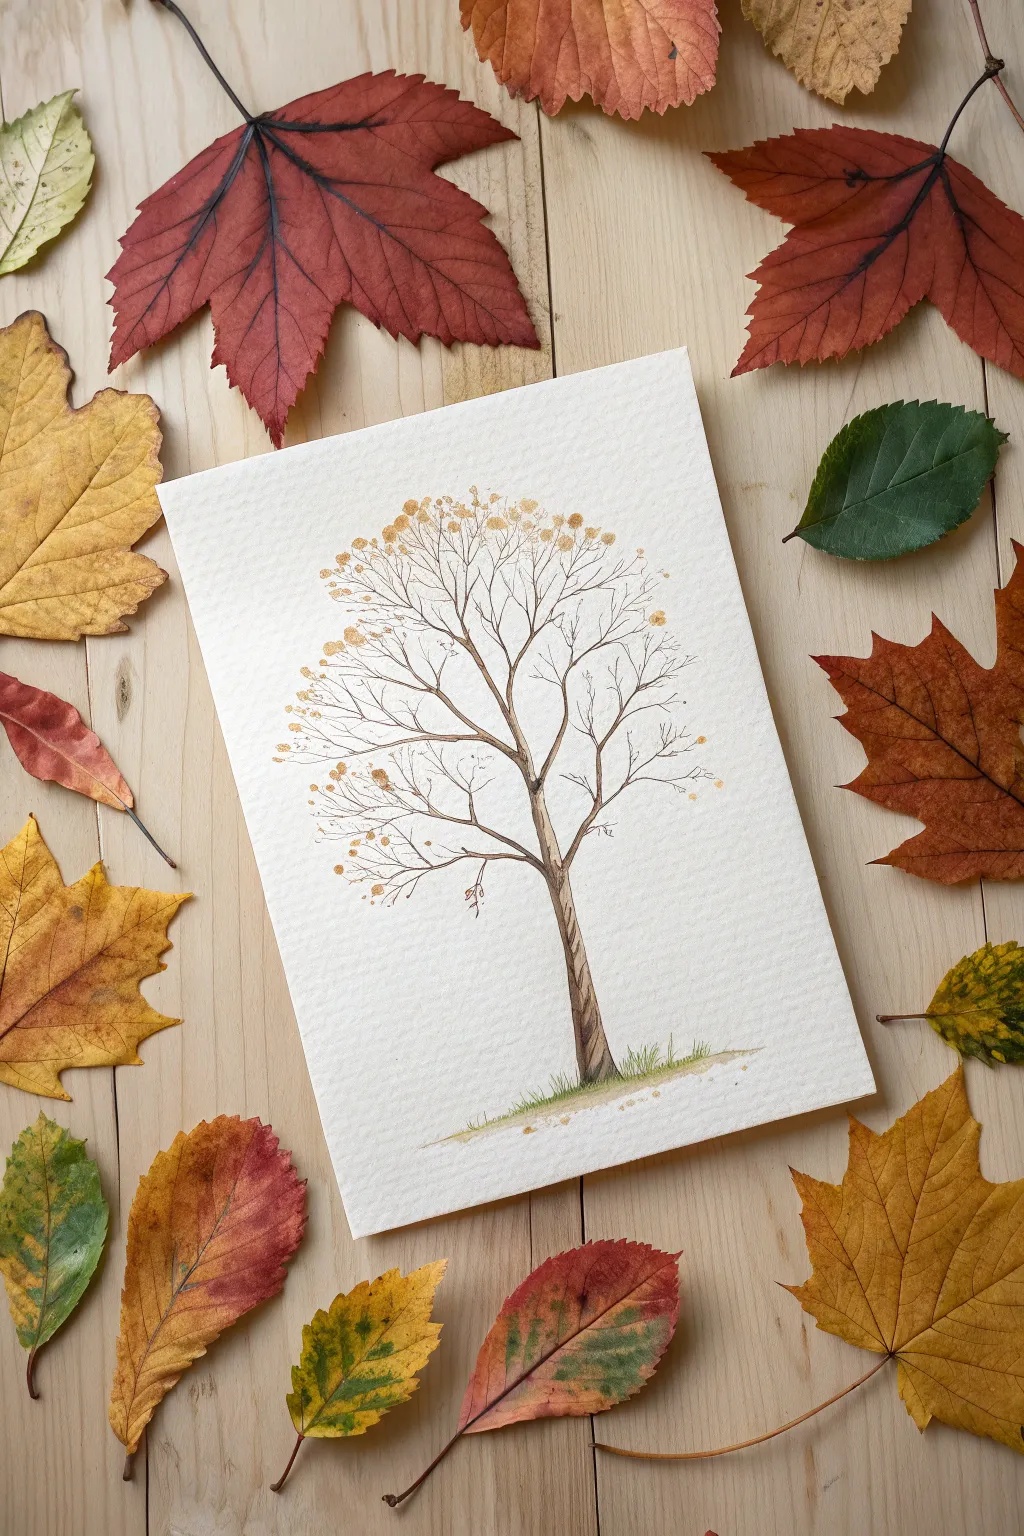
This project captures the delicate beauty of fall foliage using the most accessible tool you have—your fingertips. The result is a graceful, minimalist tree with a canopy of vibrant, multi-colored leaf prints that look surprisingly realistic.
Detailed Instructions
Materials
- White cardstock or heavy watercolor paper
- Brown marker (fine tip and medium tip) or brown acrylic paint with a thin brush
- Acrylic paints (Red, Orange, Yellow, Gold)
- Palette or paper plate
- Paper towels
- Pencil (optional)
Step 1: Drawing the Structure
-
Sketch the outline:
Start by lightly sketching the trunk and main branches with a pencil. Aim for a gently curving trunk that widens at the base, giving the tree a sense of stability. -
Draw the roots:
Extend a few jagged lines downward from the base of the trunk to create an exposed root system. These don’t need to be perfectly symmetrical; organic, wiggly lines look more natural. -
Fill in the trunk:
Using your medium-tip brown marker or a small brush with brown paint, fill in the trunk area. Use vertical strokes that follow the curve of the wood grain. -
Add texture:
Go back over the trunk with a darker brown shade or apply more pressure to create depth and shadow on one side, making the tree look round rather than flat. -
Branch out:
Draw the main branches extending upward and outward. Make them thicker near the trunk and let them taper off into very fine points at the ends. -
Create fine twigs:
Switch to a fine-tip marker or just the very tip of your brush to add tiny, delicate twigs branching off the main limbs. These provide perfectly placed perches for your leaves.
Clean Prints Pro-Tip
Does your paint look too blobby? Your paint is likely too thick. Press your finger onto a damp sponge first, then the paint, to get a thinner coat that shows your unique print texture.
Step 2: Adding the Foliage
-
Prepare your palette:
Squeeze dime-sized amounts of red, orange, yellow, and gold paint onto your palette. Keep them slightly separate, but don’t worry if they run into each other a little. -
Test your print:
Dip your index finger into the yellow paint first. Blot it once on a scrap paper to remove excess paint—you want a clear texture, not a globs. -
Start with yellow:
Press your finger onto the ends of several branches to create the first layer of leaves. I like to scatter these randomly to establish the shape of the canopy. -
Layer in orange:
Wipe your finger clean (or use a different finger) and move to the orange paint. Add these prints near the yellow ones, sometimes overlapping them slightly to create depth. -
Add red accents:
Using the red paint, place fewer prints than the other colors. Place these strategically on outer branches or near the bottom to mimic leaves that have turned color first. -
Create two-tone leaves:
For a realistic effect, dip one side of your finger in yellow and the other in red before pressing down. This creates a beautiful, marbled transition within a single leaf. -
Fill the gaps:
Step back and look for empty spaces. Add smaller pinky-finger prints in gold or light yellow to fill out sparse areas without making the tree look cluttered. -
Add falling leaves:
Place a few solitary fingerprints floating in the air below the branches or near the roots to suggest leaves that are gently drifting to the ground.
Step 3: Finishing Touches
-
Connect the leaves:
Once the paint is fully dry, take your fine-tip pen and draw tiny stems connecting some of the floating fingerprints back to the branches. -
Add a signature stamp:
In the bottom corner, simulate a traditional artist’s seal. I use a red marker to draw a loose circle and scribble a stylized initial or abstract shape inside for a professional look.
Level Up: Metallic Pop
Once the main colors are dry, add a few final fingerprints using metallic copper or gold paint. When the light hits the artwork, these special leaves will shimmer.
Frame your masterpiece in a simple wood frame to complement the organic feel of the tree


Fingerprint Leaf Canopy
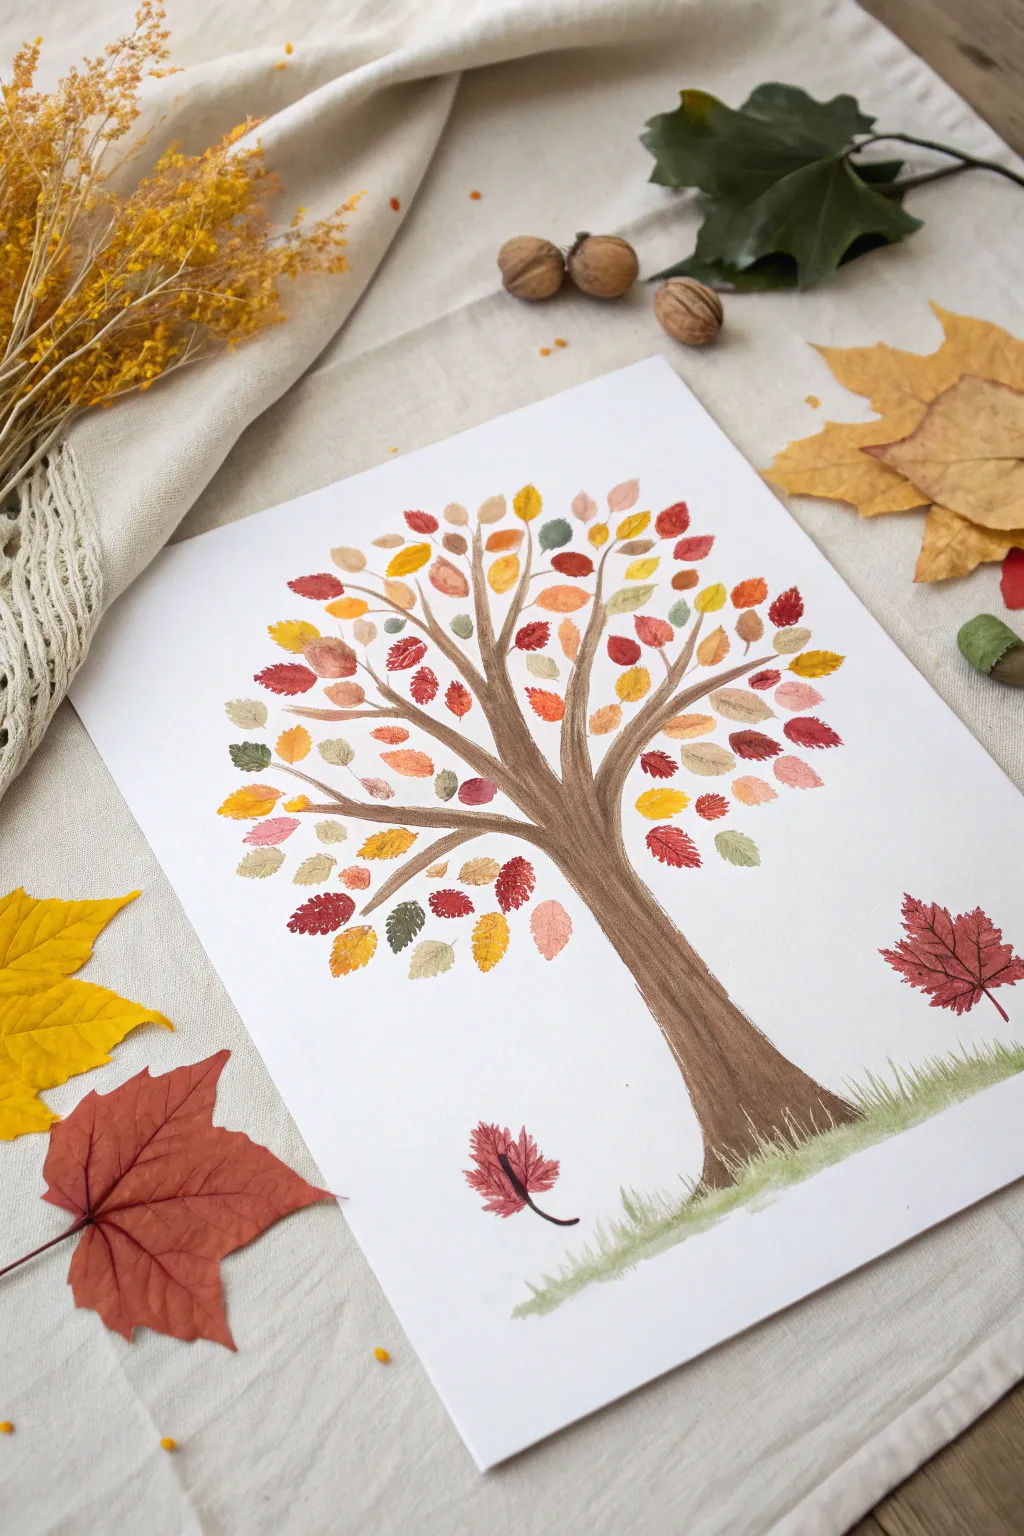
Capture the essence of a crisp fall day by creating a vibrant tree canopy using nothing more than your own fingerprints and a paintbrush. This charming project combines traditional painting with tactile fun for a result that looks surprisingly sophisticated.
Step-by-Step Tutorial
Materials
- Heavyweight white drawing paper or cardstock
- Brown acrylic or tempera paint (for the trunk)
- Fall-colored acrylic or poster paints (red, deep orange, golden yellow, sage green, and brown)
- Medium flat paintbrush
- Small fine-liner brush (optional, for grass details)
- Paper plate or palette
- Paper towels and a cup of water
Step 1: Painting the Structure
-
Prepare the Palette:
Squeeze a generous amount of brown paint onto your palette. If the paint is very thick, add a tiny drop of water to make it flow smoothly, which helps create crisp edges for the tree trunk. -
Base of the Trunk:
Starting near the bottom center of your paper, paint a wide base for the tree trunk. The base should be the widest part, tapering slightly inwards as you move upward toward the middle of the page. -
Branching Out:
From the top of your main trunk, split the line into two or three primary branches. Paint these strokes upward and outward, making them slightly thinner than the main trunk. -
Smaller Limbs:
Add secondary branches extending from your primary ones. These should be thinner and shorter, reaching out towards the edges of the paper to create a wide framework for your canopy. -
Adding Texture:
While the brown paint is still wet, you can add subtle vertical streaks with a slightly lighter or darker shade of brown to mimic the texture of bark. -
Grounding the Tree:
Dilute a bit of sage green paint with water to make a light wash. Using quick, upward brush flicks at the base of the trunk, paint wispy grass blades to give your tree a place to stand. -
Let it Dry:
Allow the trunk and branches to dry completely. This is crucial so that you don’t smudge brown paint into your colorful leaves later.
Step 2: Creating the Canopy
-
Prepare Leaf Colors:
Squeeze dime-sized amounts of your fall colors—red, orange, yellow, green, and a muted reddish-brown—onto your palette. Keep them separate to start. -
First Fingerprints:
Dip your index finger into the golden yellow paint first. Blot it once on a paper towel to remove excess globs, then press it onto the paper near the tips of the branches. -
Building the Yellow Layer:
Continue adding yellow fingerprints scattered throughout the branches. Leave plenty of empty white space between them for the other colors. -
Switching to Orange:
Wipe your finger clean and switch to the bright orange paint. Place these prints in the gaps, occasionally overlapping a branch slightly to make the tree look full. -
Adding Depth with Red:
Move on to the red paint. Use this color a bit more sparingly than the yellow and orange to create bold accents rather than overwhelming the tree. -
Filling in with Green and Brown:
Add a few touches of sage green and reddish-brown. I find these earthier tones help ground the brighter colors and make the tree look more realistic. -
Scattered Detail:
Don’t forget to place a few floating leaves detached from the branches, simulating leaves falling mid-air.
Clean Prints
Blot your finger on a scrap paper before pressing the canvas. This prevents thick globs of paint that take forever to dry and keeps the leaf shape oval and defined.
Step 3: Finishing Touches
-
Falling Leaves:
Near the bottom of the page, add one or two distinct leaf prints resting on or near the grass line. -
Stem Details:
Once the fingerprints are fully dry, take a very fine brush or a thin black marker. Draw tiny stems connecting some of the leaves to the branches. -
Leaf Veins (Optional):
For the larger falling leaves at the bottom and sides, carefully paint a central vein and a few side veins to define their shape. -
Final Check:
Step back and look for any large bald spots in the canopy. Fill them with a final small fingerprint if needed to balance the composition.
Leaf Shape Variation
Use your pinky finger for smaller, younger leaves at the top of the tree, and your thumb for large, fallen leaves near the ground.
Now you have a permanent piece of autumn beauty to display on your wall or fridge


Bare Branch Tree With Fingerprint Leaves
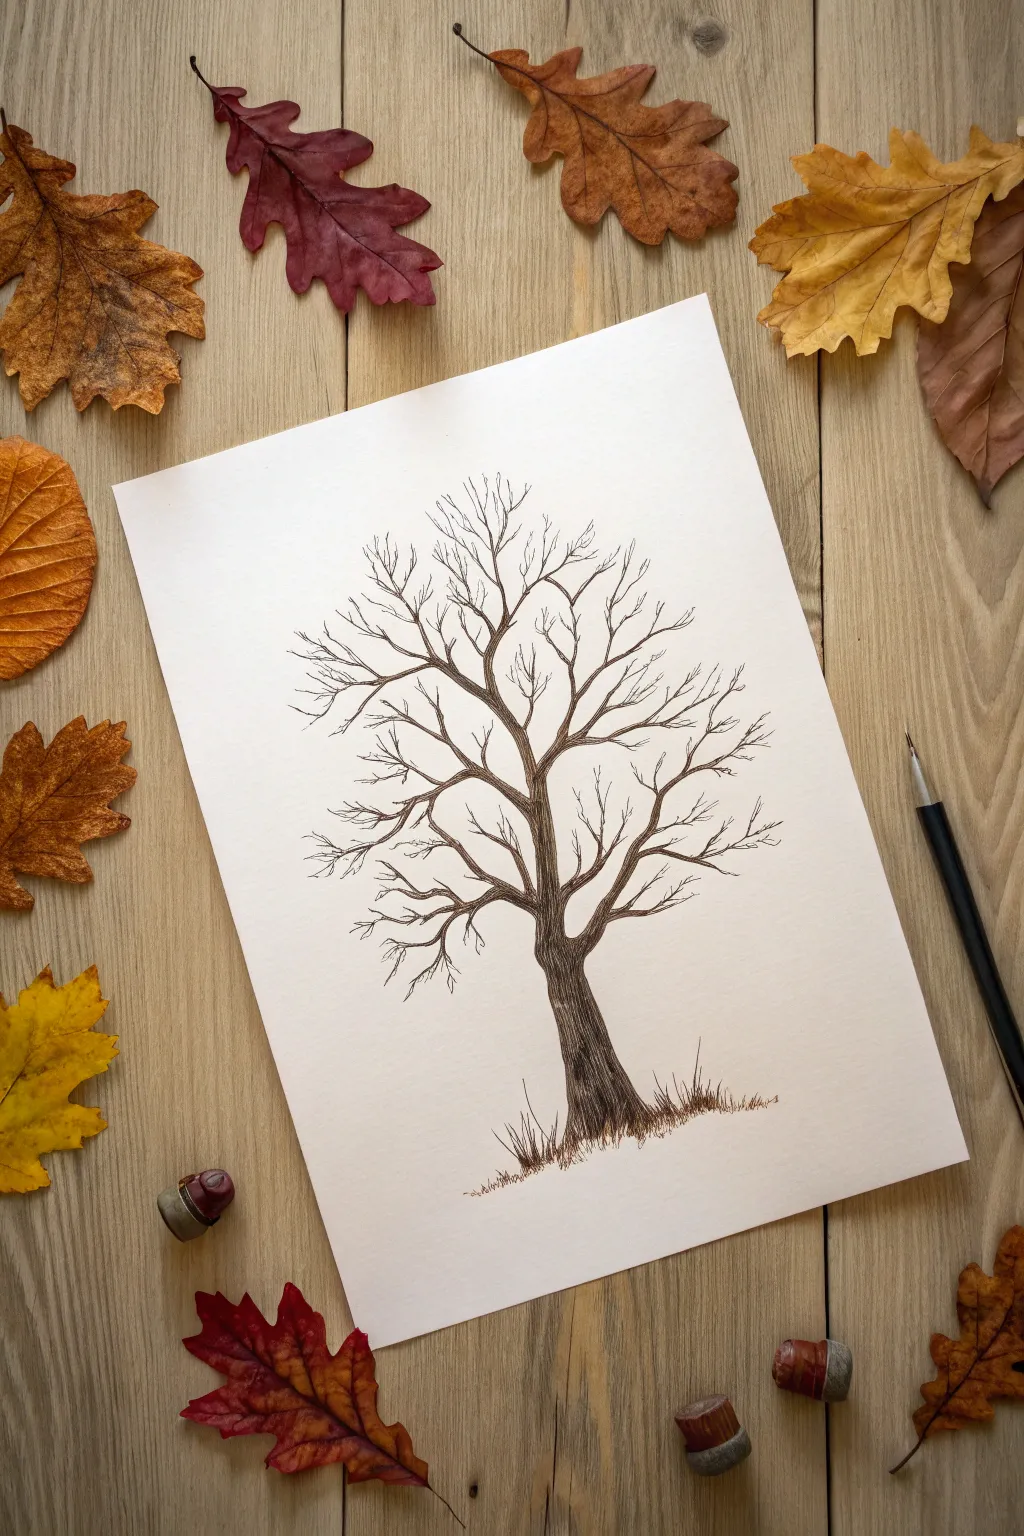
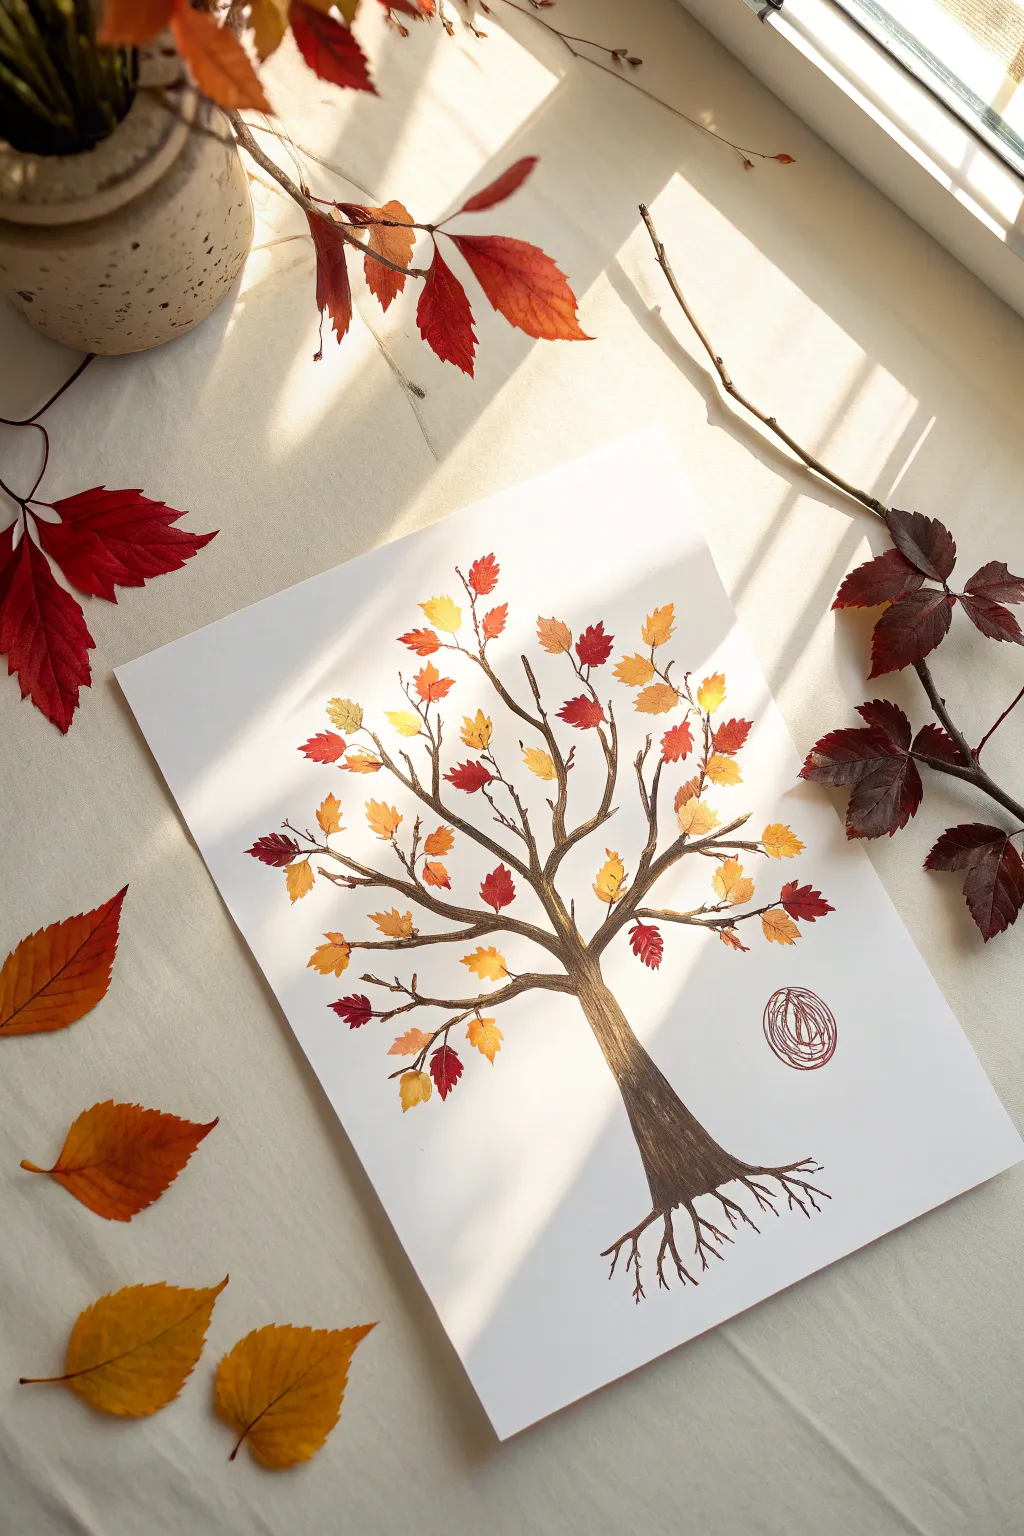
Before adding colorful fingerprint leaves, you need a strong, realistic base for your autumnal tree. This project involves sketching a detailed, leafless oak tree with delicate branches that fan out perfectly to create space for your colorful additions later.
How-To Guide
Materials
- High-quality white heavyweight drawing paper or mixed media paper
- Fine liner pen (black or sepia, approx. 0.3mm or 0.5mm)
- Graphite pencil (HB or 2B) for initial sketching
- Kneaded eraser
Step 1: Sketching the Skeleton
-
Establish the trunk base:
Begin by lightly sketching the trunk’s base near the bottom center of your paper using your pencil. Draw two vertical lines that curve slightly inward as they rise, widening at the very bottom where the roots meet the ground. -
Add primary boughs:
About a third of the way up the paper, split the single trunk into two or three main, thick branches (boughs) that reach upward and outward. -
Branch outward:
From each main bough, sketch secondary branches splitting off. Think of the letter ‘Y’ as a guide—branches almost always split into two smaller sections rather than growing straight out. -
Refine the shape:
Continue adding smaller and smaller branches until you reach the delicate tips at the top. Aim for a rounded, organic crown shape rather than a perfect circle or triangle.
Step 2: Inking and Detailing
-
Outline the trunk:
Switch to your fine liner pen. Start at the bottom of the trunk and trace over your pencil lines with a confident, slightly shaky hand to mimic rough bark texture. -
Add bark texture:
Draw vertical, contoured lines running up the trunk. These lines should curve with the form of the tree; pack them closer together on the shadowed side (usually the right) to create volume. -
Define the roots:
At the very base, flare your pen strokes outward into the imagined ground. Use short, grassy flicks around the base to ground the tree and hide the transition between bark and soil. -
Ink the main boughs:
Follow your sketch up the tree, inking the thicker branches. Where a branch splits, add a tiny ‘v’ shaped wrinkle in the crotch of the branch to show where the wood connects. -
Create smaller twigs:
Move to the outer edges of the tree. Use quick, light strokes for these finest twigs. They don’t need to be perfectly straight; slight zig-zags make them look more natural and weathered. -
Fill in the gaps:
Look at the canopy as a whole. If there are large empty white spaces, add a few crossing branches or fine twigs to balance the composition, ensuring there’s plenty of framework for your future leaves. -
Darken the shadows:
Go back to the main trunk and the undersides of the large branches. Add more hatching lines or stippling (dots) to deepen the shading, giving the tree a 3D cylindrical appearance. -
Add knot details:
I like to draw a few small ovals or swirls on the trunk to represent knots or scars where old branches might have fallen off. -
Incorporate ground cover:
Extend the grassy texture at the base slightly to the left and right, adding varying lengths of strokes to suggest wild autumn grass growing around the roots. -
Erase guidelines:
Once the ink is completely dry—wait at least 10 minutes to be safe—gently run your kneaded eraser over the entire drawing to lift the original graphite sketch.
Natural Flow
Trees taper as they go up. Ensure every branch gets thinner than the one it grew out of. If a branch looks too thick, split it again.
Smudge Prevention
If you are right-handed, work from left to right across the branches (and vice versa) so your hand doesn’t rest on wet ink.
Your bare tree is now perfectly prepped and ready for a flurry of colorful fingerprints

Fallen Leaves Along the Ground
This delicate project combines precise brushwork with the soft, organic texture of fingertip painting to create a tree shedding its final autumn leaves. The result is a simple yet elegant piece of seasonal art that captures the quiet beauty of late fall.
Step-by-Step Guide
Materials
- Cold press watercolor paper (A5 or 5×7 inches)
- Watercolor paints (Burnt Umber, Sepia, Yellow Ochre, Raw Sienna, Sap Green)
- Fine liner brush (size 0 or 00)
- Small round brush (size 2)
- Pencil (HB or H)
- Kneaded eraser
- Paper towel
- Clean water
Step 1: Sketching & Trunk
-
Find your center:
Begin by lightly sketching a vertical line slightly off-center on your paper to act as a guide for the trunk. Mark where you want the ground level to be. -
Outline the structure:
Draw the basic silhouette of the tree trunk, making it wider at the base and tapering as it goes up. Sketch the main primary branches splitting off into a V-shape. -
Mix your trunk color:
Create a watery mix of Sepia and a touch of Burnt Umber. You want a translucent, light brown for the base layer. -
Paint the first layer:
Using your size 2 round brush, fill in the trunk shape with this light wash. Keep the edges relatively crisp. -
Add bark texture:
While the base layer is still slightly damp, drop in concentrated Sepia along the right side of the trunk to create a shadow and rounded effect. -
Define the bark details:
Switch to your fine liner brush with a darker, drier mix of Sepia. Paint thin, diagonal, and curving lines up the trunk to mimic the twisted texture of bark.
Step 2: Branches & Twigs
-
Extend main branches:
Using the liner brush, extend the main branches outward. Remember that branches always get thinner the further they grow from the trunk. -
Create the canopy structure:
From your main branches, paint secondary branches reaching upward. Keep your hand loose to allow for natural, slightly shaky organic lines. -
Add fine twigs:
Fill the empty spaces with very fine twigs. Vary your pressure—press down for the start of the twig and lift off quickly to get a tapered, sharp end. -
Review the silhouette:
Step back and look at your tree’s shape. I often find I need to add a few more tiny twigs on one side to balance the composition. -
Let it dry completely:
Ensure all the ink or paint work on the branches is 100% dry before moving to the leaves to prevent smudging.
Oops, smudged branch?
If you smudge a wet branch, turn it into a thick knot or a hollow in the tree trunk. Nature isn’t perfect, and neither are trees.
Step 3: Foliage & Ground
-
Mix leaf colors:
Prepare a few puddles of autumn colors on your palette: Yellow Ochre, a brownish Raw Sienna, and a muted orange. -
Fingerprint the leaves:
Dip your index or pinky finger lightly into the Yellow Ochre. Dab gently near the ends of the finest twigs to create clusters of leaves. Don’t overdo it; leave plenty of empty space. -
Add color variation:
While the first dabs are wet, tap a tiny bit of the darker Sienna or orange into some of the leaf clusters for depth. -
Paint falling leaves:
Place a few solitary dabs ‘floating’ in the air below the branches to suggest leaves currently falling to the ground. -
Anchor the tree:
Mix a light wash of Sap Green and a bit of brown. Paint a thin, uneven organic line at the base of the trunk for the ground. -
Add grass blades:
With the liner brush and slightly darker green, flick tiny, quick upward strokes from the ground line to create sparse grass. -
Ground the composition:
Add a few tiny speckles of brown and yellow along the grass line to represent fallen leaves resting on the earth.
Make it Sparkle
Mix a tiny amount of gold metallic watercolor or gouache into your yellow leaf color for a warm, shimmering effect that catches the light.
Allow your painting to dry fully before framing it or displaying it on your mantelpiece for a cozy autumn vibe
BRUSH GUIDE
The Right Brush for Every Stroke
From clean lines to bold texture — master brush choice, stroke control, and essential techniques.
Explore the Full Guide
Birch Grove in Fall Colors
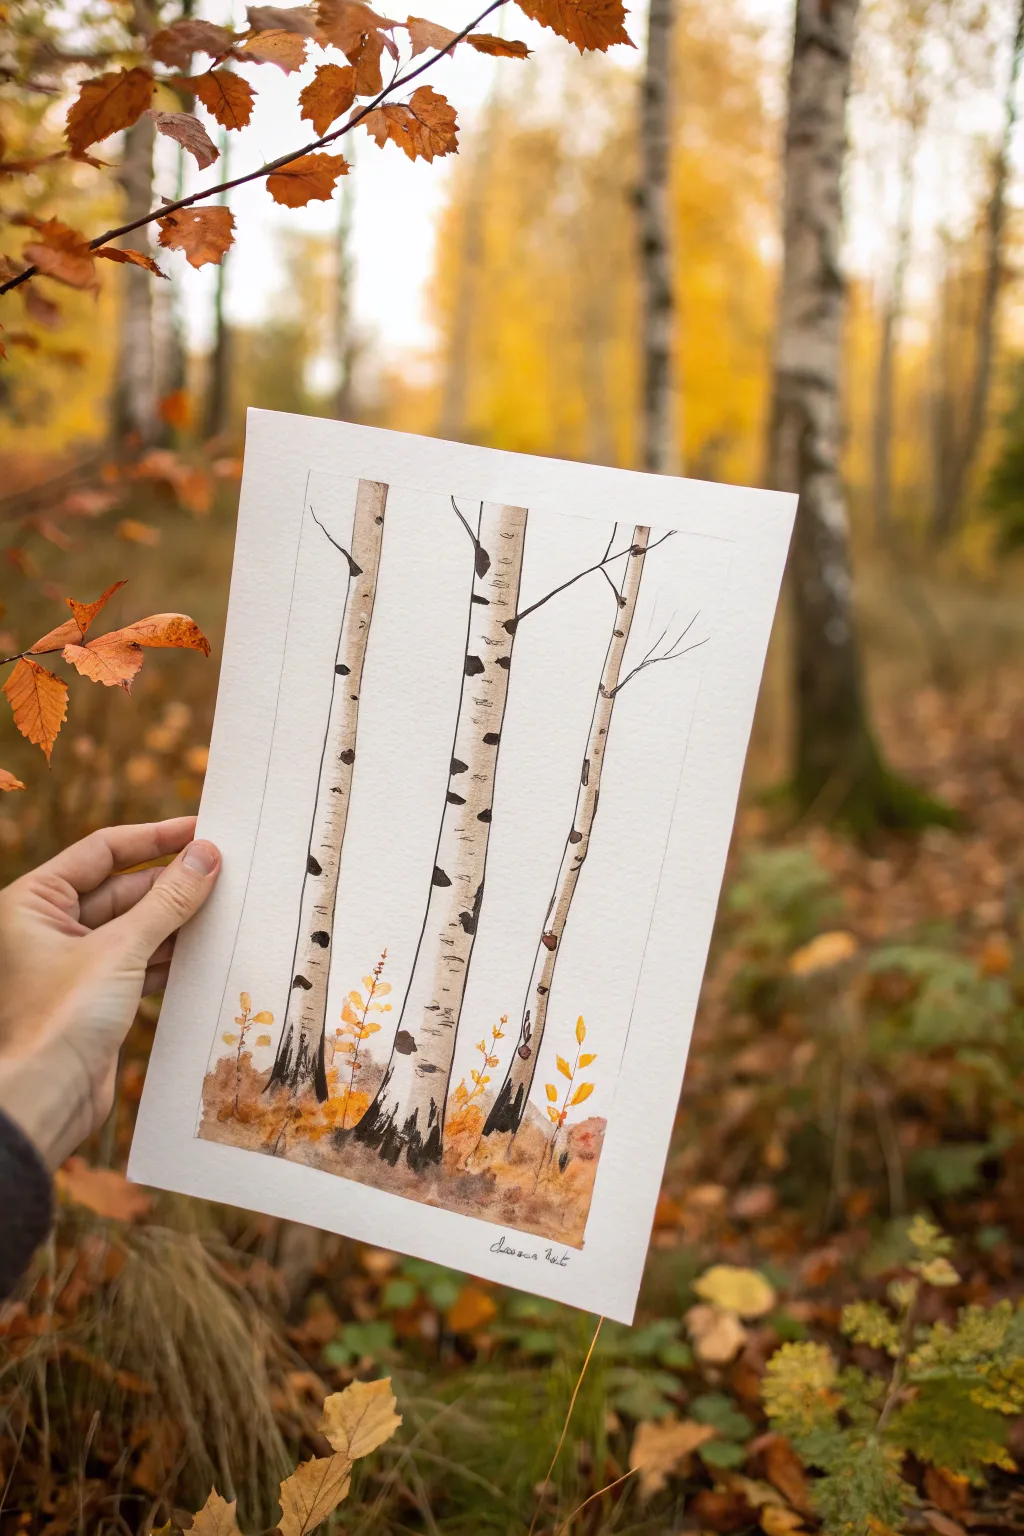
Capture the elegant starkness of birch trees against the warmth of autumn with this delicate watercolor project. By combining precise pen work with loose, organic paint application, you’ll create a lovely contrast that mirrors the changing season.
Detailed Instructions
Materials
- Cold press watercolor paper (approx. 9×12 inches)
- Small round brush (size 2 or 4)
- Fine liner brush (size 0 or 00)
- Watercolor paints (burnt sienna, yellow ochre, cadmium orange, sepia/brown)
- Black waterproof fine liner pen (0.5mm)
- Graphite pencil (HB) and eraser
- Painter’s tape or masking tape
- Jar of water and paper towels
Step 1: Sketching the Grove
-
Tape the borders:
Begin by taping down all four edges of your watercolor paper to a board or table. This creates a clean, crisp frame around your final artwork and keeps the paper flat while you work. -
Lightly pencil the trunks:
Using your HB pencil, lightly sketch three vertical tree trunks. Make them slightly uneven and curving—nature isn’t perfectly straight. Ensure the central tree is slightly offset from the exact middle for a better composition. -
Add branch guides:
Draw faint lines where the main branches will extend from the trunks. These should angle upwards rather than straight out, mimicking the natural growth of birch limbs. -
Mark the horizon line:
Sketch a very light, uneven line near the bottom of the trunks to indicate where the ground foliage begins. This doesn’t need to be straight; a bumpy line suggests fallen leaves and forest floor texture.
Natural Imperfections
Don’t try to make the black bark markings symmetrical. Varying them between thick blotches and thin horizontal dashes makes the birch trees look organic and realistic.
Step 2: Adding Ink Details
-
Outline the trunks:
Take your waterproof black fine liner and carefully go over your pencil lines for the tree trunks. Keep your hand loose; a slightly shaky line actually adds character to birch bark texture. -
Create the heavy markings:
Birch trees are defined by their dark horizontal lenticels and scars. Use the pen to fill in the distinctive black ‘eye’ shapes and horizontal wedges along the trunk edges. Vary the size and spacing so it doesn’t look like a pattern. -
Draw delicate branches:
Extend fine black lines for the branches. Start thicker at the trunk connection and lift pressure as you move outward to create whisper-thin tips. -
Detail the base:
At the very bottom of the trunks, use heavier ink shading or scribbles to ground the trees, suggesting the rougher bark texture often found near the roots. -
Erase pencil marks:
Once the ink is completely dry—give it a minute or two—gently erase all your initial graphite sketches to leave a clean black-and-white foundation.
Ink Smudging?
If your black pen smears when you add watercolor, stop immediately. Your pen might not be waterproof. Let it dry for at least 24 hours, or switch to painting the black details last.
Step 3: Painting the Texture
-
Shadow the trunks:
Dilute a tiny amount of sepia or gray paint with plenty of water. Paint a very thin, translucent shadow line down the right side of each trunk to give them cylindrical volume. -
Warm the bark:
While the shadow is damp or just after drying, add extremely subtle touches of very watered-down yellow ochre to random spots on the white bark. This reflects the surrounding autumn light. -
Base layer for the ground:
For the forest floor, wet the area around the base of the trees with clean water. Drop in burnt sienna and allow it to bleed softly, creating a fuzzy, out-of-focus background for the leaves. -
Adding fallen leaves:
Switch to your cadmium orange and yellow ochre. Using the tip of your round brush, dab small spots of color into the wet ground area to simulate piles of fallen leaves.
Step 4: Foliage and Finishing
-
Paint sapling leaves:
Mix a vibrant yellow-orange. Using the small round brush, paint distinct, individual almond-shaped leaves sprouting from the ground around the tree bases, suggesting young saplings or tall weeds. -
Add upward branches:
Use a darker brown (burnt sienna mixed with a touch of drawing ink or sepia) to paint thin stems connecting these yellow sapling leaves to the ground. -
Define foreground details:
Once the ground wash is dry, adding a few sharper, darker dabs of brown or deep orange at the very bottom creates depth, making the lighter leaves pop forward. -
Sign and Reveal:
Sign your name in ink at the bottom. Finally, slowly peel away the painter’s tape at a 45-degree angle to reveal the crisp white border that makes the artwork look professional.
Enjoy the peaceful process of bringing this little paper forest to life
Pumpkin Patch Fingerprint Pumpkins
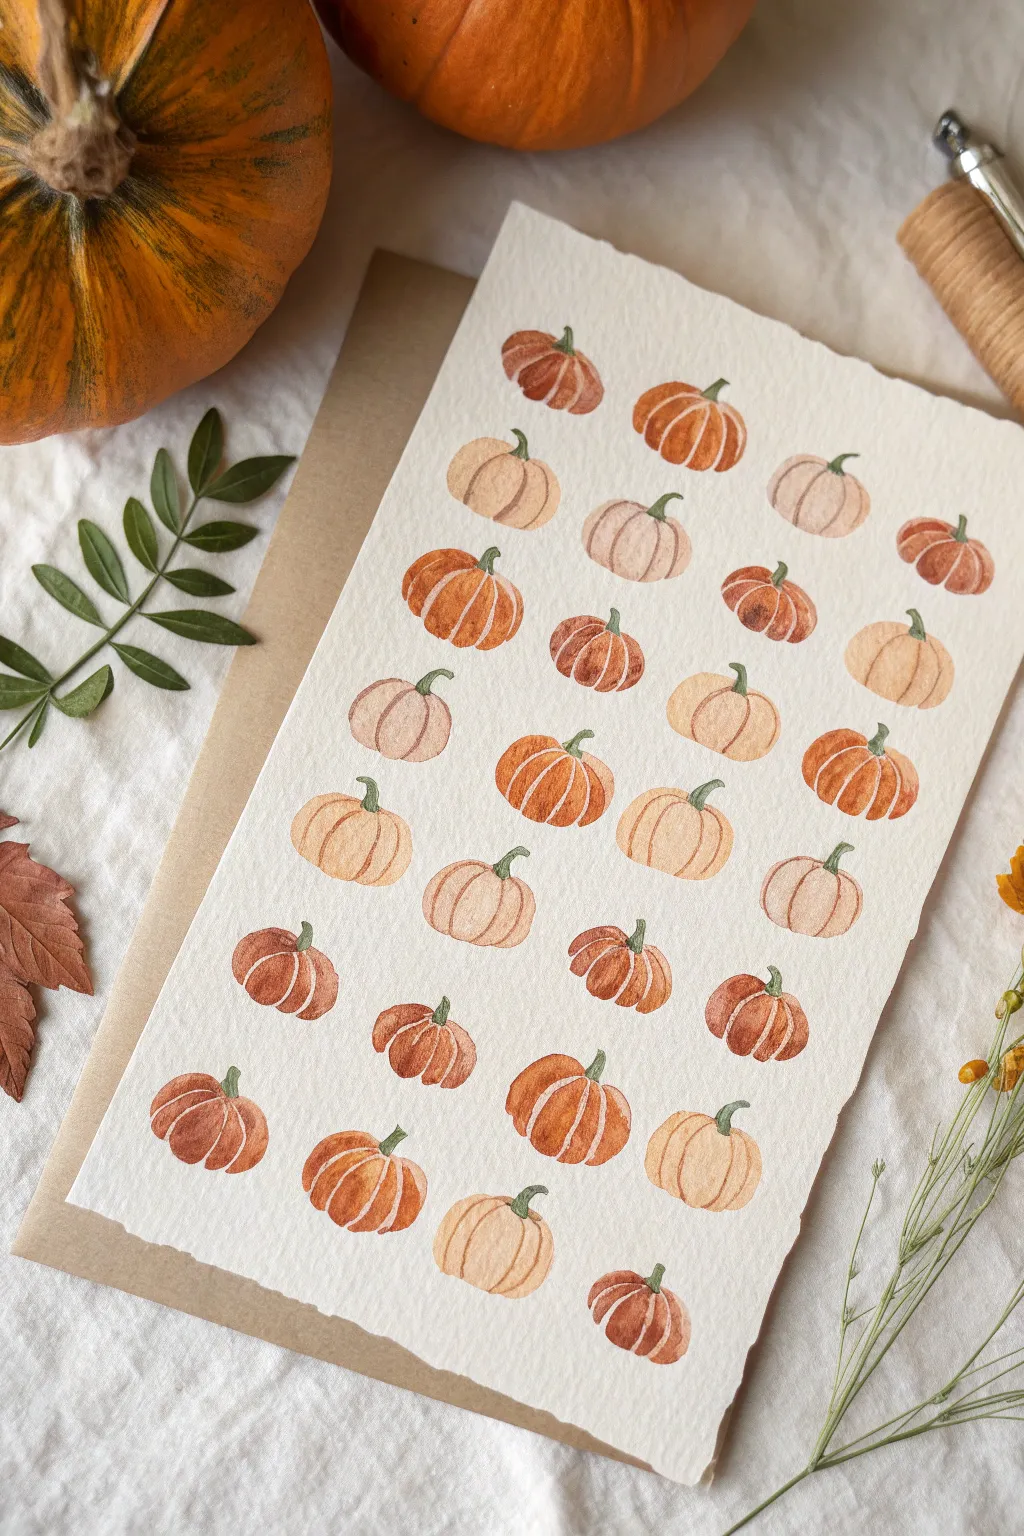
Create a charming, minimalist display of autumn gourds using just your fingertips and some watercolors. The finished piece features a lovely grid of pumpkins ranging from soft peach to deep rust, painted on high-quality textured paper for a professional look.
Step-by-Step Tutorial
Materials
- Heavyweight watercolor paper (300gsm, cold press is ideal)
- Watercolor paints (orange, burnt sienna, yellow ochre, green)
- Fine liner brush or size 0 round brush
- Paper towels
- Small cup of water
- Palette for mixing
Step 1: Preparation
-
Mix your palette:
Prepare three or four distinct shades of orange on your palette. Mix a bright orange, a muted rust (add a touch of brown to orange), and a very pale peach (water down yellow ochre with a tiny bit of red). Having variety adds depth to the patch. -
Prepare the paper:
Tear your watercolor paper to size if you want those lovely deckled edges shown in the example, or simply cut a clean 5×7 inch rectangle.
Smudgy Prints?
If your fingerprints look like watery blobs, your paint is too wet. Dab your painted finger on a paper towel once before stamping to remove excess water.
Step 2: Printing the Pumpkins
-
Apply paint to finger:
Dip your index finger into the lightest peach color first. Or, paint the pigment directly onto your fingertip with a brush for more control over the moisture level. -
Create the first shape:
Press your finger firmly onto the paper. Rock it slightly left and right to create a wider, oval shape rather than a perfect circle. This forms the body of the pumpkin. -
Repeat the light shades:
Stamp several more light-colored pumpkins randomly across the paper, leaving plenty of space between them for different colored neighbors. I like to visualize a loose grid pattern as I go. -
Switch to medium orange:
Wipe your finger clean with a damp paper towel. Load up your medium orange shade and stamp new pumpkins in the empty spaces. -
Add the darks:
Clean your finger again and finish with the deepest rust or burnt sienna color. Fill in the remaining gaps so you have a full page of oval shapes. -
Create variations:
For some pumpkins, try pressing your thumb for a shorter, stout pumpkin, or use your pinky for a tiny gourd. This variety makes the patch look organic. -
Let it dry completely:
Wait for the paint to be bone dry. If the paper is cool to the touch, it’s still wet. This is crucial before adding crisp details.
Step 3: Adding Details
-
Paint the ribs:
Using a very fine liner brush and a slightly darker version of each pumpkin’s base color, paint curved lines on top of the dried fingerprints. Start at the top center and curve down towards the bottom. -
Curve the lines:
Make sure your outer lines curve outward significantly to give the pumpkin a 3D, spherical look. The center line can be relatively straight. -
Add varying opacity:
Keep these lines delicate. It helps if the brush is not overloaded with paint; a ‘dry brush’ texture looks very nice here. -
Mix the stem color:
Mix a dark, earthy green. You want this to contrast slightly with the warm tones of the fruit. -
Paint the stems:
With the tip of your fine brush, paint a small, curved stem emerging from the top center of each pumpkin. -
Vary the stems:
Have some stems curl to the left, some to the right, and make a few short and stubby. This personality brings the character to life. -
Final drying:
Allow the fine lines and stems to dry completely before handling the paper to avoid smudging your delicate work.
Level Up
Once dry, use a white gel pen to add tiny highlights on the upper curves of the pumpkins for a glossy, dimensional look.
Mount your finished painting on a kraft paper card or frame it for a seasonal decoration

PENCIL GUIDE
Understanding Pencil Grades from H to B
From first sketch to finished drawing — learn pencil grades, line control, and shading techniques.
Explore the Full Guide
Apple Orchard Fingerprint Apples
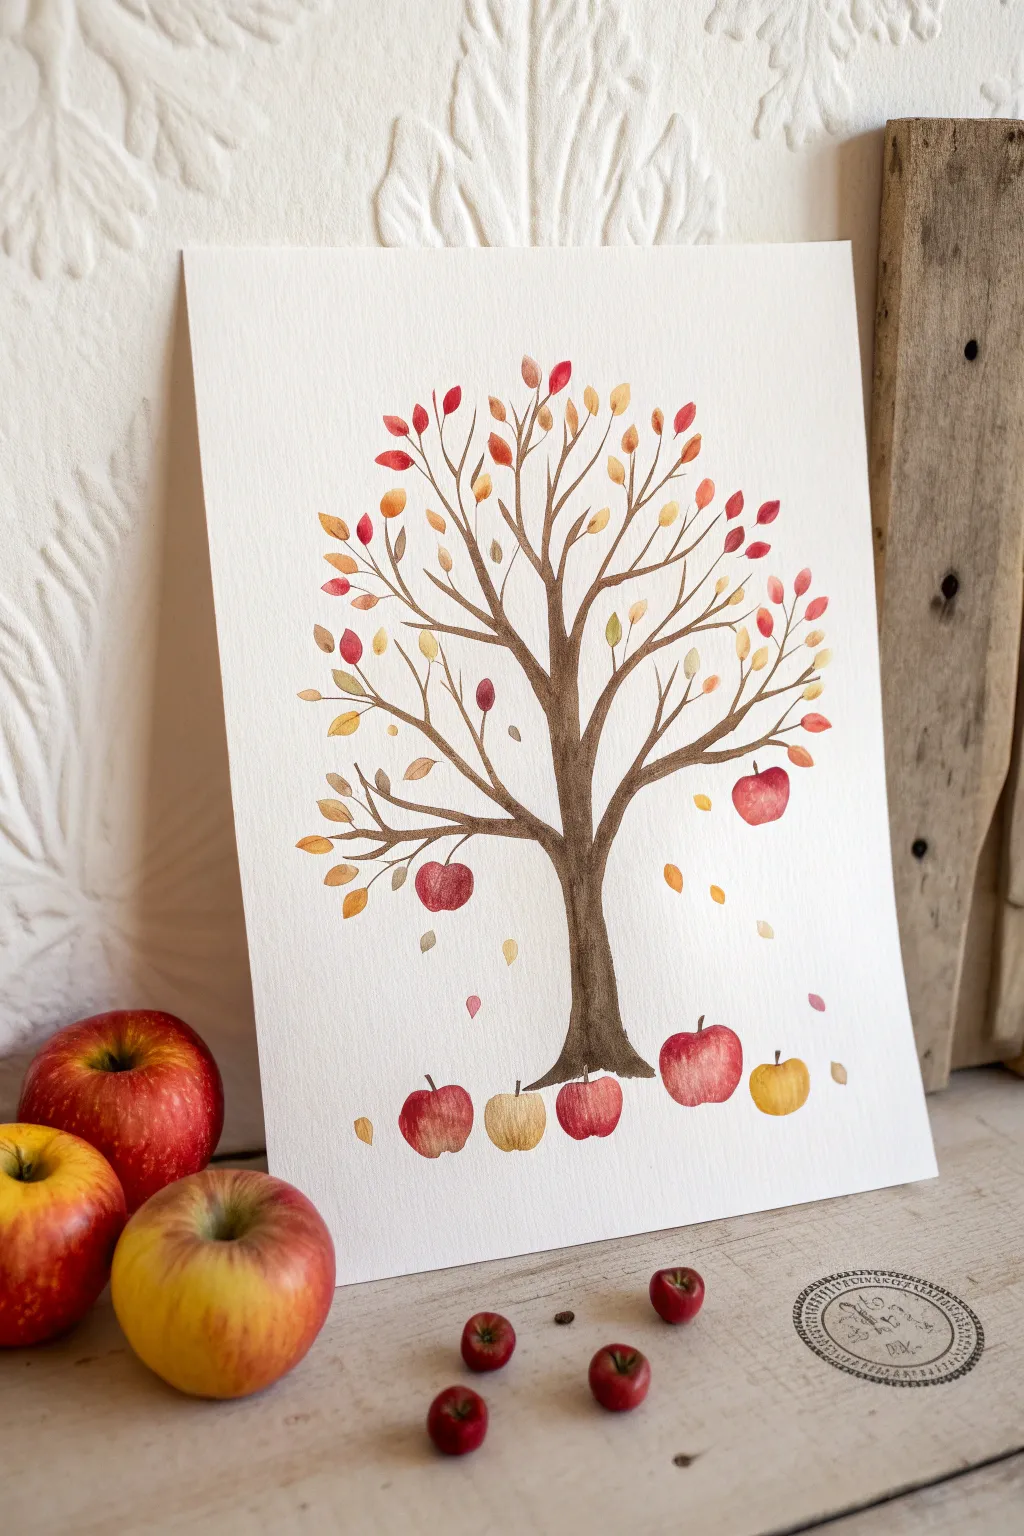
Capture the essence of autumn with this delicate watercolor painting featuring a graceful, bare tree adorned with falling leaves and a bountiful apple harvest. This project combines simple brushwork with playful fingerprint art to create a charming seasonal keepsake.
Step-by-Step Tutorial
Materials
- High-quality watercolor paper (cold press creates nice texture)
- Watercolor paints (browns, reds, yellows, oranges)
- Small round brushes (sizes 2 and 4)
- Fine liner brush (size 0 or 00) for details
- Paper towels
- Water cups
- Pencil (optional for sketching)
- Palette for mixing
Step 1: Painting the Tree Structure
-
Mix your brown hue:
Start by mixing a rich, earthy brown on your palette. I like to mix a touch of burnt sienna with a darker umber to get that warm tree bark color. -
Establish the trunk base:
Using your size 4 brush, paint the base of the trunk near the bottom center of the paper. Make it slightly wider at the bottom where the roots would be, tapering gently as you move upward. -
Extend the main trunk:
Continue the trunk upwards to about the center of the page. The paint should be fluid but not dripping; you want control over the edges. -
Branch out:
From the top of your trunk, split the line into two or three main branches. Let your hand tremble slightly as you paint to create organic, natural-looking deviations rather than straight lines. -
Add secondary branches:
Switch to a size 2 brush. Extend smaller branches from your main ones, reaching up and out towards the corners of the paper. -
Paint fine twigs:
Using the tip of your smallest brush or a fine liner, add delicate twigs at the ends of the branches. These should be very thin and light, filling out the canopy shape without looking heavy. -
Allow to dry:
Let the tree structure dry completely before adding leaves or fruit to prevent colors from bleeding into the brown bark.
Step 2: Adding Leaves and Apples
-
Prepare autumn colors:
Mix puddles of fall colors: golden yellow, burnt orange, and muted red. Keep the paint watery for a translucent look. -
Dab the leaves:
Using the tip of a size 2 brush, press down and lift quickly to create small, almond-shaped leaves along the branches. Vary the colors randomly for a vibrant look. -
Create falling leaves:
Paint a few stray leaves floating in the empty space around the tree and near the ground to suggest a gentle breeze. -
Start the hanging apples:
For the apples on the tree, dip your index finger or thumb lightly into red paint (rub off excess on a paper towel) and press it gently onto a branch. Alternatively, paint round shapes with a brush if you prefer more control. -
Paint the fallen harvest:
near the base of the trunk, paint a row of larger apples sitting on the ground. Use a mix of red and yellow-green paints to give them variety. -
Shape the fruit:
While the apple paint is still damp, you can drop in a little darker red on one side to create a shadow and volume.
Bleeding Colors?
If colors run into each other, your paper is too wet. Let the first layer dry completely, or use a hair dryer on a low, cool setting to speed it up.
Step 3: Finishing Touches
-
Add the stems:
Once the apple shapes are dry, take your fine liner brush with dark brown paint and add tiny stems to the tops of the fruit. -
Detail the apples:
Paint a very small curved dip at the top of each apple where the stem connects to give the fruit its characteristic shape. -
Refine the ground:
Add a few tiny specks or quick dashes of brown under the fallen apples to ground them, so they don’t look like they are floating. -
Review and balance:
Step back and look at your composition. If a spot looks too empty, add a small falling leaf or an extra twig to balance the scene.
Pro Tip: Texture
For realistic apple texture, lift a tiny spot of wet paint with a dry brush or tissue to create a soft, white highlight on the fruit’s curve.
Frame your beautiful orchard scene and enjoy the cozy autumn vibes it brings to your space
Acorn Caps and Nuts With Fingerprints
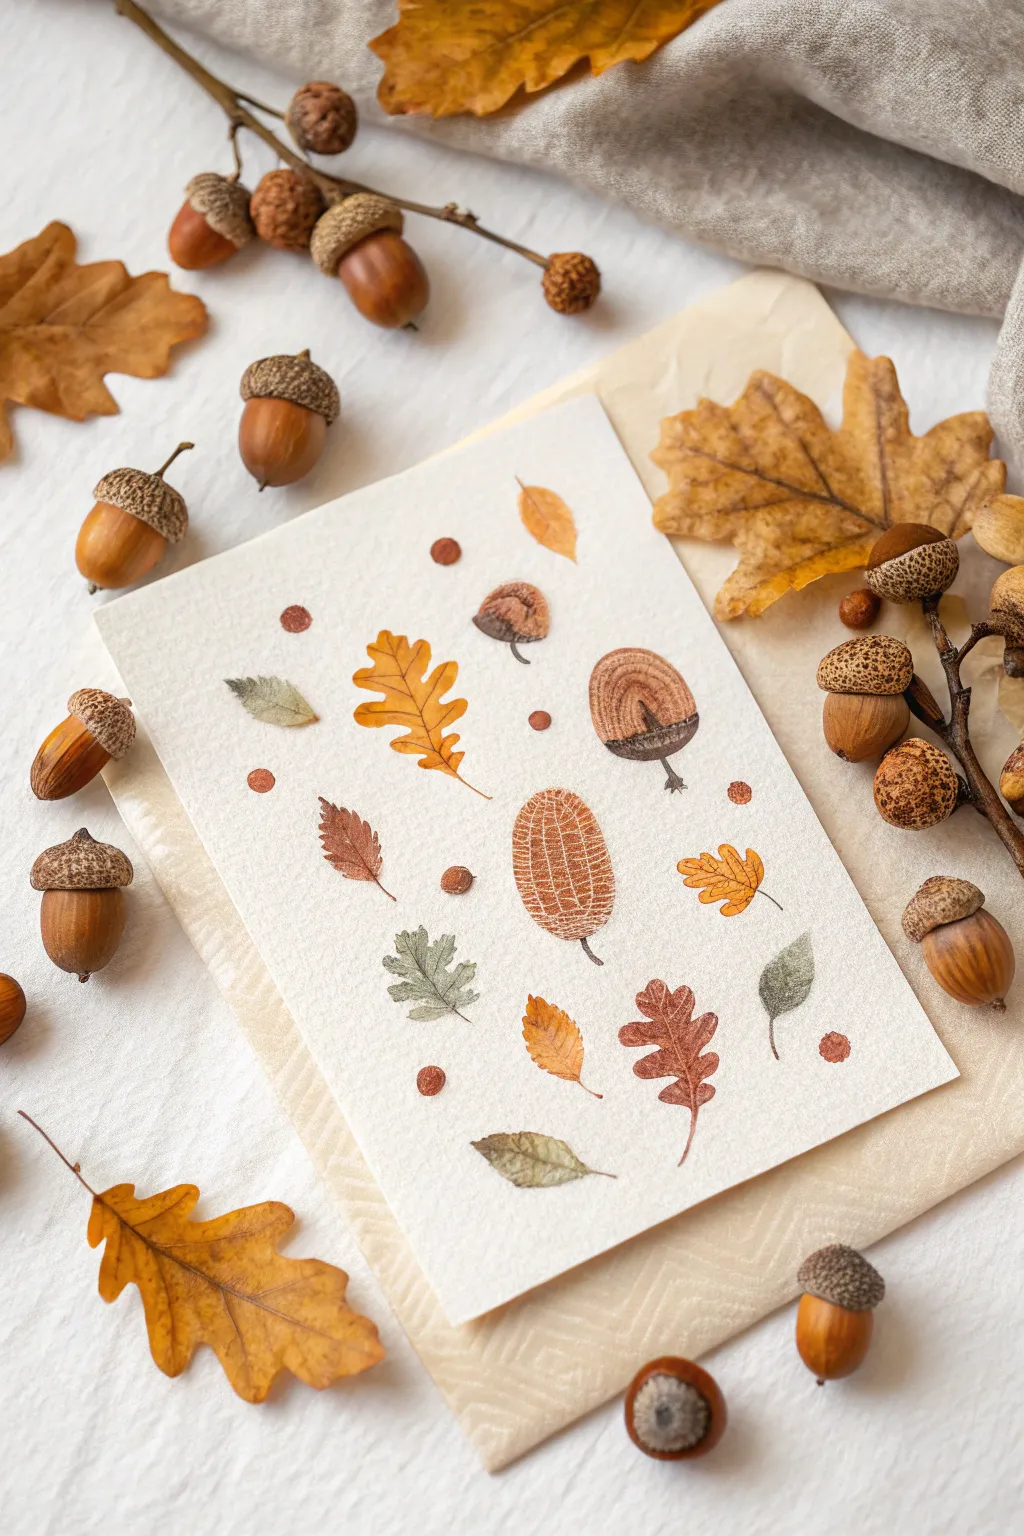
Embrace the imperfect beauty of autumn with this delicate mixed-media card that uses your own fingerprints to create texture. By combining subtle watercolor washes with fine liner details, you’ll build a scattered pattern of falling leaves and acorns that feels cozy and organic.
Step-by-Step Guide
Materials
- Heavyweight watercolor paper or cardstock (creamy off-white works best)
- Brown, ochre, and muted green ink pads (or watercolor paint applied to fingers)
- Fine-tipped archival ink pens (brown and black, sizes 0.1 and 0.3)
- Watercolor paints (burnt sienna, yellow ochre, sap green, raw umber)
- Small round watercolor brush (size 2 or 4)
- Paper towels
- Pencil and kneadable eraser
Step 1: Planning and First Impressions
-
Prepare the workspace:
Cut your watercolor paper to your desired card size, perhaps 5×7 inches to match the reference. Lay it on a flat surface and dampen a paper towel to keep handy for wiping your fingers between colors. -
Visualize the layout:
Before stamping, visualize a random, scattered pattern. You want the acorns and leaves to look like they have naturally fallen, so avoid placing them in strict rows. Aim for open white space between elements. -
Stamp the large acorn bodies:
Press your thumb onto a brown or tan ink pad. Alternatively, brush a layer of raw umber watercolor onto your thumb. Stamp firmly onto the paper to create the oval body of the larger acorns. Create two or three of these scattered across the page. -
Add smaller acorn nuts:
Switch to your index finger for smaller acorn shapes. Use a slightly different shade of brown or a mix of brown and ochre to add variety. Stamp these near the edges or in gaps, leaving room above them for caps. -
Create leaf base shapes:
For the broad oak leaves, you’ll paint freely rather than stamp. Mix a watery wash of yellow ochre and paint loose, wavy leaf shapes. Don’t worry about perfect edges; the watercolor’s natural bloom adds character. -
Paint smaller leaf accents:
Using a muted green mix (sap green with a touch of brown), paint small, single teardrop shapes or tiny leaflets. Keep these quite sheer, allowing the paper texture to show through.
Step 2: Adding Texture and Caps
-
Dry completely:
It is crucial to let all finger stamps and watercolor washes dry completely before drawing over them, or your pen lines will bleed. You can use a craft heat tool to speed this up. -
Sketch the acorn caps:
With a pencil, lightly sketch the bowl-shaped caps sitting atop your fingerprint acorn bodies. Some can be tall and domed, others flat and wide. -
Draw the crosshatch texture:
Using a fine brown pen, fill in the acorn caps with a crosshatching pattern. Start with vertical curved lines following the cap’s shape, then cross them with horizontal curved lines to create a woven, textured look. -
Ink the acorn outlines:
Outline the bottom of the acorn bodies (the fingerprint part) with a broken, sketchy line. You don’t need to trace the entire fingerprint perfectly; just suggest the bottom curve to define the nut. -
Add stems and points:
Draw small, nubby stems coming out of the top of the caps. At the bottom of each nut, create a tiny, sharp point—the remnant of the style—to make them look realistic.
Stamp Clarity Secret
If using watercolor on your finger instead of an ink pad, blot your finger on a paper towel once before stamping. This removes excess water and preserves the unique fingerprint ridges.
Step 3: Leaf Details and Final Touches
-
Outline the oak leaves:
With your brown pen, trace the yellow ochre leaf shapes. Add characteristic lobes and sinuses (the dips in the leaf edge), giving the line a slightly jittery, organic feel. -
Draw leaf veins:
Draw a central vein down the middle of each oak leaf, then branch out with secondary veins extending into the lobes. Keep the lines thin and delicate. -
Detail the green leaves:
For the smaller green leaves, use a very light touch with the pen. Draw a simple center vein and perhaps a serrated edge if mimicking elm or birch leaves. -
Add tiny dot accents:
Dip a cotton swab or the very tip of a pinky finger into reddish-brown paint. Dab tiny, perfect circles into the empty spaces to act as berries or small seeds, balancing the composition. -
Deepen the contrast:
I like to go back in with a slightly darker brown watercolor and glaze the bottom curve of the acorn caps to give them dimension and shadow. -
Erase pencil marks:
Once you are certain the ink is bone-dry, gently gently erase any visible pencil sketches from the acorn caps. -
Final assessment:
Step back and look at the balance. If a spot feels too empty, add a very faint, small leaf or another tiny berry dot to fill the visual gap.
Level Up: Metallic Glint
Once the illustration is dry, add tiny accents of metallic gold watercolor to the acorn caps or leaf veins. It catches the light beautifully when the card is held.
Now you have a charming, hand-crafted piece of fall art ready to be gifted or framed.


Corn Cob With Finger-Dotted Kernels

Capture the harvest season with this charmingly simple finger painting project that mimics the texture of real corn. By layering warm yellows and oranges with your fingertips, you’ll create a dimensional cob that looks good enough to roast.
Step-by-Step Tutorial
Materials
- Heavyweight white paper or cardstock (8×10 inches)
- Acrylic or tempera paints (yellow, orange, white, and pale green)
- Pencil for sketching
- Small flat paintbrush
- Paper plate or palette
- Paper towels for cleaning fingers
- Green wooden picture frame (optional, for display)
Step 1: Sketching the Base
-
Outline the Cob:
Begin by lightly sketching the shape of a corn cob in the center of your paper. Make it slightly tapered at the top and rounded at the bottom, roughly 6-7 inches tall. -
Add a Husk Hint:
At the very top and bottom of your oval shape, sketch faint, jagged lines to indicate where the green husks or stalk connection points will go later. -
Create a Pale Underlayer:
Mix a tiny amount of yellow paint with a lot of white to create a very pale, creamy yellow. Use your flat brush to paint the entire inside of the cob shape. This creates a base so no stark white paper shows through the gaps later. -
Dry the Base:
Let this underlayer dry completely. It needs to be dry to the touch so your finger dots sit on top rather than blending into a muddy mess.
Smudge Prevention
Work from the top down (if right-handed, work left to right) to avoid dragging your hand through wet paint dots.
Step 2: Creating Kernels
-
Prepare Your Palette:
Squeeze out quarter-sized dollops of bright yellow, golden yellow, orange, and white paint onto your palette. -
Load Your Finger:
Dip the tip of your index finger into the bright yellow paint first. Dab it on a clean part of the palette once to remove excess globbiness—you want a nice round print, not a puddle. -
Start the Center Row:
Press your finger onto the paper starting at the top center of the cob, working your way down in a straight vertical line. These dots simulate the central kernels. -
Continue Vertical Rows:
Reload your finger and add parallel vertical rows of yellow dots on either side of your center line. Keep the dots close together but not completely overlapping. -
Mix Colors for Depth:
Wipe your finger clean, then dip it into the orange paint. I like to dab randomly over a few of the wet yellow dots or place new orange dots in the gaps to mimic the natural variation of Indian corn. -
Add Highlights:
While the paint is still tacky, dip a clean pinky finger into the white paint. Gently touch the top-left side of random kernels to create a tiny ‘shine’ highlight, making them look rounded. -
Add Splatter Texture:
Dilute a drop of orange paint with water. Dip a toothbrush or stiff brush into it, and flick the bristles to send a very fine mist of speckles around the corn cob for an artistic, rustic effect.
Varied Sizes
Use your thumb for the wider middle kernels and your pinky finger for the smaller kernels near the top and bottom tips.
Step 3: Finishing Touches
-
Paint the Top Husk:
Using your small flat brush and pale green paint, add short, feathery strokes at the very tip of the cob. -
Add the Bottom Stalk:
Paint a small, rounded area at the bottom base of the cob with the same pale green, blending it slightly into the bottom row of kernels. -
Refine the Silhouette:
Step back and look at the shape. If the sides look too uneven, add a few half-dots of yellow along the edges to create a smoother oval profile. -
Let it Cure:
Allow the painting to dry flat for at least an hour. Because the paint is applied thickly with fingers, it takes longer to dry than brush strokes. -
Erase Guide Lines:
Once fully dry, gently erase any visible pencil marks from your initial sketch that weren’t covered by paint. -
Frame Your Art:
Place your finished artwork into a green frame to complement the husk colors and make the yellow pop.
Now hang your masterpiece and enjoy the golden glow of autumn corn all year round
Scarecrow Shirt With Finger-Painted Plaid
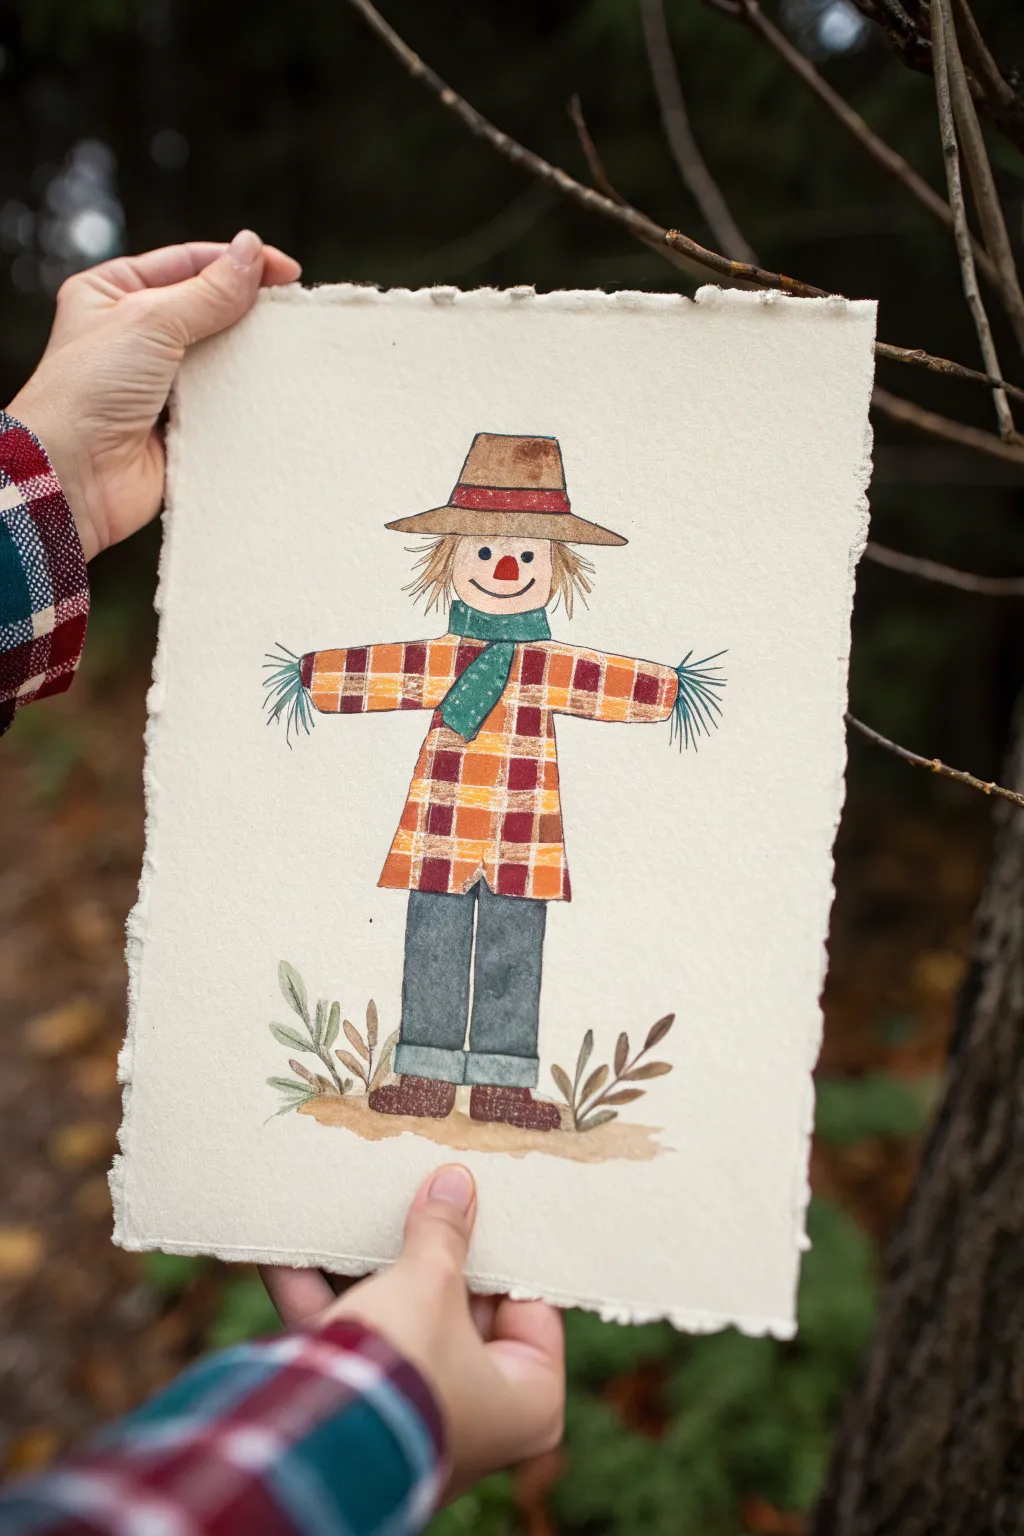
Capture the cozy textures of autumn with this charming scarecrow artwork, featuring a unique plaid pattern created with your own fingertips. The rough, deckle-edge paper adds a rustic feel, making this a perfect seasonal decoration or keepsake.
Detailed Instructions
Materials
- Heavyweight textured paper (watercolor or handmade cotton rag with deckle edge)
- Pencil and eraser for sketching
- Acrylic paints (burnt orange, mustard yellow, burgundy, dark brownish-grey, denim blue, forest green, straw yellow, beige)
- Fine liner brush or black micron pen for outlining
- Small flat brush for filling color
- Palette or paper plate
- Paper towels and water cup
Step 1: Sketching the Scarecrow
-
Draft the basic shape:
Start by lightly sketching a simple T-shape in the center of your paper. This will serve as the skeleton for the body and outstretched arms. -
Outline the clothing:
Draw the scarecrow’s oversized shirt around the horizontal bar of your T-shape, giving it a loose, boxy fit. Add rectangle legs below for the jeans. -
Add head and accessories:
Sketch a round head atop the shirt, then add a floppy hat with a wider brim. Don’t forget the scarf wrapped snugly around the neck area. -
Include the straw details:
Draw little triangular tufts sticking out from the sleeves for hands and poking out from the pant cuffs. Add some messy strands of ‘hair’ under the hat brim.
Clean Prints
Keep a damp paper towel nearby to wipe your finger completely clean between color changes. This prevents the plaid colors from turning into a muddy brown mess on the shirt.
Step 2: Creating the Finger-Painted Plaid
-
Prepare the base coat:
Using a flat brush, paint the entire shirt area with an even coat of mustard yellow acrylic paint. Let this base layer dry completely before moving to the pattern. -
Mix the plaid colors:
On your palette, prepare small puddles of burnt orange and burgundy paint. You want a creamy consistency that isn’t too runny. -
Apply vertical stripes:
Dip just the tip of your index finger or pinky (depending on the scale you want) into the burnt orange paint. Press gentle fingerprints in vertical columns down the shirt. -
Add horizontal stripes:
Reload your finger with the burnt orange and create horizontal rows across the shirt, intersecting the vertical columns to form a grid structure. -
Layer the darker accent:
Once the orange is tacky or dry, use a clean finger dipped in burgundy paint to add staggered prints within the grid, creating that classic layered plaid look. I find less is more here to keep the yellow base visible.
Step 3: Painting the Outfit & Features
-
Fill in the jeans:
Mix a muted dark blue and paint the pant legs. For a denim texture, you can dab the paint slightly unevenly rather than making it perfectly smooth. -
Paint the accessories:
Color the scarf in a solid forest green. Paint the hat a soft brown, adding a darker band around the base of the crown. -
Add the face and straw:
Paint the face a light beige. Use a pale straw yellow for the hair and stuffed hands. Add a bright orange triangle for the classic carrot nose. -
Ground the figure:
Mix a watery brown and gently wash color near the feet to create a patch of earth. While wet, flick deeper brown upwards to suggest small weeds or dead grass. -
Add foliage details:
Use a small brush to paint simple leaf shapes rising from the ground in muted greens and browns on either side of the boots.
Make it 3D
Glue actual bits of raffia or dried grass onto the hands and hair area instead of painting them. This adds amazing texture that pops right off the page.
Step 4: Final Details
-
Outline the figure:
Once all paint is 100% dry, use a very fine liner brush with thinned black paint (or a waterproof ink pen) to outline the clothes, hat, and face. -
Create scarf texture:
Using the tip of a toothpick or a very fine brush with white or light green paint, add tiny stippled dots to the green scarf to make it look knitted. -
Draw the face details:
Carefully add two small black dots for eyes and a stitched smile line across the face. -
Detail the straw:
Use your liner pen to add wispy lines inside the yellow straw areas to give them individual bristle texture. -
Define the boots:
Paint the boots a solid dark brown. Once dry, you can add tiny textural dots or scratches to make them look like worn leather.
Display your rustic scarecrow proudly on the fridge or frame it to celebrate the season
Owl on a Branch Fingerprint Feathers
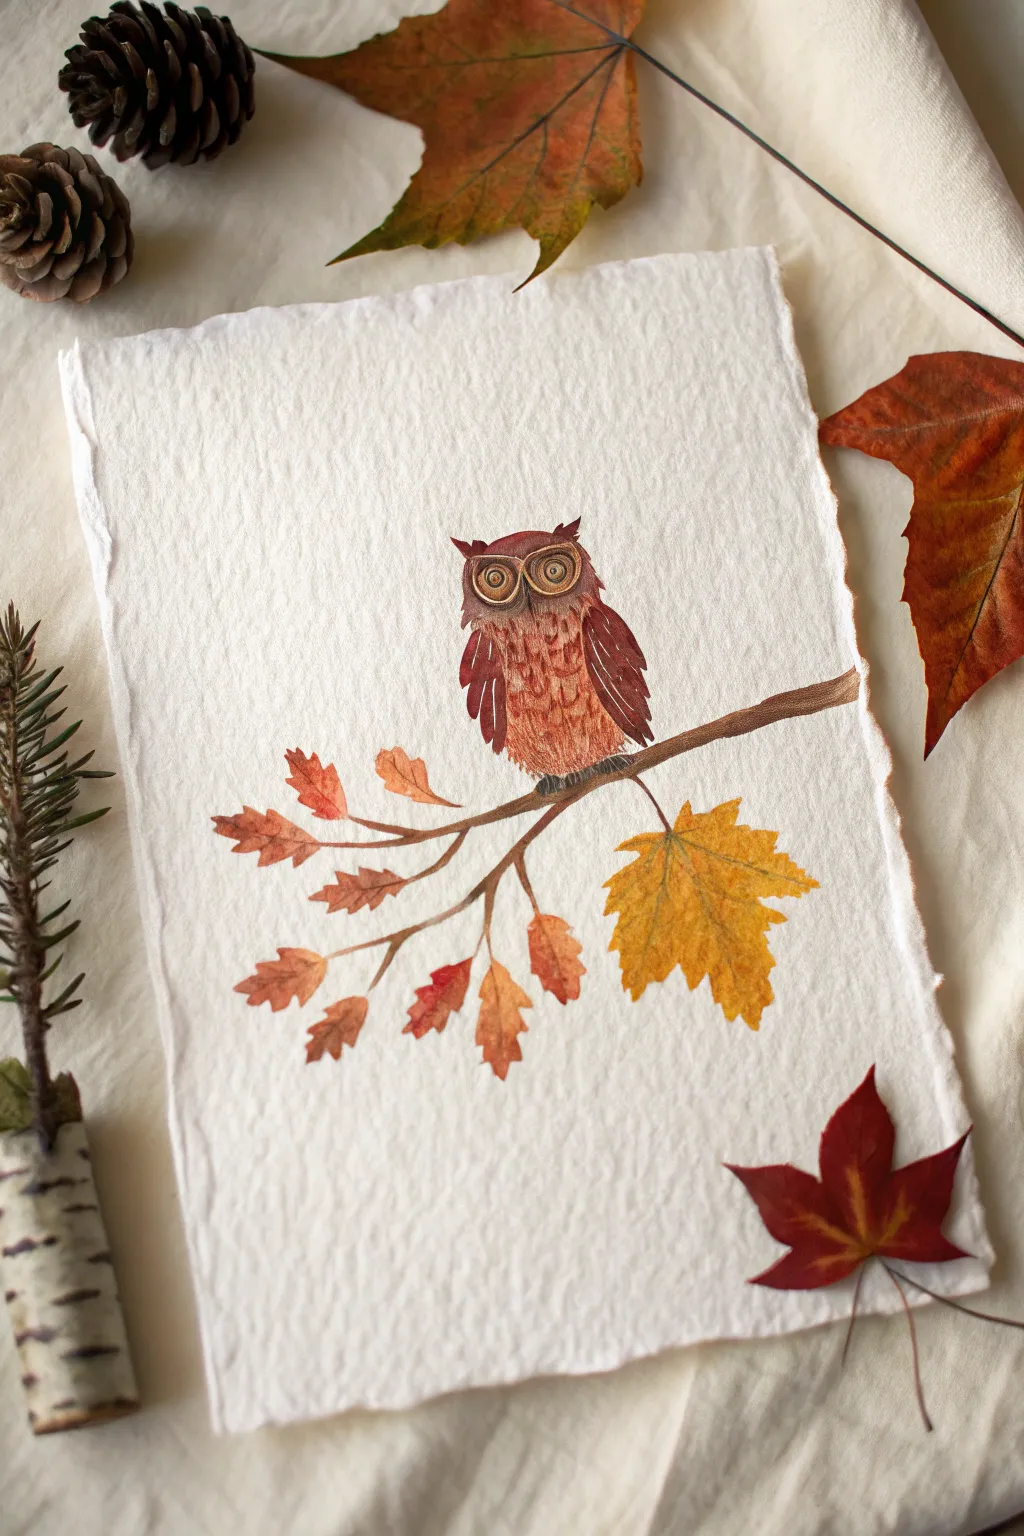
Capture the essence of autumn with this textural owl painting, where fingerprints create the delightful feathery body of our woodland friend. The rustic charm of handmade paper perfectly complements the warm, earthy tones of this simple yet striking composition.
How-To Guide
Materials
- Heavyweight handmade cotton rag paper (deckled edge)
- Watercolor paints (burnt sienna, burnt umber, yellow ochre, cadmium red deep)
- Fine detail brush (size 0 or 1)
- Medium round brush (size 4 or 6)
- Small cup of water
- Paper towels
- Palette for mixing
Step 1: Creating the Owl’s Body
-
Mix the body color:
Start by mixing a warm, reddish-brown hue on your palette using burnt sienna with a touch of cadmium red. You want a consistency that is creamy but transparent enough to show the paper’s texture. -
Print the base shape:
Dip your thumb or index finger into the paint mixture. Press it firmly onto the center of your paper to create the main oval shape of the owl’s body. If the coverage is too light, reload your finger and press again slightly overlapping to build up the form. -
Add wing texture:
While the body is still damp, use your pinky finger dipped in a slightly darker brown (burnt umber) to dab onto the sides of the oval. This creates the suggestion of folded wings resting against the body. -
Form the head tufts:
Using just the very tip of your pinky finger or a small brush, gently pull the paint upwards from the top corners of the head oval to create two small, pointed ear tufts. -
Let it dry completely:
Because the paper is textured and absorbent, ensure the fingerprinted area is fully dry before adding details to prevent bleeding.
Step 2: Painting the Branch & Leaves
-
Draw the main branch:
Load your medium round brush with burnt umber paint. Starting from the right edge of the paper, paint a branch that extends underneath the owl’s feet, tapering it slightly as it moves to the left. -
Add smaller twigs:
Switch to your fine detail brush. Extend delicate, thinner twigs branching off the main limb on the left side, curving them naturally to hold the smaller leaves. -
Paint the large maple leaf:
Mix a vibrant yellow ochre. Paint a large maple leaf shape hanging from the main branch on the right side. Let the paint pool slightly in the serrated edges for a natural look. -
Add small oak leaves:
Using burnt sienna and hints of red, paint small, lobed oak-style leaves attached to the thin twigs on the left. Vary the colors slightly between leaves to mimic autumn variety. -
Define leaf veins:
Once the leaves are dry, use your finest brush with a diluted brown to paint subtle central veins on the maple leaf and larger oak leaves.
Pro Tip: Finger Moisture
If your fingerprint looks too patchy, try lightly dampening your finger with a sponge before dipping it into the paint. This helps transfer pigment into the deep paper texture.
Step 3: Fine Details & Face
-
Outline the eyes:
With the fine detail brush and dark brown paint, carefully draw two large circles side-by-side on the upper part of the dried body print. Draw a smaller circle inside each for the pupils. -
Add eye details:
Paint concentric rings inside the eyes using a lighter brown wash, leaving the tiny pupils dark. This gives the owl its signature wide-eyed stare. -
Paint the beak:
Just below the juncture of the two eyes, paint a small, sharp inverted triangle in dark brown or black for the beak. -
Feather detailing:
I like to use the very tip of the detail brush to flick tiny, vertical hatch marks in burnt sienna across the owl’s chest. This mimics the texture of breast feathers over the fingerprint base. -
Define the wings:
Strengthen the wing shapes by outlining them loosely with dark brown strokes, adding vertical lines to suggest long flight feathers. -
Paint the claws:
Add three small, curved lines gripping the branch directly under the owl’s body to ground it in the scene.
Level Up: Real Texture
Instead of painting the large maple leaf, try pressing a real, small dried leaf into paint and stamping it onto the paper for authentic botanical veins.
Now your charming little owl is ready to bring a touch of woodland wisdom to your wall
Hedgehog With Leafy Fingerprint Spines
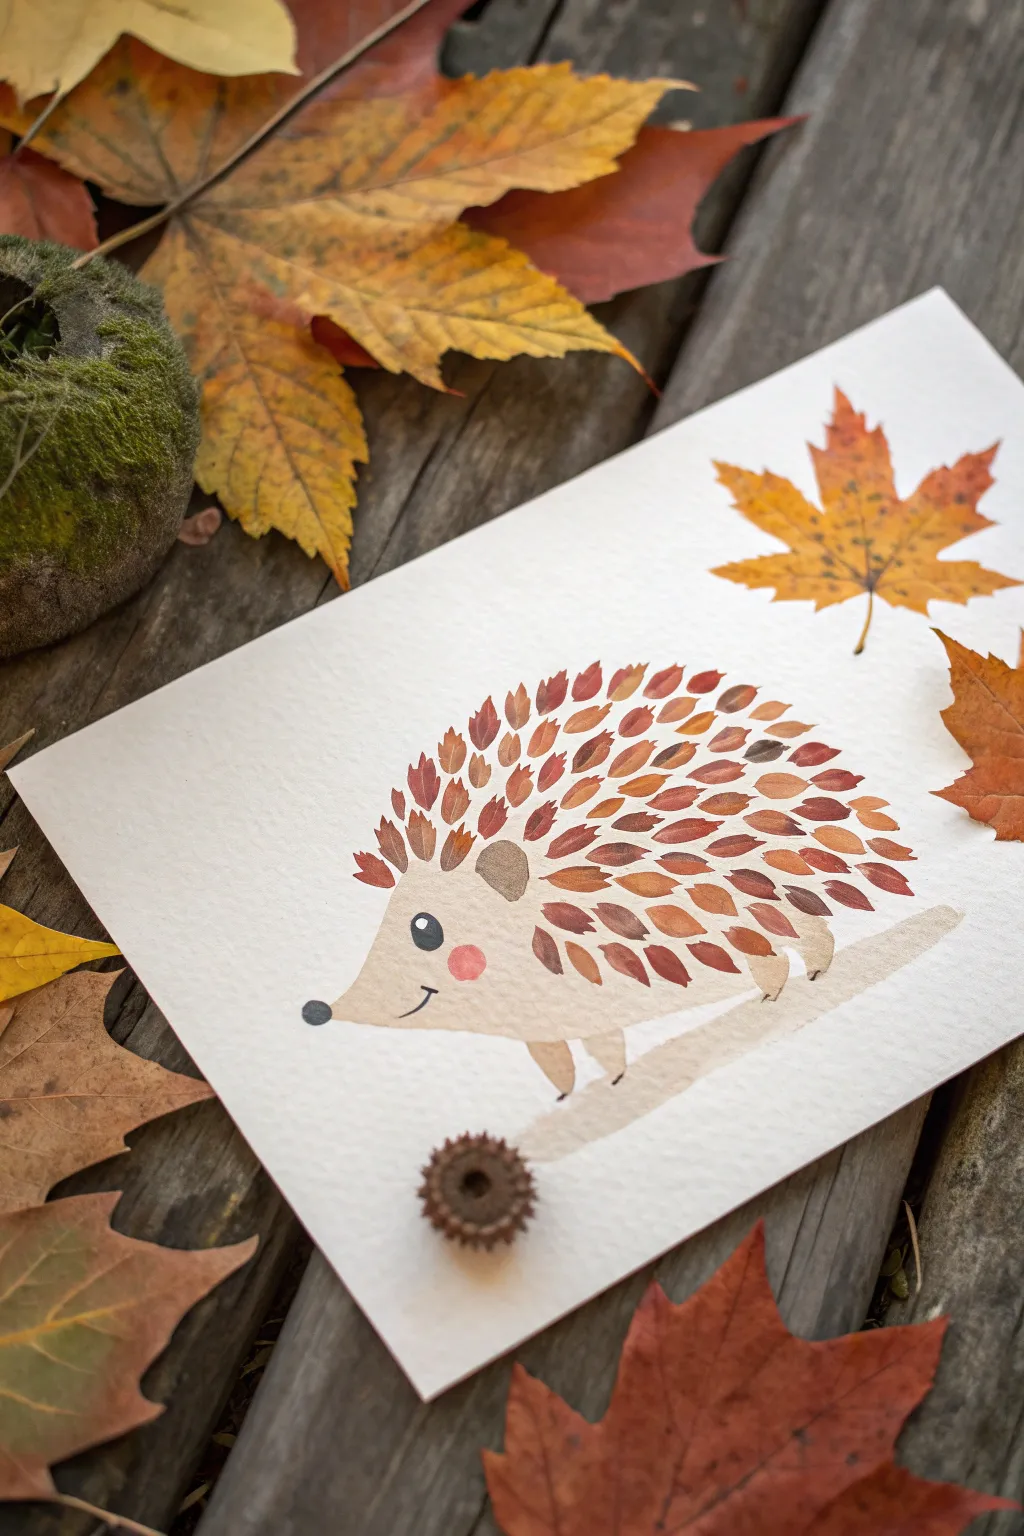
Capture the cozy essence of autumn with this darling hedgehog painting, featuring unique spines created with gentle finger painting techniques. The warmth of burnt orange and sienna creates a textured, leafy look that feels right at home in the season.
Step-by-Step Tutorial
Materials
- Heavyweight watercolor paper (300gsm recommended)
- Watercolor paints (shades of brown, beige, rust, and burnt orange)
- Fine detail brush (size 0 or 1)
- Medium round brush (size 4 or 6)
- Water cup and paper towels
- Pencil for sketching
- Black ink pen or fine marker
Step 1: Planning and Body
-
Sketch the outline:
Begin by lightly sketching the hedgehog’s body shape on your watercolor paper. Draw a teardrop shape on its side, keeping the nose slightly pointed and the back rounded. Mark where the face ends and the spine area begins. -
Mix the body color:
Create a very dilute wash of beige or light brown watercolor. You want this base layer to be quite pale to contrast with the darker spines later. -
Paint the body base:
Using your medium round brush, fill in the hedgehog’s face, underbelly, and legs with your pale beige mix. Leave the spine area (the back) unpainted for now. -
Add the feet:
Extend four small, simple leg shapes from the bottom of the body using a slightly more concentrated version of your beige mix to give them definition. -
Paint the log:
Beneath the hedgehog, paint a simple, elongated shape representing a branch or log. Use a light wash of brown so it doesn’t overpower the main subject. Let this entire base layer dry completely before moving on.
Smudgy Prints?
If your fingerprints are losing their shape or blending too much, your paint is too wet. Let the paint sit on the palette for a moment to thicken, or blot your finger more thoroughly.
Step 2: Creating the Spines
-
Prepare spine colors:
Mix three distinct autumnal shades on your palette: a deep rust, a golden ochre, and a dark brown. Having these ready will allow you to alternate colors easily. -
The fingerprint technique:
Instead of a brush, dip your index finger (or pinky for smaller spines) into the rust paint. Blot excess paint on a paper towel so the texture isn’t gloopy. -
Start the spine layer:
Press your finger gently onto the paper starting at the back hindquarters of the hedgehog. Angle your finger slightly so the print looks like a pointed leaf or teardrop. -
Build the texture:
Continue stamping fingerprints, moving from the back toward the front. Alternate between your rust, ochre, and dark brown paints to create depth and variety in the coat. -
Refine the shape:
As you stamp closer to the face, pay attention to the hairline. You want the stamped spines to overlap slightly with the beige face area for a natural look. -
Add pointed tips:
If your fingerprints look too round, use a fine brush with the same paint colors to pull a tiny point at the end of each stamped shape, mimicking the sharp look of spines or leaf tips. -
Let it dry:
The thicker paint used for finger stamping takes longer to dry than a wash. I generally wait at least 15-20 minutes here to avoid smearing your hard work.
Natural Texture
Use actual small leaves found outside as stamps instead of your fingertips! Coat the vein side of a leaf with paint and press it down for intricate, realistic spine textures.
Step 3: Details and Finishing Touches
-
Paint the ear:
Using a medium brown shade, paint a small, rounded ear shape situated right where the spines meet the face. -
Add the rosy cheek:
Dilute a tiny bit of red or pink watercolor and paint a soft circular blush spot on the cheek area. -
Draw the eye:
With a fine black marker or very precise black paint, draw a solid round eye. Leave a tiny white spec unpainted for a highlight, or add it back later with white gouache. -
Nose and mouth:
Paint a small black circle at the very tip of the snout for the nose. Use your fine liner to draw a small, happy curved smile. -
Ground the scene:
Paint a small, dark brown textured circle below the log to represent an acorn cup or seed pod, giving the composition some balance. -
Add falling leaves:
If you wish, add a few floating maple leaf shapes in the background using your ochre and orange paints to frame the hedgehog.
Once the final details are dry, frame your cheerful woodland friend to bring a touch of autumn indoors
Fox Fur Texture With Finger Dabs
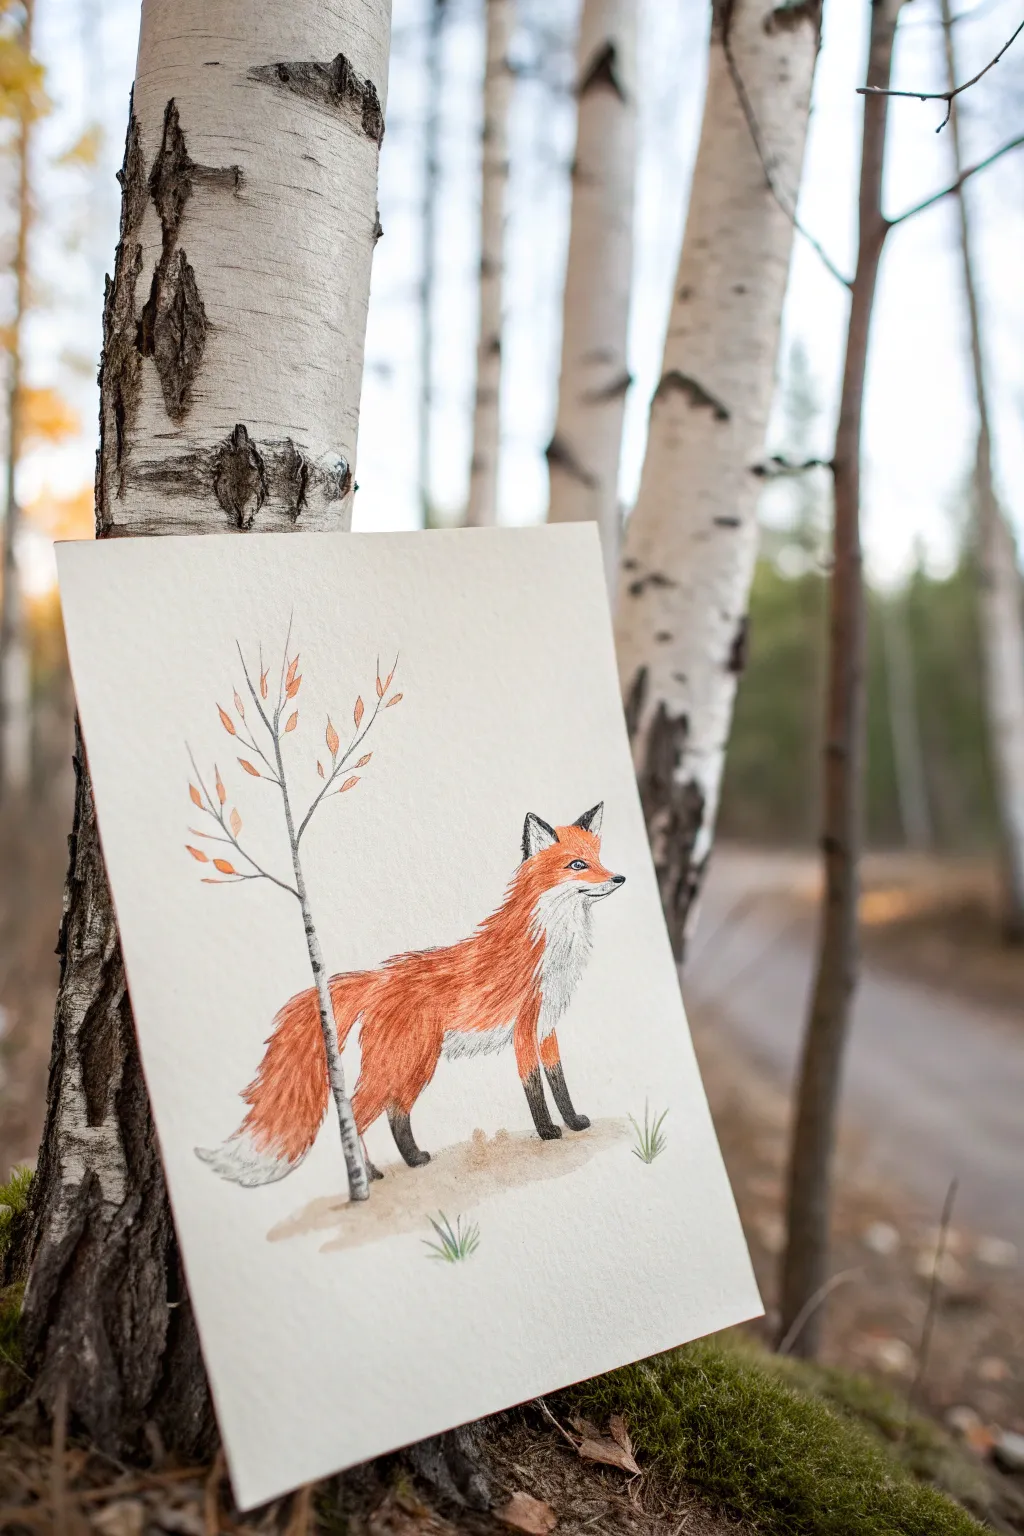
Create a charming woodland scene featuring a bright red fox and delicate birch sapling. This project combines simple sketching with a fun finger-painting technique to build up a rich, textured fur effect that looks surprisingly realistic.
Detailed Instructions
Materials
- Thick watercolor paper or mixed media paper (cream or off-white)
- Fingers (your primary tool!)
- Orange, red-brown, and white acrylic or gouache paints
- Fine liner pen (black, 0.3mm or 0.5mm)
- Small round brush (size 2 or 4)
- Pencil and eraser for sketching
- Paper palette or plate
- Paper towels
Step 1: Sketching the Scene
-
Outline the fox:
Begin by lightly sketching the outline of the fox in the center of your paper. Draw a triangular head, a long oval body, and the legs. Don’t press too hard with your pencil so lines remain subtle. -
Add the tree:
Draw a thin, slightly curving vertical line to the left of the fox to represent the birch sapling. Add thin branches reaching upwards and outwards. -
Refine the details:
Add the fox’s ears, the bushy tail, and mark where the white chest fur separates from the orange body fur. Sketch the eye and nose placement.
Step 2: Creating the Fur Texture
-
Prepare your palette:
Squeeze out small amounts of orange, reddish-brown, and white paint onto your palette. You want a creamy consistency that isn’t too watery. -
Base coat dabbing:
Dip your index finger into the orange paint. Dab off excess on a paper towel until the print is textured, not a solid blob. Gently dab color onto the fox’s body, tail, and head, leaving the chest and tip of the tail white. -
Deepening the color:
While the orange is still tacky, pick up a tiny bit of reddish-brown on your finger. Dab this over the back and top of the head to create shadow and depth in the fur. -
White fur details:
Clean your finger thoroughly. Using white paint, dab the chest area, the lower jaw, and the very tip of the tail. I like to blend the edges slightly where the white meets the orange for a softer transition. -
Texture refinement:
For smaller areas like the ears or face, use your pinky finger to apply smaller dabs of color, maintaining that mottled, furry look. -
Grounding shadow:
Mix a very watery light brown. Use your finger to swipe a sheer wash of color under the fox’s feet to create the ground.
Too Much Paint?
If your finger dabs look like solid blobs instead of fur texture, dab your finger on a scrap paper first to remove excess paint before touching the artwork.
Step 3: Adding Definition
-
Dry thoroughly:
Wait for the paint to dry completely. This is crucial before using the pen to avoid smudging or clogging the nib. -
Outline the fox:
Using the fine liner pen, carefully trace the fox’s outline with short, quick strokes to mimic hair rather than a solid continuous line. -
Facial features:
Draw the eye, filling in the pupil but leaving a tiny white highlight. Ink the nose and add whiskers with quick, confident flicks of the pen. -
Leg details:
Color the lower legs and paws with the black pen or dark grey paint, using short vertical strokes to blend it up into the orange leg fur.
Directional Fur
Make sure your finger dabs follow the direction the fur grows. Dab downwards on the legs and backwards along the body for a natural flow.
Step 4: The Birch Tree
-
Ink the tree trunk:
Go over your pencil line for the tree trunk with the pen. Add characteristic horizontal birch markings—small dashes and black patches along the trunk. -
Paint the leaves:
Dip a clean fingertip into the orange paint again. Very lightly press just the tip of your finger onto the branches to create small, oval-shaped autumn leaves. -
Ground details:
Draw a few small tufts of grass near the fox’s feet and the base of the tree using the fine liner. You can add a touch of green paint here if you wish.
Once dry, display your woodland friend against a natural backdrop or frame it for a cozy autumn decoration
Turkey Tail With Fingerprint Fan
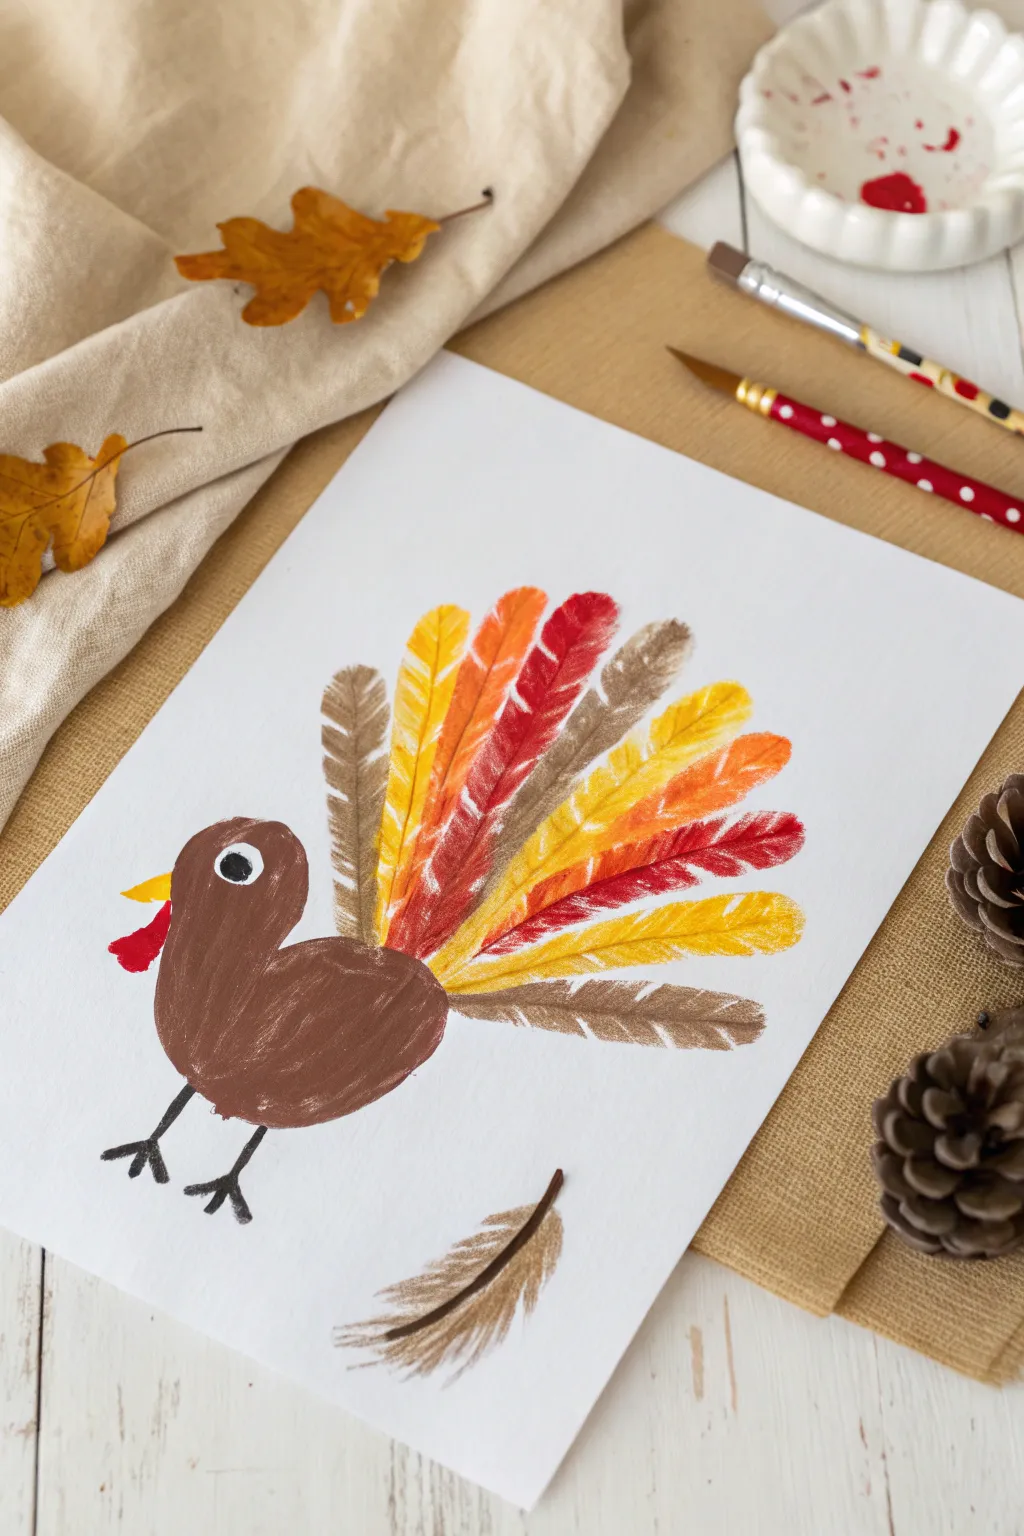
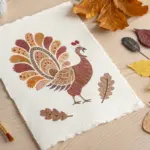
This charming turkey craft combines classic painting with textured elements for a delightful mixed-media effect. By using real feathers as stamps, you’ll create a vibrant, fanned-out tail that perfectly captures the spirit of Thanksgiving.
Step-by-Step Guide
Materials
- White cardstock or heavy watercolor paper
- Brown, red, orange, and yellow acrylic or tempera paint
- Googly eye (optional) or white and black paint
- Small stiff paintbrush
- Large faux craft feathers (white or light-colored)
- Black marker or fine liner brush
- Paper plate or palette
- Paper towels
Step 1: Creating the Turkey Body
-
Paint the body:
Start by dipping a medium brush into brown paint. Paint a shape resembling a slightly flattened circle or oval near the bottom left-center of your paper for the turkey’s body. -
Add the head:
Continuing with the brown paint, add a smaller circle directly on top of the left side of the body oval to form the head. -
Smooth the connection:
Gently stroke the wet paint at the ‘neck’ area to blend the head and body shapes together smoothly so it looks like one cohesive bird. -
Let it dry:
Allow the brown body paint to dry completely before adding facial features to prevent colors from muddying. This usually takes about 10-15 minutes.
Smudgy Stamps?
If feather prints look like blobs, you’re using too much paint. Sponge off excess paint lightly with a paper towel before stamping to reveal the delicate texture.
Step 2: Stamping the Tail Feathers
-
Prepare your palette:
Squeeze out quarter-sized dollops of red, orange, yellow, and brown paint onto your paper plate or palette. -
Coat the first feather:
Take a craft feather and lay it flat on a scrap piece of paper. Brush a generous layer of yellow paint onto one side of the feather, ensuring the vanes are well-coated but not dripping. -
First stamp:
Carefully press the painted side of the feather onto the paper, positioning it so the quill points toward the turkey’s back. Press down firmly along the spine and vanes, then peel it back to reveal the print. -
Continue the pattern:
Clean your feather or grab a fresh one. Repeat the process with orange paint, stamping this feather next to the yellow one, slightly overlapping or fanning it out. -
Complete the fan:
Continue stamping feathers in an alternating pattern—red, brown, orange, yellow—around the turkey’s back until you have a full, colorful semi-circle fan. -
Add the wing:
Using a smaller feather or just the tip of one painted brown, stamp a wing shape directly onto the center of the dried brown body.
Step 3: Detailing the Face
-
Paint the eye:
Once the brown head is dry, use a small brush to paint a white circle for the eye. Let it dry, then add a tiny black dot in the center for the pupil. -
Add the beak:
Dip a fine-tipped brush into yellow paint and create a small triangle pointing outward from the left side of the head. -
Create the wattle:
Using red paint, add a small, wavy teardrop shape hanging down from the base of the beak for the turkey’s wattle. -
Draw the legs:
Using black paint and a very fine brush (or a black marker once the paint is fully dry), draw two stick legs extending downward from the body. -
Add the feet:
Finish the legs by adding three small lines at the bottom of each stick leg to represent the turkey’s toes. -
Paint the loose feather:
For a whimsical touch, paint a single brown feather shape floating near the bottom of the page as if it just fell off.
Texture Twist
Before the paint on the stamped feathers dries, try sprinkling a tiny pinch of gold or copper glitter onto the wet paint for a festive Thanksgiving sparkle.
Now you have a colorful, textured turkey ready to display for the holiday season
Fingerprint Leaf Wreath
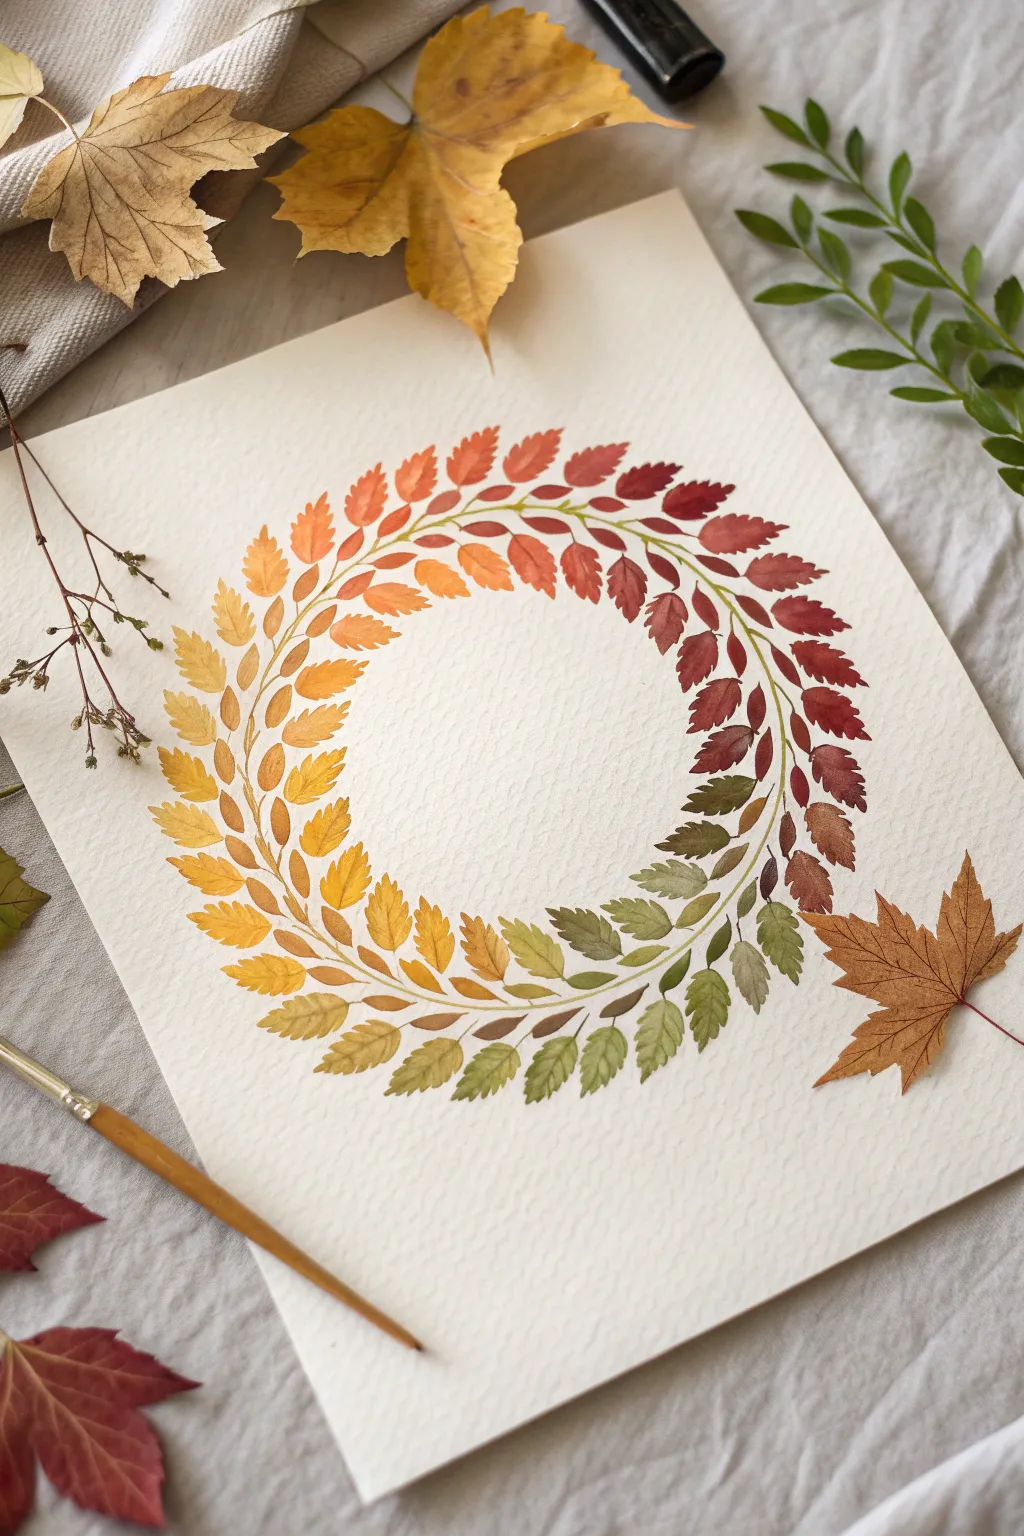
Capture the shifting colors of autumn in a mesmerizing circular design that celebrates nature’s palette. This delicate wreath transitions seamlessly from golden yellows through fiery reds to earthy greens, creating a sophisticated piece of seasonal art.
Detailed Instructions
Materials
- Heavyweight watercolor paper (cold press texture recommended)
- Watercolor paints (pan or tube set)
- Small round brushes (sizes 2 and 4)
- Palettes for mixing colors
- Pencil (HB or H)
- Compass or circular object (like a bowl) for tracing
- Water cups
- Paper towels
Step 1: Preparation & Planning
-
Lightly trace the guide:
Center your compass or circular template on the watercolor paper. Very lightly sketch a perfect circle with your pencil. This line will act as the spine for your wreath, so ensure it’s faint enough to be erased or covered later. -
Plan the color flow:
Visualize the gradient before you paint. Decide where your “start” point is—perhaps the bright yellow section at the 8 o’clock position—and how the colors will flow clockwise: yellow -> orange -> red -> deep maroon -> brown -> olive green -> chartreuse -> back to yellow. -
Prepare your palette:
Pre-mix puddles of your key transition colors. You’ll need a bright lemon yellow, a warm orange, a crimson red, a deep burgundy, a sepia or burnt umber, and a few shades of green ranging from muddy olive to fresh spring green.
Clean Color Tip
Use two water jars: one for the ‘dirty’ rinse when changing color families, and a second ‘clean’ jar for wetting your brush to mix fresh paint. This keeps yellow bright.
Step 2: Painting the Gradient
-
Start with yellow:
Load your size 4 brush with the Lemon Yellow. Starting on the left side of your circle, paint small, fern-like leaf shapes radiating outward and inward from the central pencil line. -
Shape the leaves:
To get the leaf shape, press the belly of the brush down to create width, then lift slowly as you pull away to create a sharp point. Aim for pairs of leaves generally mirroring each other across the spine. -
Transition to orange:
While the yellow leaves are still slightly damp, pick up a bit of orange on your brush. Paint the next set of leaves further up the circle, allowing the colors to naturally bleed slightly where the new leaves meet the previous ones. -
Moving into red:
Continue clockwise, cleaning your brush slightly and adding crimson to your mix. The leaves at the top of the wreath should be a vibrant mix of burnt orange and red. -
Deepening the tones:
As you descend down the right side, introduce violet or brown to your red to create deep burgundy and maroon tones. Keep the leaf size relatively consistent, though natural variation adds charm. -
The earthy turn:
At the 4 o’clock position, switch to your brown tones. If the paint feels too opaque, dip your brush in water to keep that characteristic watercolor transparency. -
Transition to green:
Blend your brown into an olive green for the bottom right section. This is a crucial transition; mixing a little of the previous brown into the green helps bridge the colors smoothly. -
Completing the circle:
Finish the bottom loop with lighter, fresher greens, eventually meeting back up with your starting yellow leaves. Soften the edge where the green meets the yellow with a clean, damp brush.
Add Metallic Flair
Once the watercolor is dry, use a fine-tip metallic gold pen or gold watercolor paint to add thin veins inside the darkest red and green leaves for subtle shimmer.
Step 3: Refining Details
-
Let it dry:
Allow the main leaf shapes to dry completely. If you touch the paper now, it should feel room temperature, not cool. -
Add the central stem:
Using your smallest size 2 brush and a diluted brown or green mix, carefully paint a very thin line connecting the leaves along the original pencil circle. This grounds the floating leaves. -
Layering for depth:
Go back over the dried wreath and paint a second layer of smaller leaves in the gaps between the first layer. Use a slightly more saturated version of the local color to make these pop. -
Add serrated edges:
For a more realistic look like the reference creates, use the very tip of your small brush to add tiny points or serrations to the edges of selected larger leaves. -
Erase guidelines:
Once the painting is 100% bone dry (I usually give it an extra hour just to be safe), gently erase any visible pencil marks from your initial circle sketch.
Step back and admire the continuous loop of seasons you have captured on paper


Have a question or want to share your own experience? I'd love to hear from you in the comments below!