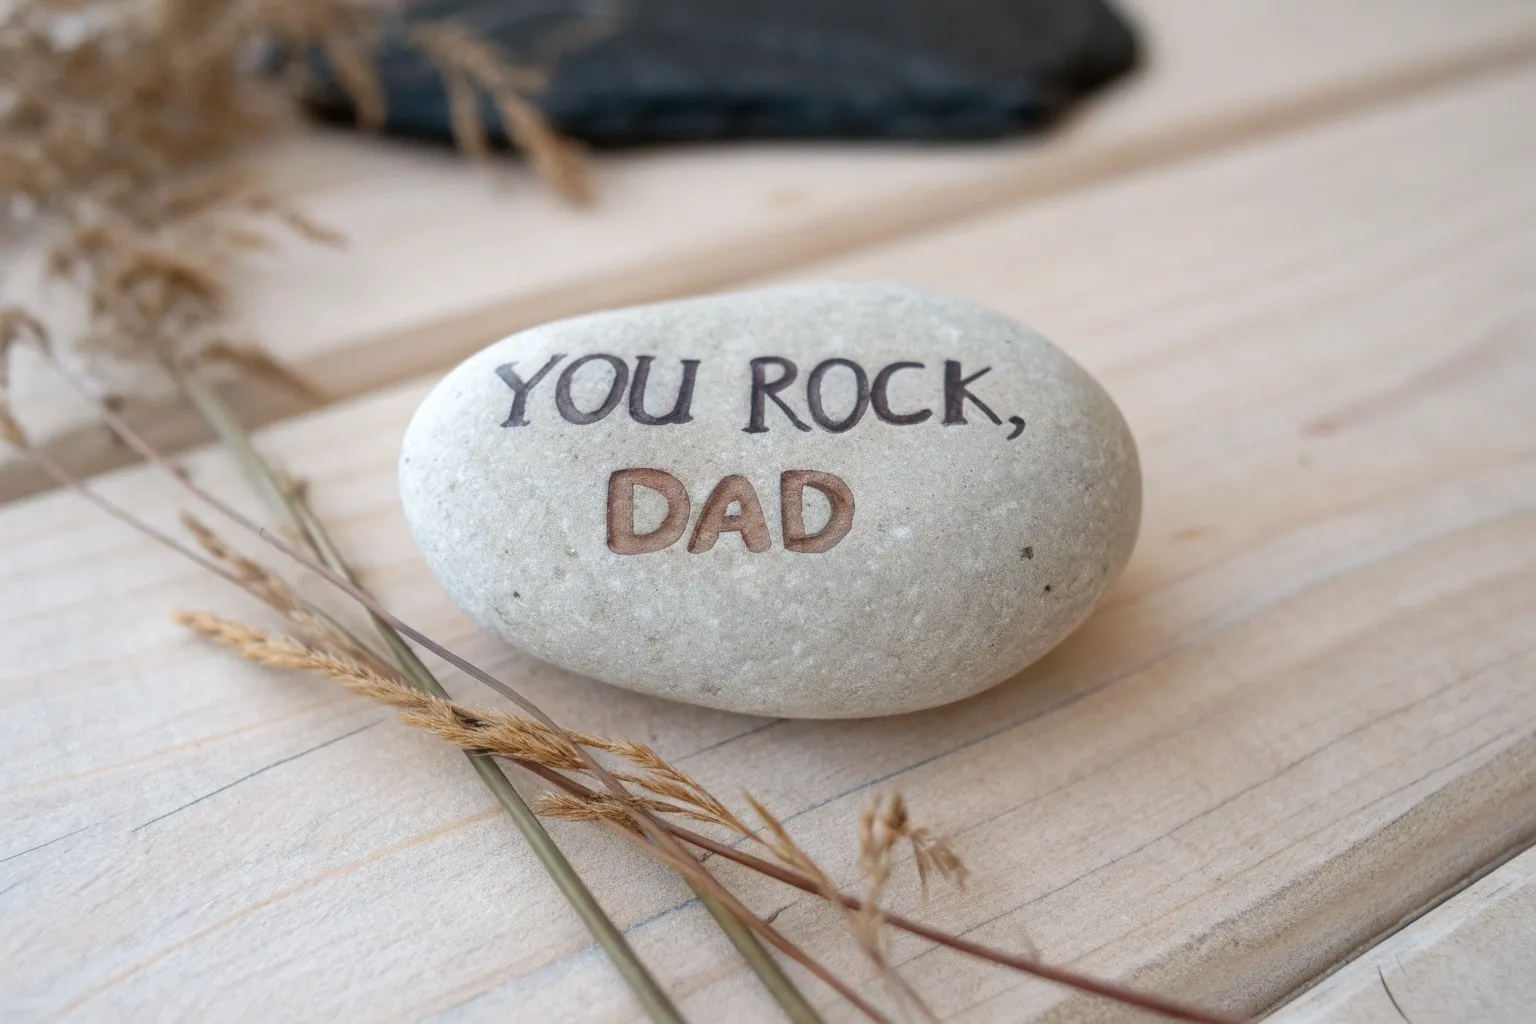
If you’ve got a handful of smooth stones and a little paint, you’ve already got the start of a seriously sweet Father’s Day gift. I love rock painting for dads because it’s simple, personal, and turns into a keepsake he can actually use as a desk paperweight.
You’re My Rock Minimal Script
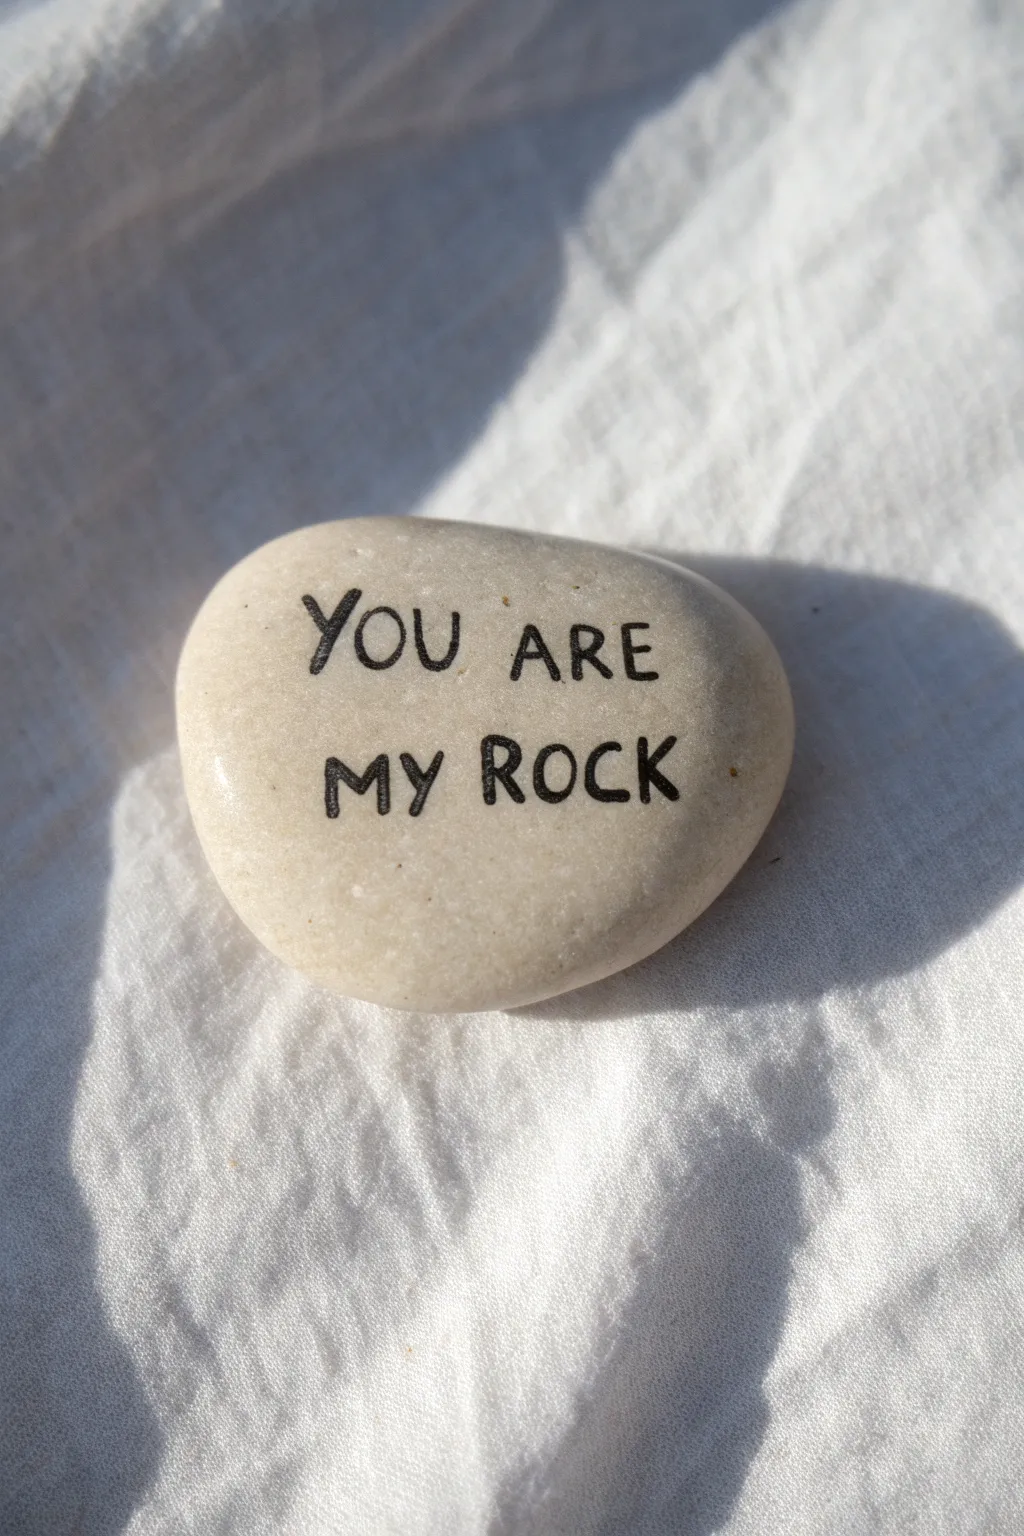
Sometimes the simplest messages carry the most weight, and this understated rock art proves exactly that. With its clean lines and smooth surface, this project relies on a steady hand and a minimalist aesthetic to create a timeless Father’s Day gift.
Step-by-Step Guide
Materials
- Smooth river stone (light cream or white)
- Black fine-point paint pen (or permanent marker)
- Pencil (HB or lighter)
- White block eraser
- Matte spray sealant
- Soap and water
- Scrub brush
- Paper towel
Step 1: Preparation & Cleaning
-
Select the perfect canvas:
Begin by finding a river rock that feels substantial in the hand. Look for one with a naturally flat, smooth face and a light color—cream, off-white, or pale grey work best to make the black text pop. -
Clean thoroughly:
Wash the stone with warm soapy water and a scrub brush to remove any dirt, oils, or moss that might interfere with the ink. -
Dry completely:
Rinse off the soap and pat dry with a paper towel. Let the stone sit in a sunny spot or warm area for at least an hour to ensure all moisture has evaporated from the porous surface.
Pro Tip: Pencil Prep
A very hard pencil (like a 2H or 4H) leaves lighter marks that are much easier to erase later without ghosting, keeping the rock’s surface pristine.
Step 2: Drafting the Design
-
Visualize the spacing:
Look at the face of your rock and mentally divide it into two horizontal lines. You want the text to sit centrally, leaving ample negative space around the edges for that clean, modern look. -
Pencil in the top line:
Using an extremely light touch with your pencil, sketch the words ‘YOU ARE’ across the upper imaginary line. Keep the letters capitalized and roughly equal in height. -
Pencil in the bottom line:
Directly below, draft the words ‘MY ROCK’. Aim to align the start of ‘MY’ roughly underneath the ‘Y’ in ‘YOU’ to keep the visual weight balanced. -
Check the alignment:
Step back and look at your drafting. The goal is a slightly loose, hand-written feel, but the centering should look intentional. Adjust any letters that feel too cramped.
Level Up: Hidden Note
Flip the rock over and write the year or a short personal message (like ‘Love, [Child’s Name]’) on the back for a hidden sentimental touch.
Step 3: Inking the Lettering
-
Prime your pen:
Shake your black fine-point paint pen well and press the nib on a scrap piece of paper until the ink flows smoothly and consistently. -
Trace the top line:
Begin tracing over your pencil marks for ‘YOU ARE’. Use slow, deliberate strokes. I find that pulling the pen toward me creates straighter lines than pushing it away. -
Bold the downstrokes:
To mimic the style in the photo, go back over the vertical lines of each letter slightly to thicken them just a hair, while keeping horizontal strokes thinner. -
Ink the bottom line:
Repeat the process for ‘MY ROCK’. Pay special attention to the ‘R’ and ‘K’ in ‘ROCK’ to ensure their legs are distinct and clear. -
Wait for ink to set:
Resist the urge to touch the rock immediately. Let the paint pen dry completely for at least 30 minutes to prevent any smudging during the next step.
Step 4: Finishing Touches
-
Erase guidelines:
Once the black ink is 100% dry, gently run a white block eraser over the entire surface to remove any visible pencil marks. -
Clean off debris:
Brush away the eraser dust with a soft, clean brush or blow it off carefully so you don’t smear the ink. -
Prepare for sealing:
Set up a well-ventilated area, preferably outdoors, and place your rock on a piece of cardboard or newspaper. -
Apply sealant:
Hold a can of matte spray sealant about 12 inches away from the rock. Apply a very light, misting coat. Do not spray heavily or the ink might run. -
Let it cure:
Allow the first coat to dry, then apply a second light coat if the rock will be kept outdoors.
Now you have a solid, enduring reminder of appreciation ready to be gifted


Happy Father’s Day Typography Rock
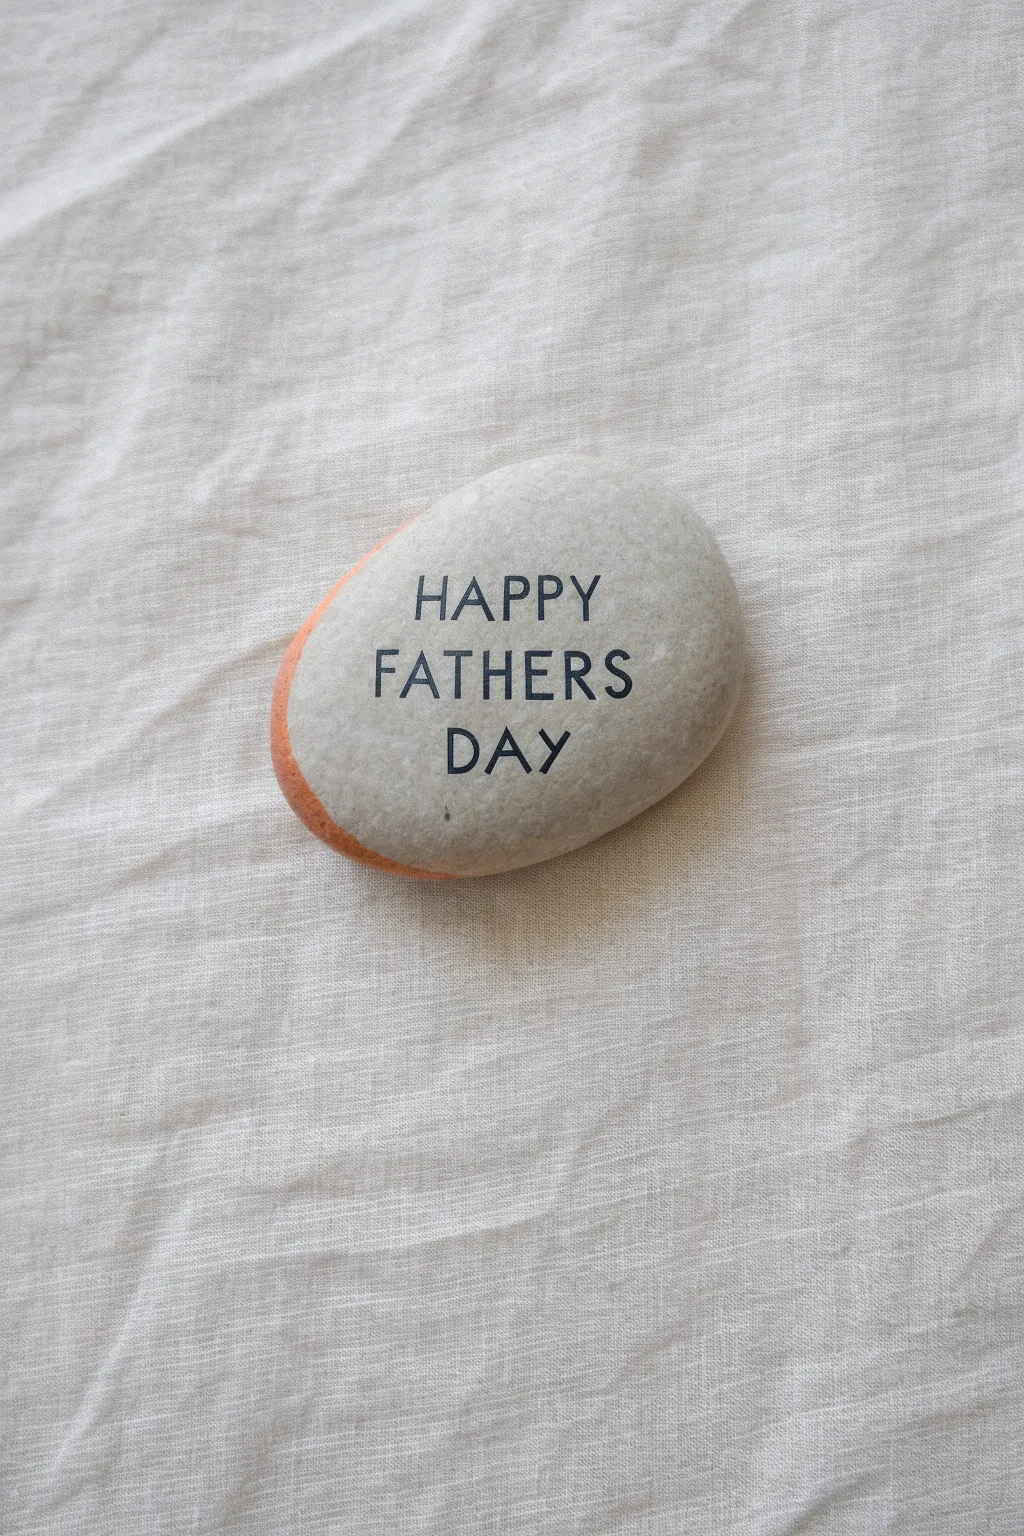
Embrace simplicity with this elegant Father’s Day rock that proves less is often more. This project features crisp, clean lettering on a smooth natural stone for a sophisticated and modern look that any dad will appreciate.
How-To Guide
Materials
- Smooth river rock (flat surface preferred)
- Black acrylic paint or black paint pen
- Rub-on transfer letters or letter stamps (alternatively: small vinyl decal)
- Matte finish sealant spray
- Soft cloth for cleaning
- Painter’s tape based on your method preference
- Pencil for guidelines
Step 1: Preparation
-
Select your canvas:
Choose a river stone that is relatively flat and smooth. The smoother the surface, the cleaner your typography will look. -
Clean the surface:
Wash the stone thoroughly with soap and water to remove any dirt or oils. -
Dry completely:
Allow the stone to dry fully. Moisture trapped in the stone can affect how well the letters adhere.
Step 2: Layout Design
-
Plan your spacing:
Before committing to the surface, lay out your letters on a scrap piece of paper to check the sizing against your rock. -
Mark guidelines:
Using a pencil very lightly, draw three horizontal straight lines on the stone to serve as baselines for ‘HAPPY’, ‘FATHERS’, and ‘DAY’. -
Center the design:
Find the vertical center of your rock and mark a tiny dot on each guideline to help you keep the text symmetrical.
Fixing Broken Letters
If a transfer letter breaks or applies partially, use a fine-tip black permanent marker or a 005 micron pen to carefully fill in the missing gaps by hand.
Step 3: Application
-
Start with the middle word:
Begin by applying the word ‘FATHERS’ first. This is usually the longest word and establishes the width of the design. -
Apply the letters:
If using rub-on transfers, position the ‘H’ in the center of your guideline and rub firmly with a stylus or popsicle stick. -
Work outwards:
Continue applying the letters ‘T’, ‘A’, ‘F’ to the left, and ‘E’, ‘R’, ‘S’ to the right to ensure perfect centering. -
Align top text:
Move to the top line. Align the word ‘HAPPY’ so it sits comfortably above ‘FATHERS’ without crowding it. -
Align bottom text:
Position the word ‘DAY’ on the bottom line, ensuring the vertical spacing matches the gap between the top two lines. -
Check for errors:
Inspect the letters carefully. If a transfer didn’t adhere fully, gently place the backing sheet down and rub over it again.
Add a Personal Touch
While the front is minimalist, paint the date or a small personal message on the back of the stone using a white paint pen for a hidden sentimental detail.
Step 4: Finishing Touches
-
Erase guidelines:
Once the lettering is secure, use a soft eraser to gently remove the pencil guidelines, being careful not to scratch the lettering. -
Dust off debris:
Use a soft, dry brush to whisk away any eraser shavings or dust particles. -
Prepare sealant:
Take your stone to a well-ventilated area for sealing. -
First coat:
Apply a very light mist of matte sealant. I find that spraying too heavily at first can sometimes cause transfers to crinkle. -
Dry and repeat:
Let the first coat dry for about 15 minutes, then apply a second, slightly heavier coat for durability. -
Final cure:
Let the stone sit undisturbed for 24 hours to ensure the finish is hard and protective before gifting.
This sophisticated little stone makes a perfect paperweight for dad’s desk

Best Dad Ever Award Badge
Transform a simple garden stone into a lasting trophy for the best dad around. This project creates a crisp, badge-style design that looks like a high-quality patch or enamel pin, perfect for a paperweight or desk decor.
Step-by-Step Tutorial
Materials
- Smooth, oval-shaped river rock (clean and dry)
- Pencil and eraser
- Fine point permanent marker (black)
- Acrylic paint markers or fine detail brushes
- Paint colors: Cream/Beige, Turquoise/Teal, Burnt Orange/Rust, Golden Yellow
- Spray sealer or varnish (matte or gloss)
Step 1: Planning and Sketching
-
Surface Prep:
Begin with a rock that is clean and completely dry. Rub the surface gently with your thumb to ensure no loose dust remains, which could interfere with the marker adhesion. -
Center Circle:
Using a pencil, lightly sketch a circle in the upper-middle portion of the rock face. This will be the main badge area where the text goes. -
Outer Ring:
Draw a second, slightly larger circle around the first one to create a thick band or border. Try to keep the spacing between the two circles consistent all the way around. -
Adding Ribbons:
Sketch two ribbon tails hanging down from the bottom of the outer ring. They should angle slightly outward like an inverted ‘V’. Add a ‘V’ notch at the bottom of each ribbon tail for a classic look.
Step 2: Color Blocking
-
Base Color:
Fill in the center circle using a cream or beige paint pen. You’ll want a very opaque layer here so the text pops later, so let the first coat dry and add a second if the stone’s color shows through. -
Turquoise Segments:
On the outer ring, you need to create the segmented pattern. Paint four equal sections in a deep turquoise or teal color—top, bottom, left, and right—leaving gaps between them. -
Detailing the Ring:
In the gaps between the turquoise sections, paint small rectangles of rust-orange. Flank these orange rectangles with thin stripes of golden yellow. -
Ribbon Fill:
Move down to the ribbon tails. Paint the main central stripe of each tail with the rust-orange color. -
Ribbon Borders:
Carefully edge the rust-orange ribbons with the golden yellow paint to create a trim effect. I find a very fine tip marker works best for these thin parallel lines.
Text Centering Tip
Write the middle word ‘DAD’ first to center it perfectly. Then add ‘BEST’ above and ‘EVER’ below to keep the alignment balanced.
Step 3: Outlining and Text
-
Drying Time:
Pause here and ensure all paint feels completely dry to the touch. If the paint is tacky, your black marker ink might bleed or ruin the marker tip. -
Main Outlines:
Using your fine point black marker, trace over your original pencil lines. Outline the center circle and the outer ring first to define the badge shape. -
Ribbon Definition:
Outline the entire shape of the hanging ribbons, including the V-notch at the bottom. Draw black lines separating the yellow borders from the orange centers. -
Segment Lines:
Go back to the outer ring and draw distinct black lines separating the turquoise, yellow, and orange segments to give it that stitched patch look. -
Lettering Layout:
Lightly pencil in the words ‘BEST DAD EVER’ in the cream center. Stack them vertically: ‘BEST’ at the top, ‘DAD’ in the middle, and ‘EVER’ at the bottom. -
Inking Text:
Trace over your letters with the black marker. Use serif font styles (little feet on the letters) to make it look like a traditional award stamp. -
Thickening Lines:
Go over the outermost holding line of the entire design (the outside of the ring and ribbons) one more time to make it slightly bolder than the interior detail lines.
Paint Pen Troubleshooting
If your paint pen tip gets scratchy or dry, press it onto a scrap piece of cardboard a few times to re-saturate the nib before returning to the rock.
Step 4: Final Touches
-
Cleanup:
Once the black ink is fully dry, gently erase any visible pencil sketch lines that might be peeking out from the edges. -
Sealing:
Protect your artwork by spraying it with a clear sealer. Use light, misting coats rather than one heavy coat to prevent the ink from running.
This simple yet meaningful token is ready to be displayed on a desk or bookshelf as a reminder of his award-winning status


#1 Dad Trophy Paperweight
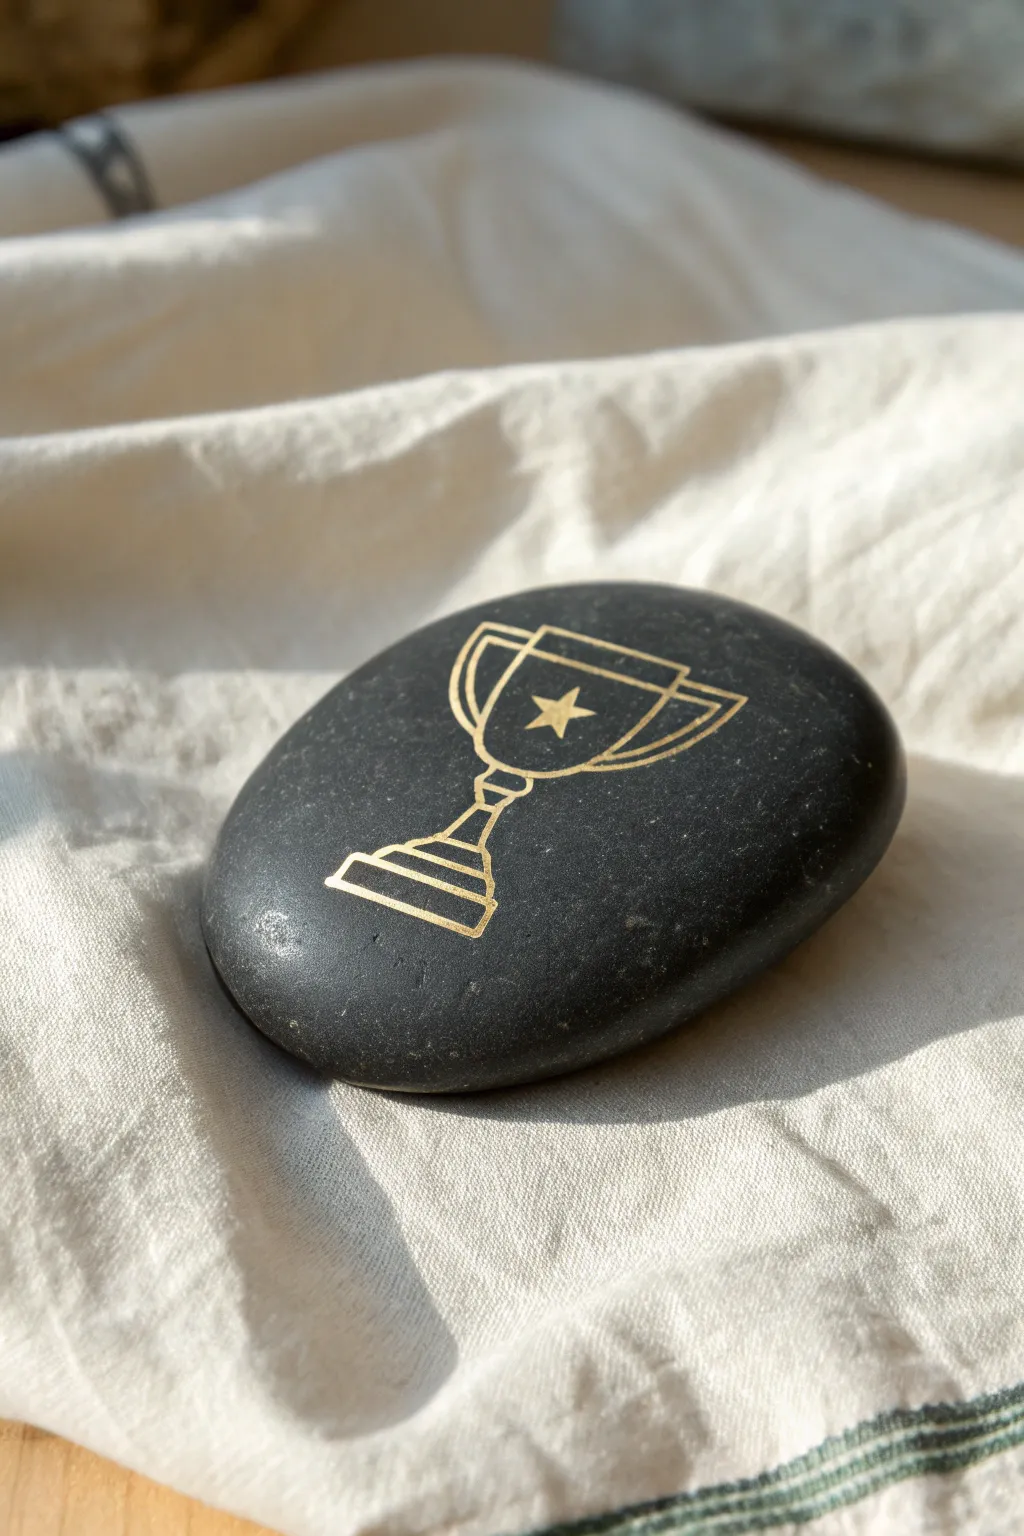
Transform a simple river stone into a sophisticated and understated desk accessory for Dad. This clean, minimalist design relies on the striking contrast between matte black stone and shimmering metallic gold lines to create a gift he’ll cherish.
Detailed Instructions
Materials
- Smooth river rock (flat surface is best)
- Matte black spray paint or acrylic paint
- Gold metallic paint marker (extra fine tip)
- Pencil (HB or soft lead)
- White eraser
- Sealer (matte or satin finish spray)
- Ruler (optional)
- Scrap paper
Step 1: Preparation and Base Coat
-
Clean the stone:
Begin by washing your chosen rock thoroughly with warm soapy water to remove any dirt or oils. -
Dry completely:
Set the stone aside or dry it with a towel; it must be completely moisture-free before painting. -
Apply the base coat:
Coat the entire top surface of the rock with matte black paint. Spray paint gives the smoothest finish, but acrylics work too. -
Let it cure:
Allow the black layer to dry fully. If you used acrylics, you might need a second coat to ensure pure opacity.
Steady Hand Pro-Tip
To keep lines straight on the curved rock surface, rest your pinky finger on the table or a dry part of the stone as an anchor while you draw.
Step 2: Drafting the Trophy
-
Practice the shape:
Before touching the rock, sketch the trophy shape a few times on scrap paper to get comfortable with the proportions of the cup, stem, and base. -
Center the design:
Lightly mark a vertical centerline on your stone with a pencil to keep your drawing symmetrical. -
Sketch the bowl:
Draw the main U-shape of the trophy cup near the top center of the rock. -
Add the rim:
Close off the top of the U-shape with a horizontal rectangle or slight oval to represent the rim of the cup. -
Draw the handles:
Sketch two angled loops on either side of the cup for the handles. Keep them geometric and angular rather than purely round for a modern look. -
Create the stem:
Draw a small neck below the cup, flaring out slightly as it moves downward toward the base. -
Form the base:
Sketch a tiered base at the bottom using stacked trapezoid shapes, getting wider as you go down. -
Add the star:
Place a simple five-pointed star right in the visual center of the trophy cup.
Level Up: Personalize It
Add ‘Dad’ or the year (e.g., ‘Est. 2024’) in tiny block letters on the base of the trophy for a custom touch.
Step 3: Inking and Finishing
-
Test your marker:
Shake your gold paint marker well and depress the nib on scrap paper until the ink flows smoothly. -
Trace the outline:
Carefully trace over your pencil lines with the gold marker. I find it helpful to pull the pen toward me rather than pushing it. -
Refine the lines:
Go over any lines that look faint, ensuring the gold stands out solidly against the black background. -
Fill the star:
Color in the star completely with the gold marker to make it the focal point. -
Dry thoroughly:
Let the gold ink dry completely for at least 30 minutes to prevent any smearing. -
Erase guidelines:
Gently gently erase any visible pencil marks, being careful not to scratch the gold paint. -
Seal the rock:
Apply a light coat of matte or satin sealer spray to protect the artwork from scratches and wear.
Now this sleek little trophy is ready to hold down Dad’s important papers in style
BRUSH GUIDE
The Right Brush for Every Stroke
From clean lines to bold texture — master brush choice, stroke control, and essential techniques.
Explore the Full Guide
Dad Tie-and-Collar Design
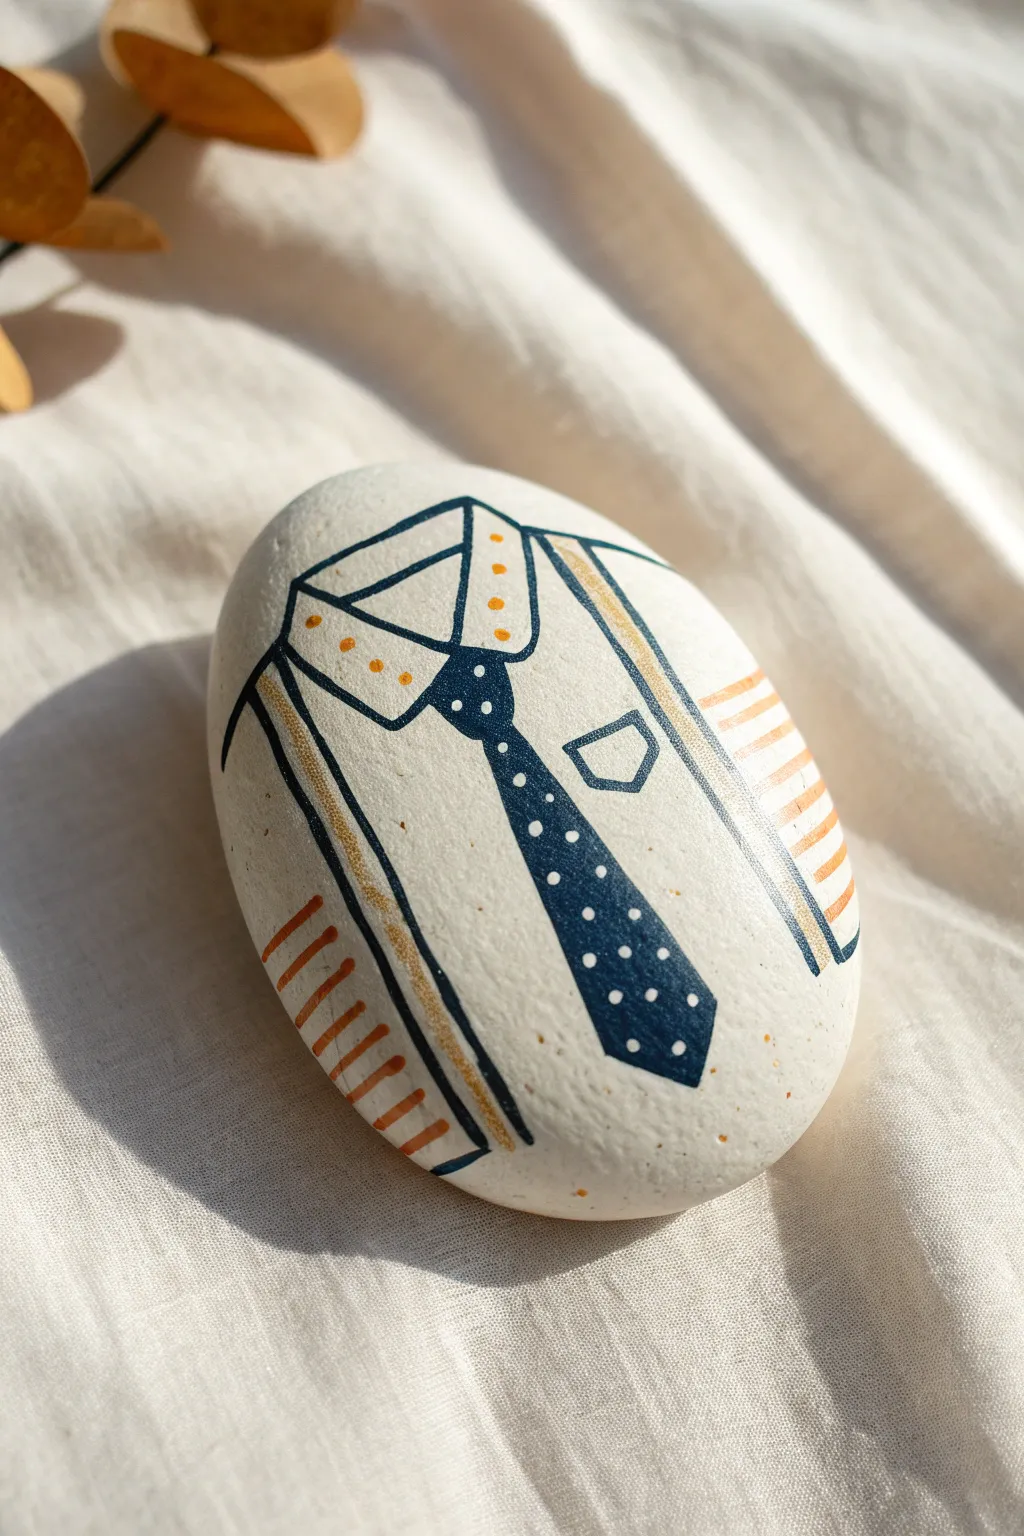
Transform an ordinary smooth stone into a charming little token of appreciation for Dad with this stylish shirt-and-tie design. The clean lines and pops of orange and blue create a crisp, tailored look that makes for a perfect paperweight or desk decoration.
Step-by-Step Guide
Materials
- Smooth, oval-shaped river rock (cleaned and dried)
- White or cream acrylic paint (matte finish)
- Navy blue fine-point paint pen or liner brush
- Orange or burnt sienna ultra-fine paint pen
- Gold or yellow ochre paint pen
- White gel pen or tiny detail brush
- Pencil and eraser
- Clear sealant sketch (spray or brush-on)
Step 1: Preparation and Base Coat
-
Clean surface:
Begin by washing your stone thoroughly with soap and water to remove any dirt or oils, then let it dry completely. -
Apply base color:
Paint the entire top surface of the rock with a creamy white acrylic paint. You’ll likely need two to three thin coats to get full, opaque coverage, letting each layer dry in between. -
Sketch the outline:
Once the base is bone dry, use a pencil to lightly sketch the central tie first to establish the center line, followed by the triangle collar shapes on either side. -
Draw the suspenders:
Sketch two vertical lines running down the sides of the rock for suspenders, angling them slightly inward toward the bottom. -
Add details:
Lightly draw the small pocket on the right side of the chest and the curved sleeve lines on the outer edges.
Smudged Lines?
If paint bleeds, wait for it to dry fully. Paint over the mistake with your beige base color, let that dry, and then redraw the line cleanly.
Step 2: Line Work
-
Outline the tie:
Using your navy blue paint pen or a liner brush, carefully trace the outline of the necktie and the knot at the top. Keep your hand steady for crisp edges. -
Fill the tie:
Fill in the entire tie shape with the navy blue paint. Don’t worry about the polka dots yet; we will add them later. -
Outline the shirt features:
Trace your pencil lines for the collar, the pocket, and the main lines of the suspenders using the navy blue pen. I find it easiest to pull the pen toward me for smoother lines. -
Define the sleeves:
Draw the curved lines for the sleeves on the far left and right edges of the rock, extending them slightly down the sides.
Step 3: Adding Color and Pattern
-
Create suspender details:
Using the gold or yellow ochre pen, draw a thick line inside the suspender outlines. Leave a tiny sliver of white space between the gold and the blue outline if you can. -
Paint sleeve stripes:
With the orange pen, draw horizontal stripes across the sleeve areas on the sides of the rock. Aim for about 5-6 stripes per side. -
Decorate the collar:
Add small orange dots along the edges of the collar triangles to mimic stitching or a patterned fabric. -
Add tie polka dots:
Once the blue tie is completely dry, use a white gel pen or a toothpick dipped in white paint to dab small, evenly spaced polka dots across the tie.
Make it Personal
Customize the tie pattern! Instead of polka dots, paint tiny diagonal stripes or use Dad’s favorite color to match a real tie he owns.
Step 4: Finishing Touches
-
Clean up:
Check for any pencil marks that are still visible and gently erase them, being careful not to rub off any paint. -
Final inspection:
Look over your lines; if any black lines look shaky, you can carefully re-trace them to crisp them up. -
Seal the rock:
Apply a coat of clear sealant (matte or satin works best for this fabric look) to protect the paint from chipping and scratching.
Now you have a dashing, permanent reminder of Dad’s style that he can keep on his desk forever
Dad Mustache and Glasses Portrait
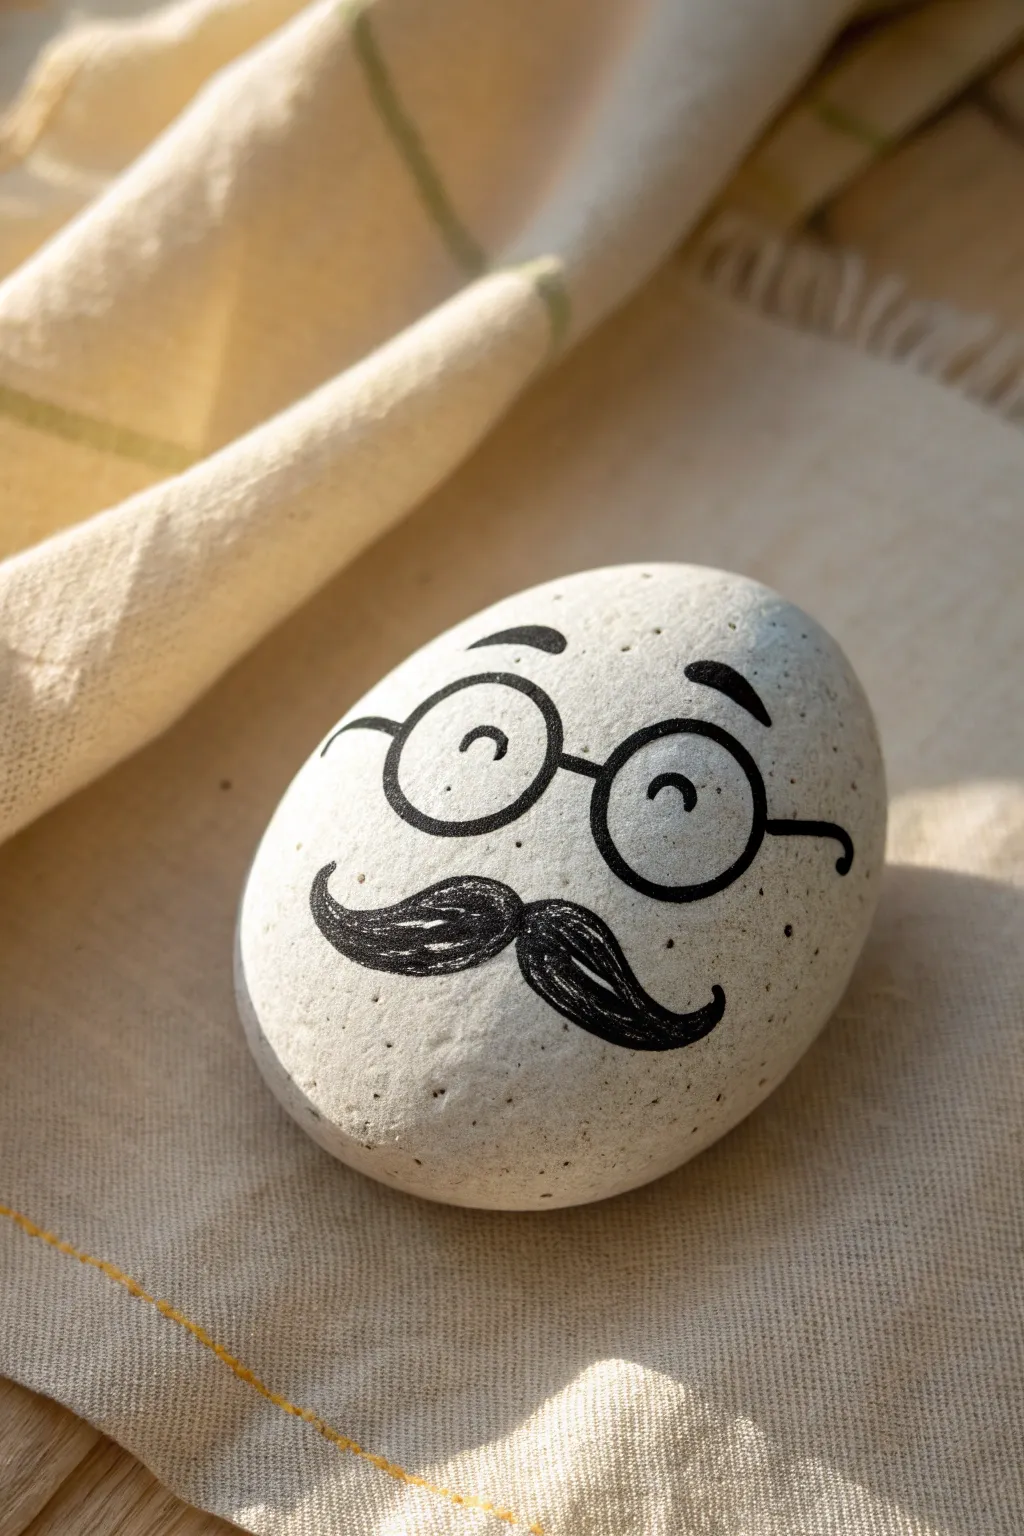
Capture Dad’s distinguished charm with this wonderfully simple yet expressive rock painting. Using just a few clean black lines on a natural stone canvas, you’ll create a minimalist portrait featuring iconic circle glasses and a dapper handlebar mustache.
How-To Guide
Materials
- Smooth, oval river rock (light grey or off-white works best)
- Black acrylic paint marker (fine tip, 0.7mm to 1mm)
- Black acrylic paint marker (medium or brush tip for filling)
- Pencil (HB or lighter)
- White eraser
- Matte spray sealant or brush-on varnish
- Soap and water for cleaning rock
Step 1: Preparation
-
Select the perfect canvas:
Look for a rock that mimics the shape of a head—an oval or egg shape is ideal. A lighter colored stone will provide the best contrast for the black ink, making the facial features pop. -
Clean surface:
Scrub the rock thoroughly with soap and warm water to remove any dirt, oils, or grit. Dry it completely with a towel and let it air dry for another hour to ensure no moisture is trapped inside.
Fixing Wobbly Lines
If your hand shakes while drawing circles, don’t panic. Thicken the line slightly to hide the wobble, or claim it as a ‘vintage’ frame style.
Step 2: Drafting the Design
-
Sketch the glasses:
Using a pencil very lightly, draw two circles near the center of the rock. They don’t need to be perfectly round; a slightly hand-drawn look adds character. Leave a small gap between them for the bridge of the nose. -
Connect the frames:
Draw a small arch connecting the two circles. Then, sketch horizontal lines extending outward from the sides of the circles toward the edges of the rock to represent the temple arms of the glasses. -
Add the eyes:
Inside each circle, draw a small, upside-down ‘U’ shape toward the top. This creates the appearance of happy, squinting eyes behind the lenses. -
Draft the mustache:
Below the glasses, sketch a large handlebar mustache. Start with a dip in the center and curve upwards on both sides, tapering to playful points at the ends. -
Position the eyebrows:
Place two small, arched eyebrows floating clearly above the glasses frames. These add a surprised or jovial expression to the face.
Make It 3D
Glue tiny googly eyes inside the glasses frames for a silly, wiggly effect, or use actual wire to shape mini-glasses and glue them on.
Step 3: Inking the Features
-
Trace the glasses:
Take your fine-tip black paint marker and carefully trace over your pencil lines for the glasses frames. Go slowly to keep the curves as smooth as possible. -
Thicken the rims:
Go over the circular frames a second time to slightly thicken the line weight. This makes the glasses the focal point of the portrait. -
Draw the temples:
Extend the lines from the sides of the glasses frames, wrapping them slightly around the curve of the rock to give a sense of dimension. -
Ink the closed eyes:
Trace the small internal arches for the eyes. Keep these lines crisp and singular so the expression remains happy and light. -
Outline the eyebrows:
Fill in the eyebrows with solid black strokes. I like to taper the ends slightly so they look natural rather than blocky.
Step 4: Detailing the Mustache
-
Outline the mustache shape:
Use your fine marker to trace the outer perimeter of the handlebar mustache you sketched earlier. -
Fill with texture:
Instead of coloring it solid black immediately, use a medium tip marker to fill the shape with directional strokes that follow the curve of the hair. This adds a subtle sense of texture. -
Deepen the color:
If the coverage looks patchy, apply a second layer of ink to the mustache to ensure a rich, solid black finish that contrasts boldly against the stone.
Step 5: Finishing Touches
-
Erase guidelines:
Allow the paint marker to dry completely—give it at least 15 minutes. Then, gently use a white eraser to remove any visible pencil marks. -
Clean up edges:
Inspect your lines. If any edges look fuzzy, use the fine tip marker to sharpen them up one last time. -
Seal the artwork:
To protect your portrait, apply a light coat of matte spray sealant. Light misting is better than a heavy coat to prevent the ink from running.
Place this charming stone on Dad’s desk as a rock-solid reminder of how much he is loved

PENCIL GUIDE
Understanding Pencil Grades from H to B
From first sketch to finished drawing — learn pencil grades, line control, and shading techniques.
Explore the Full Guide
Superhero Dad Emblem Rock
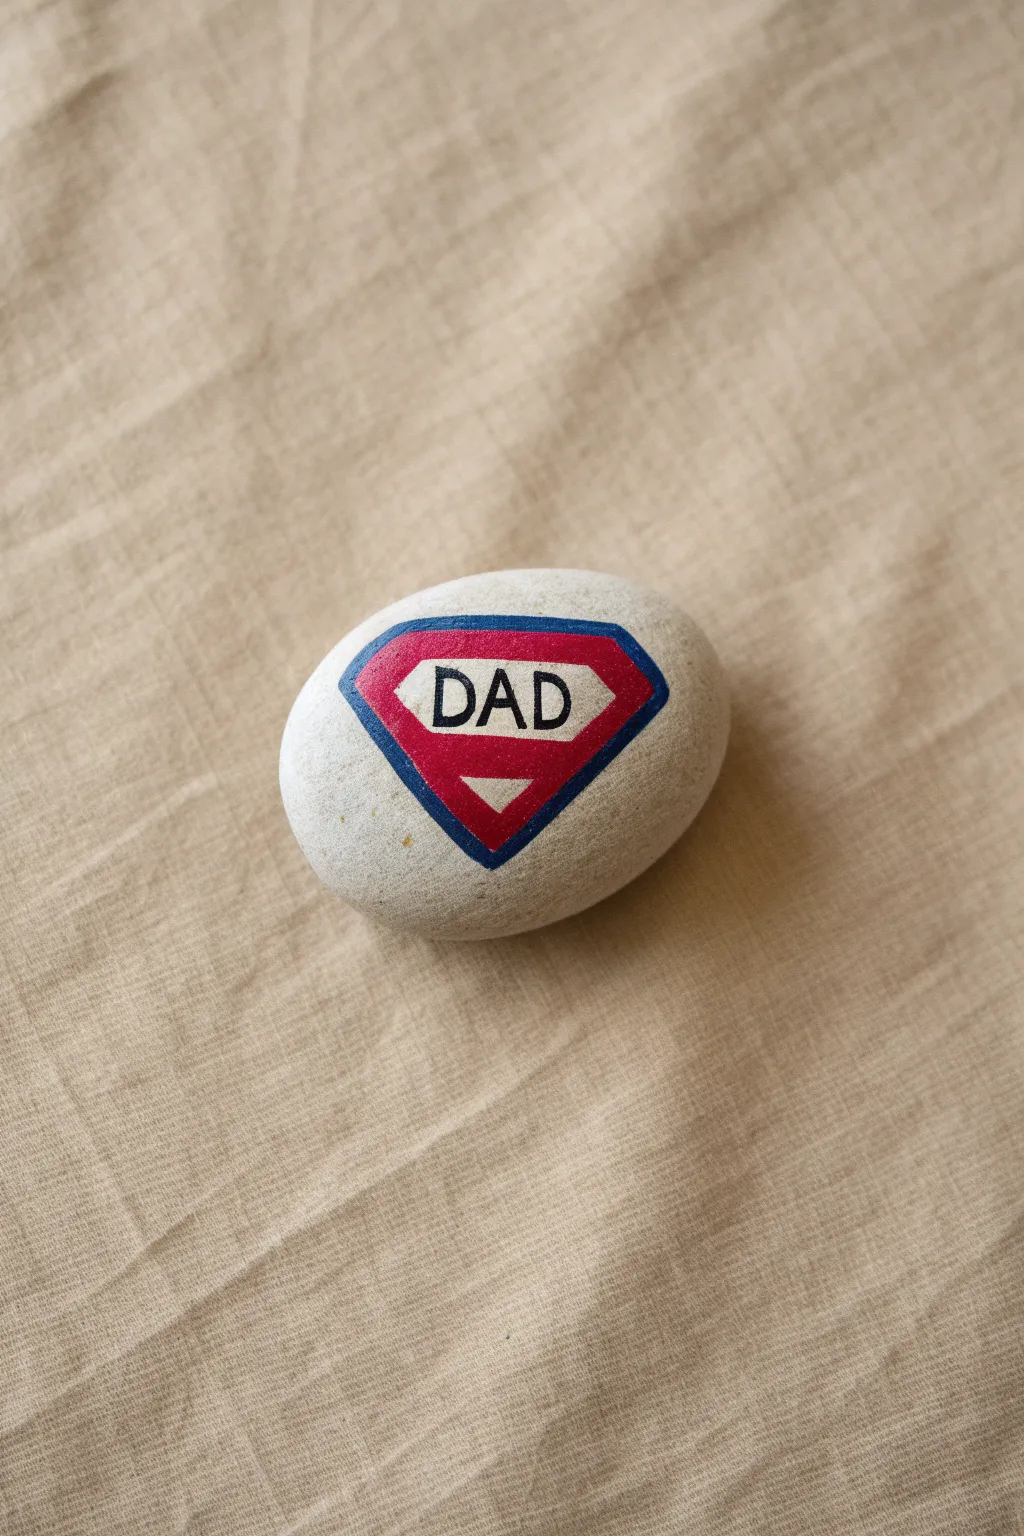
Transform a simple garden stone into a heroic tribute for Dad with this classic comic book-inspired design. The clean lines of the Superman crest make for a striking yet achievable project.
Step-by-Step Guide
Materials
- Smooth, oval-shaped river rock (approximately palm-sized)
- White acrylic paint (or gesso)
- Red acrylic paint
- Blue acrylic paint
- Black acrylic paint or fine-point black paint pen
- Pencil
- Fine detail paintbrush (size 0 or 00)
- Small flat paintbrush
- Spray sealer or varnish
Step 1: Preparation & Base
-
Clean the stone:
Before picking up a brush, wash your rock thoroughly with soap and water to remove any dirt or oils, then let it dry completely. -
Prime the surface:
Since we want the colors to be vibrant against the natural stone, paint a rough diamond shape in white where you want the logo to sit. This acts as a primer. -
Let it dry:
Allow the white base layer to dry fully. If the stone is dark, apply a second coat of white to ensure opacity.
Fixing Smudges
If red bleeds into white, don’t wipe! Let it dry completely, then paint over the mistake with white acrylic. It acts like an eraser.
Step 2: Drafting the Emblem
-
Sketch the outline:
Lightly use a pencil to draw the classic diamond shield shape over your white primed area. -
Add the inner border:
Draw a smaller diamond inside the first one to create the thick border of the shield. -
Sketch the text bar:
Draw a horizontal rectangle across the upper middle section of the inner diamond where the word ‘DAD’ will go. -
Draw the bottom triangle:
Below the text bar, sketch a small inverted triangle shape.
Make it Shine
Mix a tiny bit of gold metallic paint into the yellow or red sections for a shimmering, high-quality superhero effect.
Step 3: Painting the Colors
-
Paint the red top:
Using your fine brush and red paint, carefully fill in the area inside the inner diamond, just above the text bar. -
Paint the red sides:
Continue with the red paint, filling in the slanted sections on either side of the bottom triangle. -
Fill the border:
Switch to blue paint. Carefully fill in the outer border between your two initial diamond outlines. -
Refine the edges:
If your blue paint wobbled a bit, use a clean damp brush to gently wipe away mistakes or touch up with white once dry. -
Dry break:
Let these colored sections dry completely before moving on to the text to prevent smudging.
Step 4: Text & Details
-
Outline the text:
Use a very fine brush with black paint, or a paint pen for better control, to outline the word ‘DAD’ in capital letters inside the white horizontal bar. -
Fill the letters:
Carefully fill in the letters with black, keeping the lines crisp and legible. -
Outline the emblem:
Using the same black paint or pen, trace the very outer edge of the blue diamond to give it a finished comic-book look. -
Define the sections:
Add thin black outlines separating the red sections from the white text bar and the bottom triangle.
Step 5: Finishing Touches
-
Clean up:
Check for any stray pencil marks. If the paint is fully dry, you can gently erase visible pencil lines. -
Seal the deal:
Once the paint has cured for 24 hours, spray the rock with a clear sealant to protect it from weather or wear.
Now you have a super gift that rocks just as much as he does
Rock Star Dad Guitar Icon
Celebrate the musical dad in your life with this rustic yet striking painted stone featuring a classic acoustic guitar surrounded by retro-style sunbursts and foliage. The design captures a warm, folksy vibe with its minimal palette of black, white, and earthy orange tones on a natural stone background.
How-To Guide
Materials
- Smooth, oval-shaped river stone (light beige or cream color)
- Black acrylic paint or extra-fine Posca paint pen (Black)
- White acrylic paint or extra-fine Posca paint pen (White)
- Terra cotta or burnt orange acrylic paint
- Fine detail brushes (lined sizes 0 or 00)
- Small flat brush
- Pencil for sketching
- Matte spray sealant or clear acrylic varnish
Step 1: Preparation and Sketching
-
Clean the canvas:
Begin by thoroughly washing your stone with warm soapy water to remove any dirt or oils. Let it dry completely in the sun or use a hairdryer to speed things up. -
Position the centerpiece:
Using a light pencil, sketch the outline of the acoustic guitar in the center of the rock. Angle the neck slightly toward the upper right to create a dynamic composition. -
Sketch the foliage:
Draw two main leaf stems curving upwards on either side of the guitar body. On the right, sketch a bolder branch with oval leaves; on the left, a thinner, more delicate sprig. -
Add floating leaves:
Sketch two larger, single leaves at the base of the design—one lying horizontally near the guitar’s bottom right, and another tilted near the bottom left.
Oops! Wobbly Lines?
If your guitar strings or leaf outlines get messy, wait for the paint to dry completely, then use a toothpick to gently scrape away the excess paint.
Step 2: Painting the Guitar
-
Block in the guitar body:
Using your small flat brush and black paint, fill in the sketched guitar body. Use smooth strokes to ensure solid coverage without texture. -
Paint the neck and headstock:
Switch to a fine detail brush to carefully paint the long, thin neck and the curved headstock at the top. Keep your hand steady to maintain straight edges. -
Add strings and frets:
Once the black paint is bone dry, use a very fine brush or a white paint pen to draw three vertical lines down the neck for strings and tiny horizontal dashes for the tuning pegs. -
Detail the sound hole:
Paint a white circle outline on the guitar body for the sound hole, and add a small white rectangle for the bridge near the bottom.
Make It Personal
Swap the generic guitar brand for Dad’s initials on the headstock, or write a tiny ‘Dad Rocks’ message along the bottom curve of the stone.
Step 3: Botanic Accents
-
Outline the main leaves:
Using black paint or a fine pen, outline the large floating leaves at the bottom and the delicate sprig on the left side. -
Paint orange foliage:
Dip your fine brush into the terra cotta or burnt orange paint. Carefully fill in the leaves of the branch on the right side of the guitar. -
Add orange accents:
Paint a second stem of orange leaves rising up the left side of the guitar, intertwining slightly with the black outlined sprig. -
Detail the floating leaves:
Inside the large black outlined leaves at the bottom, paint a single central vein line to give them dimension. -
Create leaf veins:
For the solid orange leaves, I like to go back in with a very fine black pen or brush to add a central vein line once the orange paint is fully dry.
Step 4: Finishing Touches
-
Paint the sunburst rays:
Using the orange paint, add short, radiating lines extending outward from the main design. Focus these ‘rays’ around the top of the guitar and the bottom curve. -
Add texture with dots:
In the spaces between the sunburst rays, add tiny dots of orange paint. This stippling effect adds a lovely vintage texture to the background. -
Review and refine:
Check your lines. If any black outlines look shaky, carefully crispen them up with your finest brush. -
Seal the artwork:
Once the entire design is completely dry (give it at least an hour), spray the rock with a matte sealant to protect the paint from chipping without adding too much unnatural shine.
This charming nature-inspired guitar rock makes a perfect paperweight for Dad’s desk or a unique addition to his garden


Grill Master Dad Flames
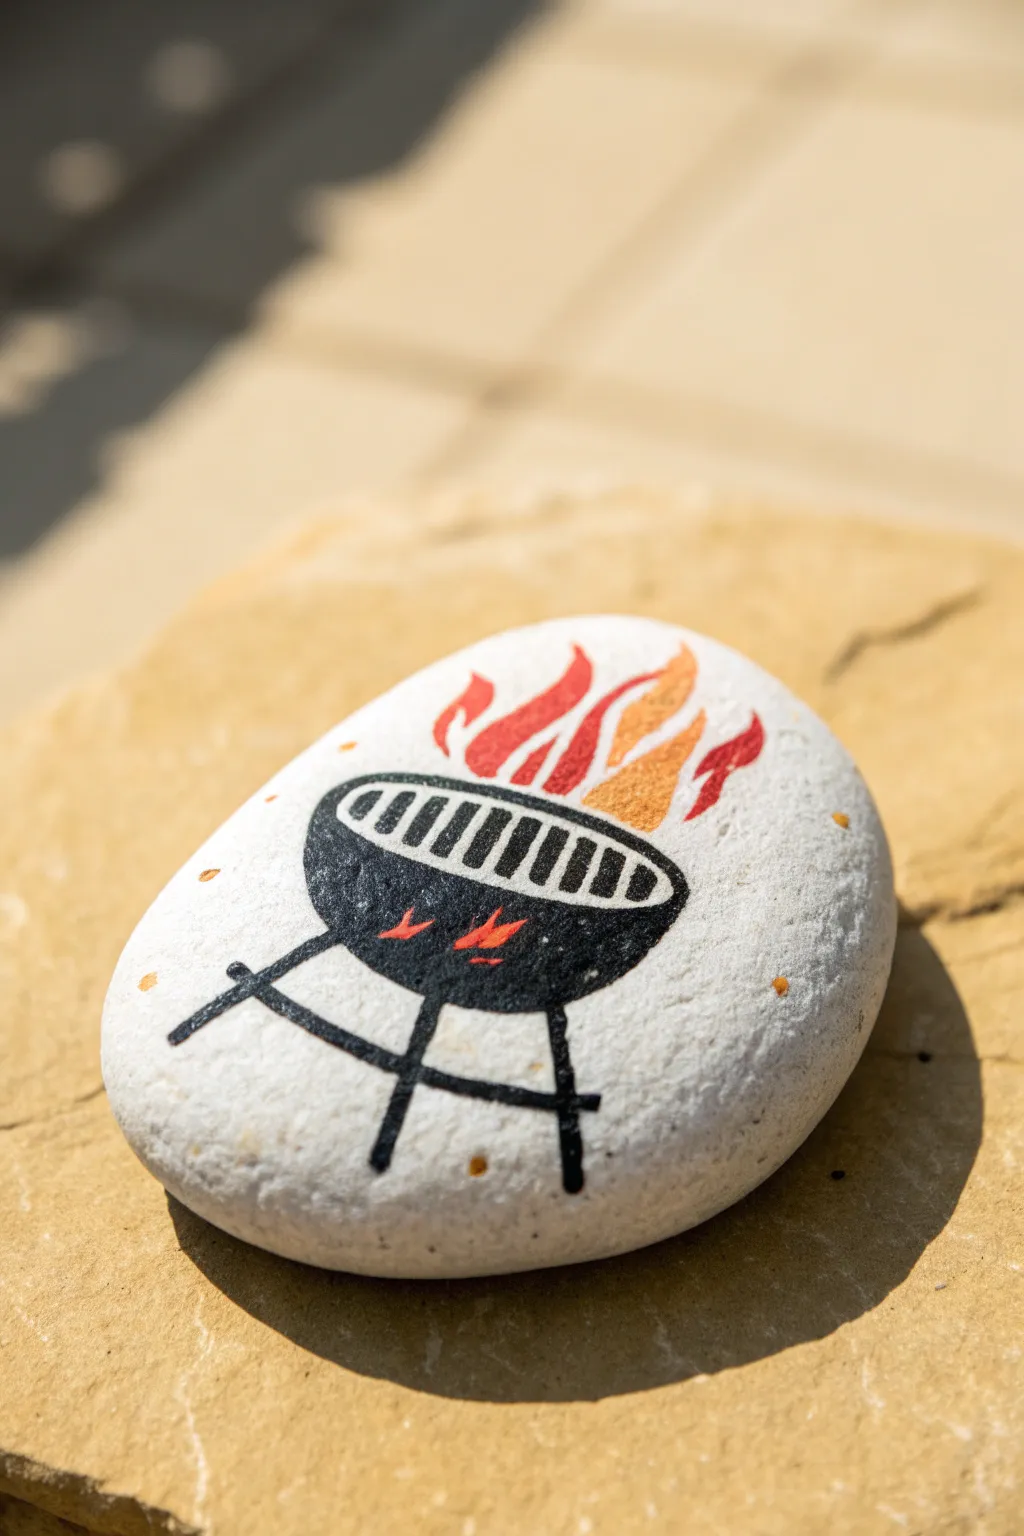
Celebrate the king of the coals with this fiery little tribute painted on a smooth white stone. The design features a classic kettle grill silhouette topped with vibrant, stylized flames that capture the heat of a summer cookout.
Step-by-Step Guide
Materials
- Smooth, round river rock (approx. 3-4 inches wide)
- White acrylic paint or gesso (for base)
- Black acrylic paint or paint pen (medium tip)
- Red acrylic paint
- Orange acrylic paint
- Yellow or gold acrylic paint (for accents)
- Small flat brush
- Fine detail brush
- Pencil for sketching
- Clear acrylic sealer (spray or brush-on)
Step 1: Preparation and Base
-
Clean the canvas:
Begin by washing your stone thoroughly with warm soapy water to remove any dirt or oils, then let it dry completely in the sun. -
Prime the surface:
Apply a base coat of white acrylic paint to the top surface of the rock. This creates a bright background that will make your black grill and fiery colors pop. -
Second coat:
If the rock’s natural color is still showing through after the first layer dries, add a second thin coat of white for solid, opaque coverage. -
Sketch the grill:
Once the white base is bone dry, lightly sketch the outline of a kettle grill drum in the center of the rock using a pencil. Draw an oval for the opening and a semi-circle underneath for the bowl.
Step 2: Painting the Grill
-
Outline the bowl:
Using black paint and a fine brush, or a black paint pen, carefully trace the semi-circle bowl shape of the grill. -
Fill the silhouette:
Fill in the main body of the grill with solid black paint. I like to use a slightly larger brush here to get smooth coverage without visible strokes. -
Create the grate:
For the grill opening oval on top, draw a thick black outline. Inside this oval, paint vertical black stripes evenly spaced to represent the grill grate, leaving the white background visible between them. -
Add the legs:
Draw two angled legs extending downward from the grill bowl. Connect them with a horizontal crossbar near the bottom for stability. -
Detail the feet:
Add small horizontal lines at the bottom of each leg to create feet, ensuring the grill looks grounded on the rock. -
Paint the handle:
Add a small, angled line on the left side of the grill body to represent the side handle.
Fixing Wobbly Lines
If your grate lines get crooked, let the black dry fully. Then, use a white paint pen to clean up the edges and straighten the gaps.
Step 3: Adding the Heat
-
Base flames:
Start painting the flames rising from the grate using your red paint. Create distinct, wavy shapes that curve upward and taper to sharp points. -
Layering orange:
While the red is still slightly tacky or just dry, paint smaller flame shapes in orange, either next to the red or layered inside larger red flames for depth. -
Inner coals:
Add tiny flecks of red and orange paint directly onto the black body of the grill to simulate glowing embers or reflected heat. -
Sparks and embers:
Dip the very tip of your fine brush into orange or gold paint and dot small ‘sparks’ floating around the main design on the white background.
Make It Personal
Add ‘Dad’ or ‘King of the Grill’ in chunky letters curved under the legs, or write the year on the back for a keepsake.
Step 4: Finishing Touches
-
Review contrast:
Check your black lines against the flames. If paint overlapped messy edges, touch up the black outlines to keep the silhouette crisp. -
Dry completely:
Allow the entire design to dry for at least an hour to ensure the thick black paint is fully set. -
Seal the deal:
Apply a coat of clear acrylic sealer to protect your artwork from the elements, especially if this rock will live in the garden.
Now you have a durable decoration perfect for weighing down napkins at the next family cookout
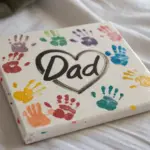
Handprint Heart for Dad
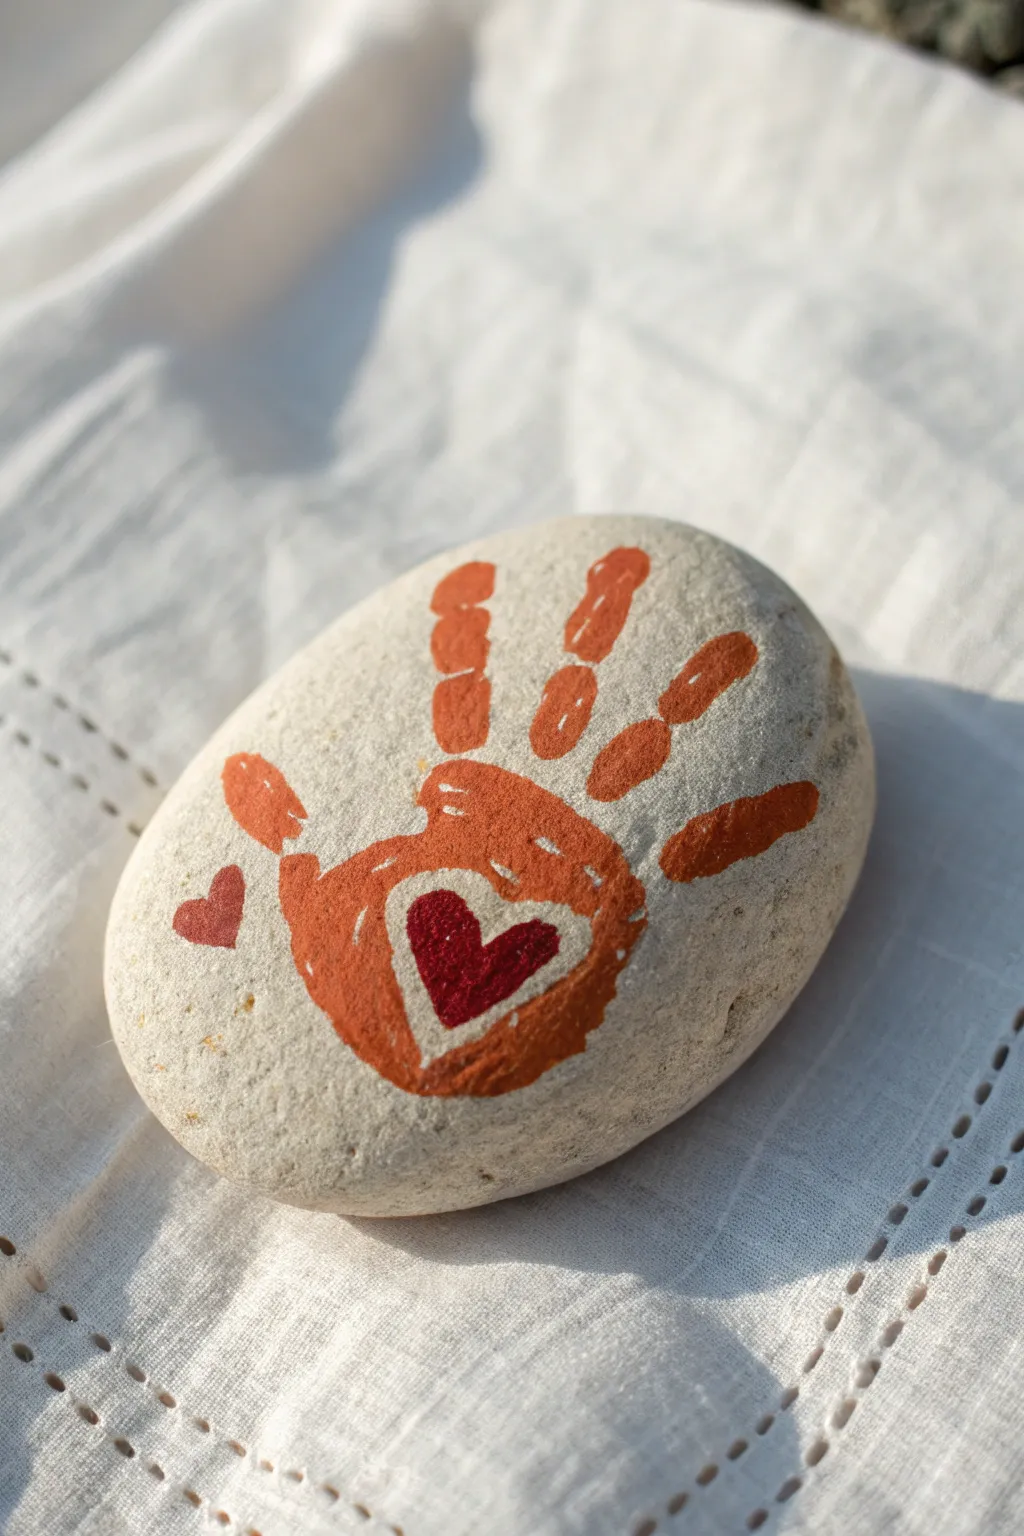
Capture a sweet, symbolic gesture with this handprint-style rock art that places love right in the palm of your hand. The design features a warm orange handprint silhouette with a deep red heart nestled in the center, all painted on a smooth, natural stone.
How-To Guide
Materials
- Smooth, oval-shaped river rock (cleaned and dried)
- Acrylic paint (warm orange/terracotta)
- Acrylic paint (deep red/burgundy)
- Small flat paintbrush
- Fine detail paintbrush or liner brush
- Pencil (optional for sketching)
- Matte or satin spray sealer
Step 1: Preparation & Outline
-
Select your stone:
Choose a rock that is relatively flat and wide enough to accommodate the width of a handprint design. Wash it thoroughly with soap and water to remove any dirt or oils, then let it dry completely. -
Plan the placement:
Visualize where the palm and fingers will go. The palm should sit lower on the rock, leaving room for the fingers to extend upward toward the curved top edge. -
Sketch the outline (optional):
If you’re nervous about freehanding, lightly sketch the hand shape with a pencil. Draw an oval for the palm and five sausage-like shapes for the fingers.
Wobbly Lines?
If your painted edges look shaky, wait for the paint to dry fully. Then, use a fine-tip paint pen in the same color to trace over the edges for a crisp finish.
Step 2: Painting the Handprint
-
Paint the palm shape:
Using your flat brush and the warm orange paint, create a rounded, organic shape for the palm at the bottom center of the rock. Keep the edges slightly uneven to mimic a real print. -
Create the heart reserve:
While painting the palm, carefully leave a blank, heart-shaped space in the very center. It’s easier to paint around this negative space now than to paint over the orange later. -
Clean up the heart edges:
Use your fine detail brush and a tiny bit of orange paint to refine the edges of the unpainted heart, making sure the curves are symmetrical and crisp. -
Paint the thumb:
Dip your flat brush in orange again. Paint the thumb extending out to the left side, angled slightly away from the other fingers. -
Add the first two fingers:
Paint the index and middle fingers extending upwards. Make the segments look slightly separated or disjointed, rather than straight lines, to give it that organic, stamped texture. -
Finish the fingers:
Paint the ring and pinky fingers. The pinky should be shorter and angled slightly to the right. -
Texture the print:
I like to dab the wet paint slightly with a dry brush or a sponge to remove brushstrokes and give it a textured, skin-like appearance. -
Add floating hearts:
To the left of the main handprint, paint a small, solid orange heart. You can adhere to the pencil sketch if you made one, or place it freely. -
Add a second tiny heart:
Paint an even smaller heart just below the first one for balance. Let all the orange paint dry completely before moving to the next color.
Step 3: Refining Details
-
Fill the center heart:
Switch to your deep red or burgundy paint. Carefully fill in the negative space heart you left in the center of the palm. -
Outline the inner heart:
Use a very fine liner brush and the white of the stone (or white paint if needed) to leave a tiny gap between the red heart and the orange palm for definition. -
Add white highlights (optional):
If you want the heart to pop, you can add a tiny speck of white or a lighter red to the top curve of the heart to simulate a shine. -
Check opacity:
If the orange or red looks streaky, apply a second thin coat once the first is dry to ensure solid, bold color. -
Clean up stray marks:
If any paint went outside the lines, use a damp cotton swab or a brush with a bit of water to gently scrub it away before it cures.
Make it Personal
Write the year or a tiny ‘Dad’ on the back of the rock with a black permanent marker so he always remembers when this keepsake was made.
Step 4: Sealing
-
Dry completely:
Allow the rock to sit undisturbed for at least an hour, or until the thickest parts of the paint are fully hard to the touch. -
Apply sealer:
Take the rock outside or to a well-ventilated area. Spray a light, even coat of matte or satin sealer over the surface to protect the paint from chipping.
Now you have a durable, heartfelt token perfect for a desk paperweight or a garden decoration.
Dad and Kids Rock Family Set
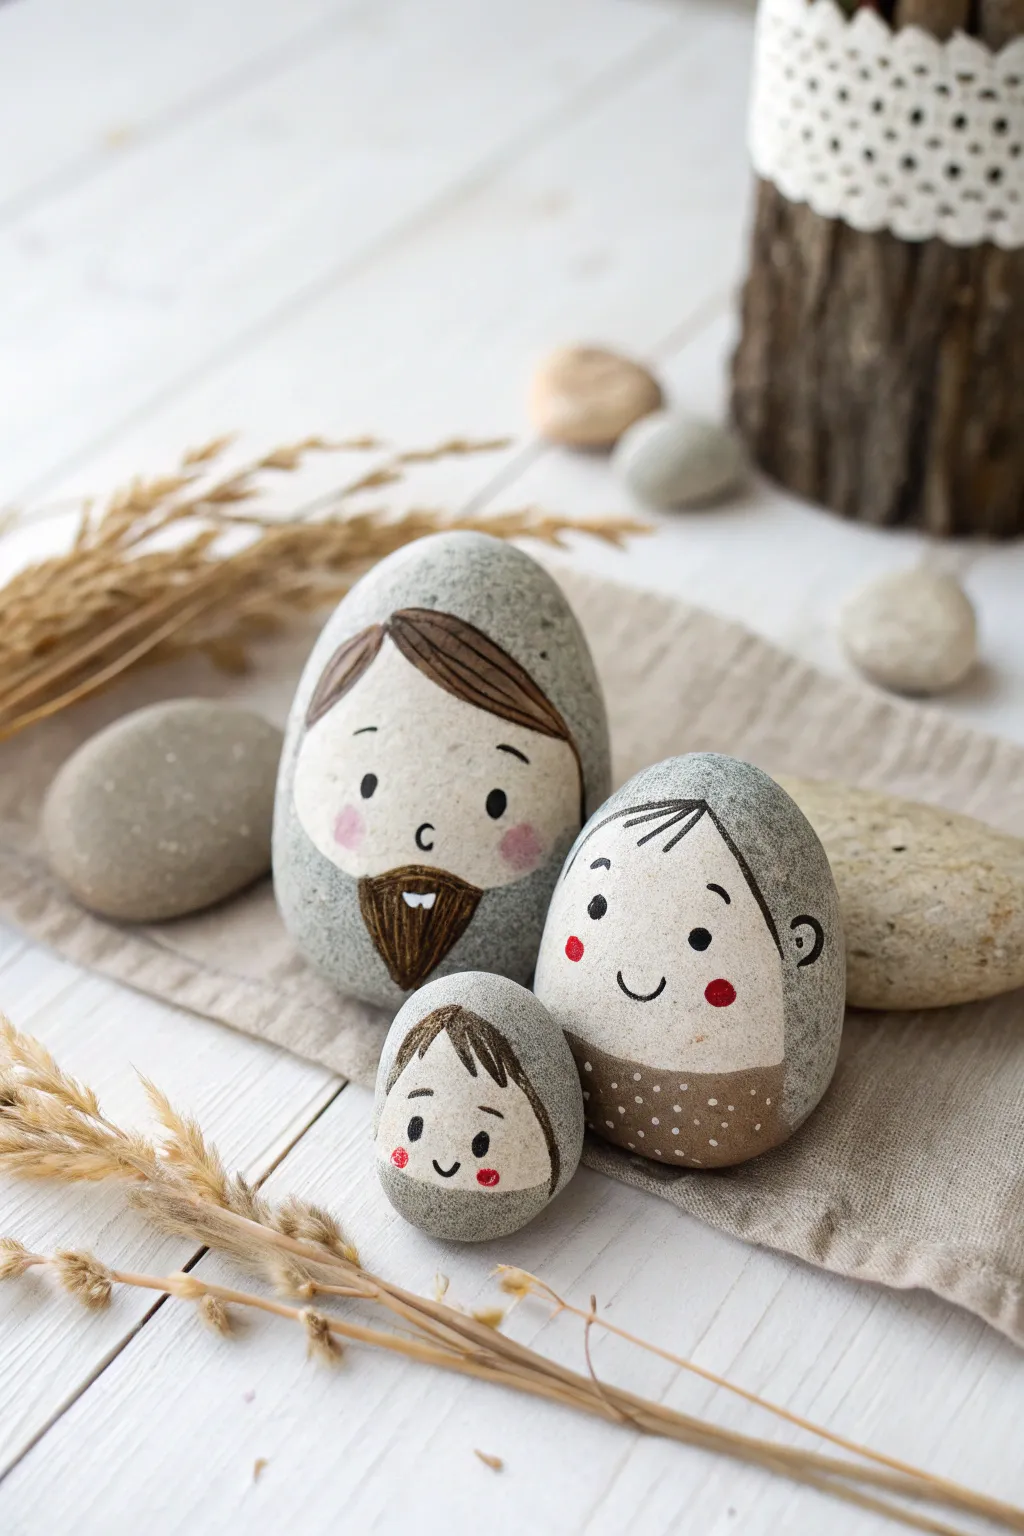
Capture the warmth of your family unit with this charming set of nesting-style painted rocks. Using the natural grey of the stones as a backdrop, you’ll create sweet, minimalist faces with simple lines and rosy cheeks.
Step-by-Step Guide
Materials
- Three smooth, oval river rocks (large, medium, small)
- White or cream acrylic paint
- Brown acrylic paint (multiple shades or mixable)
- Black fine-point paint pen or liner brush
- Pink acrylic paint or paint pen
- Small flat brush
- A clean, dry sponge or cloth
- Matte finish sealant spray
Step 1: Stone Prep and Faces
-
Clean the canvas:
Begin by scrubbing your selected stones with warm soapy water to remove any dirt or oils. Use a stiff brush if needed, then rinse thoroughly and let them dry completely in the sun or with a hairdryer. -
Position the faces:
Hold the largest stone (the Dad) upright. Imagine an invisible oval on the upper front surface where the face will go. It shouldn’t cover the whole rock; leave plenty of natural grey stone visible around the edges. -
Paint the skin tone base:
Using your white or cream paint and a small flat brush, paint a soft, rounded shape for the face. It helps to paint a slightly flattened circle or an oval shape. -
Repeat for the family:
Do the same for the medium (Mom) and small (Child) stones. Adjust the size of the face oval to match the scale of each rock, ensuring the family looks proportional when placed together. -
Opacity check:
The first layer of white might look translucent against the grey stone. I usually let this dry for about 15 minutes and apply a second coat to get a solid, crisp surface for drawing.
Natural Stone Look
Don’t paint the backs of the rocks! Leaving the natural grey visible creates a beautiful contrast and makes the painted faces pop more.
Step 2: Adding Hair and Character
-
Outline the Dad’s hair:
Once the white face paint is fully dry, mix a dark brown acrylic paint. Using a liner brush, paint a swooping hair line along the top of the white oval, creating a side-part look. -
Fill in the hair:
Paint the hair area, extending it slightly off the white face onto the grey stone to anchor the character. Add a few thin, darker distinct lines within the brown to simulate hair texture. -
Paint the Dad’s beard:
At the bottom of the Dad’s white face oval, paint a triangular beard shape in the same dark brown. Leave a small gap for the mouth later, or paint it solid to add a mouth on top. -
Create the Mom’s hair:
For the medium stone, paint the hair framing the face. You can add a little bun detail or just frame the forehead with simple bangs using a lighter brown or black, drawn with short, deliberate strokes. -
Add the Child’s hair:
On the smallest stone, paint simple bangs swooping down over the forehead. Keep the lines loose and playful. -
Detail the clothing:
For the medium stone, paint a band at the bottom of the rock in a contrasting brown to suggest a shirt or dress. Once dry, add tiny white dots for a pattern.
Step 3: Facial Features
-
Draw the eyes:
Switch to your black fine-point paint pen. On all three rocks, draw two small, solid black circles for widely spaced eyes. This spacing is key to the cute, ‘kawaii’ look. -
Add eyebrows:
Draw tiny, floating curved lines above the eyes for eyebrows. Give the Dad slightly thicker brows, and the child smaller, higher arches. -
Create the noses:
Draw a tiny ‘c’ shape or a simple loop in the center of the face for the nose. Keep it minimal. -
Paint the smiles:
Draw a simple ‘u’ curve for the smile. For the Dad, position the smile inside the beard area (use white paint if the brown is dark) or just above it. -
Add the blush:
Dip a pinky finger or a dry sponge into a tiny amount of pink paint. Dab off the excess, then gently press rosy cheeks onto the outer sides of the faces. -
Add highlights:
Using the very tip of a brush or a toothpick with white paint, add a tiny white dot to the beard teeth or eyes to bring them to life. -
Seal the set:
Allow the stones to dry overnight. Spray them with a matte sealant to protect the paint without making them too glossy, preserving the natural stone look.
Shaky Lines?
If your hand shakes while using the paint pen on the uneven stone surface, brace your pinky finger against the dry part of the rock for stability.
Arranging these together creates a heartwarming shelf display perfect for Father’s Day
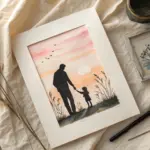
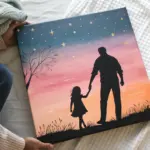
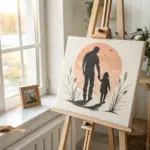
Father-Child Sunset Silhouette Scene
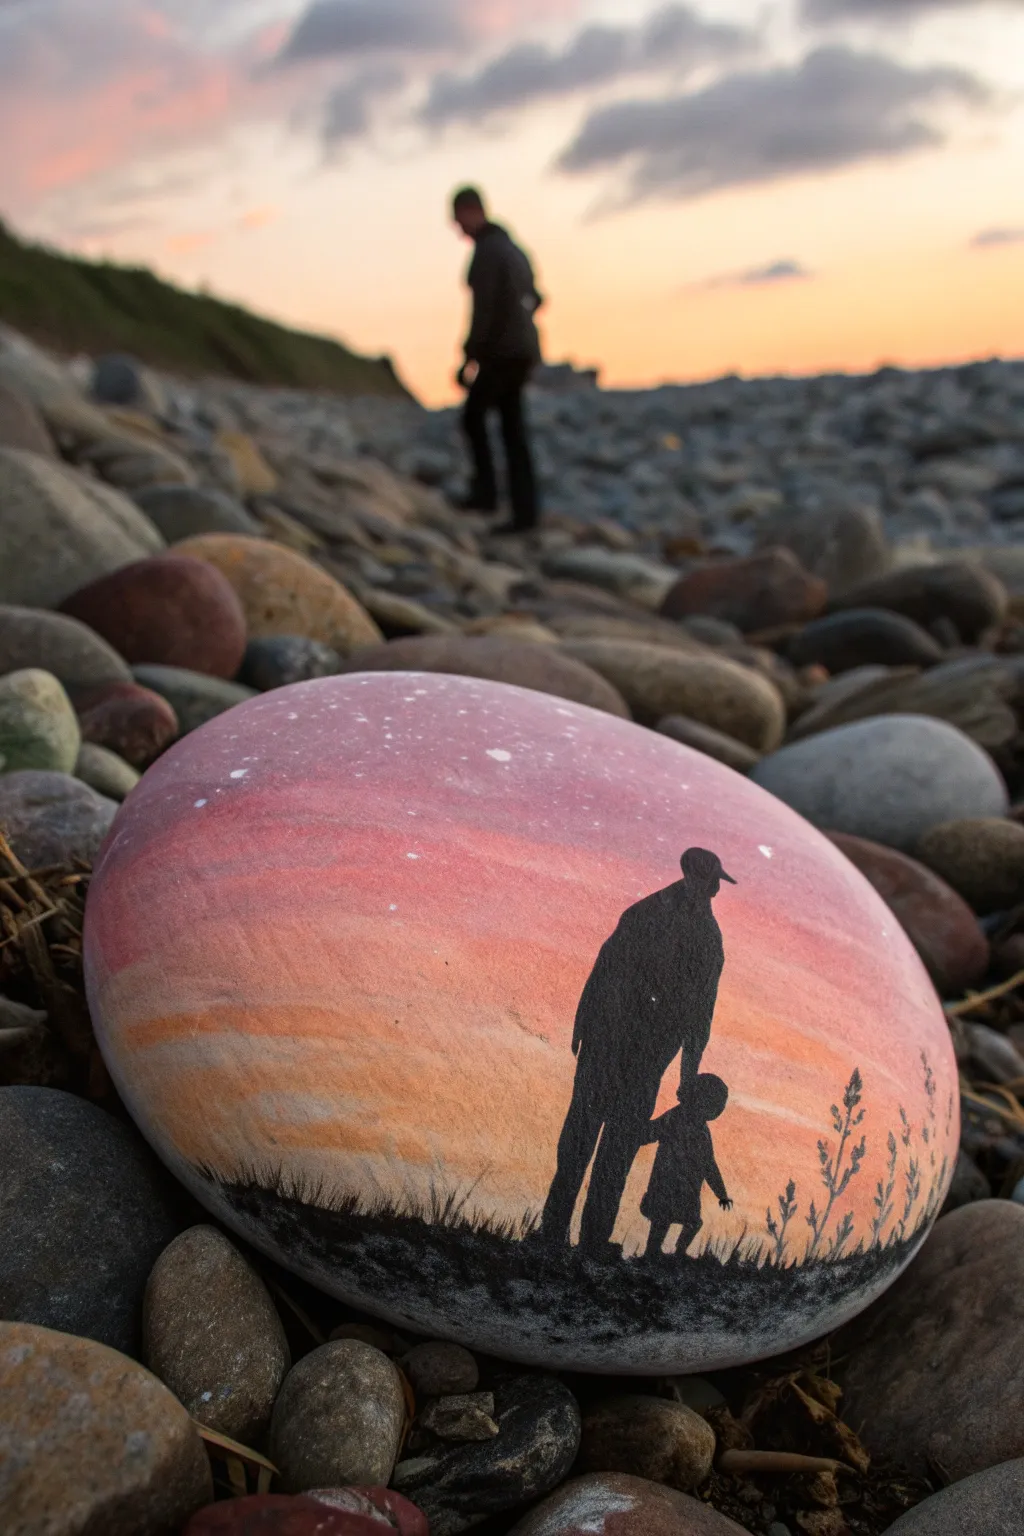
Capture a heartwarming moment between father and child with this serene sunset silhouette stone. Using soft blending techniques and crisp black lines, you’ll create a keepsake that glows with the warmth of a summer evening.
Step-by-Step
Materials
- Large, smooth river rock (oval or round)
- Acrylic paints (Titanium White, Pink, Orange, Yellow, Black)
- Flat shader brush (size 8 or 10)
- Small round detail brush (size 0 or 00)
- Cup of water
- Palette or paper plate
- Paper towels
- Spray sealer or varnish (matte or satin finish)
Step 1: Preparing the Canvas
-
Clean the surface:
Begin by washing your stone thoroughly with soapy water to remove any dirt or oils. Let it dry completely before starting, as moisture can prevent the paint from adhering properly. -
Prime the stone:
Apply a base coat of Titanium White acrylic paint over the entire top surface of the rock. This white background ensures your sunset colors will appear bright and vibrant rather than muddy.
Step 2: Painting the Sunset Sky
-
Mix your pinks:
On your palette, mix a soft pink shade. If your pink is too hot or neon, tone it down with a touch of white. -
Start the gradient:
Using the flat shader brush, paint a horizontal band of pink across the top third of the rock. While the paint is still wet, add a little white to the very top edge to suggest the highest clouds. -
Transition to orange:
Clean your brush quickly and pick up some orange paint. Apply a band of orange directly below the pink, slightly overlapping the wet pink paint. -
Blend the horizon:
Use back-and-forth horizontal strokes where the pink and orange meet to create a seamless, soft blend. I find that keeping the brush slightly damp helps smoothen this transition. -
Add the yellow glow:
paint the bottom third of the sky area with yellow, blending it upward into the orange. This creates the glowing horizon line where the sun has just set. -
Create cloud textures:
While the sky is drying but still slightly tacky, lightly streak a tiny bit of white across the pink and orange sections to create feathery, wispy clouds. Don’t overwork this; keep it subtle.
Uneven Blending?
If your sky colors look stripey instead of blended, use a slightly damp (not wet) brush to gently sweep back and forth over the line where two colors meet while the paint is still wet.
Step 3: Adding Starts and Ground
-
Splatter stars:
Once the sky is dry to the touch, load a toothbrush or stiff brush with watered-down white paint. Flick the bristles with your thumb to spray tiny stars across the pink upper section of the sky. -
Paint the ground line:
Switch to black acrylic paint. At the very bottom of the rock, paint a solid, undulating black mound to represent the grassy hill or dune. -
Texture the grass:
Using a small round brush or even an old, frayed brush, dab the top edge of the black ground to create a rough, grassy texture rather than a smooth line.
Pro Tip: Initial Sketch
Nervous about freehanding the silhouettes? Draw the figures lightly with a pencil directly on the dry sunset background first. The black paint will easily cover the graphite marks.
Step 4: Painting the Silhouette
-
Outline the father:
Using your smallest detail brush (size 0), carefully outline the shape of the father figure. Start with the head and cap, then move down to the shoulders and legs. Keep the figure entirely black. -
Fill in the father:
Once you are happy with the outline, fill in the body of the father figure with solid black paint. Ensure the coverage is opaque. -
Add the child:
Paint the smaller child figure next to the father. Pay attention to the connection point—their hands should be joined. The child’s silhouette should be simpler, perhaps wearing a dress or shorts. -
Detail the tall grass:
With the tip of your liner brush, flick thin, upward strokes from the ground around the figures. Make these vary in height and direction to look like wild dune grass. -
Add botanical accents:
On the right side of the rock, paint a few distinct stalks with small leaves or seed heads on them to frame the scene and add depth. -
Final touches:
Check for any light patches in your black silhouette and apply a second coat if needed for a solid, dark contrast against the sunset. -
Seal the artwork:
Allow the rock to dry overnight. Once fully cured, apply a spray sealer in a matte or satin finish to protect the painting from chipping or fading.
Place this painted stone on a desk or in the garden as a permanent reminder of fatherly love


Have a question or want to share your own experience? I'd love to hear from you in the comments below!