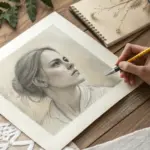
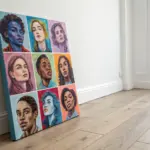
Feminist painting can be tender, loud, funny, furious, or quietly unshakeable—and it all counts. Here are some of my favorite feminist painting ideas that let you turn your brush into a voice, without losing your personal style.
Venus Symbol With a Raised Fist
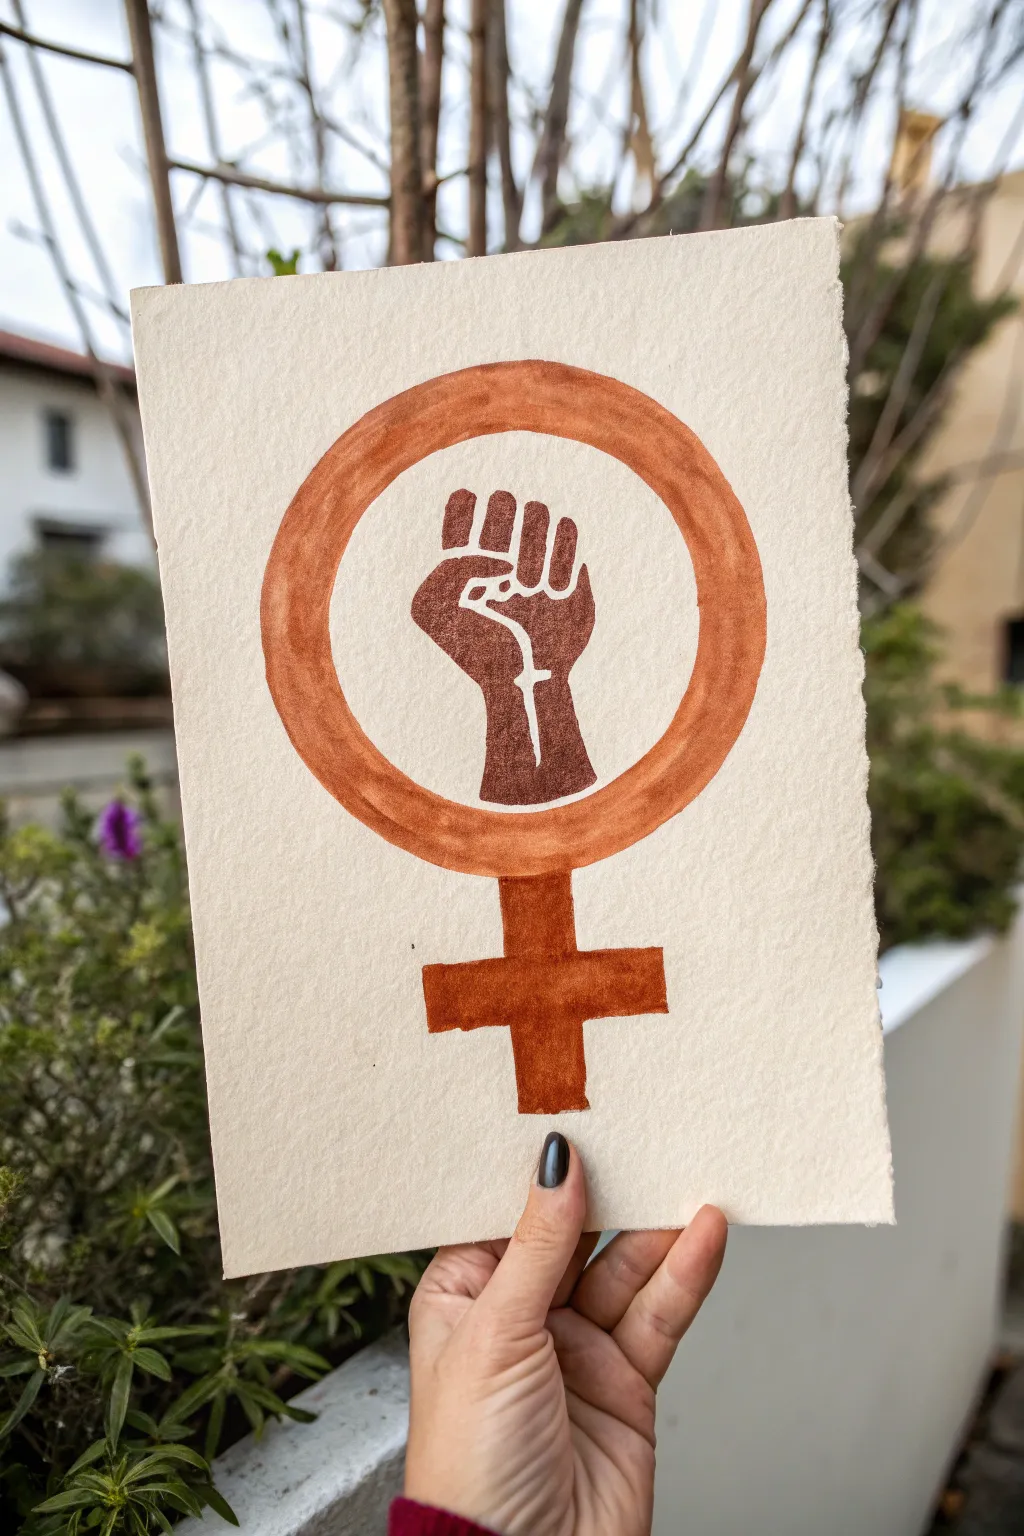
Combine the universal symbol for womanhood with the raised fist of solidarity in this striking, monochromatic painting. The warm, earthy terracotta tones create a bold yet organic look on textured watercolor paper.
Step-by-Step Tutorial
Materials
- Cold-pressed watercolor paper (300 gsm)
- Pencil (HB or H)
- Eraser
- Gouache or opaque watercolor paint (burnt sienna/terracotta)
- Small round brush (size 2 or 4)
- Fine liner brush (size 00)
- Ruler
- Compass (optional but recommended)
- Mixing palette
- Water jar
Step 1: Drafting the Design
-
Center the page:
Begin by finding the visual center of your watercolor paper. Use a ruler to lightly mark a vertical centerline to guide the symmetry of the Venus symbol. -
Draw the main circle:
Using a compass, draw the outer circle of the Venus symbol. Keep your pencil pressure very light so the graphite doesn’t show through the paint later. -
Create the inner ring:
Adjust your compass to be slightly smaller—about 1.5 cm less in radius—and draw an inner circle sharing the same center point. This creates the thick ring of the symbol. -
Sketch the cross:
At the bottom of the outer circle, sketch the vertical rectangle for the cross stem, centered on your guide line. Add the horizontal bar crossing it, measuring to ensure both arms are equal in length. -
Outline the fist:
Inside the negative space of the circle, lightly sketch the raised fist. Start with a rectangle for the palm and add cylinders for the fingers. I find it helpful to look at my own hand in a mirror for reference. -
Refine the fist details:
Refine the sketch by curving the fingers inward and adding the thumb tucked across the knuckles. Pay attention to the negative space lines that define the fingers.
Step 2: Painting the Symbol
-
Mix your base color:
On your palette, mix a burnt sienna or terracotta hue. Achieve a creamy consistency similar to melted ice cream to ensure the paint is opaque but flows smoothly. -
Paint the outer ring:
Using the size 2 or 4 round brush, carefully paint the ring of the Venus symbol. Rotate your paper as you go to maintain a comfortable angle for your hand. -
Fill the cross:
Move down to the cross shape. Use the flat edge of your brush or a ruler to help keep the edges of the cross straight and crisp. -
Start the wrist:
Switch to a slightly darker version of your mix by adding a touch of brown or using less water. Begin painting the wrist area of the fist, working upward.
Keep it Clean
Rest your painting hand on a clean scrap piece of paper while working. This prevents oils from your skin transferring to the paper and stops you from accidentally smudging wet paint.
Step 3: Detailing and Refining
-
Define the thumb:
Carefully paint the thumb shape, leaving a thin white line of negative space between the thumb and the bulk of the hand to define the form. -
Paint the fingers:
Switch to your fine liner brush for precision. Paint each folded finger segment individually, leaving tiny gaps of white paper between the fingers and knuckles to act as outlines. -
Add saturation:
Once the first layer is dry, you might notice some transparency. Go over the main ring again with a second coat to deepen the color and reduce streakiness. -
Clean edges:
Inspect the edges of your circle and cross. If any lines are wobbly, use the fine liner brush with slightly thicker paint to tidy them up. -
Erase guides:
Allow the painting to dry completely—give it at least 20 minutes. Gently erase any visible pencil marks, being careful not to rub the paint itself.
Fixing Wobbly Circles
If your circle looks uneven, don’t panic. Thicken the line weight slightly around the entire circumference to mask the wobble rather than trying to spot-fix just one area.
Now you have a powerful piece of art ready to display or gift to an inspiring friend


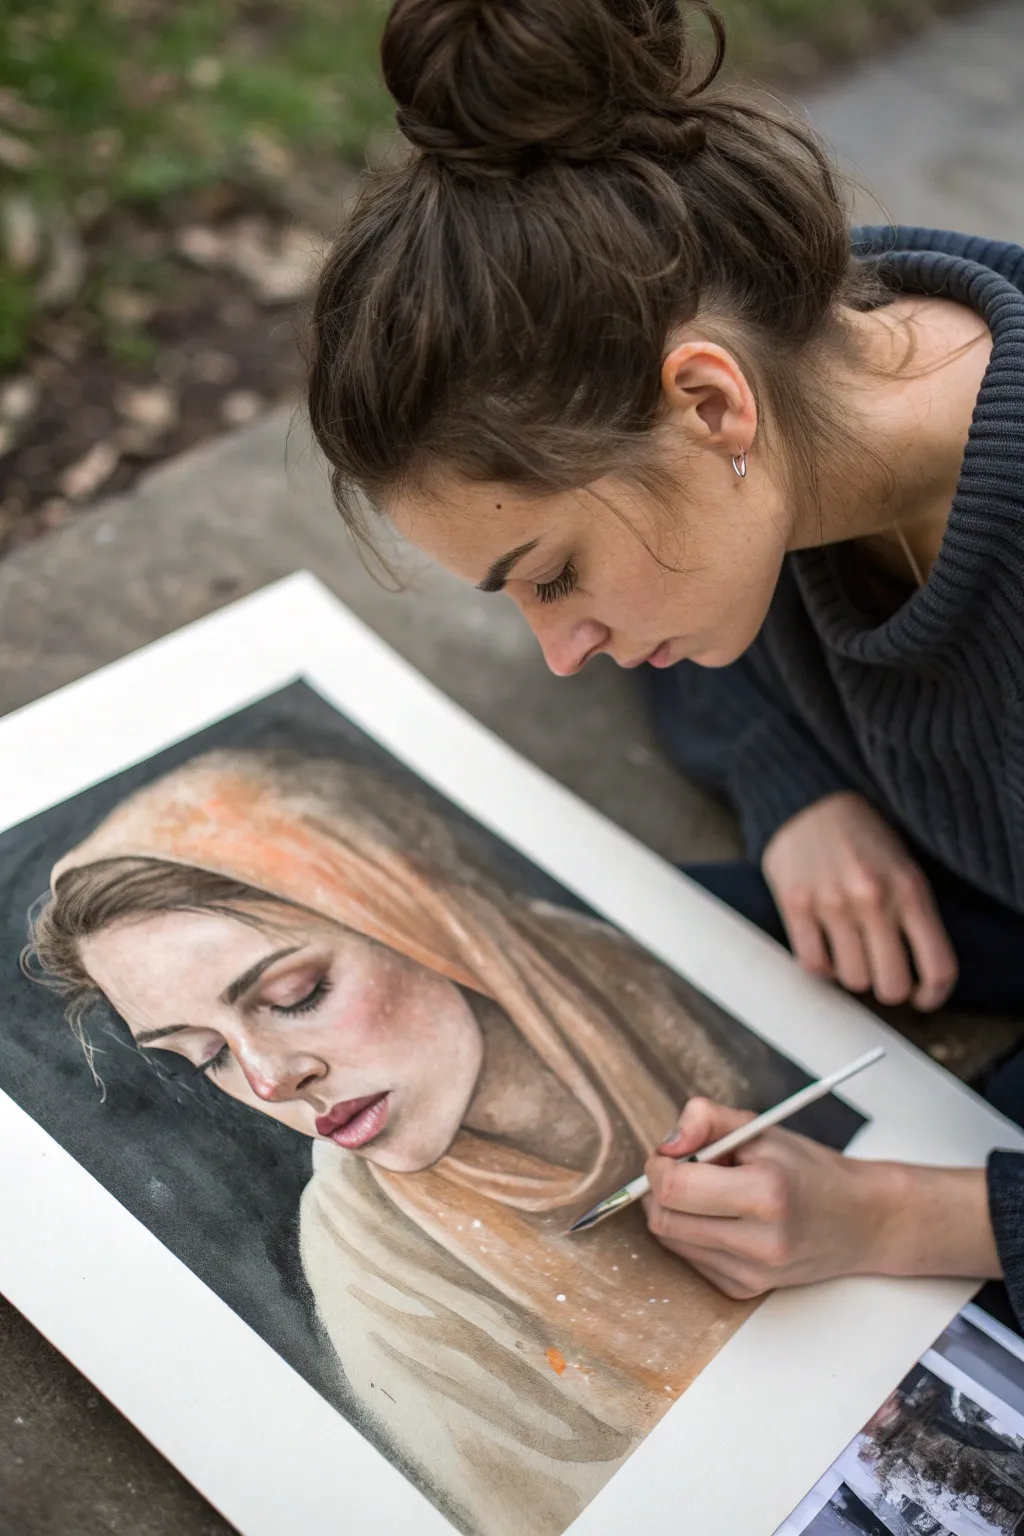
Confrontational Portrait With Direct Gaze
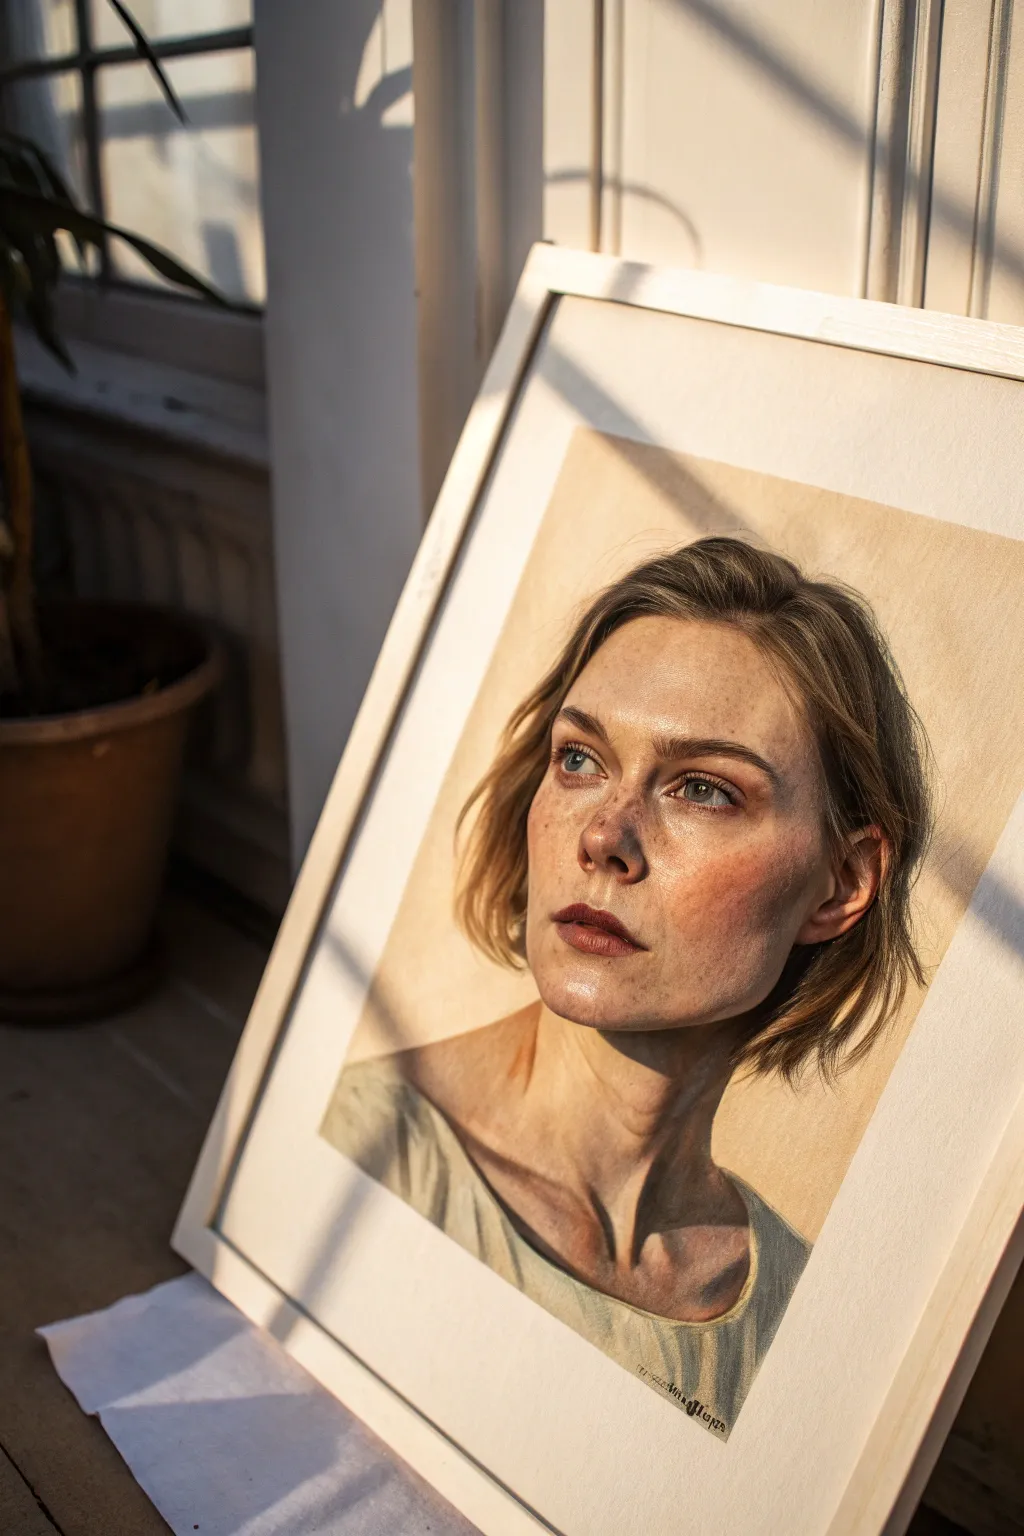
Capture the raw intensity and quiet strength of the female gaze with this striking portrait project. Using a mix of soft pastels and charcoal, you will create a piece that feels both hyper-realistic and deeply emotive, bathing your subject in warm, golden light.
Detailed Instructions
Materials
- Heavyweight toned paper (tan or beige, 18×24 inches)
- Soft pastels (flesh tones: ochre, sienna, burnt umber, cream, pink)
- Charcoal pencils (soft, medium, hard)
- White charcoal or pastel pencil for highlights
- Kneaded eraser
- Blending stumps (tortillons)
- Fixative spray (workable)
- Backing board and painter’s tape
- Reference photo of a model with direct lighting
Step 1: Sketching the Foundation
-
Tape and Prep:
Secure your toned paper to a rigid backing board using painter’s tape on all four sides. This prevents the paper from buckling as you work and creates a clean edge. -
Basic Blocking:
Using a medium charcoal pencil, lightly sketch the oval shape of the face and the slope of the shoulders. Keep your lines loose and faint; avoid pressing hard to keep the paper tooth intact. -
feature Placement:
Mark the horizontal lines for the eyes, nose, and mouth. The key to the ‘confrontational’ look is the eyes—ensure they are positioned to look straight at the viewer, slightly above center. -
Refining the Drawing:
Tighten up the facial features. Pay special attention to the nose structure and the jawline. Don’t shade yet, just establish clear boundaries for where your colors will go.
Don’t Over-blend
Resist the urge to smooth everything out perfectly. Leaving some rough pastel strokes visible adds texture closer to skin pores and prevents the ‘plastic doll’ look.
Step 2: Building Skin Tones & Form
-
Base Layer Application:
Start with a mid-tone ochre or soft brown pastel. Apply this broadly over the shadowed side of the face and the neck to establish the light source coming from the left. -
Adding Warmth:
Layer a dusty rose or terra-cotta pastel into the cheeks and the bridge of the nose. This mimics the blood flow under the skin and prevents the face from looking waxy. -
First Blend:
Use your fingers or a large blending stump to gently merge the base tone and the blush tone. Use a circular motion to push the pigment into the paper’s grain. -
Defining Shadows:
Take a burnt umber pastel and deepen the shadows under the jawline, the eye sockets, and the side of the nose. This high contrast is crucial for that dramatic, sunlit effect. -
Cooler Undertones:
I like to add a tiny touch of faint blue or cool grey in the deepest shadow of the neck and under the lip. It adds incredible realism against the warm orange light.
Step 3: The Gaze and Details
-
Constructing the Eyes:
Use a sharp charcoal pencil to outline the iris and pupil. Fill the pupil with solid black, but leave the iris softer. Add the whites of the eyes using a cream pastel, not pure white, to keep it natural. -
Iris Detail:
Layer blues or greens into the iris, radiating outward from the pupil. Add a sharp, white highlight right at the top of the pupil to make the eyes look wet and alive. -
Freckles and Texture:
Using a sharp brown pastel pencil, dot irregular freckles across the nose and cheeks. Vary the pressure so some are faint and others are distinct. -
The Lips:
Fill the lips with a deep mauve or brownish-red. Keep the edges slightly soft to blend into the skin, but define the cupid’s bow sharply. -
Hair Foundation:
Block in the hair shape with broad strokes of brown and blonde pastels. Follow the direction of hair growth—from root to tip.
Dramatic Shadows
To intensify the ‘confrontational’ mood, darken the background behind the lit side of the face. This pushes the portrait forward and increases the psychological impact.
Step 4: Light and Final Polish
-
Highlighting:
This is the transformational step. Use a soft white or pale cream pastel to hit the high points: the forehead, the tip of the nose, the cheekbones, and the collarbones. -
Refining Hair Strands:
Use a fine charcoal pencil and a white charcoal pencil to draw individual stray hairs over the blocked-in shapes. Let some strands fall messily over the face for realism. -
Clothing Suggestion:
Sketch the shirt using loose, broad strokes of white and grey. Keep this area less detailed than the face to ensure focus remains on the gaze. -
Cast Shadows:
Simulate the strong shadow lines (like window blinds) falling across the artwork by darkening diagonal strips across the neck or chest if desired, using a transparent layer of charcoal. -
Fixative:
Take the drawing outside and spray a light, even coat of workable fixative to prevent smudging. Let it dry completely before handling.
Frame your portrait simply to let the powerful expression speak for itself
Protest Sign Self-Portrait
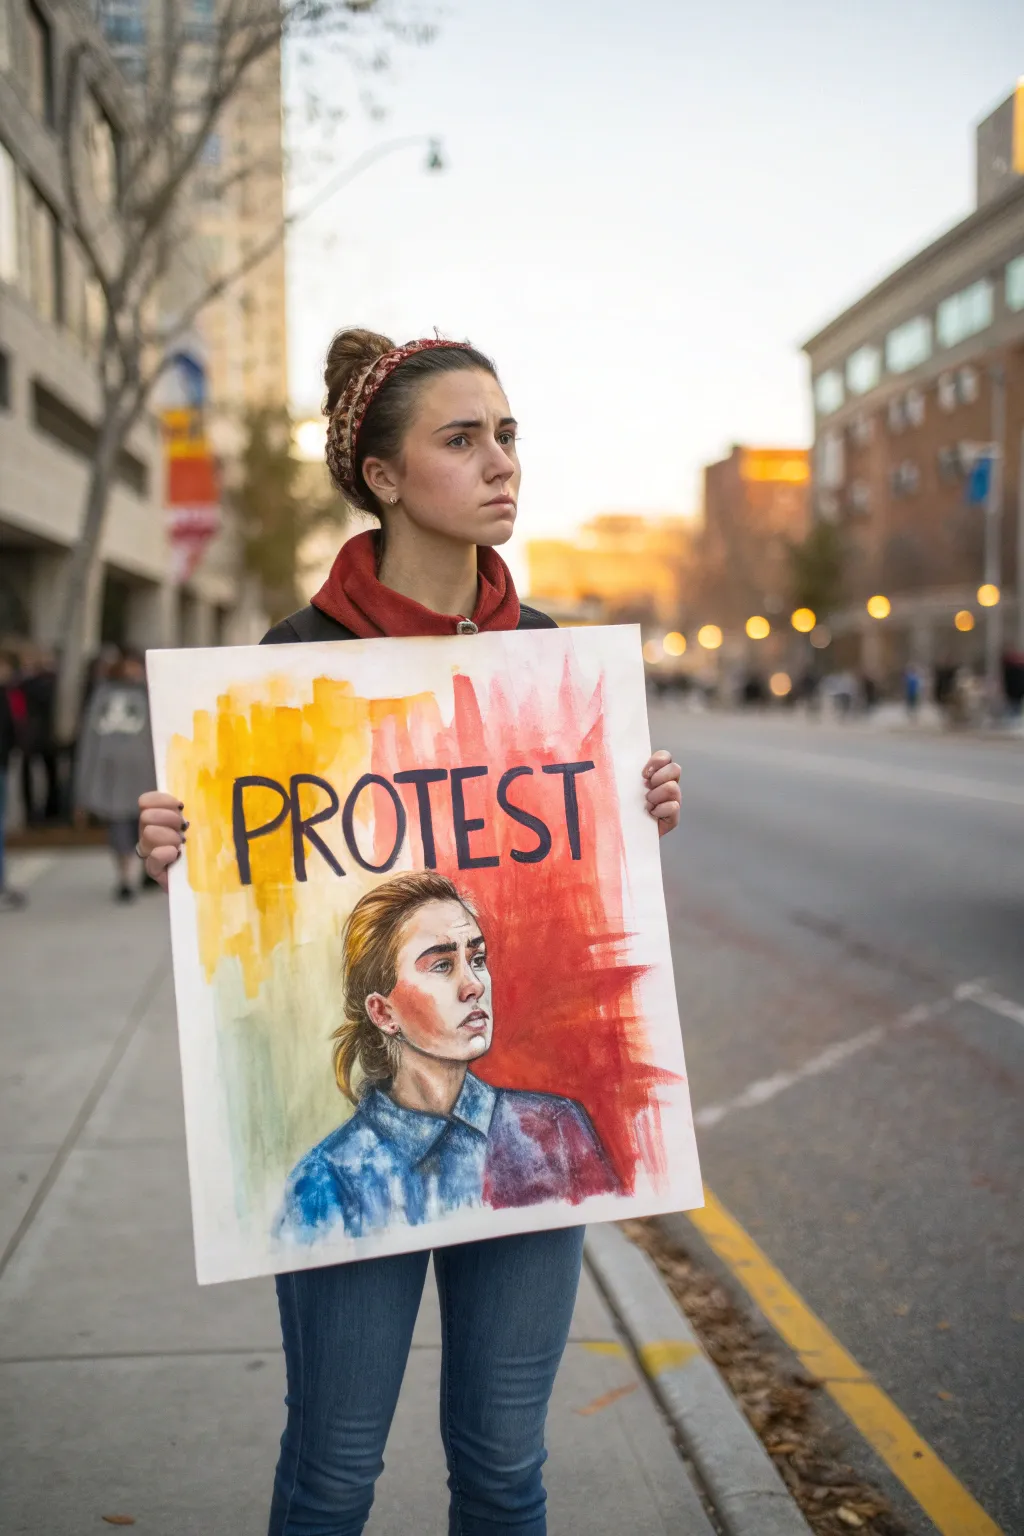
This striking project combines traditional protest imagery with personal expression by featuring a self-portrait right on your placard. Using bold lettering against a loose, fiery watercolor wash, this sign makes a statement that is both political and deeply personal.
Step-by-Step Tutorial
Materials
- Large heavy-weight watercolor paper or mixed media board (approx. 18×24 inches)
- Pencil (HB or 2B) and eraser
- Watercolor paints (tube or pan)
- Large flat wash brush (1-2 inch)
- Round watercolor brushes (sizes 6 and 10)
- Black acrylic paint or India ink
- Painter’s tape or masking tape
- Reference photo of yourself looking upward/determined
- Paper towels and water cup
Step 1: Planning and Sketching
-
Surface Prep:
Begin by securing your large sheet of watercolor paper to a rigid board using painter’s tape along all four edges. This prevents buckling when we add the washes later. -
Layout the Text:
Using a ruler and a light pencil touch, draw a horizontal guidelne about one-third of the way down from the top edge. Sketch the word ‘PROTEST’ in large, slightly uneven block letters. You want them to look hand-painted but legible. -
Sketch the Portrait:
Beneath the text, lightly sketch your self-portrait contour. Focus on the angle of the head looking up and to the side. Don’t worry about shading yet; just capture the placement of the eyes, nose, mouth, and the collar of your shirt. -
Refine Features:
Go back into the face sketch to define the jawline and hair. Since this is a stylized portrait, keep the lines relatively simple, leaving room for the paint to do the work.
Pro Tip: Controlled Bleeding
To keep the face clean while painting the background, apply a fluid masking fluid over your pencil sketch. Rub it off after the background dries to reveal pristine white paper.
Step 2: The Watercolor Wash Background
-
Mix Your Palette:
Prepare a warm palette of cadmium yellow, orange, and a deep red or alizarin crimson. You want plenty of pigment mixed with water so the colors are vibrant but fluid. -
Apply the Yellow Wash:
Starting on the left side behind the ‘P’ and ‘R’, use your large flat brush to apply a wet, vertical wash of yellow. Don’t be afraid to let brushstrokes show—the texture adds energy. -
Transition to Orange:
While the yellow edge is still slightly damp, introduce the orange wash in the center area. Let the colors bleed into each other naturally. -
Finish with Red:
On the right side, apply the deep red wash. Create rough, jagged edges on the top and right side to mimic flames or energetic movement. Avoid painting over the face area, but feel free to let the wash overlap the shirt area slightly. -
Dry Completely:
Let this background layer dry fully. If you rush this step, the text we add next will bleed into the damp paper.
Step 3: Lettering
-
Fill the Text:
Using a smaller flat brush and black acrylic paint or India ink, carefully fill in the ‘PROTEST’ letters. I like to use acrylic here because it’s opaque and stands out boldly against the transparency of the watercolor. -
Clean Edges:
Go back and sharpen the edges of your letters. The contrast between the rigid black text and the loose watercolor background is key to this look.
Level Up: Mixed Media
After the watercolor dries, use colored pencils or pastels to add texture to the hair and crisp up the facial features for a grittier, mixed-media aesthetic.
Step 4: Painting the Portrait
-
Base Skin Tones:
Mix a diluted skin tone suitable for your complexion. Wash this over the face area, leaving the highlights on the forehead, nose bridge, and cheekbones purely white. -
Adding Shadows:
While the base is damp, drop in a slightly darker, reddish-brown tone under the eyebrows, beside the nose, and under the chin to create dimension. -
Hair Texture:
Paint the hair using loose, streaky strokes. Don’t try to paint every strand; treat the hair as mass shapes with light and dark areas. -
The Shirt:
Paint the shirt in blue tones (or your preferred color). Allow the red background wash to visually merge with the right shoulder of the figure, integrating the subject into the environment. -
Defining Details:
Once the face paint is dry, use a fine round brush (size 6) with a dark brown or black mix to outline the eyes, eyebrows, and lips. Keep the lines sketch-like and expressive rather than hyper-realistic. -
Final Touches:
Add a few intentional splatters or loose brush marks around the edges if the composition feels too static. Remove the tape carefully once everything is bone dry.
Now you have a powerful piece of art that speaks volumes before you even say a word


Hands Over Mouth, Voice Breaking Through
Capture a moment of quiet strength with this realistic watercolor portrait featuring soft, earthy tones and delicate blending. The detailed rendering of facial features and draped fabric creates an intimate and contemplative mood.
How-To Guide
Materials
- Hot press watercolor paper (heavyweight, e.g., 300gsm)
- Watercolor paints (burnt umber, yellow ochre, alizarin crimson, ultramarine blue, lamp black)
- White gouache for highlights
- Pointed round brushes (sizes 2, 4, 8)
- Mechanical pencil (HB) for sketching
- Kneaded eraser
- Palette for mixing
- Two jars of water
- Masking tape
Step 1: Preparation & Sketching
-
Secure the paper:
Tape your watercolor paper down to a rigid board using masking tape on all four sides. This prevents the paper from buckling when wet washes are applied. -
Initial outline:
Lightly sketch the woman’s profile and the fabric drape using a mechanical pencil. Focus on accurate proportions for the nose, closed eyelids, and the curve of the jawline. -
Refine the features:
Add details for the eyebrows, lips, and the folds of the headscarf. Keep your lines faint so they won’t show through transparent watercolor layers. -
Soften the sketch:
Gently roll a kneaded eraser over the entire drawing to lift excess graphite, leaving just a ghost of the image to guide your painting.
Step 2: Painting the Skin
-
Base skin tone:
Mix a diluted wash of yellow ochre and a touch of alizarin crimson. Apply this pale wash over the entire face area, avoiding the brightest highlight on the nose tip. -
Building shadows:
While the base is damp but not soaking, mix burnt umber with a tiny bit of ultramarine to create a shadow tone. Gently drop this into the eye sockets, under the nose, and below the chin. -
Refining the eyes:
Productively use a size 2 brush with a darker brown mix to define the crease of the eyelid and the lash line. Soften the edges with a clean, damp brush. -
Adding flush:
Glaze a very watery alizarin crimson over the cheeks and tips of the nose to bring warmth to the skin. I like to let this layer dry completely before proceeding. -
Lip detailing:
Paint the lips with a mix of crimson and burnt umber. Make the upper lip slightly darker and leave a tiny unpainted sliver on the lower lip for a natural highlight.
Muddy colors?
If skin tones look dirty, you likely over-blended. Let the layer dry fully before glazing a new color. Don’t mix more than three pigments for skin tones.
Step 3: Painting the Fabric & Background
-
Fabric base layer:
Mix a warm beige using yellow ochre and burnt umber. Apply a loose wash over the headscarf area, following the direction of the folds. -
Deepening folds:
Once the base is dry, use a concentrated brown mix to paint the shadows within the fabric creases, creating depth and dimension. -
Adding texture:
Dry brush a little burnt umber over the fabric surface to suggest a woven texture, keeping the strokes light and feathery. -
Background wash:
Prepare a rich, dark wash using lamp black and ultramarine blue. Carefully paint the negative space around the portrait to make the figure pop. -
Adding flecks:
While the background is still slightly wet, you can splatter a tiny amount of clean water or white pigment around the edges for atmospheric texture.
Adding gold leaf
For a mixed-media twist, apply gold leaf to the halo area or fabric patterns. Use gilding size on dry paper, wait for tackiness, and press the leaf down gently.
Step 4: Final Details
-
Hair strands:
Using your smallest brush, paint individual hair strands escaping the scarf with a dark brown mix. Use quick, flicking motions for natural tapering. -
Highlight accents:
Take opaque white gouache and apply tiny dots to the inner corner of the eye, total tip of the nose, and the peak of the lip bow. -
Clean up:
Assess the contrast. If the shadows look too pale, glaze a final layer of cool brown over the deepest areas. -
Remove tape:
Wait until the painting is bone dry, then peel the tape away slowly at a 45-degree angle to reveal a crisp white border.
Step back and admire the subtle emotion you’ve captured in your portrait
BRUSH GUIDE
The Right Brush for Every Stroke
From clean lines to bold texture — master brush choice, stroke control, and essential techniques.
Explore the Full Guide
Intersectional Feminism Color Wheel Portrait
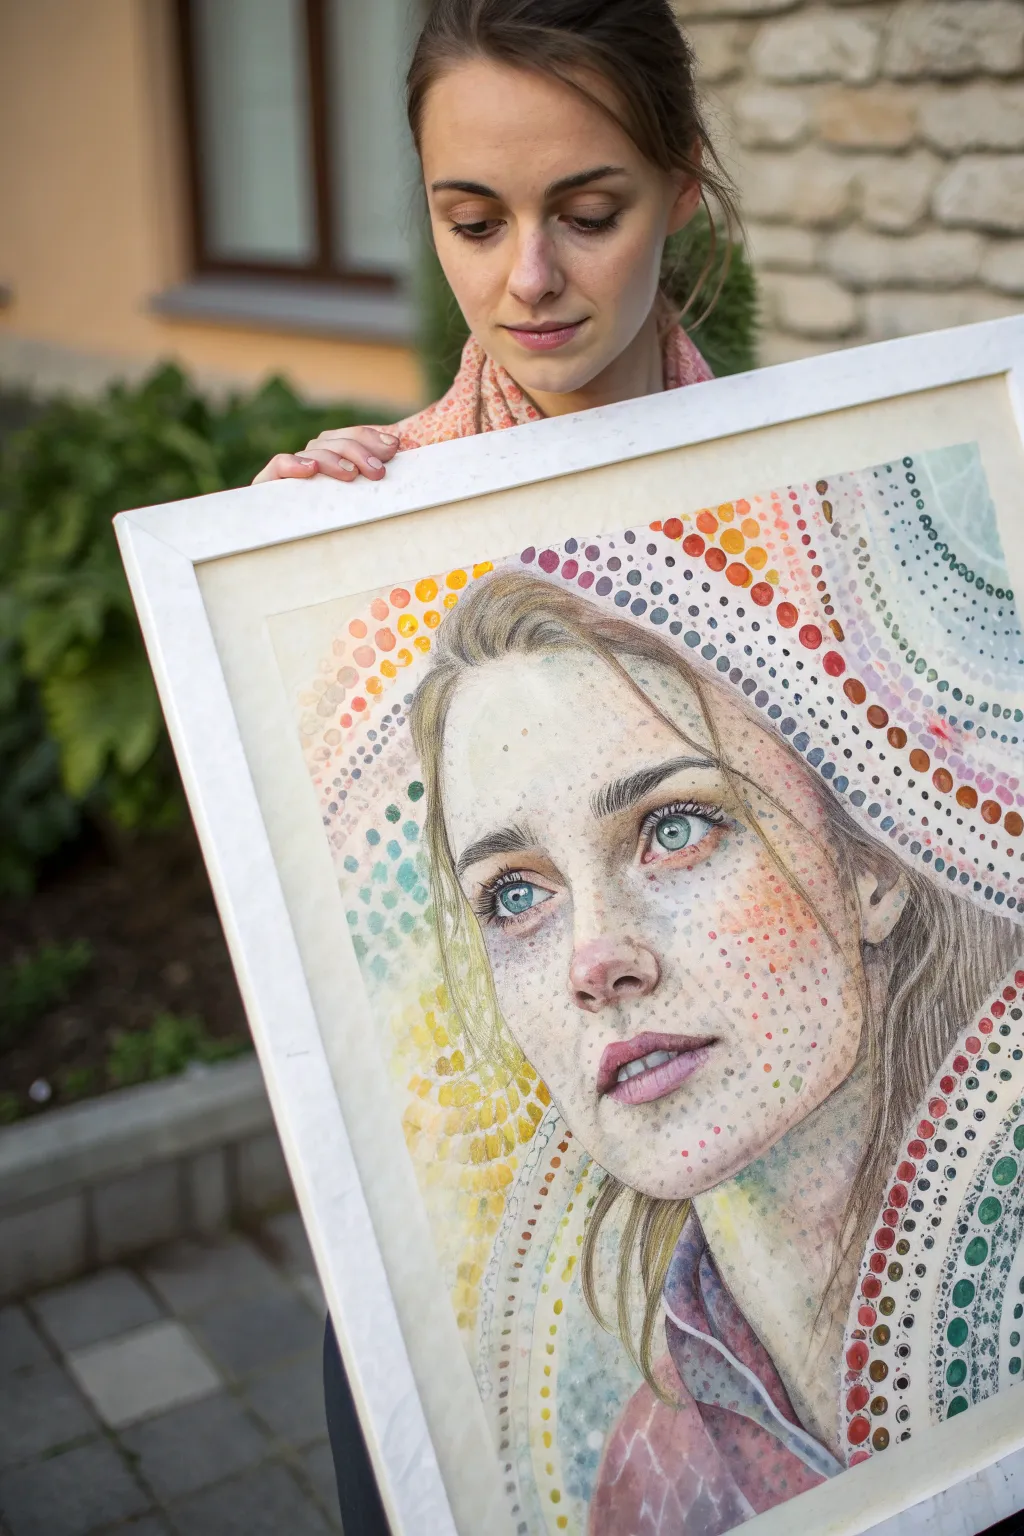
This striking watercolor project blends realistic portraiture with a symbolic pointillist abstraction, representing intersectional feminism through a vibrant color wheel. By surrounding a delicate facial study with radiating dots of pure pigment, you create a piece that feels both intimate and universally connected.
Step-by-Step Guide
Materials
- High-quality hot press watercolor paper (140lb/300gsm)
- Watercolor paint set (professional grade)
- Set of round watercolor brushes (sizes 0, 2, 6, and 10)
- HB graphite pencil
- Kneaded eraser
- Masking tape
- Wooden drawing board
- Two jars of water
- Paper towels
- Liquid frisket (masking fluid) – optional
Step 1: Preparation and Sketching
-
Stretch the paper:
Begin by taping your hot press paper securely to a wooden drawing board. This prevents buckling when we add the water washes later. -
Draft the contours:
Using an HB pencil, lightly sketch the portrait. Focus on the placement of eyes, nose, and mouth. The goal is a realistic, slightly upward-gazing expression. Keep lines faint so they disappear under the paint. -
Map the dot zones:
Lightly outline curved sections around the head where the dot patterns will flow. Think of these as radiating auras or veils rather than rigid circles.
Step 2: Painting the Face
-
Base skin tones:
Mix a very watery wash of Burnt Sienna with a touch of Alizarin Crimson. Apply this to the face area using a size 10 brush, leaving the highlights on the forehead and nose bridge purely white paper. -
Build facial depth:
While the first layer is touched-dry, deepen the shadows around the eye sockets, under the nose, and the jawline with a slightly more concentrated mix of the flesh tone plus a hint of Ultramarine Blue for coolness. -
Detail the features:
Switch to a size 2 brush. Carefully paint the irises with a crisp teal or blue, leaving tiny white reflections. Paint the lips with a soft rose wash, darkening the center line where the lips meet. -
Hair underpainting:
Lay down the base color for the hair strands using loose, sweeping strokes. Don’t worry about individual hairs yet; just establish the flow and volume.
Brush Control Secret
To keep your dots perfectly round rather than teardrop-shaped, hold your brush perpendicular to the paper (straight up and down) when stamping the pigment.
Step 3: The Pointillist Spectrum
-
Start the color wheel:
For the dotted background, choose a starting point for your spectrum. I often begin with the warm yellows on the left side. Load a size 6 brush with pigment and gently press the tip to make circular marks. -
Transitioning colors:
As you move clockwise around the head, gradually shift your colors. Move from yellows to oranges, then reds, purples, and finally cool blues and teals on the right side. -
Vary dot sizes:
Mix up your brush sizes here. Use the size 6 for bold, outer dots and the size 2 for tinier dots that sit closer to the face or fill gaps between larger circles. -
Layering transparency:
Allow some dots to overlap slightly once dry to create interesting transparency effects, characteristic of watercolor. -
Face integration:
Bringing the dots onto the face is the scary but crucial part. Using very dilute paint, dab tiny ‘freckles’ of the surrounding colors onto the cheeks and forehead to visually merge the subject with the background.
Bleeding Dots?
If your dots are merging into blobs, your paper is too wet or the dots are too close before drying. Let one section dry completely before placing new dots adjacent to it.
Step 4: Finishing Touches
-
Deepen hair texture:
Return to the hair with a size 0 or 1 brush. Add fine, dark lines to suggest individual strands, weaving them through the dotted patterns where appropriate. -
Define the eyes:
Add the pupils with a concentrated dark mix (Payne’s Grey works well) and define the lash line carefully. -
Refine the background:
Look for empty spaces in your color arcs. Fill them with tiny micro-dots using the tip of your smallest brush to make the pattern feel dense and complete. -
Final assessment:
Step back and check the balance. If the face looks too pale against the vibrant dots, add a very transparent glaze of warmth to the cheeks.
Once the paint is fully cured, remove the tape carefully to reveal the crisp white border that frames your artwork
Window Grid: Trapped vs. Liberated
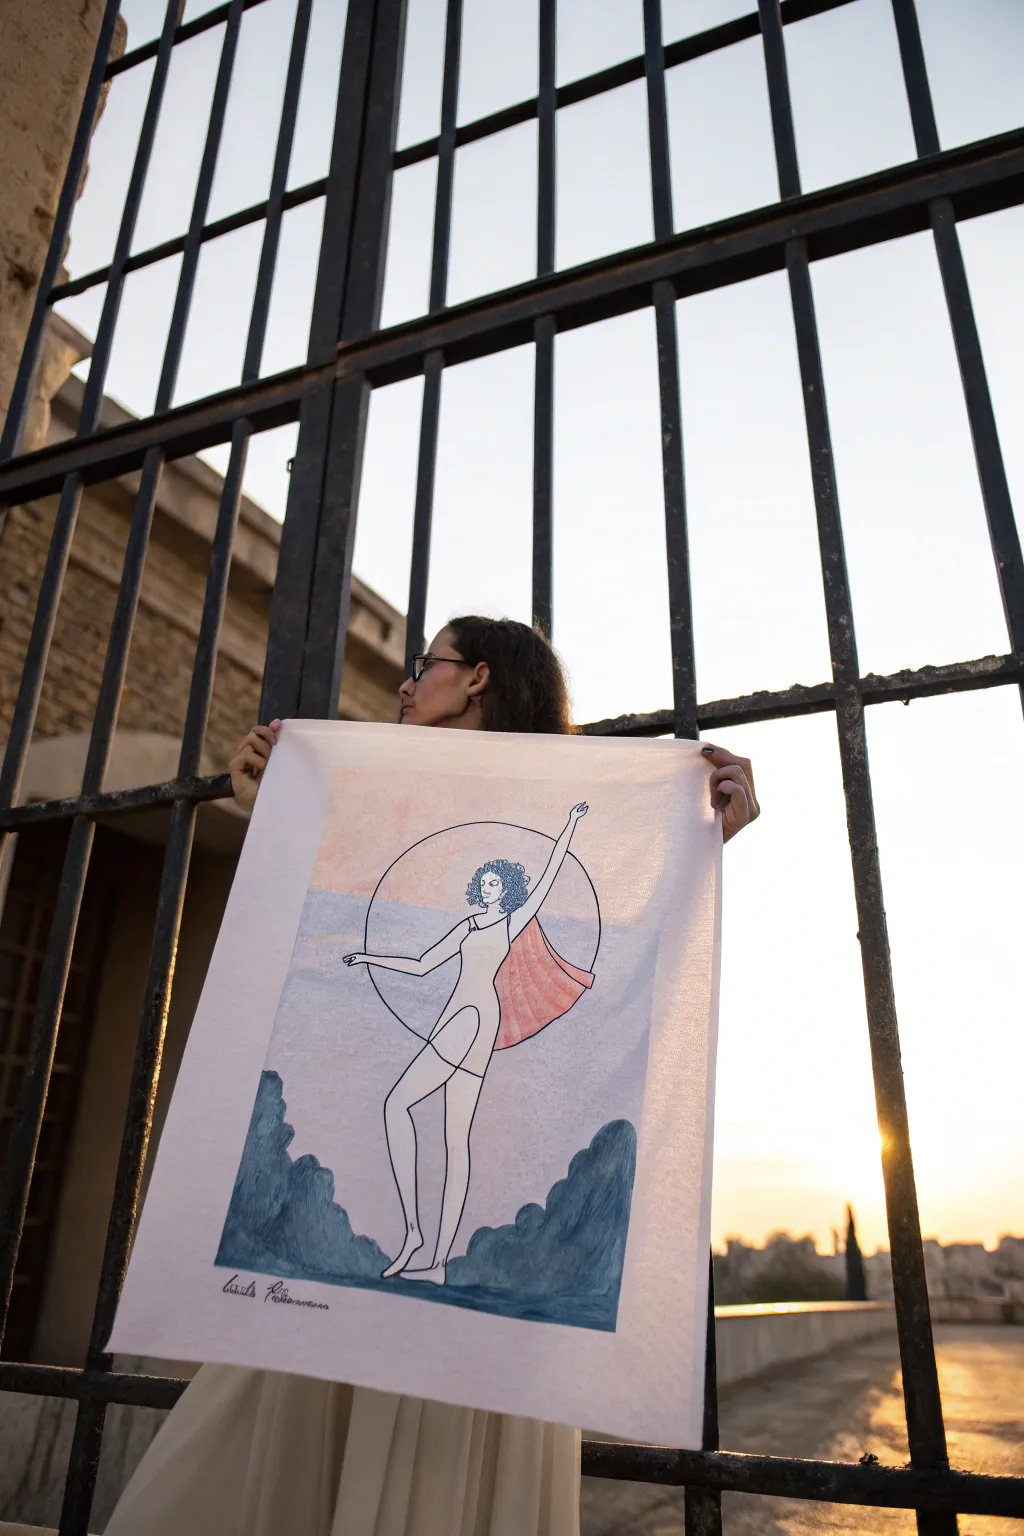
Capture the spirit of freedom with this mixed-media artwork on fabric, blending delicate line work with soft watercolor-style washes. The piece juxtaposes a liberated dancer against a grid-like backdrop, perfect for expressing themes of breaking barriers.
How-To Guide
Materials
- Cotton or canvas fabric sheet (approx. 24×36 inches)
- Fabric medium
- Acrylic paints (Indigo blue, dusty pink, charcoal grey, white)
- Fine liner brush (size 0 or 00)
- Flat shader brush (1/2 inch)
- Round watercolor brush (size 6)
- Fabric marker or disappearing ink pen
- Cardboard or drawing board for support
- painter’s tape
- Water container and palette
Step 1: Preparation & Sketching
-
Prepare your surface:
Begin by ironing your fabric sheet to remove any creases, ensuring a completely flat painting surface. Tape the edges of the fabric securely to a piece of cardboard or a drawing board to keep it taut and prevent shifting while you work. -
Draft the central circle:
Using a large compass or by tracing a round object like a large plate or pot lid, lightly draw a perfect circle in the upper center of the fabric with your disappearing ink pen. This geometric shape anchors the composition. -
Sketch the figure:
Lightly sketch the dancing figure within and extending out of the circle. Focus on the gesture—one arm reaching high, legs in a graceful stride. Don’t worry about perfect anatomy yet; capture the movement first. -
Define the landscape:
Draw the rolling, cloud-like shapes at the bottom to represent stylized bushes or terrain. Then, draw a horizontal horizon line cutting through the circle behind the figure’s waist.
Fabric Medium Magic
Don’t skip the fabric medium! It prevents acrylics from becoming stiff and cracking, keeping your artwork soft and flexible like a real dye.
Step 2: Color Application
-
Mix your washes:
To achieve a watercolor effect on fabric, mix your acrylics with fabric medium and a fair amount of water. You want the consistency of ink, not heavy paint. Prepare a pale dusty pink and a muted indigo blue. -
Paint the sky:
Using the round brush, apply a very faint wash of the dusty pink to the upper half of the background within the circle. Keep the edges soft and organic. -
Add the horizon:
Switch to the muted indigo wash for the lower half of the background inside the circle. Blend the meeting point with the pink slightly for a hazy horizon line effect. -
Fill the cape:
Mix a slightly more saturated dusty pink or salmon color. Paint the flowing cape behind the figure’s back. I like to let the brush strokes show slightly here to mimic fabric texture. -
Paint the foreground terrain:
Use a darker, more opaque indigo blue for the cloud-like bushes at the bottom. Apply the paint in sweeping, curved strokes to emphasize their rounded forms. -
Create depth in the terrain:
While the indigo is still wet, drop in a touch of charcoal grey near the bottom edges of the bushes to add weight and shadow.
Add Metallic Flair
Trace the large geometric circle with gold leaf or metallic gold paint instead of black. This creates a halo effect that catches the light beautifully.
Step 3: Line Work & Details
-
Outline the circle:
Once the background washes are completely dry, use your fine liner brush and thinned black or dark grey acrylic paint to trace the initial circle. A steady hand is key here. -
Inking the figure:
carefully outline the dancer’s body using the fine liner. Keep the lines continuous and fluid. When outlining the face and hair, use lighter pressure for delicate features. -
Hair texture:
For the curly hair, use a stippling motion or tiny squiggles with the very tip of your brush to build up volume without coloring it in solid. -
Define the clothing:
Outline the simple dress. Add a diagonal line across the hip to suggest the hem or fabric fold, keeping the aesthetic minimal and graphic. -
Final touches:
Go over the outlines of the bottom bushes with the fine liner to crisply separate them from the background. Sign your work at the bottom left corner if desired. -
Heat setting:
Allow the piece to dry for at least 24 hours. Then, place a cotton cloth over the artwork and iron on a medium setting to heat-set the fabric paint, making it permanent.
Hang your finished banner in a window or doorway to let the light illuminate your design

PENCIL GUIDE
Understanding Pencil Grades from H to B
From first sketch to finished drawing — learn pencil grades, line control, and shading techniques.
Explore the Full Guide
Birdcage Head, Open Door Moment
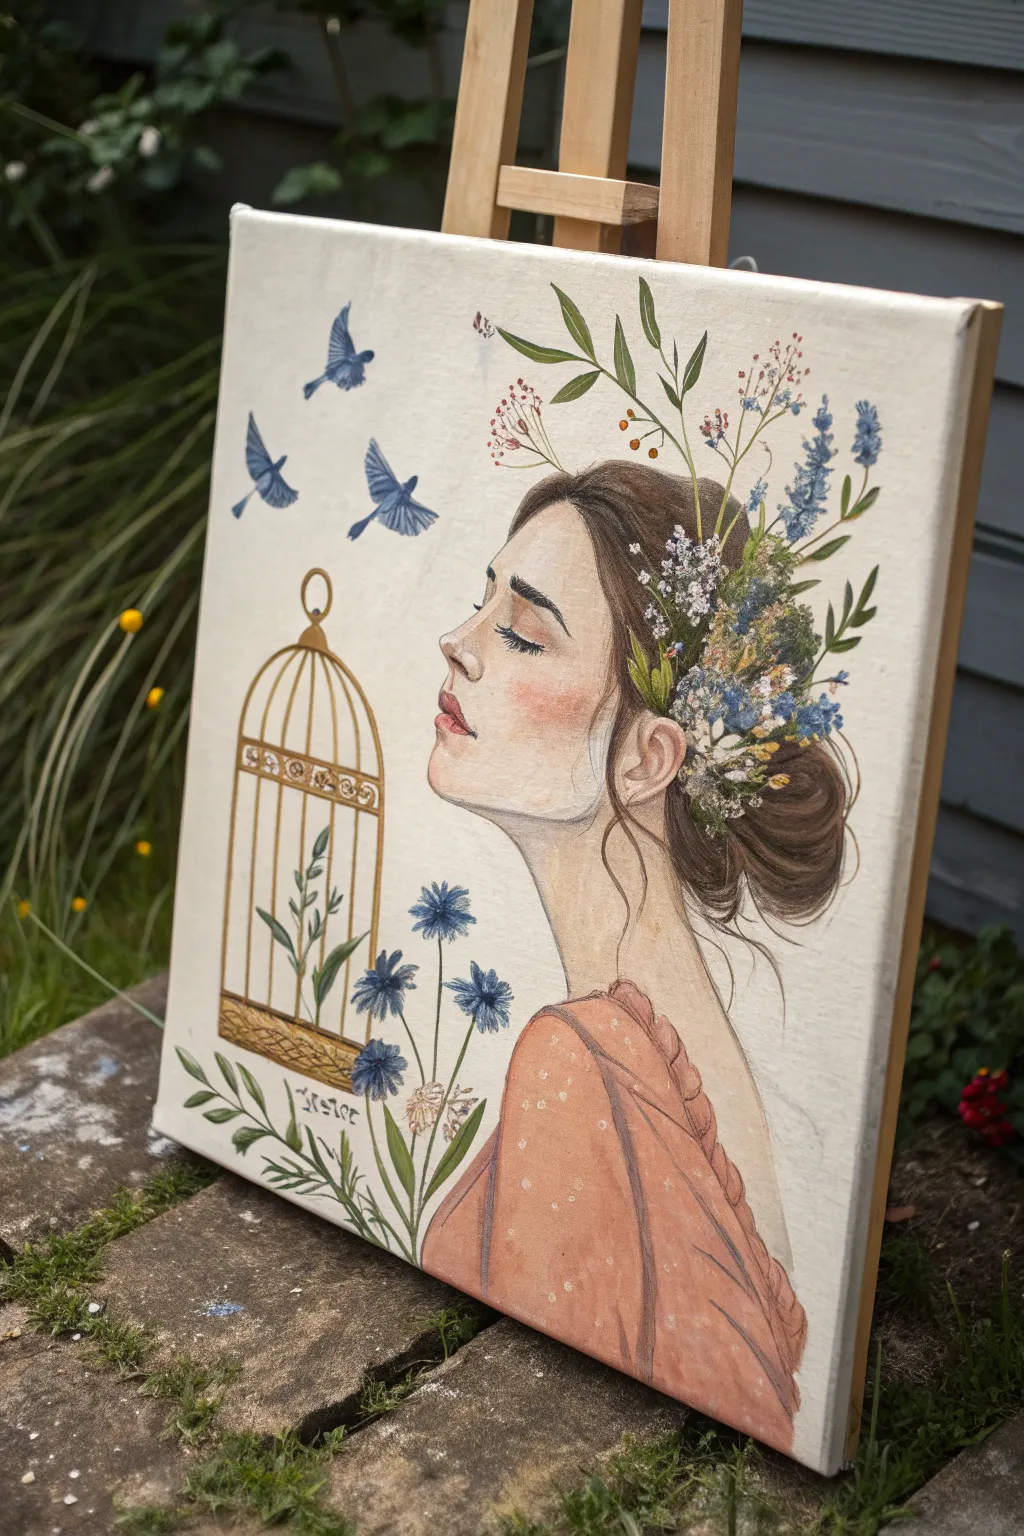
Capture the poignant moment of release with this illustrative acrylic painting featuring a serene woman, an open birdcage, and bluebirds taking flight. This project combines delicate portraiture with botanical elements to symbolize liberation and inner peace.
Step-by-Step Guide
Materials
- Stretched canvas (approx. 12×16 inches)
- Acrylic paints (Titanium White, Burnt Umber, Yellow Ochre, Ultramarine Blue, Cadmium Red, Gold/Metallic)
- Set of synthetic brushes (flat wash, small round #2 and #4, liner #00)
- Water container and palette
- Carbon transfer paper or soft graphite pencil for sketching
- Medium matte gel (optional, for blending)
- Easel
Step 1: Sketching and Background
-
Prepare the canvas:
Start with a clean, primed canvas. No background wash is needed for this piece as the creaminess of the raw gesso or a very light cream wash (white mixed with a tiny drop of yellow ochre) provides a nice, neutral negative space. -
Draft the composition:
Lightly sketch the profile of the woman on the right side. Focus on the slope of the nose, the closed eyelid, and the bun at the nape of the neck. Her neck should be long and graceful. -
Add symbolic elements:
Sketch the birdcage on the left side, ensuring the door is open. Draw three simple bird silhouettes flying upward and away from the cage. Add the rough shapes of the floral crown in her hair and the wildflowers near the cage base.
Pro Tip: Steady Lines
For the thin cage bars and bird wings, mix a drop of water or flow medium into your paint. Inky consistency prevents brush drag for smoother lines.
Step 2: Painting the Figure
-
Mix skin tones:
Create a pale skin tone using Titanium White, a touch of Yellow Ochre, and a tiny speck of Burnt Umber. For the shadowed areas under the chin and near the ear, add a little more Umber and a dot of Red. -
Apply the base skin layer:
Paint the face, neck, and shoulder area with your base mix. Don’t worry about perfect blending yet; just get the shapes filled in. -
Add facial details:
Once the base is tacky-dry, use a #2 brush to add the blush on the cheek and nose using a watered-down mix of red and orange. Paint the lips with a soft dusty rose color. -
Define the features:
Using a fine liner brush and thinned brown paint (not black, to keep it soft), outline the eye, the nostril, and the jawline. Draw delicate eyelashes sweeping downward. -
Paint the hair:
Mix Burnt Umber with a touch of Blue to create a rich dark brown. Paint the hair mass in flowing strokes that follow the direction of the strands, leaving space for the floral crown. -
Refine hair texture:
I like to go back in with a lighter brown mix to add wispy strands escaping the bun and framing the face, which adds a sense of movement. -
Paint the dress:
Mix a warm apricot/terracotta shade. Paint the dress shape, adding darker values in the folds of the fabric to create volume. Add small dots of lighter orange or white for a patterned texturing effect.
Level Up: Gold Leaf
Instead of gold paint for the birdcage, apply adhesive size and real gold leaf. The metallic shine will make the symbol of the ‘gilded cage’ stand out beautifully.
Step 3: The Cage and Nature
-
Paint the golden cage:
Use a gold metallic paint or mix yellow ochre with white and brown for a matte gold look. Use a steady hand or a liner brush to paint the thin bars of the cage. -
Emphasize the open door:
Make sure the cage door is clearly painted in the ‘open’ position. Outline the cage details with a thin brown line to make it pop against the light background. -
Create the bluebirds:
Using Ultramarine Blue mixed with White, paint the three birds. Make the one closest to the cage largest and the highest one smallest to show perspective. Add tiny dark grey beaks. -
Paint the floral crown:
Dab small spots of blue, white, and yellow into the hair area. Don’t overthink the individual petals; use an impressionistic stippling technique to suggest a dense cluster of wildflowers. -
Add greenery:
Mix an olive green shade. Paint leaves extending from the floral crown and rising above her head. Add long, slender stems and leaves growing up through the bottom of the birdcage. -
Paint the bottom flowers:
Paint the blue cornflowers at the bottom left, intertwining with the cage sketching. This connects the ‘trapped’ area with the ‘nature’ area visually.
Step 4: Final Touches
-
Refine outlines:
Go over the main contours of the figure and the cage with a very fine, faint pencil or diluted paint line to sharpen the image, mimicking an illustration style. -
Add highlights:
Add tiny dots of pure white to the birds’ wings, the center of the flowers, and the tip of the woman’s nose for dimension.
Step back and appreciate the narrative of liberation you have created on the canvas
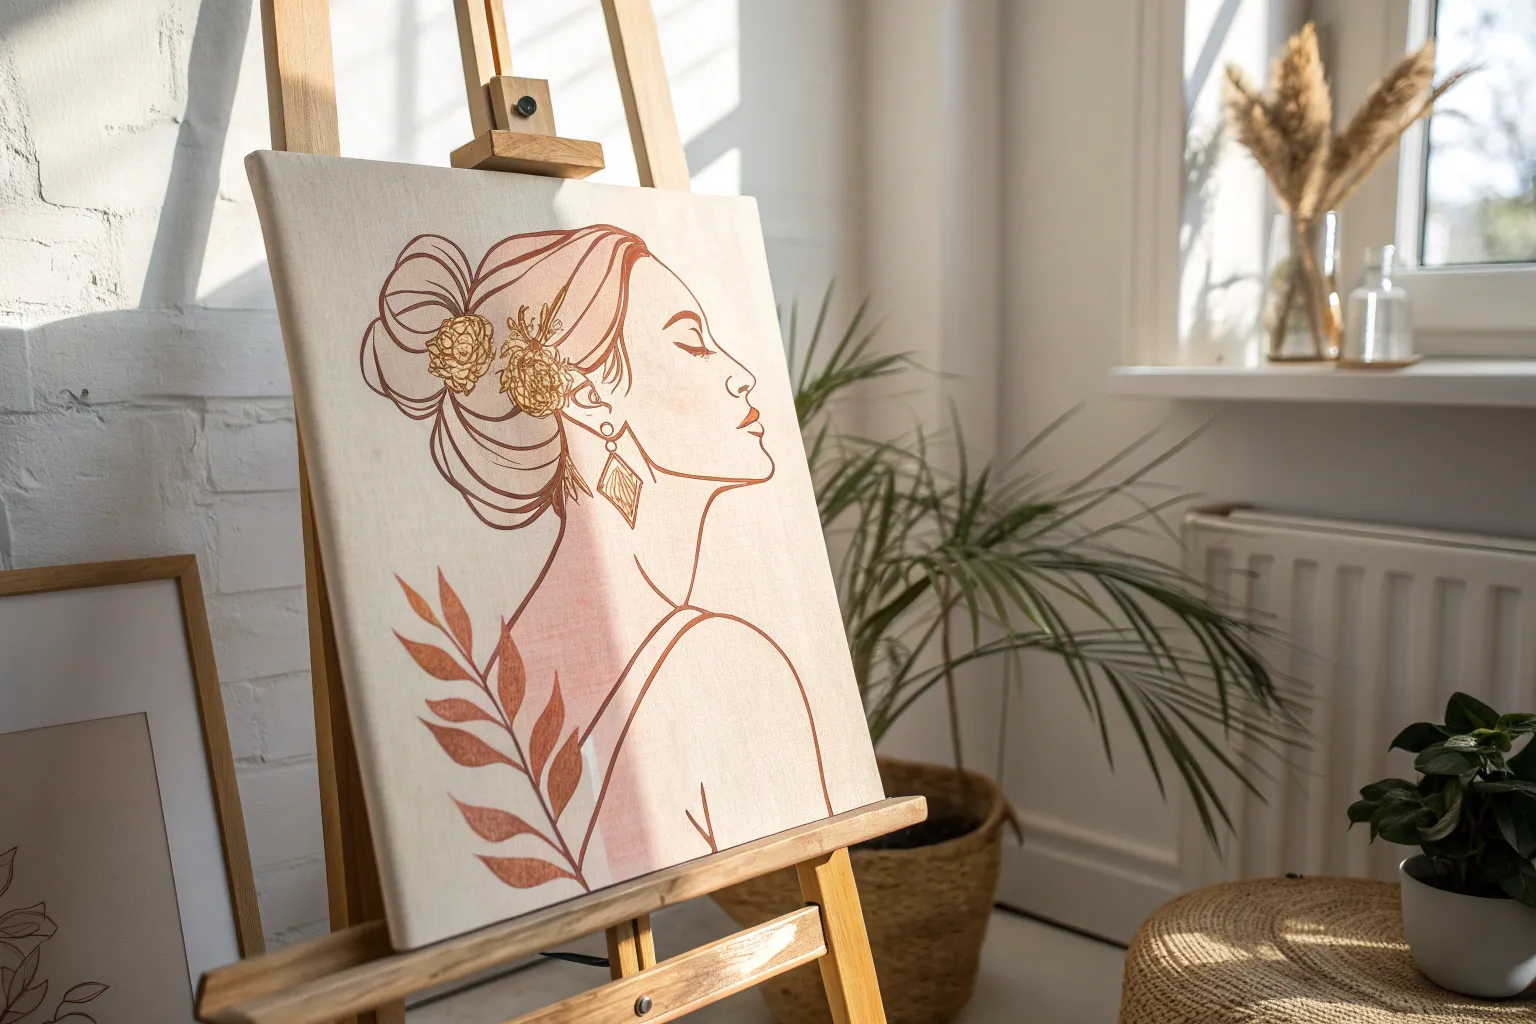
Floral Censorship as Self-Protection
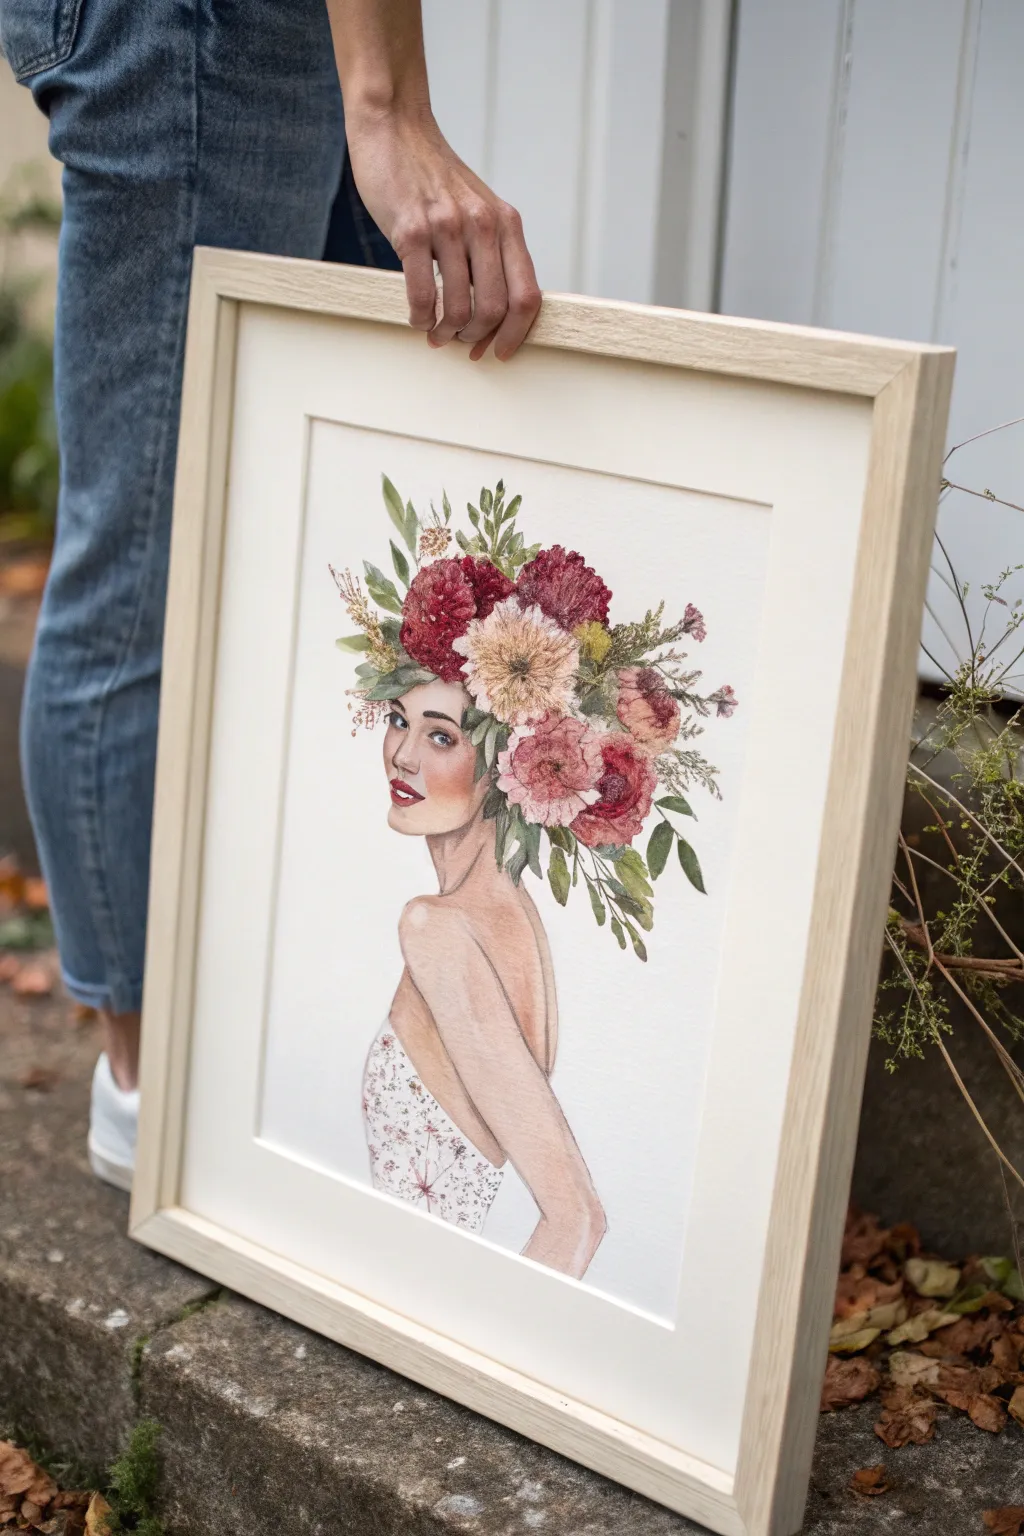
Capture the delicate strength of femininity with this illustrative watercolor portrait, featuring a woman crowned by an abundance of botanical life. The piece merges fashion illustration techniques with botanical realism, creating a striking composition where nature serves as both adornment and shield.
Step-by-Step
Materials
- Hot press watercolor paper (300 gsm)
- Watercolor paints (Alizarin Crimson, Sap Green, Burnt Sienna, Yellow Ochre, Paynes Grey, White Gouache)
- Pencil (HB or H) for sketching
- Kneaded eraser
- Round watercolor brushes (Size 2, 6, and 10)
- Fine liner pen (0.1mm, brown or sepia) – optional
- Masking fluid (optional)
- Wooden frame with matte board
Step 1: Drafting the Figure
-
Establish the pose:
Begin with a light pencil sketch focused on the composition. Draw a gentle curve for the spine to capture the over-the-shoulder look, positioning the head in the upper center of the page. -
Refine facial features:
Sketch the profile of the face, paying close attention to the turn of the neck and the jawline. Since the hair will be covered, you only need to indicate the hairline lightly. -
Outline the florals:
Instead of drawing individual petals immediately, block in the general shapes of the flower clusters on top of the head. Think of them as spheres and ovals to get the balance right before adding detail. -
Finalize the sketch:
Add the details of the dress bodice—a simple sweetheart neckline works well—and refine the leaves extending from the flowers. Lighten your pencil lines with a kneaded eraser until they are barely visible.
Clean Edges Pro Tip
Use two water jars: one for rinsing dirty brushes and one for picking up fresh water. This creates cleaner, brighter floral colors without muddying the delicate skin tones.
Step 2: Painting the Portrait
-
Base skin tone:
Mix a watery wash of Yellow Ochre and a tiny touch of Alizarin Crimson. Apply this to the face, neck, and back, leaving the white of the paper for the brightest highlights on the nose and cheekbone. -
Shadowing the form:
While the base is slightly damp/dry, mix a slightly darker skin tone using Burnt Sienna. Glaze the shadows under the jawline, behind the ear, and along the spine to create dimension. -
Facial details:
Switch to your size 2 brush. Use a mix of Alizarin Crimson and Burnt Sienna for the lips, and a darkened brown mix for the eyes and eyebrows. Keep these features crisp. -
Dress pattern:
For the bodice, use a very pale gray wash to suggest shadows. Once dry, use the tip of your smallest brush to stipple a delicate floral pattern, mirroring the colors you plan to use for the headpiece.
Step 3: Developing the Floral Crown
-
First floral wash:
Start with the lightest flowers. Apply dilute washes of pale pink and cream to the central blooms, letting the water create soft, natural edges. -
Deepening the reds:
For the darker chrysanthemums or peonies, use a concentrated Alizarin Crimson. Drop in darker pigment while the paint is wet to create a ‘blooming’ effect in the center of the flowers. -
Adding greenery:
Mix Sap Green with a touch of Paynes Grey for a muted olive tone. Paint the leaves, varying the value—some very light and watery, others dark and crisp to suggest depth. -
Defining petals:
I find waiting for the first layer to dry completely is crucial here. Once dry, use a slightly darker shade of the flower color to paint negative shapes, defining the edges of individual petals. -
Texture and pollen:
Use a nearly dry brush to scumble some texture onto the center of the flowers. You can dot in some Yellow Ochre for pollen centers or seed pods. -
Connecting stems:
Ensure the flowers look rooted by painting thin, connecting stems that weave into the hair area, grounding the arrangement on the head.
Level Up: Texture
Sprinkle a tiny pinch of salt onto the wet floral washes while they are still drying. When you brush the salt off later, it leaves a beautiful, organic crystal texture on petals.
Step 4: Finishing Touches
-
Refining edges:
Step back and assess the image. If the face feels too soft against the flowers, strengthen the jawline or lash line with a very sharp pencil or fine liner. -
Adding highlights:
Use a small amount of white gouache to add tiny highlights to the eyes and the tip of the nose, and perhaps a few dots on the dress pattern to make it sparkle. -
Final foliage check:
Add a few loose, trailing sprigs of greenery or dried filler flowers at the edges of the crown to break up the silhouette and add movement. -
Assembly:
Once artwork is completely bone-dry, mount it behind a cream or off-white matte board and place it into a light wood frame to complement the organic aesthetic.
Hang your finished piece in a well-lit spot where the delicate watercolors can be admired


Have a question or want to share your own experience? I'd love to hear from you in the comments below!