
If you’ve ever stared at a boring floor and thought it could be so much more, you’re my kind of artist. These floor painting designs turn plain wood or concrete into custom surfaces that feel like tile, rugs, or bold art—without the renovation headache.
Classic Checkerboard Floor
Transform a plain hallway into a grand entrance with this classic black and cream checkerboard painted floor. This project creates an illusion of high-end tiling while preserving the warmth of the original wood underneath.
Detailed Instructions
Materials
- High-quality floor paint (Cream/Off-White)
- High-quality floor paint (Black/Charcoal)
- Painter’s tape (1-inch and 2-inch widths)
- Sander and sandpaper (120-grit)
- Measuring tape
- Chalk line or long straight edge
- Pencil
- Carpenter’s square
- Paint rollers (foam or short nap)
- Small angled paintbrush
- Primer (suitable for wood floors)
- Clear polyurethane floor sealer (matte or satin)
- Cleaning supplies (TSP or degreaser)
Step 1: Preparation and Base Coat
-
Clean the surface:
Begin by thoroughly cleaning the floor to remove any wax, grease, or dirt. Use a heavy-duty degreaser or TSP solution, then rinse well and let it dry completely. -
Sand the floor:
Lightly sand the entire area using 120-grit sandpaper. You don’t need to strip it to bare wood, but you must scuff up the glossy finish so the new paint adheres properly. -
Remove dust:
Vacuum up every speck of sanding dust, then wipe the floor down with a damp tack cloth or microfiber rag to ensure a perfectly smooth surface. -
Apply primer:
Roll on a coat of high-quality wood floor primer. Work from the furthest corner toward the exit so you don’t paint yourself into a corner. -
Paint the base color:
Once the primer is dry, apply two coats of your lighter cream color across the entire floor. This will serve as the ‘white’ squares in your checkerboard. Allow at least 24 hours of drying time before taping.
Bleed-Proof Lines
If you struggle with paint bleeding under tape, verify your tape is firmly pressed down. Using a credit card to burnish the edges before that ‘sealing’ coat of base paint makes a huge difference.
Step 2: Measuring and Taping
-
Find the center:
Locate the center point of the hallway width-wise. Snap a chalk line down this center to ensure your pattern stays symmetrical. -
Calculate square size:
Determine the size of your diamonds (squares turned 45 degrees). For a hallway like this, 12-inch or 14-inch squares usually look proportionate. -
Mark the border:
Decide on the width of your border. Measure about 4 to 6 inches from the walls and snap lines to create a rectangular frame where the checkerboard pattern will live. -
Draw the grid:
Using a carpenter’s square and pencil, lightly draw your diagonal grid inside the border rectangle. It helps to draw the full grid out so you can see exactly where the pattern lands. -
Tape the pattern:
Apply painter’s tape along the outside edges of the squares that will be painted black. Remember, you have to tape *outside* the lines of the shape you want to paint. This is the trickiest part, so take your time. -
Do the border tape:
Tape off the thin double-line border shown in the image. Use narrower tape or space two strips of tape apart to create that thin pinstripe effect between the main pattern and the outer wood floor. -
Seal the tape edges:
Here I prefer to brush a tiny amount of the *base cream paint* over the edges of the tape. This seals the tape and prevents the black paint from bleeding underneath later.
Step 3: Paint and Finish
-
Paint the dark checks:
Using a small foam roller or brush, fill in the squares marked for black paint. Do this carefully, applying thin, even coats to avoid ridges. -
Paint the border stripe:
Carefully paint the border pinstripe black as well. Use a steadier hand or a smaller artist’s brush if the space is tight. -
Apply a second coat:
Let the first coat dry to the touch, then apply a second coat of black paint to ensure solid, opaque coverage. -
Remove the tape:
Peel up the tape while the final coat is still slightly tacky. Pull the tape away at a 45-degree angle slowly to keep lines crisp. -
Touch up:
Inspect the floor for any bleeds or mistakes. Use a tiny artist brush to touch up lines with the appropriate cream or black paint. -
Seal the floor:
Once the paint has cured for at least 48 hours, apply 2-3 coats of clear water-based polyurethane. This protects your hard work from scuffs and foot traffic.
A Vintage Vibe
For an aged, authentic look, lightly sand the black squares in high-traffic areas before sealing. This distresses the finish slightly, making the floor look like it’s been there for decades.
Enjoy the dramatic, upscale feel your new custom floor brings to the hallway without the cost of real stone tiles
Bold Painted Stripes
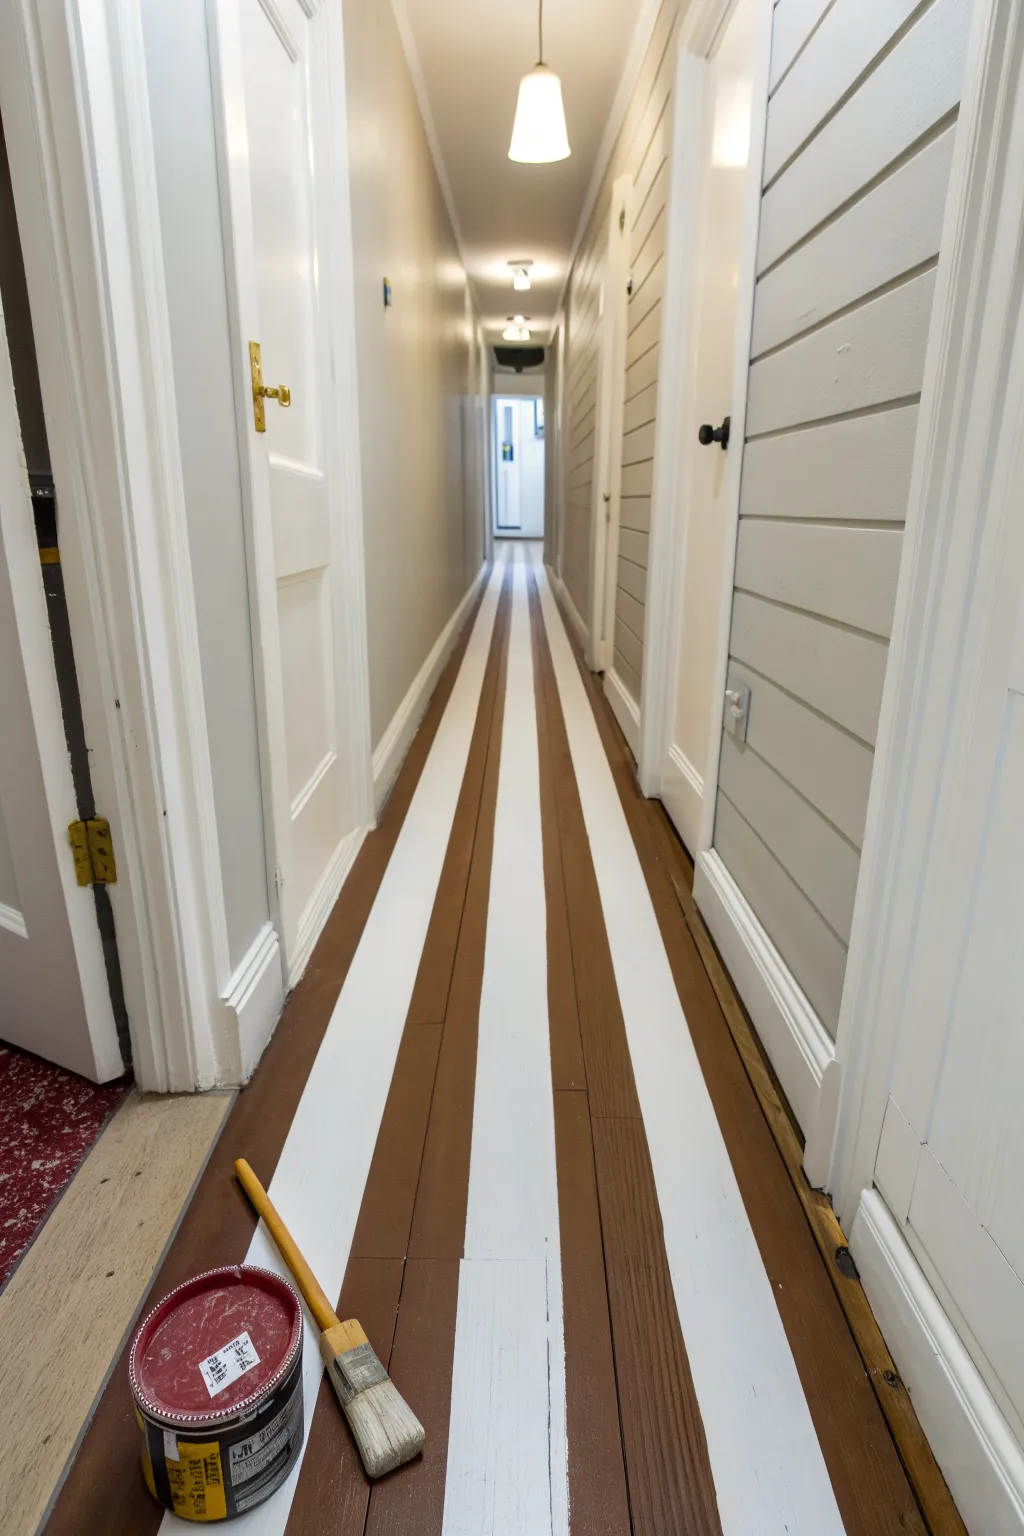
Transform a narrow, forgotten hallway into a striking design feature with bold, lengthwise stripes. This high-contrast look elongates the space and adds a crisp, custom finish to standard wooden floorboards.
Step-by-Step
Materials
- Appropriate floor cleaner/degreaser
- Sandpaper (120-grit and 220-grit)
- Orbital sander or sanding pole
- Vacuum and tack cloths
- Blue painter’s tape or delicate surface tape (2-inch width)
- Primer suitable for floors
- Floor paint: Bright White
- Floor paint: Chocolate Brown
- Angled sash brush (2.5 inch)
- Mini foam roller and tray
- Measuring tape
- Chalk line or pencil
- Polyurethane floor sealer (optional but recommended)
Step 1: Preparation & Base Coat
-
Clear and Clean:
Remove all furniture, rugs, and runner clips. Scrub the floor thoroughly with a cleaner/degreaser to remove years of wax, dirt, or oil build-up, ensuring the paint adheres properly. -
Sand for Adhesion:
Lightly sand the entire floor using 120-grit sandpaper. You aren’t trying to strip it to bare wood, just scuffing the glossy surface to give the paint ‘teeth’ to grip onto. -
Dust Removal:
Vacuum up every speck of dust, paying special attention to corners and baseboards. Follow up by wiping the entire surface with a tack cloth to capture fine particles. -
Apply Primer:
Roll on a high-quality primer designed for floors. Start at the far end of the hallway and work your way backward so you don’t paint yourself into a corner. -
Dry and Sand:
Allow the primer to dry completely according to the can’s instructions. Once dry, give it a very light pass with 220-grit sandpaper to smooth out any raised grain, then wipe with a tack cloth. -
Base Color Application:
Apply the lighter color (Bright White) as your base coat over the entire floor. It is much easier to tape off stripes over white than to try covering dark brown later. -
Second Coat:
After the first coat dries, apply a second coat of white to ensure solid, opaque coverage without any bleed-through. Let this cure fully—ideally overnight—before moving to tape.
Step 2: Mapping and Painting Stripes
-
Find the Center:
Measure the width of the hallway at both ends and mark the exact center point. Snap a chalk line or draw a pencil line connecting these points to create your central guide. -
Plan Your Widths:
Decide on your stripe width. For the look in the photo, stripes appear to be roughly 6-8 inches wide. Calculate outward from the center line so the pattern looks symmetrical on both sides. -
Mark the Lanes:
Using a measuring tape, mark the stripe boundaries lightly with a pencil at intervals down the hallway to ensure your lines stay straight. -
Apply Tape:
Run your painter’s tape along the outside edges of the stripes that will stay white. Press the tape edges down firmly with a credit card or putty knife to prevent paint bleed. -
Seal the Tape:
Here is a trick I always use: brush a very thin layer of the *base white paint* over the edge of the tape. This seals the gap; if any paint bleeds under, it will be white on white, keeping your final lines crisp. -
Paint the Dark Stripes:
Once the seal coat is dry, apply the Chocolate Brown paint to the exposed stripe areas. Use a brush for edges near the wall and a small roller for the main sections. -
Second Dark Coat:
Apply a second coat of the brown paint to ensure rich, deep color saturation. Two thin coats are always better than one thick, gloppy one. -
The Reveal:
While the final coat of brown is still slightly tacky (not fully dry), carefully peel up the painter’s tape at a 45-degree angle. This prevents the paint from chipping as you remove the tape. -
Final Cure and Seal:
Let the floor cure for at least 24-48 hours before walking on it. For high-traffic hallways, finish with two coats of clear, water-based polyurethane to protect your hard work.
Seal the Deal
Always start removing tape while the final topcoat is still slightly wet. If the paint dries completely, it can bridge over the tape and lift off with it.
Style Shift
For a nautical or coastal vibe, swap the chocolate brown for a deep navy blue, or use a soft sage green for a cottage aesthetic.
Enjoy the dramatic depth and character your new striped floor brings to the home


Timeless Trellis Grid
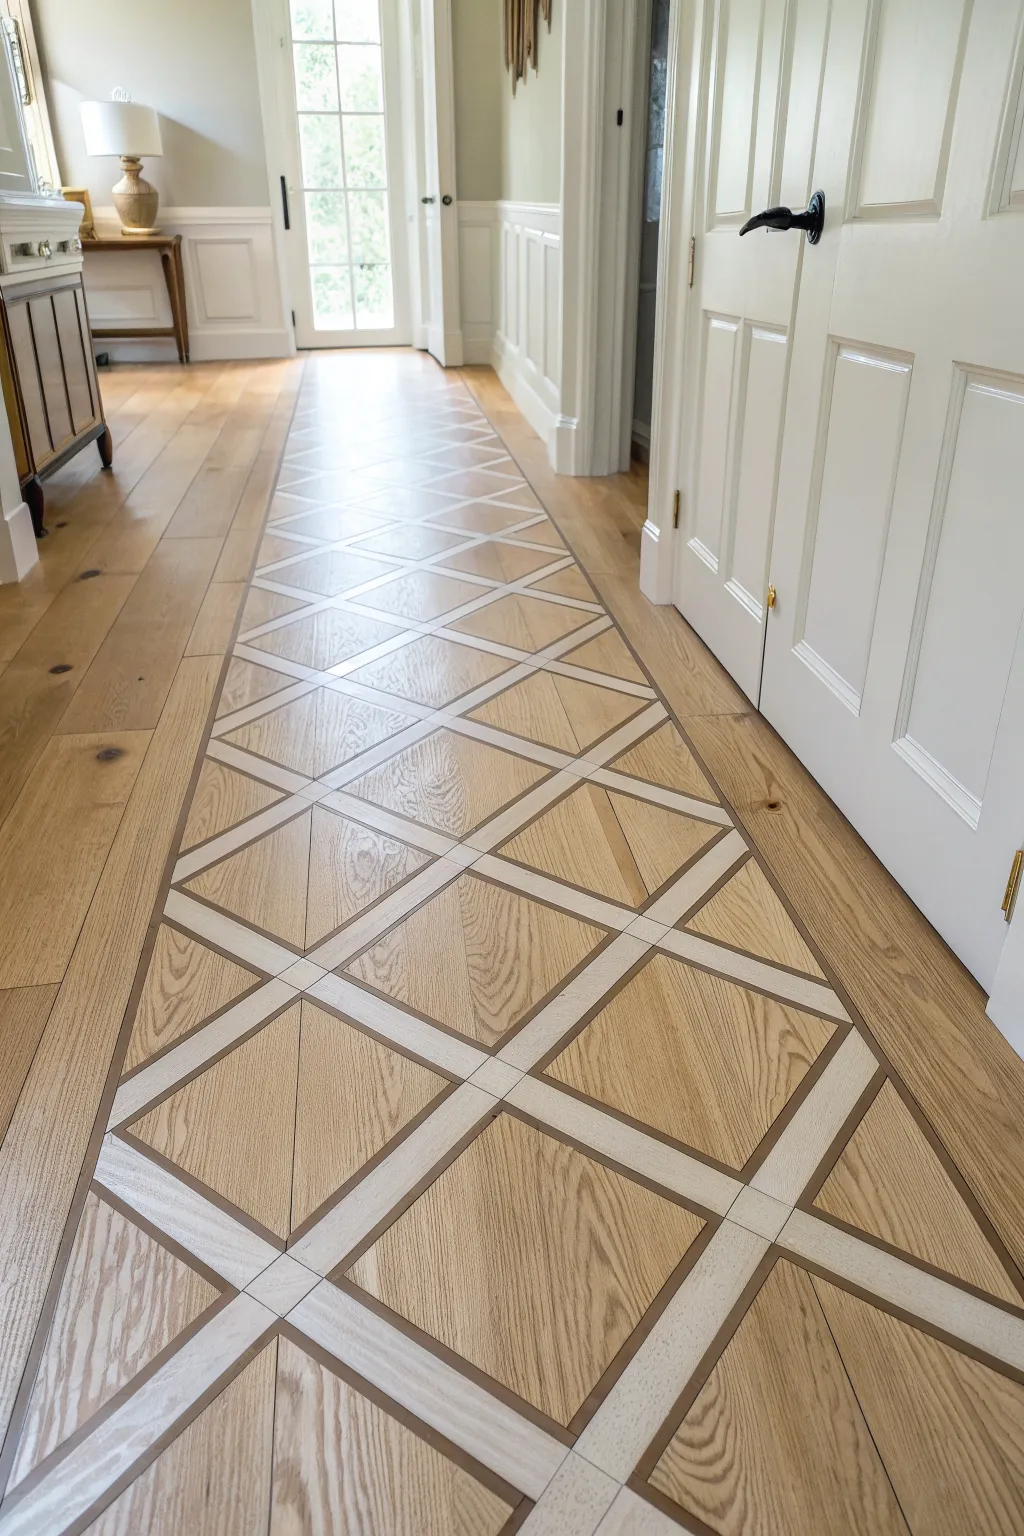
Transform a plain hallway into a grand corridor with this sophisticated floor painting technique that mimics expensive wood inlay. By alternating grain directions and using a clever taping method, you achieve a dimensional trellis grid that adds instant architectural heritage to your home.
Step-by-Step Tutorial
Materials
- Sander and sandpaper (120 and 220 grit)
- Primer (oil-based or bonding primer suitable for floors)
- Base coat paint (warm oak or natural wood tone)
- Secondary paint (creamy white or light beige for the trellis)
- Detail paint (dark brown or charcoal for the outlines)
- Painter’s tape (various widths: 1-inch and 1/4-inch)
- Measuring tape and chalk line
- Pencil and long straightedge
- Faux wood graining tool
- Glaze medium (clear)
- Polyurethane floor sealer (satin or matte)
Step 1: Preparation and Base Layer
-
Clean and Sand:
Begin by thoroughly cleaning the floor to remove any wax or grease. Sand the existing finish lightly with 120-grit paper to create a mechanical bond for your new paint, then vacuum up every speck of dust. -
Apply Primer:
Roll on a high-quality primer designed for heavy foot traffic. Let this cure fully according to the manufacturer’s instructions, usually overnight, to ensure your hard work lasts. -
Lay the Base Coat:
Apply your base color, which will serve as the ‘wood’ tone for the diamond insets. A warm oak or honey-toned floor paint works best here. Apply two coats for solid coverage, sanding lightly with 220-grit paper between coats for a smooth finish.
Bleed-Proof Lines
Before painting your contrast color, seal the tape edge with a thin layer of the *base* color first. This fills any gaps so your dark line stays perfectly crisp.
Step 2: Drafting the Grid
-
Find the Center:
Measure the width of your hallway at both ends to find the center point. Snap a chalk line down the entire length of the hall to establish your central axis. -
Mark the Diamonds:
Decide on the size of your diamonds (e.g., 24 inches long). Using your center line as a guide, mark the top and bottom points of your diamonds along the chalk line. Then, measure outward to mark the widths, ensuring perfect symmetry. -
Connect the Lines:
Use a long straightedge and a pencil to connect your marks, drawing the full diamond grid onto the painted floor. Keep your pencil lines light so they are easy to cover later. -
Tape the Trellis:
Apply 1-inch painter’s tape *over* the pencil lines. This taped area represents the light-colored trellis work that separates the wood diamonds. Press the edges down firmly to prevent bleed.
Step 3: Creating the Wood Effect
-
Mix the Glaze:
Mix a small amount of dark brown paint with a clear glaze medium. The ratio should be about 1 part paint to 4 parts glaze; you want it translucent enough to see the base color but dark enough to simulate grain. -
Grain the Diamonds (First Batch):
Working on every *other* diamond to prevent wet paint from smudging, brush on the glaze mixture. Immediately drag your wood graining tool through the glaze. -
Directional Graining:
This is crucial for realism: vary the direction of the grain. If one diamond runs vertically, make the adjacent ones run horizontally or diagonally. This mimics real parquet flooring. -
Complete the Graining:
Once the first batch of diamonds is dry to the touch, repeat the glazing and graining process on the remaining diamonds. Let the glaze dry completely, preferably overnight.
Level Up: Texture
For an even more realistic look, lightly dry-brush a tiny amount of the dark glaze onto the cream trellis strips to give them a weathered, aged texture.
Step 4: The Trellis and Details
-
Reveal the Grid:
Carefully peel up the 1-inch tape. You should now see the original base coat color in a grid pattern between your faux-wood diamonds. -
Paint the Trellis:
Using a small artist’s brush or a very steady hand with a foam brush, paint these 1-inch strips with your creamy white or light beige paint. You might need two coats for opacity. -
Drafting the Inlay Lines:
Once the cream paint is dry, use a ruler to lightly mark the borders where the trellis meets the wood diamonds. This prepares you for the high-contrast outline. -
Apply Detail Tape:
For razor-sharp lines, run two strips of painter’s tape very close together along the edges of the trellis, leaving a tiny gap (about 1/8th inch) exposed. -
Paint the Dark Outline:
Dab dark brown or charcoal paint into that tiny gap. I usually use a stencil brush for this to avoid pushing paint under the tape edges. -
Peel and Clean:
Ideally, remove the tape while the detail paint is slightly tacky but not wet. Peel slowly at a 45-degree angle to reveal crisp, dark inlay lines that make the pattern pop.
Step 5: Protection
-
Clear Coat Application:
After the paint has cured for at least 24 hours, apply a floor-rated polyurethane. Use a satin finish to mimic the sheen of waxed wood. -
Final Seal:
Apply at least two more coats of poly, lightly sanding with fine grit sandpaper between coats, to ensure your beautiful faux inlay can withstand hallway traffic.
Enjoy the sophisticated, custom look of your new hallway floor that captures the charm of classic carpentry.


Modern Diamonds and Harlequin

Transform a plain or outdated floor into a sophisticated statement piece with this oversized grey and white diamond pattern. This classic harlequin design adds instant depth and architectural interest, making your entryway or mudroom feel significantly larger and more elegant.
Step-by-Step
Materials
- Floor primer (appropriate for your surface type)
- Porch and floor paint (White base color)
- Porch and floor paint (Grey accent color)
- Painter’s tape (1-inch width)
- Measuring tape
- Pencil or chalk line
- Straight edge or long ruler
- Paint roller with extension pole
- Small foam roller
- Angled sash brush
- Utility knife
- Sandpaper (120 grit)
- Clear polyurethane floor sealer (optional)
Step 1: Preparation & Base Coat
-
Clean and sand:
Begin by thoroughly cleaning the floor to remove any grease, wax, or dirt. Once dry, scuff-sand the entire surface with 120-grit sandpaper to ensure the paint adheres properly, then vacuum up all dust. -
Apply primer:
Roll on a coat of high-quality floor primer. Start from the corner furthest from the door and work your way out so you don’t paint yourself into a corner. -
Paint the base color:
Once the primer is fully dry, apply two coats of your white floor paint. This will serve as the lighter diamonds in your final pattern. Allow the final coat to cure for at least 24 to 48 hours to prevent the tape from peeling it up later.
Step 2: Measuring & Taping
-
Find the center:
Measure the width of your room to find the exact center point at the doorway. I like to mark this spot clearly with a pencil as my anchor for the entire design. -
Establish the grid:
Decide on the size of your diamonds (the ones in the photo look to be about 18-24 inches wide). Use a long straight edge to mark a grid of squares on the floor, but rotate them 45 degrees to create the diamond shape. -
Snap lines:
If spanning a large room, use a chalk line to snap your diagonal guides across the floor. This ensures your diamonds stay straight over a long distance. -
Tape the pattern:
Apply painter’s tape along the OUTSIDE of the boxes that will be painted grey. This is the trickiest part—you must be consistent about taping outside the line so your grey squares don’t end up smaller than the white ones. -
Seal the tape edges:
To get crisp lines, take a small amount of your *base* white paint and brush it lightly over the edges of the tape. This seals the tape and prevents the grey paint from bleeding underneath.
Seal the Deal
Before painting the grey, run a credit card or putty knife firmly over all tape edges. This friction creates a tighter bond and significantly reduces bleed-through on textured floors.
Step 3: Painting the Diamonds
-
Cut in the edges:
Using an angled sash brush, carefully paint the grey color around the perimeter of the taped diamonds and along any walls or baseboards where a roller won’t reach. -
Roll the grey:
Use a small foam roller to fill in the rest of the taped-off diamond areas. A foam roller helps achieve a smooth finish without heavy texture marks. -
Apply a second coat:
Let the first coat of grey dry according to the can’s instructions, then apply a second coat for solid, opaque coverage. -
Remove tape:
Ideally, peel up the tape while the second coat of paint is still slightly tacky. Pull the tape slowly at a 45-degree angle away from the wet paint to get the sharpest line.
Add an Aged Look
For a vintage vibe, lightly sand the painted diamonds after they dry but before sealing. This distresses the pattern slightly, making the floor look original to an older home.
Step 4: Finishing Touches
-
Touch up:
Inspect your lines once potential bleeds or shaky edges are visible. Use a small artist’s brush and your original white paint to correct any imperfections. -
Seal the floor:
For high-traffic areas like mudrooms, apply 2-3 coats of clear water-based polyurethane. This protects your hard work from scuffs and scratches without yellowing the white paint. -
Cure time:
Allow the floor to cure fully before walking on it with shoes or replacing furniture. This usually takes about a week for full hardness, even if it feels dry to the touch sooner.
Step back and admire how this bold geometric pattern completely redefines the energy of your space
BRUSH GUIDE
The Right Brush for Every Stroke
From clean lines to bold texture — master brush choice, stroke control, and essential techniques.
Explore the Full Guide
Painted Herringbone Illusion
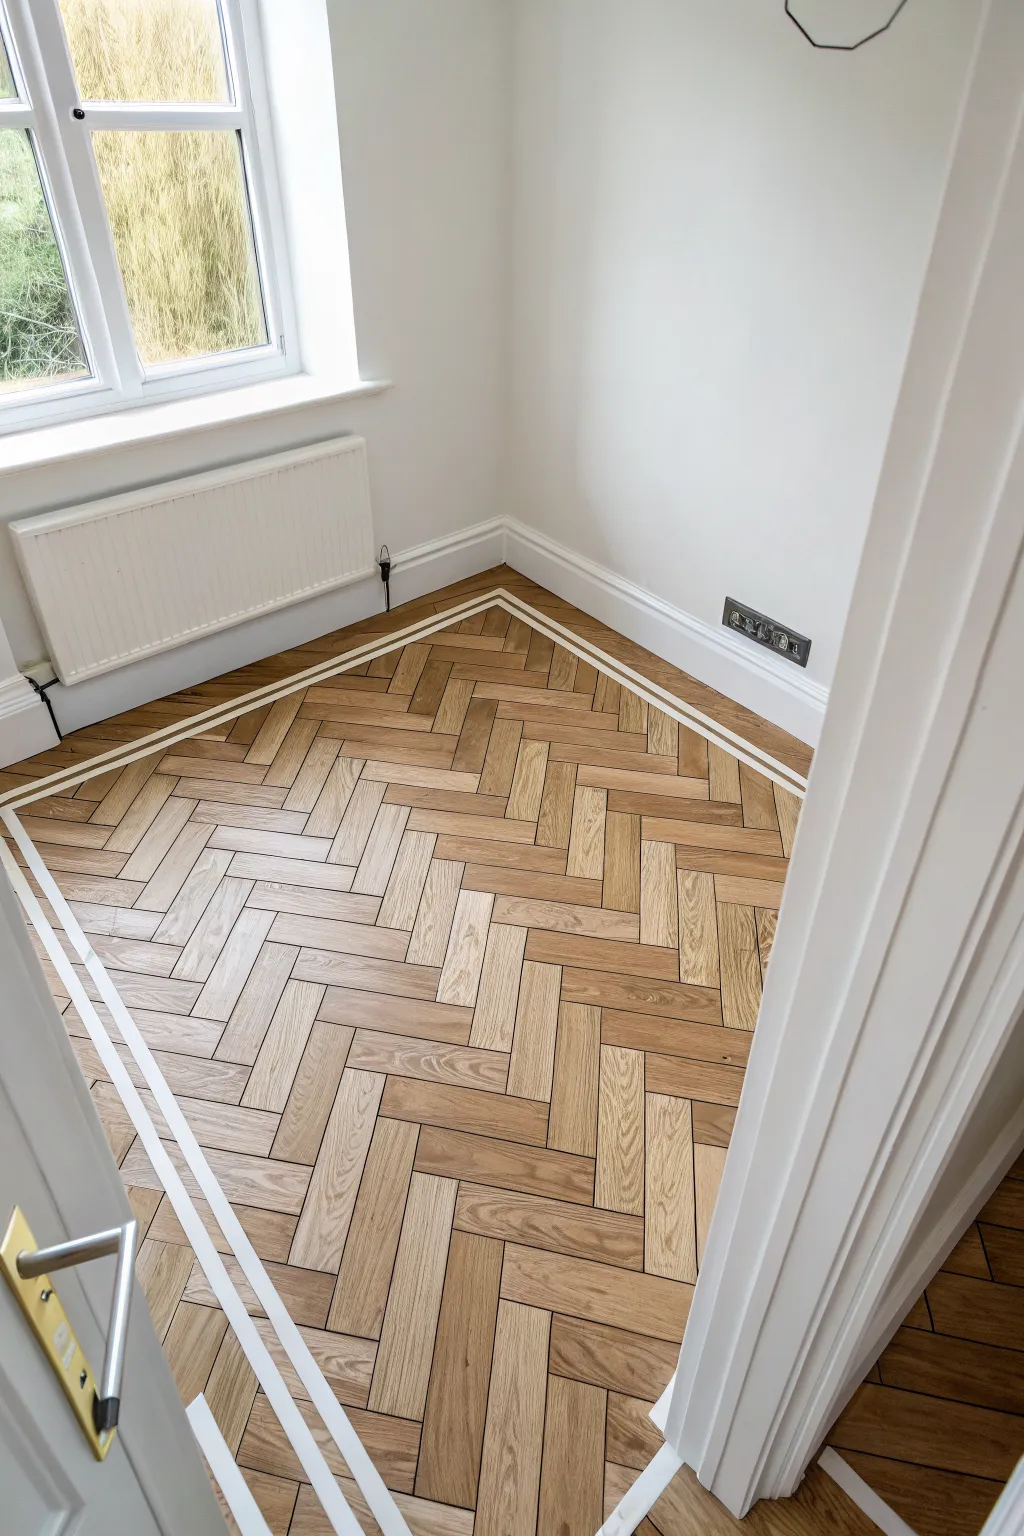
Transform a plain subfloor or existing linoleum into a stunning, high-end feature with just paint and tape. This project creates a convincing illusion of expensive oak parquet flooring through strategic masking and careful wood-grain blending.
How-To Guide
Materials
- Base coat floor paint (light oak tone)
- Secondary floor paint (medium oak/warm brown)
- Dark glaze or gel stain (for graining)
- Painter’s tape (various widths, including 1/4 inch framing tape)
- Carpenter’s square and ruler
- Chalk snap line
- Pencil
- Paint rollers and tray
- Wood graining rocker tool (optional)
- Stiff bristle chip brushes
- Clear polyurethane floor sealer (matte or satin)
Step 1: Preparation and Base Coat
-
Clean and prep:
Start by thoroughly cleaning the floor surface. If you are painting over a glossy finish, sand it lightly to ensure adhesion. Vacuum up every speck of dust. -
Apply the base color:
Roll on two coats of your lightest paint color across the entire floor. This will serve as the ‘grout’ lines and the lightest undertone of the wood. Allow 24 hours for this to cure completely before applying tape.
Bleed-Through Blues?
If paint seeps under the tape, don’t scrub it. Wait for it to dry completely, then scrape the bleed gently with a craft knife or touch it up with a fine liner brush and base paint.
Step 2: Mapping the Pattern
-
Find your center:
Measure the width of the room to find the exact center. Snap a chalk line down the middle of the room to guide your first row of herringbone. -
Create the border:
Decide on a border width—usually about 4-6 inches from the wall. Apply tape to mark off this perimeter, creating the ‘frame’ for your rug-like effect seen in the photo. Don’t paint inside this yet. -
Tape the grid:
The herringbone pattern relies on a diagonal grid. Use your square to mark 45-degree angles from your center line. I find it helpful to draw a few guide lines in pencil first. -
Lay the ‘grout’ lines:
Using thin 1/4 inch tape (or whatever width you want your gaps to be), tape out the zigzag pattern. You are taping where the *cracks* between the boards will be. Ensure all your rectangular ‘boards’ are uniform in size, typically a 1:2 or 1:3 ratio. -
Add the white accent stripe:
To mimic the inlaid border detail shown in the photo, run a strip of wider tape (about 1 inch) parallel to your outer border tape, leaving a thin gap. This preserves the white ‘inlay’ strip. -
Seal the tape:
Roll a very light layer of your base coat color over all the tape edges. This locks the tape and prevents the darker wood colors from bleeding under, keeping your lines crisp.
Level Up: Nail Holes
For ultimate realism, use a tiny stamp or the end of a chopstick dipped in dark paint to add two small ‘nail hole’ dots to the end of each painted plank.
Step 3: Creating the Wood Effect
-
Apply the mid-tone:
Working in sections, brush your medium oak paint color onto the individual ‘planks’ between the tape. Don’t aim for perfect opacity; some of the lighter base showing through adds depth. -
Add texture immediately:
While the mid-tone paint is still wet, drag a dry, stiff bristle brush through it in the direction of the wood grain. Vary the pressure to create streaks. -
Introduce variation:
Dip a brush lightly into the dark glaze or stain. Randomly apply this to some planks or edges to create the natural color variance found in real wood. The photo shows some boards are significantly darker than others. -
Simulate grain details:
For a few random planks, use a wood graining rocker tool. Rock it gently as you pull it through the wet glaze to create knots and heartwood patterns. -
Wait and repeat:
Let this layer dry slightly. If the floor looks too flat, go back with a very dry brush and a darker brown to dry-brush highlights on the edges of the planks.
Step 4: The Reveal and Finish
-
Remove the tape:
This is the crucial moment. Carefully peel up all the tape *before* the paint is fully cured (usually when it’s dry to the touch but not hard). Pull at a 45-degree angle away from the paint edge. -
Touch up lines:
Inspect your ‘grout’ lines. If any paint bled through, use a small artist’s brush and your base color to tidy up the edges. -
Soften the look (optional):
If the contrast between the planks and the grout lines is too stark, you can apply a very watered-down wash of brown glaze over the entire floor to unify the tones. -
Protect your work:
Once the paint has cured for at least 48 hours, apply 2-3 coats of clear polyurethane floor sealer. A matte or satin finish looks most like natural wood.
Step back and admire how a simple can of paint has completely redefined the architectural character of your room
Chevron Pathway for Narrow Rooms
Transform a simple hallway with this painted floor runner that mimics the warmth and texture of a woven rug. Using alternating chevrons of deep navy and terracotta against a crisp white border, this design adds elongation and character to narrow spaces without the trip hazard of a real carpet.
Step-by-Step
Materials
- Floor primer (suitable for wood)
- Porch and floor enamel paint (White/Cream base)
- Porch and floor enamel paint (Navy Blue)
- Porch and floor enamel paint (Terracotta/Red-Brown)
- Painter’s tape (various widths: 1-inch and 2-inch)
- Measuring tape and pencil
- Chalk line or long straight edge
- Small foam roller
- Angled sash brush (2-inch)
- Detail brush for touch-ups
- Sandpaper (120-grit)
- Polyurethane floor sealer (water-based)
Step 1: Preparation and Base Coat
-
Clean and sand the floor:
Begin by thoroughly cleaning the hallway floor to remove dust, wax, or grime. Once dry, lightly sand the area where the runner will go using 120-grit sandpaper; this helps the paint adhere properly to the existing finish. -
Define the perimeter:
Measure the width of your hallway to find the center. Decide on the width of your runner—leaving about 6-8 inches of wood floor visible on either side usually looks best. Mark the outer edges with a pencil. -
Tape the outline:
Apply long strips of painter’s tape along your pencil marks to create the long, straight sides of the runner. Press the tape edges down firmly to prevent bleed-under. -
Apply the primer:
Roll a coat of high-quality floor primer within the taped area. Let this dry completely according to the manufacturer’s instructions. -
Paint the base color:
Apply your white or cream base color over the primer. This will serve as the ‘grout lines’ between your chevrons and the border of the rug. You’ll likely need two coats for full opacity, allowing sufficient drying time between layers.
Step 2: Drafting the Design
-
Mark the center line:
Once the base coat is fully cured (give it at least 24 hours), lightly mark a center line running down the entire length of the runner. A chalk line works well here, but be gentle so you don’t embed colored chalk into the paint. -
Establish the chevron pitch:
Decide on the height of your V-shapes. Making marks every 6 to 8 inches along the center line and corresponding marks along the side edges is a good standard. Connect these points to form your zigzag pattern. -
Tape the chevron pattern:
This is the most critical step. Tape off your V-shapes. Remember that the tape itself represents the white lines you want to keep. You will need to tape ‘outside’ the shape you intend to paint first. -
Tape the border:
Add a strip of tape just inside the outer perimeter tape to create that distinct white border effect seen in the photo. This separates the chevron pattern from the wood floor. -
Seal the tape edges:
To ensure razor-sharp lines, I like to brush a very thin layer of the base color (white) over the edges of the tape. This seals any tiny gaps; if paint bleeds, it will correspond to the base color and be invisible.
Bleeding Lines?
If paint bleeds under tape, wait for it to dry fully. Then, place tape over the colored area exactly on the line and touch up with the base white paint using a tiny artist’s brush.
Step 3: Applying Color
-
Plan your color sequence:
Mark which chevrons will be blue and which will be terracotta with a small piece of tape or pencil mark to avoid confusion once you start painting. -
Paint the first color set:
Using a small brush for edges and a mini roller for the centers, fill in all the navy blue sections. Two thin coats are better than one thick one to avoid ridges. -
Paint the second color set:
Switch to a fresh brush and roller to apply the terracotta paint to the remaining sections. Ensure the coverage is solid and consistent. -
Remove tape immediately:
Don’t wait for the paint to dry completely. Carefully peel back the tape while the paint is still slightly tacky. Pull at a 45-degree angle away from the fresh paint to keep lines crisp.
Tape Removal Trick
Pulling tape too fast can rip up the base coat. Warm the tape slightly with a hair dryer on low heat as you peel it back to soften the adhesive without damaging the floor.
Step 4: Finishing Touches
-
Inspect and touch up:
Once dry, inspect your work close up. Use a small detail brush to tidy up any spots where the paint might have bled or where the coverage is thin. -
Protect the finish:
After the design has cured for several days, apply a clear, water-based polyurethane floor sealer. Use a wide foam brush or applicator pad to apply 2-3 coats, letting it dry between applications. -
Final cure:
Keep heavy foot traffic off the area for at least a week to allow the finish to harden completely to a durable, scuff-resistant surface.
Enjoy the durable beauty of your new painted runner

PENCIL GUIDE
Understanding Pencil Grades from H to B
From first sketch to finished drawing — learn pencil grades, line control, and shading techniques.
Explore the Full Guide
Two-Tone Frame to Define Space
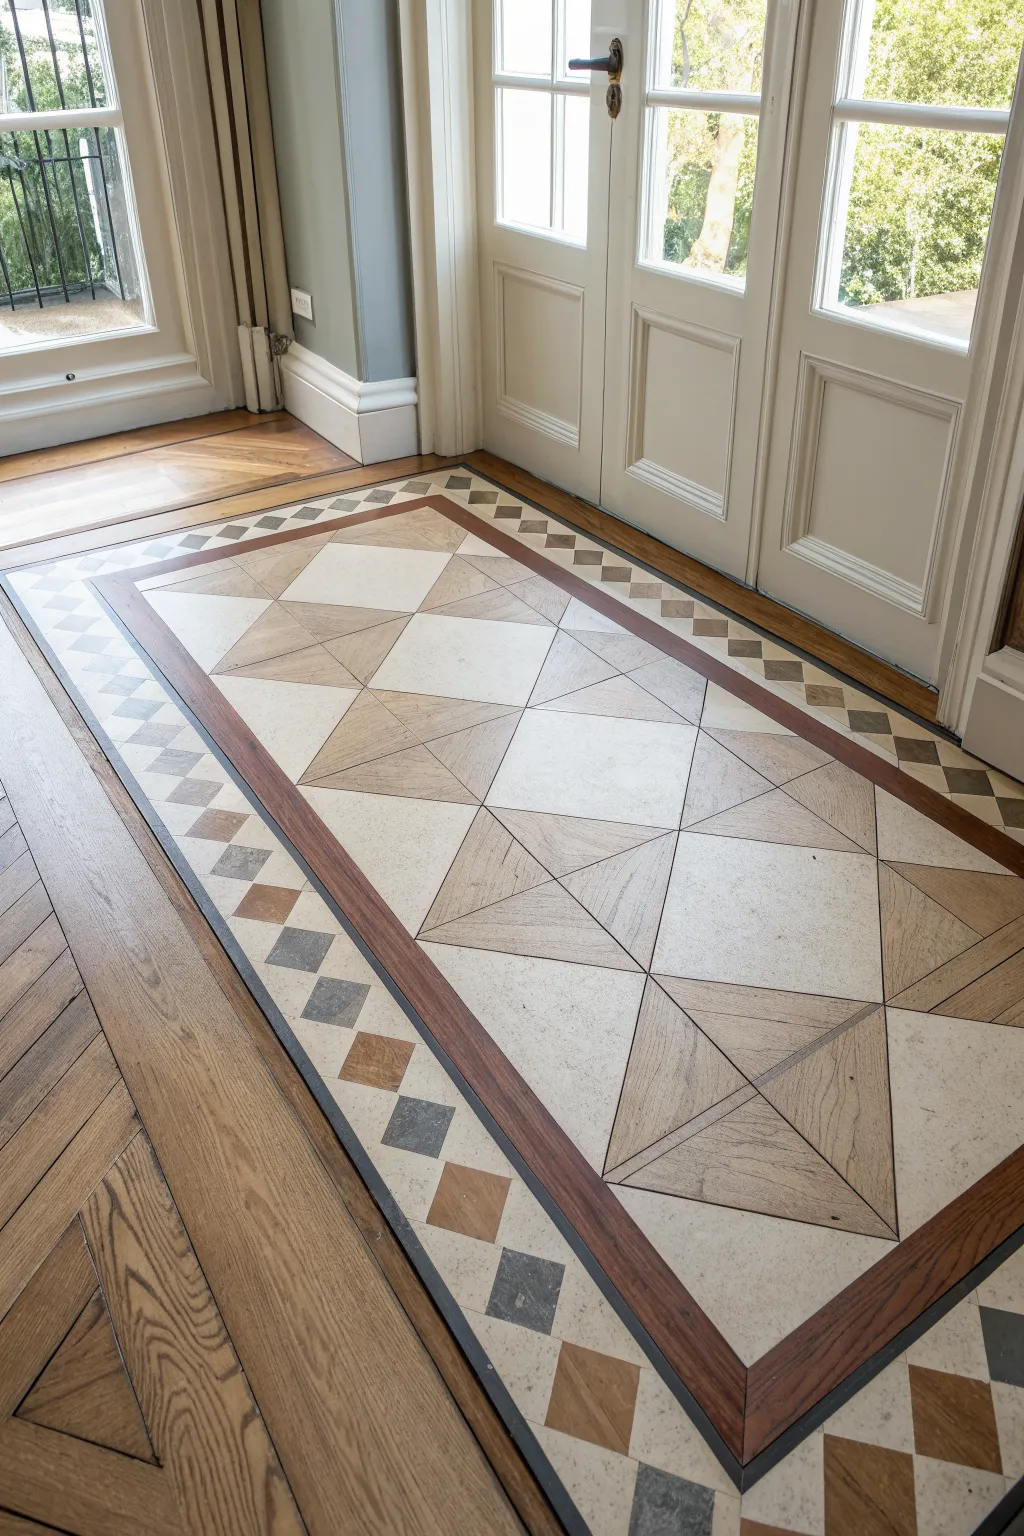
Transform a plain hardwood or plywood floor into an elegant statement piece with this faux inlay design. By combining geometric stenciling with careful taping, you can mimic the sophisticated look of expensive wood and stone parquetry.
Step-by-Step Tutorial
Materials
- Sander and sandpaper (120 and 220 grit)
- Primer (bonding primer suitable for floors)
- Painter’s tape (various widths: 1-inch, 2-inch, and fine-line tape)
- Chalk line or laser level
- Base paint color (creamy off-white/limestone)
- Secondary paint colors (slate blue-grey, terracotta brown, dark espresso)
- Glaze medium
- Polyurethane floor sealer (satin or matte finish)
- High-density foam rollers
- Artist brushes (angled sash and fine liner)
- Ruler and T-square
- Pencil
Step 1: Preparation and Base Coat
-
Surface prep:
Begin by thoroughly cleaning and sanding your existing floor. You need to remove the old finish so the new paint adheres properly. Vacuum up every speck of dust and wipe with a tack cloth. -
Prime the area:
Roll on a bonding primer across the entire area you plan to paint. Let it dry completely according to the manufacturer’s instructions. -
Apply the limestone base:
Apply two coats of your creamy off-white base color. This simulates the light stone or wood sections of the design. Allow for full drying time between coats to ensure a durable foundation.
Step 2: Drafting the Design
-
Establish the perimeter:
Using a laser level or chalk line, mark out the large outer rectangle that will contain the design. Measure carefully to ensure it is centered in your entryway or hallway. -
Draw the grid:
Lightly pencil a grid inside your rectangle. Start by finding the center point and working outwards to create equal-sized squares that will eventually become the diamond patterns. -
Draft the diamond border:
Measure a 5-inch border around the central panel. Mark alternating squares along this strip—these will become your two-tone diamond border.
Bleed Prevention
Before applying your colored paint, brush a thin layer of the *base color* over the tape edges. This seals the tape so any bleeding is invisible.
Step 3: Taping and Painting the Border
-
Tape the diamond grid:
Use fine-line tape to mask off the alternating diamonds in the border. Press the edges of the tape down firmly with a credit card to prevent paint bleed. -
Paint the grey accents:
Mix your slate blue-grey paint. Use a small foam brush to fill in every other diamond in your taped border pattern. -
Paint the terracotta accents:
Once the grey is dry to the touch, fill the remaining alternating diamonds with the terracotta brown shade. This creates the classic checkerboard effect. -
Create the dark frame:
Tape off the thin linear strips that separate the border from the central panel and the outer floor. Paint this a solid dark espresso color to act as a ‘frame’ for your artwork.
Faux Grain Direction
When painting the faux wood triangles, always pull your brush strokes toward the center point of the design to mimic how real wood pieces would be cut.
Step 4: Creating the Central Medallion
-
Tape the starburst geometry:
Mask off the large geometric triangles inside the central panel. You are creating a ‘star’ or ‘envelope’ pattern where four triangles meet at a center point. -
Apply the graining glaze:
Mix a small amount of dark brown paint with glaze medium. Brush this translucent mixture onto the taped triangle sections, dragging the brush in one direction to simulate wood grain. -
Add faux joints:
Use a fine liner brush and thinned dark paint to draw very thin lines separating the triangular sections. This mimics the physical seams found in real parquetry flooring. -
Detailing the ‘stone’ sections:
For the light creamy sections that remain unglazed, I like to spatter a tiny bit of diluted grey paint (using a toothbrush) to give them the texture of natural limestone.
Step 5: Sealing and Protection
-
Remove tape and inspect:
Carefully peel back all tape at a 45-degree angle. Use a small artist brush to touch up any areas where paint might have bled or lines aren’t crisp. -
Cure time:
Allow the painted design to cure for at least 24-48 hours. The paint needs to be hard enough to withstand the sealer application without smudging. -
Apply the first topcoat:
Roll on a coat of clear, water-based polyurethane. Use a satin or matte finish to maintain a natural look. -
Final coats:
Apply 2-3 additional coats of polyurethane, lightly sanding with fine-grit sandpaper between coats for the smoothest possible finish. Let it cure fully before walking on it.
Now you have a stunning, durable floor design that adds architectural interest without the cost of real stone inlay
Painted Floor Medallion Centerpiece

Transform an ordinary wooden floor with this stunning, oversized compass rose medallion that mimics the look of high-end marquetry. Using stain and paint techniques, you can create the illusion of inlaid wood in rich mahogany, slate blue, and natural oak tones.
Step-by-Step
Materials
- Large sheet of kraft paper or cardboard
- Pencil and eraser
- Long straightedge or ruler
- Chalk line or string and tack
- Compass tool (large beam compass preferred)
- Painter’s tape (various widths, high-quality)
- Utility knife or X-Acto knife with fresh blades
- Floor paint or gel stain (Dark Walnut, reddish-brown, Slate Blue/Black)
- Small foam rollers
- Assorted artist brushes (flat and detail)
- Clear urethane floor sealer
- Sandpaper (220-grit)
Step 1: Preparation and Design
-
Assess the surface:
Ensure your wooden floor is clean, dry, and lightly sanded; if the floor is already sealed, you’ll need to scuff-sand the area where the medallion will go to ensure adhesion. -
Find the center:
Measure the room to locate the exact center point of your intended design area and mark it clearly with a pencil. -
Draft the outer circles:
Using a beam compass or a string anchored at the center with a tack, draw the large outer circle for the border, a slightly smaller inner circle for the border’s edge, and the main circle that will contain the star points. -
Mark the cardinal points:
Use a chalk line or long straightedge to divide the circle into four equal quadrants (North, South, East, West), ensuring your lines intersect perfectly at the center point. -
Create the octagon:
Bisect each quadrant to create eight equal pie slices; these lines will serve as the guides for the main eight points of your compass star.
Clean Lines Pro-Tip
Before painting your color, brush a thin layer of clear matte medium or the base floor color over the tape edge. This seals the tape and ensures razor-sharp lines.
Step 2: Creating the Compass Star
-
Draft the star points:
Mark the desired length of your main four points (N, S, E, W) and the shorter secondary points; connect these tips back to the base lines to form the sharp triangular shapes of the star. -
Divide for shading:
Draw a line down the center of each star point triangle, splitting it in half; this is crucial for the 3D ‘light and shadow’ effect where one side is dark and the other is light. -
Tape the first set of facets:
Apply painter’s tape deeply along the edges of the ‘shadow’ side of each star point, pressing the edges down firmly with a credit card to prevent bleed-under. -
Painting the dark tones:
Fill in these taped sections with your darkest color, like a slate blue or charcoal paint; use a dry-brush technique if you want some wood grain to show through. -
Tape the contrasting facets:
Once the dark paint is fully dry, carefully remove the tape and mask off the adjacent ‘light’ sides of the star points. -
Apply the warm tones:
Paint or stain these sections with a reddish-brown or mahogany tone to create warmth and contrast against the slate color. -
Add the minor stars:
Draft and paint the smaller, floating four-point stars located between the main compass points using a simplified version of the previous steps, sticking to a single dark reddish tone for consistency.
Level Up: Faux Grain
Instead of solid paint, mix your acrylics with glazing medium. Use a specialized graining rocker tool on the wet glaze to create fake exotic wood textures.
Step 3: The Border and Finishing Touches
-
Draft the segmented border:
Draw angled lines within the outer border ring to create a ‘rope’ or ‘bar’ pattern; the angles should generally point towards the center or follow a consistent diagonal. -
Masking the border sequence:
Tape off every other segment in the border ring. -
Paint the first border color:
I prefer to start with the darker reddish-brown here, filling in the exposed segments carefully. -
Complete the border pattern:
Remove tape, let dry, then tape the painted segments to fill the remaining gaps with the lighter tan or natural wood tone. -
Detail the center:
Paint the central small circle with the same alternating light/dark pattern as the main star to tie the whole design together. -
Add fine lines:
Use a very fine liner brush and black paint to carefully outline the star points and border rings; this pinstriping mimics the look of separate wood inlays. -
Seal the artwork:
Once the paint has cured for at least 24-48 hours, apply 2-3 coats of clear polyurethane floor sealer over the entire medallion area to protect it from foot traffic.
Enjoy the timeless elegance your new compass rose brings to the room every time you walk across it


3D Cube Optical Illusion
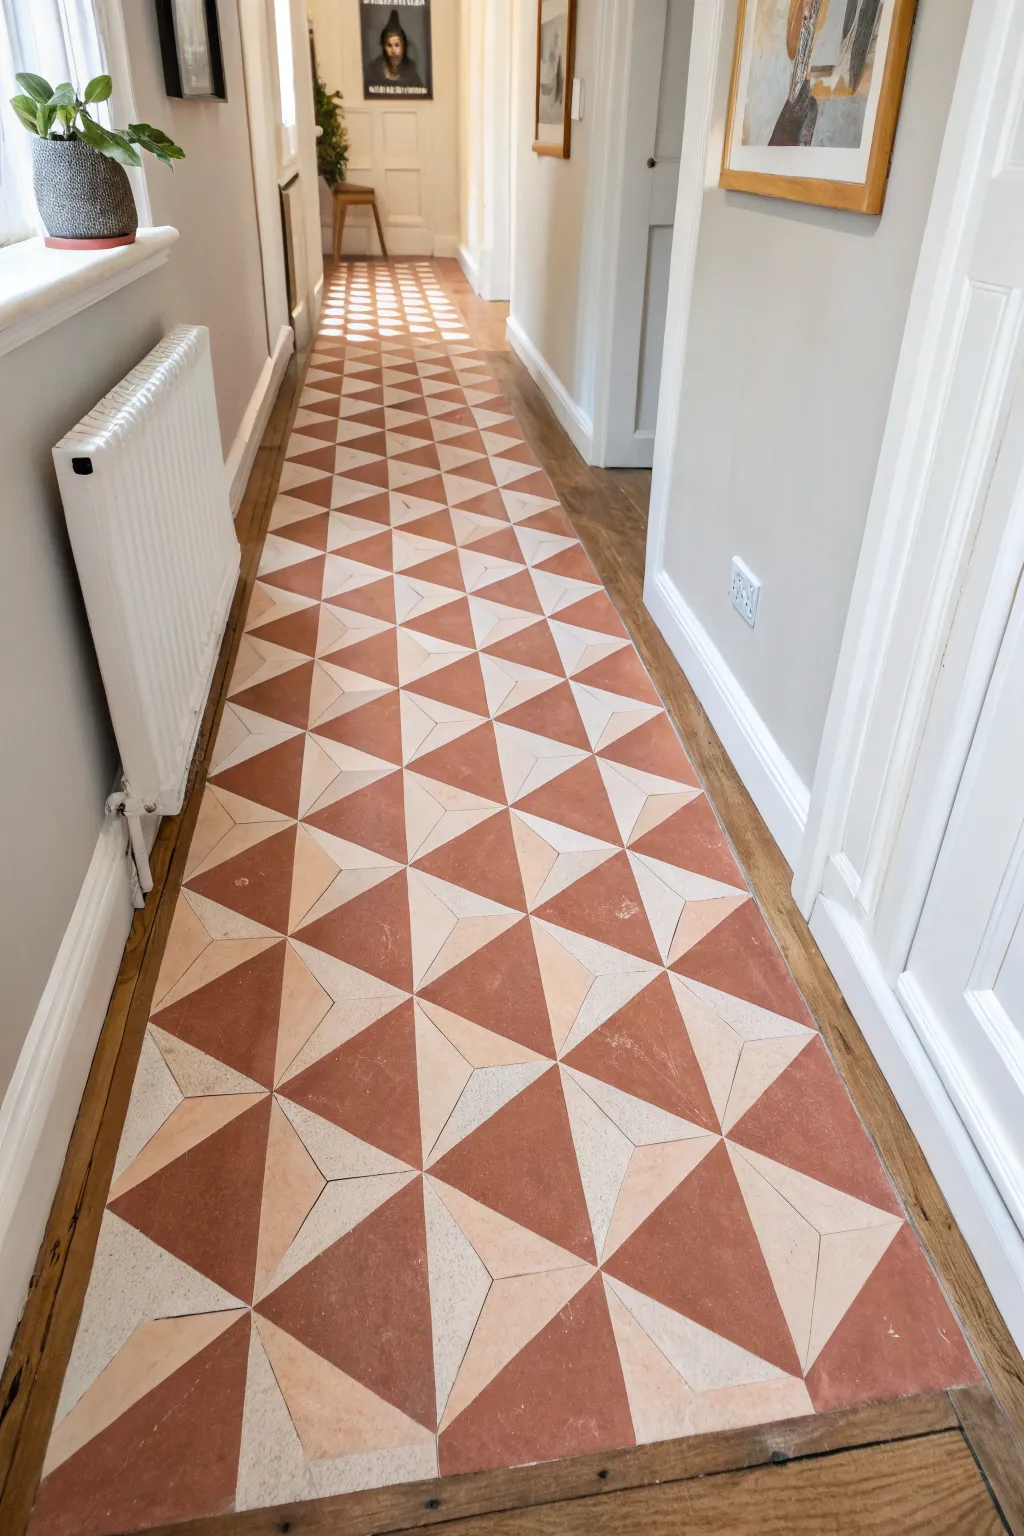
Transform a plain hallway into a stunning optical illusion using nothing but paint and tape. This tumbling block pattern creates a sophisticated 3D effect that mimics high-end encaustic tiles for a fraction of the cost.
Step-by-Step
Materials
- High-quality floor paint (Terra Cotta/Burnt Orange)
- High-quality floor paint (Warm Cream/Off-White)
- High-quality floor paint (Light Beige/Taupe)
- Painter’s tape (various widths, high adhesion)
- Chalk line or laser level
- Ruler and protractor
- Pencil
- Small foam roller
- Small angled paintbrush
- Degreaser/floor cleaner
- Clear polyurethane floor sealer
Step 1: Preparation & Base Coat
-
Clean the surface:
Start by thoroughly sweeping and vacuuming the hallway floor to remove every speck of dust. Scrub the floor with a degreaser to remove oils or wax that could prevent paint adhesion. -
Sand and repair:
Lightly sand the existing floor to create a ‘key’ for the paint to grip. If there are deep gouges or cracks, fill them with wood filler or floor patch and sand smooth once dry. -
Apply the base color:
Roll on two coats of your lightest color (the Warm Cream) across the entire floor. This will serve as the ‘top’ face of your cubes and ensures a bright, solid foundation. Allow this to cure fully, preferably overnight.
Step 2: Drafting the Pattern
-
Establish the centerline:
Snap a chalk line or use a laser level down the exact center of the hallway length. This ensures your pattern stays straight even if the walls aren’t perfectly parallel. -
Mark the rows:
Using a pencil, mark horizontal lines perpendicular to your centerline at even intervals. The spacing determines the height of your cubes; around 6-8 inches works well for a standard hallway. -
Draw the diamonds:
Connect your points to create a grid of diamonds (rhombuses) across the floor. Use a 60-degree angle for true isometric perspective, or essentially draw a grid of equilateral triangles. -
Define the cubes:
Inside each diamond grid, identify the ‘Y’ shape that splits the diamond into three smaller diamonds (rhombuses). Drawing this internal structure is what creates the three faces of the cube.
Seal Tape Tip
Before painting your color, brush a tiny bit of the base color over the tape edge. This seals the gap so any bleed is invisible!
Step 3: Taping & Painting
-
Tape the first color set:
We will paint one color face at a time. Tape off the ‘right’ side faces of every cube first. Ensure you press the tape edges down firmly with a credit card to prevent bleed. -
Paint the terra cotta faces:
Using the small foam roller, fill in the taped sections with the Terra Cotta paint. I find distinct, thin coats work better than one thick one here. -
Remove tape while wet:
Peel up the tape carefully while the paint is still slightly tacky to get the crispest lines. Let this set clearly dry before moving to the next color. -
Tape the second color set:
Once the terra cotta is dry, tape off the ‘left’ side faces of the cubes. You will serve to tape over the dried paint edges carefully. -
Paint the beige faces:
Fill in these sections with your Light Beige/Taupe paint. This creates the ‘shadow’ side of the cube, enhancing the 3D effect. -
Reveal and touch up:
Remove the tape. You should now see the cream base coat remaining as the ‘top’ of the cube, with your painted sides completing the shape. Use a tiny artist’s brush to correct any small bleeds or gaps.
Level Up: Faux Texture
Sponge the wet paint lightly with a slightly darker shade to give the ’tiles’ a weathered stone texture instead of a flat finish.
Step 4: Finishing
-
Clean pencil marks:
Gently erase or wash away any visible pencil guidelines that weren’t covered by paint. -
Seal the floor:
Apply at least two to three coats of clear polyurethane floor sealer. This protects your hard work from foot traffic and scuffs. -
Final cure:
Allow the sealer to cure for at least 24-48 hours before walking on it or replacing furniture.
Enjoy the depth and character your new geometric floor brings to the space


Have a question or want to share your own experience? I'd love to hear from you in the comments below!