
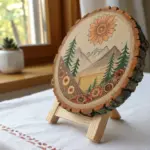
There’s something super satisfying about turning a humble log round into a tiny piece of art you can actually hold in your hand. Here are my favorite log painting ideas that really lean into the grain, the rings, and that gorgeous bark edge.
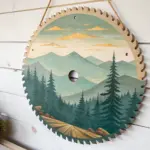
Rustic Mountain Mini Landscape
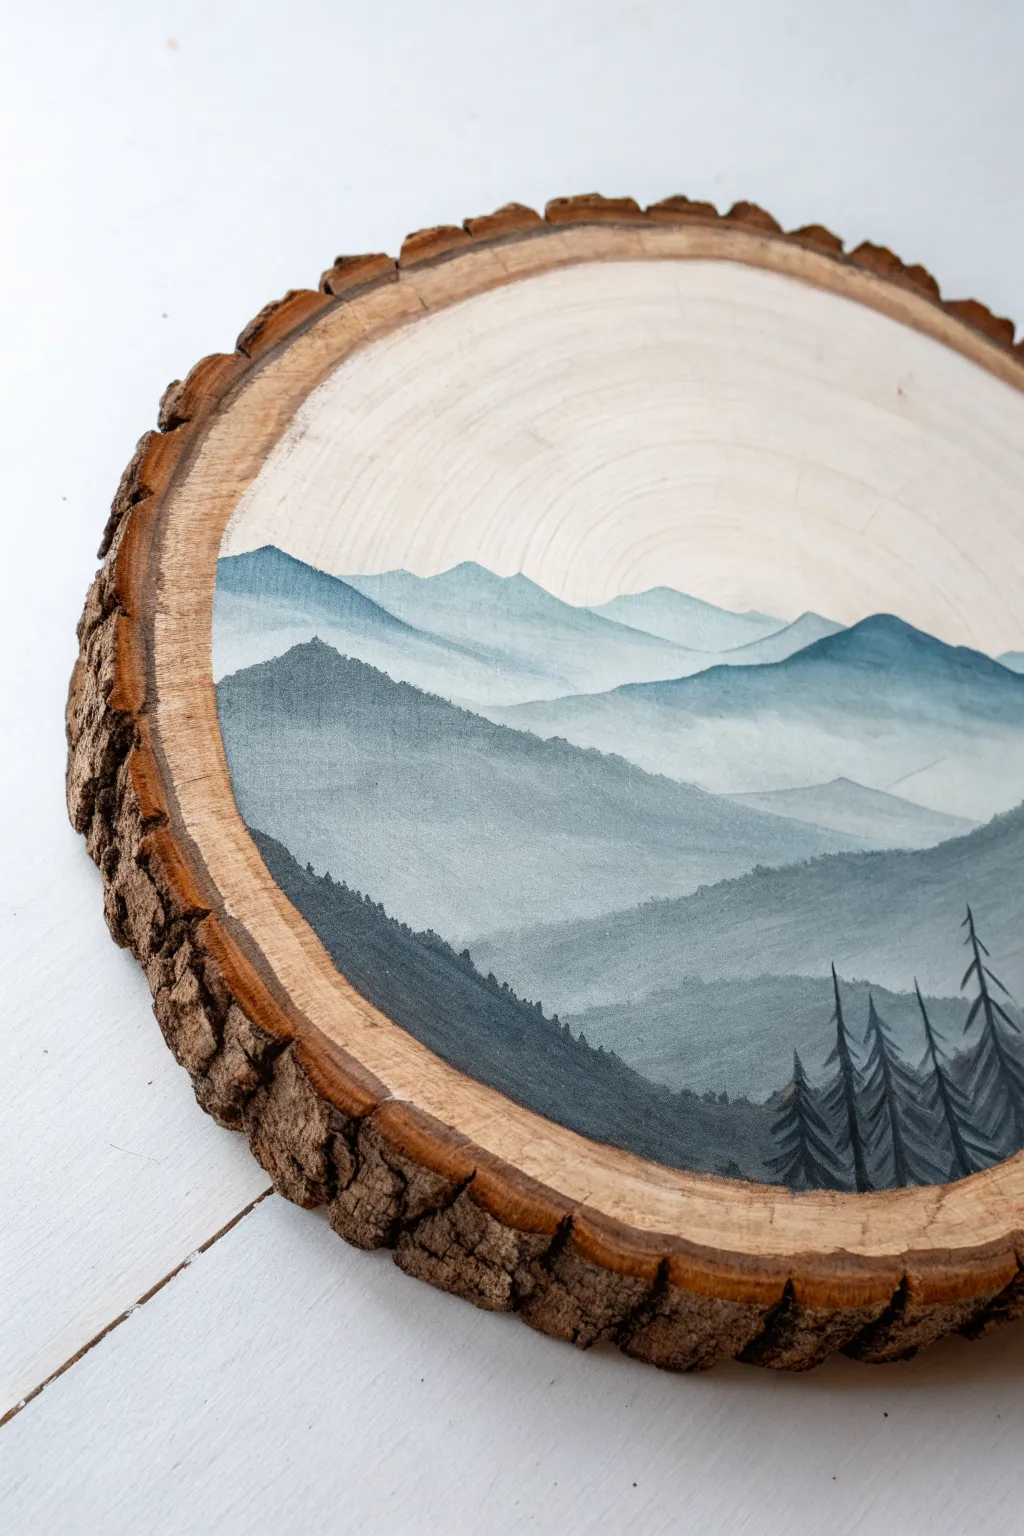
Capture the serenity of a misty mountain range on a rustic wood slice canvas. This project uses a monochrome palette of blues to create atmospheric depth, blending natural wood textures with soft, layered acrylics.
How-To Guide
Materials
- Basswood or birch log slice (approx. 8-10 inches)
- Acrylic paints: Titanium White, Phthalo Blue (or Navy), Mars Black
- Flat shader brushes (medium and small)
- Liner brush or very fine round brush
- Gesso or clear wood sealer (optional)
- Palette for mixing
- Container of water
- Paper towels
- Fine-grit sandpaper
Step 1: Preparation and Background
-
Prep the surface:
Begin by ensuring the wood slice is smooth. Lightly sand the face of the wood with fine-grit sandpaper to remove any loose fibers that might catch your brush. Wipe away the dust with a dry cloth. -
Prime the wood:
Since wood is porous, you can apply a thin layer of clear sealer or gesso to the center area where you will paint. However, leaving it raw allows the grain to show through the sky, which adds a lovely texture. -
Establish the horizon:
Decide where your sky ends and the mountains begin. This painting leaves a large portion of the upper wood unpainted to serve as the sky. Visualize an imaginary line about 1/3 of the way down from the top bark edge.
Step 2: Layering the Mountains
-
Mix the lightest value:
On your palette, mix a very large amount of white with a tiny dot of blue. You want an extremely pale, misty blue that is just barely darker than the raw wood. -
Paint the furthest range:
Using a flat shader brush, paint the silhouette of the furthest mountain peaks. Keep the edges soft. Pull the paint downwards, fading it out slightly as you go to create a misty effect. -
Mix the second layer color:
Add just a little more blue to your original mixture to create a slightly darker shade. Acrylics dry darker, so proceed with subtle increments. -
Add the second range:
Paint the second mountain range overlapping the first one slightly lower down. Ensure the top edge of this new range is crisp against the lighter mountains behind it. -
Create the middle ground:
Mix a medium-blue tone by adding more blue and a tiny touch of black to desaturate the color. Paint the third layer of mountains, making their peaks slightly more jagged and pronounced. -
Darken the palette:
For the fourth layer, mix a deep blue-grey. Increase the ratio of blue and black. This layer should feel significantly closer to the viewer. -
Paint the foreground slope:
I like to angle this layer dramatically. Paint a large sloping mountain face coming from the left side, filling a good portion of the bottom area with this dark blue-grey wash. -
Add the nearest hill:
Mix your darkest color yet—mostly blue and black with very little white. Paint a rolling hill shape at the very bottom right, overlapping the large slope you just painted.
Atmospheric Perspective
Remember: things get lighter and bluer the further away they are. Keep your background mountains very pale and your foreground elements dark and sharp.
Step 3: Details and Trees
-
Mix the tree color:
Create a near-black mixture using black and dark blue. It should be opaque and bold. -
Paint the silhouette ridge:
Along the spine of the large left-side slope, use a small brush to dab tiny, irregular vertical marks. These suggest distant pine trees lining the ridge. -
Start the foreground trees:
Switch to your fine liner brush. On the bottom right hill, paint vertical lines to act as the trunks for the closest pine trees. Vary their heights for a natural look. -
Add pine branches:
Starting at the top of a trunk, use a zig-zag motion to paint branches getting wider as you move down. Keep the strokes loose and somewhat transparent at the tips. -
Fill the cluster:
Continue adding trees to the bottom right corner until you have a dense little forest cluster that anchors the composition. -
Final touches:
Assess the gradient. If any mountain layer looks too separate, you can use a clean, slightly damp brush to soften the bottom edge of that layer before it fully cures.
Golden Hour Glow
Once the sky area is dry, dry-brush a tiny amount of watered-down gold metallic paint along the very top ridges of the mountains for a sunrise effect.
Allow the paint to fully cure before displaying your miniature alpine slice on a shelf or wall


Snowy Cabin in the Pines
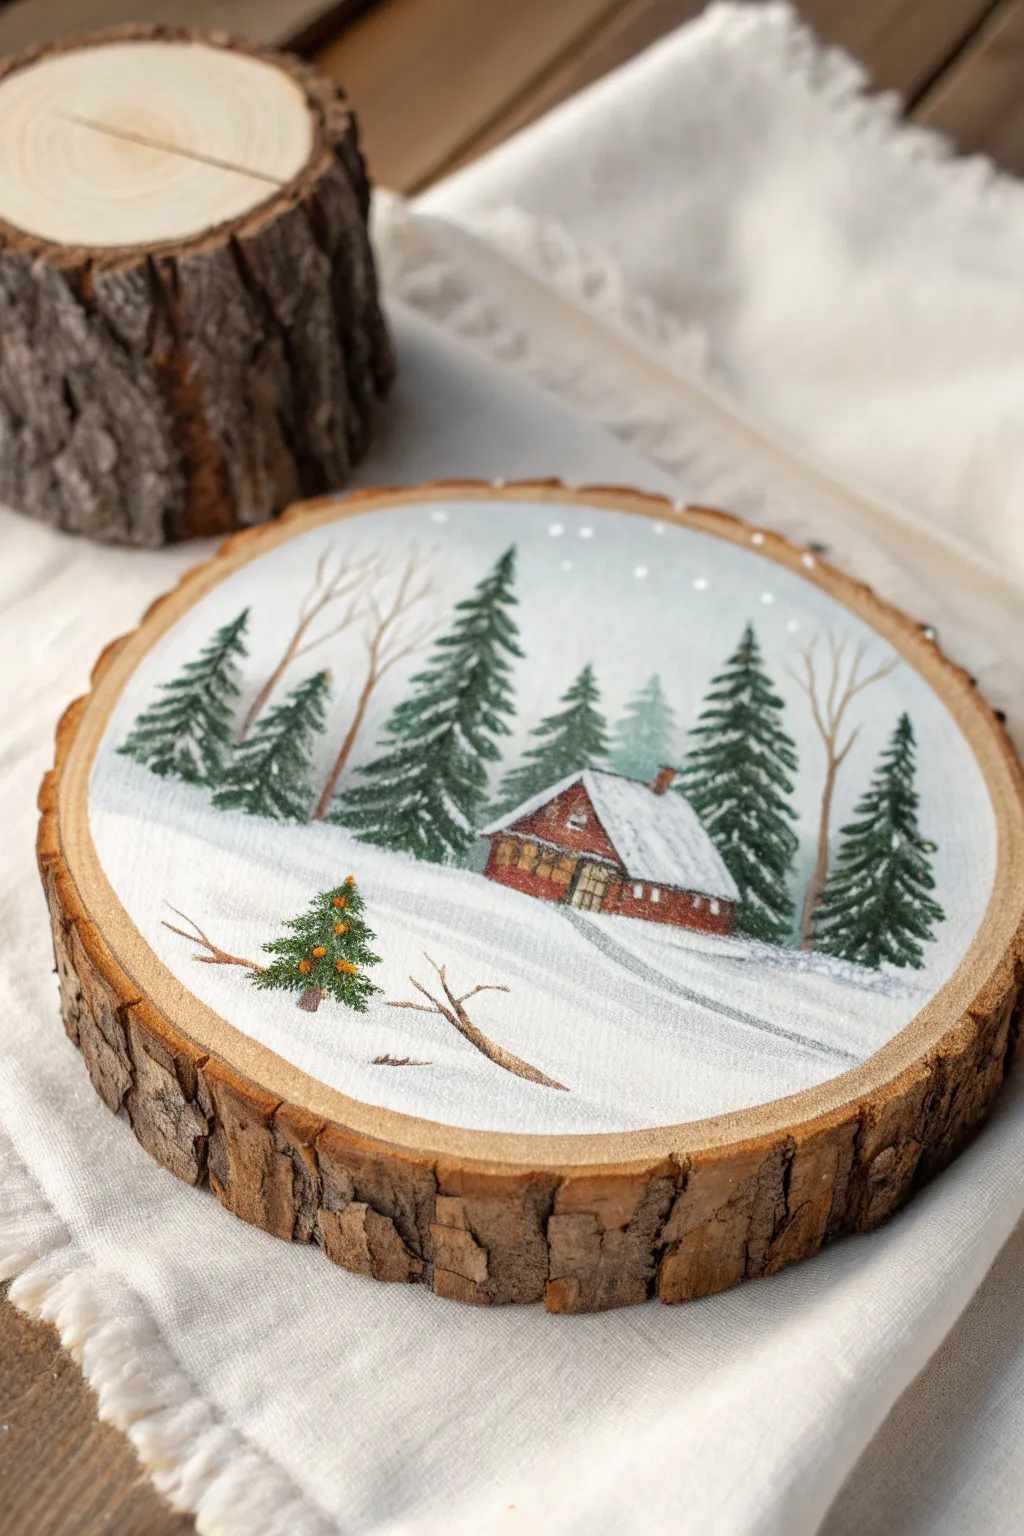
Transform a rustic wood slice into a serene winter landscape featuring a cozy red cabin nestled among snow-dusted pines. This project captures the quiet beauty of a snowy day, using simple acrylic techniques to build depth and atmosphere.
Step-by-Step Tutorial
Materials
- Medium-sized wood slice with bark (approx. 6-8 inches diameter)
- Sandpaper (220 grit)
- White Gesso or primer
- Acrylic craft paints: Titanium White, Mars Black, Sap Green or Hooker’s Green, Burnt Umber, Burnt Sienna (reddish-brown), Bright Red, Yellow Ochre
- Assorted brushes: 1-inch flat wash brush, small angle brush, #2 round brush, #0 liner brush
- Palette for mixing
- Water cup and paper towels
- Clear matte acrylic sealer (spray or brush-on)
- Small dotting tool or toothpick (optional)
Step 1: Preparation & Background
-
Prep the Surface:
Before painting, ensure the wood slice is smooth. Lightly sand the face of the log slice with 220-grit sandpaper to remove any rough splinters. Wipe away the dust with a barely damp cloth. -
Prime the Wood:
Apply a thin layer of white Gesso to the flat surface of the wood slice, stopping just short of the bark edge. This creates a bright, sealed surface so the wood grain doesn’t absorb all your paint. -
Paint the Sky:
Mix a tiny dot of black into a large amount of white to create a very pale, misty grey. Using the flat wash brush, paint the upper two-thirds of the slice in smooth horizontal strokes. -
Add the Snow Layer:
For the ground, use pure Titanium White. Paint the bottom third of the slice, blending slightly upward into the grey sky where they meet creating a soft, misty horizon line.
Step 2: Painting the Trees
-
Background Trees:
Mix a little white into your Sap Green to create a lighter, faded green. Using a small brush, dab in a few pine tree shapes near the horizon line to suggest distant trees obscured by mist. -
Bare Branches:
Mix Burnt Umber with white to make a light tan. Using the liner brush, paint thin, spindly bare trees reaching up into the sky. Keep the lines delicate and branching outward. -
Dark Evergreen Shapes:
Load a round brush or small angle brush with dark green (Sap Green with a touch of black). Paint the main pine trees on the left and right sides. Start with a vertical line for the trunk, then use quick, downward strokes to fan out the branches, getting wider as you move down. -
Highlighting the Pines:
Once the dark green is dry, load a dry brush with a small amount of white paint. Lightly ‘stipple’ or tap snow onto the tops of the evergreen branches, focusing on the upper edges where snow would naturally settle.
Snow Textures
Mix a pinch of baking soda into your white paint for the roof and foreground drifts. This creates a gritty, fluffy texture that looks like real piled-up snow.
Step 3: The Cabin & Foreground Details
-
Outline the Cabin:
Position your cabin slightly off-center nestled in the trees. Use diluted Burnt Sienna to sketch a simple rectangle for the base and a triangle for the roof. -
Fill the Cabin Walls:
Paint the walls of the cabin with Burnt Sienna mixed with a touch of Bright Red for warmth. Keep the paint somewhat opaque. -
The Snowy Roof:
Paint the roof with thick Titanium White. Extend the white slightly over the edges of the walls to mimic overhanging snow drifts. -
Cabin Details:
Use a liner brush and dark brown to paint a small door, window frames, and the tiny chimney. Add a touch of Yellow Ochre in the windows to suggest warm light inside. -
Foreground Snow Drifts:
Add dimension to the white ground by painting gentle, curved sweeping strokes of pale blue-grey. This creates the look of undulating snow drifts leading toward the cabin. -
Fallen Branches:
In the immediate foreground, use the liner brush and dark brown paint to create a broken branch lying in the snow. Add a thin line of white on top of the branch to ground it in the scene. -
Little Christmas Tree:
Paint a very small triangular pine tree in the left foreground using your dark green mix. Dab tiny dots of yellow and orange on it to look like lights or ornaments.
Unwanted Blobs?
If you splatter too much paint when creating the falling snow, wait for the blob to dry completely, then paint over it with your background sky color.
Step 4: Finishing Touches
-
Falling Snow:
Thin down your white paint with water until it’s inky. Load a toothbrush or stiff brush and gently flick speckles across the entire painting to create a snowfall effect. -
Atmospheric Dots:
For larger, softer snowflakes, use the handle end of a brush or a toothpick to place deliberate white dots in the sky area. -
Seal the Work:
Allow the painting to dry overnight completely. Once dry, seal the wood slice with a clear matte spray sealer to protect the paint and prevent the wood from cracking over time.
Now you have a charming winter keepsake that brings the peace of a snowy forest right into your home

Moonlit Forest Silhouette

Capture the mystic beauty of a full moon rising behind a silent forest with this striking wood slice painting. Using negative space and stark silhouettes, you will create a dimensional piece where the natural grain of the wood adds warmth to the moonlight.
Step-by-Step
Materials
- Round wood slice (approx. 8-10 inches, bark intact)
- Sandpaper (medium and fine grit)
- Acrylic paints: Titanium White, Mars Black, Unbleached Titanium (or Cream)
- Flat shader brushes (medium and large)
- Detail round brush (size 0 or 00)
- Old toothbrush or stiff bristle brush
- Pencil
- Circular object or compass for tracing
- Matte varnish or sealant
Step 1: Preparation & Mapping
-
Surface Prep:
Begin by sanding the face of your wood slice until it is perfectly smooth. Start with medium grit to remove saw marks and finish with fine grit. Wipe away all dust with a damp cloth or tack cloth. -
Define the Canvas:
Visualize a circle within the wood slice, leaving a roughly 1-inch border of raw wood around the edge. You can lightly trace a bowl or use a compass to mark this boundary if you want a perfect circle, or sketch it freehand for an organic feel. -
The Moon Outline:
Inside your main circle, sketch a large crescent or partial circle shape that will become the night sky. The unpainted negative space in the center-right will actually become your moon.
Bleeding Edges?
If acrylic paint bleeds into the wood grain, score your pencil outlines lightly with a craft knife before painting. This severs the wood fibers and creates a physical barrier.
Step 2: Creating the Moon
-
Base Tone:
Mix a watery wash of Titanium White and a tiny drop of Unbleached Titanium. Apply this thinly over the moon area so the wood grain still shows through, creating a natural crater-like texture. -
Texturing:
while the base is still slightly damp, dab a dry brush or sponge with slightly thicker cream paint to create cloudy patches on the moon’s surface. Keep this subtle; the wood grain does a lot of the work for you. -
Highlighting:
Add pure white highlights to the upper left edge of the moon to enhance the spherical shape, blending it softly into the creamier center.
Step 3: The Night Sky
-
Painting the Void:
Using a flat shader brush and Mars Black, carefully paint the crescent shape outlining the moon. Ensure the edge where the black sky meets the moon is crisp and clean. -
Defining the Border:
Paint outwards to your initial pencil boundary line. Maintain a sharp edge against the raw wood border to frame the artwork effectively. -
Starry Details:
Once the black paint is bone dry, dip an old toothbrush or stiff brush into watered-down white paint. Use your thumb to flick a fine mist of stars over the black area. Adding a few larger, hand-painted dots with a detail brush creates depth.
Pro Tip
Don’t paint the moon opaque white. Letting the natural tan wood grain show through provides instant, realistic texture that mimics the lunar surface without any effort.
Step 4: Forest Silhouettes
-
Ground Line:
With black paint, establish a sloping hill at the bottom of the moon. This anchors your composition and provides a base for the trees. -
Tree Trunks:
Using your smallest detail brush, paint vertical lines for the tree trunks. Vary their heights, placing the tallest ones on the right side to balance the composition. -
Branch Structure:
Starting from the top of the tree trunks, paint downward-sloping branches. Keep the strokes short and jagged at the top, getting wider as you move down the tree. -
Adding Volume:
Fill in the trees by stippling or tapping the brush to simulate pine needles. Leave tiny gaps of light showing through the branches to prevent the trees from looking like solid triangles. -
Bare Branches:
To the left of the main pine trees, add a few delicate, bare twig structures peaking over the hill. Use the very tip of your brush and light pressure for razor-thin lines.
Step 5: Finishing Touches
-
Clean Up:
Check the outer rim of your painted circle. If any paint bled onto the raw wood border, you can carefully sand it away or scrape it off with an X-Acto knife. -
Sealing:
Allow the painting to dry overnight. Apply a coat of clear matte varnish to protect the artwork and seal the raw wood border without adding distracting glare.
Hang this rustic piece near a warm light source to emphasize the golden tones of the wood moon

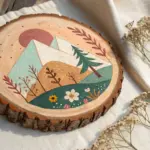
Single Tree on a Hill
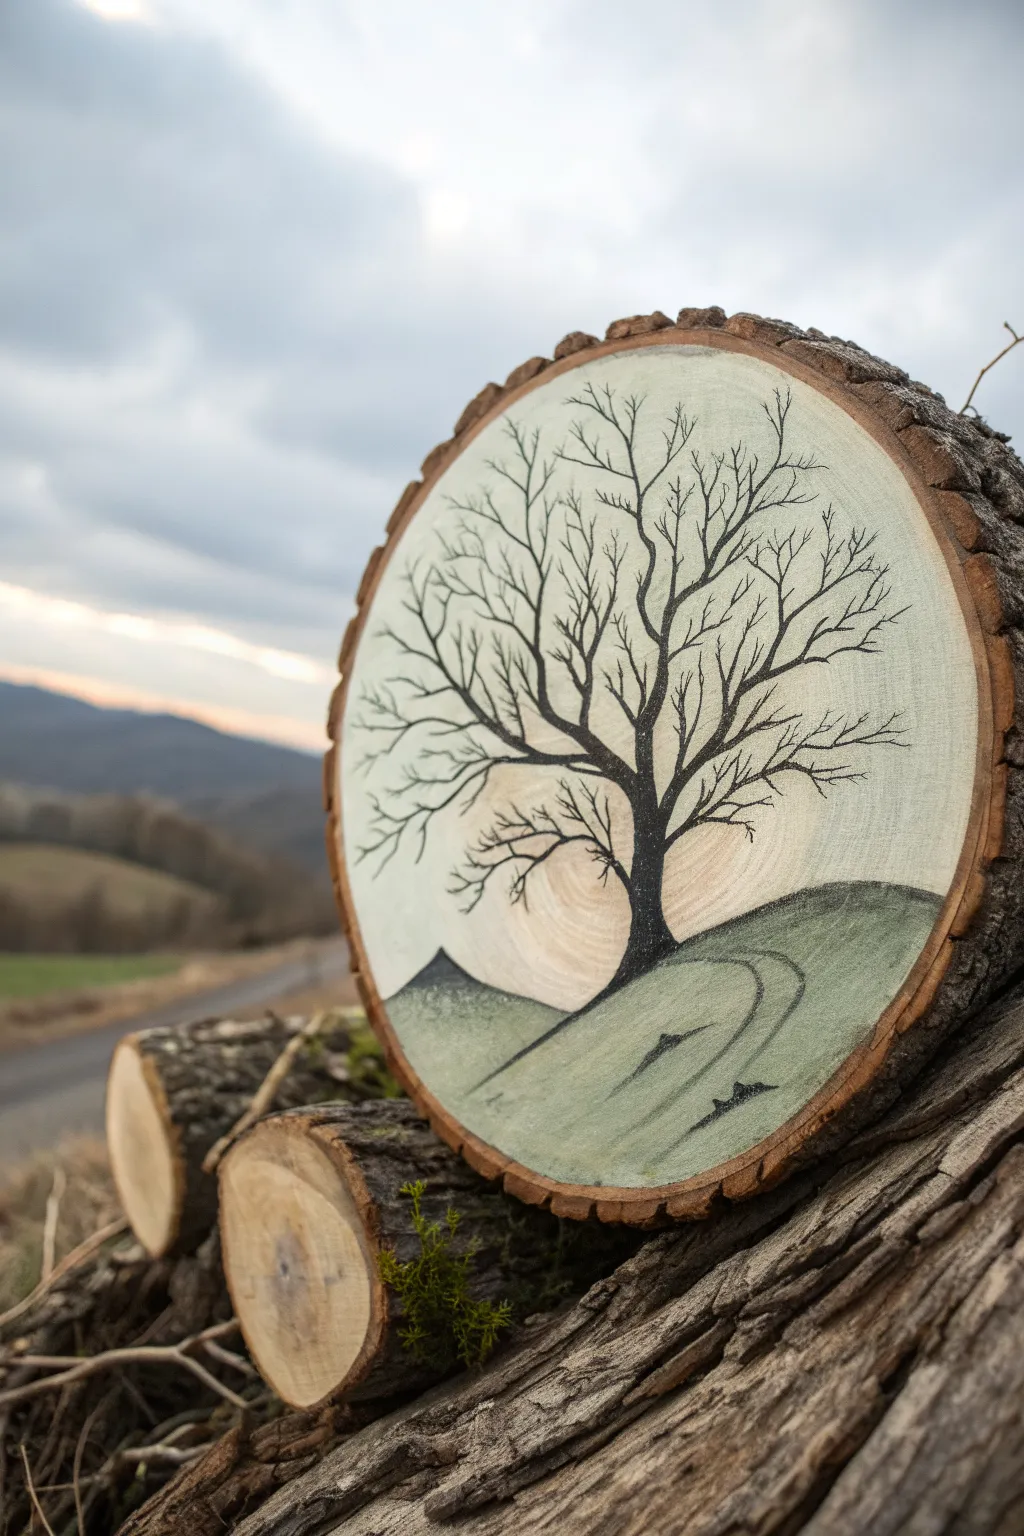
This rustic project transforms a raw wood slice into a serene landscape featuring a lone, intricate winter tree. The natural wood grain creates a beautiful texture behind the painted hills and delicate branches.
Step-by-Step Tutorial
Materials
- Large wood slice (approx. 8-10 inches diameter)
- Sandpaper (120 and 220 grit)
- Acrylic paints (Titanium White, Mars Black, Sap Green, Slate Blue/Grey)
- Black fine-liner paint pen or permanent marker (optional but recommended)
- Fine detail brush (size 00 or 0)
- Flat shader brush
- Pencil
- Matte spray varnish
Step 1: Preparation
-
Sand the surface:
Begin by sanding the face of your wood slice until it feels extremely smooth to the touch. Start with 120 grit to remove saw marks, then finish with 220 grit. This smoothness is crucial for painting the fine tree branches later. -
Clean the wood:
Wipe away all sawdust with a damp tack cloth or microfiber towel. Ensure the surface is completely dry before applying any paint.
Bleeding Paint?
If paint bleeds into the wood grain, your wash was too watery. Use slightly thicker acrylics or apply a layer of clear matte medium first to seal the pores.
Step 2: Painting the Background
-
Prime the sky:
Using your flat brush, apply a very thin wash of titanium white to the upper two-thirds of the wood slice. You want this to look like a pale, hazy sky while still letting some of the natural wood tone warm it up. -
Sketch the horizon:
Lightly sketch a rolling hill line across the lower third of the slice with a pencil. Make one large hill in the foreground and a smaller peak or two peeking out from behind. -
Paint the hills:
Mix a muted green using Sap Green and a touch of white and grey. Paint the foreground hill with this earthy tone, ensuring the brushstrokes follow the curve of the land. -
Add distant depth:
For the smaller background hill, use a slate blue or grey color. This cooler, darker tone pushes that shape into the distance visually. Let these base layers dry completely.
Step 3: Creating the Tree
-
Outline the trunk:
With a pencil, lightly draw the main structure of your tree. Place the trunk on the right side of the foreground hill, grounding it firmly. -
Paint the main trunk:
Using Mars Black and your detail brush, fill in the trunk. I like to make the base slightly wider where the roots would be entering the earth. -
Extend main branches:
Pull the black paint upward to create the primary thick branches. Keep your hand steady and let the branches taper naturally as they reach higher. -
Add secondary branches:
Switch to your smallest brush or a black fine-liner pen. From each main branch, draw smaller shoots splitting off in ‘V’ or ‘Y’ shapes. -
Fill in fine twigs:
This is the meditative part—fill the crown with dozens of tiny, hair-thin twigs. Vary their direction slightly to create a tangled, realistic silhouette. -
Touch up the ground:
To integrate the tree into the landscape, gently feather some black paint or dark green at the base of the trunk so it doesn’t look like it’s floating.
Pro Tip: Pen vs. Brush
For the tiniest twigs, a black acrylic paint marker is much easier to control than a brush and creates crisp, confident lines without reloading constantly.
Step 4: Finishing Touches
-
Add landscape details:
Using a diluted black or dark grey, paint faint curved lines along the hill to suggest contours or a path winding around the slope. -
Paint distant shadows:
Add a few tiny distinctive triangular shapes on the distant hills to suggest faraway treetops or rocks. -
Seal the artwork:
Once the paint is cured (wait at least an hour), take the wood slice to a ventilated area and apply a clear matte spray varnish to protect the wood and paint.
Display your rustic landscape on a stand or hang it to bring a bit of quiet nature indoors
BRUSH GUIDE
The Right Brush for Every Stroke
From clean lines to bold texture — master brush choice, stroke control, and essential techniques.
Explore the Full Guide
Sunflower Burst on a Log Round
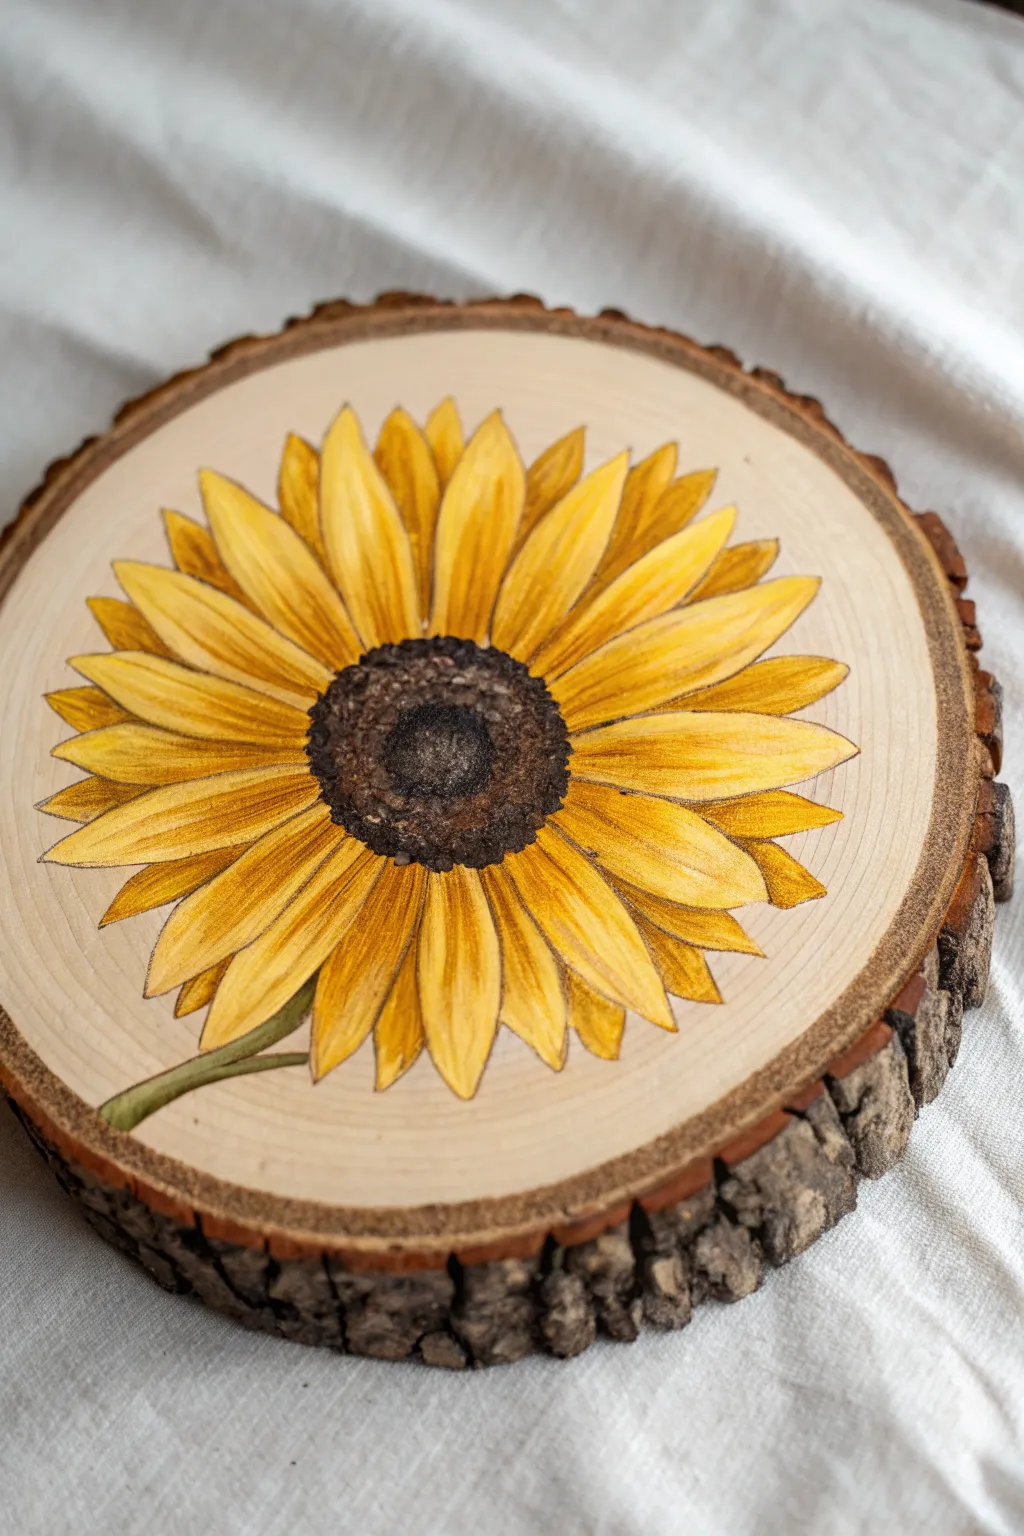
Capture the warmth of summer with this detailed sunflower illustration on a rustic wood slice. The natural grain of the wood provides the perfect warm, neutral backdrop for the vibrant yellows and deep browns of the flower.
Step-by-Step Guide
Materials
- Medium-sized wood slice (approx. 8-10 inches)
- Sandpaper (fine grit)
- Pencil and eraser
- Acrylic paints (Yellow Ochre, Cadmium Yellow, Burnt Umber, Dark Brown, Olive Green, White)
- Fine detail paintbrushes (sizes 0, 1, and a small angled shader)
- Mixing palette
- Water cup and paper towels
- Clear matte or satin varnish spray
Step 1: Preparation and Sketching
-
Prep the Surface:
Begin by sanding the top face of your wood slice until it is extremely smooth. Any roughness will catch your brush or pencil and make straight lines difficult. -
Wipe Clean:
Use a tack cloth or a slightly damp paper towel to remove all sawdust. Let it dry completely if you used moisture. -
Outline the Center:
Using a light hand with your pencil, draw a circle in the center of the wood slice. It doesn’t need to be perfectly geometric; a slightly organic shape looks more natural. -
Sketch the Petals:
Sketch two rows of petals radiating from the center. Draw the front row of large, wide petals first, then fill the gaps with the tips of a second row peeking out from behind. -
Add the Stem:
Draw a short, slightly curved stem extending from the bottom left quadrant of the flower head towards the edge of the wood.
Step 2: Painting the Petals
-
Base Coat Yellows:
Mix a creamy base yellow using Cadmium Yellow and a touch of White. Fill in all the petals, but keep the paint thin enough that you don’t lose your pencil lines entirely. -
Define Shadows:
Mix Yellow Ochre with a tiny dot of brown to create a darker golden shade. Apply this to the base of the petals where they meet the center, and along the edges of the ‘back’ row of petals to push them into the background. -
Petal Texture:
Using your smallest brush (size 0), paint thin, faint lines of the darker golden shade running from the flower center up the middle of each petal. This mimics the veining found in real sunflowers. -
Highlighting:
Mix a pale yellow (mostly White with a drop of Cadmium Yellow). Paint strokes on the tips and centers of the front petals to make them pop forward. -
Refining Edges:
If the edges look messy, use a very fine brush with a slightly darker yellow-brown to carefully outline the individual petals for crisp definition.
Bleeding Paint?
If paint bleeds into the wood grain, use a clear acrylic medium or gesso to prime just the area inside your sketch before applying color.
Step 3: The Center & Stem
-
Base the Center:
Paint the entire center circle with a solid coat of deep Burnt Umber. Let this dry completely. -
Inner Texture:
Mix a lighter brown. Using a stippling motion (dabbing the brush tip vertically), create a ring of texture just inside the outer edge of the brown center. -
Core Depth:
Mix your darkest brown or black. Stipple the very center of the flower to create a sense of depth and concavity. -
Pollen Details:
I like to take a tiny bit of Yellow Ochre and stipple it lightly around the transition zone between the dark center and the petals to suggest pollen. -
Paint the Stem:
Fill in the stem with Olive Green. While wet, blend in a little brown on the bottom edge for shadow and white on the top edge for a highlight.
Add Dimension
Use a wood burning tool (pyrography pen) to outline the petals before painting. The burned lines add a distinct, rustic textured border.
Step 4: Finishing Touches
-
Final Check:
Step back and look at the composition. If any pencil lines are still visible and distracting, carefully erase them or paint over them. -
Seal the Wood:
Once the paint is fully cured (give it a few hours), spray the entire face of the wood slice with a clear matte or satin varnish to protect the artwork and keep the wood from drying out.
Display your rustic sunflower on a shelf or attach a hook to the back for instant wall art
Mushroom Cluster in a Tiny Meadow
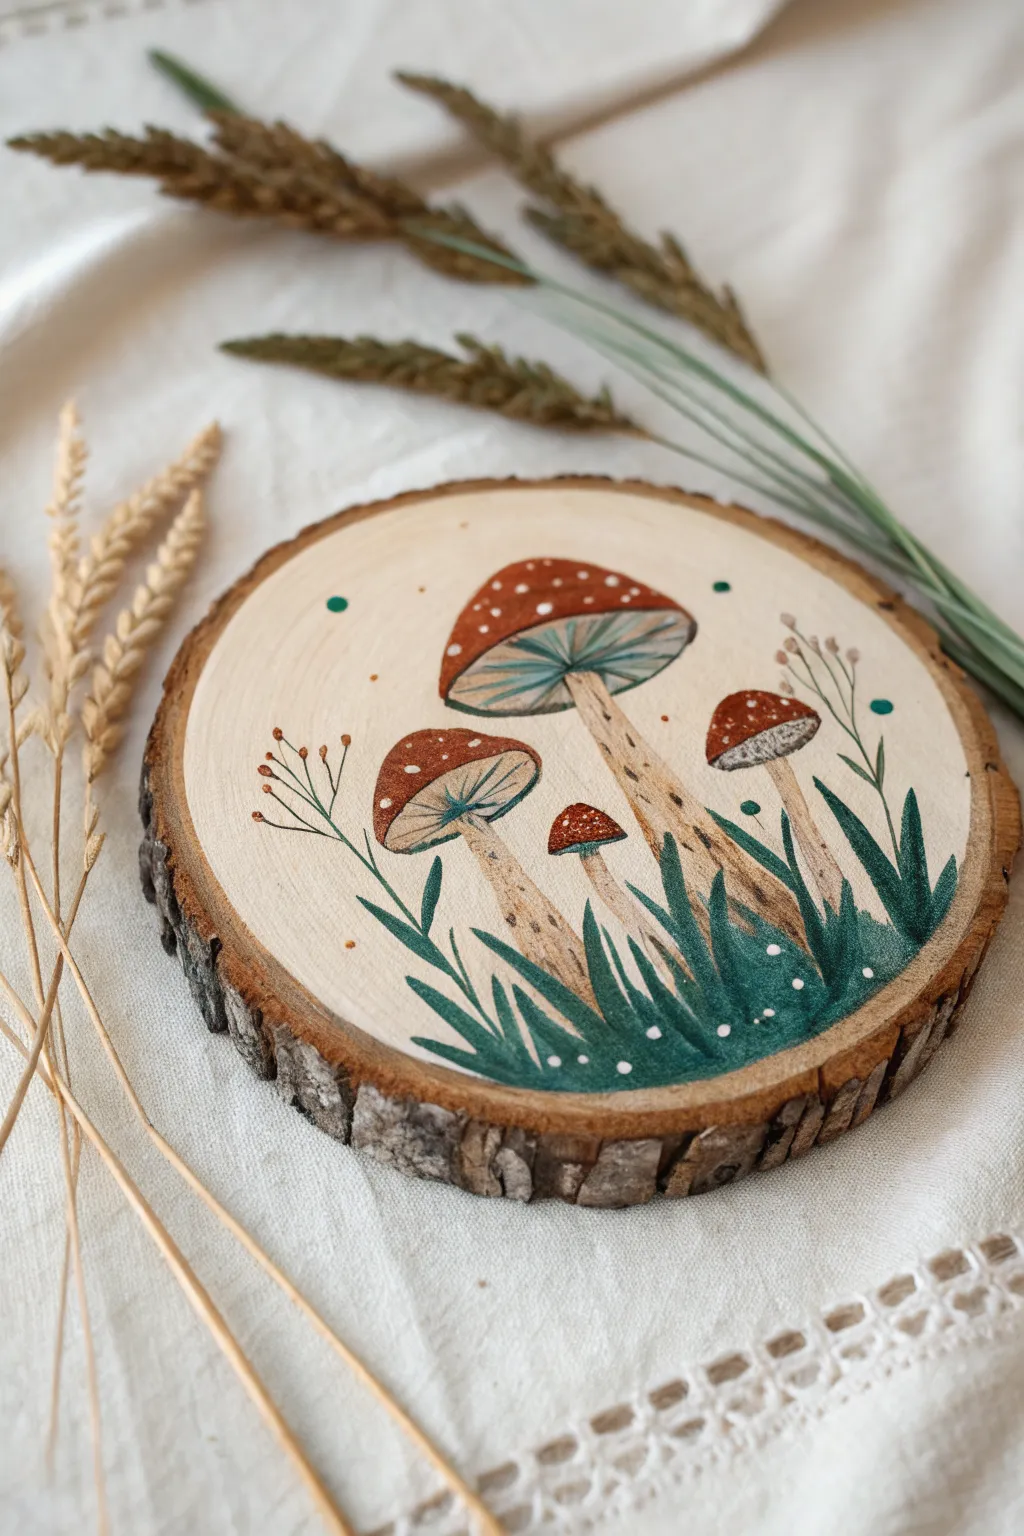
Transform a rustic wood slice into an enchanting forest floor scene featuring a cluster of vibrant red-capped mushrooms. This charming project combines the natural texture of raw wood with delicate painting techniques for a lovely cottagecore aesthetic.
Step-by-Step
Materials
- Wood slice with bark (approx. 4-6 inches diameter)
- Fine-grit sandpaper (220 grit)
- Acrylic paints (Titanium White, Burnt Sienna, Crimson Red, Sap Green, Dark Green, Teal)
- Small flat brush (size 4 or 6)
- Fine liner brush (size 0 or 00)
- Pencil and eraser
- Water cup and palette
- Matte or satin varnish (optional spray or brush-on)
Step 1: Preparation and Sketching
-
Prepare the Surface:
Begin by lightly sanding the face of your wood slice. You want the surface to be smooth enough for your paintbrush to glide easily but still retain the natural wood grain. -
Wipe Clean:
Use a dry cloth or tack cloth to remove all sawdust. Any lingering dust will ruin the smoothness of your paint application. -
Sketch the Composition:
Lightly sketch your mushroom cluster with a pencil. Place the largest mushroom near the center-top and add three smaller ones at varying heights below it. Don’t press too hard, as graphite can be tricky to erase from raw wood. -
Add Ground Elements:
Sketch a swooping, vague outline for the grassy area at the bottom, curving upwards on the sides to frame the mushrooms.
Paint Bleeding?
If paint bleeds into the wood grain, apply a thin layer of clear matte medium or white gesso just over your sketch lines before painting color. This creates a barrier.
Step 2: Painting the Mushrooms
-
Base Coat the Stems:
Mix a very pale beige using White and a tiny dot of Burnt Sienna. Paint the stems of all four mushrooms, keeping the paint consistency fluid but opaque. -
Block in Caps:
Using a mix of Crimson Red and a touch of Burnt Sienna for an earthy tone, paint the rounded caps of the mushrooms. Leave the underside areas blank for now. -
Paint the Gills:
Mix a soft, muted teal or light blue-grey. Carefully paint the underside of the caps. Once dry, use your finest liner brush and a darker version of this color to draw thin, radiating lines for the gills. -
Detail the Stems:
Once the beige base is dry, take thinned brown paint and your liner brush to add texture. Create small vertical dashes and dots on the stems to mimic the shaggy texture of a mushroom stalk. -
Highlight the Caps:
Add the iconic white spots to the red caps. Vary the size of the dots—some tiny, some slightly larger—to make them look organic rather than uniform.
Step 3: Creating the Meadow
-
Base Layer of Grass:
Mix a deep, dark green. Using a flat brush turned on its chiseled edge, paint thick, swooping blades of grass at the very bottom, anchoring the mushrooms. -
Add Dimension:
While the dark green is still slightly tacky, blend in a lighter Sap Green or Teal on the tips of the grass blades to suggest light hitting the meadow. -
Specific Grass Blades:
Switch back to your liner brush. Paint specific, sharp blades of grass rising up around the stems, overlapping the base of the mushrooms slightly to ground them in the scene. -
Paint Whispy Sprigs:
On the left and right sides, paint very fine, delicate stems branching out. Add tiny orange or brown dots to the tips to create dried flower sprigs.
Pro Tip: Transparency
I like to water down the beige paint for the stems just slightly. This creates a semi-transparent wash that lets a bit of woody texture verify the organic look.
Step 4: Final Touches
-
floating Elements:
Dip the end of your brush handle or a dotting tool into teal or green paint. Add a few decorative, floating dots in the background space to add whimsy. -
White Highlights:
Add tiny white dots specifically near the base of the grass clumps to look like tiny dew drops or small flowers. -
Let it Cure:
Allow the paint to dry completely. Raw wood absorbs moisture, so give it an extra hour to ensure all layers are set. -
Seal the Wood:
Apply a coat of matte or satin varnish over the face of the wood slice. This protects the acrylic from chipping and keeps the raw wood from graying over time.
Display this charming slice on a small easel or add a magnet to the back for a rustic fridge decoration

PENCIL GUIDE
Understanding Pencil Grades from H to B
From first sketch to finished drawing — learn pencil grades, line control, and shading techniques.
Explore the Full Guide
Cute Woodland Animal Portrait
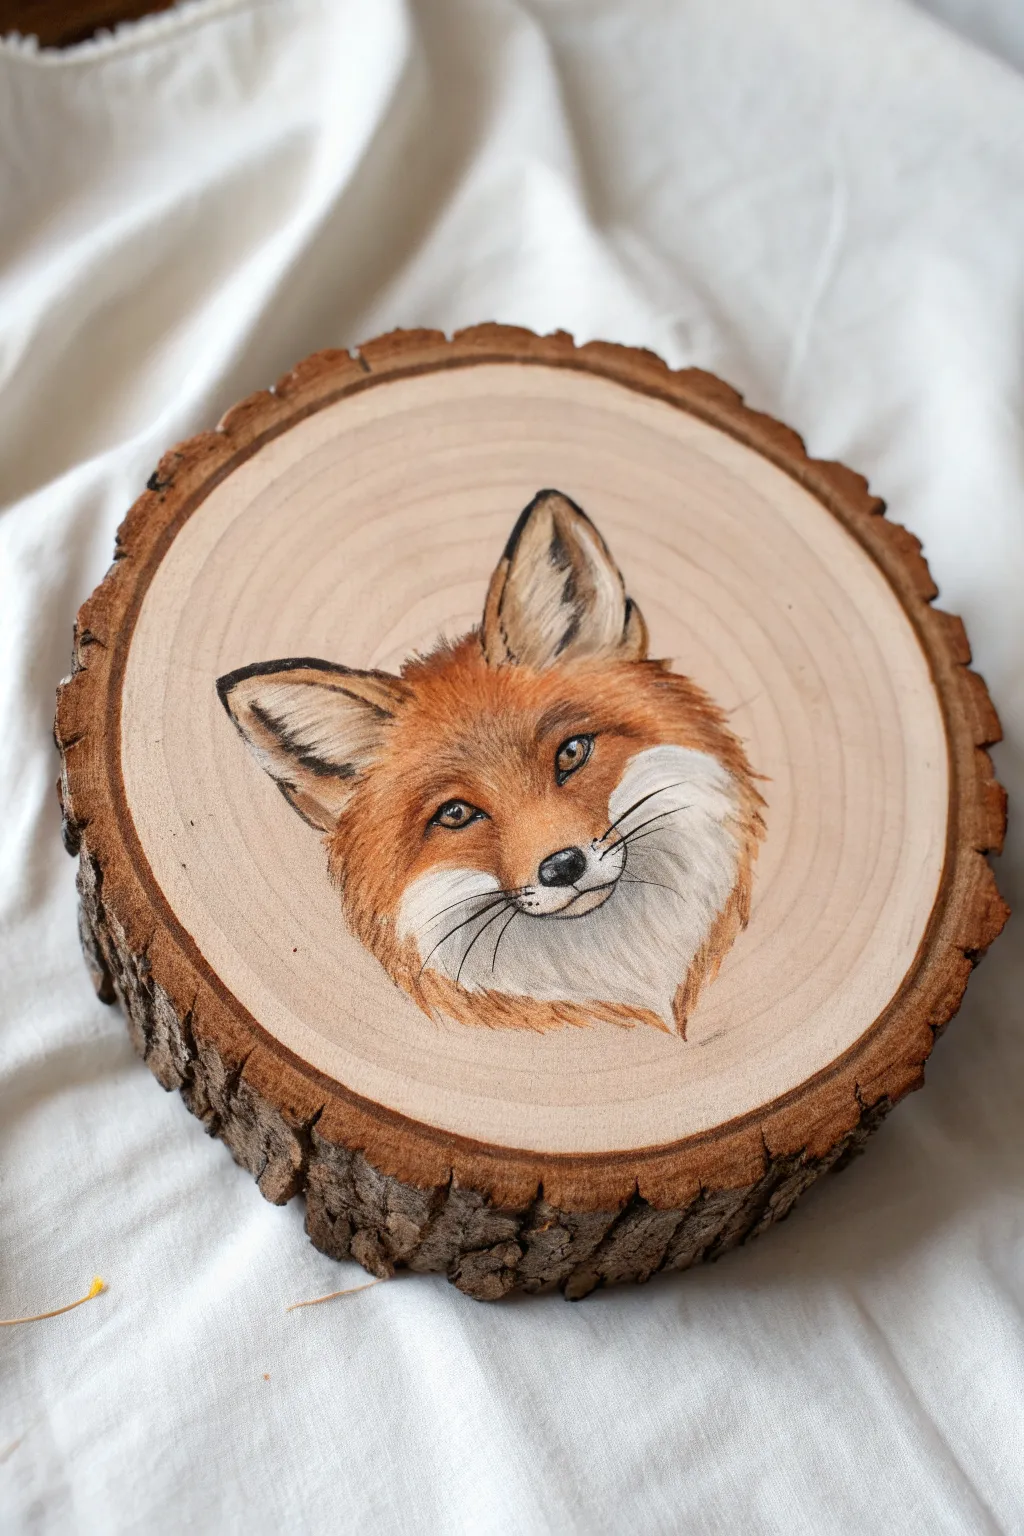
Capture the spirit of the forest with this charming fox portrait painted directly onto a rustic wood slice. The natural grain of the wood adds warmth and depth to the fox’s ginger fur, creating a piece that feels both earthy and refined.
Step-by-Step Guide
Materials
- Wood slice (approx. 6-8 inches diameter, sanded smooth)
- Pencil (HB or lighter)
- Eraser
- Fine-point permanent black marker or fine liner pen (archival ink)
- Acrylic paints (burnt sienna, orange, ochre, white, black, dark brown)
- Set of small detail brushes (sizes 0, 00, and 2)
- Palette or small plate
- Clear matte varnish or sealant
- Paper towel and water cup
Step 1: Preparation & Sketching
-
Prepare the surface:
Ensure your wood slice is clean and free of sawdust. If the surface feels rough, give it a quick pass with fine-grit sandpaper to create a smooth canvas for your delicate lines. -
Map out the shape:
Using a light pencil, sketch a diamond-like shape in the center of the wood slice to represent the fox’s head. Keep it centered but leave room for the ears to extend upward. -
Refine the features:
Draw the large, triangular ears followed by the eyes, nose, and muzzle. The eyes should be almond-shaped and slanted slightly downward toward the nose. -
Detail the fur directions:
Lightly sketch directional lines to indicate how the fur flows—outward from the nose and cheeks, and upward on the forehead. This will be crucial when you start applying color.
Natural Wood Tips
Use the wood’s natural rings as a guide! Center the nose on the central rings to create a subtle, symmetrical radiating effect for the portrait.
Step 2: Painting the Base Layers
-
Mix the perfect ginger:
Combine burnt sienna with a touch of orange and a tiny bit of ochre. You want a rusty, natural red rather than a bright cartoon orange. -
Apply the main coat:
Using a size 2 brush, paint the forehead, the area around the eyes, and the bridge of the nose with your mixed orange. I like to dilute the paint slightly with water so the wood grain shows through just a little. -
Paint the white areas:
Use titanium white to fill in the muzzle, the cheeks, and the inner parts of the ears. Apply this in thin, hair-like strokes rather than a solid block to ease the blending later. -
Add dark accents:
Mix a dark brown or charcoal tone. Paint the very tips of the ears and the dark patches behind them. Avoid using pure black here as it can look too harsh against the warm wood.
Paint Bleeding?
If paint bleeds into the wood grain, your paint is too watery. Use a thicker consistency or prime exactly the painted area with clear gesso first.
Step 3: Building Texture & Detail
-
Blend the transitions:
While the paint is just barely damp, gently feather the orange paint into the white areas on the cheeks using a clean, damp brush. This creates a soft gradient. -
Create fur texture:
Switch to your smallest brush (size 0 or 00). Dip it in slightly watered-down white paint and overlay tiny, flicking strokes on the muzzle and chin to simulate individual hairs. -
Deepen the shadows:
Add a little brown to your orange mix. Use this to paint small shadows under the eye brows and along the side of the snout to give the face dimension. -
Paint the eyes:
Fill the almond eye shapes with a golden-brown or amber color. Once dry, add a small black pupil in the center and line the rim of the eye with dark brown. -
Highlight the eyes:
The most important step for life: add a tiny, crisp white dot to the upper corner of each pupil. This ‘catchlight’ makes the fox look alert. -
Paint the nose:
Fill in the nose with black paint. Add a tiny dab of grey or white on the top curve to make it look wet and shiny.
Step 4: Inking & Finishing
-
Outline the features:
Once the paint is completely dry, use your fine-point black pen to very delicately outline the eyes and the nose. Don’t outline the whole head; keeping the fur edges soft looks more realistic. -
Draw the whiskers:
With quick, confident strokes of the pen or a liner brush with black paint, add long whiskers extending from the muzzle. Vary their length for a natural look. -
Darken the ear details:
Use the pen or black paint to add the tufts of dark fur inside the ears, ensuring they look fluffy and slightly messy. -
Seal the artwork:
Allow the piece to cure for at least 24 hours. Apply a layer of clear matte varnish over the painted area (or the whole slice) to protect it from dust and UV light.
Now you have a rustic piece of forest art ready to display on a shelf or hang on the wall
Bee and Honeycomb Pattern
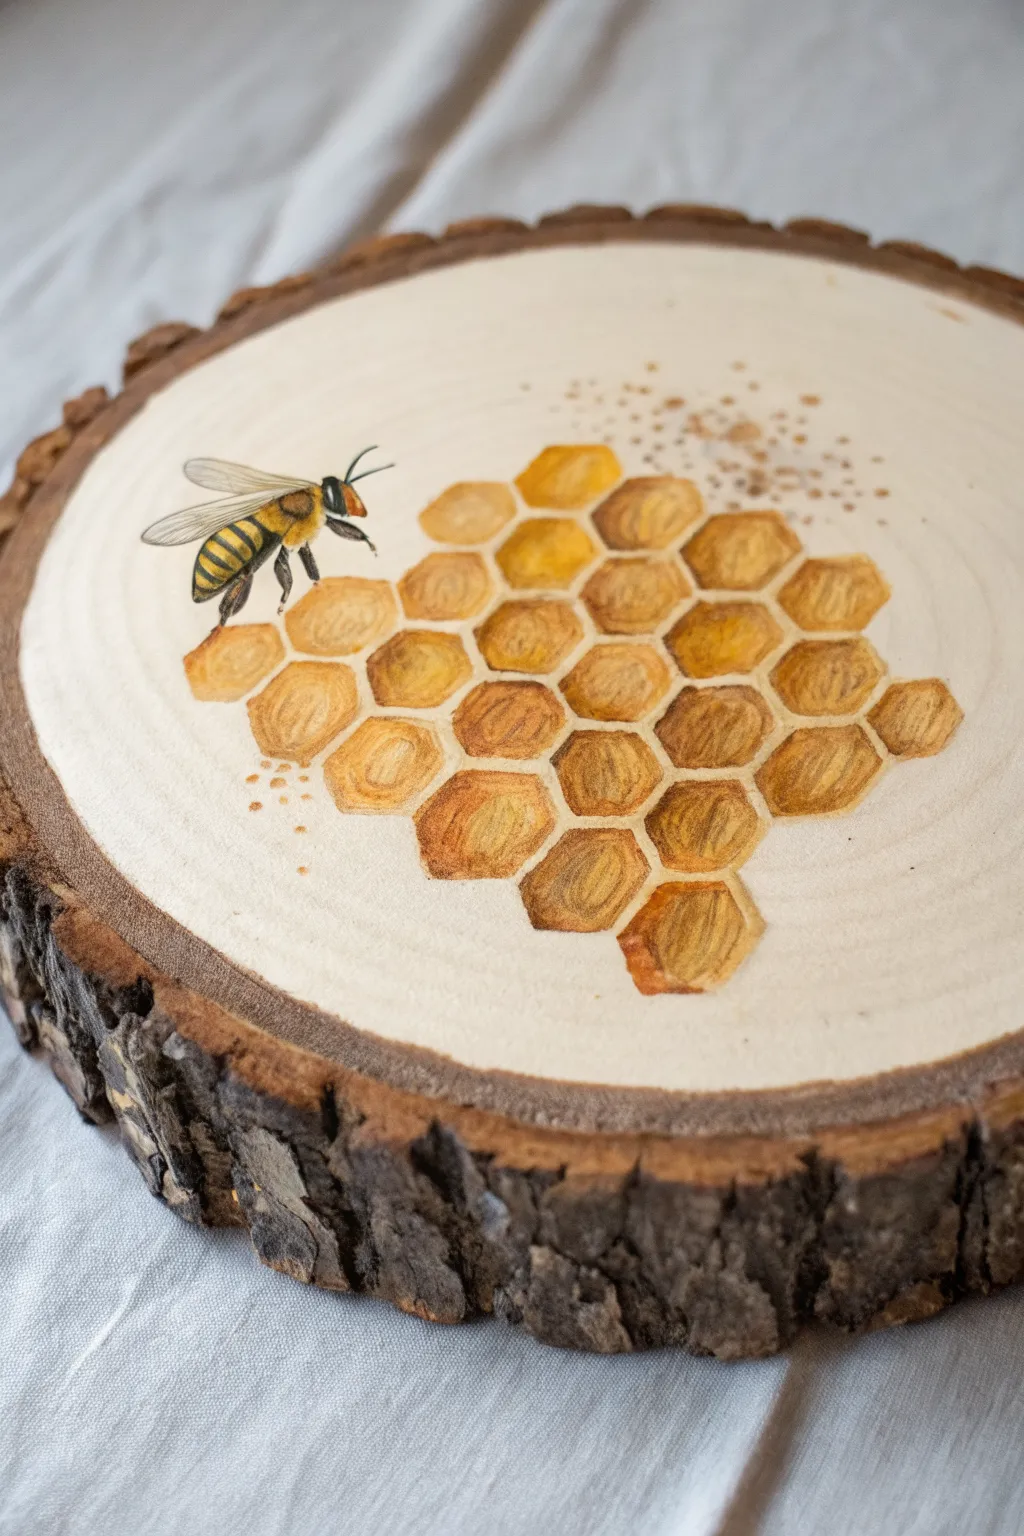
Bring the warmth of nature indoors with this detailed bee and honeycomb study painted directly onto a rustic wood slice. The natural grain of the wood complements the golden amber tones of the honey, creating a piece that feels organic and handcrafted.
Step-by-Step Tutorial
Materials
- Wood slice (approx. 6-8 inches diameter, sanded smooth)
- Pencil (HB or H)
- Eraser
- Watercolor paints or fluid acrylics (Yellow Ochre, Burnt Sienna, Raw Umber, Black, White)
- Small round brushes (size 0, 2, and 4)
- Fine liner brush or micron pen (black)
- Palette
- Water cup
- Paper towels
- Clear matte varnish spray
Step 1: Preparation and Sketching
-
Prepare the surface:
Ensure your wood slice is clean and free of sawdust. If the surface feels rough, give it a quick sanding with fine-grit sandpaper to prevent your paint from bleeding into the grain excessively. -
Sketch the honeycomb structure:
Using a light hand and an HB pencil, draw a cluster of hexagons in the center right of the slice. Don’t worry about making them mathematically perfect; a slightly organic, uneven grid looks more natural. -
Draw the bee:
To the left of the honeycomb, sketch the outline of a honeybee. Start with the thorax and abdomen ovals, then add the head and legs. Position the legs so the bee appears to be crawling onto a comb cell.
Step 2: Painting the Honeycomb
-
Base wash for the cells:
Mix a watery wash of Yellow Ochre. Fill in the hexagons, leaving some areas slightly lighter or even unpainted to suggest the wax edges and light reflection. -
Add depth with amber tones:
While the base is still damp, drop in touches of Burnt Sienna near the bottom and corners of the hexagons. This wet-on-wet technique creates a soft gradient that mimics liquid honey. -
Define the cell walls:
Once the previous layer is dry, mix a darker brown using Raw Umber. Carefully paint the thin outlines of the hexagons to define the comb structure. -
Create shadows:
Blend a bit of Burnt Sienna with Raw Umber to deepen the shadows inside the cells. Paint mainly along the upper interior edges of each hexagon to make the cells look recessed. -
Add pollen speckles:
Dip a stiff brush or an old toothbrush into diluted brown paint. Use your thumb to flick a fine spray of speckles above the honeycomb cluster, suggesting scattered pollen or dust.
Bleed Control
If paint feathers into the wood grain too much, apply a layer of clear acrylic medium or gesso to the raw wood before painting to seal the fibers.
Step 3: Painting the Bee
-
Block in the bee’s body:
Paint the thorax with a fuzzy texture using a mix of Yellow Ochre and a touch of Black. For the abdomen, paint stripes using plain Yellow Ochre, leaving space for the black stripes later. -
Add the black details:
Using a size 0 brush or a fine liner, carefully paint the black stripes on the abdomen, the legs, and the head. I find using a very dry brush here helps create the texture of tiny hairs. -
Paint the wings:
Mix a very dilute wash of white with a tiny dot of black to create a transparent grey. Fill in the wing shapes. When dry, use your finest liner brush to draw delicate veins. -
Highlighting:
Use a small dot of pure white paint to add a highlight to the bee’s eye and the top of the thorax. This small detail brings the insect to life.
Gild the Lily
Once the paint is dry, use gold leaf or metallic gold paint on a few random hexagon edges to make the honeycomb shimmer in the light.
Step 4: Finishing Touches
-
Reinforce shadows:
Check the contrast on your honeycomb. If the honey doesn’t look deep enough, add a glaze of Burnt Sienna to the bottom of the cells. -
Final outlines:
If you want a crisper look, you can very lightly go over the main outlines of the comb and bee with a micron pen or fine liner brush. -
Seal the wood:
Allow the paint to dry completely—preferably overnight. Spray the entire face of the wood slice with a clear matte varnish to protect the artwork and prevent the wood from fading.
Hang your finished wood slice or prop it on a shelf to enjoy a permanent touch of summer sweetness


Songbird on a Branch

Capture the delicate beauty of nature by painting this vibrant bluebird perched on a slender branch. Using a smooth wood slice as your canvas adds a rustic, organic warmth that complements the soft feathers and sharp details of the bird.
Step-by-Step
Materials
- Basswood round with bark edge (approx. 8-10 inches)
- Fine-grit sandpaper (220 and 400 grit)
- Acrylic paints (Titanium White, Burnt Umber, Cerulean Blue, Ultramarine Blue, Cadmium Red/orange hue, Black)
- Pencil (HB or 2H)
- Detail brushes (sizes 0, 00, and 2)
- Matte spray varnish or sealer
- Palette for mixing
- Water cup and paper towels
Step 1: Preparation and Sketching
-
Surface Prep:
Begin by sanding the face of your wood slice until it is extremely smooth. Start with 220 grit to remove saw marks, then finish with 400 grit. A smooth surface is crucial for fine feather details. -
Clean the Grain:
Wipe away all sawdust with a slightly damp cloth or tack cloth. Let the wood dry completely before touching it with a pencil. -
Outline the Branch:
Using a light hand and a sharp pencil, sketch the main branch structure. Start from the bottom center, angling up towards the right, and add two smaller twigs branching off to the left. -
Outline the Bird:
Sketch the bird’s oval body shape sitting on the main branch. Add the head shape, the beak pointing left, and the tail extending down past the branch. Keep lines faint so they won’t show through the lighter chest paint.
Paint Bleeding?
Raw wood acts like a sponge. If paint bleeds into the grain, seal the specific painting area with clear matte medium before applying color to create a barrier.
Step 2: Painting the Branch
-
Base Branch Color:
Mix a wash of Burnt Umber with a tiny drop of water. Fill in the branch sketch, letting the wood grain show through slightly for texture. -
Adding Wood Texture:
Once the base is dry, use a size 0 brush with un-thinned Burnt Umber to paint darker streaks along the bottom edges of the distinct branches to create shadow and cylindrical volume. -
Branch Highlights:
Apply thin highlights on the upper side of the branches using a mix of White and a touch of Burnt Umber. This mimics sunlight hitting the wood.
Level Up
Leave the wood background raw, but gently whitewash the very outer ring near the bark to create a subtle vignette effect that draws the eye to the center.
Step 3: Painting the Bluebird
-
Chest Color Blocking:
Mix a soft reddish-orange using Cadmium Red, a touch of Umber, and White. Paint the upper chest area, feathering the edges downward where it meets the white belly. -
White Belly:
Fill in the lower belly and under-tail coverts with Titanium White. Blend this wet-on-wet where it meets the orange chest for a soft, fluffy transition. -
Blue Feathers Base:
Combine Cerulean Blue with a little White. Paint the head, back, and wing areas. Don’t worry about individual feathers yet; just get good, solid coverage. -
Adding Depth to Wings:
Switch to Ultramarine Blue to darken the wing tips and the shadowed area just under the wing fold. Use short, liner strokes to suggest layers of feathers. -
Wing and Tail Details:
Mix a dark grey (Black plus White). Use your smallest brush (00) to paint the primary flight feathers on the wing and the long tail feathers, keeping lines crisp and distinct. -
Feather Texture:
Go back over the blue head and back with tiny, directional strokes of lighter blue (add more White to your mix). This creates the illusion of soft downy feathers.
Step 4: Final Details
-
The Eye:
Paint a small black circle for the eye. Once dry, add a tiny ring of brown around it, and finish with a single, crucial dot of Titanium White for the reflection. -
Beak and Legs:
Paint the small beak using a dark charcoal grey. Use the same color for the legs and feet, ensuring the toes look like they are gripping around the branch, not just sitting on top of it. -
Clean Up:
Check the edges of your bird. If you went outside the lines, you can carefully gently sand it away or paint over it with a color matching the raw wood (though sanding is cleaner). -
Sealing:
Allow the painting to cure for 24 hours. Mist—don’t soak—the surface with a matte spray varnish to protect the paint without making the raw wood look plastic.
Hang your finished piece on a gallery wall or use a display stand to show off your nature-inspired creation
Simple Leaf Study in Earthy Greens
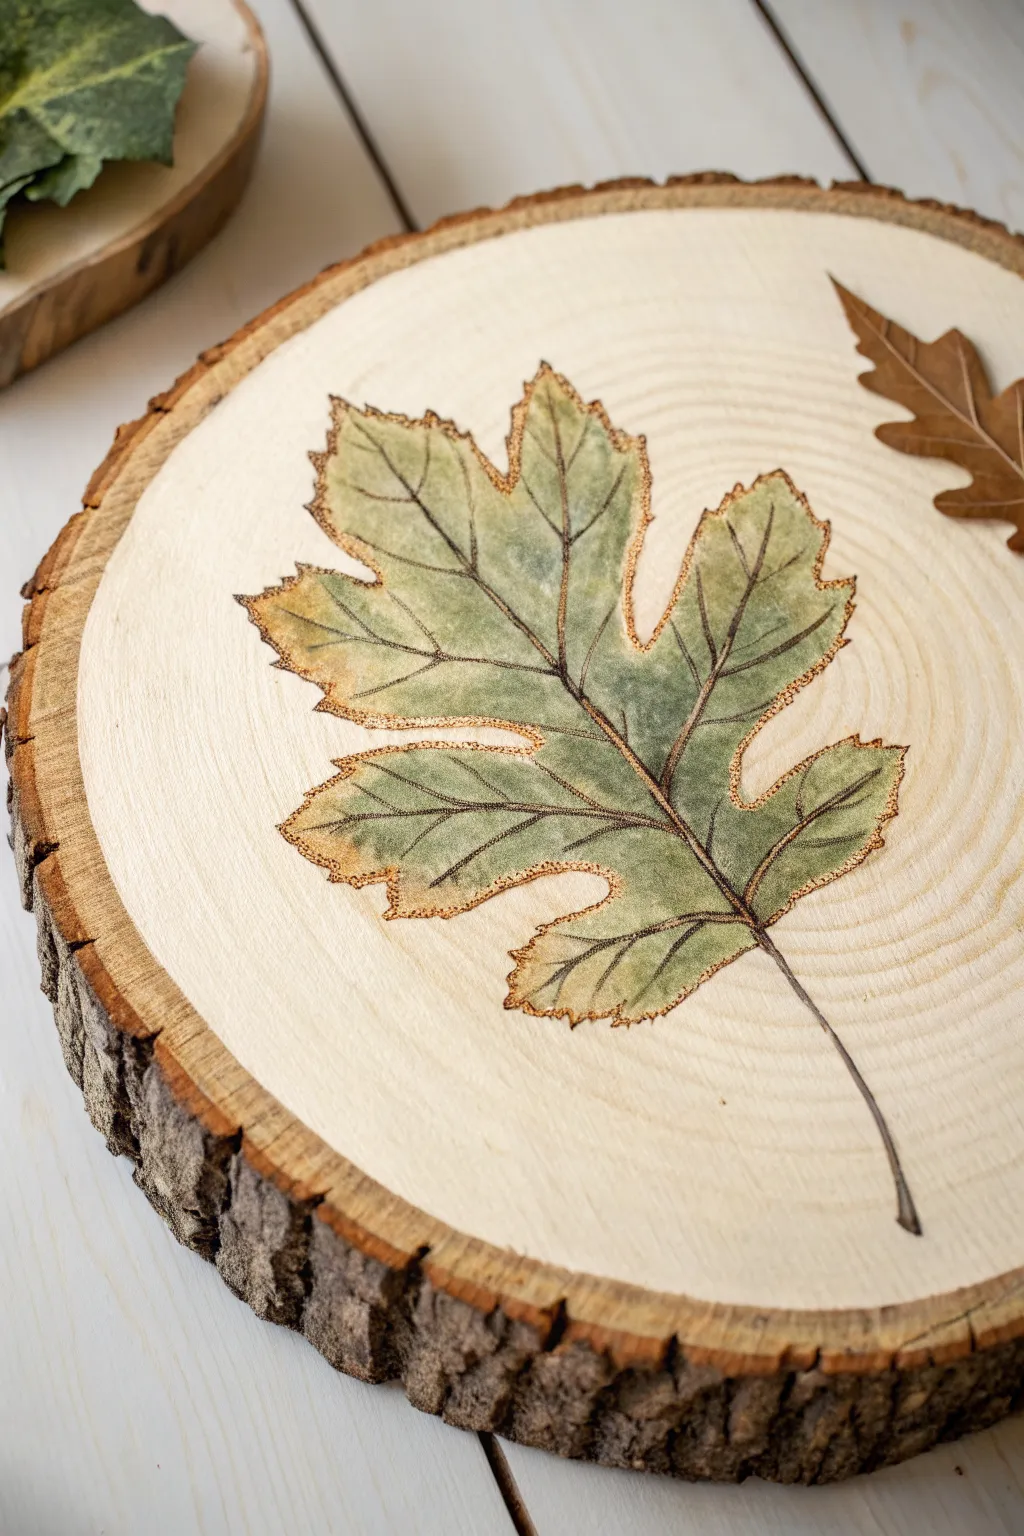
Capture the fleeting beauty of autumn with this delicate leaf study painted directly onto a rustic wood slice. The artwork features a soft, translucent watercolor style that allows the natural wood grain to show through, bordered by crisp, wood-burned style outlines.
Detailed Instructions
Materials
- Large wood slice (approx. 8-10 inches) with bark intact
- Fine-grit sandpaper (220 grit)
- Pencil and eraser
- Maple leaf template or real leaf
- Brown fine-point permanent marker or pyrography tool
- Acrylic paints (olive green, sap green, heavy body white, burnt sienna)
- Float medium or water for thinning
- Small flat brush
- Fine liner brush
- Clear matte acrylic sealer
Step 1: Preparation & Outline
-
Prepare the surface:
Start by sanding the face of your wood slice until it is buttery smooth. This is crucial because any rough fibers will cause your paint to bleed and your pen lines to feather. -
Clean the wood:
Wipe away all sanding dust with a slightly damp cloth or a tack cloth. Let the wood dry completely before moving on. -
Position your subject:
Place your leaf template or a real pressed leaf slightly off-center on the wood slice. Lightly trace the outer shape with a pencil, keeping the pressure very gentle to avoid denting the soft wood. -
Sketch the veins:
Draw the central vein running from the stem to the tip, then add the branching veins extending to each lobe point. Keep these lines fluid and organic rather than ruler-straight. -
Define the edges:
Go over your pencil outline with a brown fine-point permanent marker or a pyrography pen. If using marker, use short, sketchy strokes to mimic the jagged edge of a dried leaf rather than a solid, heavy line.
Prevent Bleeding
Before painting, apply a clear matte medium along your pencil lines. This creates a barrier so the liquid paint wash won’t seep into the surrounding wood grain.
Step 2: Painting the Leaf
-
Mix a wash:
Create a very thin wash of olive green paint mixed with plenty of water or float medium. You want the consistency of watercolor so the wood grain remains visible through the color. -
Apply the base layer:
Paint the interior of the leaf with this wash. Don’t worry about being perfectly even; slightly patchier application adds to the organic, dried-leaf look. -
Add depth:
While the first layer is still slightly damp, mix a drop of burnt sienna into your green wash. Touch this warmer color onto the tips of the leaf lobes and along the outer edges to simulate early autumn browning. -
Clean up the edges:
If any paint went outside the lines, you can often gently scrape it away with a craft knife or lightly sand it off once dry since the wood is raw. -
Dry completely:
Let these initial washes dry fully. I usually give it about 20 minutes because the wood absorbs the moisture deeply.
Burn It
Swap the brown marker for a wood burning tool. Pyrography creates a beautiful physical texture for the outline that catches the light and adds authenticity.
Step 3: Detailing & Finishing
-
Darken the veins:
Using your fine liner brush and thinned dark brown paint (or the marker again), re-trace the vein lines. Make the lines thicker at the base near the stem and taper them to near-invisibility at the tips. -
Add vein shadows:
Mix a slightly darker sap green wash. Run a very thin line of this color right next to your main vein lines to make them pop and look embedded in the leaf tissue. -
Highlight the texture:
Using a dry-brush technique with a tiny amount of white paint, lightly whisk over the center of the leaf sections between the veins. This creates a pillowy, dimensional effect. -
Refine the border:
Go back over the outer perimeter with your brown marker or burning tool. Add tiny serrated details or “teeth” to the leaf edge to make it look realistic. -
Extend the stem:
Draw the stem extending downwards, curving it slightly to follow the natural flow of the composition. -
Seal the artwork:
Once absolutely dry, apply a thin coat of clear matte sealer. This prevents the wood from darkening too much and protects your delicate paint washes from fading.
Display your new piece on a small easel or attach a hook to the back for a touch of woodland charm on your wall
Seasonal Ornament Set on Wood Slices
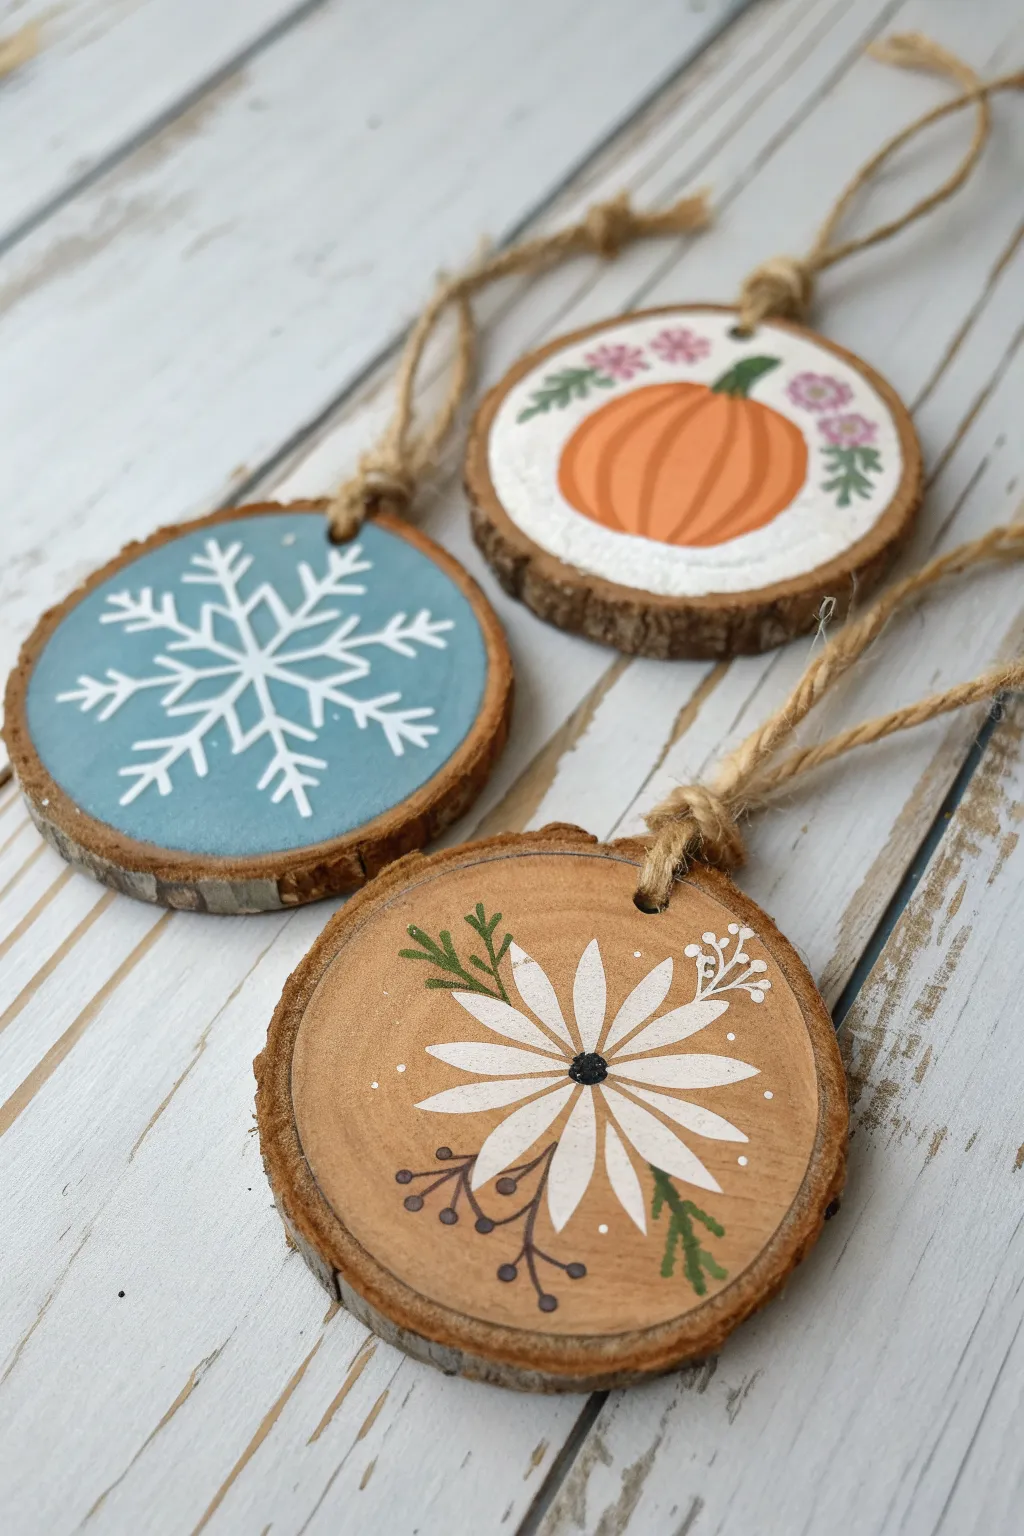
Capture the magic of fall and winter with these charming hand-painted wood slice ornaments. This set features a rustic daisy for late summer, a vibrant pumpkin for autumn, and a crisp snowflake for winter, all tied together with natural jute twine.
Step-by-Step Guide
Materials
- 3 pre-drilled wood slices (approx. 2.5-3 inches diameter)
- Acrylic craft paints (white, light blue, orange, brown, olive green, pink)
- Small flat brush (size 4 or 6)
- Fine detail liner brush (size 0 or 00)
- Dotting tool or toothpick
- Jute twine
- Palette or small plate
- Paper towels
- Water cup
Step 1: Preparation & Base Layers
-
Clean the surface:
Ensure your wood slices are clean and free of loose sawdust. If the surface feels rough, give it a very light sanding with fine-grit sandpaper, but avoid damaging the bark edge. -
Paint the snowflake base:
For the winter ornament, take your flat brush and apply a solid coat of light blue paint across the entire face of one wood slice, leaving a small rim of natural wood visible near the bark if you like the rustic look. Let this dry completely and apply a second coat for opacity. -
Paint the pumpkin background:
For the autumn ornament, paint a large, loose circle of white in the center of the second wood slice. It doesn’t need to be perfectly round; a slightly organic shape works well as a background for the pumpkin. -
Leave the daisy base natural:
The third ornament relies on the natural wood grain, so no base coat is needed. Just ensure the surface is clean and ready for the floral design.
Step 2: The Winter Snowflake
-
Mark the center:
Once the blue base is dry, use a very small dot of white paint to mark the absolute center of the circle to guide your symmetry. -
Paint the main axes:
Using your fine liner brush and white paint, draw a vertical line through the center dot, followed by a horizontal line to form a cross. Add two diagonal lines intersecting the center to create an eight-point star shape. -
Add the details:
On each of the eight main arms, paint small ‘V’ shapes pointing outward to create the feathery, crystalline look of the snowflake. I find it helps to rotate the wood slice as I work to keep the angle consistent.
Paint Consistency
If your acrylics are too thick, the fine lines will break. Thin your paint with a tiny drop of water until it has an inky consistency for smooth, continuous strokes.
Step 3: The Autumn Pumpkin
-
Shape the pumpkin:
On the dry white background of the second slice, paint an orange oval shape. Make it slightly wider at the bottom to give it weight. -
Add definition lines:
While the orange is still wet, mix a tiny bit of brown into your orange paint. Use a liner brush to paint curved vertical lines following the pumpkin’s shape to create the ridges. -
Paint the stem:
Using olive green paint, add a small, curved stem emerging from the top of the pumpkin. -
Add the floral wreath:
Using the tip of your liner brush, dab small groups of pink dots around the pumpkin to simulate flowers, and add small green dashes for leaves.
Personalize It
Paint the year or a family name on the back of the ornament using a fine-tip paint pen to turn these into keepsake gifts or annual milestones.
Step 4: The Rustic Daisy
-
Create the flower center:
On the natural wood slice, paint a small black dot in the center using a dotting tool or the back end of your brush handle. -
Paint the petals:
Load your liner brush with white paint. Press the brush down near the black center and pull outward, lifting up as you reach the end to create a tapered petal shape. Repeat this all the way around the center. -
Add greenery:
With olive green paint, draw delicate stems and small leaves extending from underneath the flower petals. -
Add subtle accents:
Using a very dark brown or black, add tiny stems with small dots on the ends to represent dried berries or buds. -
Add white accents:
Use your finest brush or a toothpick to add tiny white dots near the tips of the green sprigs for extra texture.
Step 5: Finishing Touches
-
Dry thoroughly:
Allow all ornaments to dry completely for at least an hour to prevent smudging. -
Clear coat (optional):
For longevity, you can apply a layer of matte spray sealer or Mod Podge over the painted surfaces. -
Attach the hanger:
Cut three lengths of jute twine, each about 8 inches long. Thread one through the pre-drilled hole of each ornament. -
Secure the loop:
Tie a secure knot at the base near the wood, and then tie the ends together to create a hanging loop.
Your rustic seasonal trio is now ready to bring a touch of woodland charm to your home decor
Aurora Sky Over Dark Trees
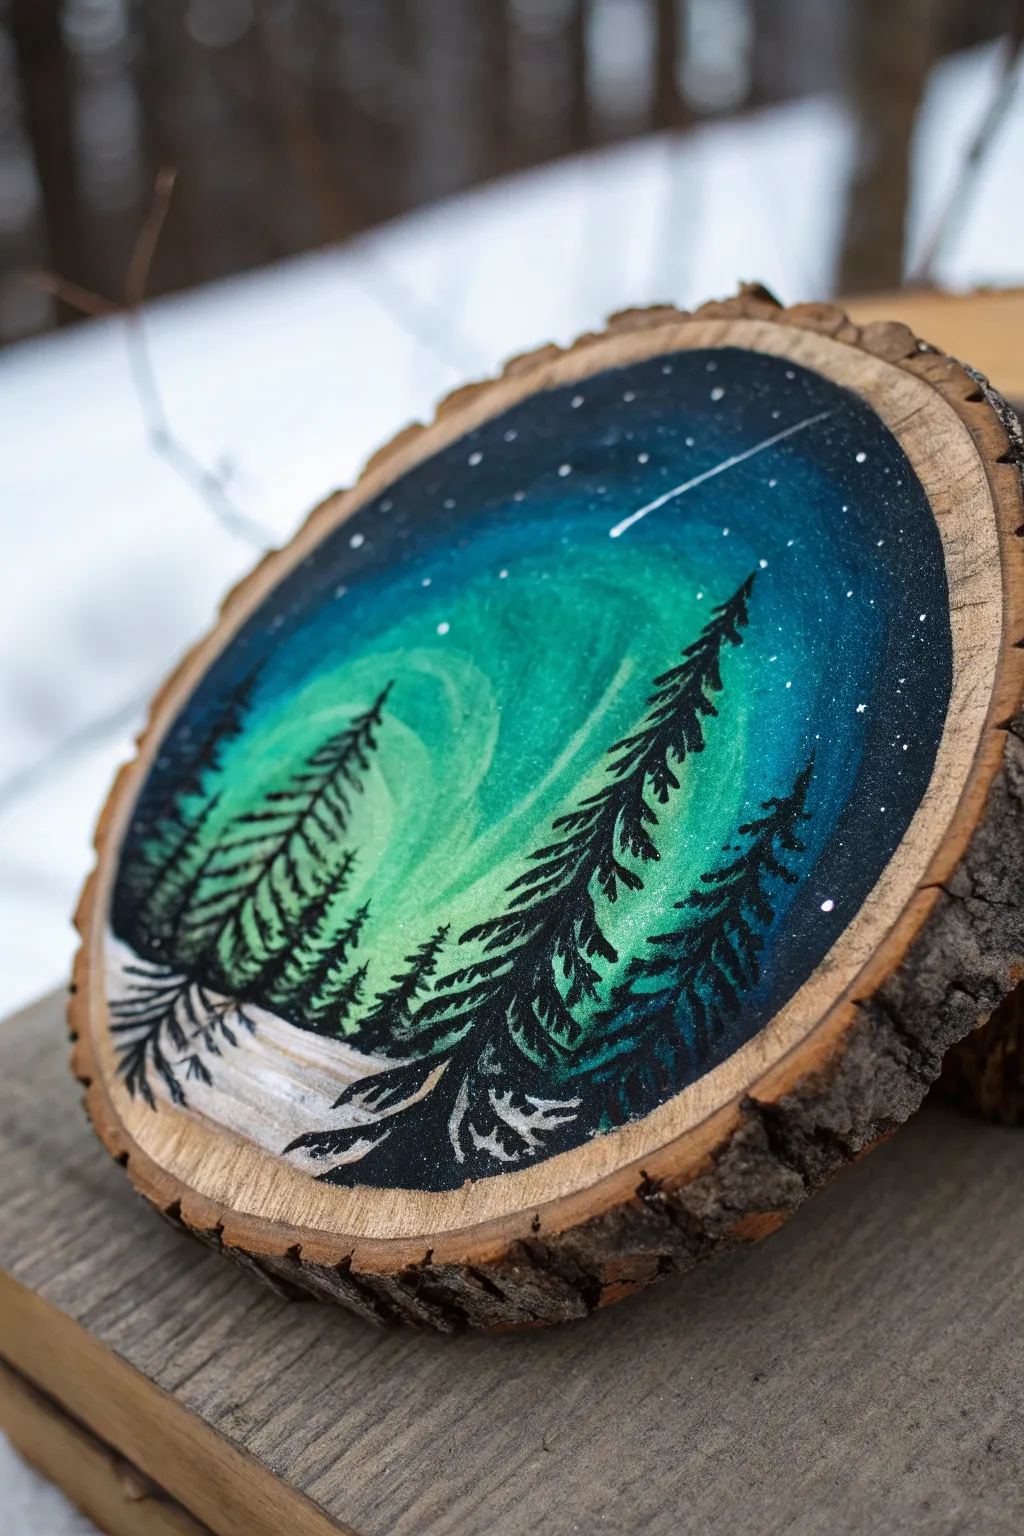
Capture the magic of the polar night on a rustic canvas with this stunning wood slice painting project. The swirling green aurora and silhouetted pines create a sense of depth and wonder that looks beautiful on any mantle or wall.
How-To Guide
Materials
- Wood slice with bark edge (approx. 4-6 inches)
- Sandpaper (medium to fine grit)
- Gesso or white acrylic primer
- Acrylic paints: Phthalo Blue, Turquoise, Emerald Green, Titanium White, Carbon Black
- Flat shader brush (medium)
- Small round detail brush
- Old toothbrush or stiff fan brush (for stars)
- Cup of water
- Palette or paper plate
- Gloss varnish or sealant
Step 1: Preparation & Base Coat
-
Prep the Surface:
Before grabbing a brush, ensure your wood slice is smooth. Lightly sand the face of the wood to remove any rough splinters or saw marks, then wipe away the dust with a slightly damp cloth. -
Prime the Wood:
Wood is thirsty and absorbs paint quickly. Apply a thin, even coat of gesso or white acrylic paint to the center area where you plan to paint, stopping just short of the bark edge. Let this dry completely.
Muddy Sky Fix
If your sky colors turn muddy while blending, let the layer dry completely. Then, apply a fresh, thin glaze of the desired color on top to restore vibrancy.
Step 2: Creating the Sky
-
Lay Down the Dark Sky:
Start by mixing a deep midnight blue using Phthalo Blue and a tiny touch of black. Using your flat brush, paint the outer upper edges of the wood slice, curving inward but leaving a large, irregular oval shape in the middle unpainted for now. -
Blend the Mid-Tones:
While the dark blue is still slightly wet, load your brush with pure Turquoise. Paint just inside the dark blue edge, blending the two colors where they meet to create a smooth transition. -
Add the Aurora Core:
Clean your brush thoroughly. Mix Emerald Green and a generous amount of Titanium White to create a glowing mint color. Paint this into the center empty space. -
Swirl and Blend:
With a slightly damp brush, gently work the edges where the mint green meets the turquoise. Use circular or sweeping motions to create the wispy, ethereal look of the aurora. Don’t over-blend; you want visible streaks of light. -
Intensify the Glow:
I like to take a tiny bit of nearly pure white and add a few central streaks right in the middle of the green section to make it look like the brightest part of the lights.
Step 3: Adding the Stars
-
Create the Starfield:
Once the sky is dry to the touch, protect your work surface. Dilute a small amount of white paint with water until it’s inky. Dip an old toothbrush or stiff brush into it and flick the bristles with your thumb to spray tiny stars across the upper sky. -
Paint a Shooting Star:
Using your finest detail brush, paint a single, sharp white line diagonally across the upper right. Make the starting point slightly thicker and let it trail off to a fine point.
Sparkle Upgrade
Mix a pinch of iridescent glitter into your gloss varnish for the final coat. It adds a magical, shimmering frost effect perfect for winter scenes.
Step 4: Painting the Foreground
-
Outline the Snow:
At the very bottom of the slice, use white paint mixed with a tiny drop of blue (to create a shadow color) to block in a sloping, snowy ground. Leave the absolute bottom edge raw wood or paint it white, depending on your preference. -
Draft the Trees:
Switch to your small round brush and black paint. Paint vertical lines to establish the trunks of your trees. Place the tallest ones on the sides and shorter ones towards the middle to enhance perspective. -
Foliage Technique:
To create pine needles, start at the top of a trunk and use small, quick dabbing motions. The dabs should be narrow at the top and get wider as you move down the tree. -
Layering Branches:
Don’t make the trees solid black triangles. Leave small gaps between branches so the beautiful aurora background peeks through. Extend the lower branches slightly over the white snowy ground area. -
Final Snow Details:
Once the black trees are dry, add a few tiny swipes of white paint on the tops of the lower black branches to look like settled snow.
Step 5: Finishing Touches
-
Clean the Edges:
If any paint strayed onto the bark, quickly wipe it off or paint over it with a brown that matches the wood. -
Seal the Artwork:
Protect your masterpiece with a coat of clear gloss varnish. This will make the dark colors pop and give the aurora a glassy, luminous finish.
Hang your new northern lights painting or prop it on a shelf to bring a cozy winter atmosphere into your home.
Galaxy Swirl With Splatter Stars
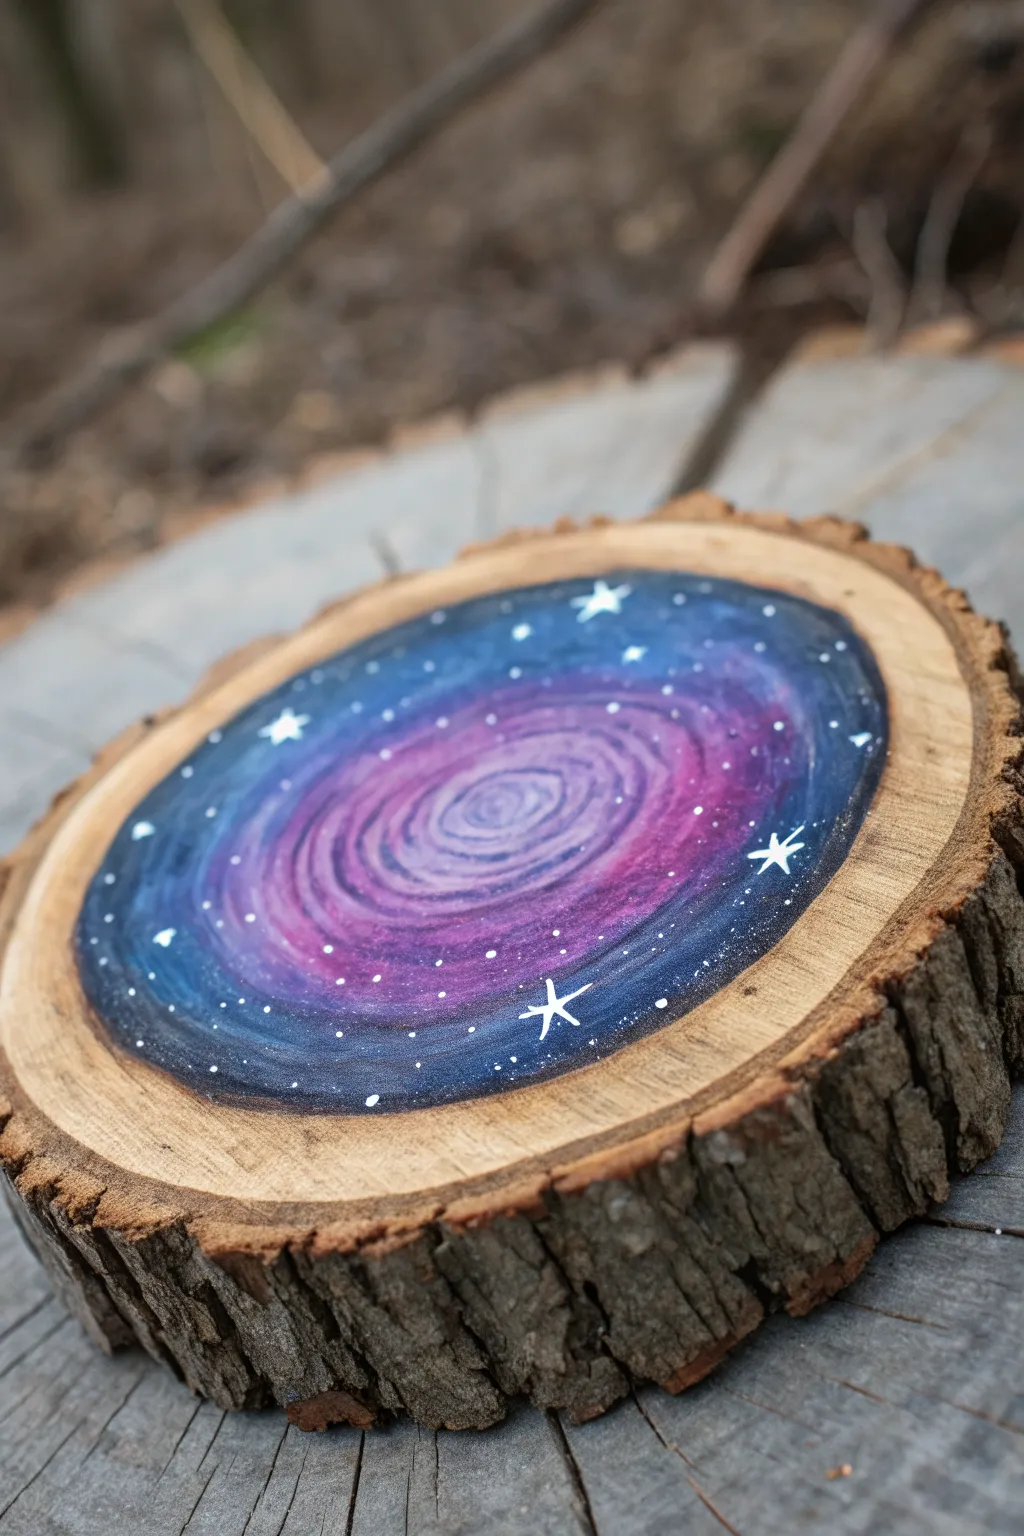
Capture the magic of deep space on a rustic canvas with this stunning galaxy swirl design. The natural wood grain frames a mesmerizing portal of blue and purple nebulae, accented by bright white stars.
Detailed Instructions
Materials
- Wood slice (approx. 4-6 inches diameter)
- Fine sandpaper (220 grit)
- Acrylic paints: Navy Blue, bright Ultramarine Blue, Purple, Magenta, White
- Medium flat brush
- Small round brush
- Detail liner brush
- Old toothbrush (optional for splattering)
- Palette or paper plate
- Cup of water and paper towels
- Clear spray sealant (matte or gloss)
Step 1: Preparation & Base Ring
-
Smooth the Canvas:
Begin by lightly sanding the face of your wood slice. You want a smooth surface for the paint to glide on, but be careful not to damage the bark edging. -
Clean the Surface:
Wipe away all sanding dust with a slightly damp cloth or paper towel to ensure your paint adheres properly. -
Define the Border:
Using your medium flat brush and navy blue paint, create a defining circle about half an inch inside the bark edge. This leaves a beautiful ring of raw wood visible. -
Fill the Background:
Fill in the entire circle with the navy blue paint. This dark base layer provides depth for your galaxy and helps the lighter colors pop.
Muddy colors?
If your swirl colors are turning gray or brown, stop blending! Let the current layer dry completely before adding new colors on top to keep them distinct.
Step 2: Creating the Galaxy Swirl
-
Start the Spiral:
While the navy base is still slightly wet (or after re-wetting slightly), mix a bit of purple with ultramarine blue. Paint a broad spiral motion starting from the outside and moving inward. -
Add Magenta Hues:
Load your brush with magenta and a touch of white to create a lighter pink-purple. Apply this to the center of your spiral, blending outward into the darker blue. -
Intensify the Center:
Mix a very light lavender (mostly white with a dot of purple). Paint a tight swirl right in the center of the galaxy to create a glowing core effect. -
Blend the Transitions:
Use a clean, slightly damp brush to gently feather the edges where the pink meets the blue. You want a soft, smoky transition rather than harsh lines, mimicking gas clouds. -
Deepen the Void:
Go back in with pure navy blue or even a touch of black around the very outer edges of your painted circle to increase the contrast against the raw wood border. -
Texture the Swirl:
I like to take a fairly dry brush with a tiny amount of white paint and lightly drag it along the spiral lines. This dry-brush technique emphasizes the motion of the swirl.
Add dimension
For a 3D effect, mix a pinch of fine glitter into your clear sealant topcoat. It will make the galaxy shimmer subtly when the light hits the wood.
Step 3: Stars & Finishing Touches
-
Prepare White Paint:
Thin down a small amount of white acrylic paint with a drop of water until it has an ink-like consistency. -
Create Distant Stars:
Dip your detail brush (or an old toothbrush) into the thinned white paint. Use your finger to flick the bristles over the painting to create a spray of tiny stars. -
Paint Major Stars:
Switch to your finest detail liner brush. Dip it in un-thinned white paint and carefully place larger dots randomly across the galaxy, focusing on the dark outer ring. -
Draw Starbursts:
Select 3 or 4 of your largest white dots. Carefully paint a small cross through them to turn them into twinkling four-point stars. -
Add Star Highlights:
Place a few tiny dots of white right in the center of the lightest spiral sections to make the galaxy core look active and bright. -
Dry Completely:
Let the artwork dry fully. Since wood is porous, give it at least an hour to ensure moisture has evaporated from the grain. -
Seal the Project:
Spray the surface with a clear acrylic sealer. This protects the paint from scratching and keeps the raw wood from yellowing over time.
Display your cosmic creation on a shelf or add a hook to hang your slice of the universe on the wall
Constellation Map on a Wood Round
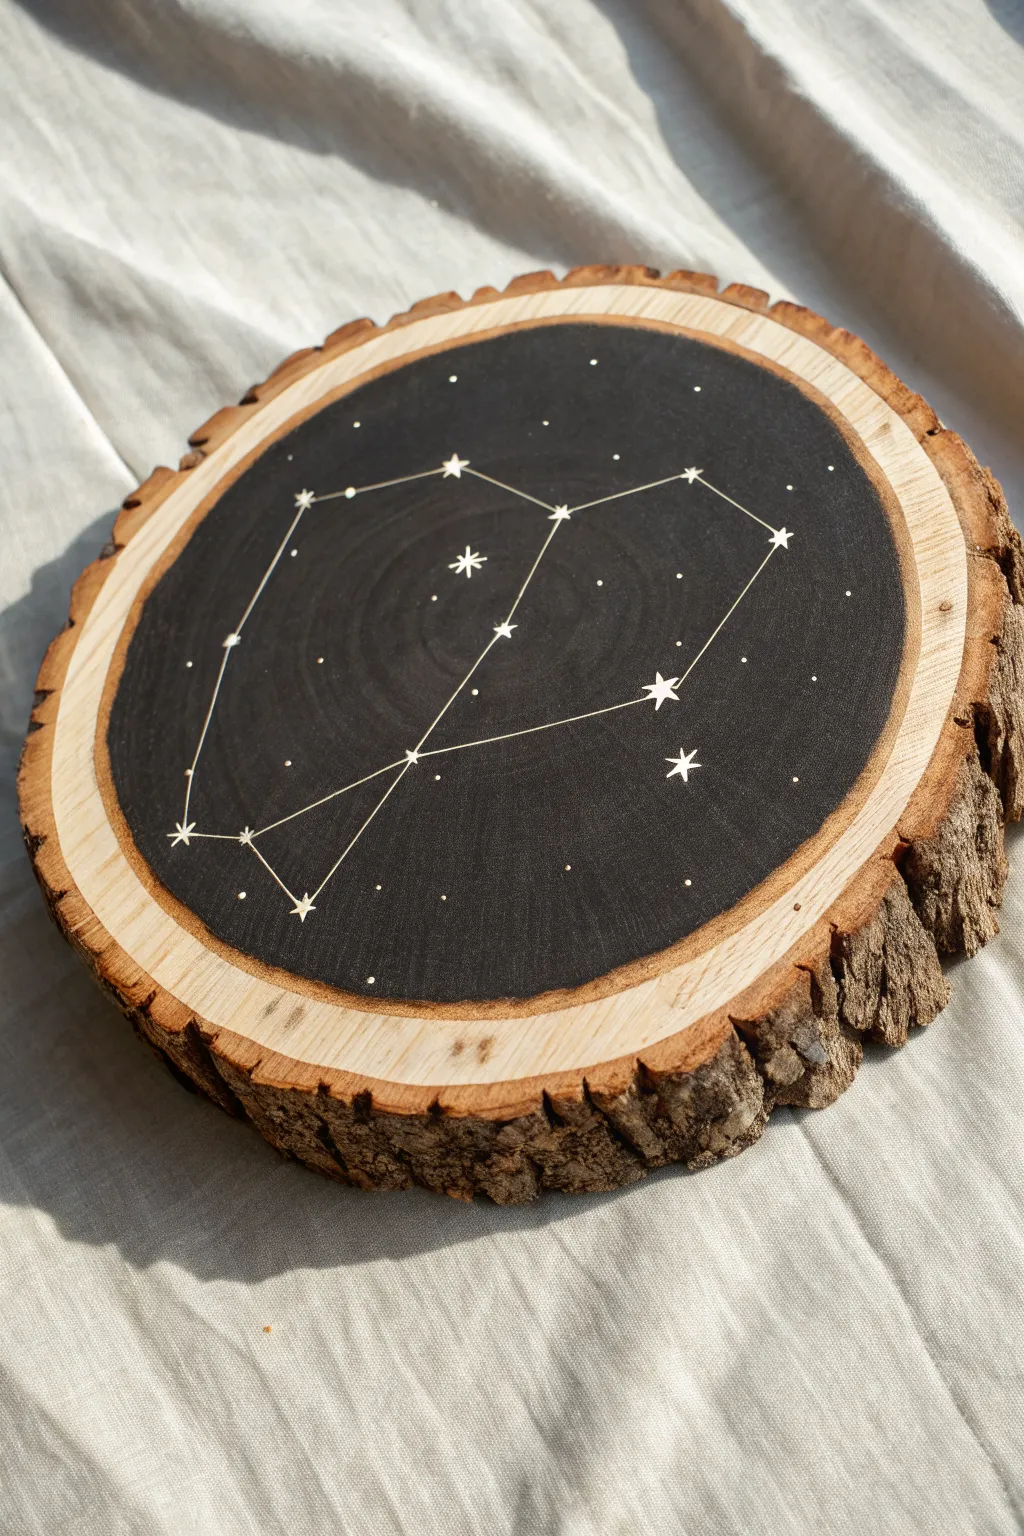
Transform a rustic log slice into a window to the night sky with this elegant constellation project. The contrast between the raw, natural wood edge and the deep black painted center creates a striking piece of decor perfect for any stargazer.
Step-by-Step Tutorial
Materials
- Medium-sized wood slice (approx. 8-10 inches diameter)
- Sandpaper (120 and 220 grit)
- Black acrylic paint (matte finish)
- Flat paintbrush
- Pencil
- Ruler
- White paint pen (fine and ultra-fine tips)
- Gold or Silver paint pen (optional for stars)
- Printed constellation reference
- Clear matte varnish or sealant
- Lint-free cloth
Step 1: Preparation & Base Coat
-
Surface Smoothing:
Begin by sanding the face of your wood slice. Start with 120-grit sandpaper to remove any rough saw marks, then switch to 220-grit for a flawlessly smooth finish. Wipe away all dust with a lint-free cloth or a tack cloth. -
Mapping the Circle:
Decide how wide you want your natural wood border to be. I usually aim for about a half-inch to an inch depending on the slice size. Use a compass or trace a circular object (like a bowl) to lightly draw your boundary circle in pencil. -
Painting the Night Sky:
Using a flat brush, carefully fill in the circle with matte black acrylic paint. Use the edge of the brush to keep the boundary line crisp and clean. -
Checking Consistency:
Let the first coat dry completely. If the wood grain is still showing through too much, apply a second thin coat of black to ensure a deep, opaque background. -
Drying Time:
Allow the paint to cure fully. If the wood grain raised up slightly after painting, you can very gently pass over it with fine sandpaper, but be careful not to scratch through the color.
Bleeding Lines?
If paint bleeds into the wood grain at the border, clean it instantly with a damp Q-tip. For a sharp edge, score the circle line with an X-Acto knife before painting.
Step 2: Drafting the Constellation
-
Planning the Layout:
Look at your reference image of the constellation (the example shows Gemini). Visualize where the main stars sit relative to the center of your wood slice. -
Marking Main Stars:
Using a pencil, lightly tap small dots onto the black paint to mark the positions of the primary stars. Don’t press hard; graphite can be shiny on matte black, so keep it faint. -
Connecting the Dots:
Use a ruler or straight edge to lightly draw the connecting lines between your star points. Double-check your reference to ensure the angles look correct before moving to ink.
Make It Shine
Add subtle metallic accents by re-dotting the major stars with a silver or gold gel pen. This catches the light beautifully when displayed on a shelf.
Step 3: Inking the Details
-
Drawing the Connections:
Take your fine-tip white paint pen and trace over the pencil lines connecting the stars. Use a steady hand and a ruler if you aren’t confident in your straight lines. -
Creating Major Stars:
At the junction points where lines meet, draw larger stars. You can make simple five-point stars or stylized four-point ‘sparkle’ shapes. Fill them in solid white. -
Adding Minor Stars:
Look for spots along the lines or nearby in the sky map for smaller stars. Use the ultra-fine tip pen to make tiny dots or small crosses for these dimmer stars. -
Background Galaxy:
To give the piece depth, add random, tiny stippled dots across the rest of the black background. Vary your pressure to make some dots distinct and others barely visible. -
Final Cleanup:
Once the ink is completely dry, gently erase any visible pencil marks. Be gentle to avoid rubbing off the black paint.
Step 4: Protection
-
Sealing the Work:
Apply a clear matte varnish over the painted area. This protects the paint from chipping and keeps the white lines bright. I prefer a spray sealant here to avoid smearing the paint pen work. -
Bark Care:
If the bark on your slice feels loose, you can brush a little diluted white glue or matte medium into the cracks to secure it.
Hang your celestial slice on the wall or use a small easel to display your personal piece of the universe
Stained-Glass Geometric Pattern
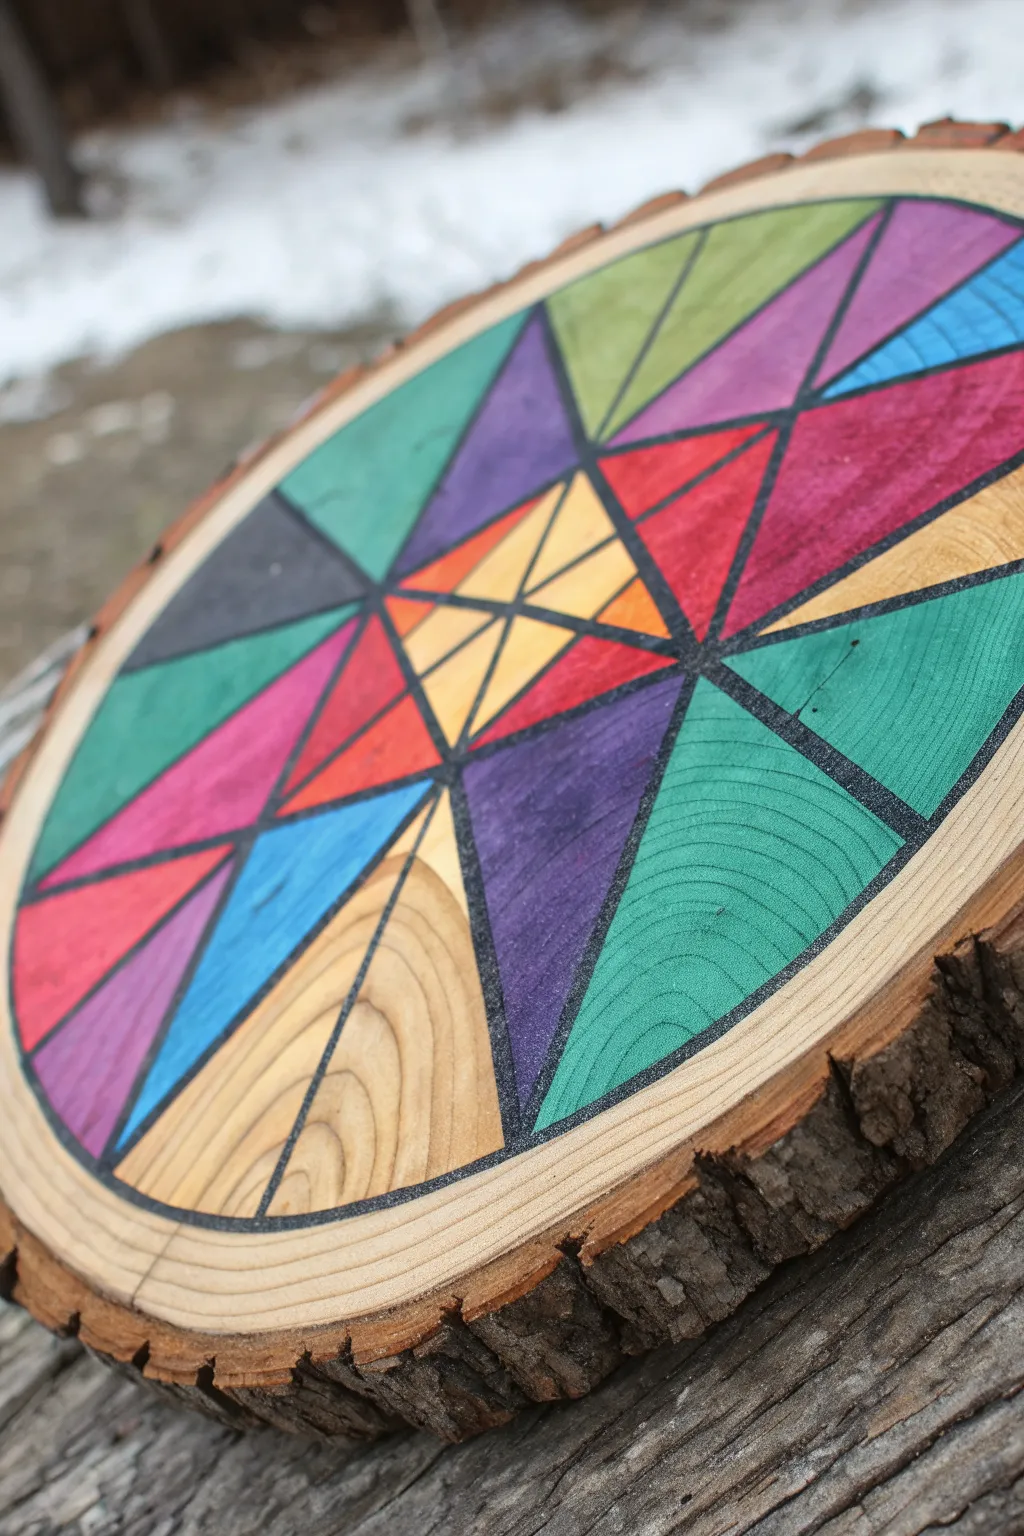
Transform a rustic slice of nature into a vibrant, modern art piece using this stained-glass inspired technique. The bold black lines contrast beautifully with the translucent color stains, allowing the natural wood grain to shine through the geometric design.
Step-by-Step
Materials
- Large wood slice with bark (sanded smooth)
- Pencil and eraser
- Ruler or straight edge
- Compass (optional)
- Water-based wood stains or diluted acrylic paints (various colors)
- Black oil-based paint marker or fine paintbrush with black acrylic
- Small flat paintbrushes
- Clear polyurethane sealer (spray or brush-on)
- Sandpaper (220 grit)
- Paper towels
Step 1: Preparation & Design
-
Smooth the Surface:
Before anything else, ensure the face of your wood slice is incredibly smooth. Sand it thoroughly with 220-grit sandpaper to remove any rough fibers that might bleed your paint later. Wipe away all dust with a tack cloth or slightly damp paper towel. -
Find the Center:
Measure across the diameter of the wood slice in a few directions to locate the approximate visual center. Mark this spot lightly with a pencil. -
Draft the Primary Lines:
Using a ruler, draw a series of straight lines intersecting at your center point, dividing the circle like a pizza. For the specific look in the photo, aim for about 8 to 12 main radial lines. -
Create the Geometric Web:
Connect your radial lines by drawing straight lines between them at various distances from the center. Creating triangles and quadrilaterals of different sizes gives that shattered glass effect. -
Refine the Pattern:
Go over your pencil lines to ensure they are distinct. If a section looks too large or empty, I usually bisect it with another line to create more detail for coloring.
Bleed Prevention
Score your pencil lines lightly with an X-Acto knife before painting. This severs the top wood fibers and creates a physical barrier that stops paint bleeding.
Step 2: Adding Heavy Lines
-
Outline in Black:
Now, trace over every pencil line with a thick black medium. A broad-tip oil-based paint marker works best for control, but a steady hand with a liner brush and black acrylic paint also works beautifully. -
Thicken Intersections:
Make sure the lines are solid opaque black. You may want to slightly thicken the lines where they meet at the center or major intersections to mimic the look of lead came in stained glass. -
Let it Cure:
Allow the black outlines to dry completely. This is crucial because wet black ink will smear into your colors and ruin the crisp effect.
Add Metallic Flair
Instead of matte black, use a metallic gold or copper leafing pen for the outlines. It mimics brass inlay and reflects light beautifully.
Step 3: Staining & Sealing
-
Prepare Your Colors:
If you don’t have rainbow wood stains, create your own ‘stain’ by diluting acrylic craft paint with water (about a 1:1 ratio). You want these to be translucent so the wood grain remains visible. -
Test Stick:
Test your consistency on the back of the wood slice or a scrap piece. The color should soak in rather than sit on top like a plastic film. -
Plan Your Palette:
Select which geometric segments will be which color. In the photo, adjacent shapes often have contrasting cool and warm tones (reds/purples against greens/blues). -
Fill the Sections:
Carefully paint inside the black lines. Use a small flat brush to get crisp edges. Don’t worry if you touch the black lines slightly, but try to stay within the boundaries. -
Leave Natural Spaces (Optional):
Consider leaving a few segments unpainted, exposing the raw pine tones. This adds warmth and emphasizes that natural material base. -
Blot Excess Moisture:
If a puddle forms, quickly dab it with a paper towel. Staining requires the pigment to absorb, not pool. -
Dry Time:
Let the colors dry fully. The wood will look matte and slightly dull at this stage, but don’t worry—the sealer will make it pop. -
Apply the Finish:
Seal the artwork with a clear polyurethane topcoat. This protects the wood and deepens the contrast of the colors.
Now you have a stunning geometric display piece that balances vivid color with rustic charm

Have a question or want to share your own experience? I'd love to hear from you in the comments below!