The best painting studio isn’t the fanciest one—it’s the space that makes you want to pick up a brush right now. Here are my favorite painting studio ideas to help you build a workflow-friendly, light-loving setup that still feels like you.
Chase That Natural Light
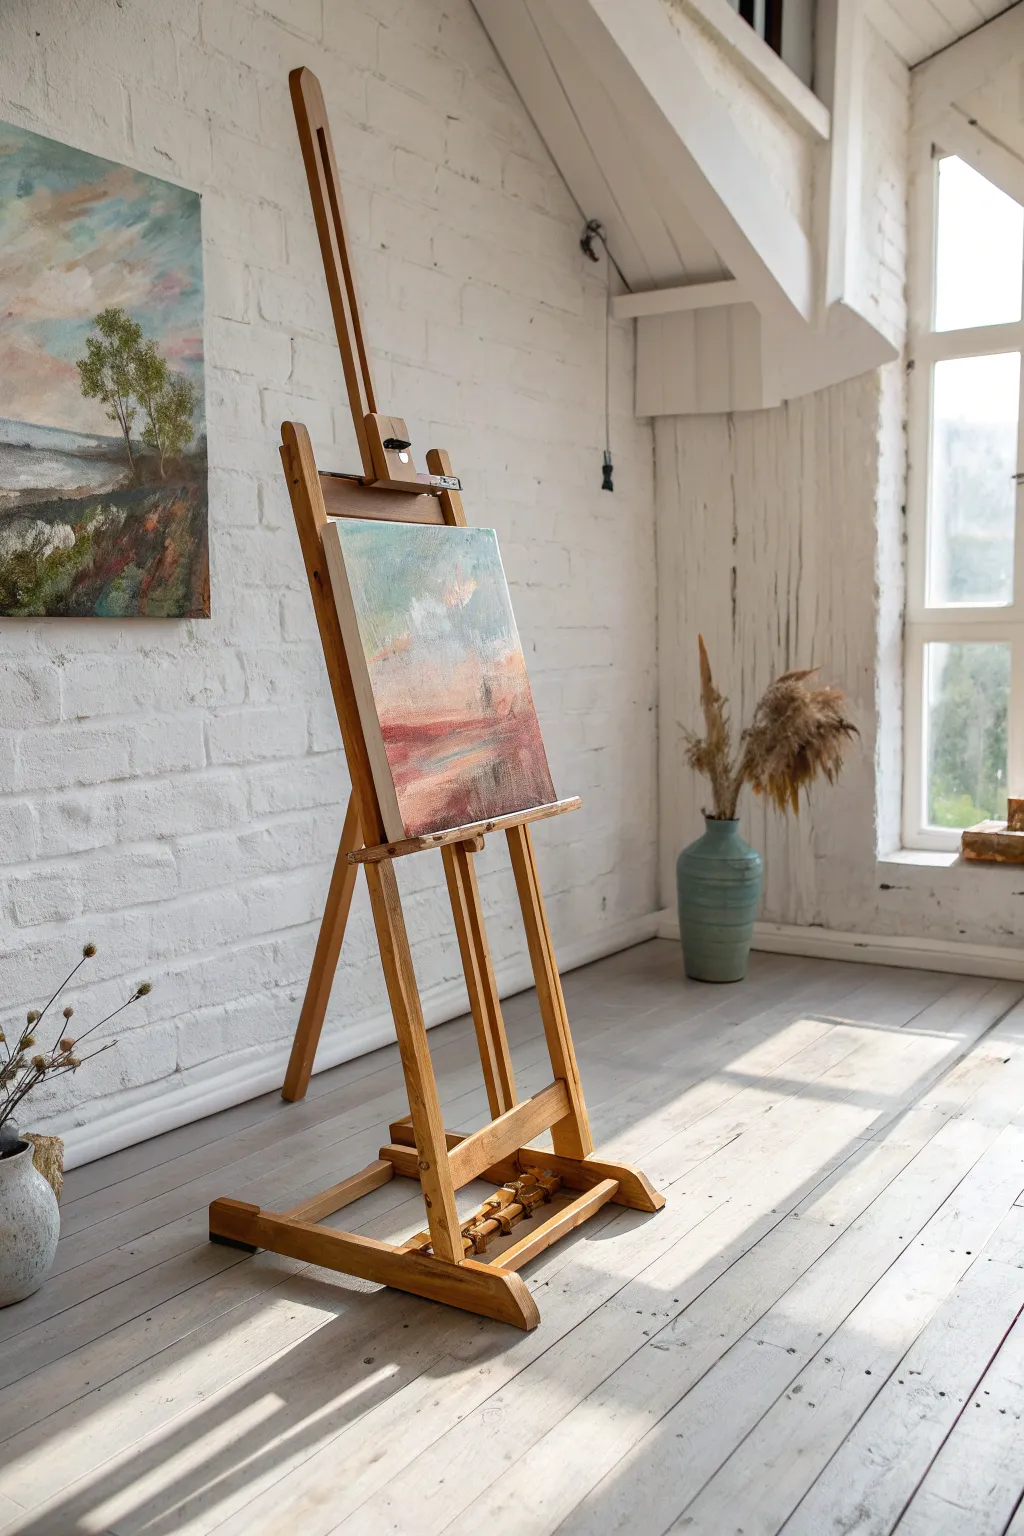
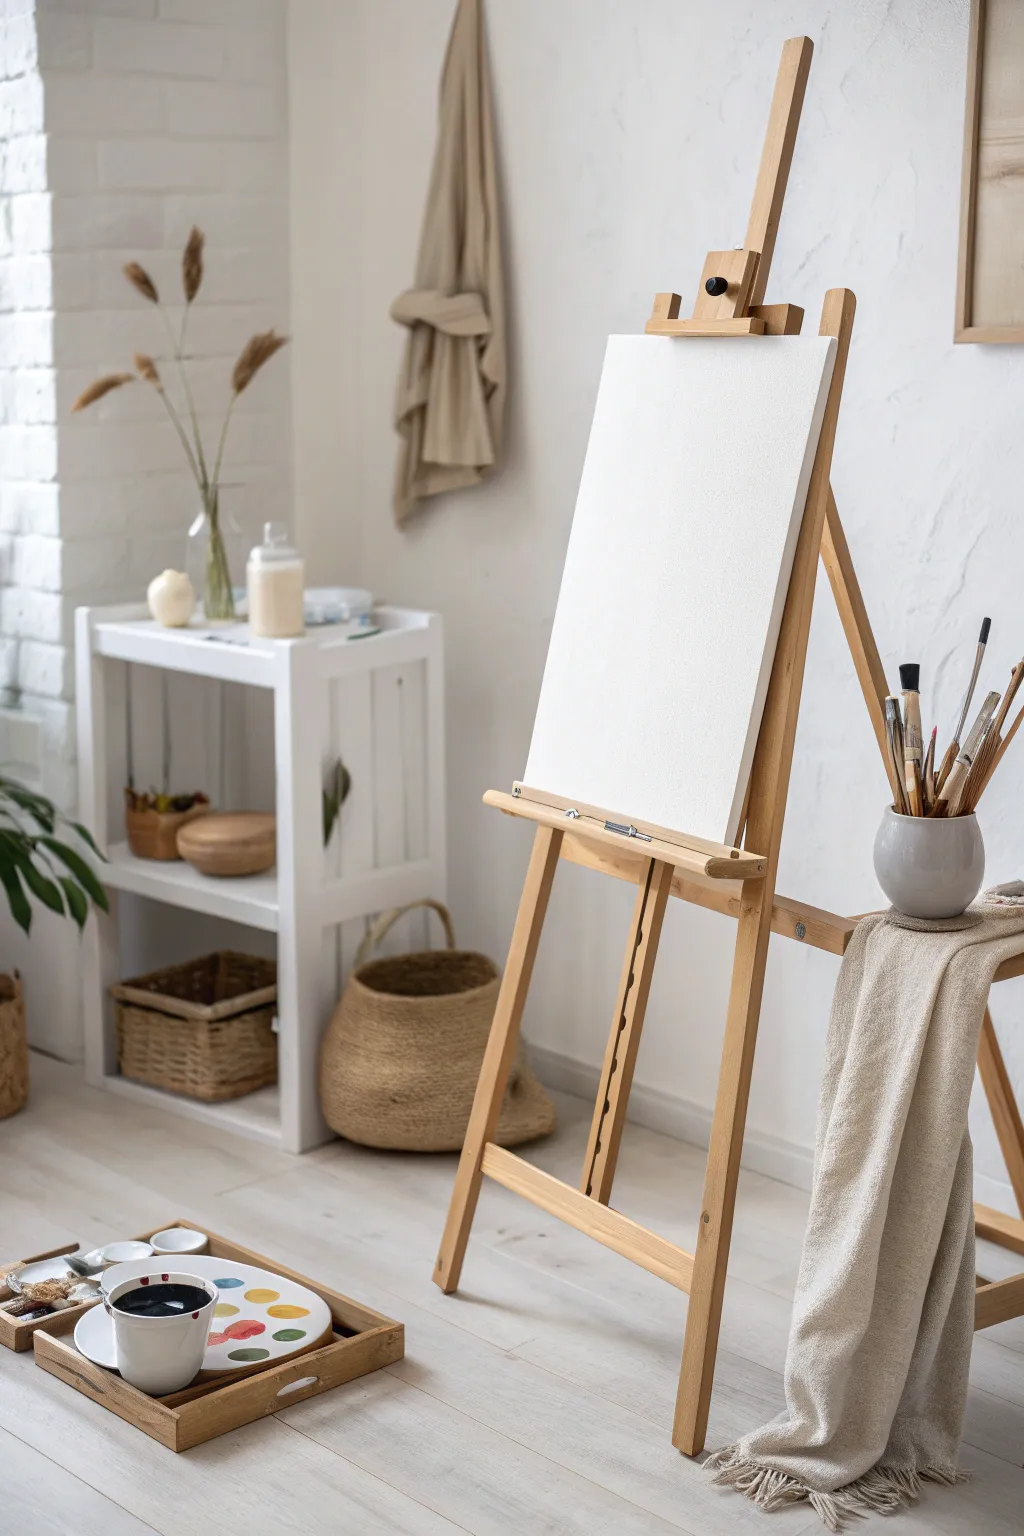
Capture the serene potential of a fresh start by painting this bright, minimalist studio scene. This project focuses on rendering light, texture, and the inviting emptiness of a blank canvas waiting for inspiration.
Detailed Instructions
Materials
- Stretched canvas (16×20 inches or similar)
- Acrylic paints: Titanium White, Burnt Umber, Yellow Ochre, Raw Sienna, Payne’s Grey, Unbleached Titanium
- Flat brushes (large and medium)
- Round brushes (small for details)
- Palette knife
- Water container and rags
- Pencil for sketching
- Slow-drying medium (optional for blending)
Step 1: Setting the Scene
-
Establish the composition:
Begin by lightly sketching the main vertical lines of the window frames and the angles of the easel. Keep your lines faint, focusing on the perspective of the tall windows and the wooden floorboards leading the eye inward. -
Block in the walls:
Mix a large amount of Titanium White with a tiny touch of Payne’s Grey and Burnt Umber to create a warm, off-white wall color. Apply this broadly to the wall areas, using vertical strokes to mimic the texture of painted brick or plaster. -
Paint the window light:
For the window panes, use pure Titanium White mixed with a very pale blue-grey. Keep the edges slightly soft to suggest bright, diffused light pouring in from the outside. -
Lay down the flooring:
Mix Yellow Ochre, Burnt Umber, and White to create a light wood tone. Paint the floor using long, horizontal strokes, varying the pressure to suggest individual wooden planks and grain texture.
Uneven Wood Grains?
If your floorboards look too solid, dry-brush a lighter tint over the dry base coat. This catches the texture of the canvas weave, instantly mimicking wood grain.
Step 2: Constructing the Elements
-
Form the easel structure:
Using a flat brush and a mixture of Raw Sienna and Burnt Umber, paint the main legs and central mast of the easel. Ensure the lines are straight and sturdy-looking. -
Add dimension to wood:
Add shadows to the side of the easel legs facing away from the window using a darker Burnt Umber mix. Highlight the window-facing edges with a mix of Raw Sienna and White to show the directional light source. -
Create the blank canvas:
Paint the rectangular canvas sitting on the easel with pure Titanium White. To distinguish it from the wall, add a very subtle, thin shadow line beneath it and along the right side where it casts a shadow on the easel frame. -
Draft the window frames:
Use a smaller flat brush and a rich brown mix (Burnt Umber + touch of Black) to paint the wooden window frames. I find that breaking the lines slightly helps them look worn and natural rather than like plastic.
Curtain Call
To get that ethereal, sheer curtain look, mix a tiny drop of glazing medium into your white paint. It increases transparency without losing the pigment’s body.
Step 3: Weaving Texture
-
Base coat for baskets:
For the large vase on the left and the basket on the right, lay down a solid base shape using a mid-tone tan color (Yellow Ochre + White). -
Weave the vase details:
Once the base is dry, use a small round brush with a darker brown to paint short, horizontal dash marks across the vase. Curve these strokes with the form of the vase to create the illusion of roundness and woven texture. -
Detail the floor basket:
Repeat the weaving technique for the floor basket, but use thicker, slightly messier strokes to suggest a coarser weave. Don’t forget to paint the handle arching over the top. -
Add the pampas grass:
Use a fan brush or an old, splayed bristle brush. Mix a fluffy beige color and dab lightly above the tall vase to create the soft, feathery heads of the dried grass. Keep the texture airy and translucent at the edges.
Step 4: Light and Atmosphere
-
Paint the curtains:
Create the sheer curtains using extremely watered-down White or a glazing medium. Drag the brush vertically from the top of the window down to the floor, allowing the wall and window colors to show through slightly. -
Refine curtain folds:
Add slightly more opaque white highlights to the ridges of the curtain folds where the light hits them most directly. -
Place the floor cup:
Paint a small cylinder shape near the tall vase for the cup. Use a dark grey for the interior and a lighter grey for the exterior, adding a small cast shadow on the floor to ground it. -
Final highlights:
Take a small detail brush with pure White and add tiny highlights to the rim of the cup, the glossiest parts of the easel wood, and the metallic hardware on the easel. -
Cast shadows:
Glaze a transparent cool grey (watered down Payne’s Grey) on the floor extending from the easel legs and baskets, stretching away from the window to firmly anchor objects in the space.
Step back and admire how a simple palette creates such a peaceful, light-filled atmosphere in your home studio painting


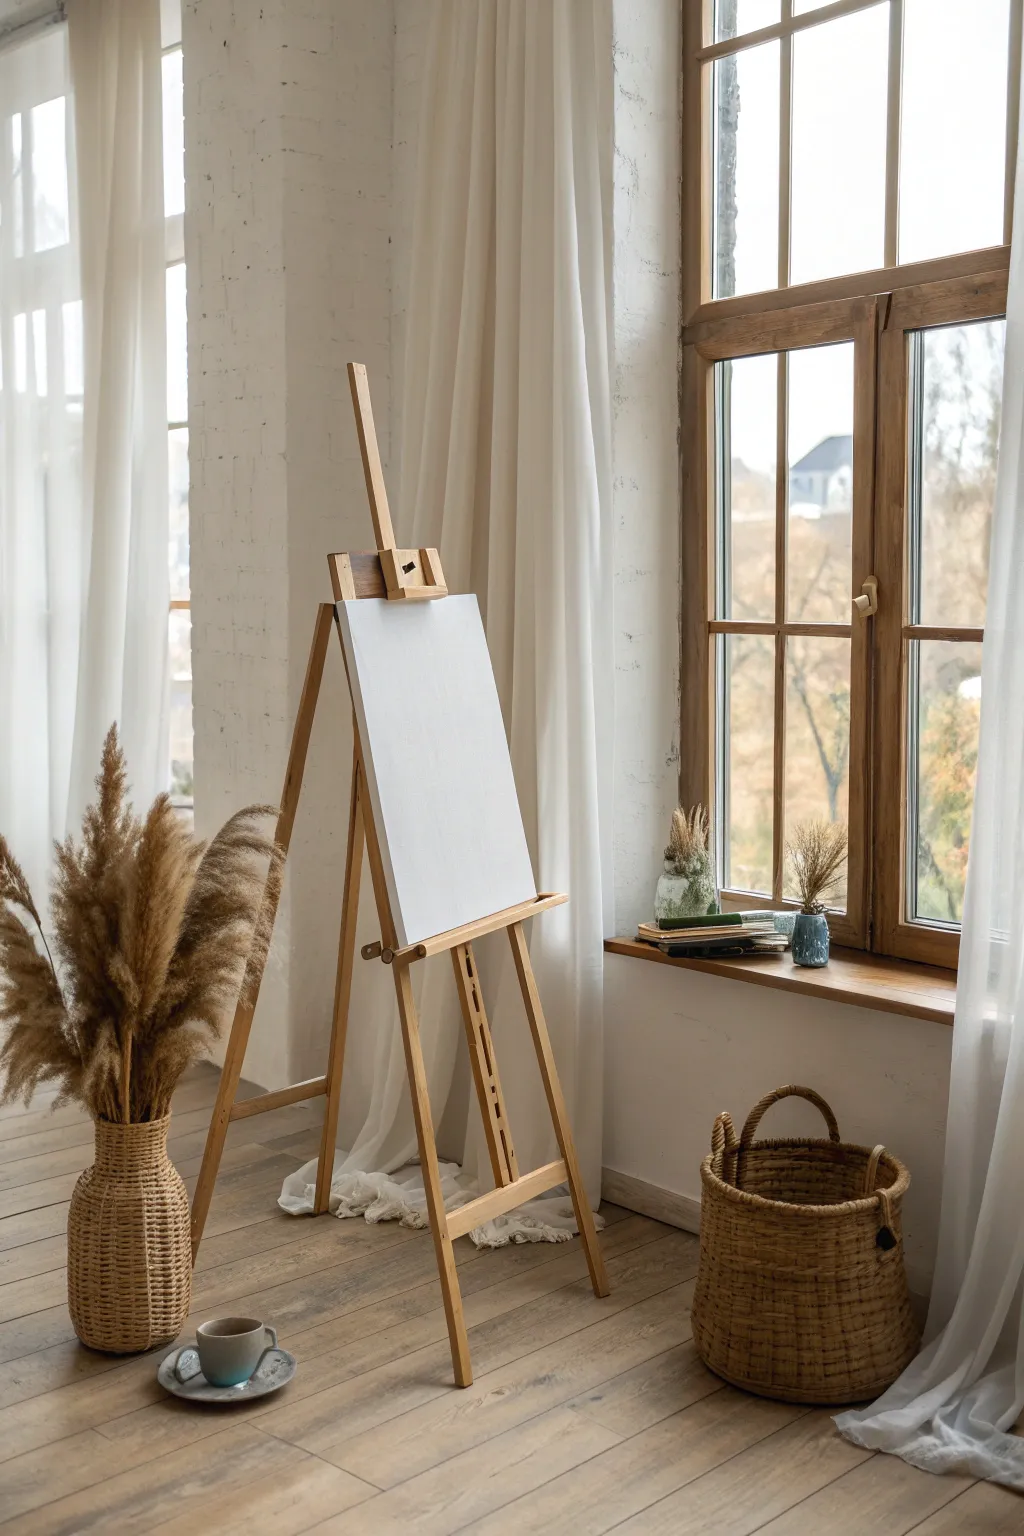
Anchor the Room With Your Easel
Capture the fleeting beauty of dusk with this soft, impressionistic landscape painting. Using gentle layering and a muted palette of pinks, teals, and peach, you will create a dreamy composition that brings a sense of calm to any studio space.
Step-by-Step Tutorial
Materials
- Stretched canvas (approx. 16×20 inches)
- Acrylic paints (Titanium White, Naples Yellow, Raw Sienna, Turquoise, Alizarin Crimson, Burnt Umber)
- Glazing medium or slow-drying medium
- Large flat brush (1-2 inch)
- Medium filbert brush
- Palette knife
- Water container and rags
- Spray bottle with water
Step 1: Creating the Atmosphere
-
Prime and tone:
Begin by applying a thin wash of Raw Sienna mixed with plenty of water across the entire canvas. This warm undertone will peek through later layers, adding a subtle glow to your finished piece. -
Establish the horizon:
Once the wash is dry, mix Titanum White with a touch of Turquoise and glaze medium. Applying this roughly across the upper two-thirds determines your sky area, keeping the strokes loose and horizontal. -
Block in the ground:
For the lower third, mix Alizarin Crimson with a little Burnt Umber and White to create a dusky rose color. Apply this broad wash below your horizon line to establish the land or water mass. -
Blend the transition:
While the paint is still slightly tacky, take a clean, damp brush and gently soften the line where the sky meets the ground. We want a hazy, indistinct horizon rather than a sharp edge. -
Add first sky layers:
Mix a pale peach using Naples Yellow and a tiny dot of Crimson. Using a large brush, scumble this color into the lower part of the sky area, just above the horizon, allowing it to mix optically with the blue underneath.
Muddy Color Solution
If your pinks and greens turning brown, stop blending wet paint. Let the first layer dry completely before glazing the opposing color on top.
Step 2: Building Depth and Texture
-
Deepen the foreground:
Introduce a darker, reddish-brown mix (Crimson and Burnt Umber) to the bottom corners and the lowest edge of the painting. This weight anchors the composition and pushes the lighter horizon further back. -
Suggest cloud forms:
Load a filbert brush with pure Titanium White and a touch of glazing medium. Scrub in soft, cloud-like shapes in the upper sky, using a circular motion to keep edges fluffy and indistinct. -
Layering warmth:
Return to your peach and pink mixtures. Add horizontal streaks of these warm tones into the middle ground, suggesting light reflecting off water or land. Keep your brush strokes long and sweeping. -
Cool shadows:
Mix a muted grey-blue. Add subtle shadows to the undersides of your white clouds, blending them upwards so they dissolve into the light. -
Introduce texture:
Switch to a palette knife. Mix a thick body of pale pink paint. Lightly drag the knife horizontally across the foreground area to create broken texture that mimics ripples or rough terrain. -
Mist the surface:
If your acrylics are drying too fast, give the canvas a very light mist with your spray bottle. This allows you to continue blending wet-into-wet without dragging the paint.
Keep It Loose
Stand back from your easel every 10 minutes. Viewing the work from 5 feet away helps you see the overall composition and prevents over-detailing.
Step 3: Refining and Highlighting
-
Define the focal point:
Near the center right of the horizon, add a slightly brighter concentration of light using Naples Yellow and White. This suggests where the sun is setting behind the mist. -
Add vertical interest:
Using the edge of a flat brush or a palette knife, make a few faint, vertical marks in the middle ground. These abstract suggestions can represent trees, structures, or distant figures in the fog. -
Enhance sky movement:
Take a dry brush with a tiny amount of Turquoise and White. Lightly whisk this through the upper sky in diagonal motions to give the impression of wind or drifting clouds. -
Final highlights:
Use the palette knife to apply thick impasto touches of pure White mixed with Naples Yellow on the areas where the light hits strongest—typically the cloud tops and water reflections. -
Harmonizing glaze:
Wait for the thick paint to dry completely. I prefer to finish with a very watery glaze of Alizarin Crimson over the bottom third to unify the shadows and warm up the foreground. -
Varnish:
Once fully cured (wait at least 48 hours for acrylics), apply a satin varnish to protect the surface and even out the sheen between the thick and thin layers.
Step back and enjoy the tranquil mood created by your soft layering and color choices

Build a Painter’s Work Triangle
Embrace the potential of minimalism with this clean, organized painting studio setup featuring a fresh, primed canvas ready for inspiration. This project is all about establishing the ideal foundation—stretching and priming your own canvas and arranging a functional, aesthetically pleasing workspace that invites creativity.
Step-by-Step
Materials
- Raw cotton or linen canvas roll
- Heavy-duty wooden stretcher bars (24″ x 36″ or desired size)
- Canvas pliers
- Staple gun and heavy-duty staples
- Gesso (white acrylic primer)
- Wide priming brush or roller
- Sandpaper (fine grit)
- Wooden easel
- Drop cloth or workspace covering
- Scissors
Step 1: Building the Foundation
-
Assemble Stretcher Bars:
Begin by interlocking the corners of your wooden stretcher bars. Push them together firmly by hand, ensuring they form a perfect 90-degree angle at each corner. If the fit is tight, use a rubber mallet to gently tap them into place without damaging the wood. -
Check for Squareness:
Measure the frame diagonally from corner to corner in both directions. If the measurements are identical, your frame is perfectly square, which is crucial for a professional finish. -
Cut the Canvas:
Unroll your raw canvas on a clean, flat surface and place the assembled frame on top. Cut the canvas, leaving about 2-3 inches of excess fabric on all four sides to allow enough material for stretching and stapling.
Tension Test
Flick the back of the canvas with your finger. A properly stretched canvas should sound like a drum. If it sounds dull or loose, remove staples and pull tighter.
Step 2: Stretching the Canvas
-
Anchor the Long Sides:
Fold the canvas over one long side of the frame. Place one staple in the very center of the bar to anchor it. Rotate the frame to the opposite long side, pull the canvas taut with your canvas pliers, and place a staple in the center there as well. -
Anchor the Short Sides:
Repeat this process for the two shorter sides. You should now have a diamond shape of wrinkles radiating from the center staples. This tension is the starting point for a drum-tight surface. -
Work Outwards:
Return to the first long side. Pull and staple about two inches to the left of the center staple, then two inches to the right. Rotate to the opposite side and repeat. Continue this alternating pattern, working from the centers toward the corners, stopping about two inches before the corners. -
Fold the Corners:
Tuck the excess corner fabric neatly. Fold the fabric like you are wrapping a present—creating a clean 45-degree fold that lies flat against the frame. Pull tight and staple securely on the back.
Step 3: Priming the Surface
-
First Coat of Gesso:
Pour some white gesso into a tray. Using a wide brush or roller, apply an even coat across the entire canvas surface. Use horizontal strokes to ensure full coverage, working the primer into the weave of the fabric. -
Let it Dry:
Allow this first layer to dry completely. It usually takes about 30 minutes to an hour depending on humidity. The canvas might tighten further as it dries. -
Sand for Smoothness:
Once dry, lightly sand the surface with fine-grit sandpaper. This knocks down any rough fibers and creates a smoother tooth for painting. Wipe away the dust with a clean, dry cloth. -
Second Coat Application:
Apply a second coat of gesso, this time painting with vertical strokes perpendicular to your first layer. This cross-hatching technique ensures no pinholes remain and creates a uniform texture. -
Final Sand and Inspect:
Let the second coat dry thoroughly. Give it a final light sanding if you prefer an ultra-smooth surface for detailed work. Inspect the surface for any uneven spots and touch up if necessary.
Tone the Ground
Mix a tiny amount of raw sienna or burnt umber into your final gesso coat. This creates a warm, neutral ground that is often less intimidating to paint on than stark white.
Step 4: Setting the Scene
-
Position the Easel:
Place your wooden easel in a spot with good natural light, preferably with the light source coming from your non-dominant side to avoid casting shadows on your work. -
Mount the Canvas:
Adjust the bottom tray of the easel to a comfortable working height. Place your freshly primed, brilliant white canvas onto the easel and slide the top clamp down to secure it firmly in place. -
Arrange Tools:
Set up a side table or cart within arm’s reach. Place a jar of brushes, your palette, and cleaning supplies nearby. Keeping your tools organized creates a mental ‘ready state’ that makes starting easier.
With your canvas prepped and your studio organized, you are now perfectly poised to begin your next masterpiece


Set Up a Dedicated Palette Station
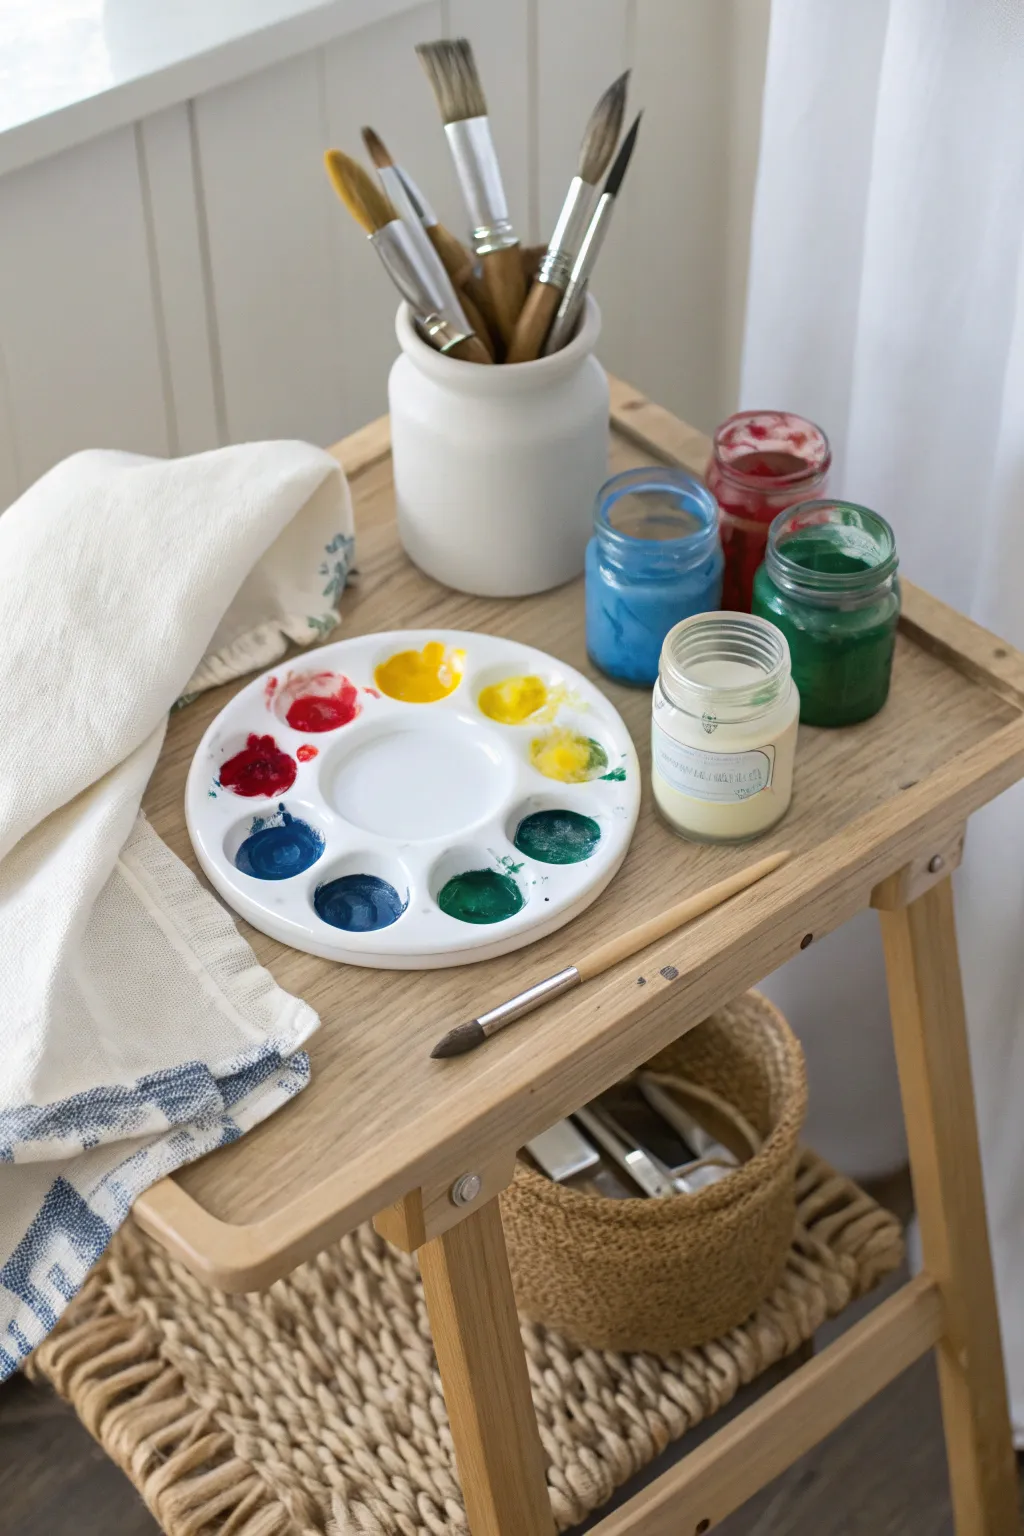
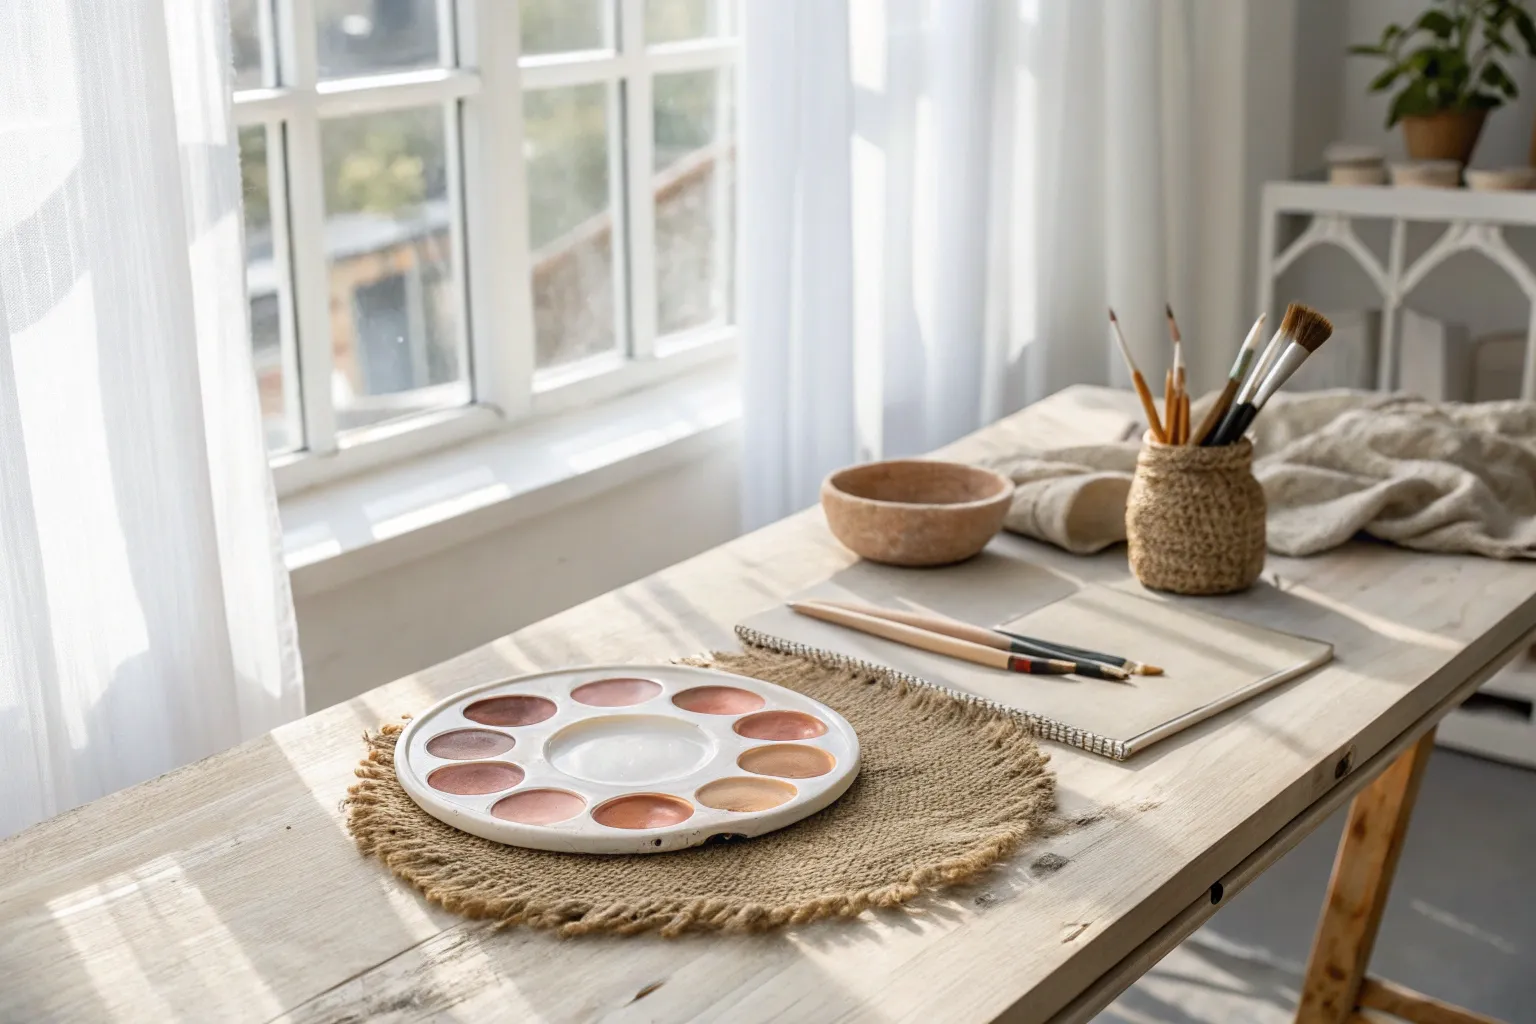
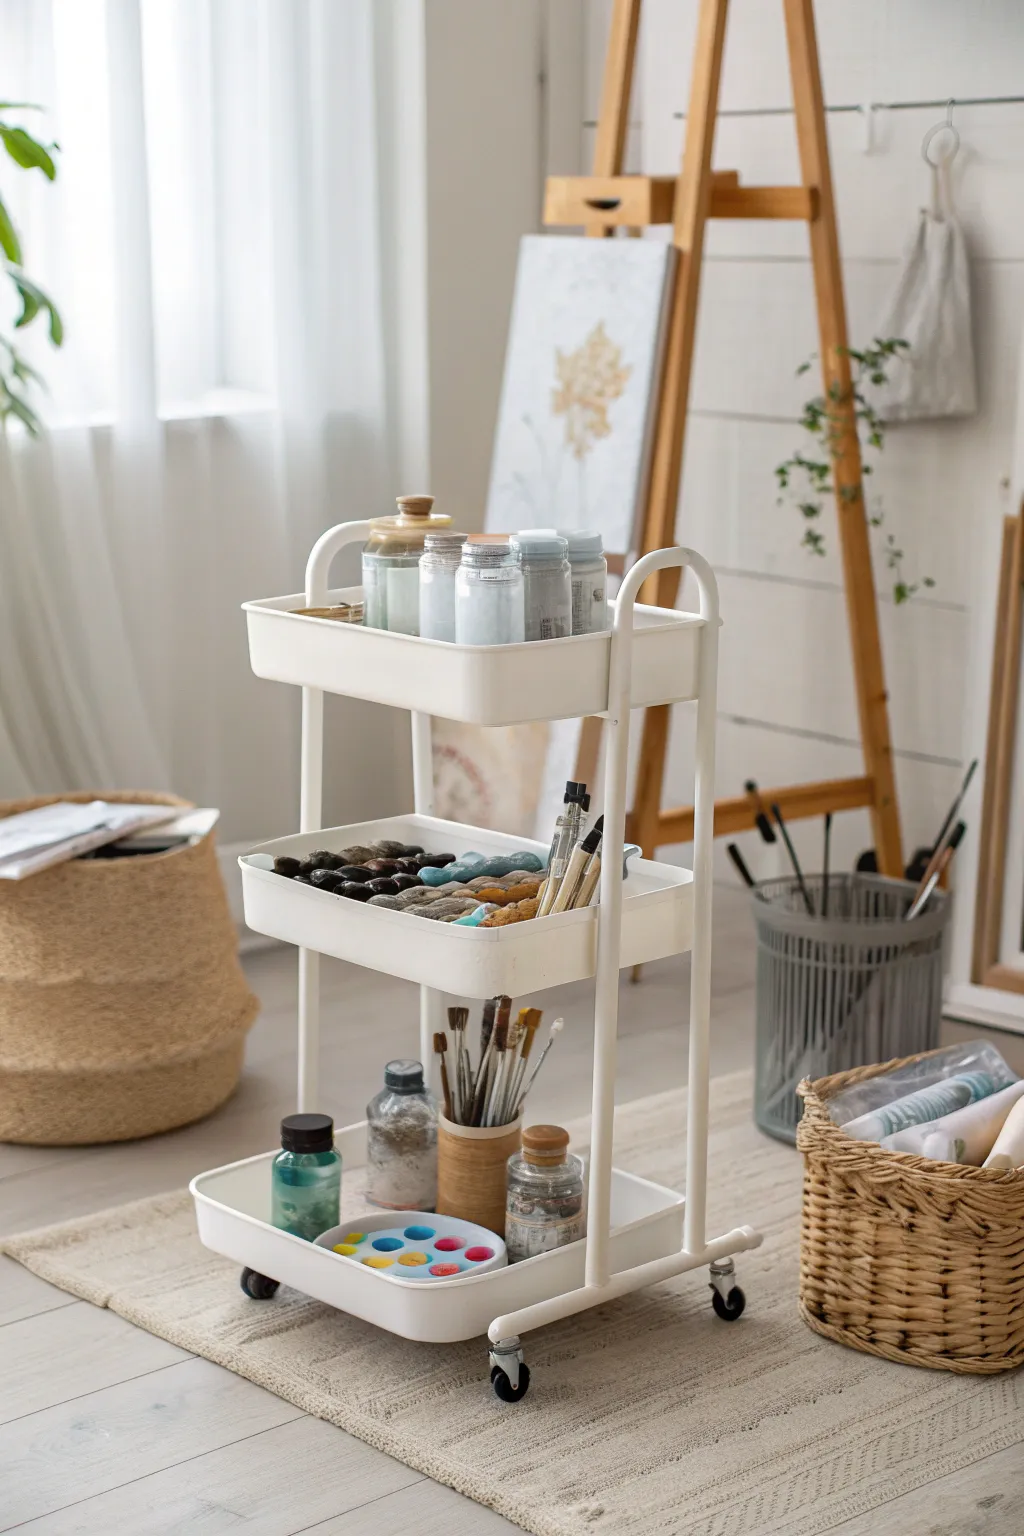
Create a calming, organized space for your creativity to flow with this dedicated palette setup on a multi-tiered wooden stand. This arrangement not only keeps your essential tools within reach but also serves as an inviting visual anchor for your painting studio.
Detailed Instructions
Materials
- Multi-tiered wooden plant stand or side table
- White ceramic utensil holder or jar
- Assorted watercolor or gouache brushes (various sizes)
- White ceramic or plastic circular palette (10-well)
- Four small glass jars with lids (recycled jam jars work well)
- Gouache or acrylic paints (Red, Yellow, Blue, Green, White)
- Soft white cotton rag or tea towel with blue detailing
- Woven basket (sized to fit the lower shelf)
- Spare brushes and palette knives
Step 1: Setting the Foundation
-
Choose the right surface:
Begin by selecting a sturdy wooden side table or plant stand. A tiered option is ideal because it doubles your storage capacity without increasing the footprint. -
Prepare the basket storage:
Place a woven basket on the lower shelf. This acts as a catch-all for tools you aren’t currently using, keeping the top surface clutter-free. -
Fill the basket:
Tuck extra supplies like palette knives, spare rags, or larger wash brushes into the lower basket so they are accessible but out of the way. -
Position the textile:
Fold your white cotton rag neatly. Place it on the left side of the top surface, draping it slightly over the edge for a casual, lived-in look that is easy to grab for wiping brushes.
Clean Water Wisdom
If using acrylics or gouache, keep two water jars: one for the initial dirty rinse and a second for a final clean rinse to keep colors bright.
Step 2: Arranging the Tools
-
Prepare the brush holder:
Take your white ceramic jar or utensil holder. Ensure it is clean and dry before placing it towards the back center of the table. -
Organize brushes:
Place your primary brushes into the ceramic jar, bristle-side up. I like to arrange them by handle height to make selecting the right tool easier during a session. -
Set up paint jars:
Clean four glass jars thoroughly. Fill three of them with premixed custom colors or simply water for rinsing, depending on your workflow. -
Group the jars:
Arrange the glass jars in a cluster on the right side of the table. Keep the most frequently used color or the clean water jar closest to the front. -
Add the white paint:
dedicate one specific jar for white paint or gesso, keeping the lid handy to prevent it from drying out too quickly.
Step 3: Preparing the Palette
-
Position the palette:
Place the circular palette in the center of the table, resting slightly on the edge of the cotton rag to prevent it from sliding. -
Dispense warm colors:
Squeeze a dime-sized amount of yellow and red paints into the upper wells of the palette. -
Dispense cool colors:
Fill the lower or side wells with your blue and green tones. Leaving space between warm and cool colors helps prevent accidental varying into muddy mixtures. -
Add deep tones:
Place a dab of dark blue or black in one of the bottom wells for creating contrast and shadows. -
Prepare the mixing area:
Leave the large central well of the palette empty. This space is crucial for blending your custom hues once you start painting. -
Place the working brush:
Select the brush you intend to start with and lay it diagonally across the front of the table, handle pointing right, ready for immediate use.
Label Your Jars
Add vintage-style adhesive labels to your glass paint jars. It adds charm and helps you quickly identify custom color mixes or mediums.
Now you have a perfectly organized station that invites you to sit down and paint whenever inspiration strikes
BRUSH GUIDE
The Right Brush for Every Stroke
From clean lines to bold texture — master brush choice, stroke control, and essential techniques.
Explore the Full Guide
Use a Rolling Supply Cart
Transform a chaotic workspace into a haven of efficiency with this impeccably organized rolling art cart. By giving each tool its own designated home, you create a mobile station that keeps your creative flow uninterrupted and your mind clear.
Step-by-Step Guide
Materials
- 3-tier metal rolling utility cart (white)
- Small glass jars with lids (for paints/mediums)
- Medium-sized glass jars (for brushes)
- Ceramic or plastic paint palette with wells
- Various paint tubes (acrylic or oil)
- Selection of paintbrushes (various sizes)
- Paint markers or pens
- Adhesive labels or masking tape (optional)
- Cleaning clothes or rags
Step 1: Top Tier: Ready-to-Use Paints
-
Assess your primary mediums:
Begin by gathering the paint colors or mediums you reach for most often. These belong on the top tier where they are easiest to grab while standing at your easel. -
Decant into jars:
Pour customized paint mixes or bulk mediums into uniform glass jars. This not only looks cleaner than messy tubes but allows you to see the exact color at a glance. -
Arrange mainly by height:
Place the tallest jars toward the back of the tray and smaller items near the front. This prevents you from knocking over smaller items when reaching for the big ones. -
Add quick-grab tools:
Tuck a few essential palette knives or stir sticks into the negative space between jars so you can mix colors immediately without hunting for tools.
Step 2: Middle Tier: Tubes and Small Tools
-
Group paint tubes:
Lay your paint tubes flat in the middle tray. Organizing them color-side up or cap-out helps you identify the pigment quickly. -
Incorporate drawing tools:
Add a small container or simply lay out your paint markers or sketching pens. These are often needed for underpaintings or adding details later. -
Create sections:
If you have loose charcoal, pastels, or small miscellaneous items like clips, group them on one side. Keeping loose items contained prevents them from rolling around when the cart moves. -
Check for accessibility:
Ensure nothing is stacked too high here, as the clearance between the middle and top shelf can sometimes be tight. You want to execute a smooth grab-and-go motion.
Jar Genius
Reuse glass yogurt pots or jam jars for uniform storage. Their lids seal tight to keep custom paint mixes fresh for days.
Step 3: Bottom Tier: Cleaning and Storage
-
Position heavy solvents:
Place your heaviest jars—like brush cleaner, turpentine, or large water jars—on the bottom shelf. The lower center of gravity keeps the cart stable. -
Store the palette:
If using a circular palette like the one shown, nestle it here when not in use. It catches drips and is ready for your next session. -
Add a brush holder:
Use a sturdy cylindrical container (like a repurposed candle jar or ceramic pot) to hold your tall brushes upright. Placing them on the bottom tier allows the long handles to extend upwards without hitting a shelf above, provided you position it near the open edge. -
Organize brushes by type:
I like to separate my brushes by bristle type or size within the holder if possible, or at least keep the bristles facing up to protect their shape. -
Final stability test:
Give the cart a gentle push. If anything rattles dangerously or feels top-heavy, rearrange the jars on the top and bottom tiers until the movement feels smooth and silent.
Magnetic Magic
Attach magnetic strips to the side of the metal cart tiers to hold metal palette knives or clips for easy exterior access.
Now your mobile studio is perfectly prepped for your next masterpiece conversation
Hang a Vertical Inspiration Wall
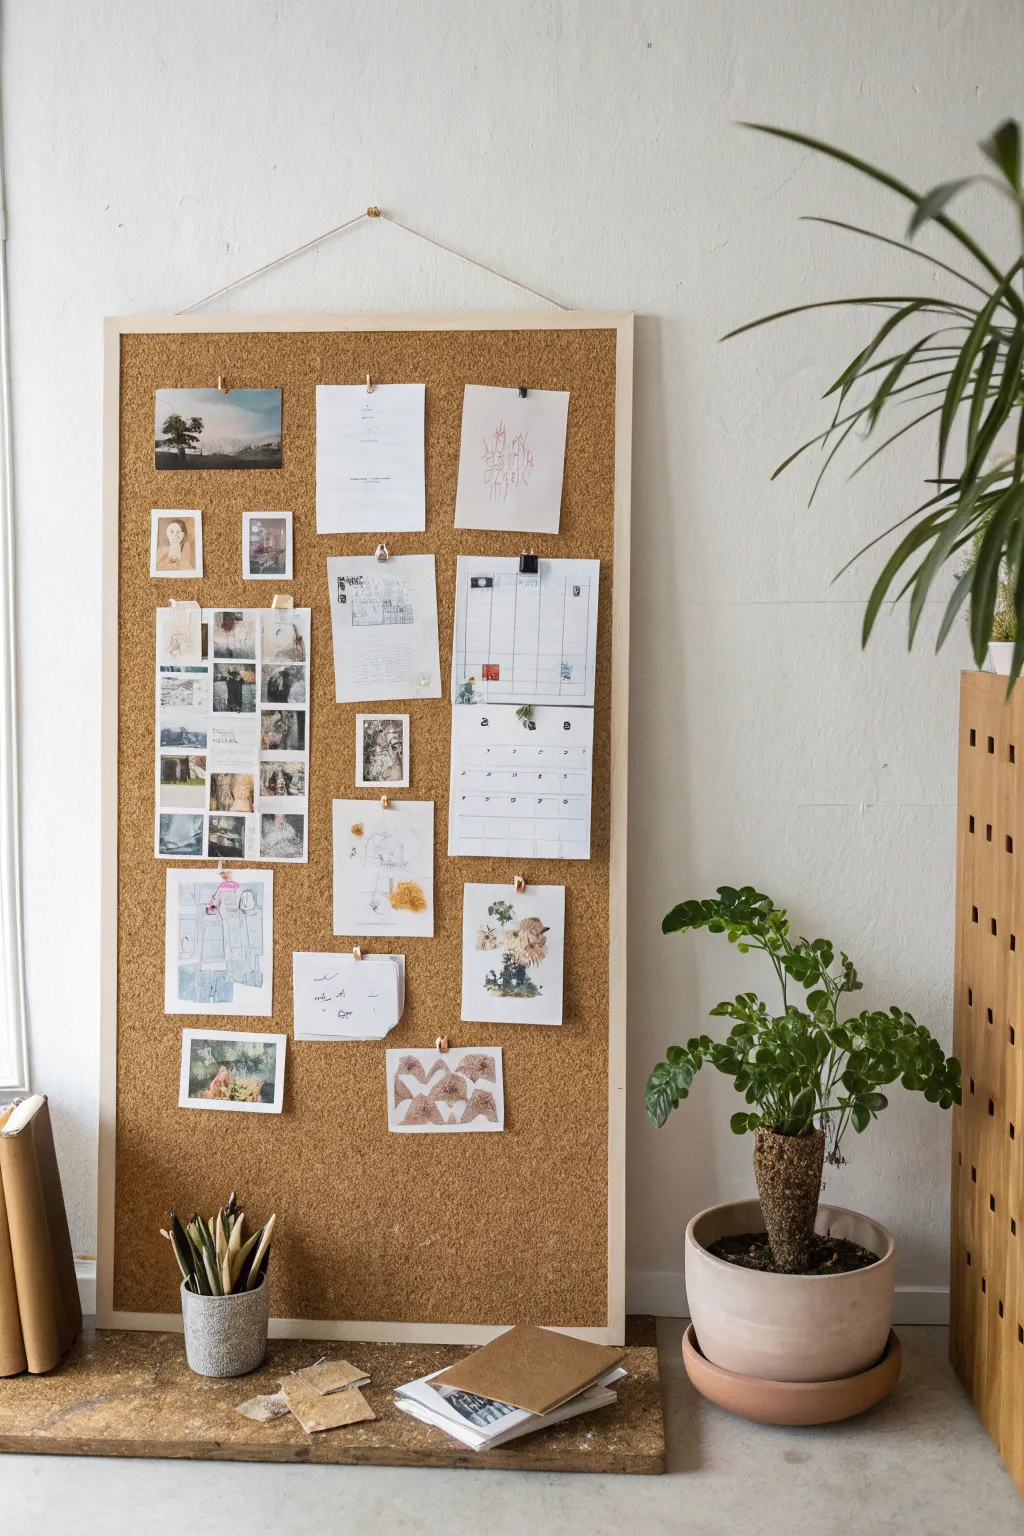
Transform a blank wall into a dynamic canvas for your ideas with this oversized, vertical cork board. Framed in light wood for a minimal aesthetic, this hanging display offers ample space to pin up swatches, sketches, and daily musings.
Step-by-Step Tutorial
Materials
- Large sheet of cork roll or cork tiles (approx. 24″ x 48″ or custom size)
- Plywood or MDF backing board (cut to match cork dimensions)
- 1×2 inch pine lumber (for framing)
- Wood glue
- Spray adhesive
- Miter box and saw (or chop saw)
- Corner clamps
- Brad nailer or finishing nails and hammer
- Sandpaper (120 and 220 grit)
- Masking tape
- Heavy-duty cotton twine or rope
- Two screw eyes
- Drill with pilot bit
- Assorted clips, push pins, and washi tape
Step 1: Preparing the Base
-
Cut the backing board:
Begin by determining the desired size of your vertical board. Cut your plywood or MDF sheet to these dimensions; for a striking vertical look like the photo, a 2:1 ratio (height to width) works beautifully. -
Size the cork:
Unroll your cork sheet on a flat surface. If it has a strong curl, weigh it down with books overnight to flatten it. -
Trim the cork:
Lay the plywood board over the cork and trace the outline, then carefully cut the cork to match the backing exactly using a sharp utility knife and a straight edge. -
Adhere the layers:
Take your spray adhesive and apply a generous, even coat to both the plywood surface and the back of the cork. Wait untill the glue becomes tacky—usually about a minute. -
Mount the cork:
carefully align one edge of the cork with the plywood and smooth it down inch by inch to prevent air bubbles. I like to use a rolling pin here to really press the layers together firmly.
Step 2: Framing the Board
-
Measure the frame pieces:
Measure the long sides of your mounted board first. Mark your 1×2 pine lumber to length. -
Cut the miters:
Using a miter saw or miter box, cut the ends of all four frame pieces at a 45-degree angle. Ensure the inside edge of the miter matches the length of your board sides. -
Sand the wood:
Give the pine pieces a quick sanding with 120-grit paper to remove rough spots, followed by 220-grit for a smooth, finished feel. -
Attach the frame:
Apply a bead of wood glue along the edge of the plywood/cork sandwich. Press the frame pieces into place, using corner clamps to hold the 90-degree angles tight. -
Secure with nails:
While the glue is drying, drive a few brad nails through the frame into the edge of the plywood backing for a permanent hold. Wipe away any excess glue immediately.
Glue Mastery
For the smoothest cork surface, apply adhesive in cross-hatch patterns and let it get tacky before joining. This prevents bubbling better than wet glue.
Step 3: Hanging and Styling
-
Install hanging hardware:
Pre-drill small pilot holes into the top edge of the frame, about 2 inches in from each corner. Screw in the metal screw eyes securely. -
Attach the twine:
Thread a length of heavy-duty cotton twine through the screw eyes. Tie secure knots, leaving enough slack to create the triangular hanging shape shown in the inspiration photo. -
Install the hook:
Find a stud or use a heavy-duty wall anchor to install a decorative hook or knob on your wall at the desired height. -
Hang the board:
Lift the board onto the hook by the twine triangle, adjusting it until it hangs perfectly level. -
Curate your content:
Start pinning! Mix different media types—sketches, photographs, and printed calendars. Use binder clips hung on push pins for a dimensional look that avoids damaging delicate papers. -
Add visual flow:
Arrange items loosely in columns but allow overlap. I often leave a bit of negative space near the bottom to keep the board from feeling cluttered.
Creative Clips
Spray paint standard binder clips in gold, brass, or matte black to match your room’s hardware for a custom, high-end finish.
Now you have a dedicated creative zone that evolves with your projects

PENCIL GUIDE
Understanding Pencil Grades from H to B
From first sketch to finished drawing — learn pencil grades, line control, and shading techniques.
Explore the Full Guide
Protect Floors With Drop Cloth Layers
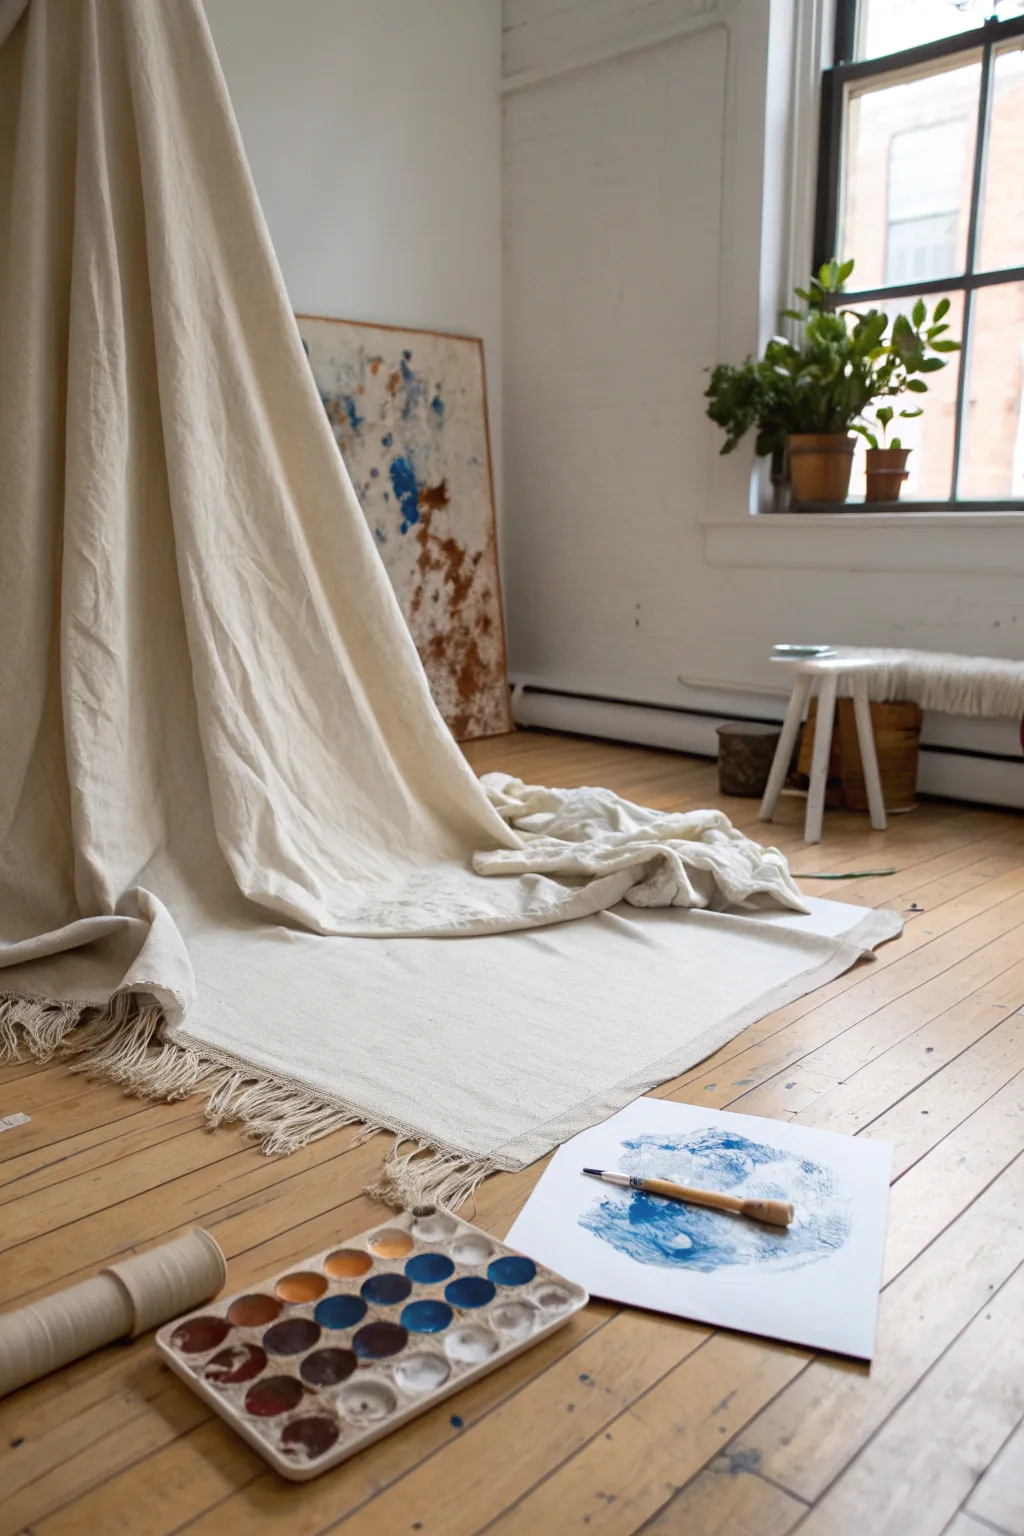
This project explores the ethereal beauty of monochromatic watercolor through a loose, abstract study in indigo and prussian blue. The result is a moody, organic composition that mimics the movement of water or clouds, perfect for practicing wet-on-wet techniques.
Step-by-Step Tutorial
Materials
- Cold press watercolor paper (140 lb or heavier)
- Watercolor palette with wells
- Watercolor paints (Indigo, Prussian Blue, Ultramarine)
- Medium round brush (size 8 or 10)
- Large wash brush or mop brush
- Clean water container
- Paper towels or rag
- Spray bottle with water (optional)
Step 1: Preparation and First Wash
-
Secure the paper:
If you are working with a block of paper, leave it attached. If using a loose sheet, you might tape down the edges to a board to prevent buckling, although for this loose study, allowing the paper to warp slightly can add character. -
Activate paints:
Add a few drops of water to your dried watercolor pans or squeeze fresh tube paint into the wells. I find letting the water sit on dry pans for a minute really helps get a rich pigment load. -
Prepare the surface:
Take your large wash brush and dampen the center area of the paper with clean water. You don’t want a puddle, just a glossy sheen on the surface to encourage paint flow. -
Apply the lightest wash:
Dilute a small amount of Ultramarine with plenty of water to create a very pale, transparent blue. dropped this loosely into the damp area of the paper. -
Soften edges:
While the paint is still wet, use a clean, damp brush to gently feather the outer edges of your blue shape so it fades seamlessly into the white of the paper.
Step 2: Building Depth and Texture
-
Mix a mid-tone:
Create a stronger concentration of Prussian Blue. Ideally, this should be the consistency of whole milk. -
Drop in color:
While the first layer is still damp (but not swimming), touch the tip of your round brush loaded with the mid-tone into the center of the shape. Watch the pigment bloom outward. -
Tilt the paper:
Gently lift and tilt your board or paper in different directions to guide the flow of the wet paint, creating organic, unpredictable currents. -
Create texture with water:
Flick a few droplets of clean water from your fingertips onto the semi-wet paint. This pushes the pigment away, creating ‘cauliflower’ blooms and interesting textures. -
Allow partial drying:
Let the piece sit for about 10-15 minutes until it loses its glossy shine and becomes matte, but is still cool to the touch.
Fixing Muddy Colors
If your blues turn gray or dull, let the paper dry completely before adding more layers. Wet-on-wet can sometimes overmix pigments.
Step 3: Deepening Values
-
Mix the darkest tone:
Prepare a thick mixture of Indigo. It should be barely diluted, resembling heavy cream. -
Add definition:
Identify areas within the cloud-like shape where you want the most drama. Apply the Indigo sparingly to these spots using the round brush. -
Blend selectively:
Rinse your brush and blot it slightly. Use the damp brush to soften just one side of your dark Indigo marks, leaving the other side hard-edged for contrast. -
Scumbling technique:
Take a nearly dry brush with a little pigment and lightly drag it across the textured grain of the paper in the outer areas. This ‘scumbling’ highlights the paper’s tooth. -
Evaluate balance:
Step back and look at the composition. If it feels too heavy on one side, add a small wash of water to balance it out, or lift pigment with a clean paper towel. -
Final dry:
Allow the painting to dry clear through. The colors will lighten slightly as the water evaporates.
Add Salt Texture
Sprinkle coarse sea salt onto the wet wash. As it dries, the salt absorbs pigment, creating beautiful starry patterns.
Once dry, you can press the paper under a heavy book to flatten it before displaying your atmospheric creation
Add Task Lighting for True Colors
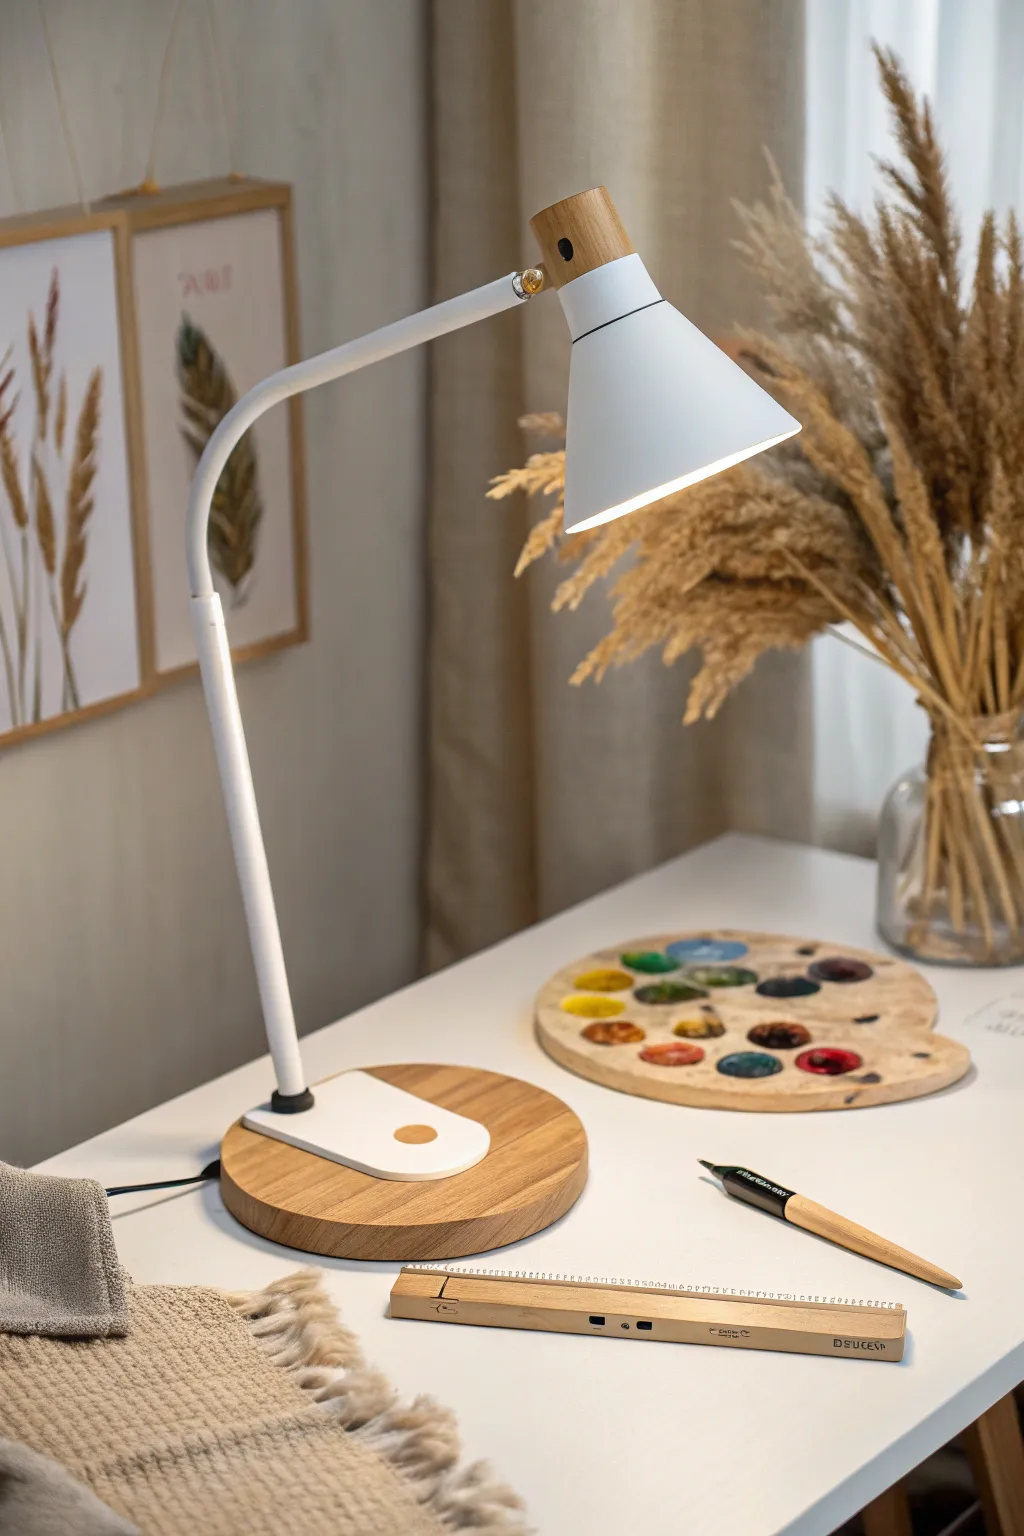
Capture the delicate beauty of dried pampas grass and wheat stalks with this beginner-friendly watercolor project. By focusing on warm, earthy tones like ochre, brown, and muted greens, you’ll create a pair of minimalist botanical illustrations that add a serene, natural touch to any workspace.
How-To Guide
Materials
- Cold press watercolor paper (A4 or 8×10 size)
- Watercolor paints (Yellow Ochre, Burnt Sienna, Burnt Umber, Sap Green)
- Round watercolor brushes (sizes #2, #4, and #8)
- Pencil (HB or H)
- Kneaded eraser
- Two jars of water
- Paper towels
- Two light wood frames
Step 1: Planning and Sketching
-
Observe your subject:
Before putting pencil to paper, study the dried grass arrangement in the image. Notice how the stalks bunch together at the bottom but fan out gracefully at the top, and observe the specific feathery texture of the seed heads. -
Lightly sketch the stems:
Using your HB pencil, draw faint, slightly curved vertical lines to represent the main stems. Keep your hand loose to mimic the natural sway of dried grass rather than drawing perfectly straight lines. -
Outline the seed heads:
At the top of your stems, sketch elongated oval shapes to indicate where the fuzzy or feathery parts of the grass will go. Use broken, jagged lines to suggest texture right from the start. -
Add leaf blades:
Draw a few long, slender leaves extending from the lower parts of the stems. Let them curve away from the center to create volume and movement in your composition. -
Refine the composition:
Step back and check the balance. If it feels too sparse, add an extra stalk or two in the background. Once satisfied, use your kneaded eraser to lighten the graphite lines until they are barely visible guides.
Muddy colors?
If your browns look dull or muddy, you might be overworking the layers while wet. Let each layer dry fully before adding the next glaze to keep colors crisp and translucent.
Step 2: Base Layers
-
Mix your base colors:
Prepare a watery mix of Yellow Ochre with a tiny touch of Burnt Sienna on your palette. You want a light, warm, straw-like color that is very transparent. -
Paint the stems:
Using your #4 brush, paint the stems with a single fluid stroke for each. Vary the pressure slightly as you pull the brush down to create natural variations in thickness. -
Wash in the seed heads:
With the same light mixture, fill in the seed head shapes. Use a dabbing motion rather than smooth strokes to begin building that fluffy texture immediately. -
Introduce variation:
While the paint is still damp on the seed heads, drop in a tiny bit of darker brown (Burnt Umber) near the base of the fluffs. This wet-on-wet technique creates soft, natural shadows. -
Paint the leaves:
Switch to a mix of Yellow Ochre and a hint of Sap Green for the leaves. Paint these with long, sweeping strokes, lifting the brush at the end to create a sharp, tapered point.
Step 3: Adding Texture and Detail
-
Dry the first layer:
Let the paper dry completely. If the paper feels cool to the touch, it’s still wet. Patience here ensures your crisp details won’t bleed into the background wash. -
Define the stalks:
Mix a slightly thicker, darker version of your stem color. Use your #2 brush to add thin shadow lines along one side of each stem to give them cylindrical form. -
Create feathery texture:
Using the tip of your #2 brush and a darker brown mix, make tiny, quick flicking motions outward from the center of the seed heads. These little marks simulate the individual fibers of the dried grass. -
Layering for depth:
I like to go back over areas that look too flat with a second glaze of warm brown. Focus this second layer on the parts of the grass that would be in shadow, leaving the highlight areas untouched. -
Add distinct accents:
For contrast, mix a concentrated dark brown. Add very sparing, sharp details near the ‘nodes’ (knees) of the stems and the very bottom where the stalks gather.
Use a dry brush
For the wispy edges of the grass, wipe your brush on a paper towel so it holds very little water. This ‘dry brush’ technique creates perfect scratchy textures.
Step 4: Finishing Touches
-
Evaluate the contrast:
Step away from your painting for a moment. If the artwork looks too pale overall, mix a stronger brown and carefully deepen the darkest crevices within the seed heads. -
Clean up:
Once the paint is bone dry, gently erase any remaining pencil marks that might be showing through on the unpainted white paper areas. -
Repeat for the second piece:
Use the same steps to create a companion piece. Try changing the height or arrangement slightly so they look like a set but aren’t identical copies. -
Frame your work:
Place your finished paintings into light wooden frames to complement the earthy tones of the subject matter.
Hang your new botanical duo above your desk to enjoy a calming, nature-inspired view while you work.


Create Brush-Washing and Tool-Cleaning Spot
Bring a touch of spa-like tranquility to your painting studio’s wash station with this custom organization set. Featuring a beautifully stained wooden tray and repurposed glass jars, this project combines functionality with a minimalist, natural aesthetic perfect for storing cleaning tools.
Detailed Instructions
Materials
- Small rectangular wooden tray (unfinished)
- Small glass jars with wooden or bamboo lids (2)
- Ceramic cup or vase (fluted cream texture preferred)
- Wooden palm brush or nail brush
- Glass soap dispenser with stainless steel pump
- Wood stain (light oak or teak)
- Matte polyurethane varnish
- Sandpaper (220 and 400 grit)
- Clean cotton rags
- Painter’s tape
- Epsom salts or brush cleaning soap granules (for filling)
- Sugar or brown abrasive scrub (for filling)
Step 1: Prepping and Staining the Wood
-
Sand the surfaces:
Begin by lightly sanding your unfinished wooden tray using 220-grit sandpaper. Focus on smoothing any rough edges on the rim and inside corners to ensure it feels premium to the touch. -
Dust off debris:
Wipe away all sanding dust thoroughly with a tack cloth or a very slightly damp rag. Any leftover dust will create a gritty finish when you apply stain. -
Apply the stain:
Using a clean cotton rag, dip into your light oak or teak wood stain. Rub the stain into the wood grain in long, smooth strokes, working from the center outwards. -
Wipe away excess:
Let the stain sit for about 5 to 10 minutes, depending on the desired depth of color, then wipe off any excess liquid with a fresh cloth to reveal the wood grain. -
Let it cure:
Set the tray aside in a dust-free area to dry completely for at least 6 hours, or according to the manufacturer’s instructions. -
Repeat for lids:
If your glass jars came with raw wood lids, lightly sand and stain them to match the tray for a cohesive look. Be careful not to stain any silicone seals. -
Seal the wood:
Once dry, apply a coat of matte polyurethane varnish to the tray and lids. This protects the wood from water splashes near the sink. I prefer a spray varnish for an even, brush-stroke-free finish.
Waterproofing Wood
Apply at least 3 coats of polyurethane to the tray, sanding lightly with 400-grit paper between coats. This is crucial for durability in wet zones.
Step 2: Assembling the Containers
-
Clean the glass:
Thoroughly wash your glass jars and soap dispenser with warm soapy water to remove any factory residue. Dry them until they are spotless. -
Fill the soap dispenser:
Pour your preferred clear liquid hand soap or brush cleaning gel into the tall dispenser. A clear liquid maintains the airy, uncluttered visual of the setup. -
Prepare the scrub jar:
Take one of the small jars and fill it with brown sugar scrub or coarse bath salts. This creates a pleasing textural contrast with the clear glass and wood. -
Fill the white jar:
Fill the second jar with white bath salts, baking soda, or a solid brush cleaning soap paste. Smooth the top surface for a neat appearance. -
Secure the lids:
Place your newly stained and dried wooden lids onto the jars. Ensure the seals are tight to prevent moisture from clumping your salts or scrub.
Adding Texture
Wrap a strip of twine or leather cord around the neck of the soap dispenser for an extra rustic detail that matches the wooden elements.
Step 3: Final Styling
-
Position the ceramic cup:
Select a heavy-bottomed ceramic cup, ideally one with a fluted or textured design, to hold scrub brushes or sponges. Place this on the right side of your tray. -
Add the palm brush:
Nestle a wooden palm brush inside the tray, perhaps leaning slightly against the rim or the ceramic cup. The natural bristles add softness to the arrangement. -
Arrange the jars:
Set the two glass jars on the countertop near the tray rather than inside it, creating a layered grouping that doesn’t feel overcrowded. -
Final wipe down:
Give everything a quick polish with a microfiber cloth to remove fingerprints before placing the set next to your sink.
Now you have a pristine, organized spot that makes cleaning your tools a peaceful ritual
Store Paper Flat and Happy
Transform chaotic paper piles into a serene, gallery-worthy storage solution with these custom flat-file drawers. This project mimics the clean lines of oak cabinetry while providing distinct, shallow compartments perfect for preserving large sketches, blueprints, or delicate watercolor papers.
Step-by-Step Tutorial
Materials
- 3/4-inch Oak Plywood (for cabinet carcass)
- 1/2-inch Oak Plywood (for drawer boxes)
- 1/4-inch Oak Plywood (for drawer bottoms)
- Solid Oak boards (for drawer fronts and trim)
- Heavy-duty full-extension drawer slides (side mount)
- Wood glue
- Pocket hole screws
- Brad nails (18 gauge)
- Dark bronze drawer knobs
- Sanding sealer
- Clear matte polyurethane finish
- Sandpaper (120, 220, 320 grit)
- Table saw
- Pocket hole jig
- Drill/driver
Step 1: Building the Cabinet Carcass
-
Cut the carcass panels:
Begin by ripping your 3/4-inch oak plywood to the desired depth of your cabinet, typically around 24 to 30 inches for standard flat files. Cut two side panels and a bottom panel to size according to your space requirements. -
Join the sides and bottom:
Use a pocket hole jig to drill holes along the side edges of the bottom panel. Apply wood glue to the mating edges and secure the sides to the bottom panel using pocket hole screws, ensuring the front edges are perfectly flush. -
Add structural stretchers:
Cut 4-inch wide strips of 3/4-inch plywood to span the top of the cabinet between the two side panels. Install these strips at the front and back using pocket holes acting as top stretchers to keep the box square and stable. -
Install the back panel:
Cut a piece of 1/4-inch plywood to fit the back of the cabinet. Applying a bead of glue around the perimeter, tack it in place with brad nails to provide racking resistance.
Step 2: Constructing the Shallow Drawers
-
Cut drawer box sides:
For flat files, shallow drawers are key. Rip 1/2-inch plywood into strips approximately 3 to 4 inches tall. Cut these to length for the sides, front, and back of your drawer boxes. -
Groove for the bottom:
Set your table saw blade to a height of 1/4 inch. Run a groove (dado) along the bottom inside edge of all drawer box pieces, located 1/2 inch up from the bottom edge, to accept the drawer floor. -
Assemble the drawer boxes:
Apply glue to the joints of the drawer sides. Assemble the box frame, sliding the 1/4-inch plywood bottom into the grooves before attaching the final side. check for square by measuring diagonals before clamping. -
Install internal dividers:
If you want the organized small storage shown in the lower drawer, cut thin strips of wood to act as dividers. Glue and pin-nail them inside selected drawers to create compartments for brushes or smaller pads.
Sticky Slides?
If drawers bind, check your box width. It must be exactly 1 inch narrower (usually) than the opening. Shim the slides relative to the carcass wall if the gap is too wide.
Step 3: Installation and Facing
-
Mount the drawer slides:
Install the cabinet-side members of your drawer slides. I prefer using a spacer block here to ensure each slide is perfectly spaced vertically, allowing just enough clearance between the shallow drawers. -
Attach slides to drawers:
Attach the corresponding drawer-side members to the sides of your drawer boxes. Slide the boxes into the cabinet to test the fit, ensuring they glide smoothly without binding. -
Prepare the drawer fronts:
Cut solid oak boards for the false drawer fronts. These should be cut slightly larger than the drawer boxes to overlap the cabinet edges and create a consistent gap between drawers, usually about 1/8 inch. -
Attach the fronts:
Use double-sided tape to temporarily position the oak fronts onto the drawer boxes. Once aligned perfectly with even gaps, secure them permanently from the inside of the drawer box using screws.
Add Velvet Liners
For a luxe touch, cut adhesive velvet or felt liners to fit the bottom of the drawers before assembly. It protects delicate paper edges and prevents tools from sliding around.
Step 4: Finishing Touches
-
Sand the surfaces:
Sand all exposed oak surfaces, starting with 120 grit and progressing to 220 grit. Pay special attention to the edges of the drawer fronts to soften them slightly. -
Apply sanding sealer:
Brush on a coat of sanding sealer. This is crucial for oak as it raises the grain slightly and seals the pores, ensuring your final finish goes on smoothly without soaking in unevenly. -
Sand again:
Once the sealer is dry, lightly hand-sand with 320-grit paper to knock down any raised grain, leaving a buttery smooth surface. -
Apply the topcoat:
Apply two to three coats of clear matte polyurethane. Lightly sand between coats if necessary. The matte finish enhances the natural wood look without making it look plastic. -
Install hardware:
Measure and mark the center of each drawer front. Drill pilot holes and install the dark bronze knobs, which provide a nice contrast to the light oak.
Now you have a professional-grade storage system ready to keep your artwork crisp and organized
Go Vertical With Wall Shelves
Bring a touch of botanical simplicity to your walls with this elegant single-leaf print project. The clean lines and soothing green tones of the monstera leaf create a calming focal point that perfectly complements a modern, organized studio space.
Detailed Instructions
Materials
- High-quality watercolor paper (Heavyweight, cold press)
- Watercolor paints (Sap Green, Hooker’s Green, Lemon Yellow)
- Pencil (HB or 2B)
- Kneaded eraser
- Pointed round watercolor brushes (Size 4 and 8)
- Clean water jar
- Paper towels
- Light wood frame with mat board
Step 1: Sketching the Form
-
Outline the leaf shape:
Start by lightly sketching a large heart shape on your paper. This will serve as the general boundary for your monstera leaf. -
Define the center vein:
Draw a gently curved line down the center of your heart shape, extending slightly at the bottom to form the stem. -
Add the fenestrations:
Along the edges of your leaf shape, sketch inward-curving notches and ovals. These iconic slits and holes are what give the monstera its distinctive look. -
Refine the edges:
Connect the notches to the main leaf body with smooth, organic lines. Erase your initial guide heart shape so only the final leaf outline remains. -
Sketch the veins:
Lightly draw side veins radiating from the center line towards the edges. Keep these lines faint as they will guide your painting, not stand out heavily.
Uneven Watermark Woes?
If you get ‘blooms’ or hard edges where you don’t want them, your brush might have too much water. Dab it on paper towel before touching the paper to control moisture.
Step 2: Painting the Greens
-
Mix your base green:
Combine Hooker’s Green with a touch of Lemon Yellow to create a fresh, vibrant base color. Test the shade on a scrap piece of paper first. -
Apply the wash:
Load your size 8 brush with watered-down paint. Fill in one half of the leaf, working carefully around the veins you sketched to leave them white. -
Paint the second half:
Repeat the process on the other side of the leaf. I like to keep the paint fairly wet here to allow for soft blending in the next steps. -
Add depth with shadows:
While the base layer is still slightly damp, mix a darker green using Sap Green and a tiny bit of blue. Drop this into the areas near the center vein for natural shading. -
Soften the transitions:
Use a clean, damp brush to gently blend the darker paint into the lighter areas, ensuring there are no harsh lines between the shades.
Step 3: Detailing and Framing
-
Refine the white veins:
If your paint bled into the white vein lines, use a small, damp brush (size 4) to lift the color out gently while it’s still workable. -
Paint the stem:
Using your medium green mix, paint the stem with a steady hand. Add a slightly darker shadow on one side to give it a cylindrical form. -
Texture details:
Once dry, use the tip of your small brush to add very fine, faint lines branching off the main veins for added realism. -
Final drying:
Let the artwork dry completely. Watercolor paper can feel cool to the touch if it’s still damp, so give it extra time to ensure it is bone dry. -
Erase pencil marks:
Use your kneaded eraser to gently lift any remaining visible pencil lines, being careful not to smudge the paint. -
Prepare the frame:
Clean the glass of your light wood frame to ensure no dust is trapped inside. -
Mount and hang:
Center your finished painting behind the mat board, secure it in the frame, and hang it to enjoy your new botanical art.
Level Up: Salt Texture
While the paint is still wet, sprinkle a few grains of table salt onto the leaf. Let it dry completely, then brush off creating a unique, speckled organic texture.
Now you have a serene piece of botanical art to brighten your creative corner
Try Pegboard-Style Tool Hanging
Transform your chaotic workspace into a model of efficiency with this custom wooden pegboard system. Featuring warm wood tones and specialized shelving, this wall-mounted organizer is as beautiful as it is functional for keeping your essential tools within arm’s reach.
Step-by-Step Tutorial
Materials
- One 24″ x 36″ sheet of 3/4″ high-quality plywood (birch or maple)
- Scrap pieces of 1/2″ plywood or solid wood (for shelves)
- Wooden dowels (1/4″ or 3/8″ diameter, depending on hole size preference)
- Drill press or handheld drill with guide block
- Spade bit or Forstner bit matching your dowel size
- Jigsaw or table saw
- Wood glue
- Sandpaper (120 and 220 grit)
- Pencil and ruler (or T-square)
- Mounting hardware (French cleat system recommended)
- Clear matte polyurethane or wood wax
Step 1: Planning and Drilling the Grid
-
Measure the grid:
Lay your main plywood sheet on a flat surface. Using a ruler and a long straight edge, mark a grid of points across the entire surface. Spacing the holes 1.5 to 2 inches apart usually works best for versatility. -
Mark the centers:
Double-check your measurements to ensure the rows and columns are perfectly straight. Use an awl or a nail set to create a small divot at each intersection point; this helps keep your drill bit from wandering. -
Set up for drilling:
If using a drill press (highly recommended), set your depth stop so you drill cleanly through without tearing out the back too much. Place a scrap board underneath your main sheet to prevent splintering on the exit side. -
Drill the holes:
Drill through every marked point using your chosen spade or Forstner bit. Keep the drill perpendicular to the surface. I find that taking breaks helps, as drilling this many holes can fatigue your arm and lead to crooked angles. -
Sand the surface:
Once all holes are drilled, use 120-grit sandpaper to smooth out the face of the board and remove any pencil marks. Pay special attention to the edges of the holes, sanding away any splinters.
Step 2: Creating Custom Accessories
-
Cut the dowel pegs:
Cut your wooden dowel rod into segments. You’ll want a variety of lengths—some short (2 inches) for hanging scissors or rolls of tape, and some longer (3-4 inches) for supporting shelves. -
Chamfer the ends:
Lightly sand the cut ends of your dowels to round them over slightly. This makes it easier to slide tools on and off the pegs later. -
Build the shelf base:
Cut strips of your scrap wood to create the small shelves shown at the bottom of the board. You’ll need a back piece, a bottom ledge, and a front rail to keep items from falling off. -
Assemble the shelf:
Glue and clamp the shelf pieces together to form a shallow trough or L-shape. Wipe away excess glue immediately with a damp cloth. -
Attach mounting pegs to shelves:
Drill holes into the back edge of your assembled shelves that match the spacing of your pegboard grid. Glue short dowel stubs into these holes so the shelf can plug directly into the main board.
Grid Precision Tip
Use a piece of existing commercial pegboard as a drilling template. Clamp it over your plywood and drill through its factory holes to ensure perfect spacing without measuring every single dot.
Step 3: Finishing and Installation
-
Final sanding:
Give the entire board, the dowels, and the custom shelves a final pass with 220-grit sandpaper for a silky smooth feel. -
Apply finish:
Apply a coat of clear matte polyurethane or wood wax. This protects the wood from dirty tool hands while keeping that raw, natural aesthetic. -
Install wall mount:
Attach the wall-side of your French cleat system to the wall, ensuring it is perfectly level. Screw the mating cleat to the back of your pegboard. -
Mount the board:
Lift the pegboard and lock the cleats together. It should sit flush and secure against the wall. -
Arrange your layout:
Insert your dowels and hanging shelves into the grid. Play around with the arrangement until your most-used tools—like scissors and measuring tapes—are in the most convenient spots.
Loose Peg Troubleshooting
If a dowel fits too loosely in a hole, wrap a single layer of masking tape around the end of the peg or dab a tiny drop of water on the wood to swell the fibers for a tighter friction fit.
Enjoy the satisfaction of seeing your creative tools displayed like an art installation in their own right
Add a Drying and Curing Shelf
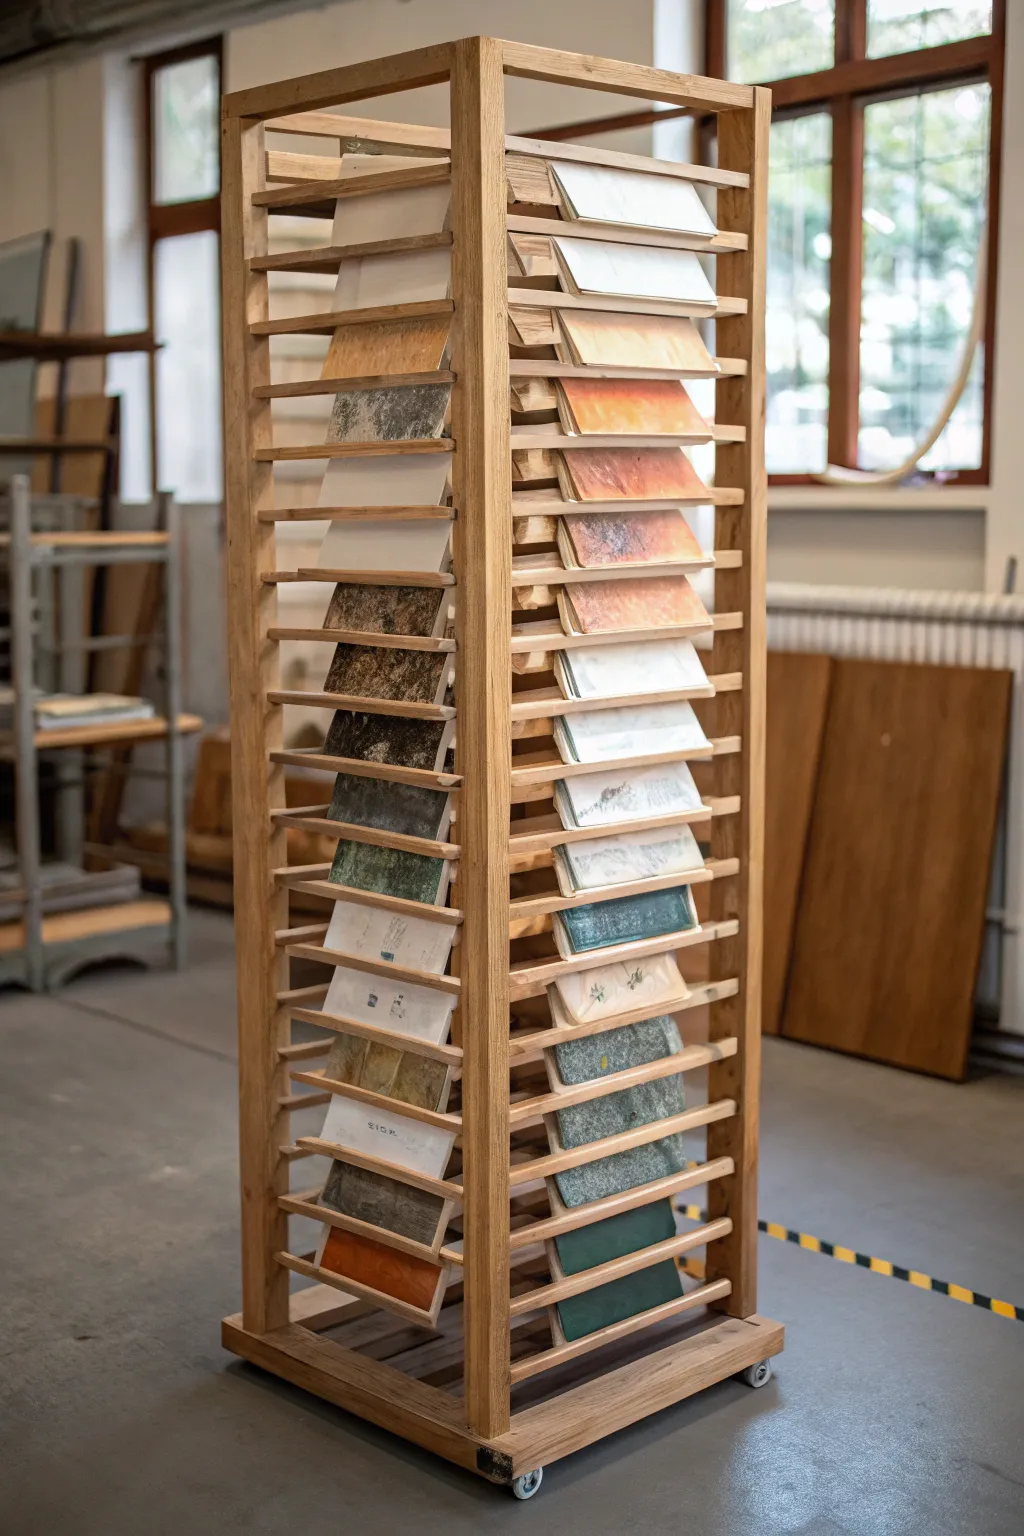
This indispensable studio companion is a tall, mobile wooden tower designed to safely dry and cure multiple flat artworks simultaneously without taking up precious table space. With its open-slat construction and castor wheels, it combines excellent airflow with easy mobility for any creative workspace.
Step-by-Step Guide
Materials
- Four 8-foot lengths of 2×2 inch hardwood (oak or maple)
- Twenty-five 1×1 inch square dowels (for shelf supports)
- One 2×2 foot sheet of 3/4 inch plywood (for the base)
- Four heavy-duty castor wheels (two locking)
- Wood glue
- 2.5 inch wood screws
- 1.5 inch finishing nails or brad nails
- Sandpaper (120 and 220 grit)
- Clear polyurethane or wood varnish
- Drill with pilot hole bits
- Miter saw or hand saw
- Framing square
Step 1: Planning and Cutting the Frame
-
Determine dimensions:
Decide on the final height of your tower. For the rack in the image, aim for approximately 6 feet tall. Measure your typical canvas or paper size to ensure the width between posts will accommodate your work. -
Cut the vertical posts:
Cut your four 2×2 hardwood lumber pieces to your desired height (e.g., 72 inches). Ensure all four are exactly the same length to prevent wobbling. -
Cut the horizontal braces:
Cut eight pieces of the 2×2 lumber to create the top and bottom frames. These should match the width of your base plywood minus the post thickness. -
Preparation for assembly:
Sand all cut edges with 120 grit sandpaper to remove splinters. I find it much easier to do a preliminary sanding now before everything is screwed together.
Step 2: Building the Shelf Supports
-
Cut the shelf slats:
Cut your 1×1 inch dowels into equal lengths corresponding to the depth of your tower. You will need roughly 40-50 pieces depending on how close you want your spacing. -
Mark the spacing:
Lay the four vertical posts on the ground side-by-side. Use a tape measure and pencil to mark horizontal lines across them every 2 to 3 inches. Consistency here is critical for level shelves. -
Attach slats to side A:
Take two vertical posts and arrange them parallel on a flat surface. Apply a dab of wood glue to your marked lines and place a 1×1 dowel across them. -
Secure the slats:
Use a brad nailer or finishing nails to secure each slat to the vertical posts. Repeat this process all the way up the ladder-like structure. -
Repeat for side B:
Construct the second side of the tower identical to the first. Double-check that your slat heights align perfectly with the first side by stacking them briefly.
Wobbly Rack?
If the tower rocks on its wheels, the floor might be uneven. Use washers as shims between the castor plate and the wooden base to level out the specific corner that is too high.
Step 3: Assembling the Tower
-
Construct the base:
Take your 3/4 inch plywood square and reinforce the edges underneath with your 2×2 bottom braces using glue and screws. -
Attach the wheels:
Flip the base over and install the four castor wheels at the corners. Ensure the locking wheels are on the front side for easy access. -
Mount the sides:
With a helper or clamps, stand your two ladder-sides upright on the plywood base. Drill pilot holes and secure them to the base from underneath using long wood screws. -
Install top bracing:
Connect the top of the two side ladders using the remaining horizontal 2×2 braces to create a rigid box frame. Use a framing square to ensure the tower isn’t leaning. -
Add cross supports:
If the tower feels flimsy, add diagonal measurements to check for squareness, and consider adding a small diagonal brace at the back corners.
Wax On, Wax Off
Rub a stick of beeswax or paste wax along the tops of the shelf slats. This helps sticky or heavy wet papers slide in smoothly without catching or tearing.
Step 4: Finishing Touches
-
Final sanding:
Go over the entire structure with 220 grit sandpaper. Pay special attention to the shelf slats where wet paper or canvas will slide in. -
Clean the surface:
Wipe down the wood with a tack cloth or slightly damp rag to remove all sawdust before finishing. -
Apply sealant:
Apply a coat of clear polyurethane or varnish. This is important because wet paintings can transfer moisture to raw wood, potentially causing warping or staining. -
Dry and cure:
Let the finish dry completely according to the manufacturer’s instructions before sliding in your first artwork.
Now you have a professional-grade drying solution that keeps your workflow moving and your art safe.
Split Wet and Dry Work Surfaces
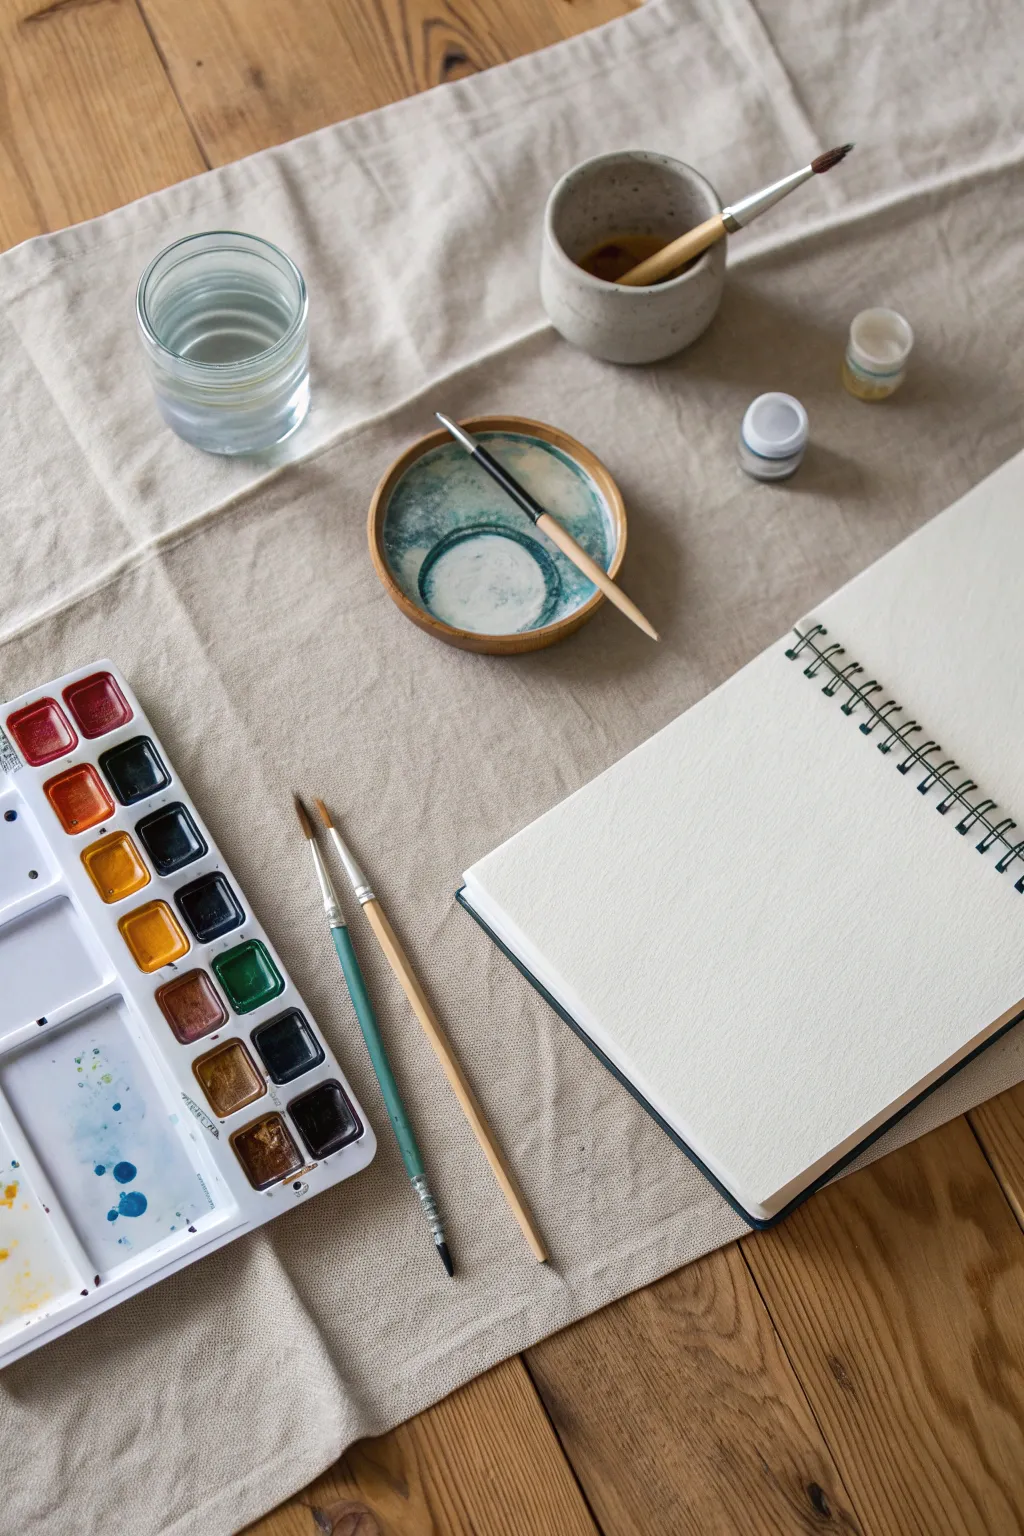
This project isn’t about creating a single painting, but establishing the perfect minimalist workspace to invite creativity. By organizing your watercolor tools on a neutral linen surface, you create a calm, inviting atmosphere that separates wet mixing areas from your pristine dry paper.
Step-by-Step Tutorial
Materials
- Natural linen table runner or large scrap of fabric (beige/oatmeal color)
- Watercolor sketchbook (spiral bound, cold press paper)
- Plastic or metal watercolor palette with half-pans
- Round watercolor brushes (Size 4 and Size 8)
- Small ceramic dish or bowl (for mixing or resting brushes)
- Clear glass jar for water
- Small ceramic pot for dirty water (optional)
- Small jars of gouache or white ink (optional for highlights)
- Wooden or rustic table surface
Step 1: Creating the Foundation
-
Fabric placement:
Begin by laying down your natural linen fabric on a wooden table. Smooth it out gently but leave the natural creases and soft folds visible; this texture adds to the aesthetic appeal and catches stray drops. -
Zoning the workspace:
Visually divide your runner into two zones. The left side will handle the ‘wet’ and messy materials, while the right side will be reserved for your ‘dry’ sketchbook to prevent accidental splashes.
Step 2: Arranging the Wet Zone
-
Palette positioning:
Place your watercolor palette on the bottom left corner of the cloth. Open the lid fully so the mixing wells are accessible. If your paints are dry, spritz them lightly with water now to activate them. -
Water jar placement:
Set a clear glass jar filled with fresh water near the top left. Keeping it clear allows you to see when the water gets too muddy and needs changing. -
Brush rest setup:
Position a small ceramic dish or coaster in the middle of the workspace. This dedicated spot is perfect for resting a wet brush so it doesn’t roll onto your clean fabric or paper. -
Secondary water vessel:
If you use a two-jar system (one for washing, one for clean water), place the second, opaque ceramic vessel near the top right of the wet zone. I find this keeps my colors brighter for longer. -
Brush layout:
Lay your primary brushes—a synthetic round and a natural hair brush—diagonally between the palette and the sketchbook. Orient them so the bristles point away from you, ready to be picked up.
Water Control
Use a paper towel or rag under your water jar to catch condensation or drips before they soak into the linen runner.
Step 3: Preparing the Dry Zone
-
Book orientation:
Place your spiral-bound watercolor sketchbook on the right side of the cloth. Angle it slightly for a comfortable drawing position, opening it to a fresh, blank page. -
Accessory placement:
Set any small auxiliary containers, like little jars of white gouache or masking fluid, near the top right corner. Keep their lids on until you are ready to use them to avoid spills. -
Final check:
Sit at the workspace and simulate reaching for water and paint. Ensure your arm doesn’t cross over the open sketchbook when reaching for the palette, minimizing the risk of drips. -
Lighting check:
Adjust the entire setup so natural light flows from the side or top, rather than casting a shadow from your hand onto the paper.
Color Harmony
Pre-mix a ‘palette soup’ in your ceramic dish using leftover paint colors to create unique, muted neutrals for backgrounds.
Step 4: Maintenance & Care
-
Cleaning the palette side:
After a painting session, wipe down the mixing wells of your palette but feel free to let residual paint dry in the pans for next time. -
Linen care:
If paint gets on the linen runner, spot clean it immediately with water and mild soap. Over time, slight stains can add character to an artist’s workspace, so don’t worry too much about perfection.
Now you have a serene, functional studio setup ready for your next masterpiece
Make a Tiny Corner Studio Actually Work
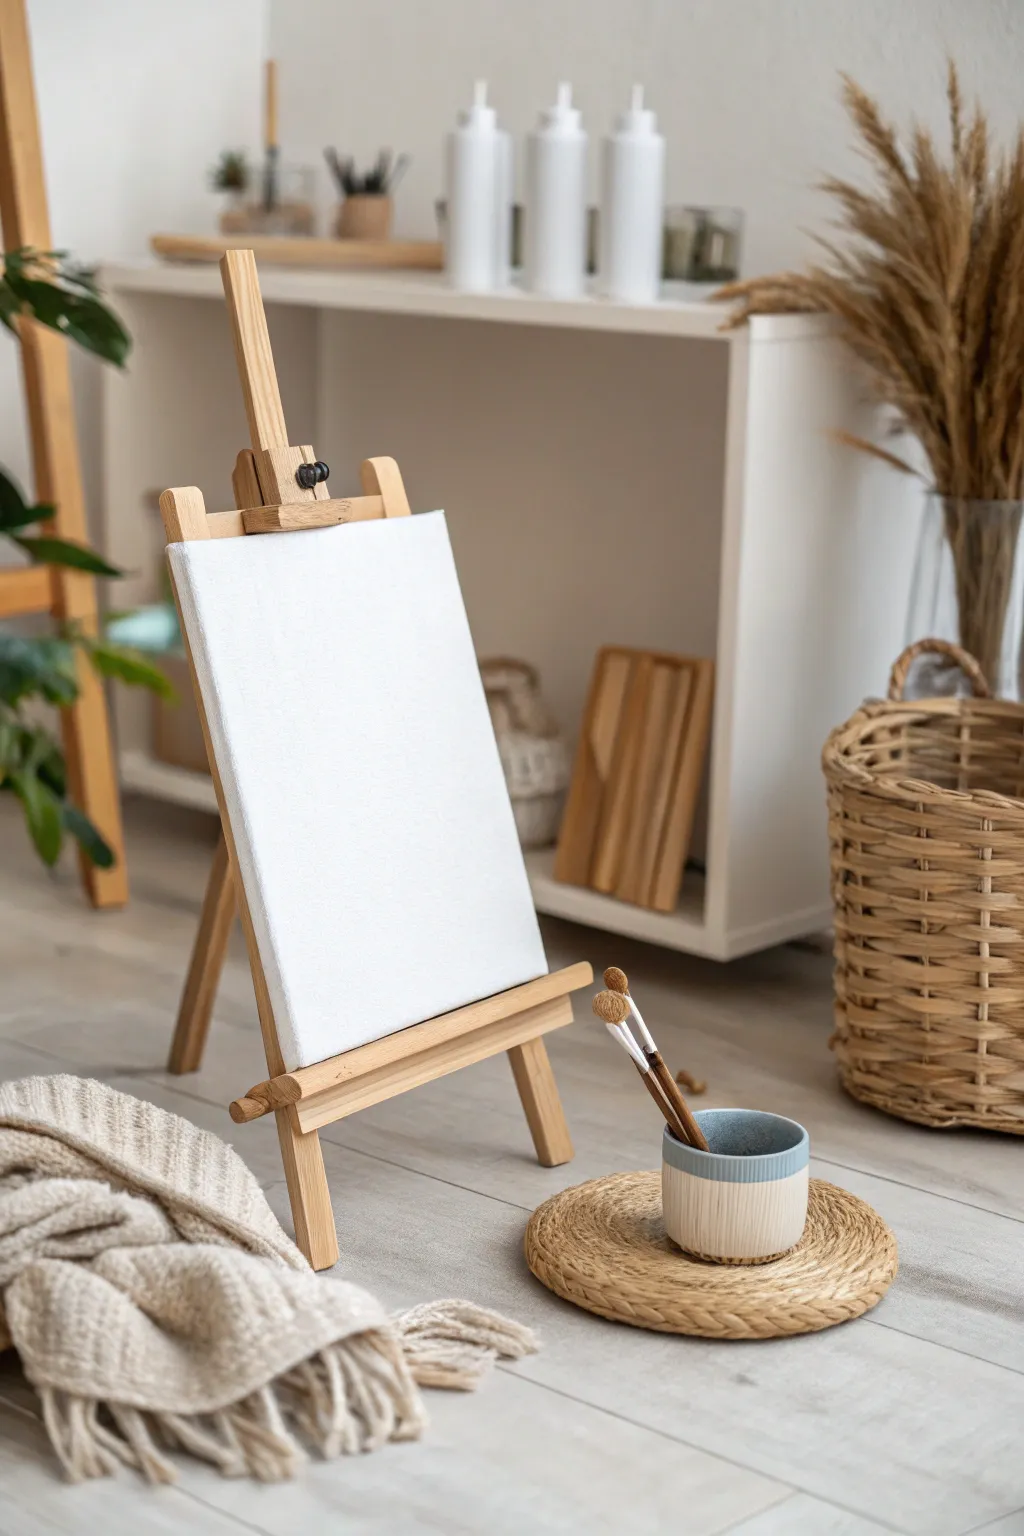
Sometimes the most inspiring project is simply setting the stage for creativity itself. This tutorial focuses on creating that perfect, minimalist pristine canvas prep that invites new ideas, transforming a small corner into a dedicated artistic sanctuary.
Detailed Instructions
Materials
- Small tabletop wooden H-frame easel (adjustable)
- 8×10 or 9×12 inch stretched cotton canvas
- Gesso (acrylic primer)
- Wide flat brush (2-inch or larger)
- Fine-grit sandpaper (220 grit)
- Drop cloth or old newspaper
- Ceramic or stoneware cup for water/brushes
- Woven coaster or trivet
- Neutral/beige throw blanket
Step 1: Preparing the Foundation
-
Inspect the canvas:
Begin by removing the plastic wrapping from your stretched canvas. Check the surface for any loose threads or dents in the fabric. If you find a dent, lightly mist the back of the canvas with water to tighten the fibers as it dries. -
Check canvas tension:
Tap the center of the canvas lightly; it should sound like a drum. If it feels slack, locate the canvas keys (small wooden wedges usually included in a baggie) and tap them gently into the corner slots on the back frame. -
Set up the priming station:
Lay down your drop cloth or newspaper on a flat work surface. Even pre-primed canvases often benefit from an extra layer of gesso for a smoother, more professional texture. -
Apply the first gesso layer:
Dip your wide flat brush into the gesso. Apply a thin, even coat across the entire canvas using horizontal strokes. Ensure you cover the white space fully without leaving thick ridges of paint. -
Smooth the edges:
Don’t forget the sides. Run your brush along the outer edges of the canvas frame so the texture wraps around cleanly, which looks much better if you decide to display the work unframed later. -
Let it cure:
Allow this first layer to dry completely. This usually takes about 20 to 30 minutes, depending on the humidity in your room. The surface should feel chalky and dry to the touch.
Sticky Situation
If your gesso feels gummy when sanding, it hasn’t cured enough. Stop immediately to avoid peeling. Give it another 30 minutes or use a hair dryer on a cool setting to speed it up.
Step 2: Refining the Surface
-
Sand for smoothness:
Once fully dry, lightly sand the surface with 220-grit sandpaper. Use a circular motion to knock down any bumps or brush ridges. Wipe away the dust with a clean, dry cloth. -
Apply the second coat:
Apply a second layer of gesso, but this time use vertical brush strokes—perpendicular to your first layer. This cross-hatching technique creates a subtle weave texture that grabs paint beautifully. -
Final drying time:
Let this final coat dry for at least an hour. I like to let this dry briefly in a sunlit spot if possible to speed things up, but ensure no dust settles on the wet surface. -
Prepare the easel:
While the canvas cures, set up your wooden easel. Adjust the central mast and the bottom tray height so it sits comfortably for your eye level when seated. -
Tighten the hardware:
Check the wingnuts or knobs on the easel (like the black knob shown in the image). Ensure they are tight enough to hold the weight of the canvas but loose enough to adjust if needed.
Step 3: Styling the Space
-
Mount the canvas:
Place your dried, pristine white canvas onto the easel tray. Slide the top clamp down until it holds the canvas securely in place without putting too much pressure on the frame. -
Arrange the tools:
Place a ceramic cup nearby to hold your brushes. Choose a cup with a heavy bottom so it won’t tip over easily when filled with water or tall brushes. -
Protect surfaces:
Set the cup on a woven trivet or coaster. This adds natural texture to your setup and protects your floor or table from potential water rings or paint drips. -
Add comfort:
Drape a soft, neutral throw blanket nearby. Having a cozy element helps soften the workspace and makes the corner feel inviting rather than purely utilitarian. -
Final check:
Step back and assess the setup. The goal is a clean, obstruction-free zone where the white canvas is the brightest focal point, ready for your first stroke of color.
Tone It Down
White canvas can be intimidating! Mix a tiny drop of burnt umber or gray acrylic into your final gesso layer to create a toned ground, which helps you judge values better when painting.
Now your studio corner is perfectly prepped and waiting for your next masterpiece
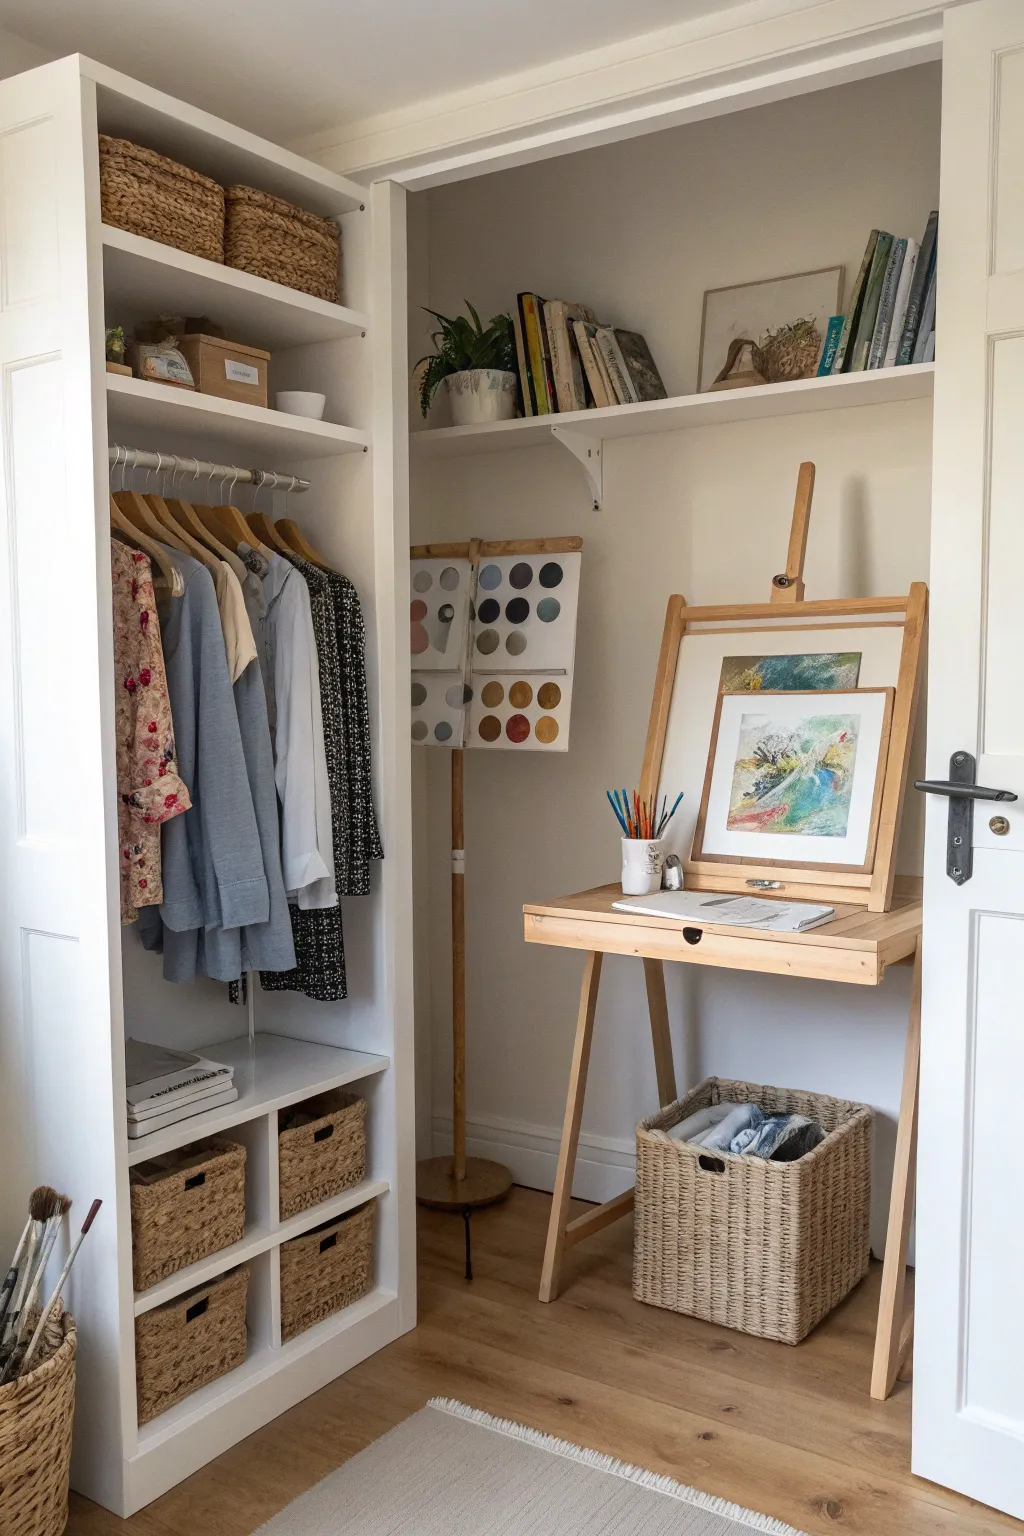
Convert a Closet Into a Micro Studio
Capture the fluid beauty of rolling hills and open skies with this expressive watercolor landscape. Using a wet-in-wet technique, this project creates soft transitions and vibrant color bleeds that mimic a dreamlike countryside scene.
Step-by-Step
Materials
- Cold press watercolor paper (140lb/300gsm, approx. 8×10 inches)
- Watercolor paints (phthalo blue, sap green, cadmium yellow, alizarin crimson, burnt sienna)
- Painter’s tape or masking tape
- Wooden drawing board
- Round watercolor brushes (sizes 6, 10, and 12)
- Pencil (HB)
- Two jars of water (one for clean, one for rinsing)
- Paper towels
- Salt (optional for texture)
Step 1: Preparation and Sketching
-
Secure Your Paper:
Tape your watercolor paper down to the drawing board on all four sides. This prevents the paper from buckling when it gets wet and creates a crisp white border for framing later. -
Draft the Horizon:
Using your HB pencil, lightly sketch the horizon line about two-thirds of the way down the paper. Keep the line faint so it won’t show through the transparent paint later. -
Outline the Hills:
Sketch two or three overlapping hill shapes in the foreground. Don’t worry about perfect realism; you want organic, flowing shapes that lead the eye into the painting.
Muddy Colors?
If your greens look dull or brown, you likely overmixed them on the palette or paper. Let layers dry completely before glazing over them to keep colors crisp.
Step 2: Painting the Sky
-
Wet the Sky Area:
Using your largest round brush (size 12), apply clean water to the entire sky area above your horizon line until the paper has a gentle sheen but isn’t pooling. -
Apply the First Wash:
Load your brush with a diluted mix of phthalo blue. Starting at the top edge, sweep the color across, letting it naturally diffuse downward into the wet paper. -
Add Cloud Variation:
While the sky is still wet, lift out pigment using a crumpled paper towel to create soft white cloud shapes. Alternatively, drop in hints of alizarin crimson near the horizon for a warmer atmosphere.
Step 3: Creating the Landscape
-
Mix Your Greens:
Prepare three different green mixtures on your palette: a yellow-green (sap green + yellow), a true green (sap green), and a deep blue-green (sap green + phthalo blue) for shadows. -
Paint the Furthest Hill:
Wait until the sky is damp but not soaking wet. Paint the most distant hill using a watery, pale blue-green mix. This creates atmospheric perspective, making it look further away. -
Mid-Ground Hills:
Move to the middle hills. Use heaver pigment of your true green mix. Apply the paint quickly, allowing the edges to touch the still-damp distant hill slightly for a soft, blended transition. -
Foreground Vibrancy:
For the closest hill, use your yellow-green mix. Drop in pure yellow or even burnt sienna while the paint is wet to suggest wildflowers or earthy patches. -
Adding Texture:
If you want visual interest in the foreground vegetation, sprinkle a pinch of table salt onto the wet green paint. As it dries, the salt pushes the pigment away, creating a unique starburst texture.
Go Mixed Media
Once dry, use pastel crayons or colored pencils to add defined outlines or vibrant highlights on top of the watercolor wash for a modern, illustrative look.
Step 4: Refining Details
-
Dry Thoroughly:
Let the main washes dry completely. If the paper feels cool to the touch, it is still wet. I prefer to wait an extra ten minutes just to be safe. -
Enhance Shadows:
Switch to a size 6 brush. Mix a concentrated dark green or blue. paint thin, jagged lines along the bottom of the hills to define the separation between slopes. -
Suggest Trees or Shrubs:
Using the tip of the small brush, dab small clusters of dark green along the crest of the hills to suggest distant tree lines or shrubbery. -
Final Touches:
Assess the composition. If an area looks too flat, you can dry-brush a little texture over the top, dragging a semi-dry brush with pigment lightly across the paper’s tooth. -
Remove the Tape:
Once the painting is 100% dry, carefully peel the tape away at a 45-degree angle, pulling away from the painted area to ensure you don’t rip the paper surface.
Frame your finished hills with a wide mat to give it a professional gallery presence in your new studio space
Lean Into Cozy Clutter-Core (On Purpose)
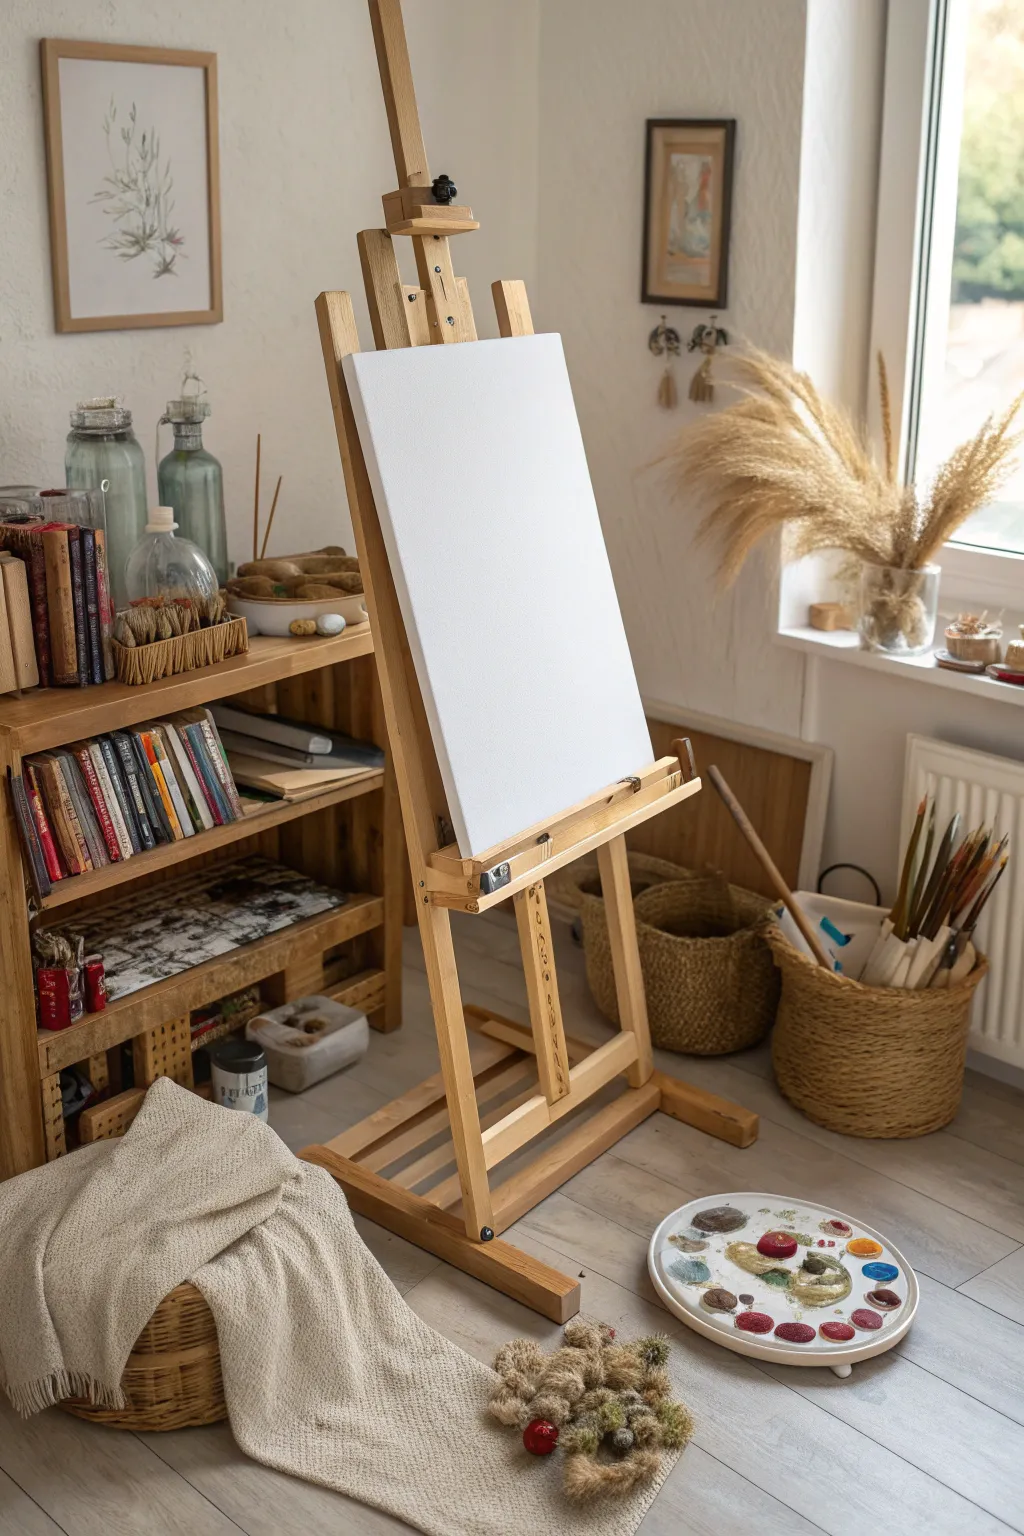
Sometimes the most inspiring project isn’t a single painting, but the creation of the creative space itself. This guide helps you curate that perfectly imperfect ‘clutter-core’ aesthetic, transforming a corner of your room into an inviting, texture-filled artist’s sanctuary ready for its first brushstroke.
How-To Guide
Materials
- Wooden studio easel (A-frame or H-frame)
- Large blank stretched canvas
- Wooden shelving unit or crates
- Various vintage glass jars and bottles
- Dried pampas grass or wheat stalks
- Woven baskets (various sizes)
- Textured throw blanket (neutral tone)
- Ceramic palette or white plate
- Assorted books with colorful spines
- Paint brushes (long-handled)
- Acrylic or oil paints (for the palette aesthetic)
- Natural elements (dried flowers, decorative gourds)
Step 1: Establishing the Foundation
-
Position the Easel:
Begin by placing your wooden easel near a natural light source, ideally a window. Angle it slightly into the room to create depth and ensure the light hits your future canvas perfectly. -
Mount the Canvas:
Secure a large, blank white canvas onto the easel. Adjust the top and bottom clamps so the canvas sits firmly; this blank white rectangle will serve as the bright focal point against the wood tones. -
Anchor with Shelving:
Place a low wooden bookshelf or a stack of sturdy crates to the left of the easel. This provides the primary surface for your organized chaos and keeps essential tools within arm’s reach.
Step 2: Curating the ‘Clutter’
-
Stack Books Vertically:
Fill the lower shelf with books. Arrange them vertically with spines facing out to add varied color and pattern. Don’t worry about perfect alignment; a little lean adds character. -
Layer Glassware:
On the top surface of the shelf, group 2-3 vintage glass jars or bottles. Varied heights and slight tints like sea glass green create visual interest without overwhelming the eye. -
Add Organic Textures:
Fill a small basket or wooden tray with natural items like dried seed pods, gourds, or rolled fabric scraps. Place this beside your glassware to contrast the smooth glass with rougher textures. -
Arrange the Brushes:
Place a tall jar filled with long-handled paintbrushes on the floor or a low stool nearby. I find that grouping brushes by handle color creates a surprisingly cohesive look. -
Soften with Botanicals:
Place a large clear vase on a windowsill or side table and fill it generously with dried pampas grass or wheat. Fluff the stems so they fan out broadly, adding a soft, feathery texture to the background.
Palette Prep
If you want the ‘messy palette’ look without wasting paint, let acrylic blobs dry fully. They will keep their color and shape indefinitely for decor purposes.
Step 3: Adding Cozy Touches
-
Position Floor Baskets:
Tuck a medium-sized woven basket next to the shelf and a larger one near the window. These catch-alls are perfect for hiding less aesthetic supplies like rags or solvent cans. -
Drape the Throw:
Spill a textured, neutral-colored throw blanket out of a basket or over a nearby chair. Let it puddle naturally on the floor to connect the vertical elements with the ground. -
Hang Small Details:
If you have wall space behind the easel, hang a small framed print or a few drying herbs. Keep these low-key so they don’t distract from the main canvas.
Scaling Up
To add height, lean a tall roll of canvas or a large, flat portfolio case against the wall behind the easel to frame the workspace.
Step 4: The ‘Work in Progress’ Detail
-
Prepare the Palette:
Take a ceramic palette or a simple white plate and place it on the floor near the easel leg. This implies a session is just about to start or has just finished. -
Add Paint Blobs:
Squeeze out fresh dollops of paint onto the palette—choose colors like deep reds, ochres, and blues that complement the room’s warm tones. Don’t mix them too much; keep the pigment rich. -
Scatter Dried Flora:
For the final touch of whimsy, loosely scatter a few dried flower heads or moss clumps near the palette and blanket. It blurs the line between nature and art.
Now step back and enjoy a studio space that invites creativity before you even pick up a brush
Try a Minimal White Box Studio Look
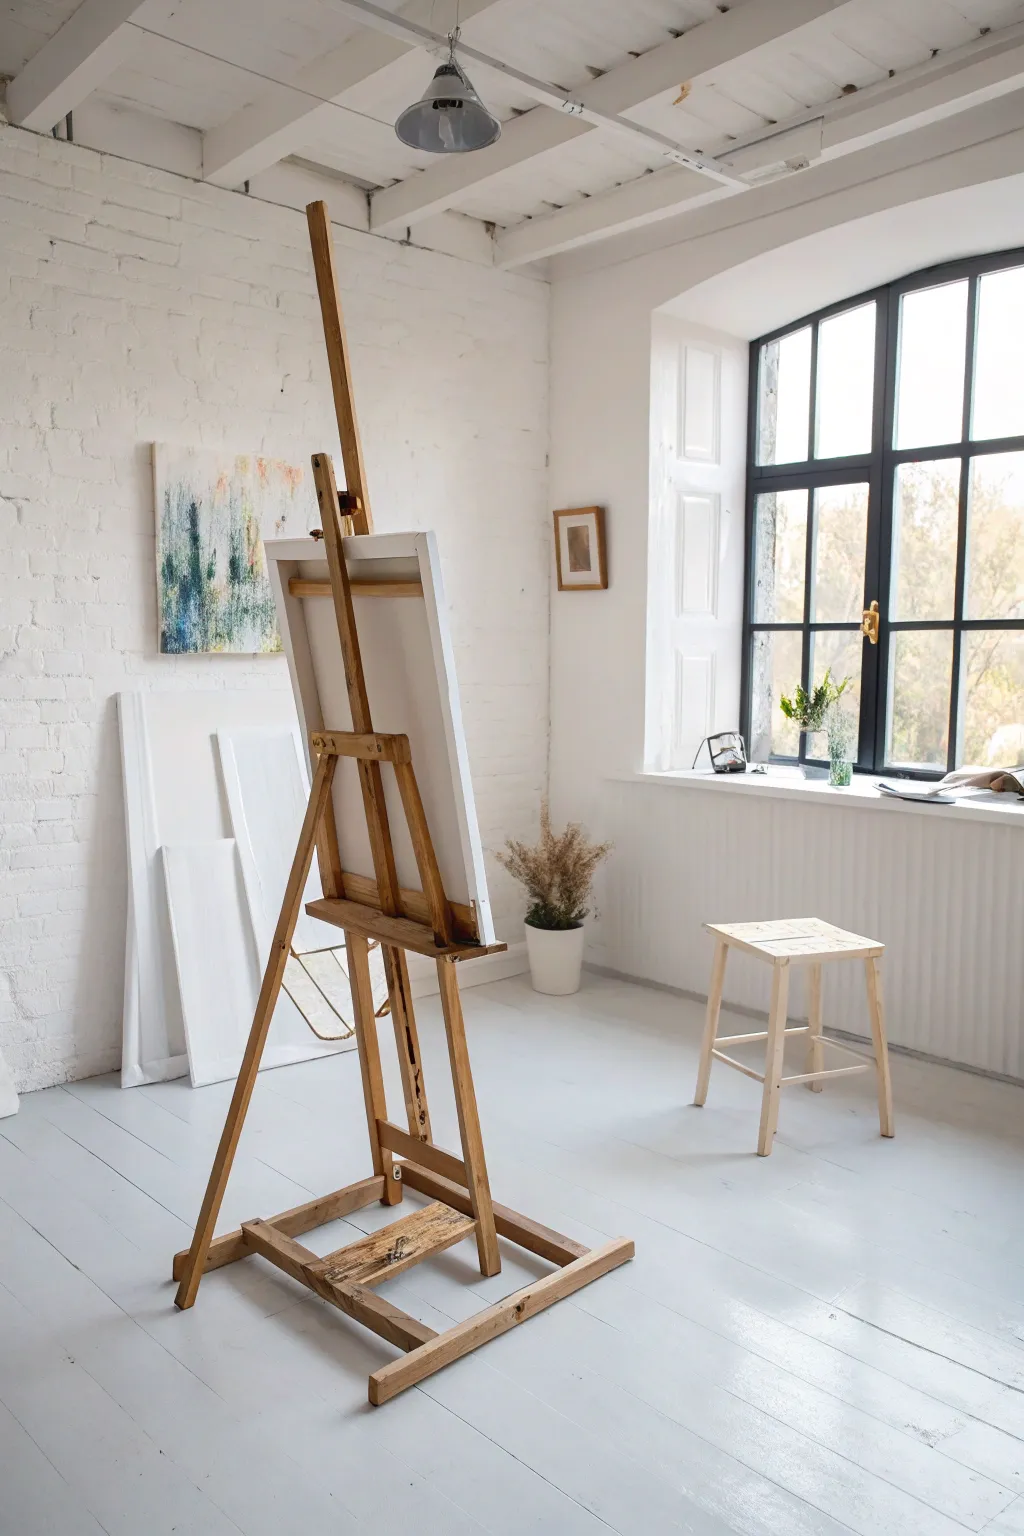
Achieve the ethereal, airy aesthetic of a minimal studio with this abstract mixed-media canvas. This project mimics the soft, light-filled painting hanging on the brick wall, combining gentle washes of color with vertical textures to evoke a hazy forest scene.
Step-by-Step Tutorial
Materials
- Large square canvas (approx. 24×24 inches or larger)
- White gesso
- Acrylic paints: Titanium White, Cerulean Blue, Sap Green, Yellow Ochre, Burnt Umber
- Large flat paintbrush (2-3 inch)
- Medium round brush
- Palette knife or old credit card
- Spray bottle with water
- Paper towels or rag
- Palette or mixing plate
Step 1: Setting the Atmosphere
-
Prime the Surface:
Even if your canvas is pre-primed, apply a fresh coat of white gesso. This gives you a clean, bright starting point and adds a subtle texture that catches the light differently than factory priming. -
Create a Pale Wash:
Mix a large amount of Titanium White with a tiny drop of Yellow Ochre and water. You want a very milky consistency. Brush this roughly over the central and upper areas of the canvas to create a warm, glowing background. -
Introduce Cool Tones:
While the background is still slightly damp, mix white with a hint of Cerulean Blue. Apply this to the sides and corners using broad, sweeping strokes to suggest an airy sky or mist. -
Blend the Transitions:
Use a clean, damp large brush to soften the edges where the warm and cool tones meet. The goal isn’t a perfect gradient, but a soft, atmospheric blur. -
Initial Drying Time:
Let this background layer dry completely. I like to use a hairdryer on a cool setting to speed this up if I’m impatient, as the next layers require a dry surface to avoid muddying.
Keep it Loose
Hold your brush at the very end of the handle. This reduces your control just enough to prevent the trees from looking too stiff or manufactured.
Step 2: Building the Vertical forest
-
Mix Your Greens:
Prepare three distinct green mixtures on your palette: a dark forest green (Sap Green + Burnt Umber), a mid-tone grassy green (Sap Green + Yellow Ochre), and a pale minty green (Sap Green + White). -
Apply the Darkest Vertical Strokes:
Using a palette knife or the edge of a stiff card, pick up the dark forest green. Scrape the paint vertically down the canvas in simplified tree-trunk shapes, focusing on the lower left quadrant primarily. -
Distress the Paint:
Before the dark paint dries, lightly spritz it with water. Let the pigment run slightly, or blot it gently with a paper towel to create a weathered, organic look. -
Layering Mid-Tones:
Switch to your medium brush. Load it with the mid-tone green and add loose, vertical dashes around the dark trunks. These represent distant foliage or smaller trees. -
Adding Pops of Blue:
Introduce a deeper blue tone into the foliage area on the left. Use a dry brush technique—wiping most paint off the brush first—to scumble this blue over the greens, adding depth and shadow. -
Highlighting with Warmth:
Take a clean palette knife with a mix of Yellow Ochre and White. Scrape this gently over the top right area and sporadically through the trees to simulate sunlight filtering through the canopy.
Step 3: Refining and Softening
-
The White Veil:
To achieve that signature ‘ghostly’ look, mix a very translucent glaze of white paint and water. Brush this vertically over sections of the painting that feel too heavy or dark. -
Create Negative Space:
Use a damp rag to wipe away paint in vertical lines, revealing the lighter background underneath. This subtractive method adds complex layers without adding more paint. -
Detailing the Foreground:
With a smaller round brush, add thin, distinct vertical lines using a dark brown wash. These define the nearest tree trunks without overpowering the abstract feel. -
Final Atmosphere Check:
Step back and assess the painting. If any area demands too much attention, knock it back with another light mist of white spray or a dab of white paint blended with your finger. -
Seal the Work:
Once fully dry (give it at least 24 hours due to the varying thickness of paint), apply a matte varnish to protect the surface while maintaining that soft, non-reflective finish found in minimal studios.
Muddy Colors?
If your greens are turning grey or brown, you’re blending too much while wet. Stop, let the layer dry completely, then apply fresh color on top.
Now you have a serene, gallery-worthy piece that perfectly complements a white minimalist space
Create an Indoor-Outdoor Painting Flow
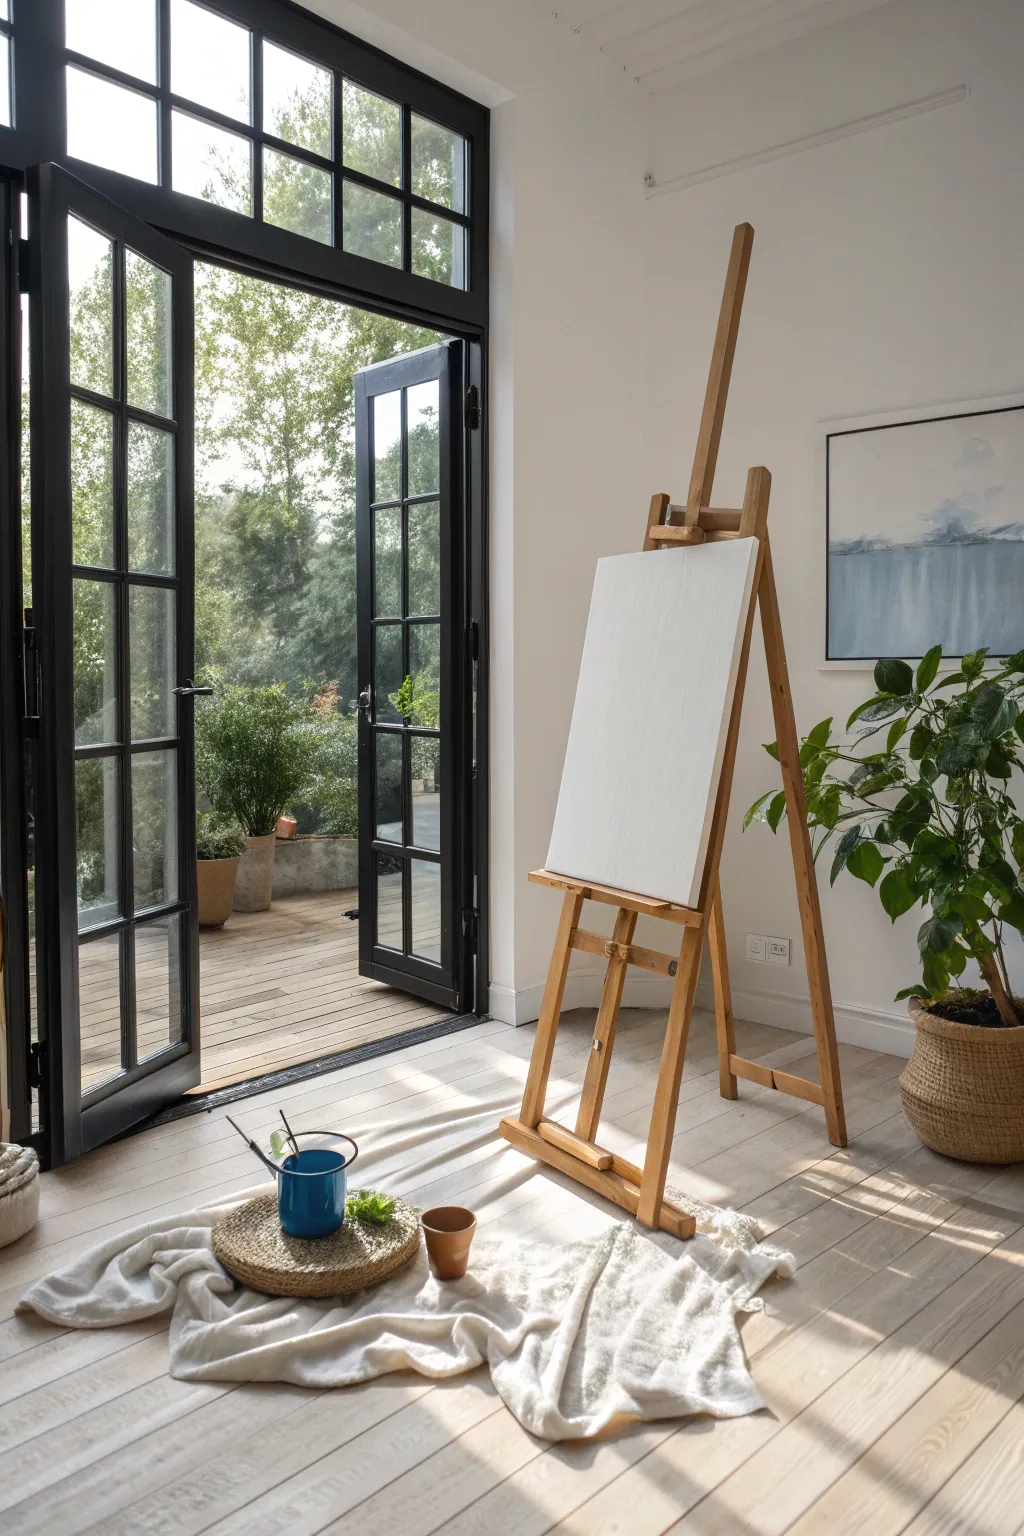
Even the most accomplished artist starts with a blank canvas and an inspiring space. This tutorial guides you through assembling and arranging the foundational elements of this airy, light-filled painting corner, creating the perfect flow between indoors and outdoors for your next masterpiece.
How-To Guide
Materials
- H-frame or A-frame wooden studio easel (adjustable)
- Stretched canvas (24×36 inches or similar large format)
- Natural fiber or woven floor mat (round)
- Small succulent or potted plant
- Ceramic or terracotta pot for brushes
- Blue enamel mug or water container
- Soft, textured throw blanket (cream or white)
- Wide-bristle priming brush (optional)
- Gesso (optional if canvas is unprimed)
Step 1: Positioning the Easel
-
Choose the optimal spot:
Identify a location in your dedicated room that receives ample natural light but avoids direct harsh glare on your canvas. Near large French doors or a window wall is ideal. -
Angle for the view:
Orient the easel so that when you stand or sit at it, you have a clear sightline to the outdoors. This helps establish that indoor-outdoor connection which is vital for creative flow. -
Adjust the mast angle:
Loosen the side knobs on the easel’s main mast. Tilt the central column slightly backward for stability, ensuring it isn’t perfectly vertical, which can feel precarious. -
Secure the legs:
Fully extend the rear leg of the tripod or H-frame base until the easel stands firm and doesn’t rock. Tighten all wing nuts or adjustment screws at the base.
Natural Light Tip
Position your easel so the light comes from your non-dominant side (left if you’re right-handed). This prevents your hand from casting annoying shadows on the canvas while you paint.
Step 2: Preparing the Canvas
-
Set the bottom tray height:
Determine your preferred painting height—whether you plan to stand or sit on a stool—and raise or lower the bottom canvas shelf accordingly. Lock it tightly in place. -
Mount the canvas:
Place your large, blank stretched canvas onto the bottom shelf. Make sure it sits squarely in the center groove. -
Secure the top clamp:
Slide the top canvas holder down the mast until it firmly grips the top edge of your canvas. Tighten the knob so the canvas doesn’t shift while you work. -
Inspect the surface:
Check your canvas for any loose threads or dents. If the surface is unprimed raw canvas, apply a coat of gesso with a wide brush now to get that bright white, toothy finish seen in the studio setup.
Step 3: Curating the Creative Zone
-
Layer the floor texture:
Lay down a soft, textured throw blanket casually on the floor near the foot of the easel. Bunch it slightly to create inviting folds rather than flattening it out completely. -
Add the woven element:
Place a round, woven fiber mat onto the blanket. This adds a natural, grounding element to your workspace and creates a designated spot for supplies. -
Arrange your water source:
Set a blue enamel mug or a sturdy water container on the woven mat. Choose a color that pops against the neutral tones of the wood and fabric. -
Introduce greenery:
Place a small potted succulent or green plant next to the water container on the mat. This small touch of life mirrors the large standing plant in the corner and connects the floor arrangement to the garden outside. -
Organize tools nearby:
Add a small terracotta or ceramic pot to hold extra brushes or palette knives. Keep this grouped on the floor arrangement for a relaxed, bohemian studio vibe. -
Check the light path:
Step back and observe how the light falls across the easel and your floor arrangement. I like to tweak the angle of the easel just a few degrees here to catch the best shadows.
Stabilizing the Setup
If your floorboards are uneven and the easel wobbles, wedge a small piece of folded cardboard or a rubber shim under the shortest leg to create a rock-solid painting surface.
Now you have a serene, perfectly organized space ready to welcome your creative energy
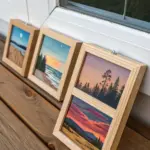


Have a question or want to share your own experience? I'd love to hear from you in the comments below!