Painting wicker is one of my favorite “instant refresh” projects because the weave grabs color in the prettiest, most dimensional way. If you’ve got a tired chair, settee, or little wicker table, these ideas will help you turn it into something that looks intentional and current.
Crisp White Porch Classic
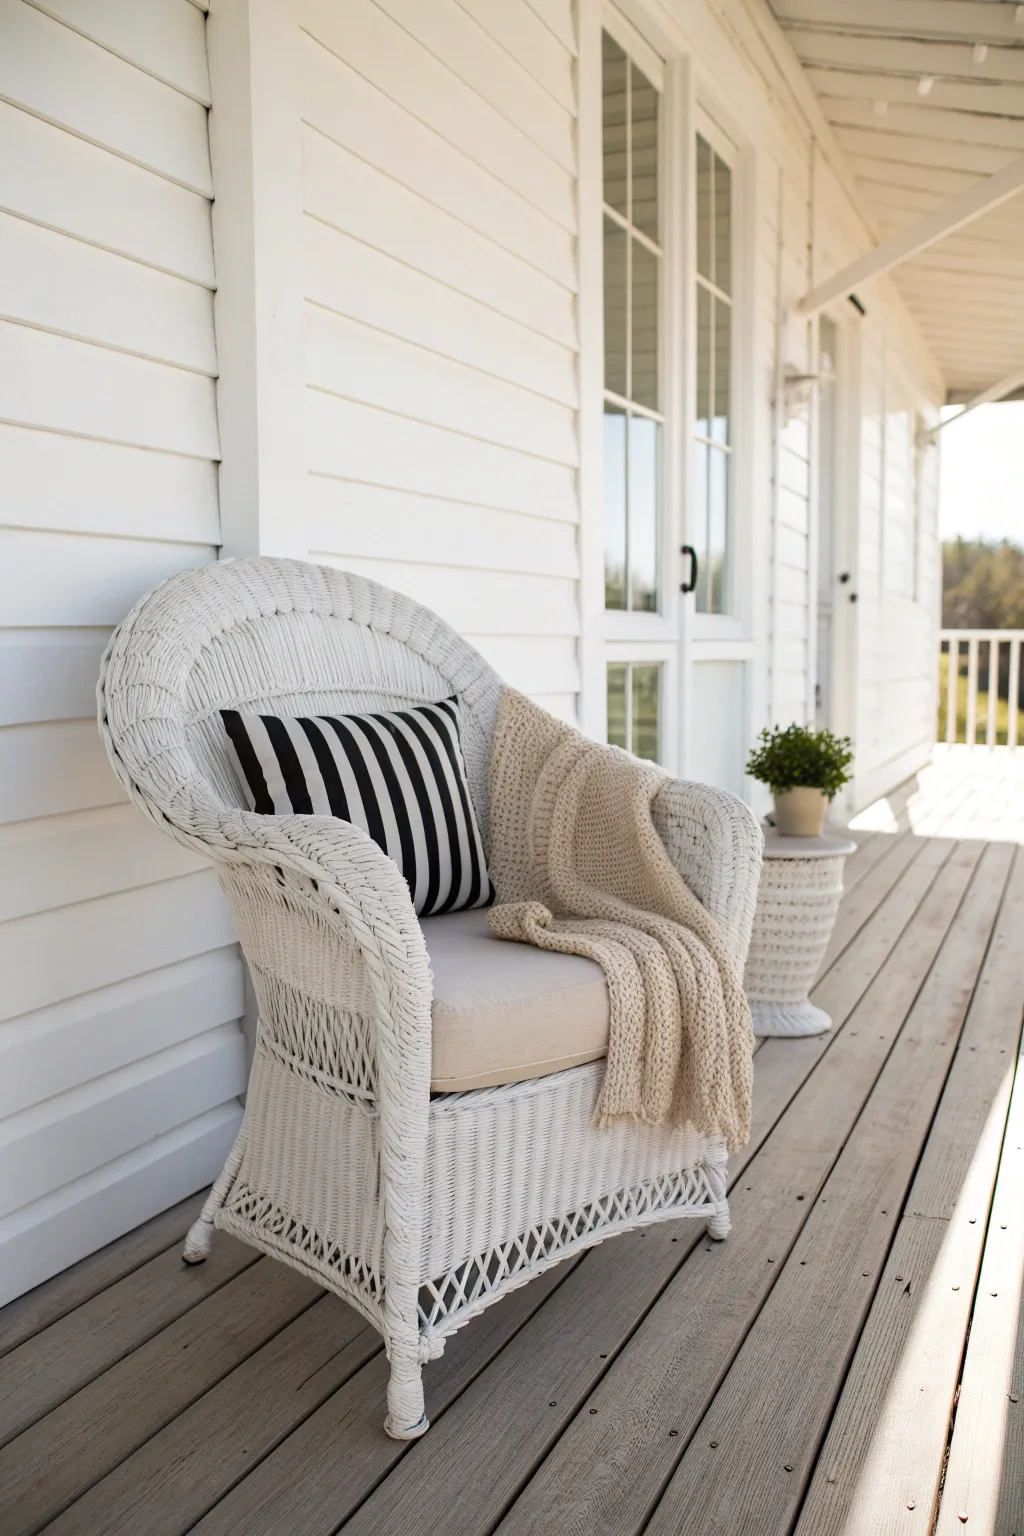
Transform a tired or dated wicker chair into a timeless porch staple with a fresh coat of bright white paint. This project revitalizes intricate woven textures, creating a clean, airy look perfect for outdoor relaxation.
Step-by-Step
Materials
- Wicker chair (vintage or new)
- Wire brush or stiff-bristled scrub brush
- Vacuum with brush attachment
- Mild detergent or TSP substitute
- Bucket and sponge
- Sandpaper (120-grit)
- Drop cloths or plastic sheeting
- Oil-based bonding primer (spray can recommended)
- Outdoor semi-gloss enamel paint (white)
- High-quality angled sash brush (1.5 to 2 inch)
- Small artist brush (for crevices)
- Compressed air (optional)
- Tack cloth
Step 1: Preparation & Cleaning
-
Initial inspection:
Begin by inspecting your wicker piece for any loose strands or damage. If you find broken reeds, use a little wood glue to secure them back into place before you start cleaning. -
Dry brushing:
Take your wire brush or stiff scrub brush and vigorously go over the entire chair. This knocks loose any flaking old paint, dirt, or debris stuck in the weave. -
Vacuuming debris:
Using the brush attachment on your vacuum, thoroughly clean the chair to remove the dust and flakes you just loosened. Pay special attention to the deep crevices where the seat meets the back. -
Washing the wicker:
Mix a mild detergent or TSP substitute with warm water in a bucket. Use a sponge to wash the wicker down completely. This removes oils and grime that could prevent paint adhesion. -
Deep drying:
Let the chair dry completely, preferably in the sun for at least 24 to 48 hours. Wicker absorbs moisture easily, and painting over damp wood will cause the finish to peel later. -
Light sanding:
Once dry, lightly scuff smooth areas like the arms or legs with 120-grit sandpaper to give the primer something to grip. Wipe away the sanding dust with a tacky cloth.
Step 2: Priming the Surface
-
Setting up the workspace:
Move the chair to a well-ventilated area and place it on top of drop cloths to protect your floor or deck. -
First coat of primer:
Using an oil-based spray primer is often easier than brushing for the first layer. Hold the can about 8–10 inches away and spray in light, sweeping motions to coat the intricate weave without creating drips. -
Checking angles:
Flip the chair upside down or onto its side to ensure you are priming the underside of the weave and the legs. Missing these spots is a common mistake that shows up later. -
Second pass:
After the first coat is dry to the touch, apply a second light coat of primer if the original color is still showing through significantly. -
Curing time:
Allow the primer to fully cure according to the manufacturer’s instructions before moving on to the topcoat.
Sticky Situation
If the paint feels tacky days later, humidity is likely the culprit. Move the piece to an air-conditioned room or place a fan directly on it for 24 hours to help the solvents evaporate fully.
Step 3: Painting & Finishing
-
First coat of paint:
Stir your outdoor semi-gloss enamel thoroughly. Begin painting with your angled sash brush, working the paint into the weave. Don’t overload the brush; thin coats are key to avoiding globs in the crevices. -
Detail work:
Keep a small artist brush handy to dab paint into deep recesses where the larger brush can’t reach. I find this step tedious but essential for a professional finish. -
Addressing drips:
Constantly check for drips, especially on the vertical reeds and legs. Smooth them out immediately with your brush before they become tacky. -
Drying between coats:
Let the first coat dry completely. This usually takes longer for oil-based enamels or thick outdoor paints, so be patient. -
Second coat application:
Apply a second coat of paint, moving in the direction of the weave where possible. This coat will provide the solid, opaque white coverage and the durability needed for outdoor use. -
Final inspection:
Once the minimal drying time has passed, inspect for any missed spots or ‘holidays’ in the paint. Touch up these small areas carefully with your small brush. -
Full cure:
Allow the furniture to cure for several days before adding cushions or sitting on it. This hardening process prevents the paint from feeling sticky or chipping immediately.
Add a Protectant
For chairs in direct rain, apply a clear outdoor polyurethane sealer over the white paint. Use a spray formula to easily coat the weave without brush marks. It adds years to the finish.
Enjoy styling your bright new chair with bold patterned pillows for a classic summer look

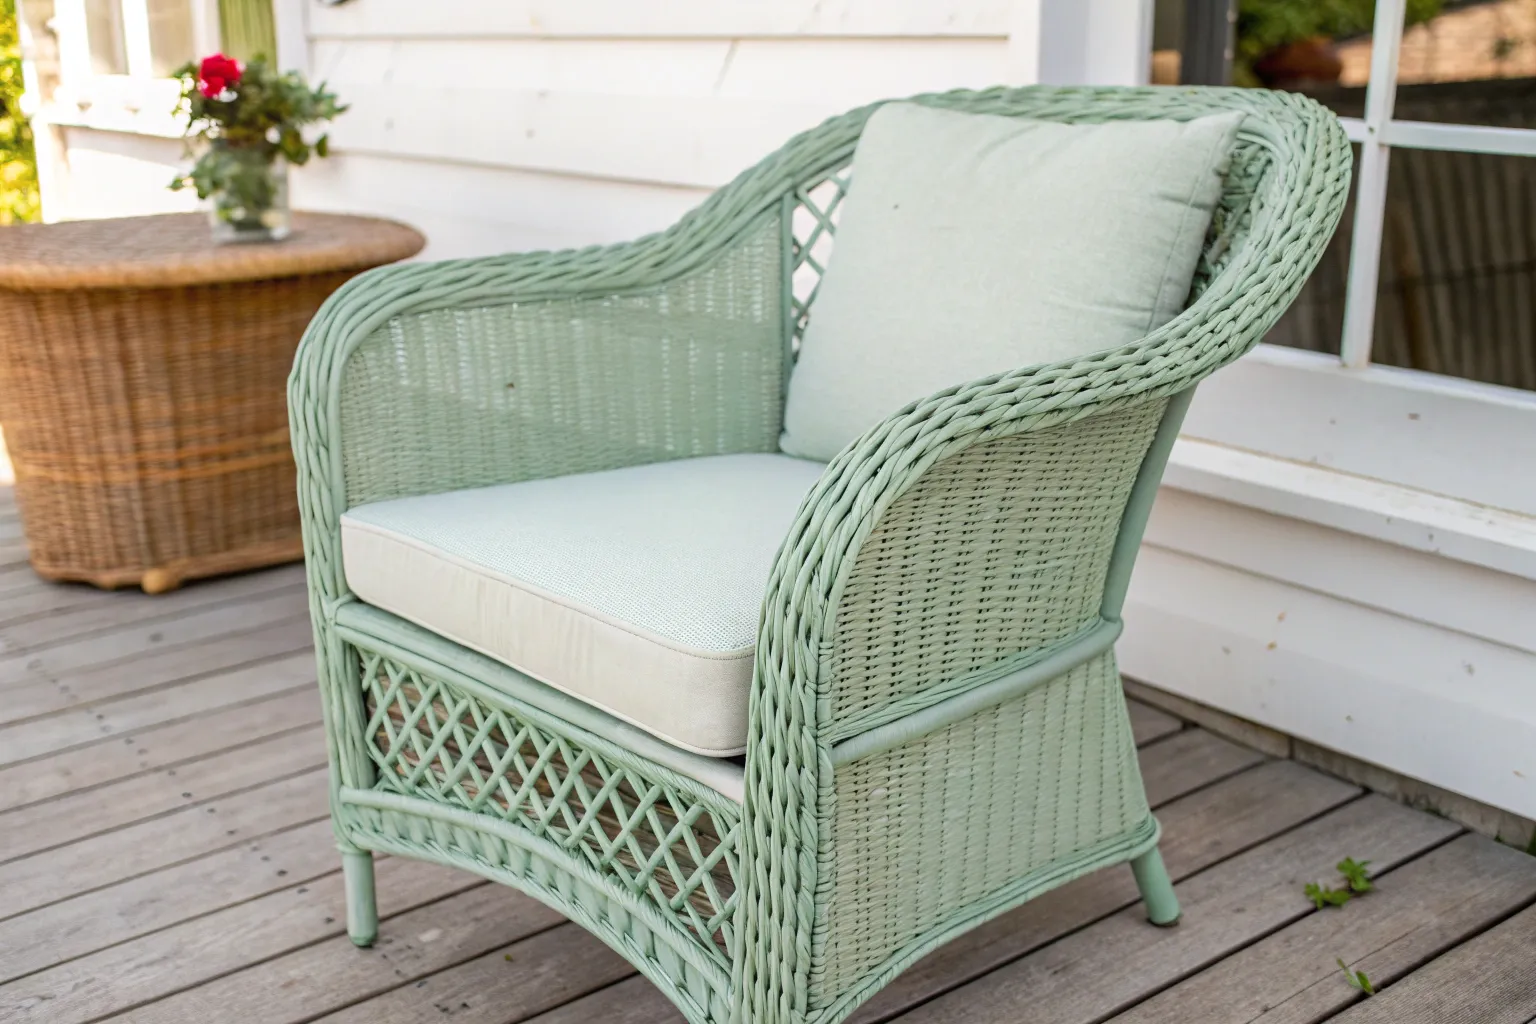
Soft Coastal Pastels
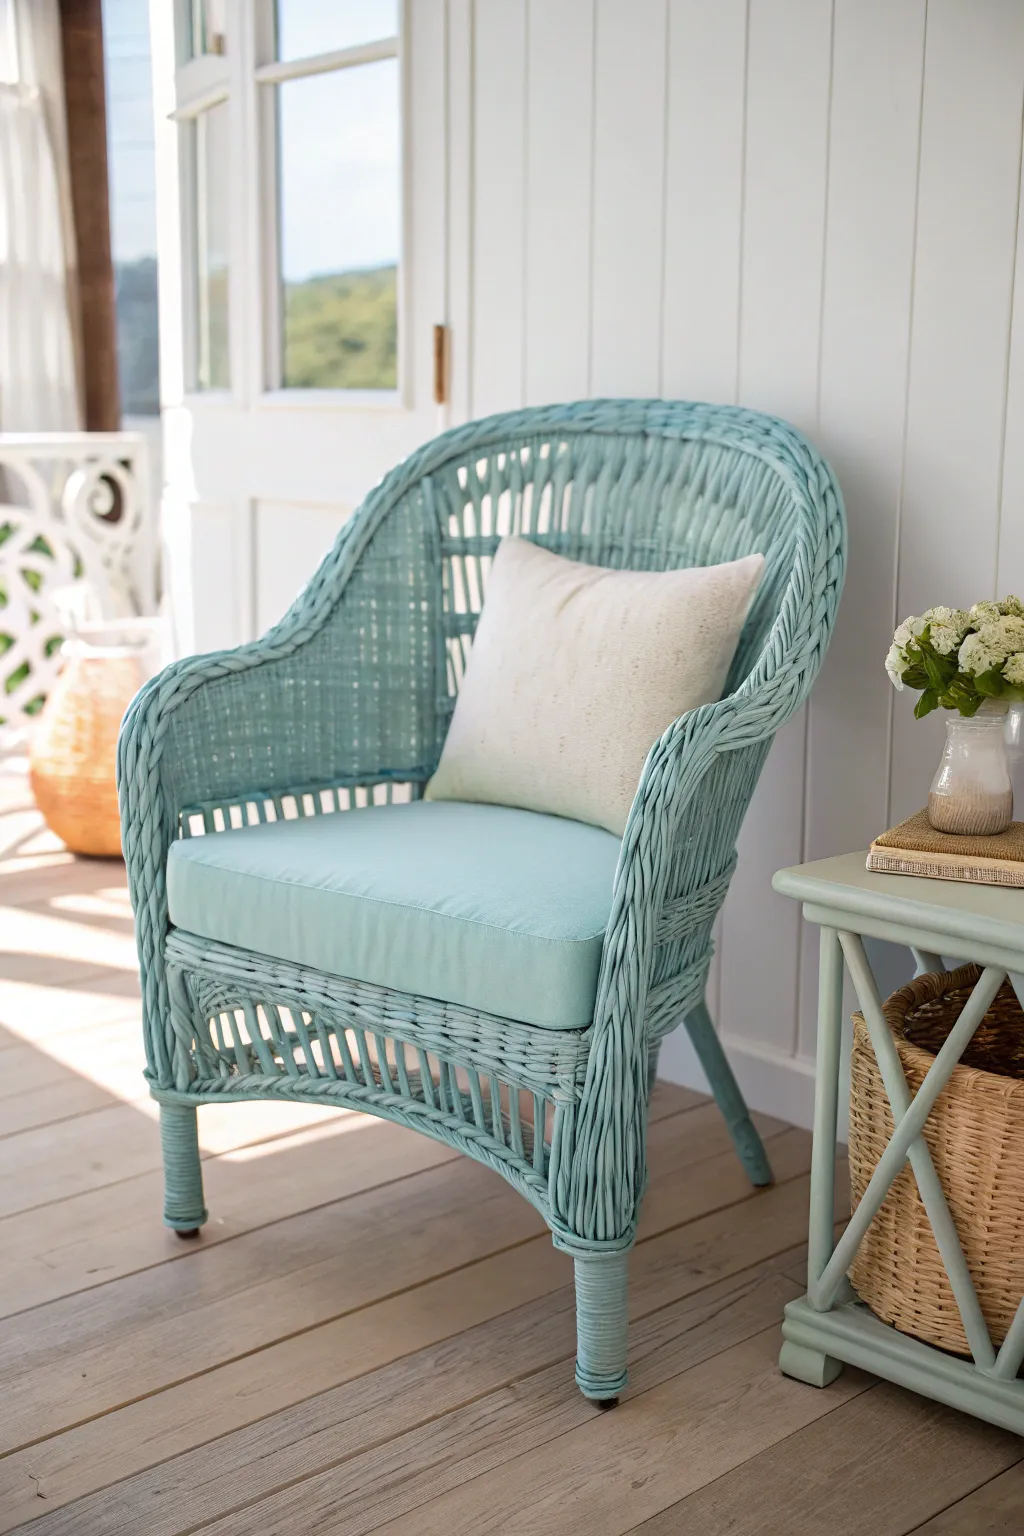
Transform a tired wicker piece into a breezy coastal gem with this soft pastel finish. The muted blue-green tone mimics sea glass, bringing a relaxed, beach-house vibe to your porch or sunroom.
Detailed Instructions
Materials
- Wicker chair (vintage or new)
- Mild dish soap and water
- Soft-bristle scrub brush
- Vacuum with brush attachment
- Oil-based bonding primer (spray preferred)
- High-quality spray paint in pastel blue-green (satin finish)
- Drop cloths or cardboard
- Painter’s tape
- Respirator mask
- Sandpaper (fine grit)
- Tack cloth
- Clear protective sealant (optional, for outdoor use)
Step 1: Preparation & Cleaning
-
Initial inspection:
Begin by examining your wicker chair for any loose reeds or structural damage. Glue down loose ends with wood glue and secure with painter’s tape until dry. -
Deep clean:
Wicker loves to trap dust. Vacuum the entire piece thoroughly using a brush attachment to get into the deep crevices of the weave. -
Scrub down:
Mix mild dish soap with warm water. Using a soft-bristle brush, gently scrub the chair to remove grime and oils. Avoid soaking the wicker; just clean the surface. -
Dry completely:
Let the chair dry fully in a sunny, breezy spot. This is crucial—painting damp wicker can trap moisture and cause mold or peeling later. -
Surface prep:
Lightly sand any rough glossy spots if the chair was previously painted. Wipe away the dust with a tack cloth to ensure a pristine surface.
Trigger Finger Saver
Use a snap-on spray can grip handle. It turns the standard nozzle button into a trigger, giving you better control and saving your finger from fatigue during large projects.
Step 2: Priming the Surface
-
Set up your workspace:
Lay down drop cloths in a well-ventilated area, preferably outdoors on a calm day. Prop the chair up on blocks if possible to reach the bottom legs easily. -
Apply primer:
Using an oil-based bonding primer spray, apply a thin, even coat over the entire chair. I find oil-based primers adhere best to old wicker and block tannin bleed-through. -
Invert and prime:
Once the top is dry to the touch, flip the chair over. Carefully prime the undersides of the arms, seat, and legs to ensure no raw wicker shows through later. -
Check coverage:
Look at the chair from multiple angles. Wicker is tricky; you often miss spots deep in the weave. Apply a second light coat of primer if needed.
Step 3: Painting & Finishing
-
First color pass:
Shake your pastel blue spray paint can vigorously for at least one minute. Hold the can about 8-10 inches away and spray in steady, sweeping motions. -
Light layers strategy:
Don’t try to get full coverage on the first pass. Aim for a light dusting of color. Multiple thin coats prevent the dreaded drips that ruin the look of woven textures. -
Drying time:
Allow the first coat to dry according to the manufacturer’s instructions, usually about 15-20 minutes. -
Second color pass:
Apply a second coat, focusing on changing your angle. Spray slightly upwards and downwards to catch the intricate sides of the wicker strands. -
Detail work:
Inspect closely for missed crevices. Use short bursts of spray to target deep recessed areas without flooding them with paint. -
Flip and finish:
Turn the chair upside down again to coat the bottoms of the legs and any hidden under-sections. This professional touch ensures the piece looks finished from every angle. -
Final cure:
Let the chair cure for at least 24 hours before handling or adding cushions. This hardening time is vital for durability. -
Optional protection:
If this chair will live on an uncovered porch, apply a clear matte or satin sealant spray to protect your hard work from the elements.
Drip Disaster?
If you create a drip, don’t wipe it! Let it dry completely, then gently sand it smooth with fine-grit sandpaper before applying a final touch-up spray.
Add a soft linen pillow and enjoy the cool, calming atmosphere your new chair brings to the space


Modern Matte Black Statement
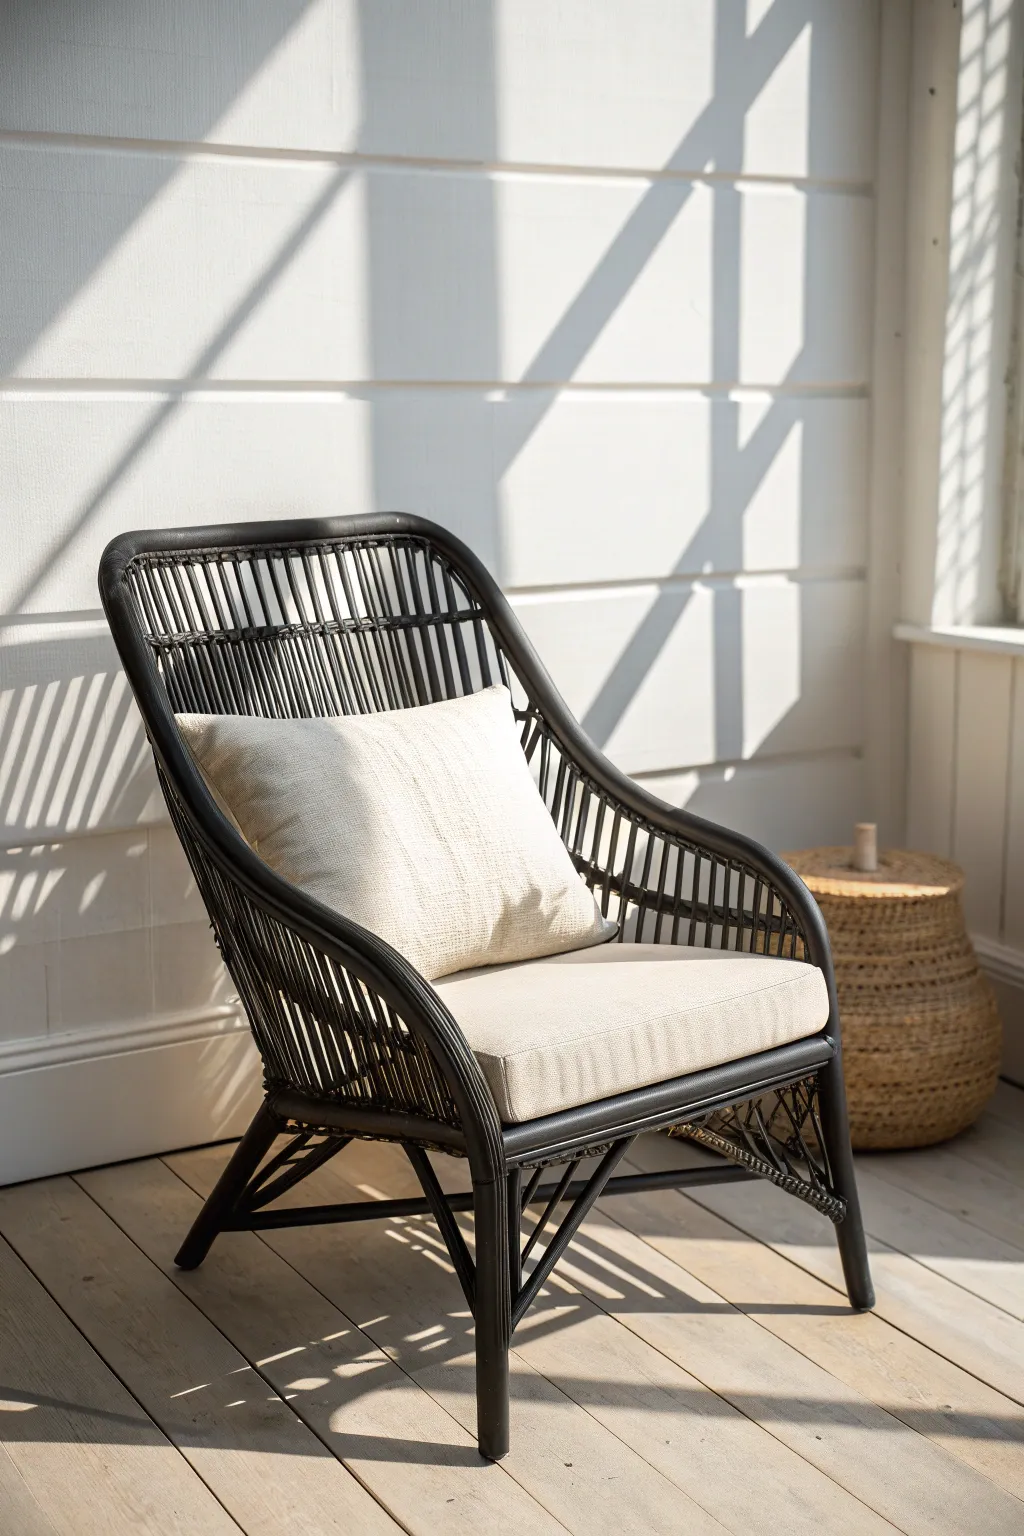
Transform a dated or worn wicker chair into a striking modern accent piece with a sleek matte black finish. This project creates a bold silhouette that pairs beautifully with neutral creamy textiles for a sophisticated, high-contrast look.
Step-by-Step
Materials
- Wicker, rattan, or bamboo chair
- Deglosser or liquid sander
- Vacuum with brush attachment
- Wire brush (soft bristles)
- Painter’s tape
- Drop cloths
- Oil-based primer (spray can recommended)
- Matte black spray paint (outdoor rated if for patio)
- Cardboard scraps
- Face mask or respirator
- Gloves
Step 1: Preparation & Cleaning
-
Assess the weave:
Begin by inspecting your chair for any loose winding or broken reeds. Secure any loose ends with a dab of wood glue and let them set completely before moving forward. -
Deep clean the crevices:
Vacuum the entire chair thoroughly using a brush attachment. Wicker loves to trap dust deep in the weave, and paint won’t stick to dust bunnies. -
Scrub the surface:
Use a soft wire brush or a stiff nylon brush to gently dislodge stubborn dirt or flaking old varnish. Be careful not to damage the natural fibers. -
Wipe down:
Clean the entire piece with a damp cloth and a mild degreasing soap. Allow the chair to dry completely in the sun; moisture trapped inside can cause the paint to peel later. -
Apply deglosser:
Instead of traditional sanding, which is difficult on woven surfaces, apply a liquid sander or deglosser with a rag. This helps the primer bite into the existing shiny finish. -
Set up your workspace:
Move the chair to a well-ventilated area and place it on a large drop cloth. I prefer using cardboard scraps to prop up the legs slightly, making it easier to spray the feet.
Drips in the Weave?
If paint pools in the wicker weave, don’t wipe it! Use a can of compressed air (like for keyboards) to gently blast the wet paint deeper into the crevices to disperse it.
Step 2: Priming the Surface
-
Choose the right primer:
Select an oil-based primer, preferably in a spray can. Water-based primers can sometimes raise the grain of natural wicker or cause it to swell. -
Flip and spray underneath:
Turn the chair upside down first. Spray the underside of the seat and the inside of the legs to ensure no original color shows through at odd angles. -
Prime the top side:
Flip the chair upright and apply a thin, even coat of primer over the entire surface. Don’t worry about perfect coverage yet; you just need a grippy base layer. -
Check for drips:
Inspect the weave immediately for any pooling primer. Use a small dry brush to smooth out drips before they harden.
Step 3: Painting & Finishing
-
First coat of black:
Shake your matte black spray paint can vigorously for at least one minute. Apply the first coat using smooth, sweeping motions, starting and stopping the spray off the furniture. -
Target the angles:
Wicker requires spraying from multiple angles (left, right, top, bottom) to penetrate the deep weave. Move around the chair constantly to hit those hidden spots. -
Let it dry:
Allow the first coat to dry according to the manufacturer’s instructions. Patience is key here to prevent tackiness. -
Second pass:
Apply a second light coat. It is better to do three thin coats than one heavy coat that drips. Focus on any areas that still look light or where the primer is peeking through. -
Inspect the finish:
Check the chair in natural light. Does the matte finish look consistent? If you see glossy spots, the paint might have pooled, or you need another light dusting. -
Cure time:
Let the chair cure for at least 24 to 48 hours before adding cushions. Even if it feels dry to the touch, the paint needs to harden fully so it doesn’t transfer to your clothes. -
Style and contrast:
Place a cream or oatmeal-colored linen cushion on the seat for that high-contrast, modern aesthetic shown in the photo.
Add Protective Feet
To keep your new black paint from chipping off the bottom, hammer in plastic glides or apply heavy-duty felt pads to the bottom of the legs once the paint is fully cured.
Enjoy the sleek, updated look of your furniture that now commands attention in any room


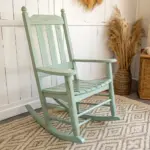
Warm Cream Instead of Stark White

Transform a tired or dark wicker rocker into a warm, inviting focal point with a soft cream finish that avoids the harshness of bright white. This project highlights the intricate texture of natural weave while creating a serene, vintage-inspired look perfect for any cozy corner.
Step-by-Step Guide
Materials
- Wicker or rattan rocking chair
- Degreasing cleaner (like TSP substitute) and a bucket
- Soft-bristle scrub brush or old toothbrush
- Vacuum with brush attachment
- Medium-grit sandpaper (120-150 grit)
- Tack cloth or microfiber rags
- Oil-based bonding primer (spray preferred for wicker)
- Warm cream spray paint (satin finish)
- Drop cloths or cardboard
- Painter’s tape
- Respirator mask and gloves
Step 1: Preparation & Cleaning
-
Inspect and Repair:
Begin by giving the chair a thorough inspection. Look for any loose unwinding reed or broken strands. If you find loose ends, secure them back into place with a dab of wood glue and secure with painter’s tape until dry. -
Vacuum Thoroughly:
Use the brush attachment on your vacuum cleaner to remove loose dust, pet hair, and debris from the deep crevices of the weave. Wicker traps dust easily, and painting over it will ruin the finish. -
Deep Clean the Wicker:
Mix a degreasing cleaner with warm water according to the package instructions. Dip your soft-bristle brush into the solution and gently scrub the entire chair. Avoid soaking the wicker; you just want to lift surface grime and old oils. -
Detail Work:
For the tightest corners and joints where grime accumulates, use an old toothbrush to agitate the dirt. I find this especially helpful around the armrests and rockers where hands and floors leave residue. -
Rinse and Dry:
Wipe the chair down with a damp, clean rag to remove soap residue. Allow the chair to dry completely, preferably in the sun or a warm, dry room for at least 24-48 hours. Painting damp wicker can lead to mold and peeling paint.
Angle Advice
Wicker hides spots easily. Between coats, flip the chair upside down to spray the hidden undersides of the weave that remain visible from standard angles.
Step 2: Priming the Surface
-
Scuff Sanding:
Once bone dry, lightly scuff the accessible smooth parts of the frame (like the rockers and arms) with medium-grit sandpaper. You don’t need to sand the intricate weave, just the solid cane pieces to help adhesion. -
Surface Wipe:
Run a tack cloth over the sanded areas to pick up every speck of dust generated during sanding. -
Setup Workspace:
Move the chair to a well-ventilated area, ideally outdoors on a calm day. Lay down large drop cloths or cardboard to protect the ground from overspray. -
Apply Primer Coat 1:
Using an oil-based bonding primer spray, apply a very light coat to the underside of the chair first. Flip it over and lightly mist the top. Keep the can moving constantly to avoid drips. -
Apply Primer Coat 2:
After the first coat is tacky or dry (check can instructions), apply a second light coat. Approach the chair from different angles—high, low, and side-to-side—to ensure the primer reaches into the woven crevices without clogging them.
Step 3: Painting the Finish
-
First Cream Pass:
Shake your warm cream spray paint vigorously for at least one minute. Hold the can about 8-10 inches away and begin spraying in sweeping motions, starting and stopping the spray off the furniture. -
Focus on Depth:
Direct your spray at a 45-degree angle to get the paint inside the weave pattern. Do not try to achieve full opacity on this first pass; multiple thin layers are the secret to a professional finish on wicker. -
Rotate and Repeat:
Move around the chair to catch missed spots. Because of the texture, it’s easy to miss shadows. I like to let this dry briefly, then walk around the chair to spot darker areas that need more coverage. -
Build the Color:
Apply 2-3 additional thin coats, allowing proper dry time between each as specified by the manufacturer. The warm cream color should look consistent and opaque, covering the original color completely but leaving the texture sharp. -
Final Cure:
Let the chair cure in a dry, safe place for several days before sitting on it or adding cushions. This ensures the paint hardens fully and won’t feel sticky or imprint on clothing.
Drip Disaster?
If you get a run or drip, don’t wipe it while wet. Let it dry completely, gently sand it smooth with fine sandpaper, and spot-spray that specific area again.
Enjoy the gentle warmth of your newly refreshed rocker as a calm addition to your living space
BRUSH GUIDE
The Right Brush for Every Stroke
From clean lines to bold texture — master brush choice, stroke control, and essential techniques.
Explore the Full Guide
Earthy Sage or Olive Refresh
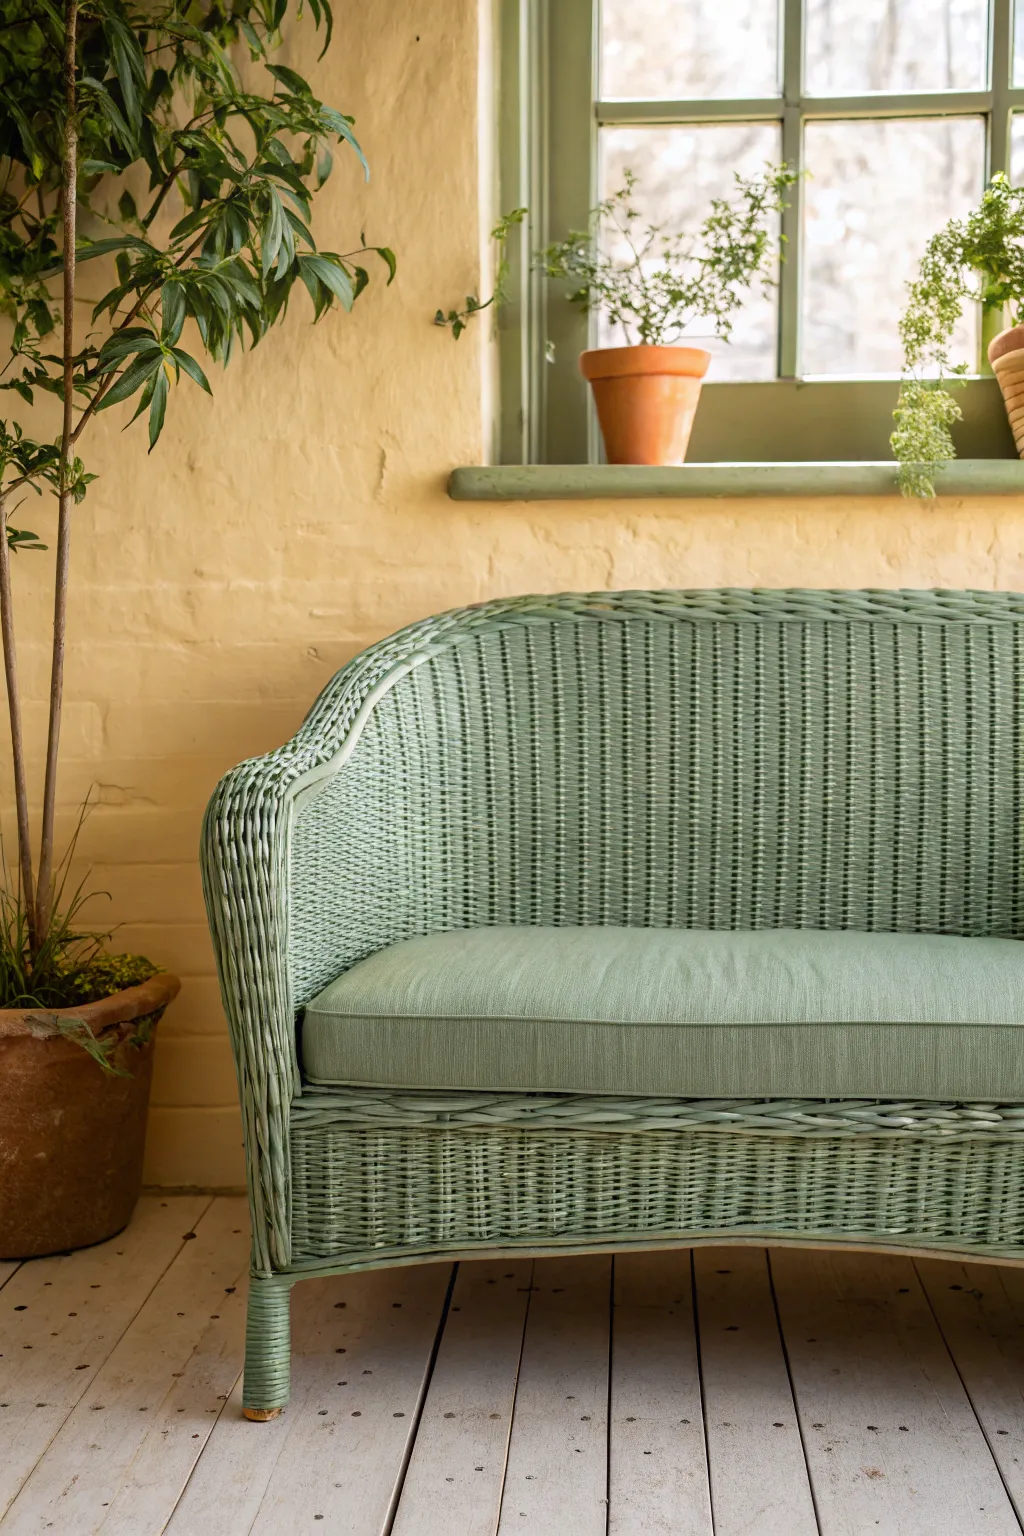
Transform a tired wicker piece into a serene focal point using a monochromatic palette inspired by nature. This project revitalizes an old loveseat with a soft, earthy sage green paint and a coordinating custom cushion cover for a seamless, designer look.
How-To Guide
Materials
- Wicker loveseat or sofa
- Wire brush or stiff-bristle scrubbing brush
- Vacuum with brush attachment
- Oil-based bonding primer
- High-quality acrylic latex paint (Satin or Semi-Gloss finish, Sage Green)
- Paint sprayer (recommended) or natural bristle brushes (2-inch and small angled)
- High-density foam cushion insert
- Sage green upholstery fabric (linen or canvas texture)
- Sewing machine and thread
- Drop cloths
- Mild detergent and bucket
Step 1: Preparation & Cleaning
-
Assess the Condition:
Examine the wicker closely for any unravelling reeds or broken strands. Use wood glue to secure loose ends and masking tape to hold them in place while the glue sets. -
Dry Brushing:
Take a wire brush or a stiff scrubbing brush and vigorously go over the entire surface. This removes flaking old paint, dirt, and loose debris caught in the weave. -
Deep Cleaning:
Mix a mild detergent with warm water. Wash the wicker thoroughly with a sponge or soft brush, ensuring you don’t soak the material too heavily, as wicker can warp. -
Vacuum Debris:
Once dry, use a vacuum with a brush attachment to pull out any remaining dust from the deep crevices of the weave. -
Protect the Area:
Lay down drop cloths in a well-ventilated area, preferably outdoors or in a garage, to catch overspray and drips.
Sticky Paint Fix
If the paint feels tacky days later (blocking), dust it lightly with clear talcum powder or rub with a dryer sheet to eliminate stickiness without changing the look.
Step 2: Priming & Painting
-
Apply Primer:
Using an oil-based bonding primer is crucial for adhesion on wicker. Spray lighter coats rather than one heavy coat to prevent drips from clogging the delicate weave pattern. -
Double Check Angles:
Wicker has many hidden spots. Turn the furniture upside down to prime the undersides and legs, ensuring no raw material is left exposed. -
First Colour Coat:
Load your paint sprayer with the sage green latex paint. Apply the first coat using smooth, sweeping motions, keeping the sprayer about 8-10 inches from the surface. -
Manual Touch-ups:
If you don’t have a sprayer, I find using a 2-inch brush works, but you must dab paint into the crevices rather than just brushing across the top. -
Second Colour Coat:
Allow the first coat to dry completely according to the can’s instructions. Apply a second thin coat to ensure full coverage and a rich, solid colour depth. -
Seal (Optional):
For extra durability, especially if the piece will be on a porch, apply a clear matte or satin polyurethane topcoat once the paint is fully cured.
Two-Tone Texture
After the sage base coat dries, dry-brush a very pale mint or cream over the raised weave. This highlights the texture and adds vintage depth.
Step 3: Cushion Styling
-
Measure the Seat:
Measure the width and depth of the seat area to cut your high-density foam. Add an inch to the dimensions if you prefer a snugger fit. -
Cut Fabric:
Cut your sage linen fabric, allowing for 1/2 inch seam allowances on all sides. You will need a top piece, a bottom piece, and a long strip for the side boxing. -
Sew Boxing:
Sew the side boxing strip to the top fabric piece, pivoting carefully at the corners to maintain a sharp, clean shape. -
Add Piping (Optional):
For the professional finish seen in the image, sew self-fabric piping into the seams between the top/bottom panels and the side boxing. -
Assemble Cover:
Attach the bottom panel, leaving the back edge open or installing a zipper. Insert the foam, close the opening, and place the cushion on the dried loveseat.
Enjoy your beautifully modernized wicker seat that brings a breath of fresh air to any room
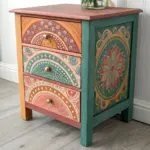
Greige for a Quiet Neutral Update
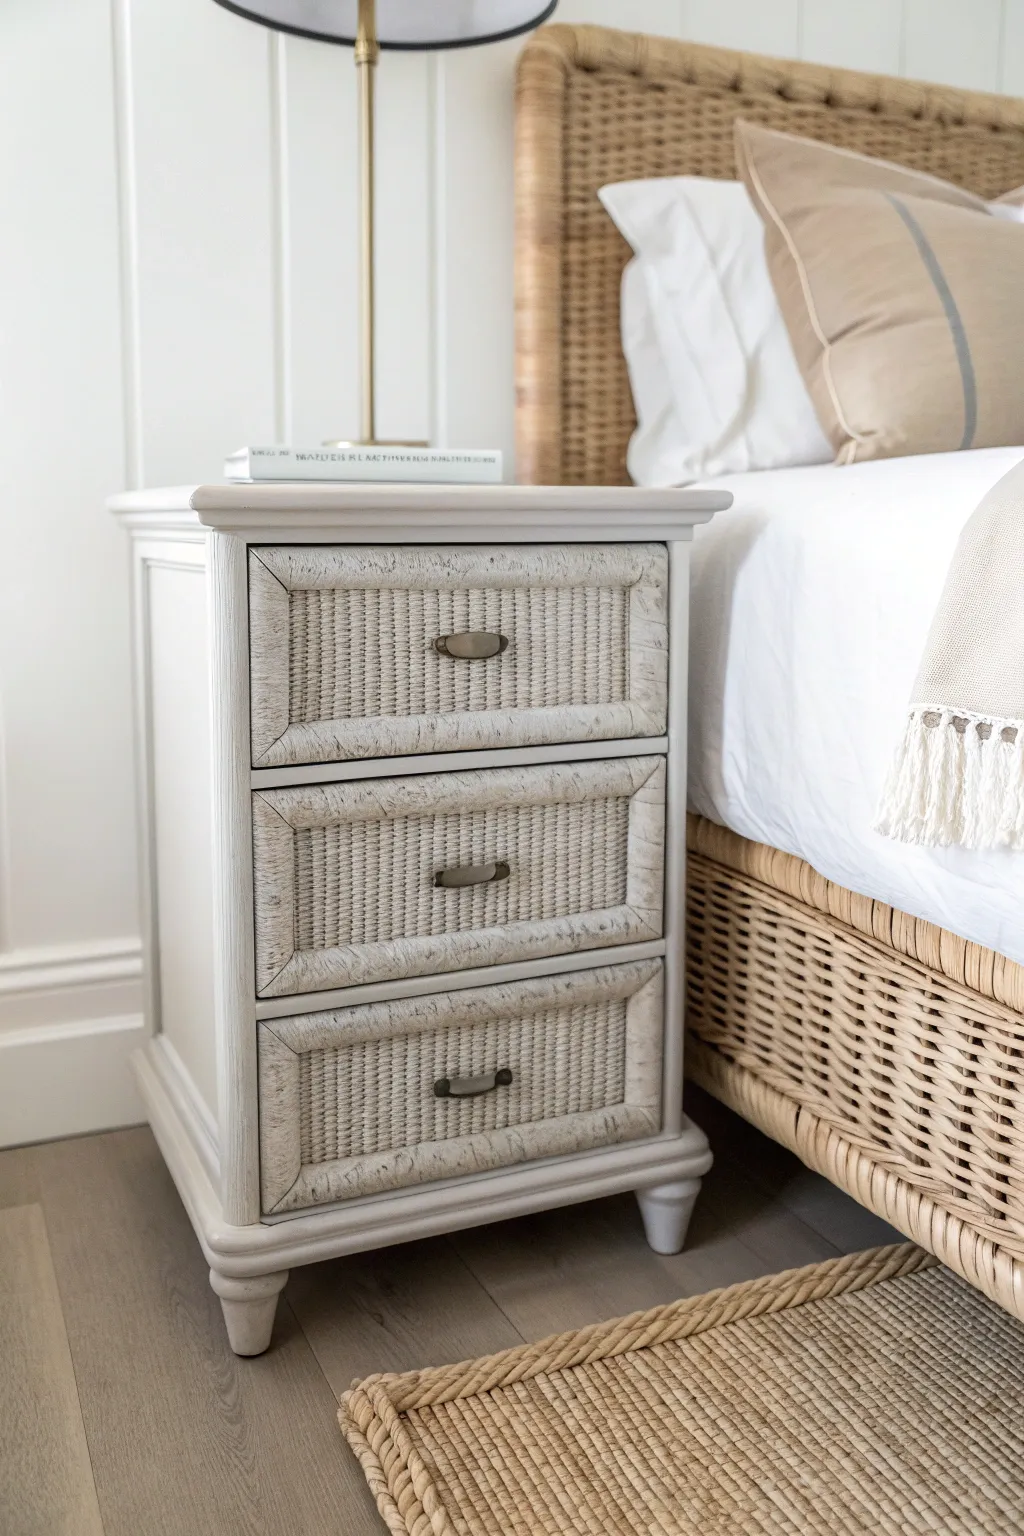
Transform a dated nightstand by updating its wicker drawers with a sophisticated greige wash that bridges the gap between coastal texture and modern neutrals. This technique softens natural fibers without hiding their character, creating a serene, tone-on-tone look.
Detailed Instructions
Materials
- Wooden nightstand with wicker/rattan drawer fronts
- Deglosser or liquid sander
- Premium chalk paint (Greige)
- White or light gray chalk paint (for dry brushing)
- Medium-grit sandpaper
- Painter’s tape
- Synthetic bristle brush (1.5 – 2 inch)
- Small chip brush or stencil brush
- Clear matte wax or polycrylic sealer
- Lint-free cloths
- Screwdriver
Step 1: Preparation
-
Remove Hardware:
Begin by removing all drawer pulls and knobs using your screwdriver. Set these aside in a labeled bag so you don’t lose any screws during the process. -
Clean and Degloss:
Wipe down the entire piece, especially the woven wicker areas, to remove dust and oils. Apply a liquid deglosser to the smooth wooden frame areas with a cloth; this helps the paint adhere without heavy sanding. -
Tape Off Wicker:
Use painter’s tape to carefully mask off the edges where the wicker panel meets the wooden frame of the drawer. This ensures a clean separation if you plan to paint the frame a solid color first.
Paint Clumping?
If paint is clogging the small weave holes, use a can of compressed air (like for keyboards) to gently blow wet paint through the gaps before it dries.
Step 2: Painting the Frame
-
Base Coat Application:
Dip your synthetic brush into the greige chalk paint. Apply smooth, even strokes to the main body of the nightstand and the wooden frames of the drawers. -
Watch for Drips:
Check corners and crevices frequently for paint buildup. Chalk paint is thick, so I like to keep a damp rag handy to quickly wipe away any heavy drips before they dry. -
Apply Second Coat:
Allow the first coat to dry completely, usually about an hour. Apply a second coat to ensure full opacity and rich color depth on the solid wood parts.
Add Metallic Depth
Mix a tiny drop of metallic bronze paint into your wax before sealing the wicker. It adds a subtle, high-end shimmer that catches the light wonderfully.
Step 3: Treating the Wicker
-
Prepare the Wash:
Remove the painter’s tape. In a small container, mix your greige paint with water in a 1:1 ratio. You want a consistency similar to heavy cream or melted ice cream. -
Apply the Wash:
Working one drawer at a time, brush the watered-down mixture thoroughly into the wicker weaving. Use a chip brush to really poke the paint into the recessed areas of the weave. -
Wipe Back Excess:
Immediately use a tint-free cloth to gently wipe the surface of the wicker. This technique removes paint from the high points while leaving it in the crevices, highlighting the texture. -
Optional Highlight:
For extra dimension, dip the very tip of a dry chip brush into your lighter white/gray paint. Offload most of it onto a paper towel until the brush is almost dry. -
Dry Brush:
Lightly drag the dry brush horizontally across the wicker. This catches only the raised textures, adding a subtle ‘limed’ or weathered look.
Step 4: Finishing and Sealing
-
Seal the Frame:
Once all paint is fully dry (overnight is best), apply a coat of clear matte wax to the smooth wooden frames. Buff it gently with a clean cloth for a silky finish. -
Seal the Wicker:
For the wicker sections, a spray-on polycrylic sealer is often easier than wax, as it gets into the grooves without clumping. Apply a light misting coat. -
Reattach Hardware:
Clean your original hardware or spray paint it a matte bronze for a modern update. Simply screw the pulls back into place once the sealer has cured.
Place your newly refreshed nightstand by the bed and enjoy the calm, textured ambiance it brings to the room

PENCIL GUIDE
Understanding Pencil Grades from H to B
From first sketch to finished drawing — learn pencil grades, line control, and shading techniques.
Explore the Full Guide
High-Gloss “Lacquer” Look
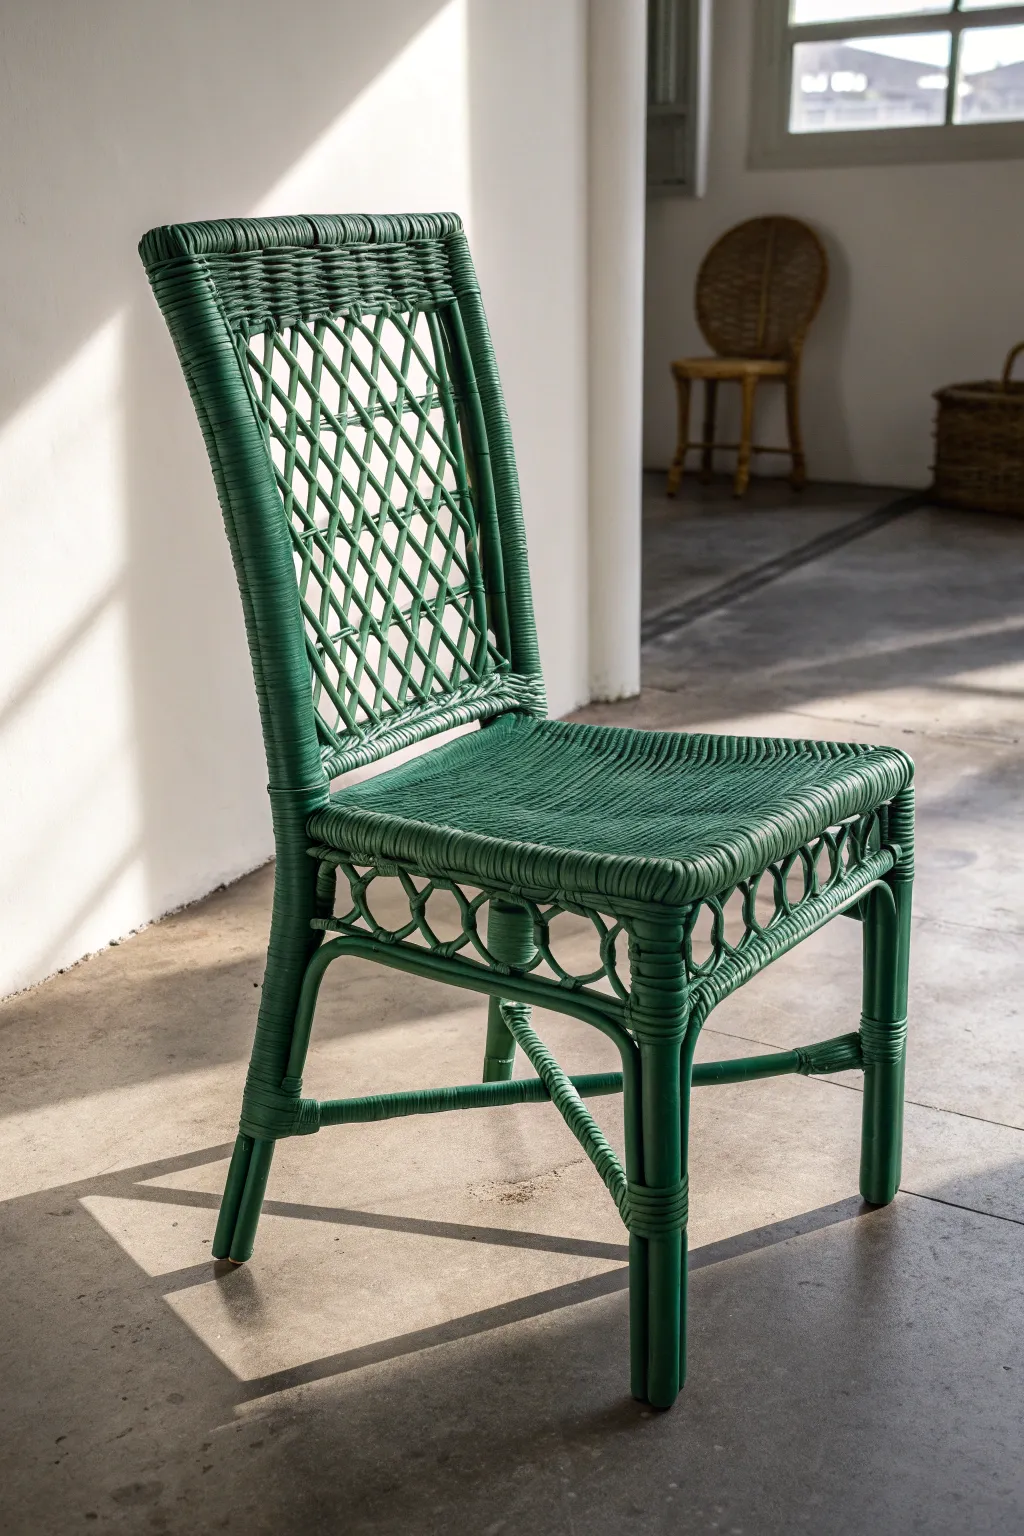
Transform a tired wicker piece into a high-end statement chair with a rich, glossy emerald finish that mimics the look of expensive lacquer. This project relies on thorough prep and multiple thin coats to achieve that deep, wet-look shine without losing the texture of the weave.
Step-by-Step
Materials
- Wicker chair (vintage or new)
- Vacuum with brush attachment
- Soft-bristle scrub brush
- Mild degreasing soap (like dish soap)
- Bucket of warm water
- Sandpaper (150-grit)
- Tack cloth
- Spray primer (oil-based works best for wicker)
- High-gloss spray paint (Emerald or Hunter Green)
- Clear high-gloss polyurethane spray (optional topcoat)
- Drop cloths or cardboard
- Respirator mask
- Painter’s tape (if masking off legs/hardware)
Step 1: Deep Cleaning & Preparation
-
Vacuum Thoroughly:
Start by vacuuming every inch of the chair using a brush attachment. Wicker loves to trap dust deep in the crevices, so go over the woven seat and backrest from multiple angles to dislodge hidden debris. -
Scrub the Weave:
Mix a mild degreasing soap with warm water. Dip your soft-bristle scrub brush into the solution and gently scrub the bamboo and rattan fibers. Focus on removing any oils or sticky residue that might repel paint. -
Rinse and Dry:
Rinse the chair lightly with a hose or a clean wet sponge—don’t soak it completely. Place the chair in a breezy, sunny spot or use a fan to ensure it is 100% bone dry before proceeding, which may take up to 24 hours. -
inspect for Damage:
Check for any loose reeds or unwinding binding cane on the legs. Glue these down with a dab of wood glue and secure them with painter’s tape until dry so your finish will be smooth. -
Light Scuffing:
Use 150-grit sandpaper to lightly scuff the glossy surfaces of the frame. You don’t need to sand the intricate weave deeply, just the smoother structural poles to help the primer grip. -
Remove Dust:
Wipe the entire piece down with a tack cloth to pick up the fine sanding dust. This step is crucial for a high-gloss finish, as any remaining dust will show up as rough bumps.
Step 2: Priming the Surface
-
Set Up Workspace:
Lay down your drop cloths in a well-ventilated area, preferably outdoors on a calm day. Prop the chair up on blocks if possible to easily reach the bottom of the legs. -
Apply First Coat of Primer:
Using an oil-based spray primer, apply a light coat to the underside of the chair first. Getting the awkward angles done early prevents overspray from ruining your top finish later. -
Flip and Prime Top:
Flip the chair upright and apply a thin coat of primer to the rest of the piece. aim the can from different angles—left, right, up, and down—to penetrate the deep weave without flooding it. -
Inspect Coverage:
Allow the primer to dry according to the can’s instructions. Look for missed spots in the lattice work; touch these up lightly rather than trying to cover everything in one heavy pass.
Angle Attack
Wicker has many hidden crevices. When spraying, hold the can at a 45-degree angle not just horizontally, but vertically too, to ensure the paint wraps around the round weaving strands completely.
Step 3: Achieving the High-Gloss Finish
-
First Color Pass:
Shake your high-gloss emerald spray paint vigorously for at least one minute. Apply the first coat in swift, sweeping motions about 10-12 inches away from the surface. Keep the coat very thin to avoid drips. -
Rotate and Repeat:
Walk around the chair as you spray to catch the blind spots in the weaving. I find that spraying in short bursts helps control the accumulation of paint in the diamond patterns of the backrest. -
Inter-Coat Drying:
Let this first coat dry until it is tacky but set (usually about 15-20 minutes). Applying the next coat too soon can cause the paint to sag or wrinkle. -
Second Color Coat:
Apply a second coat, slightly heavier than the first but still controlled. High-gloss paint is unforgiving, so watch the vertical legs closely for runs and smooth them immediately with a gloved finger if needed. -
Flip for Final Coverage:
Once the top is dry to the touch, carefully flip the chair onto a soft towel to paint the undersides of the stretchers and seat. This ensures that no bare wood is visible from low angles. -
The Gloss Coat (Optional):
For that ‘wet’ lacquer look, wait 24 hours for the green paint to cure fully, then apply a layer of clear high-gloss polyurethane spray. This adds depth and extra durability. -
Final Cure Time:
Let the chair cure undisturbed for at least 48 to 72 hours before sitting on it. High-gloss finishes can remain soft for days, and you don’t want fabric textures imprinted into your beautiful new paint job.
Level Up: Gilded Feet
Add a touch of regency flair by masking off the bottom two inches of each leg after the green paint cures. Spray the tips with metallic gold paint for a dipped ‘socks’ effect that elevates the look.
Now you have a stunning, jewel-toned accent chair that brings a sophisticated pop of color to any corner of your home
Two-Tone Frame and Weave Contrast
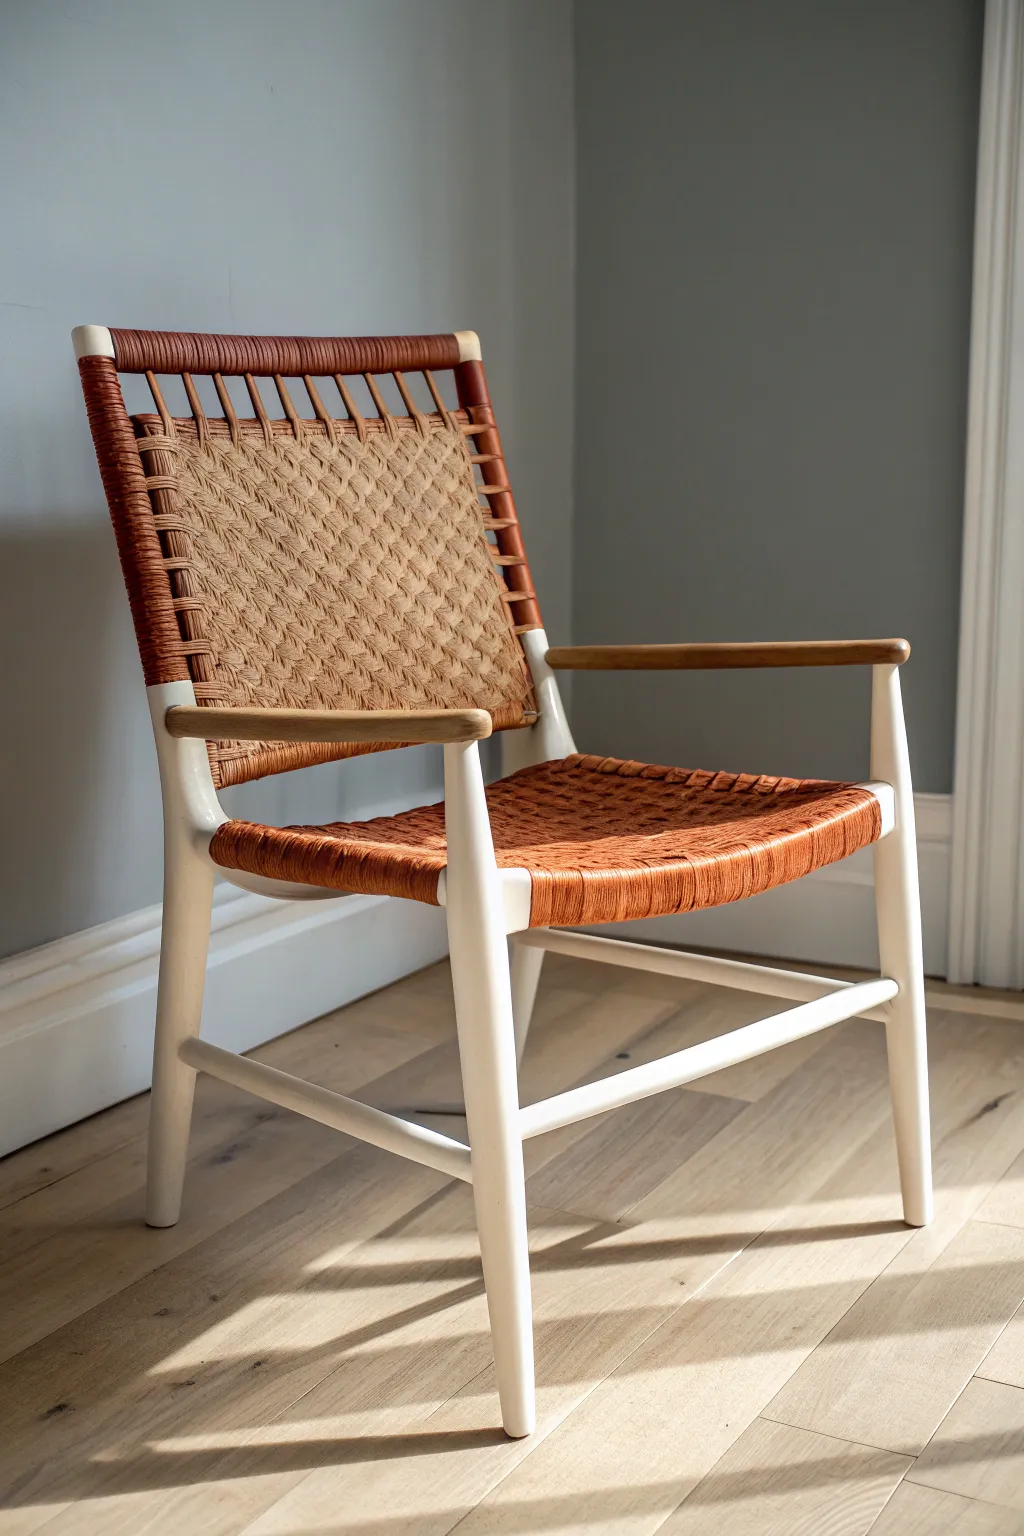
Transform a dated wicker chair into a contemporary statement piece by combining crisp white paint with warm, natural wood tones. This project highlights the intricate texture of the weave against a sleek, modern frame for a high-contrast, effortless look.
Step-by-Step Guide
Materials
- Wicker chair with wooden frame
- Medium-grit sandpaper (120-150 grit)
- Fine-grit sandpaper (220 grit)
- Painter’s tape (high quality)
- Plastic drop cloths or old newspapers
- Primer spray suitable for wood and wicker
- Satin finish spray paint (White)
- Wood stain (Honey or Teak shade)
- Clear matte polyurethane sealant
- Small detail paintbrush
- Clean lint-free rags
- Mild detergent and water
Step 1: Preparation and Cleaning
-
Clean the Surface:
Begin by thoroughly cleaning the entire chair using mild detergent and water. Use a soft-bristle brush to gently scrub the woven areas, which often trap dust and grime. Let the chair dry completely in a sunny spot or well-ventilated area before moving on, as trapped moisture can ruin the finish. -
Initial Sanding:
Scuff the wooden frame legs and armrests with medium-grit sandpaper to remove the old finish or glossy sheen. This helps the new paint and stain adhere properly. -
Inspect the Weave:
Check the wicker strands for any loose ends or breaks. Glue down any stray pieces with a dab of wood glue and secure them with tape until dry to ensure a smooth final surface.
Loose Wicker Fix
If you find a broken strand in step 1, don’t cut it. Soak it in warm water to make it pliable, tuck it back into the weave pattern, and secure with strong wood glue.
Step 2: Refinishing the Natural Weave
-
Tape Off the Frame:
Carefully wrap painter’s tape around the wooden frame parts that touch the woven sections. We want to treat the wicker first to refresh its color. -
Apply Stain to Wicker:
If your wicker is faded, apply a light coat of honey or teak-colored stain using a rag or brush. Work the stain into the crevices of the weave. -
Wipe Excess Stain:
Immediately wipe away any excess stain from the high points of the weave to highlight the texture. Allow this to dry according to the can’s instructions, usually overnight. -
Seal the Wicker:
Spray a light coat of clear matte polyurethane over the woven seat and backrest to protect the fibers and lock in the color.
Step 3: Painting the Frame
-
Reverse Masking:
Once the wicker is fully dry, cover the entire woven seat and backrest heavily with plastic sheeting and painter’s tape. Press the tape firmly along the edges where the weave meets the wood to prevent paint bleed. -
Protect the Armrests:
Since we are keeping the armrests natural exposed wood, wrap them meticulously with painter’s tape. Ensure the line where the white paint will meet the natural armrest is perfectly straight. -
Prime the Legs:
Apply a thin, even coat of primer to the exposed wooden legs and frame. Use short bursts to avoid drips. -
Sanding the Primer:
After the primer drives, lightly run fine-grit sandpaper over the frame to knock down any fuzziness for a professional finish. Wipe away the dust. -
Painting the White Coat:
Spray the satin white paint onto the legs and frame structure. Hold the can about 8-10 inches away and keep your hand moving. I find that multiple thin coats always look better than one heavy coat. -
Second Coat:
Apply a second or third coat of white paint as needed for full opacity, allowing proper drying time between each layer.
Crisp Paint Lines
Run a credit card firmly over the edge of your painter’s tape before spraying. This seals the edge tight and stops the white spray paint from creeping onto your natural weave.
Step 4: Finishing Touches
-
Remove Tape:
Carefully peel away all the tape and plastic while the final coat of paint is dry to the touch but not fully cured; this helps prevent the paint from peeling up with the tape. -
Refinish Armrests:
If the exposed wooden armrests look dull, gently sand them with fine-grit paper and rub in a small amount of the stain used earlier, or simply seal them with clear wax for a natural look. -
Touch Up:
Inspect the transition points between the white frame and the woven seat. Use a small detail brush to careful fix any spots where paint might have bled or missed. -
Final Cure:
Let the chair sit unused for at least 24-48 hours to allow the paint and sealants to harden completely before sitting on it.
Now you have a stunning, two-tone chair that looks like a high-end designer piece ready for your living room


Antiqued Glaze in the Low Spots
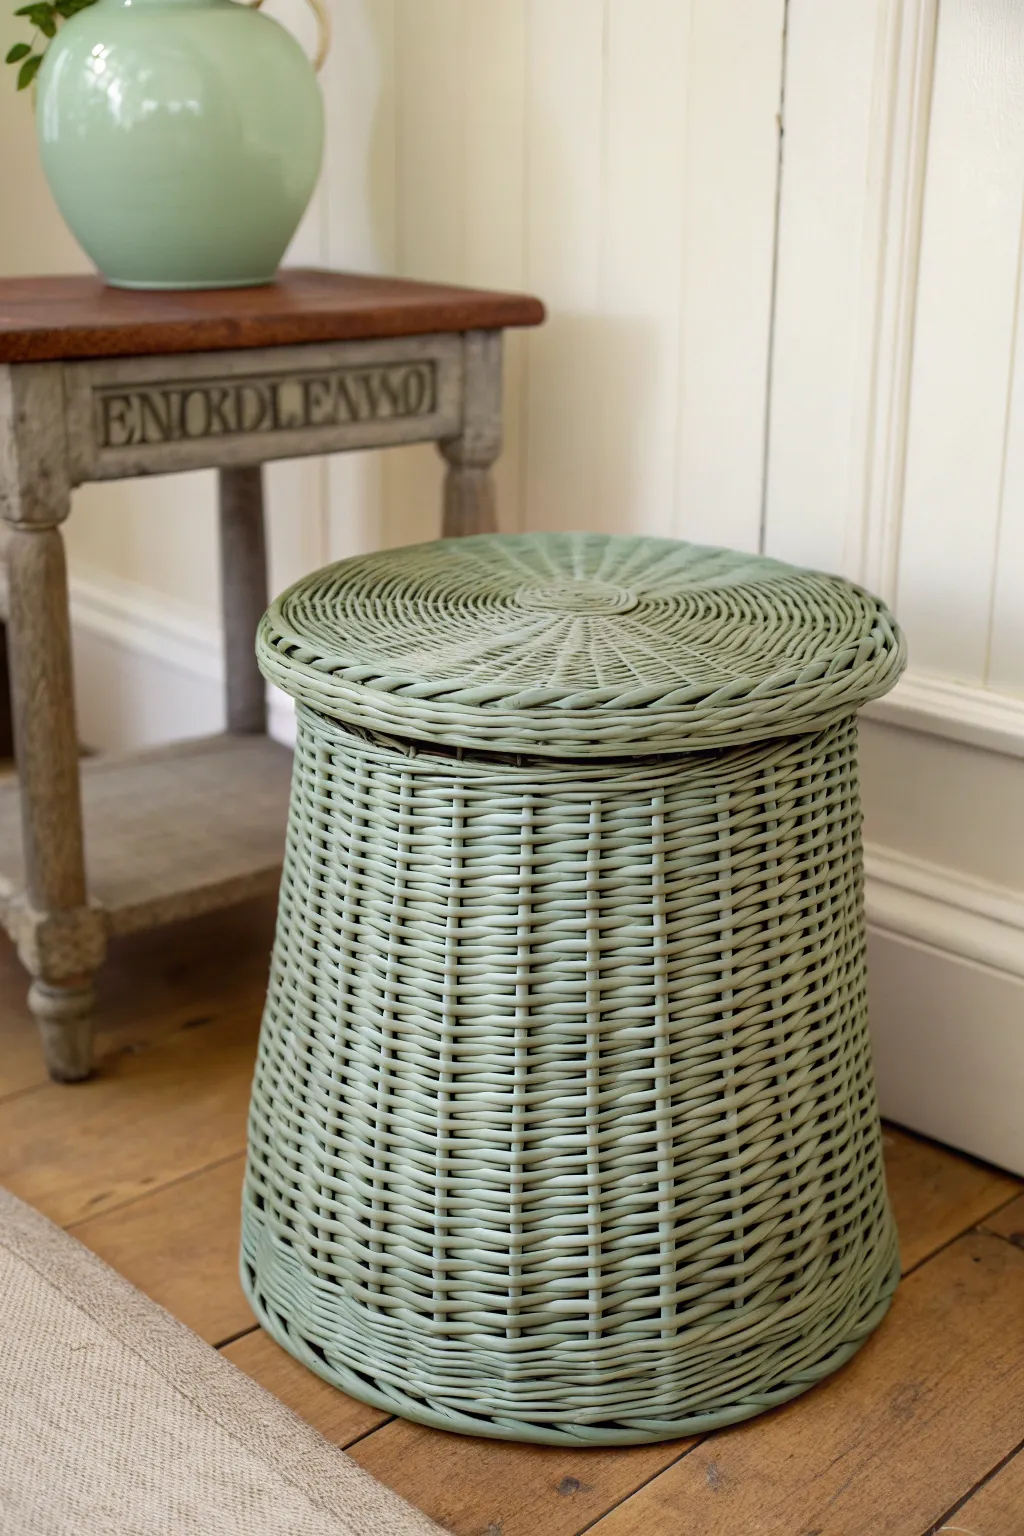
Transform a plain or worn wicker basket into a vintage-inspired piece with this soft, sage green makeover. The secret lies in using a carefully applied glaze to darken the recessed areas, making the texture of the weave truly pop.
Step-by-Step Guide
Materials
- Wicker hamper or basket with lid
- Degreaser or mild soap (like TSP substitute)
- Scrub brush
- Primer spray paint (shellac-based is ideal for wicker)
- Sage green spray paint (satin or matte finish)
- Dark wax or antiquing glaze (burnt umber shade)
- Lint-free rags or cheesecloth
- Soft bristle chip brush
- Clear matte sealer (spray)
- Drop cloth
- Painter’s tape
Step 1: Preparation & Base Coat
-
Clean thoroughly:
Begin by removing any dust or grime from the wicker. Use a scrub brush and a degreaser or mild soap solution to get deep into the crevices. -
Rinse and dry:
Rinse the hamper completely with water and set it in a warm, breezy spot or direct sunlight. It is crucial that the wicker is 100% dry before painting to prevent mold or peeling. -
Set up workspace:
Lay down a drop cloth in a well-ventilated area. If your hamper has any hardware or handles you want to protect, cover them with painter’s tape now. -
Prime the surface:
Apply a thin coat of shellac-based primer. I find spray primer best here because it reaches into the weave without glopping. This step seals the natural fibers and prevents tannins from bleeding through. -
Check coverage:
Inspect the piece from different angles. You don’t need a solid opaque block of white, but ensure the primer has reached the deeper recesses. -
Apply first color coat:
Shake your sage green spray paint can vigorously. Apply a light, even coat, holding the can about 8-10 inches away and moving in sweeping motions. -
Build the color:
Once the first coat is dry to the touch (usually 15-20 minutes), apply a second coat. It’s better to do three thin coats than one heavy drip-prone coat. -
Inspect the rim:
Don’t forget to flip the lid over and spray the underside of the rim where it might show when closed. -
Full cure:
Allow the base color to dry completely, preferably overnight. The paint needs to be hard enough to withstand the friction of the glazing process.
Too Much Grime?
If you applied too much dark glaze and it looks muddy, dampen a clean rag with a little mineral spirits (for wax) or water (for acrylic glaze) to lift the excess pigment.
Step 2: Antiquing & Sealing
-
Prepare the glaze:
If using a dark wax, have it ready on a palette. If using a liquid glaze, mix a small amount of dark brown paint with a glazing medium until it’s translucent. -
Apply to sections:
Work in small sections—about 6 inches square at a time. Use a cheap chip brush to dab the glaze or wax deeply into the woven texture. -
Wipe back immediately:
Before the glaze dries, take a lint-free rag and wipe the surface gently. You want to remove the dark color from the raised high points while leaving it settled in the low cracks. -
Check consistency:
Step back frequently to ensure the level of ‘dirt’ or aging looks consistent across the whole piece. If an area looks too dark, use a clean rag to buff it more aggressively. -
Focus on the lid:
Pay special attention to the spiral pattern on the lid. The glaze settles beautifully here, emphasizing the circular motion of the weave. -
Dry the glaze:
Let the antiquing medium set. Glazes dry quickly, but waxes may need several hours or overnight to harden properly. -
Seal the finish:
To protect your work, especially if the hamper will be handled often, apply a final coat of clear matte spray sealer. -
Final inspection:
Look for any shiny spots or uneven finish. A quick second pass with the sealer usually fixes any inconsistencies.
Liner Upgrade
Make the hamper functional by sewing a simple drawstring canvas liner. Fold the top over the rim to protect delicate clothes from snagging on the painted wicker.
Now you have a beautifully aged piece that adds vintage character to any corner of your room
Ombre Fade on a Peacock Chair
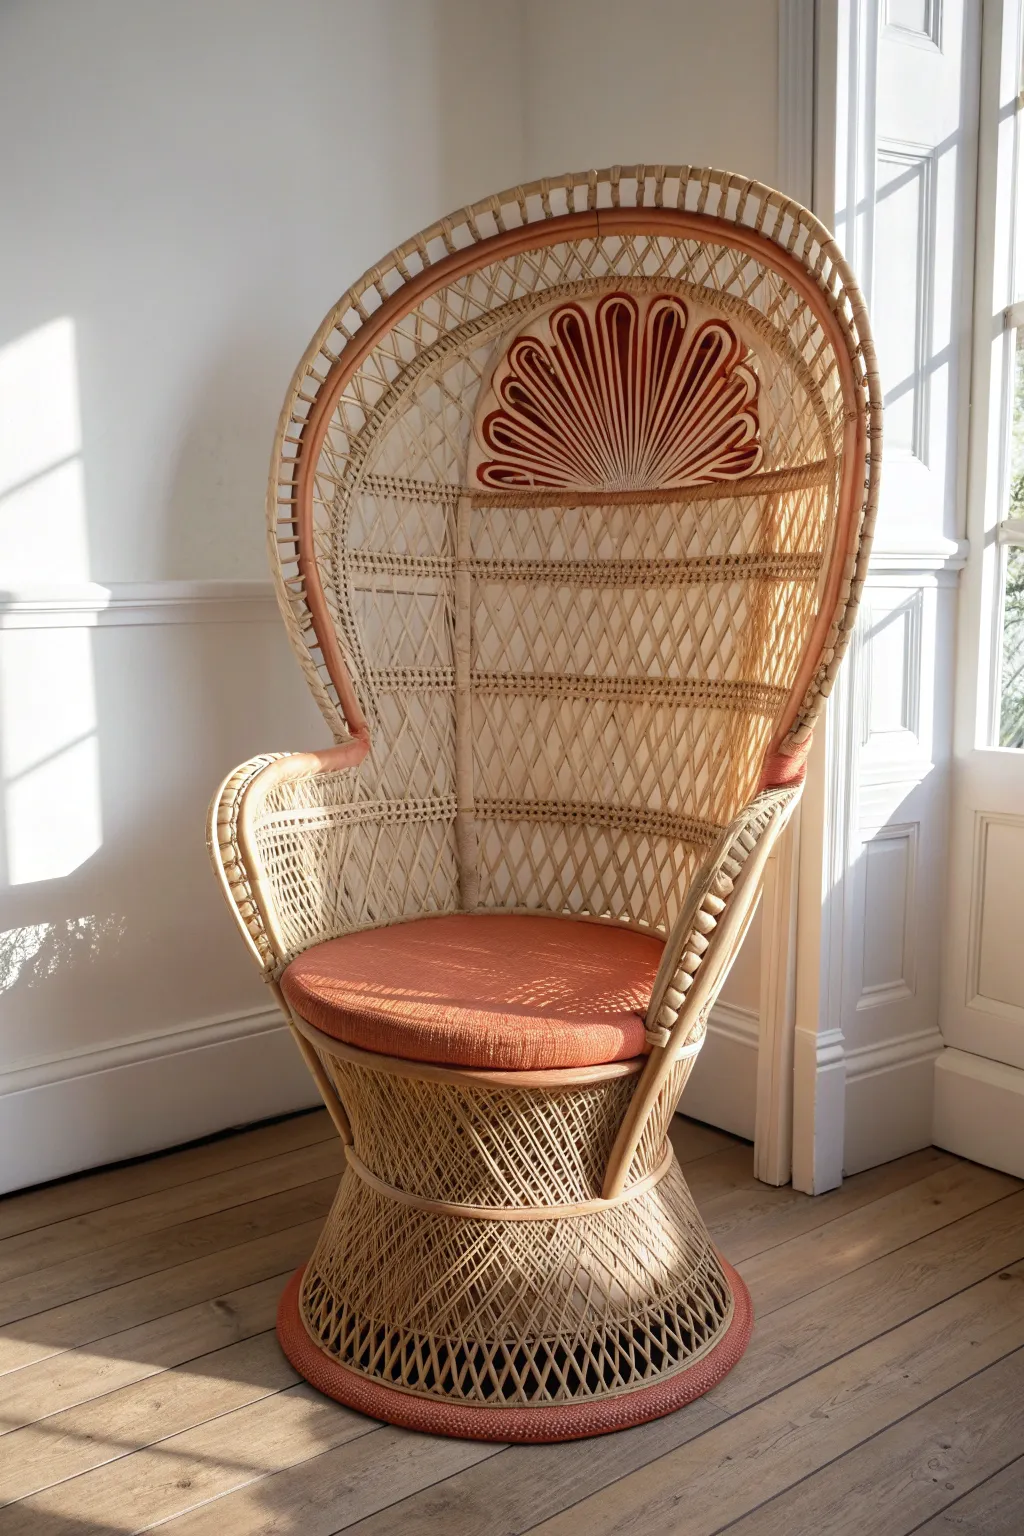
Transform a vintage peacock chair into a stunning accent piece by blending natural rattan with warm, earthy tones. This project uses a subtle ombre technique on the fan back and bold, solid accents to create a cohesive, sunset-inspired look.
Step-by-Step
Materials
- Wicker peacock chair (clean and dry)
- Chalk paint or acrylic paint (Terracotta/Burnt Orange)
- Chalk paint (White or Cream for mixing)
- Clear spray sealer or wax for wicker
- Various paintbrushes (including small detail brushes and a larger chip brush)
- Painter’s tape
- Sandpaper (medium grit)
- Drop cloth
- Water bottle (mist setting)
- Small mixing bowls or cups
- Round foam cushion form (if needed)
- Upholstery fabric (matching Terracotta)
Step 1: Preparation and Base Work
-
Clean the surface:
Before painting, thoroughly vacuum the chair with a brush attachment to remove dust from the woven crevices. Wipe it down with a damp cloth and mild soap solution, then let it dry completely in the sun. -
Inspect for damage:
Check for any loose reeds or wrapping. Glue down stray pieces with wood glue and secure them with painter’s tape while they dry to ensure a smooth painting surface later. -
Protect the floor:
Spread your drop cloth in a well-ventilated area. Place the chair in the center, ensuring you have 360-degree access to move around it. -
Define the color zones:
Decide which areas will remain natural and which will be painted. For this look, we are targeting the thick structural frame of the backrest, the decorative fan detail at the top, and the very bottom ring of the base.
Mist Method
Keep a spray bottle of water handy. If your paint lines look too harsh on the wicker, a quick spritz of water helps drag and feather the acrylic for a softer fade.
Step 2: Painting the Accents
-
Mix your base color:
Pour your terracotta paint into a container. If using thick chalk paint, I prefer to water it down slightly (about 10% water) so it penetrates the woven texture more easily without clogging. -
Paint the bottom ring:
Start at the base. Apply the solid terracotta color to the thick, wrapped ring at the very bottom of the chair. Use a medium brush and work the paint into the wraps for full coverage. -
Outline the fan shape:
Moving to the high back, identify the decorative ‘fan’ or ‘shell’ motif woven into the upper center. Use a smaller artist’s brush to carefully paint the outlines of these shapes with your solid terracotta color. -
Fill the fan details:
Continue painting the interior loops of the fan design. Go slowly here; precision creates a high-end look. Keep a damp rag nearby to quickly wipe any slips on the surrounding natural wicker. -
Paint the frame border:
Apply the solid terracotta color to the thick, curved outer frame of the backrest. Follow the curve all the way down to the armrests, ensuring the paint covers the wrapped binding completely.
Metallic Pop
Add a thin line of gold leaf or metallic gold paint along the very edge of the fan detail for a glamorous, boho-luxe finish.
Step 3: Creating the Ombre Effect
-
Create a lighter wash:
In a separate cup, mix your terracotta paint with white paint (about 50/50) and add water to create a semi-transparent wash. -
Apply the mid-tone:
Apply this lighter mix to the wicker immediately adjacent to your painted fan detail. Use a dry-brush technique, wiping most paint off the brush first, to feather the color outward. -
Blend firmly:
While the paint is wet, use a clean, slightly damp brush to blur the edges where the paint meets the natural wicker. This eliminates harsh lines. -
Add the lightest highlight:
Mix an even paler version of the coral (mostly white with a drop of terracotta). Lightly highlight the very top tips of the fan detail to give it dimension and a sun-bleached effect.
Step 4: Finishing Touches
-
Seal the paint:
Once all paint is perfectly dry (wait at least 4-6 hours), spray the painted areas with a clear matte sealer. This protects the paint from chipping when the wicker flexes. -
Prepare the cushion:
While the chair dries, cut a piece of high-density foam to fit the seat circle if you don’t have an existing cushion. Trace the seat shape onto your fabric, adding an inch for seam allowance. -
Sew the cushion cover:
Sew your terracotta fabric into a simple round cover. If you aren’t a sewer, wrapping the fabric tightly around the foam and securing it with safety pins or fabric glue on the underside works perfectly for a stationary cushion. -
Final Assembly:
Place the cushion onto the seat. Check the painted areas one last time for any missed spots in the woven texture and touch up with a tiny brush if necessary.
Now step back and admire how a simple pop of color brings fresh life to this classic silhouette
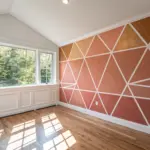
Color-Blocked Panels for Graphic Punch
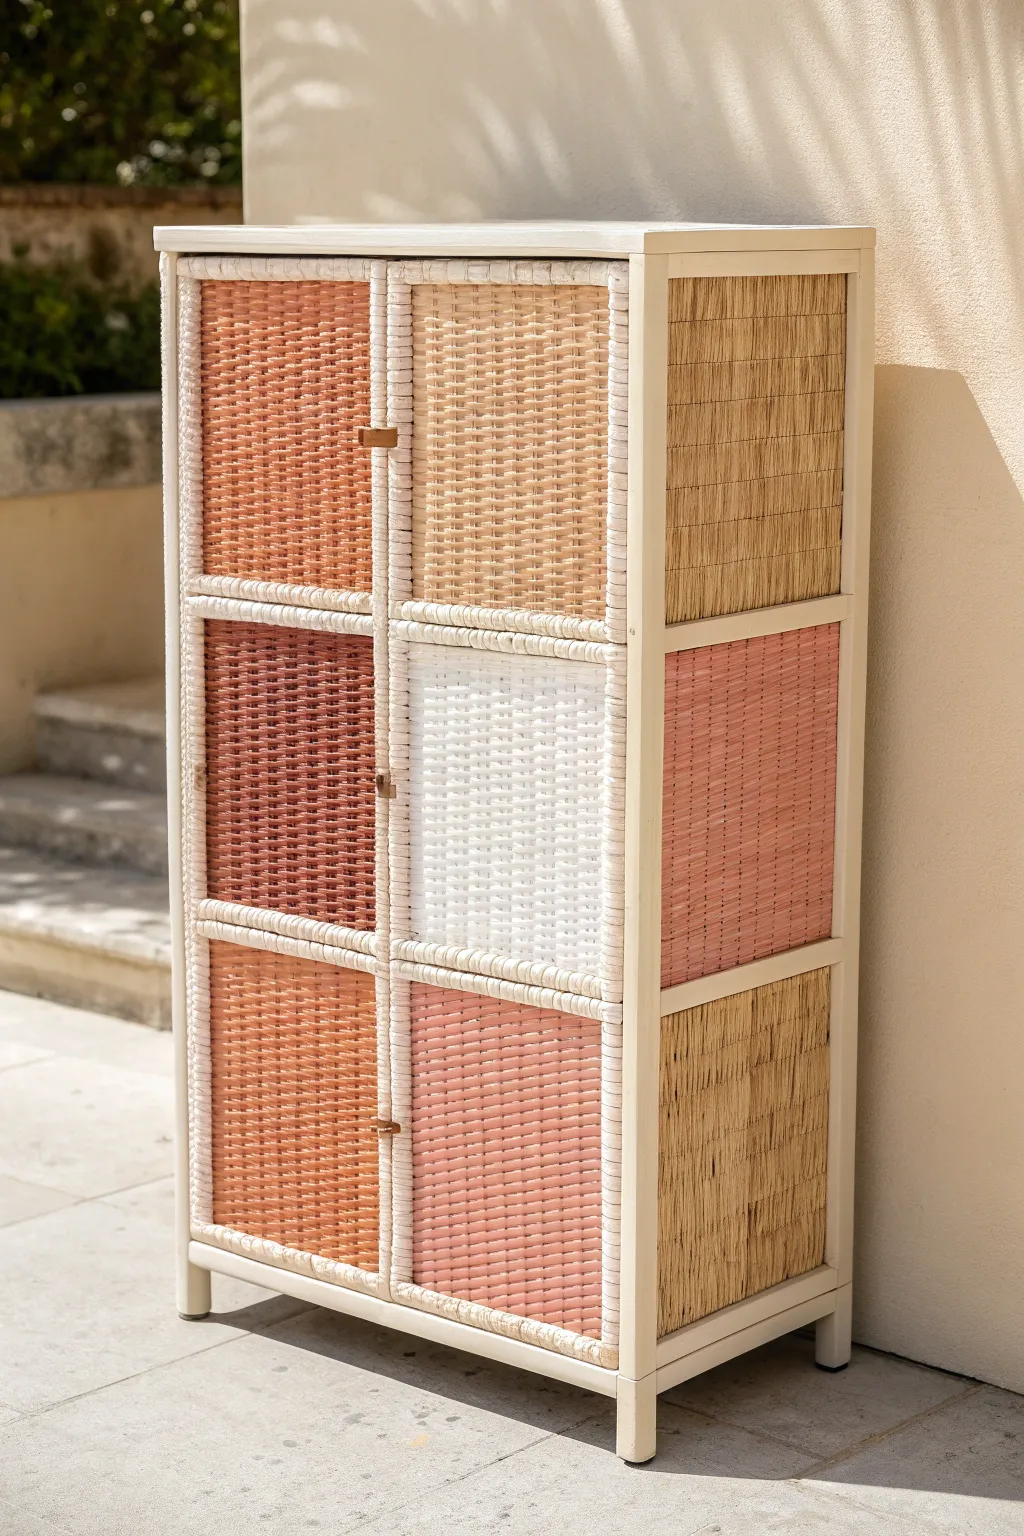
Transform a standard wicker shelving unit into a piece of geometric art with this clever color-blocking technique. The interplay of soft terra cottas, creams, and natural tones creates a warm, punchy graphic look that instantly modernizes any patio or sunroom.
Detailed Instructions
Materials
- Wicker or rattan cabinet with panel doors
- Sanding sponge (medium grit)
- Clean tack cloths
- Painter’s tape (multi-surface or delicate depending on wicker condition)
- Cream-colored chalk or mineral paint (for frame)
- Acrylic paints in palette colors: Terra cotta, peach, cream, dusty pink
- Synthetic fluted brushes (various sizes)
- Clear matte spray sealer
- Small leather scraps (optional, for pulls)
- Gold paper fasteners or small screws
Step 1: Prep and Prime
-
Clean thoroughly:
Begin by vacuuming the entire cabinet with a brush attachment to remove dust from the crevices. Wipe down all surfaces with a damp cloth and mild soap solution to strip away oils or old polish. -
Sand the frame:
Lightly scuff the main structural wood frame with a medium-grit sanding sponge. You don’t need to strip it bare, but you want to create enough ‘tooth’ for the paint to grip. -
Protect the panels:
If you plan to leave any panels natural (like the side panels in the reference photo), tape them off carefully now. Cover large areas with paper or plastic, securing the edges with painter’s tape. -
Paint the frame:
Apply a coat of cream-colored chalk or mineral paint to the structural frame and the woven trim surrounding the panels. Use a smaller round brush to get into the decorative rope twists. -
Check for coverage:
Allow the first coat to dry completely. Inspect for missed spots—wicker eats paint—and apply a second coat to the frame if necessary for solid opacity.
Paint Consistency
Don’t use spray paint for the panels. It’s too hard to control for color-blocking. Use slightly thinned brush-on acrylics for precision.
Step 2: Color Blocking
-
Map your colors:
Sketch a quick diagram of your cabinet’s grid. Decide which color goes in which square to ensure a balanced distribution of tones—mix your darks and lights so they aren’t clustered together. -
Tape interior edges:
Apply tape along the freshly painted frame edges that border the woven panels. This protects your cream frame while you paint the colorful inserts. -
Mix your palette:
Prepare your acrylic colors. I find that slightly watering down the paint (just a tiny splash) helps it flow into the woven texture better than thick paint straight from the tube. -
Paint the first color group:
Start with your darkest terra cotta shade. Paint all panels assigned to this color at once. Use a dabbing or stippling motion rather than long strokes to work paint into the weave. -
Apply lighter tones:
Move on to your peach and dusty pink sections. Rinse your brush thoroughly between colors, or use separate brushes to keep the tones muddying. -
Paint the cream panels:
Fill in the remaining panels with a cream shade that matches or slightly contrasts with your frame color. This negative space is crucial for the graphic look. -
Detail side panels:
If you have side panels like the example, decide whether to paint them or leave them natural. For a two-tone look, paint the top and bottom sections while leaving the middle natural. -
Touch up lines:
Once the panels are dry to the touch, slowly peel back the painter’s tape. Use a small artist’s brush to tidy up any bleed-through where the panels meet the frame.
Go Ombré
Instead of random blocks, paint the panels in a gradient from dark terra cotta at the bottom to pale cream at the top for a sunset effect.
Step 3: Finishing Touches
-
Seal the work:
Spray the entire piece with a clear matte sealer. This is vital for wicker, as it prevents the paint from chipping when the material flexes. -
Cut leather pulls:
Cut small rectangular strips of leather, about 1 inch wide and 3 inches long. Fold them in half to create loop handles. -
Attach hardware:
Drill a small pilot hole through the leather ends and the cabinet door frame. Secure the leather loops using brass paper fasteners or small wood screws.
Step back and admire how a simple grid of colors has turned a plain storage unit into a custom statement piece
Paint-Dipped Legs and Feet Detail
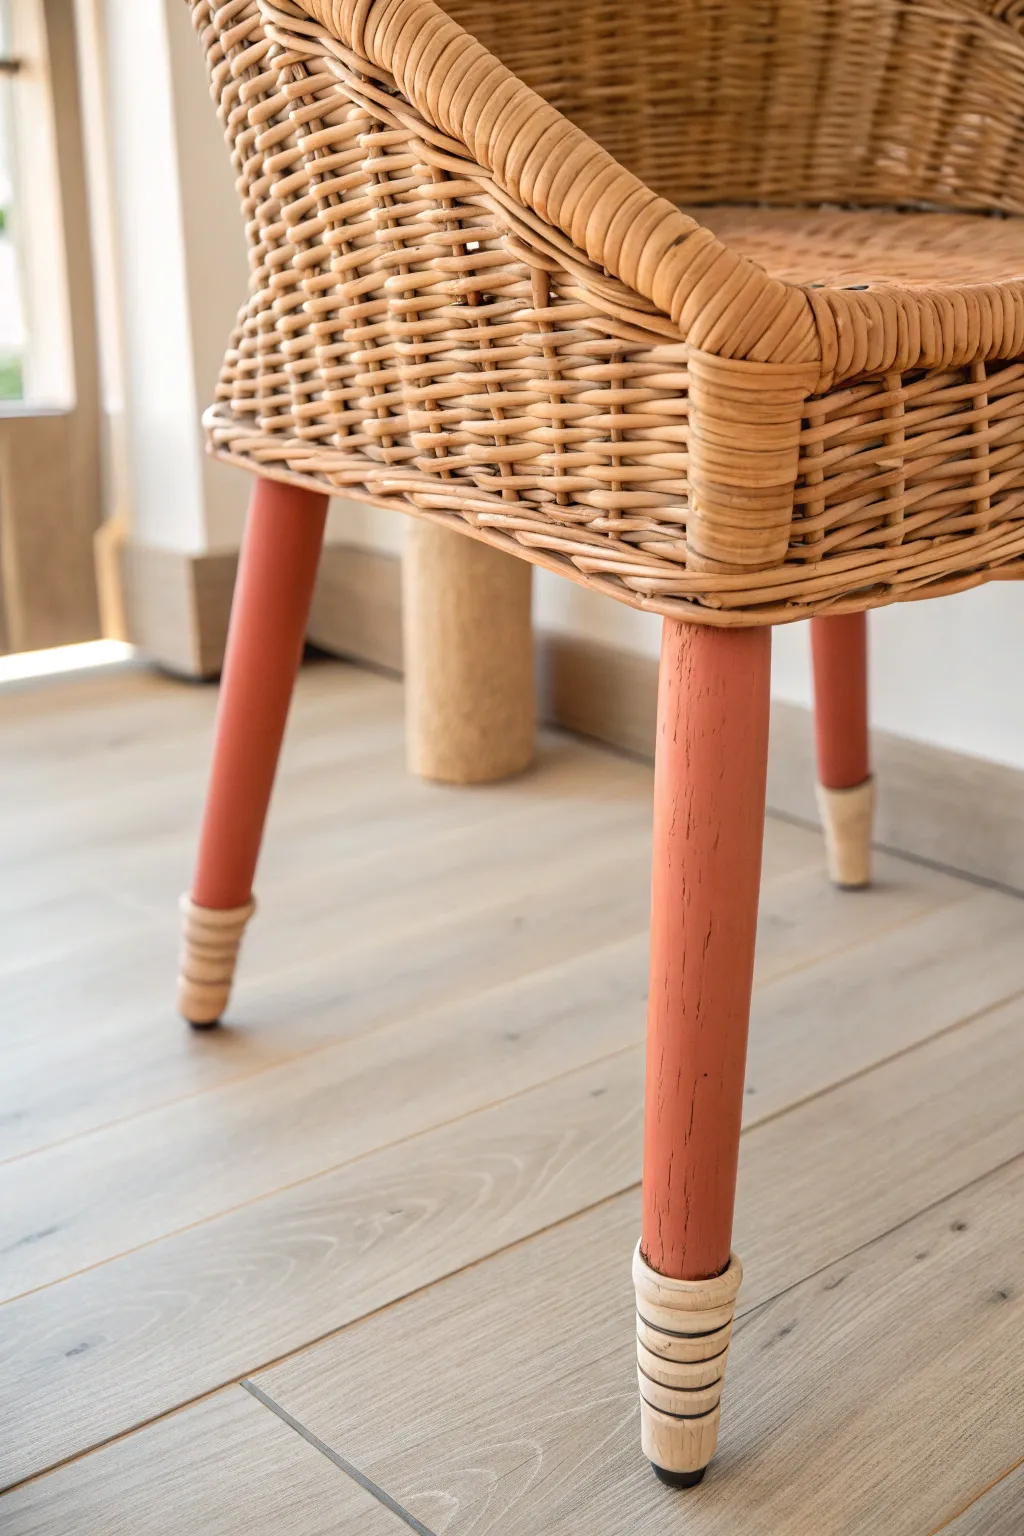
Give a classic wicker chair a modern, grounded look by adding a bold splash of color to the legs while keeping the natural weave intact. This project features a warm terracotta paint dip with a unique, striped foot detail that adds a custom finish.
Step-by-Step Tutorial
Materials
- Wicker chair with wooden legs
- Sandpaper (120 and 220 grit)
- Painter’s tape (high quality)
- Primer (suitable for wood)
- Terracotta or rust-colored chalk paint or matte acrylic paint
- Cream or off-white acrylic paint (for the feet)
- Black acrylic paint or paint pen
- Small flat paintbrush
- Medium angled sash brush
- Clear matte sealer (spray or brush-on)
- Drop cloth
- Rags for cleaning
Step 1: Preparation & Masking
-
Clean the surface:
Begin by thoroughly wiping down the legs of your wicker chair with a damp rag to remove any dust, dirt, or spiderwebs. -
initial sanding:
Use 120-grit sandpaper to scuff the existing finish on the legs; this helps the primer key into the surface for better durability. -
Wipe away dust:
After sanding, use a tack cloth or a slightly damp rag to remove all sanding residue, ensuring a completely clean surface. -
Protect the wicker:
Carefully apply painter’s tape around the very top of each leg where it meets the woven wicker seat, pressing down firmly to prevent bleed-through. -
Define the foot area:
Measure about 2-3 inches up from the bottom of each leg to define the ‘foot’ area. Wrap a band of painter’s tape around each leg at this mark.
Uneven Stripes?
If painting straight lines on the rounded foot is tricky, put the chair on a rotating lazy susan. Hold your pen steady and spin the chair instead.
Step 2: Painting the Legs
-
Apply primer:
Brush a coat of primer onto the main section of the legs—between the upper tape and lower foot tape—to ensure true color payoff. -
First coat of color:
Once the primer is dry, use your medium sash brush to apply the terracotta chalk paint, using long, smooth strokes following the wood grain. -
Dry and assess:
Let this first coat dry completely according to the manufacturer’s instructions, usually about one hour. -
Second coat:
Apply a second coat of the terracotta paint for full opacity and a rich, matte finish, touching up any thin spots. -
Remove foot tape:
While the red paint is just barely tacky (not fully cured), carefully peel off the lower tape ring to reveal the unpainted foot section.
Add Texture
For a boho twist, instead of painting the feet, wrap the bottom 3 inches tightly in dipping cord or jute twine and secure with hot glue.
Step 3: Detailing the Feet
-
Base coat for feet:
Using a small flat brush, paint the bottom foot section with your cream or off-white specific paint. I find two thin coats work best here. -
Smooth the feet:
If the original wood had a rough texture, verify it’s smooth enough for detail work now; give it a tiny sanding with 220-grit if needed. -
Painting the rings:
If your chair legs have turned ridges (grooves), carefully paint inside the indentations with black paint using a very fine detail brush. -
Creating faux ridges:
If your legs are smooth, use a black paint pen to draw three or four horizontal rings around the cream foot to mimic a turned wood look. -
Clean up edges:
Use a steady hand to touch up the line where the terracotta meets the cream foot if any smudges occurred.
Step 4: Finishing Touches
-
Final cure:
Allow all paint—both the leg color and the detailed feet—to dry overnight to fully harden. -
Remove upper tape:
Gently remove the painter’s tape near the wicker seat, pulling it away at a 45-degree angle. -
Seal the work:
Apply a clear matte sealer over the painted legs and feet to protect your work from scuffs and vacuum cleaners. -
Add floor protectors:
Stick new felt pads or rubber glides to the very bottom of the feet to protect both your hard work and your floors.
Now step back and admire how a simple color block completely transforms the personality of your chair
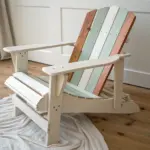
Rainbow Gradient for a Playful Art Piece
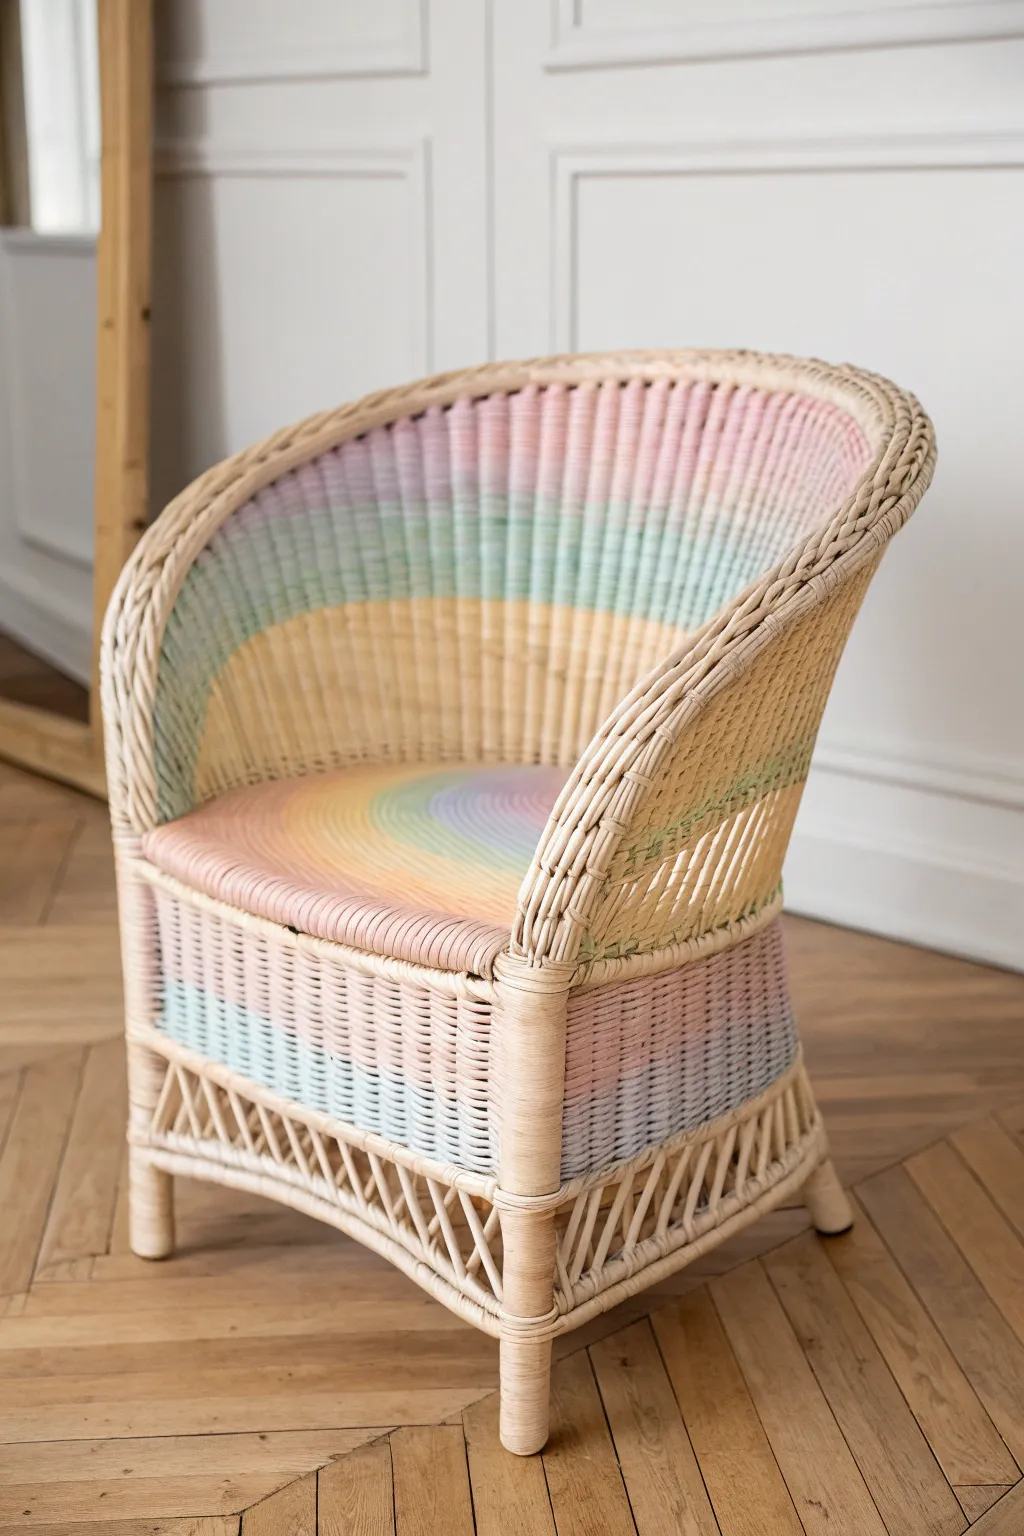
Transform a classic wicker chair into a dreamy statement piece with this soft, pastel rainbow gradient technique. The gentle transition of colors creates a playful yet sophisticated look that feels like sitting on a cloud.
Step-by-Step Tutorial
Materials
- Wicker or rattan barrel chair (clean and dry)
- Primer spray paint (white, suitable for plastic/wood)
- Acrylic paints (pastel pink, peach, yellow, mint green, baby blue)
- Fabric medium (optional, for softer seat feel)
- 2-inch synthetic bristle brushes
- Small detail brushes
- Painter’s tape
- Drop cloth
- Paper plates for mixing
- Clear matte sealant spray
Step 1: Preparation and Base Coat
-
Clean the surface:
Begin by thoroughly vacuuming the wicker with a brush attachment to remove dust trapped in the weave. Wipe it down with a damp cloth and mild soap, then let it dry completely. -
Protect your workspace:
Lay down a large drop cloth in a well-ventilated area to catch any overspray or drips. -
Prime the chair:
Apply a coat of white spray primer over the entire chair. Cover every angle, getting into the nooks and crannies of the weave. This white base is crucial so your pastel colors pop rather than getting lost in the tan wood tone. -
Check for coverage:
Inspect the chair once the first coat is dry. I usually do a second light coat of primer to ensure the natural wicker color isn’t showing through, creating a blank canvas.
Pro Tip: Keep It Wet
Work in small sections and keep a spray bottle of water handy. Lightly misting the paint on the chair helps extended drying time, making blending gradients much easier.
Step 2: Painting the Seat Gradient
-
Outline the center:
Visualize a target shape on the seat. Start with a small circle of baby blue right in the center of the seat. -
Add the first ring:
Paint a ring of mint green around the blue center. While both paints are still wet, use a dry brush to feather the edges where they meet to create a soft blend. -
Continue the rings:
Work outward with rings of yellow, peach, and finally pink near the edge of the seat cushion area. Keep your paint consistency slightly thin to penetrate the weave without clogging it. -
Blend the transitions:
Go back over the transition areas with a clean, slightly damp brush to blur any harsh lines between the colors, ensuring a seamless radial gradient.
Step 3: Painting the Backrest
-
Map out the back arches:
The backrest follows an arched rainbow pattern. Start at the top center of the chair back with your pink paint. -
Paint the top section:
Apply pink to the upper section of the vertical reeds, brushing downwards about 4-5 inches. -
Transition to green:
Below the pink, introduce the mint green. Brush firmly into the vertical grooves. Where the pink meets the green, dry-brush the colors together creates that blurred, airbrushed effect. -
Apply the next tier:
Moving down the backrest curve, paint a band of yellow. Blend it upwards into the green section you just finished. -
Finish the lower back:
Use the peach tone for the lowest section of the backrest, right where it meets the seat. Blend this carefully with the yellow above it.
Trouble with Clumps?
If paint globs inside the wicker weave, use a stiff, dry brush to aggressively stipple the area immediately. This disperses the paint before it dries into a solid chunk.
Step 4: Finishing the Base
-
Paint the apron:
For the skirt or apron of the chair (below the seat), mirror the vertical stack of colors used on the back. Start with pink at the very top edge under the seat, fading down into blue and mint. -
Detail the legs:
Leave the structural legs and the wrapped binding joint a solid neutral or white to frame your colorful artwork, or continue the fade down the legs if you prefer a fully dipped look. -
Touch up gaps:
Rotate the chair and look for missed spots from different angles. Use a small detail brush to dab paint into deep crevices that the larger brush missed. -
Seal the work:
Allow the paint to cure for at least 24 hours. Once fully dry, spray the entire chair with a clear matte sealant to protect the finish from chipping and wear.
Now you have a stunning, custom piece of furniture ready to brighten up any corner of your home

Have a question or want to share your own experience? I'd love to hear from you in the comments below!