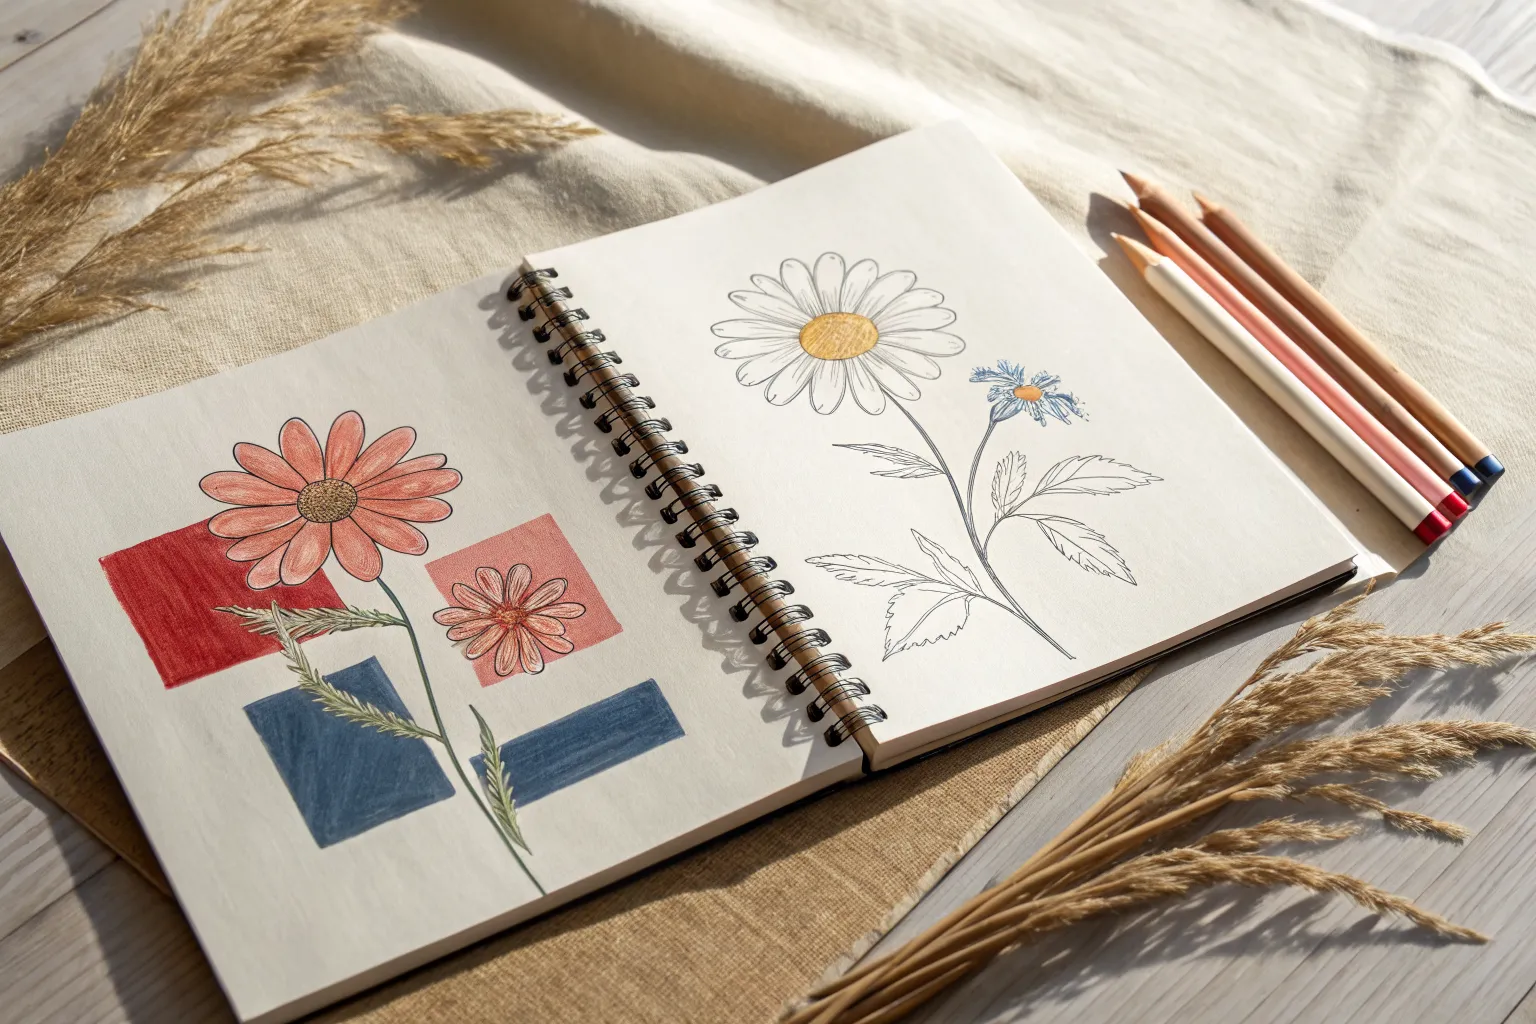
If you’re craving colorful drawings that look impressive without feeling complicated, you’re in the right place. These easy ideas are all about simple shapes, bold palettes, and fun little tricks that make your sketchbook pages glow fast.
Rainbow Gradient Stripes
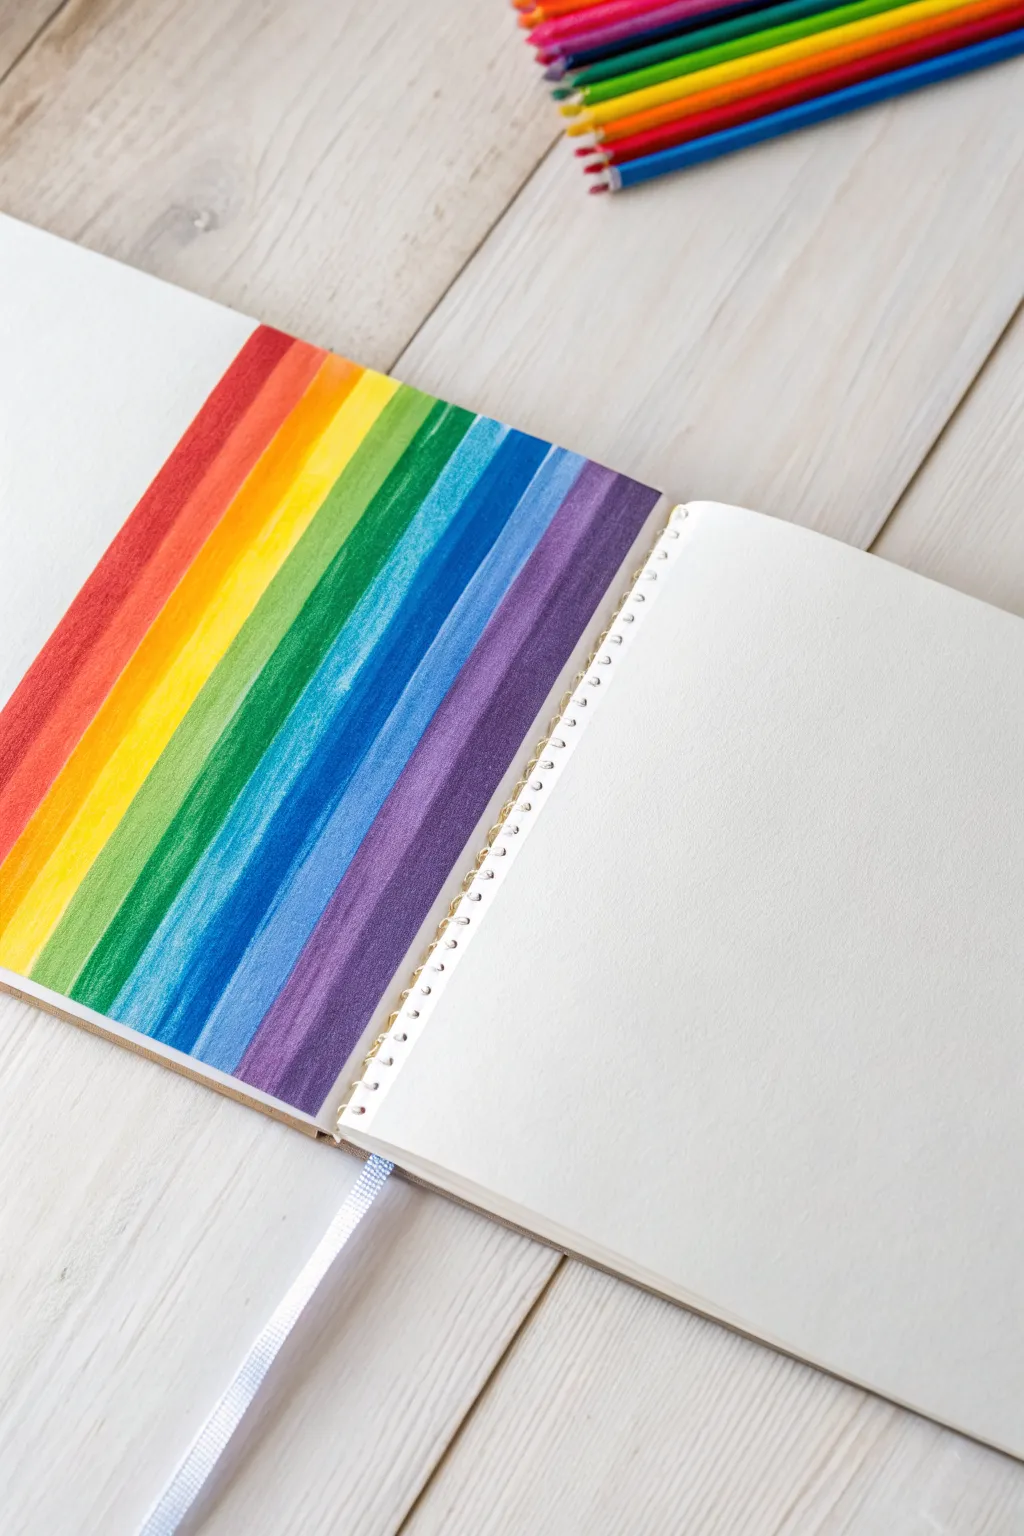
Transform a blank sketchbook page into a vibrant spectrum of color with this satisfying gradient project. By layering colored pencils in vertical stripes, you’ll create a smooth transition that looks clean, graphic, and incredibly cheerful.
Step-by-Step
Materials
- Sketchbook with smooth, heavy-weight paper
- Set of colored pencils (minimum 12 colors, highly pigmented wax or oil-based preferred)
- Ruler or straight edge
- Graphite pencil (HB or lighter)
- White vinyl eraser
- Pencil sharpener
Step 1: Preparation and Planning
-
Measure the page width:
Start by measuring the total width of your sketchbook page using your ruler. Ensure you are measuring only the workable area if you plan to leave a margin. -
Calculate stripe width:
Count how many distinct colors or transition shades you want to include. Divide your page width by this number to determine how wide each vertical stripe needs to be. -
Mark the intervals:
Using a graphite pencil, make very faint tick marks along the top and bottom edges of the page corresponding to your calculated stripe widths. -
Draw vertical guides:
Connect the top and bottom tick marks with your ruler to create light vertical guidelines. Press very lightly so these lines disappear under the color later. -
Select your palette:
Lay out your colored pencils in rainbow order: Red, Red-Orange, Orange, Yellow-Orange, Yellow, Yellow-Green, Green, Blue-Green, Blue, Indigo, and Violet. This helps visualize the flow before you begin.
Smooth Operator
To get that painted look without paint, use a coloress blender pencil or a cotton swab dipped in a tiny drop of baby oil to melt the wax pigment together.
Step 2: The Warm Spectrum
-
Begin with red:
Start on the far left stripe. Sharpen your red pencil to a fine point and outline the inner edges of the first rectangle to keep borders crisp. -
Fill the first stripe:
Fill the interior of the red stripe using small, circular motions or very consistent vertical strokes. aim for solid, saturated coverage without pressing so hard that you break the lead. -
Move to orange-red:
For the second stripe, select a reddish-orange hue. If you don’t have this specific color, lay down a base of orange and lightly layer red over it. -
Apply the orange stripe:
Fill the third section with a pure, bright orange. Ensure the edge touching the previous stripe is tight so no white paper shows between the colors. -
Transition to yellow:
Continue progressively with yellow-orange, and then filling the next stripe with a bright, sunny yellow.
Step 3: The Cool Spectrum
-
Start the greens:
Next to the yellow, apply a yellow-green or lime shade. This is a crucial bridge color that prevents the transition from looking abrupt. -
Deepen the green:
Fill the following stripe with a true grass green. Keep your stroke pressure consistent with the warm side to maintain a uniform texture across the page. -
Shift to blue:
Apply a teal or blue-green color next. I find that skipping straight to dark blue can look harsh, so this turquoise step really softens the gradient. -
Apply true blue:
Fill the next section with a standard cerulean or cobalt blue. -
Finish with cool darks:
Complete the final stripes with indigo and then a deep violet or purple on the far right edge.
Uneven Coverage?
If your coloring looks scratchy, your pencil might be too sharp or the paper too rough. try dulling the tip slightly on scrap paper and using small circles.
Step 4: Refinement
-
Burnish the surface:
Look for any white speckles of paper showing through. Go back over each stripe with its respective color, pressing slightly harder to ‘burnish’ and flatten the paper tooth for a smooth look. -
Clean the edges:
Use your ruler and eraser to tidy up the top and bottom edges of the drawing, removing any color that went outside the rectangular boundary. -
Erase guidelines:
If any graphite lines are still visible between the lighter colors (like yellow), gently dab them with a kneadable eraser, though the wax coverage usually hides them.
Now you have a stunning, graphic page that serves as a perfect color reference or a standalone piece of art

Cute Doodle Flowers in Bold Colors
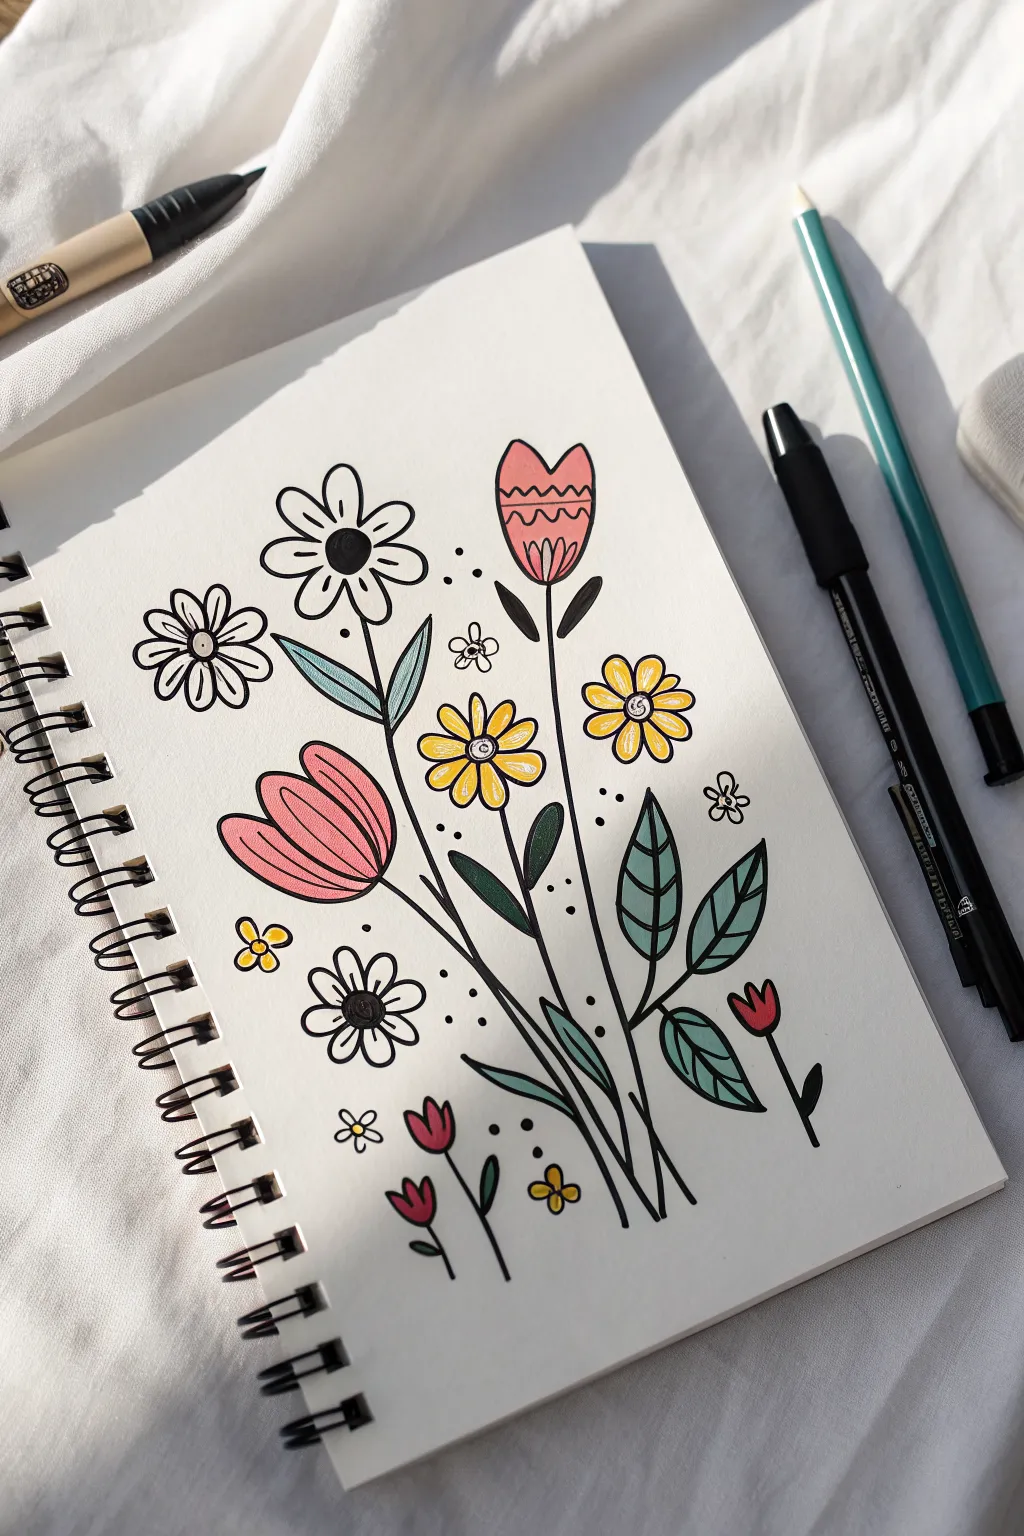
Brighten up your sketchbook page with this composition of playful, folk-art inspired flowers. Combining bold ink outlines with soft, flat washes of marker creates a charming and modern illustration.
Detailed Instructions
Materials
- Sketchbook with smooth, thick paper (mixed media or bristol)
- Black fineliner pens (0.3mm and 0.5mm)
- Dual-tip markers or colored pencils (Pink, Yellow, Teal/Light Blue, Mint Green, Red)
- Pencil and eraser for initial blocking
Step 1: Sketching the Framework
-
Map out the stems:
Begin lightly with a pencil. Draw three main, tall stems originating from the bottom center, fanning out slightly like a bouquet. Add smaller, shorter stems branching off near the base for variety. -
Position the main blooms:
Draw circles or basic shapes at the top of your pencil stems to act as placeholders. Place a large tulip shape on the central stem, a daisy shape on the left, and a sunflower-style circle on the right. -
Add foliage placeholders:
Sketch long, leaf-like ovals attached to the lower parts of the stems. Don’t worry about perfect shapes yet; just establish the flow and balance of the leaves.
Bleed-Through Blues?
If using alcohol markers, place a scrap piece of cardstock behind your current page. This catches any ink that soaks through prevents ruining the next clean sheet in your book.
Step 2: Inking the Outlines
-
Draw the central tulip:
Using your 0.5mm black fineliner, ink the central tulip shape. Give it a distinct ‘W’ shape at the top center. Draw a horizontal wavy line across the middle of the bloom and add vertical stripes inside the bottom half. -
Ink the left-side daisy:
Move to the large flower on the upper left. Draw a circular center, then add rounded petals radiating outward. Leave a small gap between the petals if you want a lighter look. -
Create the yellow blooms:
Ink the two flowers on the right side. For these, draw a central circle with a smaller dot inside, then add short, rounded petals. Repeat this for the slightly lower flower next to it. -
Define the large pink tulip:
Ink the large, side-facing tulip on the left side of the bouquet. Draw three curved teardrop shapes nestled together to form the petals, giving it a closed-bud appearance. -
Add the small filler flowers:
Scatter in the tiny details. Ink the small daisy shapes floating near the top and bottom. Draw the two tiny red tulips near the bottom right and bottom center. -
Finalize stems and leaves:
Go over your pencil lines for the stems. For the leaves, draw a central vein line first, then outline the leaf shape around it. I find drawing the vein first helps me keep the leaf symmetric. -
Erase pencil marks:
Wait a moment for the ink to fully set, then gently erase all your underlying pencil sketches to clean up the page.
Step 3: Adding Color
-
Color the pink elements:
Using a soft pink marker, fill in the large side-facing tulip completely. For the central tulip, color only the top section pink, leaving the striped bottom area specifically for a different shade. -
Fill the yellow accents:
Take a bright yellow marker. Color the petals of the two flowers on the right side. Also, create the tiny yellow clusters (groups of three dots) near the bottom left and bottom right. -
Add touches of red:
Use a darker pink or red marker for the tiny tulip buds at the bottom. Color the bottom striped section of the central tulip with this darker shade to create contrast. -
Color the teal leaves:
Select a muted teal or grey-blue marker. Color the two long leaves on the upper left stem. Use this same color for some of the lower leaves on the right side to balance the composition. -
Complete the green foliage:
Switch to a darker green or olive marker. Fill in the remaining leaves near the center and the single leaf pointing straight up near the central tulip.
Steady Lines
Pull the pen toward you rather than pushing it away when drawing long stems. This simple motion creates smoother, more confident lines with less wobble.
Step 4: Final Details
-
Darken the flower centers:
Go back with your black pen or a very dark grey marker and color in the centers of the white daisies solid black for a graphic pop. -
Add decorative texture:
Draw small dots inside the yellow flower petals if you want extra detail. Add tiny lines or veins inside the pink tulip petals to suggest texture. -
Scatter background dots:
To make the composition feel cohesive, use your finest pen (0.3mm) to place random black dots in the empty white spaces around the stems. Keep them clustered slightly for a magical, pollen-like effect.
Now you have a vibrant floral page that captures the joy of spring in simple lines and colors


Sunset Sky With a Black Silhouette
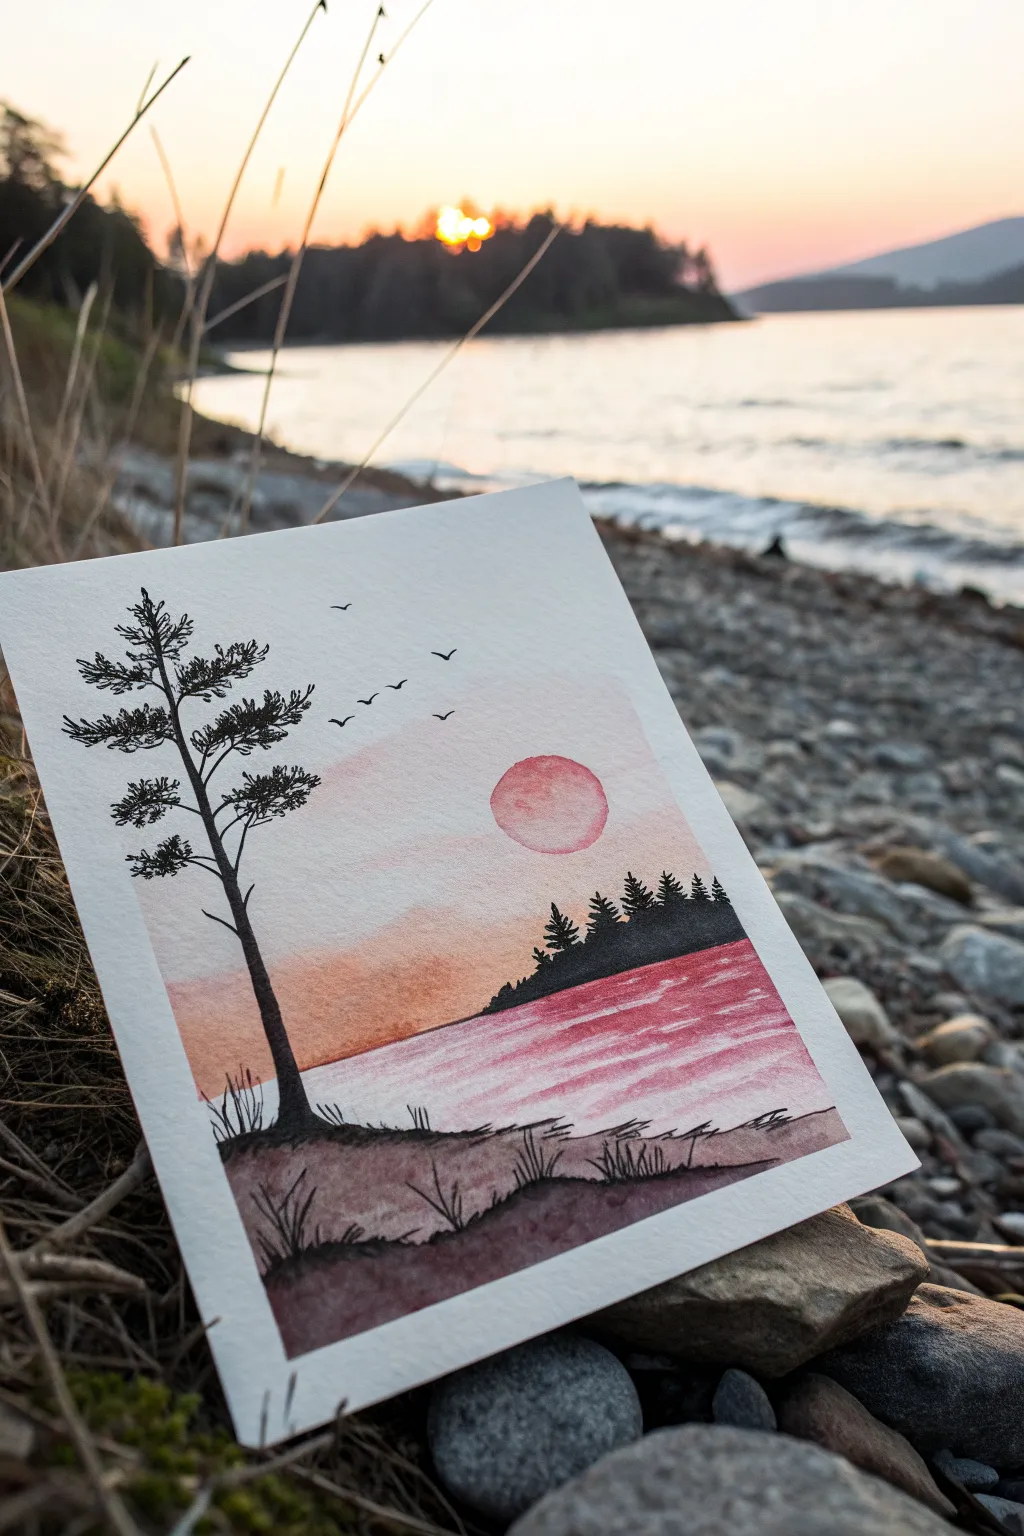
Capture the serene beauty of dusk with this simple yet striking watercolor landscape. Using warm, glowing hues against stark black silhouettes creates a dramatic contrast perfect for beginners looking to practice wet-on-wet techniques.
How-To Guide
Materials
- Cold press watercolor paper (approx. 5×7 inches)
- Watercolor paints (red, orange, black/Payne’s grey)
- Round watercolor brushes (size 6 for washes, size 0 or 00 for details)
- Black fine liner pen (waterproof) or black India ink
- Pencil and eraser
- Masking tape
- Jar of clean water
- Paper towels
Step 1: Setting the Scene
-
Prepare your paper:
Begin by taping the edges of your watercolor paper down to a board or table. This creates a clean white border and prevents the paper from buckling when wet. -
Sketch the horizon:
Lightly draw a horizontal line about one-third up from the bottom of the page to separate the sky from the water. Keep this pencil line very faint so it doesn’t show later. -
Outline the sun:
Draw a small circle for the sun just above the horizon line on the right side. You can trace a coin or bottle cap if you want a perfect circle.
Pro Tip: Texture Trick
For realistic pine needles, don’t draw individual lines. Instead, tap or stipple your felttip pen in tight clusters along the branches for a fluffy look.
Step 2: Painting the Sky and Sun
-
Wet the sky area:
With your larger round brush, apply clean water to the entire sky area, being careful to paint around the sun circle. The paper should be damp and glistening, but not soaking wet. -
Apply the sunset glow:
Load your brush with a diluted light red or salmon color. Touch it to the wet paper near the horizon line and let the color bleed upward, fading into white towards the top of the paper. -
add warmth near the horizon:
While the paper is still damp, dab a little concentrated orange or deeper red right along the horizon line to suggest the intensity of the setting sun. -
Paint the sun:
Clean your brush and pick up a soft pink or light red. Carefully fill in the dry circle you left effectively blank earlier. You can make the top slightly lighter to suggest volume. -
Let it dry completely:
Wait for the sky to become bone dry before moving on. This is crucial to prevent the next layers from bleeding into the sky.
Troubleshooting: Blooms
If cauliflower-like blooms appear in your sky, you likely added water to paint that was already drying. Next time, work faster while the paper is evenly wet.
Step 3: Creating the Water Reflection
-
Establish the water base:
Wet the water area below the horizon line with clean water. Apply horizontal strokes of a very watered-down pinkish-red, leaving some white paper showing to represent ripples reflecting light. -
Deepen the water color:
While the wash is still wet, add stronger red strokes horizontally. Focus the darkest color near the bottom and sides, keeping the center lighter where the sun reflects. -
Dry the background:
Allow the water section to dry fully. If the paper feels cool to the touch, it still holds moisture, so give it a few more minutes.
Step 4: Adding Silhouettes and Details
-
Paint the distant island:
Mix a very dark black or Payne’s grey watercolor. Using the tip of your brush, paint a jagged, uneven treeline just above the horizon on the right side, slightly overlapping the sun. -
Extend the island reflection:
Immediately beneath the island silhouette, paint a few very thin horizontal lines into the water area to mimic the dark reflection on the waves. -
Draw the main pine tree:
Switch to your waterproof fine liner pen or a very fine brush with black ink. Draw a tall, slightly curved vertical line on the left side for the tree trunk. -
Add pine branches:
Starting from the top of the trunk, make short, scribbly horizontal marks to create pine needles. keep the branches uneven and slightly sparse to look natural. -
Create the foreground ground:
Paint a rolling, uneven mound at the very bottom of the paper using diluted black or dark brown paint. This grounds your composition. -
Add foreground grasses:
Using your pen or the finest brush, flick quick upward strokes coming out of the foreground mound to create wild grasses. -
Painting the birds:
Add a few tiny ‘V’ or ‘M’ shapes in the sky between the tree and the sun to represent distant birds in flight. -
Final touches:
Once everything is completely dry, gently peel off the masking tape to reveal your crisp white borders.
Frame your mini-masterpiece and enjoy the peaceful vibe it brings to your space

Easy Galaxy Circle Drawing
This project creates a stunning little window into space using a simple circular frame. The result is a vibrant blend of pinks, purples, and blues that looks far more complex than it actually is to paint.
Detailed Instructions
Materials
- Watercolor paper (at least 300gsm/140lb)
- Watercolor paints (Pink, Purple, Blue)
- Circular stencil or masking tape roll
- Pencil
- White gel pen
- Black fine liner or marker
- Round paintbrush (size 6 or 8)
- Clean water
- Paper towel
Step 1: Planning and Base Layer
-
Draw the outline:
Start by finding a circular object to trace, such as a roll of masking tape or a rigid stencil. Lightly trace a perfect circle onto your watercolor paper with a pencil. -
Wet the paper:
Dip your clean brush into water and carefully fill the inside of the circle. You want the paper to be shiny and damp, but not so soaked that puddles form. -
Prepare your colors:
While the paper absorbs the water slightly, add a few drops of water to your pink, purple, and blue paint pans to activate them. You want rich, pigmented color for this cosmic effect. -
Add the first wash:
Load your brush with a vibrant pink shade. Touch the wet paper on the left side of the circle, letting the color bloom naturally into the wet surface. -
Blend the middle:
Clean your brush quickly and pick up a deep purple. Paint the center section of the circle, allowing the edge to touch and bleed slightly into the pink area you just created.
Step 2: Building Depth
-
Complete the gradient:
Load your brush with a cool blue tone. Apply this to the far right side of the circle, letting it mix softly with the purple edge to create a seamless transition. -
Darken the edges:
While everything is still wet, drop more concentrated pigment (less water, more paint) along the very edges of the circle. This creates a rounded, 3D illusion. -
Add texture:
If the colors look too flat, dab a few spots of water or a different color into the wet paint. This creates ‘cauliflowers’ or blooms that mimic nebulae gas clouds. -
Dry completely:
I prefer to let this air dry so the blends remain soft, but you can use a hairdryer on a low setting if you are impatient. The paper must be bone dry before the next step.
Cosmic Blooming
Work ‘wet-on-wet’ for the smoothest galaxy clouds. If the paper dries while you work, the colors won’t blend as seamlessly.
Step 3: Starry Details
-
Draw main stars:
Using a white gel pen, draw several larger, four-pointed stars scattered across the darkest parts of your galaxy. Vary their sizes for interest. -
Add distant stars:
Dot tiny points of white ink throughout the colored area. Cluster some dots together to look like distant star fields or the Milky Way. -
Create shooting stars:
If you like, drag the gel pen ink slightly on one or two stars to create a motion tail, or draw tiny crosses for twinkling effects. -
Draw external elements:
Switch to a black fine liner or marker. Draw two small black stars floating just outside the circle on the left, and one larger black star below the circle. -
Final touches:
Add a few tiny black dots around the external black stars to integrate them with the main composition, giving the impression that the galaxy is spilling out.
Clogged Gel Pen?
If your white pen skims over the paint, the watercolor might not be fully dry or is too waxy. Wait longer or scribble on scrap paper first.
Now you have a captured piece of the universe right on your sketchbook page
BRUSH GUIDE
The Right Brush for Every Stroke
From clean lines to bold texture — master brush choice, stroke control, and essential techniques.
Explore the Full Guide
Fruit Slices With Simple Patterns
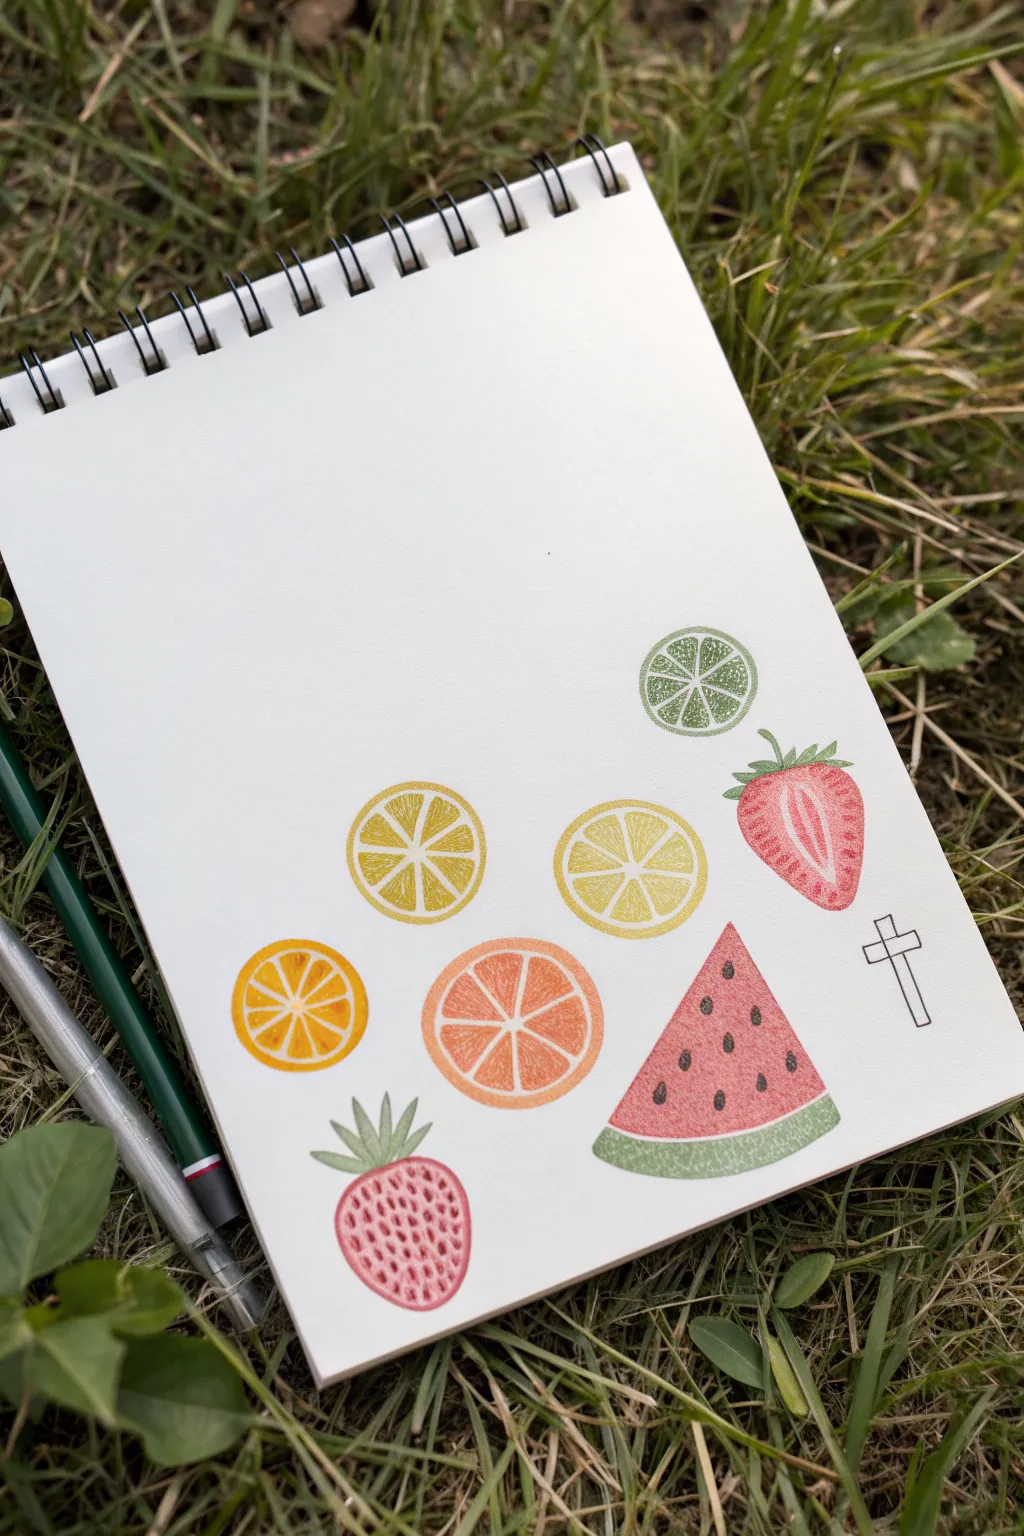
Brighten up your sketchbook with this collection of fresh fruit illustrations that use simple geometric shapes and clever texturing. This project combines vibrant marker colors with fine pen stippling to create a look that feels both graphic and delicately hand-drawn.
Detailed Instructions
Materials
- Sketchbook or mixed media paper
- Fine liner pens (black, 0.1mm and 0.5mm)
- Colored markers or felt-tip pens (colors: yellow, orange, coral/pink, red, light green, dark green)
- Pencil and eraser
- Circle template or compass (optional)
Step 1: Planning and Layout
-
Sketch the citrus circles:
Start near the center of the page. Lightly sketch five circles of roughly the same size using your pencil. Arrange them in a loose, curved formation, leaving space at the bottom right for the watermelon and strawberries. -
Add the watermelon wedge:
Below the citrus circles, draw a large triangle for the watermelon slice. Curve the bottom edge slightly to represent the rind. -
Outline the strawberries:
Sketch a heart-like shape for the whole strawberry in the bottom left corner. Draw a second, similar shape near the right edge, slightly above the watermelon, for the cut strawberry. -
Refine the citrus interiors:
Inside each circle, lightly draw a smaller concentric circle for the pith. Divide the inner circle into segments (usually 6-8) by drawing radiating lines from the center, creating triangular wedges.
Bleed-Through Blues?
If using alcohol markers, they often bleed. Place a scrap sheet behind your artwork page to protect the paper underneath from ink transfer.
Step 2: Coloring the Citrus
-
Fill the lemon slices:
Take a yellow marker. Choose two of your circles to represent lemons. Color in the triangular wedges, leaving the thin lines between them and the outer rim white. -
Color the orange slice:
Using a bright orange marker, fill in the segments of the leftmost circle exactly like the lemons. -
Create the grapefruit:
Select a coral or pinkish-orange marker for the central bottom slice. Fill in the segments carefully. -
Detail the lime:
For the top right circle, use a dull or olive green marker. Instead of solid coloring, fill these segments with tiny, dense dots (stippling) to give it a distinct texture. -
Add the outer rinds:
Go back to each fruit with its respective color. Draw a thin ring around the very outside edge of each circle, leaving a small gap of white paper between this ring and the colored segments to represent the pith.
Step 3: Berries and Watermelon
-
Color the watermelon flesh:
Fill the main triangle area of the watermelon with a reddish-pink marker. Leave a band of white at the bottom before the curved edge. -
Add the watermelon rind:
Color the bottom curved strip with a light green marker. I find drawing horizontal strokes here mimics the fibrous texture of the rind nicely. -
Color the whole strawberry:
For the bottom left strawberry, outline the shape in pink/red but don’t fill it solid yet. Instead, draw small, repeating oval outlines inside to represent the seeds, and color the space around them. -
Color the cut strawberry:
For the right-side strawberry, draw a white teardrop shape in the center for the core using the negative space. Color the flesh red around it, fading slightly as you move outward. -
Add strawberry leaves:
Use a darker green marker to draw the sepals (leaves) on top of both strawberries. Use short tapered strokes.
Make It Pop
Use a white gel pen to add tiny highlights on the watermelon seeds and strawberry skin. This makes the fruit look juicy and fresh.
Step 4: Inking and Details
-
Inking the watermelon seeds:
Using a black fine liner, draw small teardrop shapes scattered across the pink part of the watermelon for seeds. -
Texture the strawberries:
Add tiny seeds to the cut strawberry using very small dashes or dots. On the whole strawberry, carefully outline the small oval shapes you left white earlier. -
Stipple the citrus:
This is the most time-consuming but rewarding step. Take your fine liner and add tiny dots (stippling) over the colored segments of the citrus fruits. Concentrate the dots near the center and edges of each wedge to create volume. -
Define the structures:
Lightly outline the segments and the outer rinds with your pen. Keep the line weight very delicate; broke lines often look better than solid heavy ones here. -
Add final flourish:
If you wish to match the reference exactly, draw a small, simple cross shape in the open space on the right using your black pen. -
Erase guidelines:
Once the ink is completely dry, gently erase any visible pencil marks to clean up the illustration.
Now you have a refreshing page of fruit art ready to be admired
Bright Bird With Chunky Color Shapes
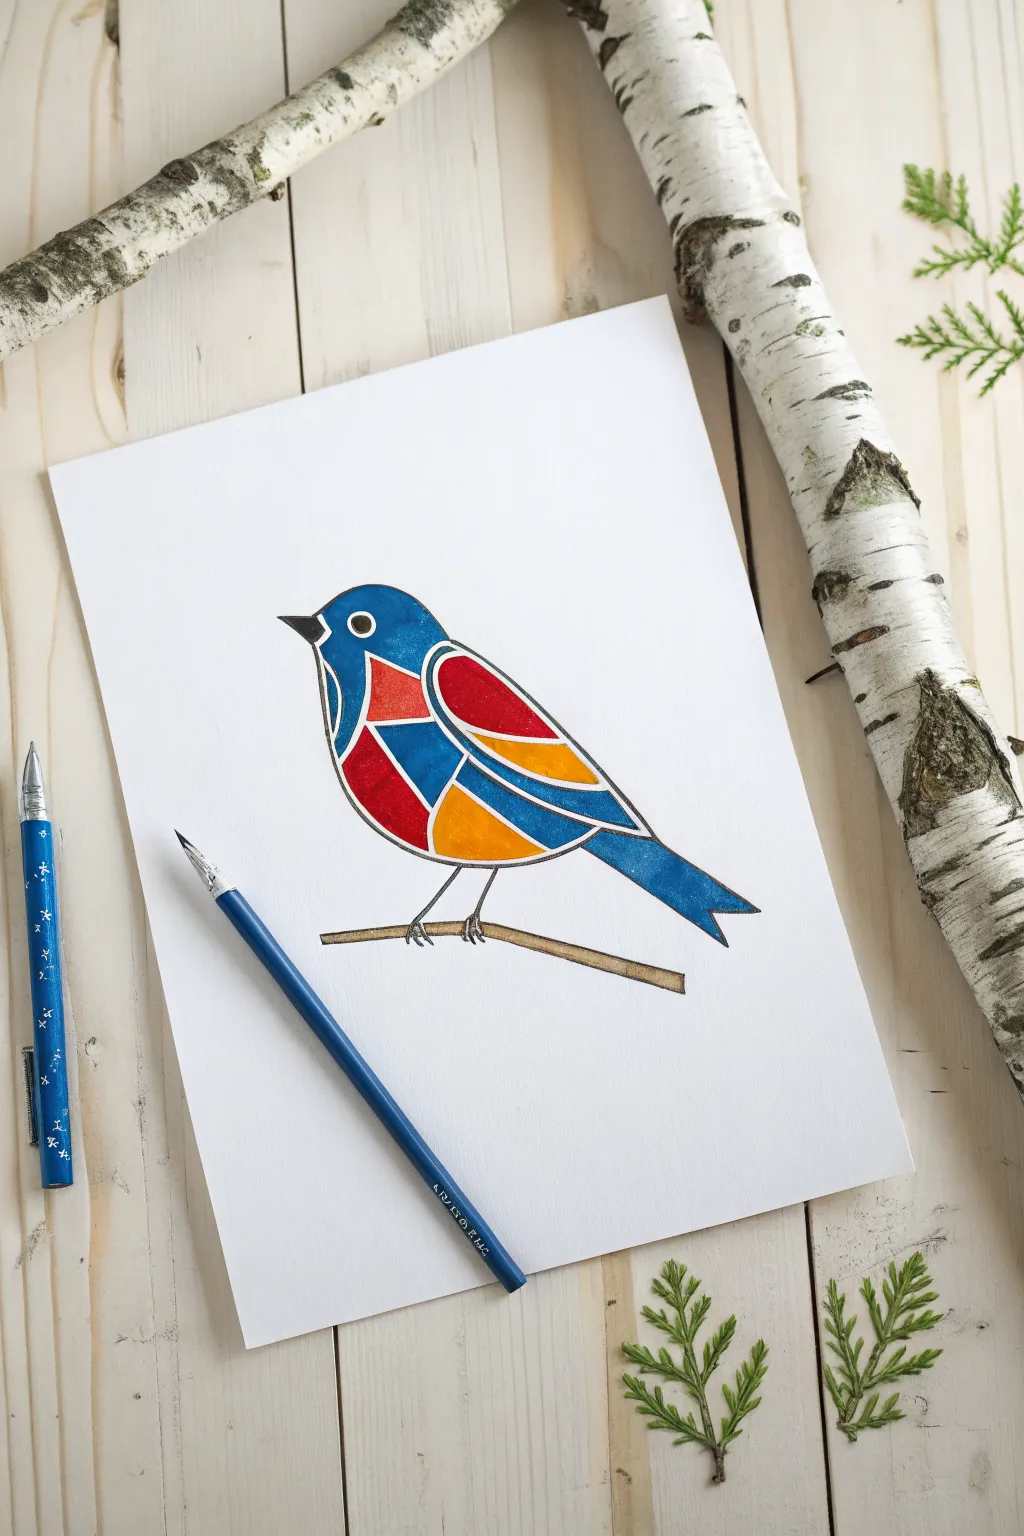
Capture the charm of a woodland bird with this geometric, stained-glass inspired drawing technique. By breaking the form down into bold, chunky shapes separated by crisp white lines, you create a vibrant piece of art that pops off the page.
Step-by-Step Guide
Materials
- Thick drawing paper or cardstock (white)
- Pencil (HB or lighter)
- Eraser
- Fine-tip black marker or drawing pen (0.5mm)
- Colored markers or brush pens (Primary blue, red, yellow, orange)
- Brown marker or colored pencil (for the branch)
- White gel pen (optional, for touch-ups)
Step 1: Drafting the Outline
-
Establish the main shape:
Begin by lightly sketching a simple oval shape for the bird’s body, leaning slightly backward. -
Add head and tail:
Draw a rounded circle on the top left of your oval for the head, overlapping slightly. Extend a straight, triangular shape downwards on the right side for the tail feathers. -
Form the wing:
Sketch a large teardrop shape tucked into the side of the body oval. This will become the canvas for your geometric patterns later. -
Refine the silhouette:
Connect your shapes to create a smooth contour. Add a small, sharp triangle for the beak and a small circle for the eye near the top of the head. -
Draw the branch:
Sketch a simple curved line beneath the bird. Thicken it slightly to create a branch, ensuring the bird’s belly hovers just above it. -
Add the feet:
Draw thin legs extending from the belly to the branch, ending in small claws that grip the wood.
Clean Lines Pro-Tip
If you struggle to leave consistent white gaps, draw your dividing lines with a white wax crayon or oil pastel first. It acts as a resist, repelling water-based markers.
Step 2: Creating the Mosaic Pattern
-
Divide the wing:
Inside the teardrop wing shape, draw smooth, curving lines to carve it into smaller sections. Aim for 3-4 distinct puzzle-piece shapes. -
Segment the body:
Create a sweeping curve across the chest area to separate the red distinct breast from the blue underbelly. Keep these lines clean and deliberate. -
Detail the tail:
Add a simple line or two inside the tail section if you want to break up the color block, though a solid shape works well here too. -
Define the gaps:
This is crucial: Go back over your internal lines and thicken them into double lines. You want to create a ‘channel’ of negative space between every color section.
Fixing Bleeds
Accidentally colored into the white gap? Don’t panic. Use a white opaque gel pen or a tiny dab of white acrylic paint to restore the separation line after the ink dries.
Step 3: Adding Color and Definition
-
Start with the blue:
Using your blue marker, fill in the head, the top ridge of the wing, the lower belly, and the tail. Be very careful to stop before you hit your pencil lines, preserving that white gap. -
Fill the red sections:
Color the chest area and the large upper section of the wing with a vibrant red. -
Add warm accents:
Use yellow and orange for the remaining segments in the wing pattern. This warm contrast makes the wing look dimensional. -
Color the details:
Fill the beak with black, leaving a tiny sliver of white at the base. Fill the eye with black, but leave a small white circle in the center for a highlight. -
Outline the bird:
Take your fine black pen and carefully trace the outermost silhouette of the bird. Do not trace the internal color separation lines; let the white space do the work. -
Finish the branch:
Color the branch with a light brown marker. I often like to use a colored pencil here instead for a textured, woody look. -
Outline the feet:
Use the black fine-tip pen to go over the legs and claws, adding tiny details for texture. -
Clean up:
Once the ink is completely dry, gently erase any visible pencil marks left in the white channels.
Now you have a striking, modern bird illustration ready to frame or turn into a greeting card

PENCIL GUIDE
Understanding Pencil Grades from H to B
From first sketch to finished drawing — learn pencil grades, line control, and shading techniques.
Explore the Full Guide
Two-Color Mountains With a Gradient Sky
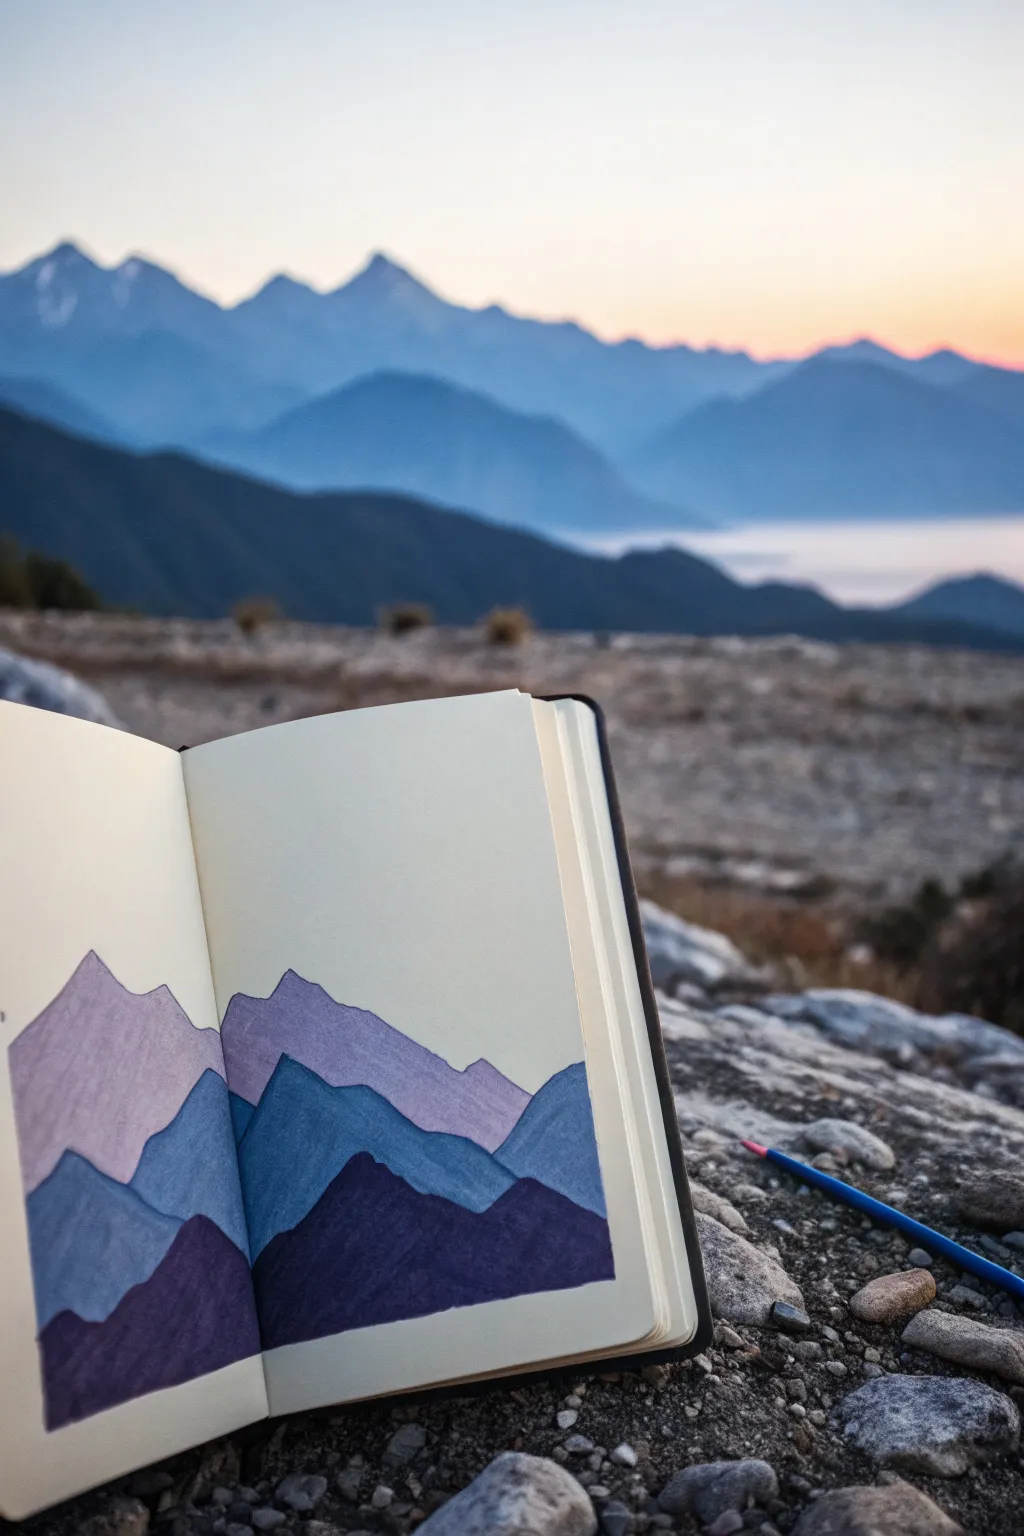
Capture the serene majesty of a twilight mountain range with this simple yet striking sketchbook study. Using distinct blocks of cool-toned colors, you’ll build layers of depth that mimic the atmospheric perspective of distant peaks against a pale sky.
Step-by-Step Tutorial
Materials
- Sketchbook with smooth paper
- Pencil (HB or 2B)
- Eraser
- Ruler (optional)
- Set of colored pencils or alcohol markers (Light Purple/Lavender, Medium Blue, Dark Indigo)
Step 1: Sketching the Horizon
-
Establish the horizon:
Begin by deciding where your mountains will sit on the page. Since this is a double-page spread, plan for the image to flow across the center crease. -
Outline the furthest range:
Lightly sketch the silhouette of the most distant mountain range. These peaks should be the highest on the page and have softer, more rolling shapes rather than sharp jagged edges. -
Add the middle ground:
Below the first line, draw a second mountain range that overlaps the first. Vary the peaks and valleys so they don’t look like carbon copies of the layer behind them. -
Define the foreground:
Sketch the final, lowest layer of mountains at the bottom. These should look the largest and closest to the viewer, perhaps with slightly steeper inclines. -
Clean up sketch lines:
Once you are happy with the composition across both pages, gently erase any stray lines or marks that cross through the mountain shapes, leaving clean outlines for coloring.
Edge Control
To get perfectly sharp peaks without wandering outside the lines, place an index card or scrap paper along the edge of your drawing as a shield while you color.
Step 2: Blocking in Color
-
Start with the lightest tone:
Select your lightest color, such as a pale lavender or soft purple. Use this shade to fill in the most distant mountain range—the one at the top of your composition. -
Maintain consistent strokes:
If I’m using colored pencils, I like to keep my shading strokes moving in the same diagonal direction to create a unified texture. -
Color the middle range:
Switch to your medium tone, like a cool steel blue. Carefully fill in the middle layer of mountains. Be precise where this color meets the lighter purple layer above to keep a crisp edge. -
Fill the foreground:
Use your darkest color, such as a deep indigo or navy, for the bottom-most mountain shapes. This dark value anchors the drawing and creates the illusion of depth. -
Handle the page crease:
When coloring near the center binding, press the book flat carefully so you don’t miss the sliver of paper deep in the crease.
Step 3: Refining and Finishing
-
Strengthen the edges:
Go back over the contour lines where the colors meet. A slightly sharper outline in the matching color helps separate the layers clearly. -
Deepen the shadows:
Add a second layer of color to the foreground mountains if needed. A solid, opaque look works best for this graphic style, so ensure no white paper shows through the dark indigo. -
Check consistency:
Look at the drawing as a whole. If the texture looks uneven in the lighter purple section, lightly graze over it again to smooth out the pencil marks. -
Final clean up:
Use a precision eraser to remove any pigment that might have smudged outside the mountain borders into the sky area.
Golden Hour Glow
Add a thin line of metallic gold or bright orange ink along the very top ridge of the highest mountain range to mimic sunlight catching the peaks.
Close your book knowing you’ve captured a perfect moment of mountain calm
Underwater Doodles in Neon Colors
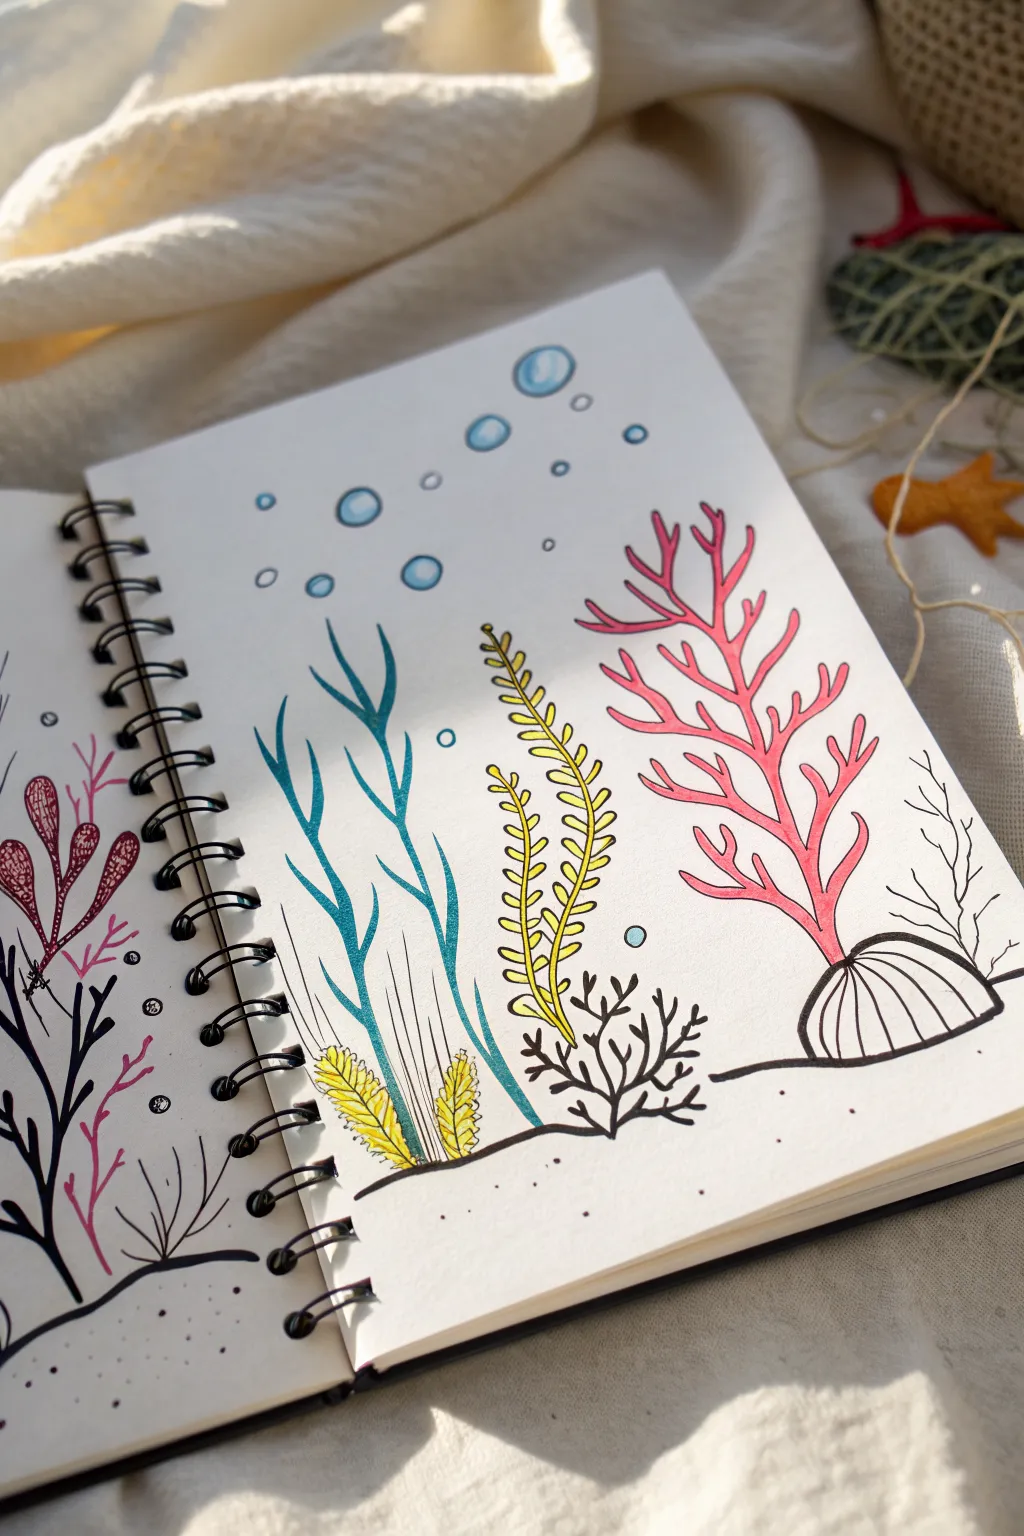
Bring the ocean floor to life with this vibrant doodle spread featuring coral reefs and swaying seaweed. The combination of bright, translucent highlighters or markers with crisp black outlines creates a striking, modern illustration style.
Step-by-Step Guide
Materials
- Spiral-bound sketchbook (smooth paper recommended)
- Pencil (HB or lighter)
- Eraser
- Fine liner pen (Black, 0.3mm or 0.5mm)
- Brush pens or Highlighters (Coral Pink, Teal/Cyan, Bright Yellow)
- White gel pen (optional for highlights)
Step 1: Planning the Layout
-
Sketch the sandy bottom:
Start by lightly sketching a gently curving horizontal line near the bottom of your page. This line doesn’t need to be perfectly straight; a slight wave gives the impression of a sandy seabed. -
Outline the main coral:
On the far right side, sketch a large, branching coral structure. Think of it like a tree without leaves, creating thick main branches that split into smaller V-shapes. -
Add a base:
Draw a rounded, semi-circle shape at the base of your coral where it meets the sand. Divide this shape with curved vertical lines to create a ribbed shell texture. -
Sketch the tall seaweed:
To the left of the pink coral, pencil in two tall, wavy stalks. These should bend slightly as if moving with the current. Along these stalks, sketch small, leaf-like ovals pairing up on either side of the stem. -
Draft the grassy kelp:
Moving further left, draw free-flowing, ribbon-like seaweed strands that reach upward. Make them long and wispy, curving different directions.
Step 2: Adding Ink Details
-
Inking the seabed:
Using your black fine liner, go over your sandy bottom line. Beneath the line, create depth by adding small stippling dots—cluster more dots near the line and spread them out as you go lower. -
Outline the shell base:
Trace the ribbed shell base with confident strokes. I like to double-line the bottom edge slightly to give it a bit of visual weight on the sand. -
Ink the coral structure:
Trace your branching coral sketch. Keep your lines smooth and continuous where possible, but don’t worry about perfection; natural coral is irregular. -
Detail the yellow weed:
Ink the central tall stalks. For the leaves on these, ensure they don’t touch the main stem perfectly every time to keep the look airy and sketched. -
Ink the teal grass:
Trace the ribbon-like seaweed. Taper the ends to sharp points to emphasize their movement in the water. -
Draw foreground visuals:
Add a small, dark bush-like plant in the foreground between the yellow and pink plants using thick, branchy black lines. No color is needed here; the contrast anchors the scene. -
Add floating bubbles:
Draw various sizes of circles floating above the plants. Group them in clusters of two or three for a natural look. -
Erase pencil guides:
Once the ink is completely dry, gently erase all your initial pencil sketches to reveal a clean black-and-white drawing.
Smudge Alert?
If your markers are smearing the black ink, switch the order! Do all your coloring first, let it dry completely, and then draw your black outlines on top.
Step 3: Vibrant Coloring
-
Color the large coral:
Take your coral pink marker and fill in the branching structure. If using a highlighter, try to use single strokes per branch to avoid uneven overlap marks. -
Highlight the center stalks:
Use a bright yellow marker for the central tall weed. You can leave tiny slivers of white paper showing within the leaves to suggest reflected light. -
Fill the ribbon seaweed:
Color the wavy ribbon grass with a teal or cyan marker. This cool tone balances the warmth of the pink coral. -
Add accents:
Use the yellow marker to add small touches to the base of the teal grass, suggesting new growth or lighting variation. -
Color the bubbles:
Gently dab a bit of blue or teal inside the bubble circles. Don’t fill them completely; just a crescent shape on one side makes them look spherical. -
Final touches:
If you have a white gel pen, add tiny dots inside the colored sections or the bubbles for extra sparkle.
Make It Pop
Add tiny fish silhouettes in solid black ink swimming between the plants to create a sense of scale and life in your underwater garden.
Now you have a refreshing splash of ocean art right in your sketchbook


Bubble Letters in a Rainbow Fade
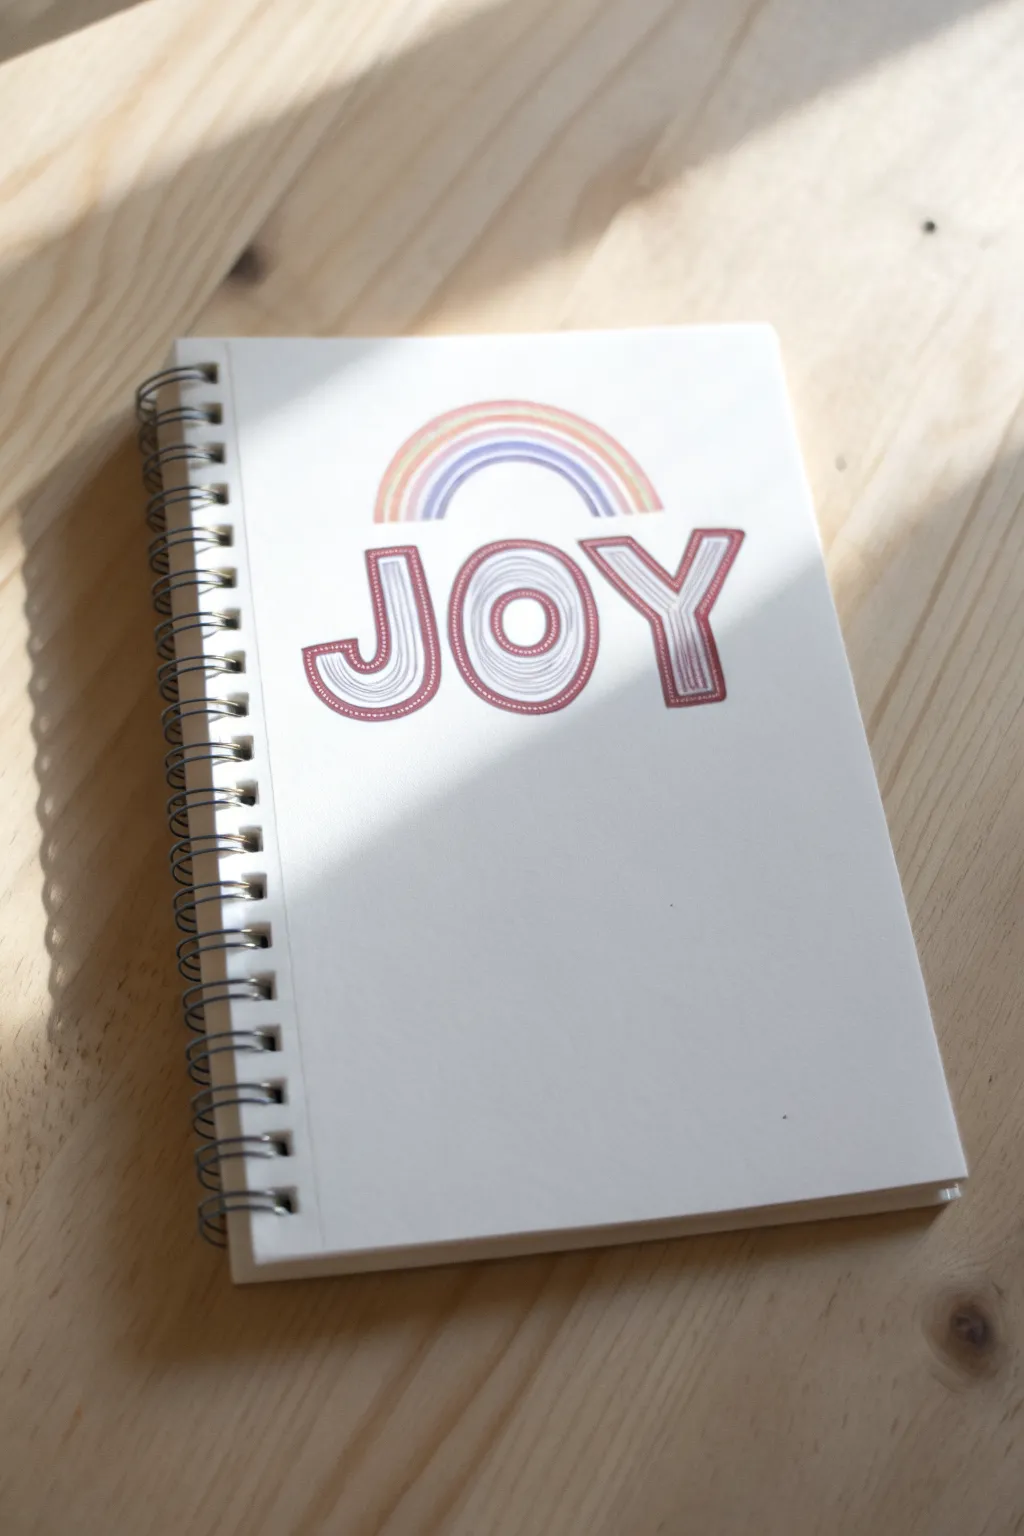
Transform a plain notebook into a source of daily inspiration with this minimalist yet cheerful design. Featuring stylized typography and a soft pastel rainbow, this project uses simple linework to create depth and character.
Detailed Instructions
Materials
- Blank white spiral-bound notebook or sketchbook
- Pencil (HB or lighter)
- Eraser
- Fine-tip markers or gel pens (maroon, burnt orange, lavender/periwinkle, soft yellow)
- Ruler (optional)
- Circle stencil or compass (optional)
Step 1: Drafting the Design
-
Find the center:
Begin by lightly marking the horizontal and vertical center of your notebook cover with a pencil. This will help ensure your word and rainbow are perfectly aligned. -
Sketch the letters:
Lightly sketch the word ‘JOY’ in large block letters. Aim for a sans-serif style where the ‘O’ is a perfect circle. Keep the spacing tight but not touching. -
Round the edges:
Go back over your block letters and round off every sharp corner to give them a softer, bubble-letter aesthetic. Pay special attention to the terminals of the ‘J’ and ‘Y’. -
Outline the rainbow:
Directly above the ‘O’, lightly sketch three concentric arches to form a simple rainbow. The width of the rainbow should match the width of the ‘O’ below it for visual balance.
Steady Hands
Rest the heel of your hand on a scrap piece of paper while drawing. This prevents smudging the ink and gives you a pivot point for smoother curves.
Step 2: Inking the Lettering
-
Select your palette:
Choose a deep maroon or rusty red color for the primary outline of the text. Using a medium-point marker or pen, trace over your final pencil lines for the word ‘JOY’. -
Erase guidelines:
Once the main outline ink is completely dry, gently erase the pencil sketch underneath to keep the page clean for the filling step. -
Start the internal lining:
Switch to a finer tip pen in the same maroon color. Draw a second line just inside the main outline of each letter, maintaining an even gap. -
Create the topographic effect:
Continuing with the fine tip, keep drawing concentric lines inward. Follow the shape of the letter precisely. -
Vary the line weight:
To mimic the style in the photo, stick to a muted, slightly sketchy line quality rather than rigid, perfect strokes. It adds a hand-drawn charm. -
Fill the center:
Keep spiraling or layering the lines inward until the entire letter is filled, leaving just a tiny bit of white space in the very center of the strokes if desired.
Step 3: Adding the Rainbow
-
Outline the outer arch:
Using a soft orange or peach marker, carefully trace the outermost arch of the rainbow sketch. -
Fill the first band:
Instead of solid coloring, use the same ‘topographic’ technique. Draw inner lines within the orange band until it is visually filled with texture. -
Draw the middle arch:
Switch to a lavender or periwinkle blue pen. Draw the middle arch and repeat the internal lining texture. -
Complete the inner arch:
Use a soft yellow or gold pen for the smallest, innermost arch. Fill it with fine concentric lines just like the previous bands. -
Final clean up:
Check for any stray pencil marks around the rainbow area and erase them. Inspect your lettering for any gaps that need a quick touch-up.
Wobbly Lines?
If your internal lines touch or overlap, don’t panic. Just thicken the line at that specific spot to hide the mistake. It adds to the organic look.
Now you have a custom notebook that brings a spark of happiness every time you open it to write
One-Line Face With Colorful Hair
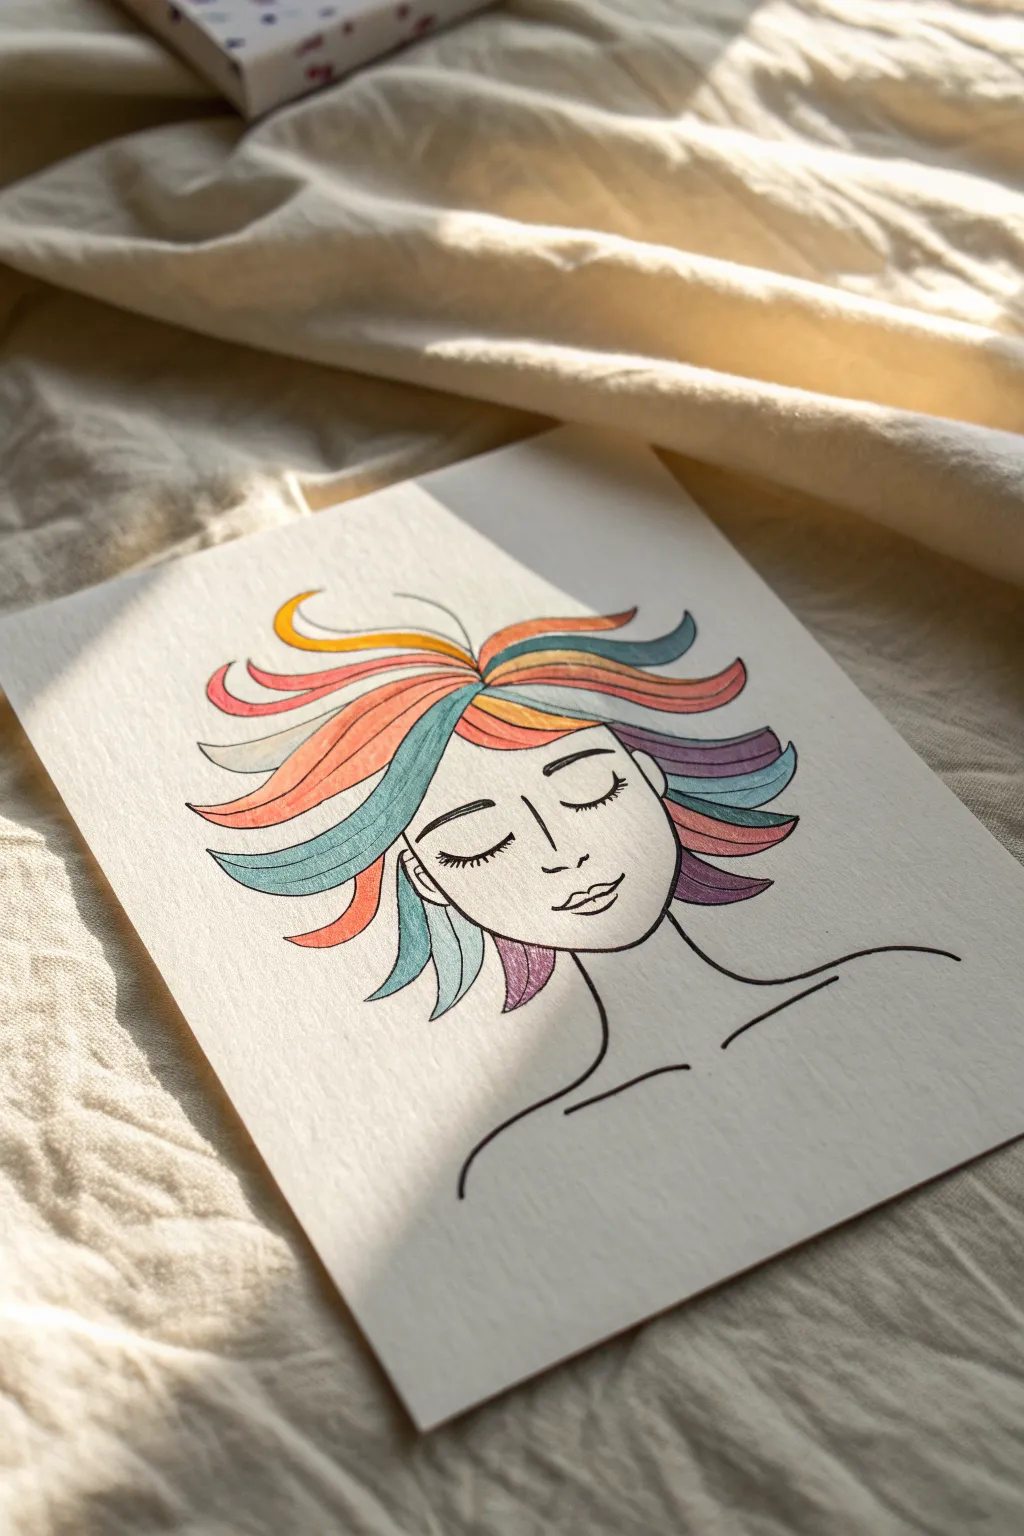
This serene and colorful drawing combines the simplicity of minimalist line art with a vibrant pop of color. It features a peaceful face with closed eyes surrounded by flowing, segmented strands of rainbow hair, making it a relaxing project for artists of any skill level.
Step-by-Step Tutorial
Materials
- High-quality white drawing paper (mixed media or heavy sketch paper)
- Fine liner pen (black, archival ink, 0.5mm or 0.8mm)
- Colored pencils or fine-tip markers (various colors: orange, teal, purple, yellow)
- Pencil (HB or 2B)
- Eraser
Step 1: Sketching the Base
-
Start with the face shape:
Begin by lightly sketching a simple U-shape for the chin and jawline in the lower center of your paper. Keep the lines soft so they can be easily adjusted. -
Position the features:
Mark the center of the face lightly. Sketch two downward-curving arcs for the closed eyes, ensuring they are symmetrical. Add small lashes flicking outward from the corners. -
Add the nose and mouth:
Draw a small, simple L-shape or curve for the nose just below the eye line. Below that, sketch the lips. I like to keep the mouth slightly parted with a gentle curve to give a peaceful expression. -
Outline the neck:
Extend two curved lines down from the jawline to form a slender neck. You can let these lines trail off into the shoulders, embracing that open, airy line-art style. -
Map out the hair flow:
This is the fun part. Sketch large, sweeping curves radiating from the top of the head. Think of them as individual thick ribbons of hair flowing outward. create varying lengths and directions for a wild, windswept look.
Fixing Smudges
If ink smudges while erasing, turn it into a shadow or add a thicker line weight to cover the error. Wite-Out can also work for tiny mistakes on white paper.
Step 2: Inking the Lines
-
Trace the facial features:
Using your black fine liner, carefully go over your pencil lines for the eyes, nose, and mouth. Use confident, smooth strokes to avoid shaky lines. -
Ink the face outline:
Trace the jawline and neck. Varying your pen pressure slightly can add character—try pressing harder on the shadow side of the neck. -
Define the hair strands:
Ink the outlines of your hair ribbons. Make sure each section is closed off so you can color them in easily later. Let the ends taper into sharp, elegant points. -
Erase pencil marks:
Wait a moment for the ink to dry completely to prevent smudging. Then, gently erase all the underlying pencil sketches to leave a clean, crisp outline.
Step 3: Adding Color
-
Select your palette:
Choose 4-5 complementary colors. The example uses a mix of warm tones (orange, yellow, pink) and cool tones (teal, blue, purple). -
Color the first strand:
Pick a prominent hair section and fill it with your first color, like a bright orange. Use consistent strokes following the curve of the hair to simulate texture. -
Alternate colors:
Move to an adjacent strand and switch to a contrasting color, such as teal or blue. Alternating warm and cool tones creates a dynamic visual rhythm. -
Fill the remaining sections:
Continue filling in the hair sections. Don’t worry about a strict pattern; a random distribution often looks more organic and artistic. -
Add subtle shading:
To give the hair depth, lightly layer a slightly darker shade of the same color at the roots (near the head) and the tips of each strand. -
Review and refine:
Check for any white gaps in your coloring and fill them in. If needed, re-trace any black lines that might have gotten covered by the colored pencil to make them pop again.
Stroke Direction
When coloring the hair, always move your pencil or marker in the direction the hair flows. This creates a natural texture rather than flat blocks of color.
Now you have a striking piece of art that balances clean lines with playful color, perfect for framing or gifting
Easy Ice Cream Cones With Sprinkles

Capture the sweetness of summer with this delightful drawing of soft-serve ice cream cones. Using simple markers and pen lining, you’ll create a vibrant, sprinkle-covered illustration that looks good enough to eat.
How-To Guide
Materials
- Sketchbook or drawing paper
- Pencil and eraser
- Fine liner pen (black, 0.3mm or 0.5mm)
- Alcohol-based markers or colored pencils (mint green, soft pink, light brown, dark brown, yellow-orange)
- White gel pen (optional for highlights)
Step 1: Sketching the Shapes
-
Main cone outline:
Start by lightly sketching a long, narrow triangle for the cone of the first ice cream. Keep the point sharp at the bottom and the top edge flat. -
First swirl layer:
Draw the bottom layer of the soft serve directly on top of the cone. It should look like a flattened cloud or blob that hangs slightly over the edges of the cone. -
Building the swirl:
Stack a second, slightly smaller blob shape on top of the first one. -
The peak:
Finish the ice cream shape with a pointed, curved dollop on top, resembling a comma or a wave crest. -
Repeat for second cone:
Draw a second cone next to the first one, perhaps tilting it slightly for a dynamic composition. Repeat the stacking process for the ice cream swirls.
Step 2: Inking the Lines
-
Outline the ice cream:
Using your black fine liner, go over your pencil lines for the ice cream swirls. Keep your hand steady to create smooth, flowing curves. -
Drip details:
When outlining the bottom of the ice cream where it meets the cone, add wavy drip lines to show the sauce or melting ice cream cascading down. -
Outline the cone:
Ink the straight edges of the cone structure. -
Erase guidelines:
Wait a moment for the ink to dry completely to avoid smudging, then gently erase all your initial pencil sketches.
Smooth Shading
For softer shading, color the edges of the swirls first and quickly fill inward while the ink is wet. This blends marker strokes.
Step 3: Adding the Waffle Pattern
-
Diagonal lines:
On the cone area, draw a series of parallel diagonal lines sloping downward from left to right. -
Cross-hatching:
Draw a second set of diagonal lines sloping right to left, crossing the first set to create a diamond grid pattern. -
Clean up:
Ensure the lines stop cleanly at the cone’s edges and don’t overlap into the ice cream area.
Make It Pop
Add a white gel pen highlight to the top curve of each ice cream swirl and the chocolate drips for a shiny, tasty look.
Step 4: Coloring
-
Mint green base:
Color the first ice cream swirl entirely with a light mint green marker. Apply the color evenly to avoid streaks. -
Pink base:
Color the second ice cream swirl with a soft bubblegum pink hue. -
Cone color:
Fill in the waffle cones. For the mint cone, use a light tan or biscuit color. For the pink ice cream’s cone, use a more vibrant yellow-orange tone for variety. -
Chocolate drips:
For the pink ice cream, color the dripping bottom section with a chocolate brown marker to make it look like fudge sauce. -
Caramel drips:
For the mint ice cream, use a caramel or medium brown shade for the drip section just above the cone.
Step 5: Sprinkles and Details
-
Adding texture:
Use the fine liner to add tiny dots or small circles within the ice cream swirls to represent sprinkles or texture. -
Background confetti:
Draw scattered small circles around the cones in the background space. -
Coloring background dots:
Fill in these floating circles with various pastel colors—pink, yellow, green, and blue—to create a festive, confetti-like atmosphere.
Now you have a sweet pair of treats that will brighten up any sketchbook page
Watercolor Wash Background With Ink Doodles
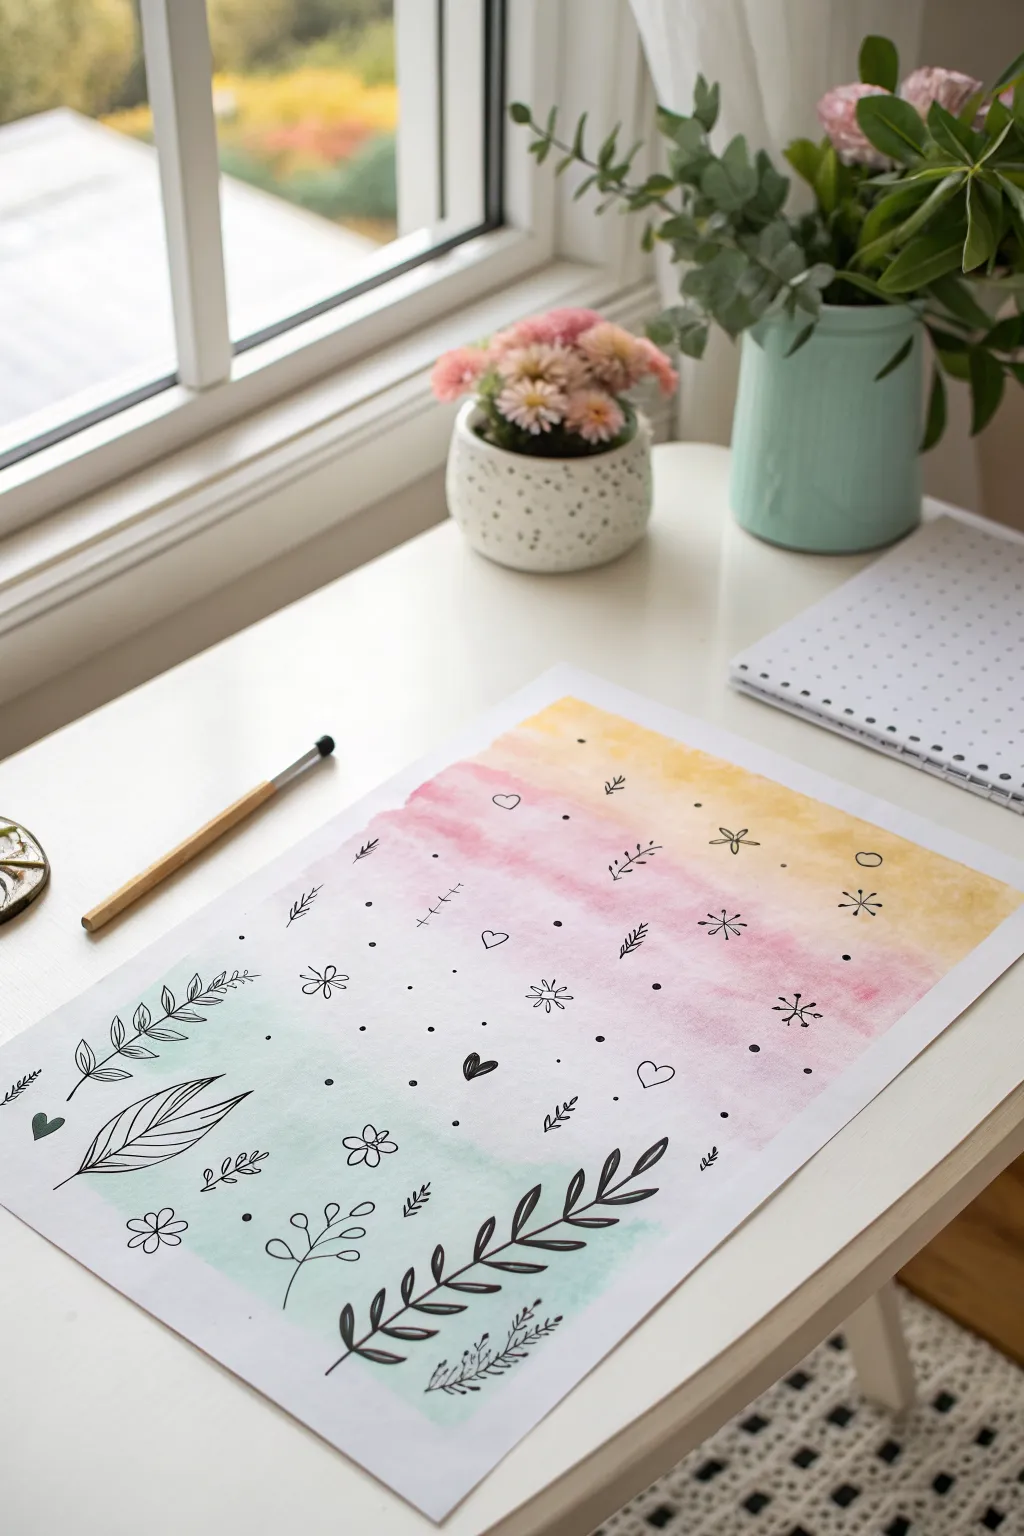
Combine the soft, bleeding beauty of watercolors with the crisp precision of ink in this relaxing project. You’ll create a seamless gradient wash that serves as a dreamy canvas for simple, nature-inspired line art doddles.
Step-by-Step
Materials
- Heavyweight watercolor paper or mixed media paper
- Watercolor paints (Yellow, Pink/Rose, Mint Green/Light Teal)
- Wide flat wash brush (1/2 inch or larger)
- Black fineliner pens (sizes 0.3mm and 0.5mm)
- Jar of clean water
- Paper towels
- Painter’s tape or washi tape
Step 1: Creating the Gradient Background
-
Prepare your workspace:
Tape down all four edges of your watercolor paper to a flat surface like a table or drawing board. This prevents the paper from buckling when it gets wet and creates a clean white border. -
Mix your colors:
Prepare three puddles of diluted paint on your palette: a sunny yellow, a rosy pink, and a soft mint green. Keep them fairly watery, like the consistency of tea, to ensure they remain transparent. -
Start with yellow:
Dip your wide flat brush into clean water first, then pick up the yellow paint. Apply broad horizontal strokes across the top third of the paper. -
Blend downward:
As you move down the page, add a little more water to your brush to fade the yellow slightly before you reach the middle section. -
Introduce the pink:
Clean your brush thoroughly. Pick up the pink paint and start painting just below the strongest yellow section, allowing the wet pink edge to touch the wet yellow edge. -
Create a smooth transition:
Gently brush back and forth where the colors meet. The wetness will allow the yellow and pink to merge naturally, creating a soft orange-peach hue in the transition zone. -
Continue the wash:
Pull the pink color down through the middle section of the paper, keeping your strokes horizontal and fluid. -
Add the green base:
Rinse your brush again. Load it with the mint green paint and apply it to the bottom third of the paper, bringing it up to meet the wet pink edge. -
Final blend:
Let the green and pink touch. Don’t overwork this area, as these complementary colors can turn muddy if mixed too vigorously; just let them kiss and bleed slightly. -
Drying time:
This is crucial. Let the paper dry completely. If the paper is cool to the touch, it’s still wet. I usually wait at least 20-30 minutes or use a hairdryer on a low setting to speed it up.
Muddy Colors?
If the transition between pink and green looks brown, let the pink layer dry almost completely before adding the green. A wet-on-dry technique prevents mixing.
Step 2: Inking the Doodles
-
Plan your layout:
Visualize a loose grid. You’ll want a mix of larger focal elements (like big leaves) and smaller filler elements (like dots and stars) distributed evenly across the color zones. -
Draw the large leaves:
Using a 0.5mm pen, draw a few large, sweeping leaf shapes in the bottom green section. Draw a central vein and add diagonal lines for texture inside the leaf. -
Add vines:
Draw curving lines with small, alternating leaves attached to them. Place one climbing up from the bottom and another smaller vine drooping down from the top yellow section. -
Intersperse florals:
Draw simple five-petal flowers scattered throughout the middle pink and top yellow sections. Keep the centers open or add a tiny dot. -
Include geometric botanicals:
Draw stylized plants that look like arrows or wheat stalks—just a straight line with V-shapes branching off the sides. -
Add whimsical icons:
Draw small open hearts and asterisk-style stars (*). Place these in the empty spaces between the larger botanical drawings. -
Fill the gaps:
Switch to a thinner 0.3mm pen if you have one. Add tiny solid dots and small open circles in any large negative spaces to tie the composition together. -
Reveal:
Once the ink is totally dry (give it a minute so it doesn’t smudge), carefully peel away the painter’s tape at a 45-degree angle to reveal your crisp white border.
Metallic Magic
Swap the black ink for a gold or silver gel pen for the smaller stars and dots. The metallic sheen looks incredible against the matte watercolor.
Hang your new artwork near a window to let the natural light enhance those transparent watercolor layers
Stained-Glass Style Animal Shapes
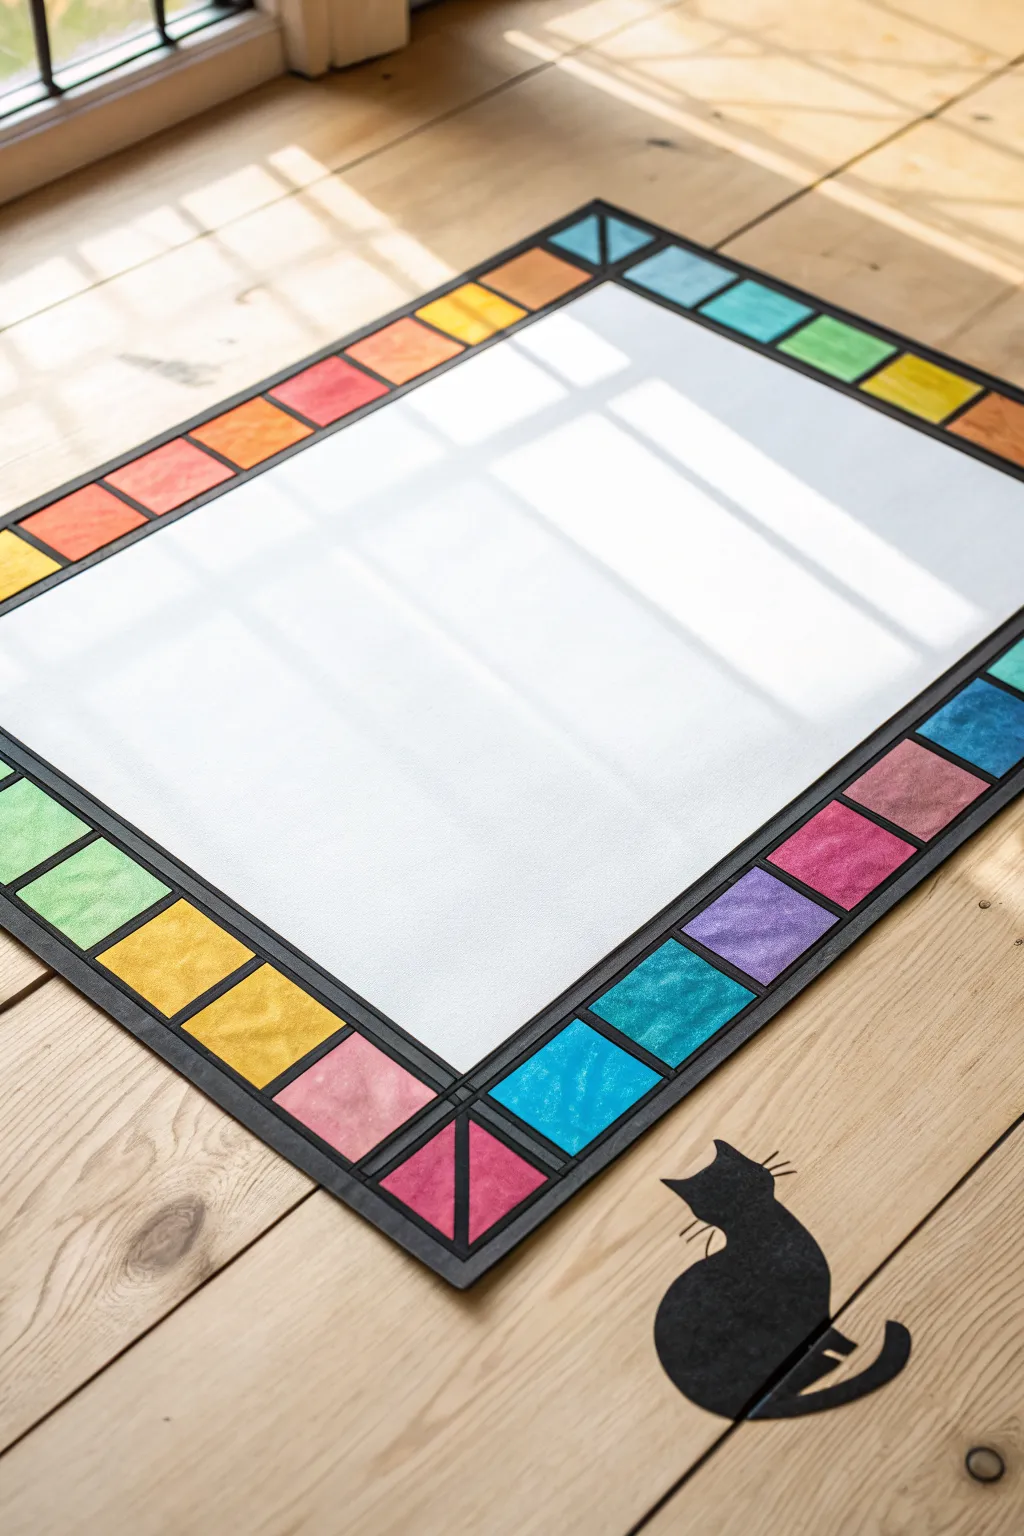
Bring a touch of whimsical color to your floor or wall with this dual-component project featuring a glowing, stained-glass style border frame and a sleek companion cat cutout. The translucent colors catch the light beautifully, creating a cozy atmosphere.
How-To Guide
Materials
- Large sheet of white poster board or foam core (approx. 24″ x 36″)
- Black electrical tape or thin black washi tape (1/4 inch width)
- Wide black duct tape or gaffer tape (1 inch width)
- Alcohol-based markers or permanent markers (various bright colors)
- Clear cellophane or transparency film sheets
- Scissors and craft knife
- Black cardstock or construction paper
- Pencil and ruler
- Glue stick or double-sided tape
Step 1: Constructing the Base Frame
-
Prepare the base:
Lay your large white poster board on a flat workspace. If you want a more rigid base, foam core works excellently here to prevent warping. -
Mark the border width:
Using a ruler and pencil, lightly mark a border around the entire edge of the board. A width of about 2 to 3 inches works well to give plenty of space for the color blocks. -
Create the outer edge:
Run a strip of the wide black tape along the very outer edge of the poster board to create a crisp, solid boundary for your frame. -
Define the inner edge:
Apply a strip of the thinner black electrical tape along the pencil line you marked earlier. This creates the inner boundary of your stained-glass border.
Sticky Situation?
If the electrical tape peels up at the ends, dab a tiny dot of superglue or clear craft glue under the lifting edge to secure it permanently.
Step 2: Designing the ‘Lead’ Grid
-
Plan the segments:
Lightly sketch vertical lines connecting the inner and outer tape borders at regular intervals. I find spacing them about 3-4 inches apart creates nice, chunky blocks of color. -
Apply vertical dividers:
Place strips of the thin black tape over your pencil marks to divide the border into rectangular stations. -
Add corner details:
For the four corners, use the thin tape to create a diagonal line or an ‘X’ shape within the corner square. This adds that classic geometric stained-glass feel.
Step 3: Adding the Stained-Glass Color
-
Prepare color inserts:
You can color directly on the white board, but for a true glossy effect, cut strips of clear transparency film to fit inside your taped rectangles. -
Color the film:
Use alcohol markers to color the film strips. Color roughly or cross-hatch to mimic the texture of real stained glass. Vary the colors—pinks, blues, ambers—for a vibrant look. -
Attach the color panels:
Glue or tape these colored film pieces into the spaces between your black tape lines. If you skipped the film, simply color the white board directly with markers, layering the ink for saturation. -
Seal the lines:
Go over any loose tape edges with your finger to ensure they are firmly adhered, pressing down the intersections where the tape keeps the color blocks distinct.
Light It Up
Place the frame near a window or backlight it with LED strips. The light passing through the marker-colored sections will glow like real glass.
Step 4: Creating the Cat Silhouette
-
Sketch the outline:
On a sheet of black cardstock, lightly sketch a simple sitting cat shape. Focus on a curved back and a round head with pointed ears. -
Cut out the shape:
Carefully cut out your cat silhouette using scissors. For tighter curves around the ears, a craft knife might give you a cleaner edge. -
Add tail details:
Cut a separate curved tail piece if your paper wasn’t big enough, or if you want to position it wrapped around the base. Attach it to the main body with a bit of glue. -
Create whiskers:
Cut very thin slivers of black paper or use stiff black wire for whiskers. Glue these delicately to the cat’s snout area. -
Final arrangement:
Place your finished frame on the floor or mount it on the wall, and position the cat silhouette right next to the corner as if it’s admiring the view.
Enjoy the interplay of light and color with your new geometric art piece
Color-Block Houses in a Simple Row

Create a charming neighborhood scene with this illustrative project that combines clean architectural lines with blocks of soft color. It’s a perfect exercise for practicing layout and line work without needing precise perspective skills.
Step-by-Step Tutorial
Materials
- Spiral-bound sketchbook or mixed media paper
- Fine-liner pen (black, 0.3mm or 0.5mm)
- Pencil (HB for sketching)
- Eraser
- Ruler
- Colored pencils or alcohol markers (mustard yellow, teal blue, terracotta red, slate blue, peach)
- White gel pen (optional for highlights)
Step 1: Planning the Layout
-
Establish the ground lines:
Begin by lightly drawing two horizontal lines across your page with a ruler and pencil. Place one line about a third of the way up from the bottom for the lower houses, and another line roughly in the middle of the page for the upper row. -
Block in house shapes:
Sketch the basic rectangular bodies of the lower three houses first. Vary their widths slightly to create interest, keeping them anchored to your bottom line. -
Add the upper row:
Draw the geometric outlines for the top three houses on the upper line. Position these so they sit in the gaps between the lower roofs, ensuring the composition feels balanced rather than crowded. -
Draft the rooflines:
Add triangular peaks to each rectangle. Feel free to mix up the styles—try a steep, tall triangle for the red house and simpler, wider triangles for the others to give each home personality.
Clean Lines
When inking long straight lines without a ruler, lock your wrist and move your entire arm from the elbow. This produces straighter lines than moving just your fingers.
Step 2: Inking the Structures
-
Outline the main forms:
Using your black fine-liner, carefully trace over your pencil lines for the walls and roofs. Use a confident, steady stroke, but don’t worry if the lines aren’t perfectly straight; a little wobble adds hand-drawn charm. -
Define windows and doors:
Draw the internal details. Add rectangular doors at the base of each house and squares for windows. Vary the window panes—some can be four-pane squares, while the blue house might look great with a round attic window. -
Detail the roofs:
For the leftmost and central lower houses, draw a grid pattern or shingles on the roofs. Keep the other roofs solid or simple to prevent the drawing from looking too busy. -
Add small architectural touches:
Sketch in a chimney on the yellow house and small steps leading up to the doors where appropriate. Drawing a simple arched top on the door of the grey house adds a nice variation. -
Erase guidelines:
Once the ink is completely dry—I usually wait at least two minutes to be safe—gently erase all the underlying pencil sketches to reveal a clean black-and-white framework.
Marker Bleed?
If using alcohol markers on thin paper, place a sheet of scrap paper or cardstock underneath your current page to protect the next sheet from ink bleeding through.
Step 3: adding Color
-
Color the yellow house:
Take your mustard yellow pencil or marker and fill in the body of the top-left house. Use vertical strokes to mimic wood siding texture. -
Fill the teal house:
Color the middle house in the top row with a muted teal or slate blue. Leave the windows white for now to keep the look bright. -
Paint the red house:
Use a terracotta or warm red shade for the top-right house. This vibrant color acts as a focal point, drawing the eye to the top right of the composition. -
Complete the bottom row:
Color the bottom-left house body in orange-yellow, the middle house in a soft peach or beige, and the bottom-right house in a light blue-grey. -
Color the roofs:
Fill in the textured roofs with a contrasting color, like a light brown or grey, to distinguish them from the walls. -
Detail doors and windows:
Color the doors in varying wood tones or accent colors like green. Carefully fill in the window glass with a very pale blue, or just leave them white for a clean, graphic look. -
Add subtle atmosphere:
Draw three tiny ‘v’ shapes floating above the red house to represent birds in the distance.
Now you have a quaint, colorful illustrated village ready to brighten up your sketchbook
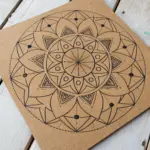
Mandala With a Simple Repeat-and-Color Plan
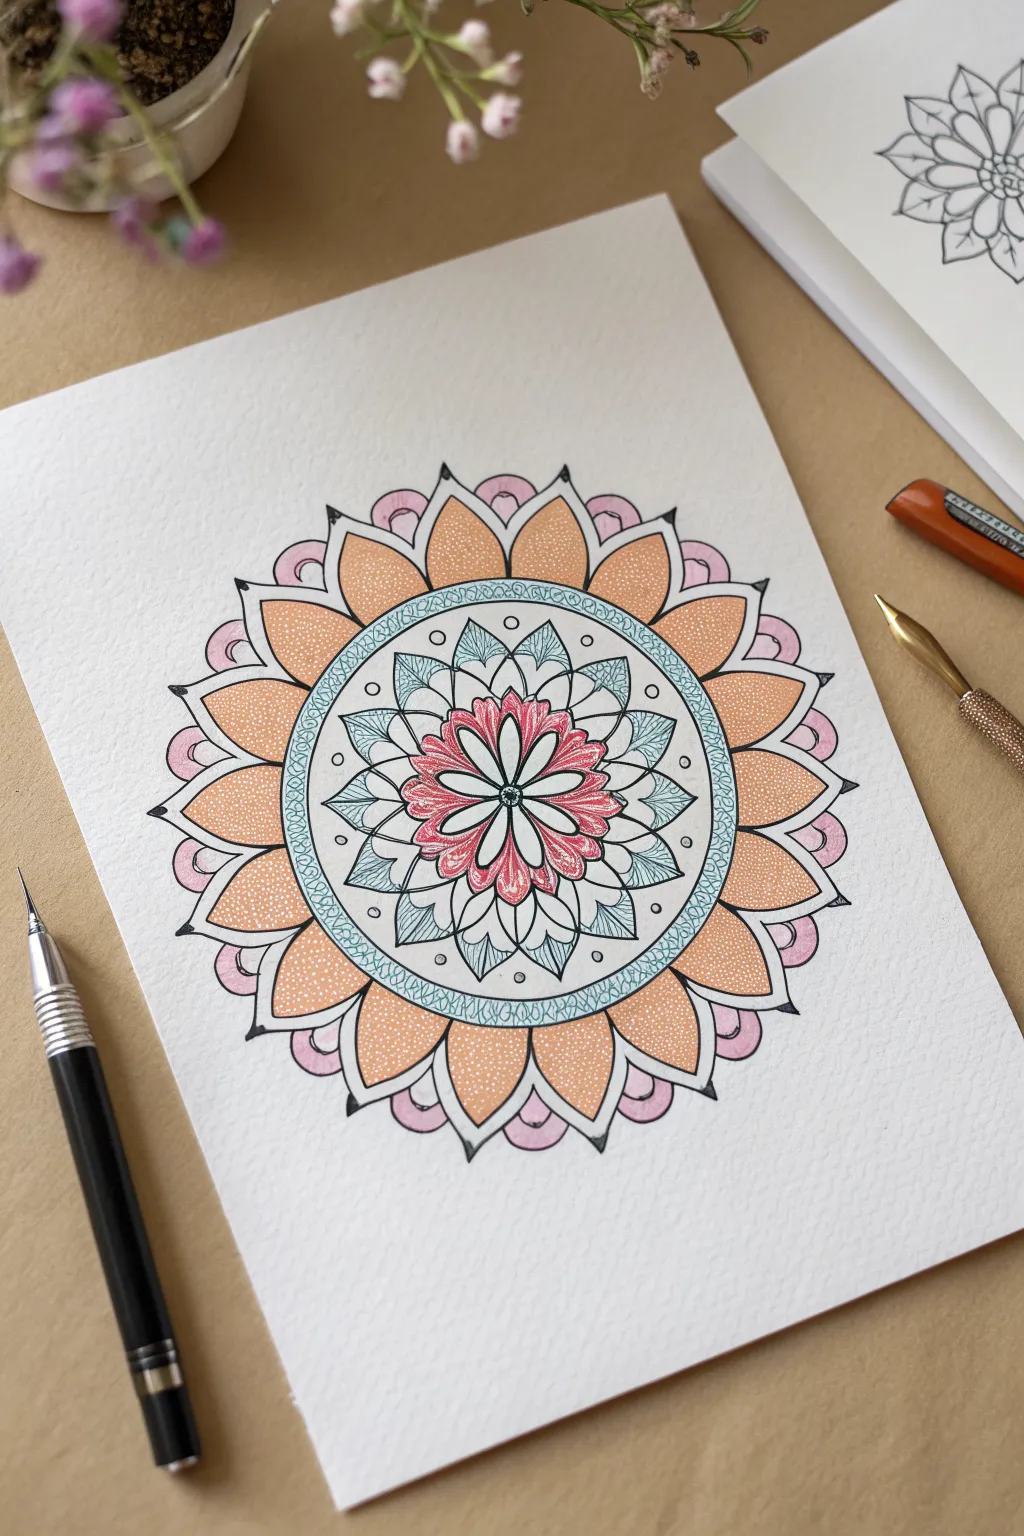
This radiant mandala combines simple repeating patterns with a warm, inviting color palette to create a stunning piece of art. With its central floral motif and expanding layers of petals and geometric details, it offers a relaxing way to practice symmetry and color balance.
Step-by-Step Guide
Materials
- High-quality white drawing paper or cardstock (smooth finish)
- Fine liner pens (sizes 0.1, 0.3, and 0.5)
- Compass for drawing perfect circles
- Pencil (HB or 2H for light guidelines)
- Eraser
- Colored markers or gel pens (pink, orange/peach, light blue)
- Ruler
Step 1: Setting the Foundation
-
Mark the Center:
Begin by finding the exact center of your paper. Using your ruler, measure lightly and mark a small dot with your pencil to anchor the entire design. -
Draw Concentric Circles:
Using your compass, draw a series of light concentric circles expanding from the center point. You will need a very small inner circle, a medium one for the flower layer, a larger band for the geometric ring, and a final large circle for the outer petals. -
Create Guidlines:
Lightly draw straight lines through the center point like a pizza, dividing the circle into equal sections (8, 12, or 16 depending on how detailed you want to go). This helps ensure your petals stay uniform in size.
Step 2: Drawing the Central Flower
-
Outline the Core Petals:
Starting at the very center, use a 0.3 fine liner to draw elongated, teardrop-shaped petals radiating outward. These should be thin near the center and widen slightly before coming to a soft point. -
Add Inner Details:
Inside each of these core petals, draw a simple line down the middle to give them a bit of dimension and vein-like structure. -
Create the Second Layer:
Draw a secondary layer of petals peeking out from behind the first set. Make these slightly wider and shorter to fill the gaps between the main petals. -
Color the Center:
Using your pink marker, color in the primary petals. For a textured look, use stroke lines rather than solid block coloring.
Even Spacing
Rotate your paper constantly as you draw. It’s much easier to draw identical curves when your hand stays in a comfortable position and the paper moves instead.
Step 3: Building the Middle Rings
-
Draw the Leaf Layer:
Moving outward, draw a ring of pointed, leaf-like shapes that surround the central flower. These should have sharp tips and a central vein line. -
Color the Leaves:
Fill these leaf shapes with a light blue shade. I like to use a very fine tip here to create delicate hatching lines instead of solid color, which adds visual interest. -
Create the Geometric Band:
Outline the wider band circle you drew earlier with your pen. Inside this band, draw a consistent, repetitive pattern—small swirls, loops, or a ‘chain-link’ texture works beautifully here. -
Shade the Band Background:
Color the background of this patterned band with a light teal or blue, leaving the pattern itself white (or visa-versa) to make it pop.
Smudge Alert
If you are right-handed, work from the center out toward the left; if left-handed, toward the right. This prevents your hand from dragging across fresh ink.
Step 4: The Outer Petals
-
Outline Large Petals:
Draw the largest ring of petals. These should be broad, curved shapes that extend to your outermost pencil guideline. Ensure the tips are sharp and centered over the sections below. -
Add Decorative Points:
Between each large petal, draw a small, sharp triangular point or spike. This adds a nice contrast to the rounded petal shapes. -
Stipple Color Technique:
For the large orange petals, use a stippling technique. Take an orange or peach marker and fill the shape with hundreds of tiny dots rather than solid ink. Concentrate the dots near the base for a gradient effect. -
Add the Final scalloped Edge:
Draw a small, rounded scallop or semi-circle behind each large orange petal tip. This creates a soft border layer. -
Color the Outer Layers:
Color these final scalloped edges with soft pink. Keep the shading light to maintain the delicate aesthetic.
Step 5: Finishing Touches
-
Refine Line Work:
Go over your main black outlines with a slightly thicker pen (0.5) to make the primary shapes stand out against the colors. -
Erase Guidelines:
Once the ink is completely dry, gently erase all the pencil circles and directional lines you drew in the first phase. -
Add Highlights:
If you have a white gel pen, add tiny dots or highlights to the center of the flower or the tips of the leaves for extra sparkle.
Now step back and admire the rhythmic beauty of your hand-drawn mandala
Abstract Blobs With Outline Details
Create your own stylish stationery or wall art with this gentle, organic design featuring muted pastel blobs and crisp line work. The combination of soft watercolor-like shapes and sharp ink details creates a modern, abstract aesthetic perfect for framing or writing notes.
Detailed Instructions
Materials
- Heavyweight mixed media paper or watercolor paper
- Gouache or watercolor paints (Sage Green, Dusty Pink, Mustard Yellow, Mauve)
- Round paintbrushes (size 4 and 8)
- Fine liner pen (Black, 0.3mm or 0.5mm)
- Pencil and eraser
- Palette for mixing
- Water cup and paper towel
Step 1: Painting the Base Shapes
-
Plan the composition:
Lightly visualize where your shapes will go. The goal is to create a border effect, leaving the center open. Focus your heaviest clusters in the top-left and bottom-right corners to frame the empty space. -
Mix your palette:
Prepare your gouache or watercolors. Aim for a dusty, muted palette by adding a tiny touch of brown or white to your primary colors. You’ll need a sage green, a soft terracotta pink, a mustard yellow, and a muted mauve. -
Paint the foundation circles:
Starting in the bottom right corner, paint a medium-sized circle using your dusty pink. It doesn’t need to be perfect; a slightly organic edge adds character. -
Add corner anchors:
In the top right and bottom right corners, paint semi-circles or quarter-circles in mauve. These act as visual anchors for your design. -
Create leaf silhouettes:
Using the sage green, paint a large almond-shaped leaf in the top left corner. Paint a rounded, oval leaf shape in the bottom cluster as well. -
Add accent blobs:
Fill in the gaps with smaller circles. Place a mustard yellow circle near the top left leaf and a pale pink circle in the bottom left area of your cluster. -
Let it dry completely:
This is crucial. The paint must be bone dry before you add ink, or the pen will bleed and ruin the crisp lines. I usually give this about 15-20 minutes.
Step 2: Adding Ink Details
-
Outline the top leaf:
Once dry, take your black fine liner. Draw a center vein down the sage green leaf in the top left, then add curved veins extending to the edges. You don’t need to outline the entire shape; painting the veins is enough. -
Detail the mauve shapes:
On the mauve corner semi-circles, draw concentric white or light pink lines if using paint pens, or simply use your black pen to draw curved contour lines that mimic the shape’s roundness. -
Add veins to the bottom leaves:
Draw the skeletal structure over the pink and green leaf shapes in the bottom right. Keep your lines confident and smooth. -
Draw simple botanical sprigs:
In the empty white spaces between colored shapes, draw simple line-art branches. Create a stem with empty almond-shaped leaves branching off it. -
Overlay line art:
Don’t be afraid to draw over the painted shapes. Sketch a delicate branch overlapping the pink circle in the bottom cluster to create depth. -
Add stippling texture:
Using the tip of your pen, add clusters of small dots. Place these over parts of the mustard circle and the pink circle to add varied texture. -
Create floating particles:
Dot loose clusters of black specks in the empty white areas surrounding the main shapes. This mimics pollen or seeds and helps integrate the painted elements with the background. -
Final assessment:
Step back and look at the balance. If a spot looks too empty, add a few more ink dots or a tiny drawn leaf to connect the elements.
Ink Confidence
Use your whole arm, not just your wrist, when drawing long leaf veins. This helps keep the lines smooth and prevents shaky, hesitant marks.
Go Metallic
Trace over some of the black ink lines with a gold gel pen or gold paint. The metallic sheen adds a luxurious touch against the matte paint.
Now you have a beautiful piece of custom stationery ready for a handwritten note
Shadow Pop Drawing With Two Bright Colors

This minimalist project uses dual-tone outlines to create a charming, slightly vibrating visual effect on textured paper. The simplicity of the heart shape, paired with the rough, handmade quality of the paper, gives it a timeless and rustic feel.
How-To Guide
Materials
- Heavyweight cold-press watercolor paper or handmade cotton paper (deckled edge preferred)
- Blue colored pencil (indigo or cobalt)
- Red colored pencil (crimson or scarlet)
- Soft graphite pencil (HB or 2B)
- Kneaded eraser
Step 1: Paper Preparation & Sketching
-
Select your canvas:
Choose a piece of paper with significant texture. A handmade cotton rag paper with rough, deckled edges works best to match the original image’s organic look. -
Tear the edges (Optional):
If you are using a standard sheet, create a faux-deckled edge by folding the paper sharply, running a damp brush along the fold, and gently tearing the paper while wet. -
Plan placement:
Identify the center of your paper. The main heart motif will float right in the middle, leaving plenty of negative space around it. -
Lightly sketch the main heart:
Using your graphite pencil, very faintly draw the outline of a heart. Keep your pressure extremely light so you don’t crush the paper’s tooth. -
Sketch the inner heart:
Draw a smaller, congruent heart inside the first one. Aim for even spacing between the two lines, though a little handmade irregularity adds character. -
Rough in the background design:
Very lightly sketch faint, swirling lines or large cursive letters (like ‘XOXO’ or ‘Love’) behind where the heart will sit. These should look like faint watermarks.
Grainy Lines?
If the pencil skips too much over the texture, don’t press harder. Instead, make small circular motions with a sharp point to work color into the valleys.
Step 2: Applying the Color
-
Sharpness check:
Sharpen your blue and red pencils. You need a fine point to get into the texture of the paper without making the lines too fuzzy. -
Draw the outer contour:
Take the blue pencil and trace over your outer graphite heart line. Use medium pressure; you want the color to catch on the high points of the paper’s grain. -
Thicken the blue line:
Go over the blue outline a second time, slightly thickening the stroke to make it bold and define the outer boundary. -
Draw the inner contour:
Switch to your red pencil. Carefully trace the inner heart sketch. -
Enhance the red line:
Add a second pass to the red line. The goal is for the red to nestle inside the blue, creating a vibrant contrast. -
Refine the texture:
I find that lightly skimming the pencil over the paper once more helps fill in any large white gaps in the grain without making the line look too solid or waxy. -
Add background details:
Using the side of your graphite pencil, gently reinforce the large background swirls or letters you sketched earlier. Keep them very subtle, almost like shadows.
Step 3: Finishing Touches
-
Clean up stray marks:
Use a kneaded eraser to dab away any visible underlying graphite sketch lines that weren’t covered by the colored pencil. -
Check the contrast:
Stand back and look at the heart. If the blue feels too light against the red, add one more layer of pressure to deepen the indigo tone. -
Final inspection:
Brush away any pencil dust or eraser crumbs. The rough paper can trap debris, so a soft drafting brush or a clean makeup brush works well here.
Softer Touch
Use a colored pencil blender or a dry cotton swap to gently smudge the shadow lines in the background for a dreamy, out-of-focus effect.
The result is a simple yet striking piece of art that highlights the texture of your materials

Have a question or want to share your own experience? I'd love to hear from you in the comments below!