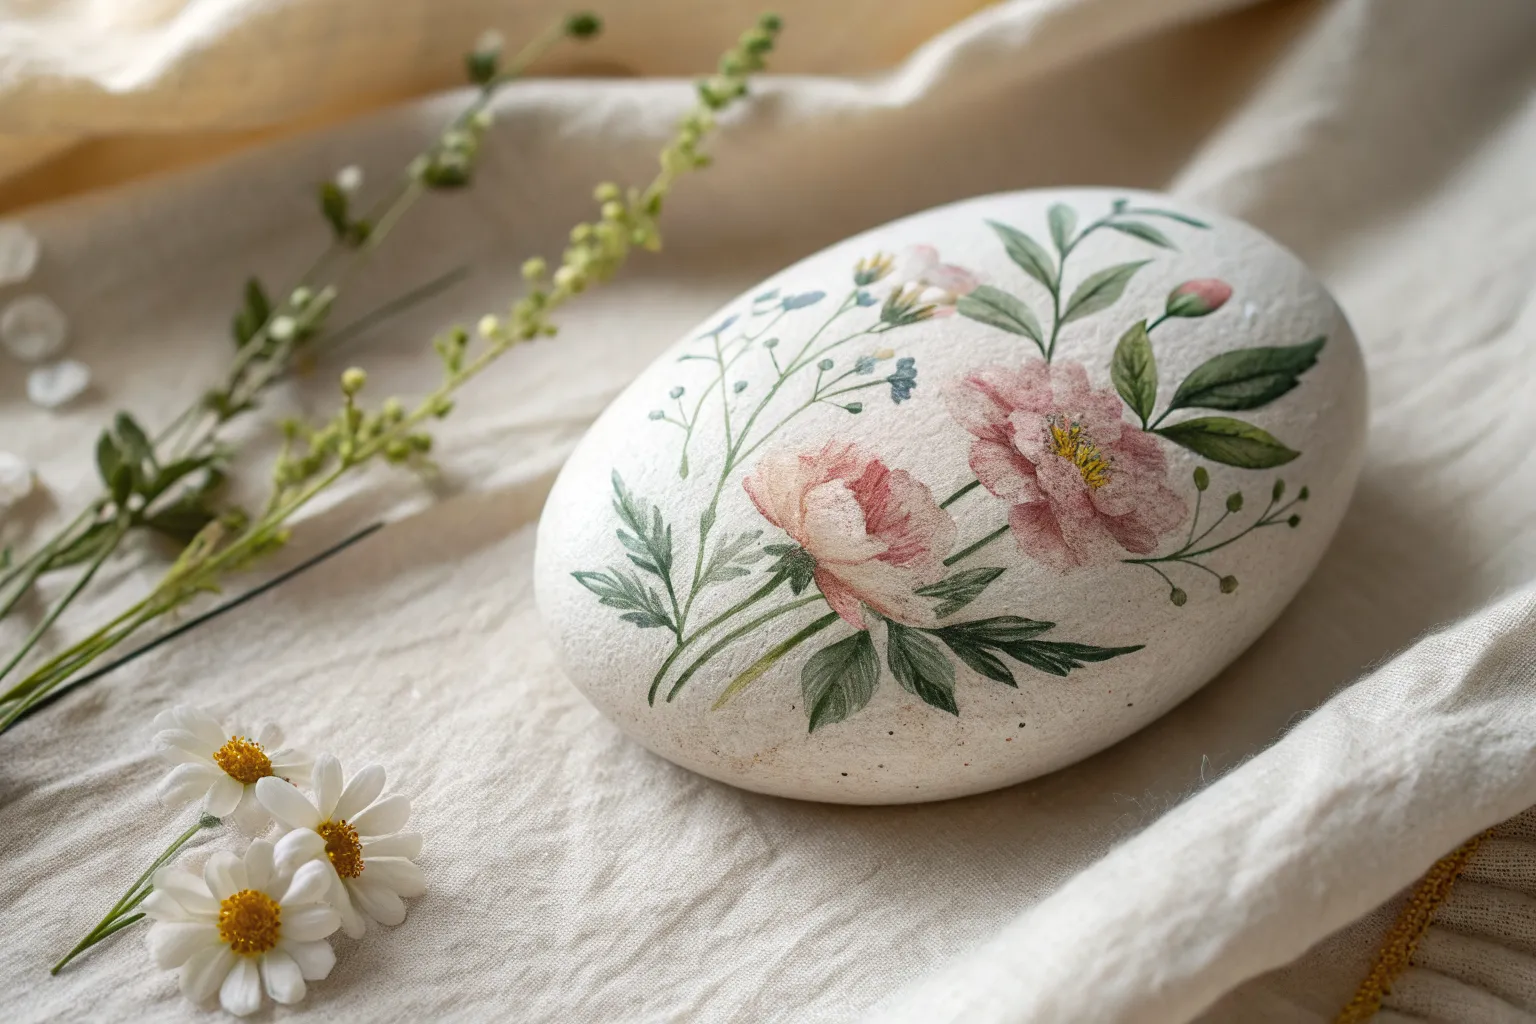
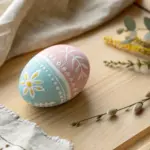
If you’ve got a handful of smooth stones and a little paint, you’re already halfway to making flowers painted on rocks that feel like tiny pocket gardens. Here are my go-to painted rock flower ideas, starting with the classics and building up to more artsy, wow-factor finishes.
Simple Daisies With Dot Centers
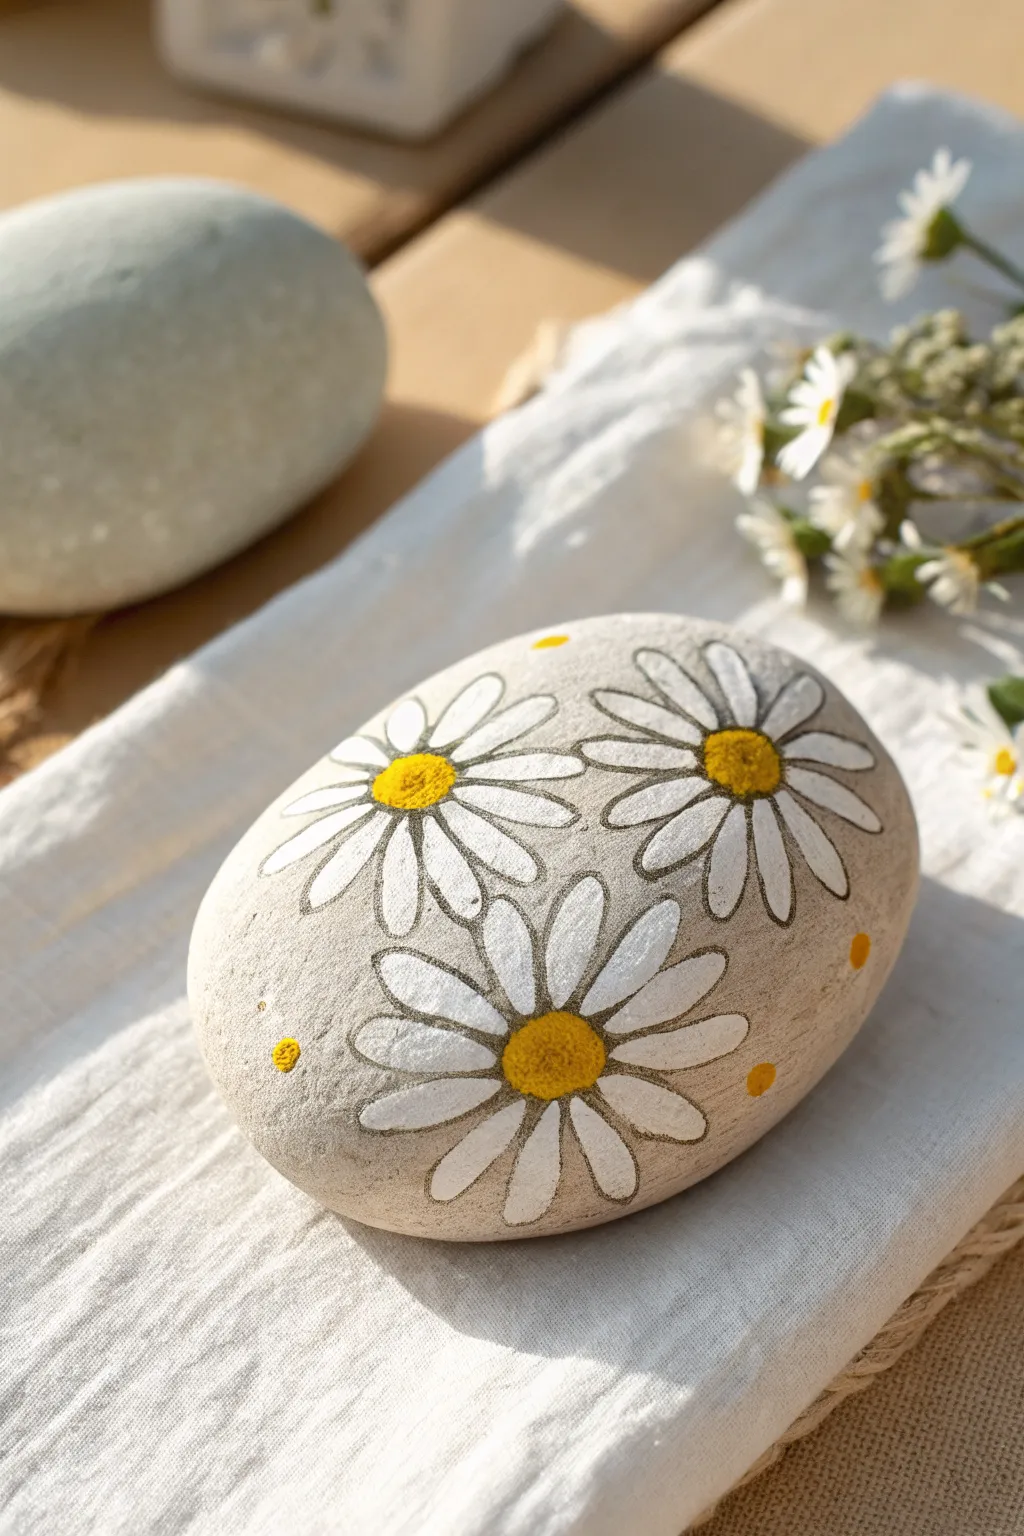
Capture the brightness of a summer field with this charming daisy-patterned stone. Using simple shapes and contrasting outlines, you’ll transform a plain rock into a cheerful piece of garden or desk decor.
How-To Guide
Materials
- Smooth, oval river rock (beige or light grey base)
- White acrylic paint
- Yellow acrylic paint (sunflower or slightly dark yellow)
- Black fine-point paint pen (0.5mm or 0.7mm) or liner brush
- Small round paintbrush (sz 2 or 3)
- Pencil for sketching
- Matte spray varnish or sealant
Step 1: Preparation & Sketching
-
Clean Your Canvas:
Begin by washing your stone with warm soapy water to remove any dirt or oils. Let it dry completely in the sun or use a hairdryer to speed things up. -
Observe the Stone:
Look at your rock’s shape. This design works best on an oval stone that mimics the shape of a large egg. -
Sketch the Centers:
Using a pencil very lightly, draw three small circles for the flower centers. Place two near the top and one centered below them, forming a rough triangle. -
Draft the Petals:
Sketch long, oval tear-drop shapes radiating from each center. Don’t worry if they overlap slightly; the overlapping actually adds depth to the design.
Step 2: Painting the Blooms
-
Base Coat the Petals:
Dip your small round brush into white acrylic paint. Fill in the petal shapes you sketched. Since rocks are porous, you might need a second coat after the first dries to get a bright, opaque white. -
Paint the Centers:
Using a clean brush, paint the round centers with your yellow paint. I prefer dabbing the paint on thickly here to give it a little texture. -
Dry Time:
Allow the paint to fully cure. If the paint is wet, your outlining pen will snag and ruin the smooth finish. -
Add Polka Dots:
While waiting for the main flowers to dry, use the handle end of a paintbrush or a dotting tool dipped in yellow paint to add small, random dots in the empty spaces around the petals.
Paint Pen Flow
If your fine liner pen skips over the rough rock texture, try drawing slower. Speed often causes the ink flow to break on uneven surfaces.
Step 3: Outlining & Details
-
Outline the Centers:
Take your black paint pen and carefully trace the yellow center circles. Keep your hand steady and rest your pinky on the table for balance. -
Outline the Petals:
Outline each white petal. Start from the center and pull the line outward toward the petal tip, then curve back in. -
Detail Lines:
Add a single, short line inside each petal, starting from the tip and moving inward about halfway. This mimics the crease found on real daisy petals. -
Texturize the Centers:
Add tiny stippled dots inside the yellow centers using your pen. Cluster them slightly denser at the bottom of the circle to create a shadow effect. -
Refine the Overlaps:
Where petals from different flowers cross, make sure the flower ‘in front’ has a continuous outline, breaking the line of the flower ‘behind’ it. -
Seal the Deal:
Once all ink is dry, take the rock to a well-ventilated area and apply a light coat of matte spray varnish to protect your artwork from chipping.
Add a Bee Friend
Paint a tiny bumblebee buzzing near one of the stray yellow dots to turn it into a whimsical scene of pollination.
Place your finished daisy rock in a sunny spot to enjoy those summer vibes all year round


Bold Sunflower Statement Rock
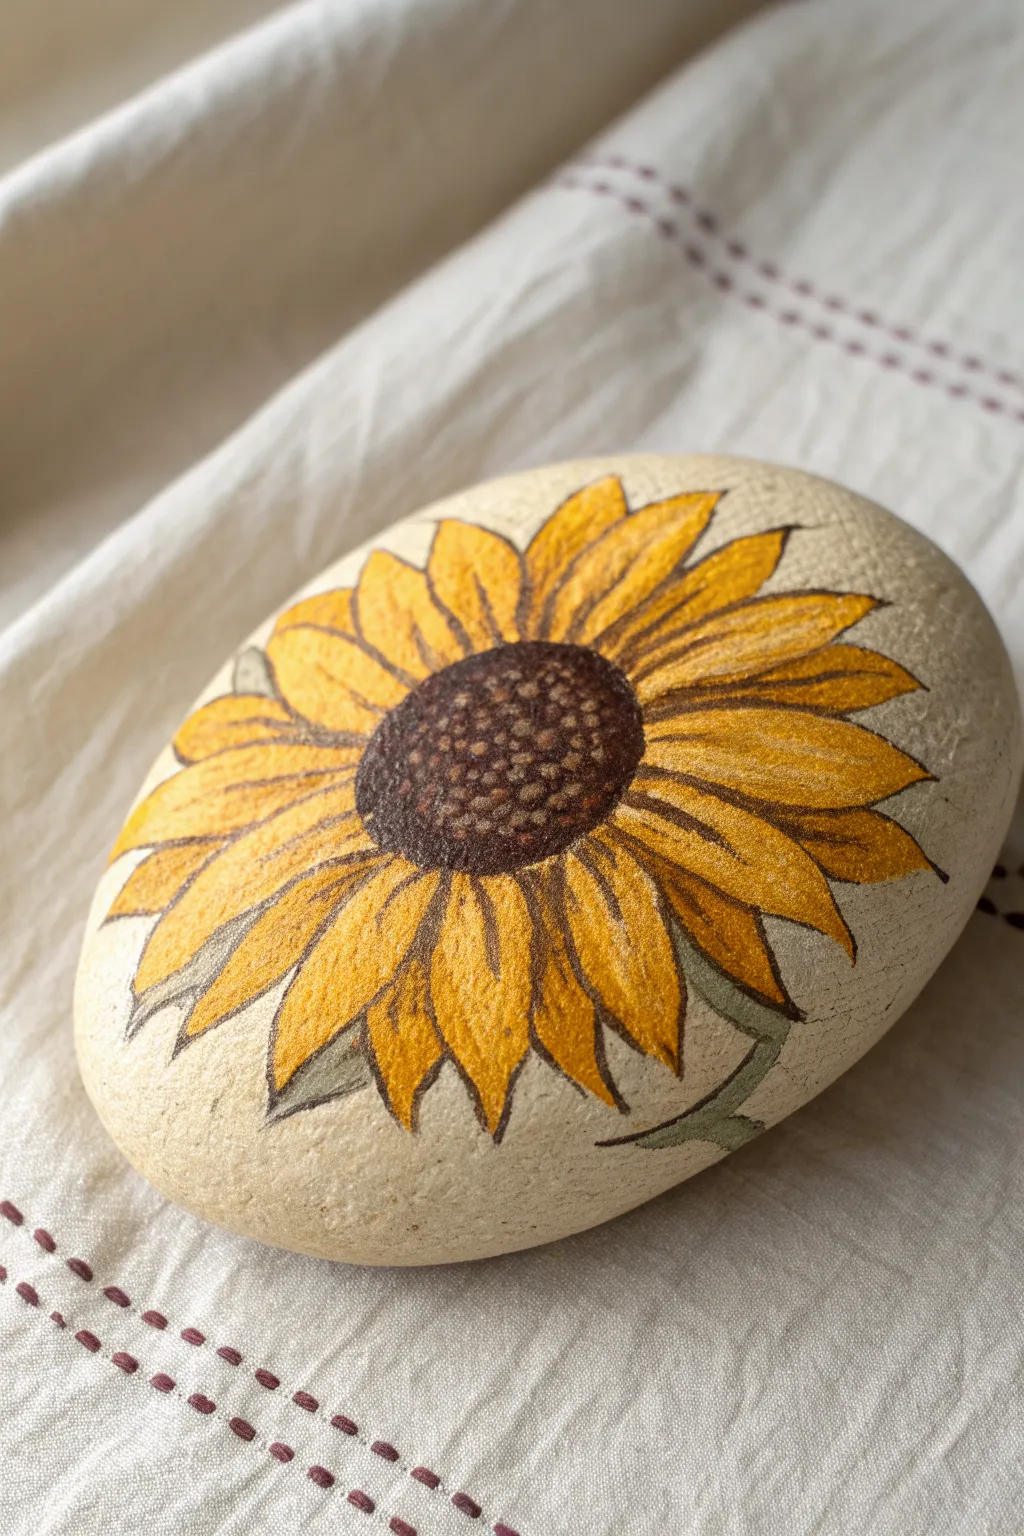
Transform a smooth river rock into a brilliant burst of summer with this detailed sunflower painting. Using careful shading and fine outlines, you’ll create a piece that feels both rustic and vibrantly alive.
Detailed Instructions
Materials
- Smooth, rounded river rock (cream or light beige preferred)
- Acrylic paints: Cadmium Yellow, Yellow Ochre, Burnt Sienna, Burnt Umber, Dark Green, White
- Surface cleaner or soapy water
- Round synthetic brushes (sizes 2 and 4)
- Fine liner brush (size 0 or 00)
- Black waterproof fine-tip pen (e.g., Micron 05) or acrylic marker
- Pencil and eraser
- Matte spray varnish
Step 1: Preparation & Sketching
-
Clean the canvas:
Begin by thoroughly washing your rock with soapy water to remove any dirt or oils. Let it dry completely so the paint adheres properly. -
Establish the center:
Using a pencil, lightly draw a medium-sized oval slightly off-center on the rock. This will be the seed head of the sunflower. -
Sketch the petals:
Around the central oval, sketch a row of elongated, pointed petals. Overlap them slightly so there are no large gaps. -
Add background details:
Draw a few smaller petal tips peeking out from behind the front row to add depth. Sketch a curved stem and two small leaves at the bottom right.
Step 2: Painting the Base Layers
-
Base coat the petals:
Load your size 4 brush with Cadmium Yellow. Paint the entire shape of the petals, ensuring opaque coverage. You may need two coats for vibrancy. -
Fill the center:
Paint the central oval with solid Burnt Umber. Don’t worry about texture yet; just get a solid dark base down. -
Paint the greenery:
Mix a little White with Dark Green to create a soft sage color. Fill in the stem and the small leaves at the bottom.
Paint Slipping?
If your acrylic paint is beading up or sliding off the smooth stone surface, dab a thin layer of matte medium over the rock first. This creates a ‘tooth’ for the paint to grip.
Step 3: Shading & Texture
-
Deepen the petal roots:
Mix a small amount of Burnt Sienna with Yellow Ochre. Using a size 2 brush, paint short, sweeping strokes from the center of the flower outward onto each petal. -
Highlight the tips:
Clean your brush and pick up a tiny bit of White mixed with Cadmium Yellow. Lightly brush the very tips of the petals to simulate sunlight hitting them. -
Create the seed texture:
Dip the tip of your smallest brush or a toothpick into a lighter brown (mix Burnt Sienna and White). Dot the center of the brown oval repeatedly. -
Refine the seeds:
Add a second layer of tiny dots in the very center using an even lighter tan shade to make the seed head look rounded and 3D. -
Shadow the leaves:
Use unmixed Dark Green to paint a thin shadow line along the bottom edge of the stem and where the leaves tuck under the petals.
Pro Tip
When doing the final pen outlines, brace your pinky finger against the rock or the table. This stabilizes your hand, giving you smoother, more controlled lines on the curved surface.
Step 4: Outlining & Finishing
-
Outline the center:
Once the paint is fully dry, take your black fine-tip pen. carefully outline the central brown oval. -
Define the petals:
Outline each individual petal with the black pen. Keep your hand loose; broken or varying line weights look more organic. -
Add petal veins:
Draw one or two very fine lines down the center of each petal to suggest veins and texture. -
Outline the leaves:
Trace the stem and leaves with the pen, adding a central vein to the visible leaf parts. -
Erase guidelines:
Let the ink set for at least 30 minutes. Gently erase any visible pencil marks remaining on the unpainted stone surface. -
Seal the artwork:
Finish by spraying the rock with a matte varnish in a well-ventilated area to protect your work from scratches and fading.
Place your warm and cheerful rock in a garden corner or on a sunny windowsill to enjoy


Lavender Sprigs on Natural Stone
Capture the delicate beauty of fresh lavender sprigs on a smooth river stone. The muted purples and soft greens create a calming, rustic accent perfect for a garden bed or a cottage-style desk display.
How-To Guide
Materials
- Smooth, oval river stone (light grey)
- Acrylic paints: deep violet, light lavender, olive green, dark forest green, white
- Fine detail brushes (size 0 and 00)
- Small flat brush (optional, for mixing)
- Pencil (optional)
- Matte spray varnish
Step 1: Preparation and Base Lines
-
Clean the canvas:
Begin by scrubbing your stone with soapy water to remove any dirt or oils that might repel the paint. Let it dry completely in the sun or with a hairdryer before starting. -
Plan the composition:
Visualize three main stems fanning out gently from the bottom right corner towards the top left. You can sketch these very lightly with a pencil if you need a guide, but freehand yields a more organic look. -
Mix your stem color:
Blend the dark forest green with just a tiny touch of black or deep violet to create a shadowed green. You want the main stems to be thin but grounded. -
Paint the main stems:
Using your size 00 brush, paint three slender, curving lines. Let the lines be slightly shaky or imperfect—nature isn’t rigid. Include a smaller, detached stem fragment on the left for balance.
Step 2: Adding Foliage
-
Create a leaf green:
Mix olive green with a bit of white to get a softer, sage-like hue. This will differentiate the leaves from the darker stems. -
Paint long leaves:
With the size 0 brush, add long, slender leaves extending from the base of the stems. Press down near the stem and lift as you pull outward to create a tapered point. -
Layer leaves:
Add a few overlapping leaves, ensuring some cross behind or in front of the main stems to create depth. Vary the lengths; lavender leaves are narrow and shoot upward. -
Add highlights:
While the green is still slightly tacky, mix a bit more white into your sage green and add a thin highlight streak down the center of the larger leaves.
Fixing “Blobby” Flowers
If your purple dots merge into a blob, let them dry completely. Then, repaint the gaps with a tiny dab of the stone’s background grey to restore separation.
Step 3: Painting the Blooms
-
Deep purple base:
Start with your darkest violet paint. Using the tip of your smallest brush, dab small, irregular clusters along the top third of each stem. -
Spacing matters:
Leave tiny gaps between the clusters of purple dots. Lavender flowers grow in whorls around the stem, not as a solid block of color. -
Soft lavender layer:
Load your brush with the light lavender shade. gently dab over the dark violet spots, but don’t cover them entirely. You want the dark purple to peek through as shadow. -
Create the taper:
Toward the very tip of each flower spike, use smaller and smaller dots. The flower head should naturally taper off into a point. -
The floating bits:
Add a few stray purple dots or tiny petals drifting off the main flower heads. I find this creates a lovely impression of movement or falling petals. -
Add the tiny left sprig:
Don’t forget the small, separate sprig on the left side of the rock. Give it a smaller flower head using the same two-tone technique.
Scented Stone Level Up
For a multi-sensory decoration, rub a drop of real lavender essential oil onto the unpainted backside of the stone so it smells as lovely as it looks.
Step 4: Detailing and Sealing
-
Connect the blooms:
Go back with your dark green mixture. Carefully paint a very thin line connecting the flower clusters if any look too detached from the main stem. -
Final highlights:
For a pop of dimension, add the tiniest specks of pure white or very pale lilac to the top-most petals where looking for the light. -
Splatter effect:
Dilute a tiny bit of violet paint with water. Tap your brush over the rock to create a few microscopic speckles around the flowers for an artistic touch. -
Dry thoroughly:
Allow the rock to sit undisturbed for at least an hour. The paint must be fully cured before sealing. -
Seal the art:
Spray the rock with a matte varnish. A glossy finish often looks artificial on these natural designs, so matte is best to preserve that raw stone look.
Place your finished stone on a pile of old books or near a window for a serene, botanical touch


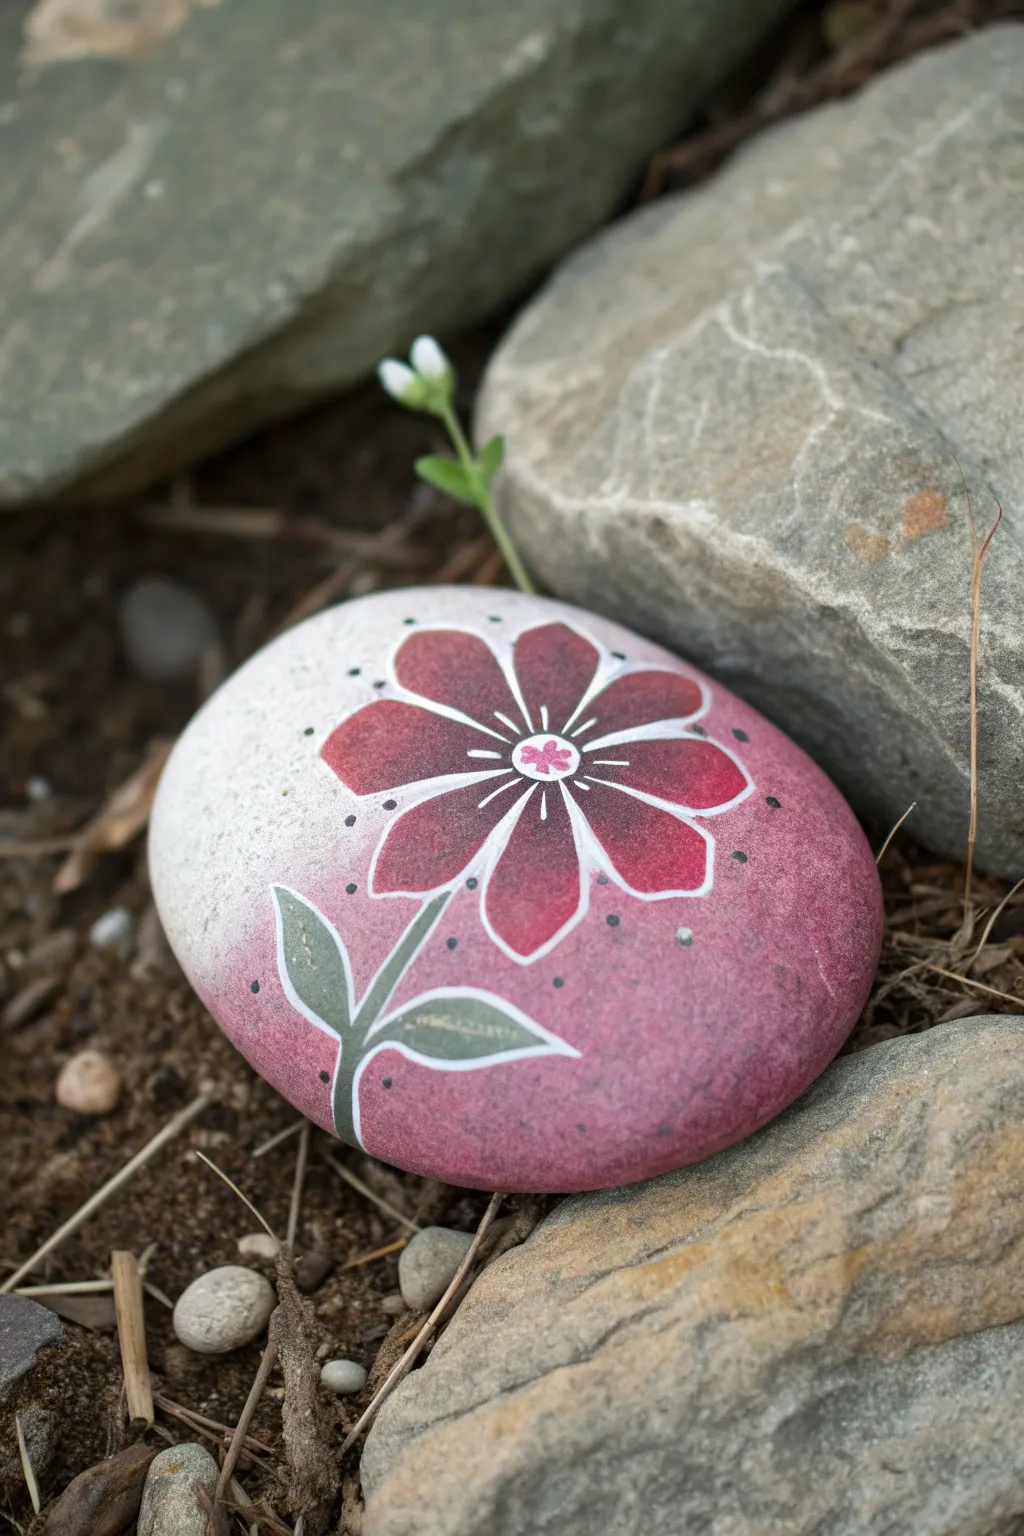
Red Poppy With Dark Center
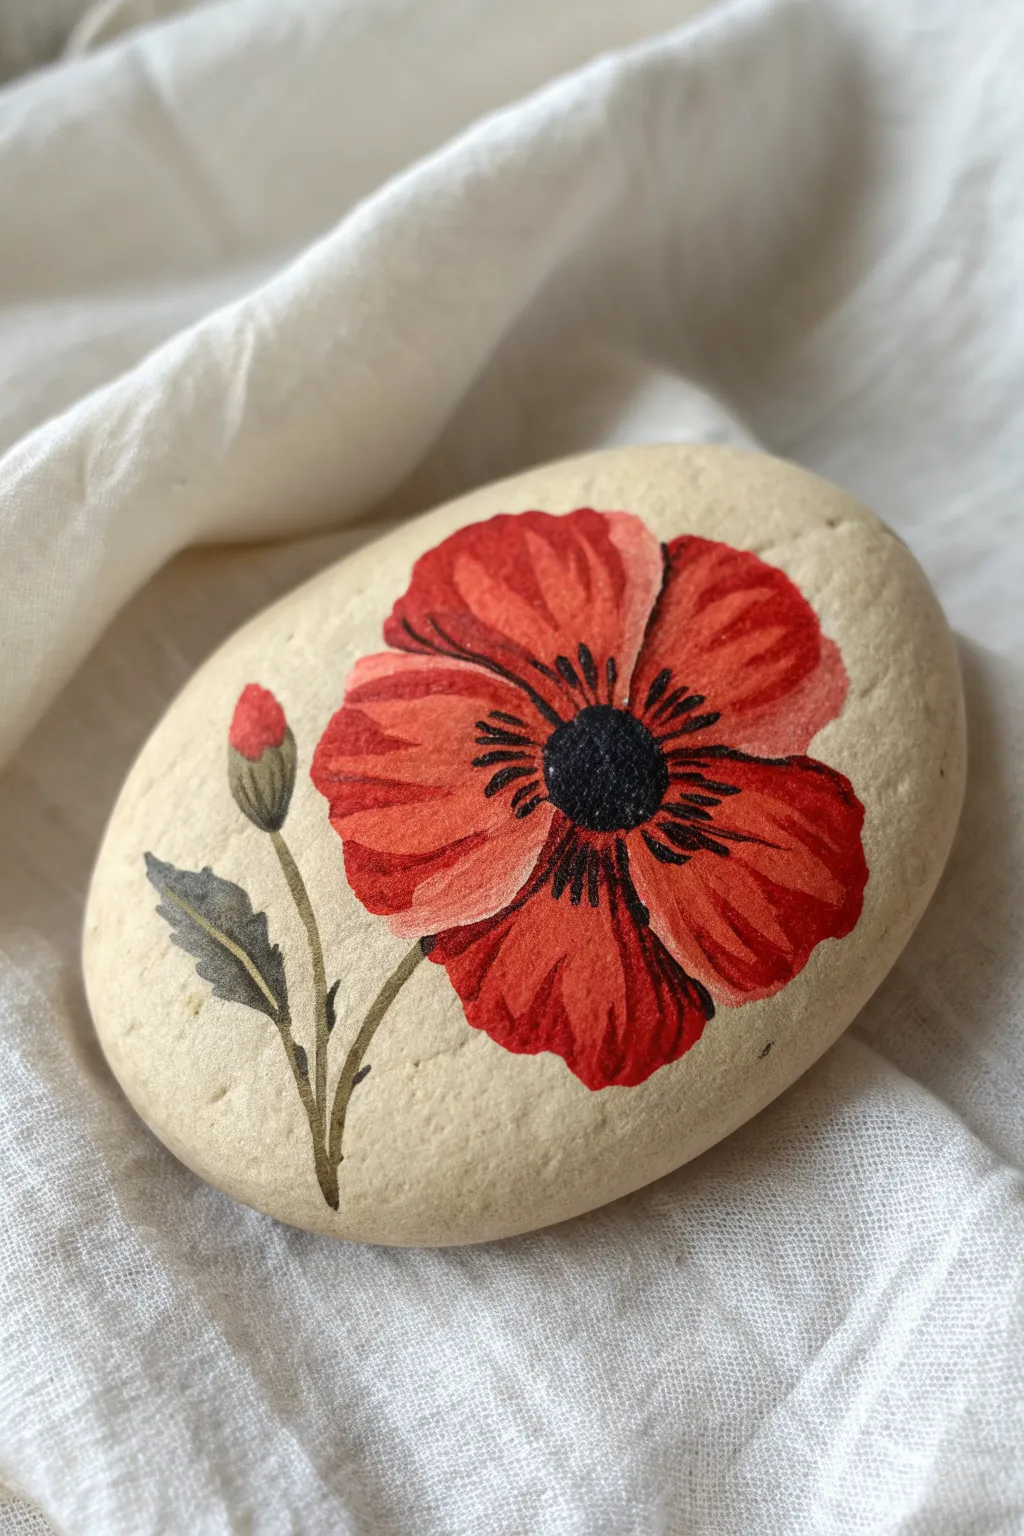
Capture the delicate beauty of a blooming poppy on a smooth river stone. This project features vibrant red petals radiating from a dark center, accompanied by a graceful bud and leaf for a balanced, natural composition.
Step-by-Step
Materials
- Smooth, flat river rock (light beige or cream color preferred)
- Acrylic paints (bright red, deep red/burgundy, black, olive green, dark green, titanium white)
- Pencil for sketching
- Fine detail paintbrush (size 00 or 0)
- Small round paintbrush (size 2 or 3)
- Matte or satin varnish (optional for sealing)
- Palette or paper plate
- Cup of water and paper towels
Step 1: Preparation & Sketching
-
Clean the surface:
Begin by washing your stone with warm soapy water to remove any dirt or oils. Let it dry completely before starting. -
Plan the composition:
Observe the natural shape of your rock. The main bloom should sit slightly off-center to the right, leaving room on the left for the stem and bud. -
Sketch the outline:
Using a pencil, very lightly sketch the rough circle for the flower head. Draw a curved line extending downward for the stem, and add a smaller oval shape to the left for the bud. -
Define the petals:
Inside your main circle, sketch four to five large, overlapping petal shapes. They shouldn’t be perfect; give them slightly wavy edges to mimic natural poppy petals.
Step 2: Painting the Base Colors
-
Base coat the petals:
Load your round brush with bright red paint. Fill in the petal shapes, being careful to stay within your pencil lines. You may need two coats for full opacity. -
Paint the stem and bud:
Mix a little olive green with a touch of white to get a soft, natural green. Paint the main stem, the smaller stem branching off for the bud, and the oval bud shape itself. -
Add the leaf shape:
Paint the jagged leaf attached to the lower part of the stem using the same olive green mixture. Keep the edges sharp and pointed. -
Add the bud tip:
Dab a tiny spot of bright red at the very top of the green bud to show the flower just beginning to peek through.
Uneven Coverage?
If your red looks streaky or translucent, don’t keep brushing wet paint. Let the first layer dry completely, then apply a second coat for a bold, solid color.
Step 3: Shading and Texture
-
Create petal depth:
Mix a small amount of deep red or burgundy with your bright red. Apply this darker shade at the base of the petals (near the center) and along the edges where one petal overlaps another. -
Blend the shadows:
While the paint is still slightly damp, gently blend the darker red outward into the bright red to create a soft gradient. This gives the flower a cup-like 3D shape. -
Highlight the edges:
Mix a tiny bit of white into your bright red to make a salmon or light coral color. Use the detail brush to carefully highlight the outer, ruffly edges of the petals. -
Detail the greenery:
Using dark green, paint a thin line down the center of the leaf and along one side of the stem to create shadow. Adding little texture lines on the bud adds realism.
Try This Twist
Make it a field of poppies! Instead of one large flower, paint three smaller poppies in varying sizes across the surface of a larger, flatter rock.
Step 4: The Center & Fine Details
-
Paint the center:
With black paint and a small round brush, paint the circular center of the poppy. It doesn’t need to be a perfect circle; a slightly organic shape works best. -
Add radial lines:
Switch to your finest detail brush. Pull very thin black lines from the black center outward into the red petals. These represent the filaments. -
Create the anthers:
At the end of some of these thin black lines, add tiny dots or dashes. This creates the pollen-covered anthers surrounding the center. -
Stipple the texture:
To give the black center texture, gently stipple (dot) a dark grey or slightly lighter black in the very middle. I find this subtle texture makes a huge difference. -
Final leaf details:
Add extremely fine dark strokes to the edges of the green leaf to emphasize its serrated, jagged nature. -
Protect your work:
Once the painting is totally dry (give it a few hours), apply a coat of matte or satin varnish to protect the paint from chipping and to deepen the colors.
Now you have a blooming piece of nature that will last forever
BRUSH GUIDE
The Right Brush for Every Stroke
From clean lines to bold texture — master brush choice, stroke control, and essential techniques.
Explore the Full Guide
Wildflower Bouquet Rock Set
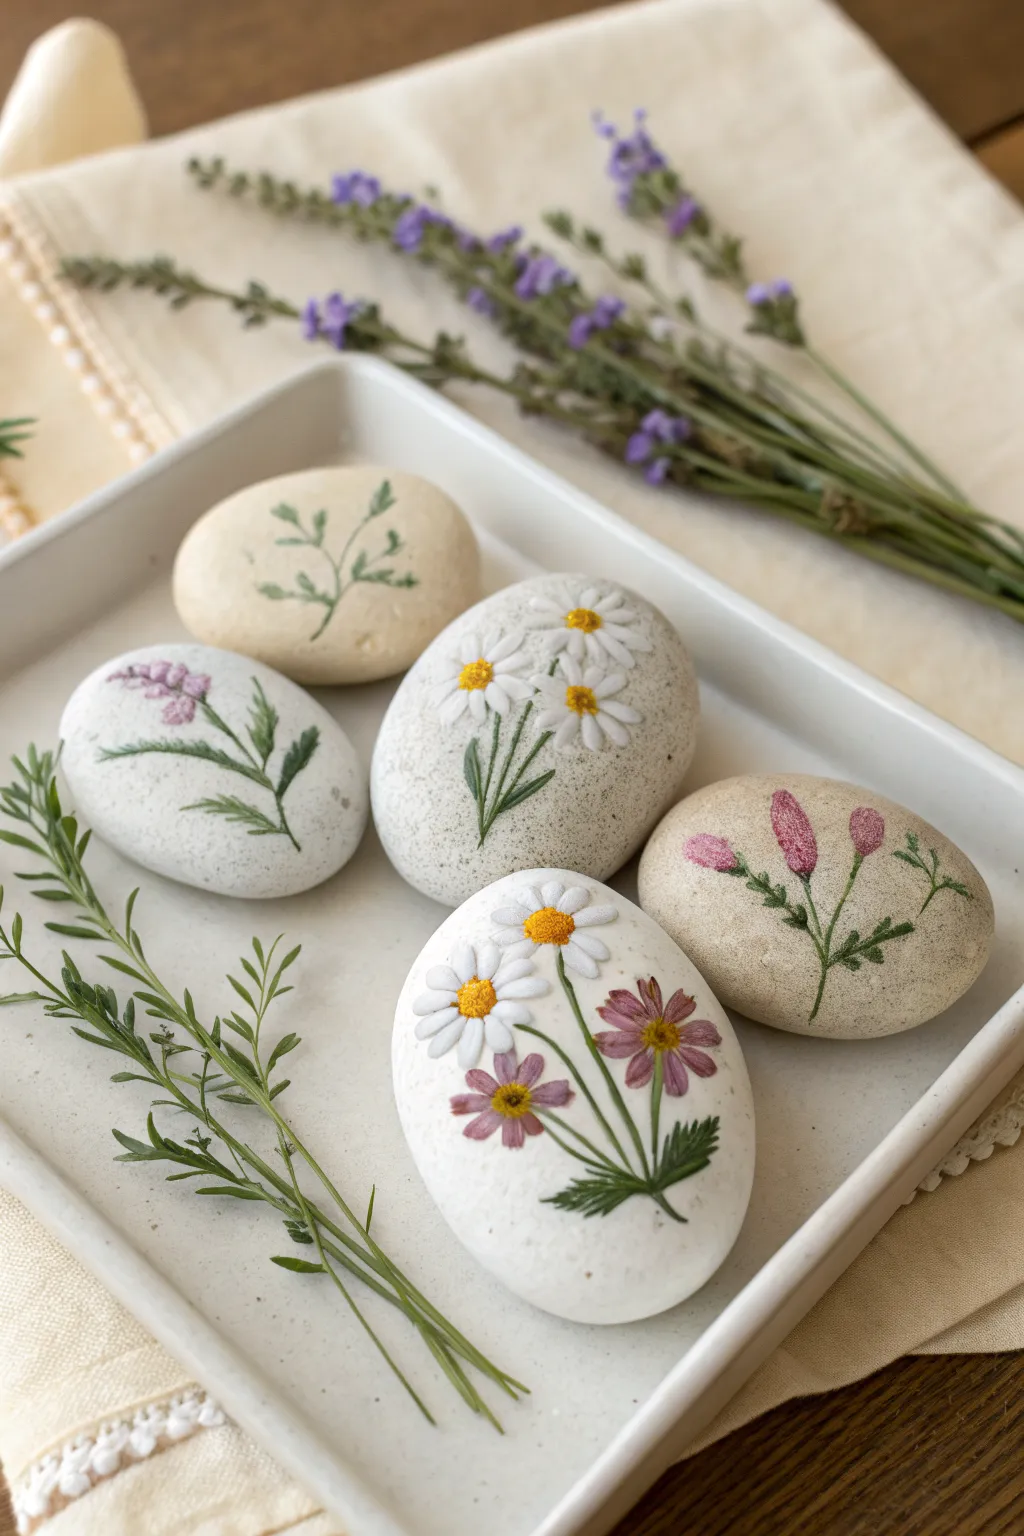
Transform smooth river stones into an everlasting botanical garden with these incredibly detailed wildflower designs. The soft, matte finish and raised texture of the petals give these rocks a realistic, almost embroidered appearance that feels both rustic and refined.
Detailed Instructions
Materials
- Smooth river rocks (assorted sizes, oval shapes preferred)
- Matte acrylic paints (white, cream, sage green, forest green, deep purple, yellow ochre, dusty rose)
- Fine detail brushes (sizes 00, 0, and 1)
- Small round brush (size 2)
- Modeling paste or heavy body acrylic gel (optional, for texture)
- Palette for mixing
- Pencil for sketching
- Matte spray varnish
Step 1: Preparation and Base Coat
-
Select and Clean:
Begin by washing your river rocks with soapy water to remove any dirt or oils. Let them dry completely. Choose stones with a naturally smooth surface—some can be left bare for a natural limestone look, while others will benefit from a base coat. -
Apply Base Color:
For the white stones, apply a coat of matte white or cream acrylic paint. For the beige or tan stone, you can either leave the natural rock color or mix a very dilute wash of tan paint to even out the tone. Let this layer dry fully. -
Speckling Effect:
To mimic the look of natural stone or eggshells, use an old toothbrush dipped in diluted grey or brown paint. Run your thumb over the bristles to flick tiny speckles onto the dry base coat. This adds depth and realism to the surface.
Step 2: Painting the Greenery
-
Sketch the Stems:
Lightly trace the main stem lines with a pencil. Aim for gentle curves rather than straight lines to capture organic movement. -
Base Green Layer:
Using your thinnest liner brush (size 00) and sage green paint, carefully trace over your pencil lines. Keep the pressure light to ensure the stems remain delicate and thin. -
Adding Leaves:
Paint the leaves branching off the stems. For the fern-like designs, use short, flicking strokes. For the broader leaves, press the brush down slightly at the base and lift as you pull outward to create a tapered point. -
Shadowing:
Mix a small amount of forest green into your sage color. Add tiny strokes along the bottom edge of the stems and the base of the leaves to create dimension and shadow.
Pro Tip: Steady Hands
Rest your painting hand’s pinky finger on the rock itself or on the table surface to stabilize your hand while painting the ultra-thin stems.
Step 3: Creating the Blooms
-
Mixing Texture:
For the daisies and white petals, I like to mix a little modeling paste with white acrylic paint. This thickens the paint, allowing you to build actual physical texture on the rock. -
Painting Daisies:
Using a size 1 brush and your textured white mix, paint the daisy petals. start from the outside and pull your brush toward the center of the flower. Apply a second coat if needed to make the white opaque. -
Purple Blooms:
For the lavender or purple wildflowers, use a stippling motion with a small brush. Dab small dots of light purple in a cone shape, then layer darker purple dots near the bottom of the cluster for depth. -
Pink Buds:
Paint the teardrop-shaped buds using a dusty rose color. Highlight the top curve of each bud with a lighter pink to make them look round and plump. -
Multi-Flower Composition:
For the complex stone with multiple flowers, paint the white daisy petals first, then overlay the pink/purple cosmos-style flowers. Ensure the first flower is dry before painting overlapping petals to keep the colors crisp. -
Flower Centers:
Once the petals are dry, use yellow ochre for the daisy centers. Dab the paint on thickly to create a raised texture. Add a tiny dot of brown on the shadowed side of the yellow center for realism.
Level Up: Pressed Flowers
Instead of painting, decoupage actual dried, pressed flowers onto the stones with Mod Podge for a mixed-media 3D botanical effect.
Step 4: Finishing Touches
-
Fine Details:
Inspect your work for any gaps. Use your smallest brush to add tiny veins to the larger leaves using a lighter green shade. -
Separation Lines:
If petals have merged together visually, use a very diluted grey wash to paint extremely thin lines between them, defining the edges of individual petals. -
Final Drying:
Allow the rocks to sit for at least 24 hours. Because the paint is applied thickly for texture, it needs extra time to cure completely. -
Sealing:
Finish with a matte spray varnish. Avoid glossy sealers, as they will ruin the natural, soft aesthetic of the botanical illustrations.
Arranging these finished stones together on a tray creates a peaceful, permanent garden centerpiece for your home
Cute Smiley-Face Flower Centers
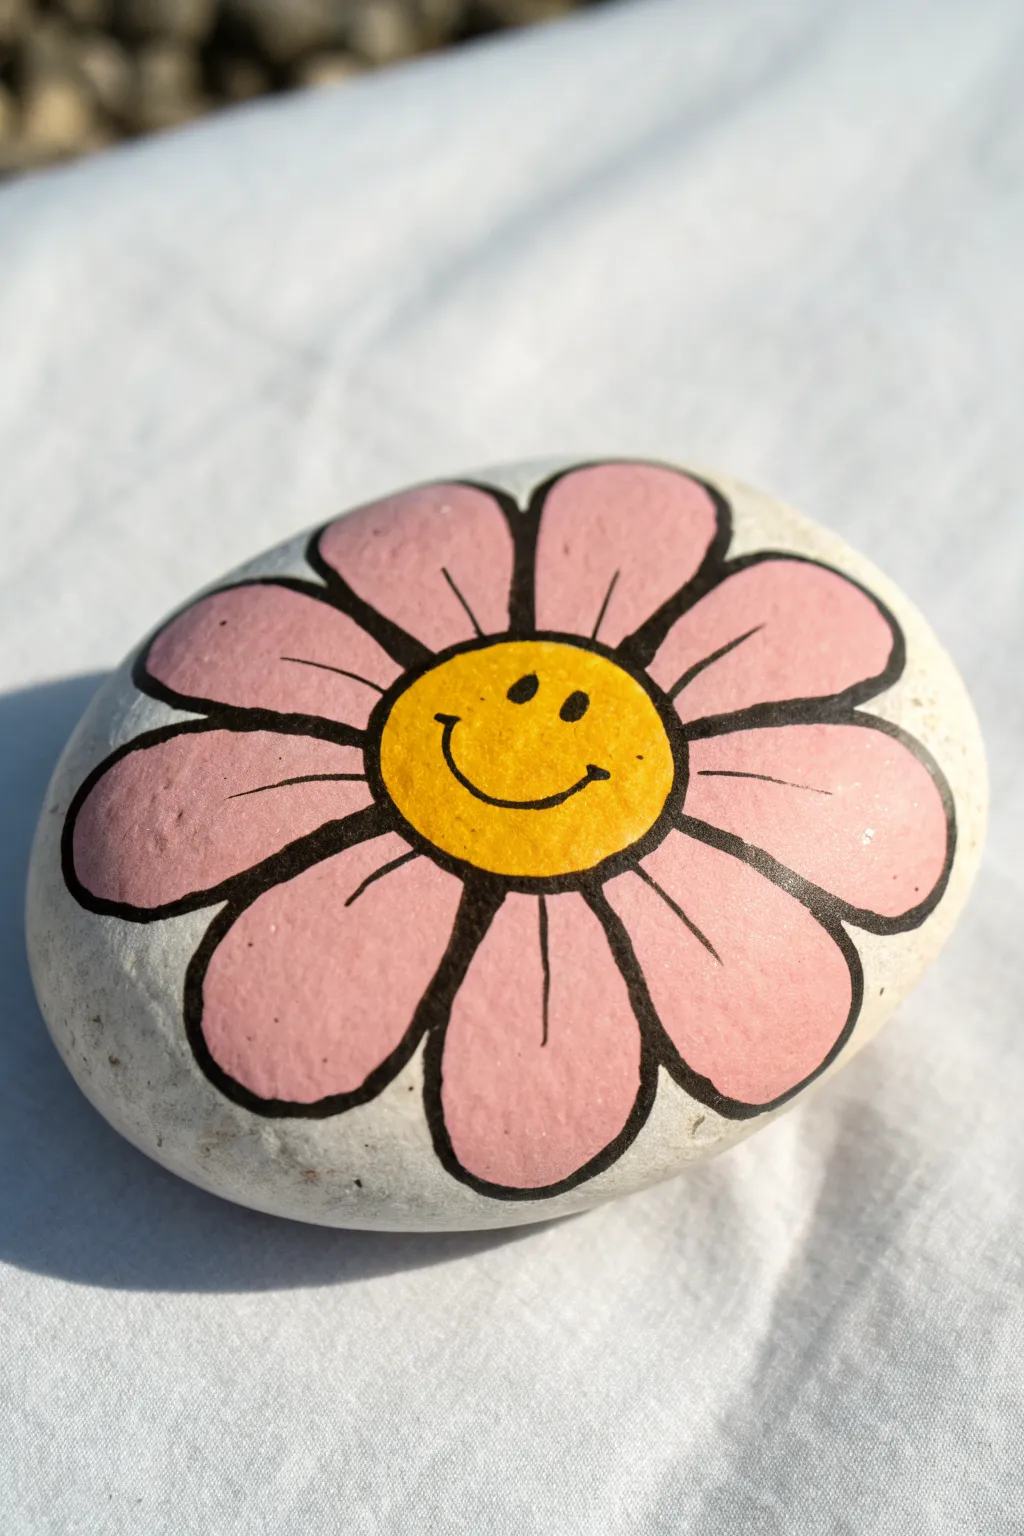
Spread a little joy with this beaming flower painted on a smooth, white stone. The cheerful yellow center features a simple smiley face that adds a dose of personality to the classic pink daisy design.
How-To Guide
Materials
- Smooth, rounded river rock (cleaned and dried)
- White acrylic paint or gesso (for base)
- Pink acrylic paint
- Bright yellow acrylic paint
- Black fine-tip paint pen or detail brush
- Medium flat paintbrush
- Small round paintbrush
- Clear sealant (spray or brush-on)
- Pencil
Step 1: Base and Sketch
-
Prep the Surface:
Start with a clean, dry rock. Apply a coat of white acrylic paint or gesso over the entire top surface to create a bright, blank canvas. This helps the colored paints pop later. -
Dry Completely:
Allow this white base layer to dry fully. If it looks streaky, add a second thin coat for smooth, opaque coverage. -
Sketch the Center:
Using a pencil, lightly draw a medium-sized circle in the middle of the rock. This will be the flower’s face. -
Sketch Petals:
Draw large, rounded petal shapes radiating outward from the center circle. Aim for about 7-8 petals depending on your rock’s size, letting them extend almost to the rock’s edge.
Uneven Lines?
If your hand shakes while outlining, try resting your pinky finger on a dry part of the rock for stability. You can also thicken the line to mask wobbly spots.
Step 2: Adding Color
-
Paint the Center:
Fill in the center circle with bright yellow acrylic paint. Use a small round brush to keep the edges neat. -
First Coat of Pink:
Using a flat or round brush, fill in the petal shapes with pink paint. Don’t worry if the coverage isn’t perfect yet. -
Let Colors Set:
Wait for the first layers of yellow and pink to dry to the touch to prevent mixing. -
Second Coat:
Apply a second coat of pink to the petals and yellow to the center. This ensures the colors look solid and vibrant against the white background. -
Full Dry Time:
Let the paint dry completely. The surface must be hard and dry before you use a paint pen, or the tip might clog.
Step 3: Outlining and Details
-
Outline the Center:
Take your black paint pen or a very fine liner brush with black paint. Carefully trace the circle outlining the yellow center. -
Outline Petals:
Trace the outer edges of each pink petal. Use confident, smooth strokes to create a bold, cartoon-like border. -
Add the Face:
Inside the yellow center, draw two small vertical ovals for eyes and a wide, U-shaped curve for the smile. I like to place the smile fairly high up towards the eyes for a cuter look. -
Cheek Marks:
Add tiny little tick marks at the ends of the smile to give the expression a dimpled effect. -
Petal Details:
Draw a thin, slightly curved line extending from the center circle into the middle of each pink petal. These crease lines add movement and texture to the flower. -
Touch Ups:
Check for any uneven lines. If needed, you can thicken the black outlines slightly to hide any shaky spots. -
Seal It:
Once the black ink is totally dry (give it extra time just to be safe), apply a coat of clear sealant to protect your happy artwork from the elements.
Smoother Paint
Mix a tiny drop of water into your acrylics on a palette. This thins the paint slightly, helping it flow off the brush more evenly for outline work.
Place this cheerful rock in your garden or on a windowsill to brighten up the day

PENCIL GUIDE
Understanding Pencil Grades from H to B
From first sketch to finished drawing — learn pencil grades, line control, and shading techniques.
Explore the Full Guide
Forget-Me-Nots All-Over Pattern
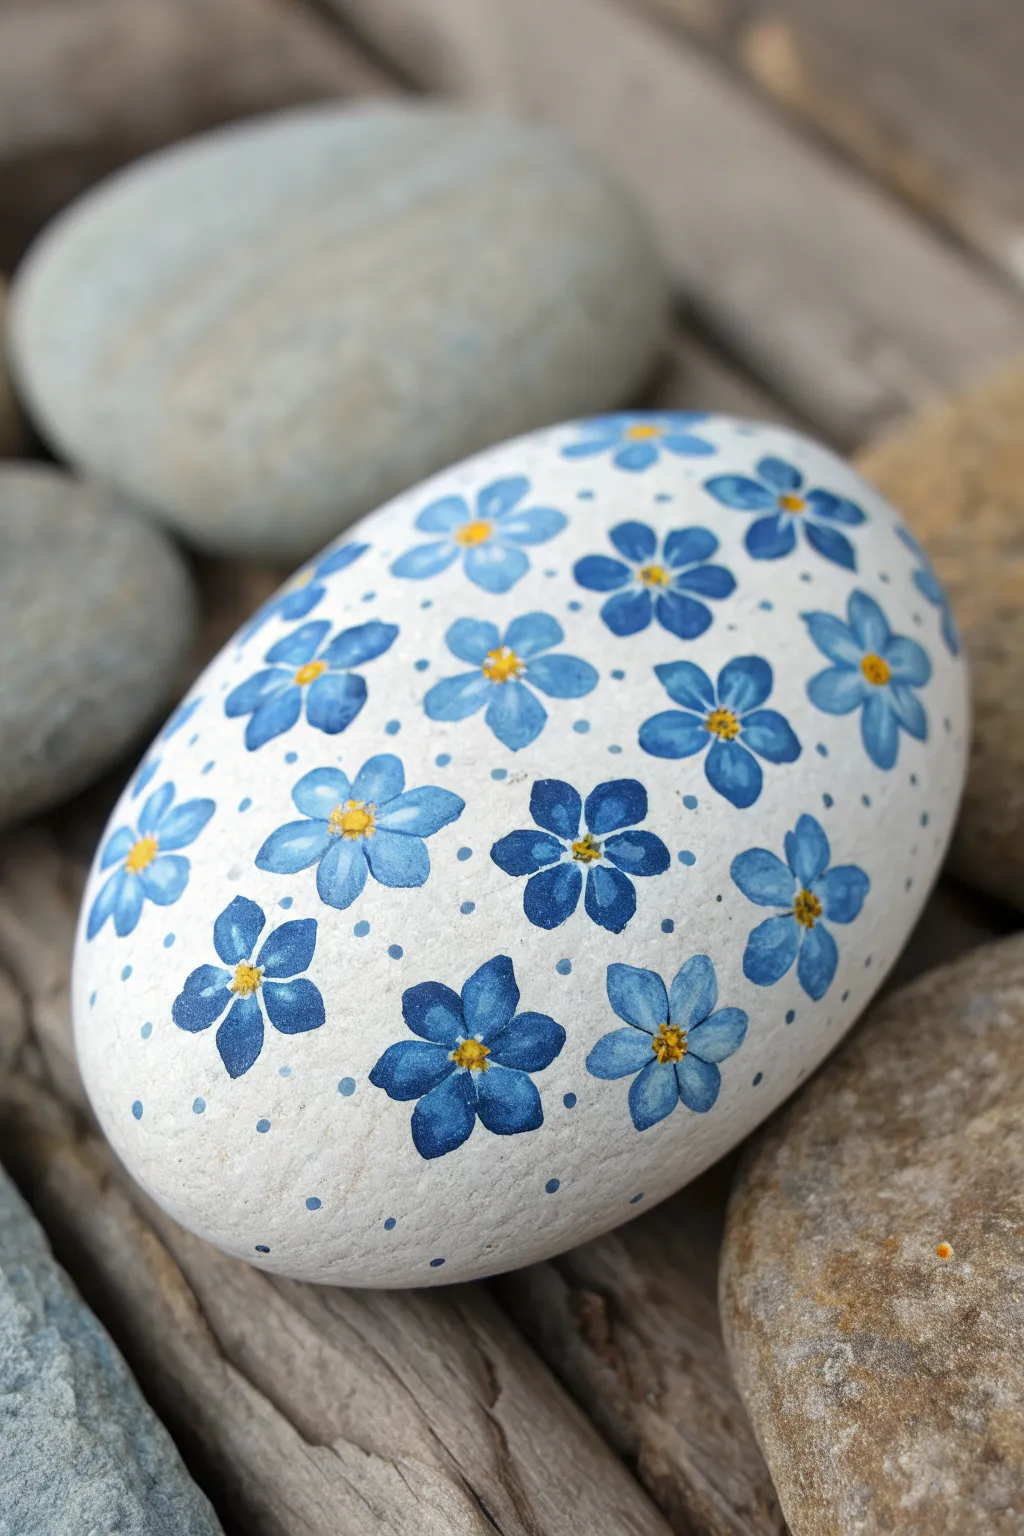
Transform a smooth river rock into a blooming keepsake with this delicate all-over forget-me-not pattern. The translucent blue petals and sunny yellow centers create a lovely watercolor effect against the crisp white background.
Detailed Instructions
Materials
- Smooth oval river rock
- Gesso or white acrylic paint
- Acrylic paints (Ultramarine Blue, Sky Blue, Cobalt Blue, Bright Yellow, White)
- Small round brush (size 1 or 2)
- Fine detail brush (size 0 or 00)
- Small dotting tool or toothpick
- Palette or mixing tray
- Water cup and paper towels
- Spray or brush-on varnish (matte or satin finish)
Step 1: Preparation & Base Coat
-
Clean the surface:
Begin by washing your stone thoroughly with soap and water to remove any dirt or oils. Let it dry completely, as moisture trapped inside can ruin the paint later. -
Prime with white:
Apply a base coat of white acrylic paint or gesso to the entire top surface of the rock. This bright foundation is crucial for making the translucent blue petals pop. -
Second coat:
Once the first layer is dry, apply a second coat of white to ensure full, opaque coverage. Smooth out your brushstrokes so the background is as uniform as an eggshell. -
Texture prep:
If your white paint dried with distinct ridges, you can very lightly sand it with fine-grit sandpaper for a smoother painting surface, though this is optional.
Fixing Cloudy Colors
If your blues look muddy or chalky over the white base, your paint is too thick. Thin it with a drop of water or glazing medium to get that airy, translucent flower petal look.
Step 2: Painting the Petals
-
Mix your blues:
Prepare three shades of blue on your palette: a light sky blue, a medium true blue, and a darker denim or cobalt shade. I like to thin these slightly with water to achieve a semi-transparent, watercolor-like finish. -
Start the center blooms:
Using your size 1 or 2 round brush, paint the first five-petal flower near the center of the rock. Use the medium blue shade. Press the belly of the brush down and lift up to create a teardrop petal shape. -
Vary the sizes:
Paint a few more flowers around the first one using the same teardrop technique. Make some slightly smaller and others larger to create natural variety. -
Add color depth:
Switch to your darker blue mixture. Paint several flowers scattered between the medium ones. The darker pigment adds visual weight and depth to the pattern. -
Fill with light blue:
Using the lightest blue shade, fill in the remaining larger gaps with more blooms. The variety of blues mimics the natural shading found in a garden patch. -
Edge details:
Paint partial flowers wrapping around the curve of the stone where the pattern fades out. This ‘infinity’ look suggests the pattern continues unseen.
Step 3: Details & Finishing
-
Tiny filler dots:
Dip the tip of a toothpick or a small dotting tool into your medium blue paint. Gently dot the white spaces between the flowers to reduce the negative space and add texture. -
Create the centers:
Once the blue petals are fully dry, use a detail brush or dotting tool to place a distinct yellow dot in the center of every flower. -
Add white highlights:
For a truly dimensional look, mix a tiny bit of white with your lightest blue. Add very thin, faint strokes to the tips of just a few petals to suggest light hitting them. -
Refine the centers:
If the yellow centers look flat, add a microscopic dot of white or orange to the very middle of the yellow for extra realism. -
Dry thoroughly:
Allow the rock to sit undisturbed for several hours. The thickest dots of paint will take the longest to cure. -
Seal the artwork:
Finish by applying a varnish. A matte finish looks very elegant and stone-like, but a satin finish will make the blue colors appear more vibrant.
Petal Placement Pro Tip
Don’t paint the petals touching perfectly in the center. Leaving a tiny pinprick of white space in the middle of the flower helps the yellow center sit better later.
Place this serene stone on your desk or in a planter for a permanent patch of spring color
Tulip Trio in Spring Colors
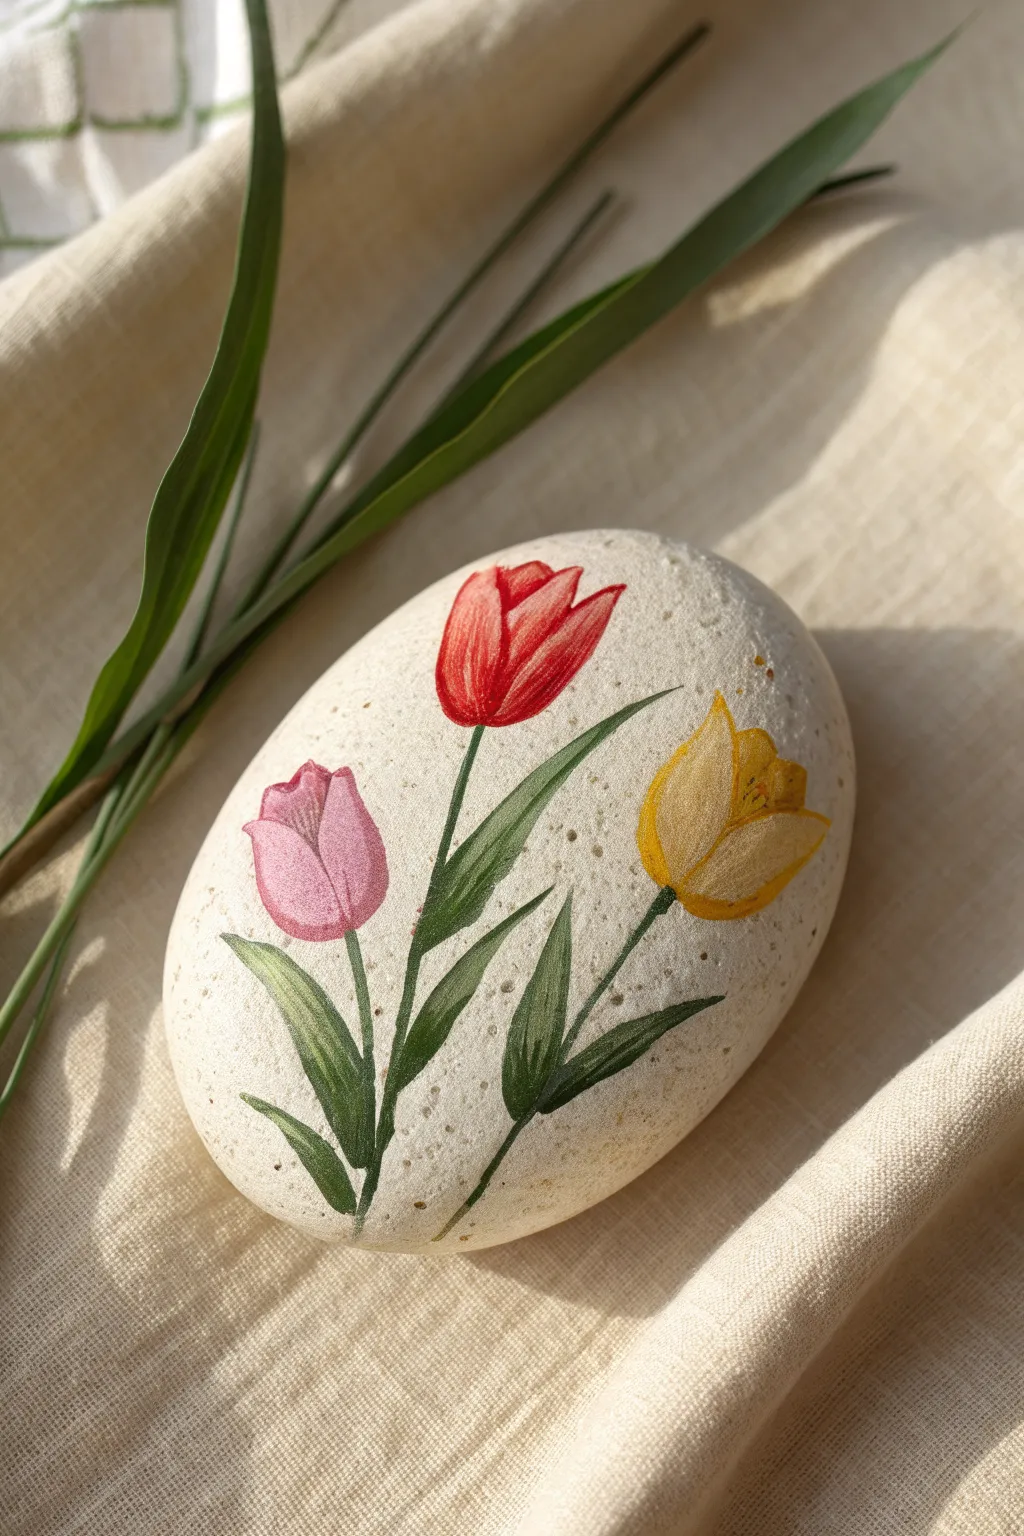
Capture the freshness of spring with this elegant rock painting project featuring three graceful tulips in red, pink, and yellow. The smooth, speckled surface of the stone provides the perfect canvas for these delicate blooms, creating a lovely piece of nature-inspired decor.
Step-by-Step Guide
Materials
- Smooth, oval river rock (light cream color)
- Acrylic paints (Red, Pink, Yellow, Dark Green, Light Green, White, Cream)
- Fine detail brushes (sizes 0 and 00)
- Small flat brush
- Pencil for sketching
- Palette or mixing plate
- Water cup and paper towels
- Matte sealant spray
Step 1: Preparation & Base
-
Clean the canvas:
Begin by thoroughly washing your stone with warm soapy water to remove any dirt or oils. Let it dry completely before starting. -
Prime the surface:
Mix cream acrylic paint with a tiny dot of white to match the natural stone color shown. Paint a thin, even coat over the top surface to create a uniform background while maintaining the rock’s natural look. -
Add speckles:
To mimic the natural stone texture seen in the photo, dilute a tiny bit of brown paint with water. Dip an old toothbrush or stiff brush into it and lightly flick fine speckles over the dry cream base. Let this dry fully.
Brush Control Tip
For the super-thin stems, thin your green paint with a drop of water until it’s like ink. This helps the paint flow smoothly off a liner brush without breaking.
Step 2: Sketching the Design
-
Plan the composition:
Visualize three stems radiating from the bottom center. The middle stem stands tallest, while the left and right stems curve gently outward. -
Sketch the flowers:
Using a light pencil, draw the basic egg shapes for the tulip heads. Place the center one highest, with the flanking flowers slightly lower. -
Add leaves and stems:
Lightly sketch the stems connecting to the flower heads. Draw long, slender leaves that wrap around the stems, tapering to sharp points.
Step 3: Painting the Blooms
-
Base coat the red tulip:
Start with the center tulip. Fill the shape with a bright, primary red acrylic paint. Ensure the edges are crisp. -
Base coat the side tulips:
Paint the left flower with a soft pink and the right flower with a warm golden yellow. Apply a second coat if the stone color shows through. -
Add petal definition:
Once the base coats are dry, use a slightly darker shade of each color to paint thin lines separating the petals. This creates the overlapping effect typical of tulips. -
Highlight the blooms:
Mix a tiny amount of white into your original red, pink, and yellow colors. Use your finest brush to add delicate highlights to the tips and upper curves of the petals for volume.
Fixing Mistakes
If you smudge a leaf or flower, don’t wipe it! Let the mistake dry completely, then paint over it with the cream background color before trying again.
Step 4: Leaves & Finishing Touches
-
Paint the stems:
Using a dark olive green, carefully paint the thin stems. I find it easiest to pull the brush from the flower head downward for a smooth line. -
Fill in the leaves:
Paint the leaves with a medium green base. Ensure the leaves hug the stems naturally as shown in the reference. -
Shadow the greenery:
Mix a small amount of black or dark blue into your green. Paint the shadowed areas where the leaves overlap or tuck behind the stems. -
Highlight the leaves:
Mix yellow or white into your green paint to create a lime shade. brush this onto the tips and outer edges of the leaves to give them dimension and light. -
Clean up edges:
If any paint went outside the lines, use your cream base color to carefully touch up the background around the flowers. -
Seal the artwork:
Once the paint is completely cured (wait at least 24 hours), spray the rock with a matte uv-resistant sealant to protect your work from fading or chipping.
Now you have a permanent bouquet that brings a touch of spring beauty to any corner of your home


Cherry Blossom Branch Sweep
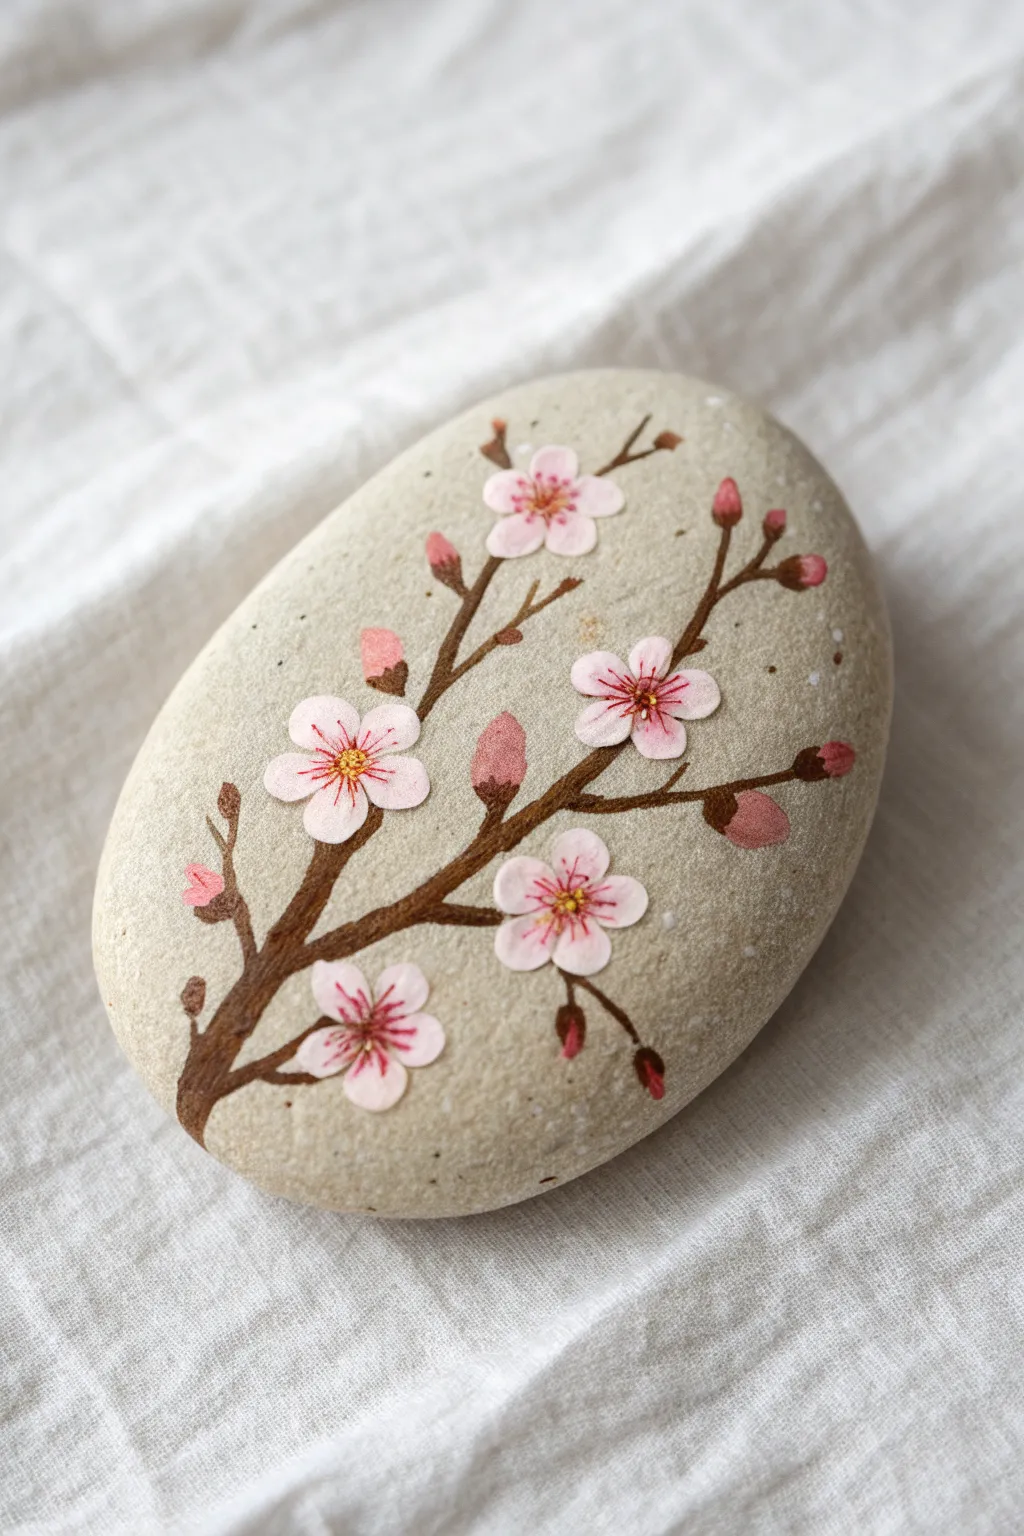
Transform a smooth river stone into a delicate piece of spring art with this cherry blossom design. The contrast of soft pink petals against the natural grey rock creates an elegant and peaceful decoration.
How-To Guide
Materials
- Smooth, oval-shaped river stone (cleaned and dried)
- Acrylic paints: Dark Brown, Titanium White, Baby Pink, Magenta, Golden Yellow
- Fine detail paintbrush (size 0 or 00)
- Small flat brush (for mixing)
- Palette or paper plate
- Cup of water
- Paper towels
- Matte playful sealant (spray or brush-on)
Step 1: Laying the Branch Foundation
-
Clean your canvas:
Begin by washing your stone with warm soapy water to remove any dirt or oils. Let it dry completely before you start painting, as moisture can prevent the acrylics from adhering properly. -
Plan the composition:
visualize a diagonal sweeping line from the bottom left to the top right. You can lightly sketch this with a pencil if you wish, or just trust your hand for a more organic flow. -
Paint the main branch:
Load your fine brush with dark brown paint. Start at the bottom left edge, painting the thickest part of the branch. As you sweep upward towards the right, gradually lift pressure to make the branch tapers thinner. -
Add secondary twigs:
From your main branch, paint smaller offshoots in varying directions. Keep your wrist loose and create ‘Y’ shapes. Remember that nature isn’t perfectly straight; wiggly lines look more realistic. -
Refine the wood texture:
If the brown looks too flat, I sometimes mix a tiny bit of white or lighter brown and add extremely subtle highlights along the top edge of the main branch to suggest roundness.
Shaky Hands?
Rest your painting hand’s pinky finger on a dry part of the rock while working. This acts as an anchor, giving you much more stability for those fine branch lines.
Step 2: Creating the Blossoms
-
Mix your petal color:
Create a soft, pale pink by mixing a large amount of white with a tiny dot of baby pink. The goal is an almost-white shade that will stand out against the grey stone. -
Paint the first flower shape:
Choose a spot near the end of a twig. Paint five small, teardrop-shaped petals radiating from a central point. Leave a tiny empty space in the very center. -
Space out your blooms:
Repeat this five-petal process for about 3-5 main flowers scattered across the branch. Don’t crowd them; negative space is key to the elegant look. -
Add variance:
For some variety, paint a few petals slightly overlapping or varying in size, so not every flower looks identical. -
Double down on opacity:
Acrylics can be translucent. Once the first layer of petals is dry, paint a second coat of your pale pink mixture over them to ensure a bright, solid coverage.
Step 3: Buds and Details
-
Paint the buds:
Using a slightly darker pink (mix more baby pink into your white), paint small teardrop shapes at the very tips of the smaller twigs. These represent unopened flower buds. -
Attach buds to branches:
Use your smallest brush and the dark brown paint to draw tiny ‘cups’ or sepals at the base of each pink bud, connecting them firmly to the wood. -
Detail the flower centers:
Mix a magenta or deep pink wash. Carefully paint fine lines radiating from the center of each open flower outward into the petals, creating a starburst effect. -
Add pollen dots:
Dip the very tip of your tool or a toothpick into golden yellow paint. Place tiny dots in the center of the magenta starbursts to represent the flower’s stamen. -
Final touch-ups:
Look for any messy edges on the petals and gently clean them up with a little fresh background paint or by carefully scraping away excess with a damp brush. -
Seal the artwork:
Allow the stone to dry for at least 24 hours. Apply a layer of matte varnish to protect your painting from scratches and fading without adding unnatural shine.
Add Subtle Depth
Water down a tiny bit of grey paint and glaze it under specific petals to create soft shadows, making the flowers look like they are floating slightly off the stone.
Now you have a serene piece of nature art that captures the fleeting beauty of spring forever
Hydrangea Cluster Using Petal Dots
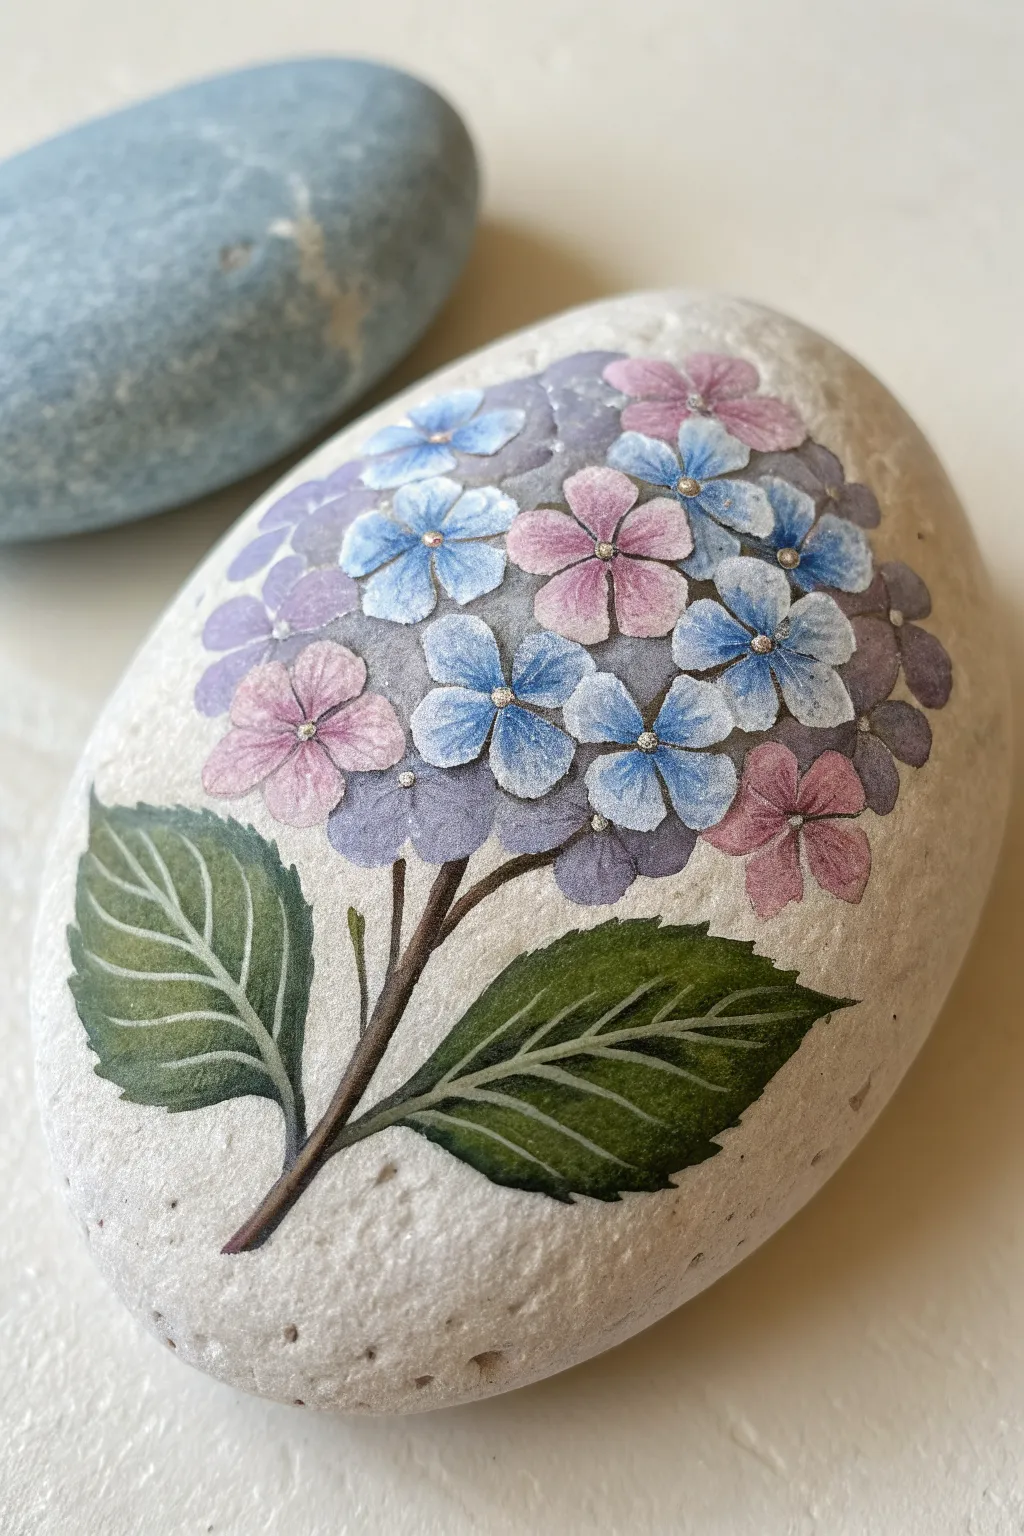
Transform a smooth river rock into a blooming garden treasure with this lovely hydrangea painting. The delicate petals in shades of blue, pink, and purple create a soft visual texture that perfectly complements the stone’s natural surface.
Detailed Instructions
Materials
- Smooth white or light gray river rock (approx. palm-sized)
- Acrylic paints (Titanium White, Ultramarine Blue, Violet, Magenta, Sap Green, Burnt Umber)
- Fine detail brushes (sizes 0, 00, and 1)
- Palette or small plate for mixing
- Pencil (HB or lighter) for sketching
- Paper towels and water cup
- Matte or satin varnish spray
Step 1: Preparation and Sketching
-
Clean the Surface:
Begin by washing your stone with warm soapy water to remove any dirt or oils. Let it dry completely. If the stone is too rough, you can lightly sand it with fine-grit sandpaper for a smoother painting surface. -
Outline the Shape:
Using a light pencil, gently sketch a large oval or circle near the upper center of the rock—this will be the main flower head. Draw a slightly curved stem line coming down from the center. -
Add Leaf Placement:
Sketch two leaf shapes extending from the base of the stem on either side. Keep the lines faint so they won’t show through the lighter paint layers later.
Step 2: Painting the Underlayers
-
Base Leaf Color:
Mix a medium Sap Green with a tiny touch of Burnt Umber. paint the entire leaf shapes, ensuring opaque coverage. You may need two thin coats for solid color. -
Create the Flower Background:
Instead of painting individual petals immediately, create a background ‘cloud’ for the flower head. Mix a very watered-down grey-purple wash and dab it softly inside your circular sketch. This creates depth behind the main petals. -
Paint the Stem:
Using your smallest brush and a mix of Burnt Umber and a little green, paint the thin stem connecting the flower head to the leaves. Taper it slightly as it goes up into the bloom.
Brush Control Secret
Add a drop of water or flow medium to your acrylics. Ink-like consistency makes painting fine veins easier.
Step 3: Creating the Blooms
-
Pallete Preparation:
Prepare three piles of paint: a soft baby blue (Blue + White), a lilac (Violet + White), and a pale pink (Magenta + White). Keep them somewhat translucent to mimic watercolor effects. -
Start the Flower Centers:
Visualize where your main florets will go. Place tiny, faint guideline dots where the center of each individual four-petaled flower will be. Scatter them, leaving some space between. -
Blue Petals First:
Using your size 0 brush, paint four teardrop shapes radiating from a few of your center dots using the blue mix. Keep the edges crisp but the paint thin. -
Add Pink and Purple Blooms:
Switch to your pink and lilac mixes. paint more four-petaled florets around the blue ones. I like to group similar colors slightly but ensure they are intermixed for a natural look. -
Layering for Depth:
Once the first layer of petals feels dry, mix slightly darker versions of your three main colors. Carefully paint ‘partial’ petals peeking out from behind the front blooms to fill the empty gaps. -
petal Detailing:
Mix a very thin, darker shade of blue (or pink/purple depending on the petal). Paint extremely fine lines down the center of each petal to suggest veins.
Add Morning Dew
Use a tiny drop of clear UV resin or high-gloss gel medium on a petal to mimic a realistic water droplet.
Step 4: Details and Finishing
-
Leaf Veining:
Mix a pale yellow-green (Sap Green + White + Yellow). Using your finest liner brush or 00 brush, paint the central vein and the branching veins on the dark green leaves. -
Leaf Highlights:
Add subtle highlights to the edges of the leaves using the same pale green mix, focusing on the tips and serrated edges to make them pop. -
Flower Centers:
Dip the tip of a toothpick or a dotting tool into white or metallic gold paint. Place a tiny dot in the absolute center of each four-petaled floret. -
Shadow Accents:
Use a very watery dark purple or grey wash to add tiny shadows right where the petals overlap, giving the cluster a 3D effect. -
Seal the Artwork:
Allow the rock to cure for at least 24 hours. Because the paint layers are delicate, seal it with a spray varnish rather than a brush-on sealer to avoid smearing the fine lines.
Now you have a permanent bloom that captures the serene beauty of a hydrangea garden.
Zinnia Spiral Petals in Layers
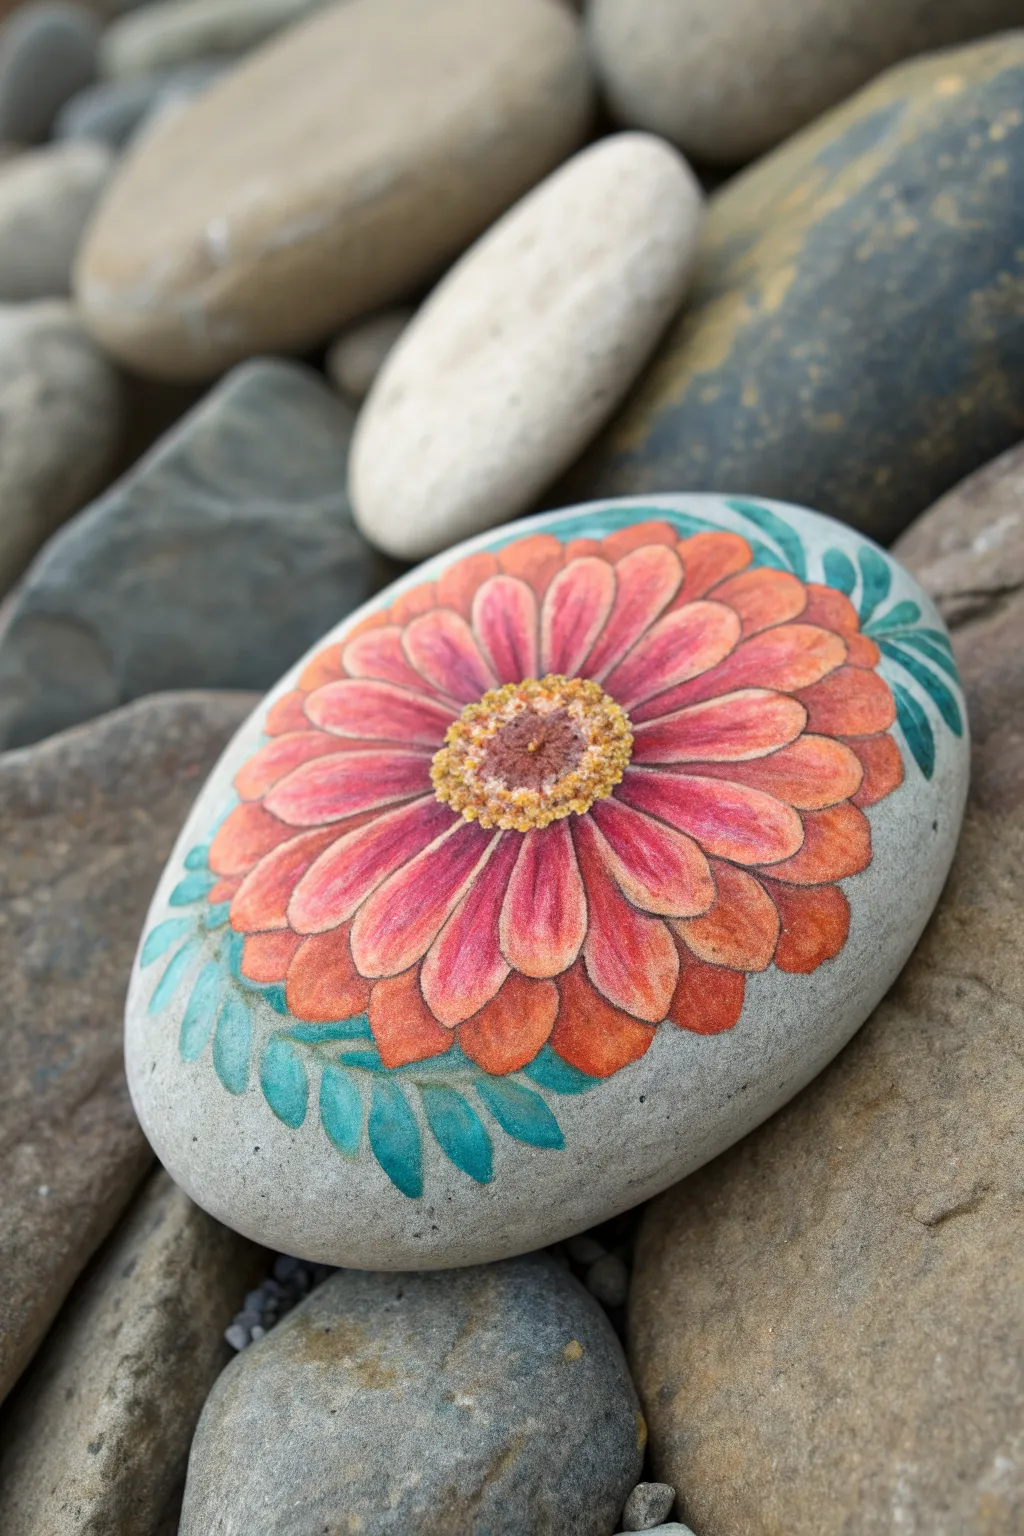
Capture the warmth of a summer garden with this vibrant Zinnia painted on a smooth river rock. The layered petals and rich gradient colors create a striking focal point that looks beautiful in any garden setting.
Step-by-Step Guide
Materials
- Smooth, oval river rock (cleaned and dried)
- Acrylic craft paints (Deep Red, Orange, Peach, Yellow, Burnt Sienna, Teal Green)
- Pencils (sketching hard lead, plus colored pencils for details if preferred)
- Fine liner brushes (sizes 0 and 00)
- Small flat or filbert brush (size 2)
- Acrylic sealing spray or varnish (matte or satin)
- Palette or wax paper
- Water cup and paper towels
Step 1: Preparation and Sketching
-
Clean Your Surface:
Begin by scrubbing your rock with warm soapy water to remove any dirt or oils. Let it dry completely in the sun or use a hairdryer to speed things up. -
Locate the Center:
Find the visual center of your stone. Using a pencil, lightly draw a small circle about the size of a dime to mark the flower’s center. -
Sketch the Inner Petals:
Around the center circle, lightly sketch the first ring of petals. These should be shorter and slightly overlapping, radiating outward. -
Add Outer Layers:
Continue sketching two or three more concentric rings of petals. Make the outer petals longer and broader than the inner ones to create depth. Don’t worry about perfect symmetry; nature is rarely perfect. -
Leaf Placement:
Sketch a few curved, leafy sprigs extending from underneath the outer petals on the left and right sides to frame the bloom.
Step 2: Painting the Base Layers
-
Base Leaf Color:
Mix a teal green with a tiny touch of white. Paint the leaf shapes neatly, ensuring smooth coverage. You might need two thin coats for opacity. -
Petal Undercoat:
Using your flat brush, fill in all the petal shapes with a solid coat of white acrylic paint. This primer step is crucial so the vibrant oranges and reds pop against the grey stone. -
Petal Gradient Filling:
Once the white is dry, paint the petals. Start with deep red near the center, blend into orange in the middle, and finish with peach at the tips. Work one petal at a time to blend the paint while wet. -
Center Base:
Fill the center circle with a burnt sienna or dark brown tone. Let this layer dry completely before adding texture.
Blending Woes?
If acrylics dry too fast to blend the gradient, use a ‘slow-dry’ medium or lightly mist your palette with water to keep paints workable longer.
Step 3: Detailing and Depth
-
Petal Definition:
Use a fine liner brush and thinned deep red paint (or a dark red pencil) to outline each petal gently. Add thin, vertical lines down the center of each petal to mimic texture. -
Enhancing Contrast:
Deepen the shadows between the overlapping petals with a wash of watered-down brown or dark red. This negative space makes the upper layers look like they are lifting off the rock. -
Leaf Veins:
Using a slightly darker teal or green, paint delicate central veins on your leaves. I like to keep these strokes very light for a delicate look. -
Texturing the Center:
Dip a small, stiff brush or a toothpick into yellow and ochre paint. Stipple small dots densely around the outer edge of the brown center circle to create pollen texture. -
Center Highlights:
Add smaller, lighter yellow dots moving toward the middle of the center disk, leaving the very middle slightly darker for dimension. -
Final Cleanup:
Check your edges. If any paint went outside the lines onto the raw stone, you can carefully scratch it off with a damp toothpick or paint over it with a grey mixture that matches the rock. -
Seal the Artwork:
Once the paint is fully cured (give it at least 24 hours), spray with a UV-resistant clear arched sealer to protect your Zinnia from the elements.
Level Up: Dew Drops
Add realistic 3D dew drops by painting tiny clear ovals with a dark shadow on top and a bright white highlight dot on the bottom edge.
Place your finished Zinnia stone in a flower pot or on a garden path to add a permanent splash of color
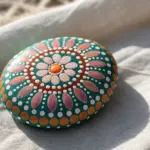
Mandala Flower Medallion
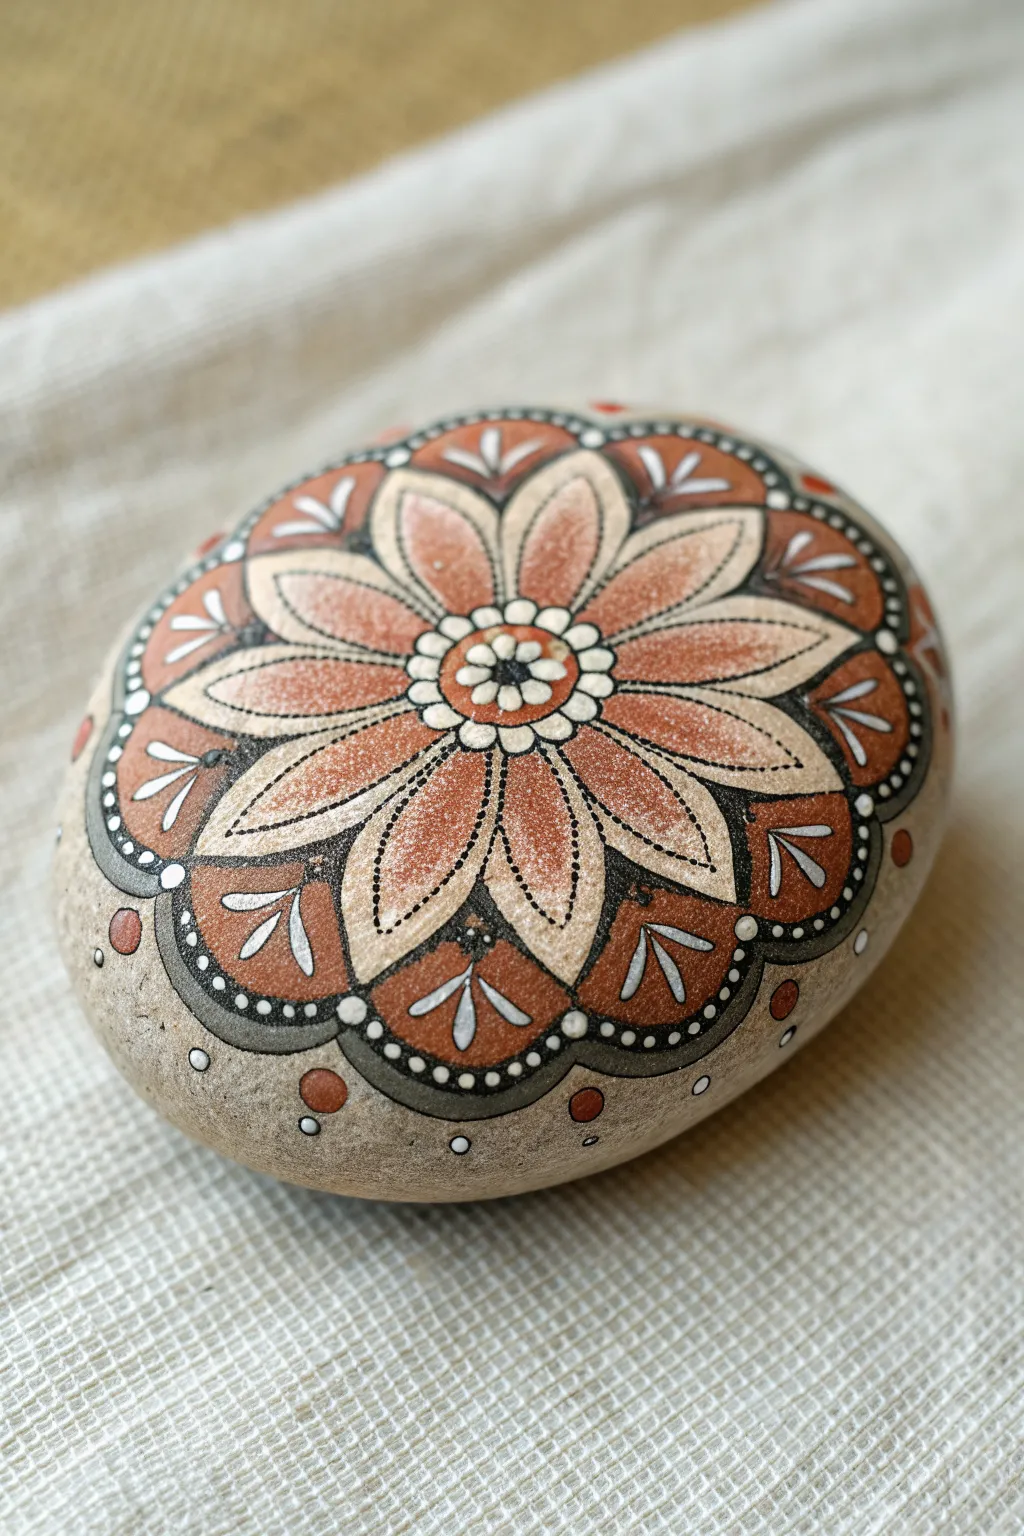
This smooth river stone features an intricate, symmetrical floral design that radiates warmth with its earthy terracotta, cream, and black palette. By layering simple shapes like petals and scallops, you will build a complex medallion that looks like ancient pottery.
How-To Guide
Materials
- Smooth, oval river rock (medium to large size)
- Acrylic paints (Terracotta/Rust, Beige/Sand, Black, White)
- Fine liner brushes (sizes 00 and 0)
- Dotting tools (various sizes) or toothpicks
- Pencil and eraser
- Compass or round stencil (optional, for guidelines)
- Matte or satin varnish/sealer
Step 1: Preparation and Grid
-
Preparation:
Begin by washing your stone with soapy water and letting it dry completely to ensure the paint adheres well. -
Find the center:
Using a pencil, lightly mark the center point of the rock’s flattest side. -
Draft the concentric circles:
Sketch a series of light concentric circles expanding from the center. You’ll need a small inner circle for the flower heart, a middle band for the main petals, and an outer band for the scalloped border. -
Divide the space:
Draw faint lines radiating from the center like wheel spokes to divide your circle into equal sections—aim for 8 or 10 sections depending on your rock’s width to guide your petal placement.
Fixing Wobbly Lines
If your black outlines get shaky or too thick, wait for them to dry completely. Then, use the original base color (beige or rust) to carefully paint over and ‘erase’ the mistake.
Step 2: The Central Flower
-
Block in the center:
Paint the small central circle in a solid terracotta color. -
Draft the petals:
In the middle band, sketch large, pointed petals encompassing the center circle. They should touch at the base and taper at the tips. -
Fill the petals:
Paint the interior of each petal with your beige or sand color. You might need two coats for opaque coverage. -
Add petal definition:
Once the beige is dry, paint a smaller, inner petal shape inside each beige petal using the terracotta paint, leaving a consistent beige outline. -
Create the center detail:
Paint a ring of small white dots or a rough white flower shape directly in the center of the terracotta circle using a small brush or dotting tool.
Add Metallic Flair
Swap the beige paint for a metallic gold or copper acrylic. This will make the lighter parts of the petals shimmer in the sunlight and give the stone a jewelry-like finish.
Step 3: Border and Details
-
Paint the scallop border:
Around the tips of your main flower petals, paint a scalloped border (semicircles) in terracotta, connecting the tips of the petals. -
Outline in black:
This is a crucial step. Using your finest liner brush and black paint reduced with a drop of water, carefully outline the main flower petals and the outer scalloped border. -
Inner details:
While you have the black paint, draw a thin line down the center of each terracotta petal section. -
The border frame:
Paint a thick black band that follows the outer curve of the scallops. This creates a strong contrast frame for the medallion.
Step 4: Fine Linework and Dots
-
Petal stippling:
Dip a needle or very fine tool into black paint and add tiny stippled dots along the inner edge of the terracotta petal sections for a shaded effect. -
Center medallion dots:
Refine the very center artwork with a black dot in the middle, surrounded by tiny white dots on the terracotta background. -
Border embellishments:
On the outer terracotta scallops, paint three simple white lines radiating outward—a central straight line and two angled side lines, resembling little leaves. -
Outer dot work:
Use a medium dotting tool to place white dots along the thick black border band. Space them evenly between the scallop peaks. -
Final accents:
Add extra decorative dots in terracotta around the raw stone outside the main design to integrate the mandala with the rock. -
Sealing:
Allow the paint to cure for at least 24 hours, then apply a matte or satin varnish to protect your intricate work from chipping.
Place your finished medallion stone in a garden pot or on a desk to enjoy its calming symmetry every day
Black Rock With Bright Floral Line Art
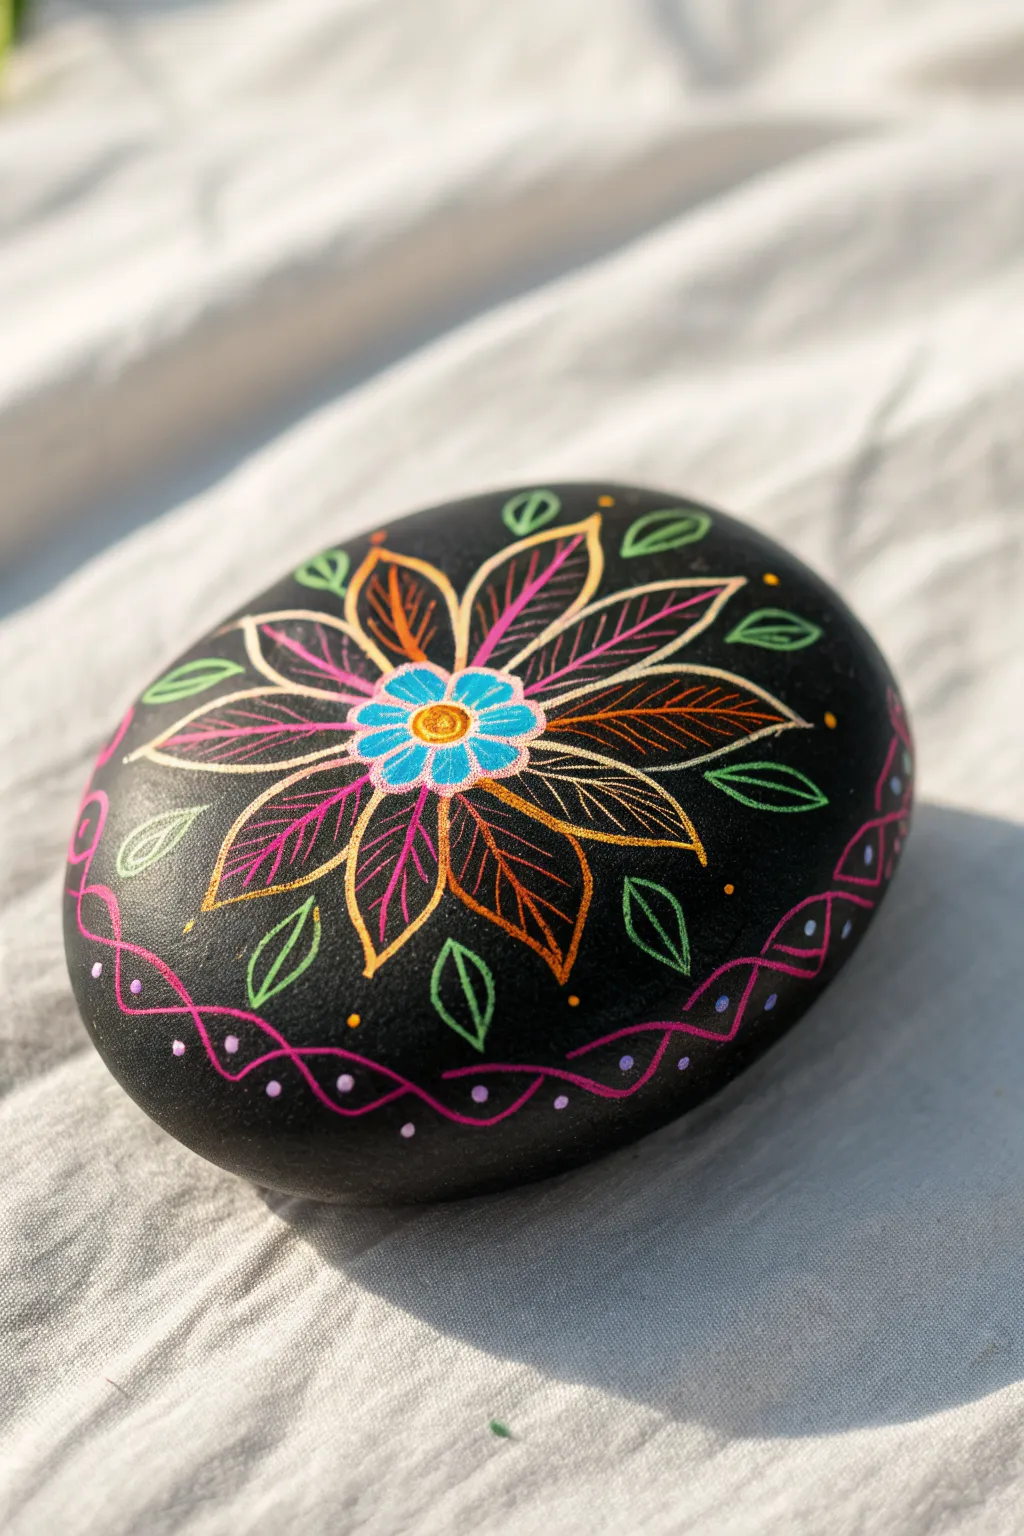
Transform a simple dark stone into a vibrant piece of art with this stunning floral line design. The stark black background makes the metallic golds, pinks, and blues pop in a mesmerizing, almost neon fashion.
Step-by-Step Guide
Materials
- Smooth oval river rock
- Gesso or primer (optional)
- Black acrylic paint (matte finish)
- Wide flat paintbrush
- Extra-fine tip acrylic paint pens (gold, bright blue, hot pink, orange, lime green, white/lilac)
- Spray varnish (satin or gloss)
Step 1: Preparing the Canvas
-
Clean the stone:
Start by washing your rock with warm, soapy water to remove any dirt or oils. Let it dry completely before starting. -
Apply the base coat:
Using a wide flat brush, paint the entire top surface of the rock with matte black acrylic paint. I usually do two thin coats rather than one thick one to avoid brush strokes. -
Let it cure:
Allow the black paint to dry thoroughly. It should be dry to the touch and not tacky before you attempt any fine linework.
Step 2: Drafting the Flower Center
-
Start the center:
With a gold paint pen, draw a small circle in the middle of the rock. It doesn’t need to be perfectly geometric; a hand-drawn look adds charm. -
Add the blue flower:
Switch to your bright blue pen. Draw roughly 7-8 small, rounded petals radiating directly from the gold center circle. -
Fill the center petals:
Color in the blue petals completely so they are solid. Then add a tiny dot of orange or gold in the center of the gold circle for dimension. -
Outline the center:
Once the blue paint is dry, carefully outline the blue petals with a contrasting color like white or a very pale pink to make them stand out against the black.
Pen Primer
Shake your paint pens vigorously before use and test the flow on a scrap paper. This prevents sudden blobs of paint ruining your black base.
Step 3: Creating the Main Petals
-
Draw the petal shapes:
Using your gold pen, draw eight large, pointed leaf-shaped petals extending outward from the blue center. Space them evenly around the rock. -
Add first layer of veins:
Inside the gold outline of the petals facing ‘North, South, East, West’, draw a central vein line in pink. Add small diagonal lines branching off it to create leaf veins. -
Add second layer of veins:
For the alternating petals (the diagonal ones), draw the internal vein structure using an orange paint pen. This alternating color scheme creates a nice rhythm. -
Highlight the tips:
Add a very faint highlight or extra line inside the tip of each petal using white or pale yellow to give them a slight glow.
Glow Up
Use neon or fluorescent paint pens for the pink and orange veins. Under a blacklight, your rock will glow vividly!
Step 4: Adding Leaves and Borders
-
Sketch floating leaves:
In the spaces between the large flower petals, draw smaller, free-floating leaf shapes using a lime green pen. -
Detail the leaves:
Draw a single central line down the middle of each green leaf to mimic a vein. -
Start the wavy border:
Using a hot pink pen, draw a continuous wavy line that wraps around the perimeter of the flower, staying close to the edge of the rock. -
Cross the border:
Draw a second pink wavy line that intersects the first one, creating a chain-link or DNA-helix style pattern around the rock edge. -
Dot the border:
Place a small lilac or white dot inside each loop created by the intersecting pink wavy lines. -
Final embellishments:
Add tiny orange or yellow dots sporadically around the flower center and near the green leaves to fill empty negative space. -
Seal the artwork:
Once all paint is completely dry (give it at least an hour), spray the rock with a clear varnish to protect the design and deepen the black background.
Display your botanical creation on a desk or in the garden for a permanent splash of color
Ombre Petals With White Highlights
This elegant rock painting features a stunning deep red-to-white gradient background that makes the bold flower design pop. The white outlining technique gives the petals a distinct, sticker-like quality that looks complicated but is surprisingly achievable.
Detailed Instructions
Materials
- Smooth oval river rock (medium size)
- White acrylic paint or gesso
- Deep magenta/berry red acrylic paint
- Forest green acrylic paint
- Sage or lighter green acrylic paint
- Small flat brush
- Makeup sponge or blending sponge
- Fine liner brush (size 0 or 00)
- White paint pen (extra fine tip) or white acrylic paint
- Dotting tool or toothpick
- Clear spray sealant (matte or satin finish)
Step 1: Preparation & Base Gradient
-
Clean the canvas:
Start by washing your rock with soap and water to remove any dirt or oils. Let it dry completely before beginning. -
Apply the white base:
Using your flat brush, paint the top surface of the stone with white acrylic paint. This ensures your colors will be vibrant. You may need two coats for full opacity. -
Prepare the gradient colors:
Squeeze a small amount of deep magenta and white paint onto your palette. You’ll need access to both while the paint is wet. -
Start the ombre:
Apply the deep magenta to the bottom third of the rock using a sponge. Dab gently to get good coverage. -
Blend the transition:
Dip your sponge into a mix of magenta and a little white to create a medium pink. Dab this in the middle section, slightly overlapping the dark bottom edge. -
Finish the fade:
Use a clean part of the sponge with pure white paint for the top third. Gently tap where the white meets the pink to blur the line, creating a soft, misty fade from dark red to white.
Smoother Blending
Work quickly while sponge blending! If the paint starts to dry, it won’t mix smoothly. Keep the sponge slightly damp (not wet) to help the acrylics move.
Step 2: Painting the Flower
-
Outline the flower placement:
Once the background is bone dry, lightly sketch a simple eight-petal daisy shape in pencil. Center the flower head mostly over the pink transition area. -
Paint the petals:
Fill in the petals with the deep magenta paint. Use a small round brush to keep the edges neat. The dark flower creates a striking contrast against the lighter background sections. -
Add the stem:
Using a liner brush and forest green paint, draw a thin, curved stem extending from the bottom of the flower to the rock’s edge. -
Paint leaves:
Paint two simple leaf shapes branching off the stem. Use the forest green for the outer edges, but fill the centers with a sage green for depth. -
Create the center:
Paint a small white circle in the center of the flower. Inside that circle, paint a tiny pink asterisk or star shape.
Try a Sunset Twist
Swap the pink palette for an orange-to-yellow gradient background with a black silhouette flower for a dramatic evening look.
Step 3: Details & Highlights
-
Outline the petals:
This is the crucial step. Using your extra-fine white paint pen or a liner brush with thinned white paint, carefully outline each petal. Leave a tiny gap between the outline and the red petal fill if you want a floating effect, or trace directly on the edge. -
Add petal details:
Draw tiny white lines radiating from the center of the flower outward onto each petal. These look like little stamens or veins. -
Highlight the stem:
Outline the stem and leaves with the white pen. Add a central vein line down the middle of each leaf. -
Add decorative pollen:
Using a dotting tool or the tip of a handle, dip into black or dark grey paint. Place small dots randomly around the flower head, concentrating them slightly more near the center. -
Seal the artwork:
Wait 24 hours for the paint pen and thick layers to cure. Spray lightly with a clear sealant to protect your work from the elements.
Place this lovely stone in a garden planter or on a desk as a colorful paperweight
Negative-Space Flowers on Natural Stone
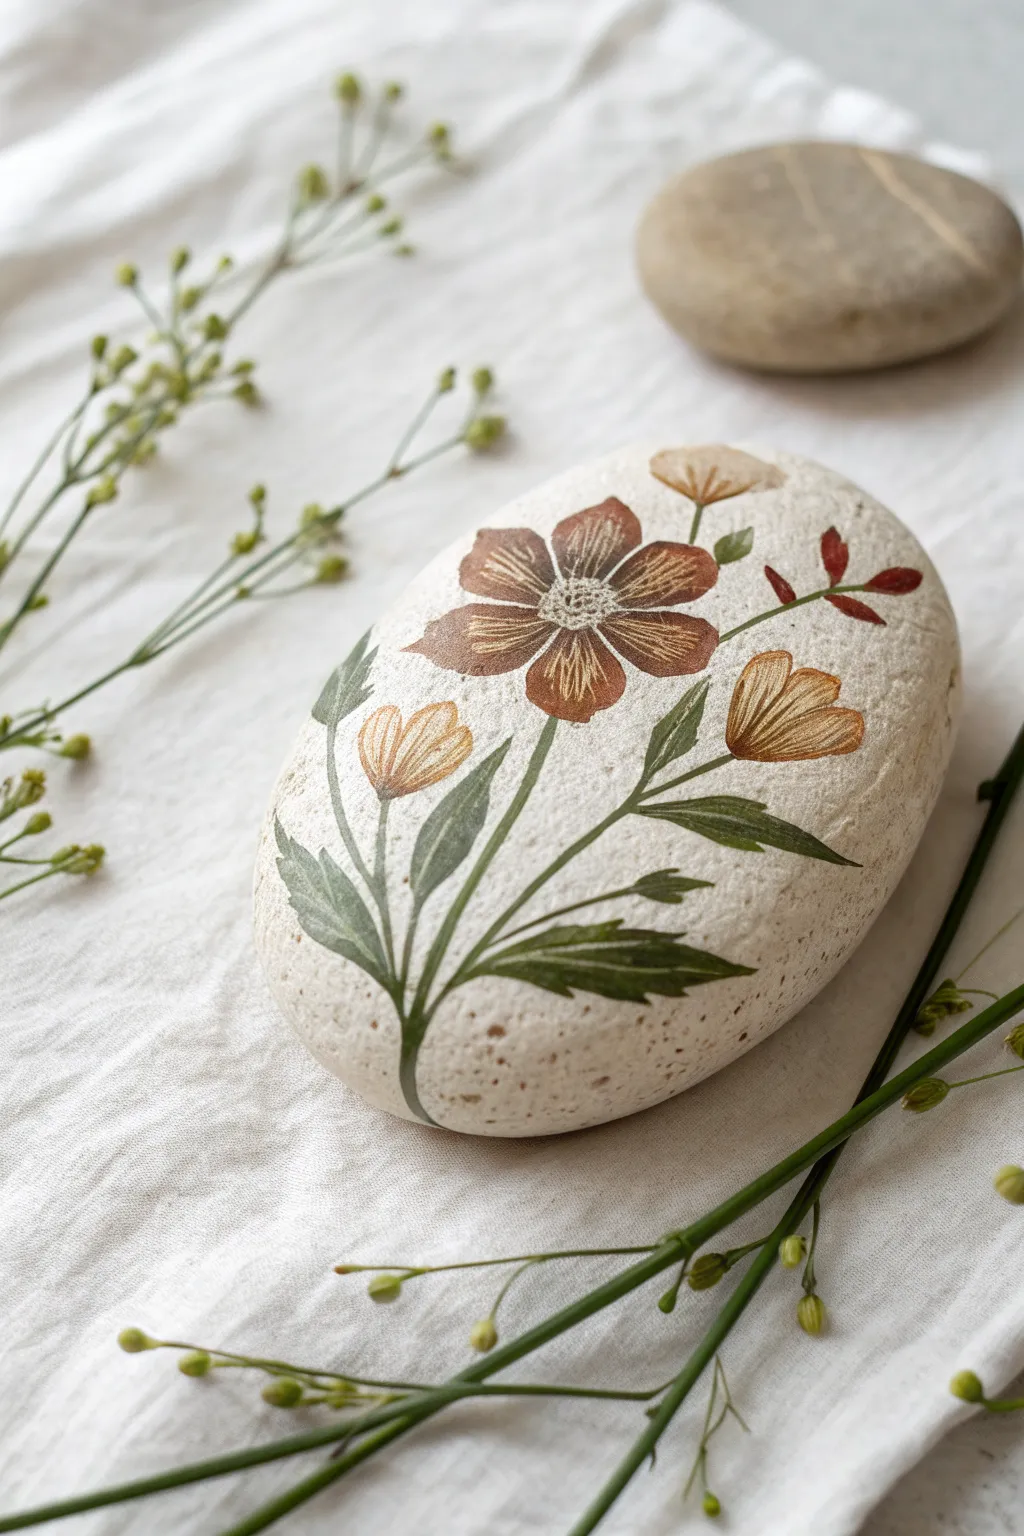
This project captures the delicate, earthy beauty of a vintage botanical illustration on a smooth, natural canvas. By using the stone’s original texture as a backdrop, the muted reds and greens feel grounded and organic, perfect for rustic decor.
Step-by-Step
Materials
- Smooth, light-colored river stone (oval shape preferred)
- Acrylic paints (burnt sienna, yellow ochre, sap green, olive green, cream/off-white, burnt umber)
- Fine detail paintbrushes (sizes 0, 00, and 1)
- Small flat brush (size 2 or 4)
- Pencil (H or HB for light lines)
- Palette or small plate
- Water cup and paper towel
- Matte spray sealant
Step 1: Preparation and Sketching
-
Stone Selection:
Choose a stone that is relatively flat and very smooth. A light beige or off-white stone works best to mimic the look of aged paper. -
Clean and Dry:
Wash the stone thoroughly with soap and water to remove any dirt or oils that might repel paint. Let it dry completely in the sun or with a hairdryer. -
Base Sketching:
Lightly sketch the main stem curvature using an H pencil. Draw a central curved line branching upwards, positioning the main flower head near the top center. -
Adding Details:
Sketch the outline of the main five-petal flower, the two smaller bud shapes to the sides, and the jagged leaves along the stem. Keep lines faint so they don’t show through the paint.
Paint Lifting?
If the second layer lifts the first, you’re painting too soon. Let the base layer cure fully. A quick blast with a hair dryer on low heat speeds this up safely.
Step 2: Blocking in Color
-
Mixing Flower Tones:
Mix burnt sienna with a tiny touch of burnt umber to create a deep, rusty red. Use a size 1 brush to fill in the five petals of the main flower. -
Painting Buds:
For the smaller side blooms, mix yellow ochre with a dot of burnt sienna. Paint these teardrop shapes carefully, ensuring the edges are crisp against the stone. -
Leaf Base Layer:
Mix sap green with a little olive green. Using your small flat brush or the size 1 round, fill in the leaf shapes. I find it helpful to pull the brush from the stem outward to the leaf tip to mimic natural growth. -
Stem Work:
Switch to a size 0 brush and use the same green mix to paint the thin stems connecting the leaves and flowers. Keep your hand steady and dragging the brush lightly. -
Drying Time:
Allow these base layers to dry completely. Acrylics dry darker, so don’t worry if the colors look slightly bright while wet.
Aged Paper Effect
Before painting flowers, apply a very thin, watery wash of cream or beige acrylic over the specific painting area. It mimics old parchment backing.
Step 3: Adding Detail and Texture
-
Petal Striations:
Mix a lighter version of your flower color by adding cream to the rusty red. With your finest 00 brush, paint very thin lines radiating from the flower center outward to create texture. -
Flower Center:
Dab a small circle of cream mixed with ochre in the center of the main flower. Wait for it to dry, then add tiny dots of burnt umber to simulate seeds or pollen. -
Bud Definitions:
On the yellow-ochre buds, use dilute burnt sienna to paint faint vertical lines, giving them a ribbed, enclosed appearance. -
Leaf Veins:
Mix a darker green using sap green and a touch of burnt umber. Paint a central vein down each leaf. Add tiny side veins if your brush control allows. -
Highlighting Leaves:
Add a very subtle highlight to the upper edges of the leaves using a mix of olive green and cream to suggest light hitting the foliage.
Step 4: Finishing Touches
-
Cleanup:
If you made any mistakes or stray marks, use a damp Q-tip to gently wipe them away before the paint cures completely. You can also touch up the stone background with a mix of white and brown if needed. -
Extra Texture:
To enhance the ‘vintage print’ look, you can add tiny speckles of watered-down brown paint around the flowers using an old toothbrush, though this is optional. -
Sealing:
Once the painting is bone dry—ideally overnight—spray the rock with a matte sealant in a well-ventilated area. A matte finish preserves the natural stone look better than gloss.
Place your finished botanical stone on a stack of books or a windowsill to enjoy a touch of nature indoors
Raised Texture Flowers for 3D Depth
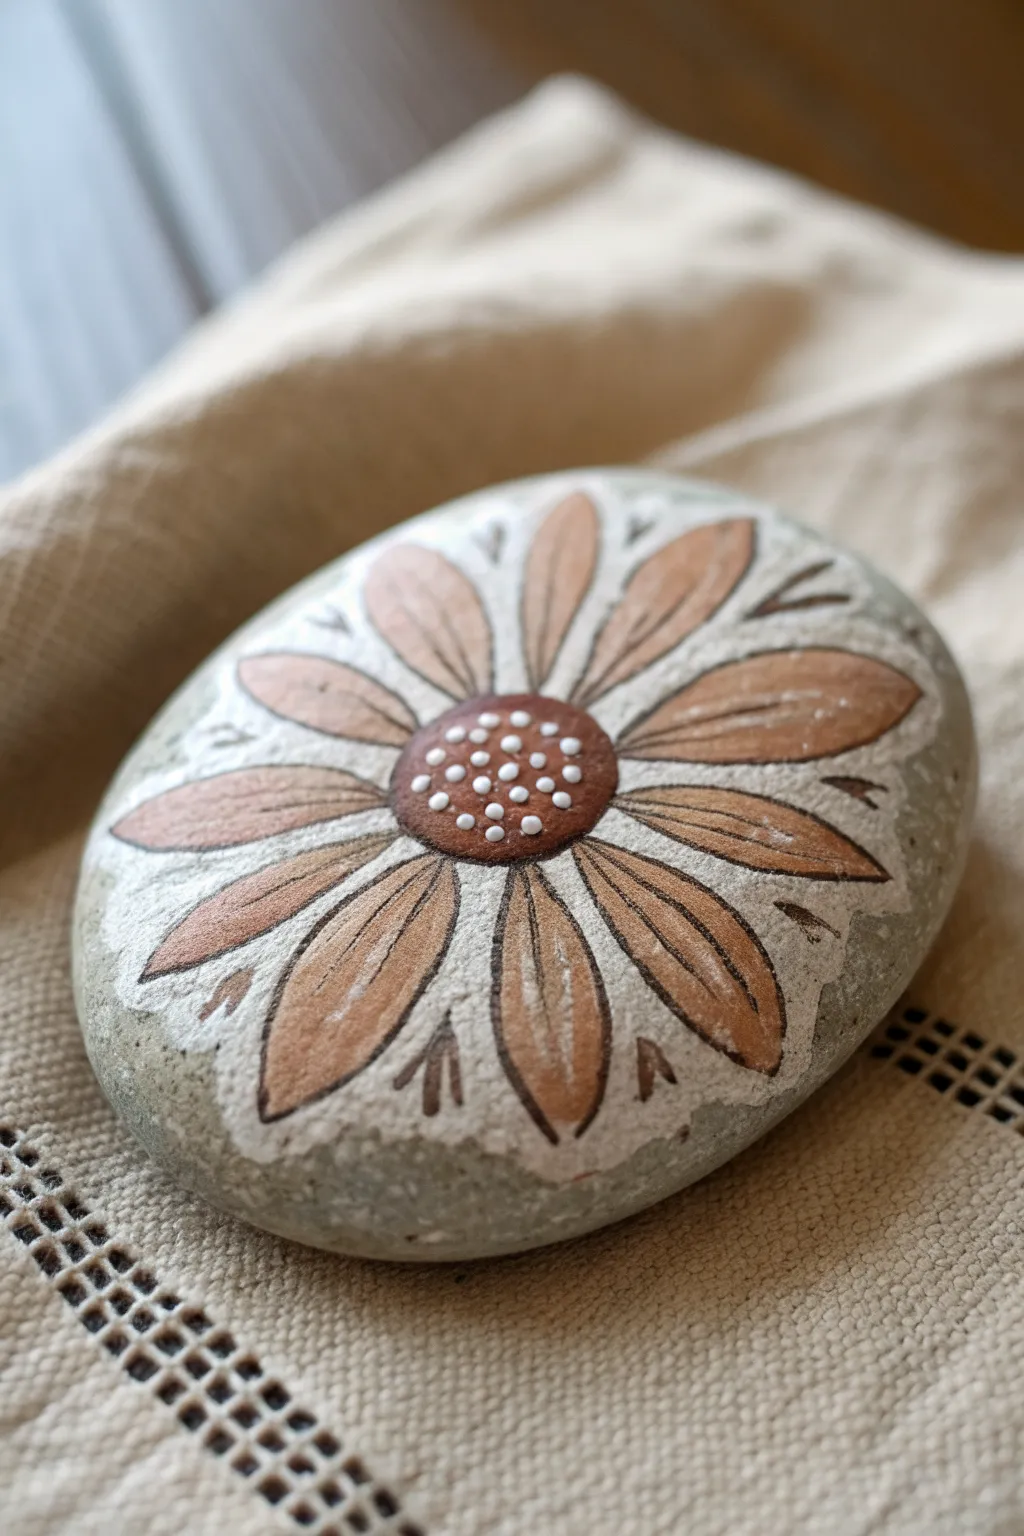
Capture the charm of a rustic garden with this beautifully textured daisy rock painting. By layering matte acrylics and strategic white highlights, you’ll create a subtle 3D effect that makes the petals look like they’re resting gently on the stone.
How-To Guide
Materials
- Smooth, oval river rock (medium size)
- Acrylic paints (White, chocolate brown, tan/beige)
- Fine detail paintbrush (size 0 or 00)
- Small round paintbrush (size 2)
- Dotting tool or toothpick
- Pencil for sketching
- Matte varnish (optional)
Step 1: Preparation and Sketching
-
Clean the surface:
Begin by washing your rock with warm, soapy water to remove any dirt or oils. Let it dry completely before starting, as moisture can prevent the paint from adhering properly. -
Find the center:
Identify the flattest, most prominent face of your rock. Use a pencil to lightly mark a small circle in the center; this will be the heart of your flower. -
Draft the petals:
Sketch long, tear-drop shaped petals radiating outward from the center circle. Aim for about 10-12 petals, ensuring they extend almost to the edge of the rock face.
Step 2: Painting the Base Layers
-
Fill the background:
Using your small round brush and white acrylic paint, fill in the negative spaces between the sketched petals. Don’t worry about being perfectly neat yet; just lay down a solid white base around the flower shape. -
Refine the white edges:
While the white paint is still workable, carefully smooth out the edges where the white meets the raw stone. You want a jagged, organic look rather than a perfect circle. -
Paint the petals:
Mix your tan or beige paint. Fill in each petal shape completely. I find that two thin coats provide better coverage and texture than one thick glob. -
Create the center:
Paint the center circle with a rich chocolate brown. Ensure it’s opaque enough to hide the stone underneath. -
Dry thoroughly:
Let the entire rock sit for 15-20 minutes until all paint feels dry to the touch. This prevents the colors from muddying during the detail phase.
Pro Tip: Steady Hands
If your hand shakes while doing the fine brown outlines, try exhaling slowly as you pull the brush across the stone. This stabilizes your movement for crisper lines.
Step 3: Adding Depth and Detail
-
Outline the center:
Using your finest detail brush and the chocolate brown paint, carefully trace roughly around the center circle to define it clearly against the petals. -
Outline the petals:
Reload the fine brush with brown paint. Draw a thin line around each individual petal. It helps to anchor your pinky finger on the table to keep your hand steady during this step. -
Add petal veins:
Paint a single, curved line down the center of each petal. Vary the length slightly for a more natural, hand-drawn look. -
Create decorative accents:
In the white spaces between the outer tips of the petals, paint small brown ‘V’ shapes or little dashes. These mimics the look of sepals or simply adds decorative flair. -
Texture the center:
Dip a dotting tool or the tip of a toothpick into white paint. Gently press small dots onto the brown center of the flower. -
Cluster the dots:
Concentrate your white dots slightly more in the very middle of the brown circle, leaving the edges darker to enhance the 3D rounded appearance. -
Final clean up:
Inspect your lines. If you need to sharpen the white background, you can gently touch it up with the white paint now that the brown outlines are dry. -
Seal the artwork:
Once absolutely dry (give it an hour or so), apply a coat of matte varnish to protect the paint without adding unnatural shine.
Level Up: Antique Look
Mix a tiny drop of brown into your white background paint for a ‘cream’ color, then lightly sand the dried surface with fine sandpaper for a weathered, vintage finish.
Place your finished stone on a bookshelf or garden table to add a touch of everlasting nature to your decor


Have a question or want to share your own experience? I'd love to hear from you in the comments below!