If you’ve got a handful of smooth stones and a little paint, you’ve got the perfect setup for making charming bird painted rocks that feel like tiny pocket sculptures. I love how the right rock shape can instantly suggest a round belly, a tucked wing, or a perky little head tilt.
Simple Bluebird on an Oval Rock
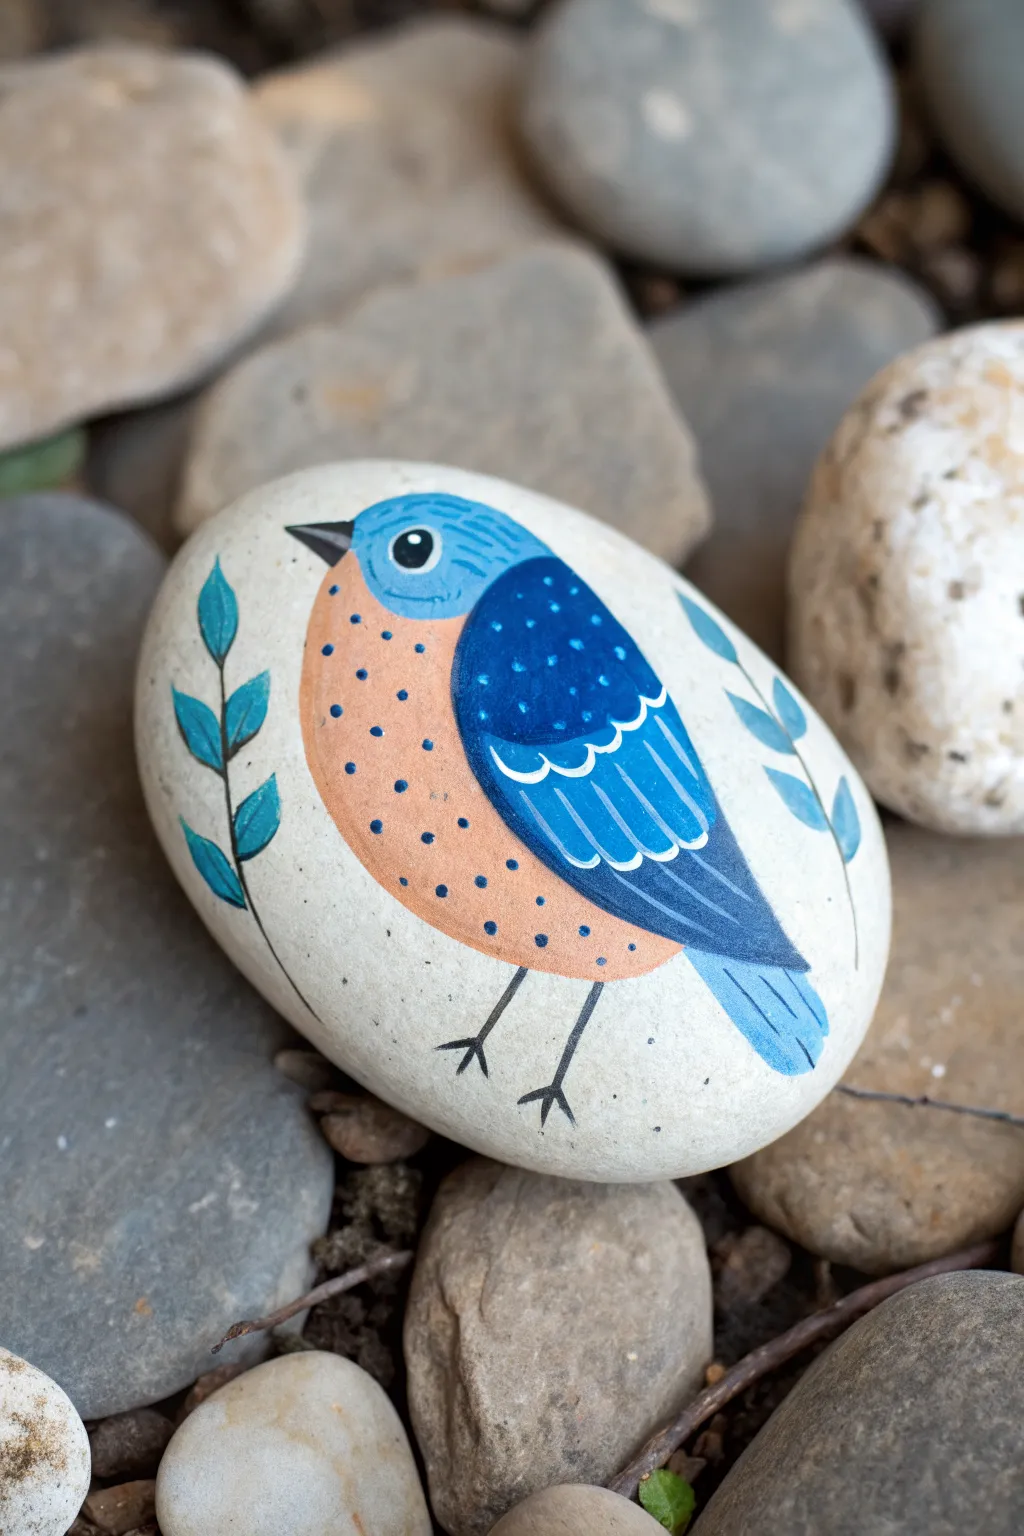
Transform a smooth, oval river rock into a charming piece of garden art with this stylized bluebird design. The folk-art inspired details, like the dotted wing and leafy sprigs, give this simple project a delightful, handcrafted feel.
Step-by-Step
Materials
- Smooth, oval river rock (approx. 3-4 inches)
- Acrylic craft paints: Light blue, dark blue, peach/orange, white, black, and teal
- Fine detail paintbrush (size 0 or 00)
- Small flat paintbrush (size 2 or 4)
- Dotting tool or toothpick
- Pencil
- Spray sealer or varnish (matte or gloss)
Step 1: Base and Sketch
-
Prep the surface:
Begin by washing your rock with soap and water to remove any dirt or grit, then let it dry completely. A clean surface helps the paint adhere much better. -
Paint the background (optional):
If your rock is naturally a nice light color like the one shown, you can leave the background raw. If your rock is dark, paint a large oval of white or cream in the center to serve as your canvas. -
Sketch the outline:
Using a pencil, lightly sketch the simple shape of the bird. Draw a round shape for the head that flows into a teardrop shape for the wing, and a curved belly underneath.
Clean Lines
If your hand shakes while painting thin lines like the legs or feather details, try bracing your pinky finger against the rock surface for extra stability.
Step 2: Blocking in Color
-
Paint the head:
Use your light blue paint to fill in the head area. You may need two coats to get a solid, opaque color, especially if the rock is porous. -
Fill the breast:
Paint the curved belly area with a soft peach or light orange acrylic. Carefully meet the line where the blue head ends. -
Paint the wing:
Fill the teardrop-shaped wing area with a darker blue shade. This contrast helps separate the wing from the lighter head. -
Add the tail:
Extend a small rectangle shape from beneath the wing tip using the light blue paint to create the tail feathers. -
Let it dry:
Allow these base colors to dry fully to the touch before moving on to avoid muddying your details.
Level Up
Add a hidden message or the year on the bottom of the rock, so whoever finds it in the garden gets a little extra surprise.
Step 3: Adding Details
-
Outline the eye:
paint a small white circle on the face for the eye area. Once dry, add a large black pupil inside it, leaving a tiny white speck for a highlight. -
Define the feathers:
Switch to your finest detail brush. Mix a slightly lighter shade of the dark blue or use white to paint thin lines on the wing, simulating individual feathers. -
Add wing scoops:
Paint small, scalloped ‘U’ shapes in white or light blue along the top edge of the wing feathers for a decorative touch. -
Detail the head:
Use a darker blue or thin black lines to add texture to the top of the head and separate the beak area. -
Paint the beak and legs:
With black paint and a steady hand, paint a small triangular beak. Then, draw two thin stick legs ending in simple three-toed feet.
Step 4: Decorative Flourishes
-
Dot the breast:
Dip a mechanical pencil tip or small dotting tool into dark blue or black paint. Add evenly spaced tiny dots across the peach belly area. -
Dot the wing:
Using white paint this time, add a cluster of small dots to the upper shoulder area of the dark blue wing. -
Paint side foliage:
Using teal or green paint, draw a long, thin curved stem on the left and right sides of the bird. Add simple almond-shaped leaves branching off the stems. -
Seal the rock:
Once you are absolutely certain the paint is bone dry, take the rock outside and spray it with a clear sealer to protect your artwork from the elements.
Place your finished stone near a potted plant or on a porch step to welcome visitors with a bit of cheer


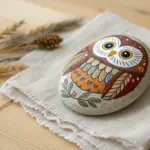
Big-Eyed Owl Rock for Beginners
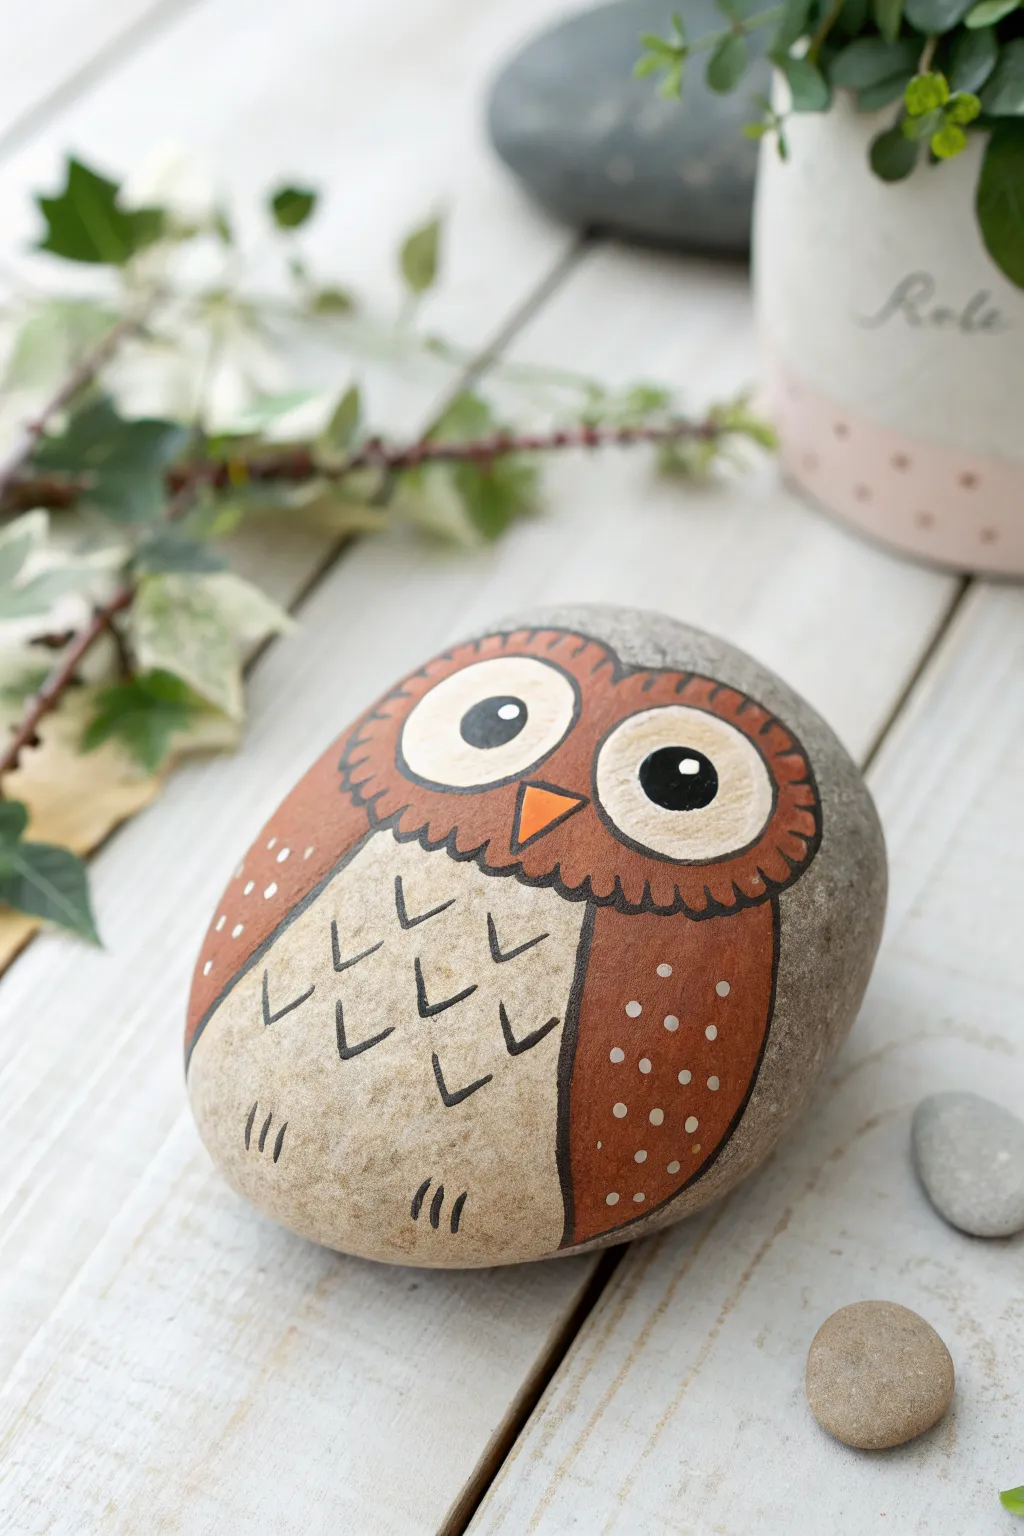
This charming craft transforms a smooth, grey river stone into an adorable wide-eyed owl with simple shapes and earthy tones. Its warm browns and bright whites make it a cozy addition to any garden or desk space.
Step-by-Step Guide
Materials
- Smooth, oval-shaped river rock (approx. palm-sized)
- Acrylic paints (Warm Brown, Cream/Off-White, Black, White, Orange/Terracotta)
- Fine detail paintbrush
- Medium flat paintbrush
- Pencil for sketching
- Matte or satin sealant spray
Step 1: Planning and Base Work
-
Clean the canvas:
Begin by scrubbing your rock with warm water and soap to remove any dirt or grease. Make sure it is completely dry before starting your paintwork to ensure proper adhesion. -
Sketch the owl shape:
Using a pencil, lightly draw a large oval shape that covers most of the rock’s face. This will be the body of the owl. -
Outline the face mask:
Inside the top third of your oval, sketch a heart-shaped ‘mask’ for the face. The bottom point of the heart should be wide and flat, not sharp. -
Draw the wings:
Sketch two curved lines down the sides of the body to separate the wings from the central chest area. The chest should look like a large ‘U’ shape in the middle.
Smooth Strokes
Add a drop of water to your black paint for lining work. Creating an ink-like consistency helps the brush glide over the stone’s texture without skipping.
Step 2: Applying Base Colors
-
Paint the wings:
Using your warm brown acrylic paint and a medium brush, fill in the wing sections on the left and right. Use two thin coats for better coverage. -
Fill the chest:
Mix a small amount of brown with white to create a beige or stone color. Fill in the central chest area with this lighter shade. I prefer to feather the edges slightly where it meets the brown, though bold lines work too. -
Paint the face mask:
Paint the heart-shaped face area with the same warm brown you used for the wings. Let this dry completely before moving to the eyes. -
Add the eye circles:
Once the brown face mask is dry, paint two large, touching circles inside it using a cream or off-white color. These should take up most of the face area.
Make a Pair
Paint a second, smaller rock with similar colors but make the owl ‘sleep’ by painting two downward curved lines instead of open eyes for a cute duo.
Step 3: Adding Details and Features
-
Paint the beak:
Right where the two eye circles meet at the bottom, paint a small, inverted triangle using bright orange or terracotta paint. -
Outline the features:
Switch to your fine detail brush and black paint. Carefully outline the large cream eye circles to make them pop against the brown background. -
Add pupils:
Paint two solid black circles in the center of the cream eye patches. Ensure they are varying sizes or looking in the same direction to give the owl personality. -
Create the reflection:
Dip the back end of your paintbrush into white paint and dot a small highlight onto each black pupil (at the ‘1 o’clock’ position) for a spark of life. -
Texture the feathers:
Using the fine brush and black paint, draw small ‘V’ shapes or checkmarks onto the beige chest area to simulate ruffled feathers. -
Outline the body:
Trace the separation lines between the wings and the chest with a confident black line. You can create a scalloped edge under the face mask to suggest feathers layering over the chest.
Step 4: Final Touches
-
Detail the head:
Add small scalloped lines along the top edge of the face mask to create a feathery texture on the forehead. -
Add polka dots:
Using the tip of a small brush or a dotting tool, add tiny cream-colored dots to the brown wings for decorative flair. -
Paint the talons:
At the very bottom of the beige chest area, paint two sets of three small vertical dashes to represent the owl’s feet or talons. -
Seal the rock:
Once all paint is thoroughly dry (give it at least an hour), spray the entire rock with a matte or satin sealant to protect your work from weather and chipping.
Now you have a wise little companion ready to watch over your garden or bookshelf


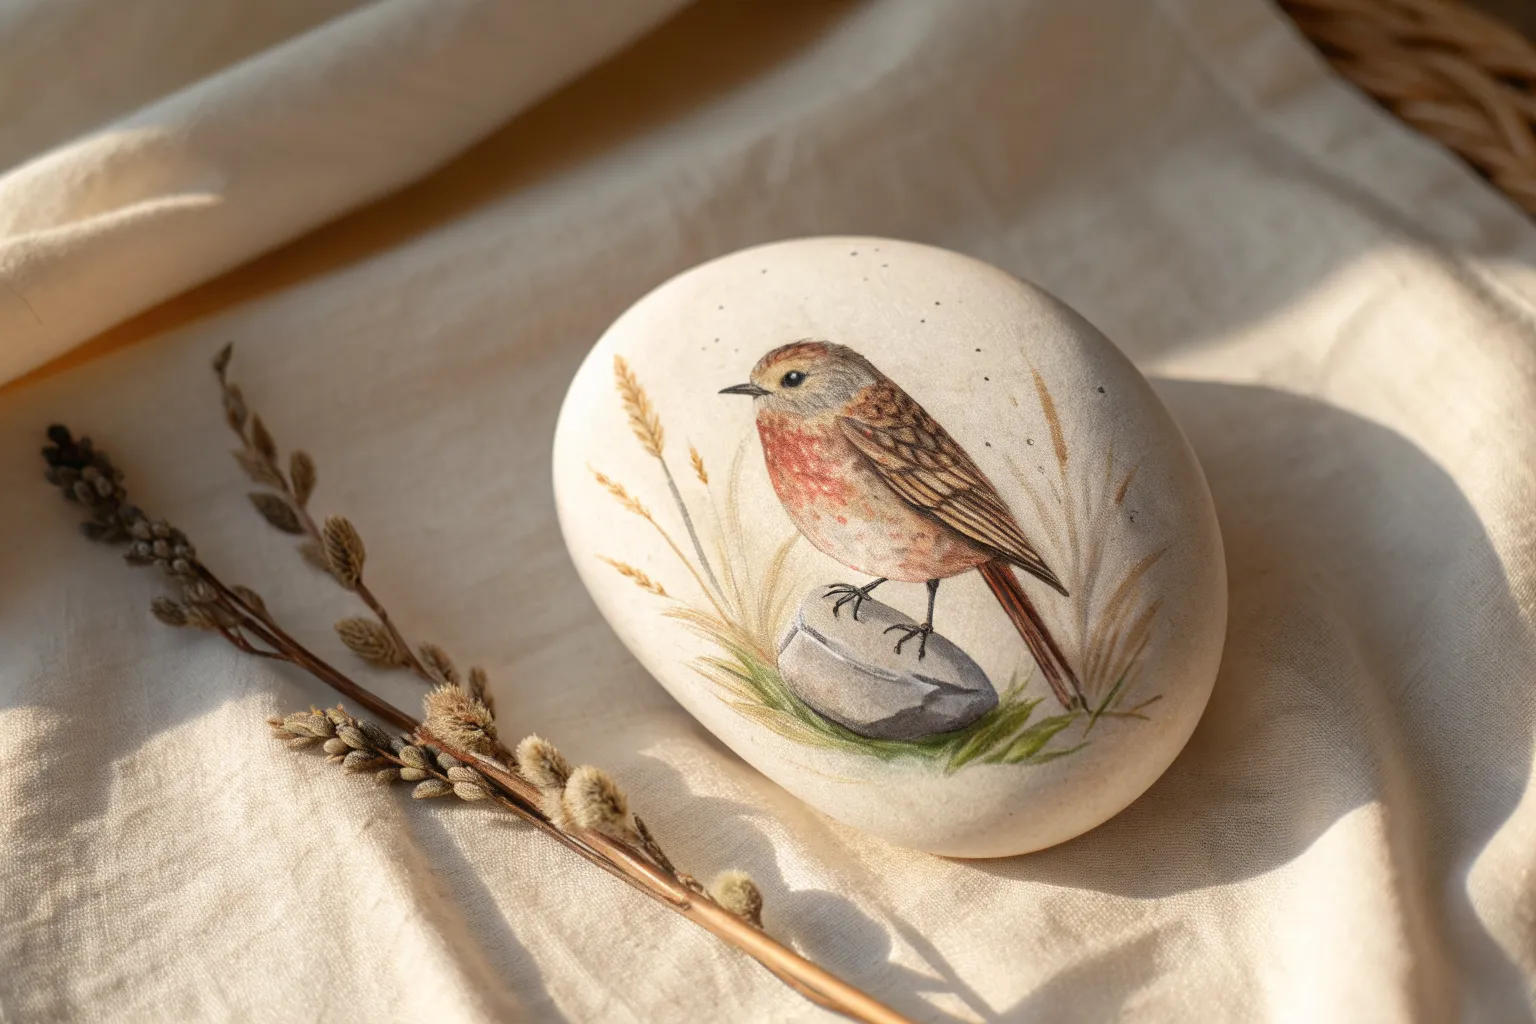
Robin With a Warm Rust Belly
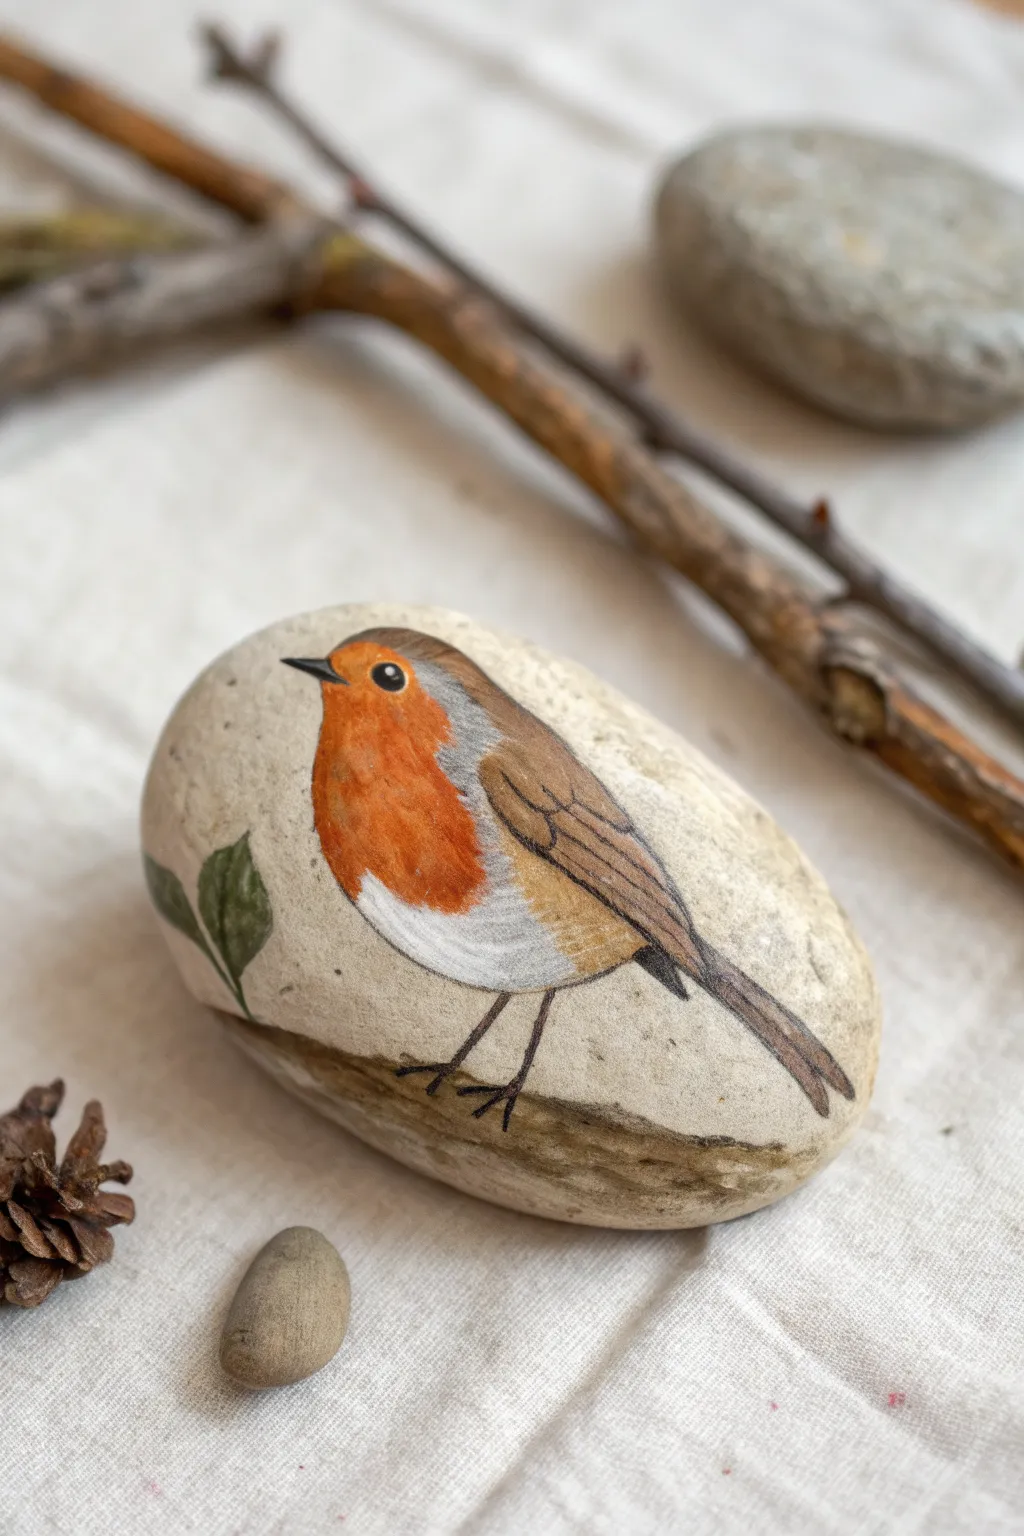
This charming project captures the gentle spirit of a European robin perched quietly on a smooth, beige stone. By using layers of warm rust and soft browns, you’ll create a lifelike feathered friend that fits right in the palm of your hand.
Step-by-Step Guide
Materials
- Smooth, rounded river rock (beige or light colored)
- Pencil for sketching
- Acrylic paints (orange/rust red, dark brown, medium brown, white, black, green)
- Fine detail brushes (size 0 and 00)
- Flat brush for base coats
- Fine-tip black micron pen or acrylic marker
- Matte spray varnish
Step 1: Sketching the Form
-
Clean your canvas:
Start by scrubbing your rock with warm soapy water and drying it completely. A clean surface ensures your paint adheres properly and lasts longer. -
Map out the body:
Using a pencil, lightly sketch a round, plump oval shape in the center of the rock. Tilt the oval slightly upwards to give the bird a perky, alert posture. -
Adding head and tail:
Draw a smaller circle overlapping the top left of your oval for the head. Then, extend a long, tapered rectangle shape downwards from the right side of the oval to form the tail feathers. -
Define the features:
Lightly mark the separation line between the wing and the body. Sketch a small triangle for the beak and a small circle for the eye. Mark out the signature red breast area on the chest. -
Include the perch:
Draw a simple, rough line beneath the bird’s feet to represent the branch or log it is standing on. Add a couple of simple leaf shapes to the left side for balance.
Fixing Wobbly Lines
If your fine lines for feathers feel shaky, switch to a superfine pigment pen (like a Micron 005) instead of a brush. It offers much more control for tiny details.
Step 2: Blocking in Color
-
Paint the breast:
Load a small brush with a warm rust or orange acrylic paint. Fill in the chest area you marked earlier, using small dabbing motions at the edges to suggest fluffiness. -
Base coat the wings:
Mix a medium brown shade and fill in the wing and tail area. apply this color thinly so the texture of the rock isn’t completely lost. -
White belly feathers:
Using clean white paint, fill in the lower belly area beneath the red breast. Blend the wet edge slightly where the white meets the orange to create a soft transition. -
Top of the head:
Paint the top of the head and the back of the neck with a greyish-brown mix. I find mixing a touch of white into your brown helps it harmonize with the stone color.
Make It 3D
Add a tiny drop of dimensional fabric paint or clear gloss medium over the eye after sealing. This creates a realistic, raised glassy dome effect.
Step 3: Adding Detail and Texture
-
Wing definitions:
Once the brown base is dry, take a darker brown paint and a fine liner brush. Carefully paint thin, curved lines to separate the flight feathers on the wing and tail. -
The eye:
Paint the eye circle solid black. Once dry, add a tiny dot of white in the upper right corner of the black circle; this ‘catchlight’ brings the bird to life instantly. -
Beak details:
Paint the beak dark grey or black. Use your finest brush to keep the point sharp and distinct. -
Legs and feet:
Draw thin, dark brown lines extending from the belly to the branch for the legs. Add three small toes gripping the wood perch. -
Branch texture:
Paint the branch below the bird with a mix of browns and greys. Use loose, horizontal strokes to mimic rough bark. -
Leaf accent:
Fill in the leaf shapes with a muted olive green. Once dry, add a subtle center vein with a slightly lighter green or pencil.
Step 4: Final Touches
-
Fine outlining:
You can use a very fine black pen or marker to gently outline key areas like the wing feathers or the underside of the belly to make them pop, but keep the lines broken and organic. -
Soften the edges:
If any paint lines look too harsh, especially around the white belly, use a dry brush to feather the edges slightly. -
Sealing the work:
Allow the rock to dry for at least 24 hours. Finish by spraying a light coat of matte varnish over the surface to protect the paint without making it unnaturally glossy.
Place your little stone robin on a windowsill or garden shelf to enjoy a bit of nature indoors all year round


Swan Scene on a Flat Stone
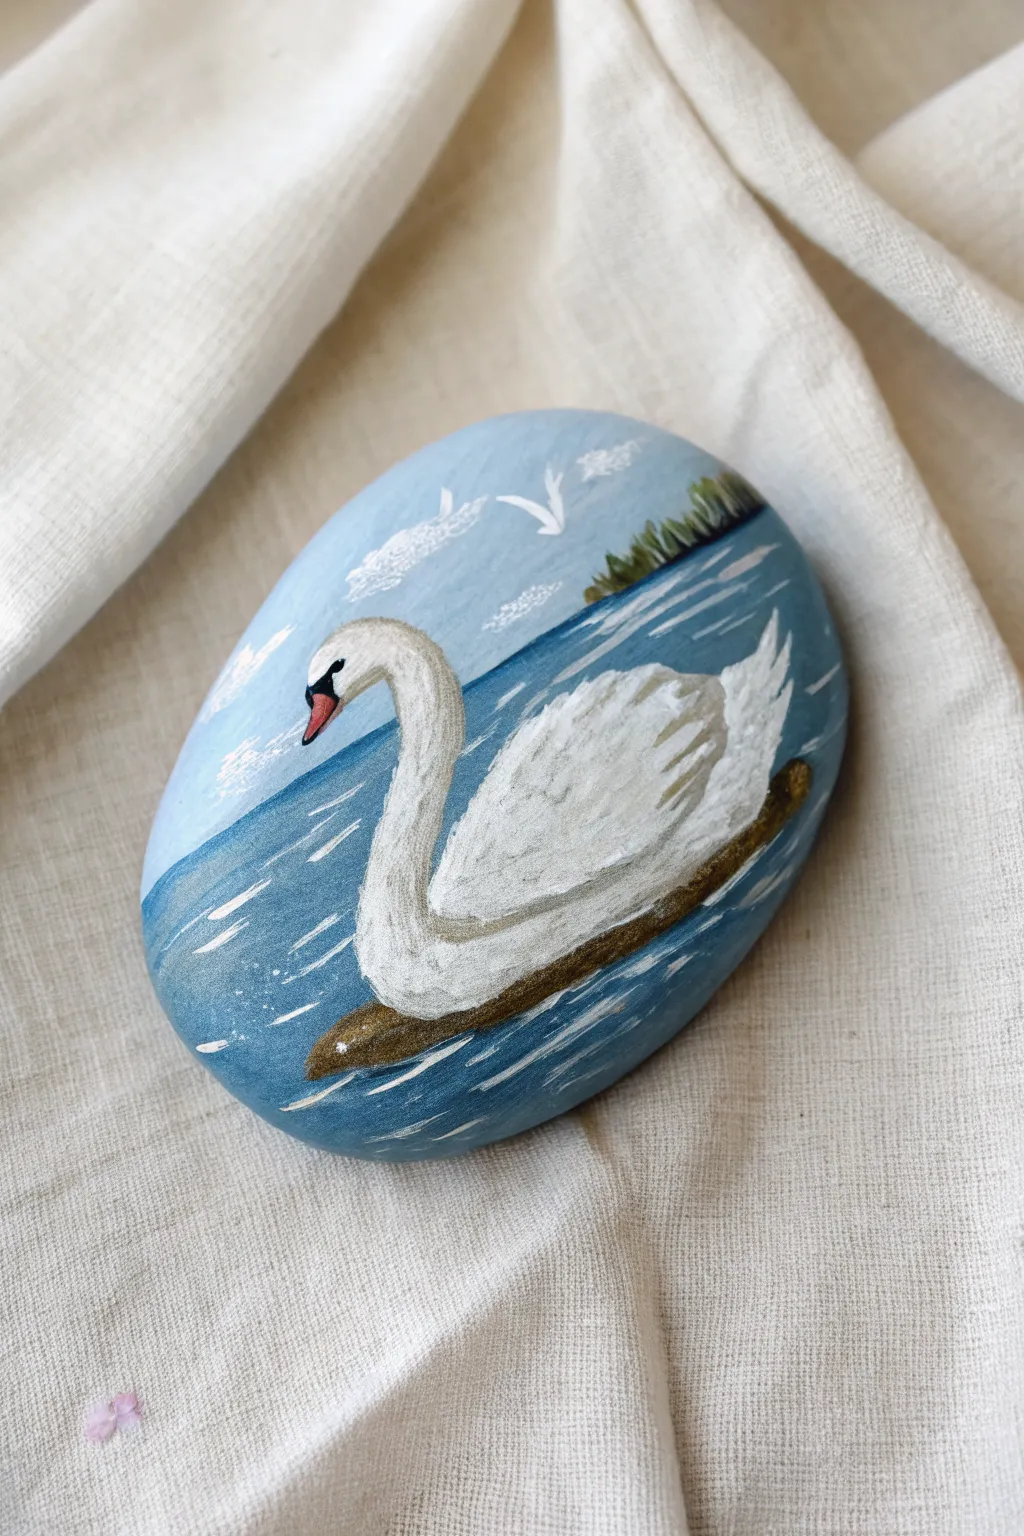
Transform a simple oval stone into a peaceful lakeside vignette featuring a majestic white swan. This project achieves a lovely sense of depth with simple color blocking and textured feather details for an elegant finish.
Step-by-Step Guide
Materials
- Smooth, oval-shaped river rock (cleaned and dried)
- Acrylic paints (Titanium White, Phthalo Blue, Ultramarine Blue, Burnt Umber, a touch of Red/Orange for the beak, Olive Green)
- Flat paintbrushes (medium size)
- Detail liner brush (size 0 or 00)
- Palette for mixing
- Water cup and paper towels
- Matte or glossy acrylic sealer (spray or brush-on)
- Pencil (optional)
Step 1: Setting the Scene
-
Clean Your Canvas:
Begin by scrubbing your rock with warm soapy water to remove any dirt or oils. Let it dry completely in the sun or with a hairdryer before painting. -
Paint the Sky Base:
Mix a very light blue using Titanium White and a tiny drop of Phthalo Blue. Using your flat brush, paint the upper two-thirds of the stone in a smooth, curved shape to represent the sky background. -
Establish the Horizon:
While the sky dries, mix a deeper blue-grey tone for the water. Paint the bottom third of the rock, overlapping slightly with the sky area to create a distinct horizon line. Don’t worry about ripples yet. -
Add Distant Shoreline:
Using the corner of your flat brush or a smaller round brush, dab a mix of Burnt Umber and Olive Green along the right side of the horizon line to create a distant, grassy shoreline. Keep the strokes vertical and short to mimic reeds or trees.
Mastering Water
Make your water look wet by adding a tiny drop of gloss medium to your blue paint, or simply paint your white ripples thinner as they get closer to the horizon line.
Step 2: Painting the Swan
-
Outline the Shape:
Once the background is dry to the touch, use a pencil or a liner brush with very diluted grey paint to lightly outline the swan’s silhouette. Focus on the ‘S’ curve of the neck and the oval body shape. -
Fill the Body Base:
Using pure Titanium White, fill in the entire swan silhouette. You may need two coats here to ensure the blue water doesn’t show through the feathers. -
Shadow the Neck:
Mix a very pale grey (white with a dot of black or brown). Gently paint the underside of the neck and the lower belly of the swan to give it rounded volume. -
Create Wing Texture:
On the main body, paint a smaller, slightly raised wing shape using a slightly darker grey-beige mix. Use short, choppy strokes to suggest layered feathers rather than a solid block of color. -
Highlight Feathers:
Reload your small brush with thick Titanium White. Paint swift, curved strokes over the top edge of the wing and the tail feathers to make them pop against the shadowed areas. -
Detail the Face:
With your finest liner brush, paint the distinctive black mask and knob at the base of the beak. Carefully extend this into the eye. -
Add the Beak Color:
Fill in the rest of the beak with a reddish-orange hue. A steady hand is key here; I sometimes rest my pinky on the table for stability.
Metallic Magic
Once the matte sealer is dry, add a touch of iridescent pearl paint over the swan’s white feathers. It catches the light just like real plumage.
Step 3: Atmosphere and Details
-
Paint the Reflection:
Mix a dark brownish-green color. Paint a horizontal, elongated shadow directly underneath the swan where it meets the water to ground the bird. -
Create Water Movement:
Using your liner brush and white paint, add thin, horizontal dashes across the blue water area. Concentrate some ripples around the swan’s base and the shoreline. -
Add Clouds:
In the sky area, dab small, fluffy cloud shapes using white paint. Keep the edges soft and irregular. -
Paint Distant Birds:
With the very tip of your liner brush, add tiny white ‘V’ shapes in the sky to represent distant seabirds flying near the clouds. -
Final Touches:
Check for any areas that need a brightness boost, perhaps adding one final highlight to the swan’s chest or the water ripples. -
Seal the Artwork:
Allow the rock to cure for at least 24 hours. Apply a spray sealer or a coat of brush-on varnish to protect your painting from scratches and weather.
Now you have a tranquil piece of nature art that captures the elegance of a swan effortlessly
BRUSH GUIDE
The Right Brush for Every Stroke
From clean lines to bold texture — master brush choice, stroke control, and essential techniques.
Explore the Full Guide
Flamingo in a Side-Profile Pose
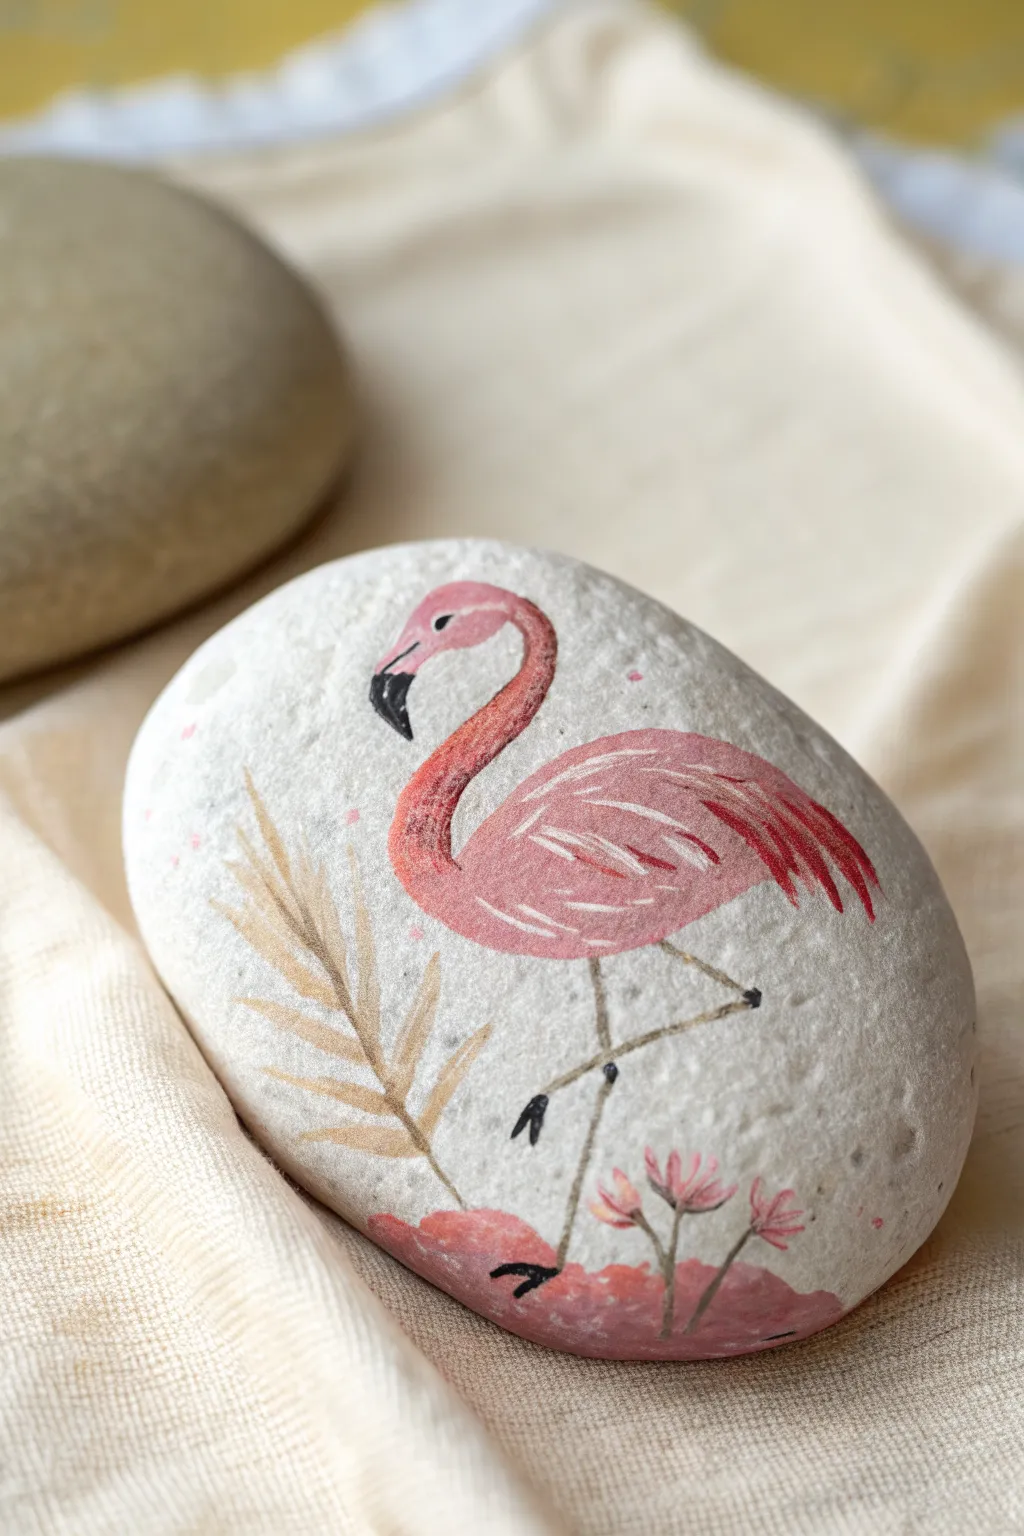
This elegant painted rock captures the grace of a flamingo in profile, featuring soft pink feathers and delicate botanical accents. The smooth white background of the stone makes the colors pop, creating a sophisticated piece of miniature art perfect for your garden or desk.
Step-by-Step
Materials
- Smooth, oval river rock (preferably white or light grey)
- White acrylic paint or gesso (for priming)
- Acrylic paints: Light pink, magenta, coral, yellow ochre, tan, black, white, and sage green
- Fine detail brushes (size 0 and 00)
- Small flat brush (size 2 or 4)
- Pencil for sketching
- Matte or satin spray sealant
- Water cup and palette
Step 1: Preparing the Canvas
-
Clean and Dry:
Begin by washing your stone thoroughly with warm soapy water to remove any dirt or oils. Let it dry completely in the sun or with a hairdryer before starting. -
Base Coat:
Even if your stone is naturally light, apply a thin coat of white acrylic paint or gesso to the surface. This creates a uniform texture and ensures your pinks will show up vibrantly. -
Sketching the Shape:
Using a light pencil, gently sketch the outline of the flamingo. Start with an oval for the body in the center, a gentle ‘S’ curve for the neck, and a small oval for the head. Mark the legs’ positions as simple lines.
Feather Flow
When painting feathers, always pull your brush stroke in the direction the feather grows—from the front of the bird toward the tail. This keeps the texture looking natural.
Step 2: Painting the Flamingo Body
-
Color Blocking:
Mix a soft, pale pink using white and a touch of magenta. Fill in the entire body, neck, and head area with this base color. Don’t worry about shading yet; just get solid coverage. -
Adding Depth:
While the base is dry, take a slightly darker coral or medium pink. paint the lower part of the neck and the underside of the body to create a rounded, 3D effect. -
Wing Definition:
Using a small flat brush and a deep magenta or reddish-pink, paint the wing shape on the side of the body. Use sweeping strokes towards the tail to mimic long feathers. -
Feather Texture:
Switch to your finest detail brush. Mix a very light baby pink (almost white). Carefully paint thin, curved lines over the wing and upper back to suggest individual feather layers. -
Tail Feathers:
At the very end of the wing, use your darkest pink or red to flick out longer, sharper lines for the tail feathers. This adds movement to the pose.
Step 3: Details and Botanicals
-
The Face:
Paint the curved beak shape. Start with white near the eye, transitioning to grey, and ending in a sharp black tip. Add a tiny black dot for the eye with a minuscule white reflection highlight. -
Legs:
Use a mix of grey and tan to paint the thin, spindly legs. One leg should be straight, and the other bent at the ‘knee’ joint. Add small black details for the feet and joints. -
Palm Frond Stem:
To the left of the bird, paint a thin, curving line using a tan or yellow ochre color. This will be the central spine of your decorative leaf. -
Leaf Blades:
Using the same tan color, quick-flick short lines outward from the spine to create a dried palm leaf look. Keep the strokes airy and tapered. -
Grounding:
Dab a mix of pink and tan loosely at the bird’s feet to create a suggestion of ground or water reflection, rather than a solid line. -
Floral Accents:
Paint three simple stems rising from the bottom right. Top them with small splashes of pink to represent budding flowers. -
Atmospheric Speckles:
Dip an old toothbrush or stiff brush in watered-down pink paint and gently flick it (splatter technique) around the bird to create magical, floating dots. I find this ties the whole composition together. -
Sealing:
Once absolutely dry (give it a few hours), spray the rock with a matte or satin sealant to protect your artwork from weathering.
Wobbly Lines?
If your thin lines for the legs are shaky, try adding a tiny drop of water to your paint. Inky consistency paint flows smoother from a liner brush than thick paint.
Place this lovely tropical stone in a potted plant to add a splash of year-round color
Hummingbird With Iridescent Highlights
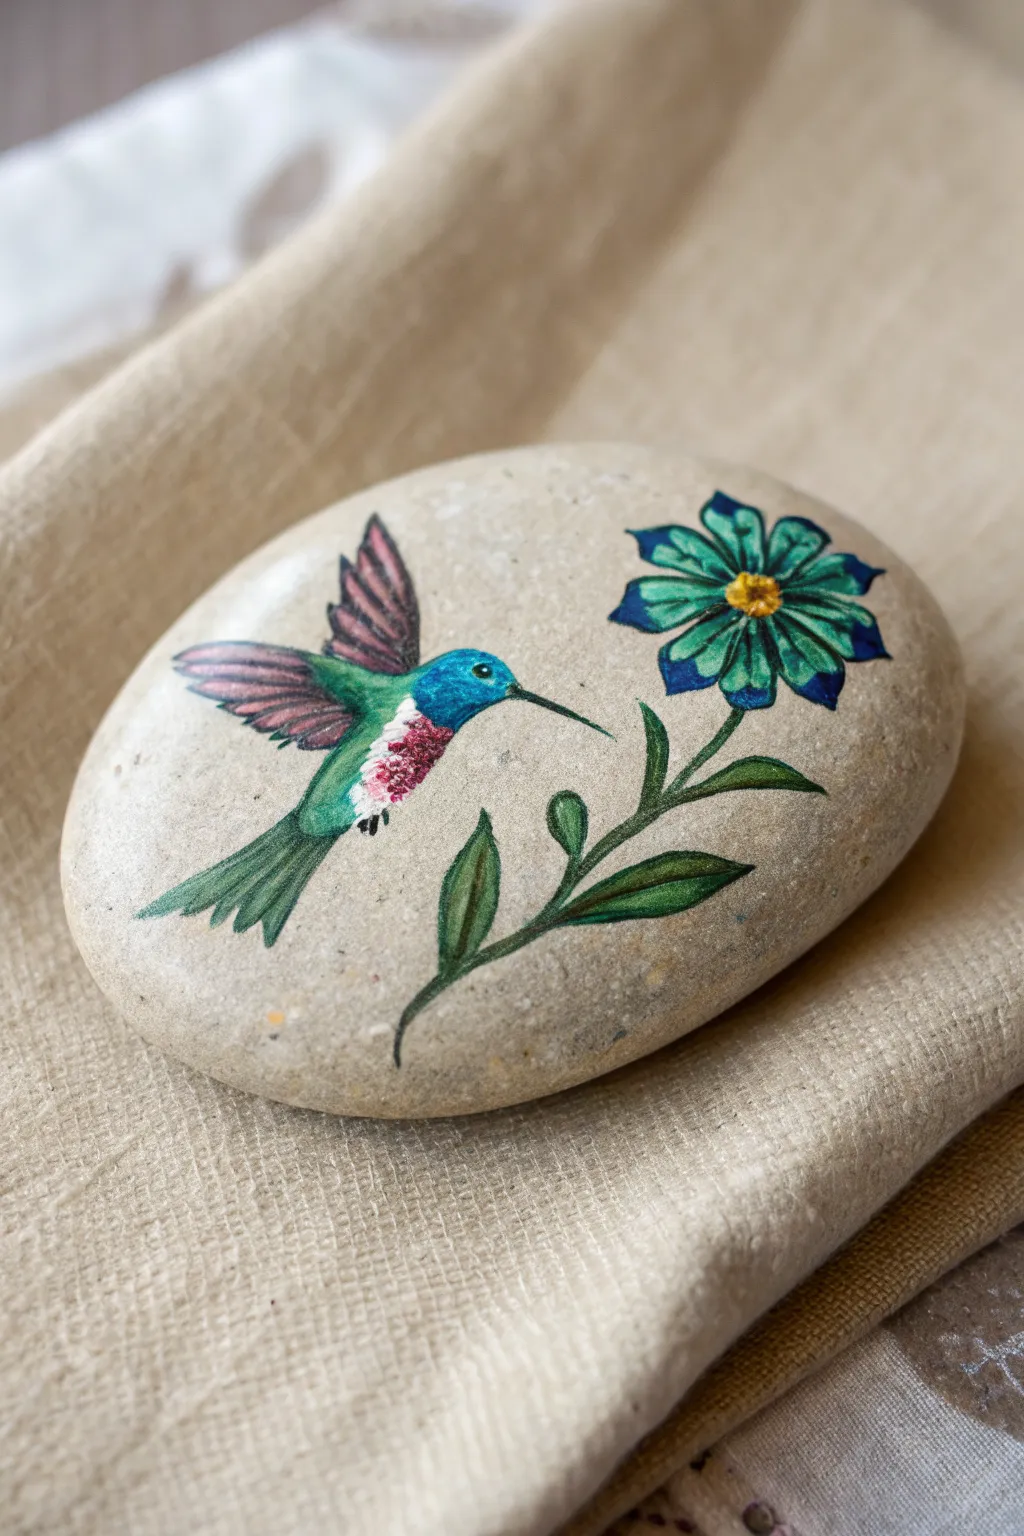
This painted rock captures the energetic beauty of a hummingbird hovering near a stylized teal flower. The natural beige stone serves as a perfect neutral background, allowing the jewel tones of the bird and the deep greens of the leaves to truly pop.
Step-by-Step Tutorial
Materials
- Smooth, oval river rock (beige or light gray)
- Acrylic paints (Titanium White, Phthalo Blue, Emerald Green, Sap Green, Magenta, Purple, Black, Yellow)
- Metallic or iridescent acrylic medium (optional)
- Small flat brush (size 2 or 4)
- Fine liner brush (size 00 or 000)
- Pencil for sketching
- Spray sealer or varnish (matte or satin finish)
- Water cup and palette
Step 1: Sketching & Base Shapes
-
Clean the canvas:
Begin by washing your rock with soapy water and drying it completely to ensure the paint adheres well to the surface. -
Outline the composition:
Using a pencil, lightly sketch the oval body of the hummingbird on the left side of the rock. -
Add wings and tail:
Draw the swept-back wings extending upward and the flared tail feathers extending downward from the body. -
Sketch the flower:
On the right side, sketch a circle for the flower center and eight distinct petals radiating outward. -
Connect the elements:
Draw a curved stem connecting the flower to the bottom of the rock, adding two simple leaves along the stem.
Step 2: Painting the Hummingbird
-
Base coat the bird:
Mix a light blue-green using Phthalo Blue and Titanium White. Paint the head and upper back of the bird. -
Define the throat:
For the gorget (throat), stipple small dots of magenta mixed with a touch of white to create a textured, fluffy appearance. -
Wing foundation:
Paint the wings with a wash of purple mixed with grey. Keep this layer somewhat translucent so we can detail it later. -
Tail feathers:
Fill in the tail feathers with Emerald Green, darkening the tips slightly with a tiny bit of black. -
Wing details:
Using your fine liner brush and black paint, draw thin lines to separate the wing feathers, adding a pinkish-purple glaze over specific feathers for iridescence. -
The beak and eye:
Paint the long, thin beak in black. Add a small black dot for the eye, followed by a tiny white highlight speck to bring it to life.
Paint drying too fast?
Rocks absorb moisture quickly. If acrylics dry too fast on the stone, dampen the rock surface slightly with a wet sponge before applying your base layers.
Step 3: Floral Details & Finishing
-
Flower base color:
Paint the flower petals with a mix of Emerald Green and Phthalo Blue for a deep teal color. -
Petal highlights:
While the petal paint is still slightly wet, blend a lighter turquoise (add white to your base mix) into the center of each petal. -
Flower center:
Dab the center of the flower with bright yellow paint. Once dry, add tiny orange or brown dots for texture. -
Stem and leaves:
Paint the stem and leaves using Sap Green. I like to add a thin line of lighter green along the top edge of the stem for a dimensional highlight. -
Sharp outlines:
Use the 000 liner brush with slightly watered-down black paint to outline the flower petals and leaves crisply. -
Final white touches:
Add tiny strokes of white on the hummingbird’s white chest patch and delicate white outlines on the flower petal tips for contrast. -
Seal the work:
Allow the rock to dry for at least 24 hours, then apply a spray varnish to protect your artwork from the elements.
Pro Tip: Iridescent Magic
Mix a drop of iridescent medium into the Magenta for the throat and the Teal for the petals. It gives a genuine shimmer when the rock catches the sunlight.
Place your finished stone in a sunny spot in the garden where the light can catch those colorful details

PENCIL GUIDE
Understanding Pencil Grades from H to B
From first sketch to finished drawing — learn pencil grades, line control, and shading techniques.
Explore the Full Guide
Folk Art Bird With Floral Patterns
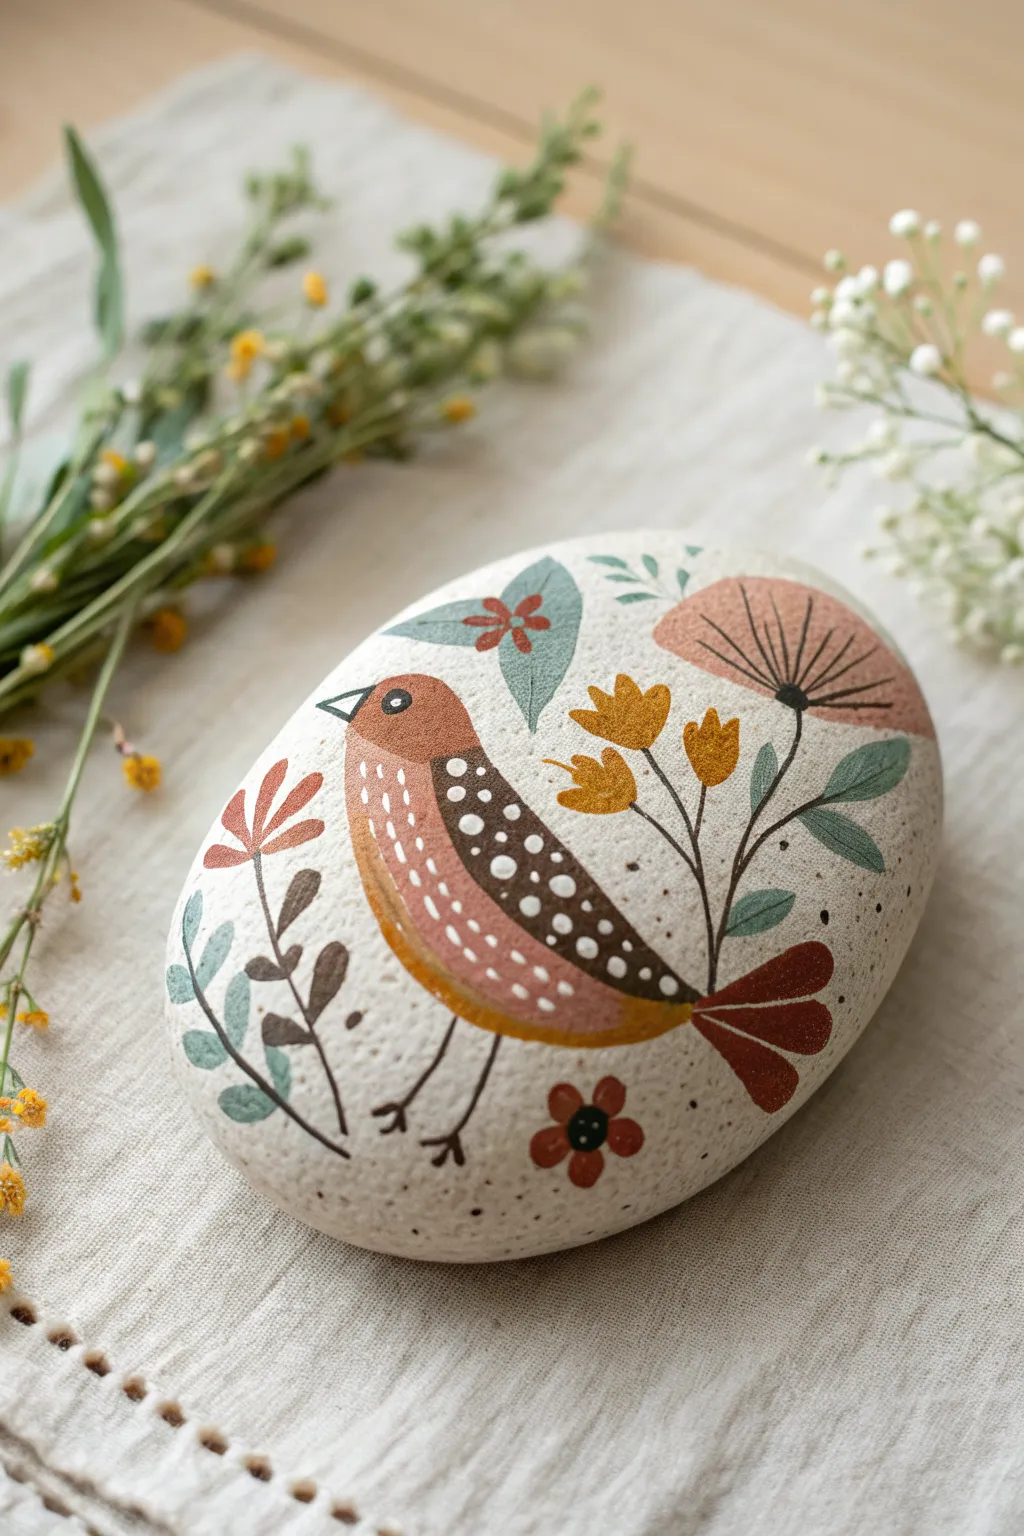
Transform a simple smooth stone into a charming piece of folk art featuring a speckled bird nestled among wildflowers. The muted, earthy color palette and playful dot details give this project a cozy, handcrafted feel that’s perfect for garden decor or a paperweight.
How-To Guide
Materials
- Smooth, oval river rock (ideally light-colored or white)
- Acrylic paints (rust red, dark brown, mustard yellow, sage green, teal blue, peach, off-white)
- Fine detail paintbrushes (sizes 0 and 00)
- Small flat brush
- Dotting tool or toothpick
- Pencil for sketching
- Matte spray sealant
Step 1: Preparation & Base shapes
-
Prepping the canvas:
Begin by washing your rock thoroughly with soap and water to remove any dirt or oils. Let it dry completely. If your rock isn’t naturally light-colored, paint a base coat of off-white or cream acrylic paint over the entire surface and allow it to dry. -
Speckling the background:
Creating that textured, stone-like look is key. Dilute a tiny amount of dark brown paint with water and flick it gently onto the rock using an old toothbrush or a stiff brush to create fine speckles. Let this dry before moving on. -
Sketching the layout:
Lightly sketch the bird’s outline in the center of the rock with a pencil. Draw a simple teardrop shape for the body, adding a smaller curved shape for the wing and a fanned tail at the back. Sketch the surrounding leaves and flowers loosely to plan their placement. -
Base coating the bird:
Mix a warm rust-red color and fill in the head and upper back of the bird. For the bird’s chest and belly, use a soft peach or light terracotta shade, blending slighty where it meets the rust color for a natural transition. -
Painting the wing:
Paint the wing shape a deep, dark brown. Ensure the edges are crisp against the lighter body colors. I like to apply two thin coats here to ensure the dark color is solid and opaque.
Clean Lines Trick
If your hand shakes on fine lines like the legs, rest your pinky finger on the dry part of the rock for stability while painting. It works like a kickstand for your hand.
Step 2: Floral Elements
-
Adding main flowers:
Paint the large semi-circle flower shape on the right side using a muted pink or dusty rose color. Then, paint the three tulip-shaped blooms near the bird’s chest in a mustard yellow tone. -
Painting leaves:
Using sage green and a liner brush, paint the stems connecting the flowers. Add leaves to the stems in varying shades of green—use a teal-blue for the large leaf above the bird and a classic sage for the others to create visual interest. -
Adding secondary foliage:
On the left side of the rock, paint the curving vine with small leaves. Alternate the leaf colors between teal and sage green to balance the composition. Add the small red flower near the bottom right. -
Refining floral details:
Once the large pink flower is dry, use a very fine brush and dark brown paint to add the radiating lines and the central stem details. This gives it that dandelion-puff look typical of folk art.
Vintage Patina
To age your rock, lightly sponge a very diluted wash of raw umber paint over the edges after everything is dry but before sealing. It adds an antique look.
Step 3: Details & Finishing Touches
-
Wing decoration:
Dip your dotting tool or the non-brush end of a paintbrush into off-white paint. Carefully place rows of dots along the dark brown wing. Make the dots larger at the top and gradually smaller towards the tip to follow the curve. -
Body details:
Add fine white dashes or small strokes to the rust-colored head and the peach belly of the bird. These tiny marks mimic feathers and add texture to the flat colors. -
Facial features:
Paint a small white circle for the eye, and once dry, add a tiny black dot in the center. Use a small liner brush to paint the beak in dark grey or black, keeping the lines sharp. -
Legs and tail:
Paint the tail feathers in a deep red or rust color, adding a central line in a lighter shade if desired. Using fine black or dark brown lines, draw the thin stick legs and feet beneath the bird. -
Final background accents:
Look at the empty spaces around your bird. Add small standalone leaves, tiny red accent marks, or stray dots to balance the composition without overcrowding it. -
Sealing the art:
Allow the rock to dry for at least 24 hours to ensure all layers are set. Finish by spraying a matte clear coat over the rock to protect your artwork from chipping and weather.
Place your finished folk art stone on a sunny windowsill or gift it to a friend who loves nature.
Mandala Feather Bird on a Smooth Stone
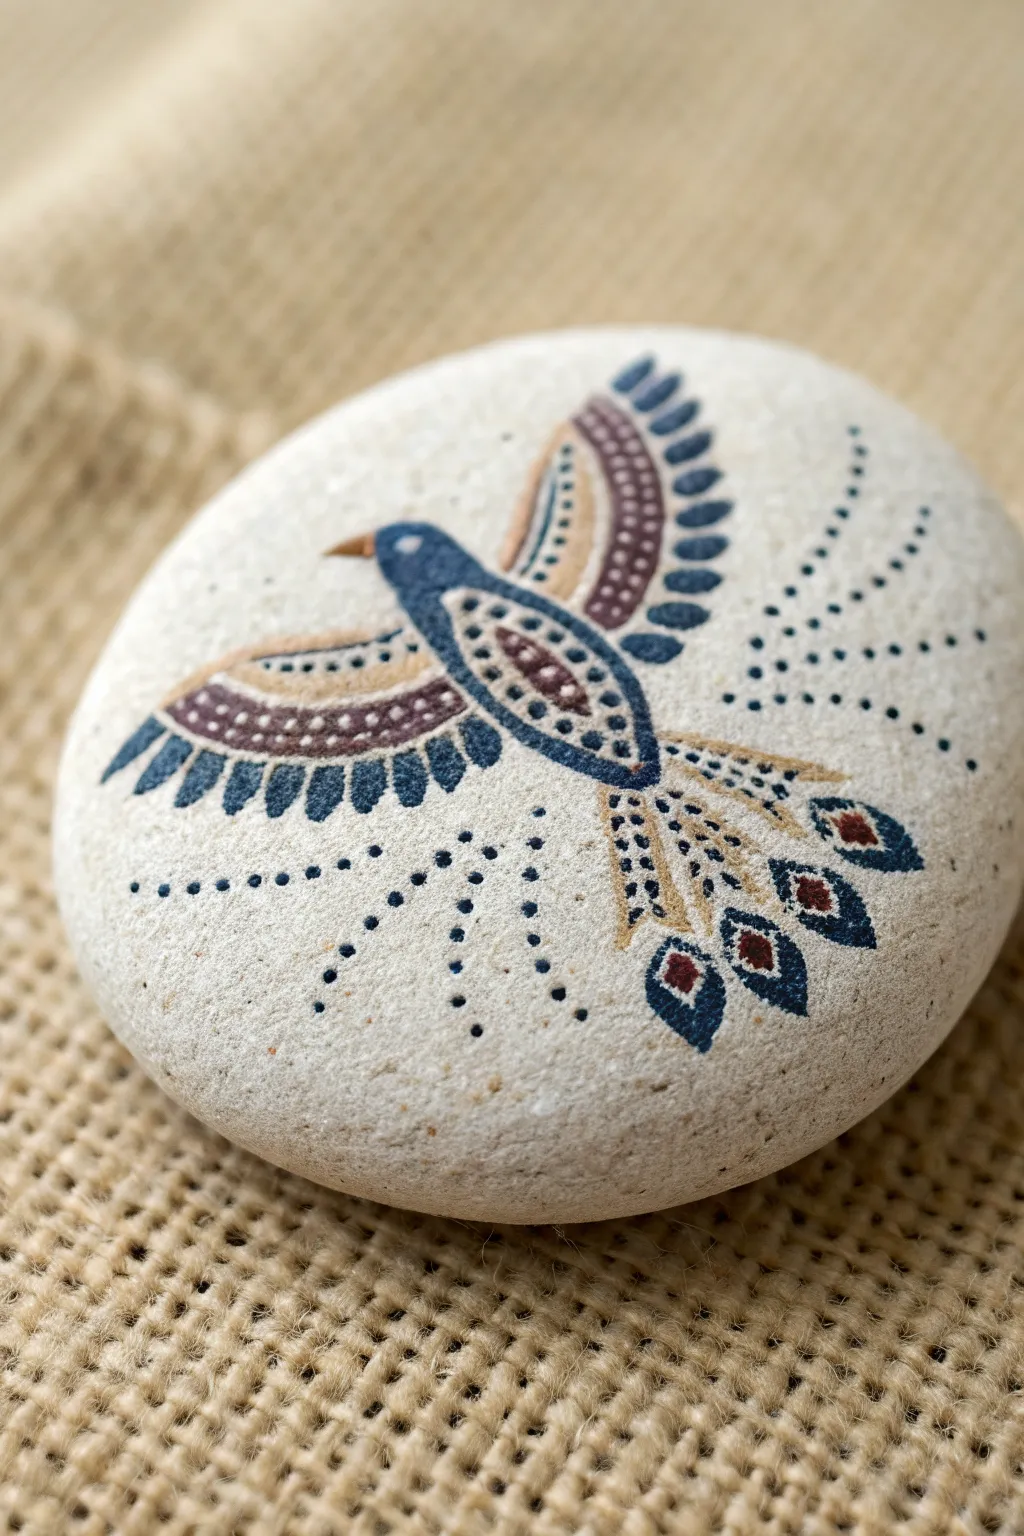
Capture the graceful spirit of a flying bird using delicate mandala-inspired dots and geometric patterns. The muted palette of navy blue, soft tan, and maroon against the natural off-white stone creates an organic, folk-art aesthetic that feels both calm and uplifting.
Step-by-Step
Materials
- Smooth, round river stone (light-colored like limestone or white marble)
- Pencil (HB or lighter) and eraser
- Acrylic paints: Navy blue, maroon/burgundy, beige/tan, white
- Fine detail brushes (sizes 000, 0, and 1)
- Dotting tools (various small sizes) or toothpicks
- Matte or satin varnish spray
- Palette for mixing
Step 1: Sketching the Form
-
Clean your canvas:
Begin by washing your stone with soap and water to remove any dust or oils that might prevent the paint from adhering. Let it dry completely. -
Outline the body:
Using a light pencil, sketch a simple teardrop shape for the bird’s body in the center of the stone. The pointy end should face downwards for the tail. -
Add the wings:
Draw two long, curved wings extending from the upper sides of the body. Aim for symmetry, curving them slightly upward like a bird in mid-flight. -
Define the tail:
Sketch a fan-shaped tail extending from the bottom of the body. Divide it lightly into four or five feather sections.
Paint Consistency Check
If your fine lines are breaking or looking scratchy, your paint is too thick. Mix in water one drop at a time until it reaches an inky consistency that flows smoothly from the liner brush.
Step 2: Painting the Base Layers
-
Fill the silhouette:
Load a size 1 brush with navy blue paint mixed with a tiny drop of water for flow. Carefully outline the entire bird shape first. -
Color blocking the body:
Paint the head and the outer edges of the body in solid navy blue. Leave the central chest area empty for now, as we will fill it with pattern work. -
Wing structural lines:
Paint the upper edge and lower tips of the wings in navy blue. For the middle sections of the wings, paint curved bands in maroon and beige, following the arc of the wing. -
Tail feather base:
Outline the individual tail feathers with thin navy lines. Fill the very tips with decorative teardrop shapes in navy blue, leaving the centers open.
Stabilize Your Hand
For steady lines on a curved surface, rest your painting hand’s pinky finger directly on the stone or table to anchor your movement while working.
Step 3: Detailing with Patterns
-
Body embellishment:
In the unpainted chest area, paint a smaller internal teardrop shape using beige. Once dry, add a maroon stripe down its center. -
Wing dots:
Using your smallest dotting tool or a toothpick, add rows of tiny white or beige dots along the maroon bands on the wings. This creates that intricate mandala look. -
Feather textures:
On the beige sections of the wings, paint thin, parallel lines in navy blue to simulate feather barbs. -
Tail decoration:
Inside the navy teardrops on the tail tips, paint smaller maroon oval shapes. Add a single beige dot above each one. -
Main body dots:
Along the central maroon stripe on the chest, place a vertical line of graduating white dots, starting larger at the top and getting smaller toward the tail.
Step 4: Final Flourishes
-
The beak and eye:
Using a size 000 brush, paint a tiny triangular beak in beige or gold. Add a small white dot for the eye on the navy head area to bring the bird to life. -
Flight trails:
Dip a fine dotting tool into navy blue paint. Create curved lines of dots trailing behind the wings and tail to suggest movement through the air. -
Dot gradation:
Make the dots closest to the bird slightly larger, and decrease the pressure to make them smaller as the lines trail away into empty space. -
Clean up:
If any pencil marks are still visible around the edges, gently erase them once you are absolutely sure the paint is 100% dry. -
Sealing:
Protect your delicate dot work with a coat of matte or satin spray varnish. I prefer matte for this style to keep the natural stone look.
Finish by finding a bright spot to display your stone, where the natural hues can complement your home decor


Songbird Silhouette at Sunset

Capture the peaceful moment of a songbird resting at dusk with this vibrant painted rock design. The smooth gradient background transitions from warm oranges to deep purples, creating a stunning backdrop for a crisp black silhouette.
How-To Guide
Materials
- Smooth, round river rock (light-colored works best)
- Acrylic paints: Orange, Crimson/Deep Pink, Dark Violet, Titanium White, Black
- Makeup sponge or small crafting sponge
- Fine liner brush (size 0 or 00)
- Small flat brush
- Dotting tool or toothpick
- Clear acrylic sealant spray (matte or glossy)
Step 1: Creating the Sunset Gradient
-
Clean Your Canvas:
Begin by washing your stone with soap and water to remove any dirt or oils. Let it dry completely so the paint adheres properly. -
Base Coat:
Apply a layer of white acrylic paint over the entire top surface of the rock. This primes the stone and ensures your sunset colors will pop rather than looking dull against the natural gray. -
Prepare the Sponge:
Dampen your makeup sponge slightly and squeeze out excess water. This helps blend the acrylics smoothly without absorbing too much paint. -
Apply the Base Colors:
Squeeze out stripes of your sunset colors onto a palette: orange at the bottom, deep pink in the middle, and violet at the top. Dab the sponge into the orange first and sponge it onto the bottom third of the rock. -
Blend the Middle:
Without cleaning the sponge entirely, pick up the pink paint. Sponge the middle section, overlapping the orange slightly to create a soft, peachy transition where they meet. -
Finish with Violet:
Pick up the violet paint and sponge the top third of the stone. Blend it down into the pink layer. Keep tapping the sponge gently up and down the transition lines until the gradient looks seamless. Let this background dry completely.
Step 2: Painting the Silhouette
-
Sketch the Branch:
Use a very thin liner brush loaded with black paint. Start from the bottom left side and pull a curved line diagonally upwards toward the right to create the main branch. -
Add Twigs:
Paint smaller, thinner offshoot branches extending from the main one. Vary their lengths and angles to make the tree look natural and organic. -
Outline the Bird:
I find it helpful to lightly sketch the bird shape with a pencil first if you are nervous. Using the liner brush and black paint, outline a simple bird shape perching on the main branch, ensuring it faces towards the right. -
Fill the Silhouette:
Carefully fill in the bird’s body with solid black paint. Use the very tip of your brush to define a small, sharp beak. -
Paint the legs:
Add two tiny, thin lines connecting the bird’s body to the branch to represent its legs. -
Paint the Foreground Grass:
At the very bottom edge of the rock, paint a solid black undulating line for ground. Use short, upward flicking strokes to create blades of grass silhouetted against the bright orange sunset.
Gradient Smoothness
Work quickly while the paint is still wet to get the best blend. If the sponge starts lifting paint, wait for it to dry and do a second layer.
Step 3: Adding Celestial Details
-
Create Tiny Stars:
Dip a toothpick or a small dotting tool into white paint. Gently dot random stars across the purple and pink sections of the sky. Vary the pressure to create different sized dots. -
Add Larger Stars:
Select a few spots for brighter stars. Paint tiny ‘plus’ signs or 5-point asterisks using your finest brush and white paint to mimic twinkling starlight. -
Paint a Black Star:
For contrast, paint a single five-pointed black star in the lower right pink section, floating just above the grass line. -
Add Final Accents:
If you have a gold or yellow paint pen or fine brush, add one or two tiny yellow stars for a hint of magic. -
Seal the Artwork:
Once the paint is absolutely dry (give it at least an hour), take the rock outside and spray it with a clear acrylic sealer to protect your beautiful sunset scene from chipping.
Glow in the Dark
Use glow-in-the-dark acrylic paint for the white stars! Your rock will absorb light during the day and the sky will twinkle at night.
Place this serene stone in a planter or on a windowsill to enjoy a permanent sunset view.
Perched Bird Pebbles on a Twig Stand
Transform smooth river stones into a charming aviary with these delicately painted bird portraits. Arranged on a piece of driftwood, this display captures the quiet beauty of songbirds perched in a row, making a perfect rustic centerpiece.
Step-by-Step Tutorial
Materials
- 5 smooth, oval river rocks (approx. 2-3 inches)
- Acrylic paints (White, Black, Burnt Sienna, Payne’s Gray, Cerulean Blue, Cadmium Red, Ochre)
- Fine detail brushes (sizes 0, 00, and 1)
- Pencil for sketching
- Matte spray varnish or sealer
- Piece of driftwood or weathered branch
- Large wood slice (base)
- Super glue or strong craft adhesive (E6000)
- Dried grass or wheat stems for styling (optional)
Step 1: Preparing the Canvas
-
Clean and Prep:
Begin by scrubbing your five river rocks with warm soapy water to remove any dirt or oils. Let them dry completely, as moisture will prevent the paint from adhering properly. -
Base Coating:
Assess your rocks. For the brighter birds like the robin and chickadee, paint a layer of white acrylic over the entire surface to make the colors pop. For the bluebird and tanager, you might prefer leaving the natural grey stone background or applying a very light grey wash. -
Sketching the Outline:
Using a pencil, lightly sketch the outline of a simple bird shape on each rock. Focus on the oval body, the angle of the tail, and the small triangular beak. Don’t press too hard, or the graphite will smudge into your paint.
Step 2: Painting the Birds
-
Blocking in Color:
Start with the main body colors. For the robin, paint an orange-red breast and a brown back. For the bluebird, block in a soft blue head and wings. Apply the colors flatly at first; we will add texture later. -
Adding the Thrush:
For the specked bird (second from left), mix a cream color using white and a touch of ochre. Paint the entire body, then let it dry before dabbing small brown specks on the breast and adding dark grey wings. -
Defining the Chickadee:
On the white-based rock, paint the distinctive black cap and bib of the chickadee. Use a very fine brush to feather the edges of the black into any white areas to mimic soft downy feathers. -
Layering Feathers:
Once your base blocks are dry, mix a slightly darker shade of your main colors. Use your smallest brush (size 00) to paint short, thin strokes on the wings and tails to suggest individual feathers. -
Painting the Cardinal:
For the red bird on the far right, apply a vibrant Cadmium Red layer. Since red can be translucent, I find it often needs a second coat to look solid against a grey rock. -
Facial Details:
Carefully paint the beaks using black or dark grey. Add a tiny black dot for the eye on each bird. To make them look alive, add a microscopic dot of white paint inside the black eye for a reflection highlight.
Natural Speckling
To mimic eggshells on the background rock (like the thrush), load an old toothbrush with thinned brown paint and flick the bristles for random, organic splatter.
Step 3: The Final Touches
-
Adding the Branch:
Paint a thin, brown branch underneath each bird so it looks like they are perching. Extend the branch slightly off the ‘edge’ of the bird painting to ground it visually on the rock. -
Outlining:
Mix a watery black or dark brown paint (inky consistency). Using your finest liner brush, outline the main shapes of the birds and the branches very loosely to give them an illustrative, sketchbook style. -
Sealing:
Once the paint is fully cured (give it a few hours), spray the rocks with a matte varnish. A glossy finish tends to look artificial here, so matte is best for a natural stone look. -
Assembling the Stand:
Plan the arrangement of your rocks on the piece of driftwood. Test how they balance before gluing. You want them angled slightly upward so the birds ‘look’ at the viewer. -
Securing the Birds:
Apply a dab of strong adhesive or E6000 to the bottom of each rock and press it firmly onto the driftwood branch. Hold each one for a minute to ensure the bond sets. -
Final Composition:
Place the driftwood branch onto your large wood slice base. You can glue the branch down if you want a permanent sculpture, or leave it loose to rearrange later.
Unsteady Hands?
If painting fine outlines is difficult with a brush, use an ultra-fine tip black or brown waterproof aesthetic marker (like a Micron pen) over the dry acrylic.
Place your finished flock on a shelf or mantle where the natural light highlights the subtle details of your handiwork
Nest Theme With Egg Stones and a Parent Bird
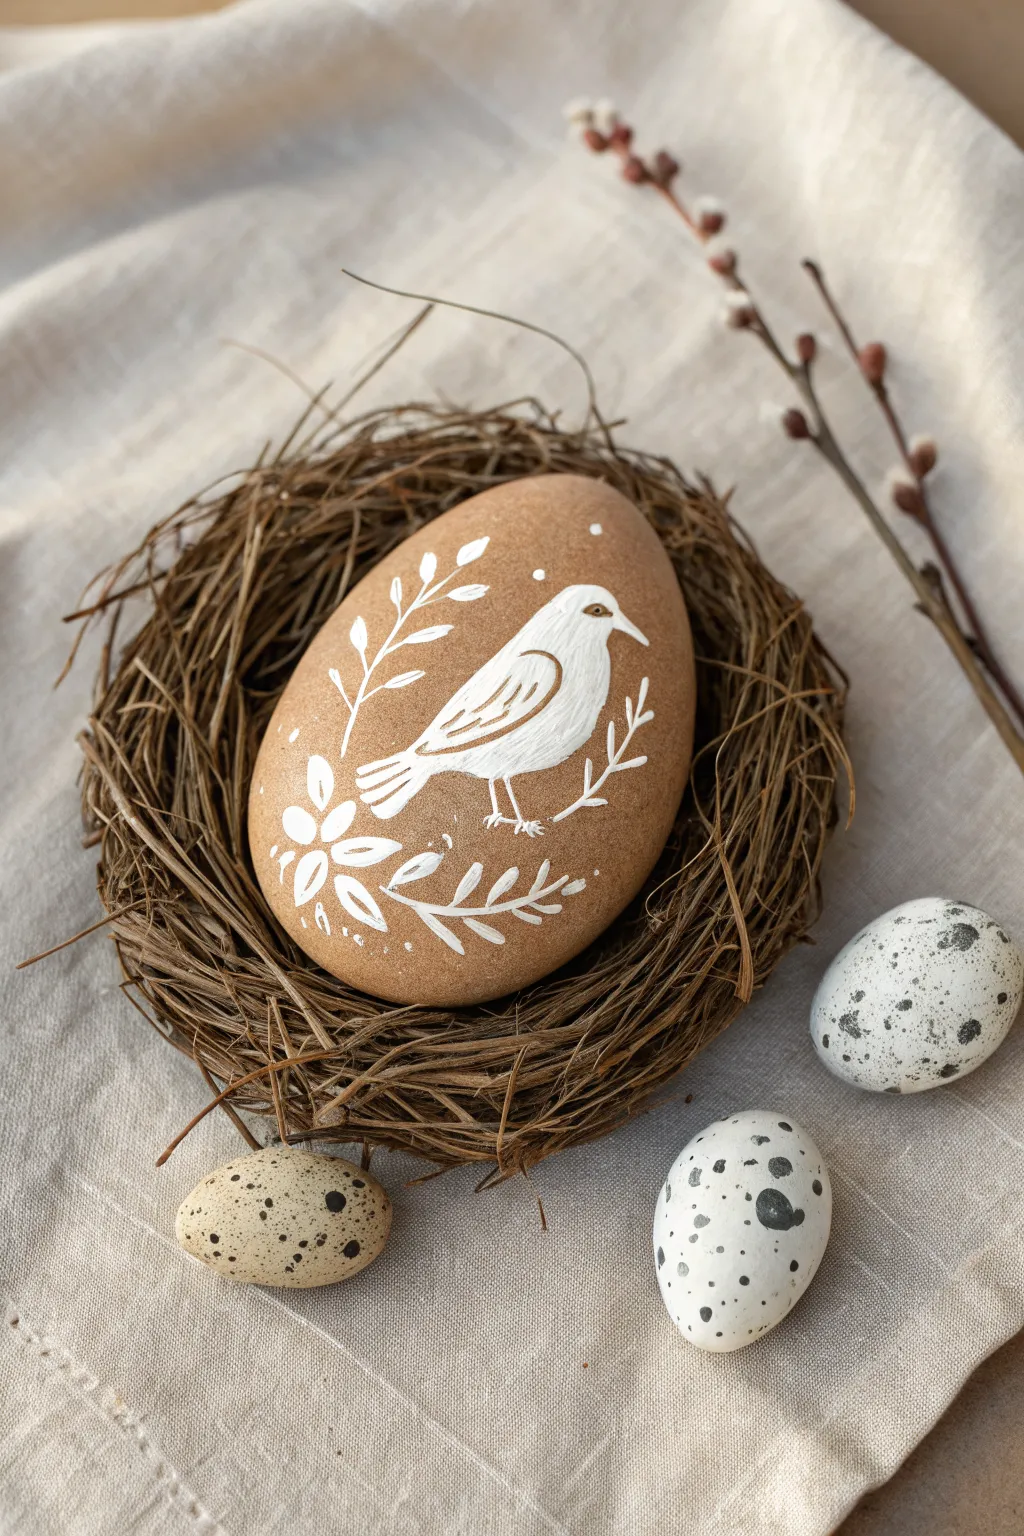
Bring sophisticated simplicity to your rock painting with this charming nesting scene featuring a delicate white bird and floral motifs. The natural brown background of the stone creates a perfect canvas for the stark white linework, evoking a peaceful, rustic aesthetic.
Detailed Instructions
Materials
- Smooth, oval-shaped river rock (tan or light brown color)
- White acrylic paint (high opacity)
- Fine detail paintbrush (size 0 or 00)
- Very fine liner brush (size 10/0 or 20/0)
- Pencil for sketching
- Small twig wreath or craft nest
- Three smaller pebbles or mini wooden eggs
- Black and grey acrylic paint (for speckling)
- Matte varnish or sealant
- Old toothbrush (optional for speckling)
Step 1: Preparation and Sketching
-
Select the perfect canvas:
Choose a smooth, oval stone that naturally resembles a large egg in shape. Wash it thoroughly with soap and water to remove any dirt or oils, then let it dry completely. -
Assess the surface color:
If your stone isn’t naturally the warm tan color shown, mix a base coat of brown, ochre, and a touch of white acrylic paint. Apply this evenly over the entire stone and let it dry. -
Lightly sketch the design:
Using a pencil, very faintly outline the shape of the bird in the center. Draw a simple teardrop shape for the body and a small circle for the head, connecting them with a curved neck. -
Map the foliage:
Sketch curving lines extending from below and behind the bird to represent the stems. Add small placement marks where the leaves and flowers will go, ensuring the composition feels balanced.
Step 2: Painting the Bird
-
Paint the body silhouette:
Load your fine detail brush with white acrylic paint. Fill in the main body of the bird, carefully following your pencil lines. You may need two thin coats to get a solid, opaque white. -
Define the wing:
Once the body is dry, use the very fine liner brush to paint the wing detail. Instead of filling it in completely, paint a loop shape carrying the outline of the wing, leaving the center or lines within it the color of the stone. -
Add wing details:
Inside the wing shape, paint two or three very thin, short strokes to suggest feathers. Keep these lines delicate so they don’t overpower the design. -
Create the tail feathers:
Extend lines from the back of the wing/body area downwards to create the tail. Use three or four distinct strokes that fan out slightly at the ends. -
Face and beak features:
Paint a small, sharp triangle for the beak. For the eye, leave a tiny negative space unpainted if you have a steady hand, or paint the head solid white and add a tiny brown dot later. -
Paint the legs:
Using your thinnest liner brush, paint two very dainty legs extending from the bottom of the bird. Add tiny claws at the feet to ‘grip’ the imaginary branch.
Pro Tip: Sharp Lines
If your white paint is too thick, adds a tiny drop of water. Ink-consistency paint flows better from liner brushes, giving you crisper edges on the leaves and bird beak.
Step 3: Painting the Foliage
-
Stem structure:
Go back to your foliage sketches. Paint thin, flowing white lines for the main stems, curving them around the bird to frame it. -
Adding leaves:
Along the stems, paint small, simple leaf shapes. I find that pressing the brush down and lifting quickly creates a nice tapered leaf look without too much fuss. -
Flower details:
Paint the flower at the bottom left. Start with a central dot (or negative space) and paint 5-6 petals radiating outward. Keep the petals simple and slightly rounded. -
Decorative dots:
Add tiny white dots randomly around the bird and near the tips of the branches to add whimsy and fill empty space.
Troubleshooting: Shaky Hands
Struggling with the thin legs or stems? rest your pinky finger on the stone surface to stabilize your hand while painting the finest details.
Step 4: Creating the Speckled & Nest Elements
-
Prepare the smaller eggs:
Take your three smaller pebbles. Paint two of them white and one a sandy beige color. Let them dry completely. -
Mix the splatter paint:
Water down a small amount of black or dark grey acrylic paint until it is the consistency of ink. -
Apply speckles:
Dip an old toothbrush or stiff brush into the watery paint. Run your thumb over the bristles to flick tiny specks onto the smaller stones. Vary the pressure to get different sized dots. -
Add larger spots:
Use a detail brush to manually add a few larger, irregular dark spots on the small eggs to make them look more realistic. -
Seal the project:
Once all paint is bone dry on both the main bird stone and the small eggs, apply a coat of matte varnish. This protects the paint while keeping the natural, non-glossy look. -
Final assembly:
Place your large bird stone in the center of the twig nest and arrange the three speckled stones around it to complete the scene.
Now you have a serene nature-inspired centerpiece that captures the gentle beauty of spring nesting season
Peacock Rock With Metallic Accent Feathers
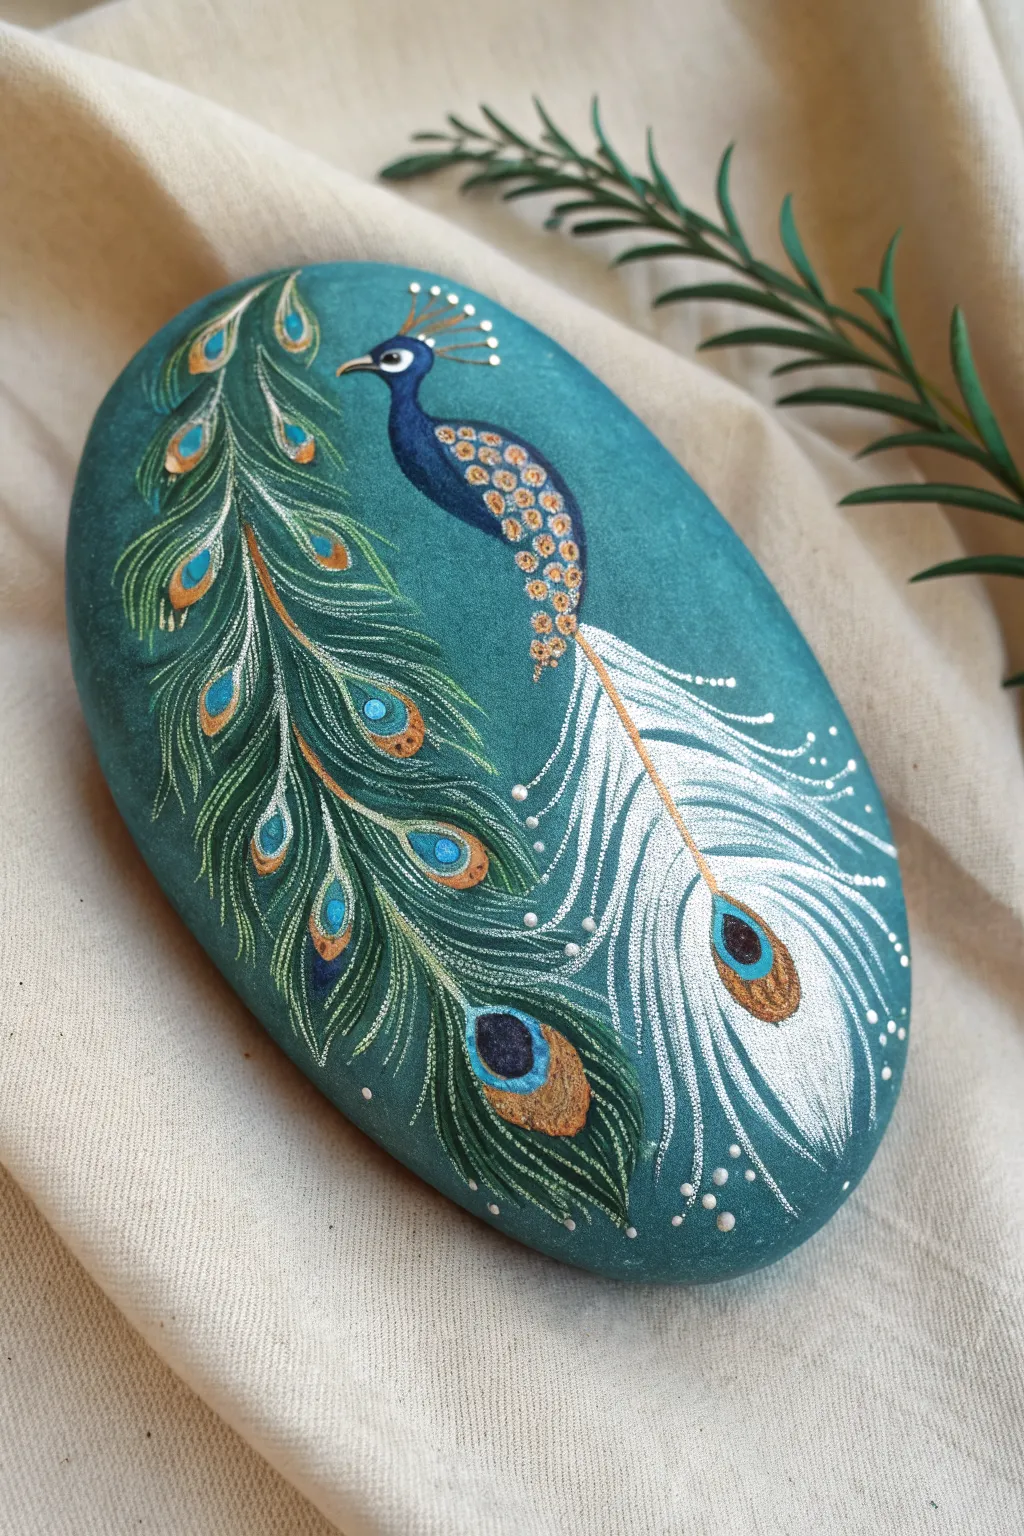
Transform a simple smooth stone into a work of art with this elegant peacock design featuring shimmering metallic accents and intricate feather details. The rich teal background provides the perfect contrast for the striking white and gold plumage.
Step-by-Step
Materials
- Smooth, oval river rock (medium to large size)
- Acrylic paints: Teal/Turquoise, Phthalo Blue, White, Black, Metallic Gold, Metallic Bronze, Metallic Copper
- Flat brush (approx. size 6 or 8) for the base coat
- Fine liner brush (size 0 or 00) for details
- Small round brush (size 2)
- Dotting tools (various sizes)
- Gloss varnish or resin sealer
- Clean water and paper towels
- Pencil for sketching (optional)
Step 1: Base Coat and Sketching
-
Prepare surface:
Scrub your rock clean with soap and water to remove any dirt or oils, then let it dry completely before beginning paintings. -
Apply background:
Using a flat brush, cover the entire top surface of the stone with a smooth coat of teal or turquoise acrylic paint. You may need two coats to ensure opacity; let each layer dry fully. -
Sketch the outline:
Once the teal base is bone dry, use a pencil to lightly sketch the curve of the peacock’s neck, the oval body shape, and the sweeping arcs for the long tail feathers.
Brush Technique Tip
For the wispiest feather lines, thin your paint slightly with water until it’s inky. This helps the paint flow smoothly off the liner brush for long, continuous strokes.
Step 2: Painting the Body
-
Block in the bird:
Use a small round brush and Phthalo (dark) Blue to paint the head, neck, and main body shape. Keep the beak area unpainted for now. -
Add the wing:
Mix a small amount of metallic bronze with a tiny dot of blue. Paint an almond-shaped wing overlaid on the body. -
Wing details:
Using a very fine dotting tool or the tip of a toothpick, add tiny dots of pure metallic gold inside the wing area to simulate texture. -
Face features:
Paint a small white patch on the face area. Once dry, add a tiny black dot for the eye within the white patch. -
Paint the beak:
With your finest brush, paint a sharp, curved beak using metallic gold or bronze.
Add Jeweled Texture
Use 3D fabric paint or ‘Liquid Pearls’ for the gold dots on the wing and crest. This adds actual physical texture you can feel when handled.
Step 3: Creating the Tail Feathers
-
Layout the main quill:
Using a liner brush and white paint, draw the long, central curved line extending from the bird down the left side of the rock. This acts as the spine for the main feather. -
Green feather barbs:
Mix a dark green (or mix teal with a little black). Using quick, flicking strokes with your liner brush, pull lines outward from that white spine to create the fluffy barbs of the feather. -
Highlighting the barbs:
Go back over some of the green barbs with very thin strokes of lighter metallic mint or pale gold to add dimension and shimmer. -
Secondary white feather:
Draw a second, shorter feather structure curving to the right using pure white paint. Use the same flicking motion to create soft, wispy barbs that look delicate against the teal. -
Gold accents:
Paint a thin gold line down the center of the white feather for a touch of elegance.
Step 4: Refining the Eyespots
-
Base shapes:
Along the main green feather and at the bottom tip, paint teardrop shapes using metallic copper or bronze. -
Inner color:
Inside each bronze teardrop, paint a smaller oval of bright light blue or turquoise. -
Centers:
Place a dark blue or black dot in the center of the light blue ovals to complete the classic peacock ‘eye’ look. -
Detailing the crest:
Above the peacock’s head, paint 5-6 tiny white lines radiating outward. Top each line with a minuscule dot of gold or white using your smallest dotting tool. -
Atmospheric dots:
I like to finish by adding scattered white dots of varying sizes around the white feather area to create a magical, sparkling effect. -
Seal the artwork:
Allow the rock to dry for at least 24 hours. Apply a layer of clear gloss varnish or resin to protect the paint and make the metallic colors pop.
Display your finished peacock stone on a desk or shelf where the light can catch those beautiful metallic details
Night Raven Rock With Galaxy Background
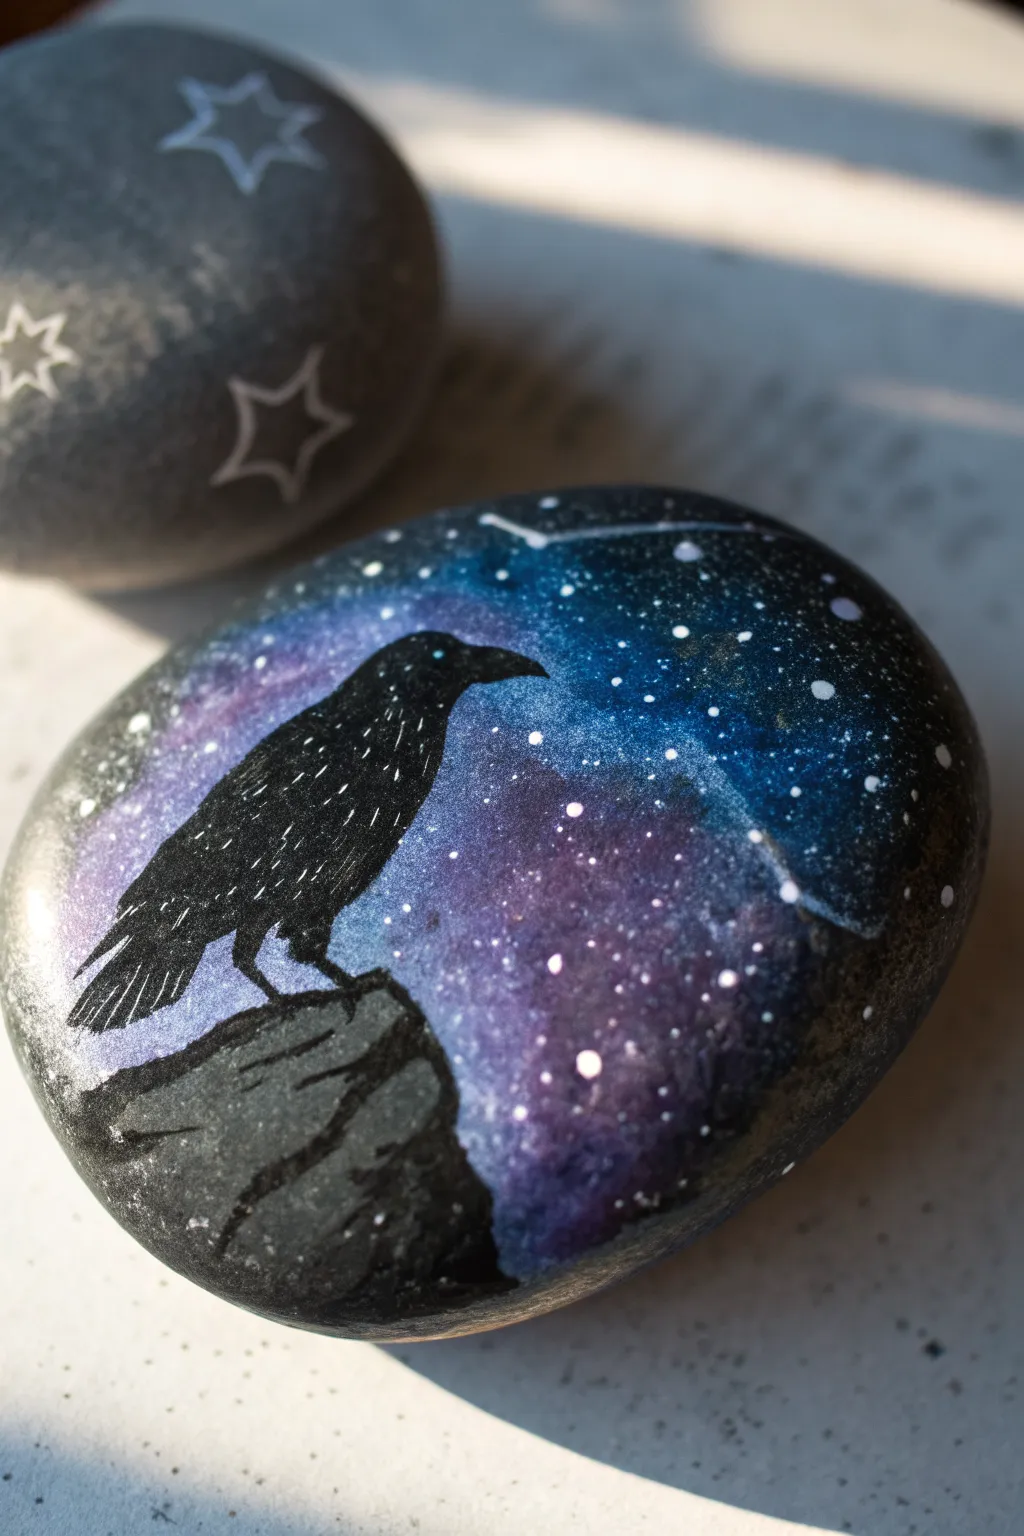
Capture the mystic beauty of a raven watching over the universe with this stunning galaxy rock painting. The deep blues and purples create a moody backdrop for the sharp silhouette, making it a perfect piece for nature lovers and stargazers alike.
How-To Guide
Materials
- Smooth, round river rock (approx. palm-sized)
- Black acrylic paint (or Posca paint pen)
- White acrylic paint (or extra fine Posca pen)
- Acrylic paints: Navy blue, deep purple, teal/turquoise, magenta
- Small painting sponge or makeup sponge wedges
- Fine detail paintbrush (size 0 or 00)
- Flat shader brush
- Old toothbrush (optional for stars)
- Sealer (spray varnish or brush-on gloss)
Step 1: Setting the Night Sky
-
Clean Slate:
Begin by washing your stone with warm soapy water to remove any dirt or oils. Let it dry completely before starting to ensure the paint adheres properly. -
Base Coat:
Paint the entire surface of the rock with a solid layer of black acrylic paint. This acts as a primer and gives your galaxy background depth. Allow this to dry fully. -
Sponge Dabbing:
Dip a small piece of sponge into navy blue paint. Dab off the excess on a paper towel, then lightly sponge cloudy patches across the upper two-thirds of the rock, leaving some black showing through. -
Adding Purple Hues:
While the blue is still slightly tacky, repeat the sponging process with deep purple paint. Concentrate this color near the center and lower blended areas to create a nebula effect. -
Brightening the Galaxy:
Using a fresh sponge edge, tap small amounts of teal and magenta into the center of your nebula clouds. I find that using a very light touch here helps the colors glow rather than looking muddy. -
White Highlights:
Lightly sponge a tiny amount of white paint into the brightest centers of your galaxy swirls to create a ‘milky way’ luminosity. Let the background dry completely.
Step 2: Stars & Constellations
-
Flicking Stars:
Thin down a little white acrylic paint with a drop of water. Dip an old toothbrush or a stiff brush into it, and gently flick the bristles with your thumb to spray a fine mist of stars across the sky area. -
Adding Major Stars:
Use your finest detail brush or a white paint pen to dot larger, distinct stars in the sky. Vary the sizes slightly for a realistic 3D effect. -
Connecting Constellations:
Look for a random grouping of your painted stars that pleases the eye. Very lightly connect a few of them with thin white lines to suggest a distant constellation, just like the faint lines seen in the reference rock.
Muddy Galaxy?
If your sponge colors turn brown or grey, you are mixing them too much while wet. Allow layers to dry for a few minutes between colors or use a fresh sponge area for each new hue.
Step 3: The Raven Silhouette
-
The Perch:
Using black paint and a flat brush, paint a jagged, sloped shape at the bottom of the rock. This will be the cliff or stone ledge the bird rests on. -
Outlining the Bird:
With a fine brush or black paint pen, carefully sketch the outline of the raven standing on the ledge. Start with an oval for the body and a smaller circle for the head, connecting them with a smooth neck curve. -
Beak and Tail:
Add the distinct sharp beak pointing slightly upward. Then, draw the tail feathers extending downward, slightly overlapping the rock ledge you painted. -
Filling the Shape:
Fill in the entire silhouette with opaque black paint. You may need two coats here to ensure it stands out starkly against the colorful galaxy background. -
Feather Texture:
Once the black is dry, use your finest white pen or brush to add extremely subtle, thin dashes along the wing and tail feathers. These shouldn’t be solid lines, just tiny scratch-like highlights to suggest texture. -
The Eye:
Place a single, tiny dot of white (or light blue) for the raven’s eye to give it life and focus. -
Rock Details:
Add a few faint grey or diluted white lines to the black cliff ledge underneath the bird to give the rock some dimension and cragginess.
Glow in the Dark
Mix glow-in-the-dark powder or use phosphorescent paint for the white stars. Your raven will look like a regular silhouette by day, but the galaxy will magically ignite when the lights go out.
Step 4: Finishing Touches
-
Final Inspection:
Check your edges. If the black silhouette got lost in the dark background, re-line the very edge with a deeper black or a tiny hint of backlighting. -
Sealing:
Once the paint is cured (wait at least 24 hours for best results), apply a coat of spray varnish or brush-on gloss sealer to protect your artwork from the elements.
Place your finished cosmic raven in a garden pot or on a bookshelf to enjoy your tiny slice of the universe


Have a question or want to share your own experience? I'd love to hear from you in the comments below!