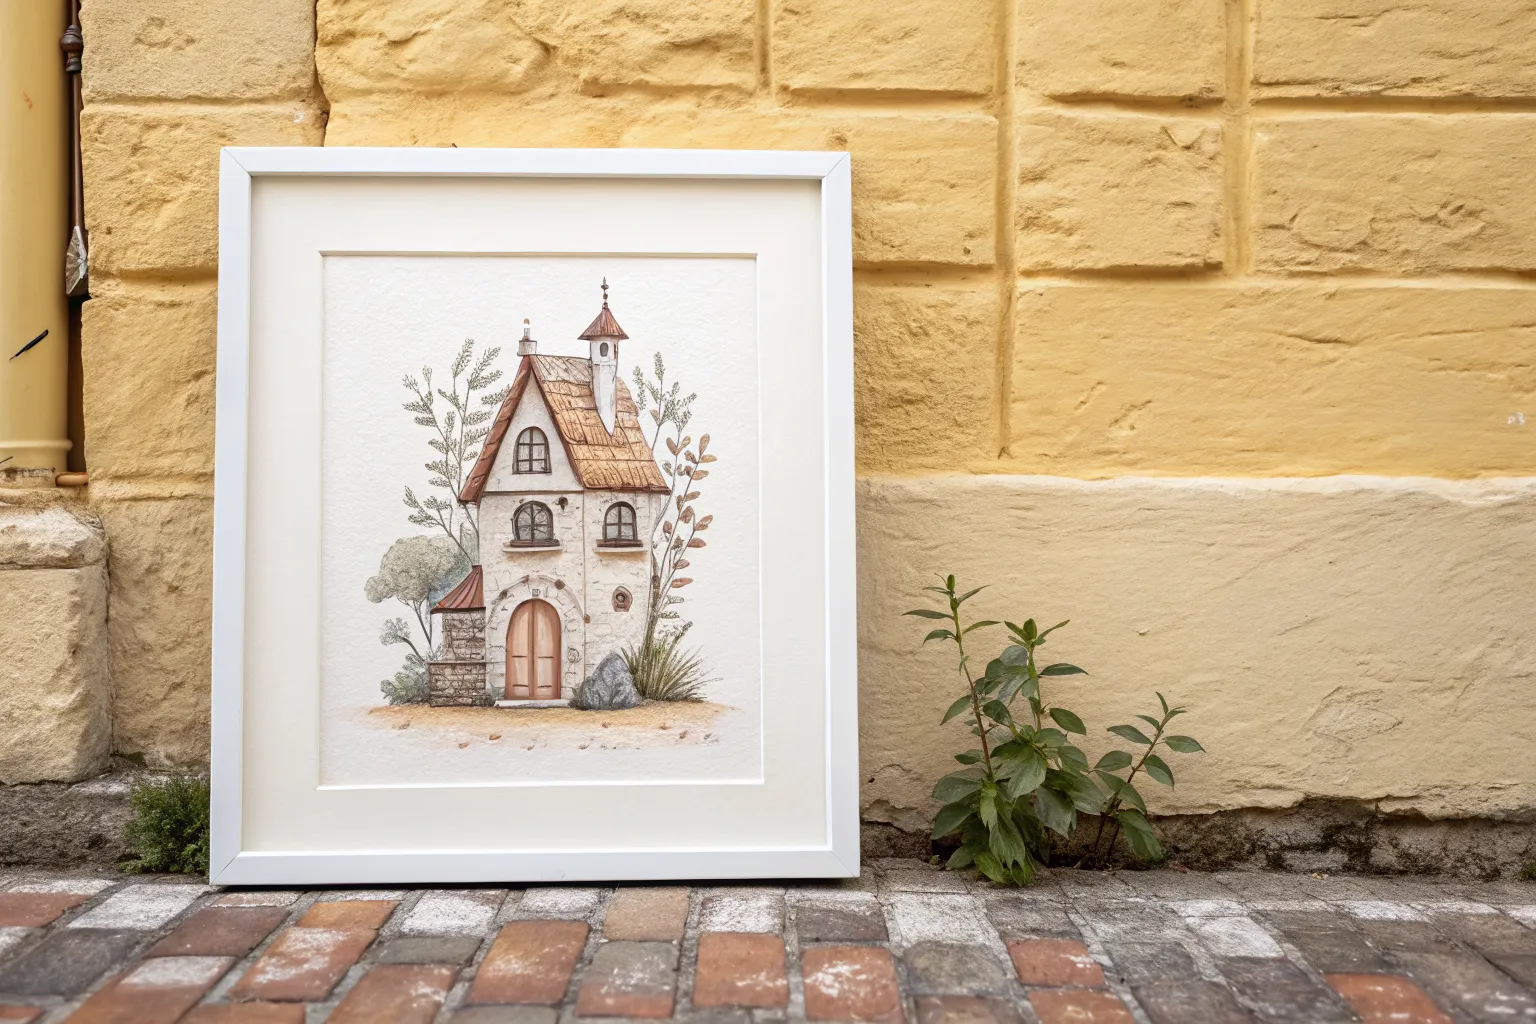
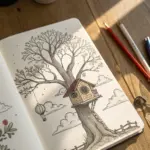
When I sketch fantasy house concept art, I treat the building like a character with a secret backstory. Here are a bunch of fantasy house ideas you can riff on fast—starting with the classics and drifting into the wonderfully weird.
Wizard Tower With a Top-Heavy Silhouette
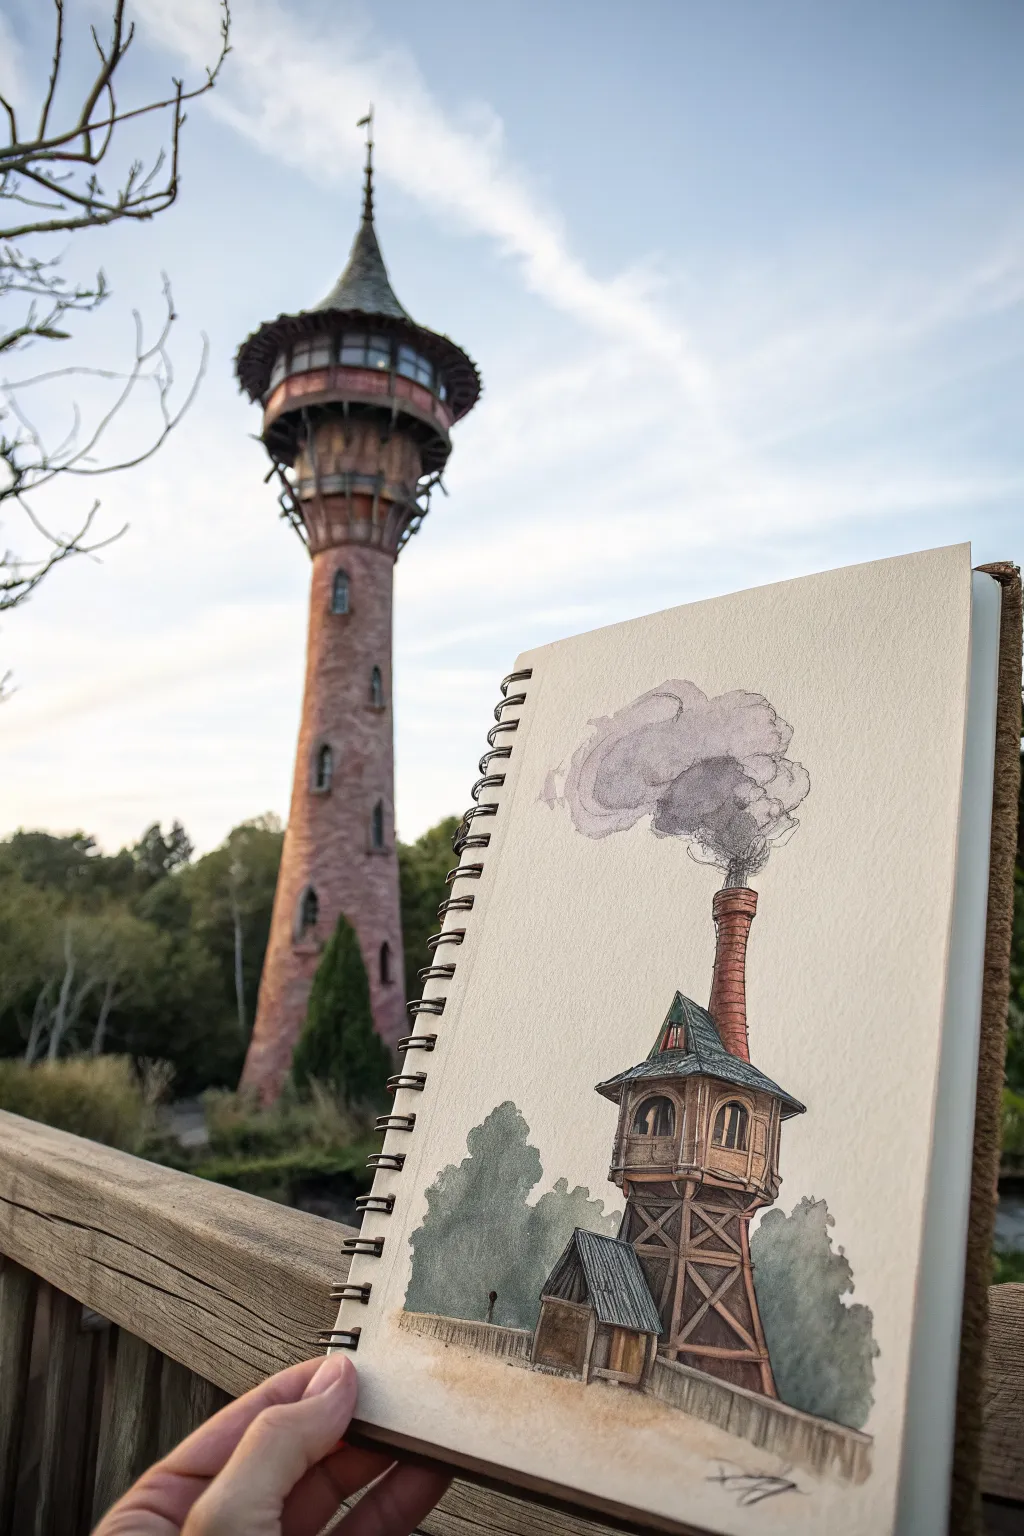
Capture the whimsical charm of a top-heavy wizard tower with this mixed-media sketch tutorial. Combining precise ink lines with loose watercolor washes, you’ll create a characterful structure that feels both grounded and magical.
Step-by-Step Tutorial
Materials
- Spiral-bound watercolor Sketchbook (cold press paper recommended)
- Pencil (HB or 2B)
- Kneadable eraser
- Fine liner pens (sizes 0.1, 0.3, and 0.5, waterproof ink)
- Watercolor paints (Burnt Sienna, Yellow Ochre, Payne’s Grey, Alizarin Crimson, Sap Green)
- Round watercolor brushes (size 4 and size 8)
- Jar of water
- Paper towel
Step 1: Penciling the Structure
-
Establish the horizon:
Begin by lightly drawing a low horizon line near the bottom of your page. This will ground your tower and provide a base for the fence and trees later. -
Block in basic shapes:
Visualize the tower as a stack of simple geometric forms. Sketch a tall rectangle for the base supports, a cube for the main cabin, and a thin cylinder for the chimney. Don’t worry about details yet; just get the proportions right. -
Refine the cabin silhouette:
Add the roof overhangs to the main cabin area. The roof should look slightly too large for the structure, giving it that top-heavy fantasy feel. Sketch the small annex shed at the bottom left. -
Draft the structural details:
Lightly draw the X-bracing on the tower support legs. Sketch the placement of the arched windows on the cabin and the rim of the chimney stack.
Step 2: Inking the Lines
-
Outline the main forms:
Using a 0.3 pen, trace over your pencil lines for the main structure—the walls, the roof, and the primary support beams. Keep your hand relaxed to allow for slightly organic, imperfect lines that add character. -
Add texture to the wood:
Switch to a 0.1 pen to add wood grain details. Draw vertical lines on the siding boards and small knots or cracks on the beams. Break the lines occasionally so the texture doesn’t look too uniform. -
Detail the brickwork:
With the 0.1 pen, draw the horizontal rows of bricks on the chimney. Add vertical dividing lines, staggering them row by row. You don’t need to draw every single brick; suggestive patches work best. -
Smoke and atmosphere:
Instead of a hard outline for the smoke, use very light, broken scumbling lines with your thinnest pen to suggest the billowing clouds coming from the chimney. -
Erase pencil guides:
Once the ink is completely dry—give it a few minutes to be safe—gently erase all the underlying pencil marks with your kneadable eraser.
Loose Smoke Technique
Pre-wet the paper area where the smoke will be with clean water before dropping in faint grey paint. This ‘wet-on-wet’ technique creates soft, billowy edges automatically.
Step 3: Watercolor Washes
-
Base wash for the wood:
Mix a watery wash of Yellow Ochre and a touch of Burnt Sienna. Paint the wooden cabin walls and the support beams. Keep the wash light and uneven to suggest weathered timber. -
Roof and metal details:
Mix Payne’s Grey with a distinct hint of Sap Green or Teal. Apply this to the roof of the cabin and the small shed. Let the color pool slightly at the bottom edges of the roof panels for natural shading. -
Painting the brick chimney:
Use a mix of Burnt Sienna and a little Alizarin Crimson for the chimney. Paint it carefully, leaving tiny slivers of white paper showing through occasionally to represent mortar or highlights. -
Adding shadows:
Once the base layers are dry, mix a darker brown using Burnt Sienna and Payne’s Grey. Paint shadows under the roof eaves, inside the window arches, and on the side of the support beams away from the light source. -
Background foliage:
Mix a dull, muted green using Sap Green and a touch of Payne’s Grey. Paint the silhouette of bushes and trees behind and around the base of the tower. Keep the edges soft and loose so they don’t distract from the main subject. -
Grounding the structure:
Add a wash of diluted Yellow Ochre and brown for the ground/dirt path at the bottom. I like to let this fade out into the white of the paper at the edges for a vignetted look.
Make It Yours
Customize your tower’s purpose by changing the chimney smoke color. Green smoke implies potion brewing, while sparkling blue smoke suggests magical experiments.
Step 4: Final Touches
-
Smoke volume:
With a very dilute wash of Payne’s Grey or light purple, paint the shadow areas of the smoke cloud to give it volume. Keep the edges soft by using a clean, damp brush to feather the paint out. -
Deepen contrasts:
Use your 0.5 pen to re-emphasize the darkest shadows, such as the deep interior of the windows or the bottom edge of the foundation, to make the structure pop. -
Highlight recovery:
If you accidentally painted over a highlight, you can use a tiny dot of white gouache or a white gel pen to bring back a sparkle on the window glass or metal fixtures.
Your finished sketch now stands ready to house its reclusive wizard, perfectly blending mechanical structure with storybook charm


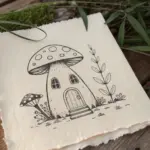
Floating Island Cabin
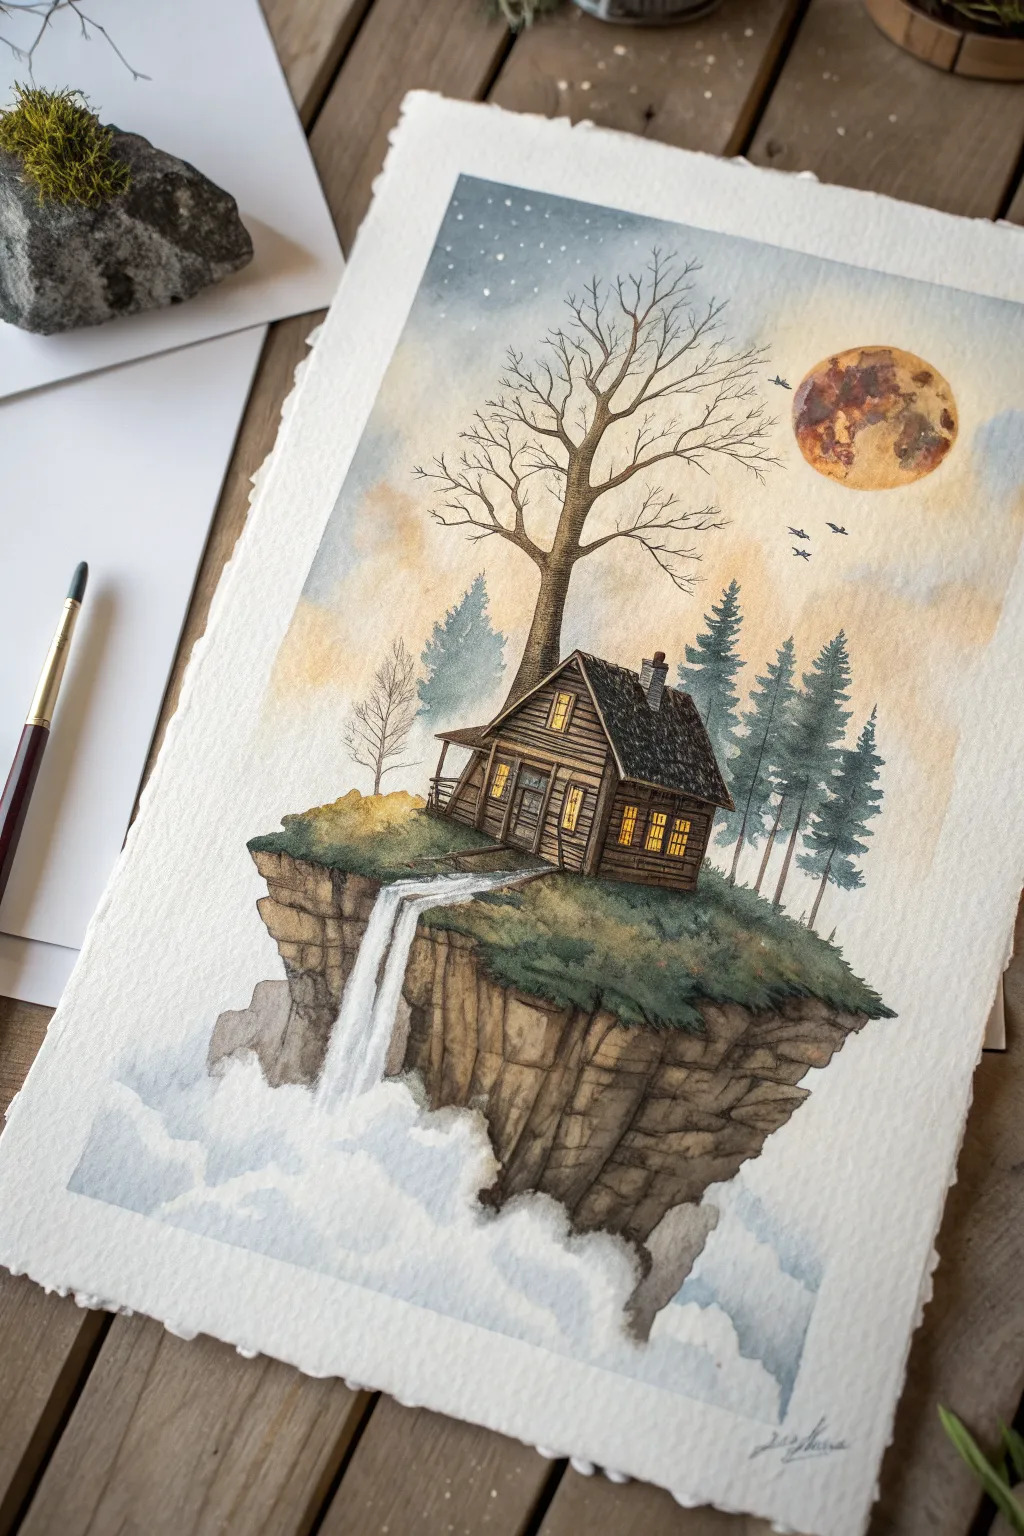
Capture the magic of a solitary cabin adrift in the clouds with this cozy, detailed watercolor illustration. The painting features warm, glowing windows contrasting against cool, misty blues to create a dreamy floating island effect.
How-To Guide
Materials
- Cold press watercolor paper (300 gsm)
- Watercolor paints (Indigo, Burnt Sienna, Yellow Ochre, Paynes Grey, Sap Green)
- White gouache or white gel pen
- Pencil (HB or 2B) and kneaded eraser
- Round watercolor brushes (sizes 2, 6, and 10)
- Fine liner pen (brown or sepia, waterproof)
- Masking fluid (optional)
- Paper towels and two water jars
Step 1: Sketching and Masking
-
Light Outline:
Begin by lightly sketching the outline of the floating rock island, the cabin structure, and the large bare tree. Keep your pencil pressure very light so the graphite doesn’t smudge later. -
Positioning Trees:
Sketch the vertical lines for the pine trees in the background and mark where the waterfall spills over the edge. Don’t worry about drawing every leaf or brick; just get the main shapes in place. -
Preserving Whites:
If you are using masking fluid, apply it carefully to the waterfall area and the tiny stars in the sky. This preserves the pure white of the paper. Alternatively, you can paint around these areas or use white gouache at the end.
Keep it Loose
Don’t overwork the clouds beneath the island. Allow the watercolor to bloom naturally with plenty of water to create that soft, vaporous texture.
Step 2: The Atmospheric Sky
-
Wet-on-Wet Sky:
Wet the entire sky area with clean water using your size 10 brush. While it’s glistening, drop in a very pale wash of Indigo at the top, fading into clear water as you move down. -
Adding Warmth:
While the paper is still damp, introduce a soft, diluted wash of Yellow Ochre around the horizon line and behind the tree branches to suggest a gentle sunset glow. -
Painting the Moon:
Let the sky dry completely. Then, paint the moon using a mix of Yellow Ochre and a touch of Burnt Sienna. While wet, dab in concentrated brown spots to create crater textures.
Step 3: Island Foundation
-
Rock Base Wash:
Mix a watery grey-brown using Burnt Sienna and Paynes Grey. Apply a loose wash over the rocky underside of the island, letting the color pool naturally at the bottom of the rock formations. -
Grassy Top:
Paint the grassy surface of the island with Sap Green mixed with a little brown to desaturate it. Use a stippling motion with your brush to suggest uneven turf texture. -
Shadows on Rocks:
Once the first rock layer is dry, mix a darker, less watery version of your rock color. Paint vertical, jagged strokes to define the cliffs and deep crevices, emphasizing the underside of the overhangs.
Level Up: Seasonal Shift
Change the mood by altering the palette! Use cool blues and leave the roof white for winter, or add pinks to the tree branches for a spring cherry blossom vibe.
Step 4: The Cabin and Surroundings
-
Cabin Walls:
Paint the cabin logs with a rich Burnt Sienna. Leave the window panes unpainted for now. I find it helpful to vary the brown tone slightly between logs to add age and character. -
Roof Texture:
Use a dark Paynes Grey for the roof. While drying, lift a tiny bit of color with a thirsty brush or add darker dots to suggest shingles or slate tiles. -
Glowing Windows:
Fill the window spaces with a bright, concentrated Yellow Ochre or warm yellow. This creates that inviting, ‘lamp-lit’ look. -
Pine Trees:
For the background pines, use a cool green-blue mix. Paint them loosely, starting with a thin line for the trunk and dabbing foliage downwards in a triangular shape. -
The Main Tree:
Detail the large, bare tree with a fine brush and dark brown paint. Ensure the branches taper as they extend outward, crossing over the moon for depth.
Step 5: Magical Details
-
Waterfall:
If you used masking fluid, rub it off now. If not, use white gouache. Paint streaks of white falling from the island edge, fading into a misty white cloud at the bottom. -
Cloud Base:
Paint the clouds beneath the island using a very diluted blue-grey. Use soft, circular strokes and plenty of water to keep the edges fluffy and indistinct. -
Fine Liner Work:
Once the painting is bone dry, use your waterproof pen to delineate the cabin logs, window frames, and cracks in the rocks. Keep the lines broken and organic, not ruler-straight. -
Highlights:
Use a white gel pen or gouache to add final sparkles: stars in the sky, highlights on the water, and glints on the edges of the roof. -
Birds:
Add three or four tiny silhouettes of birds flying near the moon using your darkest paint or ink pen to give the scene a sense of scale.
Now frame your mystical floating island and enjoy the peaceful escape you’ve created on paper
Watermill House With an Oversized Wheel
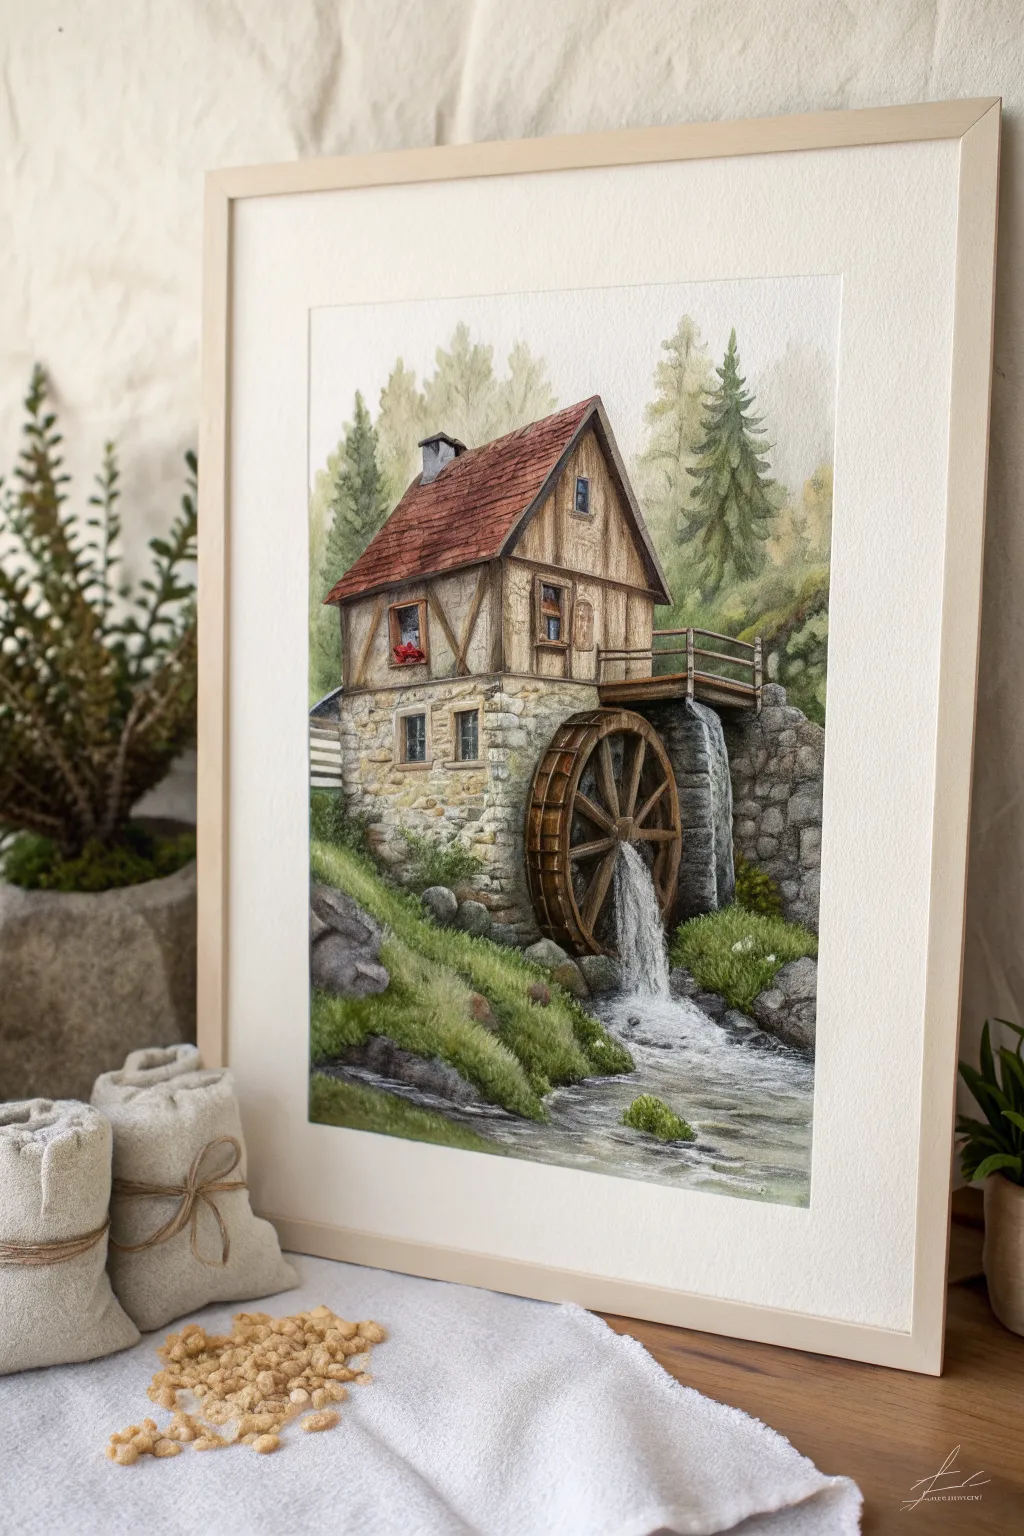
Capture the charm of a fantasy countryside with this detailed watercolor and ink illustration of a watermill. The piece combines textural stone work, warm wood tones, and flowing water to create a serene and nostalgic atmosphere.
Step-by-Step Guide
Materials
- Hot press watercolor paper (300gsm)
- Waterproof fine liner pens (0.1, 0.3, and 0.5mm)
- Watercolor paint set
- Synthetic round brushes (sizes 2, 6, and 12)
- White gouache or white gel pen
- Masking fluid
- Graphite pencil (HB) and kneaded eraser
- Painters tape and board
Step 1: Drafting and Masking
-
Prepare the workspace:
Tape your watercolor paper down to a board on all four sides. This prevents the paper from buckling when wet and creates a crisp white border for framing later. -
Sketch the structure:
Lightly sketch the main shapes using an HB pencil. Start with a rectangular prism for the stone base and a pitched roof structure on top. Position the large circle for the water wheel on the right side. -
Refine the details:
Add specific architectural details like the timber framing on the upper floor, the small windows, the chimney, and the uneven stones on the lower level. Sketch the wooden walkway leading to the wheel. -
Establish the landscape:
Loosely draw the rocky stream bed, the grassy bank on the left, and the vague shapes of pine trees in the background. -
Preserve highlights:
Apply masking fluid to the areas where the water is most turbulent: the splash at the bottom of the wheel and the waterfall pouring over the sluice. Let this dry completely.
Step 2: Washes and Textures
-
Paint the sky:
Using a size 12 brush, apply a very pale, wet wash of cool gray or faint blue to the upper sky area, letting it fade out as you move down toward the treeline. -
Background foliage:
While the sky is damp but not soaking, drop in desaturated greens for the background trees. Keep edges soft to push them into the distance. -
Base layer for the house:
Mix a warm beige for the timber walls and a cool, light gray for the stone base. Apply these flat washes, avoiding the window panes and the wooden beams. -
Roof shingles:
Paint the roof with a mix of burnt sienna and a touch of red. Don’t make it uniform; vary the saturation to suggest weathered tiles. -
Wood details:
Using a size 6 brush and burnt umber, fill in the exposed timber framing, the water wheel, and the walkway railing. I like to keep the paint slightly watery here to let the paper texture show through. -
Stone texture:
Once the gray base is dry, dab in individual stones using various shades of gray, tan, and brown. Leave thin gaps between them to represent mortar.
Stone Variation Pro Tip
Don’t just use gray for stones! Drop in tiny spots of yellow ochre, mossy green, and burnt sienna while the stonework is damp to simulate lichen and mineral deposits.
Step 3: Depth and Definition
-
Deepen shadows:
Mix a dark cool gray or indigo. Apply this shadow mix under the eaves of the roof, inside the wheel housing, and beneath the wooden walkway to create depth. -
The water wheel:
Add darker brown wood grain details to the wheel spokes. Ensure the side of the wheel facing away from the light source is significantly darker. -
Foreground grass:
Use sap green and olive green for the grassy bank. Use short, upward flicking strokes with a size 2 brush to simulate individual blades of grass near the water’s edge. -
Painting the stream:
Paint the water surface with horizontal strokes of gray-blue and greenish-gray. Leave the masked areas alone for now. Darken the water around the rocks to show reflection and depth. -
Ink outlining:
Once all paint is bone dry, use the 0.1mm and 0.3mm pens to outline the architecture. Use broken lines for the stones to keep them looking organic, and firmer lines for the timber beams.
Level Up: Atmospheric Mist
After everything is dry, lightly glaze the very bottom of the painting and the background trees with a super watery white gouache to create a morning mist effect.
Step 4: Final Touches
-
Remove masking:
Gently rub away the masking fluid to reveal the crisp white paper underneath. -
Enhance the water:
Soften the hard edges of the revealed white paper with a damp clean brush. Add small touches of white gouache to the splashing water to make it look foamy and dynamic. -
Window details:
Paint the window interiors dark gray, leaving small white highlights. Add a pop of red for the flower box in the upper window. -
Final assessment:
Step back and check the contrast. If the roof or stones look too flat, add a light glaze of sepia or gray to unify the shadows.
Now you have a charming piece of fantasy architecture ready to be framed and displayed


Canal House With Arched Bridges

Capture the romantic decay of a sinking city with this detailed watercolor study of an aging canal house. The soft washes and crumbling textures perfectly evoke the feeling of warm, humid afternoons by the water.
Step-by-Step Tutorial
Materials
- Cold press watercolor paper (300 gsm)
- Watercolor paints (Burnt Sienna, Yellow Ochre, Ultramarine Blue, Hooker’s Green, Alizarin Crimson, Sepia)
- Round brushes (sizes 2, 6, and 10)
- Rigger or liner brush
- HB Pencil
- Kneaded eraser
- Masking fluid (optional)
- Clean water jar and palette
Step 1: Planning and Sketching
-
Establish the horizon:
Lightly draw a horizon line about one-quarter of the way up from the bottom of your paper. This marks where the canal meets the building foundations. -
Block in the structure:
Sketch the main vertical rectangle of the house. Give it a slight, charming tilt or irregularity to suggest age and settling foundations rather than perfect architectural precision. -
Add architectural details:
Pencil in the roofline with its gentle slope, the tall chimney on the left, and the placement of the windows and arched doorway at the water level. -
Sketch the foliage:
Use loose, cloud-like shapes to map out where the climbing ivy and window flower boxes will go. Don’t draw every leaf; just indication the masses.
Step 2: First Washes
-
Paint the sky:
Wet the sky area with clean water. Drop in a very pale wash of Ultramarine Blue, keeping it lighter near the horizon line to suggest atmospheric depth. Let this dry completely. -
Base coat the building:
Mix a warm, diluted wash of Yellow Ochre and a touch of Burnt Sienna. Apply this loosely over the house facade, purposefully leaving some white paper showing for high-contrast highlights. -
Create the water base:
While the building dries, mix Ultramarine Blue with a tiny bit of Hooker’s Green. Paint horizontal strokes for the canal, leaving white gaps near the bottom edge for reflections. -
Initial shadows:
Once the house wash is dry, mix a light purple-grey using Ultramarine and Alizarin Crimson. Glaze this over the left side of the building and under the eaves to establish the light source coming from the right.
Muddy Water?
If your water reflections look muddy, let the paper dry fully between layers. Glazing wet-on-wet blends colors too much; wet-on-dry keeps ripples crisp.
Step 3: Building Textures and Details
-
Distress the walls:
Using a drier brush and a mix of Burnt Sienna and Sepia, scumble texture onto the facade to simulate peeling plaster and exposed brickwork, concentrating on edges and corners. -
Paint the roof:
Use a mix of Burnt Sienna and Alizarin Crimson for the roof tiles. Dab the color on in small, irregular rows rather than painting a solid block to suggest individual clay tiles. -
Define the windows:
Paint the shutters with a mix of Hooker’s Green and a touch of Sepia to dull it down. I find painting the slats with quick, horizontal flicks of a size 2 brush creates the best weathered wood effect. -
Deepen the water:
Add darker horizontal ripples to the water using a stronger mix of your water color. Add a reflection of the building directly beneath it using a muted version of the house colors, pulling the paint vertically downwards.
Old World Charm
Sprinkle a tiny pinch of table salt onto the wet paint of the building facade. As it dries, it creates a bloom texture that looks exactly like ancient, crumbling stone.
Step 4: Foliage and Final Touches
-
Layer the greenery:
Start with a light yellow-green for the ivy and flower boxes. While still damp, drop in darker teals and olive greens to create volume and shadow within the plant masses. -
Add floral pops:
Once the green is dry, stipple small dots of Alizarin Crimson or bright red into the window boxes to represent geraniums. -
Enhance contrast:
Use your rigger brush and a dark Sepia mix to outline crucial details like the chimney pot, the dark recesses of the open windows, and the waterline stain on the foundation. -
Refine the shadows:
Add the darkest cast shadows under the window boxes and the eaves using a strong purple-grey mix. This makes the architectural features pop forward.
Mat your finished piece with a wide white border to let the colors truly breathe

PENCIL GUIDE
Understanding Pencil Grades from H to B
From first sketch to finished drawing — learn pencil grades, line control, and shading techniques.
Explore the Full Guide
Isometric Game-Style House Turnaround
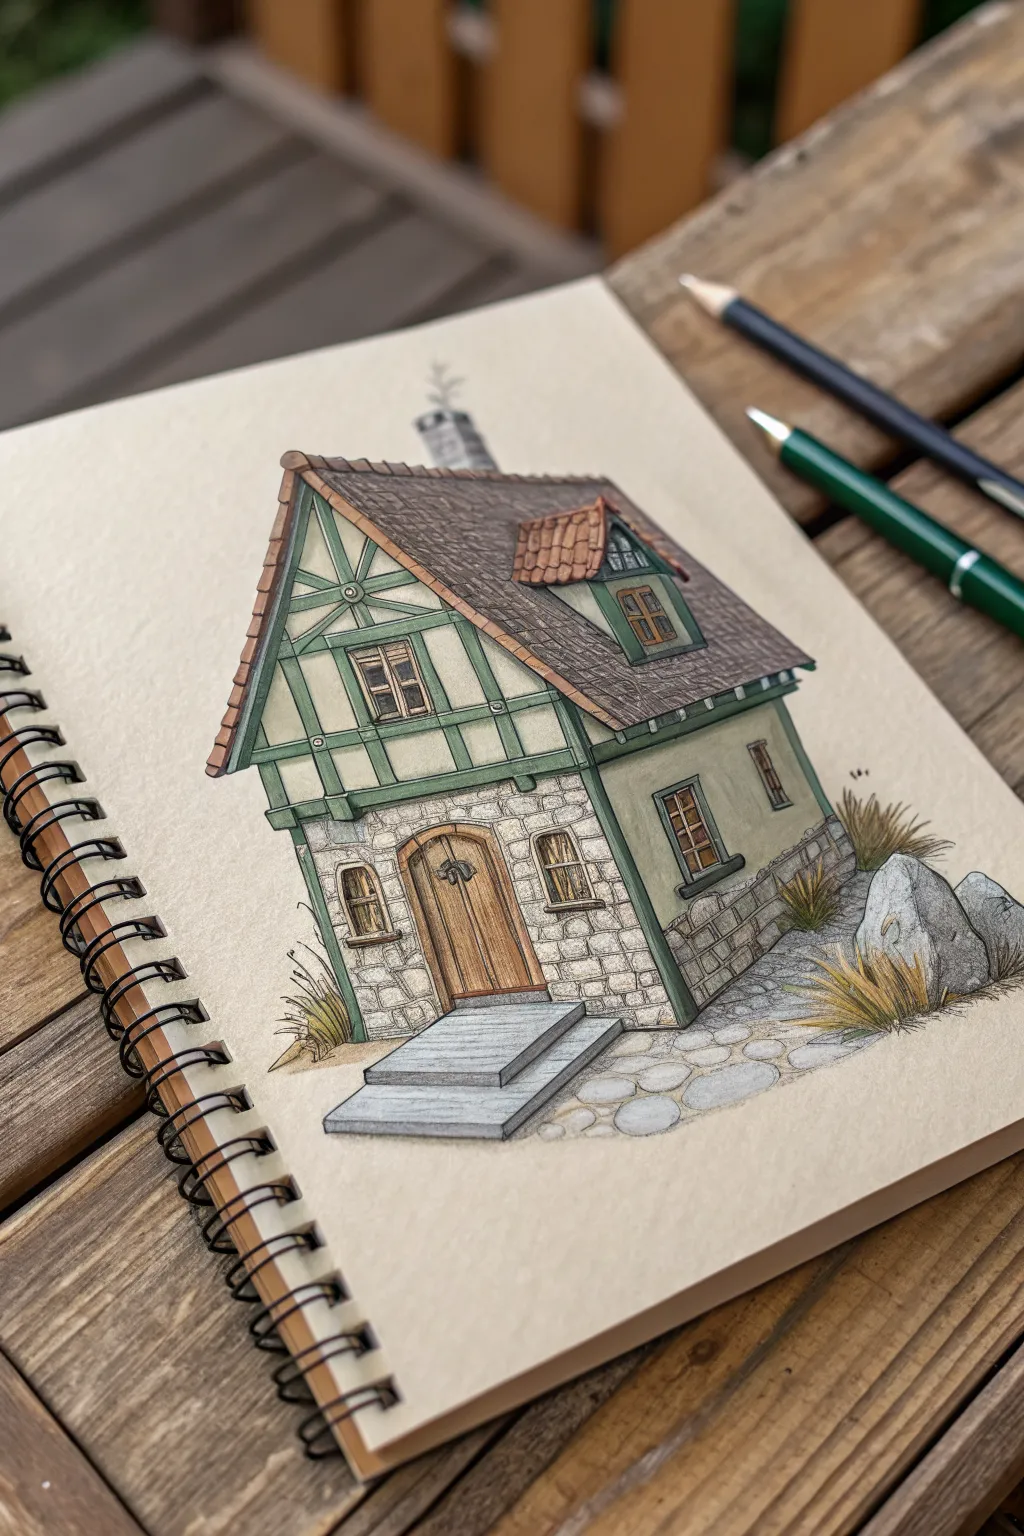
Bring an RPG world to life on paper with this charming isometric house concept. Using toned sketchbook paper creates an instant warmth, allowing your colored pencil and ink details to pop with classic architectural character.
Step-by-Step Guide
Materials
- Toned tan or kraft sketchbook (spiral bound)
- HB or F graphite pencil for underdrawing
- Fine liner pens (sizes 0.1, 0.3, and 0.5 – black)
- Alcohol markers or artist quality colored pencils (muted greens, warm browns, grays)
- White gel pen or white colored pencil
- Ruler or straight edge
- Kneaded eraser
Step 1: Planning the Structure
-
Establish the Isometric Base:
Begin by lightly sketching a vertical line for the nearest corner of the house. From the bottom of this line, draw two angled lines moving upward at approximately 30 degrees to create the isometric ‘V’ shape of the foundation. -
Rough in the Volumes:
Construct the main box of the house, keeping your vertical lines perfectly straight and parallel. Add a triangular shape on the left-facing side to indicate the roof peak, creating the gable end. -
Add the Roofline:
Extend the roof lines past the walls to create eaves. Draw the steep main roof slope and add a smaller popping-out box on the right side for the dormer window. -
Define Major Features:
Sketch the placement of the front door, the stone steps leading up to it, and the window placements on both the lower and upper floors. Don’t worry about details yet; just focus on proportions.
Pro Tip: Line Weight
Make the outer perimeter line of the house thicker (using a 0.5 or 0.8 pen) than the interior details. This ‘pop-out’ effect separates the house from the paper background instantly.
Step 2: Inking the Framework
-
Main Outlines:
Switch to your 0.5 fine liner. Carefully go over the main structural lines of the house—the corners, the roof ridge, and the base. Use your ruler if you want a cleaner ‘game asset’ look, or freehand it for organic charm. -
Timber Framing:
Use a 0.3 pen to draw the decorative timber beams on the upper green section. Follow the isometric angles, creating vertical posts and diagonal supports commonly found in Tudor-style architecture. -
Detailed Stonework:
For the lower floor, use a 0.1 pen to draw individual stone shapes. Vary the sizes – some large blocks, some small filler stones – and keep the lines slightly wobbly to simulate rough-hewn texture. -
Windows and Door:
Ink the window panes and the wooden planks of the door. Add small hardware details like hinges and the door knocker with the finest pen tip. -
Erase Pencils:
Once the ink is completely dry (give it a few minutes to avoid smearing), gently lift all graphite guidelines with your kneaded eraser.
Troubleshooting: Flat Roof
If the roof looks flat, curved hatch lines on individual tiles help. Instead of straight grid lines, curve the bottom of each shingle slightly downward to mimic gravity and volume.
Step 3: Applying Color and Texture
-
Base Colors – Walls:
Start with your markers or colored pencils. Fill the upper plaster walls with a muted sage or moss green. Keep the coverage even, but leave the timber beams uncolored for now. -
Timber and Door Notes:
Color the wooden beams, door, and window frames with a warm, medium brown. I like to streak the color slightly in the direction of the grain to suggest wood texture. -
Roof Tiling:
Use a darker, cool brown or slate gray for the main roof shingles. For the dormer roof, switch to a terracotta or reddish-brown to create visual interest. Draw small ‘U’ shapes or lines to suggest individual tiles. -
Stone Foundation:
Lightly shade the stone blocks with cool warm grays. Don’t fill them in solid; leave the paper tone showing through in the center of the stones to act as a highlight. -
Ground and Steps:
Color the steps and the surrounding cobblestones with a lighter cool gray. Add some uneven patches of tan or dust around the base to ground the building.
Step 4: Final Polish
-
Deep Shadows:
Use a dark gray marker or pencil to add shadows under the eaves, beneath the window sills, and inside the door frame. Choose a light source (e.g., top left) and shadow the opposite sides accordingly. -
Highlights:
Take your white gel pen or white charcoal pencil. Add small glints to the window glass, the top edges of the roof tiles, and the edges of the stone steps to make them look three-dimensional. -
Environmental details:
Sketch a few tufts of grass and some rocks around the base using quick, flicking strokes with your fine liner and a touch of olive green for color. -
Chimney Detail:
If you sketched a chimney, lightly detail it with brick textures in gray or light red, keeping it slightly faded to show it is in the background.
Now you have a cozy fantasy dwelling ready to anchor your next architectural study

Have a question or want to share your own experience? I'd love to hear from you in the comments below!