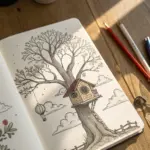
If you’re craving easy canvas painting ideas that still look totally frame-worthy, painting a simple house is one of my favorite shortcuts to a satisfying finished piece. I’m sharing house-centered compositions that keep the lines friendly, the shapes bold, and the details optional—so you can actually enjoy the process.
Simple House With a Winding Path
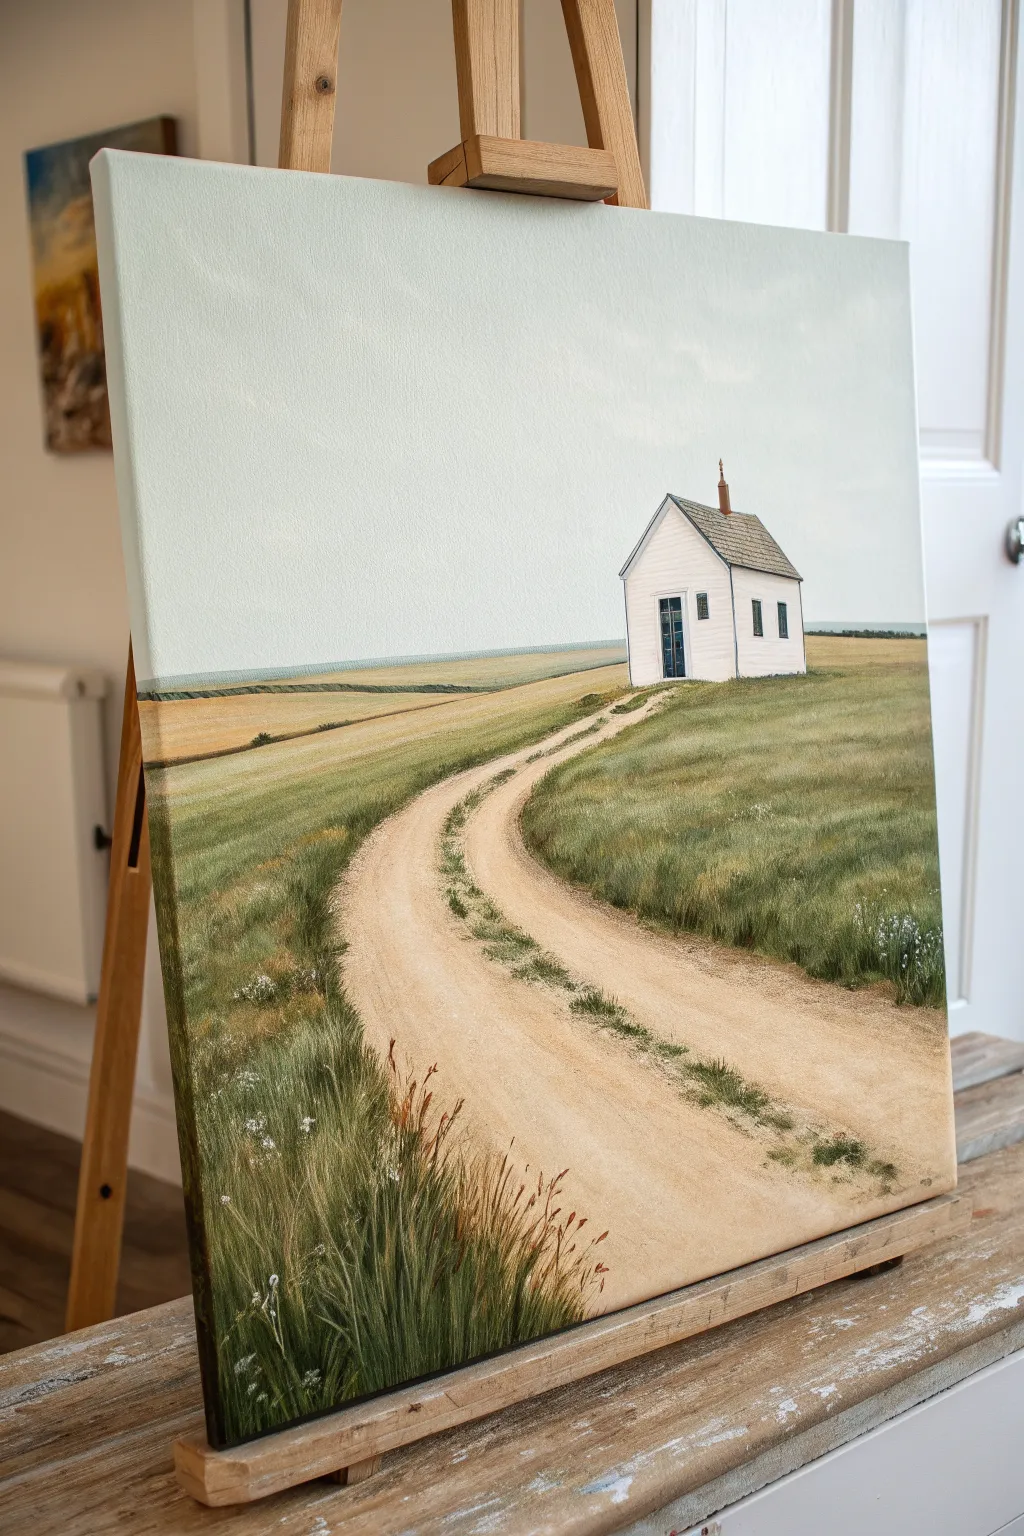
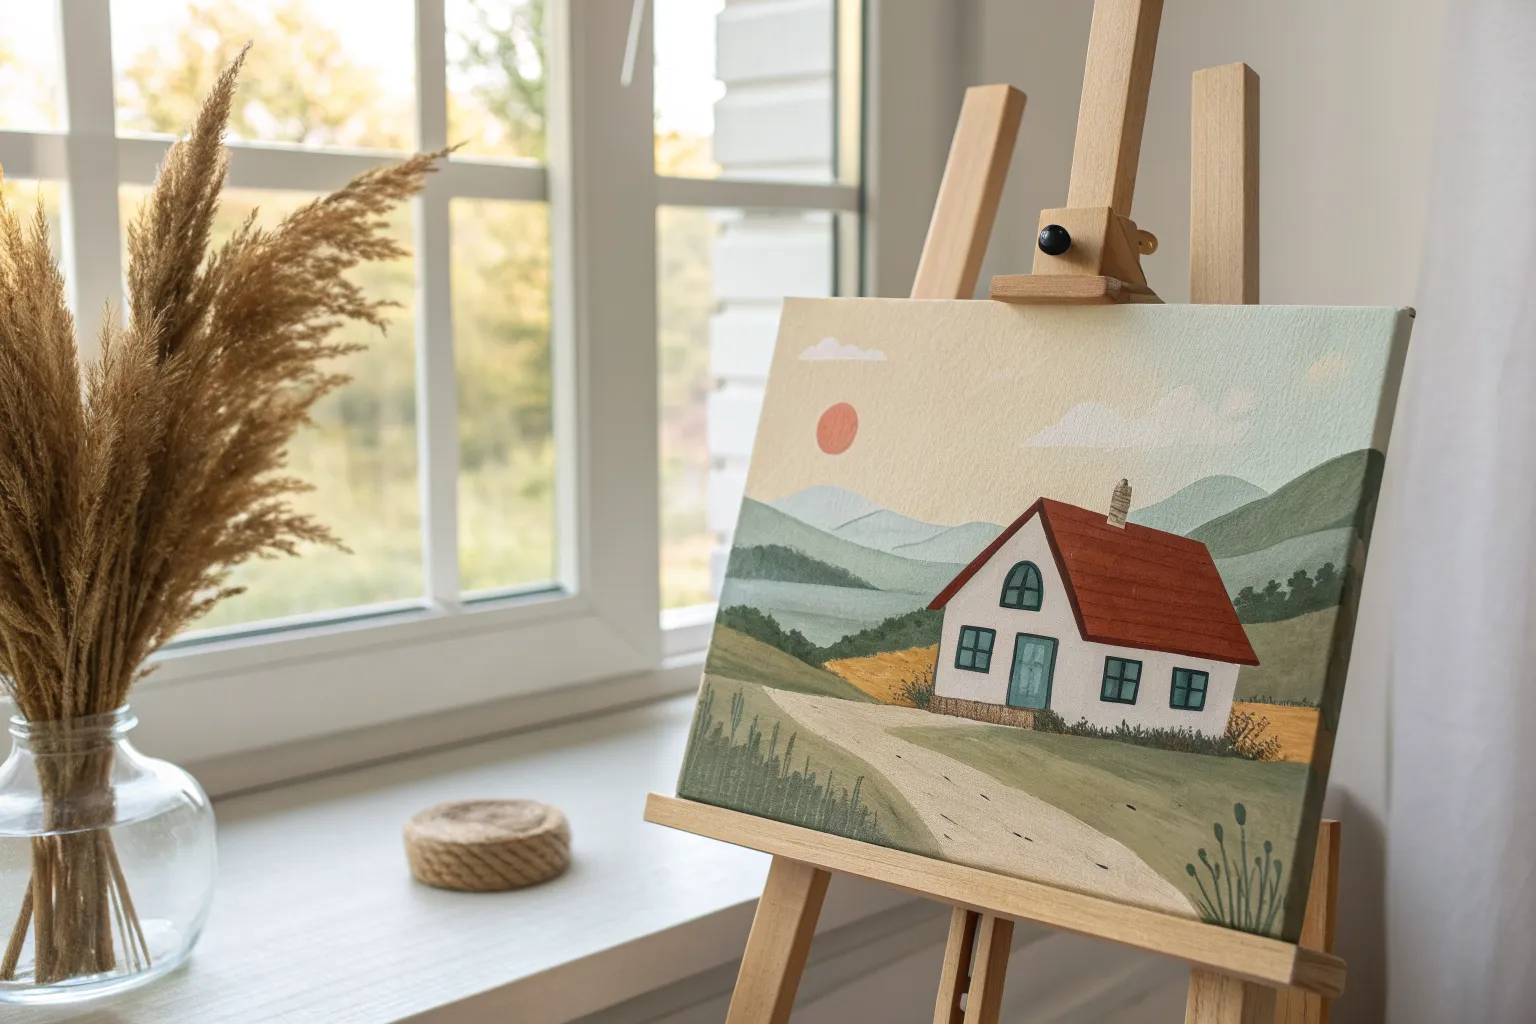
Capture the serene solitude of the countryside with this beautiful acrylic painting featuring a rustic white structure atop a rolling hill. The gentle curve of the dirt road drawing the eye upward creates a wonderful sense of depth and journey.
Step-by-Step Tutorial
Materials
- Stretched canvas (16×20 inches recommended)
- Acrylic paints (Titanium White, Burnt Umber, Yellow Ochre, Sap Green, Hooker’s Green, Ultramarine Blue, Mars Black)
- Flat brushes (large and medium)
- Round brushes (small for details)
- Fan brush (optional, for grass texture)
- Palette knife
- Water cup and paper towels
- Pencil for sketching
Step 1: Planning and Sky
-
Sketch the layout:
Begin by lightly sketching your horizon line about one-third of the way up the canvas. Draw the basic perspective shape of the house on the right side of the hill, and outline the winding road starting wide at the bottom and narrowing as it reaches the building. -
Mix the sky color:
Create a very pale blue-grey by mixing a large amount of Titanium White with a touches of Ultramarine Blue and a tiny speck of Burnt Umber to desaturate it. -
Paint the background sky:
Using a large flat brush, paint the entire sky area. Use horizontal strokes to keep it smooth, perhaps blending in a little pure white near the horizon line to suggest distance and atmosphere.
Step 2: Foundational Landscape
-
Block in the distant fields:
For the furthest field just below the horizon, mix a pale wheat color using Yellow Ochre and White. Paint a horizontal band across the canvas, keeping the edge against the sky relatively crisp. -
Base coat the grassy hills:
Mix Sap Green with a little Yellow Ochre and White to create a muted, grassy green. Apply this to the large hill areas on either side of the road, using sweeping strokes that follow the curvature of the land. -
Underpaint the dirt road:
Mix a light tan color using White, Yellow Ochre, and a touch of Burnt Umber. Fill in the road area completely. Don’t worry about texture yet; just get the color down to cover the white canvas.
Clean Lines
For the perfectly straight edges on the tiny house, stick a piece of painter’s tape or washi tape to the dry canvas. Paint inside the masked area, then peel it away for crisp architectural lines.
Step 3: The Structure
-
Paint the house walls:
Using a medium flat brush, paint the walls of the house with Titanium White. To give it dimension, mix a very light grey for the side of the house that faces away from the light source. -
Add the roof:
Mix Burnt Umber with a little Black and White to get a weathered grey-brown. Paint the roof shape, using short vertical strokes to suggest shingles. -
Define windows and doors:
With a small round brush and dark grey or black paint, carefully fill in the rectangular shapes for the windows and the door. Leave tiny spots of the background color showing through if you want a weathered look. -
Add architectural details:
Use a liner brush to paint thin white lines for the window panes and door frames. Add a small chimney or spire on the roof using a brown tone.
Season Change
Change the mood easily by altering the palette. Use burnt oranges and reds in the grass for autumn, or add heavy white and blue shadows to the ground to turn this into a snowy winter scene.
Step 4: Texture and Depth
-
Create grass texture:
Switch to a fan brush or an old, splayed bristle brush. Mix various shades of green—some darker with Hooker’s Green, some lighter with Yellow Ochre. Tap and flick the brush upward along the hills to create the look of tall grasses. -
Shadowing the road:
The road needs definition to look realistic. Mix a darker sandy brown and lightly dry-brush it along the edges of the path where the grass meets the dirt, and down the center where vehicle tires wouldn’t tread. -
Detailing the tracks:
Enhance the tire tracks by painting two parallel, lighter strips within the road using a mix of White and Yellow Ochre. This visual trick makes the road look worn and travelled. -
Planting weeds:
Use your smallest round brush to paint distinct clumps of grass growing in the center strip of the road. I like to vary the height of these to make it look wild and unkempt.
Step 5: Foreground and Finishing
-
Foreground grasses:
The grass closest to the viewer needs the most detail. Use long, confident upward strokes with a liner brush in the bottom corners, mixing dark greens and bright highlights to show individual stalks. -
Add wildflowers:
For a delicate touch, dot tiny clusters of white or pale blue amongst the foreground grass to represent small wildflowers or seed heads. -
Refine the horizon:
Check the horizon line one last time. If it feels too sharp, you can glaze a very thin layer of the sky color over the distant hills to push them further back into the distance. -
Final highlights:
Add a few pure white highlights to the sunward side of the house and the tips of the tallest grasses in the foreground to make the painting pop.
Step back and admire the peaceful solitude of your country landscape, ready to hang on the wall


Lake House With Easy Reflection Strokes
Autumn House With Dabbed Leaf Trees
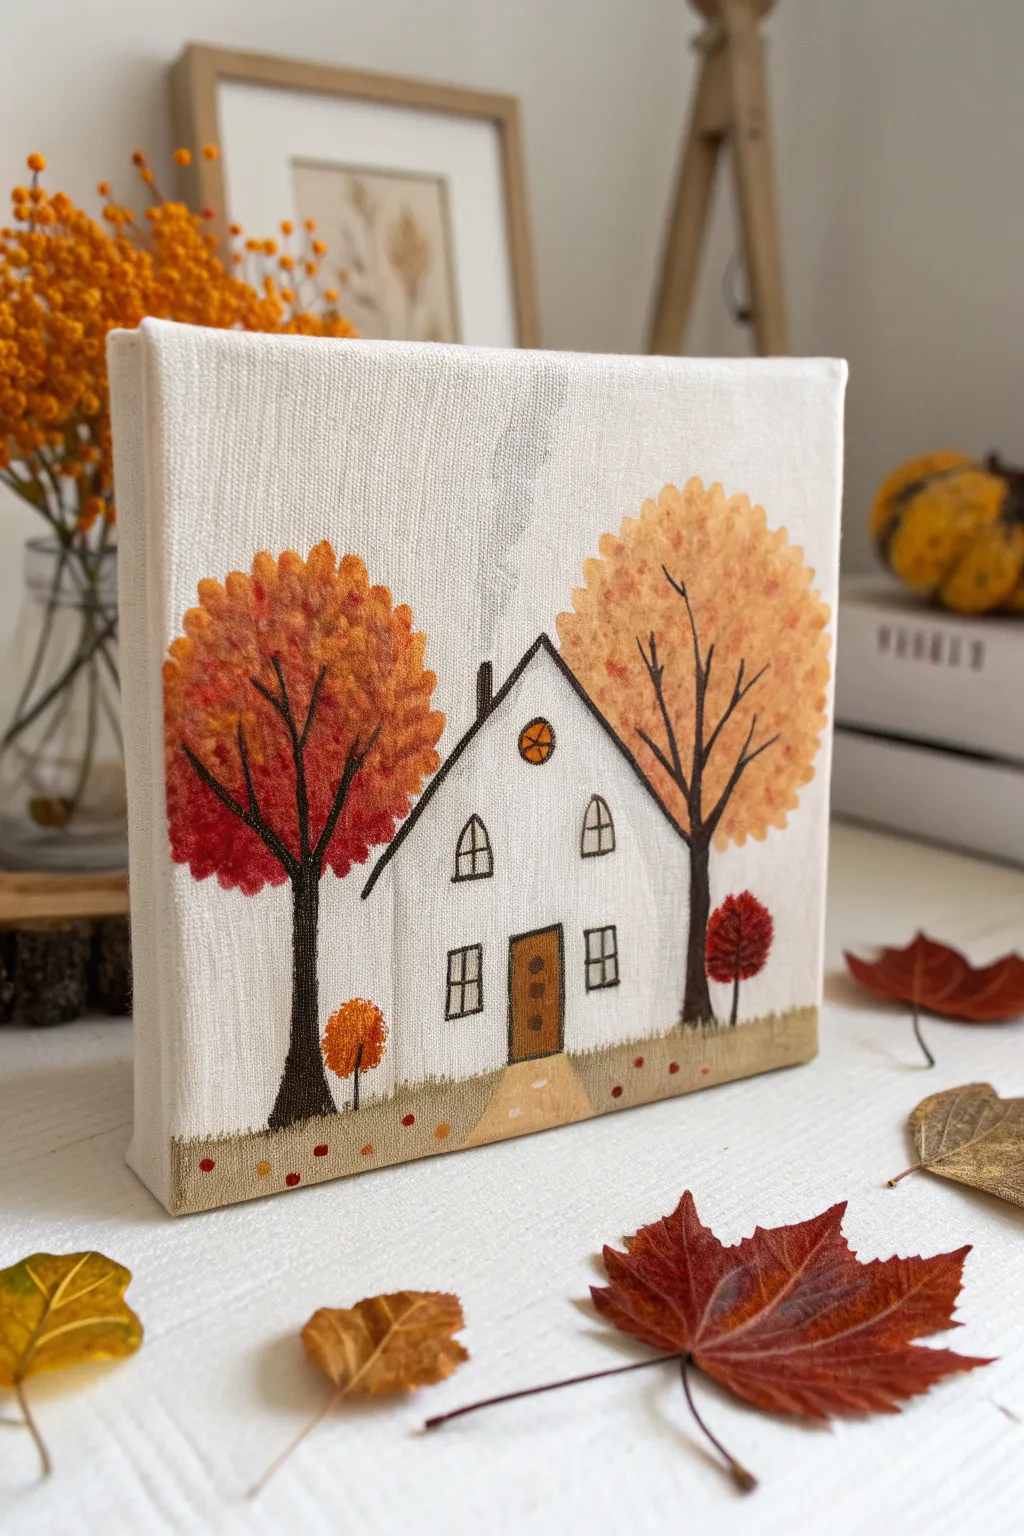
Capture the cozy essence of fall with this charming little house scene painted on a textured canvas block. Using a simple dabbing technique for the foliage creates a lovely, soft texture that perfectly mimics turning leaves without needing complex brushwork.
Detailed Instructions
Materials
- Small square canvas or canvas block (approx. 6×6 or 8×8 inches)
- Acrylic paints: Titanium White, Burnt Umber (dark brown), Yellow Ochre, Cadmium Orange, Red
- Fine tip black permanent marker or black liner paint pen
- Small flat brush
- Small round detail brush
- Round sponge applicator or an old, stiff stencil brush
- Pencil and eraser
- Palette for mixing
- Cup of water and paper towels
Step 1: Sketching and Base Layers
-
Map out the scene:
Begin by lightly sketching the outline of a simple house in the center of your canvas. Draw a steep triangular roof, vertical walls, a central door, and four windows arranged symmetrically. Add a small circle window near the roof peak. -
Add the landscape:
Lightly draw a horizon line behind the house, ensuring it is low enough to leave plenty of sky. Sketch vertical lines for the two large tree trunks on either side and marking spots for two smaller bushes. -
Paint the house base:
Using your flat brush, fill in the house shape with Titanium White. Even if the canvas is white, this layer adds opacity and separates the house from the fabric texture. Let this dry completely. -
Fill the ground:
Mix a small amount of Yellow Ochre with plenty of White to create a pale sandy beige. Paint the ground area at the bottom of the canvas, extending a small path leading to the door.
Dab, Don’t Drag
To keep the trees fluffy, move your brush or sponge strictly up and down. If you drag it sideways, you’ll lose that lovely individual leaf texture.
Step 2: Adding the Autumn Foliage
-
Mix your leaf colors:
Prepare three piles of paint on your palette: pure Yellow Ochre, a mix of Orange and Red (for a deep rust), and a pure Orange. -
Dab the left tree:
Dip your round sponge applicator or stiff stencil brush into the rust-red mixture. Dab repeatedly in a circular shape around the top of the left tree trunk sketch. Keep the edges soft and slightly irregular. -
Texture the left tree:
While the paint is still tacky, dab a little pure Orange near the top center of the tree to create a subtle highlight. -
Create the right tree:
Clean your tool and switch to the Yellow Ochre. Dab a large, fluffy circle for the tree on the right side. This one should look golden and airy. -
Add the bushes:
Use a smaller brush or just the tip of your sponge to dab a small red bush on the right and a small orange bush on the left near the house. -
Paint the trunks:
Once the foliage is mostly dry, paint the tree trunks using Burnt Umber and a detail brush. Draw thin branches reaching up into the dabbed foliage, forming ‘Y’ shapes.
Make It 3D
Instead of regular acrylics, mix your leaf paint with a bit of modeling paste or thick gel medium to give the trees actual raised texture you can feel.
Step 3: Details and Outlines
-
Paint the door:
Fill in the rectangular door shape with the Burnt Umber paint mixed with a tiny dot of Yellow Ochre to warm it up. -
Outline the house:
Using a fine tip black marker or a liner pen, carefully trace the outline of the house, including the roofline and walls. I find a steady hand works best if you brace your pinky finger against the dry canvas. -
Define the windows:
Draw the window outlines with the black pen. Add a cross in the center of the square windows and a vertical line in the arched windows to create panes. -
Add the chimney smoke:
Mix a very watery grey wash (mostly water with a speck of black paint). Lightly paint a faint, swirling column of smoke rising from the chimney area. -
Detail the door:
Use the pen to add three small dots vertically on the door, representing the handle and hardware. -
Sprinkle falling leaves:
Dip the very tip of your smallest brush handle into red or brown paint. Dot the ground area randomly to look like fallen leaves resting on the grass.
Place this lovely piece on a mantel or bookshelf to bring a permanent burst of crisp autumn air into your home.


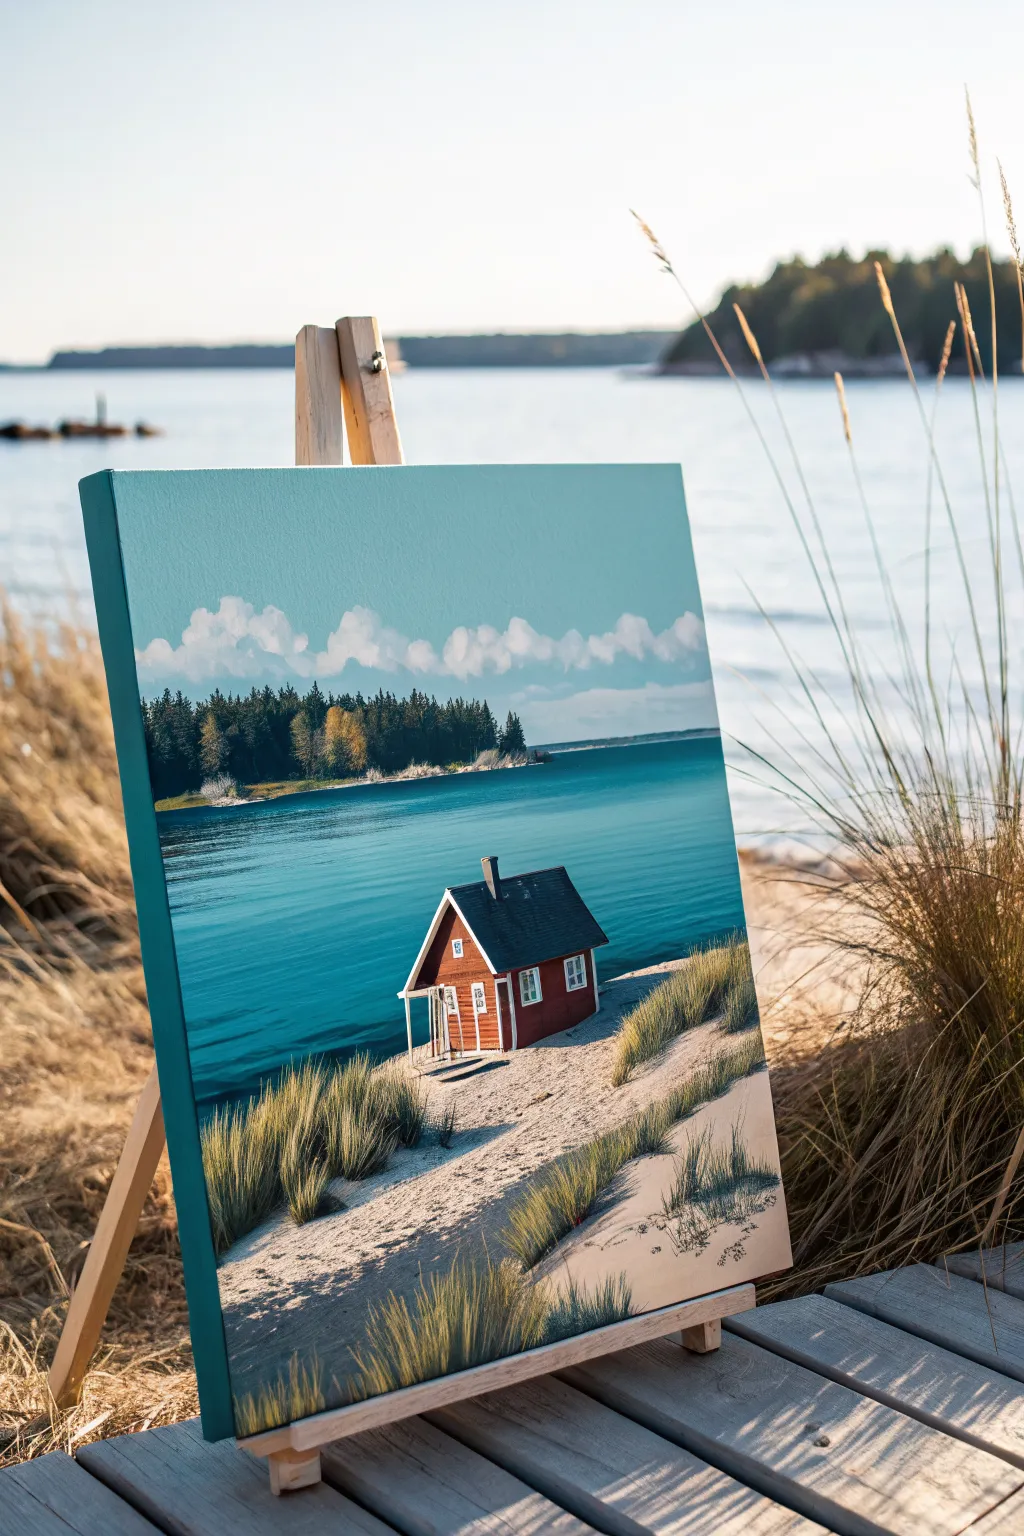
Beach House With Two-Tone Ocean Bands
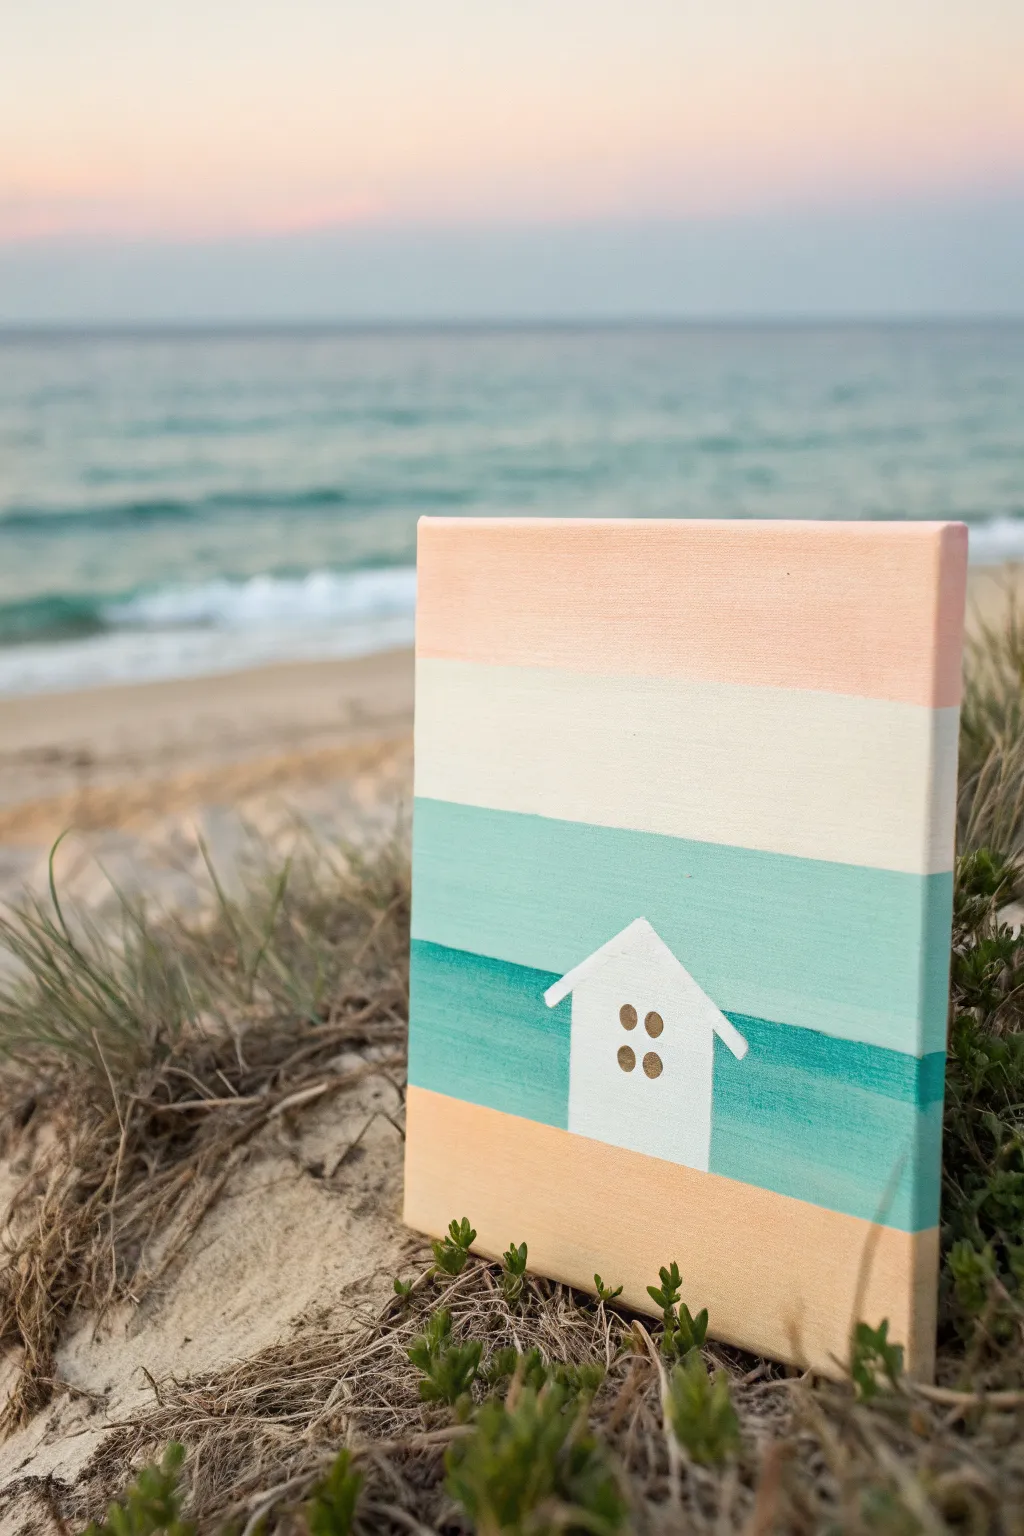
Capture the calm hues of a sunset shoreline with this minimalist beach house painting. Using simple horizontal bands and a stark silhouette, you will create a piece that feels both modern and tranquil.
Step-by-Step Tutorial
Materials
- Small stretched canvas (e.g., 5×7 or 8×10 inches)
- Acrylic paints: Peach/Coral, Cream/Off-White, Light Teal/Aqua, Dark Teal/Turquoise, Titanium White, Metallic Gold
- Painter’s tape or masking tape (approx. 1 inch width)
- Flat shader brush (medium width)
- Small fine detail brush
- Ruler
- Pencil
- Palette or paper plate
- Cup of water and paper towels
Step 1: Creating the Background Bands
-
Mark the sections:
Begin by lightly measuring your canvas vertically. Divide the height into five roughly equal sections using your pencil and ruler. These marks will guide your color bands. -
Paint the top band:
Load your flat brush with the peach or soft coral paint. Apply this color to the very top section, painting smooth horizontal strokes from edge to edge. Don’t forget to wrap the paint around the sides of the canvas for a finished look. -
Apply the second band:
Clean your brush thoroughly. For the second section down, mix a generous amount of cream or off-white. Paint this strip directly below the peach, carefully meeting the edge without blending too much. -
Add the light ocean color:
Switch to your light teal or aqua paint. Fill in the third section, which represents the lighter, shallower water. Try to keep your hand steady to maintain a straight line where it meets the cream section. -
Paint the deep ocean band:
For the fourth section, use the darker teal or turquoise shade. Paint this band horizontally, ensuring solid coverage. This darker tone adds depth and contrasts nicely with the lighter sections above. -
Finish the bottom band:
Clean your brush one last time and return to your peach or coral color. Paint the final bottom section to mirror the sky color at the top, grounding the composition. Let the entire background dry completely before moving on.
Wobbly Lines?
If you struggle with freehand straight lines, place strips of painter’s tape across the canvas before painting each band. Remove the tape while the paint is still slightly wet to prevent peeling.
Step 2: Adding the House Silhouette
-
Sketch the house:
Once the paint is dry to the touch, lightly sketch a simple house shape with a pencil. Position it so the roof peak sits in the light teal band, while the base rests in the bottom peach band. -
Create the roof overhang:
Draw the roof slightly wider than the house body to create distinct eaves on the left and right sides. This small detail makes the silhouette much more recognizable. -
Fill the silhouette:
Using a smaller flat brush or the edge of your medium brush, fill in the house shape with Titanium White paint. You may need two coats here to ensure none of the background colors show through. -
Refine the edges:
I like to use a very small detail brush to neaten up the corners of the roof and the sides of the house, ensuring the lines are crisp and straight. -
Mark the window:
Determine the center of the white house shape. Lightly mark four dots in a square formation where the window panes will go.
Make it Shine
For a magical touch, mix a tiny amount of glitter medium into the dark teal band to mimic sunlight glistening on the deeper ocean waves.
Step 3: Final Details
-
Paint the window panes:
Dip the tip of a fine detail brush or the back end of a paintbrush handle into metallic gold paint. Carefully dot or paint four small circles to create the window grid. -
Touch up lines:
Inspect the horizontal lines between your color bands. If any areas look wobble, use the original paint color and a steady hand to straighten them out. -
Check opacity:
Look closely at the white house. If the teal background is still slightly visible underneath, apply a final thin layer of white paint around the gold window dots. -
Seal the work:
Once fully dry, you can apply a layer of matte or gloss varnish to protect the painting from dust and fading.
Now you have a peaceful slice of the seaside ready to display on your shelf or desk
BRUSH GUIDE
The Right Brush for Every Stroke
From clean lines to bold texture — master brush choice, stroke control, and essential techniques.
Explore the Full Guide
Fence-and-Front-Yard House Scene
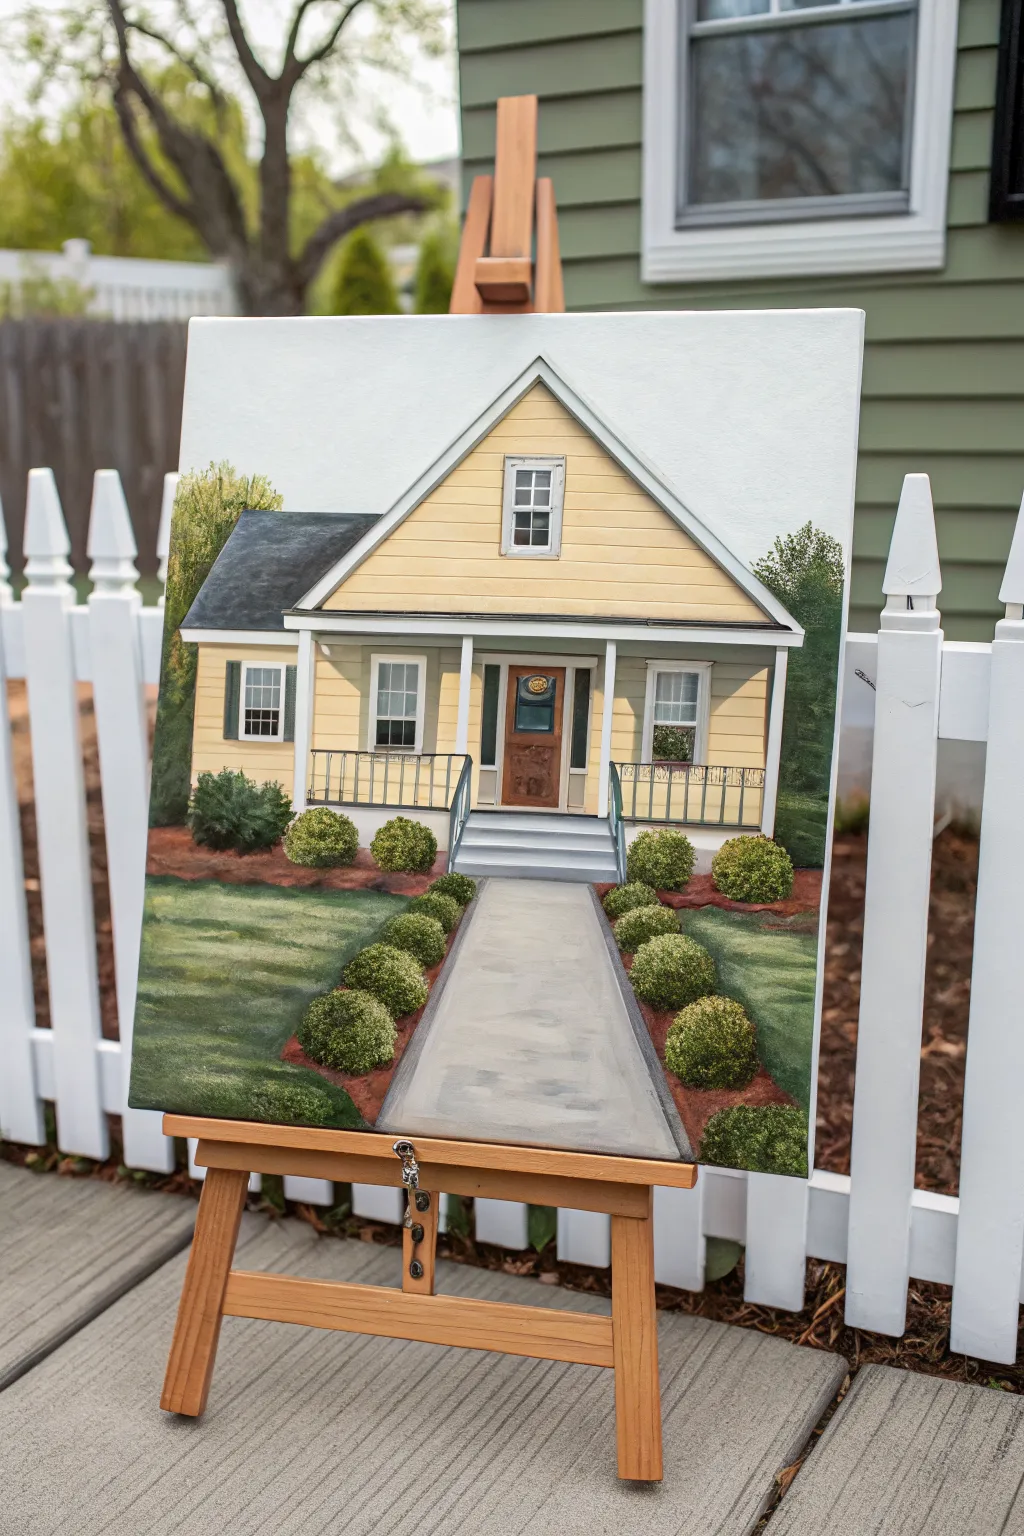
Capture the welcoming spirit of a home with this detailed acrylic painting of a classic yellow cottage. This project focuses on clean architectural lines, warm siding tones, and structured landscaping to create a piece that feels both realistic and cozy.
Step-by-Step Tutorial
Materials
- Stretched canvas (16×20 or similar)
- Acrylic paints (Titanium White, Yellow Ochre, Cadmium Yellow, Burnt Sienna, Burnt Umber, Payne’s Gray, Sap Green, Hooker’s Green)
- Set of brushes: 1-inch flat, medium filbert, small round, and a fine liner brush
- Ruler or T-square
- Pencil and eraser
- Palette and water cup
- Paper towels
- Painters tape (optional for straight lines)
Step 1: Drafting the Structure
-
Establish the Horizon:
Begin by lightly sketching a horizontal line about one-third of the way up the canvas to separate the lawn from the house foundation. -
Outline the House Shape:
Using a ruler, draw the main triangle of the roof peak centered on the canvas. Add vertical lines for the side walls and horizontal lines for the porch roof and foundation. -
Sketch Architectural Details:
Lightly pencil in the windows, the central front door, the porch columns, and the staircase leading down. Keep your lines light so they are easy to paint over later. -
Map the Pathway:
Draw the concrete walkway extending from the bottom of the stairs to the bottom edge of the canvas. Make the path slightly wider at the bottom to create perspective.
Step 2: Blocking in Base Colors
-
Paint the Sky:
Mix a very pale gray-blue using White and a tiny drop of Payne’s Gray. Fill in the sky area above the roofline, keeping the color flat and opaque. -
Base Coat the Siding:
Mix Yellow Ochre with White to create a soft, creamy yellow. Apply this to the main body of the house, carefully painting around windows and columns. -
Roof and Foundation:
Paint the roof area with a dark charcoal mix (Payne’s Gray and Burnt Umber). Use a lighter gray for the foundation strip along the bottom of the house. -
Lawn Underpainting:
Fill the grass area with a medium green tone using Sap Green mixed with a little White. Don’t worry about grass texture yet; just get the color down.
Straight Line Secret
For crisp siding lines or columns, lay down a strip of painter’s tape. Paint over the edge to seal it, let dry, then peel for a razor-sharp straight line.
Step 3: Adding Details and siding
-
Clean White Trim:
Use your flat brush and pure Titanium White to paint the fascia boards, porch columns, window frames, and the picket fence railing on the porch. -
Siding Lines:
Once the yellow base is fully dry, use a ruler and a very dilute mix of Burnt Sienna to paint thin horizontal lines across the house to represent the lap siding. -
Creating the Walkway:
Paint the concrete path with a light gray. While wet, streak in subtle touches of white and darker gray horizontally to mimic the texture of cement sections. -
Door and Shutters:
Paint the front door a warm wood tone using Burnt Sienna. Paint the shutters and any dark window panes with a deep gray-green or charcoal.
Level Up: Seasonal Shift
Change the season by altering the landscaping! Add bright tulips along the path for spring, or paint orange pumpkins on the stairs for an autumn vibe.
Step 4: Landscaping and Final Touches
-
Stippling the Bushes:
Load a worn or stippling brush with dark green. Tap in the rounded shapes of the bushes lining the walkway and foundation. -
Highlighting Greenery:
Mix a lighter lime green (Sap Green + Yellow). Dab this onto the top-left side of each bush to simulate sunlight hitting the foliage. -
Deepening Shadows:
Glaze a thin, dark shadow under the porch roof and beneath the eaves to give the house dimension. I find this step crucial for making the porch look recessed. -
Mulch Beds:
Paint the soil areas around the bushes with Burnt Sienna, dabbing the brush to create an uneven, earthy texture. -
Fine Line Definition:
Use your liner brush with slightly watered-down dark gray to sharpen the edges of the steps, window panes, and railing spindles.
Step back and admire your architectural masterpiece, now ready to bring a touch of home to any wall.
Tiny Houses Row in Simple Perspective
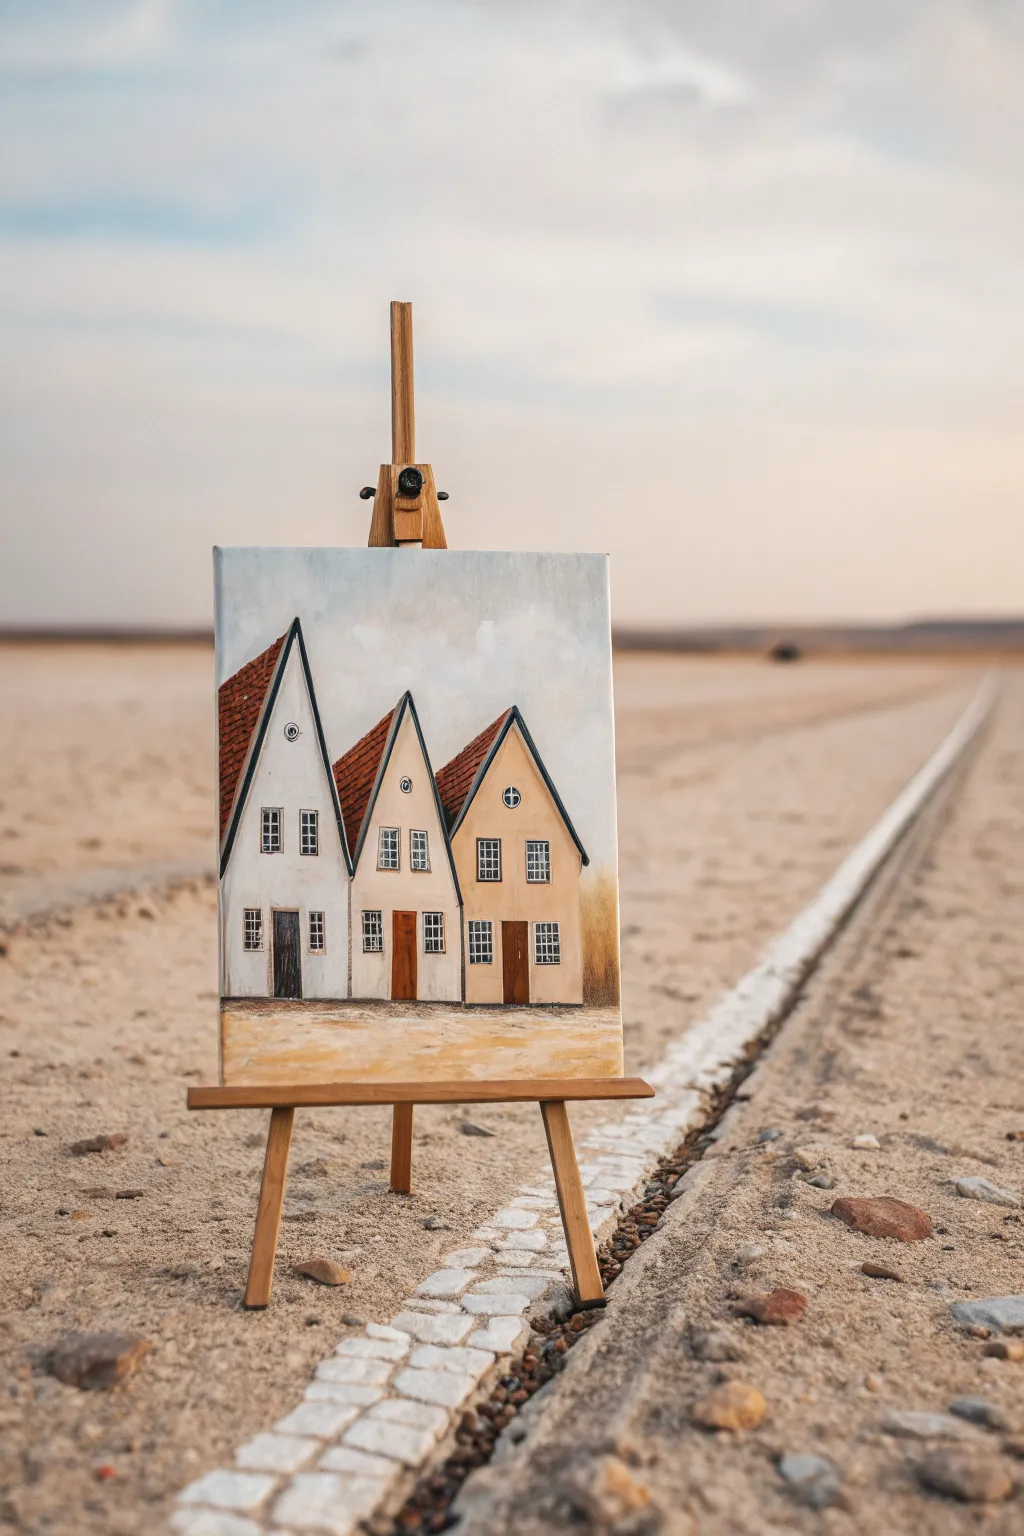
Capture the charm of storybook architecture with this delightful acrylic painting of three narrow, high-pitched houses. With its soft, muted palette and simple geometric shapes, this project is perfect for beginners looking to practice clean lines and basic perspective.
Step-by-Step Guide
Materials
- Stretched canvas (e.g., 11×14 or similar portrait orientation)
- Acrylic paints: Titanium White, Burnt Umber, Yellow Ochre, Burnt Sienna, Payne’s Grey, Unbleached Titanium (Beige)
- Flat shader brushes (medium and large)
- Fine liner or detail brush (size 0 or 00)
- Ruler or straight edge
- HB pencil
- Palette and water cup
- Paper towels
Step 1: Planning and Sky
-
Sketch the horizon:
Begin by lightly drawing a horizontal line across the lower third of your canvas. This will separate your foreground ground from the sky. -
Outline the houses:
Using your ruler, draw three tall triangles side-by-side. The middle one should be slightly behind the other two, so let the outer triangles overlap it just a bit. Make the roofs very steep and pointed for that distinctive look. -
Add architectural details:
Sketch in vertical lines for the walls below the triangular roofs. Draw small rectangular windows with grids and arched rectangular doors. Varied heights add character, so don’t worry about perfect symmetry. -
Paint the sky base:
Mix Titanium White with the tiniest touch of Payne’s Grey and Burnt Umber to create a cloudy, off-white sky color. Paint the entire sky area around your house outlines, using broad, sweeping strokes. -
Create soft clouds:
While the sky is still slightly damp, mix a slightly darker grey-blue and dab it gently into the upper corners and random spots to create soft, diffused cloud shadows. Blend the edges with a clean, dry brush for a hazy effect.
Wobbly Lines?
If your hand shakes while outlining, try resting your pinky finger on a dry part of the canvas for stability. You can also use a black paint pen instead of a brush for easier control.
Step 2: Blocking in the Houses
-
Paint the first house:
For the leftmost house, use pure Titanium White or a very light cream. Fill in the wall shape carefully, avoiding the windows and door. -
Color the second house:
Mix White with a drop of Yellow Ochre and Unbleached Titanium to get a warm, sandy beige. Paint the middle house wall with this mixture. -
Paint the third house:
For the rightmost house, create a slightly darker tan by adding a touch more Yellow Ochre and a speck of Burnt Sienna to your previous mix. This variation helps distinguish the buildings. -
Lay down the roof base:
Mix Burnt Sienna with a little Burnt Umber for a rich, reddish-brown. Paint the steep triangular roof sections. I find that doing two thin coats here gives better coverage than one thick coat.
Add Some Life
Make the scene cozy by painting a tiny wreath on a door, or add a thin chimney with a wisp of smoke coming out of the tallest roof peak.
Step 3: Details and Ground
-
Paint the foreground:
Mix White, Yellow Ochre, and a little Burnt Sienna to create a sandy ground color. Paint the area below the houses, using horizontal strokes. Add a few streaks of lighter white for texture. -
Add roof texture:
Once the roof base is dry, take a smaller brush with dark brown (Burnt Umber) and dab small, scale-like patterns or dots onto the reddish roofs to simulate tiles or shingles. -
Outline the structures:
Using your fine liner brush and thinned Payne’s Grey or Black, carefully outline the steep peaks of the roofs and the edges of the walls. Keep the lines crisp. -
Fill the windows:
Paint the inside of the window rectangles with a light grey. Once dry, use your liner brush to paint the dark grid frames (muntins) over the grey. -
Paint the doors:
Use Burnt Umber or a dark wood tone for the doors. You can add a tiny highlight of Unbleached Titanium to suggest a curve or a handle. -
Ground the houses:
Mix a dark brown splashy wash and gently apply it right at the base of the houses where they meet the ground. This ‘dirt’ layer settles them into the landscape so they don’t look like they are floating. -
Final touches:
Check your white house; if the paint looks thin, add a second coat to brighten it up. Add tiny circular attic windows near the peaks if you have space.
Step back and admire your charming little village, complete with all the personality of a storybook illustration

PENCIL GUIDE
Understanding Pencil Grades from H to B
From first sketch to finished drawing — learn pencil grades, line control, and shading techniques.
Explore the Full Guide
Swirly Sky Over a Small Grounded House
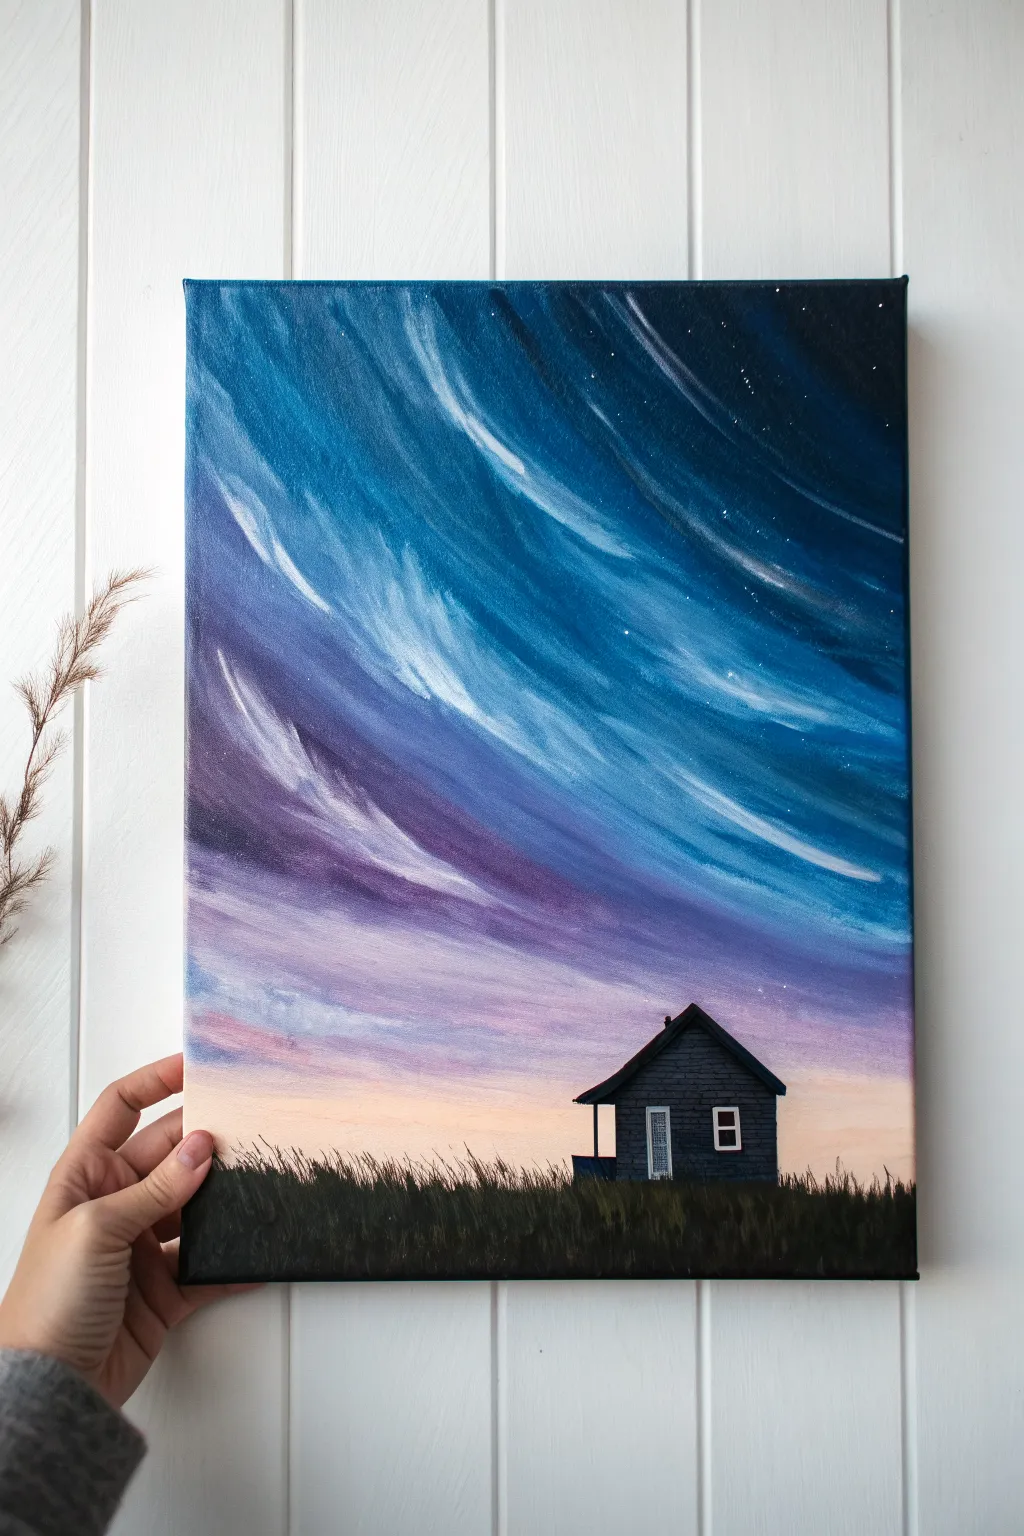
This striking canvas captures the magic of a vast, moving sky over a humble silhouette. By layering curved strokes of colour, you will build a dynamic background that leads the eye straight to the peaceful little house grounded in the shadows.
Step-by-Step
Materials
- Rectangular stretched canvas (e.g., 11×14 or 16×20 inches)
- Acrylic heavy body paints (Titanium White, Paynes Grey, Phthalo Blue, Dioxazine Purple, Magenta, Cadmium Orange, Mars Black)
- Large flat brush (1 inch)
- Medium filbert brush
- Small round brush (size 2-4)
- Fine detail liner brush
- Palette knife (optional, for mixing)
- Water cup and paper towels
Step 1: Setting the Scene
-
Establish the horizon:
Approximately one-fifth of the way up from the bottom of your canvas, draw a very faint pencil line to mark your horizon. This will separate the grassy ground from the expansive sky. -
Draft the house shape:
Slightly right of centre on your horizon line, lightly sketch the simple silhouette of a house. It should be relatively small to emphasize the scale of the sky. Include the main body, a pitched roof, and a small porch overhang on the left side. -
Base layer for the sky:
To ensure your canvas is covered, apply a thin wash of white paint over the entire sky area. This wet base will help your colours blend more smoothly in the next steps.
Step 2: Creating the Swirling Sky
-
Paint the horizon glow:
Using your flat brush, pick up a mix of White and a tiny touch of Cadmium Orange. Paint horizontal strokes just above the horizon line, fading upward into a soft pink by adding a little Magenta. -
Introduce the purple transition:
clean your brush and mix Dioxazine Purple with a bit of White. Apply this above the pink layer, but instead of straight lines, start curving your brushstrokes diagonally from the bottom-left toward the top-right. -
Add the deep blue mid-tones:
Move higher up the canvas with Phthalo Blue and White. Continue following that sweeping diagonal curve. The strokes should feel like they are wrapping around the sky, creating a tunnel-like effect. -
Deepen the corners:
For the top right and top left corners, use a mix of Phthalo Blue and Paynes Grey (or a touch of Black). This creates the deep night sky effect and frames the swirling motion in the centre. -
Blend the gradients:
While the paint is still tacky, use a soft, clean dry brush to gently feather the edges where the colours meet. I find it helpful to wipe the brush often to avoid muddying the vibrant hues. -
Add motion highlights:
Switch to a filbert brush with pure Titanium White. Create swooping, distinct streaks through the blue and purple sections, following the established curve. Let these streaks feather out at the ends to look like wind-blown clouds.
Muddy Sky Fix
If your blue and orange accidentally mix into brown, stop. Let the layer dry completely, then repaint the transition area with a “buffer” colour like soft pink or violet.
Step 3: The House and Ground
-
Block in the ground:
Using Mars Black mixed with a tiny bit of Green or Brown (to avoid it looking flat), paint the entire ground area below the horizon line. Keep the top edge slightly uneven to suggest grass. -
Paint the house silhouette:
Using a small round brush and a dark grey (mix Black and White), fill in the house shape. It shouldn’t be pitch black, as we want it to stand out slightly against the dark grass. -
Add shadows:
Use pure Black to paint the side of the house that faces away from the main light source (if imagining a moon), or simply darken the bottom of the structure to ground it. -
Detail the windows and door:
With a fine liner brush and soft grey paint, outline two small windows and a door frame. Fill the window panes with a very dark grey, distinct from the house siding colour. -
Add siding texture:
Using extremely faint horizontal strokes of a slightly lighter grey, suggest the texture of wood siding on the house. Keep this subtle so it doesn’t overpower the silhouette.
Add a Window Glow
Make the house look lived-in by painting the inside of the windows with a tiny dab of pale yellow or warm orange, mimicking a warm lamp turned on inside.
Step 4: Final Details
-
Paint the tall grass:
Load a liner brush or the edge of a small flat brush with black paint. Flick distinct, sharp lines upward from the bottom of the canvas to create tall grasses reaching toward the horizon. -
Vary grassy heights:
Ensure the grass is uneven, with some taller stalks overlapping the bottom of the house and the horizon glow, adding depth to the foreground. -
Add the stars:
Dilute a small amount of White paint with water until it is inky. Dip a stiff brush (or toothbrush) into it and flick the bristles to splatter tiny stars into the darkest blue corners of the sky. -
Place focal stars:
Use your liner brush to manually place a few larger, brighter stars in the deep blue swirls to create constellations or focal points.
Step back and admire the contrast between your dynamic sky and the quiet stillness of the landscape
Monochrome House in One Color Family
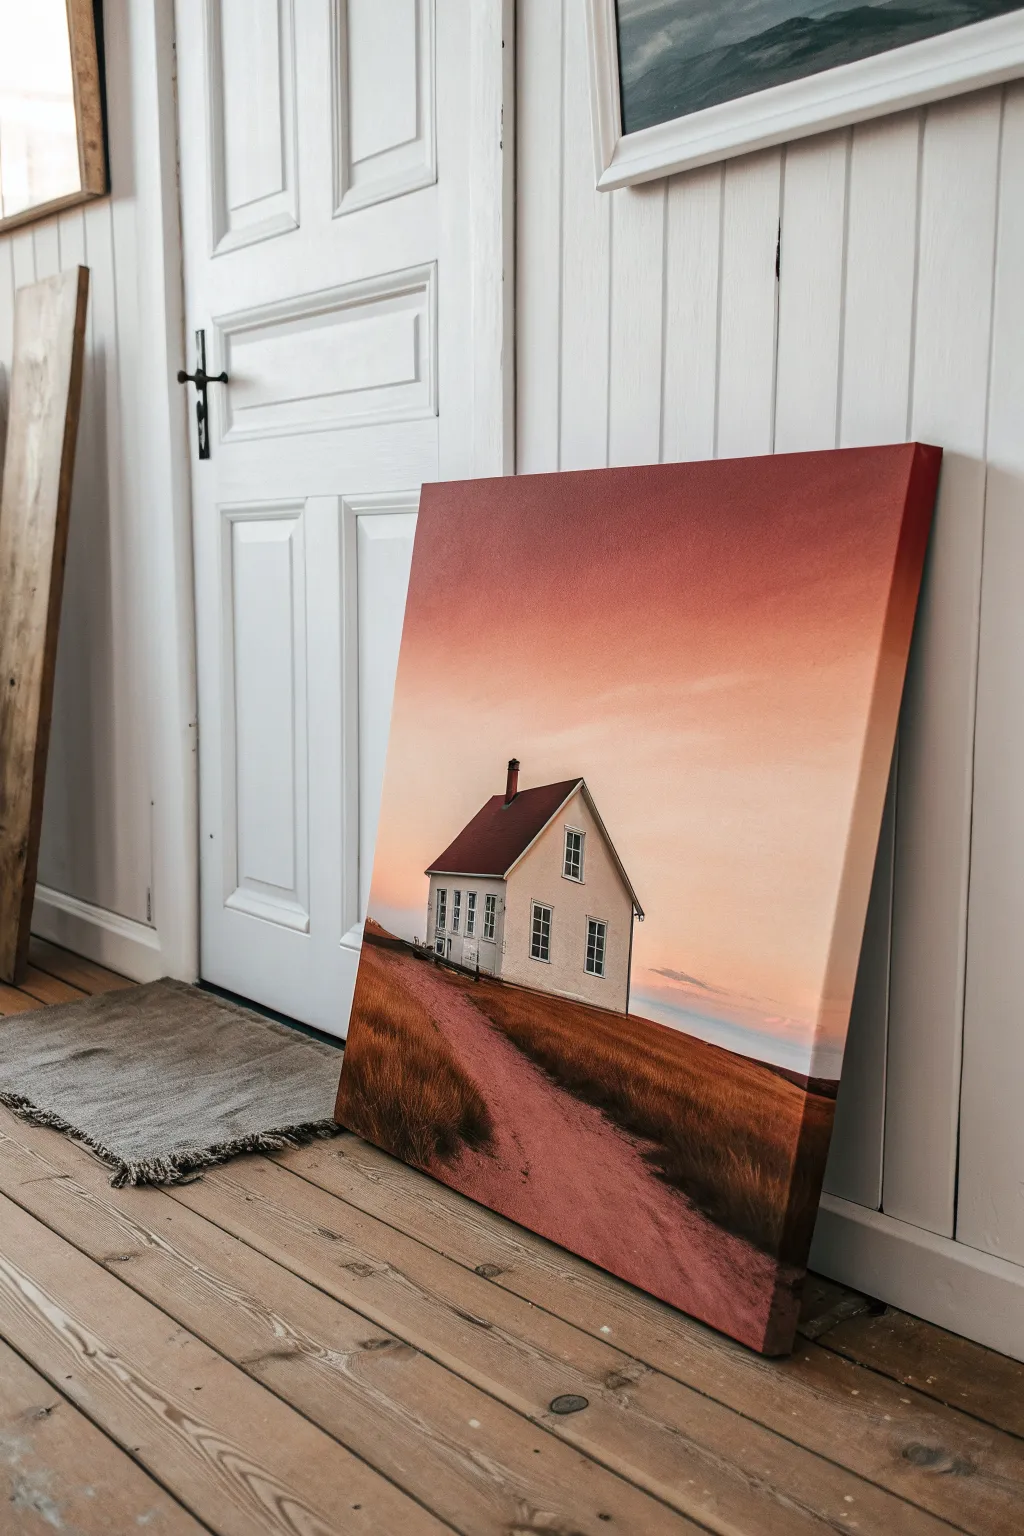
This evocative project explores the power of a limited color palette, using warm reddish-orange hues to create a serene, dreamlike atmosphere. By focusing on a single color family, you’ll learn how to build depth and mood through subtle gradients.
Step-by-Step Guide
Materials
- Stretched canvas (16×20 or similar)
- Acrylic paints: Titanium White, Burnt Sienna, Cadmium Red, Yellow Ochre, Burnt Umber, Mars Black
- Large flat brush (2-inch)
- Medium filbert brush
- Small round detail brush
- Ruler or straight edge
- Pencil (HB or H)
- Palette knife (optional for mixing)
- Water cup and paper towels
Step 1: Planning and Sketching
-
Prime the Surface:
If your canvas isn’t pre-primed, apply one or two coats of gesso. Even on pre-primed canvases, a very thin wash of Burnt Sienna mixed with lots of water can kill the stark white and help unify the warm tones later. -
Establish the Horizon:
Using a ruler and a light pencil touch, draw a low horizon line about one-third of the way up the canvas. It doesn’t need to be perfectly flat; a slight slope adds naturalism. -
Outline the House Structure:
Sketch the basic shape of the house slightly off-center. Focus on the perspective of the roofline and the vertical walls. Keep your lines faint so they don’t show through the lighter paint layers. -
Add Architectural Details:
Lightly pencil in the windows, the chimney, and the door placement. Don’t worry about perfect detail yet, just get the proportions right. -
Map the Path:
Draw the winding path leading from the foreground toward the house. Make the path wider at the bottom of the canvas and narrower as it recedes to create depth.
Step 2: Painting the Sky Gradient
-
Mix the Sky Colors:
Prepare a gradient palette: a deep rusty red (Burnt Sienna + Cadmium Red) for the top, transitioning to a soft peach (White + tiny dot of Cadmium Red + Yellow Ochre). -
Apply the Darkest Tone:
Using your large flat brush, paint the top third of the canvas with the deep rusty red mixture. Use long, horizontal strokes for a smooth finish. -
Blend downward:
Gradually mix in your lighter peach tone as you move down the canvas. Blend the colors while they are wet to create a seamless transition from the dark top to the pale horizon. -
Soft Horizon Glaze:
At the very horizon line, add a touch more white to your mixture to suggest atmospheric perspective. Let the sky dry completely before moving on.
Create Smooth Gradients
Work quickly while the acrylics are wet. If the paint drags, mist your canvas lightly with water to help the colors blend effortlessly.
Step 3: Blocking in the Landscape
-
Paint the Fields:
Mix Burnt Sienna with a touch of Burnt Umber. Use the filbert brush to paint the grassy areas on either side of the path. Let the brushstrokes follow the contours of the land. -
Define the Path:
For the dirt road, mix a dusty pink using White, Burnt Sienna, and a hint of Red. Paint the path using horizontal strokes to make it lie flat. -
Add Texture to the Grass:
While the field color is tacky, use a dry brush with slightly lighter orange-brown paint to flick upward strokes, suggesting dry, tall grass catching the sunset light.
Add Realistic Texture
Mix a pinch of fine sand or modeling paste into the paint for the dirt path. This physical texture mimics gravel and catches the light beautifully.
Step 4: The House and Details
-
Base Coat the House:
Paint the walls of the house with Titanium White mixed with a tiny speck of Burnt Umber. Pure white will look too stark against the warm background; an off-white cream sits better in the scene. -
Paint the Roof:
Use a dark crimson (Cadmium Red + Burnt Umber) for the roof. Apply it solidly, ensuring crisp edges against the sky. -
Shadows and Depth:
I prefer to mix a cool grey (White + Black) and apply a thin glaze to the side of the house that is facing away from the light source to give the building volume. -
Window Frames:
Switch to your smallest round brush. Carefully paint the window frames in white. If your hand is shaky, rest your pinky finger on a dry part of the canvas for stability. -
Dark Accents:
Fill the window panes with a dark grey or black to reflect deep interior shadows. Paint the chimney with the dark roof color, adding a highlight on one side. -
Final Highlights:
Add tiny touches of pure white to the edges of the roof and window sills where the light would hit hardest.
Step back and admire the tranquil warmth of your finished architectural landscape


Collage-Style House With Paper-Cut Shapes
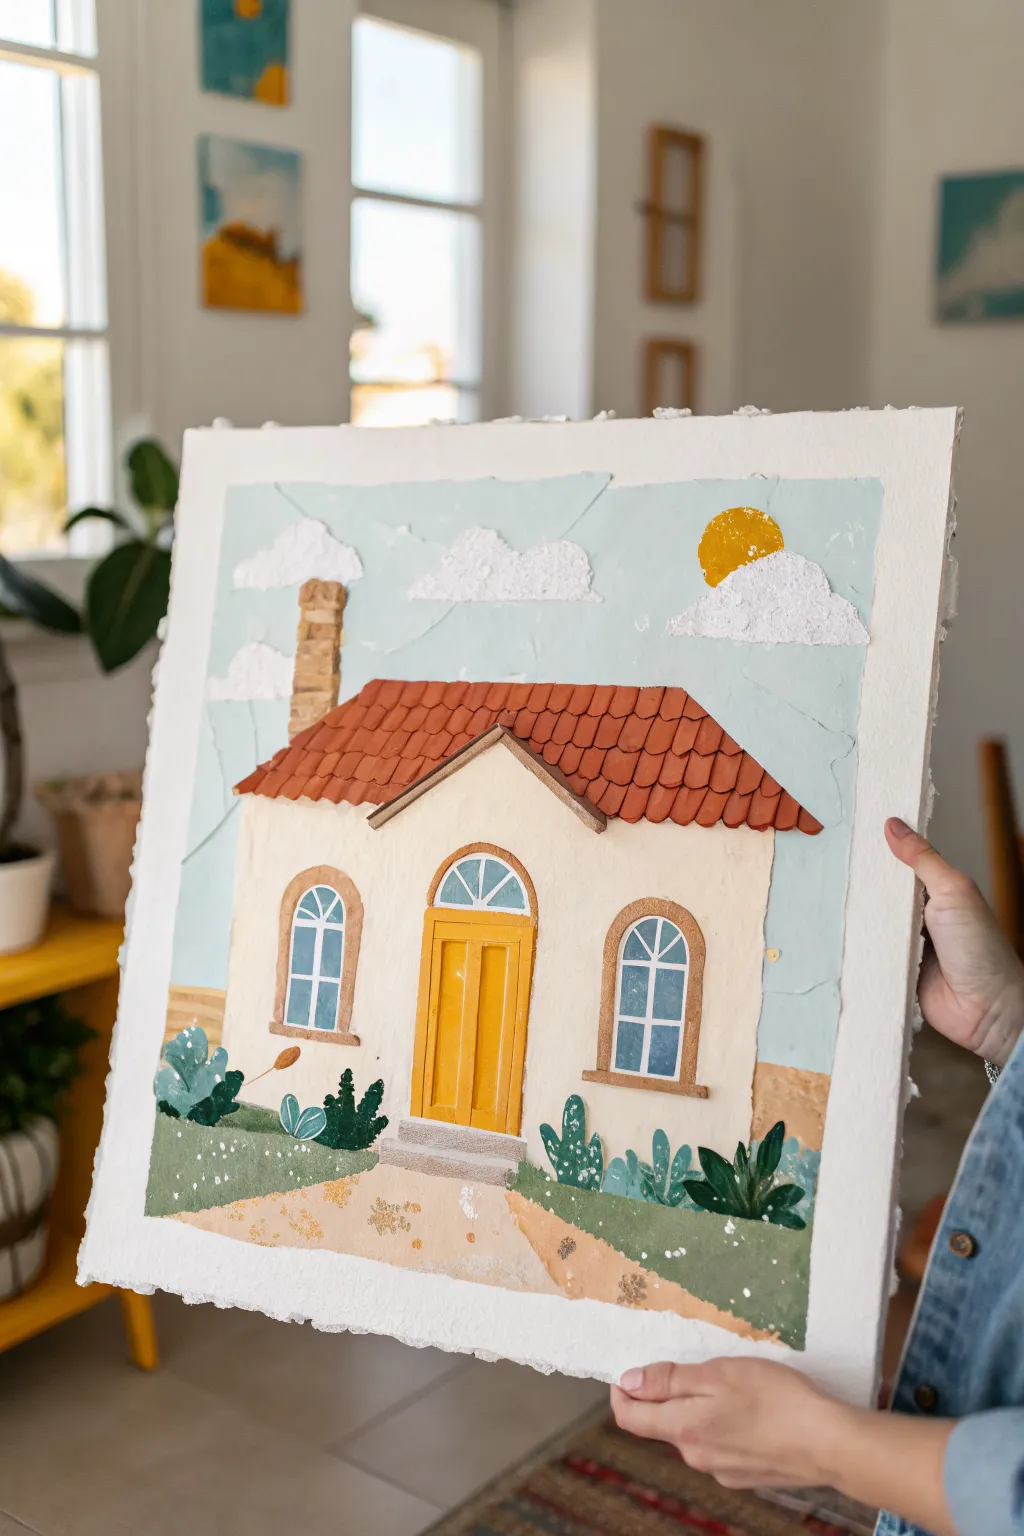
This charming artwork combines the structural beauty of paper collage with the tactile richness of modeling paste, resulting in a delightfully dimensional scene. The soft pastel sky and contrasting earthy roof tiles give it a warm, illustrative feel perfect for a cozy corner.
Step-by-Step Guide
Materials
- Heavyweight watercolor paper or rigid canvas panel (square format, approx. 12×12 inches)
- Modeling paste or white texture paste
- Palette knives (medium and small)
- Acrylic paints (pale blue, cream/off-white, terra cotta, yellow, grey, greens)
- Cardstock or thick watercolor paper (for cutouts)
- Scissors and X-ACTO knife
- Craft glue or gel medium
- Fine liner brushes
- Pencil and ruler
Step 1: Setting the Scene
-
Prepare the Background:
Start by mixing a very pale, calming blue acrylic paint. Using a palette knife rather than a brush, spread this color across the upper two-thirds of your canvas or heavy paper. Apply it somewhat unevenly to create a subtle, stucco-like texture for the sky. -
Ground the Composition:
For the bottom third, paint a soft green base for the lawn and a sandy beige tone for the central path. Don’t worry about perfect coverage yet, as we will be adding layers on top. -
Draft the House Shape:
Lightly sketch the outline of the house directly onto the dried background using a pencil and ruler. Center the main building but leave plenty of room above for the roof and chimney.
Glue Control
Use a heavy matte gel medium instead of school glue. It holds heavier paper pieces firmly and won’t cause the cardstock to buckle or warp from moisture.
Step 2: Building the House Structure
-
Create the House Base:
Mix modeling paste with a drop of cream or warm white acrylic paint. Apply this tinted paste inside your house outline using a palette knife. Smooth it out enough to look like plaster walls, but keep some surface grain for character. -
Form the Clouds:
While you have the white paste out, scoop up dollops with your palette knife and press them into the sky area. Rough up the surface with the tip of the knife to create fluffy, dimensional clouds. -
Add the Sun:
Mix a small amount of yellow acrylic into fresh modeling paste. Apply a circular shape in the upper right sky, ensuring it’s thick and textured to stand out against the blue background.
Pro Tip: Shadow Play
Once the collage is dry, use a very diluted grey wash to paint thin shadows under the roof eaves and window sills. This small step adds incredible pop and realism.
Step 3: Crafting the Roof and Elements
-
Cut the Roof Tiles:
On a separate sheet of thick cardstock, paint a large swatch of terra cotta or reddish-brown. Once dry, cut out rows of small, scalloped shapes or individual rounded rectangles to serve as roof tiles. -
Assemble the Roof:
Glue the tile strips onto the house shape, starting from the bottom eaves and overlapping them as you move upward to the peak. This layering creates authentic depth. -
Construct the Chimney:
Cut a rectangular chimney shape from cardstock. Paint it with a brick pattern using shades of tan and brown, then glue it behind the roof line on the left side. -
Make the Door and Window Frames:
Cut out the main front door and two arched window frames from thick cardstock or thin cardboard. Paint the door a cheerful mustard yellow and the window frames a warm brown.
Step 4: Adding Details and Accents
-
Install the Windows:
Cut pieces of medium-blue paper to fit behind your window frames to represent glass. Glue these ‘glass’ pieces to the house first, then glue the brown frames on top of them. -
Position the Front Door:
Glue the yellow door centrally on the house. Paint subtle vertical lines and panels onto the door to give it definition. I like to add a tiny white dot for the doorknob. -
Create the Porch Steps:
Using grey-tinted modeling paste or painted cardstock strips, create a small set of stairs leading up to the yellow door. -
Plant the Garden:
Cut various organic leaf shapes from green-painted paper. Arrange these around the base of the house and path to create shrubbery and plants.
Step 5: Final Flourishes
-
Add Floral Specks:
Dip a fine brush or a toothpick into white paint and dot tiny flowers onto the green bushes and the grass area for a delicate meadow effect. -
Refine the Path:
Dab a little extra beige modeling paste onto the path area to roughen it up, simulating gravel or dirt. -
Clean Up Edges:
If you are working on paper with deckled edges, ensure no paint has accidentally smeared on the white border. If working on canvas, paint the sides a neutral color to finish.
Enjoy displaying your textured architectural piece on a shelf or wall to brighten the room
Dreamy Floating House on Abstract Clouds
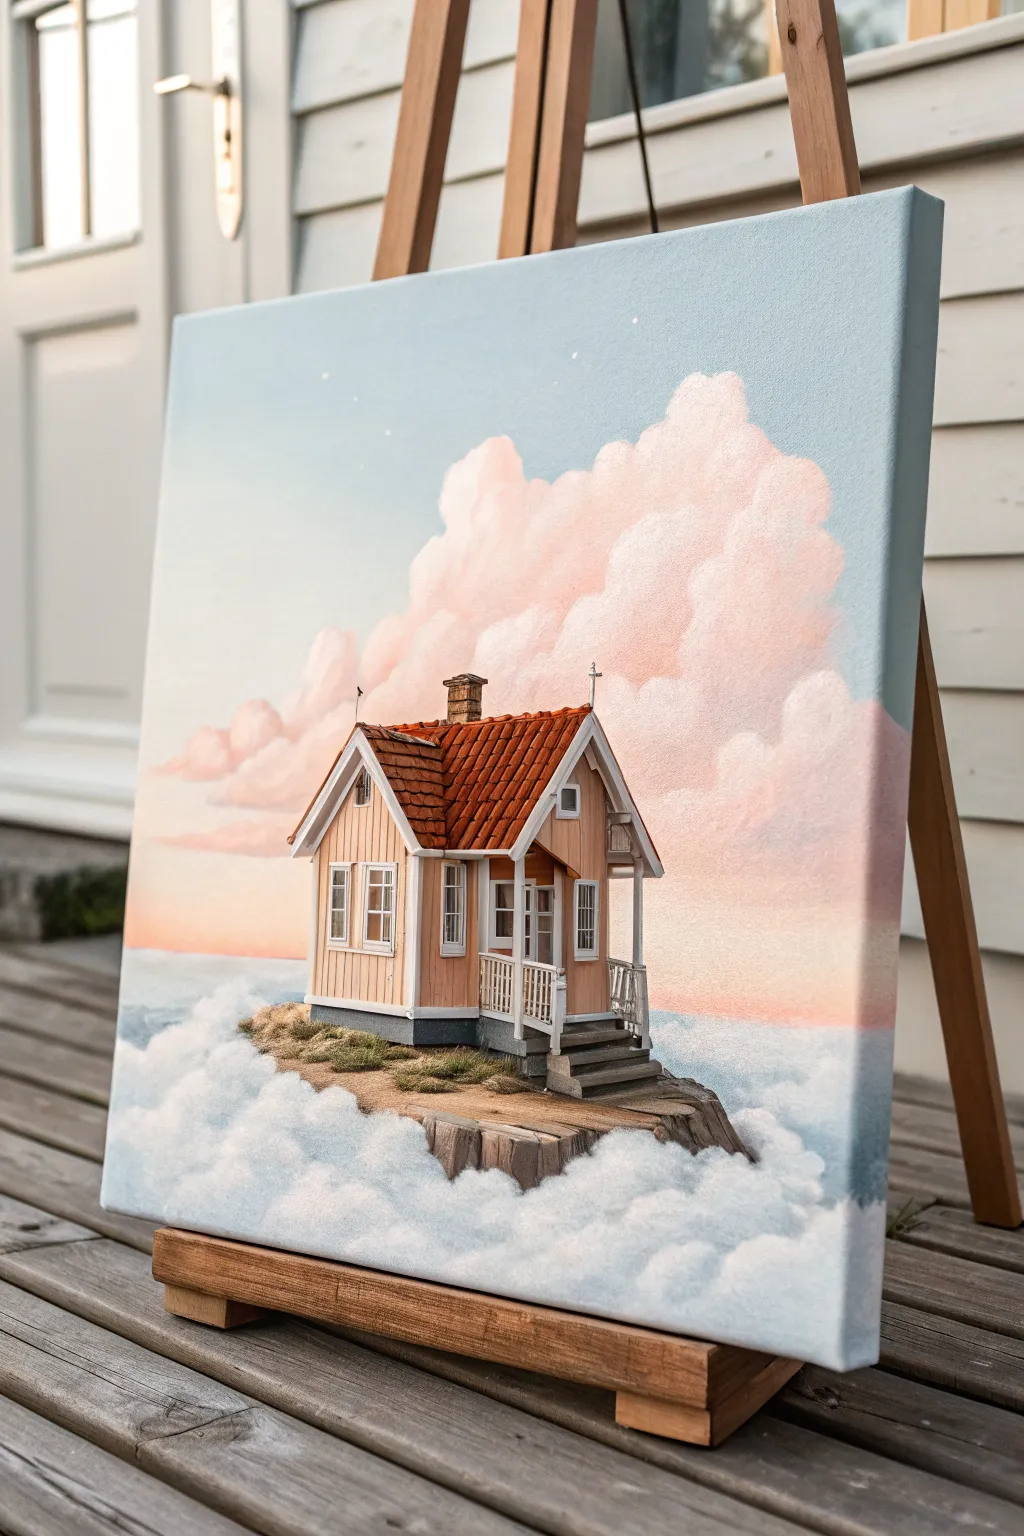
Transport yourself to a dreamlike world with this surreal acrylic painting of a cozy cottage drifting on a sea of clouds. The soft pastel palette and realistic architectural details create a stunning contrast that feels both grounding and magical.
Detailed Instructions
Materials
- Stretched canvas (square format, e.g., 16×16 or 20×20 inches)
- Acrylic paints (Titanium White, Sky Blue, Peach/Salmon, Burnt Sienna, Raw Umber, Paynes Grey, Cadmium Red)
- Large flat brush (for sky gradients)
- Medium filbert brush (for clouds)
- Small round brushes (sizes 0 and 2 for house details)
- Fine liner brush (for railing and window frames)
- Palette knife (optional, for rock texture)
- Pencil and eraser
- Ruler
- Water cup and paper towels
Step 1: Setting the Scene
-
Sketch the Composition:
Begin by lightly sketching the outline of the house in the center of the canvas using a pencil. Use a ruler to ensure your perspective lines for the roof and walls are straight. Sketch the jagged rocky base beneath the house and lightly indicate where the large cloud formations in the background will sit. -
Paint the Sky Gradient:
Mix Titanium White with a touch of Sky Blue. Start at the top of the canvas and paint downwards using a large flat brush. As you move lower toward the horizon line, add more white and a tiny hint of peach to create a soft, dawn-like transition. -
Add the Distant Clouds:
While the sky is drying, mix a soft pink using White, Peach, and a speck of Red. Use a medium filbert brush to block in the large, billowy clouds behind the house. Keep the edges soft and round. -
Define Cloud Shadows:
Mix a slightly darker mauve-grey using your pink mix and a tiny dot of Paynes Grey. Apply this to the bottom and crevices of the background clouds to give them volume and three-dimensionality.
Wobbly Lines?
If painting the fine railings is difficult, try using a white acrylic paint pen instead of a brush. It gives you more control for straight lines and architectural details.
Step 2: Building the House
-
Block in Base Colors:
Fill in the siding of the house with a warm peach or salmon tone. Paint the roof area with a flat coat of Burnt Sienna mixed with a little Cadmium Red. Don’t worry about details yet; just get the solid colors down. -
Shade the Siding:
Mix a slightly darker version of your peach wall color. Apply this to the sides of the house that would be in shadow (typically under the eaves and the side facing away from the light source). This establishes the building’s form. -
Paint the Windows and Doors:
Using a small flat brush, paint the interior shapes of the windows with a dark grey or black. Once dry, use a fine liner brush and pure white paint to carefully draw the window frames, mullions, and door details. -
Detail the Roof Tiles:
Switch to a small round brush. Mix a dark reddish-brown and paint small, rhythmic lines across the roof to suggest individual tiles. Highlight the top edge of each tile row with a lighter orange-red to make them pop. -
Add Architectural Trim:
Paint the fascia boards, corner trim, and the decorative porch columns in a crisp white. I like to use two coats here to ensure the white is opaque and sharp against the peach siding. -
Construct the Railing:
This requires a steady hand. Use your finest liner brush to paint the vertical spindles and horizontal rails of the porch. If the paint is too thick, thin it slightly with water so it flows smoothly off the brush.
Pro Tip: Depth Control
Make background clouds slightly bluer/cooler and foreground clouds warmer/whiter. This atmospheric perspective trick instantly pushes the background away.
Step 3: Grounding the Fantasy
-
Paint the Rocky Base:
For the island beneath the house, mix Raw Umber, White, and Grey. Use a small flat brush or even a palette knife to apply the paint in jagged, vertical strokes to mimic the texture of rough cliff stone. -
Add Shadows and cracks:
Take a dark brown-black mix and paint deep cracks and shadows into the rock face. Focus on the underside where the rock meets the clouds to show depth. -
Plant the Grass:
Mix a muted olive green. Using an old, splayed brush or a fan brush, tap gently on top of the rock surface around the base of the house to create the texture of tufty grass. -
Create the Foreground Clouds:
Load a round brush with pure Titanium White. Stipple (dab repeatedly) paint around the base of the rock island to create the fluffy ‘floor’ of clouds the house rests on. Let some of the white overlap the bottom of the rocks to make it look like the island is sinking into the mist. -
Soften the Cloud Edges:
While the white cloud paint is still wet, use a clean, slightly damp brush to blur the bottom edges into the underlying sky color, ensuring the clouds look vaporous rather than solid. -
Final Highlights:
Add tiny touches of bright yellow-white to the top corners of the chimney, the roof peak, and the tips of the grass to simulate sunlight hitting the structure. -
Final Inspection:
Step back and check your perspective lines and contrast. Add a few tiny stars in the upper blue sky if you want to enhance the magical evening feel.
Hang your new masterpiece and enjoy the peaceful escape of your floating sanctuary


Have a question or want to share your own experience? I'd love to hear from you in the comments below!