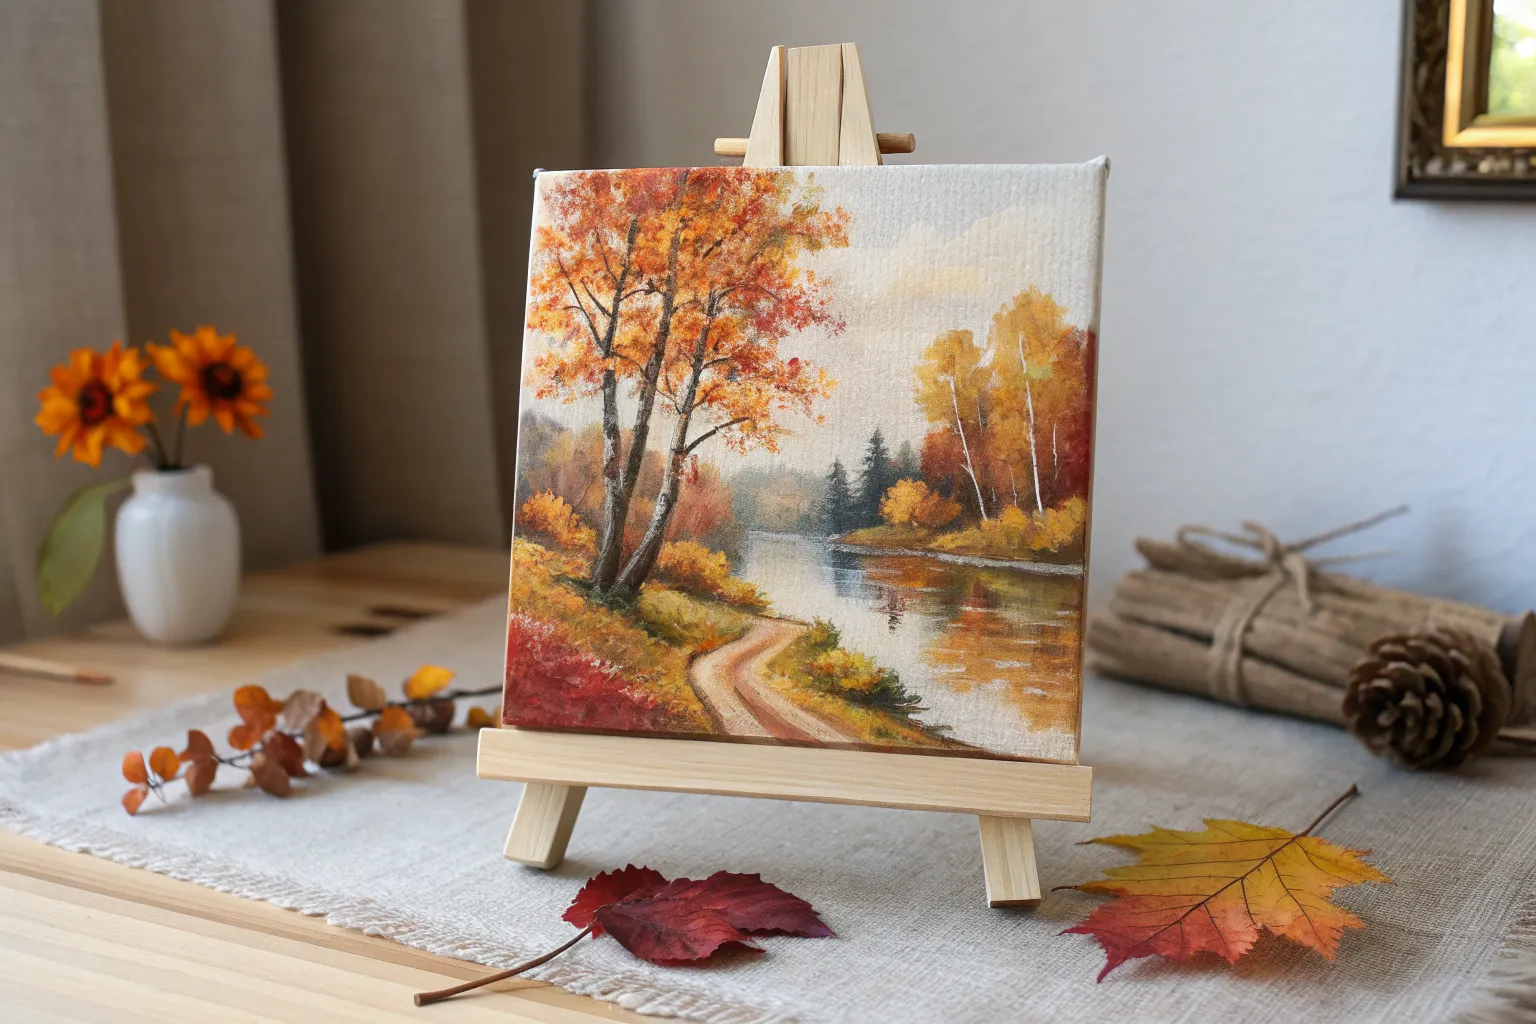
When I’m craving cozy color and easy inspiration, I always come back to autumn landscapes—they’re basically nature’s best palette. Here are some approachable autumn landscape painting ideas that let you play with warm foliage, cool skies, and all that crisp fall atmosphere.
Birch Grove in Peak Color
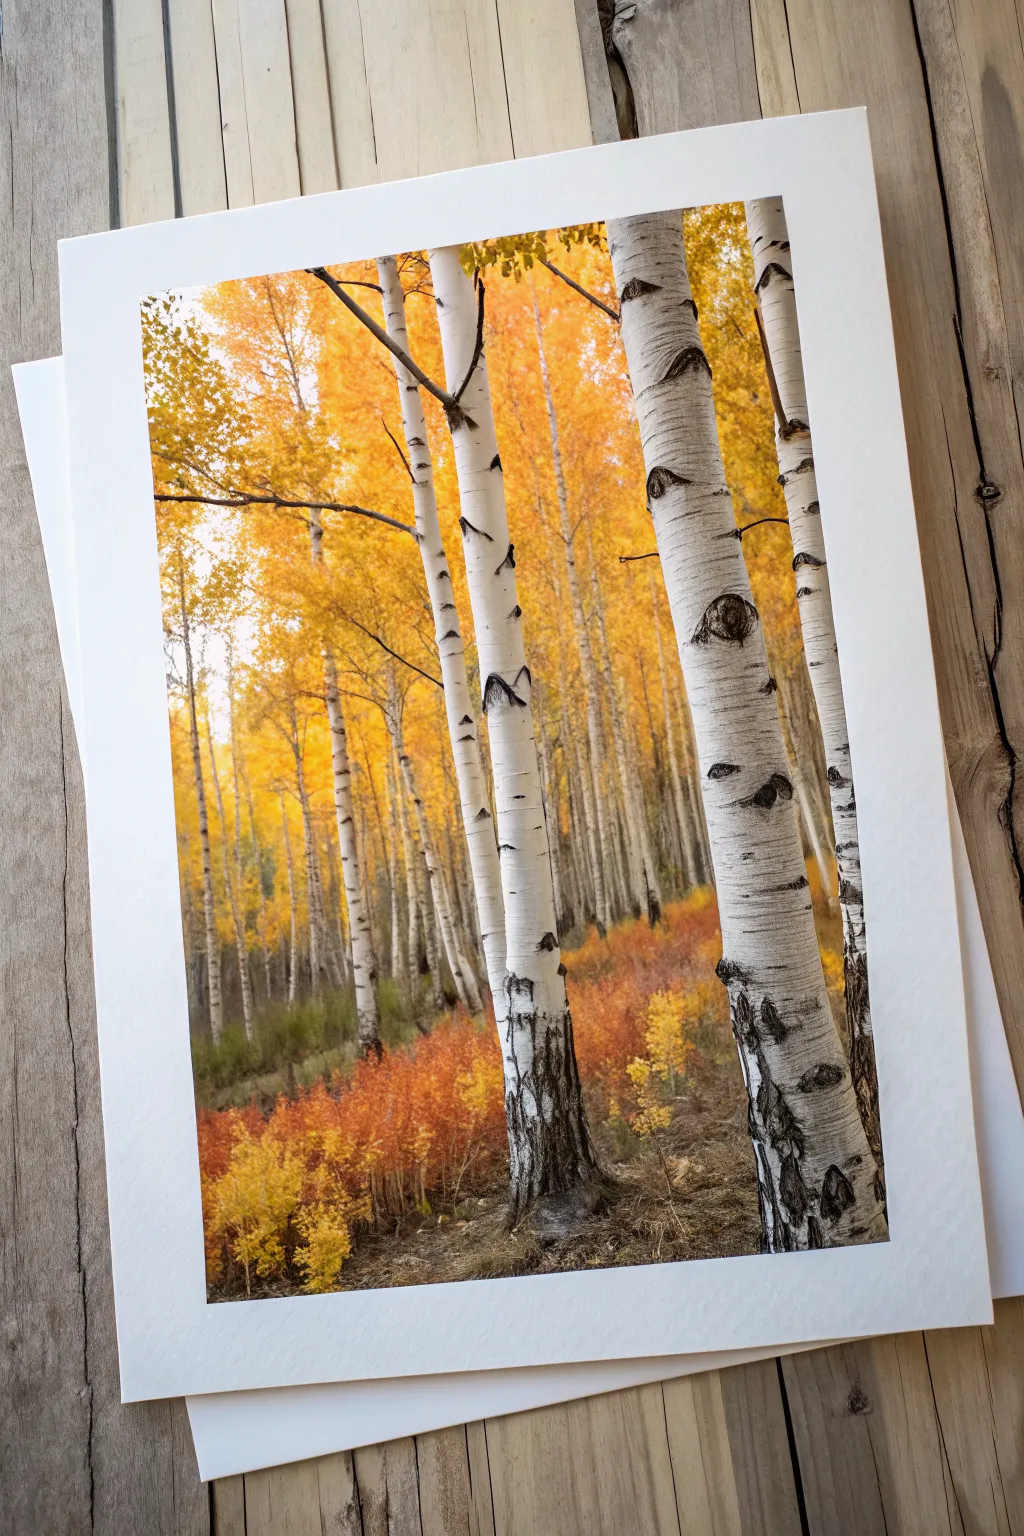
Capture the luminous glow of peak autumn foliage contrasting against stark white birch bark in this vibrant watercolor project. By masking the trunks early, you’ll preserve their crisp edges while letting the golden background colors flow freely.
Step-by-Step
Materials
- Cold press watercolor paper (140lb/300gsm)
- Masking fluid (drawing gum)
- Old brush or ruling pen for masking
- Watercolor paints: Lemon Yellow, Gamboge (or Cadmium Yellow Deep), Burnt Sienna, Payne’s Gray, Burnt Umber
- Large round brush (size 10 or 12)
- Small detail brush (size 2 or 4)
- Artist tape
- Board for mounting
- Paper towels
- Rubber cement pickup tool (optional)
Step 1: Preparation and Masking
-
Tape down the paper:
Secure your watercolor paper to a board using artist tape on all four sides. This creates a clean white border and prevents buckling when we add water. -
Sketch the composition:
Lightly sketch three main birch trunks in the foreground, with one dominant trunk on the right and two slightly thinner ones to the left. Suggest a few distant, thinner trees in the background, keeping lines faint. -
Apply masking fluid:
Using an old brush or applicator, coat the main tree trunks entirely with masking fluid. Don’t forget to mask a few thin, squiggly horizontal branches that cross the scene. -
Add texture masking:
Dab small dots of masking fluid on the ground area to preserve white highlights for fallen leaves or light-hit shrubs later. Allow the masking fluid to dry completely until tacky-free.
Protect Your Brushes
Never use your good sable brushes for masking fluid! It dries into rubber that ruins bristles instantly. Use a silicone applicator or a cheap synthetic brush designated just for glue.
Step 2: Painting the Glowing Background
-
Wet the paper:
With your large brush, wet the entire paper surface *except* the masked areas with clean water. You want a sheen, not puddles. -
Drop in sunlight yellow:
Load your brush with watery Lemon Yellow and wash it over the top two-thirds of the paper. Let it bleed and bloom softly. -
Deepen the canopy:
While the paper is still damp, dab Gamboge or deep orange into the upper corners and between the masked trunks to create depth in the distant leaves. -
Paint the forest floor:
Mix Burnt Sienna with a touch of orange. Stipple this mixture onto the bottom third of the paper, creating a textured look for the undergrowth shrubs. Keep the edges soft. -
Suggest distant trees:
Using a diluted mix of Gray and Sienna, paint thin, vertical lines in the background while the paper is slightly damp. These soft lines will look like distant trees fading into the mist. -
Dry completely:
Let the entire painting dry thoroughly. If the paper feels cool to the touch, it’s still wet.
Torn Paper Fix
If removing the tape rips the paper surface, heat the tape gently with a hair dryer on a low setting for a few seconds before peeling. This softens the adhesive for a clean release.
Step 3: Revealing and Defining the Birches
-
Remove the mask:
Gently rub off the masking fluid with a rubber pickup tool or your clean finger. You should now have stark white trunks against a colorful background. -
Shadow the trunks:
Mix a very watery gray (Payne’s Gray + water). Paint a strip of shadow down the left side of each trunk to give them a cylindrical form, keeping the right side bright white. -
Add characteristic markings:
Switch to your small detail brush. Using a thick mix of Payne’s Gray and Burnt Umber, paint horizontal lenticels (the stripy dashes) across the trunks. -
Create the ‘eyes’:
Paint the distinct triangular or eye-shaped scars where branches have fallen off. I like to make these dark at the center and slightly lighter at the edges. -
Darken the base:
Paint the very bottom of the trunks with a dark, textural mix of Umber and Gray to show the rougher, older bark near the ground.
Step 4: Final Details
-
Layer the underbrush:
Go back to the reddish-orange shrubs at the bottom. Use a damp brush to stipple more saturated color (Burnt Sienna mixed with red) to define individual bushes. -
Connect branches:
Using a rigger or fine liner brush, paint thin, jagged twigs connecting to the main trunks, ensuring they pass behind or in front of the trees logically. -
Enhance contrast:
If the background feels too light, add a glaze of darker orange foliage around the white trunks to make them pop even more. -
Remove tape:
Once absolutely dry, peel the tape away slowly at a 45-degree angle to reveal your crisp white border.
Step back and admire how the crisp black-and-white birch details create a stunning focal point against the warm, hazy autumn backdrop


Mountains Behind Crimson Trees

Capture the serene transition of seasons with this watercolor landscape, featuring hazy purple mountains and vibrant crimson birch trees framing a winding dirt road. This piece balances soft, wet-on-wet background washes with crisp, dry-brush details in the foreground.
Step-by-Step Tutorial
Materials
- Cold press watercolor paper (300 gsm)
- Watercolor paints (Indigo, Alizarin Crimson, Burnt Sienna, Yellow Ochre, Paynes Gray, Sap Green)
- Masking fluid (optional)
- Round brushes (sizes 2, 6, and 10)
- Flat wash brush (1/2 inch)
- Two jars of water
- Paper towels
- Pencil and kneaded eraser
- Painter’s tape
Step 1: Planning and Sky
-
Tape and Sketch:
Secure your paper to a board using painter’s tape to create a clean border. Lightly sketch the horizon line, the general shape of the mountain peaks, the winding road, and the vertical trunks of the birch trees on the left. Keep lines faint so they don’t show through the paint later. -
Protect the Birch:
If you struggle to paint around thin shapes, apply a thin layer of masking fluid to the birch tree trunks and let it dry completely. Alternatively, simply be mindful to leave these areas white as you paint. -
Wet the Sky:
Generously wet the sky area with clean water using your flat wash brush. The paper should glisten but not have standing puddles. -
Sunset Glow:
Drop in a very diluted wash of Yellow Ochre and a touch of diluted Alizarin Crimson near the horizon line where the sun would be setting. Keep this irregular and soft. -
Upper Sky:
While the paper is still wet, mix a faint purple-grey using Ultramarine and a dot of Alizarin Crimson. Paint the upper corners of the sky, letting the color bleed down towards the sunset hues without fully covering them.
Step 2: Creating Depth with Mountains
-
Distant Peaks:
Once the sky is bone dry, mix a cool, pale blue-grey. Paint the furthest mountain peak with a watery wash. To create the look of snow or light hitting the peak, leave the paper white on one side of the summit. -
Mid-Ground Ranges:
Mix a slightly stronger, warmer purple by adding more Alizarin Crimson to your grey mix. Paint the large mountain range in the middle ground. Ensure the edge of the previous mountain is dry so the distinct ridgelines remain crisp. -
Atmospheric Fade:
While this purple layer is still wet, rinse your brush and soften the bottom edge of the mountain range with clean water, fading it out into white mist where the trees will eventually go. -
Lower Hills:
Create a darker, moodier violet-grey mix. Paint the lowest set of hills, again softening the bottom edge to maintain that misty, atmospheric perspective.
Atmospheric Haze Tip
To make the mountains recede, add more water to your paint for each range further back. Objects in the distance are always lighter and bluer.
Step 3: Forests and Foliage
-
Distant Pines:
Mix Indigo with Sap Green for a deep, cool forest green. Using a size 6 round brush, dab in the distant treeline along the base of the purple mountains. Keep these shapes small and indistinct to suggest distance. -
Mid-Ground Trees:
Move closer to the foreground on the left side. Paint taller evergreen trees using a darker, less watery mix of the forest green. Use the tip of the brush to create the jagged tops of the pines. -
Layering the Forest:
While the green is damp, drop in touches of Paynes Gray to shadow the lower branches, adding volume to the forest density. -
The Dirt Road:
Mix a watery grey-brown using Burnt Sienna and a touch of Ultramarine. Paint the road surface with vertical, sweeping strokes that follow the curve of the path. Let the bristles split slightly to create texture. -
Grassy Banks:
Paint the fields on the right side of the road using varying shades of warm red-browns and deep purples to signify autumn heath. Use a stippling motion to suggest texture.
Muddy Colors?
If your purple mountains look muddy, let the layers dry completely between coats. Wet paint into damp paint often creates unwanted blooms or brown mixes.
Step 4: Foreground Details
-
Revealing the Birch:
If you used masking fluid, gently rub it off now to reveal the white paper trunks. If you painted around them, refine the edges if needed. -
Birch Bark Texture:
Take a nearly dry size 2 brush with dark grey paint. Paint the distinctive horizontal notches and markings on the birch trunks. Keep these marks random and varying in thickness. -
Shadowing Trunks:
Add a very thin wash of cool grey to the shadowed side (likely the right side) of the birch trunks to give them a cylindrical form. -
Crimson Canopy:
For the autumn leaves on the birch trees, mix a vibrant Alizarin Crimson with a touch of Burnt Sienna. Use the side of your brush to tap in clusters of leaves. -
Leaf Variation:
While the red leaves are wet, drop in tiny amounts of concentrated orange or dark brown to create variety within the foliage clusters. -
Final Contrast:
Add the darkest details now—deep shadows under the roadside bushes and defining lines in the road ruts—to anchor the painting.
Peel off the tape carefully to reveal your crisp border and enjoy the peaceful autumn view you have created


Cabin by a Quiet Shoreline
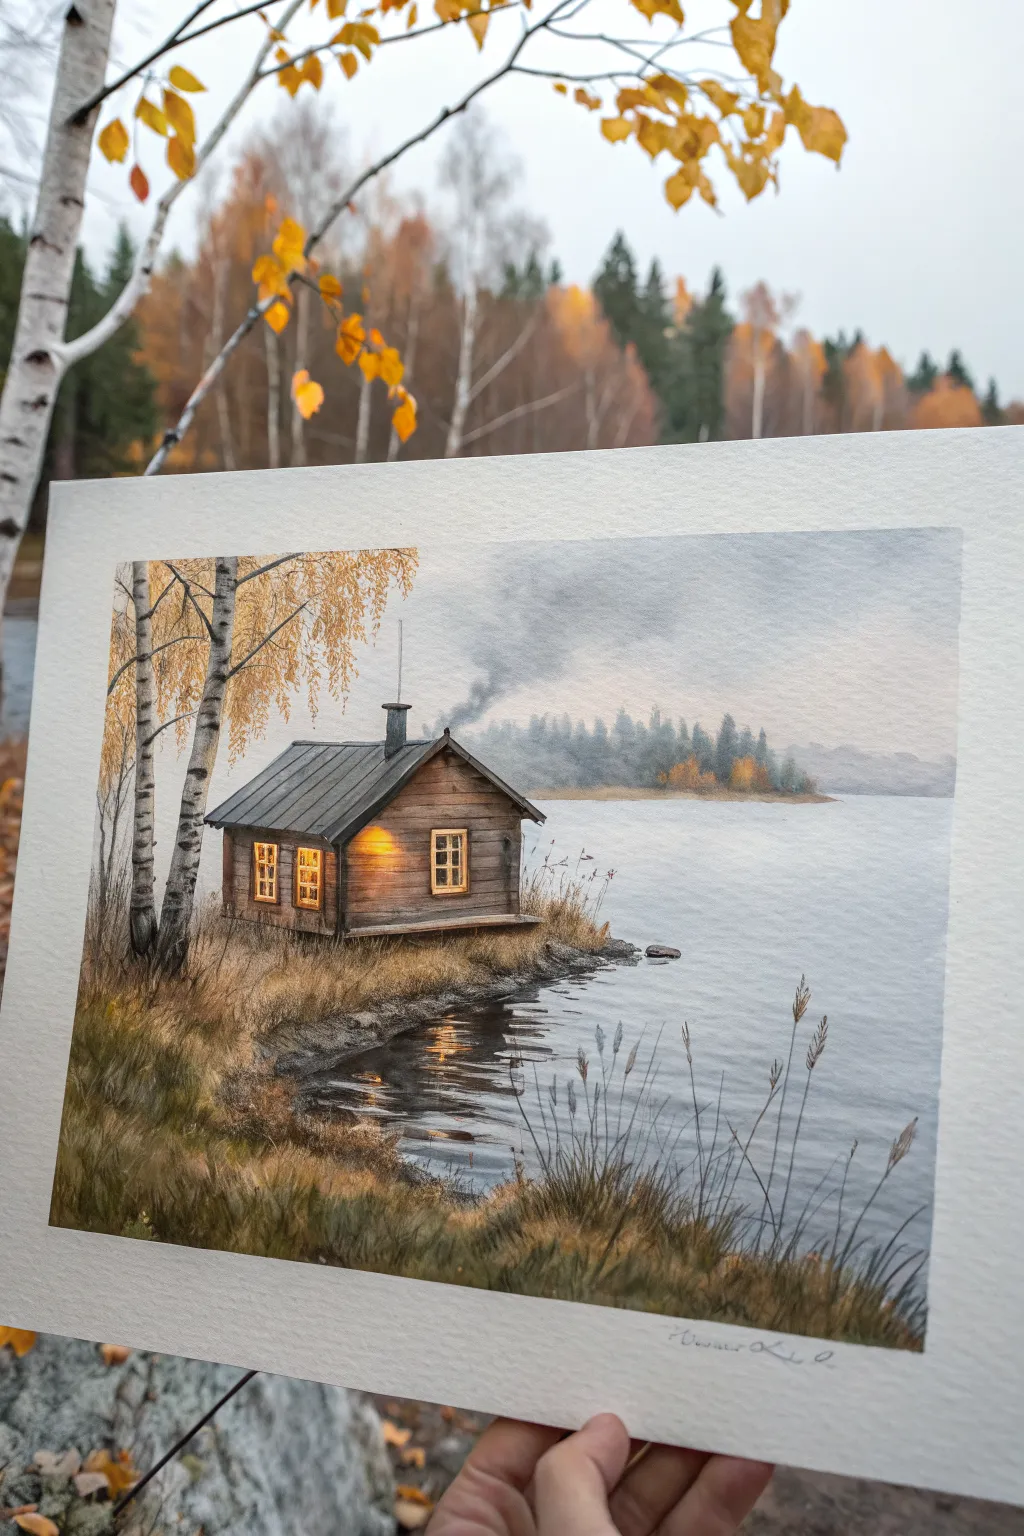
Capture the serene hush of a cabin retreat with this atmospheric watercolor guide. You’ll layer soft mists and sharp architectural details to create a cozy, glowing scene nestled in an autumn landscape.
Detailed Instructions
Materials
- Cold press watercolor paper (300gsm/140lb)
- Watercolor paints (Payne’s Grey, Burnt Sienna, Yellow Ochre, Ultramarine Blue, Alizarin Crimson, Sepia)
- White gouache
- Liquid masking fluid (optional but recommended)
- Flat wash brush (1-inch)
- Round brushes (sizes 8, 4, and 0 for details)
- Pencil and kneaded eraser
- Paper towels
- Two jars of water
Step 1: Planning and Sky
-
Light Sketching:
Begin with a very faint pencil sketch. Outline the horizon line slightly above the center, place the cabin structure on the left bank, and indicate the positions of the larger birch trees. Keep your lines minimal to avoid graphite smudging later. -
Masking Details:
If you are using making fluid, carefully apply it to the birch tree trunks and the tall grass stalks in the foreground. This preserves the white of the paper for bright highlights later. -
Wet-on-Wet Sky:
Wet the entire sky area and the water surface with clean water. While sheen is still visible, drop in a very diluted mix of Payne’s Grey and a touch of Ultramarine Blue for a moody, overcast sky, fading it out as you reach the horizon. -
Distant Trees:
While the sky is still damp (but not soaking), paint the distant tree line using a soft, hazy mix of Payne’s Grey and a hint of green. The damp paper will naturally blur the edges, creating a sense of depth and distance. -
Water Reflections:
Pull some of that same grey-blue sky color down into the water area making horizontal strokes. Leave gaps of white paper near the shoreline to suggest ripples and movement.
Step 2: The Cabin and Foreground
-
Cabin Base Layer:
Once the background is bone dry, mix Burnt Sienna with a touch of Sepia. Paint the wooden siding of the cabin. While wet, lift a small spot of pigment in the center of the wall to suggest a subtle lighting variance. -
Roof Texture:
Paint the roof with a darker mix of Payne’s Grey. Use a dry brush technique here—dragging the brush sideways—to create that weathered, textured metal look. -
Window Glow:
Use pure, concentrated Yellow Ochre or a warm orange mix for the window panes. Let this bleed slightly into the surrounding wood frame to simulate a glowing light spilling out. -
Defining Planks:
With your smallest round brush (size 0), use a dark Sepia mix to draw fine horizontal lines across the cabin walls for the log siding details. Be careful not to make these too uniform; broken lines look more natural. -
Adding the Chimney:
Paint the chimney stack in dark charcoal. While wet, soften the top edge with a clean damp brush and trail a little grey pigment upwards and to the right to create the wisp of smoke.
Muddy Waters?
If your water reflections look too muddy, you likely overworked the paint while it was damp. Let it dry completely, then glaze over a thin layer of blue to unify it.
Step 3: Organic Details
-
Shoreline Foundation:
Paint the grassy bank using Yellow Ochre mixed with Burnt Sienna. I prefer to dab the color on loosely to mimic the uneven texture of earth and dried grass. -
Birch Trees:
Remove the masking fluid if you used it. Paint the birch shadows with a pale grey-blue, defining the cylindrical shape. Add the characteristic black markings on the bark using the tip of your smallest brush and dark Sepia. -
Autumn Foliage:
For the leaves on the birch trees, use a stippling motion with Yellow Ochre and Burnt Sienna. Keep the foliage sparse and airy to show the sky through the branches. -
Grasses and Reeds:
Using a rigger brush or fine round brush, flick upward strokes of varying lengths in the foreground for the tall dry grasses. Use a mix of browns and greys. -
Water Reflections:
Paint the reflection of the cabin and the shoreline into the water. Use darker, wavy horizontal strokes directly beneath the landmass, breaking them up as you move further down. -
Final Highlights:
Use opaque white gouache to add the window frames over the yellow glow and to pick out the brightest highlights on the birch bark and water ripples.
Enhance the Glow
Make the cabin feel warmer by adding a very thin glaze (transparent layer) of orange watercolor over the grass immediately under the window to show cast light.
Step back and admire the peaceful solitude you have captured on paper


Golden Fields and Distant Tree Line
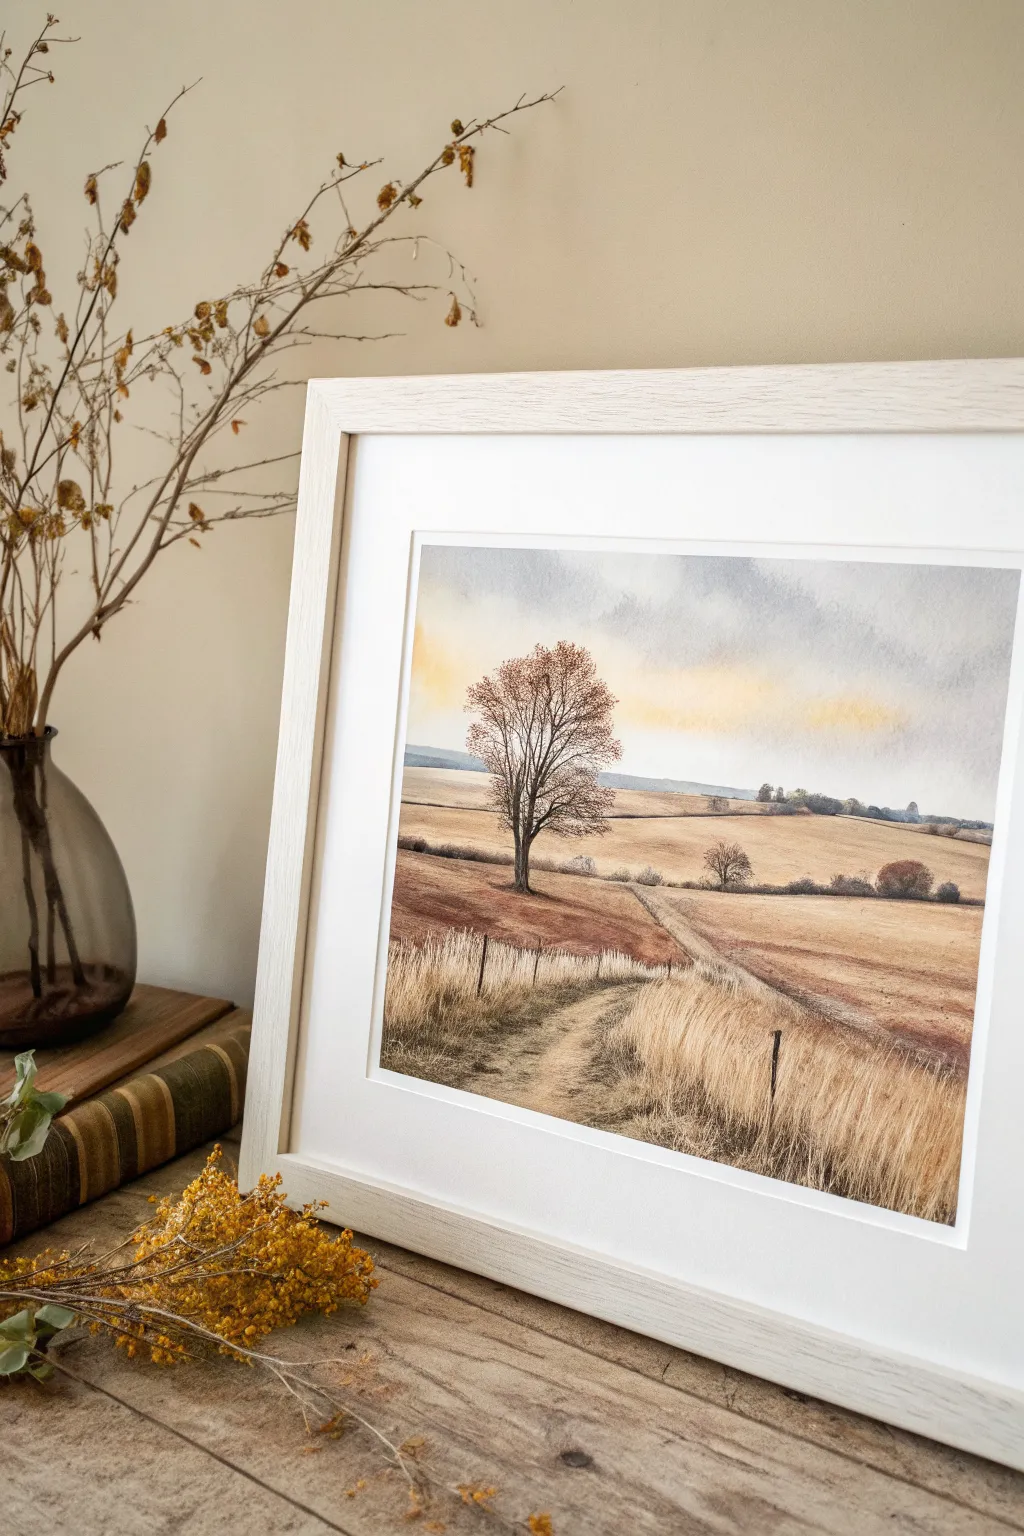
Capture the quiet beauty of late autumn in this watercolor landscape, featuring rolling golden hills and a striking bare tree caught in the fading light. This project focuses on warm washes and delicate brushwork to create depth and texture without overworking the scene.
How-To Guide
Materials
- Cold press watercolor paper (300 gsm)
- Watercolor paints: Yellow Ochre, Burnt Sienna, Raw Umber, Ultramarine Blue, Alizarin Crimson, Sepia
- Large flat wash brush (1 inch)
- Round brushes (sizes 4, 8, and 12)
- Rigger or liner brush size 1
- Masking fluid (optional)
- Pencil (HB) and kneaded eraser
- Two jars of water
- Paper towels
Step 1: Sketching and Sky
-
Establish the horizon:
Lightly sketch the horizon line about one-third of the way from the top of the paper. Keep the line slightly uneven to represent rolling hills rather than a flat plane. -
Map the composition:
Pencil in the winding dirt path leading from the bottom right towards the center. Sketch the main tree’s trunk shape on the left mid-ground and faintly indicate the distant treeline. -
Protect highlights:
If you want crisp white highlights on the foreground grass, apply thin lines of masking fluid now and let it dry completely. Otherwise, you can scrape them out later. -
Wet-on-wet sky:
Wet the entire sky area with clean water using your large flat brush. The paper should glisten but not hold puddles. -
Apply sky warmth:
Drop in a dilute wash of Yellow Ochre near the horizon line to create that soft, glowing sunset effect. -
Add cloud shadows:
Mix a soft grey using Ultramarine Blue and a touch of Burnt Sienna. While the paper is still damp, paint the upper sky, letting the grey bleed downwards but stopping before it touches the yellow band.
Muddy Fields?
If your field colors look dull, you likely overmixed the warm browns and cool blues on the paper. Allow layers to dry completely before glazing shadows over the yellow grass.
Step 2: Building the Landscape
-
Base layer for fields:
Once the sky is dry, mix a large puddle of Yellow Ochre with a tiny bit of Burnt Sienna. Apply a variegated wash over the fields, adding more water as you move toward the foreground for a lighter value. -
Distant hills:
For the furthest hills, mix a cool, pale violet-grey. Paint thin, horizontal bands to suggest distance, ensuring the edges are soft to push them back visually. -
Mid-ground texture:
While the field wash is damp but settling, drop in thicker Burnt Sienna horizontally across the mid-ground to suggest furrows or changes in the terrain. -
Painting the path:
Leave the path mostly the paper’s white or a very pale ochre wash. Define its edges using a mix of Raw Umber and Burnt Sienna, keeping the brushstrokes loose and broken.
Level Up: Texture
Sprinkle a tiny pinch of table salt onto the wet paint in the foreground corner. As it dries, it pushes pigment away, creating incredible organic texture perfect for dried grass.
Step 3: The Focal Tree and Details
-
Main trunk structure:
Using a size 4 round brush and a dark mix of Sepia and Ultramarine, paint the trunk of the main tree. Start thick at the base and taper upward. -
Branching out:
Switch to a rigger or liner brush. extend fine branches outward from the trunk. Use a shaky hand movement to create natural, organic twists in the wood. -
Adding foliage remnants:
Stipple a very dry mix of Burnt Sienna and Alizarin Crimson lightly over the branches to suggest the last few clinging reddish-brown leaves. -
Distant vegetation:
Use the point of your size 8 brush to dab in small, distant bushes and trees along the horizon line using a muted green-grey mix. -
Foreground grasses:
Mix a warm, golden brown. Using upward flicking motions with a rigger brush, paint tall dry grasses in the immediate foreground, overlapping the bottom of the path. -
Shadows and depth:
Glaze a cool purple-grey shadow extending from the base of the main tree to the right, following the contour of the hill. -
Final scratches:
If you didn’t use masking fluid, use the edge of a credit card or a palette knife to scratch out fine lines in the painted foreground while damp to create bright grass highlights.
Let your painting dry naturally before erasing any pencil lines and finding a frame that complements those warm earth tones
BRUSH GUIDE
The Right Brush for Every Stroke
From clean lines to bold texture — master brush choice, stroke control, and essential techniques.
Explore the Full Guide
River Bend With Colorful Banks
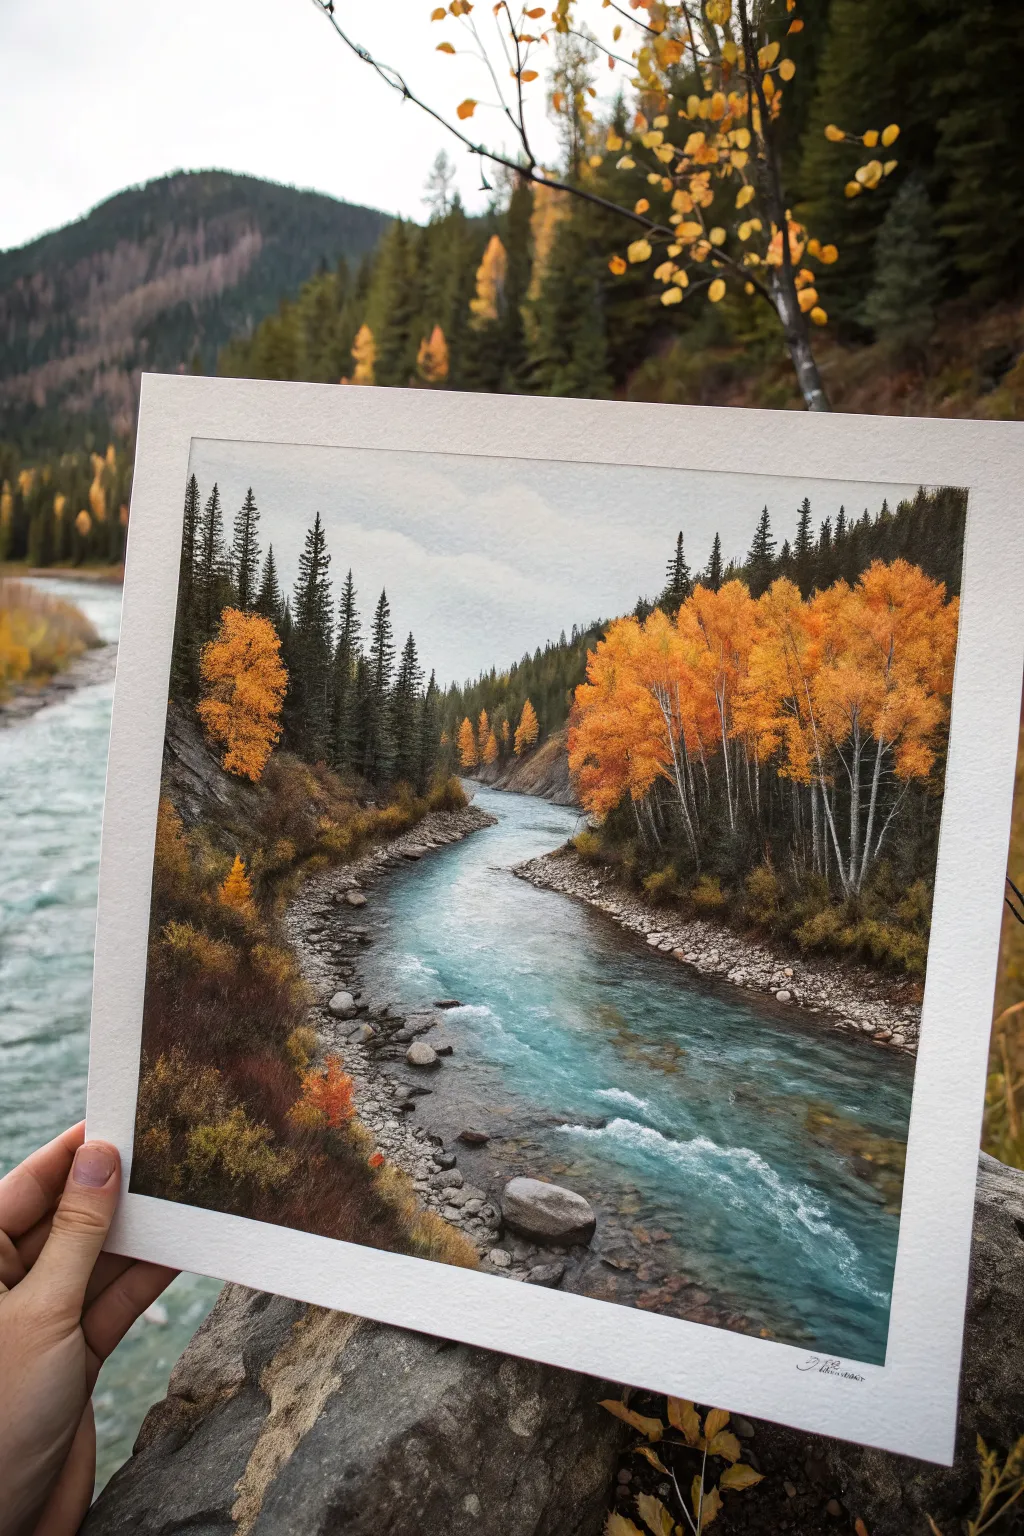
Capture the cool, crisp feeling of an autumn river running through a valley in this detailed landscape painting. Using layering techniques, you will balance the vibrant oranges of turning leaves against the deep, moody greens of evergreens and glacial blue waters.
Step-by-Step
Materials
- Cold press watercolor paper (140lb or heavier, roughly 8×10″)
- Painter’s tape and mixing palette
- Watercolor or gouache paints
- Colors: Phthalo Blue, Burnt Sienna, Yellow Ochre, Cadmium Orange, Sap Green, Ivory Black, Titanium White
- Round brushes (sizes 2, 6, and 10)
- Detail liner brush (size 0 or 00)
- Pencil and eraser
- Two jars of water and paper towels
Step 1: Sketching and Sky
-
Prepare the workspace:
Tape down all four edges of your watercolor paper to a board. This creates the crisp white border seen in the reference and prevents buckling when the paper gets wet. -
Sketch the composition:
Lightly sketch the horizon line slightly above the center. Draw the meandering curve of the river, ensuring the banks are uneven and rocky. Keep pencil lines faint so they don’t show through the final paint. -
Paint the sky:
Mix a very watery, pale gray-blue using Phthalo Blue and a touch of black. Wash this over the sky area, leaving some white paper showing for soft clouds. Let this layer dry completely before moving on.
Brush Texture Tip
For the white water foam, use an old, frayed brush with stiff bristles. The irregular shape creates a much more natural ‘splashing’ effect than a precise new brush.
Step 2: Blocking in the Background
-
Paint distant hills:
For the furthest hill, mix a muted, desaturated green. Apply this wash lightly; atmospheric perspective means objects get lighter and bluer the further away they are. -
Create the evergreen foundation:
On the left bank and background hills, use Sap Green mixed with a little Black or Blue to create dark, vertical shapes. These don’t need to be perfect trees yet, just the dark underlayer for the forest density. -
Add background warmth:
Dab small spots of Yellow Ochre mixed with Burnt Sienna among the distant greens to suggest changing leaves far away in the valley.
Step 3: The Glacial River
-
Lay the water base:
Mix Phthalo Blue with a tiny bit of Titanium White and Sap Green to get that striking turquoise glacial color. Apply a flat wash to the river area, painting around the rocks on the shoreline. -
Deepen the currents:
While the blue is still slightly damp, drop in darker teal (more blue/green mix) along the deeper parts of the river and under the banks to create depth. -
Add water movement:
Once the river is dry, use a very dry brush with Titanium White to lightly scumble (drag) over the surface. This creates the effect of rushing water and whitecaps, particularly where the river bends.
Level Up: Gouache Highlights
Use opaque white gouache for the final tree trunks and water highlights. It sits on top of watercolor perfectly and pops much brighter.
Step 4: Mid-Ground and Banks
-
Paint the rocky shoreline:
Mix varying shades of gray and brown. Paint individual stones along the water’s edge. Vary the size—some should be tiny pebbles, others large boulders. -
Texture the banks:
On the earthen banks above the rocks, use Burnt Sienna and dark brown to create a soil texture. Use short, choppy strokes to suggest rough terrain and underbrush. -
Detail the evergreens:
Returning to the left side, use a size 2 brush and a very dark green-black mix to paint the detailed tops and branches of the pine trees. Use a flicking motion to create the needle texture.
Step 5: Vibrant Foliage
-
Mix the autumn palette:
Prepare puddles of bright Cadmium Orange, Yellow Ochre, and a mix of Red/Orange on your palette. You want these to be creamy and opaque. -
Stipple the leaves:
On the right bank, paint the large cluster of aspens. I prefer to start with the darkest orange for the shadows, dabbing the brush to create a leafy texture. -
Add highlights:
Layer lighter yellow and bright orange on top of the dark orange blobs, focusing on the tops where the sun would hit. -
Paint the tree trunks:
Use your liner brush and white paint (tinted slightly gray) to draw the thin, vertical trunks of the aspen trees peaking through the orange leaves. Make sure they are crooked and organic, not perfect straight lines. -
Balance the colors:
Add a few splashes of this bright orange foliage to the left bank as solitary bushes to balance the composition.
Step 6: Final Touches
-
Refine the water edge:
Use a dark brown wash to add shadows directly under the rocks where they meet the water, grounding them. -
Add foreground details:
In the bottom left corner, use detailed brushstrokes to add individual blades of dried grass and small shrubs in brownish-red tones. -
Remove the tape:
Wait until the painting is bone dry. Slowly peel the tape away at a 45-degree angle to reveal your clean edges.
Step back and admire how the warm autumn tones vibrate against the cool blue river in your finished piece
Park Scene With a Lonely Bench
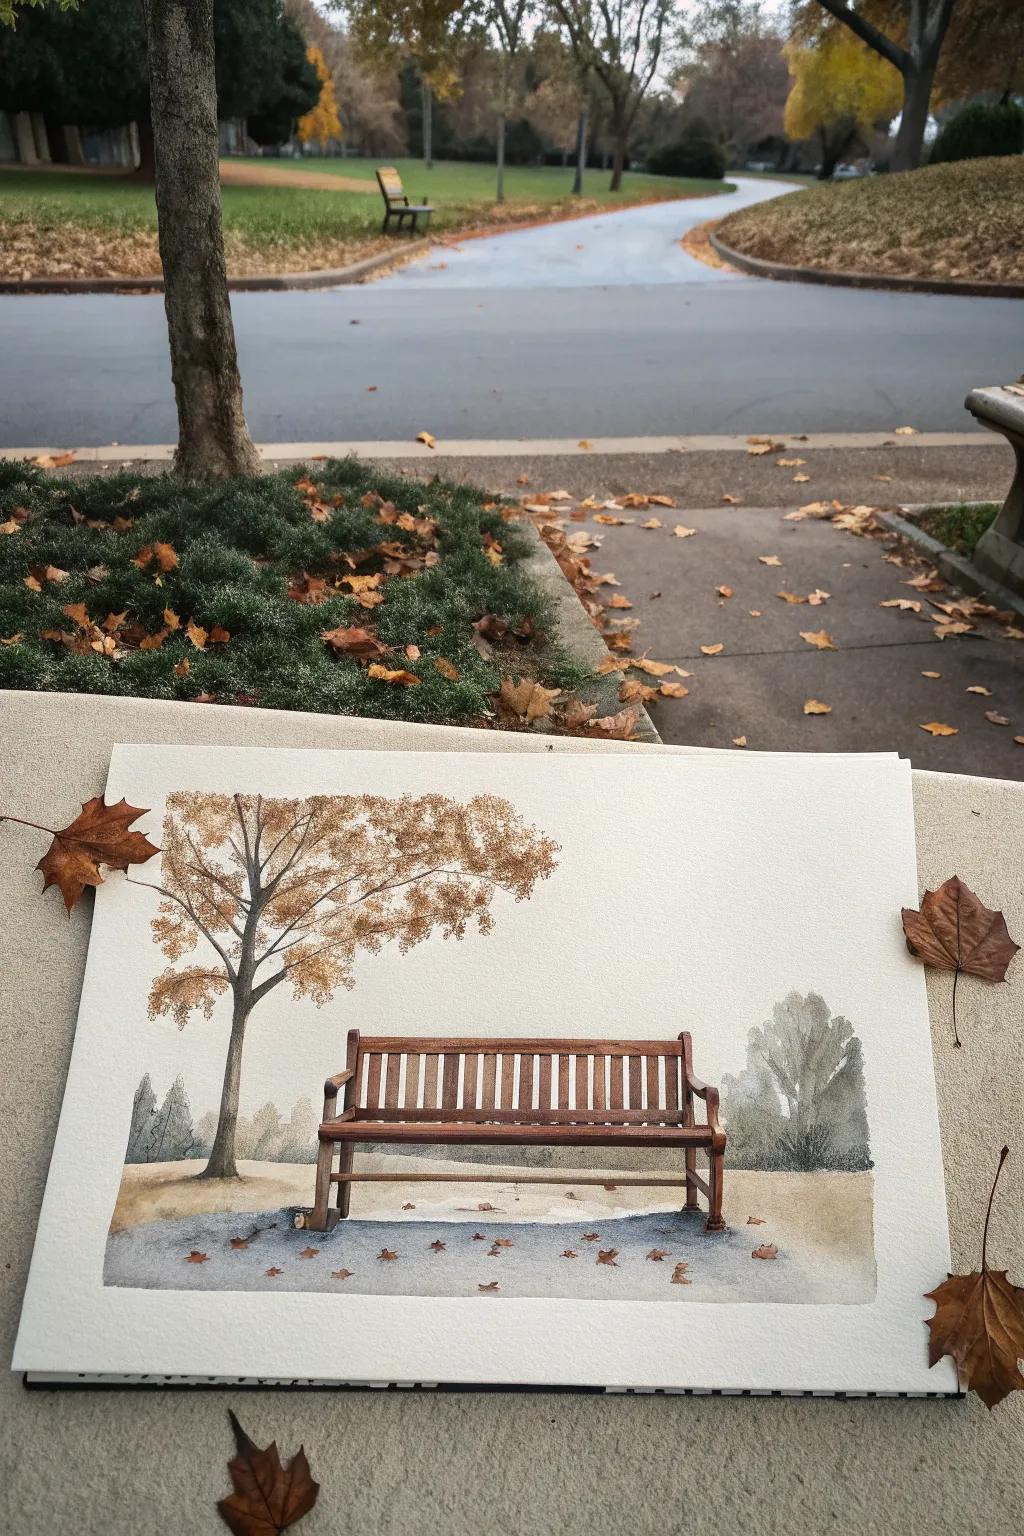
Capture the quiet solitude of a fall afternoon with this serene watercolor study. Featuring a detailed wooden bench set against hazy foliage and a delicate, shedding tree, this painting balances crisp architectural lines with soft atmospheric washes.
Step-by-Step Tutorial
Materials
- Cold press watercolor paper (140lb/300gsm)
- Watercolor paints (Burnt Sienna, Yellow Ochre, Burnt Umber, Paynes Grey, Sap Green)
- Pencil (HB or 2H for light sketching)
- Ruler
- Small round brush (size 2 or 4)
- Medium round brush (size 8)
- Fine liner brush (size 0 or 00)
- Painters tape or masking tape
- Paper towels
- Water jar
Step 1: Sketching the Composition
-
Prepare the paper:
Tape down your watercolor paper to a board to prevent warping. Use a ruler to lightly mark the horizon line about a third of the way up from the bottom of the page. -
Draft the bench structure:
Using your ruler and a light pencil, draw the basic geometric shape of the bench centrally in the foreground. Focus on the parallel slats of the backrest and the seat. -
Add bench details:
Refine the sketch by adding thickness to the legs and the curved armrests. Keep your lines light so they won’t show through the final paint layers. -
Sketch the tree:
To the left of the bench, lightly sketch the main trunk and primary branches of the tree. The branches should reach up and over the bench area, but don’t draw every single twig yet.
Clean Lines Pro Tip
For the straight slats on the bench, use a small flat brush instead of a round one. One distinct stroke with the flat edge creates a perfect rectangular slat instantly.
Step 2: Painting the Foreground & Background
-
Wash the ground:
Mix a diluted solution of Yellow Ochre and a touch of Burnt Sienna. With your medium round brush, apply a loose wash across the bottom third of the paper for the grassy area, leaving patches of white paper for highlights. -
Paint the paved path:
Mix Paynes Grey with plenty of water to create a very pale, cool gray. Paint the area immediately under and in front of the bench to represent the paved walkway or gravel path. -
Create distant foliage:
While the background is still slightly damp, mix Sap Green with a little Paynes Grey. Paint soft, hazy bush shapes on the right side and far left background. The damp paper will help blur the edges, pushing them into the distance. -
Let it dry:
Allow these base layers to dry completely before moving on to the detailed wooden structures. This prevents the colors from bleeding into your crisp bench lines.
Level Up: Texture
Splatter tiny droplets of brown paint onto the tree canopy area using a toothbrush. It creates a more organic, airy texture for the fading leaves than hand-painting each dot.
Step 3: The Wooden Bench
-
Base coat for the wood:
Mix a warm brown using Burnt Sienna. Carefully paint the wooden slats of the bench backrest and seat. Use the tip of your small brush to keep within the pencil lines. -
Darken the shadows:
While the base coat is drying, mix a darker brown (Burnt Umber) for the shadowed areas. Apply this to the underside of the seat, the legs, and the shaded sides of the armrests to give the bench dimension. -
Add wood grain texture:
Once the base layer is dry, use a slightly drier brush with concentrated Burnt Umber to add subtle vertical streaks on the slats, mimicking wood grain. -
Define the gaps:
Take your fine liner brush and the darkest brown or dark grey mix. Carefully paint the thin negative spaces between the slats on the backrest. This high contrast step makes the bench pop.
Step 4: The Tree and Final Details
-
Paint the tree trunk:
Using a mix of Burnt Umber and Paynes Grey, paint the trunk of the tree on the left. Start thicker at the base and taper as you move upward into the branches. -
Add delicate branches:
Switch to your fine liner brush or the very tip of your small brush to paint the thin, spindly branches extending outward. Ensure they taper to fine points. -
Create autumn foliage:
I like to use a stippling technique here. dip an old or splayed brush into varied mixes of Yellow Ochre and Burnt Sienna. Dab gently onto the branches to create clusters of dying leaves. -
Add fallen leaves:
Using the same autumn colors, paint tiny distinct specks on the grey path and the grass around the bench to represent fallen leaves. vary the spacing so it looks natural and random. -
Ground the bench:
Mix a watery dark grey. Paint cast shadows extending from the bench legs onto the path. This anchors the object to the ground so it doesn’t look like it’s floating. -
Final touches:
Step back and assess your values. If the background bushes dried too light, add a second glaze of cool green-grey to deepen them.
Remove the tape carefully to reveal your crisp white border and enjoy your peaceful autumn scene

PENCIL GUIDE
Understanding Pencil Grades from H to B
From first sketch to finished drawing — learn pencil grades, line control, and shading techniques.
Explore the Full Guide
Misty Morning Forest Layers
Capture the ethereal calm of a foggy autumn morning with this layered watercolor landscape. By blending soft, cool background tones with the warm, crisp details of a lone birch, you’ll create a piece that feels both vast and intimate.
How-To Guide
Materials
- Cold Press Watercolor Paper (140 lb / 300 gsm)
- Watercolor Paints: Indigo, Payne’s Grey, Burnt Sienna, Yellow Ochre, Sepia
- White Gouache (for mist effects)
- Masking Fluid
- Painter’s Tape
- Flat Wash Brush (1 inch)
- Round Brushes (Size 6 and Size 2 for details)
- Rigger Brush (optional, for fine branches)
- Two Jars of Water
- Paper Towels
Step 1: Preparation and Sky
-
Secure the paper:
Tape down all four edges of your watercolor paper to a board. This prevents buckling and creates that crisp white border seen in the reference. -
Sketch the composition:
Lightly sketch the horizon line about one-third up from the bottom. Mark the position of the main central tree trunk, but don’t draw every branch yet. -
Protect the foreground:
Apply masking fluid to the main tree trunk and some of the grassy textures in the immediate foreground. Let this dry completely before touching it with water. -
Wet-in-wet sky:
Wet the entire sky area with clean water using your flat wash brush. The paper should glisten but not have puddles. -
Soft atmosphere:
Drop in a very dilute wash of Indigo and Payne’s Grey near the top, fading it out to almost pure white as you reach the horizon line to simulate thick fog. Let this dry bone dry.
Foggy Edges?
If your background trees have hard edges that ruin the misty effect, gently scrub the dry edge with a damp stiff brush and blot with a tissue to soften it.
Step 2: The Misty Background
-
Distant tree shapes:
Mix a watery, pale grey-blue using Indigo. With a size 6 round brush, paint faint, vertical tree silhouettes in the background. -
Softening edges:
While the distant trees are still damp, soften their bottom edges with a clean, wet brush so they seem to disappear into the ground fog. -
Mid-ground layers:
Once the first layer is dry, mix a slightly darker, more saturated blue-grey. Paint a second row of trees slightly larger than the first set, overlapping them here and there. -
Adding depth:
Use the same softening technique at the base of these mid-ground trees. This layering creates the ‘atmospheric perspective’ that makes the forest look deep. -
Ground cover wash:
Paint the ground area with a wash of diluted Burnt Sienna and Sepia, allowing it to bleed slightly into the misty horizon line.
Pro Tip: Splatter Texture
Tap a loaded brush against your finger to splatter tiny droplets of Burnt Sienna over the tree crown; it looks just like falling autumn leaves.
Step 3: The Hero Tree
-
Remove masking:
Gently rub away the masking fluid from the main tree and foreground grass once everything is completely dry. -
Base trunk texture:
Paint the trunk using a mix of Sepia and Payne’s Grey. Use the ‘dry brush’ technique—wiping most paint off your brush—to drag texture across the paper, mimicking birch bark. -
Branch structure:
Using a rigger brush or a size 2 round brush, extend the branches outward. I like to be a bit shaky with my hand here to give the branches a natural, organic crookedness. -
Darkest details:
Add the dark knots and horizontal striations typical of birch bark using concentrated Sepia. -
Foliage clusters:
Mix Burnt Sienna with a touch of Yellow Ochre. Using the side of your round brush, stipple clusters of leaves onto the branches. -
Leaf variation:
While the orange paint is wet, drop in tiny dots of darker brown (Sepia) to create shadow and volume within the leaf clusters.
Step 4: Foreground and Finishing
-
Foreground grasses:
Use your rigger brush with Burnt Sienna to flick upward strokes in the foreground, creating tall dead grasses around the base of the tree. -
Enhancing the mist:
If the background looks too sharp, lightly glaze a very watery white gouache over the distant trees to push them further back. -
Final contrast check:
Add a few sharp, dark accents to the foreground scrubs to anchor the painting. -
Reveal the artwork:
Carefully peel away the tape at a 45-degree angle to reveal your clean white border.
Now you have a serene piece of the forest to keep on your desk or wall
Overcast Sky With Moody Neutrals
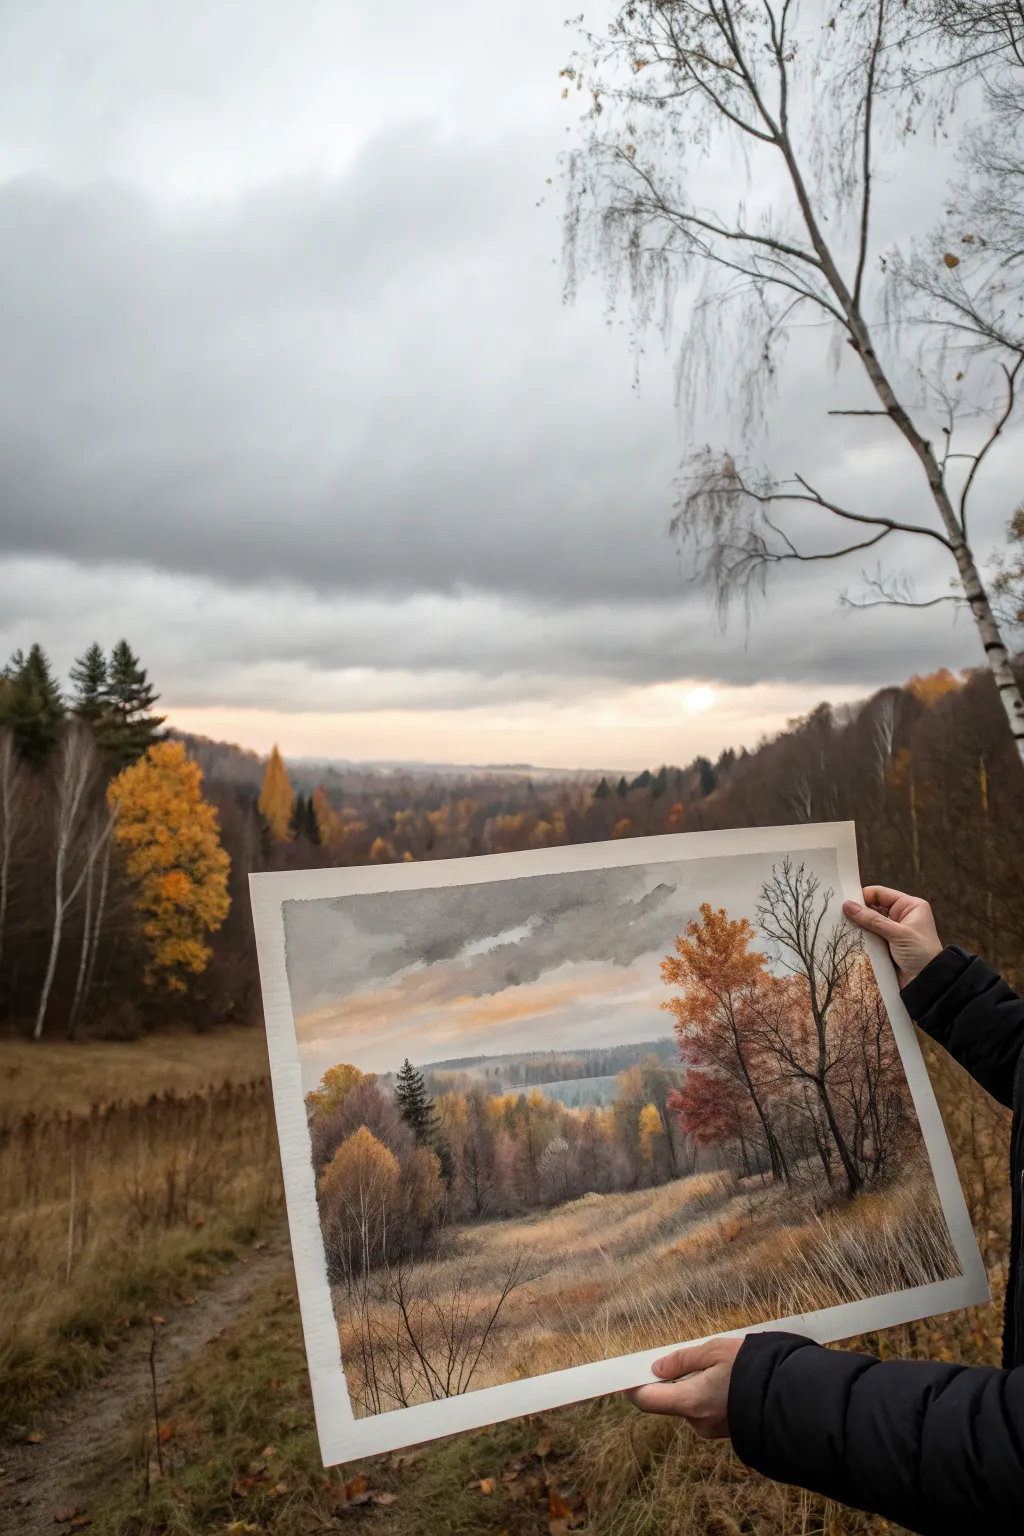
Capture the somber beauty of late autumn using a limited, moody palette of grays, browns, and muted ochres. This watercolor landscape focuses on atmospheric depth, layering soft wet-on-wet skies behind crisp, dry-brush trees in the foreground.
Step-by-Step Guide
Materials
- Cold Press watercolor paper (140lb/300gsm), approx. 12×16 inches
- Watercolor paints: Payne’s Grey, Burnt Umber, Yellow Ochre, Burnt Sienna, Alizarin Crimson, Indigo
- Masking tape
- Drawing board
- Large wash brush (flat or mop)
- Round brushes (sizes 8 and 4)
- Rigger or liner brush for branches
- Clean water and jar
- Paper towels
- Pencil (HB) for light sketching
Step 1: Preparation and Sketching
-
Secure the paper:
Tape your watercolor paper down firmly to your board on all four sides. This creates a clean white border and prevents the paper from buckling during the heavy washes. -
Establish the horizon:
Using your HB pencil, lightly sketch the horizon line about one-third of the way up from the bottom. Keep the line faint so it disappears under the paint later. -
Block in major shapes:
Sketch the rolling foreground hill and the basic masses of the distant trees. Do not draw individual leaves or branches yet; just outline the large shapes.
Soften the Horizon
To push the distant tree line back, run a clean, damp brush along the top edge of the trees just after painting them. This softens the edge against the sky, creating depth.
Step 2: The Atmospheric Sky
-
Pre-wet the sky area:
With your large wash brush, wet the entire sky area with clean water until it glistens evenly but isn’t forming puddles. -
Apply the heavy clouds:
Mix a diluted Payne’s Grey with a touch of Burnt Umber. While the paper is still wet, drop in horizontal strokes for the heavy cloud bank, leaving some areas lighter for variety. -
Add the sunset glow:
Rinse your brush and pick up a watery mix of Yellow Ochre and a tiny hint of Burnt Sienna. Paint a soft horizontal band near the horizon where the sun struggles to break through, letting it bleed upwards into the gray clouds. -
Deepen the mood:
Add a stronger mix of Indigo and Payne’s Grey to the very top of the sky to create a vignette effect, forcing the eye downward. I like to tilt the board slightly here to help the colors drift naturally. -
Let it dry completely:
Wait for the sky to become bone dry. The paper should feel room temperature to the touch, not cool.
Step 3: Distant and Middle Ground
-
Paint the distant hills:
Mix a pale, cool grey-blue. Paint the furthest hill line with a flat wash. Because it’s far away, it should be much lighter in value than the foreground. -
Create the middle ground forest:
Using a size 8 round brush, mix Burnt Sienna, Yellow Ochre, and a little Grey. Paint vertical, damp strokes to suggest the dense forest line in the valley. -
Add color variation:
While the middle ground is still damp, drop in pure Yellow Ochre or Burnt Umber into different sections to suggest patches of remaining autumn leaves versus bare trunks. -
Define the evergreen:
Using a thicker mix of Indigo and Green (or mixed darks), paint the solitary conical pine tree on the left side of the mid-ground. Keep the edges slightly soft so it sits back in space.
Add Texture with Salt
Sprinkle a tiny pinch of table salt onto the foreground hill wash while it’s still wet. When dry, brush it off to reveal starlike textures that mimic fallen leaves or frost.
Step 4: Foreground and Details
-
Wash the foreground hill:
Apply a wash of Raw Sienna and Yellow Ochre over the large foreground hill. While wet, streak in some Burnt Umber to suggest the direction of the grass and contour of the slope. -
Texture the grass:
Once the hill wash is semi-dry (damp, not wet), use a dry brush with darker brown paint to flick upward strokes, creating the texture of tall, dried field grass. -
Paint the main trees:
Switch to your size 4 brush. Mix a dark, rich brown using Burnt Umber and Indigo. Paint the trunks of the large trees on the right, starting thick at the base and tapering upward. -
Add delicate branches:
Use your rigger or liner brush with a very inky consistency of paint. Draw the fine, skeletal branches reaching up into the sky. Vary your pressure to make the lines wobble and look organic. -
Stipple the remaining foliage:
Mix a vibrant Burnt Sienna and Orange. With a fairly dry brush, stipple (dab) color onto the branches of the right-hand trees to represent the last clinging autumn leaves. -
Final dry brush details:
add some very dark, sharp dry-brush strokes to the bottom right corner for foreground weeds and grasses, giving the viewer a place to ‘stand’ in the scene.
Peel off the tape carefully to reveal those crisp white edges on your finished autumn masterpiece.


Windy Day With Leaves in Motion

Capture the stillness of late autumn with this atmospheric watercolor landscape featuring a receding path lined with barren trees. The muted palette of ochres, greys, and burnt siennas creates a peaceful, foggy mood perfect for the season.
How-To Guide
Materials
- Cold press watercolor paper (300 gsm)
- Watercolor paints (Payne’s Grey, Yellow Ochre, Burnt Sienna, Sepia, Burnt Umber)
- Masking fluid (optional)
- Round brushes (sizes 2, 6, and 10)
- Rigger or liner brush for branches
- Pencil (HB) and kneadable eraser
- Two jars of water
- Paper towels
Step 1: Sketch and Sky
-
Pencil outline:
Begin by lightly sketching the main composition. Mark the horizon line relatively low on the paper, about one-third up from the bottom. Outline the recession of the path narrowing toward the center and lightly suggest the placement of the large foreground tree on the right and the row of smaller trees on the left. -
Preserve highlights:
If you want crisp, white highlights for the sky peeking through branches or lighter grasses, you can apply a tiny bit of masking fluid now. However, for this misty look, lifting color later often works better. -
Sky wash:
Mix a very dilute wash of Payne’s Grey with a touch of Sepia to warm it slightly. Wet the sky area with clean water first (wet-on-wet technique) and drop in the pale grey mix. Keep it uneven to suggest misty clouds. -
Softening the horizon:
While the sky is still damp, soften the bottom edge where the trees will be. This creates that foggy, distant atmosphere where the background trees fade into the mist.
Step 2: Distant Trees and Fields
-
Background foliage:
Once the sky is damp but not soaking, mix a slightly stronger grey-brown. Paint the silhouette of the furthest trees. Because the paper is unsettled, these shapes will blur slightly, enhancing the illusion of depth and fog. -
Field underpainting:
Mix Yellow Ochre with a lot of water. Apply a loose wash to the fields on either side of the path. Let the color fade as it moves toward the horizon to mimic aerial perspective. -
Path base layer:
Paint the path using a watery mix of Payne’s Grey and a tiny bit of Burnt Umber. Use horizontal strokes that get narrower as the path recedes. Drop in touches of Burnt Sienna while wet to suggest fallen leaves embedded in the damp earth.
Dry Brush for Bark
Load your brush with thick pigment and wipe it on a towel before painting the tree trunk. The dry bristles will skip over the paper’s tooth, creating instant, realistic bark texture.
Step 3: Structuring the Trees
-
Main tree trunk:
Wait for the paper to be completely dry. Using your size 6 brush and a dark mix of Sepia and Payne’s Grey, paint the main trunk of the large tree on the right. Build the form from the bottom up, letting the brush skip slightly on the paper texture to create bark detail. -
Secondary trees:
Paint the row of trees on the left side of the path. These should be thinner and slightly paler than the foreground tree. Vary the angles of the trunks so they don’t look like soldiers in a rigid line. -
Branch structure:
Switch to your rigger or liner brush. With a dark, inky consistency of paint, pull out the fine branches from the main trunks. Remember that oak branches tend to be angular and jittery, not perfectly curved. -
Fine twigs:
Add the tiniest twigs at the ends of the branches. I find twisting the brush slightly between my fingers as I pull the stroke helps create natural, organic irregularities.
Add a Splash of Life
To add a narrative element, paint a tiny, distant figure walking down the path in a bright color, like a red jacket, to create a captivating focal point amidst the greys.
Step 4: Foliage and Texture
-
Canopy splatter:
Mix a vibrant Burnt Sienna with Yellow Ochre. Load a brush and tap it against your finger to splatter small droplets onto the upper branches of the main tree. This creates the effect of loose, fluttering leaves. -
Defining the leaves:
Go back into the splatter with a small brush and define some of the larger leaf clusters, connecting them to the twigs. Don’t overdo it—leave plenty of negative space so the sky shows through. -
Grasses:
Using the rigger brush and a mix of Yellow Ochre and Sepia, paint vertical grass strokes along the edges of the path. Flick the brush upward quickly to get a tapered point. Make the grass taller and more distinct in the foreground. -
Fallen leaves:
Dab distinct spots of Burnt Sienna and Burnt Umber along the edges of the path and the bottom of the painting. Vary the size and shape to look like fallen leaves piling up. -
Shadows and depth:
Add a final glaze of cool grey at the base of the trees and across the path where the trees would cast shadows. This anchors the trees to the ground. -
Final assessment:
Step back. If the foreground needs more contrast, darken the nearest tree trunk or add a few sharper grass blades to bring the front plane forward.
Let your painting dry completely before framing it to preserve the delicate pencil work and subtle washes
Minimalist Autumn Landscape in Three Colors
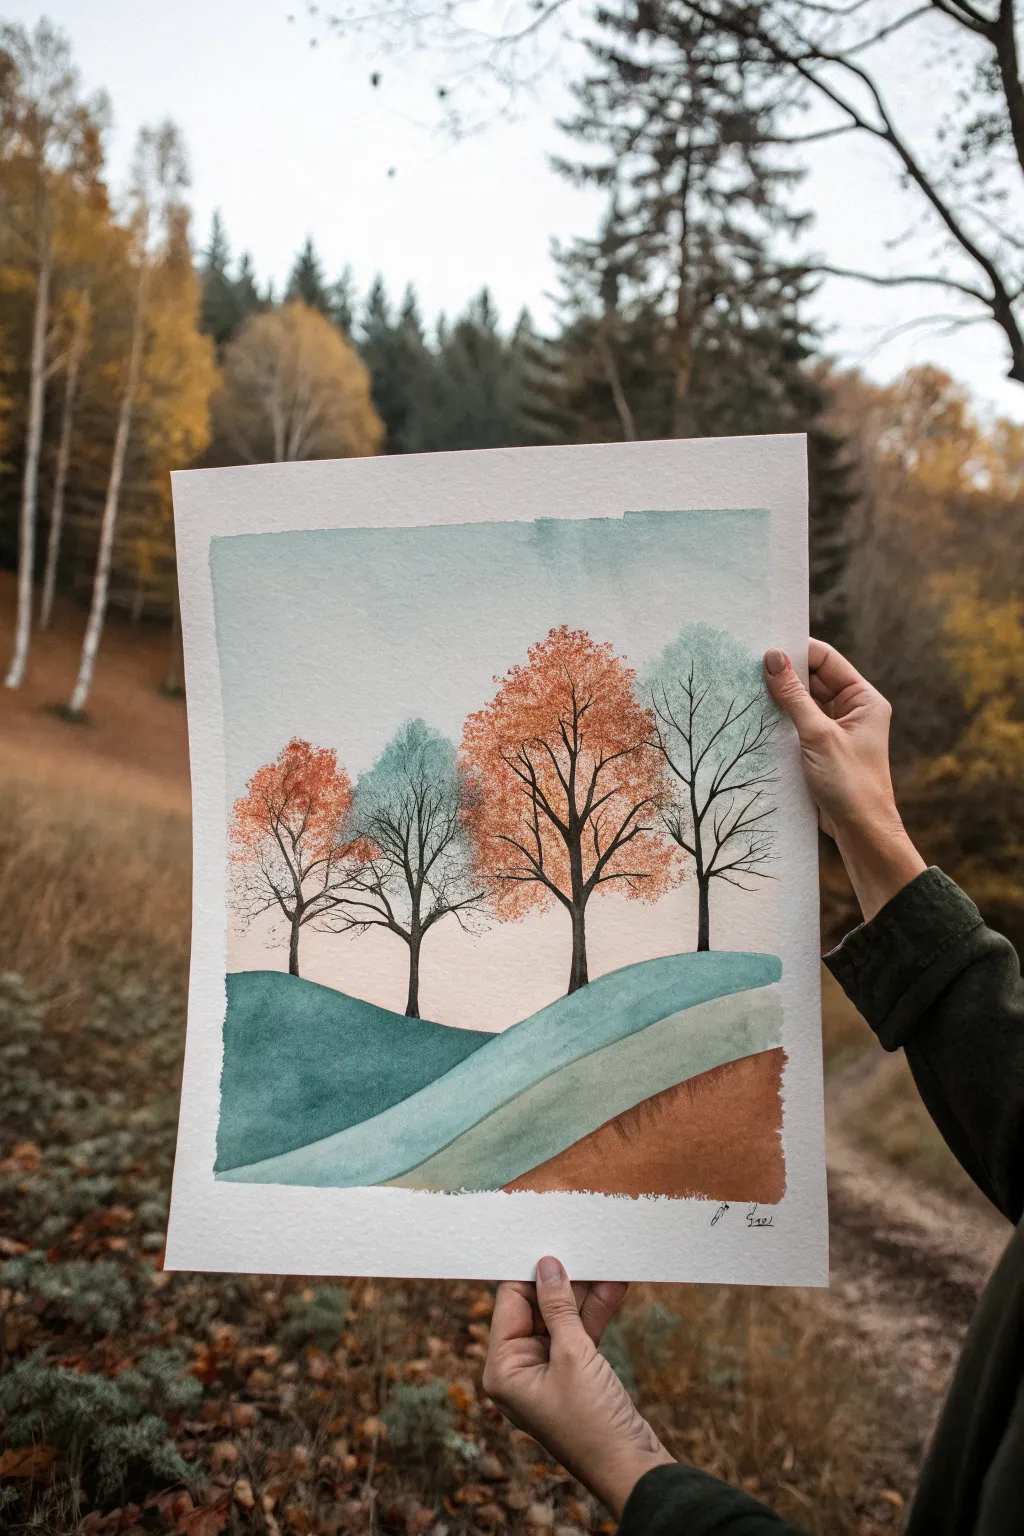
Capture the serene transition of the seasons with this minimalist watercolor landscape featuring stylized trees atop rolling hills. The soft, muted palette of teal, rust, and sage green creates a harmonious balance between cool and warm tones.
Step-by-Step Tutorial
Materials
- Cold press watercolor paper (140lb/300gsm)
- Watercolor paints (teal/turquoise, burnt sienna/rust, payne’s gray, warm beige)
- Flat wash brush (1/2 inch or 3/4 inch)
- Round brushes (flats sizes 4 and 8)
- Fine liner brush (size 0 or 00) or micron pen
- Masking tape
- Pencil and eraser
- Paper towels
- Two jars of water
Step 1: Setting the Scene
-
Prepare your canvas:
Tape down all four edges of your watercolor paper to a board. This ensures clean white borders and prevents the paper from buckling when wet. -
Sketch the layout:
Using a pencil very lightly, draw three distinct rolling hill lines. Start with a large foreground hill on the bottom right, a middle hill sloping from the left, and a background hill foundation. Mark the positions for four trees. -
Create the sky wash:
Mix a very diluted wash of teal or turquoise. Wet the sky area with clean water first (wet-on-wet technique), then drop in the color near the top, fading it out to almost clear water as you reach the horizon line behind the future trees.
Step 2: Painting the Hills
-
First hill layer:
Mix a deep teal using turquoise with a touch of Payne’s gray. Paint the middle hill (the one on the left side) with a flat brush, ensuring a smooth, crisp upper edge. -
Middle ground hill:
While the first hill dries, mix a lighter, milky turquoise-green for the flowing hill that sits centrally. Apply this carefully, leaving a clean separation between it and the darker hill. -
Foreground variety:
For the bottom-right hill, switch to a warm earth tone. Mix burnt sienna with a little brown or ochre. Paint this section solidly, giving the composition a nice warm anchor. -
Let it dry completely:
It is crucial that all sky and hill layers are bone dry before starting the trees, otherwise the fine branches will bleed into the background.
Natural Texture
For realistic foliage, try using a small piece of natural sea sponge dipped in paint instead of a brush. Dab it lightly on paper towel first to avoid blobs.
Step 3: Creating the Trees
-
Drafting the trunks:
Using a size 4 round brush ensuring it has a fine point, mix a dark charcoal grey or black. Paint four slender tree trunks, tapering them as they go up. -
Branch structure:
Switch to your size 0 liner brush. Extend branches outward from the main trunks in a ‘V’ shape pattern. Keep the lines delicate and varied in length. -
Adding smaller twigs:
Add tiny sub-branches to the ends of the main branches. The goal is a skeletal structure that looks intricate but not overcrowded. -
Stippling the foliage (Warm):
Mix a vibrant rust-orange color. Using an old, scruffy brush or a dry round brush, gently tap or stipple color over the branches of the second and third trees to create an airy canopy. -
Stippling the foliage (Cool):
Create a muted teal mix. Repeat the stippling process for the first and fourth trees. Keep the texture loose so you can still see the sky and branches through the leaves. -
Layering density:
Once the first layer of leaves is dry, go back in with slightly more saturated paint (less water) and add a few more dots near the center of the tree crowns to add depth.
Bleeding Lines?
If your fine branches start spreading into the sky, your background wasn’t dry enough. Use a hair dryer on a low, cool setting to speed up drying between layers.
Step 4: Finishing Touches
-
Grounding the trees:
Add a tiny bit of shadow at the base of each trunk where it meets the hill to make them feel planted rather than floating. -
Final assessment:
Check the balance of colors. If the sky feels too pale, you can add a very faint second glaze, careful not to touch the trees. -
The reveal:
Wait until the painting feels cool to the touch (completely dry), then slowly peel off the masking tape at a 45-degree angle to reveal your crisp white border.
Frame your new seasonal artwork or gift it to a friend who loves the woods
Thick, Textured Foliage With Bold Marks
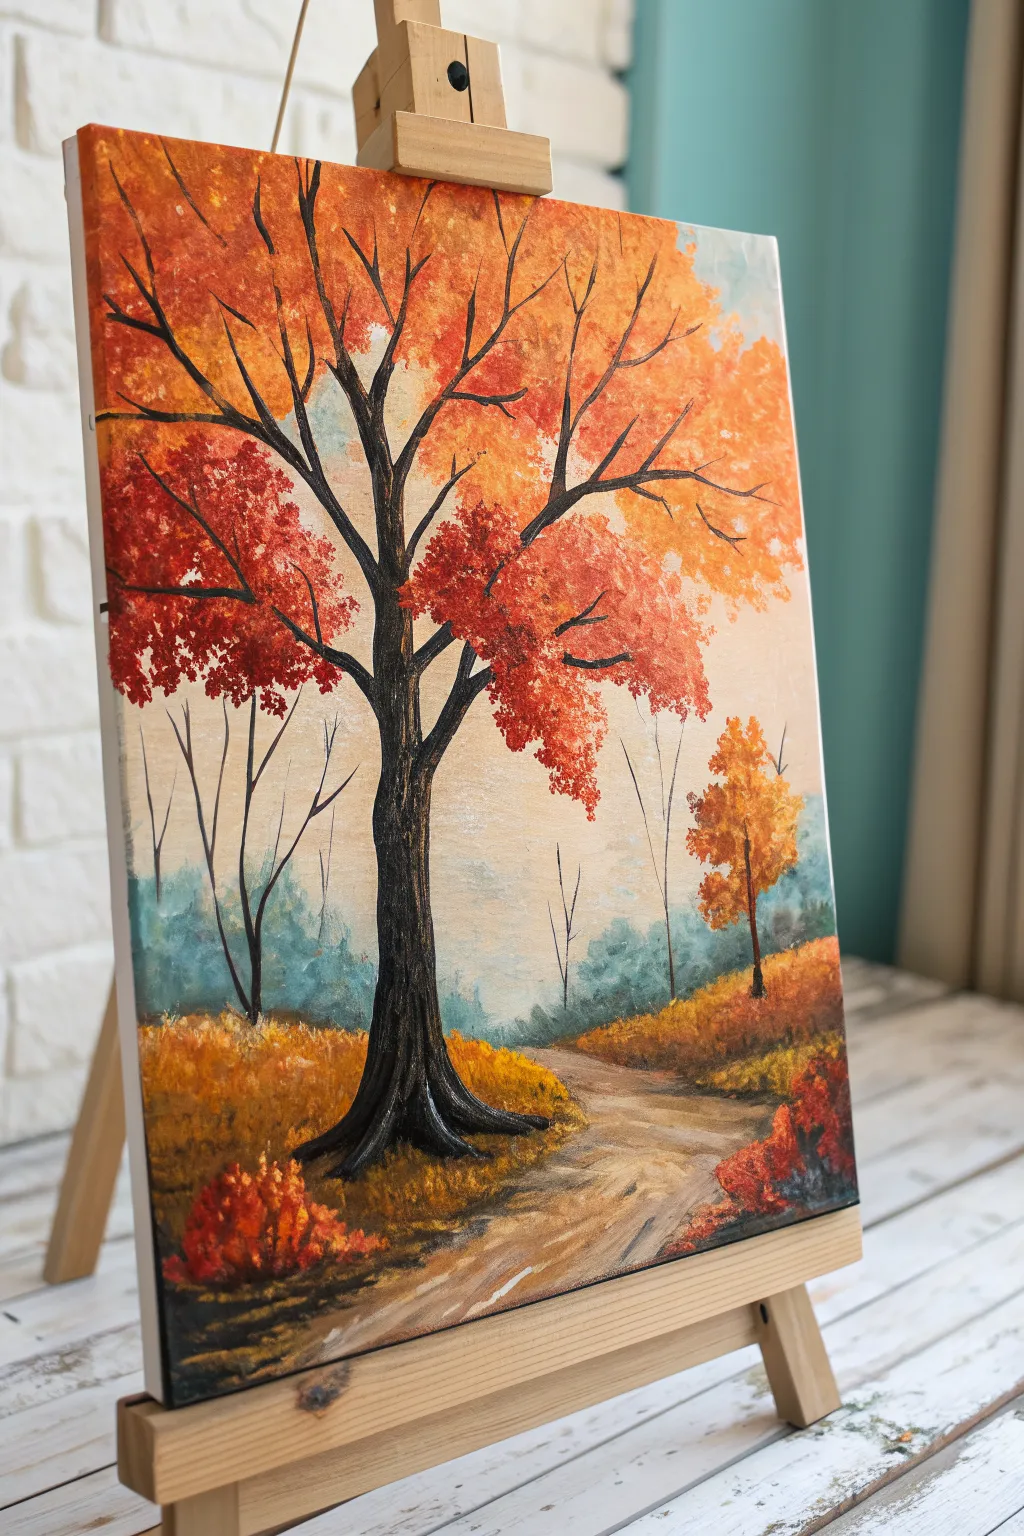
Capture the essence of a crisp fall day with this vibrant acrylic landscape, centering on a majestic tree clad in fiery orange and deep red. The scene balances bold, textured brushwork in the foliage with a soft, misty background to create inviting depth along a winding dirt path.
Detailed Instructions
Materials
- Stretched canvas (e.g., 11×14 or 16×20 inches)
- Acrylic paints: Burnt Umber, Mars Black, Titanium White, Cadmium Orange, Cadmium Red, Yellow Ochre, Ultramarine Blue, Phthalo Green
- Large flat brush (1 inch)
- Medium filbert brush
- Small round detail brush
- Fan brush or stipple brush (optional for foliage)
- Palette knife
- Cup of water and paper towels
Step 1: Setting the Atmosphere
-
Establish the background gradient:
Begin by observing the light backdrop. Mix Titanium White with a tiny touch of Yellow Ochre and a hint of Orange. Using your large flat brush, cover the entire sky area and the middle ground with this creamy, pale mixture, blending downward to create a soft, hazy light source. -
Create the distant treeline:
While the background is still slightly tacky, mix a cool, misty teal using Titanium White, a small amount of Ultramarine Blue, and a dot of Phthalo Green. Paint a low, uneven horizon line of distant trees or bushes. Keep the edges soft and blurred to push them into the distance. -
Add misty depth:
Glaze over the bottom edge of your teal treeline with a bit of your white sky color. This atmospheric perspective trick makes the trees look like they are receding into rising fog.
Muddy colors?
If your orange foliage is turning brown when mixing with the tree branches, ensure the dark brown branches are completely dry before stippling the leaves over them.
Step 2: Groundwork and Structure
-
Block in the path and grass:
Switch to a medium filbert brush. Mix Yellow Ochre with Burnt Umber to sketch a winding path starting wide at the bottom right and narrowing as it curves toward the distant mist. Fill in the grassy areas on either side with a base coat of Yellow Ochre and a touch of Orange. -
Construct the main tree trunk:
Mix Mars Black with Burnt Umber to get a dark, rich chocolate brown. Using a smaller flat brush or the edge of your filbert, paint the central tree trunk. Start wide at the base, creating rooted shapes that grip the ground, and taper the trunk as it reaches upward. -
Branch out:
Switch to a small round brush. Extend branches from the main trunk, reaching high into the canvas. Keep your hand loose and let the branches twist naturally. Add a few thinner, bare trees in the background on the left and right using a lighter grey-brown mix to show distance.
Sponge Technique
For an even more natural, airy texture in the leaves, try using a natural sea sponge instead of a brush. Dip it lightly in paint and blot it gently on the canvas.
Step 3: Adding Texture and Foliage
-
Base layer of foliage:
Now for the fun part: the leaves. Load a stipple brush, fan brush, or an old scruffy brush with pure Cadmium Orange. Dab—don’t stroke—clusters of leaves onto the upper branches. I like to focus the dense areas near the branch clusters and leave open spaces for the sky to peek through. -
Introduce deep reds:
Without cleaning your brush thoroughly, pick up Cadmium Red. Stipple this darker color into the lower, shadowed sections of the leaf clusters, specifically on the left side of the main tree to create volume. -
Highlight with gold:
Clean your brush and pick up Yellow Ochre mixed with a little White. Stipple highlights onto the very tips of the orange clusters where the light would hit them. -
Paint the background sapling:
On the right side of the path, paint a smaller tree using bright Yellow Ochre and Orange. Keep this tree slightly less detailed than the main one to maintain the focal point.
Step 4: Refining the Foreground
-
Detail the path:
Using a palette knife or a flat brush, drag streaks of White and light Ochre across the path horizontally to create the texture of dirt and dust. Add darker brown shadows along the edges where the grass meets the path. -
Foreground bushes:
Create low bushes at the bottom left and right borders using your stippling technique. Use a mix of Red, Orange, and Burnt Umber to ground the painting and frame the path. -
Highlight the trunk:
Mix a light grey (White plus a speck of Black). Use a small detail brush or the edge of a palette knife to add vertical bark texture to the main tree trunk, focusing on the right side where the light source is hitting. -
Final grassy touches:
Use a fan brush or small detail brush to flick upward strokes of Yellow Ochre and Burnt Umber along the path’s edge and at the tree base, simulating tall autumn grasses. -
Review and contrast:
Step back and look at your work. If the main tree needs to pop more, darken the shadowed side of the trunk with pure Black or deepen the red shadows in the leaves.
Allow your painting to dry completely before varnishing to protect those rich autumn colors
Semi-Abstract Color Blocks and Reflections
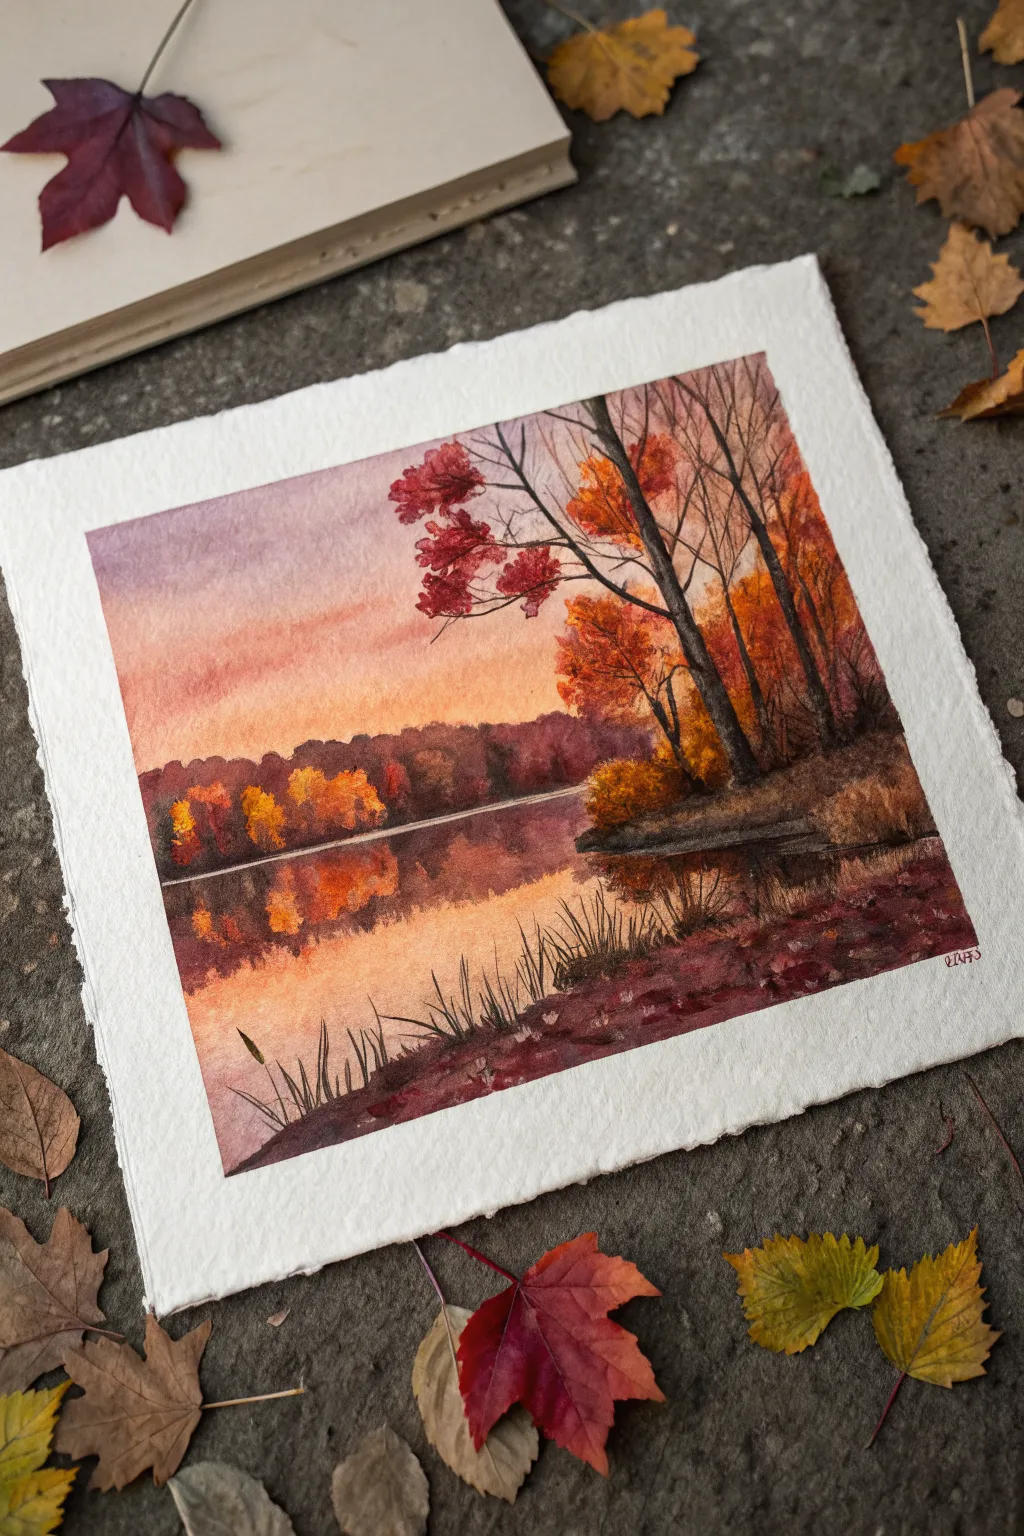
Capture the serene warmth of an autumn evening with this watercolor landscape, featuring soft sunset reflections and vibrant fall foliage. The textured paper and layered washes create a dreamy, atmospheric depth perfect for the season.
Step-by-Step
Materials
- Cold press watercolor paper (rough texture preferred, 300gsm)
- Watercolor paints: Burnt Sienna, Yellow Ochre, Alizarin Crimson, Ultramarine Blue, Sap Green, Burnt Umber
- Masking tape
- Large flat wash brush
- Medium round brush (size 8)
- Small fine-liner aka rigger brush (size 0 or 1)
- Two jars of water
- Paper towels
- Palette
- Pencil (HB or H)
Step 1: Setting the Scene
-
Prepare the paper:
Begin by taping down all four edges of your watercolor paper to a board. This creates that clean, crisp white border seen in the reference image and prevents the paper from buckling when wet. -
Light sketch:
Using an H pencil, lightly sketch the horizon line about one-third up from the bottom. Mark the curved bank of land on the right side and loosely indicate where the main tree trunks will stand. Keep lines faint so they disappear under the paint.
Muddy colors?
If your autumn oranges turn brown, you’re likely over-mixing on the paper. Let colors mingle naturally wet-on-wet rather than stirring them with the brush.
Step 2: Sky and Water Base
-
Wet-on-wet sky:
Generously wet the sky area above the horizon line with clean water. While shiny, drop in a mix of Alizarin Crimson and a touch of Ultramarine Blue at the top left, fading into a warm Yellow Ochre near the horizon. -
Reflected water layer:
While the sky is drying, wet the water area below the horizon. Mirror the sky colors upside down: Yellow Ochre just below the horizon line, transitioning into the reddish-purple mix toward the bottom left. -
Dry completely:
Let these initial washes dry completely. If the paper feels cool to the touch, it is still damp; wait until it is room temperature.
Step 3: Building the Distant Forest
-
Distant tree shapes:
Mix a muted dark violet-brown using Burnt Sienna and Ultramarine Blue for the far tree line. Using the medium round brush, paint the silhouette of the trees along the horizon, varying the heights to look natural. -
Adding fall color:
While the tree silhouette is still slightly damp, drop in pure Yellow Ochre and touches of Burnt Sienna into distinct spots along the tree line to simulate illuminated autumn leaves. -
Water reflections:
Immediately paint the reflection of this tree line into the water below. Use vertical downward strokes to pull the color into the ‘water,’ keeping the edges softer than the trees above. -
Separation line:
Leave a very thin, barely visible gap or paint a darker, sharp line of separation between the land and water to establish the bank.
Add sparkle
Use a white gel pen or a tiny dot of white gouache to add a few highlights on the water ripples or the tips of the foreground grasses for extra shine.
Step 4: Foreground and Main Trees
-
Right-side bank:
Paint the foreground land mass on the right using a dark mix of Burnt Umber and Alizarin Crimson. Allow the paint to be uneven to suggest uneven ground and fallen leaves. -
Painting the tree trunks:
Switch to a smaller brush. Mix a strong, dark brown-black. Paint the main tree trunks on the right, starting thick at the base and tapering as they reach into the sky. Allow branches to cross over each other naturally. -
Creating foliage texture:
Load a round brush with Burnt Sienna and dab it gently onto the branches to create clusters of leaves. Use a ‘stippling’ motion. Add touches of Alizarin Crimson for the redder leaves in the upper left branches. -
Layering leaf colors:
Once the first layer of leaves is dry, add a few darker dabs of brown and lighter dabs of pure orange to create volume and depth in the canopy.
Step 5: Final Details
-
Grasses and reeds:
Using your finest liner brush or rigger, paint delicate grasses sprouting from the foreground bank. Use quick, confident flicking motions upward. -
Darkest accents:
Mix your darkest value (almost black) and add tiny shadows under the bank where it meets the water, and define the texture of the tree bark on the main trunk. -
Water ripples:
With a slightly dry brush, drag horizontal lines of the dark bank color across the water reflection to suggest gentle ripples breaking the mirror image. -
The reveal:
Ensure the paper is bone dry. Gently peel away the masking tape at a 45-degree angle to reveal the clean, deckled-looking edge.
Frame your finished piece or gift it to bring a touch of autumn warmth into someone’s home.


Have a question or want to share your own experience? I'd love to hear from you in the comments below!