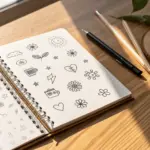
Band drawings are such a fun way to mash up people, instruments, and pure music energy into one scene. Here are my favorite band drawing ideas—from classic stage setups to artsy, unexpected compositions you can totally make your own.
Classic Band on Stage Scene
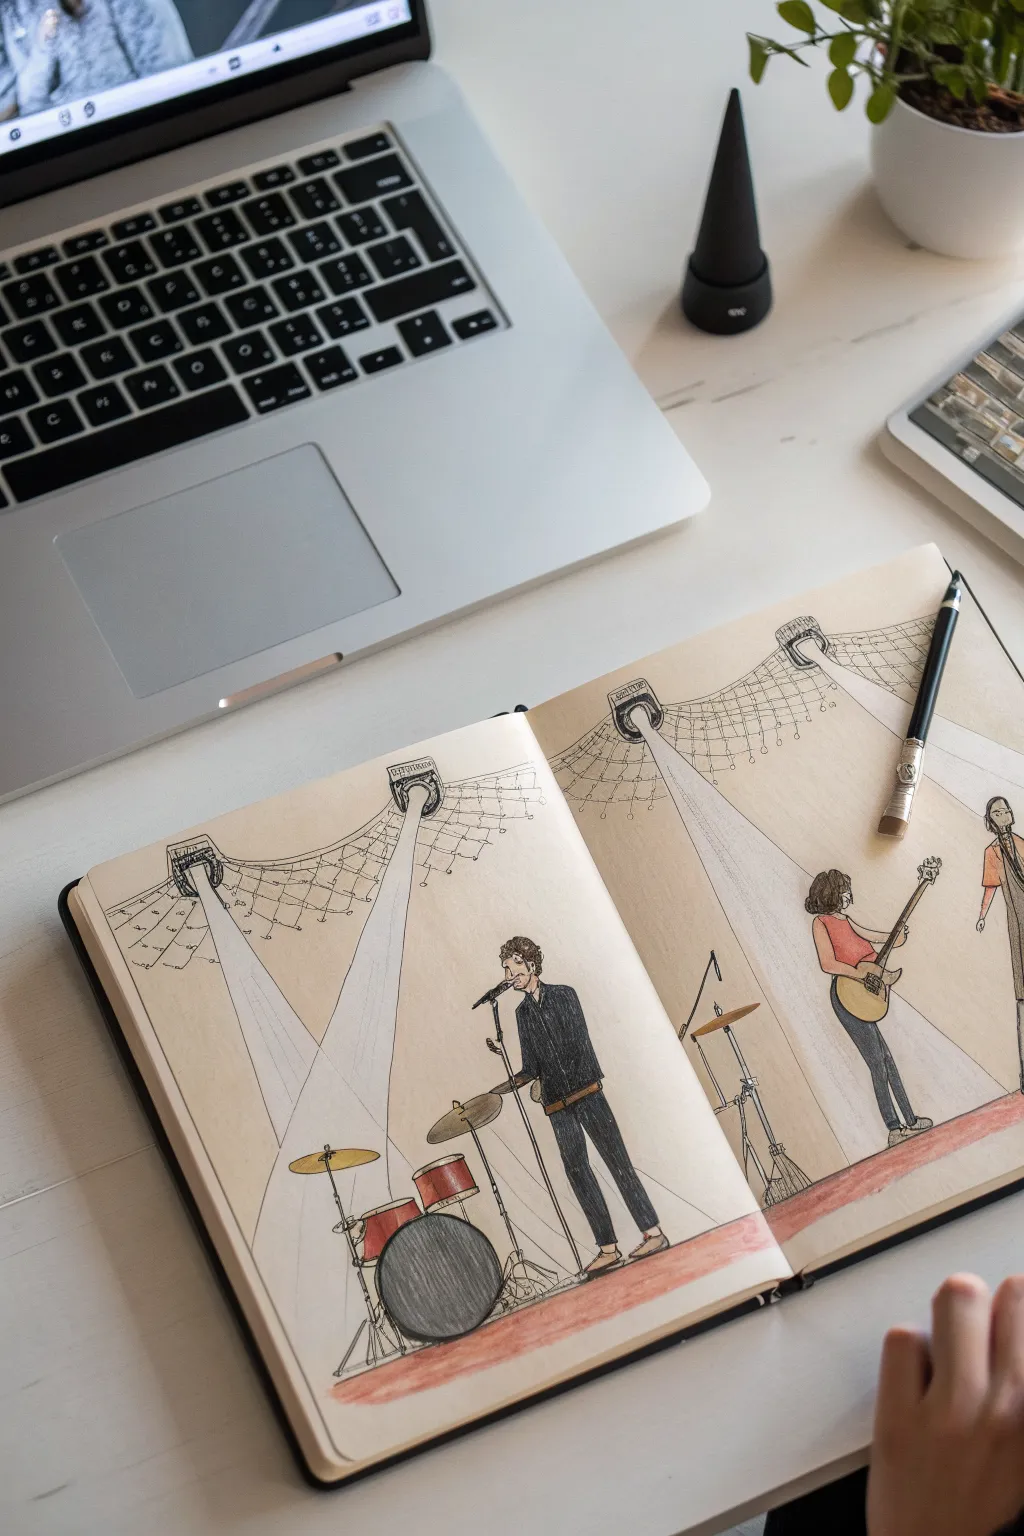
Capture the energy of a live performance with this vibrant sketchbook illustration of a band on stage. By combining crisp ink lines with soft colored pencil shading, you’ll create depth through dramatic stage lighting effects and expressive character poses.
Detailed Instructions
Materials
- A4 Sketchbook (cream or off-white paper preferred)
- Fine liner pens (sizes 0.1, 0.3, and 0.5)
- Set of colored pencils (including red, black, grey, yellow, brown, skin tones)
- Pencil (HB for initial sketching)
- Eraser
- Ruler
Step 1: Setting the Stage
-
Plan the Composition:
Begin by lightly sketching a horizontal line across the bottom third of both pages to establish the stage floor. Decide where your band members will stand; place the drummer on the left page and the guitarist and bassist on the right page to balance the spread. -
Draft the Lighting Rig:
Sketch the hanging stage lights near the top of the pages. Draw three main canister lights: one above the drummer, one centrally located, and one on the far right. Connect them with a sweeping, curved truss structure that dips slightly in the middle. -
Define the Beams:
Using a ruler, lightly draw the cone-shaped beams of light descending from the canisters. These should widen as they hit the floor, creating triangular shapes that will be crucial for the final coloring phase. -
Light Webbing Detail:
Add the intricate grid pattern behind the truss. Sketch a loose netting or grid connected to the light rig, giving the ceiling area some industrial texture.
Beam Shaping
If your light beams look too solid, try using a white eraser to gently lift pigment from the center of the beam, leaving only the edges defined.
Step 2: Drawing the Band
-
Sketch the Drum Kit:
On the left page, draft the drum kit shapes. Start with the large circle of the bass drum, then stack the smaller tom-toms and add the cymbal stands. Keep the lines loose. -
Position the Vocalist:
Place the singer near the center fold on the left page. Sketch a tall, thin figure holding a microphone stand. He should be overlapping the drum kit slightly to create depth. -
Add the Guitarist:
On the right page, sketch a female figure playing an electric guitar. Position her legs in a slight strut to imply movement. -
Include the Bassist:
On the far right edge, add a partial figure of the bassist. Cropping this figure slightly makes the scene feel like a snapshot of a larger moment. -
Refine with Ink:
Once satisfied with the pencil sketch, use a 0.3 fine liner to ink the outlines of the characters and instruments. Use a thinner 0.1 pen for the delicate webbing rig and light canisters. -
Erase Guidelines:
Wait for the ink to dry completely, then gently erase all visible graphite pencil lines to leave a clean black-and-white base.
Step 3: Adding Color & Atmosphere
-
Color the Stage Floor:
Take a muted red or rust-colored pencil and shade the floor area. Apply heavier pressure near the bottom edge of the paper and fade it out slightly as you move upward essentially creating a gradient. -
Fill the Clothing:
Use a black colored pencil for the singer’s suit and the guitarist’s pants. Press firmly to get a solid, dark tone that contrasts with the lighter background paper. -
Instrument Details:
Color the guitar body (yellow/gold) and the drum shells (red). Use a grey pencil to shade the cymbal and hardware, leaving small white highlights to suggest metallic reflection. -
Create the Spotlights:
This is the most important step for atmosphere. Use a white or very pale grey pencil to color inside the beam triangles you drew earlier. I usually layer this very softly to make the paper look ‘lit’ rather than opaque. -
Shadows and Depth:
Add shadows on the floor beneath the musicians using a dark grey or black pencil. Ensure the shadows fall away from the light sources to maintain logical perspective. -
Final Ink Touches:
Go back in with your 0.5 pen to darken key areas, like the microphone stand or the darkest folds in the clothing, to make the figures pop against the background.
Straight Lines
For the long spotlight beams, always use a ruler for the outer edges but color the inside freehand to keep the organic, dusty light look.
Close your sketchbook knowing you’ve preserved the excitement of a live concert on paper


Lead Singer With Microphone Focus
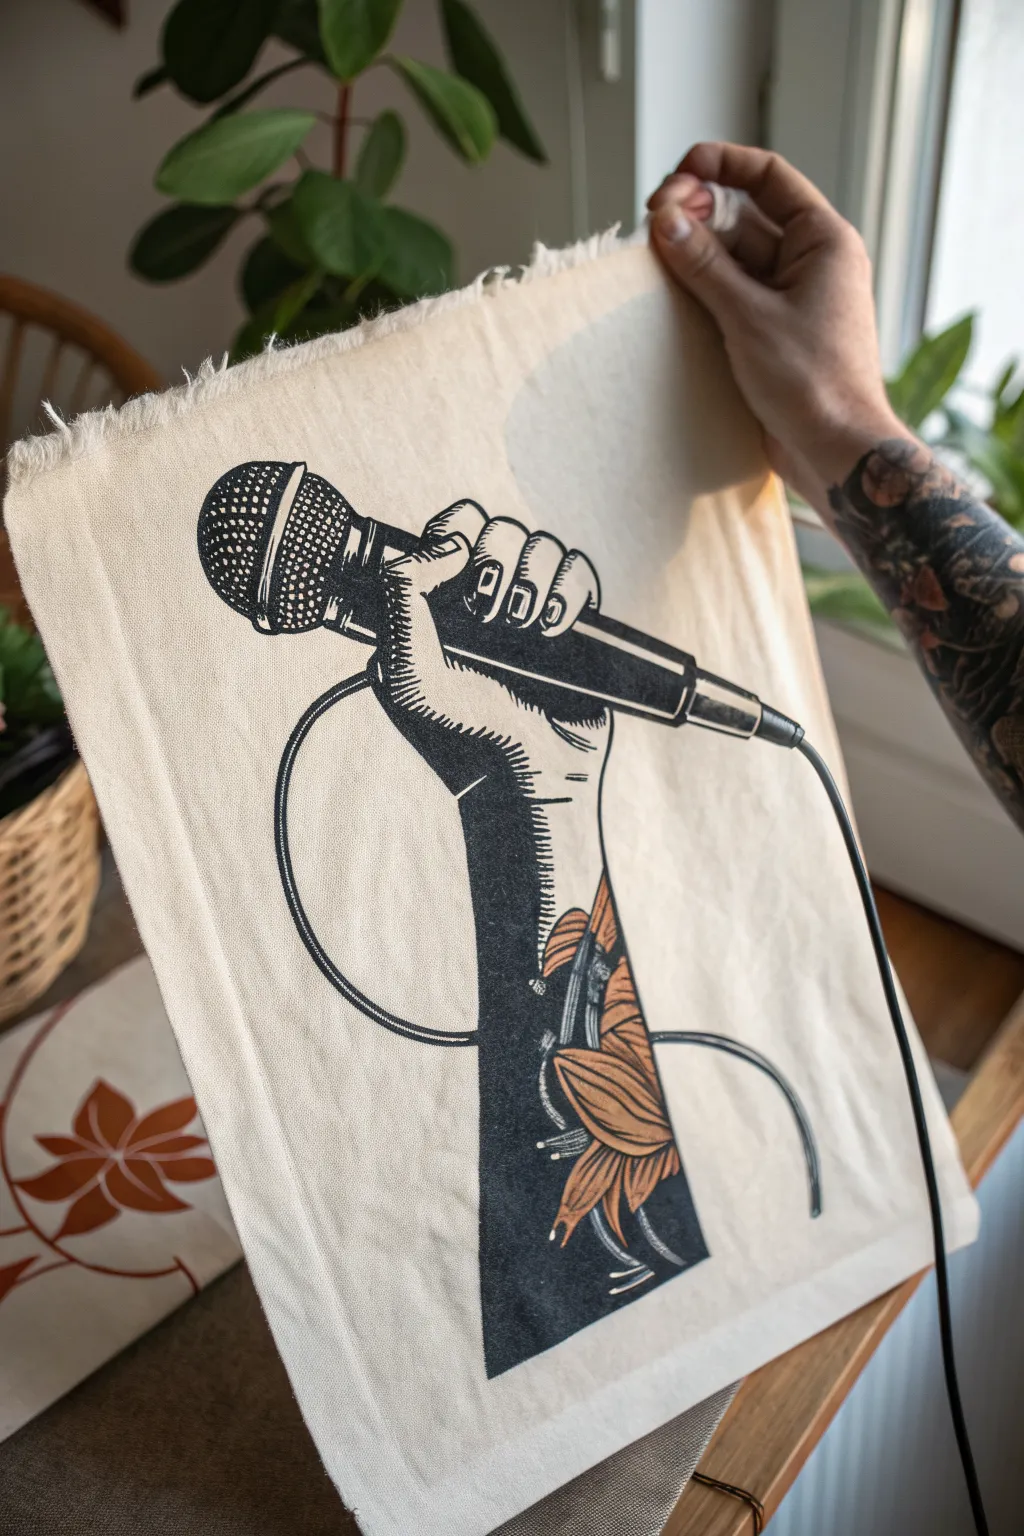
Capture the raw energy of a live performance with this striking linocut-style print on fabric. This project combines bold, black ink work with delicate autumnal details, resulting in a piece that feels both punk-rock and handcrafted.
Step-by-Step Tutorial
Materials
- Soft-cut lino block (approx. A4 size)
- Lino cutting tools (V-gouge, U-gouge, and knife)
- Cotton or linen fabric rectangle (hemmed or raw edge)
- Black screen printing ink or fabric block printing ink
- Orange/Rust fabric paint or ink
- Small fine-point paintbrush
- Brayer (roller)
- Inking plate or glass pane
- Baren or wooden spoon
- Carbon paper and pencil
- Tracing paper
- Iron (for heat setting)
Step 1: Design and Transfer
-
Drafting the Design:
Sketch your design on paper first. Focus on the strong silhouette of the hand gripping the microphone. The style relies on high contrast, so decide early which areas will be solid black (like the shadow of the arm) and which will be white. -
Adding Texture:
Plan your shading lines. Instead of smooth gradients, use distinct parallel lines (hatching) to indicate the curve of the thumb and the roundness of the microphone grill. -
The Leaf Motif:
Incorporate the leaf design on the forearm. Keep the outlines clear, as you will need to carve around these shapes to leave them negative (un-inked) or ready for distinct coloration later. -
Reversing the Image:
Trace your final sketch onto tracing paper and flip it over. Remember, printing reverses the image, so if you want the hand to be a ‘right’ hand in the print, you need to carve a ‘left’ hand on the block. -
Transfer to Block:
Place carbon paper face down on your lino block, then layer your reversed tracing paper on top. Firmly trace over your lines with a pencil to transfer the guide onto the rubber surface.
Step 2: Carving the Block
-
Outlining:
Use your finest V-gouge tool to carve along the outline of the hand, the microphone cable, and the intricate details of the microphone grill. Go slow here; these lines define the crispness of the print. -
Clearing Large Areas:
Switch to a wider U-gouge to clear away the background space around the arm and mic. Cut away from your body and keep your non-cutting hand behind the blade at all times for safety. -
Detailing the Grill:
For the microphone head, cross-hatch carefully. You want to leave tiny raised squares or diamonds to mimic the mesh texture. -
Shading the Arm:
To create the shadow effect on the skin, carve thin, parallel lines into the solid black areas. The deeper and wider you carve, the more ‘light’ hits the arm in the final image. -
Defining the Tattoo:
Carve out the negative space inside the leaf shapes on the arm. You want the leaves themselves to be mostly clear of the black ink so you can paint them later.
Spotty Coverage?
If your black areas look speckled, your fabric might have too much texture. Try a smoother cotton weave or place a slightly padded surface (like a felt mat) under the fabric while printing.
Step 3: Printing and Finishing
-
Preparing the Ink:
Squeeze a line of black fabric block printing ink onto your inking plate. Roll the brayer back and forth until you hear a consistent ‘velcro’ sound, indicating the ink is evenly distributed. -
Inking the Block:
Roll the brayer over your carved block. Apply a thin, even layer. You might need to roll in multiple directions to ensure the raised ‘mesh’ of the microphone gets fully coated without flooding the grooves. -
Aligning the Fabric:
Lay your fabric flat on a clean surface. Carefully position your inked block face down onto the fabric. Once it touches the fabric, do not shift or slide it. -
Applying Pressure:
Using a baren or the back of a wooden spoon, rub firmly in circular motions over the back of the block. Pay extra attention to the edges and the detailed grill area to ensure a solid transfer. -
The Reveal:
Peel one corner of the block up slowly to check coverage. If it looks spotty, lay it back down and rub some more. Once happy, pull the block completely off. -
Adding Color:
Allow the black ink to dry completely (check manufacturer instructions). Then, take a small brush and your rust-colored fabric paint to carefully fill in the leaf tattoo design on the arm. -
Heat Setting:
Once all ink and paint are fully dry, place a scrap cloth over the design and iron it on a high setting (appropriate for cotton) for 3-5 minutes. This seals the ink so the fabric can be washed.
Crisp Lines Pro-Tip
I like to pop my lino block in the fridge for 10 minutes before carving delicate details like the mic grill. The cold hardens the rubber slightly, allowing for sharper, less crumbly cuts.
Now you have a bold piece of wearable or displayable art that celebrates the power of the voice


Drummer and Kit Breakdown Sketch
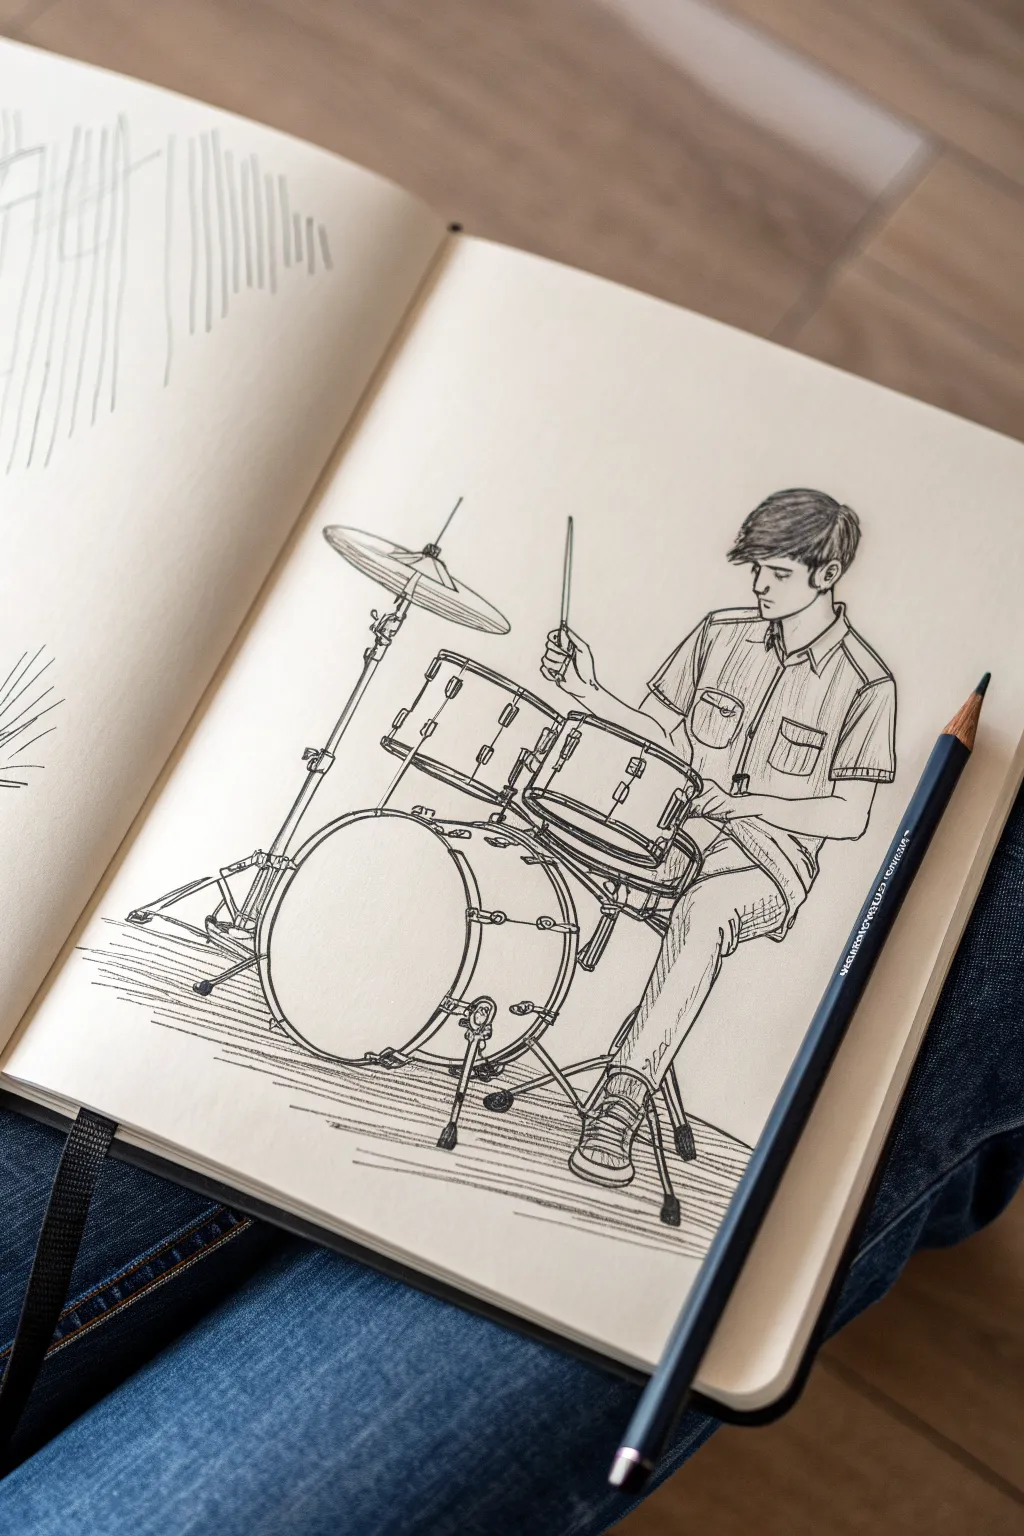
Capture the energy of a live performance with this clean, illustrative pen sketch of a drummer in action. Using confident lines and strategic shading, you’ll build a detailed drum kit and a focused musician that pops off the sketchbook page.
Step-by-Step Guide
Materials
- Sketchbook with smooth, heavy paper (at least 100gsm)
- HB graphite pencil
- Kneaded eraser
- Black fineliner pens (sizes 0.1, 0.3, and 0.5mm)
- Ruler (optional for cymbal stands)
Step 1: Penciling the Structure
-
Map the circles:
Start with light pencil strokes to place the main drums. Draw a large oval for the bass drum near the bottom center, and stack two smaller, angled ovals above it for the toms. -
Position the drummer:
Sketch a stick figure to establish the drummer’s posture. His torso should be slightly angled right, head looking down at the snare, and arms bent in a playing motion. -
Flesh out the figure:
Build volume around your stick figure. Draw the shirt with short sleeves, the shape of the head with hair falling forward, and the legs bent comfortably on the throne and pedal. -
Add hardware lines:
Use straight lines to indicate the cymbal stand on the left and the legs of the floor tom. Don’t worry about the thickness of the metal yet; just get the angles right. -
Detail the drum depths:
Turn those initial ovals into cylinders. Draw lines downward from the sides of your oval tops to create the depth of the tom-toms and the snare drum. -
Refine the cymbals:
For the crash cymbal on the left, draw a very thin, flattened ellipse. Add the small bell dome in the center where the stand meets the metal.
Step 2: Inking the Outlines
-
Start with the drums:
Switch to your 0.3mm pen. Ink the rims of the drums first. Notice how the rim has a double line to show thickness—capture that detail to make them look solid. -
Ink the tension rods:
Draw the small rectangular lugs on the sides of the drums. Connect these to the rims with straight vertical lines to represent the tuning rods. -
Define the drummer’s profile:
Outline the drummer’s face and hair using the 0.3mm pen. Use jagged, flowing strokes for the hair to suggest texture and movement. -
Clothing folds:
Ink the shirt and jeans. Focus on where the fabric creases—at the armpits, the elbows, and the knees. These lines define the form of the body underneath. -
Hardware details:
Carefully ink the cymbal stands and drum legs. Adding small knobs and wingnuts at the joints adds a level of mechanical realism that sells the drawing. -
The drumstick hand:
Ink the hand holding the stick. Keep the fingers loose but gripping firmly. The drumstick itself should be a straight, thin line extending upwards.
Pro Tip: Ellipse Perspective
Keep your ellipses consistent. The ‘openness’ of the drum heads and cymbal should look similar. If one looks like a circle and another like a flat line, the perspective will break.
Step 3: Shading and Texture
-
Erase pencil guides:
Identify any remaining visible graphite lines. I like to wait a few minutes to ensure the ink is totally dry, then gently erase everything to leave a clean black-and-white base. -
Shadow the drums:
Use your 0.1mm pen to add hatching on the sides of the drums. Keep the lines parallel and close together to create a curved shadow effect on the cylindrical shells. -
Texture the clothing:
Add vertical hatching lines on the button-down shirt to simulate fabric texture. Use darker, denser hatching in the folds of the jeans to show depth. -
Cymbal shine:
Add a few broken, curved lines on the surface of the cymbal. This suggests the concentric tonal grooves and the way light reflects off the metal. -
Ground the kit:
Draw horizontal scribbles under the bass drum and the drummer’s feet. This ground shadow prevents the drawing from looking like it’s floating in empty space. -
Final heavy touches:
Take the 0.5mm pen and go over key outlines—specifically the bottom of the bass drum and the outer edge of the drummer’s back—to add weight and contrast.
Troubleshooting: Shaky Hardware?
If your straight lines for stands and sticks are wobbly, don’t use a ruler for the ink. Instead, draw the line quickly from your shoulder, not your wrist, for a straighter stroke.
Now you have a dynamic musical moment captured forever in your sketchbook.
Guitarist Power Pose
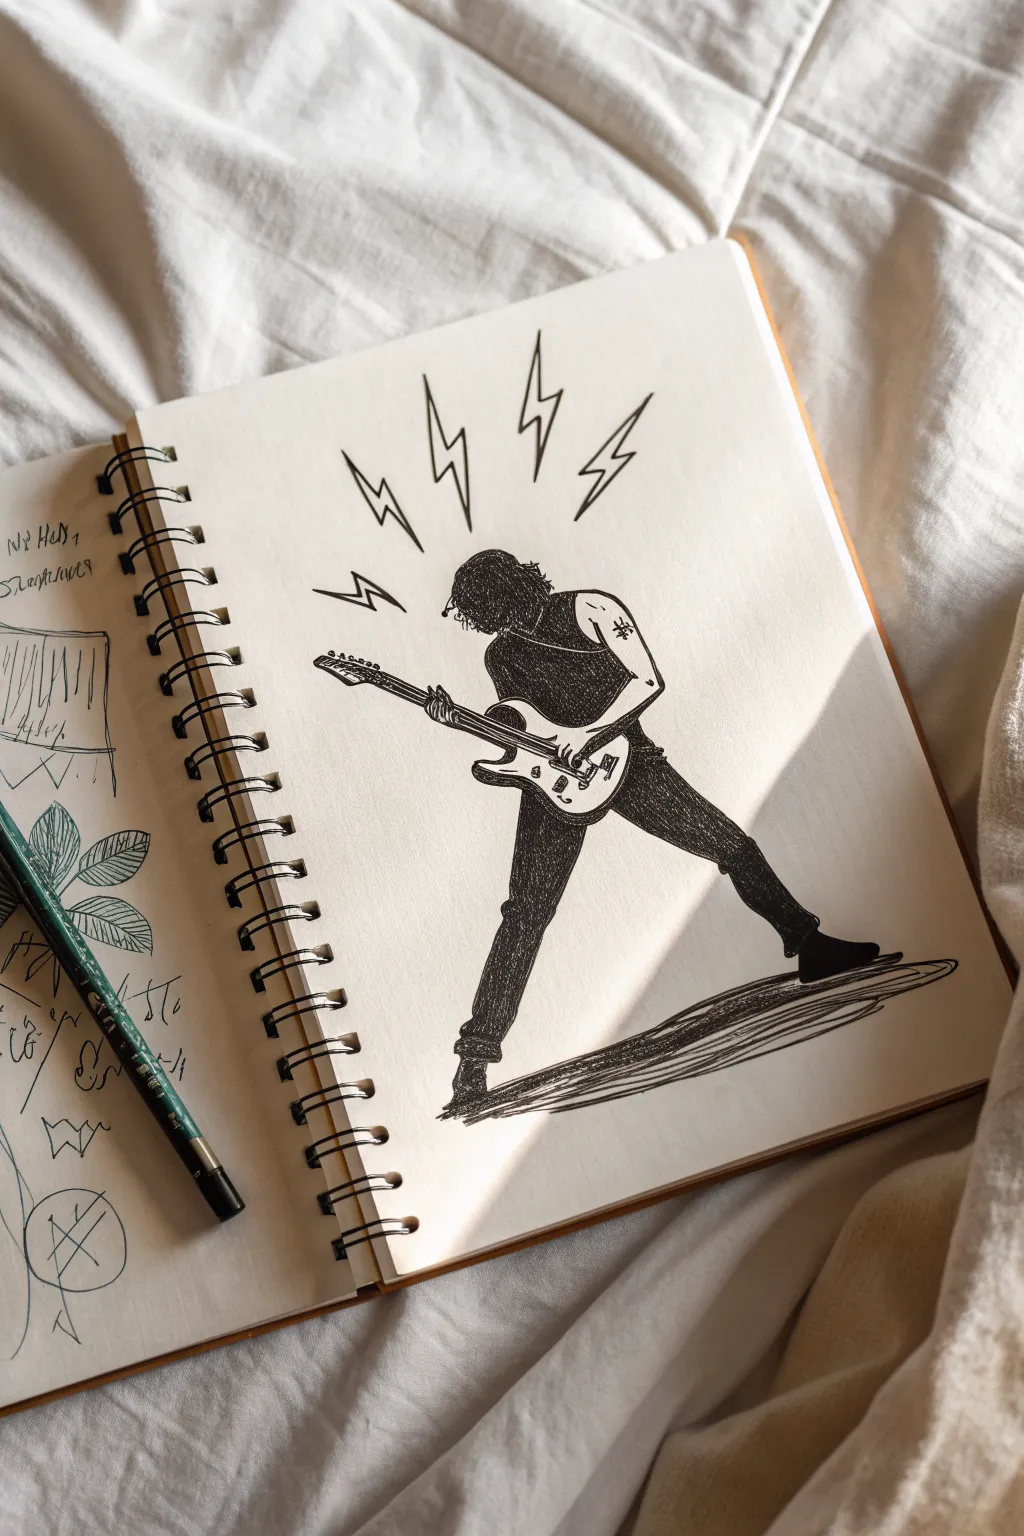
Capture the raw energy of live music with this dynamic pen-and-ink drawing of a guitarist in a classic power stance. Using strong silhouettes and energetic hatching, you’ll create a piece that feels loud even on paper.
How-To Guide
Materials
- Sketchbook or drawing paper (medium weight)
- HB or 2B pencil for initial sketching
- Kneaded eraser
- Fine liner pens (sizes 0.1, 0.3, and 0.5)
- Black brush pen or broad marker for filling
Step 1: Laying the Framework
-
Establish the gesture:
Start with a very light pencil line of action. Draw a curve that starts from the head, goes down the spine, and extends through the back leg. This creates the leaning-back momentum. -
Block in the geometry:
Using simple shapes, build the body structure. Draw an oval for the torso and two long, angled rectangles for the legs spread wide apart in an ‘A’ frame stance. Keep the legs long to emphasize the dramatic pose. -
Position the guitar:
Sketch a long, thin rectangle for the guitar neck crossing the torso diagonally. Add the curved body of the electric guitar around the player’s midsection, tilting the neck upwards. -
Add arms and head:
Sketch the head looking down at the fretboard. Draw the left arm extending down the guitar neck and the right arm bent at the elbow, hand ready to strum near the bridge.
Step 2: Refining the Lines
-
Outline the silhouette:
Switch to a 0.3 fine liner. Carefully outline the figure’s clothing—a sleeveless shirt and tight jeans. Make the fabric bunch slightly at the knees and waist for realism. -
Detail the guitar:
With a 0.1 pen, draw the specific details of the guitar. Ink the tuning pegs, the bridge, and the pickups. Keep these lines crisp and mechanical compared to the organic lines of the clothing. -
Define the hair:
Use quick, jagged strokes to create a shaggy hairstyle that obscures the face slightly. The hair should flow backward a bit, suggesting movement. -
Erase pencil guides:
Once the primary ink lines are dry, gently erase all the underlying pencil sketches to clean up your workspace.
Pro Tip: Negative Space
Leave a tiny sliver of white space between the black shirt and the guitar strap so the details don’t get lost in the dark ink.
Step 3: Adding Depth and Drama
-
Fill the blacks:
Using your brush pen or broad marker, fill in the shirt completely solid black. Leave the arms white to create high contrast. -
Hatch the pants:
Instead of filling the pants solidly, use a 0.5 pen to create dense cross-hatching. I like to keep the strokes tight to make the jeans look dark gray but textured. -
Create arm definition:
Add very minimal shading to the arms using small hatch marks near the elbows and under the shirt sleeve to suggest muscle tone without overworking it. -
Add the tattoo:
Draw a tiny, simple symbol on the upper right arm, like a star or cross, to give the character some rocker edge.
Level Up: Dynamic Noise
Use a splatter technique with white ink or gouache over the black shirt area to look like sweat or stage lights hitting the fabric.
Step 4: Final Touches
-
Draw the shadow:
Ground the figure by drawing a cast shadow under the feet. Use long, horizontal hatching strokes that trail off to the right, matching the perspective. -
Add lightning bolts:
Above the guitarist’s head, draw four sharp, jagged lightning bolts radiating outward. These represent the loud sound and energy. -
Stiffen the outlines:
Go back over the main silhouette lines with a 0.5 pen to thicken them slightly, ensuring the character pops against the background. -
Final inspection:
Check for any gaps in your black fill or uneven hatching. Add a small signature near the feet or in the corner.
Now you have a striking music-themed illustration ready to rock your sketchbook page

PENCIL GUIDE
Understanding Pencil Grades from H to B
From first sketch to finished drawing — learn pencil grades, line control, and shading techniques.
Explore the Full Guide
Band Silhouettes Under Spotlights
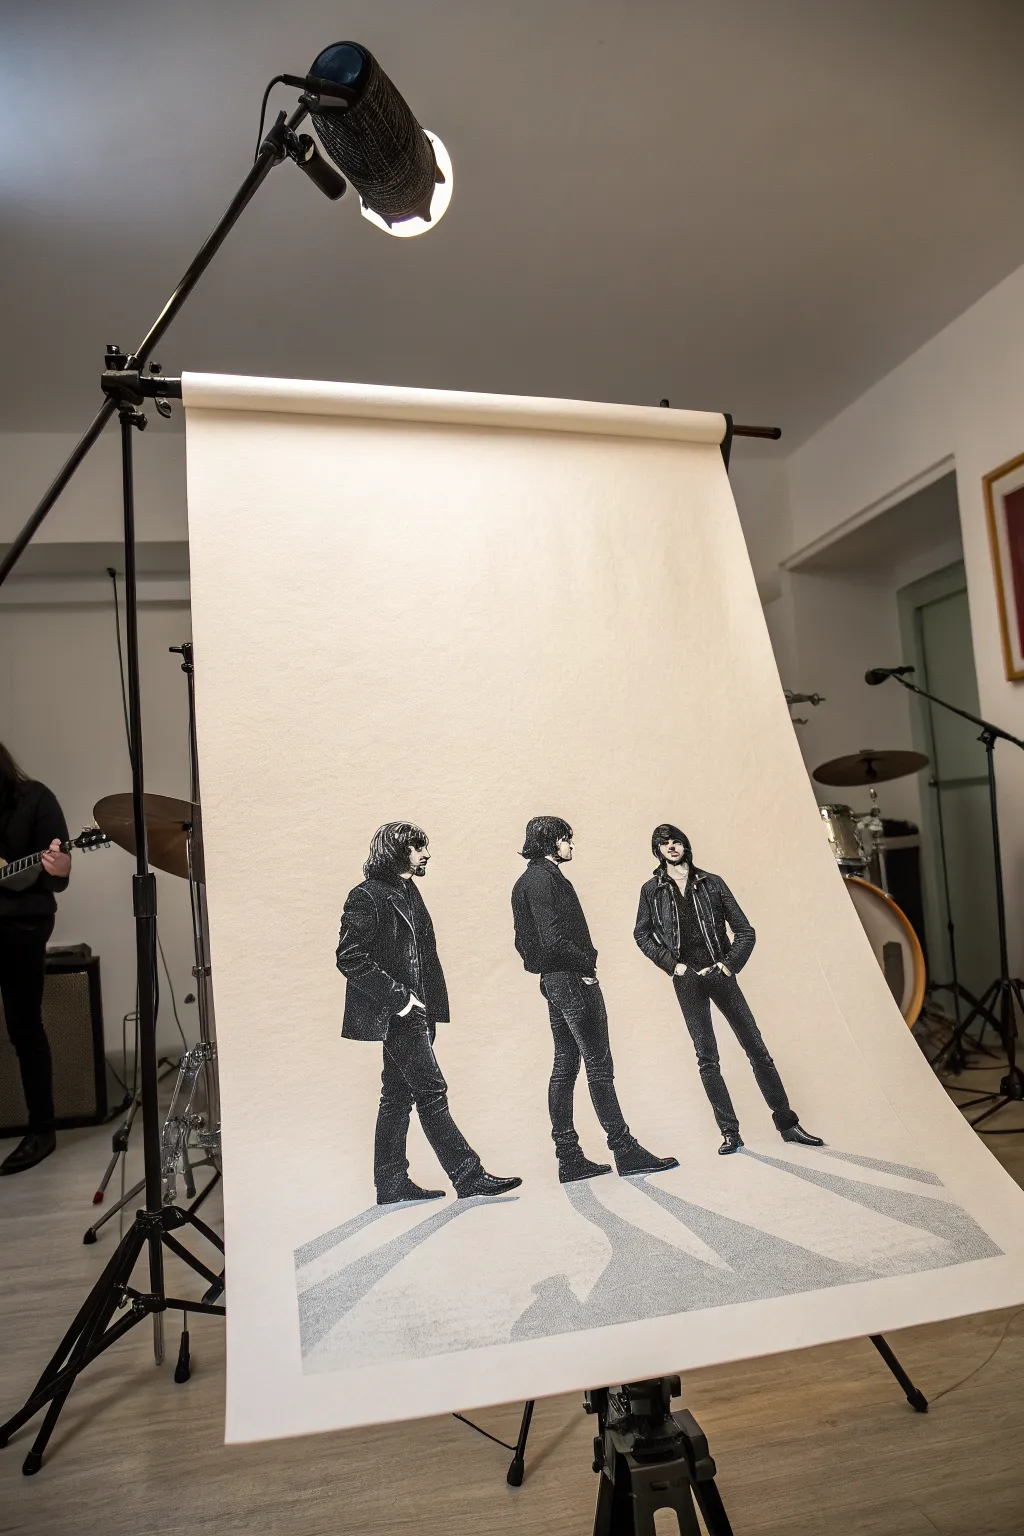
Capture the cool, moody energy of a rock band with this large-scale illustration project. Using high-contrast stippling and ink techniques, you’ll create striking figures with elongated shadows that seem to walk right off the page.
Step-by-Step Tutorial
Materials
- Large roll of heavy-weight drawing paper (cream or off-white)
- Graphite pencils (HB and 2B)
- Fine liner pens (sizes 0.1, 0.3, 0.5, and 0.8)
- Black India ink or high-quality black markers
- Ruler or straight edge
- Kneaded eraser
- Reference photo of three figures
- Masking tape
Step 1: Preparation and Sketching
-
Secure the canvas:
Since this is a large-format drawing, unroll your paper and secure the top edge to a wall or backdrop stand like the one in the photo, or simply tape the corners down flat on a large table to prevent curling. -
Plan the composition:
Lightly mark the horizon line where the figures’ feet will be placed. Ensure you leave plenty of negative space above the heads to mimic that studio backdrop feel. -
Outline the figures:
Using an HB pencil, sketch the basic contours of your three band members. Focus on their posture and clothing folds rather than facial details at this stage. Keep the lines faint so they are easy to erase later. -
Map the shadows:
Draw long, diverging diagonal lines extending from the feet toward the bottom corners of the paper. These will become the dramatic cast shadows.
Master the Lighting
Keep a consistent light source direction. If the cast shadows go left, ensure the highlights on the clothes are on the right side.
Step 2: Inking the Figures
-
Establish the darkest darks:
Identify the solid black areas of the clothing, like leather jackets or dark denim. Fill these areas in using your thickest pen or a brush with India ink, leaving slivers of white for highlights on folds. -
Stipple the mid-tones:
For areas that aren’t solid black, switch to a 0.5 fine liner. Use stippling (lots of small dots) to create texture on jeans and shirts. This transitions the deep blacks into the lighter areas. -
Detail the faces and hair:
Switch to your 0.1 and 0.3 pens. I find it helpful to use delicate hatching for hair strands to give them flow, and very minimal lines for facial features to maintain that high-contrast, graphic look. -
Refine clothing textures:
Go back over the jackets and pants. add cross-hatching to the shaded sides of the limbs to give the figures volume so they don’t look like flat cardboard cutouts.
Step 3: Creating the Shadow Floor
-
Outline the shadow boundaries:
Take your ruler and firm up the pencil lines for the cast shadows on the floor. These should start exactly at the soles of the shoes and widen as they come forward. -
Fill the primary shadow:
Unlike the figures, the floor shadows should be a uniform grey tone. You can achieve this with dense cross-hatching or a grey marker. If using ink, use a consistent stipple pattern, keeps the dots evenly spaced but close together. -
Add the secondary shadow:
Notice the faint, lighter shadow overlapping the main one? Draw a second, wider angle shadow lightly in pencil, then fill it with a very sparse stipple or light grey wash to suggest multiple light sources. -
Ground the figures:
Use your darkest black ink to deepen the small area immediately under the shoe soles. This contact shadow anchors the figures to the ground.
Ink Smearing?
Place a clean sheet of scrap paper under your drawing hand. This prevents oils from your skin transferring and stops distinct ink lines from smudging.
Step 4: Final Touches
-
Clean up:
Once you are absolutely certain the ink is dry, gently run a kneaded eraser over the entire drawing to lift the initial graphite sketch lines. -
Check contrast:
Stand back from the drawing. If the figures blend too much into the background, thicken the outline on the shadowed side of their bodies to pop them forward. -
Display:
Hang the paper on a stand or mount it on a board. Leaving the paper slightly curled at the bottom adds to the studio photography aesthetic.
Step back and admire your band’s dramatic entrance onto the paper canvas
Band Portrait Lineup
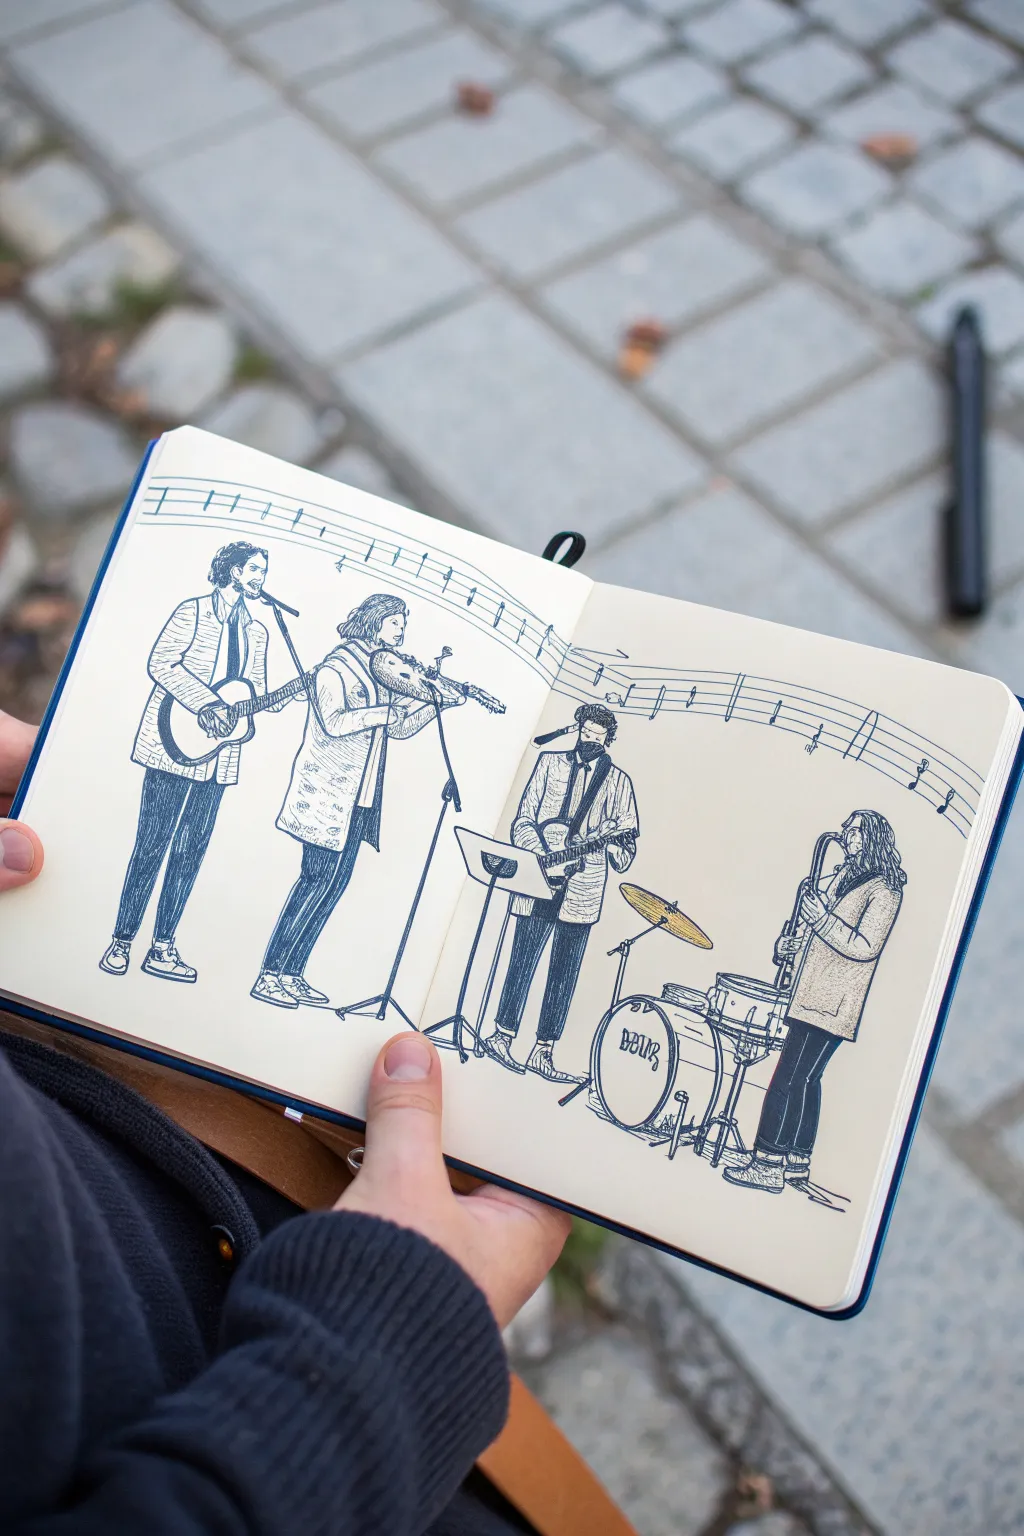
Capture the energy of a live musical performance with this detailed pen-and-ink sketchbook spread. Using clean lines and cross-hatching techniques, you’ll create a dynamic lineup of four musicians playing together across a double-page composition.
How-To Guide
Materials
- Hardcover sketchbook (A5 or similar size, smooth cartridge paper)
- H or HB pencil for initial layout
- Kneadable eraser
- Fine liner pens (sizes 0.1, 0.3, and 0.5)
- Ruler (optional, for the musical staff)
- Reference photo of a band or live subject
Step 1: Setting the Stage
-
Plan the composition:
Begin by opening your sketchbook fully flat. Visualize where the four band members will stand; place two figures on the left page and two on the right to balance the spread. -
Draw the ‘floor’ line:
Using your pencil lightly, sketch a faint horizon line near the bottom of the page to establish where the musicians’ feet will be planted. This keeps them grounded. -
Gesture sketch the figures:
Use loose, gestural shapes to block in the poses of the musicians. Focus on the tilt of the shoulders and hips, especially for the violinist and guitarist on the left. -
Add instrument placeholders:
Sketch simple geometric shapes to represent the instruments—circles for the drum kit, long rectangles for guitar necks, and a curved form for the saxophone. -
Draft the background motif:
Lightly pencil a wavy, flowing musical staff across the top third of both pages. This acts as a unifying background element that ties the two pages together.
Step 2: Refining the Lines
-
Outline the first musician:
Switch to a 0.3 fine liner. Starting on the far left, ink the contour of the first guitarist’s jacket and trousers, using confident, continuous strokes. -
Detail the violin player:
Move to the second figure. Pay close attention to the hand placement on the violin neck and the bow arm angle. Outline their clothing, adding folds where the fabric bunches at the elbows. -
Ink the rhythm section:
On the right page, outline the third guitarist and the drummer. For the drum kit, use steady, curved lines for the bass drum and snare rims. Don’t worry if your circles aren’t perfect; wobbly lines add character. -
Draw the musical staff:
Trace over your pencil lines for the floating musical staff in the background. Add vertical bar lines and small note heads to suggest a melody. -
Erase pencil guides:
Once the main ink outlines are completely dry, gently run your kneadable eraser over the entire spread to remove the initial graphite sketches.
Pro Tip: Line Variation
Use a thicker pen (0.5 or 0.8) for objects in the foreground, like the drum kit or main guitar, and a thinner pen for background elements to create natural depth.
Step 3: Adding Texture and Depth
-
Texture the clothing:
Using a 0.1 pen, add texture to the musicians’ clothes. Use short, dashed lines or small patterns to differentiate fabrics, like the plaid texture on the second musician’s coat. -
Apply leg shading:
To make the trousers look dark like denim or dress pants, use dense vertical hatching lines. Leave small white gaps to represent highlights on the thighs and knees. -
Detail the hair:
Use flowing, organic strokes to fill in the hair. For darker hair, group the lines closer together; for lighter hair, leave more white space. -
Define the instruments:
Return to the instruments with your 0.5 pen to give them weight. Darken the sound hole of the guitar and the shadow areas of the drum kit casing. -
Add microphone stands:
Draw the thin vertical lines for the microphone stands and cables. These fine details help anchor the figures to the performance space. -
Ground the figures:
Add small scribbles or cast shadows directly beneath the shoes of each musician. This ‘seats’ the figures so they don’t look like they are floating. -
Final touches:
Scan the drawing for any missing details, such as buttons on jackets or tuning pegs on the guitars. I often like to thicken the outermost silhouette lines slightly to make the figures pop.
Troubleshooting: Smudged Ink
If you accidentally smudge wet ink, don’t wipe it! Turn it into a shadow or texture pattern. For future steps, place a scrap piece of paper under your drawing hand.
Close your sketchbook knowing you have preserved a moment of musical energy in ink forever.
BRUSH GUIDE
The Right Brush for Every Stroke
From clean lines to bold texture — master brush choice, stroke control, and essential techniques.
Explore the Full Guide
Instrument Collage as a Band Poster
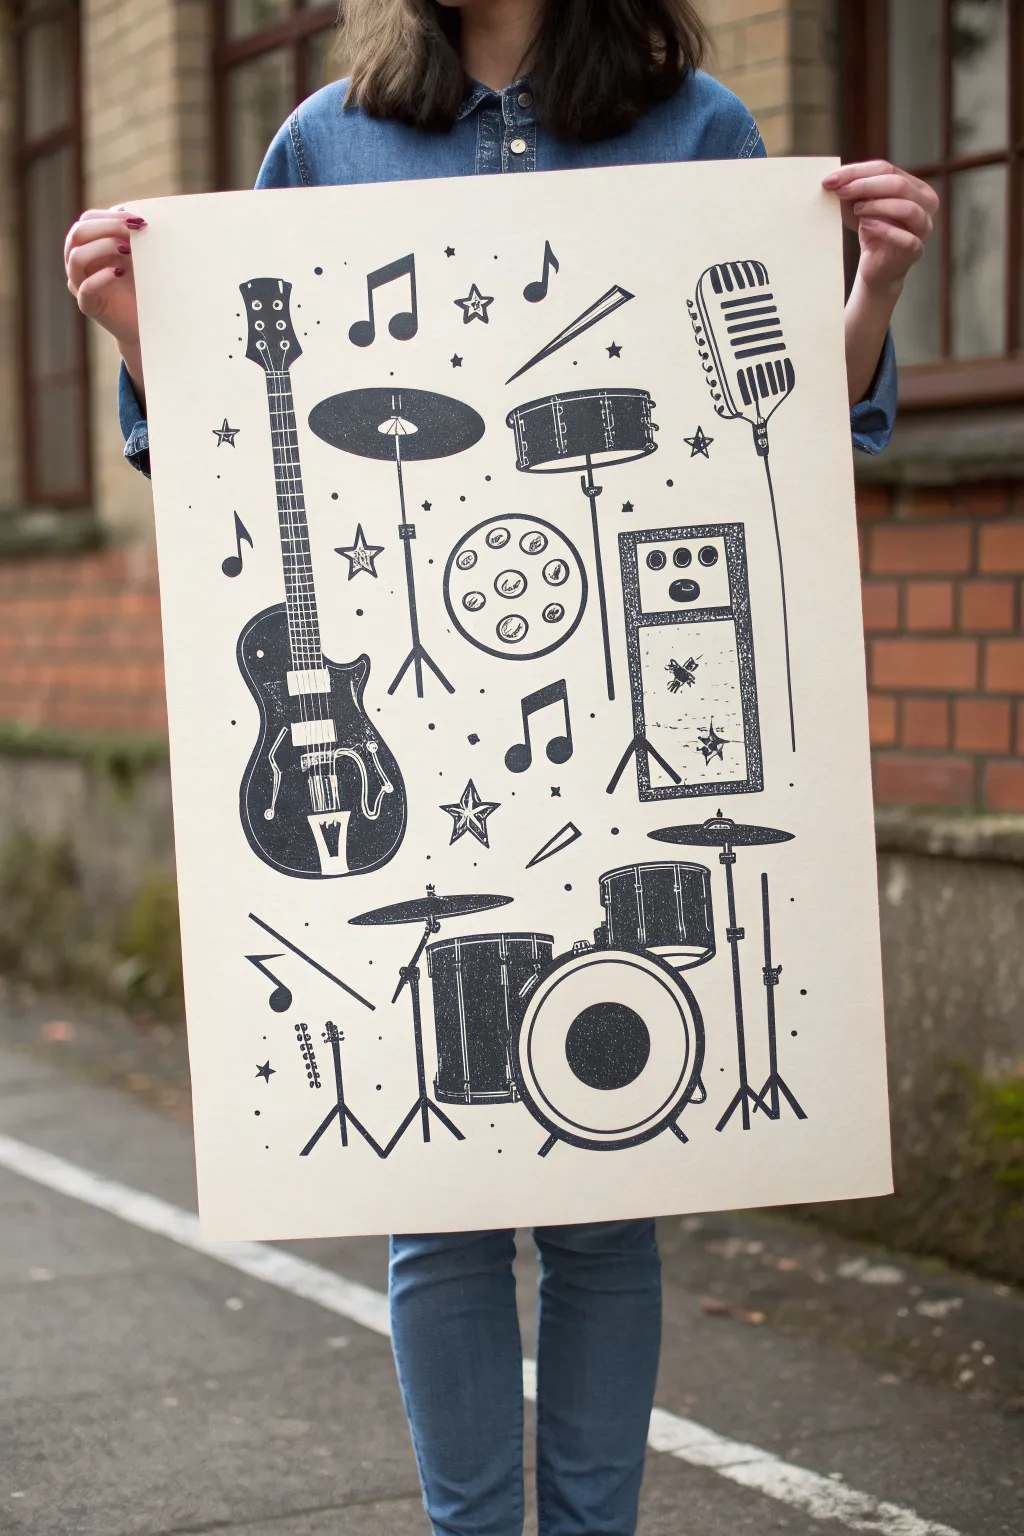
Capture the raw energy of a live band with this bold, monochromatic poster featuring a collection of musical essentials. The high-contrast black ink on cream paper gives it a classic gig-poster vibe that is both striking and timeless.
Step-by-Step Guide
Materials
- Large sheet of cream or off-white Bristol board (A2 or 18×24 inches)
- Pencil (HB or H)
- Eraser
- Black India ink or high-quality black gouache
- Fine liner pens (sizes 0.1, 0.3, and 0.5)
- Small round brush (size 0 or 1)
- Flat brush (small/medium) for filling large areas
- Ruler
- Reference photos of instruments (guitar, drum kit, mic)
- Painter’s tape or drafting tape
Step 1: Preparation and Sketching
-
Prepare your workspace:
Tape down the corners of your cream Bristol board to a flat surface. This prevents the paper from shifting while you draw and keeps it flat if the ink gets a bit heavy. -
Plan the composition:
Before drawing specific instruments, lightly sketch large shapes to designate where each item will go. Place the guitar prominently on the left and balance it with the drum kit elements at the bottom and right. -
Sketch the guitar:
Start detailing the electric guitar on the left side. Focus on the distinct shape of the body, the long neck, and the tuning pegs. Keep the lines somewhat stylized rather than perfectly realistic. -
Add the rhythm section:
Sketch a simplified drum kit at the bottom. Identify shapes for the bass drum, snare, and cymbals. Don’t forget the stands—skinny lines for the tripod legs work best here. -
Sketch the vocals and amp:
Draw a vintage-style microphone in the upper right quadrant. Below it, sketch a tall rectangular amplifier cabinet with knobs at the top. -
Fill the gaps:
Scatter smaller elements like a tambourine, drum sticks, individual cymbals, stars, and music notes throughout the empty spaces to create a cohesive collage feel.
Ink Bleeding?
If your ink feathers on the paper, your brush might be too wet. Blot it on a paper towel first, or switch to a waterproof drawing pen for outline work.
Step 2: Inking the Outlines
-
Outline the main shapes:
Using a 0.5 fine liner or a very steady hand with a small brush dipped in India ink, go over your pencil lines. Focus on the outer contours of the instruments first to establish the silhouette. -
Refine instrument details:
Switch to a 0.3 pen for internal details like the guitar frets, the mesh of the microphone, and the lugs on the drums. These lines should be clean but can have a slight hand-drawn waver for character. -
Thicken the shadows:
Identify where the darkest parts of the instruments are—like the body of the guitar or the shell of the drums. Outline these specific areas clearly so you know where to fill later.
Texture Trick
For a gritty, vintage effect, lightly dab a dry sponge with black ink and press it over the filled areas to create subtle ‘noise’ and imperfection.
Step 3: Filling and Texturing
-
Fill the solid blacks:
Use your flat brush and India ink to fill in the large black areas, such as the guitar body and the drum shells. I find it safest to work from the center outward to avoid smudging. -
Create texture on the amplifier:
For the amp speaker cloth, simpler is better. Use a stippling technique (dots) or a rough, dry-brush scumble to suggest the texture without filling it in solid black. -
Detail the microphone:
Carefully draw the vertical slots on the vintage microphone using a 0.1 pen. Leave ample negative space between the black lines to keep it looking metallic. -
Add the stars and notes:
Fill in the music notes and outline the decorative stars. For the stars, you might want to hatch the interiors or leave them open to create variety. -
Simulate a print texture:
To mimic a screen-printed or stamped look, don’t make your black fills perfectly opaque. Allow tiny specks of the cream paper to show through, or dab the ink slightly unevenly. -
Clean up straight lines:
Use the ruler and a pen to sharpen up the straight lines of the microphone stand, music note stems, and drum hardware, ensuring they contrast nicely against the curved instrument bodies.
Step 4: Final Touches
-
Erase pencil marks:
Wait until the ink is completely bone-dry. Then, gently erase all visible pencil sketches. Be careful over the heavily inked areas to avoid smearing. -
Review contrast:
Step back and look at the overall balance. If an area feels too light, add a few extra black stars or small dots (stardust) to balance the visual weight. -
Final ink inspection:
Use your smallest pen to touch up any jagged edges or lines that faded during erasing to ensure everything looks sharp and deliberate.
Hang your masterpiece on the wall and enjoy the instant cool factor of your hand-drawn gig poster.
Continuous Line Band Drawing
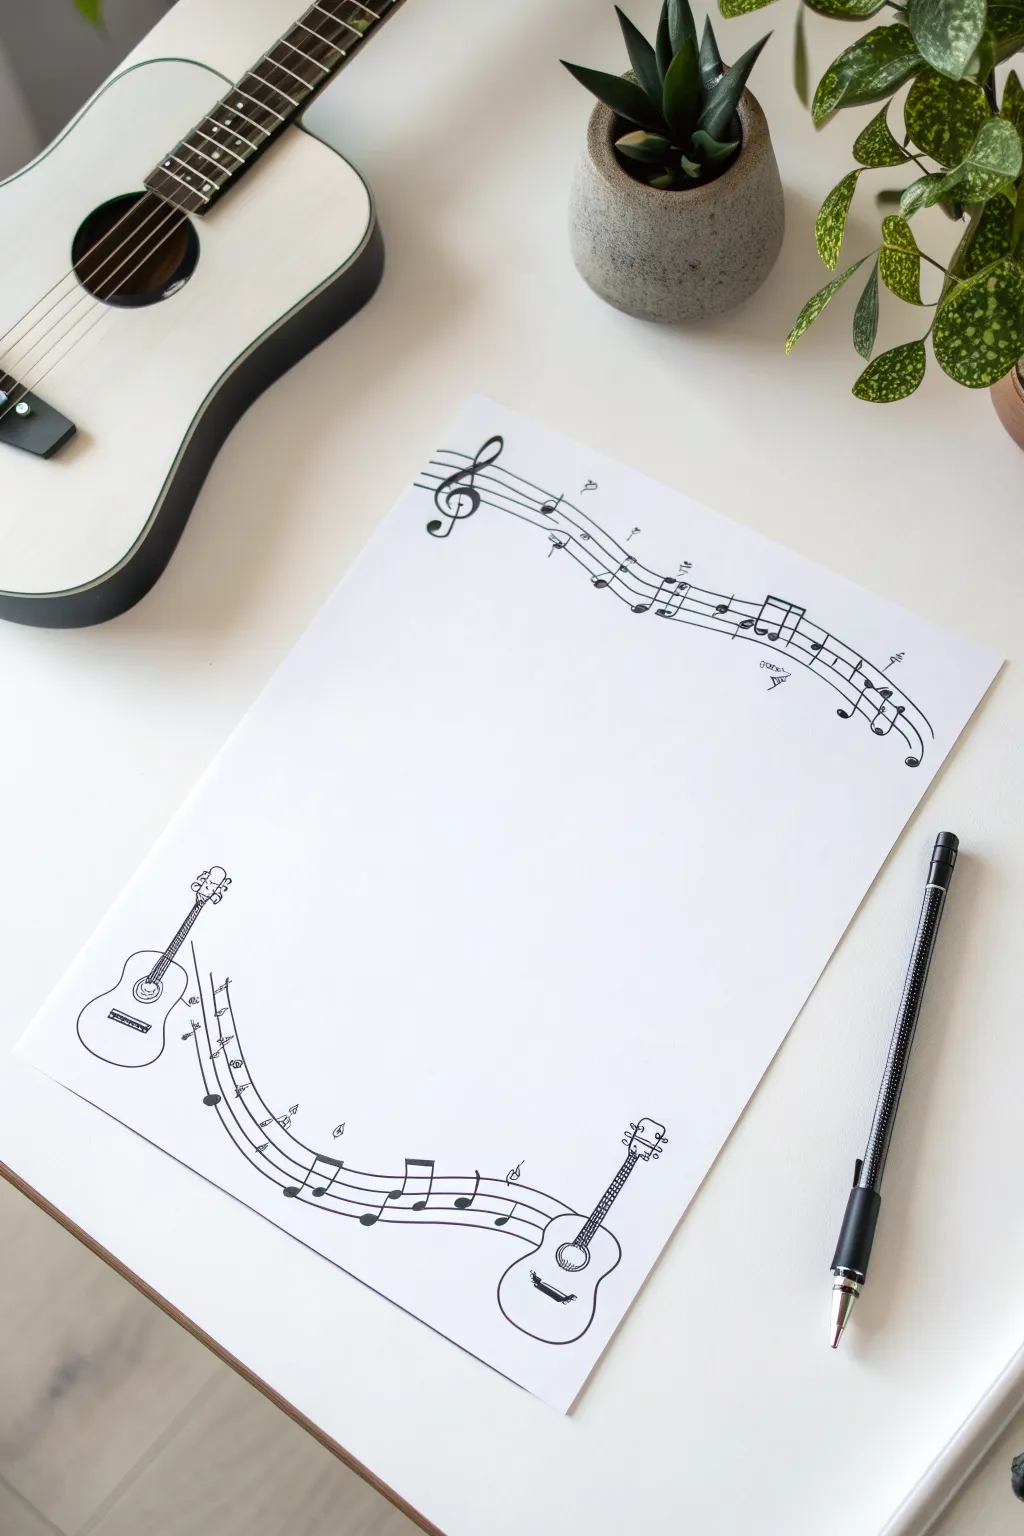
This project creates a playful, musical border design perfect for stationery, flyers, or framing. Using clean ink lines, you’ll connect miniature guitars with flowing musical staves to frame a blank center space.
Step-by-Step
Materials
- High-quality white drawing paper or cardstock (A4 size)
- Fine-liner pen (black, 0.3mm or 0.5mm)
- Pencil (HB or H for light sketching)
- Eraser (kneaded or plastic)
- Ruler (optional, though freehand adds charm)
Step 1: Conceptual Sketching
-
Define the Frame:
Visualize your paper as having a large central oval for writing. You will be drawing only in the top and bottom corners to create an implied frame. -
Placement of Top Elements:
Lightly sketch a large treble clef in the top-left corner. From the clef, draw five parallel wavy lines extending towards the top-right corner to form the staff. -
Placement of Bottom Guitars:
Sketch the outline of a small acoustic guitar on the bottom-left, tilted slightly outward. Mirror this with a second guitar on the bottom-right. -
Connecting the Guitars:
Draw the wavy five-line staff connecting the sound hole of the left guitar to the neck of the right guitar, creating a swooping curve along the bottom edge.
Keep it flowing
Don’t stress if your parallel staff lines touch or cross slightly. This ‘loose’ style mimics spontaneous sketching and looks better imperfect.
Step 2: Inking the Top Border
-
Trace the Treble Clef:
Using your fine-liner, carefully ink the treble clef. Start with the spiral in the center and work your way up and down the vertical line. -
Draw the Upper Staff Lines:
Ink the five wavy parallel lines. It’s okay if they aren’t perfectly spaced; the hand-drawn wobble adds character. -
Add Musical Notes:
Draw several eighth notes and quarter notes along this top staff. Cluster some together with beams for visual interest. -
Add Floating Details:
Scatter a few tiny, unattached music symbols like flats, sharps, or naturals floating just above or below the staff lines.
Make it yours
Instead of guitars, try drawing microphones, drum sticks, or piano keys at the corners to customize the theme for a specific musician.
Step 3: Inking the Bottom Border
-
Detail the Left Guitar:
Ink the body shape of the left guitar. Add the bridge, sound hole, and the neck with simple horizontal lines for frets. -
Draw Tuning Pegs:
Add three tiny circles on each side of the guitar headstock to represent tuning keys. -
Connect the Staff:
Ink the swooping staff lines that connect the two instruments. I find it helpful to draw these quickly to keep the line smoother. -
Detail the Right Guitar:
Ink the right guitar, ensuring the staff lines appear to pass behind or merge with it naturally. -
Populate with Notes:
Add musical notes to this bottom staff, focusing on the curve where the lines dip lowest.
Step 4: Finishing Touches
-
Thicken Key Lines:
Go back over the main outlines of the guitars and the treble clef to give them a slightly bolder weight than the staff lines. -
Fill in Details:
Color in the heads of the musical notes and the center of the guitar sound holes with solid black ink. -
Erase Pencil Marks:
Wait until the ink is completely dry—give it a few minutes to be safe—then gently erase all underlying pencil sketches. -
Final Inspection:
Check for any gaps in your lines or areas that need a tiny touch of extra ink to balance the composition.
Now you have a beautifully framed page ready for lyrics, a setlist, or a special note


Band Members as Simple Cartoon Shapes
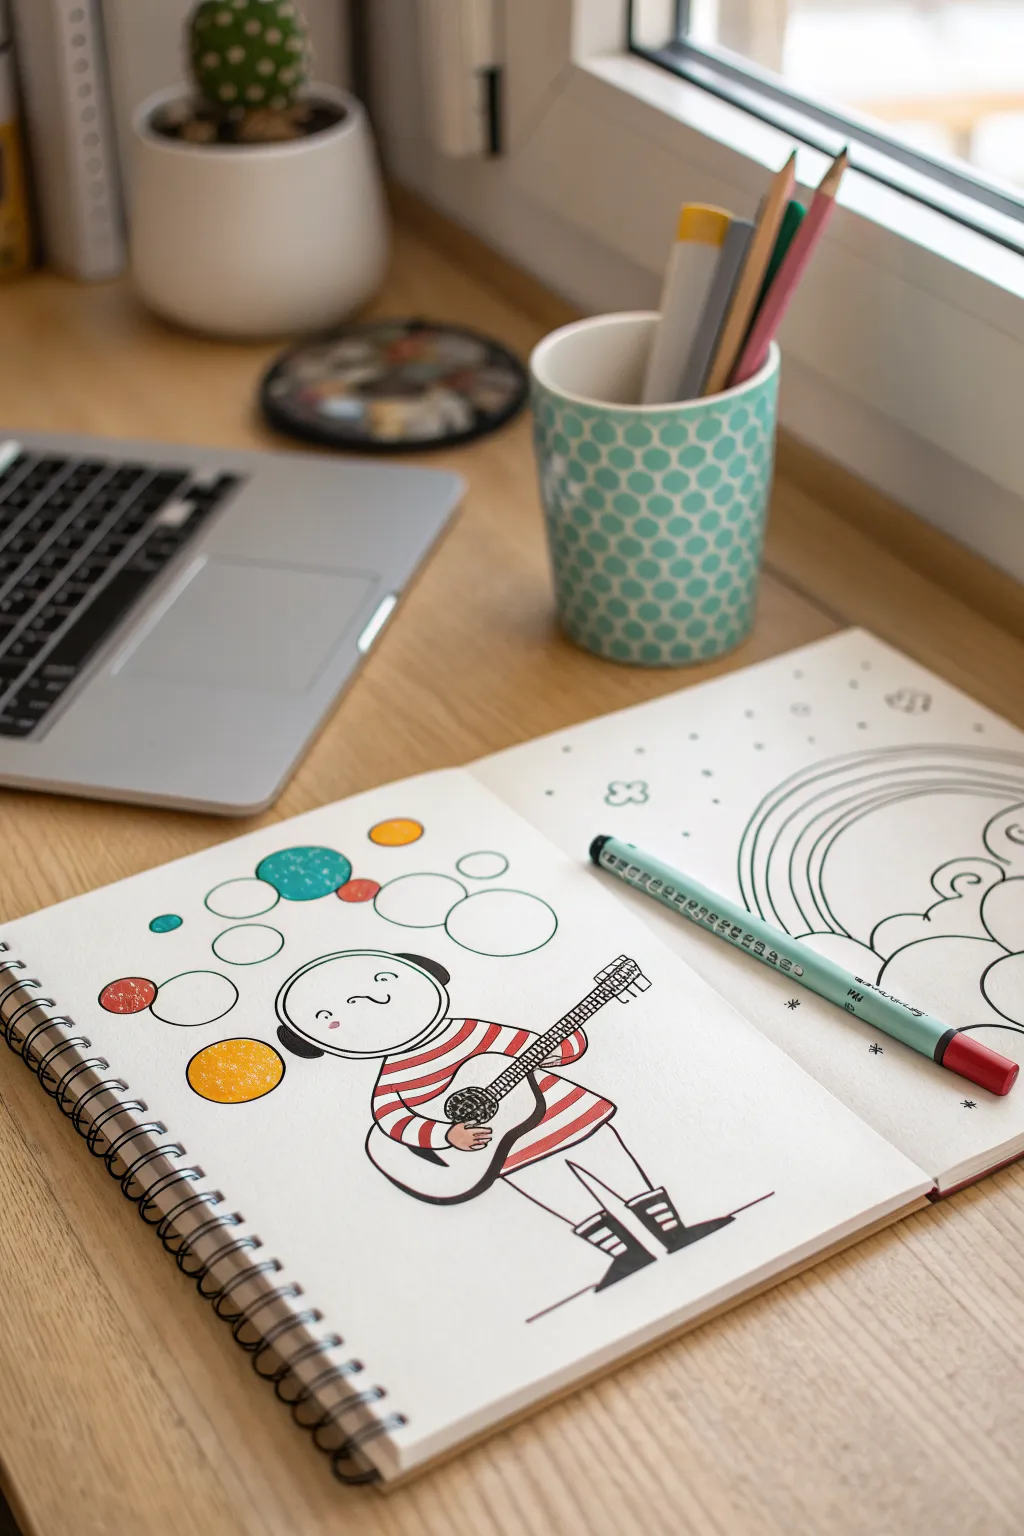
This charming illustration turns a simple cartoon figure into a cosmic musician, perfect for beginners looking to experiment with bold lines and limited color palettes. The clean, graphic style combines whimsical shapes with pops of red and teal for a standout sketchbook page.
Step-by-Step Guide
Materials
- Spiral-bound sketchbook with smooth, heavyweight paper
- Fine-liner pens (black, 0.3mm and 0.8mm)
- Colored markers or felt-tip pens (red, teal/aqua, mustard yellow)
- Pencil (HB or 2B)
- Eraser
- Circle template or compass (optional)
Step 1: Drafting the Character
-
Head shape:
Start by lightly sketching a large, slightly flattened circle for the head near the center-left of your page. -
Helmet details:
Draw an inner curved line within the head circle to define the face opening of the helmet, leaving space on the sides for the ‘ears’ or headphones. -
Body structure:
Sketch a rounded, bell-shaped torso directly beneath the head. Keep the shoulders soft and sloping. -
Blocking the legs:
Add two simple lines extending downward for legs, ending in large, rectangular shapes for the boots foundation. -
Guitar placement:
Draw a long diagonal rectangle across the body for the guitar neck and a rounded shape overlapping the torso for the guitar body.
Step 2: Inking the Lines
-
Solidifying the outline:
Using your thicker black fine-liner (around 0.8mm), trace over your pencil lines. Give the helmet a smooth, continuous curve. -
Facial features:
With a thinner pen (0.3mm), add two small dots for eyes, a tiny ‘c’ for a nose, and slight pink cheeks if you have a pale pink marker. -
Shirt stripes:
Draw horizontal bands across the torso area. Be careful to stop the lines where the guitar and arms will overlap. -
Arm details:
Ink the arms curving around the guitar. The hands can be simple mitten shapes or just rounded nubs holding the instrument. -
Boot definition:
Refine the boots by adding thick horizontal treads on the bottom and a rectangular cuff at the top. -
Guitar details:
Ink the guitar body and neck. Add tuning pegs at the top of the neck and a grid pattern for the sound hole.
Circle Perfection
Trace small household objects like bottle caps or coins to get perfect circles for the floating bubbles if you don’t have a template handy.
Step 3: Adding the Atmosphere
-
Floating bubbles:
Sketch various sizes of circles floating above and around the character’s head to create a ‘space’ or ‘music note’ effect. -
Connectors:
Ink these circles cleanly. I find it helps to rotate the sketchbook as I draw to keep the curves smooth. -
Clean up:
Once the ink is completely dry, thoroughly erase all underlying pencil sketch lines.
Space Band Twist
Draw a whole band by varying the instruments! Try a drummer with floating asteroid drums or a keyboardist with a constellation synthesizer.
Step 4: Coloring
-
Red stripes:
Take your red marker and fill in alternating stripes on the shirt and the character’s sleeves. -
Yellow accents:
Use the mustard yellow marker to color the largest floating circle near the shoulder. -
Teal tones:
Fill in one or two of the smaller floating bubbles with teal or aqua. Add a tiny dot of teal on the cheek for contrast. -
Texture details:
If your markers are textured, allow some of the paper grain to show through for a vintage look. -
Final heavy lines:
Go back over the outermost contour of the character with your thickest pen to make them pop off the page.
Now you have a whimsical, space-faring musician ready to rock your sketchbook pages
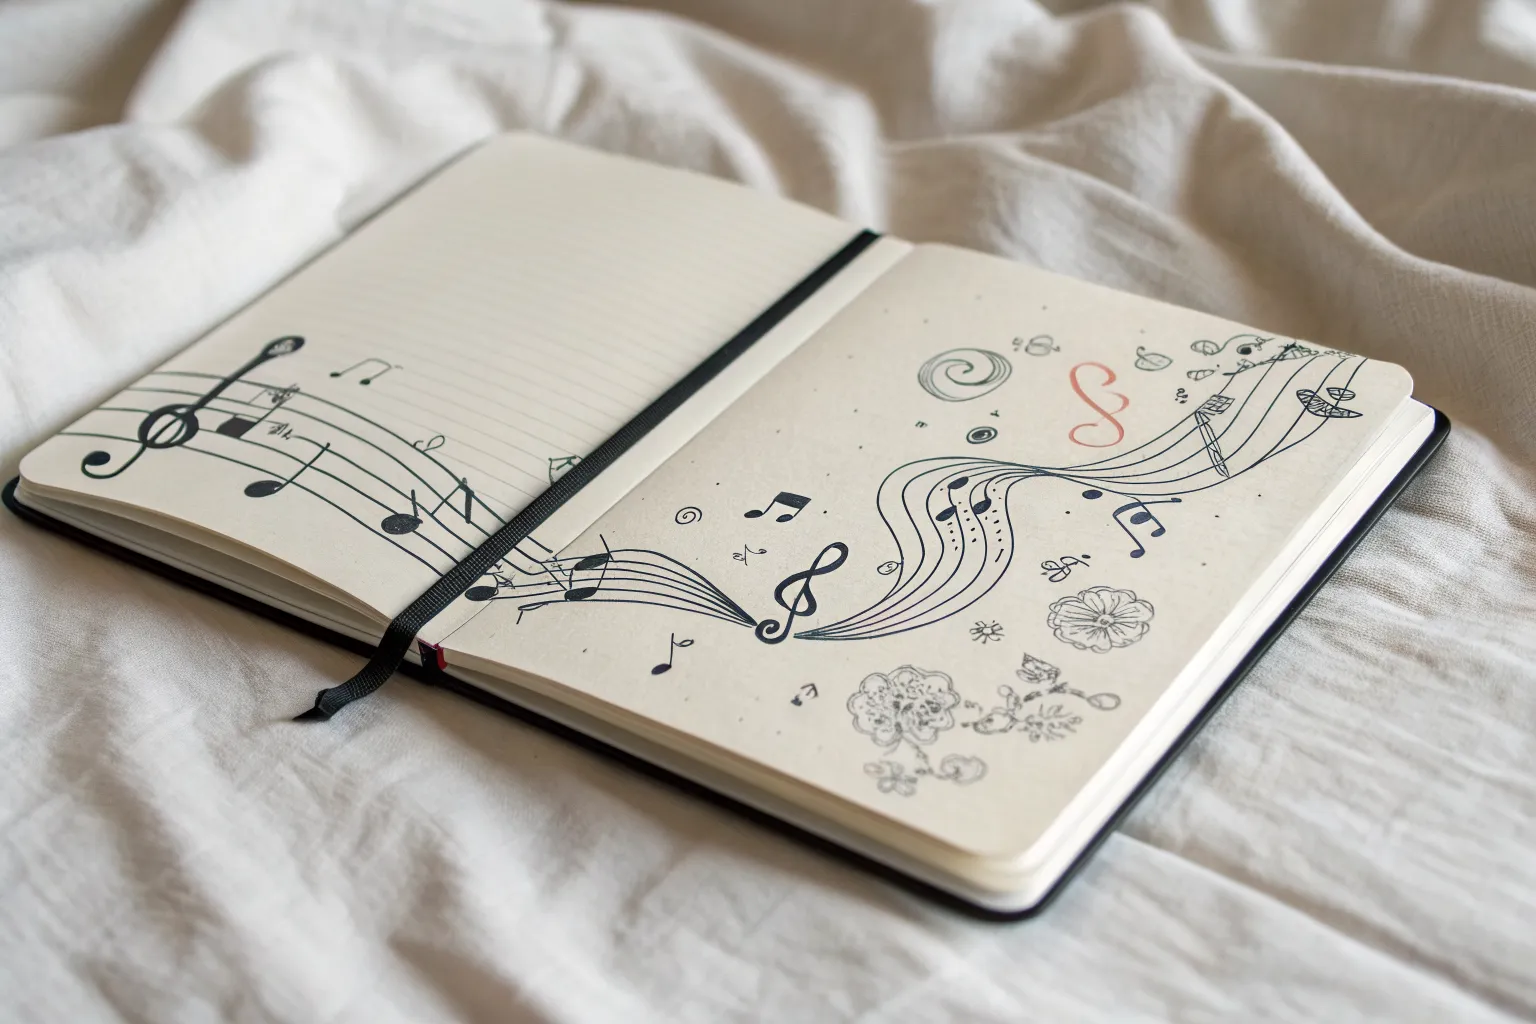
Music Notes Wrapping Around the Band
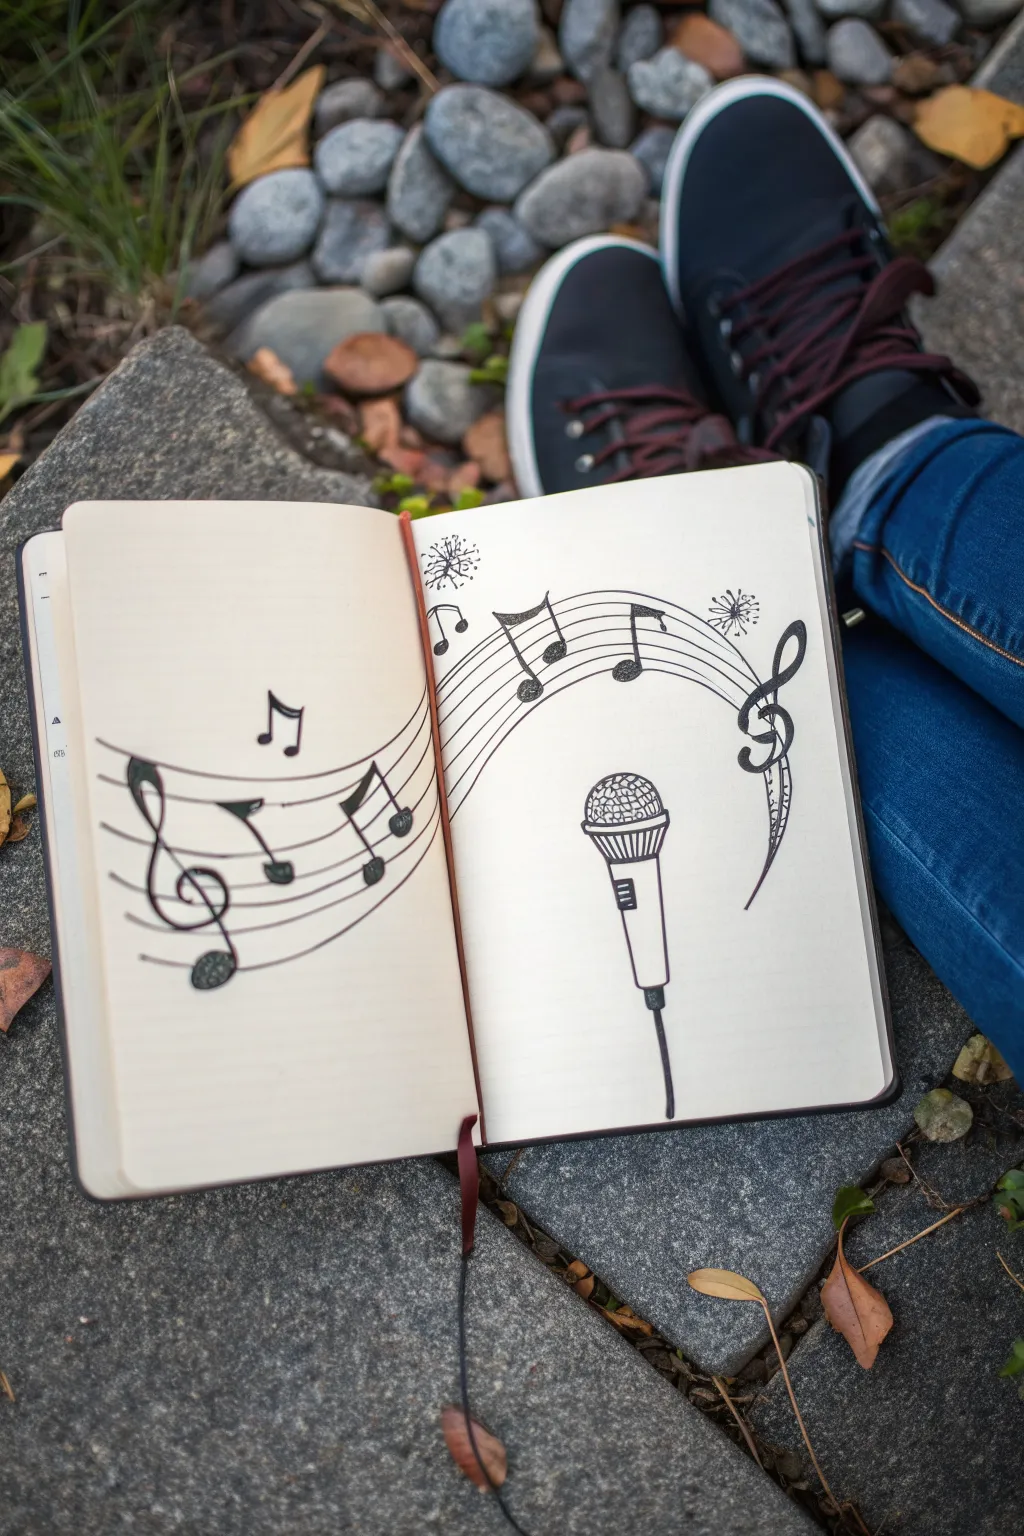
This whimsical sketchbook layout features a dynamic staff of musical notes swirling around a central microphone, bridging the gap between two pages. It creates a sense of movement and rhythm, perfect for capturing the energy of a live performance or your love for music in a simple, bold style.
How-To Guide
Materials
- Sketchbook (hardcover preferred for laying flat)
- Pencil (HB or 2B)
- Eraser
- Fine liner pen (black, approx. 0.3mm or 0.5mm)
- Ruler (optional, but helpful for staff lines)
Step 1: Planning the Composition
-
Open your canvas:
Begin by opening your sketchbook to a fresh two-page spread. Press the spine flat gently so drawing across the gutter will be easier. -
Establish the curve:
Using your pencil, lightly sketch a large, arching curve that starts from the bottom left page, crosses the center fold, and swoops over to the top right page. -
Sketch the microphone placement:
On the right-hand page, below the arch you just drew, lightly sketch a vertical rectangle for the microphone handle and a circle on top for the grille. -
Define the staff width:
Draw four more parallel curved lines following your initial arch guide. You want a total of five lines to create a musical staff. Keep the spacing relatively even, though a hand-drawn look adds charm.
Step 2: Drawing the Microphone Details
-
Refine the grille:
Go back to your microphone sketch. Flatten the top circle slightly to make it look like a rounded mesh head. Add a band just below it where the head meets the handle. -
Add structure to the handle:
Taper the handle slightly towards the bottom. Draw a small rectangular switch in the middle of the handle. -
Connect the cable:
Draw a thick line extending from the bottom of the handle, bending slightly as it goes down to suggest a cord. -
Texture the grille:
Lightly pencil in a cross-hatch pattern on the microphone head to mimic the mesh texture.
Uneven Staff Lines?
If drawing five parallel curves freehand is tricky, cut a strip of stiff paper equal to your staff width, notch five holes for pencil points, and drag it across the page as a makeshift compass.
Step 3: Adding the Musical Elements
-
Place the Treble Clef:
On the far left side of the staff (left page) and the far right side (right page), sketch large, ornate Treble Clefs interacting with the lines. -
Sketch the notes:
Scatter musical notes along the staff. Include eighth notes (single flag) and beamed notes (connected pairs) to create visual variety. Let them follow the flow of your curved lines. -
Decorative accents:
Add a few small, dandelion-like sparks or starbursts near the top of the curve for a magical effect.
Add a Splash of Life
Use a metallic gold or silver gel pen to highlight the microphone grille or add small star accents around the notes for a pop of concert-ready sparkle.
Step 4: Inking and Finalizing
-
Outline the staff lines:
Take your black fine liner and carefully trace over your five staff lines. Try to keep your hand steady, but don’t worry if they wobble slightly—it adds character. -
Ink the microphone:
Trace the microphone outline. For the grille, use lighter, shorter strokes to keep the cross-hatch texture looking delicate. -
Fill in the notes:
Ink the outlines of your musical notes and Treble Clefs. Fill in the note heads solidly with black ink, making them pop against the page. -
Thicken the main lines:
I like to go back and slightly thicken the downstrokes on the Treble Clef and the microphone handle to give the drawing more weight. -
Erase and clean:
Once the ink is completely dry (wait at least a few minutes to avoid smudging), gently erase all your pencil guidelines.
Close your sketchbook with a smile knowing you’ve captured a beautiful rhythm on paper
Ribbon Banner Band Name Space
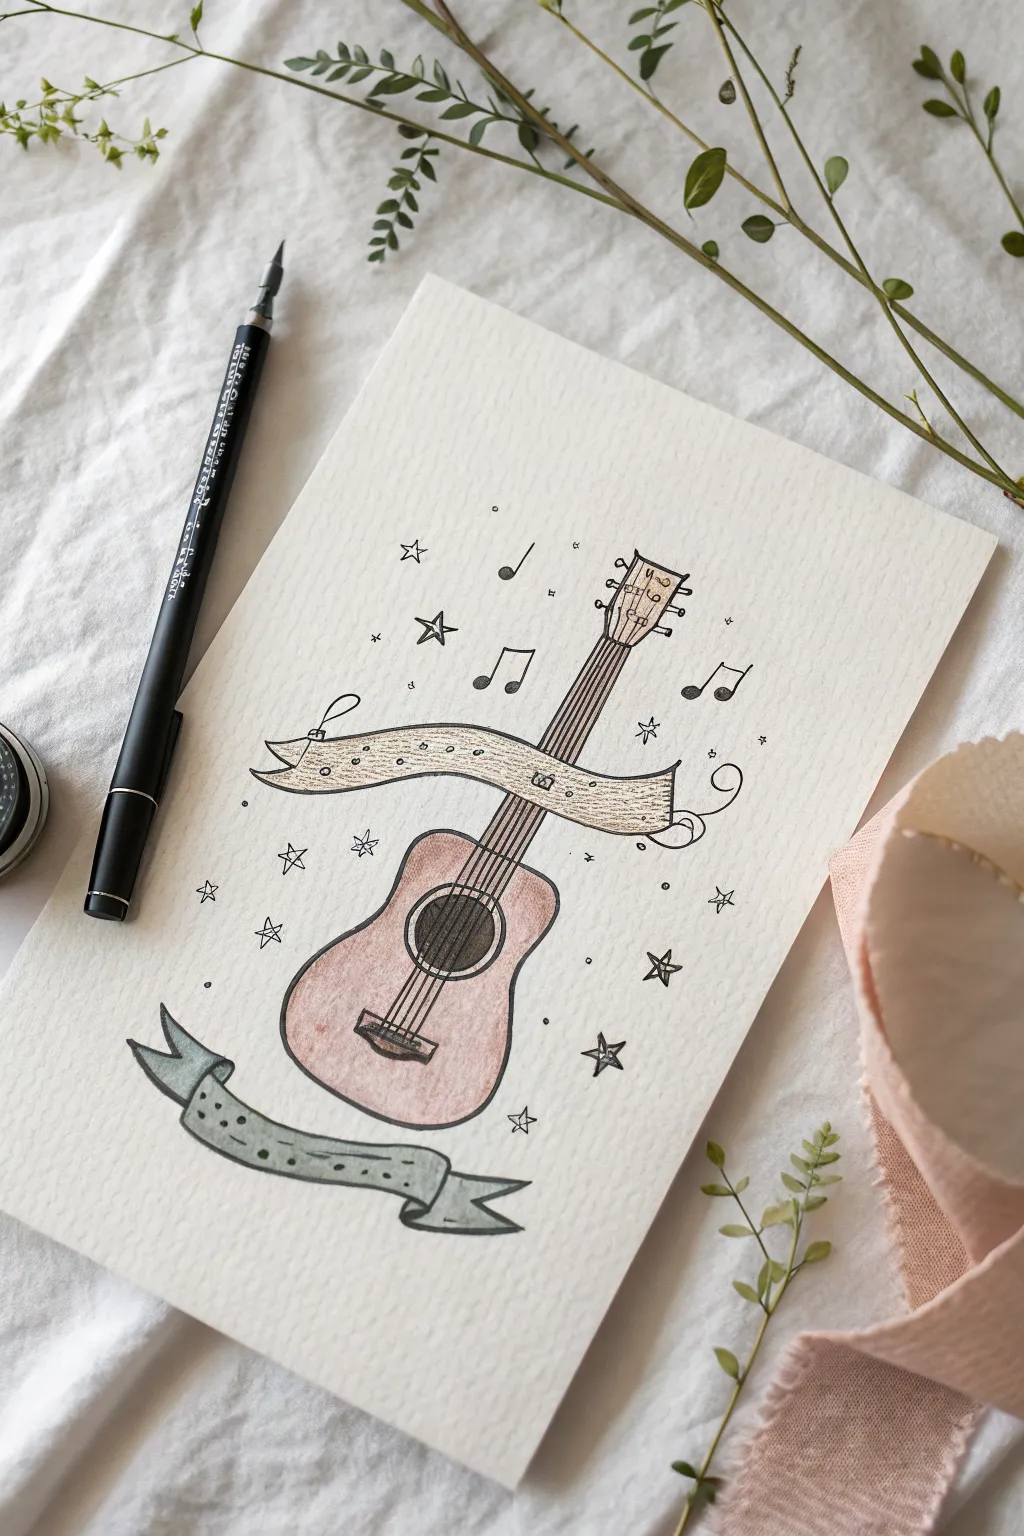
Capture the spirit of music with this charming hand-drawn illustration featuring a classic acoustic guitar wrapped in elegant ribbon banners. The sketchy ink lines combined with soft, muted watercolor washes create a lovely vintage aesthetic perfect for band logos or music-themed greeting cards.
Step-by-Step Tutorial
Materials
- Textured watercolor paper (cold press)
- Pencil and eraser
- Fine liner pen (black, waterproof, 0.3mm or 0.5mm)
- Dip pen and India ink (optional, for variation)
- Watercolor paints (burnt sienna, yellow ochre, payne’s gray, muted blue-green)
- Small round watercolor brush (size 2 or 4)
- Ruler (optional)
Step 1: Sketching the Layout
-
Center the Guitar Body:
Start by lightly sketching the main hourglass shape of the acoustic guitar body in the lower center of your paper. Keep the lines very faint so they can be erased later. -
Add the Neck and Headstock:
Draw the long, parallel lines of the guitar neck extending upward from the body. Top it off with the headstock shape, slightly widening at the very end. -
Place the Sound Hole:
Sketch a circle in the upper part of the guitar body. Add the bridge—a small rectangle—below the sound hole. -
Drape the Main Banner:
Draw a flowing ribbon banner that wraps horizontally across the guitar neck. Let the ends curl naturally; the left side can tuck behind the ‘imaginary’ space, while the right side swirls outward. -
Add the Bottom Banner:
Sketch a second, wavy ribbon banner floating below the guitar body. Give the ends a ‘V’ cut for a classic ribbon look.
Ink Smearing?
If your ink bleeds when painting, your pen isn’t waterproof. Switch to a specific ‘archival’ or micron pen, or wait at least 24 hours for standard ink to fully cure.
Step 2: Inking the Outline
-
Trace the Guitar:
Using your waterproof fine liner or a dip pen, go over your pencil lines. Use a slightly shaky or loose hand to achieve that charming, illustrative style rather than perfect technical precision. -
Detail the Strings:
Carefully draw six straight lines running from the bridge up through the neck to the headstock. I find it helps to draw the two outer strings first to set the boundaries. -
Ink the Banners:
Outline your ribbon banners. Add small tick marks or dots along the edges to simulate stitching or texture. -
Embellish the Background:
Surround the guitar with small, hand-drawn stars, music notes (eighth notes and quarters), and tiny circles to fill the negative space and add energy. -
Erase Guide Lines:
Wait until the ink is completely dry—give it a few extra minutes to be safe—then gently erase all your pencil sketches.
Step 3: Adding Color Washes
-
Paint the Guitar Body:
Dilute a burnt sienna or reddish-brown watercolor. Apply a light wash to the guitar body, keeping it transparent so the paper texture shows through. -
Color the Sound Hole:
Use a darker brown or Payne’s gray to fill in the circle of the sound hole, giving the instrument depth. -
Wash the Top Banner:
Mix a pale yellow ochre or beige. Gently paint the banner crossing the neck, staying within the lines but allowing for some natural watercolor variation. -
Paint the Bottom Banner:
Choose a muted blue-green or teal shade. Paint the lower banner, perhaps adding a slightly darker value near the folds to suggest shadow. -
Add Finishing Touches:
If you like, add tiny dots of gold or yellow to the stars, or deepen the shadows on the guitar bridge once the first layer is dry.
Make it Personal
This layout is designed for lettering! Use the empty space inside the banners to hand-letter a band name, a favorite song lyric, or a special date.
Let your artwork dry completely before framing or gifting this musical masterpiece
Totem Stack of Band Gear
Capture the essence of a band with this classic, illustrative ink drawing featuring electric guitar, headphones, and a vintage mic. Using fine liners on textured paper gives it a timeless, hand-drawn poster quality perfect for music lovers.
How-To Guide
Materials
- Heavyweight textured paper (watercolor or mixed media paper)
- HB graphite pencil
- Kneaded eraser
- Ruler
- Fine liner pens (sizes 0.1, 0.3, and 0.5)
- Reference images of electric guitars and microphones
Step 1: Pencil Framework
-
Establish the centerline:
Begin by lightly drawing a vertical line straight down the center of your paper using a ruler. This will serve as the anchor for the guitar neck and help you balance the composition. -
Block in the guitar body:
Sketch the basic curvaceous shape of the electric guitar body at the bottom center. Focus on getting the symmetry of the cutaways right, keeping your pencil strokes very light so they can be erased later. -
Add the neck and headstock:
Extend parallel lines upward from the body along the centerline for the fretboard. Top it off with the headstock shape, angling the tuning pegs slightly outward. -
Sketch floating elements:
Draw a large arc hovering above the guitar for the headphones’ headband, adding oval shapes for the ear cups. To the right of the guitar neck, sketch a rectangle and circle for the vintage microphone. -
Place the G-clef:
On the left side, sketch a stylized G-clef symbol. Draw a thin vertical line through it to connect it visually to the verticality of the guitar and microphone stand.
Ink Smearing?
If you are left-handed or working quickly, place a clean sheet of scrap paper under your drawing hand. This acts as a barrier, preventing your palm from dragging wet ink across the textured paper.
Step 2: Inking the Outlines
-
Outline the guitar body:
Switch to your 0.5 fine liner. Carefully trace the outer contours of the guitar body. I encourage breaking your lines slightly or varying the pressure to keep that sketchy, organic feel rather than a rigid technical drawing. -
Define the neck details:
Use a 0.3 pen to draw the fret lines across the neck and outline the headstock. Be precise with the six tuning pegs, keeping them relatively uniform in size. -
Ink the headphones:
Go back to the top and outline the headphones. Use double lines for the headband to show thickness and carefully ink the circular ear cushions. -
Detail the microphone and clef:
Outline the mesh grid of the microphone carefully. Move to the left and ink the flowing curves of the G-clef with smooth, confident strokes.
Step 3: Shading and Texture
-
Hatch the headphones:
Switch to your finest 0.1 pen. Add diagonal hatching lines inside the ear cups to suggest mesh or foam texture. Add slightly curved hatching on the headband to show roundness. -
Rhythm on the guitar strings:
Draw six distinct, straight lines down the guitar neck. Stop them where the bridge would be on the body. This requires a steady hand, or you can use a ruler if you are nervous. -
Pickups and knobs:
Draw the rectangular pickups under the strings on the body. Add small circles for the volume and tone knobs, adding tiny crescent shadows to one side of each knob to make them pop. -
Shadow the guitar body:
Use cross-hatching (overlapping diagonal lines) along the edges of the guitar body to create depth. Focus the shading on the bottom curves and the cutaway horns to make the flat paper look 3D. -
Microphone grill texture:
Create a cross-hatch pattern on the microphone head to mimic the metal grill. Keep the lines tight and neat here. -
Final heavy accents:
Take the 0.5 pen again and darken the deepest shadow areas—under the headphones, the very bottom of the guitar, and the thickest part of the G-clef’s curve.
Pro Tip: Line Weight
Use the thickest pen (0.5 or 0.8) strictly for the outer silhouette of the guitar and objects. Use the thinnest pen (0.05 or 0.1) only for internal shading. This contrast makes the drawing pop.
Step 4: Clean Up
-
Erase guidelines:
Wait at least 15 minutes to ensure the ink is bone dry. Gently erase all your graphite pencil marks using the kneaded eraser. Dab rather than rub if the paper is particularly soft. -
Assess and refine:
Look at the composition as a whole. If the guitar feels too light compared to the headphones, add a few more hatching lines to the body to balance the visual weight.
Prop up your finished drawing near your record player or workspace for some creative inspiration
Chaotic Band Doodle Page
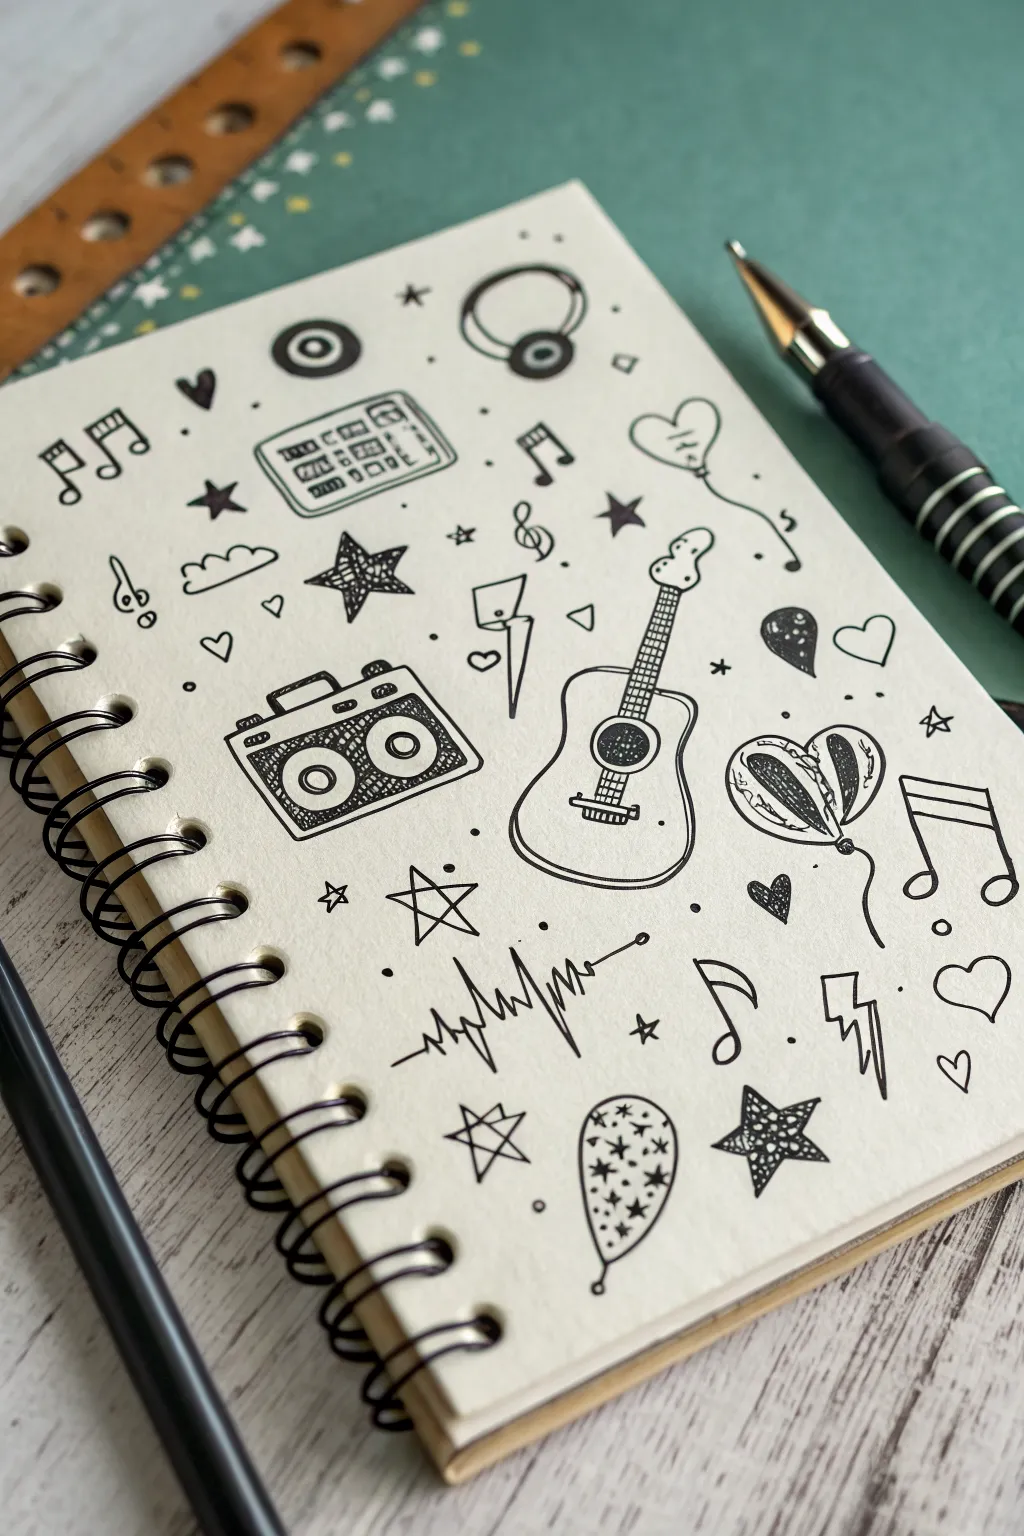
Capture the buzzing energy of a jam session with this scattered doodle page, featuring iconic musical symbols and equipment. Using just a fine liner and a sketchbook, you’ll build a cohesive composition through a playful mix of larger focal points and tiny, rhythmic fillers.
Detailed Instructions
Materials
- Spiral-bound sketchbook (cream or white paper)
- Fine liner pen (0.3mm or 0.5mm, black ink)
- Pencil (optional, for sketching)
- Eraser
Step 1: Setting the Stage: Focal Instruments
-
Draw the acoustic guitar outline:
Begin near the center-right of the page. Sketch the curvaceous body of an acoustic guitar, adding the sound hole as a dark circle and the neck extending upwards. Top it with the headstock and tuning pegs. -
Add guitar strings and details:
Carefully draw vertical lines down the neck for strings and horizontal dashes for frets. Add the bridge at the base of the body as a small rectangle. -
Create the boombox:
To the left of the guitar, draw a rectangular box shape. Add a handle on top and two large circles inside for speakers. Inside the circles, add smaller concentric circles for detail. -
Detail the boombox grill:
Fill the space around the speakers with cross-hatching or stippling to texture the speaker grill. Add buttons and dials on the top strip of the device.
Ink Smudging?
Work from top-left to bottom-right (if right-handed) to avoid dragging your hand through wet ink. Or, place a scrap piece of paper under your hand as a guard.
Step 2: Adding Musical Tech & symbols
-
Sketch the headphones:
Near the top center, draw a headband arc connecting two ear cups. Add circular details inside the cups to suggest padding or logos. -
Draw the cassette tape:
Beside the headphones, create a small rectangle with two spool holes. Add simple lines to represent the tape window and labels. -
Ink the heart balloons:
On the far right, draw two balloons tethered together—one striped and one solid or spotted. Add squiggly strings trailing downwards. Add a single heart balloon near the top right. -
Create the sound wave:
Below the guitar, draw a horizontal line that erupts into jagged spikes in the middle, representing a digital audio wave or heartbeat line.
Step 3: Filling the Void: Rhythmic Elements
-
Scatter musical notes:
Populate empty spaces with various music notes—beamed eighth notes, single quarter notes, and treble clefs. Let them ‘float’ at different angles. -
Draw lightning bolts:
Add sharp, jagged lightning bolt shapes near the boombox and guitar to suggest electric energy. -
Incorporate various stars:
Draw three types of stars: solid black five-point stars, outlined stars, and simple asterisk-style stars. Distribute them evenly to balance the heavy black ink areas. -
Add small hearts:
Include tiny outline hearts and solid black hearts in small gaps, like musical accents. -
Draw the decorative balloon:
Near the bottom center, doodle an oval balloon filled with tiny stars and dots.
Make it Pop
Use a grey brush marker to add simple drop shadows to the right of each object. This instantly lifts the doodles off the page for a 3D sticker effect.
Step 4: Finishing Touches
-
Balance with dots and circles:
Look for any awkwardly large white spaces. Fill them with tiny dots, small hollow circles, or little ‘plus’ signs to create texture without overcrowding. -
Thicken key outlines:
Go back over the main subjects like the guitar and boombox. Double up the outline in certain spots to give the drawing varied line weight and visual pop. -
Erase pencil marks:
If you sketched first, wait for the ink to be completely dry, then gently erase all underlying graphite to leave a crisp, clean finish.
Now you have a lively page of musical energy ready to inspire your next creative session
Hybrid Instrument Creature Mascot
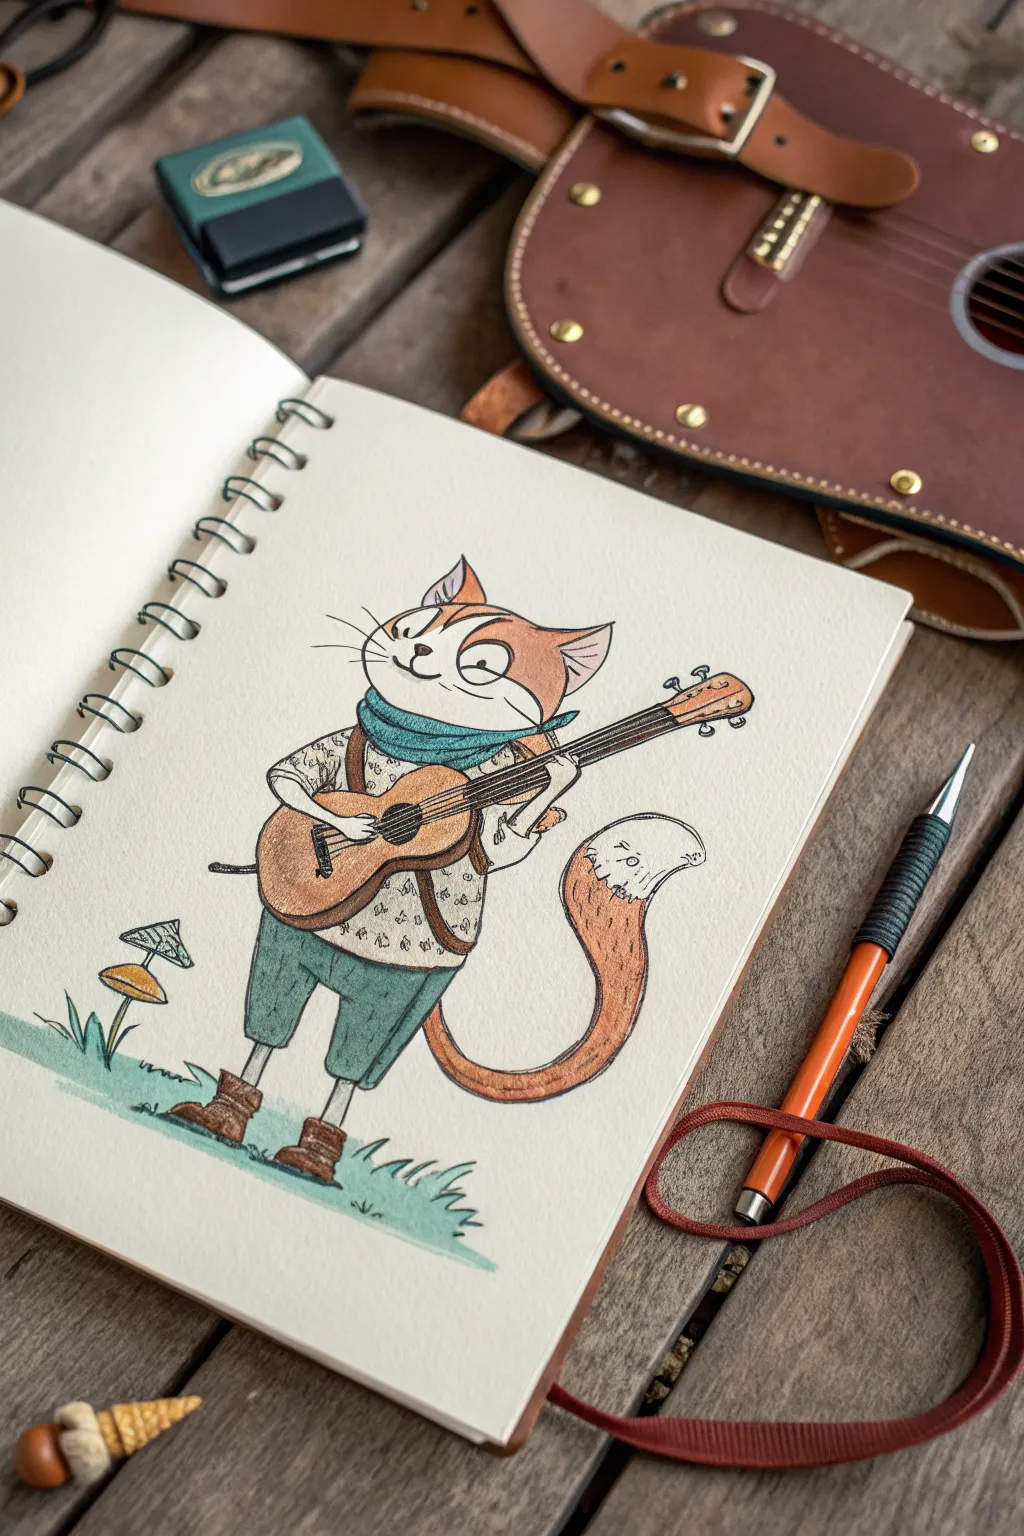
Capture the charm of a traveling musician with this delightful illustration of a guitar-playing cat. Using fine liners and colored pencils, you’ll create a character that feels both rustic and full of personality.
Step-by-Step Guide
Materials
- Heavyweight sketchbook or mixed media paper
- HB or 2B graphing pencil for sketching
- Kneadable eraser
- Fine liner pen (0.3mm or 0.5mm, black)
- Colored pencils (terracotta, teal/green, brown, cream)
- Pencil sharpener
Step 1: Sketching the Skeleton
-
Establish the pose:
Start with a light pencil sketch. Draw a large, slightly oval shape for the cat’s head and a smaller, bean-like shape below it for the torso. Position the torso at a slight angle to give the character a relaxed posture. -
Add limbs and tail:
Sketch thin lines for the legs and arms. The arms should bend at the elbows to hold the instrument. Draw a large, sweeping curve extending from behind the back leg for the tail, curving it upward at the tip. -
Block in the instrument:
Draw the basic shape of the guitar (or lute) across the cat’s midsection. Use two circles for the body—one larger, one smaller—and extend a long rectangle for the neck.
Broken Lines
Don’t connect every single ink line perfectly. Leaving tiny gaps, especially in fur or fabric folds, keeps the drawing feeling airy and handcrafted.
Step 2: Refining Features & Clothing
-
Sketch the face:
Within the head, draw two triangle ears. Add large, expressive eyes (one slightly squinted looks thoughtful), a small nose, and a curved smile. Don’t forget the long whiskers extending from the cheeks. -
Dress the character:
Draw a thick, folded scarf around the neck. Sketch a loose-fitting shirt with rolled-up sleeves and short trousers. Add slouchy boots to the feet, giving them a bit of a crumpled look around the ankles. -
Detail the guitar:
Refine the instrument’s shape. Add the tuning pegs at the headstock, the bridge on the body, and draw the circular sound hole clearly. -
Set the scene:
Ground your character by sketching a small patch of grass under the feet and adding a little mushroom off to the left side.
Step 3: Inking the Lines
-
Outline the main forms:
Using your fine liner pen, carefully trace over your pencil lines. I prefer to use a slightly broken or sketchy line quality here rather than a perfectly smooth vector-style line; it adds to the rustic feel. -
Add texture marks:
While inking, add small details like the pattern on the shirt (little triangles or flecks), the strings on the guitar, and the tufts of fur inside the ears. -
Clean up:
Wait a few moments for the ink to dry completely to avoid smudging, then gently erase all the underlying pencil graphite.
Background Tracks
Draw faint musical notes floating out of the instrument or across the page to visually represent the melody your character is playing.
Step 4: Adding Color
-
Fur tones:
Take a terracotta or rusty orange colored pencil. Lightly shade the top of the head, the ears, and the tail. Leave the muzzle and the tip of the tail white or use a very pale cream pencil. -
Clothing colors:
Use a teal or muted green pencil for the scarf and trousers. Apply a light touch for the shirt, perhaps using a cream or very light grey to make it distinct from the paper background. -
Instrument warmth:
Color the guitar body with a warm medium brown. Press harder near the edges to create a subtle vignette effect that mimics wood grain depth. -
Final nature touches:
Use a fresh green for the grass patch below. Color the mushroom cap with a soft yellow-orange to complement the cat’s fur. -
Finishing shadows:
Go back in with your pencils and darken the areas under the scarf, inside the boots, and beneath the chin to give the drawing volume and pop.
Now you have a charismatic little mascot ready to strum a tune on your sketchbook page
Surreal Soundwave Band Scene
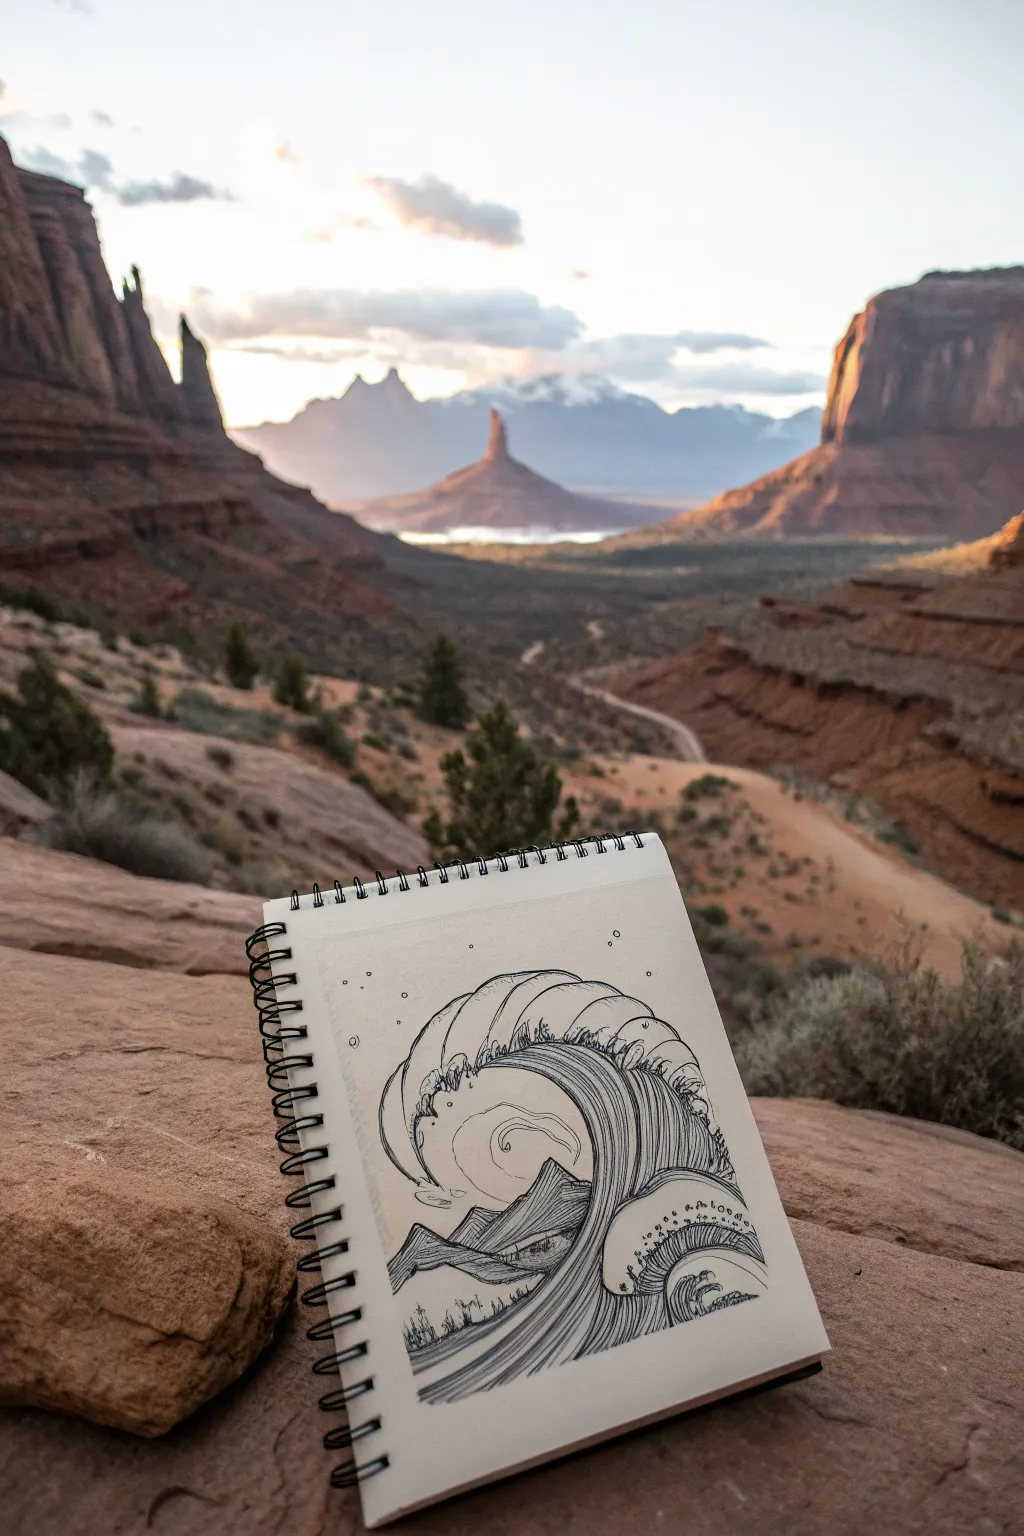
This striking ink drawing blends natural elements by merging fluid, crashing waves with jagged mountain peaks. The high-contrast, linework-heavy style mimics classic woodblock prints, creating a sense of movement and drama specifically designed for a portable sketchbook.
Step-by-Step Tutorial
Materials
- Spiral-bound sketchbook (heavyweight paper recommended)
- Fine liner pens (sizes 0.1, 0.3, and 0.5)
- Pencil (HB or 2H)
- Kneaded eraser
Step 1: Planning the Composition
-
Establish the horizon:
Start with a light pencil sketch. Draw a faint horizon line about one-third of the way up the page to ground your composition. -
Outline the mountains:
Sketch a series of jagged triangles below the horizon line. Create two or three overlapping peaks to establish depth, making the foreground mountains slightly larger. -
Draft the primary wave:
Draw a large, curling C-shape rising from the right side and cresting over the mountains. Let the top curve extend almost to the upper center of the page. -
Add secondary swells:
Sketch smaller, secondary wave shapes nestled under the main arch and to the right side, creating a rhythmic flow that leads the eye toward the center.
Step 2: Inking the Outlines
-
Trace the main contours:
Using a 0.5 fine liner, go over your pencil lines for the main wave crests and the mountain silhouettes. Keep your hand steady for clean, bold lines. -
Refine the wave crests:
Add the jagged, claw-like foam details at the top of the wave. I like to keep these somewhat stylized rather than hyper-realistic to match the surreal aesthetic. -
Define the mountain peaks:
Ink the mountains with sharp, angular lines. Break the contour lines slightly in places to suggest rugged terrain rather than perfect geometric cones. -
Erase the guides:
Once the primary ink is completely dry, gently remove all your graphite pencil marks with a kneaded eraser to reveal a clean framework.
Flow Control
When drawing the long internal wave lines, move your whole arm, not just your wrist. This creates smoother, more confident curves without shaky wobbles.
Step 3: Adding Texture and Detail
-
Create flow lines:
Switch to a thinner 0.3 pen. Inside the body of the wave, draw long, sweeping lines that follow the curve of the C-shape. Keep them parallel but varied in length. -
Detail the mountain slopes:
Use hatching and cross-hatching on the shadowed sides of the mountains. Keep the lit sides open or sparsely detailed to create contrast. -
Enhance the inner wave:
Inside the curl of the wave, create a focal point—perhaps a spiral or a smaller mountain peek—using concentric circles or thin contour lines. -
Add floating foam:
draw small clusters of bubbles and dots around the crest of the wave and near the base where the water meets the mountains. -
Incorporate tiny vegetation:
At the very bottom foreground, sketch tiny vertical lines and irregular shapes to suggest distant trees or scrub brush, giving the mountains scale.
Hidden Elements
Hide tiny symbols, like musical notes or instrument shapes, within the foam bubbles or mountain textures to tie it back to the ‘band’ theme.
Step 4: Atmosphere and Final Touches
-
Stipple the sky:
With your finest 0.1 pen, add small dots and perhaps tiny circles in the sky area to represent stars or atmospheric dust. -
Darken the depths:
Return to the wave’s darkest curves with the 0.5 pen. Thicken the lines where the wave overlaps itself to increase the sense of dimension. -
Refine the foam:
Add tiny interior lines to the ‘claws’ of the wave foam to give them volume, making sure they look like they are curling over. -
Final assessment:
Step back and look for areas that need more contrast. If a mountain feels flat, add a few more hatching lines to its shadowy side.
Now you have a surreal landscape ready to inspire your next creative session


Have a question or want to share your own experience? I'd love to hear from you in the comments below!