Baby finger painting is one of my favorite ways to turn curious little hands into tiny, joyful marks—without needing any “art skills” at all. I’m sharing my go-to finger paint for babies ideas that keep things taste-safe, manageable, and genuinely fun for both of you.
Taste-Safe Yogurt Paint Rainbow

This delightful sensory project combines the joy of finger painting with taste-safe ingredients, perfect for creating a softly textured rainbow. The finished piece features gentle, pasty strokes of red, yellow, green, and purple that capture the spontaneous movement of little hands.
How-To Guide
Materials
- Plain Greek yogurt (thick consistency)
- Food coloring (red, yellow, green, blue)
- Small bowls for mixing
- Spoons
- Large sheet of heavy white paper or cardstock
- Masking tape or painter’s tape
- High chair or protected table surface
Step 1: Preparing the Paints
-
Portion the yogurt:
Scoop about a half-cup of plain Greek yogurt into four separate small bowls. I find Greek yogurt works best because its thickness holds the brushstrokes better than regular yogurt. -
Mix the red:
Add 2-3 drops of red food coloring to the first bowl and stir until the color is uniform. Aim for a soft, strawberry-pink hue rather than a deep crimson. -
Create the yellow:
In the second bowl, mix in 3-4 drops of yellow food coloring. This usually needs a bit more dye to show up brightly against the white yogurt base. -
Blend the green:
Add 2 drops of green food coloring to the third bowl. Stir gently to create a fresh, minty green shade. -
Make the purple:
For the final color, mix 1 drop of red and 1 drop of blue into the last bowl to create a soft lavender purple.
Step 2: Setting up the Canvas
-
Secure the paper:
Place your large sheet of white paper onto the high chair tray or table. Use masking tape on all four corners to prevent it from sliding around during the painting process. -
Pre-position the paint:
To guide the rainbow shape, place small dollops of each colored yogurt in an arc shape on the left side of the paper. Order them red, yellow, green, then purple from top to bottom.
Soggy Paper Fix
If the yogurt is too watery and soaking the paper, strain it through a coffee filter or paper towel for 10 minutes before mixing colors to thicken it.
Step 3: Creating the Rainbow
-
Start the red arch:
Guide your little artist’s hand to the red dollop. Encourage them to drag their fingers in a wide curve across the top of the paper to form the outer band of the rainbow. -
Texture the red band:
Allow for some smearing and irregularity; the thick yogurt will leave raised ridges that add wonderful dimension to the stroke. -
Paint the yellow band:
Move to the yellow dollop directly beneath the red. Have the child drag this color in a parallel curve, nestling it right under the red arch. -
Adding the green:
Repeat the process with the green yogurt. Depending on hand size, this band might blend slightly with the yellow, creating lovely lime-colored transitions. -
Finish with purple:
Complete the rainbow by dragging the purple yogurt for the smallest, innermost arch. This band often ends up being the thickest as enthusiasm grows. -
Encourage sensory exploration:
Let the child pat and smudge the existing bands. The goal isn’t a perfect arc but a sweeping gesture that shows movement. -
Add white ‘clouds’:
If you have leftover plain white yogurt, dab a few spots at the base of the rainbow to simulate fluffy clouds. -
Drying process:
Carefully remove the tape and lift the paper. Lay it flat in a safe area to dry. Note that since this is food-based, it won’t keep forever, but it dries to a chalky, textured finish that can be photographed for a long-lasting memory.
Flavor Fun
Add a dash of vanilla or fruit puree to the paints. It adds a lovely scent while painting and keeps the activity fully taste-safe and sensory-rich.
Once dry, snap a photo of your textured, colorful masterpiece to preserve the memory of this messy play session


Gloopy Cornstarch Gel Finger Paint
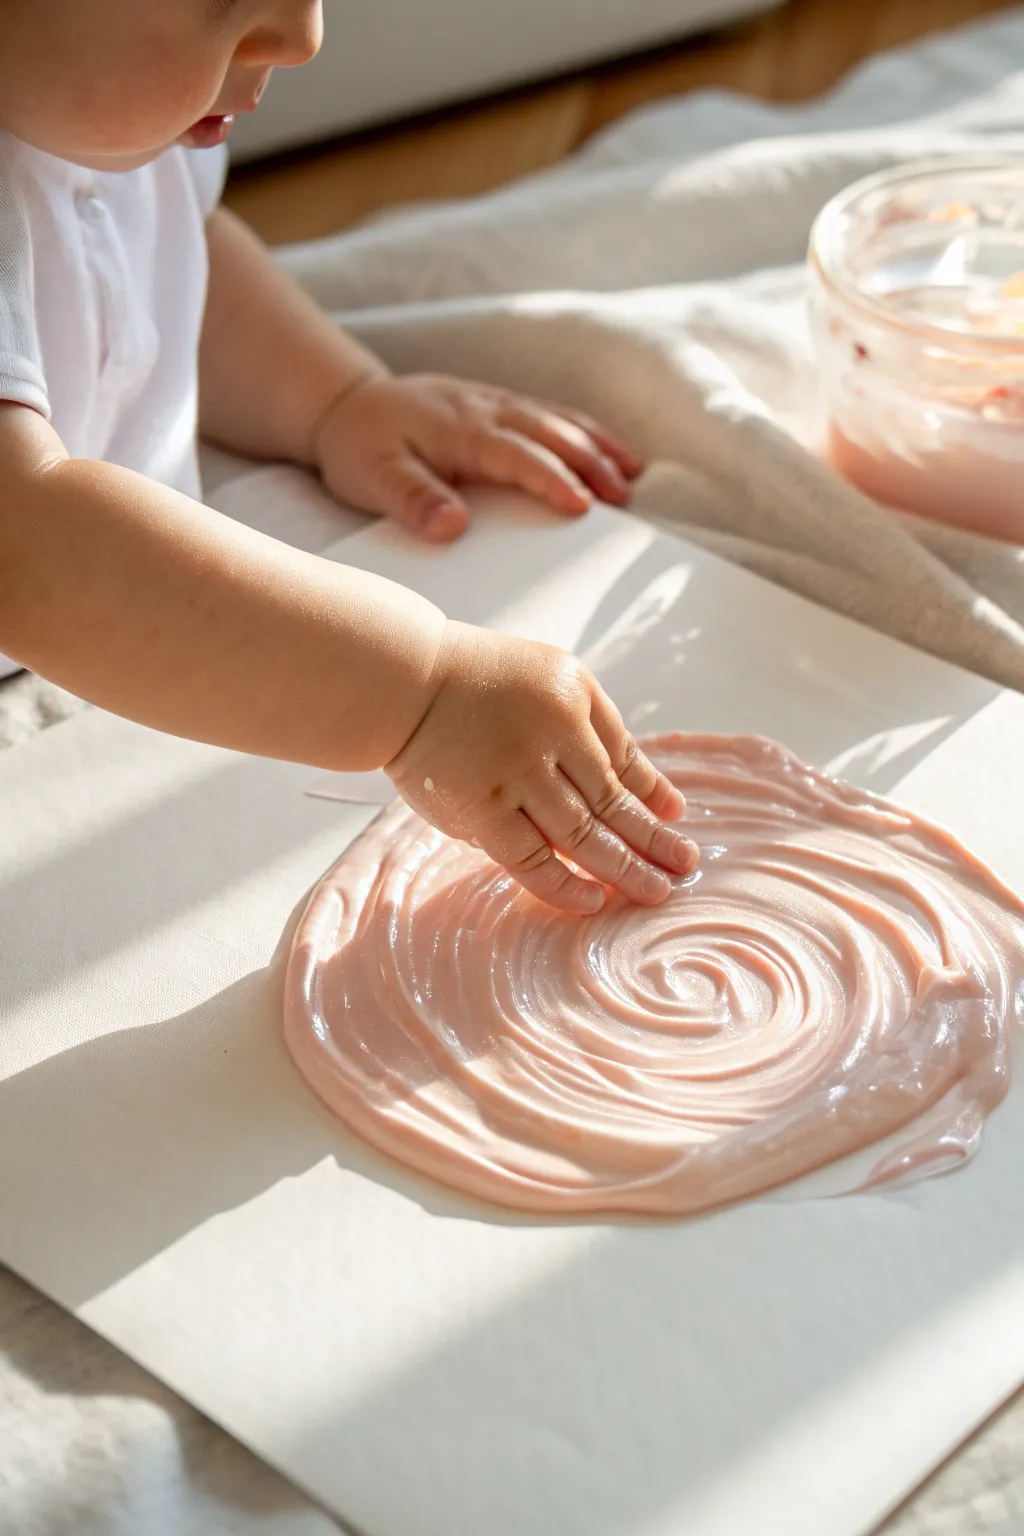
This engaging project focuses on the satisfying texture of homemade cornstarch gel, tinted to a soft, glossy pink that invites little fingers to explore. The result is a beautiful, abstract swirl pattern that captures the motion and energy of tactile play, preserved on sturdy paper.
Step-by-Step Tutorial
Materials
- Cornstarch (approx. ½ cup)
- Cold water (approx. 1 cup)
- Small saucepan or microwave-safe bowl
- Whisk
- Pink food coloring (gel or liquid)
- Heavyweight white paper or cardstock
- Wide masking tape or painter’s tape
- Glass jar or small bowl (for cooling/serving)
- Spoon
Step 1: Cooking the Gel Base
-
Mix the basics:
Begin by placing your cornstarch into a small saucepan or microwave-safe bowl. Pour in the cold water while whisking constantly to ensure no lumps form before heating. -
Heat the mixture:
Place the saucepan over medium-low heat. Stir continuously with a spoon or whisk. If using a microwave, heat in 30-second intervals, stirring vigorously between each blast. -
Observe the thickening:
Continue heating until the mixture transforms from a watery white liquid to a thick, translucent, glue-like consistency. It should hold its shape slightly when dropped from a spoon. -
Remove from heat:
Once the gel reaches that glossy, pudding-like texture, take it off the heat immediately so it doesn’t become rubbery.
Too Runny?
If your gel spreads like water instead of holding peaks, you didn’t cook it long enough. Reheat gently while stirring until it resembles thick hair gel.
Step 2: Coloring and Prep
-
Add the color:
While the mixture is still warm (but not boiling), add 1-2 drops of pink food coloring. I prefer adding color at this stage because it blends smoother and quicker than when the gel is fully set. -
Whisk thoroughly:
Stir the color in until the pale pink hue is completely uniform, ensuring there are no streaks of dye remaining. -
Cool down:
Transfer the pink gel into a glass jar or bowl, exactly like the one seen in the reference image. Allow it to cool completely to room temperature so it is safe for little hands. -
Secure the canvas:
While cooling, tape the corners of your heavyweight paper to your work surface or high chair tray. This prevents the paper from sliding around during the sensory experience.
Scented Sensory Play
Add a drop of baby-safe edible essence like vanilla or berry extract during the cooling phase to turn this visual art project into a multi-sensory experience.
Step 3: Creating the Swirls
-
Portion the paint:
Spoon a generous dollop of the now-cooled pink gel directly into the center of the paper. You want a mound about the size of a tangerine. -
Initial spread:
Using the back of a spoon or clean fingers, gently flatten the mound slightly to create a thick, circular base layer. -
Begin the texture:
Encourage the use of fingers—specifically the index and middle fingers—to press into the center of the gel pile. -
Create the spiral:
Drag fingers through the thick gel in a continuous circular motion, starting from the center and spiraling outward. The gel should be thick enough to hold the ridges created by the fingertips. -
Enhance the ridges:
If the definition is lost, simply smooth the gel back into a pile and retry the spiral motion, applying slightly more pressure to displace the varying thickness of the paint. -
Review the sheen:
Check that the light catches the wet, glossy surface of the swirls. The beauty of this art is in the wet texture. -
Preserving (Optional):
Since this is food-based, it is often transient art. However, if you wish to keep it, lay it flat in a sunlit area to dry. Note that the cornstarch will likely crackle and fade as moisture evaporates.
Enjoy watching the mesmerizing patterns emerge as the glossy gel captures every tiny movement


Tummy Time Bag Painting
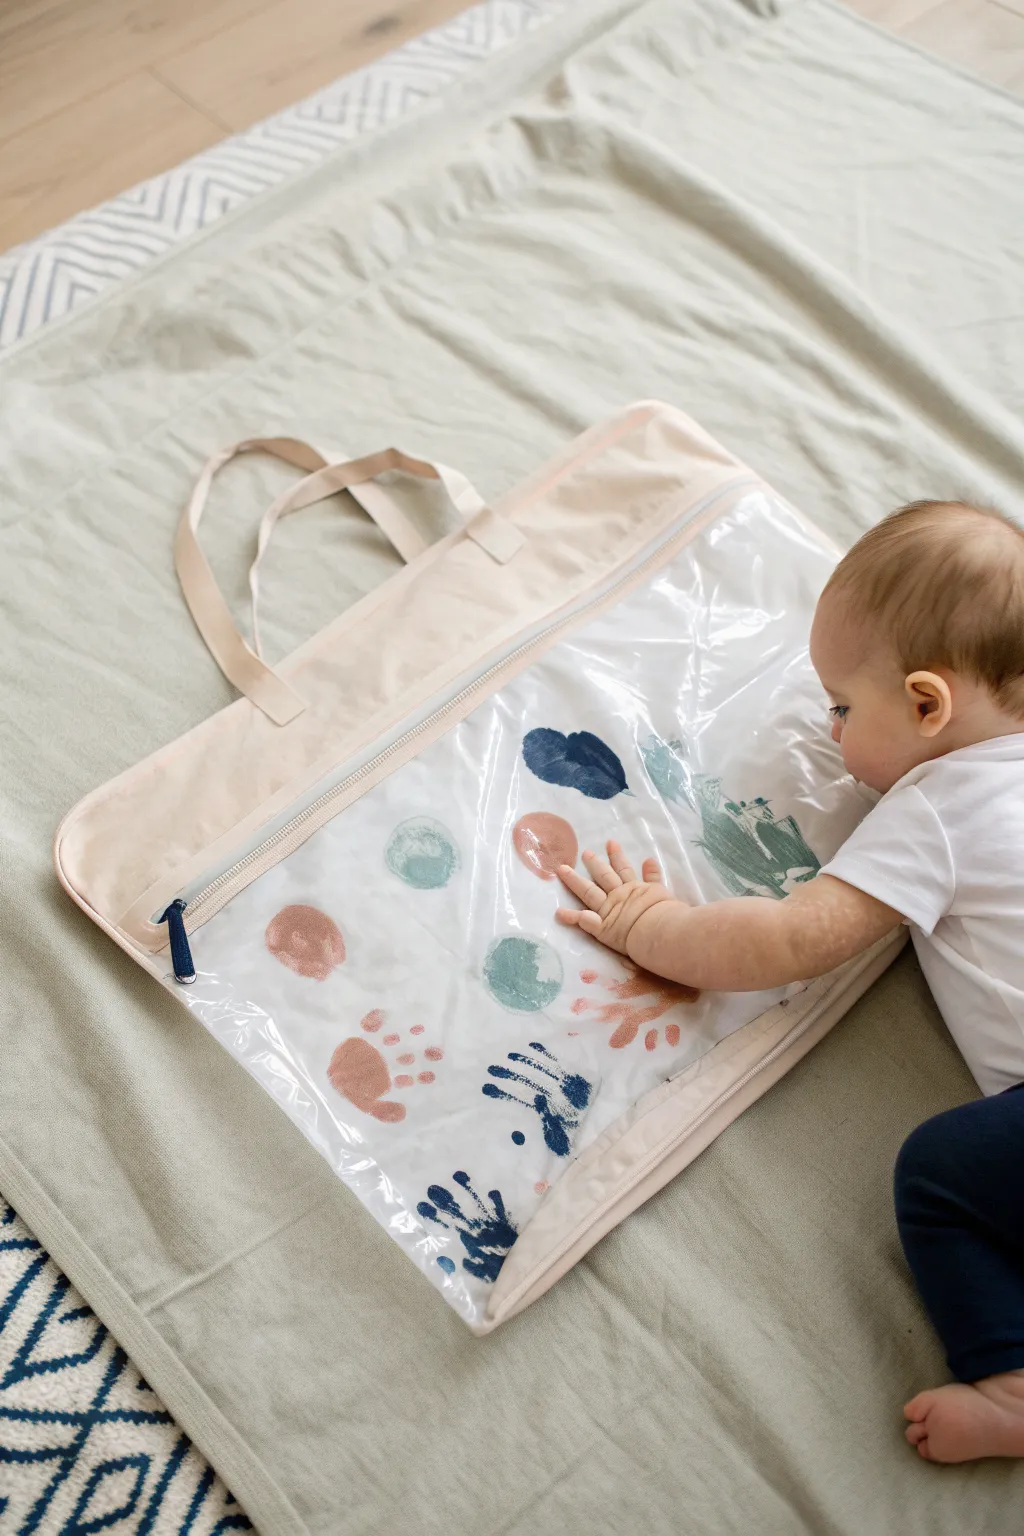
This genius sensory play idea lets your little one explore texture and color mixing without any of the clean-up. By sealing paint blobs inside a clear garment bag, you create a squishy, interactive canvas that doubles as a captivating tummy time activity.
How-To Guide
Materials
- Large clear zippered garment bag or art storage bag
- Large sheet of white butcher paper or easel paper
- Non-toxic washable finger paints (navy blue, terracotta, sage green, blush pink)
- Scissors
- Painter’s tape or masking tape (optional)
- Damp cloth (for wiping the bag later)
Step 1: Preparation
-
Measure the paper:
Lay your large sheet of white paper over the garment bag to estimate the size. You want the paper to slide easily inside the bag while covering most of the clear window area. -
Cut to size:
Trim the paper slightly smaller than the bag’s dimensions so it fits flat without wrinkling or folding at the corners. -
Secure the paper:
If you’re worried about the paper sliding around too much inside, create small loops of painter’s tape and attach the back of the paper to the inside back layer of the bag. This acts as an anchor.
Step 2: Adding the Paint
-
Select your palette:
Choose a muted, modern color palette like the one shown: navy blue, terracotta, sage green, and a soft blush pink. Using high-contrast colors also helps catch a baby’s attention. -
Apply paint dollops:
Squeeze generous, quarter-sized blobs of paint directly onto the white paper. Space them out significantly—leave at least 4-5 inches between colors so they don’t immediately turn brown when mixed. -
Vary the placement:
Place some blobs near the edges and some in the center. I find that scattering them randomly encourages the baby to reach across different areas of the bag. -
Avoid overfilling:
Don’t use too much paint. If the blobs are huge, the paper will get soggy too quickly and might tear. A tablespoon per blob is plenty.
Air Removal Trick
Before zipping the final inch, insert a straw and suck out the extra air. This vacuum effect makes the paint move more responsively to baby’s touch.
Step 3: Assembly and Play
-
Slide into the bag:
Carefully slide the paper with the wet paint blobs into the clear garment bag. Keep it horizontal to prevent the paint from running prematurely. -
Remove air pockets:
Gently press down on the empty areas of the bag to push out excess air. This makes the tactile experience better and prevents the bag from feeling like a balloon. -
Seal securely:
Zip the bag completely shut. For extra security, especially with curious older babies, place a piece of strong tape over the zipper pull so it can’t be opened. -
Double-check the seal:
Run your finger along the zipper track one last time to ensure it is fully interlocked. -
Position for tummy time:
Place the bag flat on a soft rug or play mat. Ensure the clear plastic side is facing up so the colors are visible. -
Demonstrate the action:
Show your baby how to pat and squish the paint. Gently press your own hand onto a paint blob to smear it, creating a starburst or handprint shape. -
Create distinct shapes:
Encourage isolating fingers to push the paint around. You can try to make distinct ‘handprints’ by pressing a palm firmly down on a blob and lifting straight up, though smears are just as fun. -
Observe the mixing:
Watch as the navy and pink merge. Point out the new colors forming to interact with your baby during the process.
Sensory Upgrade
Tape different textured items, like bubble wrap or crinkle paper, to the floor *under* the bag. This adds a crunchy sound or bumpy feel when they push.
Step 4: Preservation (Optional)
-
Remove the art:
Once the play session is over, carefully unzip the bag. You can slice the side of the bag open if the paper is too wet to slide out easily. -
Let it dry:
Ideally, carefully pull the paper out and lay it flat to dry. The thick globs of paint may take a full day to harden completely.
This simple project offers all the joy of finger painting with none of the mess to wipe up afterward


Big Paper Floor Splash Zone
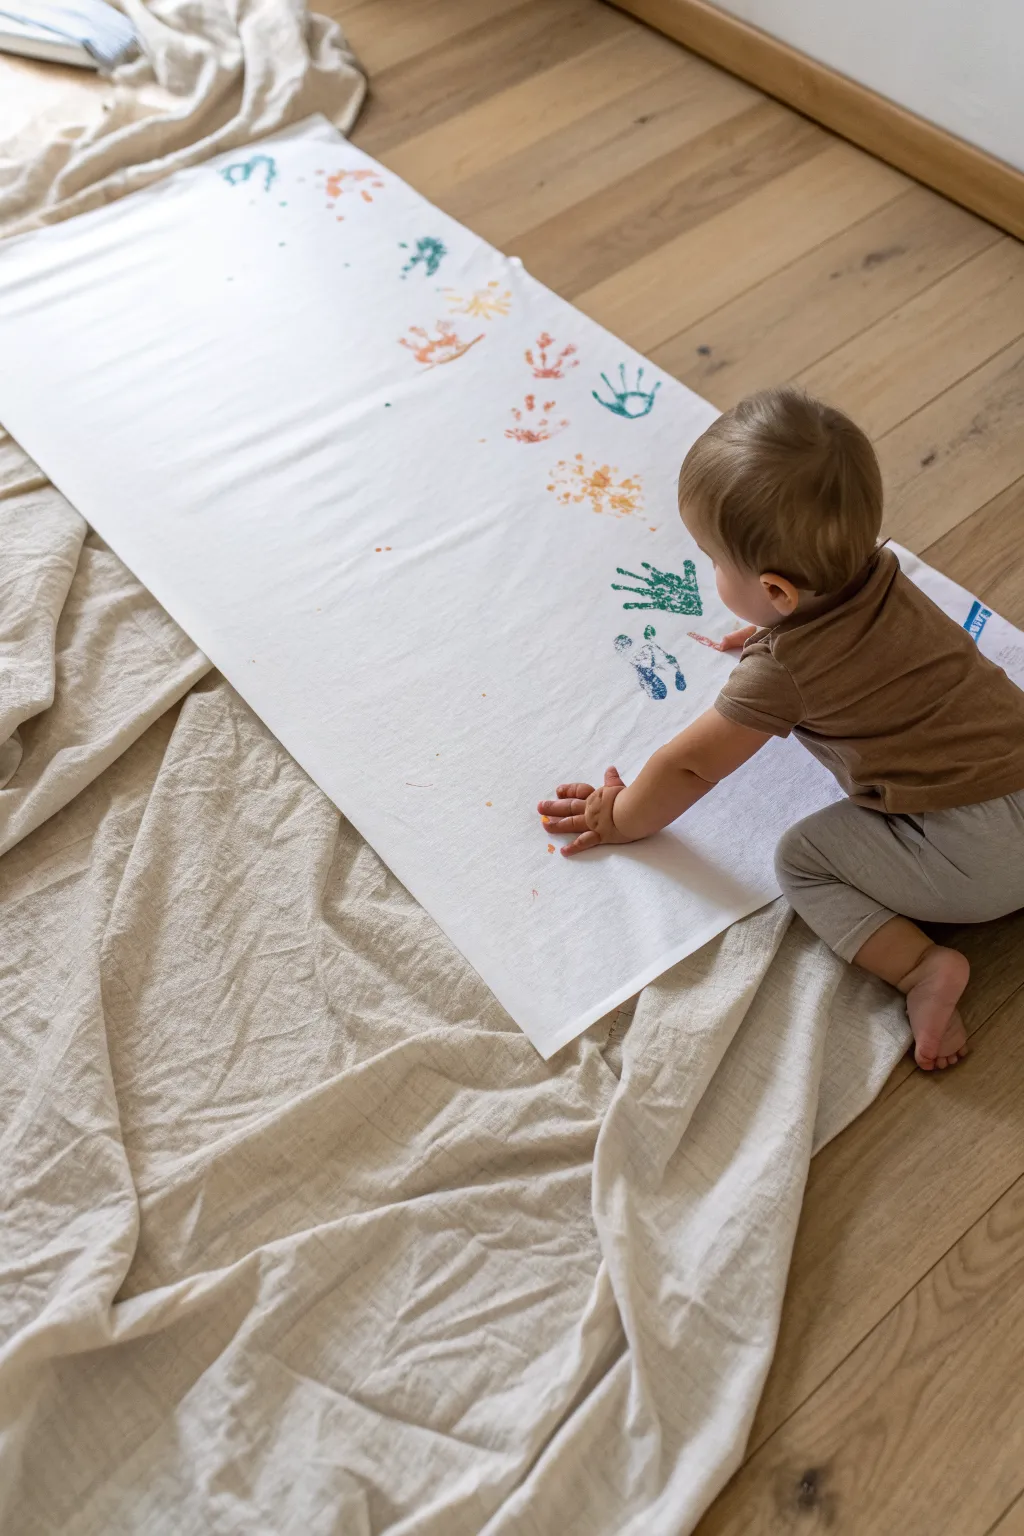
Capture the fleeting size of tiny hands and feet with this oversized floor art project that turns tracking paint into a purposeful masterpiece. It creates a whimsical, winding path of prints that serves as both a sensory activity and a charming keepsake banner.
Detailed Instructions
Materials
- Large roll of white butcher paper or easel paper (at least 18 inches wide)
- Non-toxic, washable finger paints (orange, yellow, teal, and blue)
- Painter’s tape or masking tape
- Large drop cloth or old bedsheet
- Paper plates or shallow trays for paint
- Baby wipes or damp washcloths (essential!)
- Scissors
Step 1: Setting the Stage
-
Prepare the Drop Zone:
Lay down a large drop cloth or an old sheet on a hard, flat floor surface. Smooth out any major wrinkles to ensure a stable base for the paper. -
Cut the Paper:
Unroll a long strip of white butcher paper, aiming for about 4 to 5 feet in length. Cut it cleanly with scissors. -
Secure the Canvas:
Place the paper strip in the center of your drop cloth. Use small loops of painter’s tape underneath the corners and edges to stick it to the drop cloth so it doesn’t slide around during the activity. -
Prep the Palette:
Squeeze generous blobs of finger paint onto paper plates. Keep colors separated—put teal and blue on one plate, orange and yellow on another—to prevent muddy brown mixing immediately.
Smudge Control
If a print smears badly, turn it into an abstract element by swirling it intentionally with a finger, or wait for it to dry and stamp a darker, crisp print directly over it.
Step 2: Creating the Prints
-
Start with Teal:
Dip your child’s hand or foot into the teal paint. Ensure the palm or sole is fully coated but not dripping excess paint. -
First Impressions:
Press the hand or foot firmly onto the top left corner of the paper. Rock it slightly to ensure the toes or fingers make contact with the paper. -
Switch to Orange:
Wipe the teal off quickly, then switch to orange. Place a print slightly further down and to the right, beginning to form a gentle curve. -
Add Yellow Accents:
Using the yellow paint, create a few scattered prints near the orange ones. I find that mixing a tiny bit of orange into the yellow on the plate adds a nice depth to these prints. -
Create the Arc:
Continue alternating colors and limbs (hands vs. feet) as you move down the paper. Aim for a meandering ‘S’ curve or diagonal line rather than a straight rigid line. -
Cluster the Prints:
Allow some prints to be close together or even slightly overlapping, while leaving more white space between others to create a sense of movement. -
Introduce Darker Blue:
towards the bottom third of the paper, introduce the darker blue or navy paint for a high-contrast finish to the path. -
The Final Prints:
Place the last two or three darker prints near the bottom right edge, simulating the end of the journey.
Stamp Pad Alternative
For crisper details and less mess than goopy tubes, use large washable ink pads. The ink dries faster and captures tiny fingerprints more clearly than thick paint.
Step 3: Drying and Display
-
Immediate Cleanup:
Before un-taping the paper, clean the artist’s hands and feet thoroughly to avoid accidental extra smudges on the masterpiece. -
Peel the Tape:
Gently lift the corners of the paper to detach the tape underneath. Pull slowly to avoid ripping the damp paper. -
Dry Flat:
Leave the paper on the flat surface to dry completely. Heavy paint blobs can take a few hours to set, so patience is key here. -
Flatten the Edges:
Once fully dry, the paper might curl from the moisture. Place heavy books on the corners overnight to flatten it back out before hanging.
Hang your long banner in a hallway or nursery to enjoy this little moment in time
BRUSH GUIDE
The Right Brush for Every Stroke
From clean lines to bold texture — master brush choice, stroke control, and essential techniques.
Explore the Full Guide
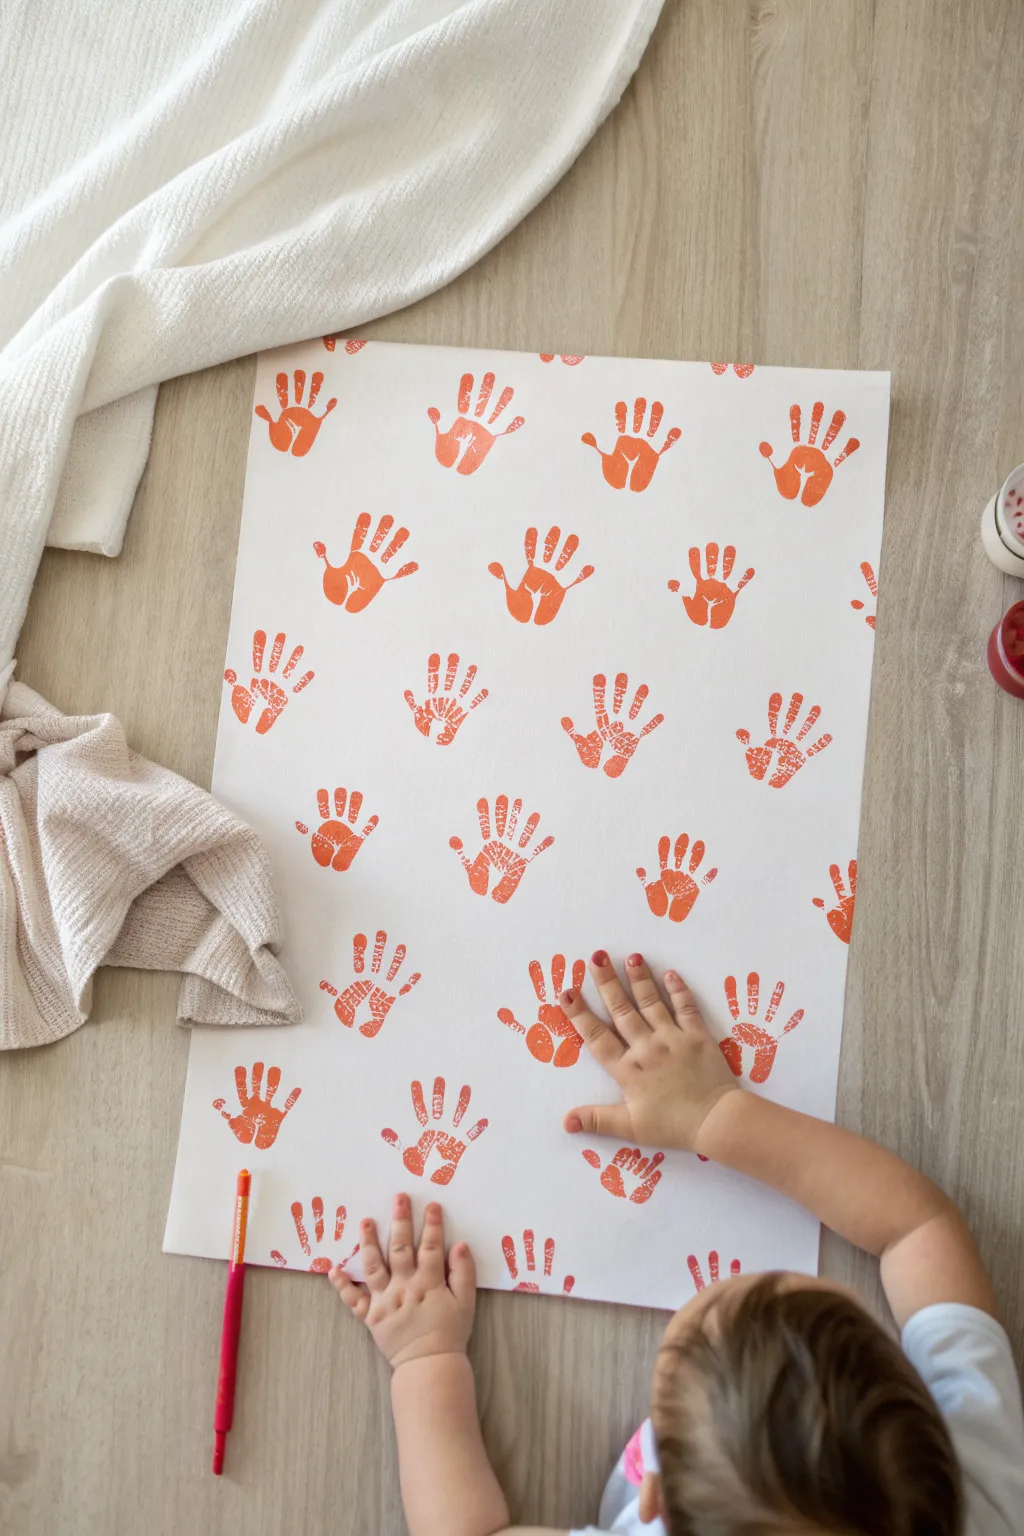
Handprint Sunbursts

Create a cheerful, repeated pattern using your little one’s own hands as stamps. This warm, monochrome artwork turns simple orange handprints into a stunning piece of modern wall art that captures a moment in time.
Step-by-Step Guide
Materials
- Large sheet of white paper (easel paper or poster board)
- Non-toxic, washable finger paint (orange)
- Paper plate or shallow tray
- Baby wipes or damp cloth
- Masking tape or painter’s tape
- Orange marker or pencil (optional, for labeling)
Step 1: Preparation
-
Prepare the surface:
Lay your large sheet of white paper on a flat, hard surface like a floor or low table. Use small pieces of masking tape on the corners to secure the paper so it doesn’t slide around while your baby works. -
Set up the paint station:
Squeeze a generous dollop of orange finger paint onto a paper plate or shallow tray. Spread it out slightly so it creates an even surface for dipping. -
Get ready for cleanup:
Keep a stack of baby wipes or a damp cloth within arm’s reach. This is crucial for quick cleanups if the paint goes somewhere it shouldn’t.
Step 2: Creating the Layout
-
Plan the grid:
Visualize a grid on your paper. You want to aim for evenly spaced rows and columns. You don’t need to draw lines, but having a mental map helps keep the pattern consistent. -
Load the hand:
Gently press your child’s palm into the orange paint. Ensure the fingers and the center of the palm get a good coating, but aren’t dripping with excess paint. -
Start at the top:
Begin stamping in the top left corner. Guide your baby’s hand down firmly onto the paper, pressing lightly on their fingers to ensure a clear print. -
Lift carefully:
Lift the hand straight up to avoid smearing the print. I find that holding their wrist offers the best control for a clean lift. -
Complete the first row:
Re-dip the hand into the paint and place the next print to the right of the first one. Continue this across the top of the paper, trying to keep the spacing uniform.
Stamp Clarity Tip
Too much paint creates blobs. Test the first stamp on a scrap paper to remove excess paint before hitting the main canvas.
Step 3: Filling the Pattern
-
Start the second row:
Move down to the next ‘row’ area. Try to align the first print of this row directly under the first print of the top row. -
Vary the prints slightly:
Don’t worry if every handprint isn’t identical. Some might have widespread fingers, while others are closer together; this variety adds charm to the artwork. -
Continue the rhythm:
Work your way down the paper, row by row. Re-ink the hand frequently to keep the color intensity consistent across the page. -
Check for gaps:
As you near the bottom, look at the overall spacing. If you have a large gap on an edge, you can add a partial handprint to make the pattern look continuous, like wallpaper.
Smudge Rescue
If a hand slides and smears, turn it into a feature! Use a paintbrush to feather the edges out, or just let it be perfectly imperfect.
Step 4: Finishing Touches
-
Let it dry:
Allow the paint to dry completely. Depending on how thick the paint is in areas, this might take anywhere from 30 minutes to an hour. -
Add a signature:
Once the paint is dry, use an orange marker or pencil to write the date or your child’s age in the corner. This subtle addition keeps the monochrome look while preserving the memory. -
Display:
Remove the tape carefully. You can now hang the poster as is, or frame it for a polished, graphic look in the nursery.
Now you have a vibrant, custom pattern that captures your little one’s size forever

Have a question or want to share your own experience? I'd love to hear from you in the comments below!