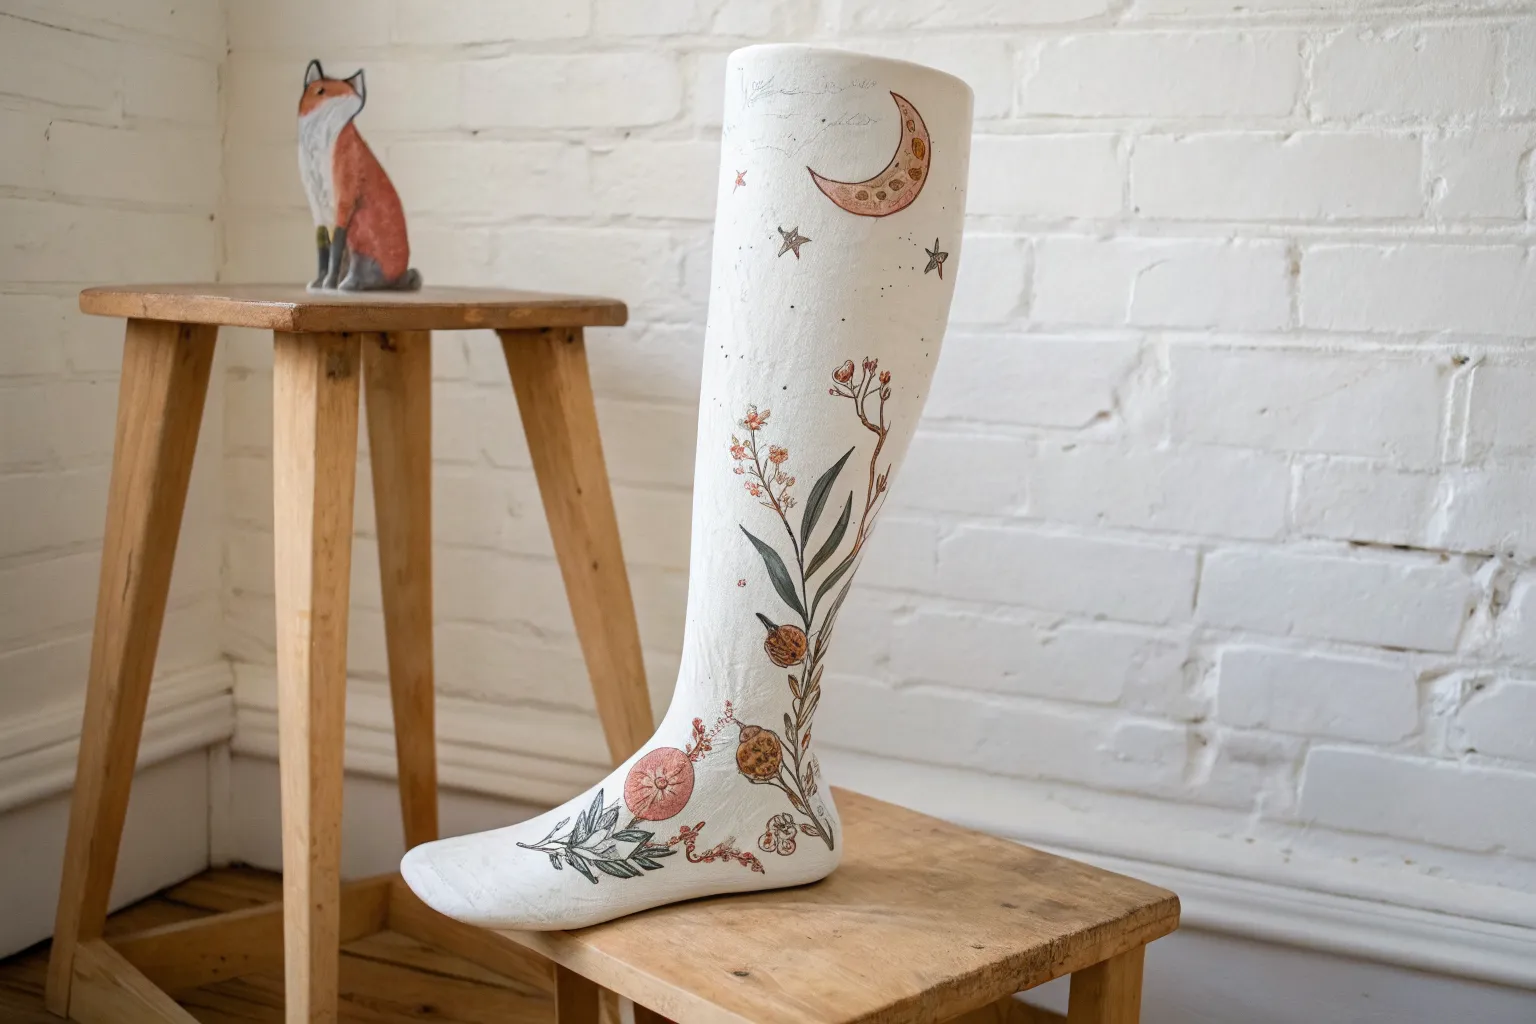
When you’re stuck wearing a leg cast, it’s basically a blank canvas you didn’t ask for—but you can still make it yours. These leg cast drawing ideas are my go-to ways to turn that clinical look into something fun, personal, and honestly kind of empowering.
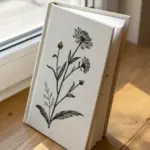
Friend Signatures on a Leg Cast
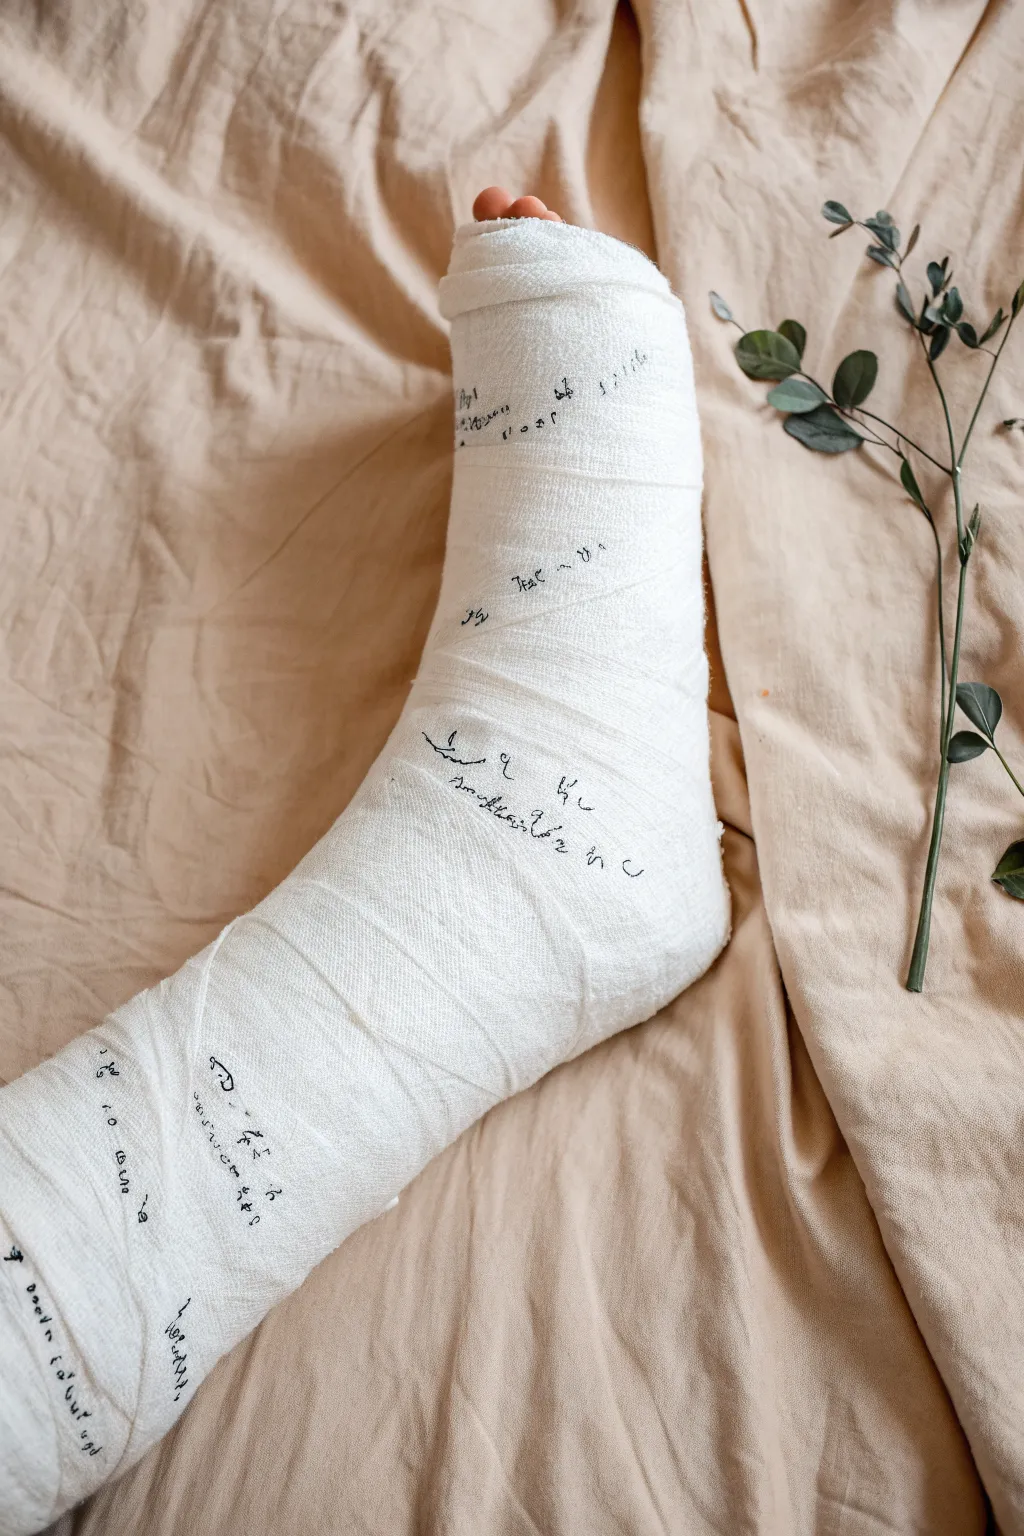
Transform a blank medical cast into a personalized keepsake with this minimalist aesthetic approach. By focusing on scattered, delicate handwriting in black ink against the stark white plaster, you’ll create a sophisticated memory board that captures well-wishes without the usual clutter.
Step-by-Step
Materials
- White plaster or fiberglass leg cast (already applied)
- Fine-point black permanent marker (e.g., Sharpie Ultra Fine)
- Medium-point black permanent marker
- Pencil (optional for drafting)
- Eucalyptus branches (for styling/photo prop)
Step 1: Planning the Layout
-
Assess the canvas:
Sit comfortably with the cast extended. Observe the natural ridges and texture of the wrapping material. You want to identify smoother areas where writing will be legible versus heavily textured ridges where the ink might skip. -
Drafting zones:
Mentally divide the cast into three sections: the shin, the ankle, and the foot. Avoid concentrating all signatures in one spot; the goal is an airy, dispersed look like the reference image.
Ink Bleeding?
If the marker bleeds into the cast fabric, switch to a waterproof archival pen (like a Micron) or a ballpoint pen, which is less likely to wick into the fibers than a felt tip.
Step 2: Adding the Signatures
-
Establish the focal points:
Start with two or three larger messages or names. Use the medium-point marker for these to create visual anchors on the shin and the top of the foot. -
Vary the orientation:
Ask friends to sign at different angles. In the image, some text runs horizontally while other bits follow the curve of the leg or slant diagonally. This randomness adds to the artistic feel. -
Writing technique:
When writing on the bumpy cast surface, use a dotting motion or slow, deliberate strokes rather than fast scribbles. The fabric texture can catch the pen tip, so I prefer to lift the pen slightly more often than usual. -
Scattering smaller notes:
Switch to the fine-point marker. Fill in the empty spaces with smaller, more delicate handwriting. These can be short ‘get well’ messages, dates, or inside jokes. -
Maintain white space:
Resist the urge to fill every inch. The aesthetic of this project relies heavily on the negative space of the white cast. Leave large gaps between clusters of text. -
Create distinct clusters:
Group a few signatures together tightly, then leave a wide area blank before the next group. Notice how the writing on the ankle in the photo is somewhat separated from the shin.
Add Metallic Accents
Elevate the design by having one or two special people sign in gold or silver metallic marker. It adds a subtle shimmer that breaks up the monochrome look.
Step 3: Styling and Finishing
-
Check for legibility:
Inspect the writing. If any thin lines got lost in the texture of the gauze, carefully retrace them with the fine-point marker to darken the text without thickening the line weight too much. -
Clean up smudges:
If you accidentally smudge wet ink, don’t panic. You can sometimes dab it gently with a tissue, but often it’s best to turn the smudge into a small doodle or heart to hide the error. -
Adding organic elements:
To recreate the photo’s vibe, place a dried eucalyptus branch or similar greenery alongside the cast. The dark green leaves contrast beautifully with the stark white and black ink. -
Final arrangement:
Rest the leg on a neutral, textured fabric like linen or wrinkled cotton in beige or cream tones. This softens the clinical look of the medical cast. -
Photo capture:
Typically you’ll want to snap a photo for memory’s sake. Shoot from above to capture the distribution of the text and the interaction with the botanical props.
With these touches, your cast becomes a stylish diary of support during your recovery


Bold Doodles and Icon Scatter on a Leg Cast
Turn a healing process into a canvas with this bold, sticker-style doodle design. Using simple, recognizable icons scattered across the white space creates a lively, retro-inspired look that’s fun to draw and even more fun to wear.
How-To Guide
Materials
- Clean, dry white plaster or fiberglass cast
- Fine-point black permanent marker (e.g., Sharpie Fine Point)
- Ultra-fine point black permanent marker (for details)
- Red permanent marker
- Pencil (optional, for sketching)
- Eraser (if using pencil)
Step 1: Planning the Layout
-
Clean surface:
Ensure the cast is completely dry and free of any dust or debris. If the cast is brand new and slightly damp, wait for it to fully cure before drawing. -
Visualize placement:
Look at the cast as a blank cylinder. You want to space your main elements out so they don’t look cluttered. Mentally mark spots for the largest drawings first. -
Light sketching:
If you are nervous about committing to ink immediately, lightly sketch the larger icons with a soft pencil. Keep the lines very faint so they don’t show through later.
Step 2: Drawing the Major Icons
-
Start with the ‘Bang’:
Near the top shin area, draw a spiky explosion shape using the black marker. Keep the spikes irregular for a comic-book energy feel. -
Color code early:
Fill the center of your explosion shape with red marker to establish your accent color immediately. Leave a white border between the red fill and the black outline. -
Add nature elements:
Draw the mushroom shape below the explosion. Start with the cap, adding the gills underneath, and then a thick stem. Darken the stem slightly for contrast. -
Create the flower:
Further down the ankle, draw a five-petaled flower. Outline the petals in black first, then define the center. -
Flower details:
Using the red marker, color inside the petals. I find drawing a smaller red petal shape *inside* the black outline looks cleaner than filling it completely solid. -
The Planet:
On the side of the calf, draw a circle. Add a wavy separation line across the middle or bottom third to create a landscape or planetary texture. -
Darkening the Planet:
Fill in the ‘sky’ or empty portion of your planet circle with solid black ink to give the design visual weight.
Cast Texture Tip
Fiberglass casts are bumpy. Draw slowly and use a ‘dotting’ motion rather than dragging the pen to get solid lines without snagging.
Step 3: Adding Motion and Connectors
-
Lightning strikes:
Draw sharp, zig-zag lightning bolts in the empty spaces between your main icons. Vary their sizes—one large one across the shin and smaller ones near the ankle. -
Double outlines:
For the largest lightning bolt, draw a second line inside the first to create a hollow effect, rather than just a single stick figure line. -
Scattered stars:
Fill medium-sized gaps with classic five-point stars. Draw these with a single continuous line if you can, or outline the shape carefully. -
Heart accents:
Introduce more red by drawing solid red hearts. Place one near the ankle and another higher up on the side to balance the color distribution. -
Black outlines for color:
Once the red ink on the hearts is dry, carefully outline them with your black fine-point marker to make them pop against the white cast.
Glow Up
Use a silver metallic marker to fill in the lightning bolts or stars for a futuristic, shimmering effect.
Step 4: Finishing Fillers
-
Bubble clusters:
Look for leftover awkward white spaces. Draw clusters of three or four small circles (bubbles) ranging in size to fill these gaps. -
Tiny stars:
Add tiny four-point ‘twinkle’ stars (just a cross with tapered ends) in the smallest empty areas. -
Check balance:
Step back and view the cast from a distance. If one area looks too white, add a small lightning bolt or a single circle. -
Texture details:
Go back to your mushroom and planet icons. Use the ultra-fine pen to add tiny dots or hatch marks for extra texture. -
Final dry:
Let the ink set completely for at least 30 minutes before touching the drawn areas to prevent smudging on the rough texture.
Now you have a personalized piece of art that makes recovery a little more stylish

Polka Dots and Confetti Pattern on a Leg Cast
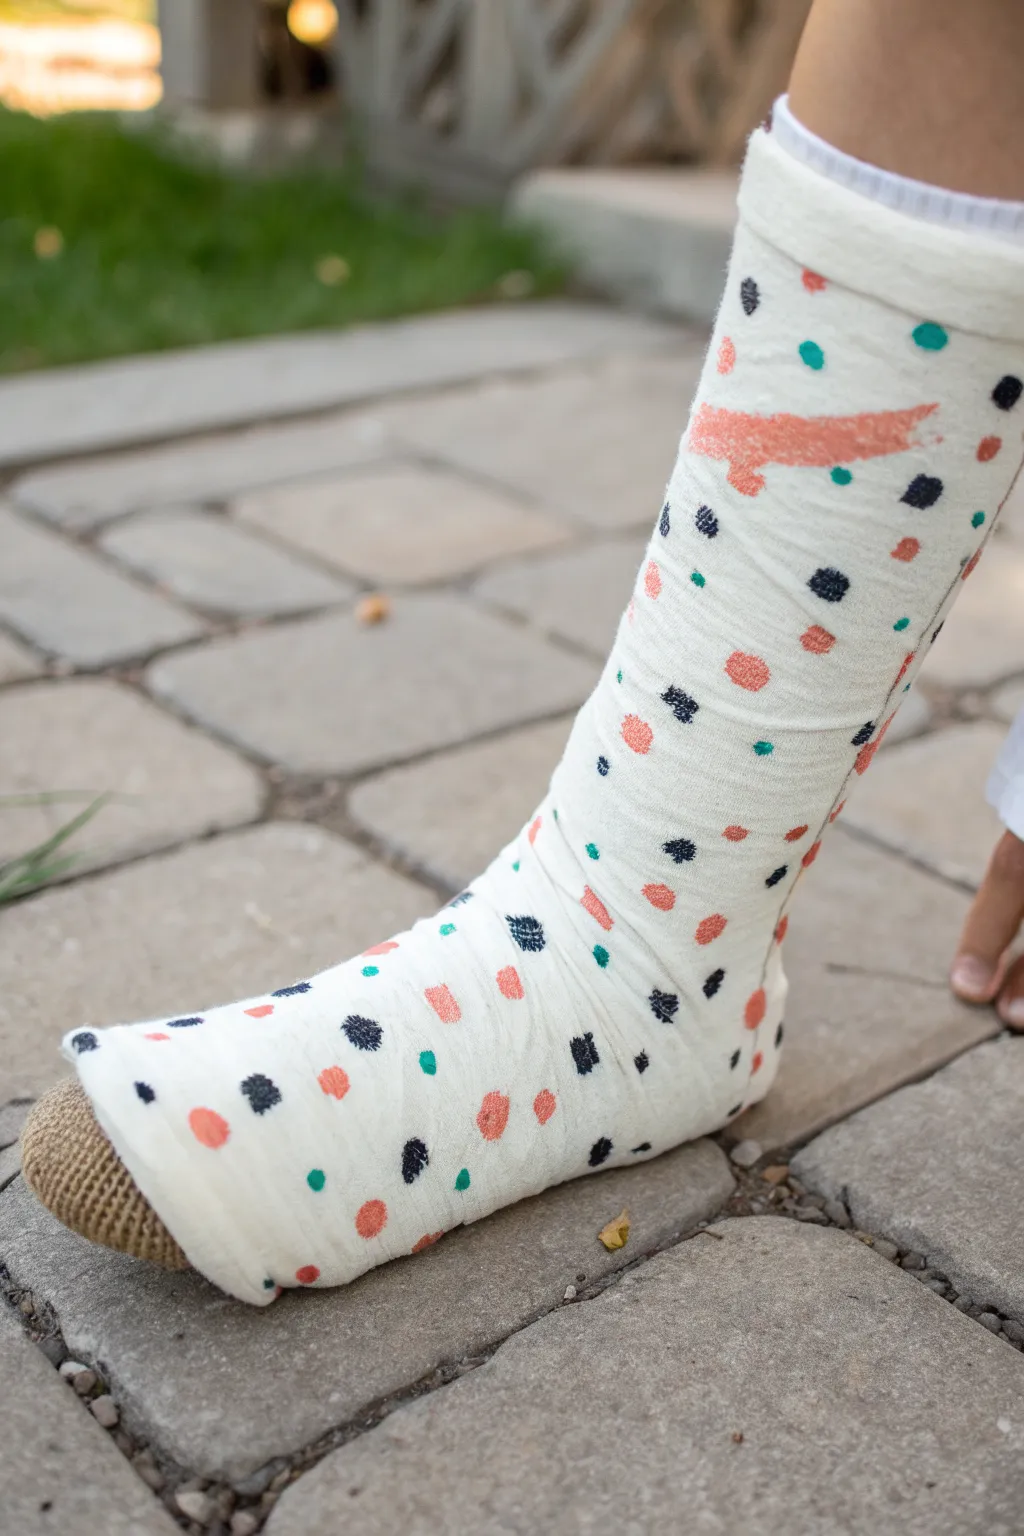
Transform a plain white leg cast into a cheerful canvas with this playful polka dot and confetti design. The combination of soft peach, teal, and navy creates a modern, gender-neutral look that brightens up recovery time.
Detailed Instructions
Materials
- White leg cast (dry and clean)
- Acrylic paints (Peach/Coral, Teal/Turquoise, Navy Blue)
- Small round sea sponge or pouncers (varied sizes)
- Small flat paintbrush (size 4 or 6)
- Detail paintbrush (size 0 or 1)
- Paper plate or palette
- Paper towels
- Water cup
Step 1: Planning and Prep
-
Surface check:
Before you begin, ensure the cast material is fully dry and set. If the cast is fiberglass, the texture will be rougher, so prepare your brushes for a bit of stippling action. -
Palette setup:
Squeeze a dime-sized amount of your Peach, Teal, and Navy paints onto your palette. Keep them separate for now to maintain crisp, clean colors. -
Test spacing:
I usually like to mentally map out where the largest elements will go first to avoid clustering everything in one spot.
Uneven Dots?
Cast texture is bumpy! Don’t aim for perfect geometric circles. Irregular edges look more like real confetti and suit the rough canvas better.
Step 2: Painting the Main Dots
-
Create peach dots:
Dip a small round sponge or the tip of a larger brush into the peach paint. Gently press it onto the cast to create varying sizes of circles. -
Vary opacity:
Don’t worry if the texture of the cast shows through; it adds to the organic, confetti look. Let some dots be solid and others slightly sheer. -
Add teal accents:
Switch to a clean brush or sponge. Apply teal dots sporadically between the peach ones. Try to make these slightly smaller than your primary peach dots for visual balance. -
Introduce navy contrast:
Using a smaller brush, dab navy blue dots into the empty spaces. The dark color acts as the confetti ‘pop’, so use it sparingly compared to the lighter colors.
Sponge Stamp Hack
Use the eraser end of a pencil dipped in paint to create perfectly uniform small dots on uneven surfaces.
Step 3: Adding Texture and Detail
-
Paint rough squares:
To break up the monotony of circles, use the flat edge of your brush to paint small, rough squares or rectangles in navy and peach. These mimic torn paper confetti. -
Create the ‘fish’ shape:
Near the top of the cast, sketch a simple elongated shape with the peach paint to resemble a fish or abstract swoosh. Fill it in with a slightly thicker layer of paint for prominence. -
Stipple for texture:
For the rougher areas of the cast, use a stippling motion (dabbing up and down) to force the paint into the little crevices of the fabric tape. -
Layering:
Once your first layer of peach dots is dry to the touch, you can add a tiny second dab on top if you want the color more vibrant.
Step 4: Finishing Touches
-
Check balance:
Step back and look at the cast from a distance. If you see large white gaps, fill them with tiny ‘specks’ using the tip of your detail brush in navy or teal. -
Refine edges:
If the cast texture made any dots look too messy, gently touch up the edges with your detail brush to round them out. -
Dry time:
Allow the paint to air dry completely. Acrylics dry fast, but giving it an extra 15 minutes ensures nothing smudges on clothing. -
Clean up:
Wash your brushes immediately with soap and water, especially if you used a rough stippling motion, which can push paint deep into the bristles.
Now you have a custom piece of art that makes healing just a little bit more colorful


Floral Vines Climbing a Leg Cast
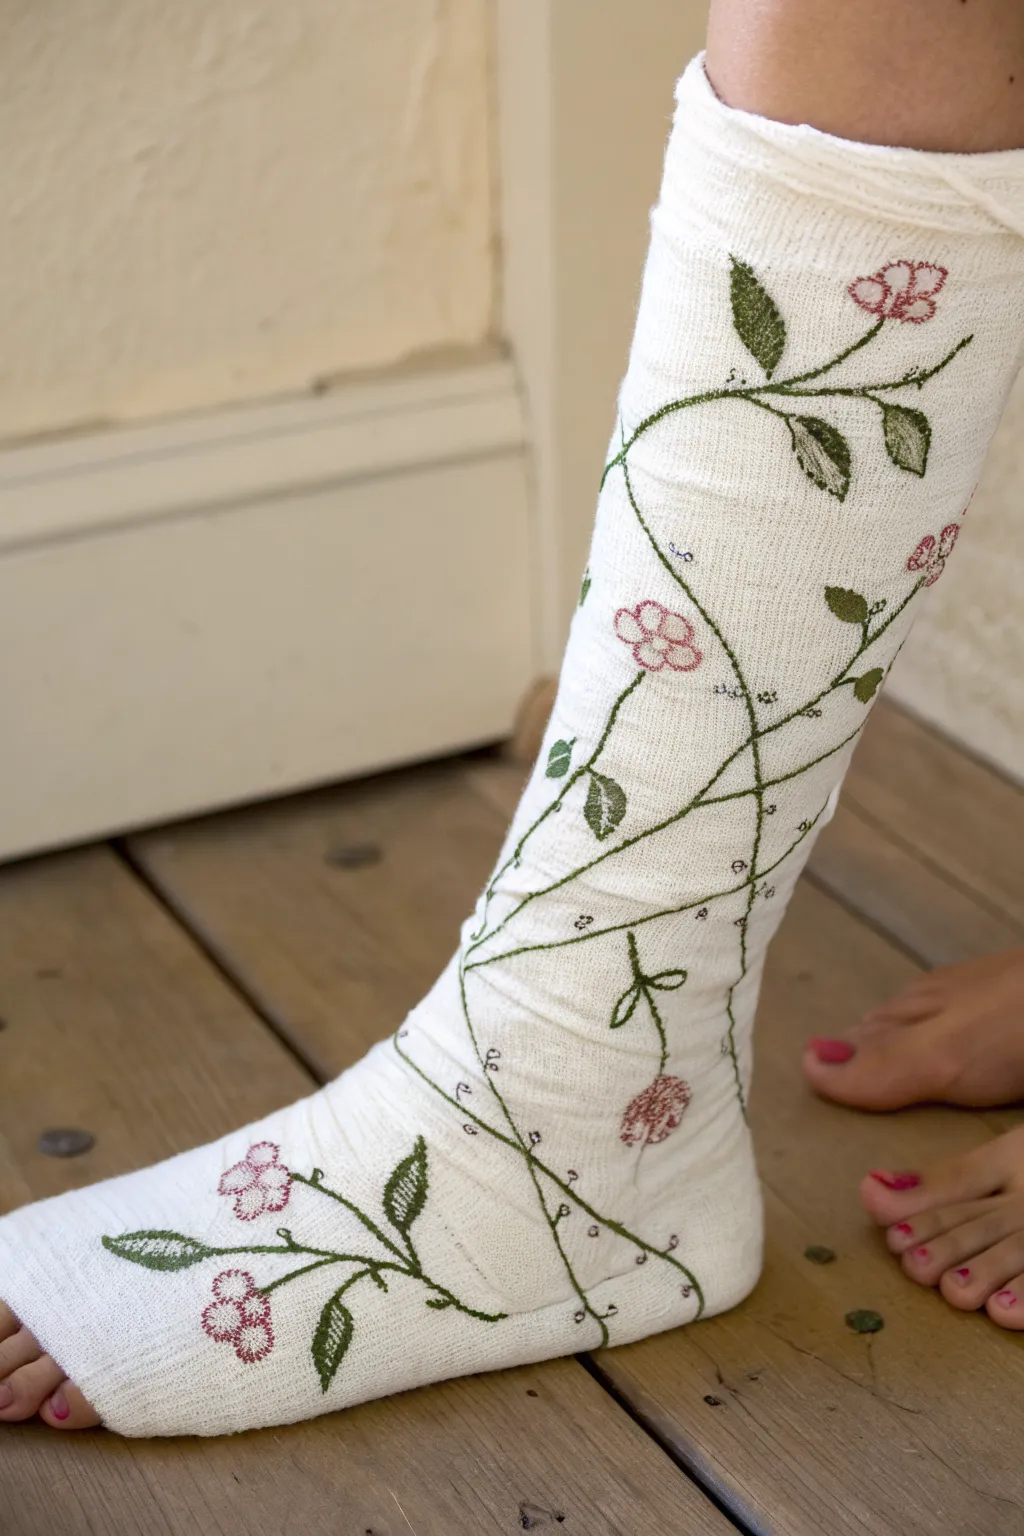
Transform a stark medical necessity into a canvas of blooming beauty with this delicate floral vine design. The climbing roses and winding green stems create an elegant, organic look that softens the harshness of a cast.
Step-by-Step Guide
Materials
- White or light-colored fiberglass cast
- Fine-point permanent markers (Dark Green, Light Green, Soft Pink, Burgundy)
- Pencil (optional, for light sketching)
- Clean, damp cloth
Step 1: Planning and Foundation
-
Prep the Surface:
Before you begin drawing, gently wipe the cast with a slightly damp cloth to remove any plaster dust or lint. This ensures your markers won’t get clogged and the ink will apply smoothly. Let it dry completely. -
Visualize the Flow:
Observe the natural curve of the leg and imagine a vine growing upward. I find it helpful to trace the main path with a finger first to see how the spiral will look before committing ink to the surface. -
Draft the Main Vines:
Using your dark green marker, draw long, sweeping lines that spiral gently from the foot area up toward the knee. Keep these lines somewhat organic and wavy rather than perfectly straight. -
Add Secondary Branches:
Branch off from your main vine lines with shorter, thinner strokes. These will serve as the stems for your leaves and flower buds.
Ink Bleed Prevention
Fiberglass texture can cause ink to spread. Draw fast strokes and avoid holding the marker tip in one spot. Test your marker on the bottom of the foot first.
Step 2: Drawing the Leaves
-
Outline Leaf Shapes:
along the vines, sketch simple almond or teardrop shapes for the leaves using the dark green marker. Vary the sizes, placing larger leaves near the bottom and smaller ones as you move up. -
Add Serrated Edges:
To make the leaves look more realistic like rose leaves, go back over your smooth outlines and add tiny jagged points or serrated edges. -
Fill with Texture:
Instead of coloring the leaves in solid, use a cross-hatching technique with the dark green marker to create depth. Leave some tiny white spaces showing through for highlights. -
Blend with Light Green:
Take your light green marker and color over the cross-hatched areas. This blends the dark green ink slightly and adds a vibrant, fresh tone to the foliage.
Step 3: Blooming Flowers
-
Position the Blooms:
Choose focal points along the vine for your flowers. Good spots are where vines cross or at the end of a stray branch. Space them out so the design doesn’t look cluttered. -
Draw Five-Petal Shapes:
Using a soft pink marker, draw simple five-petal flower outlines. Keep the shapes rounded and slightly irregular for a natural wildflower appearance. -
Add Flower Centers:
Draw a small circle in the center of each flower. You can leave this white or fill it lightly with a pale yellow or light green if you have those colors available. -
Texture the Petals:
Lightly shade the inner part of each petal (closest to the center) with the pink marker, lifting the pressure as you move outward to create a gradient effect. -
Define with Burgundy:
Use the burgundy or dark red marker to outline the petals very thinly. Add tiny dots or stamen lines in the center of the flowers to give them dimension and pop.
Add Some sparkle
Once the ink is fully dry, you can use a tiny dab of clear glitter glue on the center of the flowers or on the dew drops for a subtle, shimmering finish.
Step 4: Final Flourishes
-
Add Tiny Buds:
Draw small, closed buds at the very tips of the thinner vines using the pink marker, wrapping the base of the bud in a little green calyx. -
Create Delicate Tendrils:
From the main vine, draw very fine, curly loops using the tip of your dark green marker. These represent the grasping tendrils of the plant and fill in empty negative space. -
Tiny Leaf Accents:
Scatter very small, simple leaf shapes or mere dashes of green along the stems to break up any long, empty lines. -
Review and Refine:
Step back and look at the cast as a whole. If any area looks too sparse, add a small extra vine or a floating petal. Darken any lines that may have faded during the drawing process.
Enjoy your customized, nature-inspired cast that turns a temporary injury into a walking work of art

PENCIL GUIDE
Understanding Pencil Grades from H to B
From first sketch to finished drawing — learn pencil grades, line control, and shading techniques.
Explore the Full Guide
Big Sunflower Focus on a Leg Cast
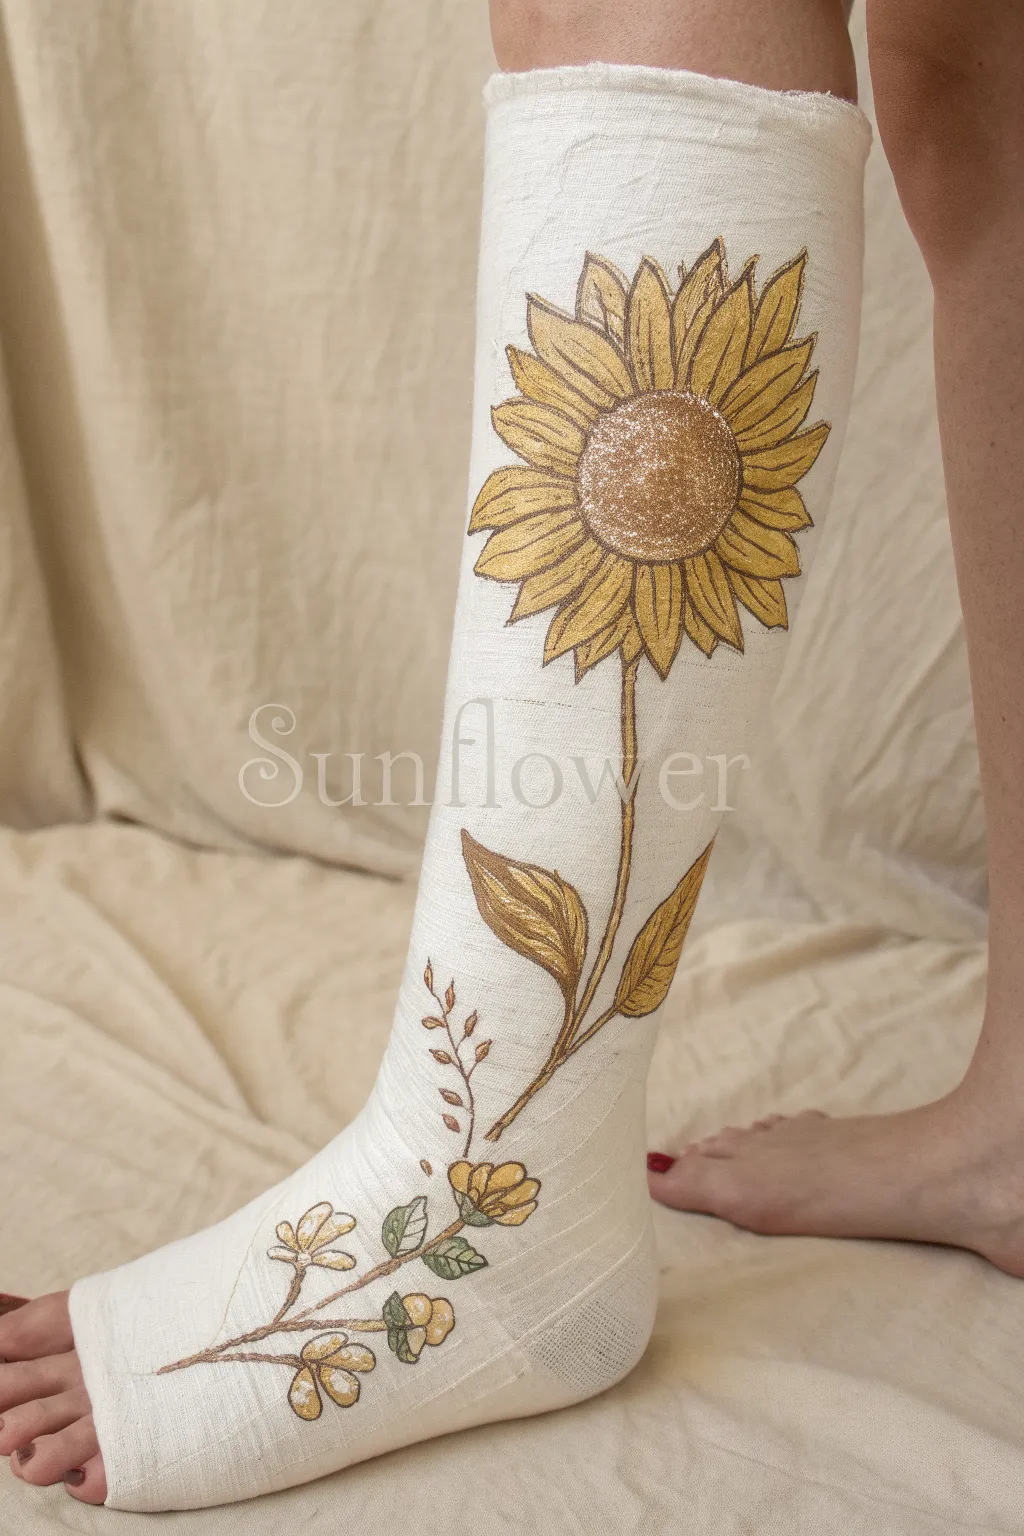
Transform a plain medical necessity into a bright statement piece with this elegant sunflower design. Featuring a shimmering glitter center and metallic gold accents, this project turns a leg cast into a canvas for cheerful botanical art.
How-To Guide
Materials
- White leg cast (plaster or fiberglass)
- Pencil (HB or 2B)
- Acrylic paints (Yellow Ochre, Burnt Sienna, Metallic Gold, Olive Green, White)
- Fine glitter (Gold or Bronze)
- Mod Podge or craft glue
- Fine-point permanent marker/liner (Black or Dark Brown)
- Small round paintbrushes (sizes 0, 2, and 4)
- Paper towel
- Water cup
Step 1: Planning and Sketching
-
Clean the surface:
Before starting, ensure the cast surface is clean and dry. If the cast is old, wipe it gently with a slightly damp cloth to remove surface dust, but be careful not to soak the plaster. -
Mark the center:
Locate a spot roughly mid-shin for the main sunflower head. Lightly sketch a circle about 2 inches in diameter with your pencil to represent the flower’s center. -
Sketch the petals:
Draw large, pointed petals radiating outward from the central circle. Don’t worry about perfect symmetry; natural variation makes the flower look more organic. -
Outline the stem and leaves:
Draw a slightly curved line extending downwards from the flower head toward the ankle. Add two large, leaf shapes branching off the stem—one higher up on the left and one lower on the right. -
Add lower details:
Near the foot area, lightly sketch a smaller, branching sprig with tiny buds and leaves to balance the large flower above.
Tape Texture Tip
Cast tape is bumpy. Don’t fight the texture; use a stippling motion (dabbing straight up and down) to get paint into the crevices.
Step 2: Painting the Base Layers
-
Paint the petals:
Using a size 4 brush, fill in the petals with Yellow Ochre mixed with a touch of Metallic Gold. The texture of the cast will absorb some paint, so you may need to dab the paint into the weave rather than just stroking it. -
Fill the leaves and stem:
Mix Olive Green with a little Metallic Gold for a bronzed-green look. Paint the stem and the two large leaves, ensuring good coverage over the cast tape texture. -
Paint the bottom sprig:
Use the same green mixture for the thinner stems near the toes. Paint the small buds with a lighter yellow or cream color. -
Paint the center base:
Fill in the central circle of the sunflower with Burnt Sienna. This dark base will help the glitter pop later. -
Let it dry:
Allow the acrylic paint to dry completely. This usually takes about 15-20 minutes depending on humidity and how thick the layers are.
Step 3: Adding Detail and Glitter
-
Apply outline details:
Once the paint is dry, use your fine-point permanent marker or a very thin brush with black paint to outline all the petals, leaves, and stems. -
Add texture lines:
Inside each petal, draw a central vein line and smaller lines feathering out near the base. Do the same for the large leaves to give them realistic veining. -
Prepare the center for glitter:
Apply a generous layer of Mod Podge or craft glue directly over the brown painted center of the sunflower. -
Dust with glitter:
While the glue is wet, carefully sprinkle the fine gold or bronze glitter over the center circle. Tap the leg gently to settle the glitter (or blow lightly) to ensure full coverage. -
Highlight the petals:
Using a dry-brush technique with pure Metallic Gold, add light swipes near the tips of the petals and on the high points of the leaves to catch the light. -
Seal the glitter:
I usually wait for the glue to dry completely, then gently dab a thin top coat of Mod Podge over the glitter to keep it from shedding everywhere.
Level Up: 3D Bees
Glue small, painted wooden ladybugs or plastic bees onto a petal or leaf using strong craft glue for a fun, tactile pop of life.
Now you have a stunning, sun-soaked design to brighten up your recovery days
Mandala Wrap Linework on a Leg Cast
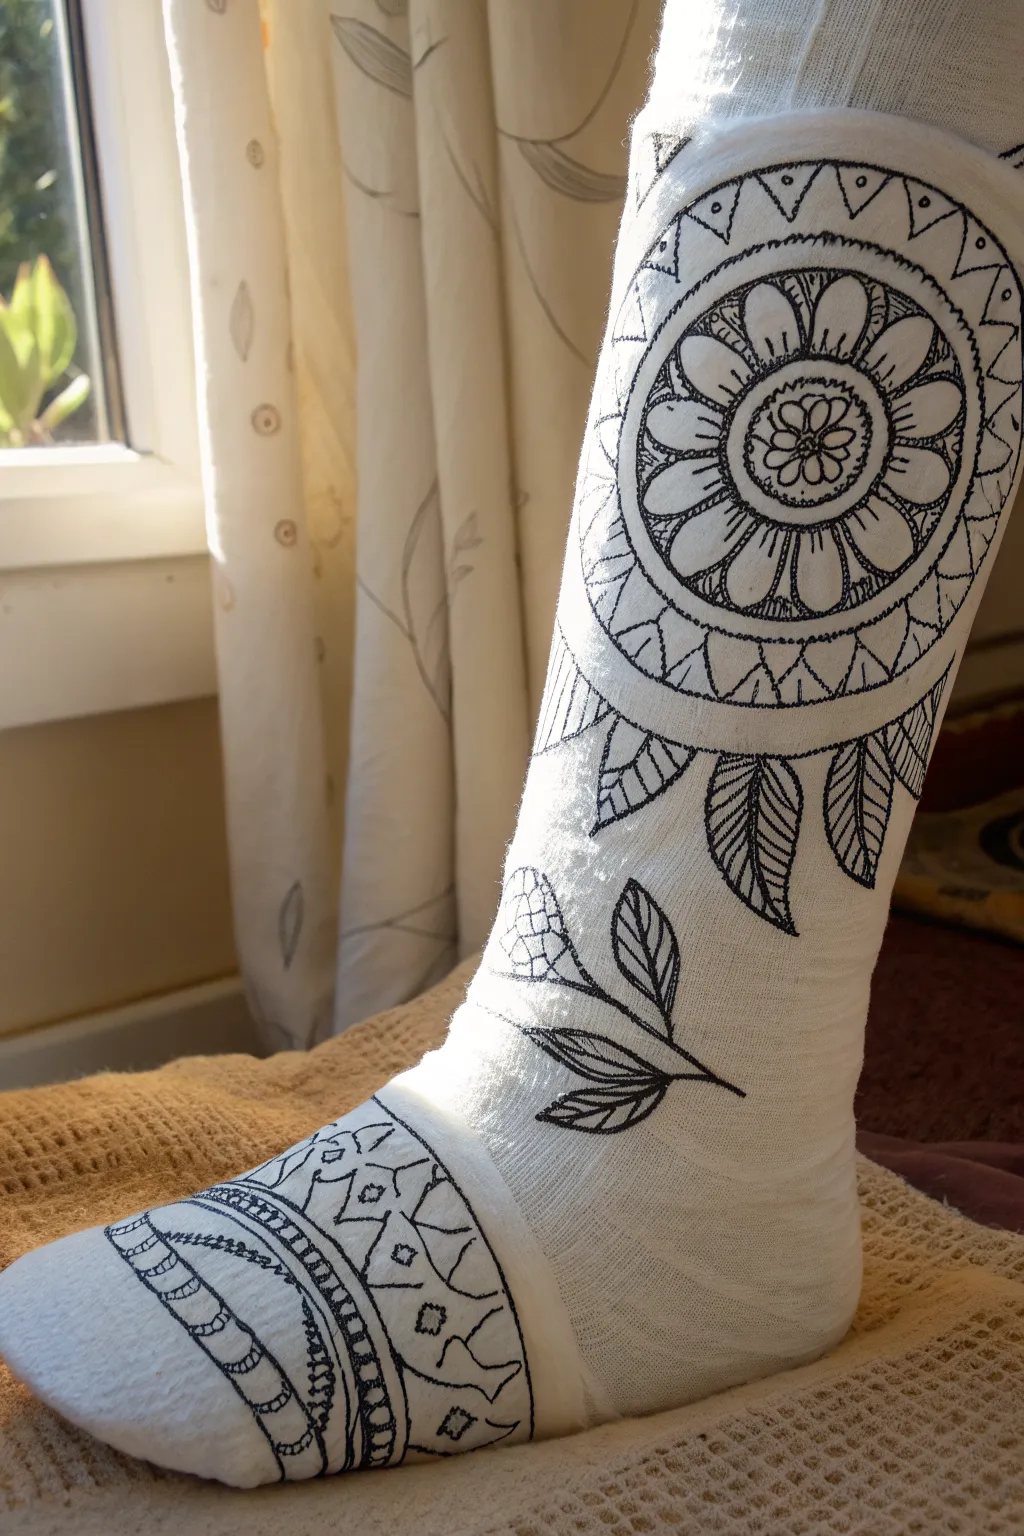
Transform a clinical white leg cast into a canvas for zen-inspired art with this stunning black linework design. Featuring a central floral mandala on the shin, dangling leaf charms, and an intricate toe band, this project proves that healing can be beautiful.
Detailed Instructions
Materials
- Clean, dry fiberglass or plaster leg cast
- Pencil (HB or 2B)
- White eraser
- Black permanent markers (Fine tip/0.5mm)
- Black permanent markers (Ultra-fine tip/0.3mm)
- Flexible sewing tape measure
- Paper towels or cloth
Step 1: Preparation & Sketching
-
Clean surface:
Before starting, ensure the cast surface is clean and completely dry. Wipe it down gently with a paper towel if it has collected any dust or lint. -
Map out the center:
Locate the flattest part of the shin area, roughly mid-calf. This will be the home for your main mandala. Using your pencil, lightly mark a small dot to serve as the center point. -
Draft the guide circles:
Sketch three concentric circles lightly around your center dot. The innermost circle should be about the size of a coin, the middle one about the size of a cookie, and the outer one spanning the width of the shin. -
Block out the toe band:
Move down to the toe opening. Lightly sketch two parallel lines circling the cast about two inches up from the edge to create the boundary for the bottom decorative band.
Bumpy Surface Blues
Fiberglass casts are uneven. Don’t fight the texture; use a ‘dotting’ motion rather than dragging the pen for smoother lines, or choose a marker with a slightly flexible nib.
Step 2: Drawing the Main Mandala
-
Start the center flower:
Switch to your Fine tip marker. Inside the smallest circle, draw a tiny five-petal flower or a cluster of small circles to create the mandala’s seed. -
Add first petal layer:
Draw rounded, U-shaped petals radiating from that center seed, stopping at the edge of your first guide circle. I find it helps to draw the petals at 12, 3, 6, and 9 o’clock first to keep them even. -
Create the sun rays:
In the gap between your first and second guide circles, draw longer, elongated oval petals. Inside each petal, draw a second, slightly smaller oval to add dimension. -
Detail the petal interiors:
Using the Ultra-fine marker, add tiny lines or stippling inside the base of these larger petals to create shading and depth. -
Draw the outer triangles:
Between the second and third guide circles, draw a zigzag line to create a ring of triangles pointing outward. This frames the flower shape. -
Final mandala border:
Outline the outermost circle heavily with the Fine tip marker. Inside each triangle of the previous step, add a small dot or a smaller triangle for texture.
Pro Tip: Contrast is King
Since you can’t use color, rely on ‘visual weight.’ Alternate between empty white spaces and dense black patterns (like the dark leaves) to keep the design readable from a distance.
Step 3: Adding Tendrils & Leaves
-
Suspend the leaves:
From the bottom edge of your main mandala, draw three to five curved lines drooping downward like necklaces or vines. -
Draw leaf outlines:
At the end of these lines, sketch large, teardrop-shaped leaves. Make them substantial so they don’t get lost on the large white space. -
Fill with veins:
Draw a center line down each leaf. Then, fill the sides with tight, diagonal hatching lines to create a dark, textured leaf vein pattern. This contrast is key to the look. -
Add floating sprigs:
To the side of the mandala (near the ankle), draw a separate botanical sprig with a stiff stem and simple, open leaves. Add a cross-hatched seed pod or bud for variety.
Step 4: The Toe Band & Finishing
-
Establish the grid:
Return to the toe section. Divide your band into sections using zigzags or waves. The example uses a large wave pattern intersected by straight lines. -
Fill the band patterns:
Alternate the fill patterns in your grid. Use small circles in one section, cross-hatching in the next, and simple triangles in another. Keep the linework tight and deliberate. -
Thicken main lines:
Review your entire drawing. Take the thicker marker and re-trace the major structural lines—the main circles of the mandala and the stems of the leaves—to make them pop against the cast texture. -
Clean up:
Once the ink is fully dry (wait at least 10 minutes to be safe), gently use your white eraser to remove any visible pencil guide lines.
Now you have a custom piece of art that makes recovery a little more stylish
BRUSH GUIDE
The Right Brush for Every Stroke
From clean lines to bold texture — master brush choice, stroke control, and essential techniques.
Explore the Full Guide
Geometric Tessellation on a Leg Cast

Turn a stark white medical necessity into a canvas of modern art with this geometric tessellation design. By combining sharp triangles, earthy tones, and detailed line work, you can create a sophisticated pattern that feels more like a fashion statement than a cast.
Step-by-Step Tutorial
Materials
- Leg cast (fiberglass or plaster)
- Pencil (HB or lighter)
- Eraser
- Fine-tip permanent markers (black)
- Medium-tip permanent markers (teal/forest green, rust/burnt orange, brown)
- Ruler or flexible straight edge
- Rubbing alcohol (optional for cleanup)
Step 1: Drafting the Design
-
Clean the Surface:
Before starting, ensure the cast surface is clean and dry. If there’s any plaster dust, wipe it away gentle with a dry cloth so your markers will adhere properly. -
Planning the Triangles:
Visualize a grid of triangles wrapping around the leg. Using a pencil, lightly sketch a series of interconnected triangles. Aim for variety in size, but keep the angles sharp. -
Creating the Tessellation:
Connect the vertices of your initial triangles to form new ones. The goal is to cover the majority of the visible cast surface with a network of three-sided shapes that share walls, creating a tessellation effect. -
Refining the Lines:
Check your pencil lines. If you want straight edges, use a flexible straight edge (like a piece of cardstock or a flexible ruler) to tidy up the sketched lines before committing to ink.
Ink Bleeding?
Fiberglass wicks ink quickly. If lines look fuzzy, switch to an ultra-fine point pen and move your hand faster—don’t let the nib rest in one spot.
Step 2: Inking the Framework
-
Outline in Black:
Take your black fine-tip permanent marker and carefully trace over your pencil lines. Go slowly over the textured surface of the cast to ensure the line is solid and doesn’t skip. -
Establishing Bold Lines:
Select a few key structural lines—often the longer diagonal ones—and thicken them slightly with a second pass of the marker. This creates a visual hierarchy and separates the larger sections. -
Erase Guidelines:
Once the black ink is completely dry (give it a few minutes to be safe), gently erase any visible pencil marks to clear up the design.
Add Metallic Flair
Swap one of the accent colors for a metallic gold or copper sharpie. The shimmer looks incredible against the matte white cast material.
Step 3: Adding Color & Texture
-
Select Color Zones:
Decide which triangles will be colored. In the example, notice how color is used sparingly—roughly one colored triangle for every four or five white ones. -
Fill with Teal:
Using the teal or forest green marker, color in select triangles completely. I find that dabbing the marker rather than dragging it helps get ink into the deep weave of fiberglass casts. -
Add Rust Accents:
Choose a few adjacent or opposing triangles to outline or fill with the rust/burnt orange marker. Instead of solid fills, try outlining the inner shape of a triangle within the black border for a lighter look. -
Create Cross-Hatching:
For the dark brown or black texture triangles, don’t color them solid. Instead, draw a tight grid or cross-hatch pattern inside the shape. This adds visual density without looking too heavy. -
Inner Segmentation:
Go back to some of the larger white triangles. Use the rust or black marker to draw a ‘Y’ shape inside them, dividing the large triangle into three smaller internal triangles. -
Detailed Patterns:
Pick a few random triangles to fill with a distinct pattern, such as a scribble texture or a tiny honeycomb, using your finest black pen.
Step 4: Finishing Touches
-
Review Connectivity:
Step back and look at the flow. Connect any floating lines to a vertex to ensure the geometric web looks continuous. -
Enhance Intersections:
Where multiple lines meet at a point, you can add a tiny dot of black ink to emphasize the vertex and make the geometry pop. -
Protect the Art:
While permanent marker is fairly durable, avoid getting the drawing wet or scrubbing it, as the ink can bleed on the porous cast material.
You now have a custom piece of wearable art that makes healing a little more stylish
Superhero Armor Panels on a Leg Cast
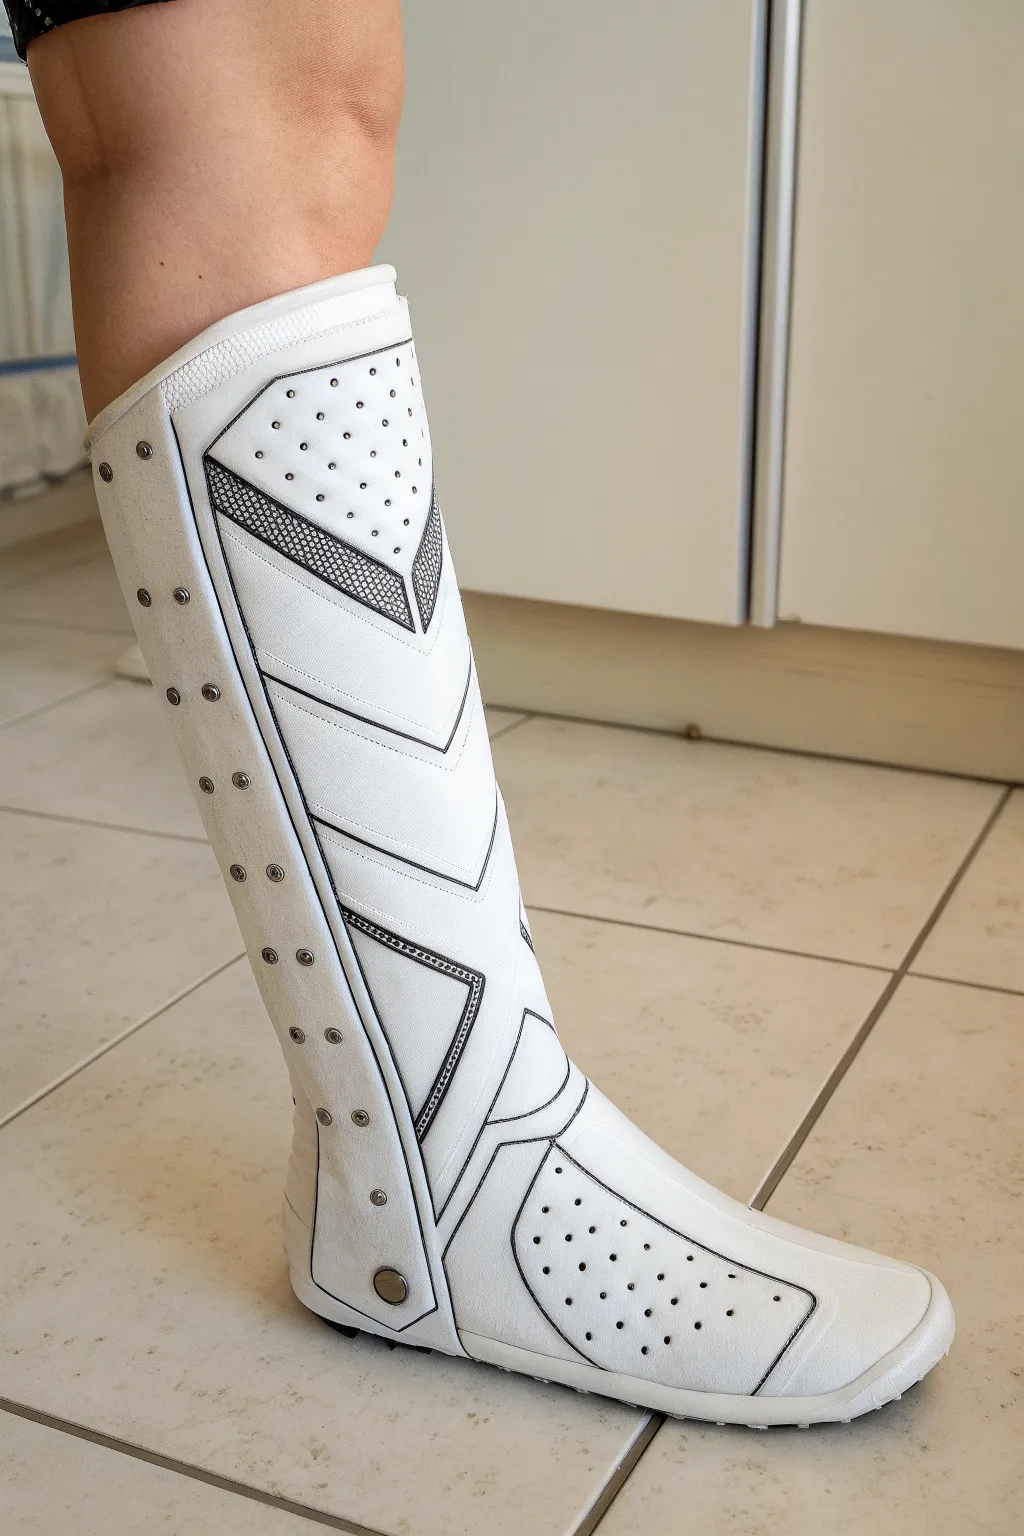
Transform a standard fiberglass leg cast into a piece of futuristic battle gear with just a few permanent markers. This monochromatic design uses crisp black lines to create the illusion of vented panels, rivets, and overlapping plates.
Step-by-Step Tutorial
Materials
- Clean, dry white fiberglass cast
- Fine-point permanent marker (black)
- Ultra-fine point permanent marker (black)
- Pencil (for sketching)
- Flexible ruler or measuring tape
- Eraser
- Reference images of sci-fi armor (optional)
Step 1: Mapping the Armor
-
Clean surface:
Ensure the cast is completely dry and free of any loose fabric threads. You might want to brush off any plaster dust with a dry cloth. -
Define the zones:
Using a pencil, lightly sketch the main vertical division lines. Draw one line straight down the shin and another down the side of the calf to separate the front ‘plate’ from the side panel. -
Sketch the chevron pattern:
On the front shin area, sketch a series of V-shaped chevrons pointing downward. Space them out so you have about three main segments between the knee and the ankle. -
Add side panel details:
On the side of the cast, lightly draw a long vertical strip that runs parallel to the calf. This will act as the mounting bracket for your simulated rivets. -
Outline the foot details:
Sketch a curved panel over the top of the foot area, creating a distinct ‘shoe’ section separate from the shin armor.
Step 2: Inking the Structure
-
Trace main lines:
Take your fine-point permanent marker and carefully trace over your main pencil lines. Go slowly over the bumpy fiberglass texture to keep the lines relatively straight. -
Double the lines:
To create the illusion of separate plates, draw a second line parallel to your first set of structural lines, keeping a consistent 2-3mm gap between them. -
Draw the rivets:
Along the vertical side strip you sketched earlier, draw small, evenly spaced circles. Add a tiny dot in the center of each circle to simulate a sunk screwhead. -
Create the vent holes:
On the top chevron and the foot panel, draw a grid of small dots. Keep these organized in rows to look like manufactured ventilation holes. -
Add the large fastener:
Near the ankle on the side panel, draw a larger circle with a thicker outline to represent the main hinge or locking mechanism of the armor boot.
Smooth Operator
Fiberglass is bumpy. When drawing long lines, don’t try to do it in one sweep. Use short, connecting strokes to maintain control over the uneven surface.
Step 3: Texturing and Detailing
-
Fill the mesh areas:
For the darker triangular accents (like the ones shown below the knee and on the side), use the ultra-fine marker to draw a tight cross-hatch or mesh pattern. -
Add depth to triangles:
Outline these mesh triangles with a thicker line using the standard fine-point marker to make them pop against the white cast material. -
Refine the edges:
Go back over the major perimeter lines of the armor plates. I like to thicken these outer lines slightly to separate the armor visually from the actual cast edge. -
Clean up:
Once the ink is fully dry, gently erase any visible pencil marks that strayed outside your inked lines. -
Final check:
Look for any gaps in your lines caused by the cast’s texture and fill them in carefully with the ultra-fine marker for a solid, manufactured look.
Ink Bleeding?
If the marker ink starts feathering into the cast fibers, switch to a finer tip pen and use a lighter touch. Do not press hard, as this wicks more ink.
You now have a custom piece of armor that makes recovery feel a little more heroic


Dragon Scales Texture on a Leg Cast
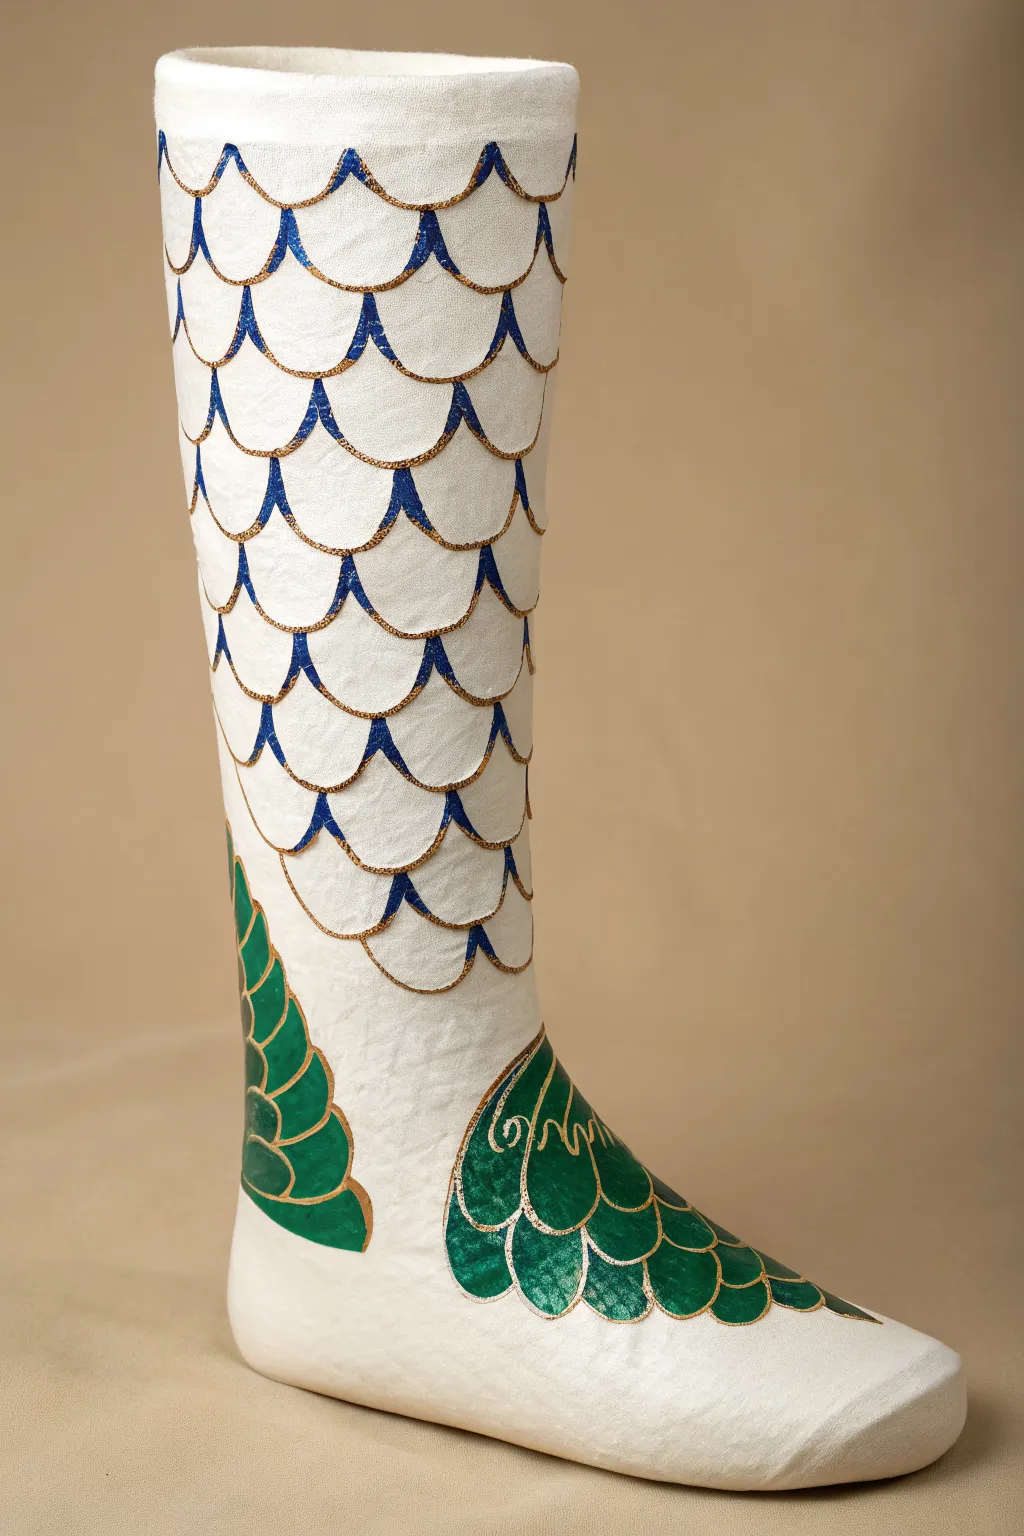
Transform a plain white leg cast into a mythical accessory with this elegant dragon scale design. Using simple outlining and filling techniques, you’ll create a shimmering contrast between royal blue upper scales and emerald green lower details, all accented with metallic gold.
Detailed Instructions
Materials
- Fiberglass or plaster leg cast (clean and dry)
- Pencil (HB or lighter)
- Eraser
- Gold paint marker (fine tip)
- Gold metallic acrylic paint
- Royal blue acrylic paint
- Emerald green acrylic paint
- Small flat brush (size 4 or 6)
- Fine liner brush (size 0 or 1)
- Clear acrylic sealer spray (matte or satin)
- Paper towels and water cup
Step 1: Planning and Sketching
-
Clean the surface:
Before starting, ensure the cast surface is free of dust or loose debris. Wipe it gently with a dry cloth. -
Visualize the zones:
The design is split into two zones: the main shin area featuring open white scales with blue tips, and the ankle/foot area featuring solid green scales. Mentally mark where you want the transition to happen, typically just above the ankle bone. -
Sketch the upper scales:
Starting near the top rim of the cast, lightly sketch overlapping scallop shapes (like U-shapes) using your pencil. Stagger them like bricks so the bottom of one scale sits between the two below it. -
Sketch the lower scales:
Move to the ankle and instep area. Sketch larger, slightly more elongated scallop shapes here. These will eventually be filled with green. -
Add decorative swirls:
On the largest green scale near the ankle, sketch a few simple spiral or swirl motifs inside the shape for added detail.
Step 2: Outlining and Detail Work
-
Outline the upper scales:
Take your gold paint marker or a liner brush with gold metallic paint. Carefully trace over the pencil lines for the upper shin scales. -
Thicken the lines:
Go over the gold outlines a second time to ensure they are opaque and have a nice, visible thickness against the white cast texture. -
Define the blue tips:
Using a small brush and royal blue acrylic paint, paint a small triangle or crescent shape at the very top ‘point’ where two scales meet. This creates the negative space effect shown in the image. -
Add gold accents to blue:
Once the blue paint is dry, use your gold marker to outline the bottom edge of those blue shapes, integrating them into the scale pattern.
Bleeding Lines?
Cast material is porous. If paint bleeds, use a thicker acrylic or mix in a tiny bit of white glue to increase viscosity. Don’t use water.
Step 3: Painting the Green Base
-
Fill the lower scales:
Switch to emerald green acrylic paint. Fill in the sketched scales around the ankle and foot area completely. You may need two coats to cover the white cast material fully. -
Create texture (optional):
While the green paint is still slightly wet, I like to dab it gently with a dry brush or sponge to give it a mottled texture that mimics reptilian skin. -
Dry thoroughly:
Let the green paint dry completely before moving on to avoid smudging. -
Outline the green scales:
Using the gold paint marker, trace the outer edges of each green scale. This provides a sharp, finished border. -
Paint interior details:
Use the fine liner brush and gold paint (or the marker) to draw the decorative swirls you sketched earlier inside the large green ankle scale. -
Add connecting lines:
If there are gaps between the green scales, fill them with thin gold lines to maintain continuity in the pattern.
Pro Tip: Stencils
Can’t draw even scallops? Cut a U-shape out of a stiff piece of cardstock and use it as a tracing template to keep every scale uniform.
Step 4: Sealing and Finishing
-
Check for gaps:
Look over the entire cast. If any pencil marks are still visible, gently erase them. Touch up any gold lines that look faint. -
Seal the artwork:
In a well-ventilated area, spray a light coat of clear acrylic sealer over the painted areas. This protects the paint from scuffs and keeps the colors vibrant.
Now your cast isn’t just a medical necessity, but a custom piece of wearable fantasy art to show off
Underwater Reef Scene on a Leg Cast
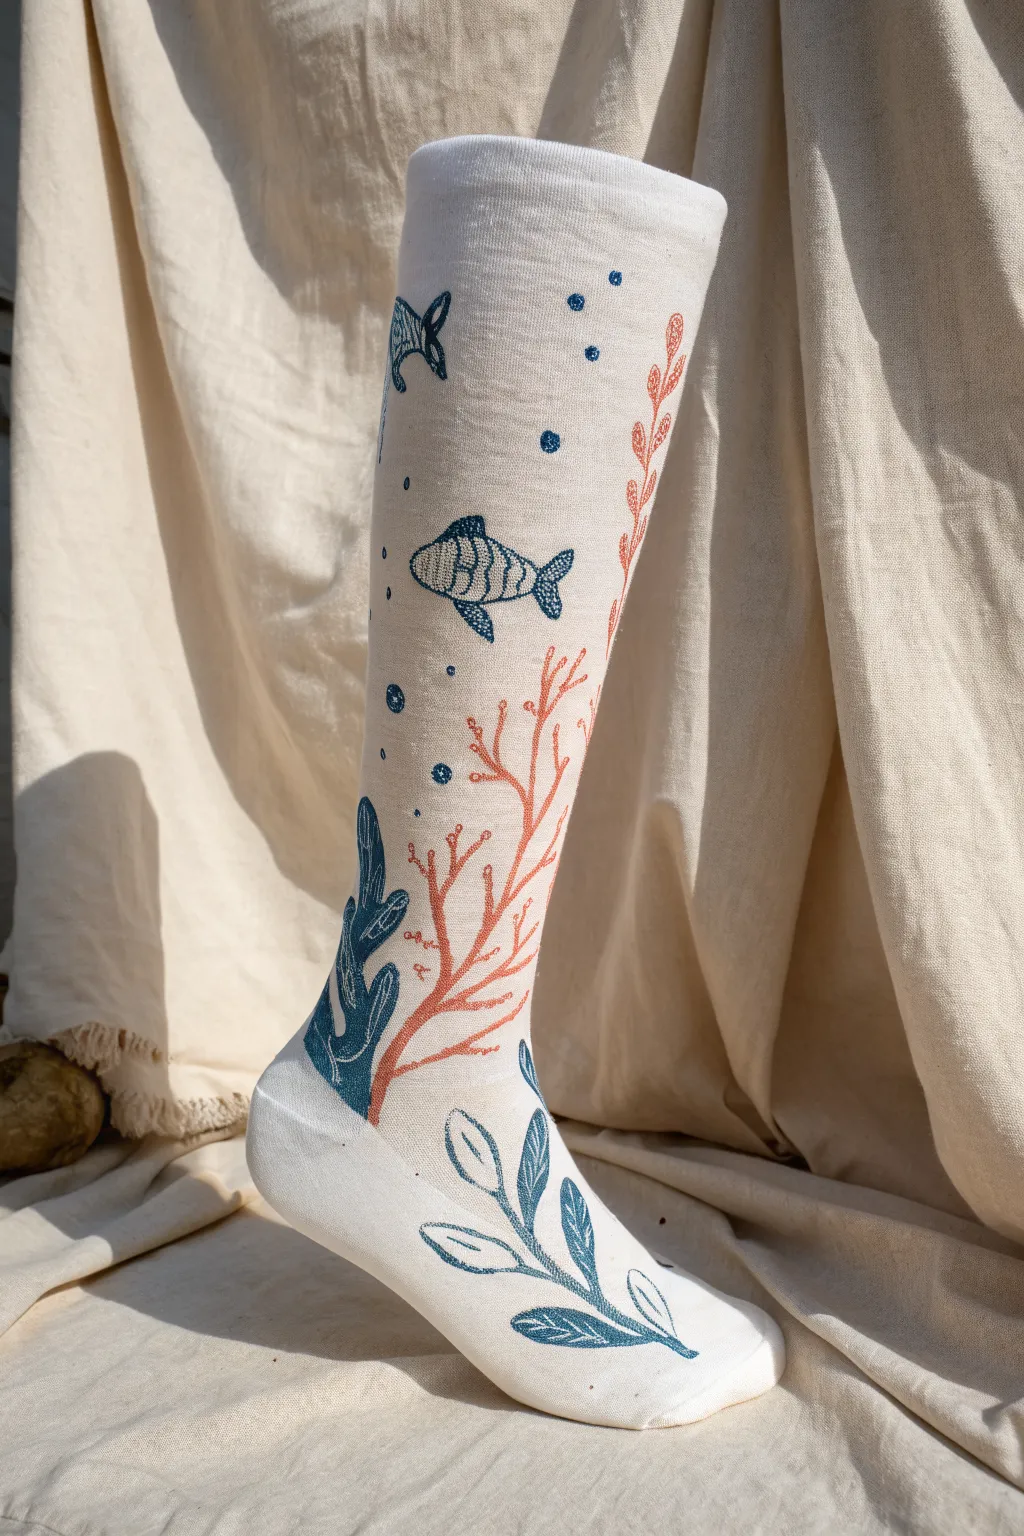
Transform a plain white leg cast into a serene underwater seascape with this charming hand-drawn design. Featuring delicate coral branches, playful fish, and floating bubbles, this project uses simple line work to turn a medical necessity into a work of art.
Step-by-Step
Materials
- White leg cast (fiberglass or plaster surface)
- Fine-point permanent markers (navy blue, teal, coral/orange)
- Pencil (HB or lighter)
- Soft eraser
- Rubbing alcohol
- Cotton rounds or paper towel
- Clear matte sealant spray (optional, check with doctor)
Step 1: Preparation & Sketching
-
Clean the Surface:
Before starting, gently wipe the cast surface with a cotton round dampened with rubbing alcohol. This removes oils and dust that might prevent the markers from adhering properly to the cast texture. -
Plan Your Layout:
Visualize three main zones: a leafy base near the foot, a central reef area with coral and fish, and an upper section with floating bubbles and smaller sea life. -
Lightly Sketch the Base:
Using a pencil, very lightly map out the large leaf or seaweed frond that will sit right on top of the foot area. Keep the lines faint so they don’t show through later. -
Outline the Coral:
Sketch the branching coral structure moving up the shin. Draw these as wavy, interconnected Y-shapes that naturally flow vertically up the cast. -
Position the Fish:
Pencil in the outline of the main fish in the center of the shin and a smaller partial fish swimming near the top cuff. Consider the curve of the leg so the fish doesn’t look distorted.
Bleeding Ink?
If ink bleeds into the cast texture, switch to a finer tip marker and draw faster strokes. Don’t press down hard, just skim the surface.
Step 2: Inking the Foundation
-
Draw the Foot Foliage:
Take your teal or dark blue marker and trace the large leave shapes on the foot. Use confident strokes to create the outer boundary of each leaf. -
Add Vein Details:
Inside each leaf on the foot, draw a central line and smaller diagonal lines for the veins. I find that keeping these lines slightly thinner adds a nice delicate touch. -
Ink the Blue Seaweed:
Moving up to the ankle area, use a thick blue marker to draw the darker, heavier seaweed clumps on the left side. Fill these shapes in solidly or with dense texture to anchor the design visually. -
Create the Coral Structure:
Switch to your coral or orange marker. Trace over your pencil lines for the tall, branching coral. Use small, jagged strokes to mimic the organic texture of sea fans.
Glow Up Idea
Use a silver metallic marker to add tiny highlights on the bubbles and fish scales for a shimmering water effect.
Step 3: Adding Life & Details
-
Outline the Main Fish:
With a navy blue fine-point marker, outline the central fish. Give it a distinct tail fin and dorsal fin. -
Detail the Fish Scales:
Fill the fish’s body with vertical stripes. You can alternate between filled stripes and hatched lines to create variety and interest without needing multiple colors. -
Draw the Upper Fish:
lnk the partial fish shape near the top of the cast. Drawing it entering from the side gives the impression of movement and a larger scene beyond the cast. -
Add Bubbles:
Scatter groups of small circles in blue around the fish and above the coral. Vary their sizes—some tiny dots, some larger open circles—to simulate rising air bubbles. -
Enhance Textures:
Go back to the orange coral and add tiny dots or additional branches to thicken it up where it looks too sparse. -
Clean Up:
Once the ink is completely dry (give it at least 10 minutes), gently erase any remaining visible pencil lines. Be careful not to smudge the marker ink.
Now you have a custom piece of wearable art that makes healing a little more cheerful
Galaxy Gradient Night Sky on a Leg Cast
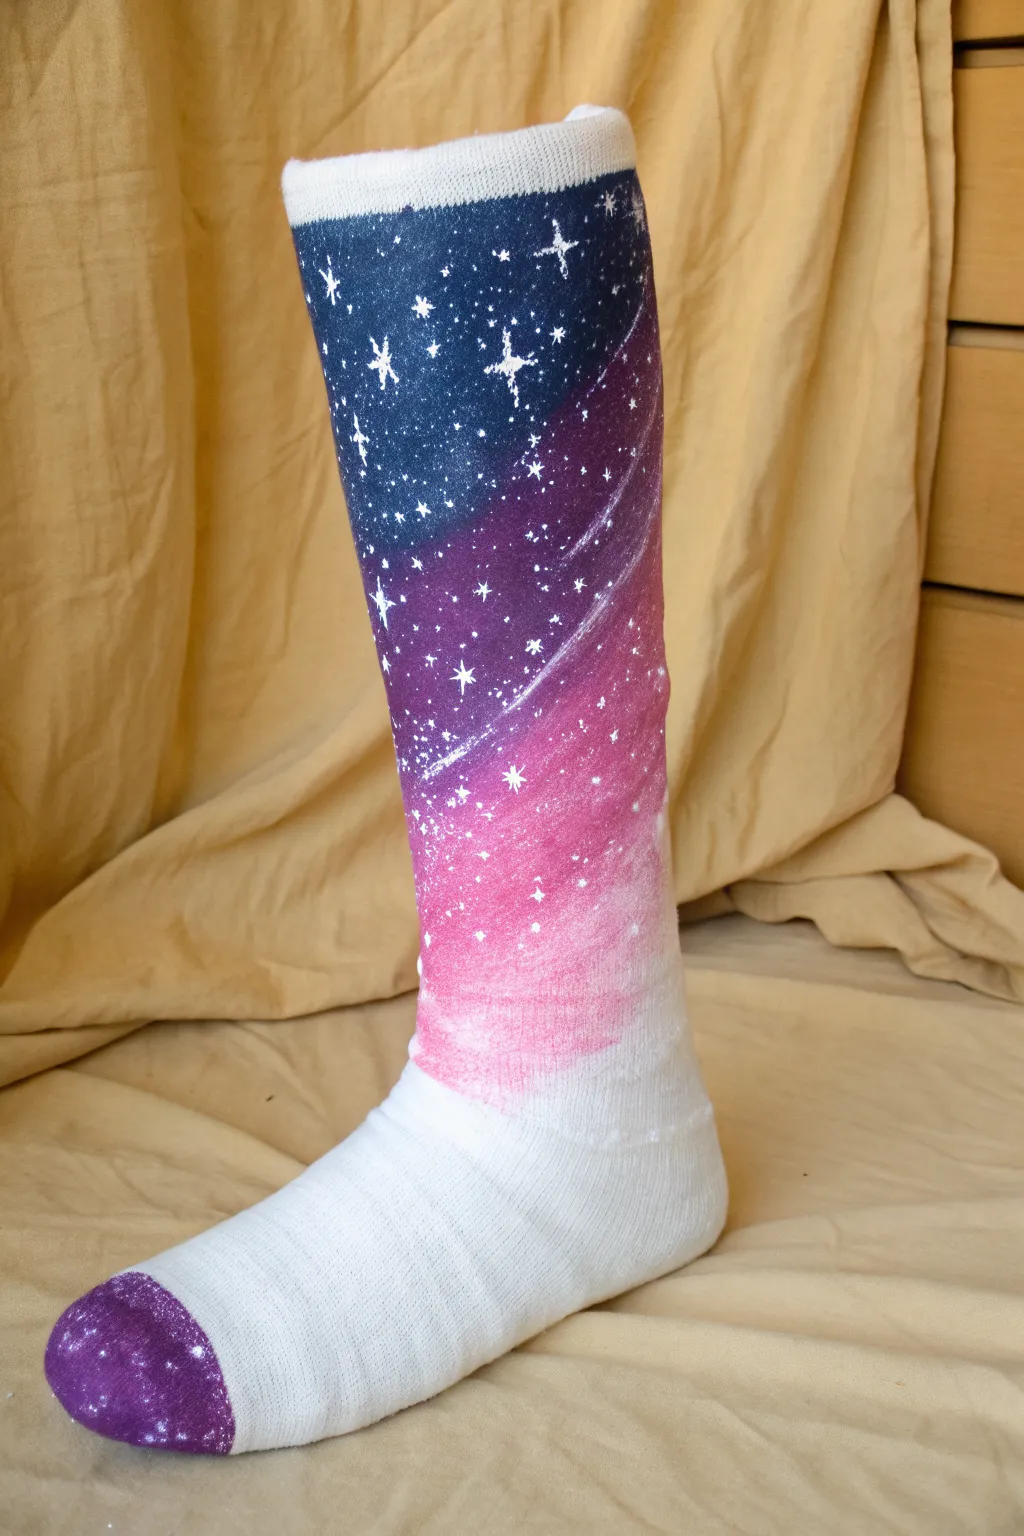
Transform a plain white leg cast into a slice of the cosmos with this stunning galaxy gradient design. Featuring a seamless blend of deep blues, purples, and pinks topped with twinkling stars, this project turns a medical necessity into a wearable work of art.
Step-by-Step Guide
Materials
- Leg cast (fiberglass or plaster)
- Acrylic paints (navy blue, violet/purple, magenta/pink, white)
- Purple glitter paint or loose glitter with Mod Podge
- Sponge brushes or cosmetic sponges
- Small detail paintbrush (round size 0 or 1)
- Painter’s tape or masking tape
- Palette or paper plate for mixing
- Water cup and paper towels
- Clear acrylic sealer spray (optional but recommended)
Step 1: Preparation & Toe Cap
-
Clean the surface:
Before starting, ensure the cast surface is clean and free of dust or oils. A quick wipe with a slightly damp cloth (barely wet) does the trick. -
Tape off the toe area:
Decide how large you want the colored toe cap to be. Apply a strip of painter’s tape smoothly around the foot part of the cast to create a clean line separating the toe cap from the rest of the foot. -
Paint the base color:
Paint the toe area below the tape with a solid coat of purple acrylic paint. Let this base coat dry completely so the glitter has a solid background. -
Add the glitter:
Apply purple glitter paint over the dried purple base. If using loose glitter, mix it with a little Mod Podge or clear medium first. You might need two coats to get that dense, sparkly look shown in the photo. -
Remove the tape:
Carefully peel off the painter’s tape while the glitter paint is still slightly tacky to ensure a sharp, crisp line.
Step 2: Creating the Galaxy Gradient
-
Define the boundaries:
This design works best on the upper shaft of the cast. You can leave the foot area plain white for contrast, or use tape to mark off exactly where the galaxy pattern should stop near the ankle. -
Apply the darkest blue:
Squeeze out your navy blue paint. Using a sponge brush, dab the paint onto the top portion of the cast. Sponging creates a textured, cloud-like appearance better than brushing. -
Start the purple transition:
While the blue is still slightly wet, load a clean sponge with violet paint. Dab this directly below the blue section, slightly overlapping the edge where they meet to start blending them. -
Blend the mid-tones:
Use the sponge to gently pat the boundary line between the blue and purple. The wet paints will mix on the cast, creating a soft, seamless transition. -
Add the pink layer:
Below the purple section, sponge on your magenta or hot pink paint. I like to angle this section slightly diagonally, as seen in the photo, to give the galaxy a dynamic, swirling motion. -
Fade to white:
For the bottom edge of the pink, load a sponge with a tiny bit of pink mixed with a lot of white (or just use a clean, dry sponge) to feather the color out until it fades completely into the white of the cast.
Sponge Technique Tip
Don’t drag the sponge! Use a dabbing or stippling motion (up and down) to blend colors. This keeps the texture rough and prevents brush strokes.
Step 3: Painting the Stars
-
Prepare the white paint:
Ensure your background gradient is totally dry to touch. Put a small amount of white acrylic paint on your palette; adding a tiny drop of water can help it flow better for fine lines. -
Paint main stars:
Using your smallest detail brush, paint several four-pointed stars. Draw a vertical line crossed by a horizontal line, keeping the centers thick and tapering the points to be very thin. -
Vary the sizes:
Paint a few large “hero” stars in the dark blue section, and make them progressively smaller as you move down into the lighter pink areas. -
Add distant stars:
Dip the very tip of your brush handle (or a toothpick) into the white paint and dot it onto the cast to create tiny, distant stars. Cluster some together to look like constellations. -
Create the Milky Way effect:
To mimic the ‘dusty’ look of a galaxy, dilute a tiny bit of white paint with water until it’s very sheer. lightly streak this through the purple and blue sections using a dry brush. -
Seal the artwork:
Once all paint is perfectly dry, lightly mist the painted areas with a clear acrylic sealer. This prevents the paint from scuffing or flaking off against clothing.
Level Up: Glow in the Dark
Mix glow-in-the-dark powder or use glow paint for the white stars. When the lights go out, your leg cast will literally light up the room!
Enjoy your beautiful new accessory that makes healing feel a little more magical.
Floating House and Balloons on a Leg Cast
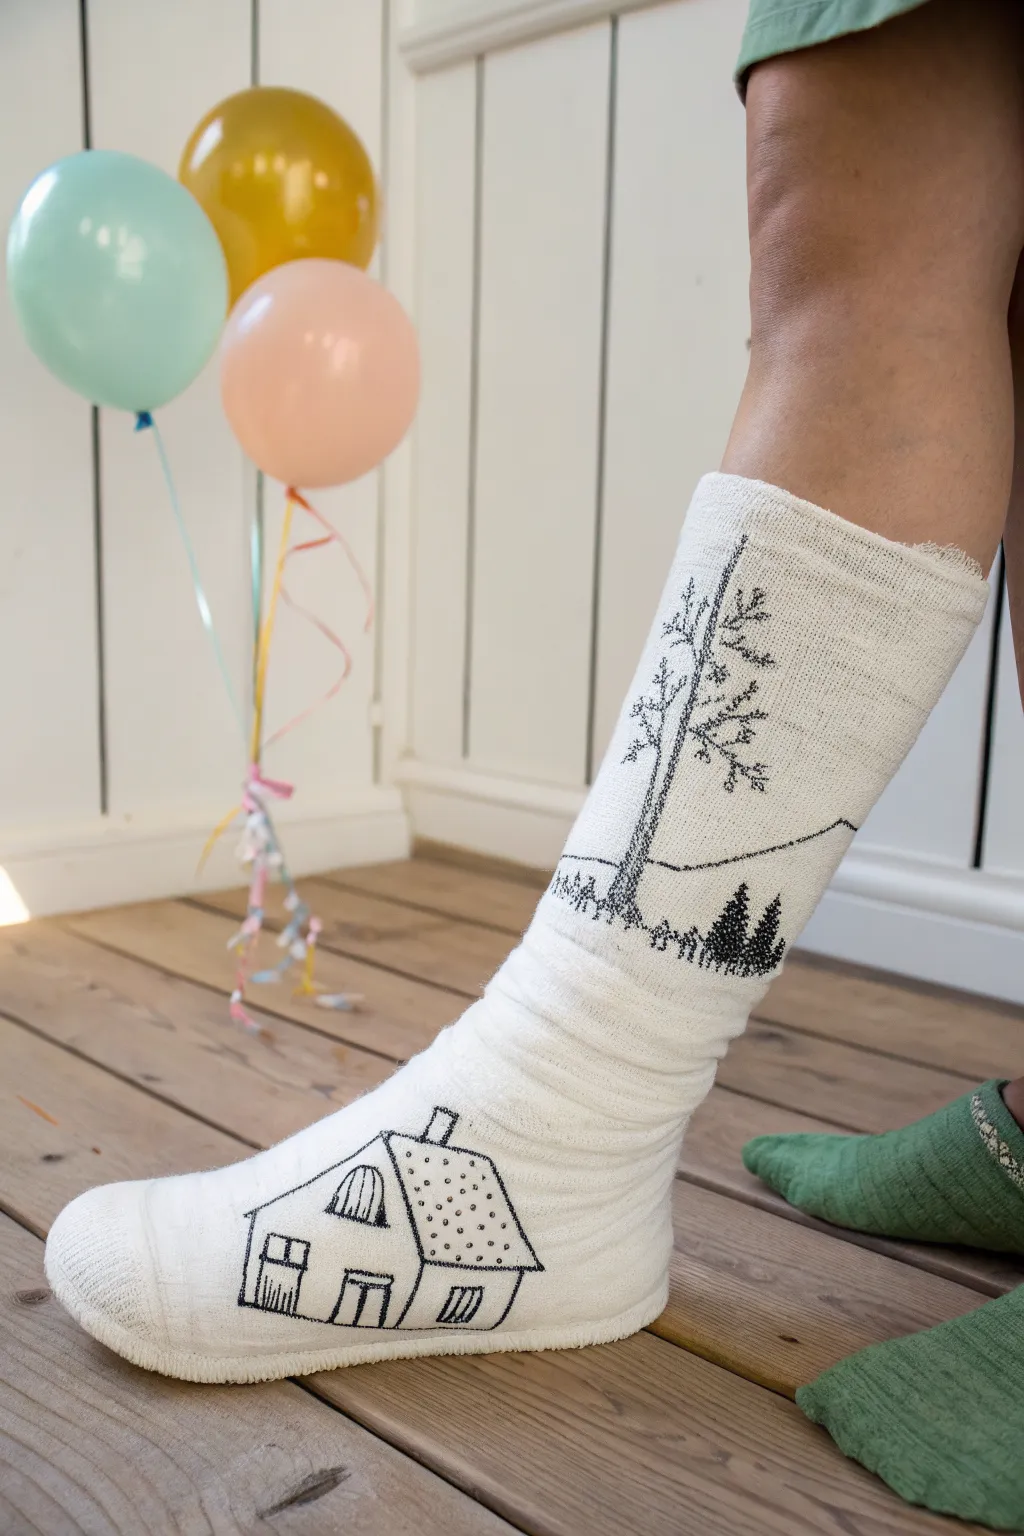
Turn a stark white leg cast into a canvas for storytelling with this charming, minimalist landscape design. Featuring a cozy house near the toes and towering pines stretching up the shin, this simple black-line artwork adds personality and a touch of the outdoors to recovery time.
Step-by-Step Tutorial
Materials
- Clean, dry white leg cast (plaster or fiberglass)
- Black permanent marker (fine tip)
- Black permanent marker (ultra-fine tip)
- Pencil (optional, for light sketching)
- Paper towel or cloth
- Rubbing alcohol (optional, for cleaning surface)
Step 1: Preparation & Planning
-
Clean the surface:
Before starting, ensure the cast surface is free of any lotion, oils, or dust. A quick wipe with a paper towel dampened with a little rubbing alcohol can help the ink adhere better, especially on fiberglass materials. -
Map out the composition:
Visualize where the main elements will go. The foot area provides a nice wide space for the house, while the vertical length of the shin is perfect for taller trees. You can lightly sketch placement with a pencil, though keep in mind pencil creates grooves on plaster that can be hard to erase. -
Test the marker:
I recommend testing your marker on a very small, hidden area near the toes first to see how much the ink spreads. Cast textures vary, and knowing if the ink will bleed helps you adjust your pressure.
Tip: Texture Control
Work slowly over the bumps. Instead of one long stroke, use short, connecting dash strokes to navigate the rough gauze texture without snagging your marker tip.
Step 2: Drawing the Base Landscape
-
Outline the house shape:
Start near the toes on the side of the foot. Use the fine-tip marker to draw the basic geometric shape of the house: a square base with a triangular roof. Keep the lines confident but don’t worry if they are slightly wobbly; the texture of the cast adds character. -
Add architectural details:
Draw the windows and doors. For the rectangular window on the left, add a vertical line down the center. For the arched window near the roofline, draw the curve and add vertical panes. -
detail the roof:
Draw the chimney on the roofline. Then, create the roof texture by adding small stippled dots across the entire roof triangle. This simple pointillism technique adds depth without needing shading. -
Draw the horizon line:
Move your hand up the leg slightly. Switch to the fine-tip marker and draw a slightly uneven, sloping line across the shin area to represent the ground where the forest will sit. Let it dip and rise naturally.
Step 3: Creating the Forest
-
Draft the main tree trunk:
On the upper shin, draw a tall, slightly curved vertical line for the trunk of the main pine tree. It should extend almost to the top of the cast. Add a second line parallel to it to give the trunk thickness. -
Add the main branches:
Starting from the trunk, draw horizontal branches extending outward. Make the lower branches longer and shorten them as you go up, creating a conical shape. Keep the lines somewhat jagged to mimic rough bark and needles. -
Fill in pine needles:
Switch to your ultra-fine tip marker. Along the branch lines, add quick, scribbled textures to represent clusters of pine needles. Don’t overfill it; leave plenty of white space to keep the look airy. -
Draw distant trees:
Near the base of the large tree, draw two smaller triangular shapes to represent distant evergreens. Fill these in darker with scribbles to create contrast against the lighter, taller tree. -
Add ground cover:
Sketch tiny, sporadic vertical dashes along the horizon line you drew earlier. These represent grass or small shrubs and help anchor the trees to the ground.
Bleeding Ink?
If the marker starts bleeding into the plaster, switch to a ballpoint pen for the fine details. It handles porous surfaces better with less spread than felt tips.
Step 4: Finishing Touches
-
Connect the elements (optional):
To visually tie the house to the forest, you might draw a very faint, dotted path leading from the door around toward the back of the leg, implying a journey into the woods. -
Refine the lines:
Look over the entire drawing. Re-trace the outer lines of the house to make them bolder if the cast texture absorbed too much ink. Strengthen the bottom edge of the house to ‘ground’ it. -
Let it set:
Allow the ink to dry completely for at least 10-15 minutes before touching it or putting pant legs over it to prevent smudging.
Enjoy your customized cast art and may it bring a smile to your face during recovery
Retro Platform Game Level on a Leg Cast
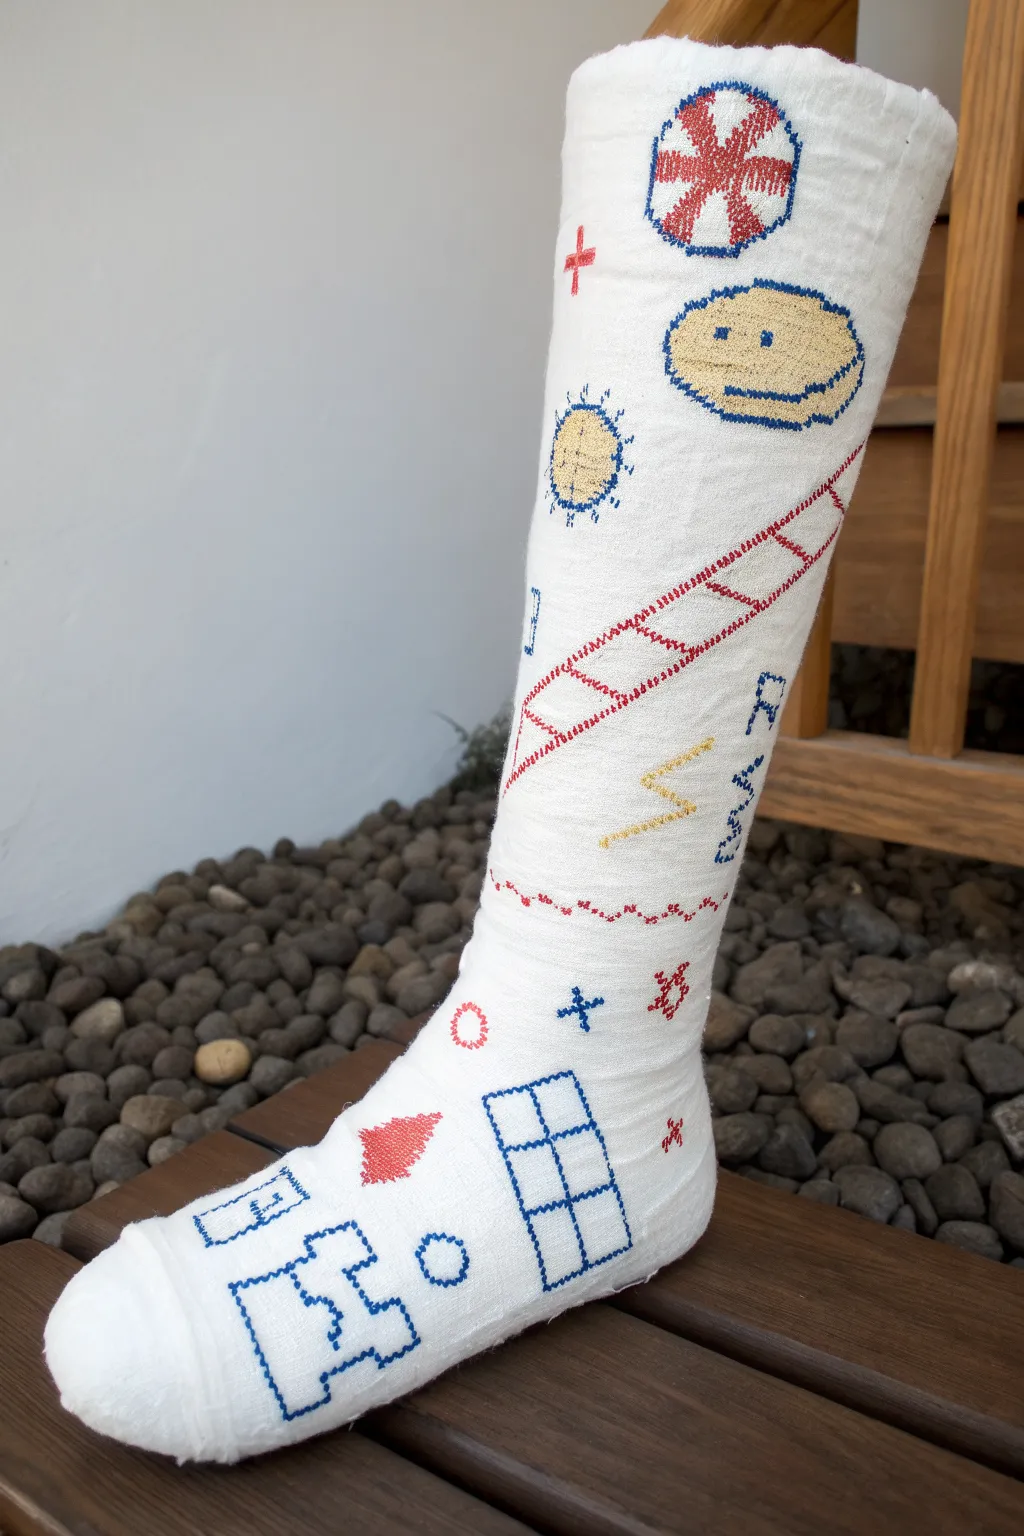
Transform a plain white leg cast into a nostalgic 8-bit adventure zone with this retro gaming-inspired design. Using simple cross-stitch style markings, you’ll create a playful scene featuring platforms, ladders, and classic arcade elements.
Step-by-Step
Materials
- Fine-point fabric markers (Red, Blue, Yellow)
- Pencil (HB or lighter)
- Clean white leg cast
- Ruler or flexible measuring tape
- Eraser
Step 1: Planning the Level
-
Map out the terrain:
Begin by visualizing the cast as a vertical scrolling level. Using a light pencil, sketch a few key zones: a ground level near the toes, a climbing section up the shin, and a ‘sky’ zone near the knee. -
Sketch the primary structures:
Lightly draw the main structural elements. Create a long diagonal ladder spanning the shin area and a series of floating platforms near the ankle. -
Add character elements:
Sketch the playful icons such as the smiling face balloon near the top, the circular ‘sun’ or saw-blade obstacle, and the health/power-up cross symbols. -
Draft the ground debris:
Near the toes, outline the scattered geometric shapes that look like broken blocks or Tetris pieces.
Ink Bleeding Control
Cast plaster is porous! Don’t press hard. Use a light, dabbing motion (‘stippling’) rather than long strokes to prevent ink from spreading into blobby messes.
Step 2: Drawing the Base Structures
-
Create the ladder rails:
Switch to your red fine-point marker. Instead of drawing solid lines, use tiny ‘x’ marks or small dashes to mimic pixel art or cross-stitching. Draw the two long side rails of the diagonal ladder on the shin. -
Add ladder rungs:
Connect the rails with horizontal rungs using the same red pixel-dash technique, spacing them evenly. -
Outline the blue grid:
Using the blue marker, draw the upright rectangular grid object near the ankle. Use small, precise dashes to form the window-pane pattern. -
Form the ground blocks:
outline the puzzle-piece shapes on the foot area with blue dashed lines. I find it helpful to rotate the foot slightly to get a continuous line around the curve.
Bonus Level
Add a ‘Lives: 3’ counter near the top or draw a tiny pixelated character jumping between the platforms to make it a true action scene.
Step 3: Adding Interactive Elements
-
Draw the smiling platform:
Near the top right, use the blue marker to outline the oval floating platform with a happy face. Keep your dashes consistent. -
Fill the smiley face:
Gently shade the inside of the oval with the yellow marker. Use a light touch to avoid saturating the plaster too much. -
Create the sun obstacle:
On the left side of the shin, draw a blue circle with radiating spikes. Fill the center with yellow cross-hatching. -
Add the lightning bolt:
Below the ladder, draw a yellow zigzag lightning bolt shape. Outline it with tiny yellow dashes first, then fill it lightly.
Step 4: Detailing and Power-Ups
-
Insert the red flower fan:
At the very top, draw a circle with the blue marker. Inside, draw fan blades or flower petals using the red marker, leaving white space between them. -
Draw floating bonuses:
Scatter small red plus signs (+) around the empty white spaces to represent health packs or stars. -
Add the red triangle:
Near the blue grid on the ankle, verify your pencil sketch for the solid red triangle. Fill this shape in with a dense red cross-hatch pattern. -
Create small obstacles:
Place a small red circle near the ankle and a small ‘x’ shaped enemy near the lightning bolt. -
Stitch the ground line:
Above the ankle area, draw a wavy horizontal line in red using small dashes to separate the lower level from the upper level.
Step 5: Final Touches
-
Add vertical text:
To the right of the ladder, write a word (like press, start, or a name) vertically using blue block letters, maintaining that segmented, digital look. -
Refine the pixel effect:
Go back over your main lines. If any dashes look too faint, carefully darken them to ensure the ‘stitched’ aesthetic is visible from a distance. -
Clean up:
Once the ink is fully dry, gently erase any visible pencil guidelines, being careful not to smudge the marker ink.
Your leg is now a retro gaming masterpiece ready to handle any level recovery throws at you
City Map and Street Grid on a Leg Cast
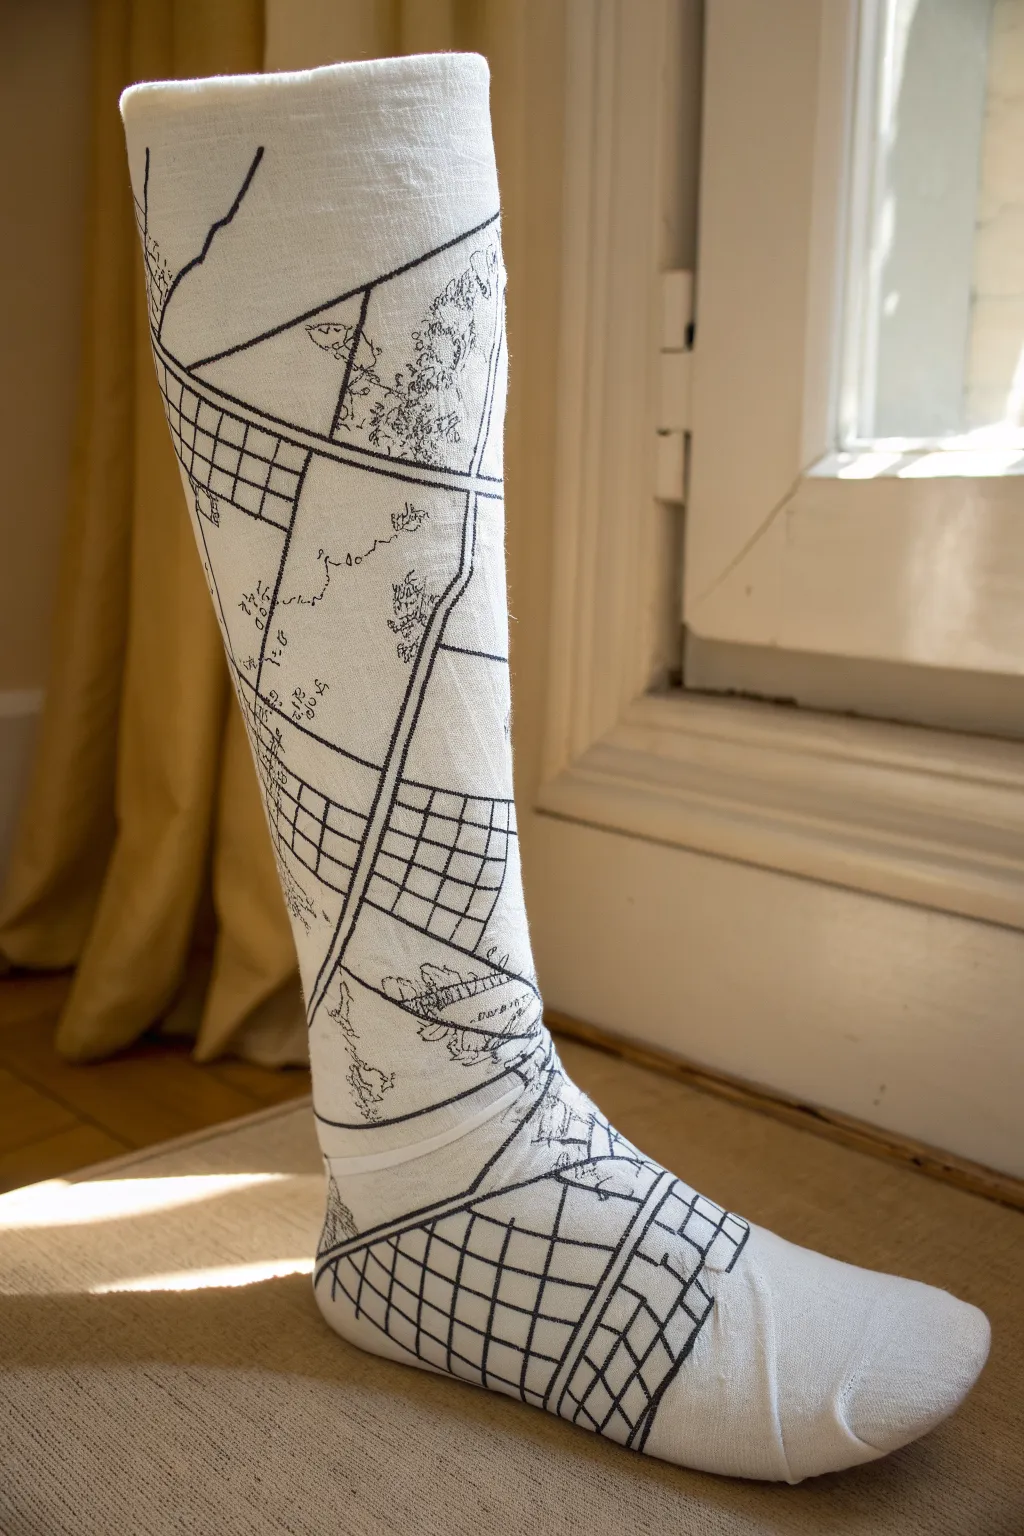
Transform a blank white leg cast into a sophisticated piece of navigational art with this intricate city map design. Using simple black linework, this project creates a detailed street grid and topographic landscape that turns a recovery aid into a conversation starter.
Detailed Instructions
Materials
- White fiberglass or plaster leg cast (dry and clean)
- Pencil (HB or H for light sketching)
- Eraser (kneaded eraser works best on textured surfaces)
- Fine-point black permanent marker (e.g., Sharpie Fine Point)
- Ultra-fine point black permanent marker (e.g., Sharpie Ultra Fine or Micron 05)
- Ruler or flexible measuring tape
- Reference map (printed or digital)
Step 1: Planning the Topography
-
Study your surface:
Begin by examining the cast’s texture. Fiberglass casts often have a woven texture that can catch pen tips, so plan for slow, deliberate strokes rather than quick sketches. -
Lightly sketch main arteries:
Using your pencil, draw the major dividing lines that will separate different neighborhoods or zones. Since the cast is cylindrical, try to have some lines wrap diagonally around the leg to lead the eye. -
Define the grid zones:
Select two or three large sections to become your dense urban grids. Lightly box these areas out so you know where the high-detail work will go. -
Sketch organic areas:
In the negative spaces between your planned grids, sketch loose, wavy shapes to represent parks, bodies of water, or undeveloped terrain.
Ink Bleeding Control
Fiberglass casts can be wickedly absorbent. Test your marker on a tiny hidden spot near the toes first. If it bleeds, spray a very light coat of hairspray first to seal the surface.
Step 2: Inking the Framework
-
Trace major roads:
Switch to the standard fine-point permanent marker. Go over your main arterial pencil lines, making these the thickest lines on the map to establish a visual hierarchy. -
Create secondary streets:
Draw medium-weight lines branching off the main roads. I usually double-line these streets slightly to give them ‘width’ rather than just being a single stick figure line. -
Establish the grid blocks:
Within your designated urban zones, draw perpendicular intersecting lines to create city blocks. Keep these lines fairly uniform, but allow them to warp slightly with the curve of the cast. -
Ink the foot section:
Extend the grid pattern down onto the top of the foot. The change in angle here can be tricky, so visualize the grid stretching slightly over the curve where the ankle meets the foot. -
Clean up initial sketches:
Once the main ink is dry (give it a minute to avoid smearing), gently erase any visible pencil guidelines with your kneaded eraser.
Add a “You Are Here”
Personalize the map by adding a small red distinct ‘X’ or a star on a specific intersection to mark a home address, the hospital, or the location where the injury happened.
Step 3: Adding Cartographic Details
-
Switch to ultra-fine detail:
Pick up your ultra-fine point marker. This tool is essential for the tiny textures that make the map look authentic. -
Fill the grids:
Inside the city blocks you created, draw faint, smaller subdivision lines or tiny squares to imply individual buildings without drawing every single house. -
Stipple the vegetation:
Move to the ‘park’ areas. Use a stippling technique (lots of small dots) or tiny, scribbly loops to create the texture of trees and uneven ground. -
Detail the terrain lines:
Draw squiggly, irregular lines in the open spaces to act as topographic isolines or wandering country roads. These should feel much looser than your rigid city grid. -
Add subtle topography:
Cluster your organic scribbles denser in some areas to suggest hills or forests, and leave other areas sparser to suggest open fields.
Step 4: Final Polish
-
Connect the zones:
Look for empty awkward gaps between the city grid and the organic terrain. Bridge these with small connector roads or faint trails using the ultra-fine pen. -
Thicken border lines:
Go back with your thicker marker and re-trace the borders of your main city blocks to make them pop against the finer background details. -
Check continuity:
Rotate the leg (or have the person move their leg) to ensure lines wrapping around the back connect logically and don’t just disappear. -
Final drying time:
Let the entire illustration set for at least 15 minutes before touching it or putting clothing over it to prevent accidental smudges.
Now you have a custom navigational chart that turns a temporary inconvenience into a detailed work of art.
Neon-Style Graffiti Message Wall on a Leg Cast
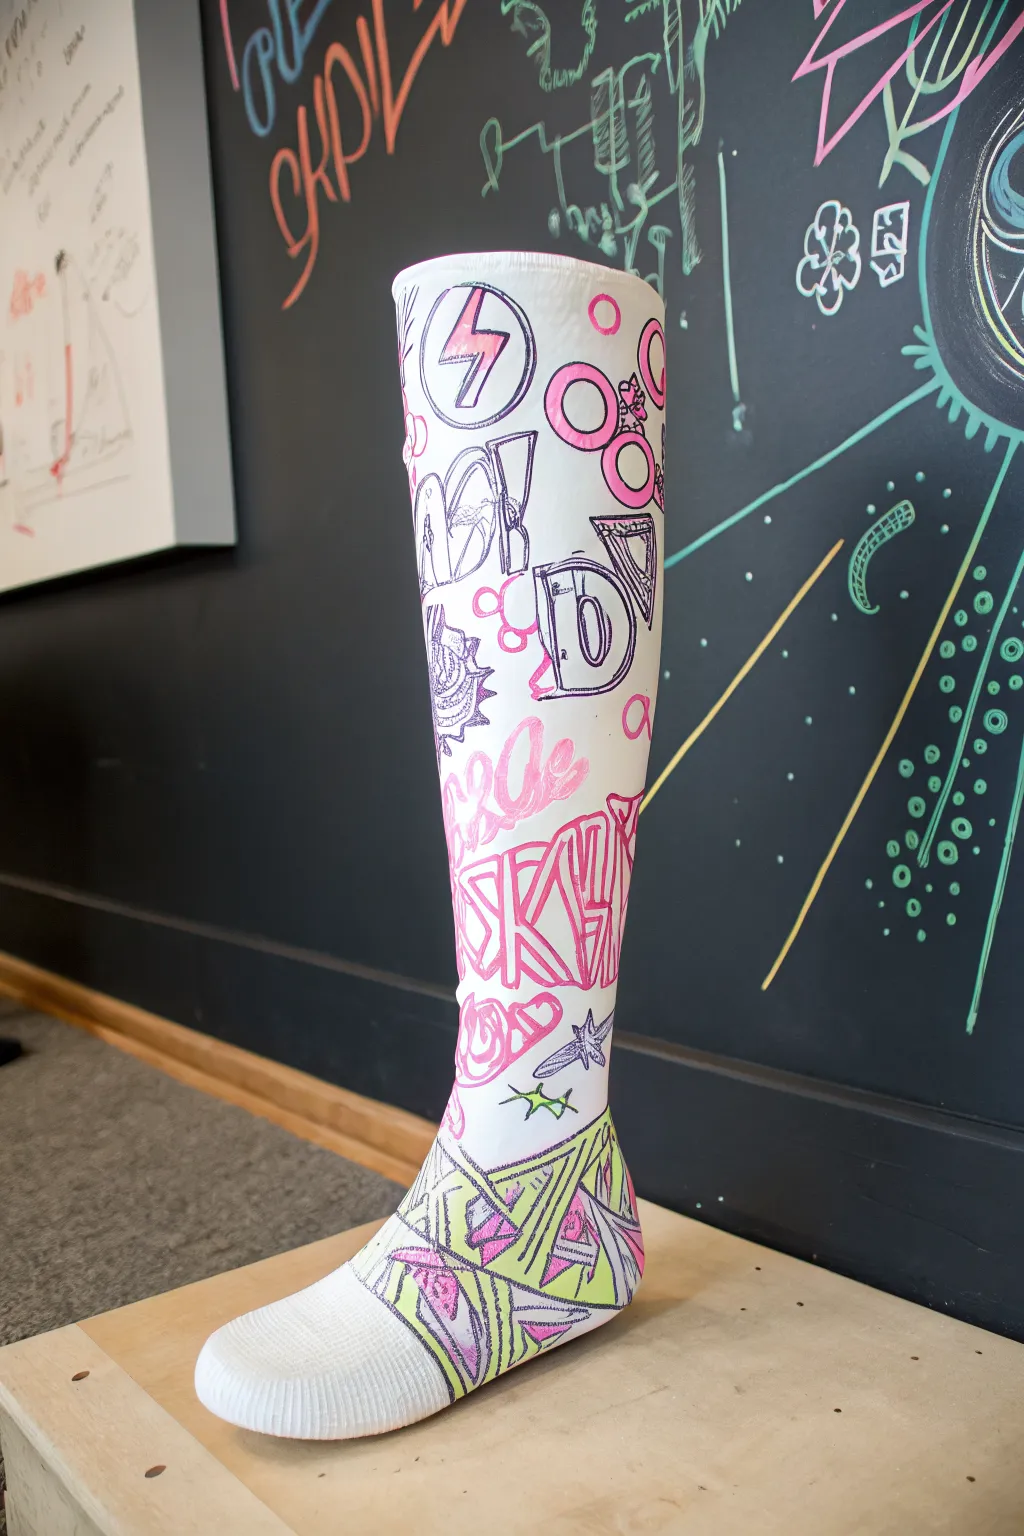
Transform a plain white cast into a vibrant piece of street art with this neon-style graffiti design. Using highlighter-bright markers, you’ll layer symbols, stylized lettering, and geometric patterns to create an energetic and personalized message wall.
How-To Guide
Materials
- Clean, dry leg cast (white surface works best)
- H pencil with an eraser
- Permanent markers (broad tip: neon pink, neon yellow)
- Permanent markers (fine tip: purple, black)
- Highlighter markers (yellow, pink)
- Reference images of graffiti fonts (optional)
Step 1: Planning the Layout
-
Clean surface:
Ensure the cast is completely dry and free of any dust or debris. If it’s a fabric-wrapped fiberglass cast, you can draw directly; if it’s plaster, make sure it’s smooth. -
Draft major elements:
Using an H pencil, lightly sketch the largest design elements first. Place the large lightning bolt near the top and the stylized ‘D’ or block letters in the middle section. -
Add floating shapes:
Sketch in the circular ‘bubble’ shapes near the top cuff and scattered star shapes lower down. Keep your pencil pressure very light so it doesn’t leave dents or dark smudges. -
Map the ankle geometry:
Around the ankle and heel area, sketch a chaotic geometric pattern of intersecting triangles and jagged shards. This will be the most complex area, so plan the lines carefully.
Step 2: Inking the Symbols
-
Outline the bolt:
Take your purple fine-tip marker and trace the outline of the lightning bolt inside a circle at the top. I like to double up on lines here to give it a comic-book sticker weight. -
Draw the bubbles:
Using the neon pink broad marker, draw the thick outlines of the circles and bubbles near the top rim. Vary the sizes from small dots to larger rings. -
Lettering outlines:
Switch back to the purple fine-tip marker to outline your central graffiti lettering. Create a stylized ‘3D’ effect by adding drop shadows to the right side of the letters. -
Fill the ‘D’:
Inside the large letter ‘D’, use the purple marker to create internal lines that mimic depth, leaving the center white for contrast.
Ink Bleeding Control
Cast material is porous. When drawing, touch the marker tip very lightly and briefly to the surface. It prevents the ink from spreading into blobby, unrecognizable shapes.
Step 3: Adding Color to the Shin
-
Pink graffiti fill:
Use the broad neon pink marker to fill in the blocky, abstract lettering that runs vertically down the shin. Let the ink bleed slightly into the fabric texture for a natural look. -
Accentuate with pink:
Add pink accents to your pencil sketches of stars and small geometric shapes. Don’t color everything in solid; leave plenty of white space to keep the look bright. -
Layering the middle:
In the center section, weave pink scribbles and smaller purple geometric icons between your main letters to fill the negative space without overcrowding it.
Glow-in-the-Dark Upgrade
Trace over your neon yellow and pink areas with UV-reactive or glow-in-the-dark fabric puffy paint. It creates texture and looks amazing under blacklight.
Step 4: Structuring the Ankle
-
Geometric outlines:
Use the fine-tip purple marker to go over your pencil lines on the ankle and heel. Create sharp, angular shards that overlap each other. -
Yellow highlights:
Take your neon yellow highlighter or marker and fill in specific triangular sections of the ankle geometry. This high-contrast color anchors the bottom of the design. -
Pink shading:
Fill alternating geometric shards with the neon pink marker. I try to ensure no two pink shapes touch directly to maintain the mosaic effect. -
Texturize the shapes:
Go back into the colored shards with the purple pen and add small hatching or dot textures to give them a gritty, street-art feel.
Step 5: Final Details
-
Bright green stars:
Draw small, four-pointed sparkles using a green or yellow fine-tip marker in any remaining large empty spots. -
Refine outlines:
Check your purple outlines. If the fabric absorbed too much ink, go over them a second time to make them crisp and dark. -
Erase guidelines:
Once the ink is fully dry (wait at least 15 minutes to be safe), gently erase any visible pencil marks that weren’t covered by marker.
Now your cast is a walking canvas that turns a recovery period into a style statement

Have a question or want to share your own experience? I'd love to hear from you in the comments below!