There’s something so satisfying about squares on a wall—they instantly add structure, rhythm, and that “finished” feel to a room. Here are my favorite square wall design ideas, starting with the classics and ending with the artsy, unexpected twists I love pulling out in my studio.
Classic Board-and-Batten Square Grid
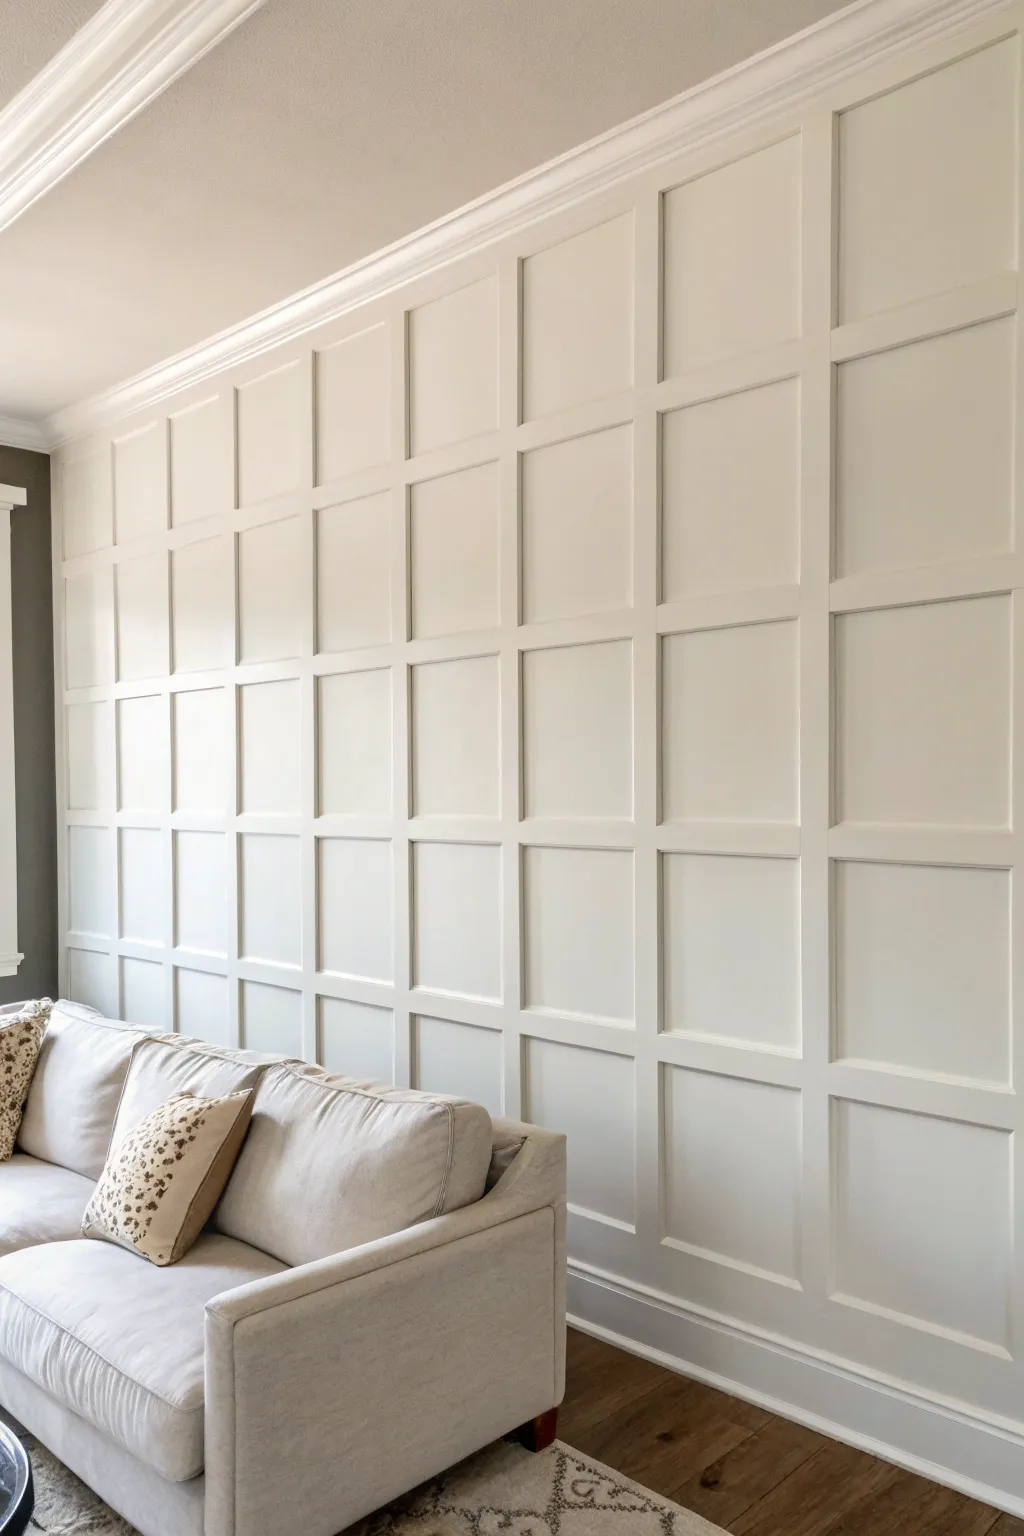
Transform a plain wall into an architectural statement piece with this floor-to-ceiling square grid design. This board-and-batten style treatment adds sophisticated depth and texture while keeping the room bright and airy.
Step-by-Step Tutorial
Materials
- 1×3 or 1×4 MDF boards (pre-primed recommended)
- Construction adhesive (Liquid Nails)
- Brad nailer
- 2-inch brad nails
- Wood filler or spackling
- Caulk (paintable, acrylic latex)
- Caulk gun
- High-quality interior paint (semi-gloss or satin)
- Sandpaper (120 and 220 grit)
- Tape measure
- Level (4-foot or laser level)
- Miter saw or circular saw
- Paint roller and angled sash brush
- Painter’s tape
Step 1: Planning and Preparation
-
Measure the wall:
Measure the total width and height of your wall precisely. It’s crucial to account for existing baseboards and crown molding—you can either remove them to start the grid flush with the floor and ceiling or butt your grid up against them. -
Calculate grid spacing:
Decide on the number of squares you want horizontally and vertically. To find the spacing, subtract the total width of all vertical boards from the wall width, then divide the remaining space by the number of columns. Repeat for the horizontal rows to ensure near-perfect squares. -
Mark the layout:
Using a pencil and a long level, draw the grid directly onto the wall. Marking the exact placement of every vertical and horizontal board helps visualize the final look and catch any measuring errors before cutting wood.
Step 2: Installing the Framework
-
Install the border frame:
Start by attaching the perimeter boards. Apply construction adhesive to the back of your MDF strips and secure them along the ceiling, floor (or top of baseboard), and side walls using a brad nailer. Ensure these are perfectly level and plumb. -
Attach vertical battens:
Cut your vertical boards to fit between the top and bottom frame pieces. Apply adhesive and place them over your vertical pencil lines. Use your level to double-check plumb before nailing them into place every 10-12 inches. -
Secure the verticals:
If you aren’t hitting studs with every board, angle your brad nails slightly (toenailing) in opposing directions to lock the board into the drywall more securely.
Spacer Block Magic
Cut one ‘master’ spacer block to your exact vertical gap height. Use this to position every horizontal slat instead of measuring. It guarantees uniform rows and saves huge time.
Step 3: Creating the Grid
-
Cut horizontal spacers:
Measure the actual distance between each vertical batten individually. Walls are rarely perfectly straight, so cutting these horizontal pieces one by one ensures a tight, gap-free fit. -
Install horizontal slats:
Starting from the bottom row, glue and nail the horizontal pieces between the verical battens. Use a pre-cut spacer block (a piece of scrap wood cut to your exact row height) to quickly position each horizontal slat without measuring every single time. -
Verify alignment:
Periodically step back and check that your horizontal lines look straight across the entire wall. A laser level is incredibly helpful here to ensure the grid doesn’t drift up or down as you move across.
Two-Tone Drama
Paint the grid framework a few shades darker than the wall inside the squares for a subtle shadow-box effect, or go bold with a contrasting color.
Step 4: Finishing and Painting
-
Fill nail holes:
Go over every board and fill the nail holes with wood filler or spackling. Overfill them slightly to account for shrinkage as it dries. -
Sand until smooth:
Once the filler is dry, sand the spots flush with the board surface using 220-grit sandpaper. Also, sand any joints where horizontal and vertical boards meet to ensure they feel like one seamless piece. -
Caulk the seams:
Apply a thin bead of paintable caulk to every internal edge where the wood meets the wall and where boards meet each other. Smooth the bead with a damp finger or rag for a professional, seamless look. -
Prime the wall:
If your wall color was dark or if you used raw wood, apply a coat of primer. I prefer to spot-prime any filler spots first to prevent dull patches in the final paint job. -
Paint the edges:
Using an angled sash brush, paint inside the squares along the edges of the grid first. This ‘cutting in’ ensures you get full coverage in the corners where a roller can’t reach. -
Roll the surfaces:
Finish by rolling the flat surfaces of the grid and the wall centers with a foam or short-nap roller. This provides a smooth, sprayed-like finish without brush marks.
The consistent rhythm of the grid creates a sense of order and elegance that completely redefines the room’s atmosphere
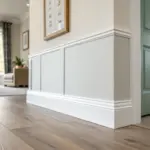

Half-Wall Square Wainscoting

Elevate a plain hallway into an elegant passageway with this timeless board and batten wainscoting project. The crisp white lines and structured squares add significant architectural interest while brightening up narrow spaces.
Step-by-Step
Materials
- 1×4 MDF or Primed Pine boards (for stiles and rails)
- 1×6 MDF or Primed Pine boards (for baseboards)
- Panel molding or cap trim
- Construction adhesive (e.g., Liquid Nails)
- Wood filler or spackle
- Paintable caulk
- Primer and semi-gloss white paint
- Brad nailer with 2-inch nails
- Miter saw
- Level and tape measure
- High-grit sandpaper or sanding block
- Stud finder
Step 1: Planning and Preparation
-
Measure and Calculate:
Begin by measuring the total length of your hallway walls. Decide on the height of your wainscoting; a common height is between 36 to 42 inches, or roughly one-third up the wall. Calculate the spacing for your vertical ‘stiles’ to ensure the squares are uniform, aiming for a distance of 16 to 24 inches between each. -
Remove Old Baseboards:
Carefully pry off existing baseboards using a utility knife to score the caulk line first, then a pry bar. If the wall behind is damaged, patch it lightly with spackle and sand smooth, though the new woodwork will cover most imperfections. -
Mark Stud Locations:
Use a stud finder to locate and mark all studs along the wall with a pencil. These marks should be slightly above where your top rail will sit so you can see them during installation.
Spacer Block Trick
Cut a scrap piece of wood to the exact width of your desired gap between stiles. Use this as a physical guide instead of measuring every time for perfect spacing.
Step 2: Installation
-
Install the Top Rail:
Establish your height line using a laser level or a long spirit level. Install the horizontal 1×4 top rail first, applying construction adhesive to the back and nailing it into the studs. Ensure this rail is perfectly level, as it dictates the look of the entire project. -
Install the Baseboard:
Install the 1×6 baseboard along the floor. Apply adhesive and nail it into the studs. Don’t worry if the floor isn’t perfectly level; simply keep the board flush to the floor, as any gaps at the bottom can be covered with shoe molding later if needed. -
Cut Vertical Stiles:
Measure the distance between the top rail and the baseboard at several points along the wall. Cut your 1×4 vertical stiles to fit snugly between these two horizontal rails. -
Dry Fit Stiles:
Place your cut stiles against the wall at your calculated intervals. I generally check the spacing visally here to ensure no stile lands awkwardly near a door frame or switch. -
Secure the Stiles:
Apply adhesive to the back of each stile. Position them using your spacer block or tape measure to ensure consistent gaps, check for plumb with a level, and nail them into the drywall. angling nails in opposing directions helps lock them in if you miss a stud. -
Add the Cap Molding:
To finish the top edge, cut a piece of cap molding or a slight projecting ledge trim to fit the length of the top rail. Glue and nail this piece to the top edge of the 1×4 rail for a distinctive, finished profile.
Step 3: Finishing Touches
-
Fill Nail Holes:
Go over every board and fill all nail holes with wood filler. Overfill slightly to account for shrinkage. -
Sand Smooth:
Once the filler is dry, sand all filled spots flush with the wood surface using fine-grit sandpaper. Vacuum up the dust and wipe the wood down with a tack cloth. -
Caulk the Seams:
Apply a thin bead of paintable caulk to every seam where wood meets wood and where wood meets the wall. Run a wet finger along the bead to smooth it out perfectly. This eliminates dark shadow lines/gaps and makes the wainscoting look like one solid unit. -
Prime the Surface:
Apply a coat of high-quality primer to the raw wood and the wall sections inside the squares. This seals the MDF or wood and ensures the topcoat has an even sheen. -
Sand Again:
I highly recommend a very light sanding after the primer dries to knock down any raised grain or fuzz, ensuring a professional, furniture-grade finish. -
Paint the Vertical Battens:
Using a brush, paint the edges and detailed areas of the trim first. Then, use a small foam roller for the flat faces of the stiles and rails to avoid brush strokes. -
Paint the Inner Panels:
Roll the wall sections inside the squares with the same paint used on the trim. Using a slightly higher sheen like semi-gloss or satin makes the wainscoting durable and easy to clean in high-traffic hallways. -
Final Coat:
Apply a second full coat of paint to everything to achieve a solid, opaque white finish.
Uneven Walls?
If walls are wavy, construct the wainscoting frames on the floor first, then adhere the whole unit to the wall. Use construction adhesive liberally to bridge gaps.
Step back and admire how this simple architectural addition brings a fresh, structured sophistication to your home
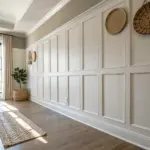

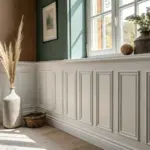
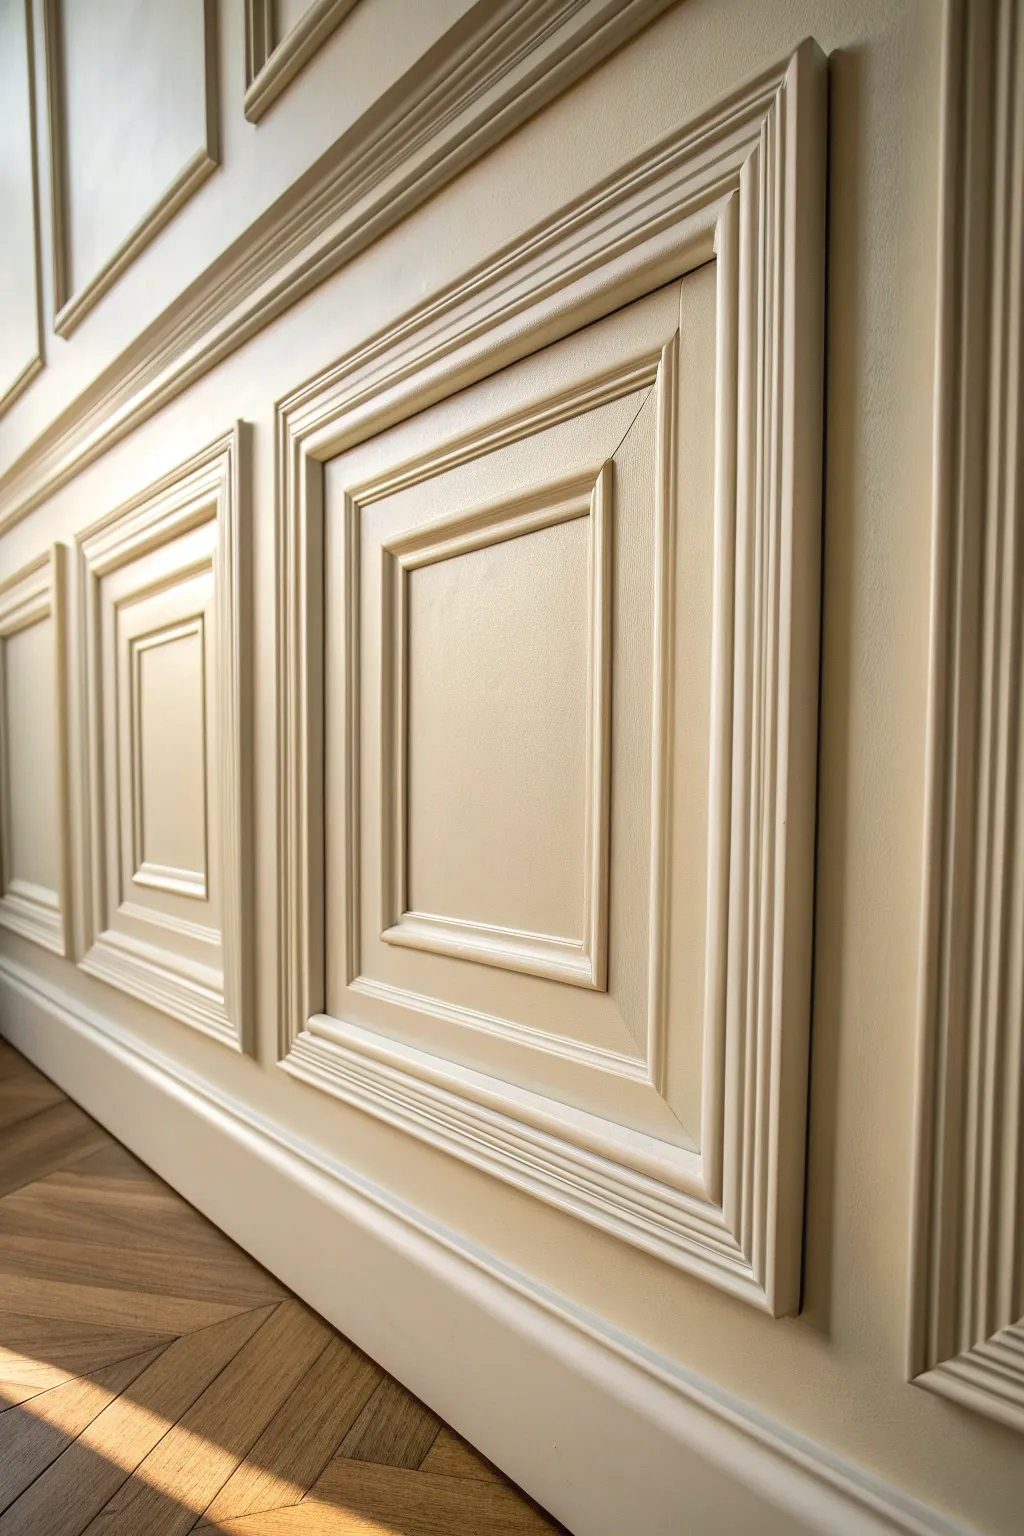
Monochrome Squares for Subtle Texture
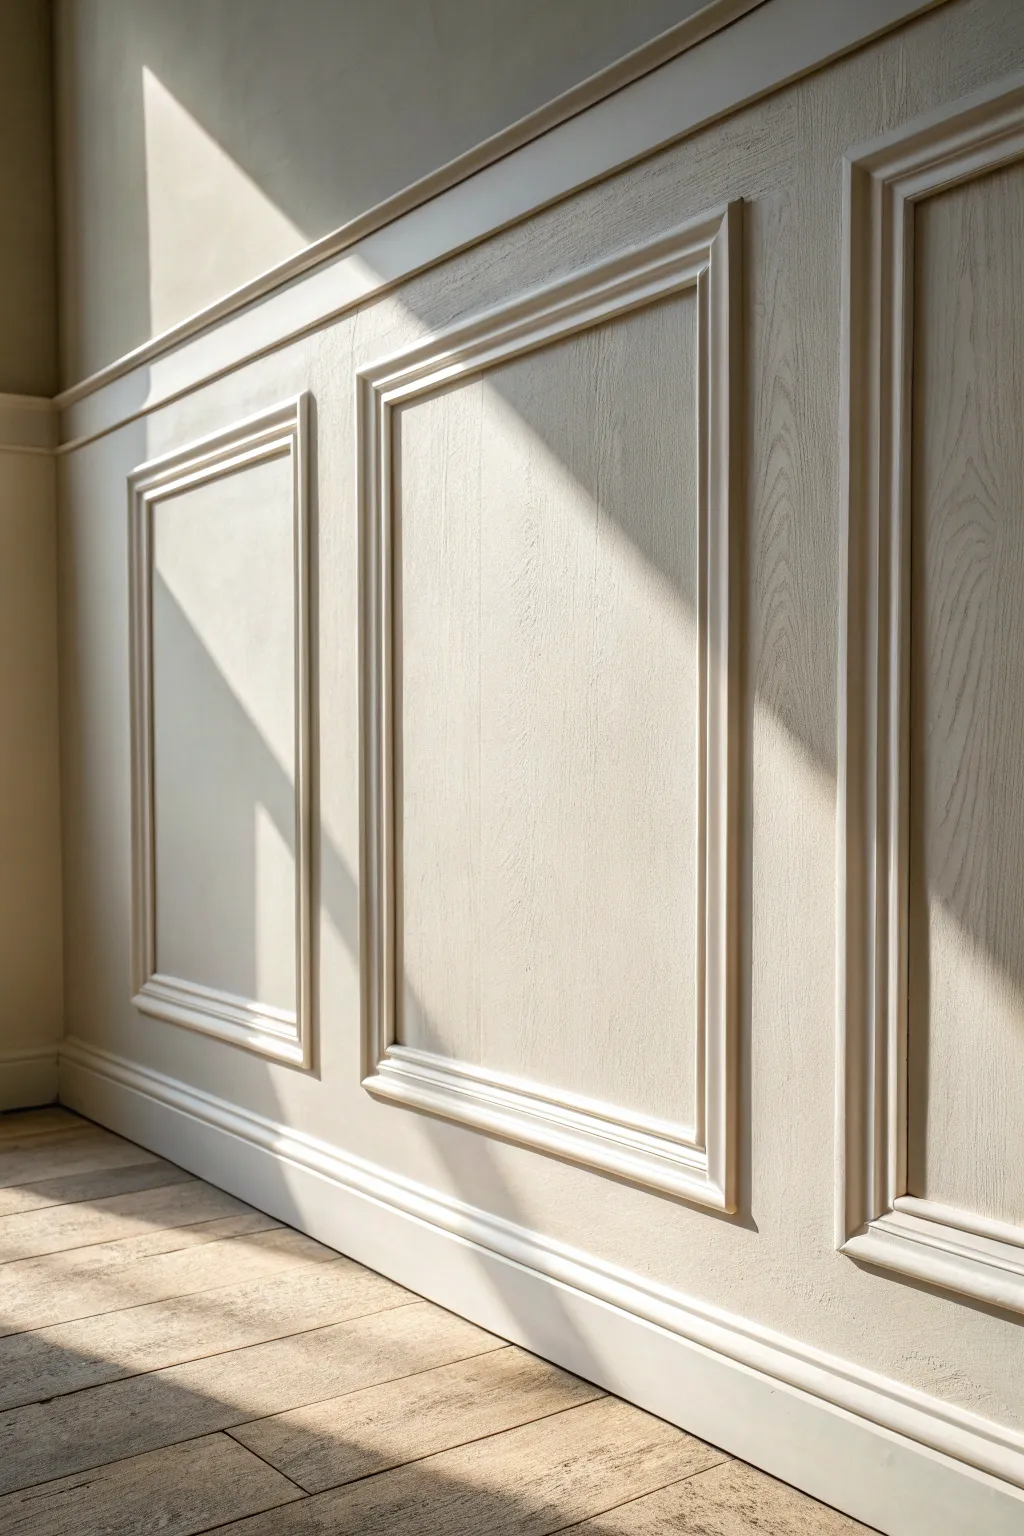
Transform a plain wall into a sophisticated architectural feature with this monochrome square paneling project. The subtle wood grain texture peeking through warm cream paint adds depth and elegance without overwhelming the space.
Step-by-Step Tutorial
Materials
- Pre-primed decorative molding strips (approx. 1-2 inch width)
- Chair rail molding (optional for top edge)
- Baseboard molding (match existing or replace)
- Construction adhesive (Liquid Nails)
- Finishing nails or brad nailer
- Wood filler and putty knife
- Caulk and caulking gun
- Fine-grit sandpaper (220-grit)
- Painter’s tape
- Level (2-foot and 4-foot)
- Tape measure and pencil
- Miter saw or miter box
- High-quality interior paint (Satin or Eggshell finish)
- Angled sash brush (2-inch)
- Microfiber roller and tray
Step 1: Planning and Layout
-
Measure the wall:
Begin by measuring the total length and height of your wall. Decide on the height of your wainscoting; standard heights are often around 32 to 36 inches, or go taller like the reference image for a more dramatic effect. -
Calculate panel sizes:
Determine how many boxes you want. Subtract the width of the vertical stiles (the spaces between boxes) and the molding width from the total wall length. Divide the remaining number by the number of boxes to get the width of each panel. -
Mark the wall:
Using your level and pencil, draw the layout directly on the wall. Mark the positions for the baseboard, the top rail, and the outer edges of each box frame to visualize the spacing. -
Check for obstructions:
Ensure your planned boxes don’t awkwardly intersect with electrical outlets or switches. Adjust the spacing slightly if needed, as it is easier to move a layout line now than cut around an outlet later.
Spacer Block Trick
Cut a scrap piece of wood to the exact width of your desired spacing. Use this block between panels as a guide during installation to guarantee perfectly even gaps without constant measuring.
Step 2: Cutting and Installation
-
Install perimeter rails:
Install the baseboard first, ensuring it is level. Then, install the top horizontal chair rail or cap molding at your desired height using construction adhesive and nails. -
Cut the molding:
Set your miter saw to a 45-degree angle. Cut the four pieces needed for your first box frame—two vertical and two horizontal pieces—according to your measurements. Always measure twice before cutting. -
Test fit the frame:
Hold the cut pieces up to your pencil markings on the wall to check the fit. The corners should meet tightly to form a perfect 90-degree angle. Adjust the miter cuts slightly if your wall isn’t perfectly flat. -
Attach the molding:
Apply a bead of construction adhesive to the back of the molding pieces. Press them into place on the wall, checking for level vertical and horizontal alignment. -
Secure with nails:
Use a brad nailer or hammer and finishing nails to secure the molding. Place nails at the top, middle, and bottom of vertical pieces, aiming for studs where possible, or act in an ‘X’ pattern for better grip in drywall.
Level Up: Texture Play
For a rustic look, use a wire brush on the molding before painting to exaggerate the wood grain, allowing the texture to catch light through the monochromatic paint.
Step 3: Finishing and Painting
-
Fill the holes:
Apply wood filler to all nail holes and mitered corner joints. Overfill slightly, as the filler will shrink when it dries. Let this cure completely. -
Sand smooth:
Once dry, sand the filled areas using 220-grit sandpaper until they are perfectly flush with the wood. Wipe away dust with a tack cloth or damp rag. -
Caulk the seams:
Run a thin bead of finish caulk along every edge where the molding meets the wall and inside the corners of the boxes. Smooth the bead with a wet finger for a seamless transition. -
Prime the wall:
If your wall color is currently dark or you are using bare wood molding, apply a coat of high-quality primer. I find this especially crucial to ensure the final finish looks uniform. -
Cut in the edges:
Using an angled sash brush, paint the molding profiles and the corners first. Work in sections to keep a wet edge. -
Roll the flat surfaces:
Use a microfiber roller to paint the flat wall sections inside and outside the boxes. Apply the paint in ‘W’ patterns for even coverage. -
Apply second coat:
Allow the first coat to dry according to the manufacturer’s instructions, then apply a second coat for a rich, solid finish. The goal is a monochromatic look where shadows provide the contrast.
Step back and admire how simple geometry and light create a timeless feature wall


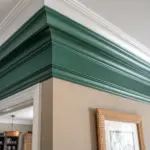
High-Contrast Square Grid Lines
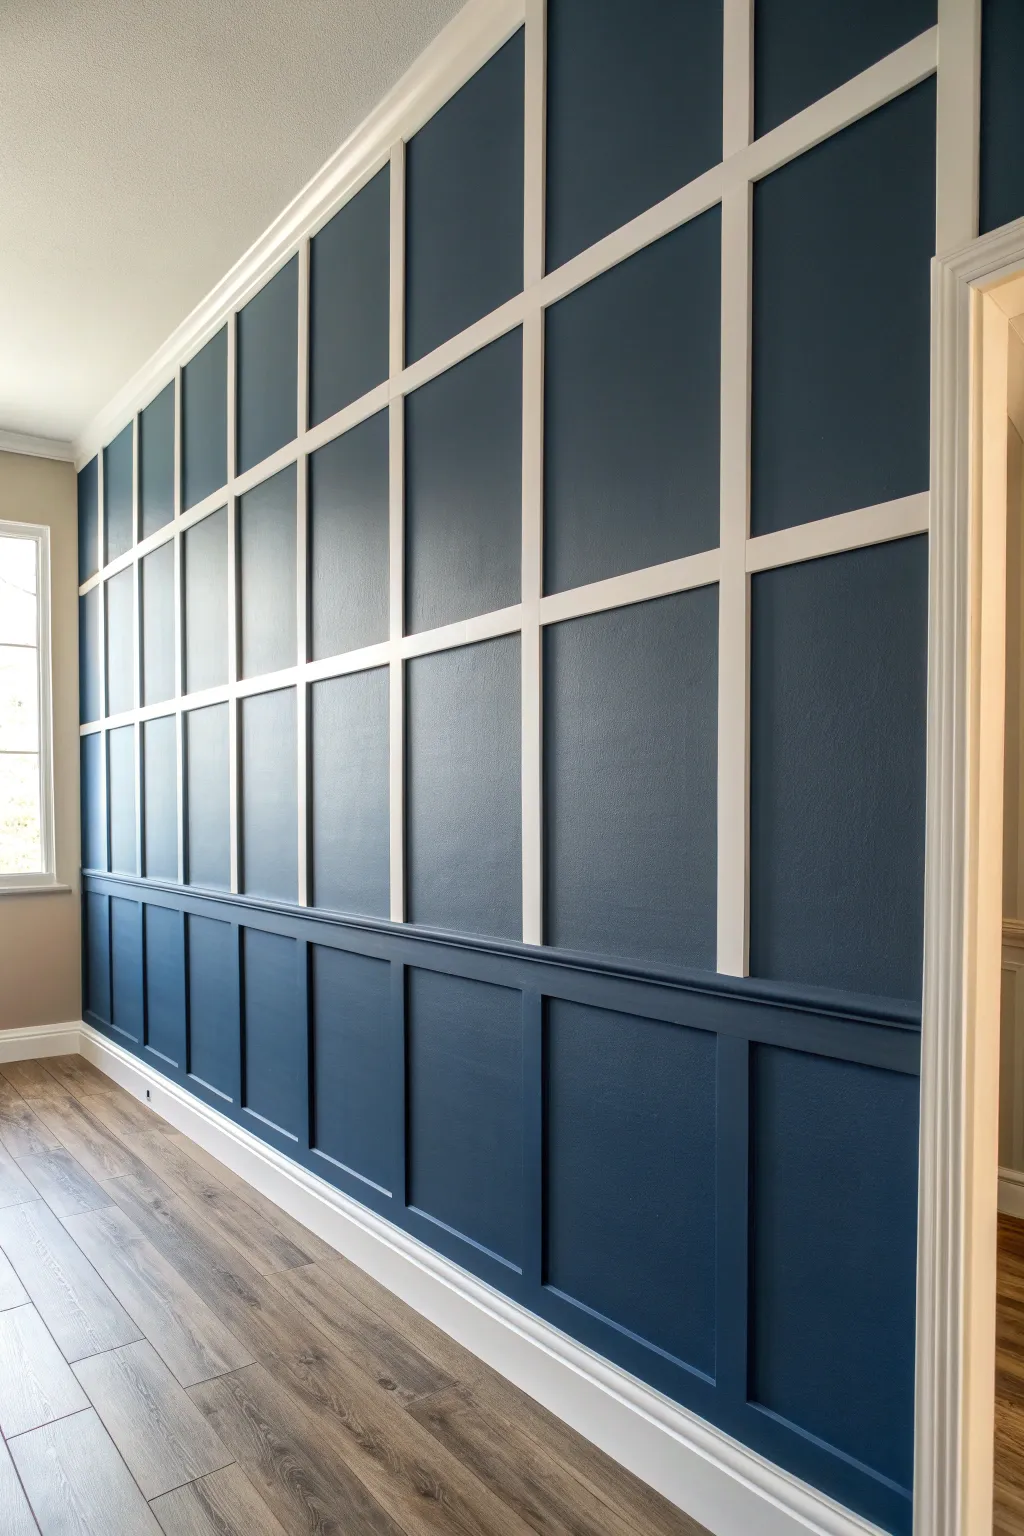
This striking accent wall combines the elegance of traditional wainscoting with a modern, high-contrast grid pattern. By pairing deep navy paint with crisp white lattice strips, you can transform a plain room into a sophisticated architectural statement.
Detailed Instructions
Materials
- 1×2 or 1×3 Primed Pine Boards (for vertical and horizontal grid lines)
- 1×4 Primed Pine Boards (for the chair rail/divider)
- Baseboard molding (matching existing style)
- Construction adhesive (e.g., Liquid Nails)
- Brad nailer and 2-inch brad nails
- Paintable Caulk and Caulk Gun
- Wood Filler and Putty Knife
- Sanding block (medium grit)
- Deep Navy Blue Paint (Satin or Eggshell finish)
- Bright White Trim Paint (Semi-gloss)
- Painter’s Tape
- Laser Level or Spirit Level
- Paint Roller (microfiber)
- Angled sash brush
Step 1: Planning and Layout
-
Measure and Calculate:
Begin by measuring the total width and height of your wall. Decide on the size of your squares; for this look, large squares (around 24 inches) work best. Sketch the grid on paper first to determine exactly how many vertical and horizontal boards you’ll need. -
Locate Studs:
Use a stud finder to mark the location of every stud along the wall. While construction adhesive does a lot of the work, nailing into studs ensures your grid will never pull away. -
Determine the Divide:
This design features a clear division between the upper grid and lower wainscoting. Mark a horizontal line roughly one-third of the way up the wall (approx. 32-36 inches from the floor) where your 1×4 divider rail will sit.
Gaps happen!
If your horizontal rails fit too loosely, don’t force them. Fill large gaps with wood filler or a sliver of wood shim before caulking to prevent future cracking.
Step 2: Base Painting
-
Cut In the Edges:
Before installing any wood, paint the perimeter of the wall with your deep navy color. This saves you from trying to cut in against fresh white trim later. -
Paint the Wall:
Roll two coats of the navy blue paint over the entire wall surface. It doesn’t need to be perfect since trim will cover some areas, but good coverage now prevents gaps in color later.
Step 3: Installing the Grid
-
Install the Divider Rail:
Install the 1×4 horizontal board along your marked line using a level to ensure it is perfectly straight. Apply adhesive to the back and secure it with your brad nailer. -
Place Vertical Stiles:
Measure and cut your vertical 1×2 strips. Install the two outer edge pieces first, flush with the adjacent walls. Then, measure the distance between them and space the remaining vertical boards evenly according to your plan. -
Check for Plumb:
As you install each vertical piece, check it with a long level. Walls aren’t always perfectly straight, so trust your level over your tape measure here. -
Install Horizontal Rails (Top):
Cut the horizontal pieces to fit snugly between the vertical stiles on the upper portion of the wall. I find it helpful to measure each gap individually, as they can vary by fractions of an inch. -
Install Horizontal Rails (Bottom):
Repeat the process for the lower wainscoting section. Ensure these align vertically with the upper grid lines for a cohesive look. -
Add Baseboard:
Install the baseboard at the very bottom. If your vertical strips are thicker than your baseboard, you may need to bevel the edges of the strips where they meet the floor for a cleaner transition.
Pro Tip: Spacer blocks
Cut a scrap piece of wood to the exact width of your intended grid spacing. Use this ‘spacer block’ to quickly position boards without measuring every single time.
Step 4: Finishing and Painting
-
Fill Nail Holes:
Overfill every brad nail hole with wood filler. Once dry, sand it smooth so the hole is completely invisible to the touch. -
Caulk the Seams:
Apply paintable caulk to every edge where the wood meets the wall and where wood meets wood. Smooth the bead with a wet finger or a caulk tool. This step is crucial for that built-in, professional look. -
Paint the Lower Section:
Paint the entire lower third—including the wall, the grid trim, the divider rail, and the baseboard—in the navy blue color. This creates the solid, grounded wainscoting effect seen in the bottom of the photo. -
Mask the Upper Grid:
Once the blue paint is fully cured (give it at least 24 hours), tape off the blue wall sections inside the upper grid squares. You want to protect the blue wall while painting the white lattice. -
Paint the Upper Trim:
Using an angled sash brush and steady hand, paint the face and sides of the upper grid lattice in semi-gloss white. You may need two to three coats for a crisp, opaque finish against the dark background. -
Remove Tape:
Peel off the painter’s tape slowly while the final coat is still slightly tacky to ensure a sharp, clean line between the white grid and the navy wall.
Step back and admire how this sharp geometric design completely redefines the sophisticated atmosphere of your room
BRUSH GUIDE
The Right Brush for Every Stroke
From clean lines to bold texture — master brush choice, stroke control, and essential techniques.
Explore the Full Guide
Picture-Frame Squares in a Tight Pattern
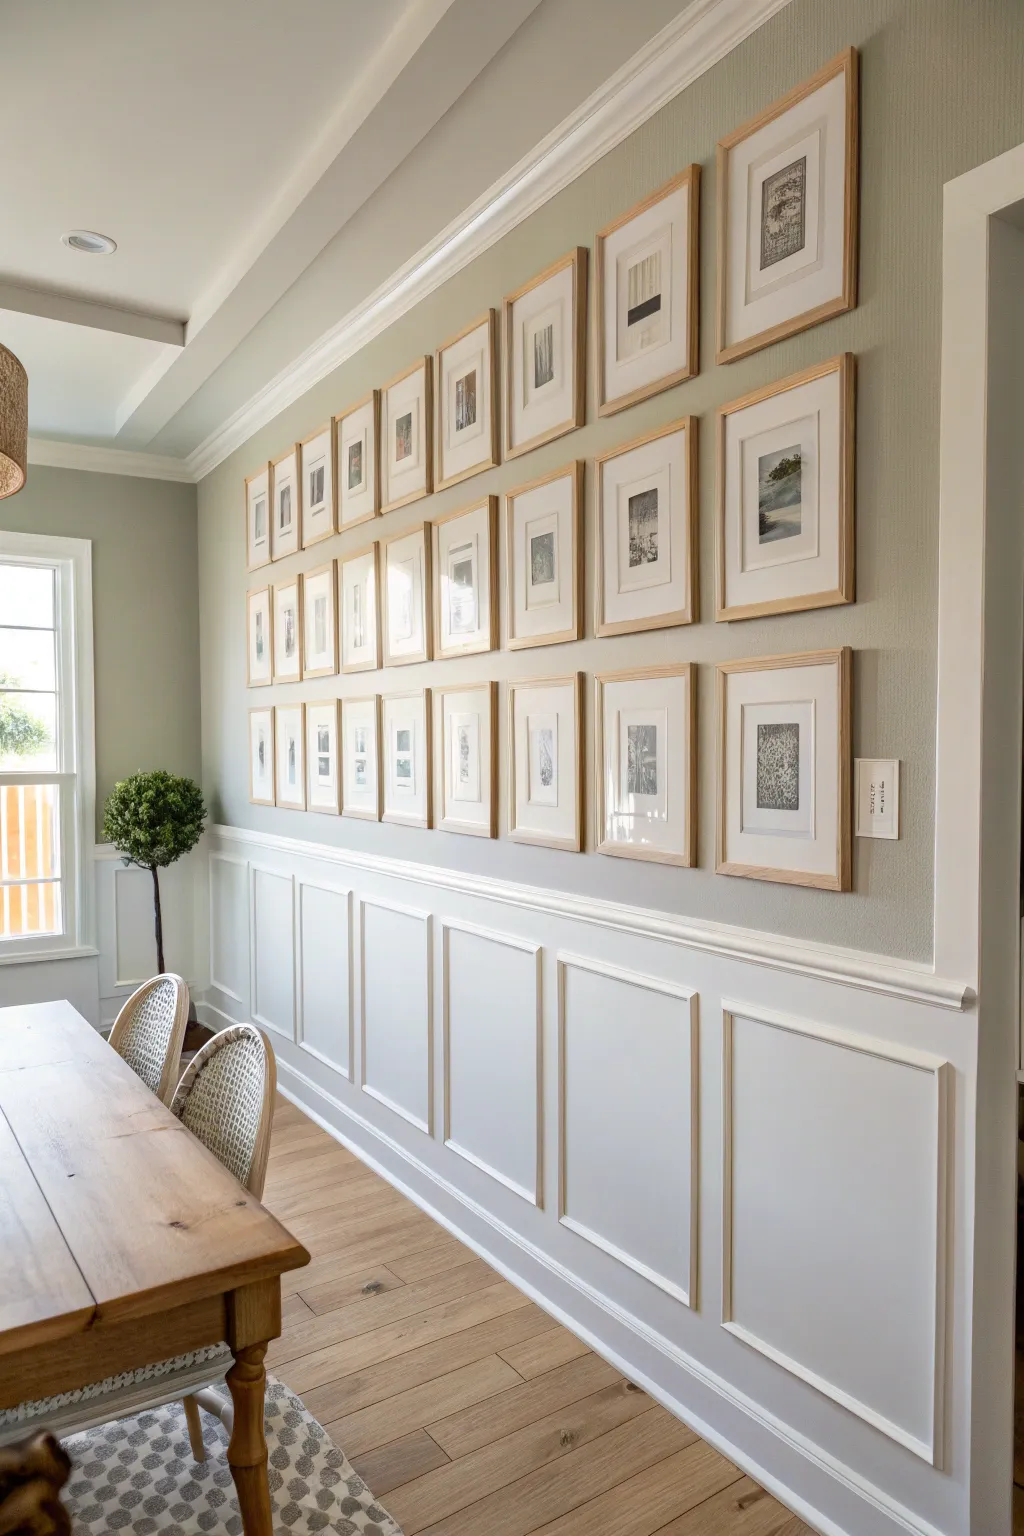
Transform a blank wall into a sophisticated focal point by combining crisp wainscoting squares with a precisely aligned gallery grid. This dual-design approach adds architectural depth to the lower wall while creating a clean, modern display space above.
Step-by-Step Tutorial
Materials
- 1×4 MDF boards (for chair rail and baseboard)
- Small base cap molding (for wainscoting squares)
- Construction adhesive (Liquid Nails)
- Brad nailer and 1.5-inch brad nails
- Miter saw
- Laser level (highly recommended)
- Tape measure and pencil
- Wood filler and sandpaper
- Caulk and caulk gun
- Primer and interior paint (white for trim, sage green for wall)
- Set of matching wood frames (light oak or pine)
- Artwork or photos (matted white)
Step 1: Planning and Base Work
-
Measure the run:
Begin by measuring the total length of your wall to determine the spacing for your lower wainscoting squares. Aim for an odd number of boxes if possible, but prioritize equal spacing. -
Calculate box sizes:
Subtract the width of your vertical stiles (the spaces between boxes) from the total length, then divide by the number of boxes to get your horizontal box width. The vertical height is determined by the distance between your baseboard and chair rail. -
Install baseboard and rail:
Secure the 1×4 baseboard along the floor and the horizontal chair rail at roughly 32-36 inches high (or about one-third up the wall) using construction adhesive and your brad nailer. -
Mark the grid:
Using a pencil and a long straight edge, lightly draw the layout of your wainscoting boxes directly onto the drywall to ensure everything looks balanced before cutting wood.
Step 2: Creating the Wainscoting
-
Cut the molding:
Set your miter saw to exactly 45 degrees. Cut four pieces of base cap molding for every box layout you marked: two vertical sides and two horizontal sides. I like to cut all horizontal pieces first to ensure consistency. -
Dry fit the corners:
Test the fit of your four pieces on the floor to ensure the miters close tightly to form a perfect rectangle. -
Attach the molding:
Apply a thin bead of adhesive to the back of the molding pieces. Using the pencil lines as your guide, nail the top piece first, checking for level, then follow with sides and bottom. -
Fill and imperfect:
Fill all nail holes with wood filler and run a bead of caulk along every edge where the wood meets the wall, as well as in the mitered corners. Once dry, sand the filler smooth. -
Paint the trim:
Paint the entire lower section—baseboard, chair rail, molding squares, and the drywall inside them—with a semi-gloss white paint for that classic integrated look.
Uneven Walls?
Walls are rarely perfectly flat. If miter corners gap, rub the round shaft of a screwdriver over the wood joint to compress fibers, then fill with wood putty.
Step 3: The Upper Gallery Grid
-
Paint the upper wall:
While the wainscoting dries, paint the upper portion of the wall in a soft sage green or your chosen contrast color. Two coats usually ensure solid coverage. -
Prep the frames:
Assemble your matching frames. Ensure each image is centered in a large white mat to maintain that airy, museum-quality aesthetic. -
Determine gallery spacing:
Measure the total wall width again. Calculate a tight spacing gap (around 1.5 to 2 inches) between frames. Calculate how many columns you can fit while leaving equal margins on the far left and right. -
Create a hanging template:
Cut pieces of craft paper to the exact size of your frames. Tape these to the wall to visualize the grid, adjusting until the spacing feels perfectly uniform. -
Set the laser level:
Project a laser line across the wall for the bottom row of frames first. This foundational line is critical for the rest of the grid’s alignment. -
Install hardware:
Mark the nail placement through your paper templates (or measure down from the frame top). Install your picture hooks or nails at these precise points. -
Hang and align:
Hang the bottom row first, checking level. Then move to the second row, using a spacer block (a piece of wood cut to your gap size) to ensure the vertical distance between frames is identical everywhere. -
Secure the corners:
Once everything is hung, place a small glue dot or rolled painter’s tape behind the bottom corners of each frame to keep them from tilting over time.
Visual Balance
For maximum impact, align the vertical ‘lines’ of your gallery grid with the vertical spaces of the wainscoting below so the whole wall feels connected.
Step back and admire how the structured grid lines create a sense of calm and order in your space.
Squares-within-Squares Detail Molding
Elevate a plain wall into a masterpiece of classical carpentry with this sophisticated square-within-square wainscoting. By layering molding profiles, you create a rich, three-dimensional effect that mimics high-end historical millwork.
How-To Guide
Materials
- Baseboard molding (6-8 inch height)
- Chair rail molding (optional, for top cap)
- Panel molding (primary frame profile)
- Smaller decorative molding (inner square profile)
- MDF or plywood sheets (if wall surface is uneven)
- Construction adhesive
- Wood filler
- Caulk (paintable)
- Sandpaper (120 and 220 grit)
- Primer and interior paint (satin or semi-gloss)
- Miter saw
- Pin nailer or finish nailer
- Level and measuring tape
- Spacer blocks
Step 1: Planning and Layout
-
Determine panel sizes:
Measure your wall’s total width and decide how many panels will fit comfortably. Aim for equal spacing between panels (stiles) and between the panels and the corners, usually between 3 to 5 inches wide. -
Mark the wall:
Using a level and a pencil, draw the exact boxes directly onto the wall. Draw both the outer box and the inner box to ensure your proportions look correct before cutting any wood. -
Check for flatness:
Place a straight edge against the drywall to check for waves or bumps. If the wall is very uneven, consider skinning the lower section with 1/4-inch MDF first to provide a perfectly flat substrate for the detailed molding. -
Install the baseboard:
Before beginning the squares, install your bottom baseboard. This acts as the visual anchor for the entire wainscoting system.
Step 2: Constructing the Outer Frames
-
Cut the outer molding:
Set your miter saw to a precise 45-degree angle. Cut the pieces for the larger, outer rectangles using the primary panel molding profile. Measure twice to ensure opposite sides are perfectly identical in length. -
Test fit the corners:
Before gluing, dry-fit the four pieces of a frame together on a flat floor to ensure the miters close tightly to form a perfect 90-degree corner. -
Install the outer frame:
Apply a bead of construction adhesive to the back of the molding pieces. Press them onto your pencil lines on the wall, checking for level. -
Secure with nails:
Tack the molding in place using a pin nailer. I like to angle the nails slightly in alternating directions to lock the trim against the drywall.
Miter Gaps?
If a corner doesn’t close perfectly due to uneven walls, use the round shaft of a screwdriver to burnish (rub hard) the wood fibers of the miter together, then fill sanding dust and glue.
Step 3: Adding the Inner Detail
-
Create spacing jigs:
Cut a few scrap blocks of wood to the exact width representing the distance between the outer and inner squares. This guarantees perfect symmetry without constant measuring. -
Cut the inner molding:
Using the smaller decorative profile, cut the pieces for the inner squares. These miters must be incredibly sharp, as gaps are more visible on smaller frames. -
Install inner squares:
Using your spacer jigs, position the inner molding inside the outer frame. Glue and pin nail these pieces, ensuring the reveal (the smooth wall space between moldings) is consistent all around. -
Check perpendicular alignment:
Step back and verify that the vertical lines of the inner box run perfectly parallel to the vertical lines of the outer box.
Level Up: Beveled Panels
Instead of leaving the wall flat between the two molding squares, install a raised plywood panel with beveled edges in the center for an even deeper, more substantial architectural look.
Step 4: Finishing and Painting
-
Fill nail holes:
Fill every tiny nail hole with wood filler. Overfill slightly to account for shrinkage during drying. -
Caulk the seams:
Run a thin bead of paintable caulk along every edge where the molding meets the wall, and inside the miter joints if needed. Smooth it immediately with a damp finger or rag. -
Sand for smoothness:
Once the filler is dry, sand the frames with fine-grit sandpaper. The transition from wood to filler should be undetectable to the touch. -
Prime the surface:
Apply a high-quality primer over the molding and the wall section within the wainscoting. This unifies the texture of the wood and the drywall. -
Apply the finish coat:
Paint the entire assembly with two coats of satin or semi-gloss paint. Use a high-quality angled sash brush to get into the intricate crevices of the profile without pooling paint.
Step back and admire how simple strips of wood have transformed your wall into a statement of elegance

PENCIL GUIDE
Understanding Pencil Grades from H to B
From first sketch to finished drawing — learn pencil grades, line control, and shading techniques.
Explore the Full Guide
Square Panels as a Headboard Wall
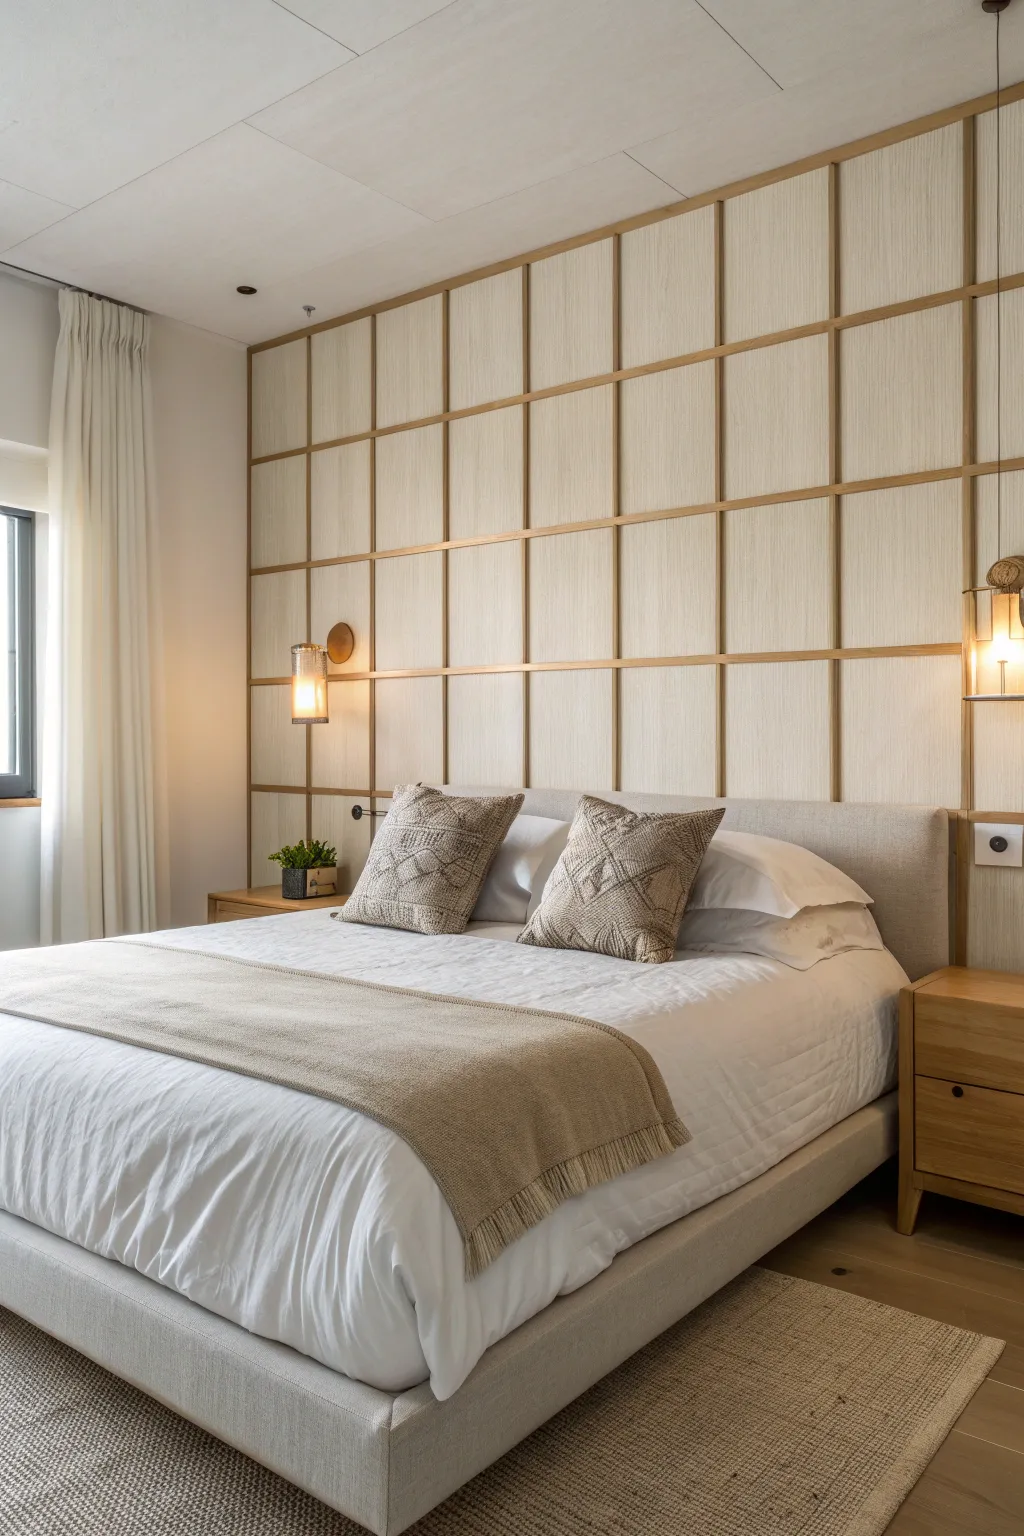
Transform your bedroom with this serene, grid-style feature wall that blends the calmness of Japanese Shoji screens with modern materials. By combining light wood paneling with striking metallic accents, you create a sophisticated geometric backdrop that doubles as an oversized headboard.
Step-by-Step
Materials
- 4×8 foot sheets of light ash or oak veneer plywood
- 1×2 inch hardwood lattice strips (ash or oak to match)
- Flat metal trim strips (brass or copper finish, 0.5 inch wide)
- Construction adhesive (heavy duty)
- Pin nailer and 1-inch pin nails
- Table saw or circular saw with fine-finish blade
- Miter saw
- Laser level
- Measuring tape
- Fine-grit sandpaper (220 grit)
- Wood stain or clear matte polyurethane
- Metal adhesive
- Paint roller and tray (for wall prep)
- Wood filler
- Stud finder
Step 1: Preparation and Base Layer
-
Measure and Map:
Begin by measuring your wall’s total height and width. Determine the size of your squares; in the inspiration photo, the squares appear to be roughly 24×24 inches. Use painter’s tape to map out the grid directly on the wall to visualize the scale. -
Prep the Wall Surface:
Remove existing baseboards and cover plates. If your wall is textured, give it a quick sand or a fresh coat of flat neutral paint so that any tiny gaps in the final assembly aren’t noticeable. -
Cut the Panel Backing:
Cut your veneer plywood sheets into square panels according to your measurements. Remember to subtract the width of your vertical lattice strips from your calculations so the overall grid fits perfectly. -
Sand and Seal Panels:
Before installation, sand the cut edges and faces of your plywood squares with 220-grit sandpaper. Apply a coat of clear matte polyurethane or a light whitewash stain to the panels and let them dry completely.
Step 2: Installing the Grid Structure
-
Set the Vertical Lines:
Cut your 1×2 hardwood lattice strips to the full height of the room. Stain or seal them to match your panels. -
Install the First Vertical Batten:
Using a laser level, establish a perfectly plumb line for your first vertical strip. Apply construction adhesive to the back of the strip and pin-nail it into the wall, ideally hitting a stud or using wall anchors at intervals. -
Mount the First Column of Panels:
Apply adhesive to the back of your first column of plywood squares. Press them firmly against the wall, butting them snugly against the installed vertical batten. secure with a few pin nails near the corners. -
Install Spacers for Horizontal Lines:
Between each vertical square in the column, you need to create the ‘channel’ for the metallic strip. Use scrap pieces of wood or specialized spacers to ensure a consistent 1/2-inch gap between the squares vertically. -
Place the Second Vertical Batten:
Once the first column of panels is up, install the next vertical 1×2 strip tight against the other side of the plywood squares. This covers the vertical seams and locks the panels in place. -
Repeat Across the Wall:
Continue this pattern—vertical strip, column of panels, vertical strip—across the entire length of the wall. Check plumb with your laser level frequently.
Use a Jig for Spacing
Cut a scrap block of wood to the exact vertical gap height (e.g., 0.5 inches). Use this as a permanent spacer while gluing panels to ensure every horizontal metal channel is perfectly uniform.
Step 3: Adding the Metallic Accents
-
Measure the Horizontal Channels:
Measure the exact width between your vertical battens within the horizontal gaps you left earlier. I find it safest to measure every single gap individually, as walls are rarely perfectly straight. -
Cut Metal Strips:
Using a metal cutting blade or hacksaw, cut your brass or copper flat strips to fit snugly into the horizontal channels. -
Dry Fit the Accents:
Test the fit of your metal pieces. If they are too tight, file the edges slightly; if too loose, center them carefully during gluing. -
Glue the Inlays:
Apply a thin bead of strong metal adhesive (like an epoxy or specialized construction glue) to the back of the metal strip. Press it firmly into the horizontal gap. -
Secure While Drying:
Use strips of painter’s tape to hold the metal pieces flush with the wood surface while the adhesive cures to prevent them from sliding or bowing out.
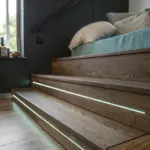
Integrated Lighting
Route a small channel behind the horizontal metal strips before installation to hide LED ribbon wire. This allows for soft, ambient backlighting that glows from behind the metal grid.
Step 4: Finishing Touches
-
Fill Nail Holes:
Inspect the vertical wood strips for any visible nail holes. Fill these with a color-matched wood putty, let dry, and lightly sand smooth. -
Final Wipe Down:
Clean off any sawdust or adhesive residue with a tack cloth. Remove the painter’s tape from the metal strips. -
Reinstall Fixtures:
If you are adding sconces like in the photo, drill careful holes through the panels where your wiring is located (assuming you pre-wired) and mount your light fixtures.
Step back and enjoy the structured elegance of your new sophisticated focal point.
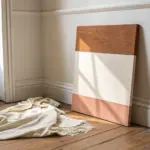
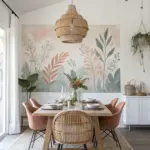
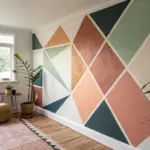
Painted Color-Block Square Layout
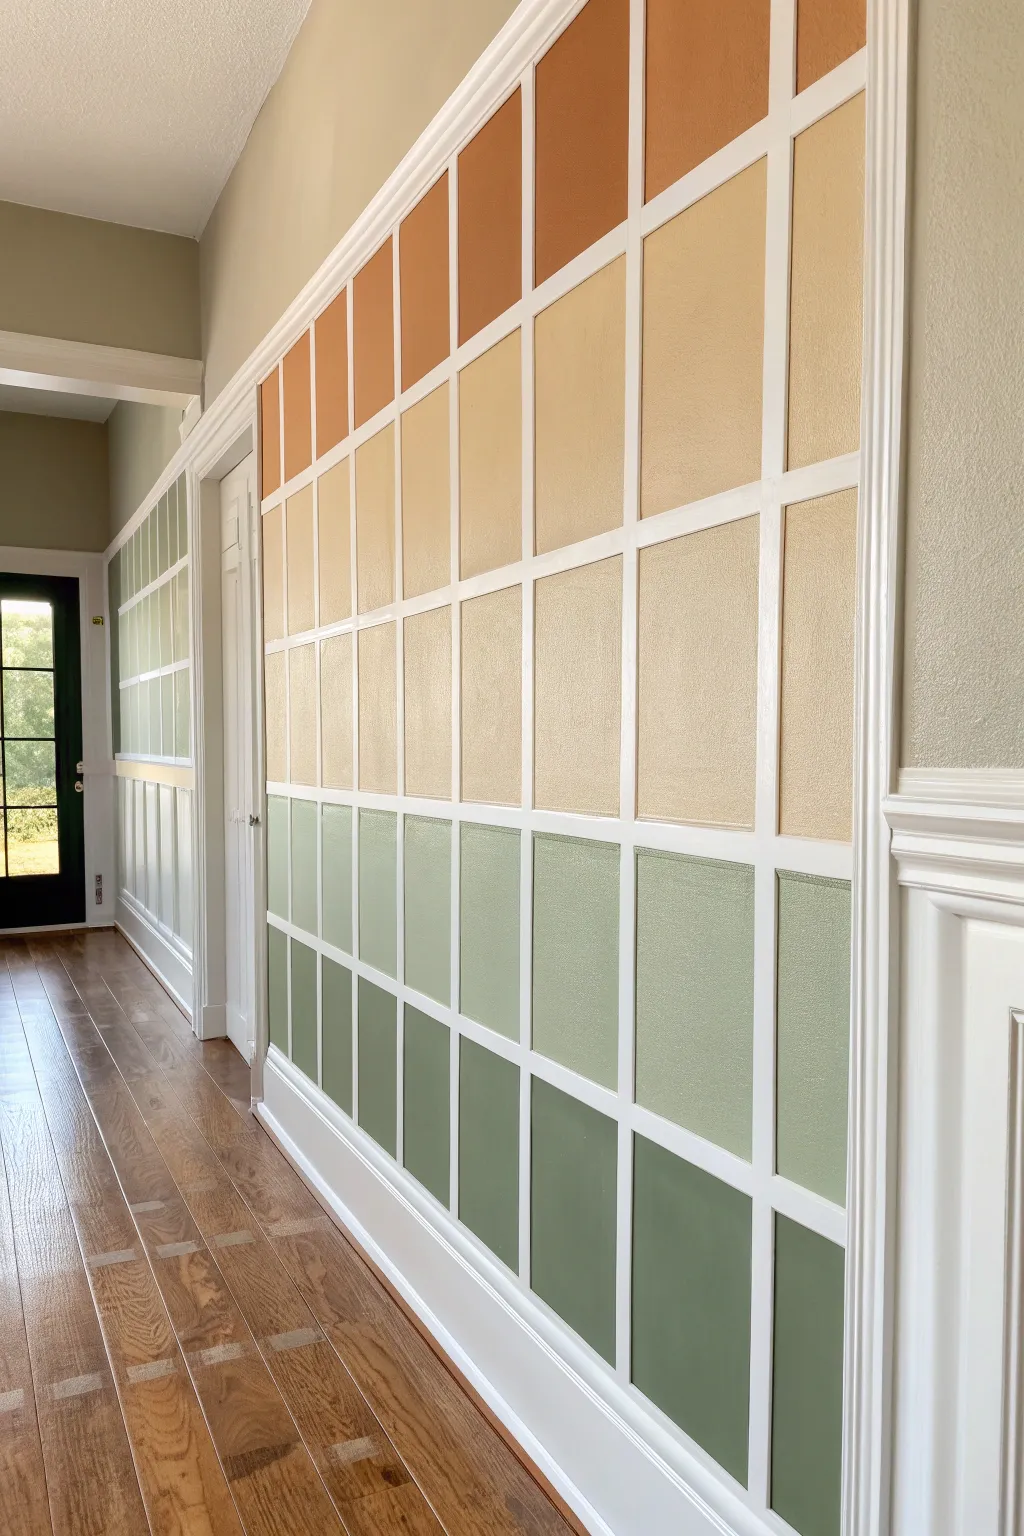
Transform a plain hallway into a stunning statement piece with this structured, colorful accent wall. By combining simple grid molding with a gradient of earth tones ranging from rusty oranges to deep sage greens, you can add architectural interest and warmth simultaneously.
How-To Guide
Materials
- Painter’s tape (high quality)
- Small foam rollers (4-inch)
- Angled sash brush (1.5 or 2 inch)
- Measuring tape
- Bubble level or laser level
- Pencil
- Primed flat trim molding (1/4 inch thick, 1-2 inches wide)
- Miter saw or hand saw with miter box
- Construction adhesive (Liquid Nails)
- Pin nailer or finishing nails and hammer
- Wood filler
- Caulk and caulk gun
- Sanding block (fine grit)
- Interior latex paint (various earth tones: rust, beige, cream, light green, dark sage)
- White semi-gloss paint for trim
Step 1: Planning and Grid Installation
-
Prepare the surface:
Begin by cleaning the wall thoroughly with a mild detergent and water solution to remove any dust or oils. Fill any existing holes with spackle and sand smooth once dry to ensure a perfect base. -
Calculate grid dimensions:
Measure the total height and width of your wall space. Decide on the number of squares you want vertically and horizontally; divide your wall measurements by these numbers to determine the exact size of each square, accounting for the width of your trim. -
Mark the layout:
Using a pencil and a laser level, mark the horizontal and vertical lines where your trim pieces will go. This step is crucial for keeping everything square, so take your time measuring twice. -
Install vertical stiles:
Cut your vertical trim pieces to the full height of the wall section. Apply a bead of construction adhesive to the back, place them on your marked lines, and secure them with a pin nailer. Check for plumb with your level as you go. -
Cut horizontal rails:
Measure the distance between your vertical stiles carefully. Cut your horizontal trim pieces to fit snugly between the verticals. I find it helpful to cut one ‘test piece’ to verify the fit before cutting the whole batch. -
Install horizontal rails:
Apply adhesive to the horizontal rails and pin nail them into place, aligning them with your horizontal pencil marks to create the grid pattern. -
Fill and sand:
Fill all nail holes and the small gaps where the horizontal and vertical pieces meet with wood filler. Once dry, sand these areas smooth so the joints become invisible. -
Caulk the seams:
Run a thin bead of finish caulk along every edge where the trim meets the wall, and where the trim meets the baseboard or ceiling. Smooth it with a wet finger for a seamless look.
Seal Tape Edges
Before painting the colored squares, brush a tiny amount of the white trim color over the edge of your painter’s tape. This seals the tape and ensures perfectly crisp lines.
Step 2: Painting the Design
-
Paint the trim:
Once the caulk is fully cured, paint the entire grid—faces and edges—with your white semi-gloss paint. It helps to paint slightly onto the wall inside the squares to ensure full coverage of the trim edges. -
Tape the grid edges:
After the white trim paint is completely dry (wait at least 24 hours), carefully apply painter’s tape to the inside edges of the grid squares. Press the tape down firmly to prevent bleed-through. -
Plan the color gradient:
Arrange your paint pots to visualize the transition. The goal is a gradient effect: light beige/cream in the center rows, transitioning to rust/terracotta at the very top and darkening to sage/forest greens at the bottom. -
Paint the top row:
Using a small brush for corners and a mini foam roller for the center, apply two coats of your darkest rust/orange color to the squares in the highest row. -
Paint the second row:
Move to the row below the top and apply a lighter terracotta shade. Use the same cut-in and roll method for a smooth, finish without brush strokes. -
Apply the neutral center:
Paint the middle rows with your lightest cream or beige tones. These rows act as a ‘breathing room’ between the warm top colors and the cool bottom tones. -
Transition to green:
For the first row of green (below the creamy center), select a soft sage or muted willow color. Apply two coats, allowing proper drying time between them. -
Finish the bottom row:
Apply your darkest forest or olive green to the bottom-most row of squares. This grounds the design visually. -
Remove tape:
While the final coat is still slightly tacky or immediately after it dries, slowly peel off the painter’s tape at a 45-degree angle to reveal crisp lines. -
Touch up:
Inspect your edges. Use a small artist’s brush and the white trim paint to fix any tiny bleeds or imperfections for a professional finish.
Uneven Walls?
If your walls aren’t perfectly flat, the trim might pop up. Use extra construction adhesive and brace the trim with heavy objects or temporary creative clamping until the glue sets.
Step back and admire how this structured splash of color completely revitalizes the hallway space


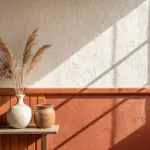
Alternating Matte and Gloss Square Finish
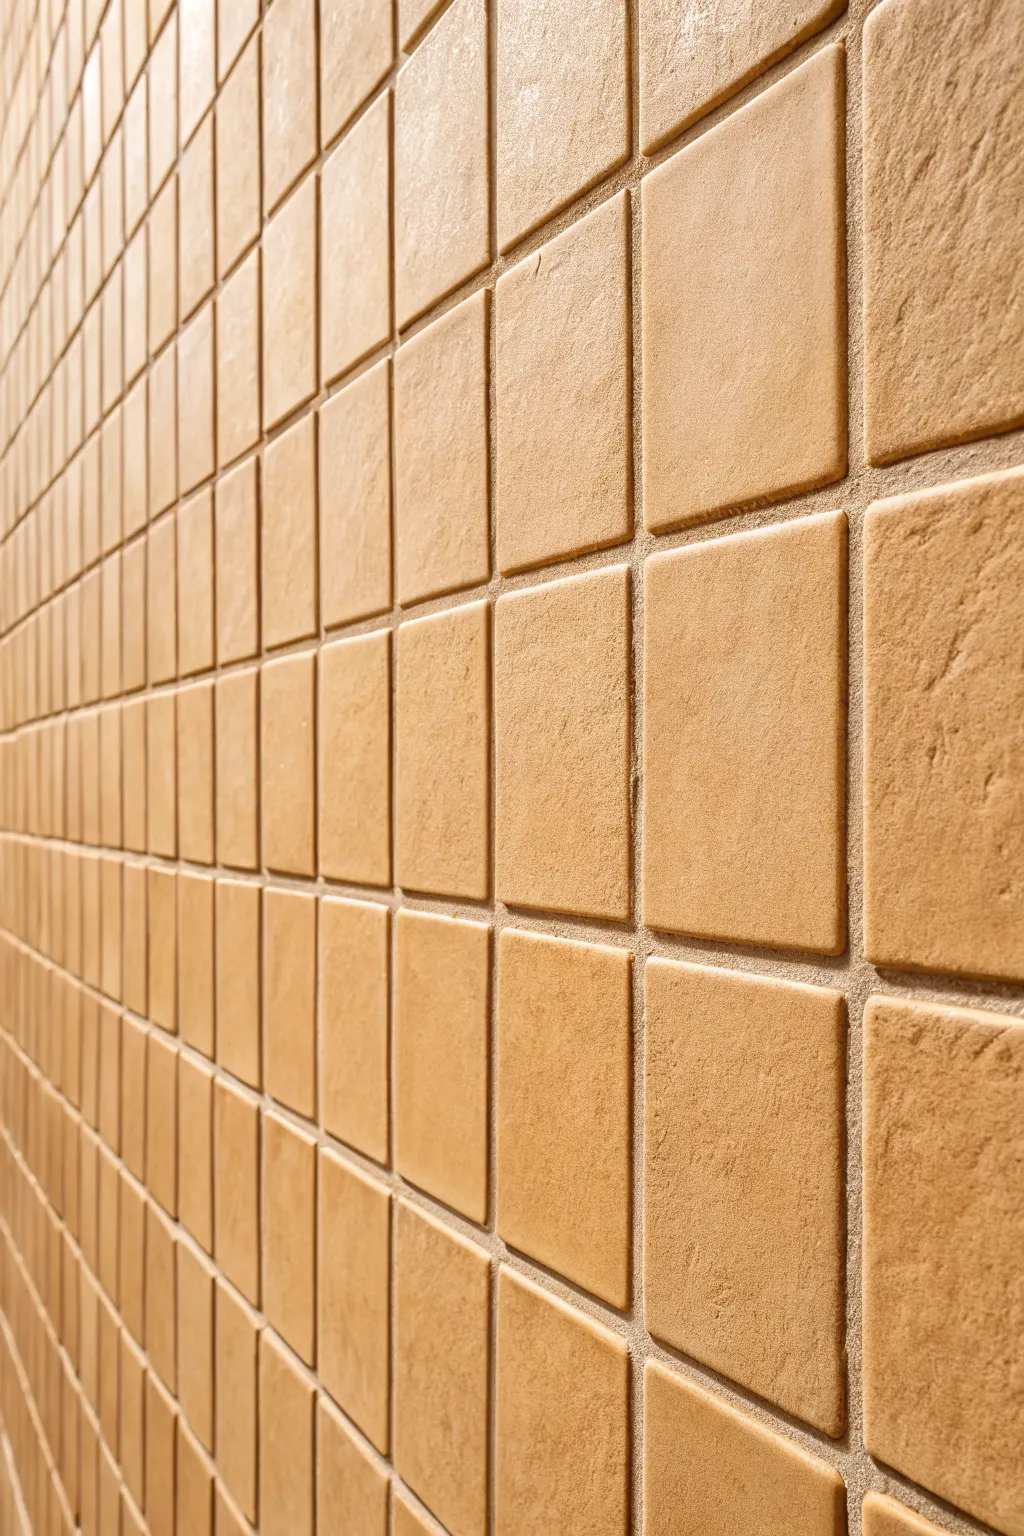
This project focuses on painting a hyper-realistic close-up of a tiled wall, emphasizing perspective and texture. By carefully layering shades of terracotta and using precise lines, you’ll create a striking sense of depth and dimension.
Step-by-Step
Materials
- Heavyweight cold press watercolor paper or canvas board
- Acrylic paints (Terracotta, Yellow Ochre, Burnt Sienna, Raw Umber, Titanium White)
- Ruler or T-square
- 2H pencil for drafting
- Fine liner brush (00 or 000)
- Flat shaders (sizes 4 and 8)
- Small round brush (size 2)
- Mixing palette
- Painter’s tape (optional)
Step 1: Drafting the Perspective Grid
-
Establish the Vanishing Point:
Begin by deciding on a vanishing point far off to the left side of your paper. This will determine the severe angle of the wall. -
Draw Horizontal Convergence Lines:
Using your ruler, lightly draw a series of converging lines radiating from your vanishing point across the paper. These will form the top and bottom edges of each row of tiles. Space them widely on the right and very narrowly on the left to simulate depth. -
Mark Vertical Divisions:
Draw vertical lines to separate the individual square tiles. Start on the right side with wide spacing (representing tiles closest to the viewer) and gradually decrease the spacing as you move left, making them extremely thin near the edge. -
Refine the Grout Lines:
Double your pencil lines slightly to create a small gap between each square. This space will become the grout, which is crucial for realism.
Step 2: Base Coating and Color Blocking
-
Mix the Base Terracotta:
Create a mid-tone mix using Terracotta, a touch of Yellow Ochre, and a tiny bit of Titanium White. You want a warm, earthy clay color. -
Paint Individual Tiles:
Using a flat shader brush, fill in each square tile shape. Be careful to stay inside your pencil lines, leaving the grid channels (grout lines) unpainted or white for now. -
Vary the Tone:
While painting, slightly alter your mix for random tiles—add a speck more Ochre to some or Burnt Sienna to others. This subtle variation mimics the natural differences in fired clay.
Don’t Be Too Perfect
Real tiles have imperfections. Allow your hand to wobble slightly when painting the tile edges; straight ruler lines look fake.
Step 3: Developing Texture and Form
-
Add Texture Stippling:
Once the base is dry, use an old, scruffy brush or a dry sponge. Dip it into a darker mix (Burnt Sienna and a hint of Raw Umber) and gently dab the centers of the larger, closer tiles to create a rough, porous stone texture. -
Create Highlights:
Mix a lighter shade with more Titanium White and Yellow Ochre. Dry brush this onto the top-left portion of the tiles (assuming light comes from the top left) to simulate a matte sheen and slight unevenness. -
Shadowing Edges:
With a small round brush and a watered-down Burnt Sienna/Raw Umber mix, glaze the bottom and right edges of each tile. This creates a bevelled effect, making the tiles look thick rather than flat.
Create a Crackle
Use a fine liner to paint tiny, hair-thin jagged lines on a few foreground tiles to simulate hairline cracks in the glaze.
Step 4: Detailing the Grout
-
Base Grout Color:
Mix a cool grey-beige using Titanium White, a dot of Raw Umber, and the tiniest speck of black. Careful not to make it too dark. -
Fill the Gaps:
Using your fine liner brush and a steady hand, paint the grid lines between the tiles. I find holding my breath for the long vertical lines helps keep them straight. -
Add Grout Shadows:
Once the grout color is dry, run a very thin line of darker grey along the top and left edges of the grout channels. This casts a shadow from the tile onto the grout, reinforcing the 3D illusion.
Step 5: Final Touches
-
Enhance The Perspective:
Review the tiles on the far left. If they look too detailed, glaze over them with a very thin wash of the grout color or a blurred grey to simulate atmospheric perspective and depth of field. -
Highlighting Edges:
Take pure Titanium White on your finest brush and add tiny tick marks on the very top corners of the closest foreground tiles. This ‘specular highlight’ suggests a slight sheen on the ceramic. -
Clean Up:
Erase any visible pencil marks that weren’t covered by paint, specifically around the outer edges of your composition.
Step back and admire how simple geometric shapes have transformed into a convincing architectural surface
Square Tile Accent Wall for Texture
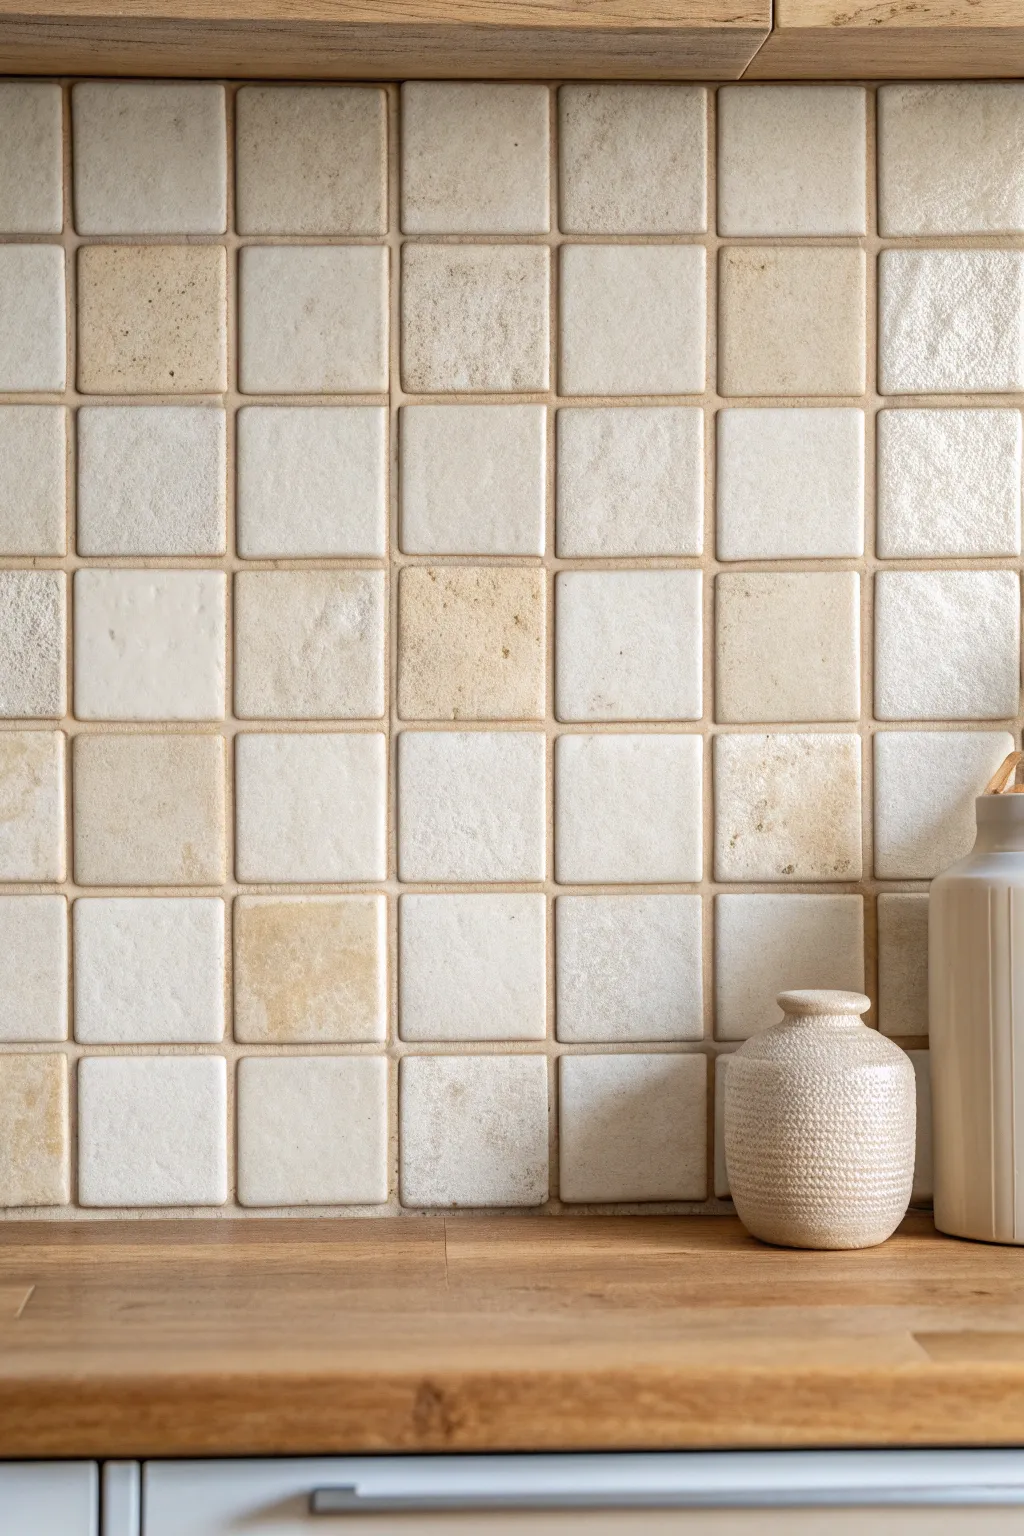
Transform a plain kitchen backsplash or accent wall into a warm, textural feature using tumbled limestone or travertine tiles. This project balances rustic charm with clean geometric lines, adding subtle depth and character to your space without overwhelming it.
Step-by-Step Tutorial
Materials
- 4×4 inch tumbled limestone or travertine tiles (variety of beige/cream tones)
- Tile adhesive (mastic or thin-set mortar)
- Notched trowel (1/4 inch)
- Tile spacers (1/8 inch or 1/16 inch)
- Tile cutter or wet saw
- Sanded grout (light beige or warm gray)
- Rubber grout float
- Large sponge
- Bucket for water
- Microfiber cloth
- Penetrating stone sealer
- Painter’s tape
- Spirit level
- Tape measure
Step 1: Preparation and Layout
-
Surface Prep:
Begin by ensuring your wall surface is clean, dry, and free of any grease or wallpaper. If you are tiling over drywall in a wet area, ensure it is primed correctly. -
Protect Surfaces:
Lay down drop cloths on your countertop and tape off the edges where the counter meets the wall to protect the wood from adhesive and grout spills. -
Test Layout:
Before mixing any adhesive, lay out a few rows of tiles on a flat surface or the floor. Shuffle tiles from different boxes to mix up the color variations and textures so you don’t end up with patches of dark or light tones. -
Establish Level Line:
Find the center of your wall and use a spirit level to draw a vertical plumb line. If your countertop isn’t perfectly level, draw a horizontal reference line slightly above the counter to ensure your first row starts straight.
Uneven Tiles?
Natural stone varies in thickness. If a tile sits too low, add a dab of extra adhesive to the back (back-buttering) to bring it flush with its neighbors.
Step 2: Installation
-
Spread Adhesive:
Apply the tile adhesive to a small section of the wall using the flat side of your trowel to key it in. -
Comb the Adhesive:
Use the notched side of the trowel to comb through the adhesive held at a 45-degree angle, creating uniform ridges that will grip the tiles firmly. -
Set First Tile:
Press your first tile firmly into the adhesive at your center line with a slight twisting motion to ensure full coverage on the back. -
Continue Placing Tiles:
Place adjacent tiles, inserting spacers between them to maintain consistent gaps. I like to periodically step back and check that the rows are staying level as I work my way across. -
Cutting Edges:
When you reach the ends of the wall or corners, measure the gap and cut your tiles to fit using a tile cutter or wet saw. -
Clean Joints:
As you work, clean out any adhesive that squeezes up between the tiles with a small tool or spacer before it hardens, as this will block the grout later. -
Let Set:
Allow the adhesive to cure fully according to the manufacturer’s instructions, usually 24 hours.
Step 3: Sealing and Grouting
-
Pre-Seal Stone:
Since natural stone is porous, apply a coat of penetrating sealer to the tile faces before grouting. This prevents the grout pigment from staining the stone surface. -
Mix Grout:
Mix your sanded grout with water until it reaches the consistency of smooth peanut butter. Let it slake (rest) for about 10 minutes, then mix briefly again. -
Apply Grout:
Using a rubber float, press the grout into the joints at a 45-degree angle. Work in small sections to ensure you fill the gaps completely without leaving voids. -
Remove Excess:
Hold the float at a steep 90-degree angle and swipe diagonally across the tiles to remove as much excess grout as possible from the surface. -
Sponge Clean:
Wait about 15-20 minutes for the grout to firm up slightly. Use a damp (not soaking) sponge to wipe the tile faces in a circular motion to shape the joints and clean the stone. -
Remove Haze:
Once the grout has dried completely and a haze forms on the tiles, buff it off with a clean, dry microfiber cloth to reveal the texture. -
Final Seal:
Apply a final layer of stone sealer over both the tiles and the grout lines to protect the entire wall from moisture and kitchen stains.
Pro Tip: Rustic Edges
Don’t stress about perfect grout lines. Slightly wider, hand-wiped joints complement the tumbled edges of the stone, enhancing that desired aged look.
Now enjoy the visual warmth your new textured stone wall brings to the room
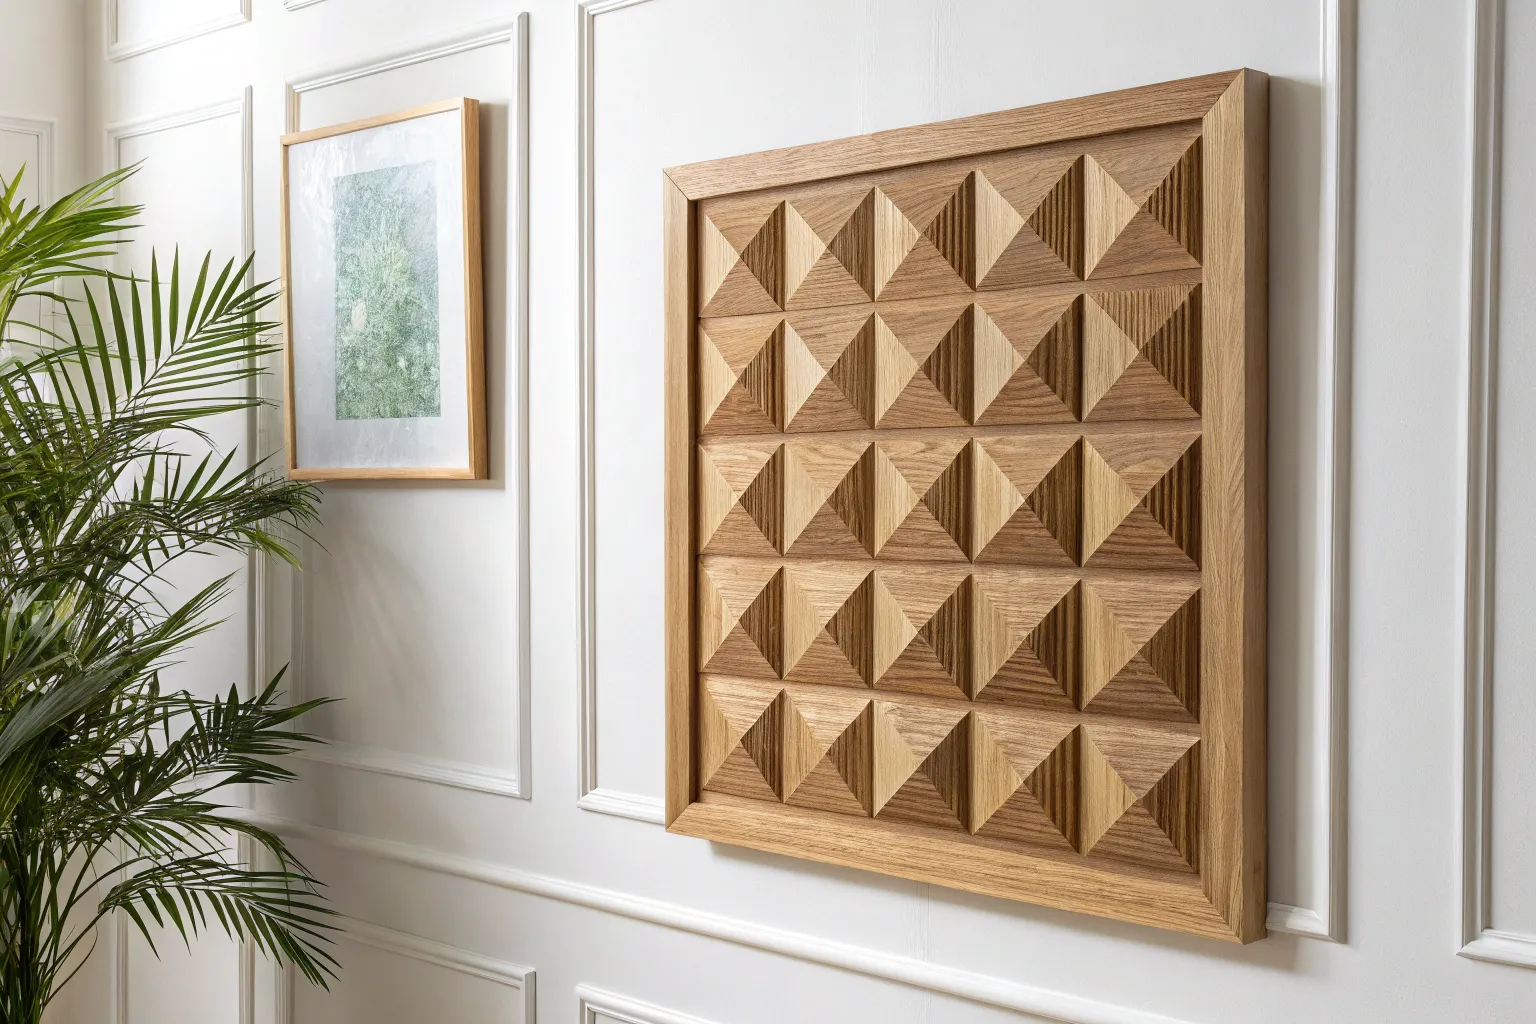
Wood Slat Squares with Direction Changes
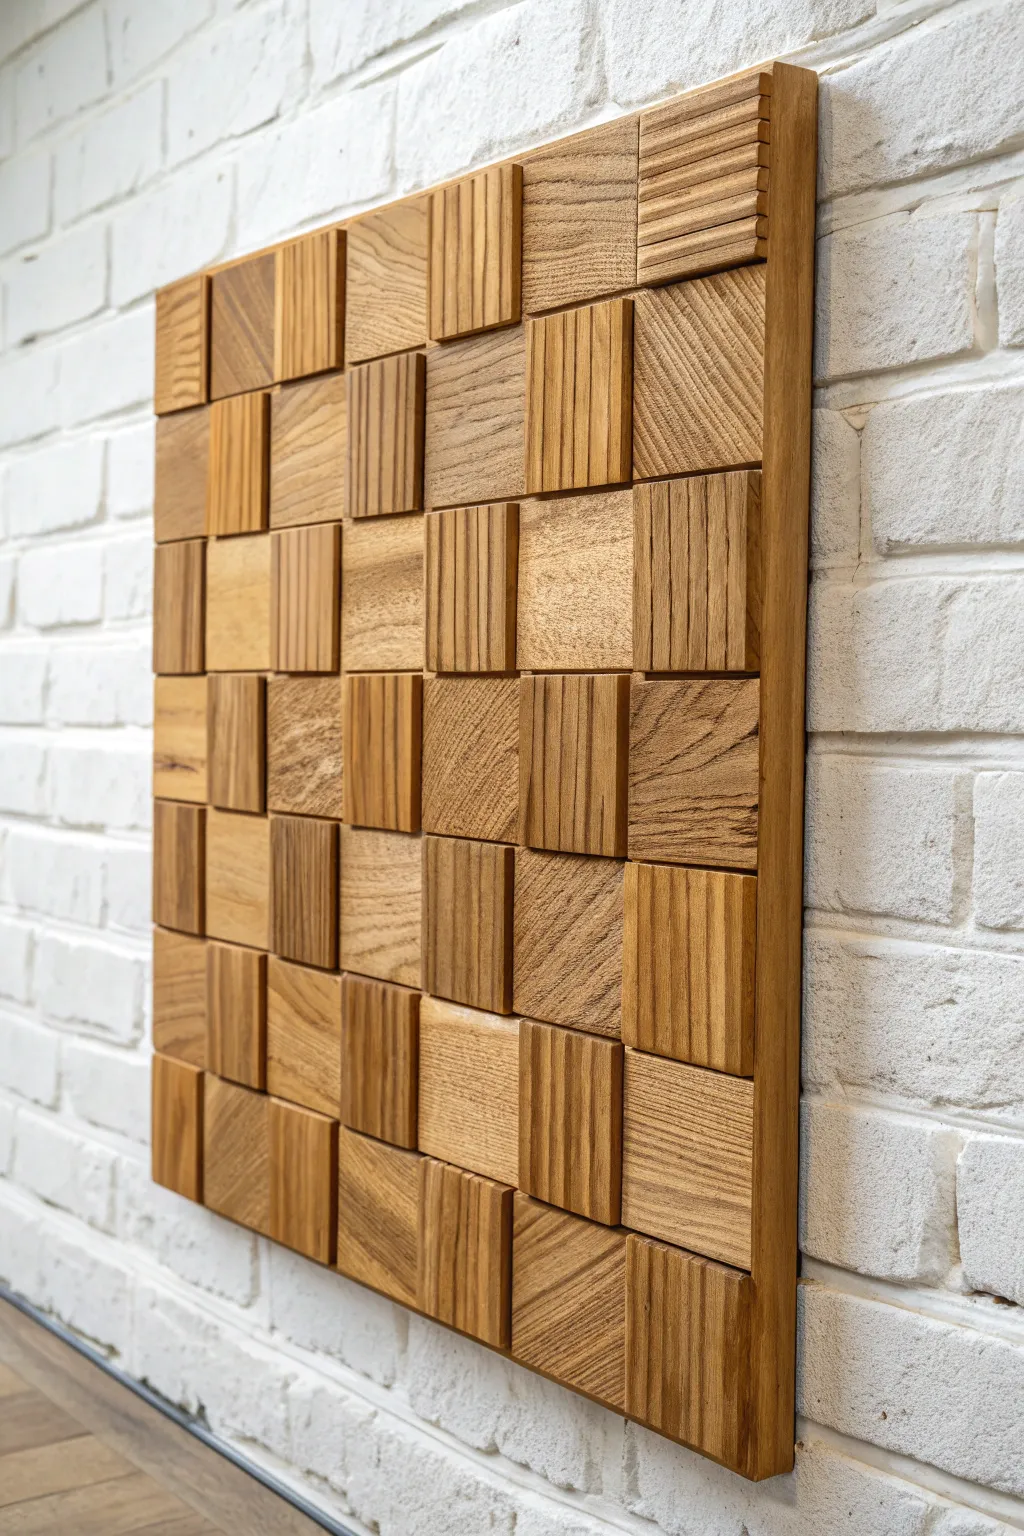
Add warmth and texture to any room with this stunning architectural piece that plays with depth, grain direction, and shadow. By alternating grooved slats with flat wood grain blocks, you’ll create a sophisticated checkerboard pattern that shifts dynamically as the light changes.
Step-by-Step
Materials
- Solid oak boards (approx. 1×6 or similar, planed)
- Plywood backing sheet (1/2 inch or 3/4 inch thick)
- Table saw or router with dado stack/bit
- Miter saw
- Wood glue
- Pin nailer or brad nailer
- Orbital sander with various grits (120-220)
- Wood stain or clear oil finish (e.g., Danish oil)
- French cleat hanging system
- Clamps
- Tape measure
- Pencil
Step 1: Preparing the Base and Blocks
-
Measure and cut the backing:
Determine the desired final size of your art piece. Cut your plywood backing sheet into a perfect square or rectangle to serve as the foundation. Sand the edges smooth since the outer frame will attach here later. -
Calculate block sizes:
Divide your backing width by the number of columns you want (e.g., 6 or 8) to determine the exact dimension of each square block. Aim for a grid where each wooden square is identical in length and width. -
Mill your lumber to thickness:
This project relies on varying depths. Plane half of your oak stock to a thicker dimension (e.g., 3/4 inch) and the other half slightly thinner (e.g., 1/2 inch) to create natural relief, or plan to use riser blocks later. -
Cut the square blanks:
Using a miter saw set to a perfect 90 degrees, cut your planed oak boards into individual squares based on your calculated dimensions. You will need enough squares to cover the entire grid.
Step 2: Adding Texture and Detail
-
Create the grooved texture:
Select half of your square blocks to receive the ‘slatted’ treatment. Set up a table saw with a dado blade or use a router table with a straight bit to cut shallow parallel grooves into the face of these blocks. -
Refine the edges:
Lightly sand the edges of every block—both the grooved and flat ones—to remove sharp burrs. A slight chamfer or ‘break’ on the edge helps differentiate the squares once they are butted together. -
Sand the surfaces:
Run an orbital sander over the faces of the flat blocks until silky smooth. For the grooved blocks, I find it easiest to fold sandpaper and hand-sand inside the channels to ensure no fuzz remains. -
Dry fit the pattern:
Lay your plywood backing flat on a workbench. Arrange your blocks in a checkerboard pattern, alternating between the grooved texture and the flat grain. Rotate the grain direction 90 degrees for each adjacent block to maximize visual interest.
Grain Direction Trick
Mark the back of each block with an arrow indicating grain direction before gluing. It makes the checkerboard assembly much faster and prevents mistakes.
Step 3: Assembly and Finishing
-
Establish a center line:
Mark horizontal and vertical center lines on your plywood backing. It is crucial to start gluing from the center and work outward so any slight measurement drift happens at the edges, not the middle. -
Glue the first blocks:
Apply wood glue to the back of your central blocks. Press them firmly onto the plywood, aligning them perfectly with your guide lines. Use a pin nailer to tack them in place while the glue sets. -
Build the grid outward:
Continue gluing and pinning blocks, working your way to the edges. Check consistently with a square to ensure your rows remain straight and tight against one another. -
Trim the perimeter:
Once all blocks are secured and the glue is dry, you might have slight overhangs at the edges. Use a track saw or table saw to trim the entire perimeter for a crisp, perfectly square edge. -
Attach the frame:
Cut thin strips of oak to frame the edges of the plywood backing, hiding the ply layers. Miter the corners for a professional look and attach with glue and pin nails, ensuring the frame sits flush with the highest blocks. -
Apply the finish:
Wipe away all dust with a tack cloth. Apply a clear oil finish or stain with a rag or brush. The oil will darken the end grain and deeper grooves slightly more, naturally enhancing the 3D effect. -
Install hanging hardware:
Flip the heavy piece over and attach a sturdy French cleat roughly 3 inches from the top edge. This ensures the artwork sits flush against the wall and can support the weight of the solid oak.
Create More Depth
Glue small scrap pieces of 1/4″ plywood behind random blocks before attaching them to the main board. This creates three levels of depth instead of just two.
Now step back and admire how the light plays across the different textures of your new centerpiece.
Floating Square Shelf Cubes as Wall Art
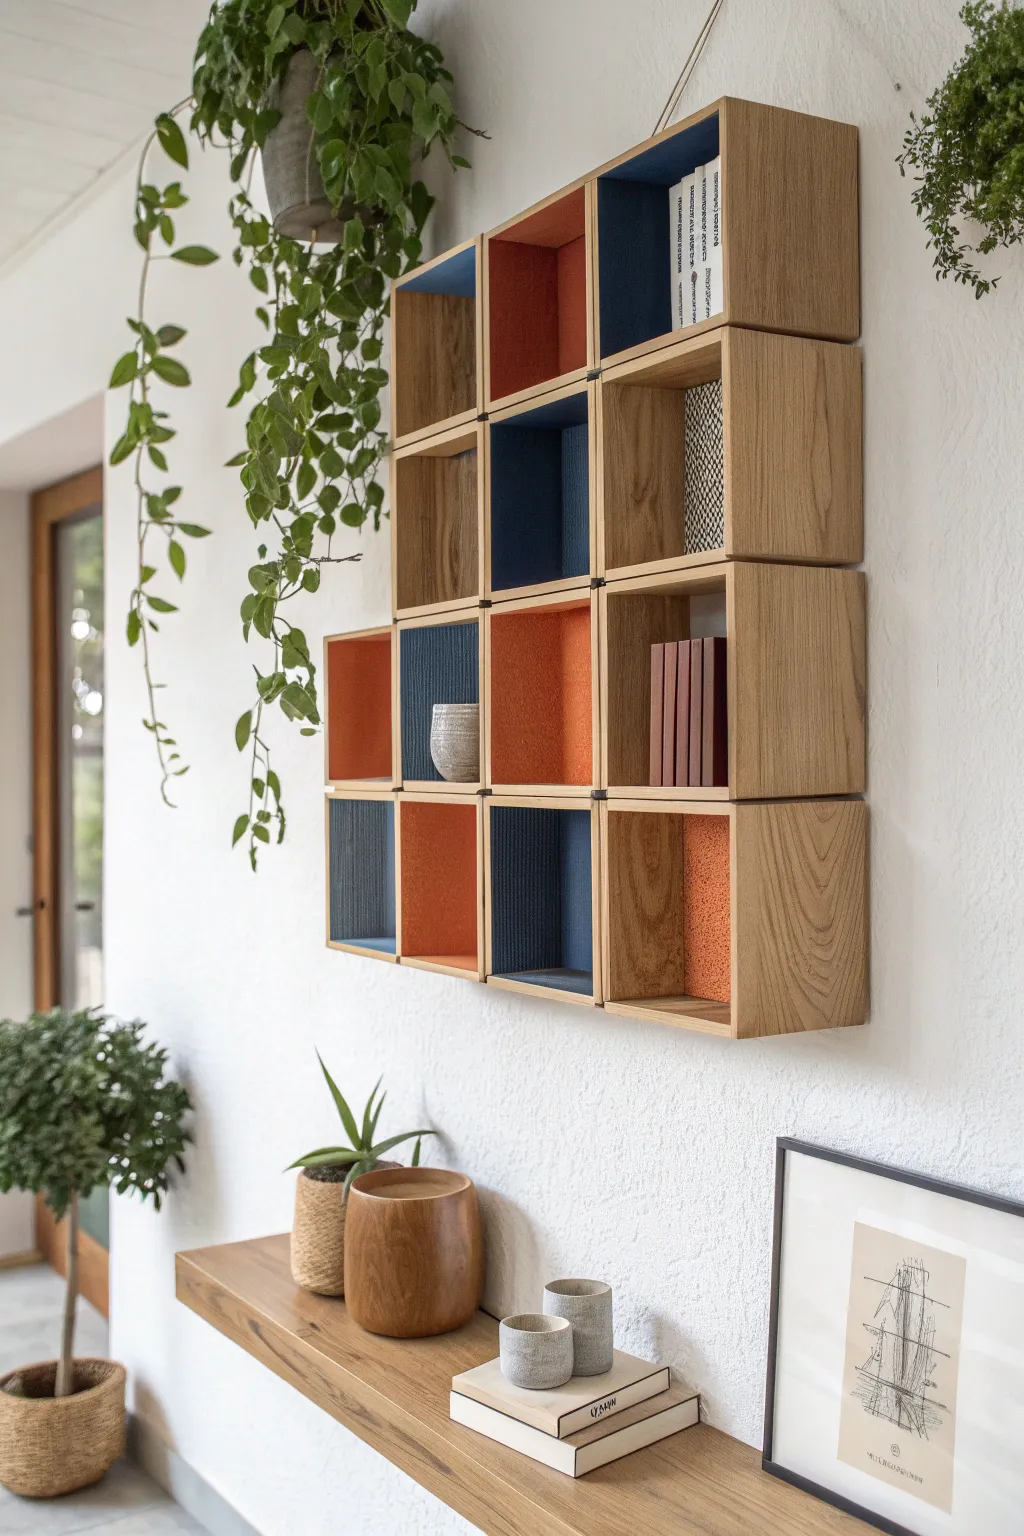
Transform a blank wall into a functional art piece with this modular shelving system made of interconnected oak cubes. The design features alternating open backs and painted interior panels, creating a playful yet sophisticated rhythm of color and negative space.
How-To Guide
Materials
- 1×6 inch oak lumber (or high-quality oak plywood)
- Wood glue
- Pin nails or finish nails
- Wood filler (oak color)
- Sandpaper (120, 220, and 320 grit)
- Clean rags or tack cloth
- Matte clear coat polyurethane
- Interior backing panels (1/4 inch plywood)
- Acrylic craft paint (terra cotta orange and deep navy blue)
- Small foam roller and tray
- Metal mending plates or binding post screws
- Heavy-duty wall anchors and mounting screws
- French cleat system or keyhole hangers
Step 1: Constructing the Cubes
-
Plan the Layout:
Begin by sketching your desired configuration on graph paper. The image shows a ‘stair-step’ pattern of 3-4-4-2 cubes from top to bottom, but decide what fits your specific wall space. -
Cut the Boards:
Cut your oak 1×6 lumber into equal lengths. For perfect squares, you will need two top/bottom pieces and two shorter side pieces per cube (subtracting the material thickness) to ensure ends are flush. -
Cut Backing Grooves:
For the cubes that will have colored backs, use a router or table saw to cut a rabbet (groove) along the back interior edge of the pieces. This allows the 1/4 inch panel to sit flush rather than sticking out. -
Assemble the Boxes:
Apply a bead of wood glue to the joints and clamp the pieces into a square shape. Use a speed square to ensure 90-degree angles. -
Secure the Joints:
While glued and clamped, drive pin nails or finish nails into the joints for added strength. Wipe away any excess glue squeeze-out immediately with a damp rag. -
Fill and Sand:
Once the glue is fully cured, fill any nail holes with oak-colored wood filler. Sand the entire box, starting with 120 grit and progressing to 220 grit for a smooth finish.
Vibrant Texture
Instead of painting plywood, glue colored felt or fabric onto the backing panels before installing. This adds sound dampening and a cozy texture.
Step 2: Finishing and Painting
-
Seal the Oak:
Apply a thin coat of matte clear polyurethane to the oak boxes. This protects the wood while keeping the natural look low-sheen. Let it dry completely. -
Sand Between Coats:
Lightly hand-sand the clear coat with 320 grit sandpaper to knock down any raised grain, then apply a second coat for durability. -
Cut Backing Panels:
Cut your 1/4 inch plywood into squares that fit snugly into the rabbeted grooves you created earlier. You only need these for about half the cubes. -
Paint the Accents:
Using a small foam roller, paint the backing panels. Alternate between the deep navy blue and terra cotta orange. I prefer two light coats rather than one heavy one to avoid drips. -
Install the Backs:
Once the paint is dry, apply a small amount of glue to the rabbet groove and press the painted panels into place. Pin nail them from the back to secure them invisibly.
Step 3: Assembly and Installation
-
Connect the Modules:
Lay out the full arrangement on the floor. Clamp neighboring cubes together and pre-drill holes through the sides where they touch. -
Fasten Together:
Secure the cubes to each other using binding post screws (Chicago screws) for a clean look, or simple standard wood screws if the heads won’t be visible. -
Attach Mounting Hardware:
Install keyhole hangers or a French cleat system on the back of the topmost cubes. Since the unit is now one piece, you need strong anchors at the top points. -
Mount to Wall:
With a helper, lift the assembled unit, check for level, and mark your anchor points on the wall. Install your wall anchors and hang the unit securely.
Seamless Joinery
For a cleaner look, use mitered corners (45-degree cuts) instead of butt joints. It takes more precision but hides the end grain beautifully.
Now you have a stunning, architectural focal point ready for your favorite books and plants
3D Raised Squares for Shadow Play
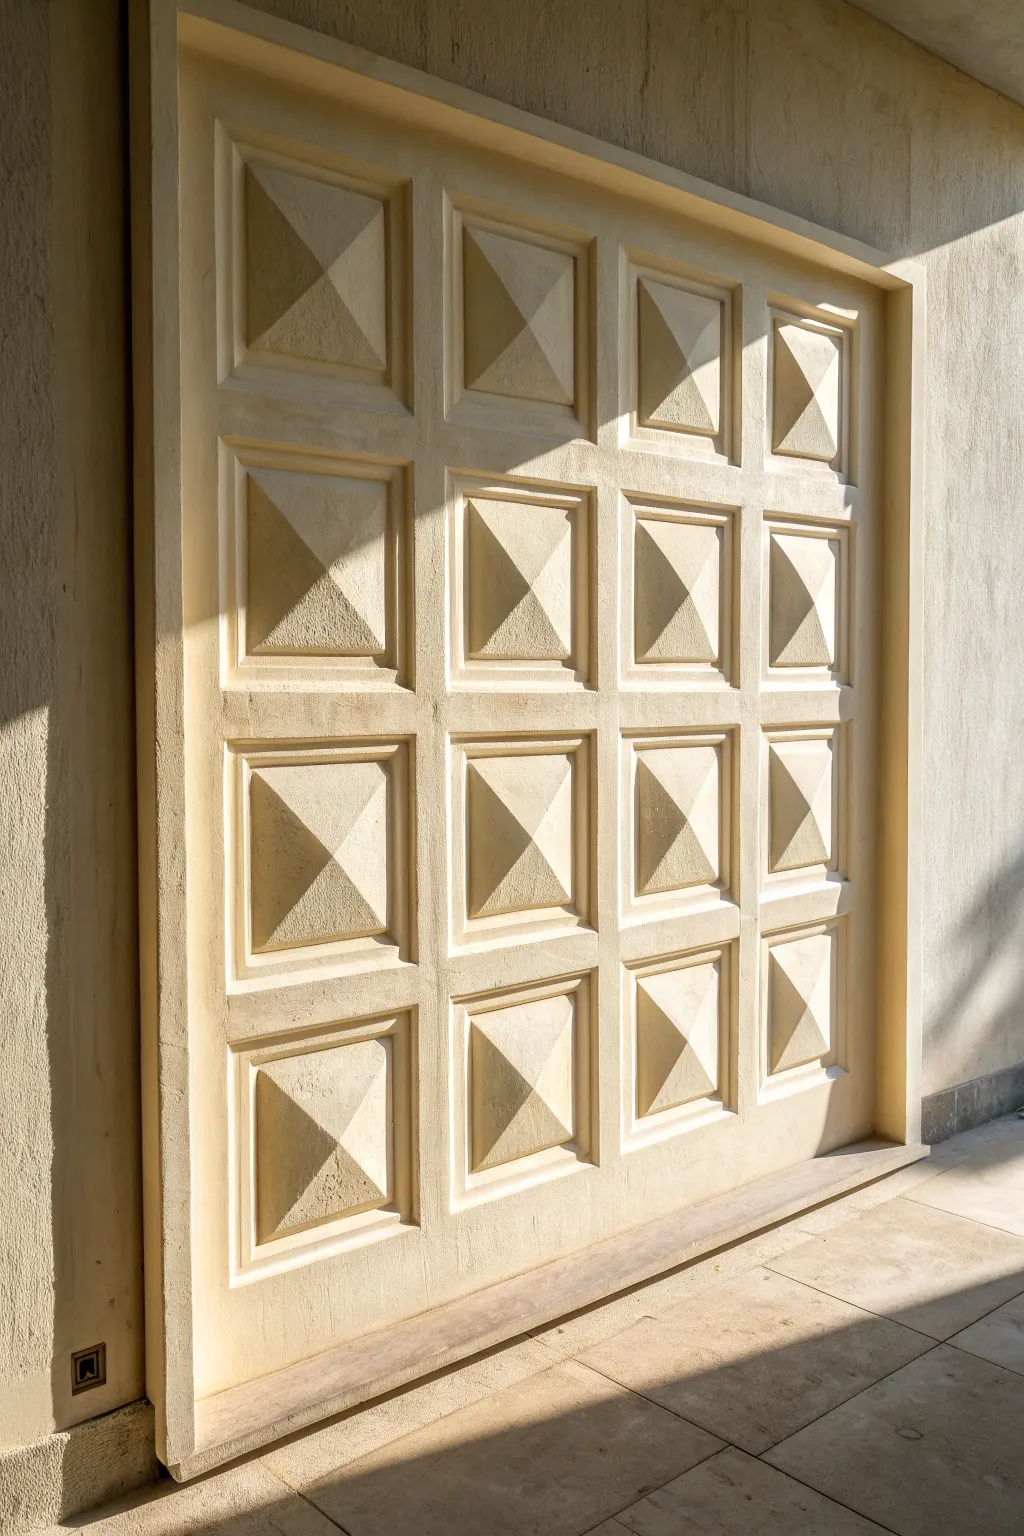
Harness the power of light and shadow with this architectural wall feature that turns simple geometry into high-impact art. By constructing a precise grid of raised pyramid shapes, you’ll create a surface that changes dramatically throughout the day as the sun moves across it.
Step-by-Step Guide
Materials
- One large sheet of 3/4-inch MDF or plywood (cut to desired total size, e.g., 4ft x 4ft)
- Square plywood bases (16 pieces, e.g., 10×10 inches each)
- Dimensional lumber (1x2s or 1x3s) for the grid framework
- Pre-cut wooden pyramid post caps (16 pieces, sized to fit your squares) OR 2-inch rigid foam insulation board to carve custom shapes
- Construction adhesive (heavy duty)
- Wood glue
- Pin nailer or brad nailer with nails
- Wood filler or drywall joint compound
- Sandpaper (120 and 220 grit)
- Primer (high-build formula recommended)
- Matte or eggshell interior paint in a warm stone/beige color
- Caulk and caulk gun
- Level and measuring tape
Step 1: Planning and Base Construction
-
Determine your scale:
Measure your intended wall space carefully. For the 4×4 grid shown in the image, you need a square base relative to the size of your pyramid inserts. A 4-foot by 4-foot total panel works well with 10-inch square inserts allowing for framing. -
Prepare the backer board:
Cut your main backing sheet (the 3/4-inch MDF) to exact dimensions. Lay it flat on a large work surface or the floor. -
Mark the grid:
Draw a precise 4×4 grid on the backer board. Calculate the spacing for your rails and stiles (the frame parts) so that every ‘window’ in the grid is identical. -
Install the grid framework:
Cut your dimensional lumber to create the raised grid. Glue and nail the vertical strips first, running from top to bottom. Then, cut shorter horizontal pieces to fit snugly between the verticals, creating 16 distinct recessed pockets.
Uneven Shadows?
If shadows look crooked, your pyramids might be slightly off-center. Use a spacer block when gluing the pyramids to their bases to ensure the border gap is perfectly equal on all four sides.
Step 2: Creating the Pyramids
-
Source the center shapes:
The easiest way to get consistent geometry is buying large wooden pyramid post caps (usually meant for fence posts) if you can find them in the right size (e.g., 8-10 inches). If not, you will need to cut them from rigid foam or build them from four triangles of mitered plywood. -
Mount pyramids to substuture:
If using post caps, glue them exactly into the center of your 16 pre-cut square plywood bases. There should be a small flat margin around the pyramid base to mimic the ‘framed’ look in the photo. -
Secure squares into the grid:
Apply heavy-duty construction adhesive to the back of each pyramid-mounted square. Press them firmly into the 16 pockets of your main grid framework. I like to use a scrap block of wood to hammer them gently to ensure they sit flush.
Stone Effect
For a true cast-stone feel, dab the wet paint with a crumpled plastic bag. This creates random organic highs and lows that catch the light just like real masonry.
Step 3: Detailing and Surface Prep
-
Fill the gaps:
This step is critical for the ‘monolithic’ stone look. Use paintable caulk for all seams where the wood meets the backer. Use wood filler for any nail holes or joints in the grid frame. -
Create a texture (Optional):
To match the sandy, stone-like texture in the image, you can mix a small amount of fine sand or additive into your primer, or skim coat the entire surface with a thin layer of drywall joint compound and tap it with a sponge. -
Sand for uniformity:
Once the filler or joint compound is fully dry, sand everything. You aren’t aiming for glass-smooth; you want a consistent, unified matte surface. Pay special attention to the corners of the pyramids. -
Prime the assembly:
Apply a coat of high-build primer. This type of primer is thicker and helps hide wood grain, making disparate materials (wood, foam, MDF) look like one solid poured piece.
Step 4: Painting and Finishing
-
First coat application:
Using a high-quality brush for the corners and a small foam roller for the flat high-spots, apply your base color. A warm, creamy beige or ‘latte’ color works best to replicate natural limestone. -
Check for flaws:
Shine a work light sideways across the panel (raking light). This will reveal any lumps or gaps you missed. Fill and sand these spots now before the final coat. -
Final coat:
Apply the second layer of paint. Maintain a ‘wet edge’ to avoid lap marks. A matte finish is essential here; glossy paint will create unwanted glare that competes with the natural shadows of the relief. -
Installation:
This panel will be heavy. Secure it to the wall using a heavy-duty French cleat system bolted into wall studs, ensuring it is perfectly level.
Step back and watch how your new wall sculpture transforms as the sun moves across the room.
Optical-Illusion Cube Squares in Paint
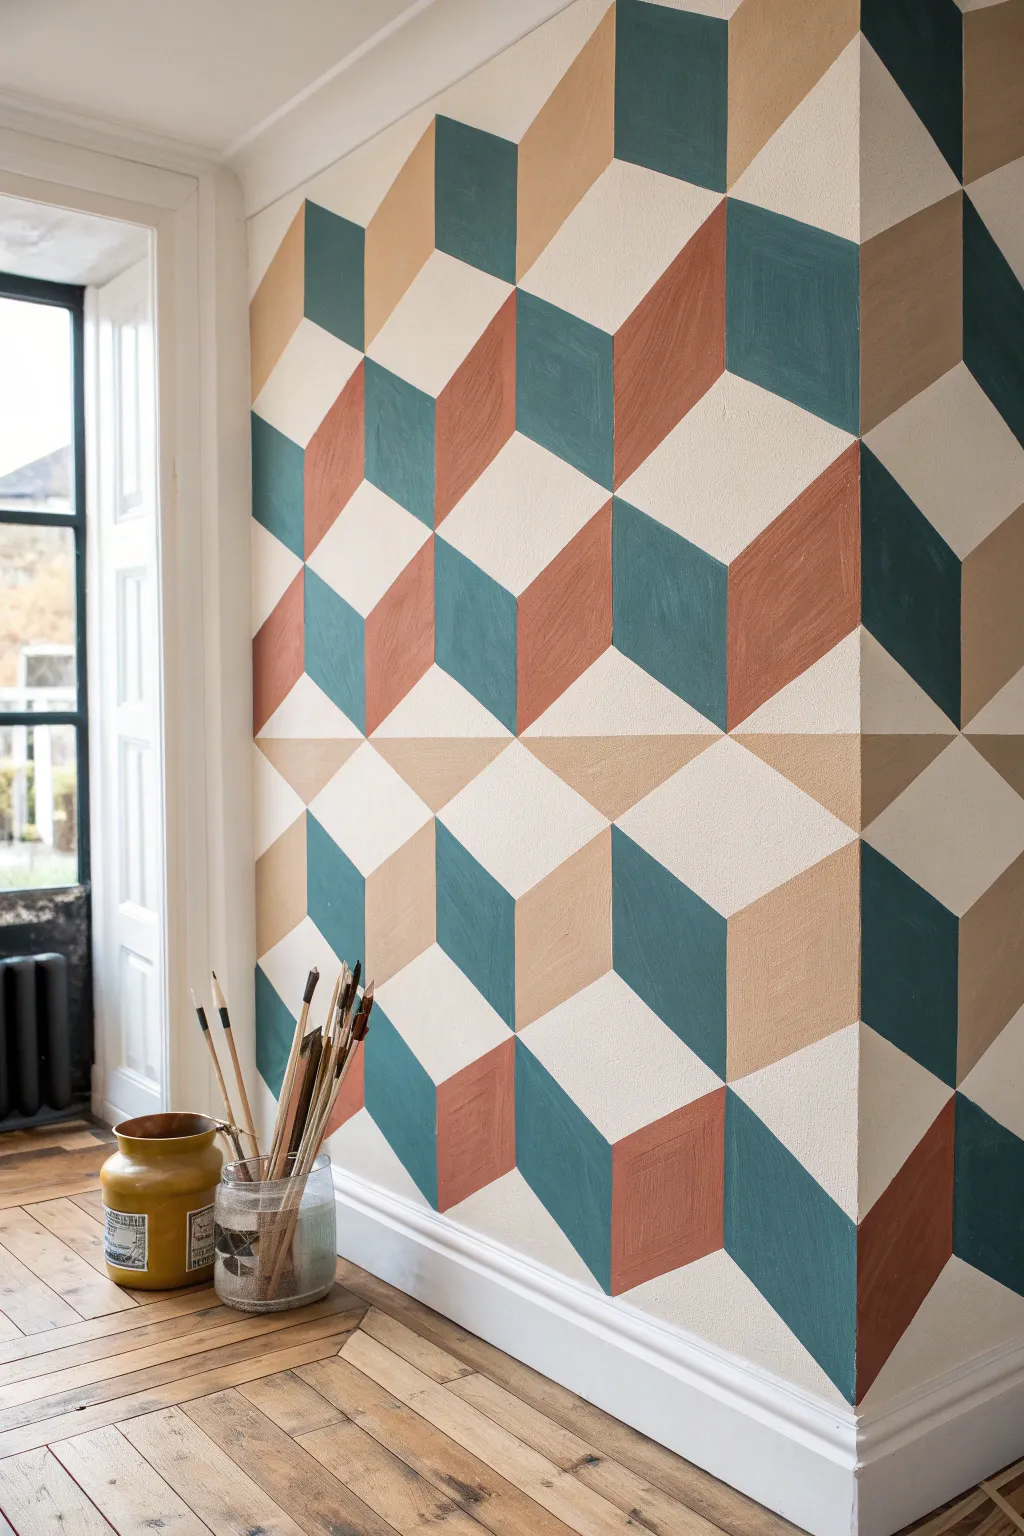
Transform a plain wall into a stunning optical illusion with this tumbling block pattern. Using a clever combination of taping and three distinct colors, you’ll create depth and dimension that makes the surface pop right into the room.
How-To Guide
Materials
- Painter’s tape (high quality, 1-inch width)
- Pencil
- Long straightedge or level (2-4 ft)
- Measuring tape
- Base wall paint (creamy off-white)
- Accent paint 1: Teal or deep green
- Accent paint 2: Terracotta or rusty orange
- Accent paint 3: Warm beige or tan
- Small foam roller
- Angled sash brush (1.5 – 2 inch)
- Drop cloth
- Cardboard diamond template (optional but helpful)
Step 1: Preparation and Grid Layout
-
Prepare the surface:
Start with a clean, dry wall. If your current wall color isn’t the creamy off-white shown on the lighter ‘top’ faces of the cubes, roll two coats of your base color over the entire wall and let it cure for at least 24 hours so tape won’t peel it up. -
Establish the vertical lines:
Measure the total width of the wall and decide on the width of your cubes (about 8-10 inches is standard). Mark vertical lines from floor to ceiling at these intervals using a level and a light pencil line. -
Mark the 60-degree angles:
To create the isometric perspective, you need 30-degree and 60-degree angles. Use a large protractor or create a cardboard diamond template where the top and bottom angles are 120 degrees and the side angles are 60 degrees. -
Draw the grid:
Trace your template or ruler guidelines up each vertical column. The pattern works by shifting the diamond up by half a diamond’s height in every alternating column. It helps to lightly pencil in the entire grid first to ensure the pattern meets the ceiling and floor correctly. -
Identify the color zones:
This step saves headaches later. Lightly mark a small ‘T’ for Teal, ‘R’ for Rust, and ‘B’ for Beige inside the corresponding diamond shapes directly on the wall. Leave the top faces blank (base color).
Clean Edges Pro Tip
Run a credit card or a plastic putty knife firmly over the edge of the painter’s tape before painting. The heat from the friction activates the adhesive for a super-tight seal.
Step 2: Taping and Painting Round 1
-
Tape the first set of shapes:
You cannot paint touching shapes simultaneously. Tape off ‘Group A’—all the teal diamond sides. Make sure the tape is pressed firmly outside the pencil line so the paint covers the line. -
Seal the tape edges:
To get crisp lines, I always run a very thin layer of the *base wall color* over the tape edge first. This seals any gaps; if paint bleeds, it will be the invisible base color. -
Paint the teal sections:
Using a small foam roller or brush, fill in the taped teal sections. Apply two thin coats rather than one thick one to avoid ridges. -
Remove tape while damp:
Peel off the tape slowly at a 45-degree angle while the second coat is still slightly tacky. This prevents the dried paint film from ripping. -
Let dry completely:
Allow these sections to dry fully (usually 2-4 hours) before taping over them for the next round.
Bleeding Lines?
If paint bleeds under the tape, wait for it to fully dry. Then, re-tape along the correct line and paint over the mistake with the original base color to ‘erase’ the bleed.
Step 3: Taping and Painting Round 2
-
Tape the contrasting sides:
Now tape off the ‘Group B’ shapes—the terracotta/rust sections. Your tape will now go over the dried teal edges you just painted, so ensure that paint is fully cured. -
Paint the terracotta sections:
Repeat the painting process with your rusty orange color. Focus on the corners where the colors meet; use an angled artist brush if the roller can’t reach the sharp point without going over the line. -
Remove and dry:
Remove the tape carefully and let this second color group dry completely.
Step 4: Final Details
-
Address the lower section:
The reference image shows a color shift near the bottom half where beige replaces one of the darker tones. Tape and paint these beige sections last, following the same drying protocols. -
Touch up lines:
Inspect your intersections. If there are small gaps between colors or slight bleeds, use a tiny artist’s liner brush and the appropriate paint color to correct them freehand. -
Erase pencil marks:
Gently erase any visible pencil guidelines that weren’t covered by paint. If the pencil is stubborn, a tiny dab of base paint on a Q-tip works as ‘white-out’.
Enjoy the incredible depth and modern flair your new feature wall brings to the space


Have a question or want to share your own experience? I'd love to hear from you in the comments below!