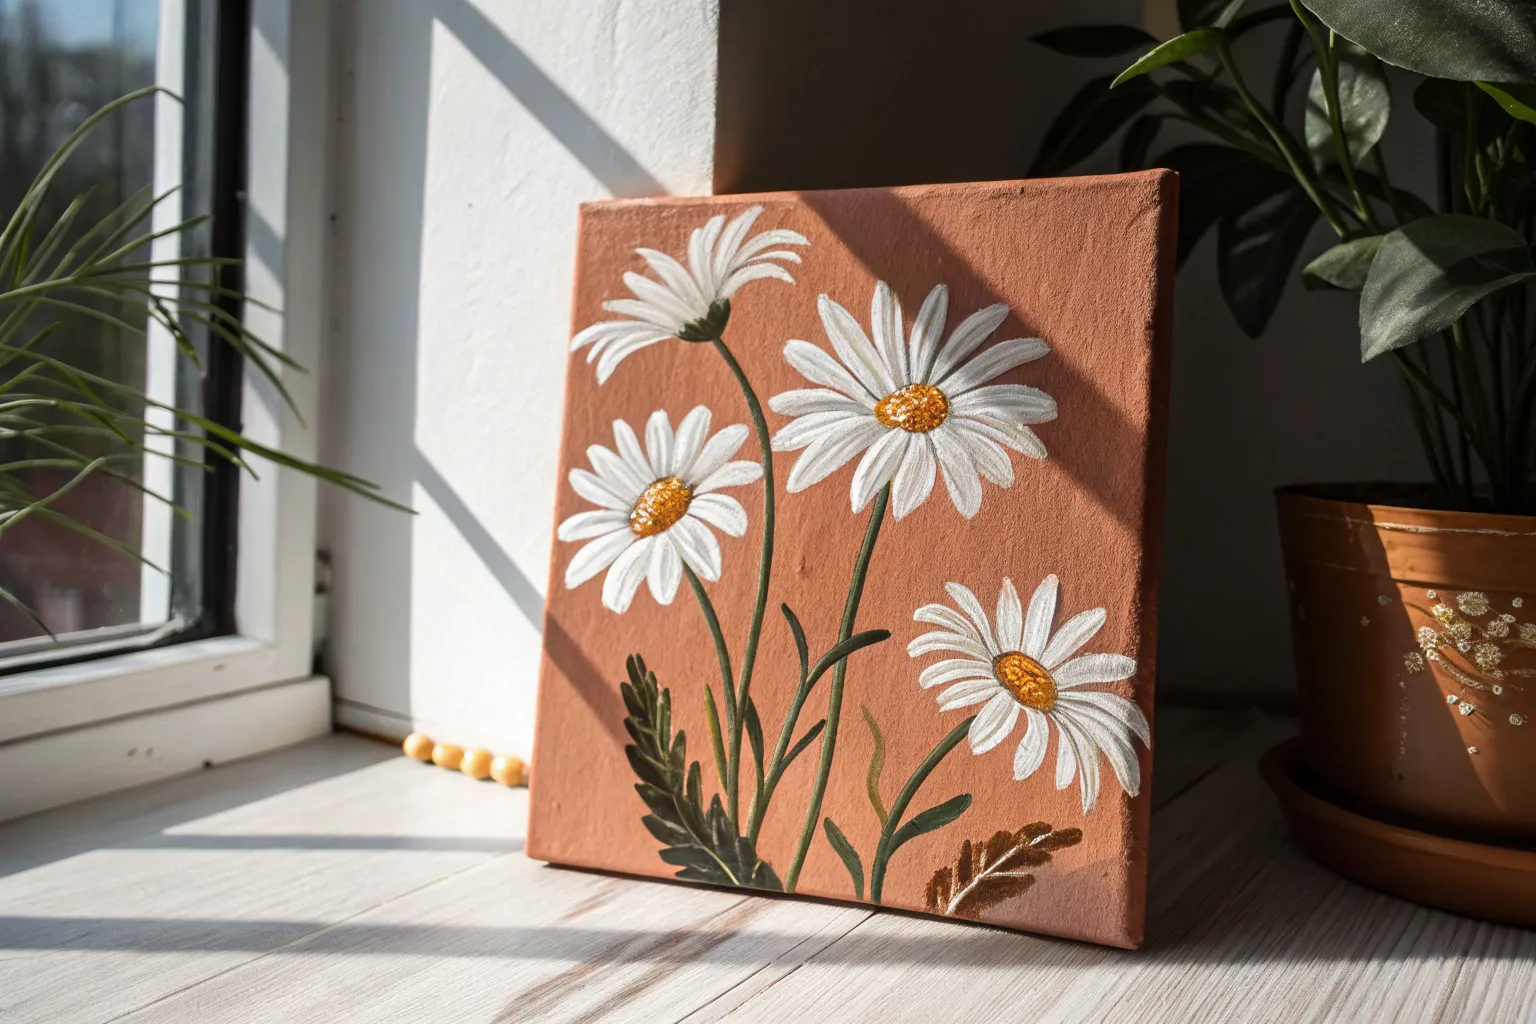
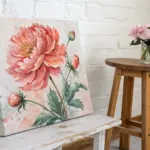
Daisies are my favorite “instant confidence” flower because you can keep them simple and still make them look gorgeous. Here are daisy flower painting ideas that start classic and beginner-friendly, then build into more playful, artsy twists once you’re warmed up.
Classic Single Daisy on a Dark Background
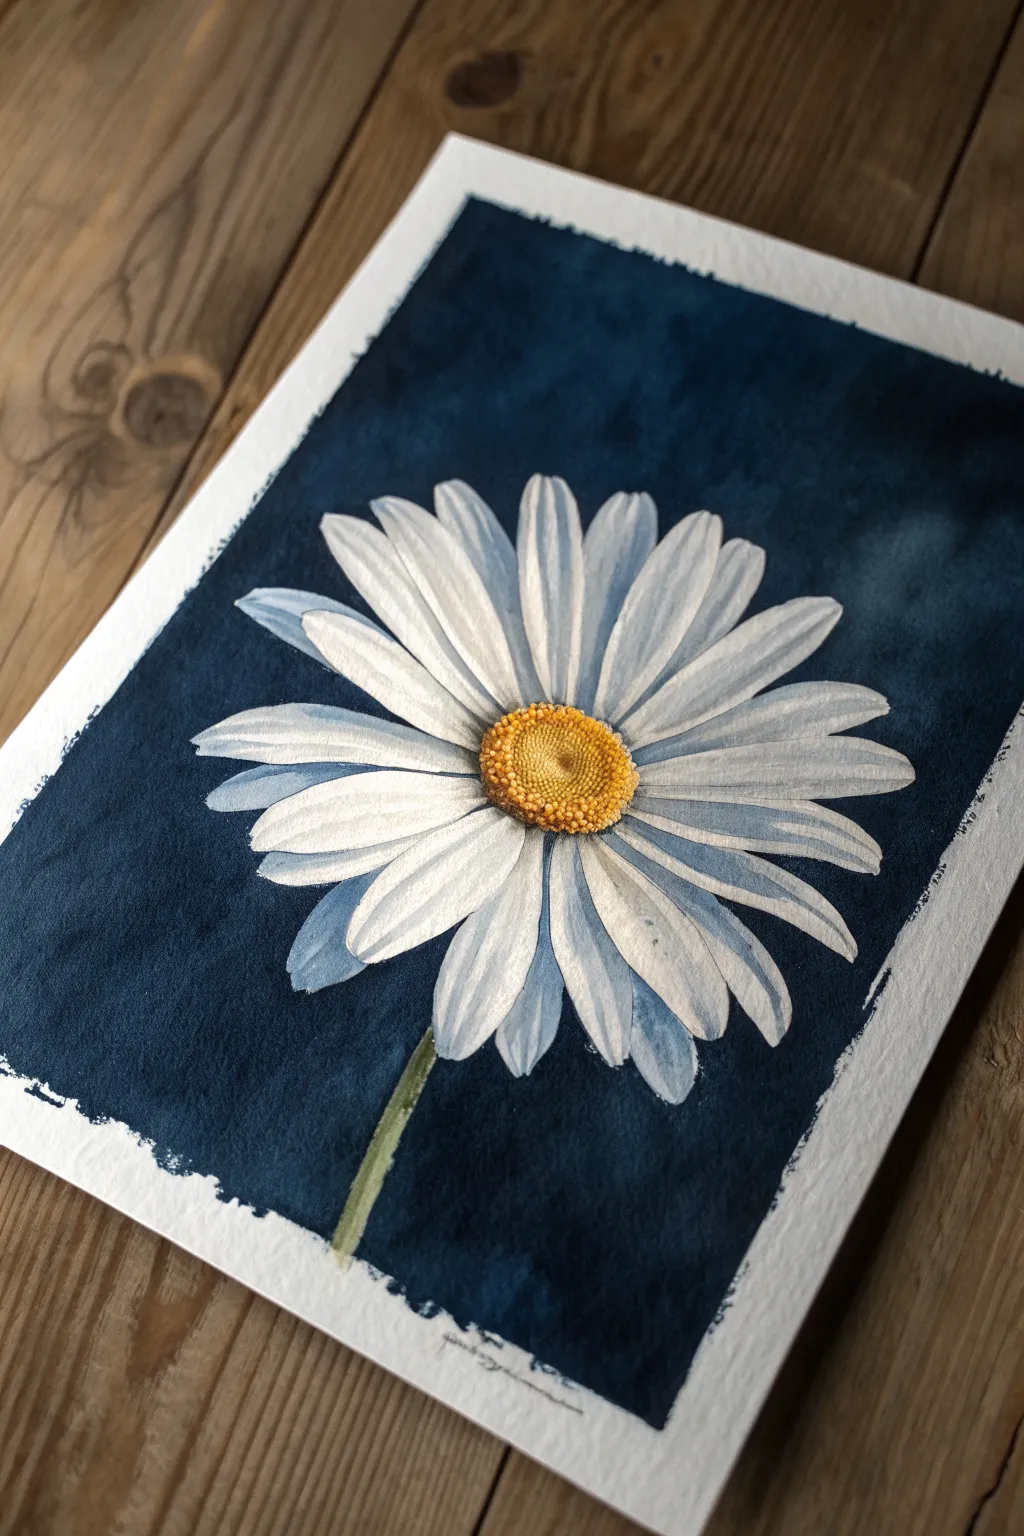
This stunning project contrasts the purity of a single white daisy against a deep, moody navy blue background. Using opaque gouache paints, you will capture the delicate texture of the petals and the golden grit of the flower’s center.
Detailed Instructions
Materials
- Cold press watercolor paper (300 gsm)
- Gouache paints (Titanium White, Prussian Blue, Burnt Umber, Lemon Yellow, Yellow Ochre, Sap Green)
- Painter’s tape or masking tape
- Round brushes (sizes 2, 6, and 10)
- Fine liner brush (size 0 or 00)
- Pencil (HB or lighter) and kneaded eraser
- Palette and water jars
Step 1: Preparation and Background
-
Tape the Edges:
Secure your paper to a flat surface using painter’s tape on all four sides. Leave about a half-inch border if you want that crisp, ragged edge look shown in the reference. -
Sketch the Outline:
Lightly draw the daisy’s center as an oval slightly below the middle of the page. Sketch the petals radiating outward, making sure they vary in length and curvature to look natural. -
Establish the Stem:
Draw a slender stem curving gently downward from the flower head. Keep your pencil pressure extremely light so graphite doesn’t smudge into the white paint later. -
Mix the Navy Background:
On your palette, mix a large amount of Prussian Blue with a touch of Burnt Umber to deepen it. You want a rich, dark navy that feels almost like the night sky. -
Paint Around the Flower:
Using the size 10 round brush, carefully paint the negative space around your daisy sketch. I prefer to outline the petals with the tip of the brush first, then fill in the rest of the background. -
Create the Edges:
As you paint toward the tape, don’t fill it solidly. Use a slightly drier brush to create a rough, textured edge that stops just short of the tape in some places, giving it an artistic, hand-painted framing.
Creamy Consistency
Gouache dries lighter than it looks when wet. Mix your white paint to the consistency of heavy cream to ensure it completely covers the dark background without looking streaky.
Step 2: Painting the Flower
-
Base Layer for Petals:
Mix Titanium White with a tiny drop of your blue background color to create a very pale, cool grey-blue. Paint the entire shape of the petals with this shade. It will act as the shadow color. -
Add Pure White Highlights:
Once the base layer is dry, load your size 6 brush with thick, creamy Titanium White. Paint specific strokes over the petals, leaving the grey-blue visible at the base and edges to create dimension. -
Refine Petal Texture:
Use the brush tip to drag fine lines of white from the tip of the petal inward. This mimics the ribbed texture found on real daisy petals. -
Underpaint the Center:
Mix Yellow Ochre with a dot of Burnt Umber. Implement this color for the flower’s central disk, applying it in a solid oval shape. -
Stipple the Center:
To create the bumpy texture, mix pure Lemon Yellow and use the tip of your size 2 brush to dot (stipple) the top, lit area of the center disk. -
Deepen the Center Shadows:
Mix Burnt Umber with a little blue. Stipple this dark mixture along the bottom edge of the yellow center to give it a 3D, rounded form.
Metallic Magic
For a magical twist, mix a tiny bit of gold mica powder or gold watercolor into the yellow center to make the daisy subtly sparkle in the light.
Step 3: Detailed Finishing Touches
-
Paint the Stem:
Mix Sap Green with a little White and Yellow Ochre for a muted, natural green. Paint the stem in a single smooth stroke using a round brush. -
Shadow the Stem:
Add a thin line of darker green (Sap Green + Blue) along the right side of the stem to indicate a cylindrical shadow. -
Add Shadow Glazes:
If separate petals look too flat, water down a tiny bit of blue-grey paint. Gently glaze the areas where petals overlap to push the bottom petals further back. -
Final White Pops:
Take your fine liner brush and pure white paint to add tiny, crisp highlights on the very tips of the petals and a few dots on the sunniest part of the yellow center. -
Reveal the Border:
Wait until the painting is completely bone-dry. Slowly peel away the painter’s tape at a 45-degree angle to reveal your crisp white paper border.
Frame your botanical masterpiece or gift it to bring a touch of eternal spring to someone’s home


Three-Daisy Cluster in an Odd Number
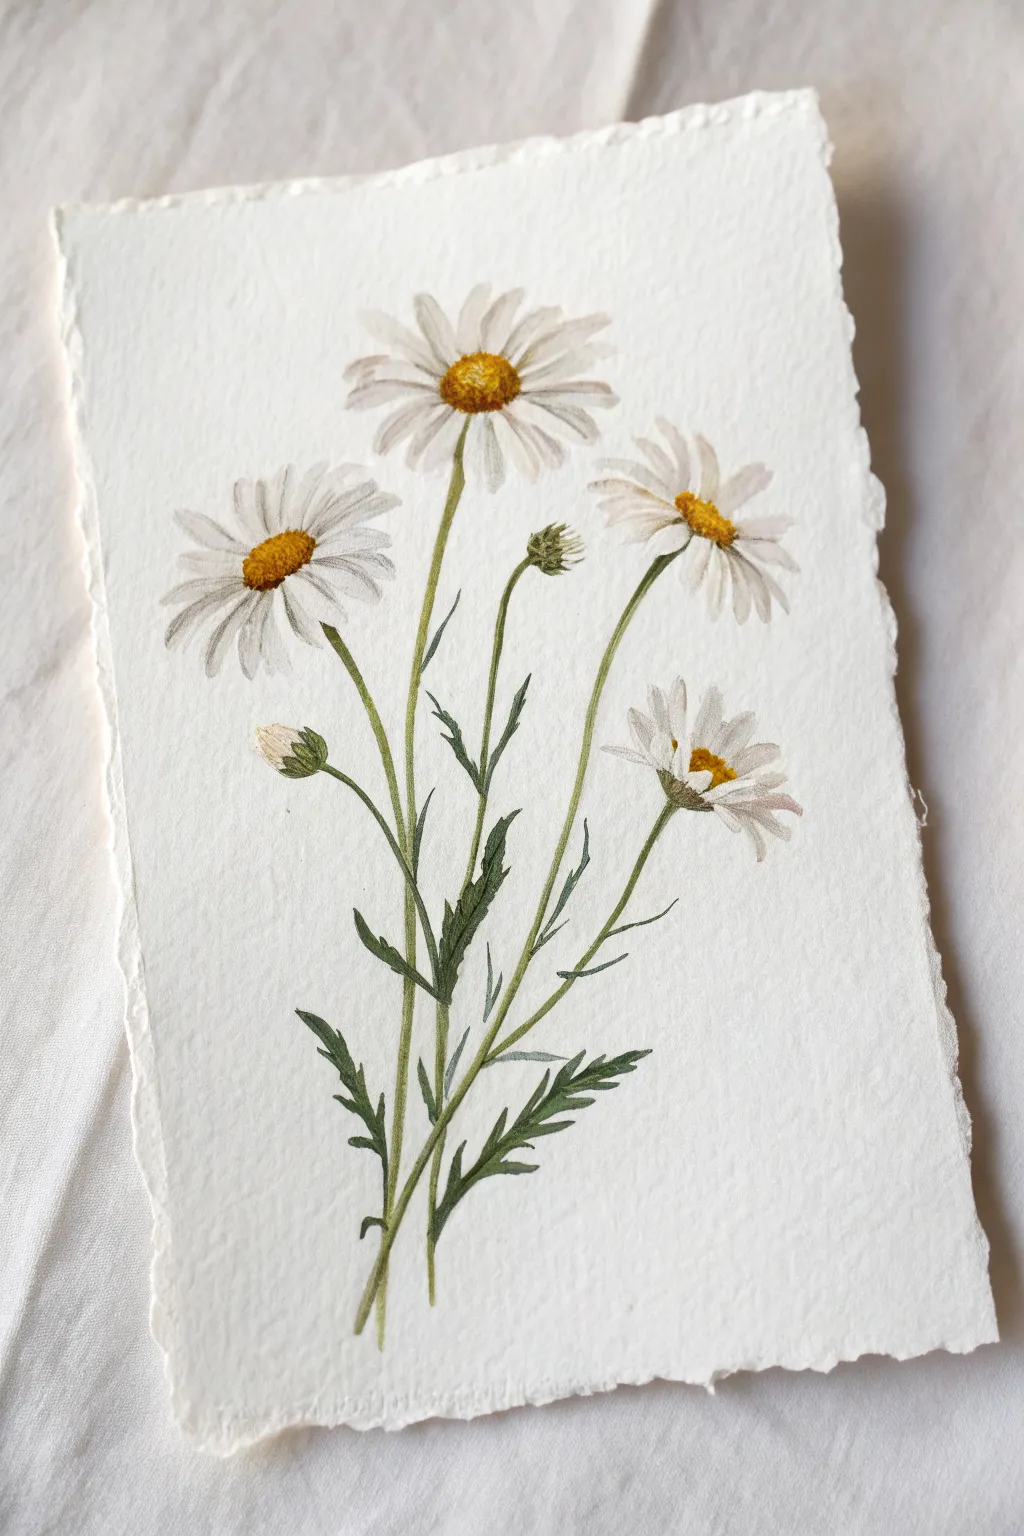
Capture the simple elegance of a clustered daisy bouquet with this detailed watercolor tutorial. The project uses textured paper and soft, layered washes to create a vintage botanical feel perfect for framing or gifting.
How-To Guide
Materials
- Cold-press watercolor paper with deckled edges
- Watercolor paints (Yellow Ochre, Lemon Yellow, Sap Green, Burnt Umber, Payne’s Gray, White or White Gouache)
- Round watercolor brushes (sizes 2, 4, and 6)
- Pencil (HB or 2H)
- Kneadable eraser
- Two jars of water
- Paper towels
Step 1: Sketching the Composition
-
Map out the stems:
Begin by lightly sketching the main stem lines with your pencil. Create a central, slightly curved stem for the highest flower, then branch out lower stems to the left and right for the supporting blooms. Keep the lines flowing naturally rather than perfectly straight. -
Position the flower centers:
Draw small ovals to mark where the yellow centers of the three main open daisies will go. Place the top one looking straight ahead, the left one tilting slightly left, and the right one angling away. -
Add buds and leaves:
Sketch the placement of the two smaller buds—one unopened tight bud near the center and a larger, half-closed bud on the lower left. Lightly indicate jagged, fern-like leaves near the base of the stems. -
Refine the petals:
Drawing very faintly, outline the petals radiating from the centers. Don’t worry about perfect symmetry; let some petals overlap or twist slightly to look organic. Use your kneadable eraser to lift up any graphite that looks too dark, leaving only a ghost image.
Step 2: Painting the Blooms
-
Base layer for centers:
Mix a warm Yellow Ochre with a touch of Lemon Yellow. Using a size 4 brush, paint the oval centers of the daisies. While the paint is still damp, drop in a tiny dot of Burnt Umber on the shadowed side (usually the bottom) to create volume. -
Texture the centers:
Once the centers are dry, use a size 2 brush with a thicker mix of Yellow Ochre and Burnt Umber to stipple tiny dots over the yellow. This mimics the dense texture of the disk florets. -
Wash the petals:
The petals are white, but we need shadow to define them. Create a very watery mix of Payne’s Gray or a diluted violet-blue. Paint the shadows where petals overlap or curve away from the light, leaving the majority of the petal paper-white. -
Define the petal tips:
With the same pale grey wash, gently stroke from the tip of the petal inward. This softens the edges and gives the flower a delicate, translucent look. -
Paint the half-open bud:
For the bud on the left, paint the white petals tightly clustered together. Use slightly more grey shading at the base where the petals meet the green sepal to show depth.
Wet-on-Wet Petal Magic
To keep petals soft, pre-wet the petal shape with clean water first, then touch grey paint to the edge. The color will bleed naturally inward.
Step 3: Stems and Foliage
-
First green wash:
Mix Sap Green with plenty of water. Paint the main stems using a size 6 brush. Start at the top near the flower head and pull the brush steadily downward to ensure a smooth line. -
Add the caloyx and sepals:
Switch to a smaller brush to paint the green cup (calyx) underneath the flower heads and the tight buds. Use a dabbing motion to create the texture of the tiny green scales. -
Paint the leaves:
For the jagged leaves near the bottom, use a darker mix of Sap Green and a touch of blue. Press the belly of the brush down and lift up sharply to create the pointed, serrated edges characteristic of daisy foliage. -
Deepen the shadows:
Once the first green layer is dry, mix a dark green using Sap Green and Payne’s Gray. Paint thin lines along one side of the stems and under the leaf joints to create a 3D cylindrical effect.
Muddy Greens?
If your stems look flat or dull, avoid mixing too many colors. Let the first green layer dry completely before adding the shadow stripe to keep it crisp.
Step 4: Final Details
-
Enhance the centers:
Go back to the yellow centers with a fairly dry brush and Burnt Umber. Add a few more deliberate dots to the darkest side of the center to make it pop. -
Highlight with white:
If you lost any crisp white edges on the petals, you can reclaim them using a small amount of white gouache or opaque watercolor at the very tips. -
Refine connections:
Check where the stems meet the flowers. Ensure there isn’t a white gap. Carefully paint a tiny transition of green blending into the bottom of the petals if needed.
Allow your painting to dry fully before erasing any remaining pencil marks to reveal your pristine botanical illustration


Half-Open Daisies and Buds Study
This botanical watercolor study captures the varying stages of a daisy’s life, from tightly closed green buds to fully realized white blooms. The composition relies on long, graceful stems and crisp, detailed petals to create a sense of elegant movement.
How-To Guide
Materials
- Cold press watercolor paper (300 gsm)
- Round watercolor brushes (sizes 2, 4, and 6)
- Pencil (HB or H)
- Kneaded eraser
- Watercolor paints (Lemon Yellow, Yellow Ochre, Burnt Sienna, Sap Green, Hooker’s Green, Indigo or Payne’s Gray)
- Clean water jar
- Paper towels
Step 1: Sketching the Composition
-
Outline the Stems:
Begin by lightly drawing three long, slightly curved lines for the main stems. Vary their heights so the flowers don’t sit in a straight row. Add two shorter stems branching off for the buds. -
Map the flower heads:
At the top of the tallest stem, draw a flattened oval for the center of the main flower. For the middle flower, sketch a U-shape cup for the green base (calyx). For the buds, draw simple teardrop shapes. -
Draft the Petals:
Lightly sketch the petals radiating from the centers. Don’t worry about perfection; make them slightly irregular. For the side-profile daisy, draw petals swept backward. Observe how the top daisy’s petals foreshadow slightly. -
Refine the Leaves:
Draw the jagged, lance-shaped leaves near the bottom of the stems. Keep the pencil pressure extremely light so lines won’t show through the transparent paint later.
Muddy Petals?
Keep your grey shadow mix very watery. Usually, ‘dirty water’ from your jar is actually the perfect hue! If shadows get too dark, lift paint with a clean, damp brush.
Step 2: Painting the Flowers
-
First wash on the centers:
Mix Lemon Yellow with a touch of Yellow Ochre. Paint the central disk of the top daisy and the visible sliver of yellow in the middle daisy. -
Define the texture:
While the yellow is still damp, drop in small dots of Burnt Sienna on the shaded side (bottom left) of the flower center to create a convex, textured look. -
Shadowing the white petals:
Dilute a tiny amount of Payne’s Gray or Indigo with lots of water to make a very pale grey. Use this to paint faint shadow lines on the white petals, separating them and adding dimension where they overlap. -
Painting the buds:
For the closed buds, use a pale wash of Sap Green. Leave the very tips of the buds white or extremely pale yellow to suggest the petals just starting to emerge.
Step 3: Stems and Greenery
-
Base layer for stems:
Load your size 4 brush with a mix of Sap Green and a little yellow. Paint the stems in long, fluid strokes. I find it helps to lock my wrist and move my whole arm to keep the line smooth. -
Painting the calyx:
Use the same green mix to paint the cup-shaped base (calyx) of the side-facing flower and the green scales covering the bottom of the buds. -
Deepening the greens:
While the stems are drying, mix Hooker’s Green with a touch of Indigo for a darker shadow color. Paint the jagged leaves at the bottom, letting the edges be crisp. -
Adding stem details:
Use the size 2 brush and the dark green mix to add thin shadow lines along one side of each stem. This simple step instantly makes the stems look cylindrical rather than flat.
Pro Tip: Masking Fluid
Apply masking fluid to the main flower’s center before painting petals. This lets you paint petal shadows loosely without accidentally bleeding grey into the bright yellow disk.
Step 4: Final Details
-
Texturing the centers:
Once the yellow centers are bone dry, use the tip of your smallest brush with thick Burnt Sienna to stipple tiny dots. Cluster them densest at the bottom edge for shadow. -
Refining the buds:
Paint vertical hatch marks on the green part of the buds to mimic the texture of the sepals holding the flower closed. -
Petal highlights:
If your petal shadows dried too light, go back in with a slightly stronger grey mix to define the tips and the spaces between petals. -
Adding splatter:
Load a brush with watery yellow or brown paint. Tap the handle against another brush over the paper to create gentle, random texture speckles around the blooms.
Now step back and admire the gentle rhythm created by the varying heights of your painted wildflowers


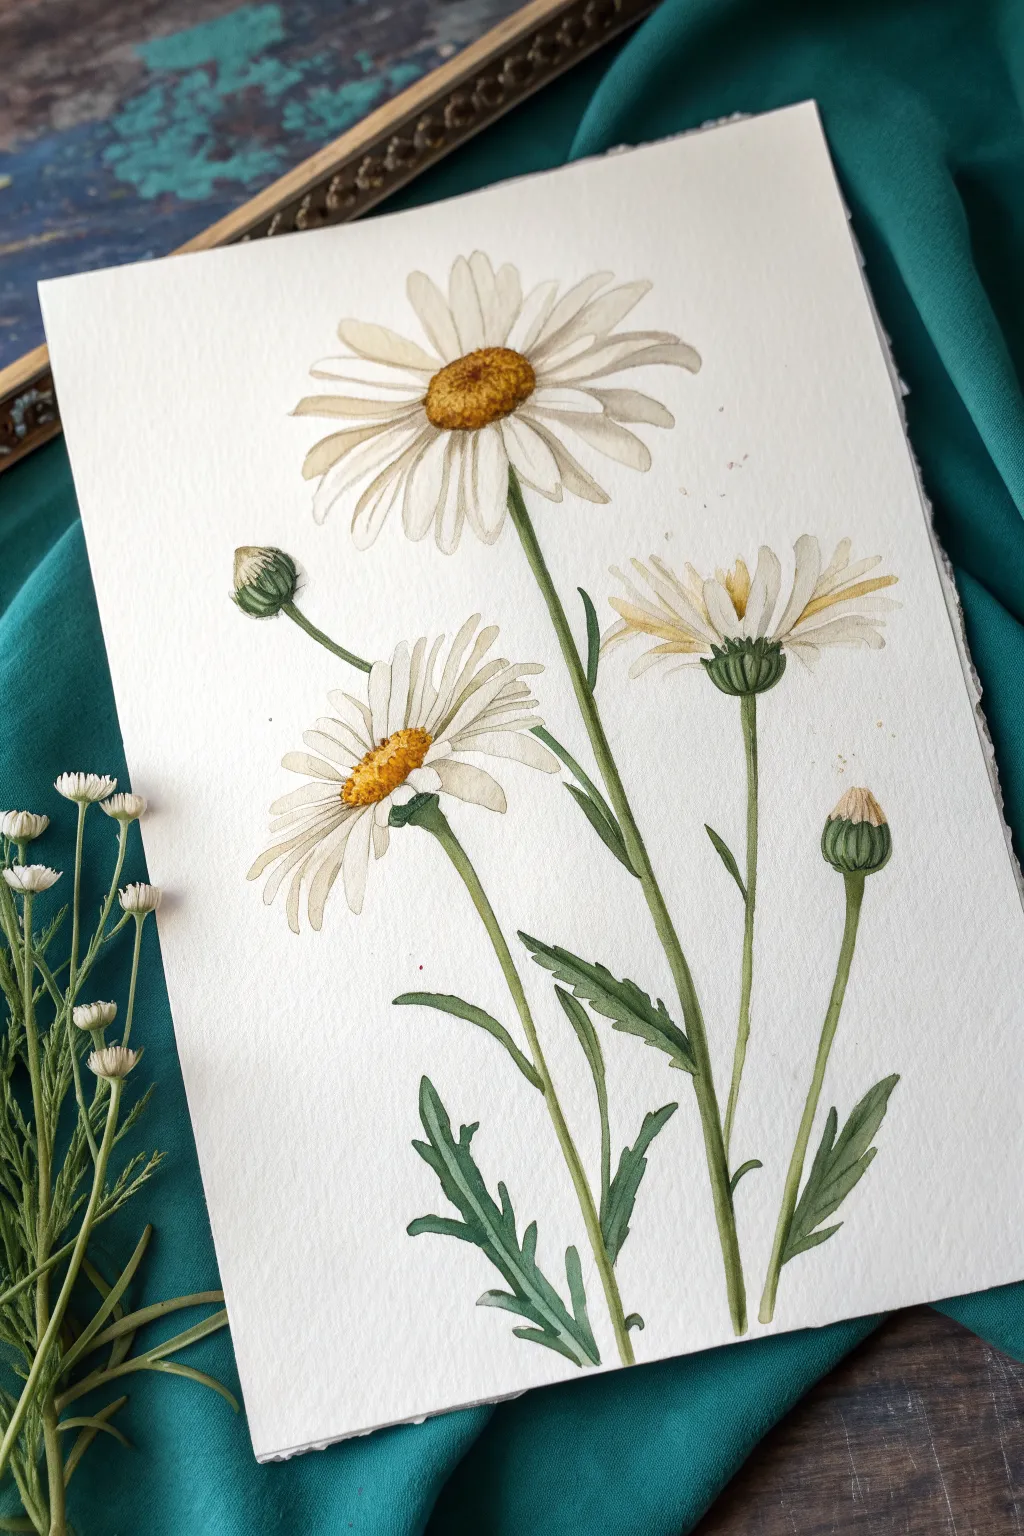
Daisy Field From the Bottom Edge

Capture the airy elegance of a wildflower meadow with this delicate watercolor study. By focusing on upward movement and negative space, you’ll paint a serene cluster of daisies reaching towards a soft blue sky.
Detailed Instructions
Materials
- Cold press watercolor paper (300 gsm or heavier, deckled edge optional)
- Watercolor paints (Cerulean Blue, Sap Green, Lemon Yellow, Burnt Sienna, Payne’s Gray)
- Round watercolor brushes (Size 2, 6, and 8)
- Pencisl (HB or lighter) and kneaded eraser
- Masking fluid (optional)
- Two jars of water
- Paper towels
- Palette for mixing
Step 1: Sketching and Preparation
-
Light Outline:
Begin by lightly sketching the composition with an HB pencil. Place the main daisy heads in the upper two-thirds of the paper, varying their angles—some facing forward, some sideways, and one facing away. -
Mapping Stems:
Draw the stems sweeping upwards from the bottom right corner, curving them naturally towards the left. Keep the lines faint so they don’t show through the transparency of the watercolor later. -
Masking (Optional):
For pristine white petals, you can carefully apply masking fluid to the daisy petals. If you don’t have masking fluid, just be mindful to paint around these shapes in the next step.
Pro Tip: Lost & Found Edges
Don’t outline every single petal. Let some white petal edges disappear into the white paper background. This “lost edge” technique makes the flower feel filled with light and air.
Step 2: Painting the Sky
-
Wet-on-Wet Background:
Using your size 8 brush, wet the upper portion of the paper with clean water, avoiding the flower heads if you didn’t mask them. The paper should be glistening but not forming puddles. -
Adding the Sky:
Load your brush with a watery mix of Cerulean Blue. Start at the top left corner and wash the color down diagonally, letting it fade into white as you reach the middle of the paper. This creates a gradient effect. -
Soft Edges:
While the paper is still damp, soften any hard edges around the flower heads with a clean, damp brush. Let this layer dry completely before moving on.
Step 3: Creating the Blooms
-
Shadowing Petals:
Mix a very dilute ghostly grey using a tiny touch of Payne’s Gray or a mix of blue and orange. With a size 6 brush, paint delicate shadows on the petals, focusing on the ones underneath or furthest away to give them dimension. -
Defining Centers:
For the flower centers (the disk florets), drop in a base of Lemon Yellow. While wet, tap in a thicker mix of Burnt Sienna on the shadowed side (usually the bottom left) to create a domed 3D look. -
Adding Texture:
Once the yellow centers are dry, use the tip of your size 2 brush to stipple tiny dots of dark brown or green along the bottom edge of the centers for texture.
Troubleshooting: Muddy Greens?
If your stems look dull, you likely overmixed your greens. Mix green on the paper by painting a yellow stem and dropping blue into it while wet, letting them blend naturally.
Step 4: Stems and Greenery
-
Painting Stems:
Mix Sap Green with a touch of yellow for a fresh, spring green. Using a size 6 brush, paint the stems in long, confident strokes starting from the flower head down. Vary the pressure to create natural inconsistencies in width. -
Adding Leaves:
Along the stems, add serrated, jagged leaves characteristic of daisies. Use the tip of the brush to flick outwards, creating sharp, organic points. -
Depth in Greens:
While the green paint is still wet in places, drop in a darker green (Sap Green mixed with a little blue or red) at the base of the stems and under the flower heads to suggest shadow and volume.
Step 5: Foreground and Details
-
Grassy Base:
At the very bottom edge, paint upward strokes of varied greens and browns to simulate a grassy field. I like to keep this abstract and loose so it doesn’t distract from the main flowers. -
Whispy Grasses:
Mix a warm, golden ochre color. Using your finest brush, paint thin, dry tall grasses rising up on the right side of the composition. These should look dry and feathery. -
Final Touches:
Evaluate your painting. Add any final dark accents to the deepest shadows in the greenery or re-define a petal edge if it got lost. If you used masking fluid, rub it off gently now. -
White Highlights:
If you lost any highlights on the flower centers or need to brighten a petal tip, use a tiny amount of white gouache or a gel pen for sharp, opaque highlights.
Now step back and admire how a simple composition can capture the joyful spirit of a summer afternoon
BRUSH GUIDE
The Right Brush for Every Stroke
From clean lines to bold texture — master brush choice, stroke control, and essential techniques.
Explore the Full Guide
Loose Watercolor Daisies With Soft Bleeds
Capture the delicate charm of a summer meadow with this watercolor daisy study on torn-edge paper. This project combines loose, watery washes for the background with crisp, defined petals to create a balanced, botanical-style illustration.
Step-by-Step Guide
Materials
- Cold press watercolor paper (300 gsm)
- Watercolor paints (Sap Green, Olive Green, Lemon Yellow, Yellow Ochre, Burnt Sienna, Payne’s Gray, Turquoise)
- Round brushes (sizes 2, 6, and 8)
- Masking fluid and applicator (optional but helpful)
- Pencil and kneadable eraser
- Clean water and paper towels
- Ruler or straight edge (for tearing paper)
Step 1: Preparation & Sketching
-
Create the deckled edge:
Start by giving your paper that vintage, handmade look. Place a ruler firmly against the dry paper where you want the edge to be and tear the paper strictly upwards against the ruler’s edge to create a soft, fibrous border. -
Map out composition:
Lightly sketch the flower centers first to adhere to the rule of thirds. Draw five main daisy heads at varying heights—some facing forward, some tilted away. -
Sketch petals and stems:
Draw the elongated oval shapes for petals radiating from the centers. Don’t worry about perfection; natural petals are often irregular. Add thin, curving lines down to the bottom for stems. -
Mask the flowers (optional):
To keep your whites brilliant, apply a thin layer of masking fluid over the daisy petals and centers. If you skip this, simply paint carefully around them in the next phase.
Keep it Clean
When painting white flowers, keep two jars of water: one for rinsing dirty brushes and a strictly clean one for wetting the paper or diluting light colors.
Step 2: Soft Background Washes
-
Prepare the background mix:
Mix a very watery puddle of Sap Green with a tiny touch of Turquoise to get a cool, minty hue. -
Wet the paper:
Using your size 8 brush, wet the negative space around the flowers with clean water. Be careful not to flood the paper, just a nice sheen. -
Drop in color:
While the paper is wet, touch your brush loaded with the mint green mix into the wet areas. Let the pigment bloom naturally, keeping it darker near the flower stems and fading out toward the top edges. -
Add depth:
While the wash is still damp, drop slightly more concentrated Olive Green near the bottom where the foliage will be densest. Let this layer dry completely.
Add Metallic Flair
Once the painting is totally dry, use a gold pen or metallic watercolor to add tiny dots to the flower centers or thin outlines on select leaves for a decorative touch.
Step 3: Painting the Flowers
-
Remove masking:
If you used masking fluid, gently rub it away with your finger or an eraser once the paper is bone dry. -
Paint the centers:
Using a size 2 brush, fill the flower centers with Lemon Yellow. While wet, drop a dot of Yellow Ochre or Burnt Sienna on the lower, shadowed side of the button to create a 3D dome effect. -
Define the petals:
The petals remain mostly the white of the paper. To separate them, mix a very pale, watery grey (using Payne’s Gray heavily diluted). Paint thin shadow lines between overlapping petals and near the center yellow disk. -
Add base stems:
Using a size 6 brush and a mix of Sap Green and Olive Green, paint the primary stems. Use a loose hand; shaky lines look more organic than straight rulers.
Step 4: Foliage & Final Details
-
Paint jagged leaves:
Daisy leaves are lobed and irregular. Using the tip of your brush, paint the foliage at the base, keeping the strokes quick and upward-moving to mimic grass. -
Layering greens:
Once the first stem layer is dry, mix a darker green using Olive Green and a touch of Payne’s Gray. Paint a few darker leaves behind the lighter ones to create a sense of density and volume. -
Adding texture to centers:
Go back to the yellow centers. Use the very tip of your smallest brush with a Burnt Sienna mix to stipple tiny dots on the shadowed side, mimicking the pollen texture. -
Splatter effect:
Load a brush with watery green paint and tap it against another brush handle over the painting to create subtle splatters. This adds energy and breaks up the white space. -
Final touches:
Check your contrast. If the white petals look too flat, add slightly stronger grey shadows just under the petals where they meet the stem.
Frame your delicate daisy study in a floating frame to show off those beautiful deckled edges you created
Press-and-Lift Petal Brushstroke Practice
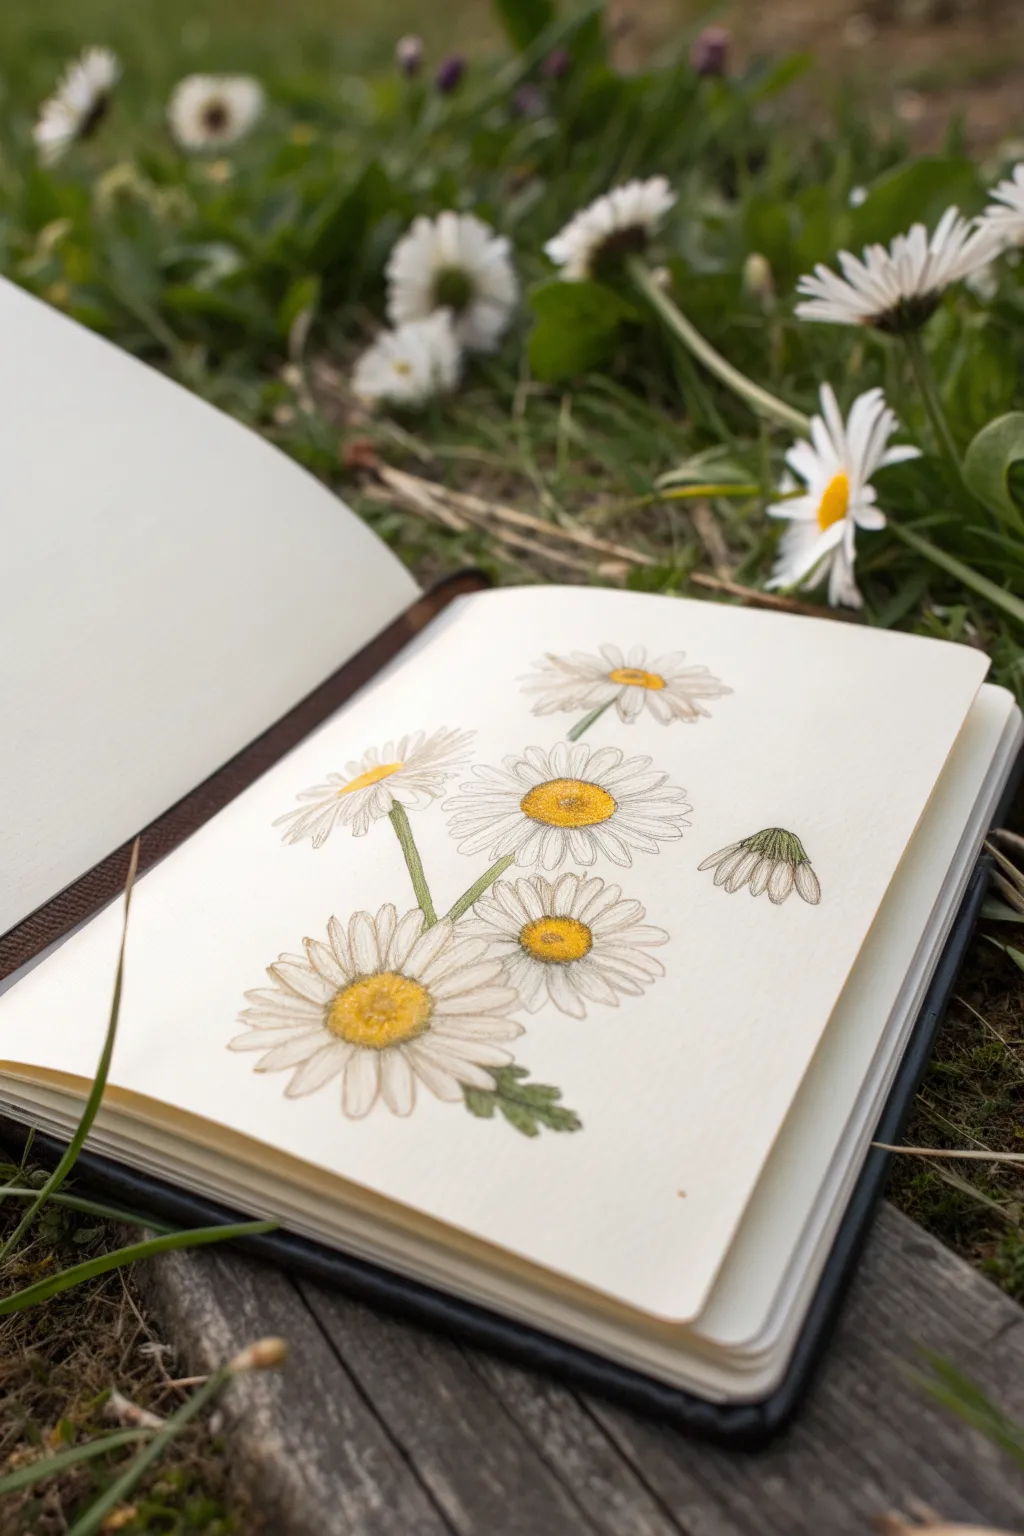
Capture the delicate beauty of a field daisy using a blend of fine liner precision and soft color shading. This sketchbook study focuses on overlapping petals and sunny yellow centers to create a realistic botanical illustration right from nature.
Step-by-Step Tutorial
Materials
- Heavyweight sketchbook (mixed media or watercolor paper)
- Set of colored pencils (white, cool grey, yellow ochre, cadmium yellow, sap green, olive green)
- Fine tip drawing pen (0.05 or 0.1mm, sepia or grey preferred)
- Graphite pencil (HB) for initial sketch
- Kneaded eraser
Step 1: Structural Sketching
-
Map the Composition:
Begin by lightly marking the position of your flower heads with small circles using your graphite pencil. Arrange five distinct blooms: a large focal one at the bottom left, one central flower, a higher bloom, one angled to the left, and a drooping bud on the right. -
Establish Angles:
Draw faint lines radiating from the center circles to dictate the direction the petals will flow. Vary these angles so some flowers look right at you while others tilt away. -
Draft the Petal Shapes:
Sketch the outline of the petals using long, slender oval shapes. Allow gaps between some petals and overlap others to create depth. For the drooping bud, curve the petals downwards like a skirt. -
Refining the Centers:
Detail the center disks. Instead of a perfect circle, give them a slightly textured, bumpy edge to represent the tiny florets. -
Stem Placement:
Draw thin, single-line stems connecting to the flower heads. Add a small cluster of jagged leaves near the base of the lowest flower.
Natural Imperfection
Don’t make petals uniform. Give some ragged tips, make some shorter, and twist a few sideways. Real flowers are rarely perfectly symmetrical.
Step 2: Detailed Line Work
-
Initial Inking:
Switch to your fine sepia or grey pen. Very delicately trace your petal outlines. Keep your hand loose; broken or faint lines often look more natural than solid, heavy outlines for white flowers. -
Adding Texture:
Add tiny, short strokes near the base of key petals (where they meet the center) to suggest grooves and shadowing. -
Defining the Centers:
Stipple tiny dots tightly inside the yellow centers. Densely pack the dots at the bottom edge of the center disk to create a 3D rounded effect. -
Clean Up:
Once the ink is completely dry, gently roll your kneaded eraser over the page to lift the graphite guidelines, leaving only the clean ink structure.
Background Contrast
Add a soft wash of diluted blue or green watercolor around the outer edges of the crisp petals to make the white paper stand out even more.
Step 3: Color and Shading
-
Yellow Base layer:
Take a cadmium yellow pencil and color the centers of the daisies. Press firmly in the middle but fade slightly towards the edges. -
Creating dimension:
Use a yellow ochre or light brown pencil to shade the lower crescent of each yellow center. This shadow gives the disk a domed appearance. -
Shading White Petals:
White petals aren’t purely white. Use a cool grey pencil to lightly shade the areas where petals overlap and near the center disk. I find that keeping the tips of the petals pure white helps them pop. -
Stem Base Color:
Color the stems with a light layer of sap green. Keep the pressure even for a smooth look. -
Stem Shadows:
Go over one side of each stem with the olive green pencil to imply a light source and roundness. -
Leaf Detail:
Fill in the small basal leaves with olive green, using short, directional strokes to mimic the leaf’s texture. -
Final Highlights:
If you have a white gel pen or opaque white pencil, add tiny dots to the upper left side of the yellow centers to simulate glistening nectar or dew.
Close your sketchbook knowing you have preserved a little piece of the meadow forever

PENCIL GUIDE
Understanding Pencil Grades from H to B
From first sketch to finished drawing — learn pencil grades, line control, and shading techniques.
Explore the Full Guide
Rustic Wood-Grain Daisy Painting
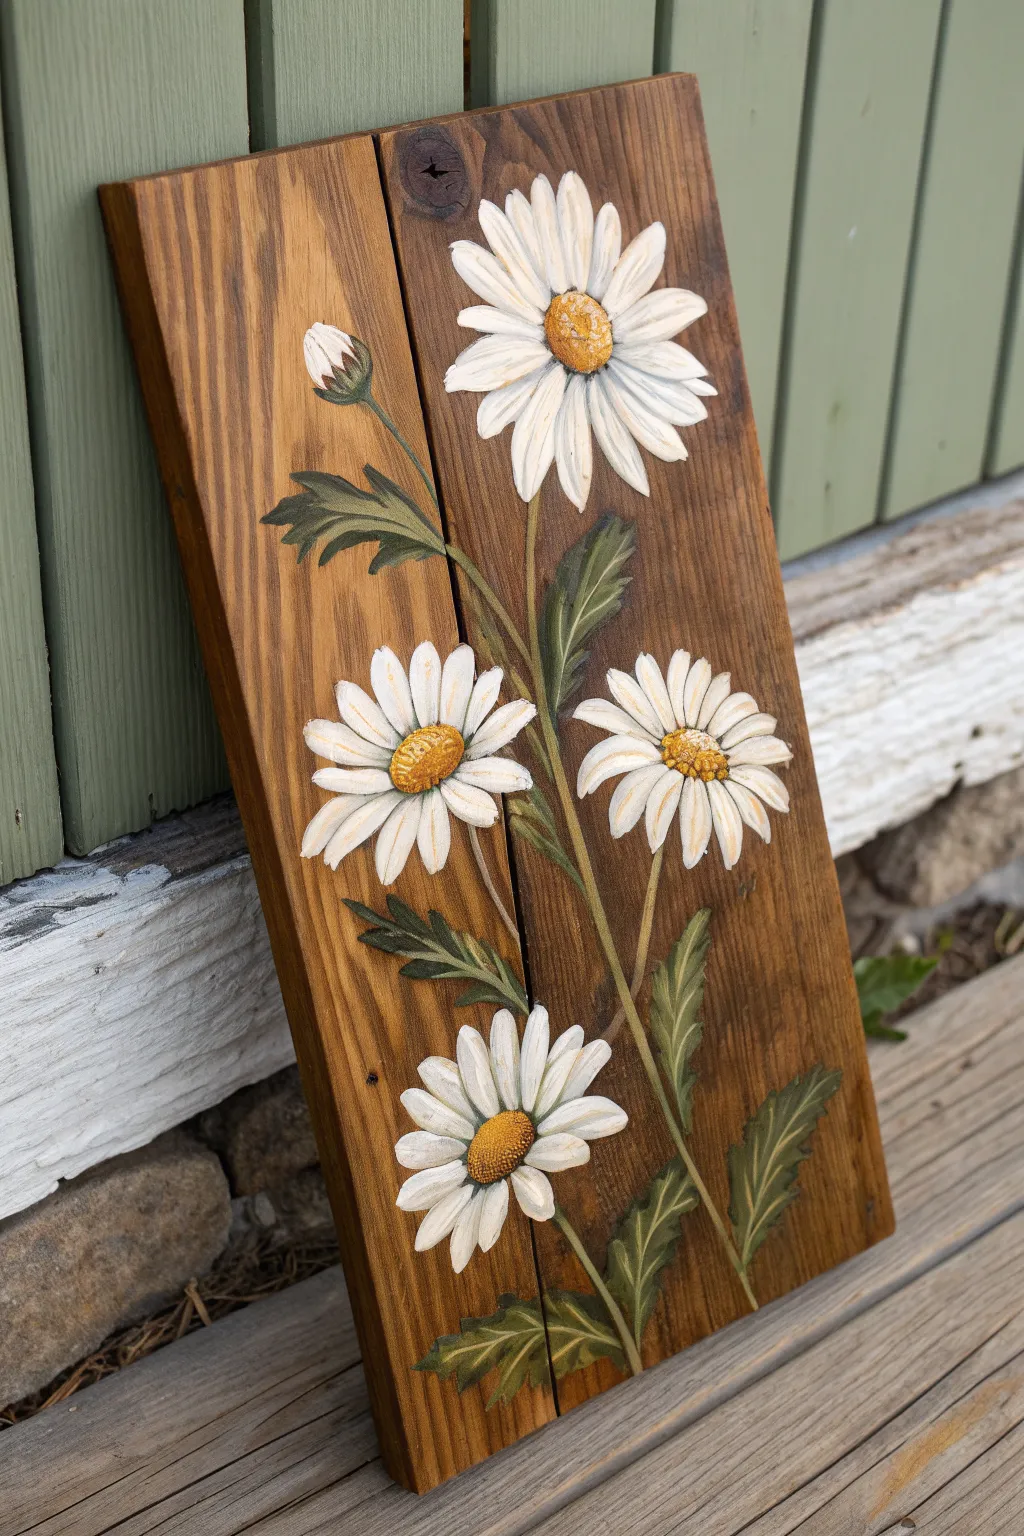
Embrace the beauty of natural textures with this rustic project that combines stained wood grain with delicate floral art. The contrast between the warm, knotty timber and the crisp white petals creates a timeless piece perfect for farmhouse decor.
Step-by-Step Guide
Materials
- Two wooden planks (approx. 6″ width each) or one wide board
- Wood stain (medium walnut or oak)
- Wood glue and clamps (if joining planks)
- Sandpaper (120 and 220 grit)
- Acrylic craft paints (Titanium White, Warm White, Golden Yellow, Burnt Umber, Olive Green, Forest Green)
- Flat shader brushes (sizes 8 and 10)
- Round detail brush (size 2)
- Synthentic liner brush
- Chalk or graphite transfer paper
- Matte or satin clear sealant spray
Step 1: Preparation & Background
-
Join the wood:
If using two separate planks to mimic the reference image, apply wood glue to the long edges and clamp them tightly together. Wipe away any excess glue immediately with a damp cloth so it doesn’t block the stain later. -
Sand the surface:
Once the glue is fully cured, sand the entire surface with 120-grit sandpaper to smooth out any rough patches, paying attention to the edges. Finish with 220-grit for a painting-ready surface. -
Apply the stain:
Using a rag or sponge brush, apply your chosen medium wood stain in the direction of the grain. Wipe off excess stain after a minute or two to let the natural wood knots and grain show through. Allow this to dry completely, preferably overnight. -
Plan the composition:
Lightly sketch your daisy arrangement directly onto the wood with white chalk, or sketch on paper first and use graphite transfer paper. Position the tallest flower near the top right and cascade others downward to create a natural flow.
Step 2: Base Layers
-
Paint the stems:
Load your liner brush or small round brush with thinned Olive Green paint. Pull long, curving lines to connect your planned flower heads, allowing the stems to cross over each other naturally. -
Block in the leaves:
Using a flat shader brush and Olive Green, paint the jagged, fern-like daisy leaves. Press the brush down to widen the stroke and lift as you pull outward to create sharp points. -
Start the petals:
For the petals, mix a tiny drop of Warm White with Titanium White. Using a filbert or worn flat brush, stroke from the tip of the petal inward toward the center of the flower. Don’t worry about full opacity yet; a slight translucency looks lovely on wood. -
Paint the centers:
Dab a simple circle of Golden Yellow in the open center of each flower using a round brush. For the tight bud, just paint the white petals closed in a teardrop shape.
Stroke Confidence
Use the “chisel edge” of a flat brush for the leaves. Twist the brush slightly as you lift it off the wood to create those classic sharp, serrated daisy leaf edges.
Step 3: Detailing & Highlighting
-
Layer the petals:
Once the first white layer is dry, apply a second coat of pure Titanium White to the upper petals to make them pop. Leave the lower or background petals slightly darker to create depth. -
Shade the centers:
Stipple a small amount of Burnt Umber mixed with Golden Yellow along the bottom edge of the yellow flower centers. This creates a shadow that makes the center look convex and button-like. -
Highlight the centers:
Add tiny dots of pale yellow or white to the very top of the yellow centers for a sun-kissed highlight. -
Add leaf veins:
Mix a darker Forest Green and use your liner brush to paint a central vein down the middle of the larger leaves. You can also add a touch of this dark green to the shadowed side of the stems. -
Define the petals:
I like to use a very watery grey or diluted Burnt Umber to paint incredibly thin lines separating overlapping petals. This helps distinguish individual petals that might have blended together. -
Highlight the leaves:
Mix a little white into your Olive Green and dry-brush a few highlights onto the tips of the leaves where the light would hit. -
Add the bud details:
Paint the sepals (the green protective leaves) at the base of the white bud using your liner brush and Olive Green, curving them up to cup the white petals.
Antique Glaze
For a more aged look, lightly sand the dried painted flowers with fine-grit sandpaper, then apply a diluted brown wash over the entire piece to mute the bright whites.
Step 4: Finishing Touches
-
Assess contrast:
Step back and look at your painting. If the white petals look too transparent against the brown wood, add one final, thick stroke of white to the brightest areas. -
Protect the art:
Allow the paint to cure for at least 24 hours. Seal the piece with a matte or satin spray varnish to protect the acrylics and the wood stain from fading.
Hang your new rustic masterpiece in an entryway or kitchen to bring a permanent touch of spring to your home
Mini Daisy Sketchbook Thumbnail Series
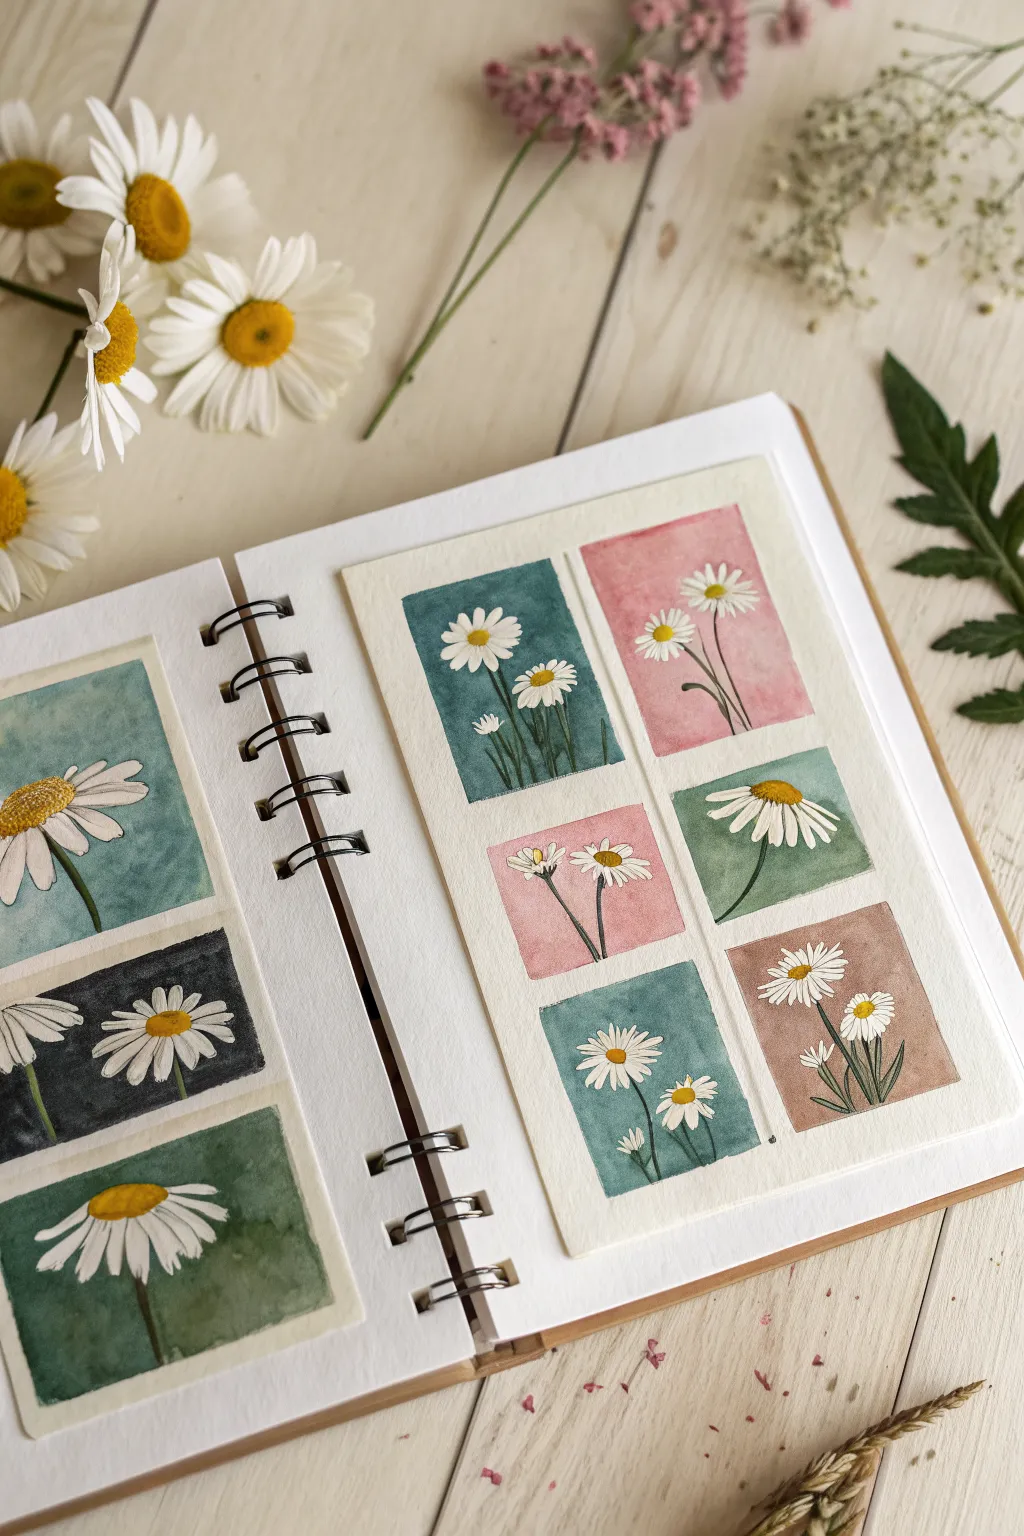
Capture the delicate beauty of daisies in miniature with this grid-style watercolor study. This project focuses on painting small, manageable “thumbnail” compositions, perfect for exploring different background colors and flower arrangements on a single sketchbook spread.
Step-by-Step Tutorial
Materials
- Spiral-bound watercolor sketchbook (A5 or similar)
- Watercolor paints (pans or tubes)
- White gouache or white gel pen (for highlights and cleanup)
- Washi tape or masking tape
- Small round brushes (Size 0 and Size 2)
- Pencil (HB) and eraser
- Palette for mixing
- Jar of water & paper towels
Step 1: Preparation & Sketching
-
Tape boundaries:
Begin by deciding on your layout. On the left page, use masking tape to block off three vertical rectangles. On the right page, you can tape off a grid of six smaller rectangles, or paint on a separate sheet of watercolor paper to paste in later. -
Sketch the lightly:
Using an HB pencil, very lightly sketch the daisy shapes inside each box. Focus on simple compositions: single large blooms, pairs of flowers, or a trio with stems. -
Vary the angles:
To keep the grid interesting, draw some daisies facing forward (circles with radiating petals) and others from the side (cone shapes with petals drooping back). -
Masking fluid (optional):
If you struggle with painting negative space, you can apply masking fluid over your pencil flower sketches now. Let it dry completely before painting the backgrounds.
Tape Clean Lines
To prevent paint bleeding under your tape, firmly burnish the edges down with a bone folder or your fingernail before painting.
Step 2: Painting Backgrounds
-
Mix your palette:
Prepare a variety of muted background colors on your palette. For this look, you’ll need a dusty teal, a soft rose pink, a deep slate blue (or black watercolor), a mossy green, and a warm terracotta brown. -
Paint the negative space:
Carefully paint around your pencil sketches (or over the masking fluid) to fill the rectangular backgrounds. Use the Size 2 brush for broader areas and the Size 0 brush to get tight into the corners between petals. -
Alternating colors:
Distribute your colors across the grid so that no two adjacent boxes share the same background color. This creates a pleasing patchwork effect. -
Controlled drying:
Allow the background layers to dry completely. If the paper feels cool to the touch, it’s still damp. I find it helpful to work on the left page while the right page dries.
Level Up: Texture
Sprinkle a tiny pinch of salt into the wet background paint of one thumbnail to create a unique, blooming texture as it dries.
Step 3: Adding the Daisies
-
Remove masking (if used):
If you used masking fluid, gently rub it away with your finger or a rubber pickup tool to reveal the clean white paper underneath. -
Shadowing the petals:
Daisy petals aren’t purely white. Mix a very watery, pale grey or cool violet wash. Use the Size 0 brush to paint thin lines or small patches on the petals to suggest shadows and overlapping layers. -
Painting centers:
For the yellow centers, drop in a mix of cadmium yellow and yellow ochre. While the paint is still slightly damp, drop a tiny dot of brown on the bottom edge of the center to create a 3D dome effect. -
Stems and leaves:
Using a mossy green mix, paint very thin stems connecting to the flower heads. Add small, jagged leaves near the bottom of the stems, keeping the strokes loose.
Step 4: Final Details
-
Define the outlines:
Once everything is dry, you can use a fine liner pen or a very steady hand with dark paint to outline the petals if you want a more illustrative look, though leaving them soft is also beautiful. -
Highlights and cleanup:
Use white gouache or a white gel pen to add tiny bright dots to the yellow centers and to crisp up any petal edges where the background paint might have bled. -
Peel the tape:
Slowly peel away your masking tape at a 45-degree angle to reveal the crisp white borders between your thumbnails.
Now you have a charming collection of miniature floral studies to brighten your sketchbook


Botanical Line-and-Wash Daisies
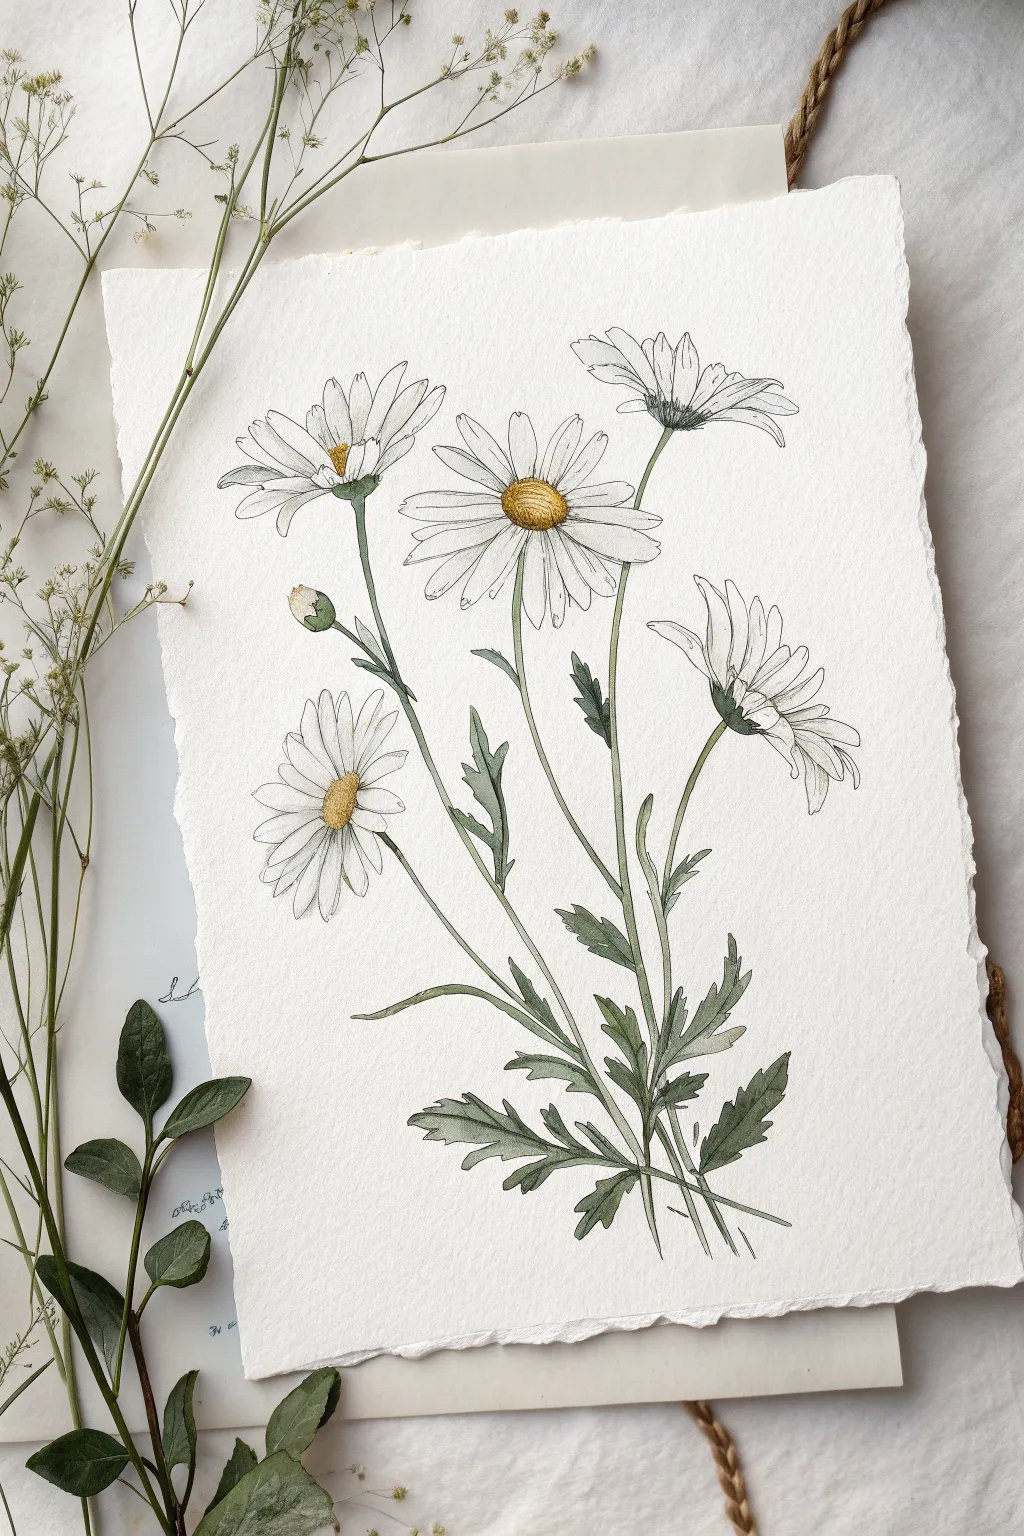
Capture the graceful simplicity of wildflowers with this botanical illustration that combines precise micron pen work with soft, translucent watercolor washes. The finished piece features five daisy blooms in various stages of opening, set on beautiful deckle-edged paper for a vintage scientific feel.
Step-by-Step
Materials
- Cold-press watercolor paper (300gsm) with deckle edge
- HB graphite pencil and kneaded eraser
- Waterproof fine liner pens (0.05mm, 0.1mm, and 0.3mm in black or sepia)
- Watercolor paints (Lemon Yellow, Yellow Ochre, Sap Green, Olive Green, Payne’s Grey)
- Round watercolor brushes (sizes 2 and 4)
- Clean water and paper towel
- Masking tape (optional)
Step 1: Planning and Sketching
-
Analyze the composition:
Observe the reference image. Note how the five main flowers fan out from a central stem cluster near the bottom. There are two fully open blooms, one facing forward and one angled up, plus two side-view blooms and one small bud. -
Map the stems:
Using your HB pencil, lightly sketch the main curved lines for the stems. Start from the bottom center and curve them gently outward. Keep your lines very faint so they are easy to erase later. -
Block in the flower heads:
Draw rough ovals or circles at the top of each stem line to indicate where the flower heads will sit. For the side-facing flowers, use flattened ellipses. -
Refine the petals:
Sketch the individual petals within your guide shapes. Notice how daisy petals are often irregular—some are slightly twisted or curled at the tips. Don’t make them too perfect or uniform. -
Add the leaves:
Sketch the lobed, serrated leaves along the lower stems. These leaves have a distinct shape with deep cutouts, appearing almost fern-like near the base of the plant.
Broken Line Technique
Don’t connect every single line when inking petals. Leaving small gaps, especially on the sunlit edges, makes the flower look lighter and more delicate.
Step 2: Inking the Outlines
-
Outline the petals:
Switch to your 0.1mm waterproof pen. Carefully trace your pencil lines for the petals. I like to break the line occasionally near the tips to suggest light hitting the white surface. -
Detail the flower centers:
For the yellow centers (disk florets), use the 0.05mm pen to create tiny stippled dots or small ‘c’ curves. This texture simulates the tightly packed seeds. -
add stem weight:
Ink the stems and leaves using a slightly thicker 0.3mm pen for the main stalks to provide structural weight, tapering your lines where the stems attach to the flower heads. -
Refine leaf veins:
Draw the central vein in each leaf, but keep the secondary veins very subtle or broken. Allow the ink to dry completely for at least 15 minutes before erasing your pencil marks.
Step 3: Applying Watercolor Washes
-
Paint the centers:
Mix Lemon Yellow with a tiny touch of Yellow Ochre. Carefully paint the centers of the daisies. While still wet, drop a more concentrated dot of Yellow Ochre or Burnt Sienna on the shadowed side (usually the bottom) to create a 3D dome effect. -
First green layer:
Dilute Sap Green with plenty of water to create a pale transparent tea consistency. Wash this color over all the stems and leaves. Don’t worry if you go slightly outside the lines; it adds to the loose sketching style. -
Deepening the shadows:
Mix Olive Green with a touch of Payne’s Grey. Once the first green layer is dry, paint this darker mix into the areas where leaves overlap or tucked behind stems to create depth. -
Shading the white petals:
White flowers aren’t truly white in a painting. Mix a very watery, pale grey using Payne’s Grey and plenty of water. Paint extremely faint shadows on the petals where they overlap or near the center of the flower. -
Adding dimension to the bud:
For the un-opened bud, use a slightly more saturated green on the sepals (the green casing) to show it is tighter and denser than the open flowers.
Vintage Paper Hack
If you don’t have deckle-edged paper, you can tear the edges of regular watercolor paper against a ruler and lightly stain them with tea for an antique botany look.
Step 4: Final Details
-
Enhance texture:
Once the paint is bone dry, use your 0.05mm pen to add extra stippling to the shadow side of the yellow centers. -
Highlighting leaves:
If your leaves look too flat, add tiny hatched lines with your finest pen in the darkest green areas to deepen the contrast further. -
Rim lighting check:
Ensure you have left plenty of white paper showing on the tips of the petals. If the grey wash is too heavy, the flowers will look wilted rather than bright.
Now you have a timeless botanical piece that captures the gentle spirit of a wildflower meadow
Negative Painting Around Daisy Shapes
Capture the delicate beauty of white daisies set against a moody, deep blue backdrop using the negative painting technique. This project plays with contrast, letting the white of the paper shine through to define the petals rather than painting them directly.
How-To Guide
Materials
- Cold press watercolor paper (300 gsm)
- Masking fluid (drawing gum) and old brush or silicone applicator
- Watercolor paints: Indigo, Prussian Blue, Burnt Umber, Yellow Ochre
- White Gouache or Bleed Proof White ink
- Round watercolor brushes (size 4, size 8)
- Fine liner brush (size 0 or 00)
- Painters tape or masking tape
- Jars of water and paper towels
Step 1: Preparation & Sketching
-
Secure Your Paper:
Tape down all four edges of your watercolor paper to a board. This keeps the paper flat during the heavy wash later and creates that crisp white border you see in the final piece. -
Outline the Composition:
Lightly sketch the flower placement with a hard pencil (like an H or HB). Draw four main daisy heads: one central and large, two higher up, and one smaller bud or side-facing flower lower down. Don’t worry about perfect symmetry; natural variance looks best. -
Draft the Stems and Leaves:
Sketch long, slender stems curving gently upwards. Add indications of the fern-like foliage at the bottom, but keep these lines very faint as they will be painted in negative later.
Don’t Ruin Your Brushes!
Never use your good watercolor brushes for masking fluid. It ruins the bristles instantly. Use a silicone shaper or a cheap craft brush you designate just for masking.
Step 2: Masking the whites
-
Apply Masking Fluid:
Using an old brush or a silicone tool, carefully apply masking fluid over the entire shape of the white petals. Ensure you cover the petals completely so no blue paint seeps in later. -
Mask the Fern Leaves:
Paint thin lines of masking fluid to define the wispy, fern-like leaves at the bottom and the smaller leaves near the top flowers. Be precise here—these masked shapes will become your white foliage. -
Create the ‘Snow’ Effect:
Flick a small amount of masking fluid across the paper using a stiff brush or toothbrush. These tiny droplets will resist the paint and create the magical, snowy speckled effect in the background. -
Let it Cure:
Wait until the masking fluid is perfectly dry. It should feel gummy but not tacky to the touch. Patience is key here to avoid tearing paper.
Jagged Edges?
If removing the mask leaves rough edges, fear not. Use opaque white gouache to smooth out the petal outlines, painting right over the blue for a crisp finish.
Step 3: The Indigo Wash
-
Mix Deep Blue:
Create a rich, dark puddle of paint. I like to mix Indigo with a touch of Prussian Blue for vibrancy. You want a creamy, milk-like consistency for deep opacity. -
Paint the Negative Space:
Taking your size 8 brush, paint the entire background blue, brushing right over the masked areas. The masking fluid protects your white shapes. -
Add Subtle Texture:
While the blue wash is still wet, drop in tiny clear water droplets or hints of slightly darker indigo in random spots to create a subtle, organic texture in the ‘sky’. -
Dry Completely:
Allow the background wash to dry thoroughly. The paper must be bone dry before the next step to prevent smudging.
Step 4: Reveal & Detail
-
Remove the Masking:
Gently rub away the masking fluid using your finger or a rubber cement pick-up tool. You will be left with stark white shapes against the deep blue. -
Paint the Centers:
Mix Yellow Ochre with a tiny bit of Burnt Umber. Paint the round centers of the daisies. Keep the top edges slightly lighter to suggest a light source. -
Texture the Centers:
Once the yellow centers are dry, stipple small dots of concentrated Burnt Umber on the bottom edge of the yellow circles to add dimension and shadow. -
Add Stems:
Mix a muted olive green (Green + a touch of Red/Brown). Using a steady hand and a size 4 brush, paint thin lines for the stems connecting the flower heads to the foliage. -
Define Petals:
Use a very watered-down gray or diluted indigo to paint faint shadow lines on the white petals. This separates the individual petals and gives them a slight curve. -
Enhance Foliage:
Using white gouache or bleed-proof white, refine the white fern leaves. You can paint over the blue background slightly to fix any jagged edges left by the masking fluid. -
Final Contrast:
With the white gouache, add a few more crisp white dots to the background if the masked dots look too soft. This makes the starry effect pop.
Peel off your tape to reveal that satisfying clean border and enjoy your striking floral composition
Bold Graphic Outlines on Daisies
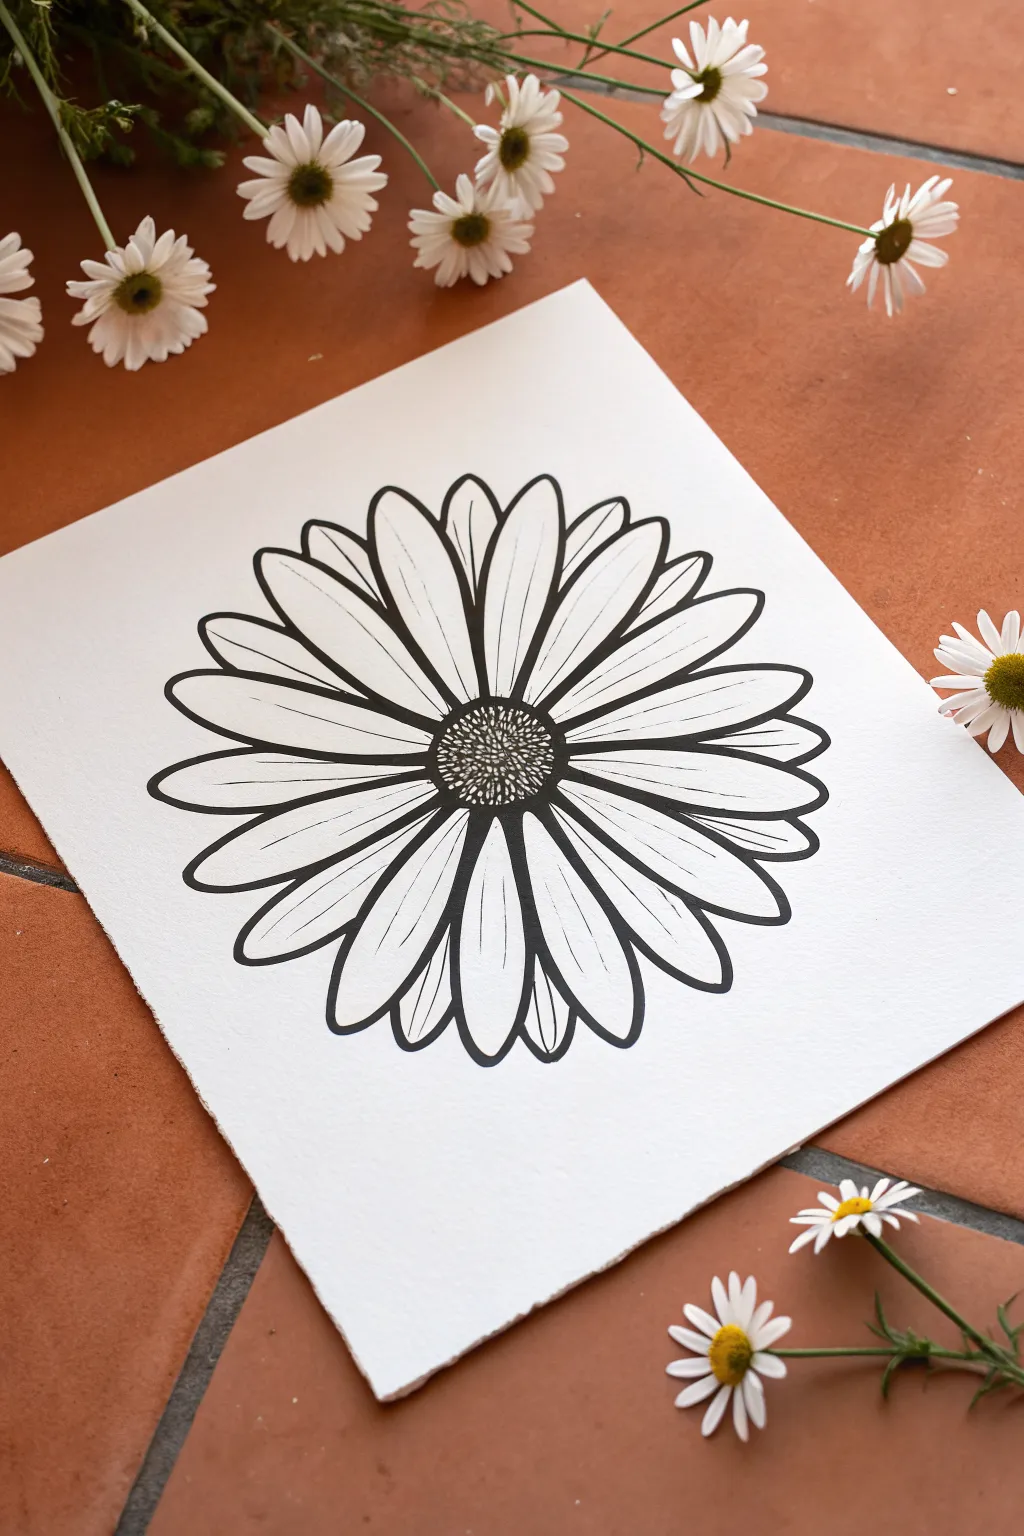
Embrace the beauty of simplicity with this striking black and white daisy illustration, featuring clean linework and contrasting weights. The textured paper adds a natural feel to the stark graphic precision, making it a perfect quick-study for practicing control and composition.
Step-by-Step Guide
Materials
- High-quality white watercolor paper or mixed media paper (heavyweight, textured)
- Pencil (HB or 2H)
- Eraser (kneaded)
- Fine liner pen (01 or 03 size)
- Thick black marker or brush pen (for bold lines)
- Ruler (optional)
- Compass or circular object (optional)
Step 1: Sketching the Foundations
-
Prepare your surface:
Begin by securing your watercolor paper to a flat surface if necessary, ensuring the textured side is facing up to capture that grain visible in the final piece. -
Establish the center:
Lightly sketch a small circle in the absolute middle of your page to serve as the flower’s disk. It doesn’t need to be perfect, as organic shapes often look more natural. -
Map the petal boundaries:
Sketch a much larger, faint circle encompassing the entire flower head to mark the maximum length of your petals. This guide helps keep the bloom symmetrical. -
Draft the primary petals:
Draw the main layer of elongated, oval-shaped petals radiating from the center disk. These should be the largest petals, spaced slightly apart. -
Layer secondary petals:
Fill in the gaps between the primary petals with smaller petal tips peeking out from behind. This adds depth and fullness to the flower without overcrowding the design. -
Refine the shapes:
Go over your pencil lines, refining the petal curves to be slightly tapered at the base and rounded at the tips.
Step 2: Inking the Center
-
Select your fine liner:
Switch to your thinner fine liner pen (size 01 or 03) to begin the detailed work in the center disk. -
Stipple the core:
Start by creating a dense cluster of small dots and tiny circles right in the middle of the center disk. -
Expand the texture:
Work outward from the core, making the dots slightly less dense as you reach the edge of the center circle. This creates a rounded, 3D effect. -
Outline the disk:
Use a slightly heavier line weight to draw the final perimeter of the center disk, locking in the stippled texture.
Wobbly Lines?
Don’t panic if your hand shakes. Simply go back over the line with a slightly thicker marker to smooth out the jitter. Intentional thickness hides mistakes.
Step 3: Creating Bold Outlines
-
Switch to a broad nib:
For the signature graphic look, switch to a thicker marker or a brush pen that can produce a solid, unwavering black line. -
outline the primary petals:
Carefully trace the outer edges of your main petals. I find it helpful to pull the pen toward me for smoother, more confident strokes. -
Vary line weight:
Try to make the lines slightly thicker where the petals meet the center and thinner at the tips to mimic shadow and structural weight. -
Ink the background petals:
Outline the secondary petals that sit behind the main layer. Ensure these lines stop cleanly where they intersect with the foreground petals. -
Add center veins:
Using a thinner pen again, draw a simple, delicate line down the center of each petal. Keep these lines fairly straight but let them break or fade slightly near the tip. -
Deepen the shadows:
Go back with your thickest marker and add small triangular wedges of black in the tight crevices where petals overlap near the center. This ‘negative space’ painting makes the white pop.
Add Pop of Color
Once the black ink is totally dry, use a yellow watercolor wash or diluted acrylic just in the stippled center disk for a classic cheerful daisy look.
Step 4: Final Touches
-
Thorough drying:
Allow the ink to dry completely. Depending on your marker type, give it at least 15 minutes to prevent smearing. -
Erase guidelines:
Gently erase all remaining pencil marks with a kneaded eraser, dabbing rather than rubbing to protect the paper’s texture. -
Assess contrast:
Step back and look at the line weights. If any main outlines look too thin, carefully thicken them to unify the bold graphic style.
Now you have a crisp, modern botanical illustration ready to frame or scan for digital use
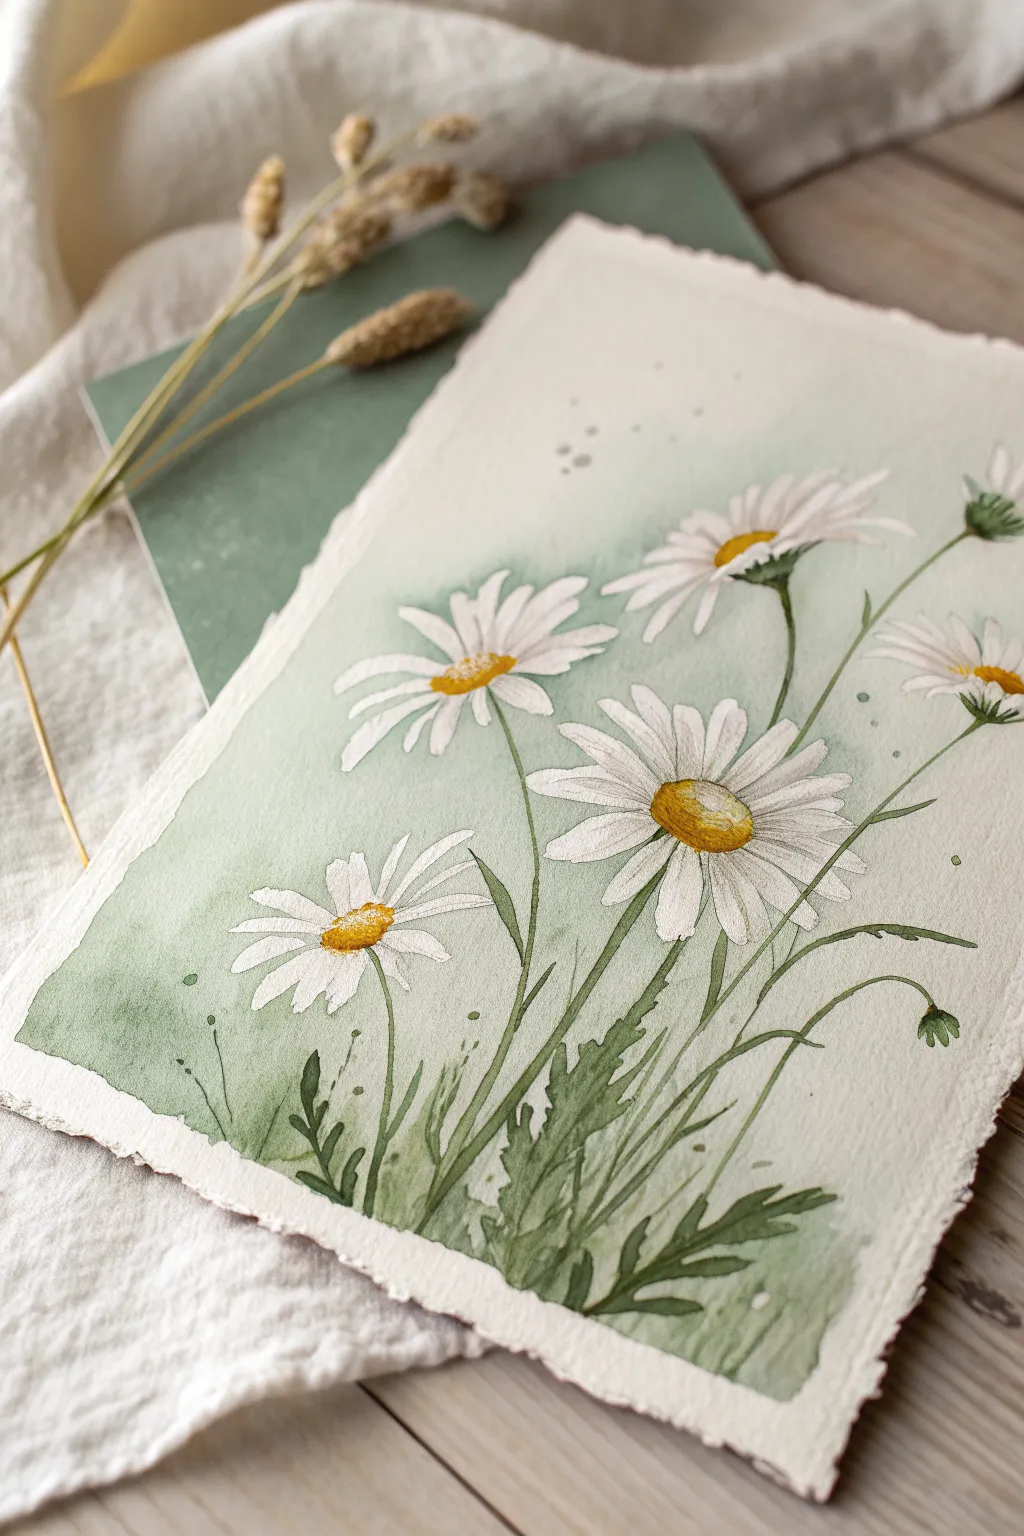
Unexpected Color-Shift Daisies
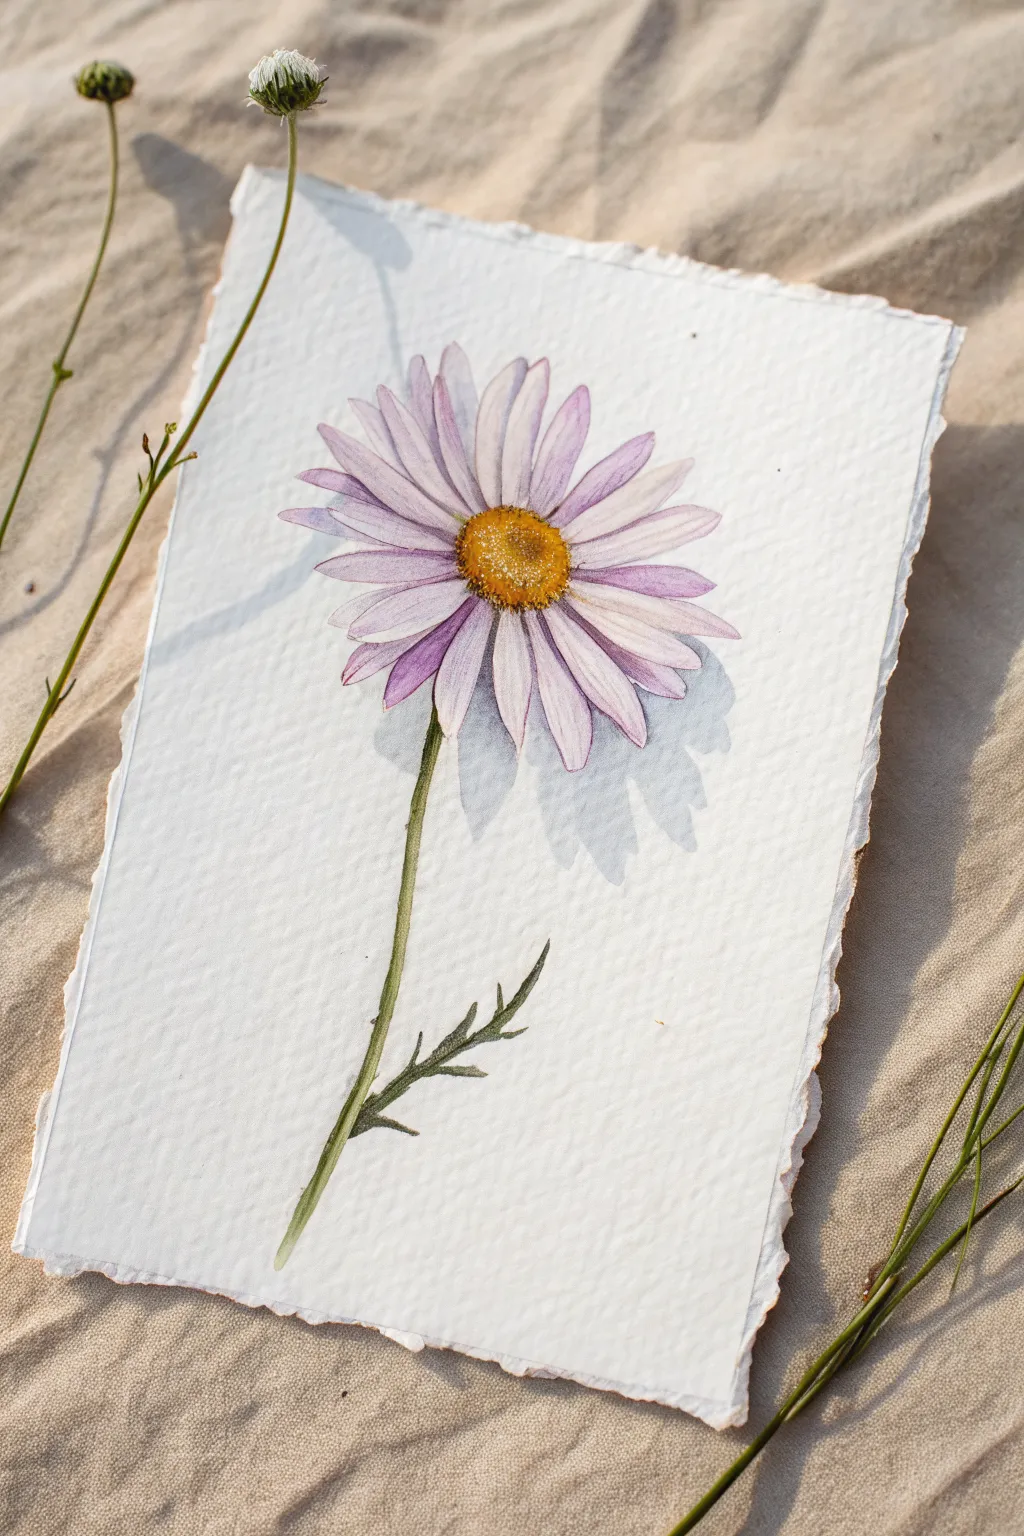
Capture the delicate beauty of a daisy with a twist by swapping traditional white petals for soft, translucent lavender hues. This simple watercolor study uses light washes to build form and shadow, creating a flower that feels both botanical and slightly dreamlike.
Detailed Instructions
Materials
- Cold-press watercolor paper with deckled edge
- Watercolor paints (Purple/Violet, Yellow Ochre, Burnt Sienna, Sap Green)
- Round brushes (sizing approximately #4 and #0 for details)
- Pencil (HB or lighter)
- Kneaded eraser
- Clean water jar
- Paper towels
Step 1: Drawing the Base
-
Outline the center:
Begin by lightly sketching an oval shape for the flower’s center (the disc). Keep this slightly tilted to give the flower perspective. -
Sketch the petals:
Draw the petals radiating outward from the center. Make them long and slender, with slightly ragged or uneven tips. vary the lengths so some appear to be reaching forward and others receding. -
Add the stem and leaves:
Draw a thin, slightly curved stem extending from the bottom. Add two or three jagged, deeply lobed leaves near the base of the stem. -
Lighten lines:
Gently roll a kneaded eraser over your sketch to lift excess graphite. You want the lines barely visible so they don’t show through the transparent watercolor.
Step 2: Painting the Petals
-
Mix a pale wash:
Dilute your purple or violet paint with plenty of water. You want a very faint, tea-like consistency for the first layer. -
First petal layer:
Paint the entire shape of each petal with this pale wash. Work quickly so the edges don’t dry hard, keeping the look soft. -
Add definition:
While the paper is still slightly damp (but not swimming), drop a slightly more saturated purple into the tips of the petals and near the base where they meet the center. -
Define overrides:
For petals that overlap, wait for the first one to dry completely, then paint the petal behind it. This creates a crisp edge between them. -
Deepen shadows:
Once the initial layers are dry, mix a stricter purple-grey. Use your small brush to paint thin lines or streaks along the length of the petals to mimic texture and separated veins.
Wet-on-Dry Texture
For the crisp lines on the petals, ensure the underlying paper is bone dry. If it’s cool to the touch, it’s still wet.
Step 3: Creating the Center
-
Base yellow layer:
Paint the center disc with a wash of Yellow Ochre. Let the edges bleed slightly if they touch the still-damp petal bases for a natural transition. -
Build texture:
While the yellow is damp, dab in dots of Burnt Sienna or a reddish-brown on the lower, shadowed side of the center disc to create a 3D dome effect. -
Stipple details:
Let the center dry fully. Using a nearly dry small brush (#0), stipple tiny dots of dark brown or concentrated orange on the shadowed side to mimic the rough texture of the pollen.
Deckle It Yourself
Don’t have deckled paper? Use a ruler as a straight edge and tear your watercolor paper against it for that rustic look.
Step 4: Stem and Shadows
-
Green basics:
Mix a natural Sap Green. Paint the stem with a single confident stroke, starting thicker at the top and thinning out as you go down. -
Leaf details:
Fill in the jagged leaves. While wet, drop a touch of brown or darker green into the crevices where the leaves meet the stem. -
Cast shadow:
Mix a very watery, cool grey-blue. Paint a loose shadow shape underneath the petals on the right side (or opposite your light source) to lift the flower off the page. -
Final touches:
Assess the contrast. If the center needs more pop, add a few more dark stipple dots. If a petal edge is lost, redefine it with a very faint line of purple.
Enjoy the gentle elegance of your finished botanical study
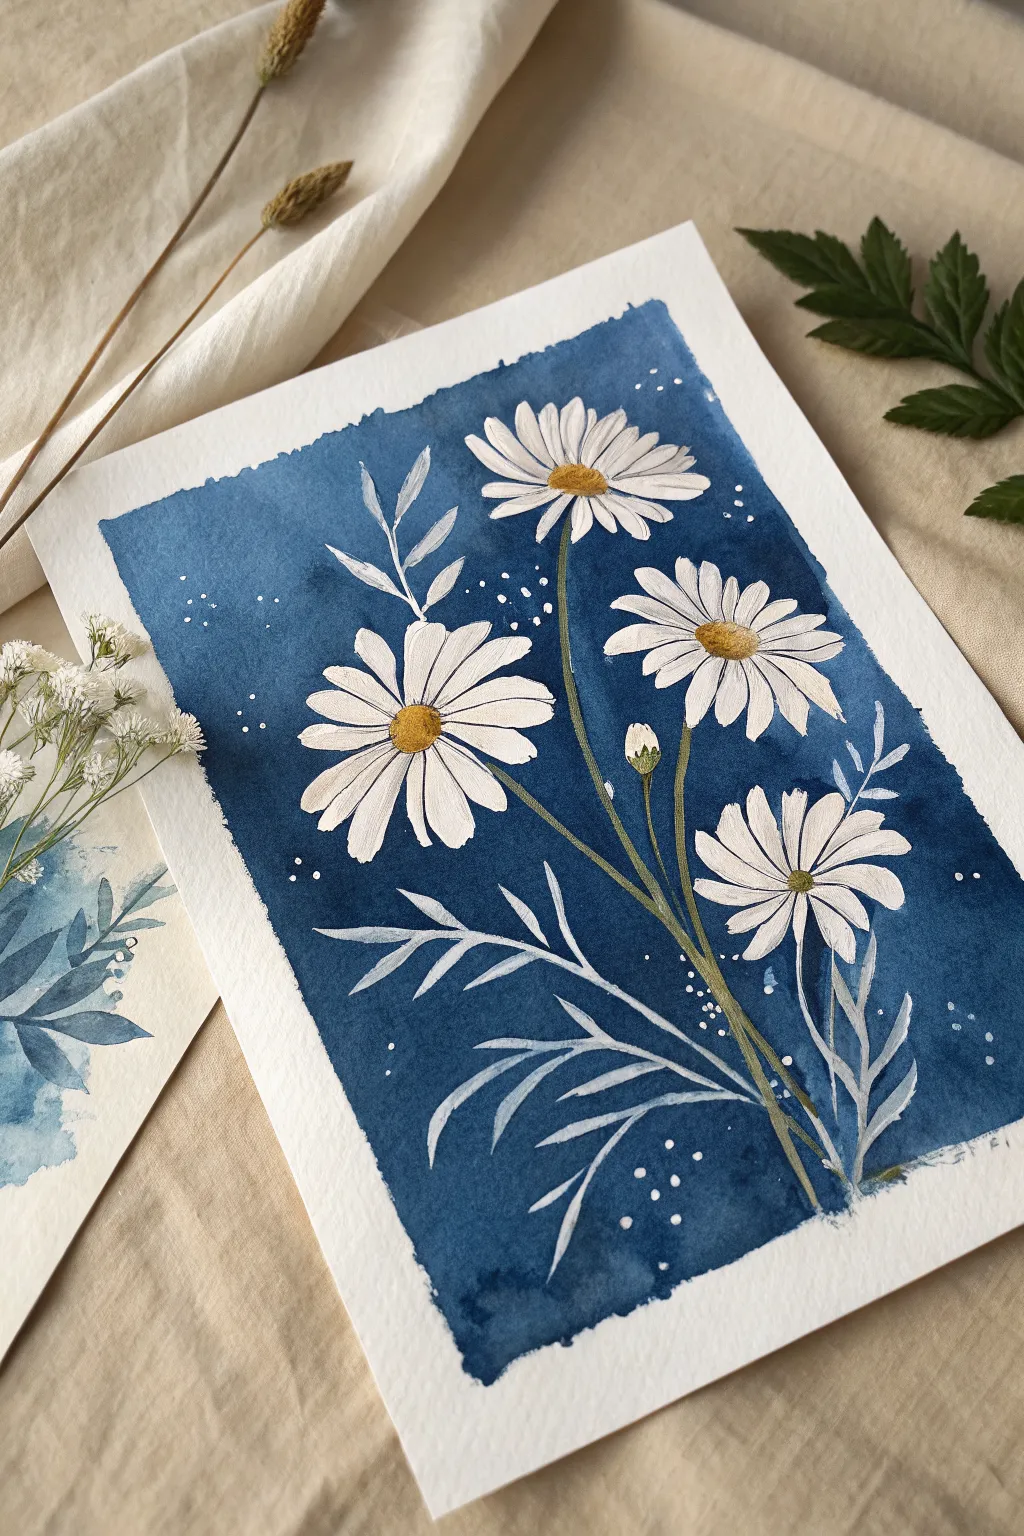
Night-Sky Daisies With Starry Splatter
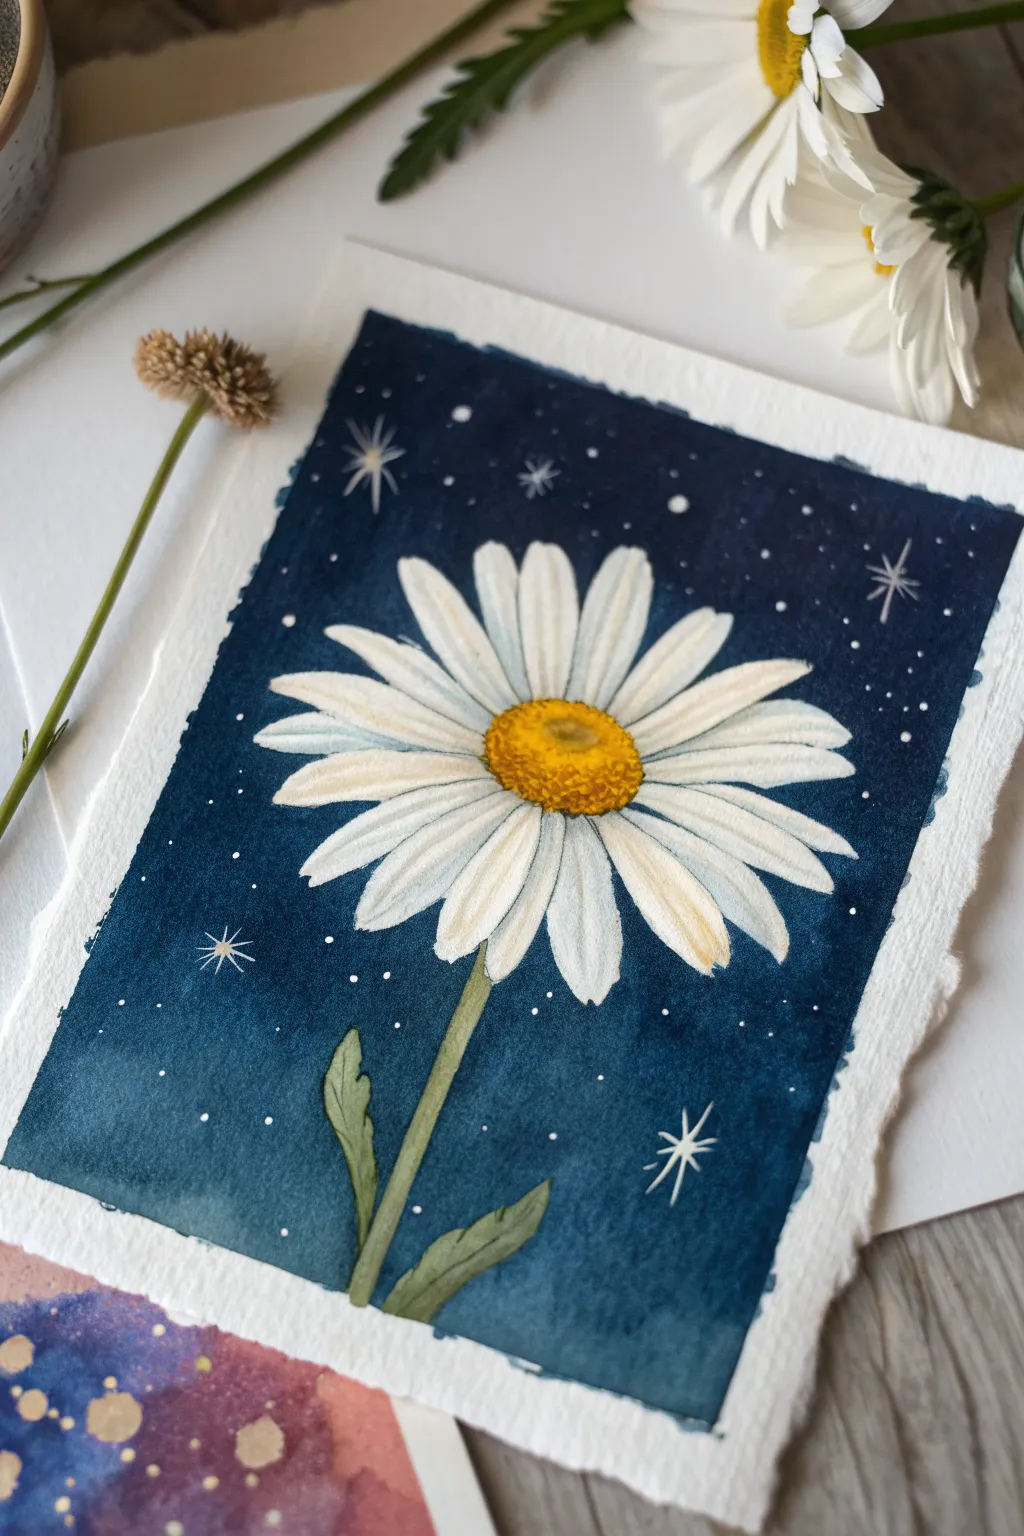
Transform a simple botanical study into a magical scene by placing a classic white daisy against a deep, dreamy indigo sky. This watercolor project uses negative painting and opaque white accents to creating a glowing, starry atmosphere.
How-To Guide
Materials
- Cold press watercolor paper (with deckled edges if possible)
- Masking fluid
- Watercolor paints (Indigo, Payne’s Grey, Sap Green, Lemon Yellow, Yellow Ochre)
- White gouache or white gel pen
- Round watercolor brushes (Size 2, 6, and 8)
- Painter’s tape or board
- Old brush or masking fluid applicator
- Pencil and eraser
- Water jars and paper towels
Step 1: Sketching and Masking
-
Rough sketch:
Lightly sketch the outline of a large daisy slightly off-center on your paper. Draw the oval center first, then radiate the long, slender petals outward. Add a simple stem and two small leaves at the bottom. -
Protect the flower:
Using an old brush or a silicone applicator, carefully apply masking fluid over the entire flower shape—petals, center, stem, and leaves. This step is crucial because it reserves the pure white of the paper so you can paint the dark background freely. -
Let it cure:
Wait until the masking fluid is completely dry and tacky to the touch. Painting over wet masking fluid can ruin your brushes and tear the paper.
Starry Splatter Fix
If a paint splatter lands on your flower, don’t wipe it! Wait for it to dry, then gently lift it off with a damp, clean brush or cover it with white gouache.
Step 2: The Night Sky Background
-
Prepare the wash:
Mix a large puddle of deep night-sky color. I prefer combining Indigo with a touch of Payne’s Grey to get a really rich, dark tone. -
First layer:
Wet the background area around the masked flower with clean water. While wet, drop in your dark blue mix, letting it flow right up to the masked edges. -
Deepen the values:
While the first layer is still damp, charge in more pigment at the top and corners of the painting to create a vignette effect, making the center appear slightly lighter. -
Texture:
If you want subtle texture, you can sprinkle a tiny pinch of salt into the wet paint or dab it lightly with a tissue, but keeping it smooth works beautifully for this look. -
Dry thoroughly:
Allow the background to dry completely. If the paper feels cold to the back of your hand, it’s still wet.
Step 3: Painting the Daisy
-
Remove mask:
Gently rub away the masking fluid with your finger or a rubber cement pickup tool to reveal the pristine white paper underneath. -
Flower center:
Paint the center disk using Lemon Yellow. While it’s wet, dab a little Yellow Ochre or diluted Brown on the bottom edge to give it a rounded, dimensional form. -
Petal shadows:
Mix a very watery, pale grey-blue. Using a small brush (size 2), paint thin lines along the separation of the petals and add subtle shadows near the center where the petals meet the disk. -
Stem and leaves:
Paint the stem and leaves with Sap Green. Drop a tiny bit of your dark background blue into the lower parts of the leaves for shadow.
Make It Glow
Before painting stars, lift a little blue paint away from around the flower petals with a damp brush. This creates a subtle ‘halo’ effect.
Step 4: Starry Details
-
Splatter stars:
Cover your dry flower with a scrap of paper. Load a stiff brush with white gouache diluted to a creamy consistency and tap the handle to splatter tiny stars onto the blue background. -
Hand-painted stars:
Using a white gel pen or a fine detail brush with opaque white gouache, manually paint a few distinct four-pointed stars and larger dots. -
Final highlights:
Add tiny dot texture to the yellow center of the flower with the white gel pen to imply pollen.
Peel off your tape to reveal the crisp edges and admire your captured piece of the galaxy handled with care

Have a question or want to share your own experience? I'd love to hear from you in the comments below!