
Dreams are basically your imagination with the volume turned all the way up—strange, tender, chaotic, and gorgeous. Here are my favorite drawing of a dream ideas that make that hazy, surreal feeling feel visible on paper.
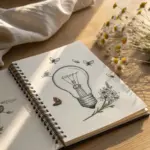
Sleeper With a Thought-Cloud World
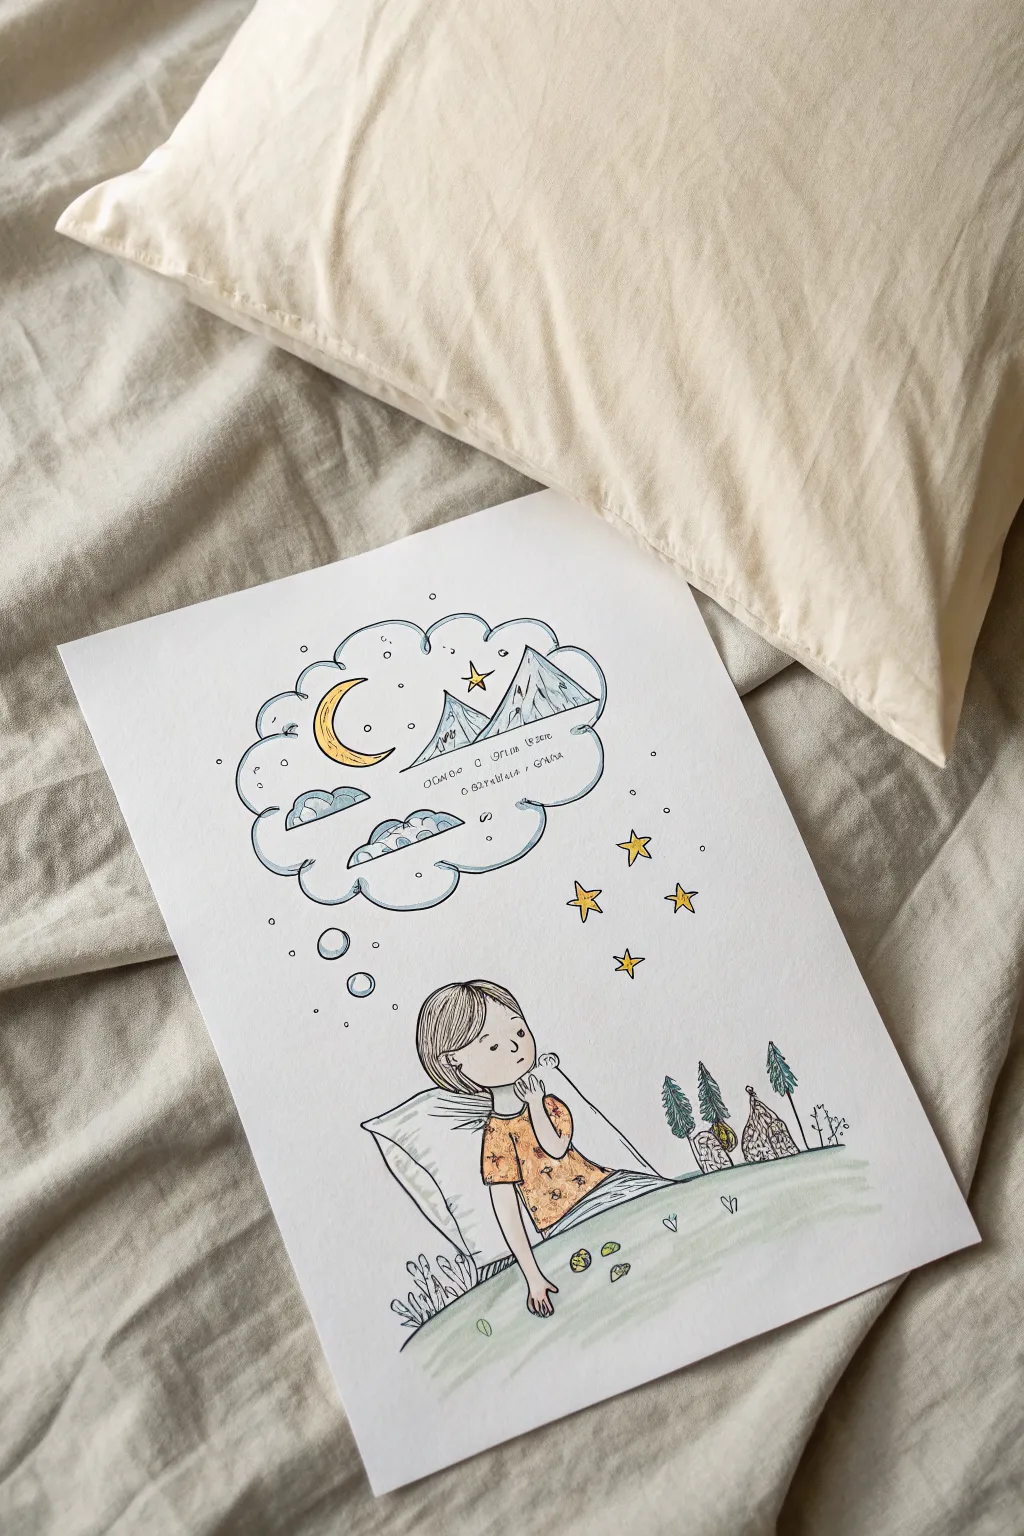
Capture the whimsy of bedtime dreams with this delicate pen and wash illustration. This project combines simple line drawing with soft washes of color to create a serene scene of a sleeper envisioning a mountain landscape.
How-To Guide
Materials
- Heavyweight drawing paper or watercolor paper (A4 size)
- Pencil (HB or H)
- Eraser
- Black waterproof fineliner pens (0.1mm, 0.3mm, 0.5mm)
- Watercolor paints or water-based markers
- Small round watercolor brush (size 2 or 4)
- Jar of water
- Paper towel
Step 1: Sketching the Composition
-
Establish the horizon:
Start by lightly drawing a gently curved horizon line near the bottom third of your paper. This will serve as the grassy hill where the bed rests. -
Place the sleeper:
Draw the basic shapes for the girl and her pillow. Use a large rectangle angled upward for the pillow and a smaller oval for her head. Sketch her torso and arm extending down, making sure she looks relaxed. -
Draw the thought bubble:
Above the sleeper’s head, sketch a large, fluffy cloud shape. Inside this cloud, lightly outline two mountain peaks and a crescent moon on the left side. -
Add nature details:
On the grassy slope to the right of the bed, sketch three small pine trees and a tiny tent or structure. Add some small star shapes floating between the girl and the cloud.
Uneven Washes?
If your watercolor dries with hard edges, wet the paper slightly with clean water before applying paint to encourage smoother blending.
Step 2: Inking the Lines
-
Outline the main cloud:
Using a 0.3mm fineliner, carefully trace over your pencil lines for the large thought cloud. Keep the lines somewhat loose and wavy to maintain a soft feel. -
Ink the mountain scene:
Switch to a finer 0.1mm pen for the details inside the bubble. Draw the mountains, adding jagged lines for snow caps, and ink the crescent moon and the small text or textures inside. -
Define the sleeper:
Use the 0.3mm pen to outline the girl’s face, hair, and shirt. Add texture to her shirt with small dots or patterns using the 0.1mm pen to give it a fabric look. -
Inking the landscape:
Outline the pillow, bedsheets, and the grassy hill. For the pine trees, use short, scribbly strokes to suggest needles and texture. -
Add celestial details:
Ink the stars and the small bubbles connecting the sleeper’s head to the thought cloud. Once ink is fully dry, gently erase all pencil marks.
Step 3: Adding Color Washes
-
Skin tones:
Mix a very watery pale peach or beige color. Apply a light wash to the girl’s face, arms, and hand. Keep it subtle. -
Color the shirt:
Paint the girl’s shirt with a warm ochre or mustard yellow. I like to keep the color slightly uneven to suggest light and shadow. -
Blue tones for the dream:
Using a diluted light blue, paint the sky area inside the thought cloud, carefully painting around the moon and cloud drifts. Add touches of blue to the snow caps on the mountains. -
Green landscape:
Wash a soft sage green over the grassy hill area at the bottom. You can layer a slightly darker green near the bottom edge for depth. -
Trees and accents:
Paint the pine trees in a darker forest green. Use a bright yellow for the crescent moon and the floating stars to make them pop against the white paper. -
Shadows and finishing touches:
Add a very faint grey or blue wash to the shadows on the pillow and under the cloud’s rim. Let everything dry completely.
Make it Sparkle
Once the paint is dry, use a white gel pen to add tiny highlights on the stars, the moon, and the girl’s eyes for extra magic.
Now you have a peaceful piece of art perfect for a bedroom wall or a calm corner


Hair Turning Into a Dream Scene
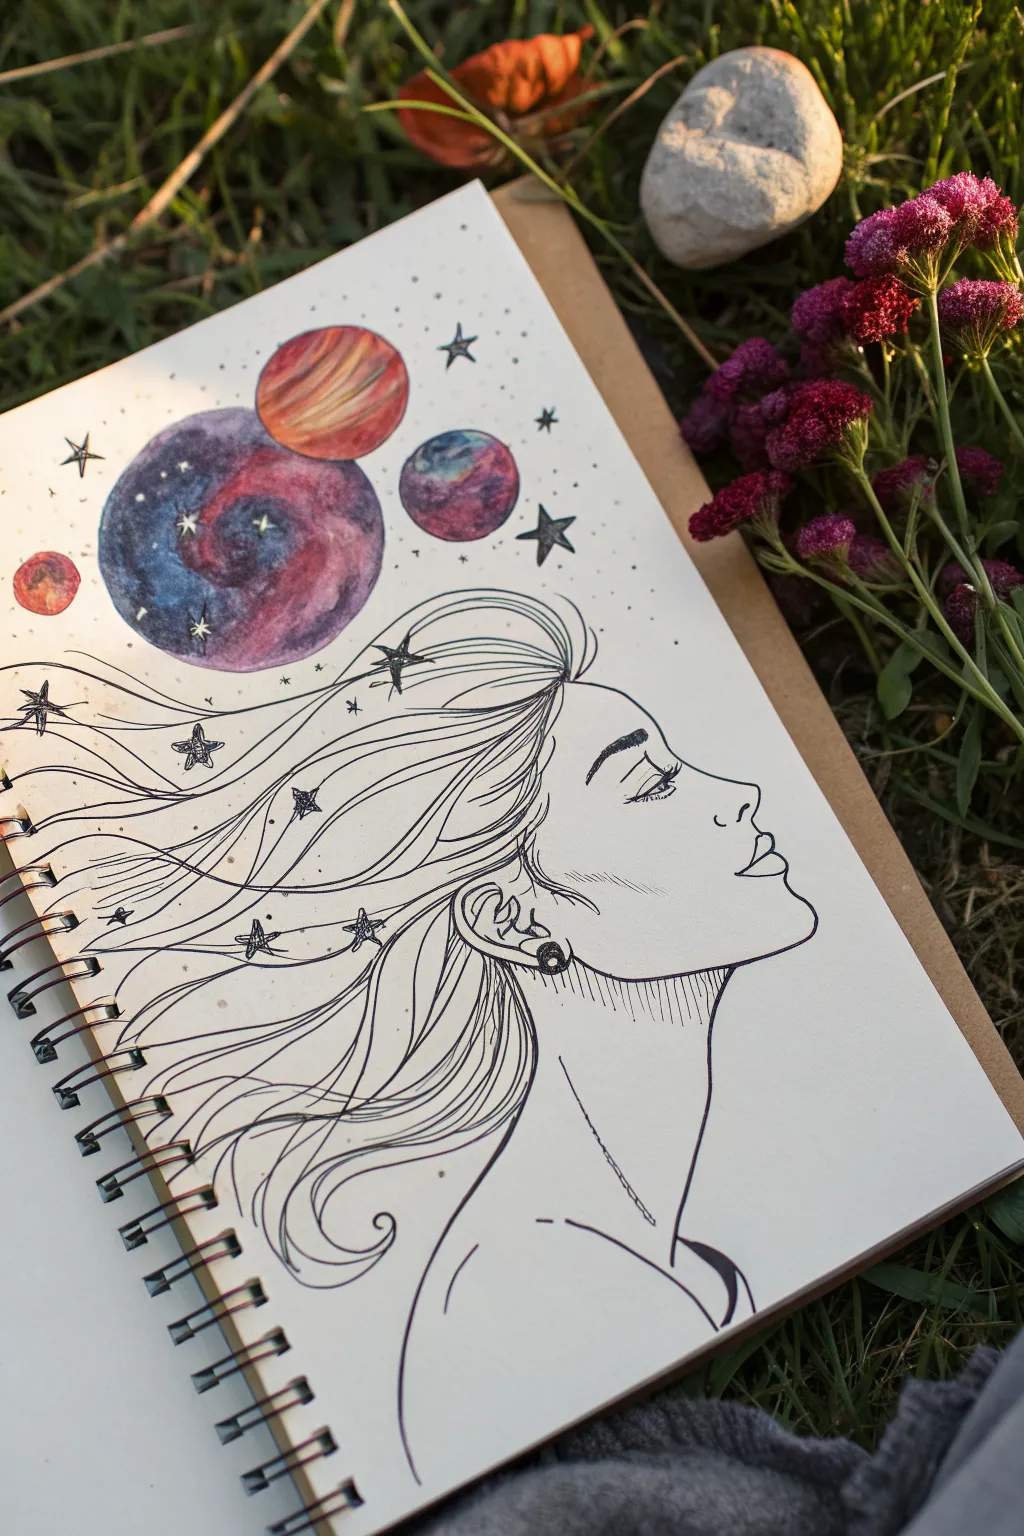
This whimsical mixed-media sketch combines delicate line art with vibrant bursts of watercolor to capture a dreamscape emerging from thought. By blending precise ink contours with fluid, galaxy-themed washes, you’ll create a surreal portrait where hair transforms into a universe of planets and stars.
How-To Guide
Materials
- Sketchbook (heavyweight or mixed-media paper)
- HB pencil and eraser
- Fine liner pens (0.1mm, 0.3mm, 0.5mm – waterproof)
- Watercolors (pan or tube)
- Round watercolor brush (size 4 or 6)
- White gel pen or gouache
Step 1: Drafting the Profile
-
Sketch the Head Shape:
Begin with your pencil, lightly sketching a circle for the cranial mass and a sweeping jawline to establish the profile view. Don’t press too hard; these lines are guides. -
Refine Facial Features:
Map out the nose, lips, and chin. The nose should have a gentle slope, and the lips can be slightly parted or relaxed. Add the neck flowing downwards into the shoulder line. -
Place the Ear:
Draw the ear just behind the jawline, keeping it level with the space between the eye and nose. Add a small circle for a stud earring if desired. -
Draw the Eye:
Sketch the eye in profile—a triangular wedge shape rather than an almond. Add the eyebrow above it with short, directional strokes. -
Establish Hair Flow:
Instead of drawing a contained hairstyle, sweep long, wavy lines backward from the forehead and temple. -
Expand the Strands:
Continue these lines, letting them fan out wider as they move away from the head. This open space in the upper left is where your planets will reside.
Water Control Tip
Use waterproof ink pens so your lines don’t bleed when you paint the nearby planets. Test your pen on a scrap piece of paper with water first.
Step 2: Inking the Lines
-
Outline the Profile:
Using a 0.3mm fine liner, carefully trace your pencil lines for the face, neck, and ear. Keep your hand steady for a clean, continuous look. -
Detail the Face:
Switch to a 0.1mm pen for delicate features like the eyelashes, nostril, and lips. Add hatching lines under the jaw and on the neck for soft shadow. -
Ink the Hair:
Go back to the 0.3mm pen (or even 0.5mm for variety) to ink the flowing hair strands. I like to keep the ends of these lines loose and open rather than closing the shapes. -
Add Star Doodles:
Intersperse small, five-pointed stars within the hair strands. Draw some stars tangled in the lines and others floating free in the space above.
Wonky Circles?
If you struggle drawing perfect circles for planets freehand, lightly trace around a coin, a bottle cap, or a roll of washi tape.
Step 3: Adding the Cosmos
-
Outline Planets:
Lightly trace three or four circles of varying sizes floating above the hair. One large planet can dominate the space, with smaller ones orbiting nearby. -
Paint the Base Layers:
Wet the inside of your first planet circle with clean water. Drop in diluted watercolor—purples, deep blues, or magentas—and let the pigment bloom across the damp paper. -
Create Planet Texture:
While the paint is still wet, drop in a contrasting color (like orange or teal) to create swirls/clouds. For a ringed planet look, lift pigment with a thirsty brush or paint stripes. -
Add a Small Red Moon:
Paint the smaller satellite circles with warmer tones like ochre or red to contrast against the cool galaxy colors. -
Dry and Refine:
Let the paint dry completely. Once dry, use your fine liner to outline the planets loosely if you want a graphic look, or leave them purely painted for softness. -
Final Cosmic Details:
Use a white gel pen to add tiny dots and crosses on top of the dried watercolor planets to represent distant stars and sparkles. -
Connecting Elements:
Draw tiny ink dots (stippling) expanding from the hair strands toward the planets, visually connecting the sketch to the painted elements.
Step back and admire how the colors bring the quiet sketch to life


Staircase to Nowhere
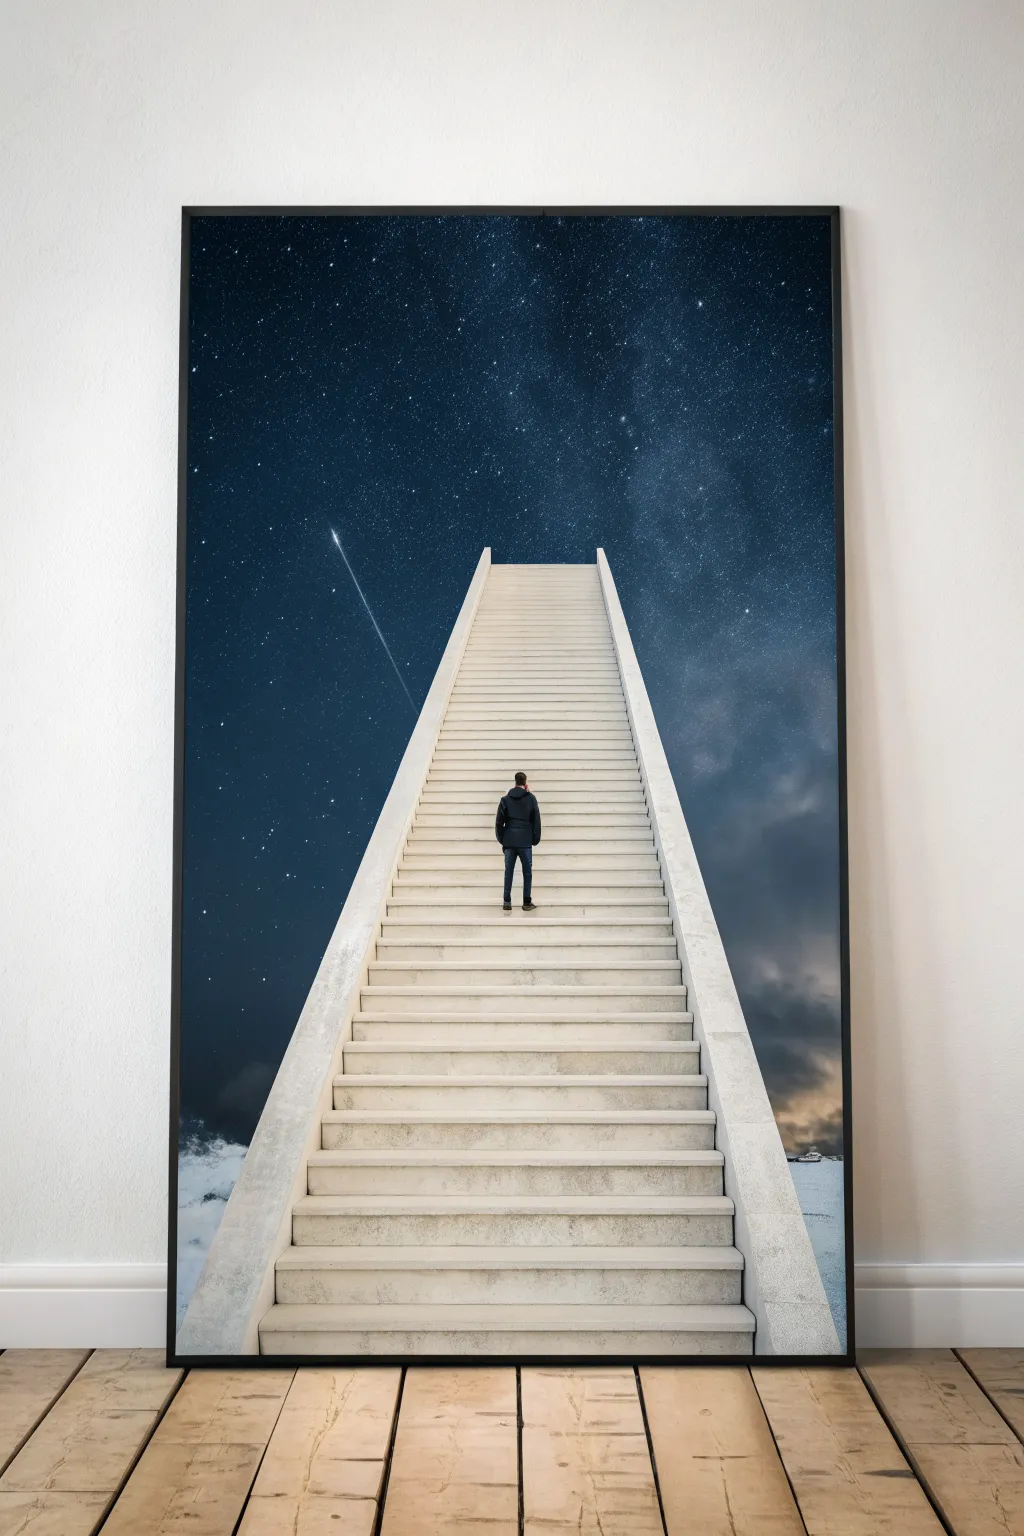
This surreal digital photo manipulation captures the awe-inspiring feeling of ascending into the unknown, blending a stark architectural element with the vast beauty of the night sky. By combining stock photography and digital painting techniques, you will create a seamless dreamscape where the earthly meets the infinite.
Step-by-Step Guide
Materials
- Digital imaging software (Photoshop, Procreate, or GIMP)
- High-resolution stock photo of a concrete staircase (straight perspective)
- High-resolution stock photo of a starry night sky/Milky Way
- Stock photo of a person standing (back view)
- Graphics tablet (optional but recommended)
- Pressure-sensitive stylus
Step 1: Setting the Scene
-
Prepare the Canvas:
Create a new document with a tall, portrait aspect ratio (around 24×36 inches at 300 DPI) to match the poster format seen in the reference. -
Import the Sky:
Place your starry sky image as the background layer. Position it so the brightest concentration of stars or the Milky Way band is visible but leaves room for the stairs in the center. -
Color Correction:
Adjust the sky’s levels or curves to deepen the blacks and make the blues richer. I like to add a subtle vignette to the top corners to focus the eye downward initially. -
Cloud Foundation:
On a new layer near the bottom, paint soft, dark clouds or import a cloudy horizon image. Blend this with the starry sky using a soft gradient mask so the transition feels natural.
Lighting the Subject
Add a subtle ‘Inner Shadow’ layer style to the figure using a pale blue color. This creates a rim-light effect, simulating the glow of the stars hitting their shoulders.
Step 2: Constructing the Stairs
-
Isolate the Staircase:
Open your staircase stock photo. Use the Pen Tool or Polygon Lasso to carefully cut out the stairs, removing any background or handrails if they don’t fit the minimal aesthetic. -
Positioning:
Paste the stairs into your main document. Center them perfectly at the bottom. Use the Distort or Perspective transform tools to narrow the top of the stairs, exaggerating the height and vanishing point. -
Desaturation:
Desaturate the staircase layer completely to achieve that stark, white stone look. Adjust the brightness/contrast to make the steps look illuminated by starlight rather than sunlight. -
Edge Refinement:
Create a new layer above the stairs and set it to a clipping mask. Use a soft brush with a dark blue hue to paint shadows on the outer edges of the staircase walls, helping them sit better against the dark sky. -
Atmospheric Perspective:
Add a Gradient Overlay or paint a soft white haze at the very top of the stairs. This mimics atmospheric depth, making the stairs appear to fade slightly into the cosmic distance.
Step 3: Adding the Figure
-
Extract the Subject:
Cut out your person from their original photo. Precision is key here, so zoom in close to get a clean edge on the jacket and jeans. -
Placement:
Place the figure on the stairs, roughly one-third of the way up. Ensure their feet align convincingly with the perspective of a specific step. -
Contact Shadows:
On a layer beneath the figure, paint a tight, dark shadow right under the shoes using a small, soft black brush. Reduce opacity to around 60%. -
Cast Shadow:
Paint a softer, elongated shadow extending slightly behind the figure on the steps below, consistent with the ambient light direction. -
Color Matching:
Add a Color Balance adjustment layer clipped to the figure. Shift the midtones towards cyan and blue so the person looks like they are actually in the night environment, not a studio.
Mismatched Perspective
If the stairs look flat, your vanishing point is off. Use the ‘Perspective Warp’ tool in Photoshop to adjust the planes of the steps until they align with your composition’s center.
Step 4: Polishing the Atmosphere
-
The Shooting Star:
On a new top layer, use a small, hard white brush to draw a straight diagonal line. Fade the tail end with an eraser to create a shooting star effect on the left side. -
Ground Integration:
At the very bottom where the stairs meet the frame edge, overlay some texture of snow or clouds to obscure the base slightly, enhancing the feeling that the stairs are floating. -
Global Dodge and Burn:
Create a new layer set to Overlay filled with 50% gray. Use the Dodge tool to brighten the center of the steps and the Burn tool to darken the sky edges further. -
Noise:
Add a tiny amount of monochrome noise (about 2-3%) to the entire image. This binds the different photo elements together and simulates film grain. -
Final Sharpening:
Flatten the image or create a merged copy. Apply a High Pass filter (radius 1-2px) set to Overlay mode to make the stars and stone texture pop.
Print your masterpiece on matte paper and frame it simply to let the infinite climb speak for itself


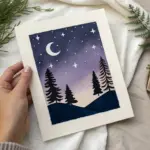
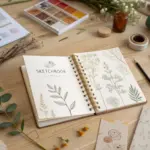
Moon Swing Childhood Dream
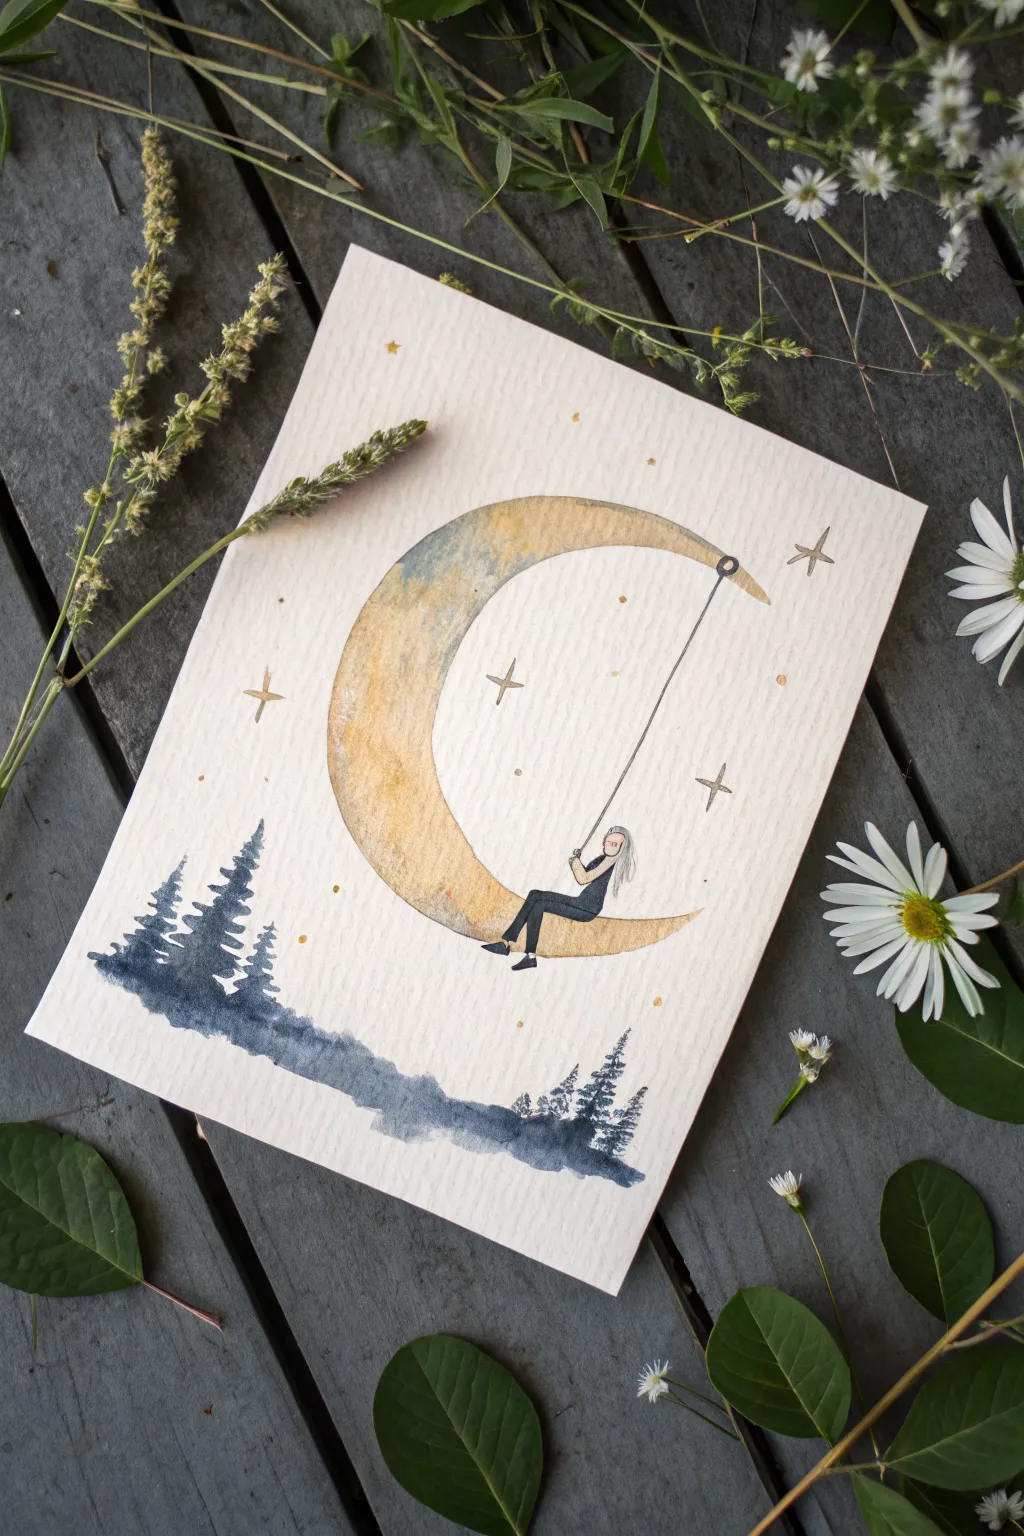
Capture the whimsy of a childhood dream with this enchanting watercolor illustration featuring a figure swinging from a crescent moon. Using textured paper and a limited palette of indigo and gold creates a cozy, magical atmosphere perfect for a greeting card or wall art.
Step-by-Step Tutorial
Materials
- Cold press watercolor paper (300 gsm)
- Watercolor paints (Indigo, Yellow Ochre, Burnt Sienna, Lamp Black)
- Round watercolor brushes (sizes 2, 4, and 0 for details)
- Mechanical pencil and eraser
- Fine liner pen (0.1mm, black)
- Gold metallic paint or gel pen
- Clean water and paper towels
- Masking tape
Step 1: Sketching the Composition
-
Secure the paper:
Tape down all four edges of your watercolor paper to a hard board using masking tape. This prevents the paper from buckling when wet and leaves a crisp white border. -
Outline the moon:
Lightly sketch a large crescent moon shape in the center of the page. Ensure the curve is smooth and the ends taper gently. -
Add the figure:
Draw a small figure sitting on the moon’s lower curve. Sketch a simple swing rope going up to the moon’s top point, and add the figure’s legs dangling down comfortably. -
Sketch the treeline:
Near the bottom, pencil in an uneven, rolling horizon line for the forest floor and mark the vertical placement of a few pine trees on the left and right sides.
Uneven Moon Color?
If the moon dries with hard water lines (blooms), soften them by gently scrubbing the dry edge with a barely damp, clean brush to blend the pigment back out.
Step 2: Painting the Moon
-
First wash:
Mix a watery wash of Yellow Ochre. Carefully fill in the moon shape, keeping the edges neat. While it’s wet, I like to drop in tiny hints of Burnt Sienna or dilute Indigo near the bottom curve to create a crater-like texture. -
Build texture:
Once the first layer is damp (not soaking), dab a slightly thicker concentration of ochre or gold paint onto the moon’s surface to enhance that mottled, celestial look. -
Let it dry:
Allow the moon to dry completely before moving on to nearby elements to prevent bleeding.
Salt Texture Trick
While the yellow moon wash is still wet, sprinkle a few grains of table salt on it. Brush it off when dry for an effortless, crater-like texture.
Step 3: Creating the Forest
-
Base layer for ground:
Dilute your Indigo paint significantly so it is a pale blue-grey. Paint the rolling horizon line at the bottom, letting the color fade out imperfectly at the edges. -
Painting the trees:
Using a size 2 or 4 brush and a more saturated Indigo mix, paint the pine trees. Start with a vertical line for the trunk, then use small, horizontal dabbing motions to create branches that get wider towards the bottom. -
Depth and shadow:
While the trees are still slightly wet, drop heavily saturated Indigo (almost black) into the bottom branches and the ground immediately beneath them to ground the scene.
Step 4: The Figure and Details
-
Painting the figure:
Using a fine detail brush (size 0), paint the figure’s pants with dark grey or black. Use a tiny touch of contrast color for the shirt. -
Inking the line:
Once the painting is totally dry, use a 0.1mm fine liner to draw the swing rope. Use a ruler if you want it perfectly straight, or freehand it for a relaxed look. -
Outlining details:
Gently outline the figure’s hair and profile with the pen. Keep lines delicate; you don’t need to outline the entire moon or trees.
Step 5: Finishing Touches
-
Adding stars:
Using metallic gold paint or a gold gel pen, draw four-pointed stars and small dots scattered around the moon. -
Highlighting:
Add a few tiny gold dots within the dark pine trees to suggest fireflies or magic dust. -
Remove tape:
Wait until the paper is bone dry, then peel the masking tape away slowly at a 45-degree angle to reveal your clean edges.
Now you have a serene little world captured on paper, ready to frame or gift
BRUSH GUIDE
The Right Brush for Every Stroke
From clean lines to bold texture — master brush choice, stroke control, and essential techniques.
Explore the Full Guide
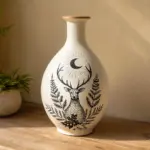
Sky Ocean With Floating Whales
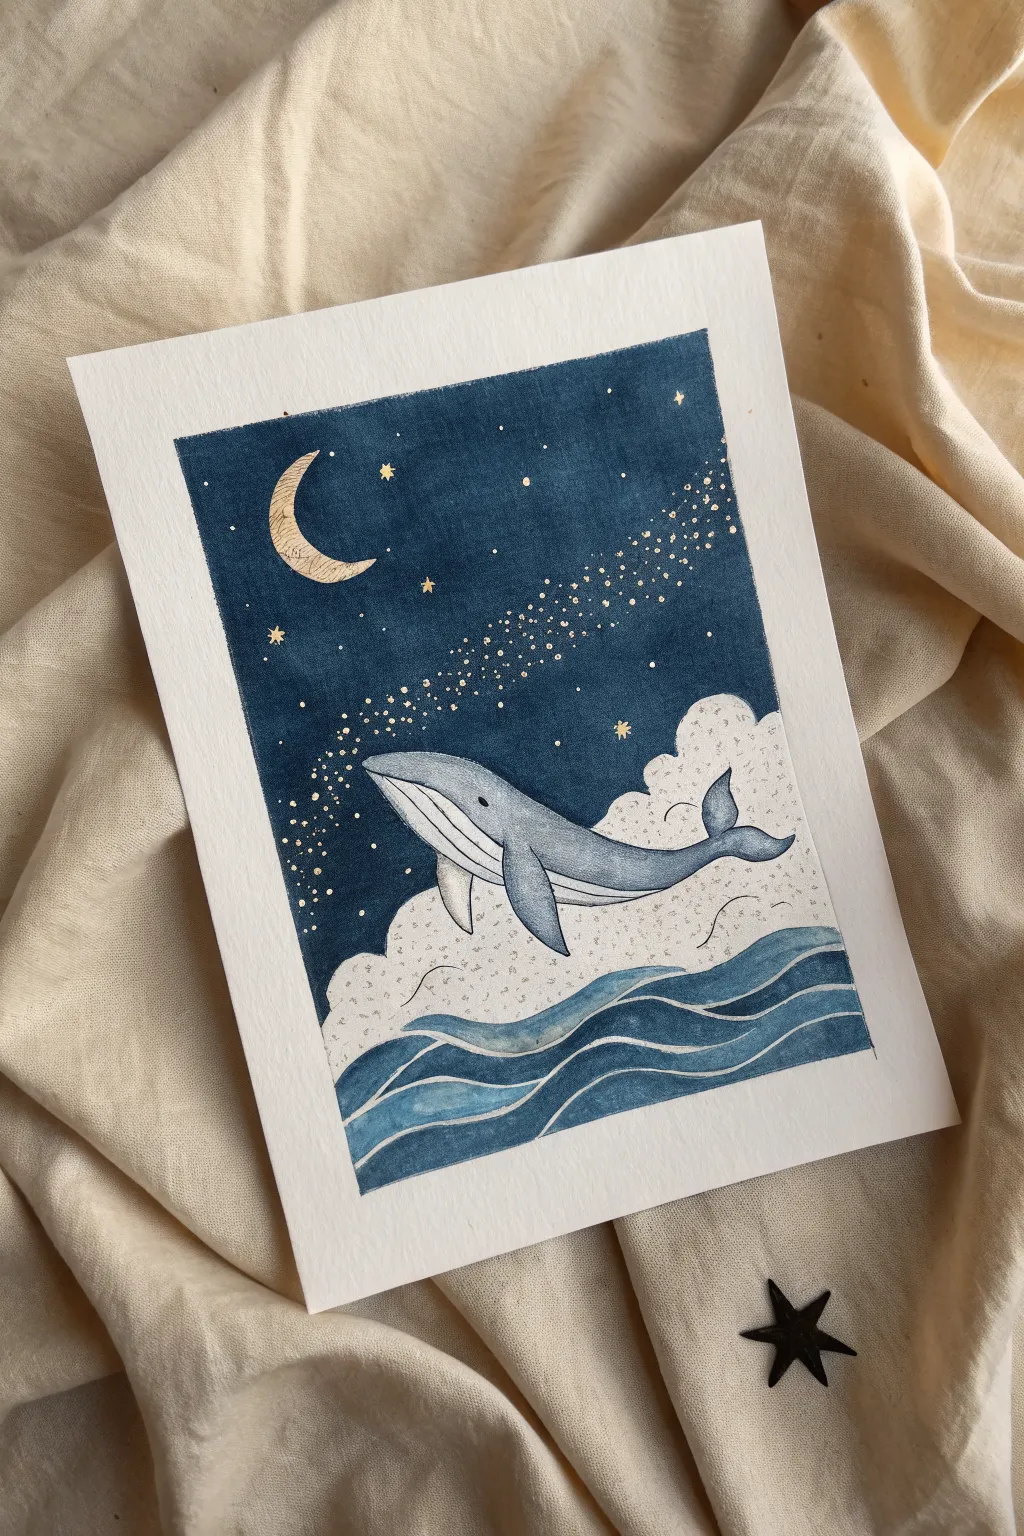
This dreamy illustration merges the depths of the ocean with the night sky, featuring a graceful whale gliding through clouds and constellations. Using deep indigo watercolors and striking metallic accents, you’ll create a magical piece of art that feels calm yet wondrous.
Detailed Instructions
Materials
- Cold press watercolor paper (300 gsm)
- Masking tape
- Pencil and eraser
- Watercolors: Indigo/Payne’s Grey, Cerulean Blue, Black
- Metallic gold ink or gouache
- Fine liner brush (size 0 or 00)
- Medium round brush (size 4 or 6)
- Fine white gel pen or white gouache
- Clean water and mixing palette
Step 1: Sketching and Preparation
-
Tape the borders:
Begin by taping down all four edges of your watercolor paper to a flat surface. This creates a crisp white border and prevents the paper from buckling when wet. -
Outline the composition:
Lightly sketch the scene with a pencil. Start with the crescent moon in the top left, then draw a diagonal separation for the clouds. Place the whale centrally, overlapping the clouds slightly, and draw wavy lines at the bottom for the sea. -
Refine the whale:
Add details to your whale sketch, defining the pectoral fins, the fluke (tail), and the pleated throat grooves. Keep the lines faint so they don’t show through the lighter paint later.
Star Sprinkle
For a more organic starry look, load an old toothbrush with gold ink and flick the bristles to spray a fine mist of stars over the dark sky area.
Step 2: Painting the Background
-
Paint the night sky:
Mix a rich, dark indigo color using dark blue and a touch of black. Carefully paint the upper section of the sky, working around the moon and the cloud line. Ensure the color is solid and opaque for a deep night effect. -
Soften edges:
While painting the sky near the cloud line, be precise with your brush tip to create varied, fluffy bumps, but don’t wet the cloud area itself yet. -
Paint the ocean waves:
For the bottom section, mix three values of blue: a dark indigo, a mid-tone blue, and a lighter watery blue. Paint the wave bands in alternating shades, leaving thin white gaps between them to separate the layers. -
Let it dry completely:
Allow the background layers to dry fully. If the paper feels cool to the touch, it is still damp.
Level Up: 3D Elements
Use gold leaf instead of ink for the moon to make it truly shine and catch the light from different angles.
Step 3: The Whale and Clouds
-
Base coat for the whale:
Mix a watery, pale grey-blue. Fill in the whale’s body. The paint should be fairly transparent to keep it light. -
Add shading:
While the whale is still slightly damp, drop a slightly darker grey-blue along the bottom of the belly and under the fins to create dimension. -
Define the clouds:
The clouds are largely the white of the paper. Mix a very diluted grey wash and paint small, curved textures or ‘c’ shapes within the white cloud area to suggest fluffiness without filling it in completely. -
Outline the whale:
Once the whale is dry, use a fine brush with dark indigo (or a fine liner pen) to outline the body, the eye, and the lines on the belly.
Step 4: Metallic Details and Stars
-
Paint the moon:
Using your metallic gold ink, fill in the crescent moon. You can dab the brush to create a cratered texture. -
Create the Milky Way:
Dip your fine brush into the gold ink. Create a diagonal stream of tiny dots flowing from the top right down toward the whale. Vary the spacing—some clustered tight, some spread out. -
Add larger stars:
Paint a few larger, four-pointed stars scattered in the dark sky using the gold. I like to place one near the moon for balance. -
Detail the waves:
Use the fine brush and gold ink to trace thin lines separating the blue wave layers, replacing the white gaps or painting over them for shine. -
Stipple the clouds:
Add tiny black dots or stippling on the cloud area near the sky boundary. This adds a graphic, illustrative texture unique to this style. -
Final touches:
Add a tiny white highlight to the whale’s eye. Once fully dry, peel off the masking tape slowly at a 45-degree angle.
Frame your celestial seascape to add a touch of quiet magic to any room
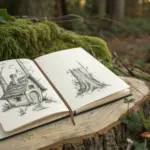
Astronaut Exploring a Thought Cloud
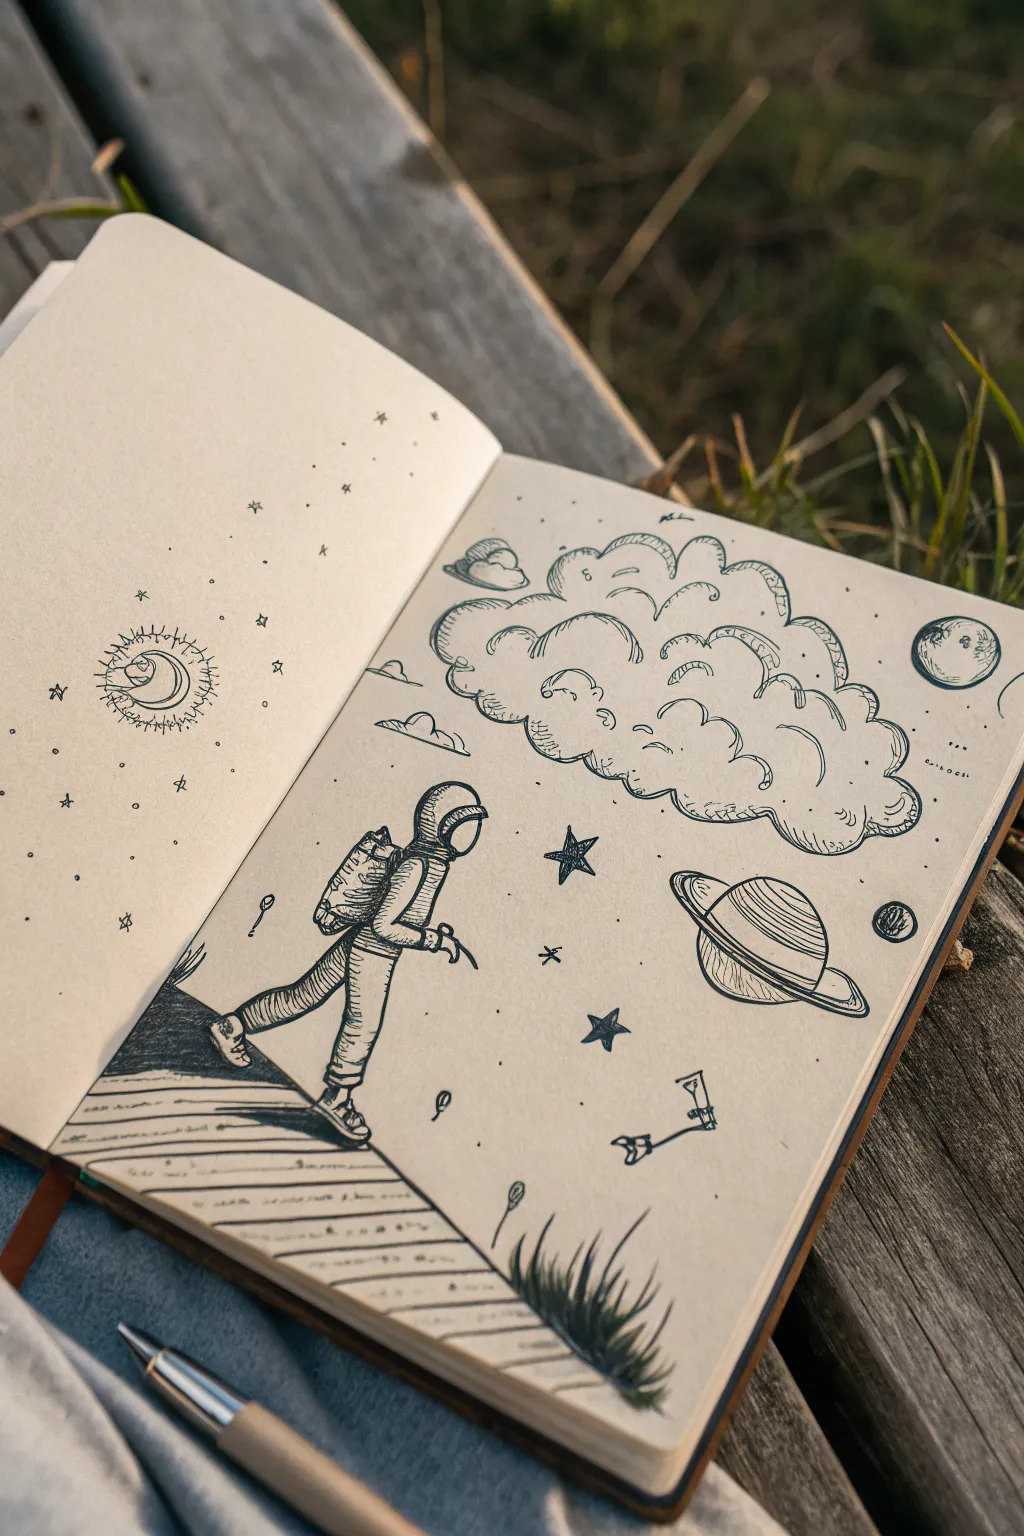
This whimsical ink drawing captures an astronaut strolling through a dreamlike galaxy, blending earthly textures with celestial wonders. The clean lines and stippled shading give it a charming, storybook illustration quality that looks great in any sketchbook.
Step-by-Step Guide
Materials
- Sketchbook with smooth, thick paper (cream or off-white recommended)
- Pencil (HB or 2H for light guidelines)
- Kneadable eraser
- Fine liner pens (sizes 0.1, 0.3, and 0.5)
- Ruler (optional, for the path)
Step 1: Setting the Scene
-
Start with the path:
Begin on the lower left of the right-hand page. Use your pencil to lightly sketch a curved path that starts wide at the bottom edge and narrows as it moves diagonally upward toward the center left. Draw horizontal lines across it to represent wooden planks. -
Outline the astronaut:
Sketch the astronaut figure walking on the path. Use simple geometric shapes first: an oval for the helmet, a rectangle for the backpack, and cylinders for the limbs. Position the figure so they appear to be stepping forward, with one foot on the path and the other lifting. -
Draft the cosmic elements:
Above the astronaut, lightly draw a large, fluffy cumulus cloud shape that dominates the upper right space. To the right of the cloud, sketch a Saturn-like ringed planet and a smaller moon. -
Add floating details:
Scatter pencil guidelines for a few five-pointed stars, tiny distant planets, and perhaps a small floating object like a key or a flower near the astronaut’s path.
Ink Smearing?
If you’re smudging ink while drawing, place a clean scrap piece of paper under your drawing hand. This acts as a shield between your skin’s oils and the fresh ink.
Step 2: Inking the Astronaut
-
Refine the helmet:
Switch to a 0.3 fine liner. Carefully outline the helmet, leaving a blank space for the visor reflection. Ink the suit details, adding horizontal ribbed lines on the arms and legs to suggest the flexible texture of a space suit. -
Detail the backpack:
Ink the life-support backpack. I like to add small pouches and buttons here to make it look technical. Use a 0.1 pen to add tiny hatching lines on the side for shadow. -
Ground the figure:
Ink the boots with a sturdy sole. Add a small cast shadow under the feet on the wooden planks to give the astronaut weight.
Add Watercolor
Once the waterproof ink is totally dry, apply a light wash of watercolor. Use diluted indigo for the sky and faint yellow for the stars to make them glow.
Step 3: Inking the Environment
-
Define the wooden path:
Go over your path lines with the 0.3 pen. Instead of perfect straight lines, make them slightly wobbly to look like weathered wood. Add small dots or grain lines on the planks for texture. -
Creating the shadow:
To the left of the path, fill in the ground space with dense hatching or solid black ink to create a high-contrast shadow area, separating the path from the void. -
Inking the cloud:
Use a 0.5 pen for the cloud’s outer edge to make it pop. Use bumpy, scalloped lines. Inside the cloud, switch to a 0.1 pen to draw lighter, broken scalloped lines that suggest volume and fluffiness. -
Planetary details:
Ink the ringed planet with smooth elliptical strokes. Add horizontal lines across the planet’s surface to simulate gas giant bands. Ink the smaller moon with crater details. -
Adding stars:
Draw the stars you sketched earlier. Fill some in solid black and leave others as outlines. Add tiny dots (stippling) around the stars and planets to create a sense of cosmic dust.
Step 4: Finishing Touches
-
Draw the grass:
At the bottom right corner, use quick, upward flicking motions with a 0.3 pen to create tufts of grass. Make the base of each blade thicker and the tip sharp. -
Left page elements:
If you are working across a spread, move to the left page. Draw a stylized sun with a face in profile. Surround it with wavy and zigzag rays. Scatter a few simple stars around it to balance the composition. -
Erase guidelines:
Wait at least 5-10 minutes for all ink to dry completely. Gently run your kneadable eraser over the entire drawing to lift the pencil sketch. -
Final contrast check:
Look over the drawing. Use your 0.1 pen to deepen any shadows—specifically under the cloud curves, on the underside of the astronaut’s limbs, and roughly on the texture of the wooden path.
Close your sketchbook knowing you’ve captured a little piece of the universe on paper

PENCIL GUIDE
Understanding Pencil Grades from H to B
From first sketch to finished drawing — learn pencil grades, line control, and shading techniques.
Explore the Full Guide
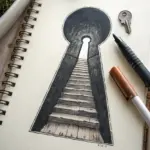
Open Book Portal Dream
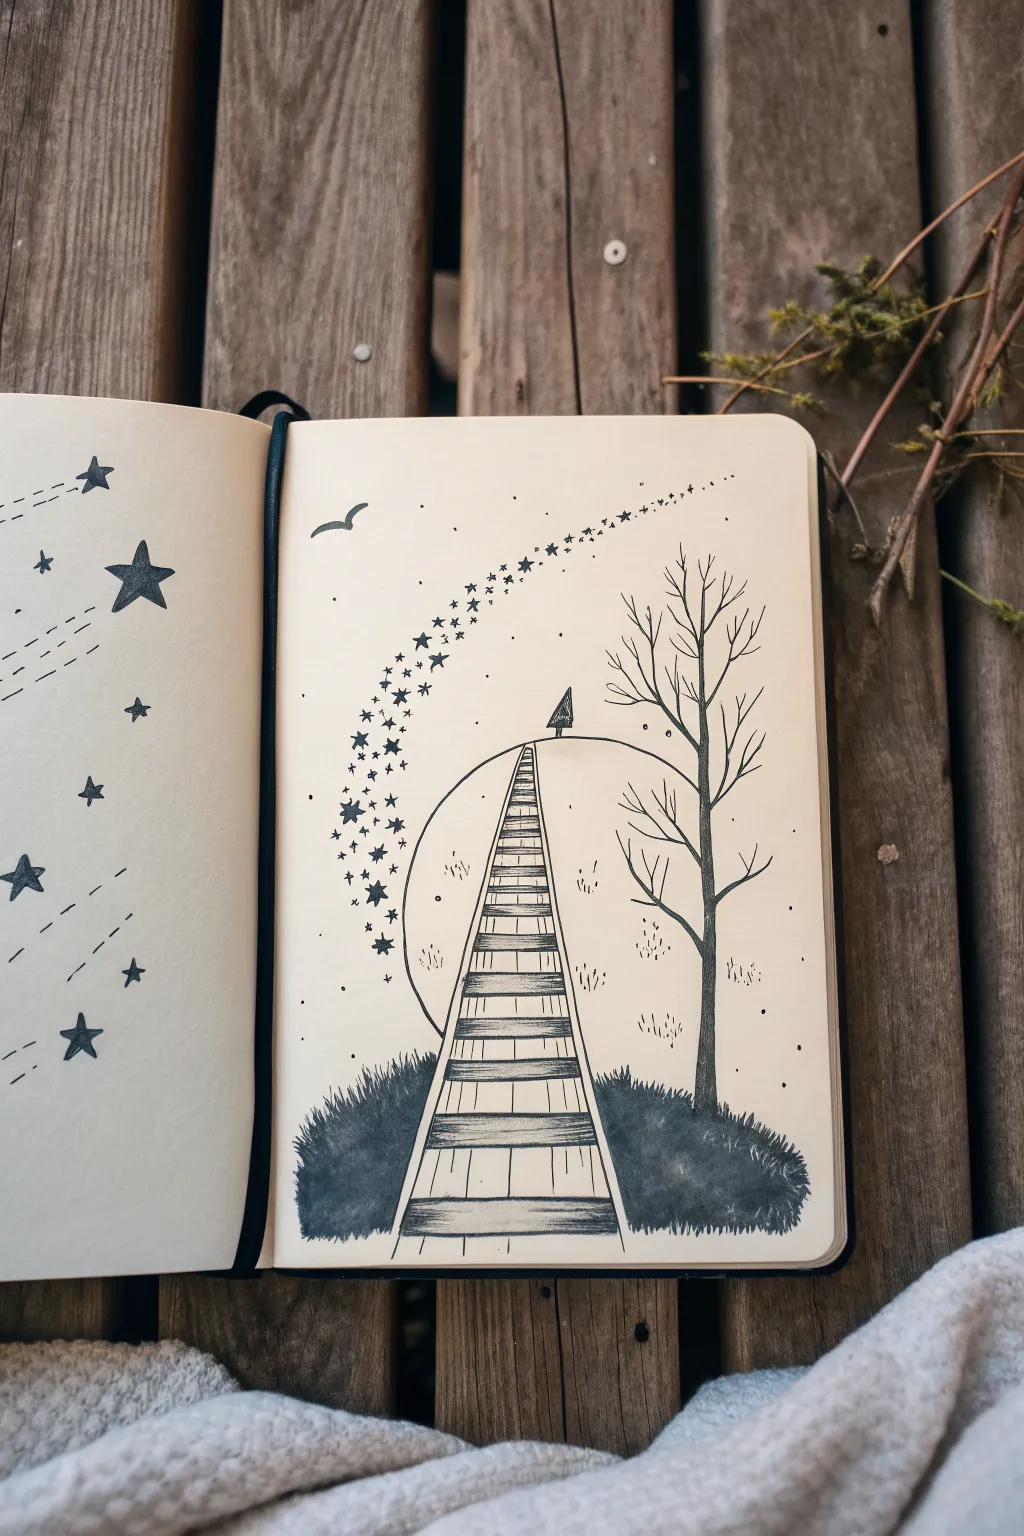
Capture the magic of a dreamscape with this surreal pen-and-ink drawing featuring a mysterious track ascending into the sky. Its bold contrasts and delicate stipple details create a captivating portal effect perfect for any sketchbook spread.
Step-by-Step
Materials
- Sketchbook with smooth, off-white paper
- Fine liner pens (sizes 005, 01, 03, and 05)
- Pencil (HB or 2H)
- Eraser
- Compass or a circular object to trace (approx. 3-inch diameter)
- Ruler
Step 1: Setting the Scene
-
Establish the horizon:
Begin by lightly sketching a gentle curve near the bottom of your page with a pencil. This will serve as the top of your grassy hill and anchor the entire composition. -
Draw the portal:
Use a compass or trace a circular object to place a large circle in the center of the page. The bottom of the circle should hover slightly above your horizon line, leaving space for the tracks to rise up to it. -
Outline the tracks:
Using a ruler, draw two long lines starting from the very bottom of the page that converge as they go up. They should enter the circle and stop about three-quarters of the way up inside it, creating a forced perspective effect. -
Sketch the tree:
To the right of the tracks, sketch the trunk of a bare tree. Let the trunk overlap the right edge of your circle slightly. Draw main branches reaching upward, keeping them thin and somewhat jagged for a wintery look.
Clean Lines Pro-Tip
When drawing the long, straight lines of the track, look at the end point of where you want the line to go, rather than watching your pen tip. This helps keep lines straighter.
Step 2: Inking the Structure
-
Ink the tracks:
Switch to an 05 fine liner. Trace your vertical track lines. Then, add horizontal sleepers (the wooden planks) all the way up. Space them closer together as they ascend to enhance the illusion of height and distance. -
Detail the wood grain:
With an 01 pen, add very subtle wood grain texture to the planks. Just a few broken, wavy lines on each sleeper will do the trick; don’t overwork them. -
Define the circle:
Carefully ink the circle’s outline with an 03 pen. Stop your line where the tree trunk or branches cross over it, so the tree appears to be in the foreground. -
Ink the tree:
Go over your tree sketch with an 03 pen for the trunk and an 01 pen for the finer branches. I like to add a few smaller twigs branching off near the ends to make it feel more organic. -
Add the tiny destination:
At the very top of the tracks, inside the circle, draw a tiny triangle or simple house shape. It should look like a small destination at the end of the journey.
Make It Magical
Use a white gel pen to add tiny bright stars on top of the black hill silhouette or to add highlights to the dark tree trunk for extra depth.
Step 3: Building Contrast & Atmosphere
-
Fill the hill:
Using your thickest pen or a black marker, fill in the grassy hill at the bottom. Use short, upward strokes along the top edge to simulate blades of grass silhouetted against the light. -
Create the star trail:
Starting from the left side of the page, draw a stream of stars curving upward and over the circle. Use the 03 pen for the larger five-point stars and the 005 for tiny dots. -
Vary the star sizes:
Make the stars denser and slightly larger on the left, gradually thinning them out into a single line of tiny dots and sparkles as they trail off to the right. -
Add the bird:
Draw a simple silhouette of a bird in flight on the upper left, near the start of your star trail context. -
Texture the background:
Inside the circle and around the base of the tracks, add small clusters of stippling (dots) and tiny grass tufts with your 005 pen. This adds texture without cluttering the negative space. -
Clean up:
Once the ink is completely dry—give it a good few minutes to prevent smudging—erase all your underlying pencil lines to reveal the stark contrast.
Now you have a surreal little world captured right there on the page
A Thousand Eyes Watching You
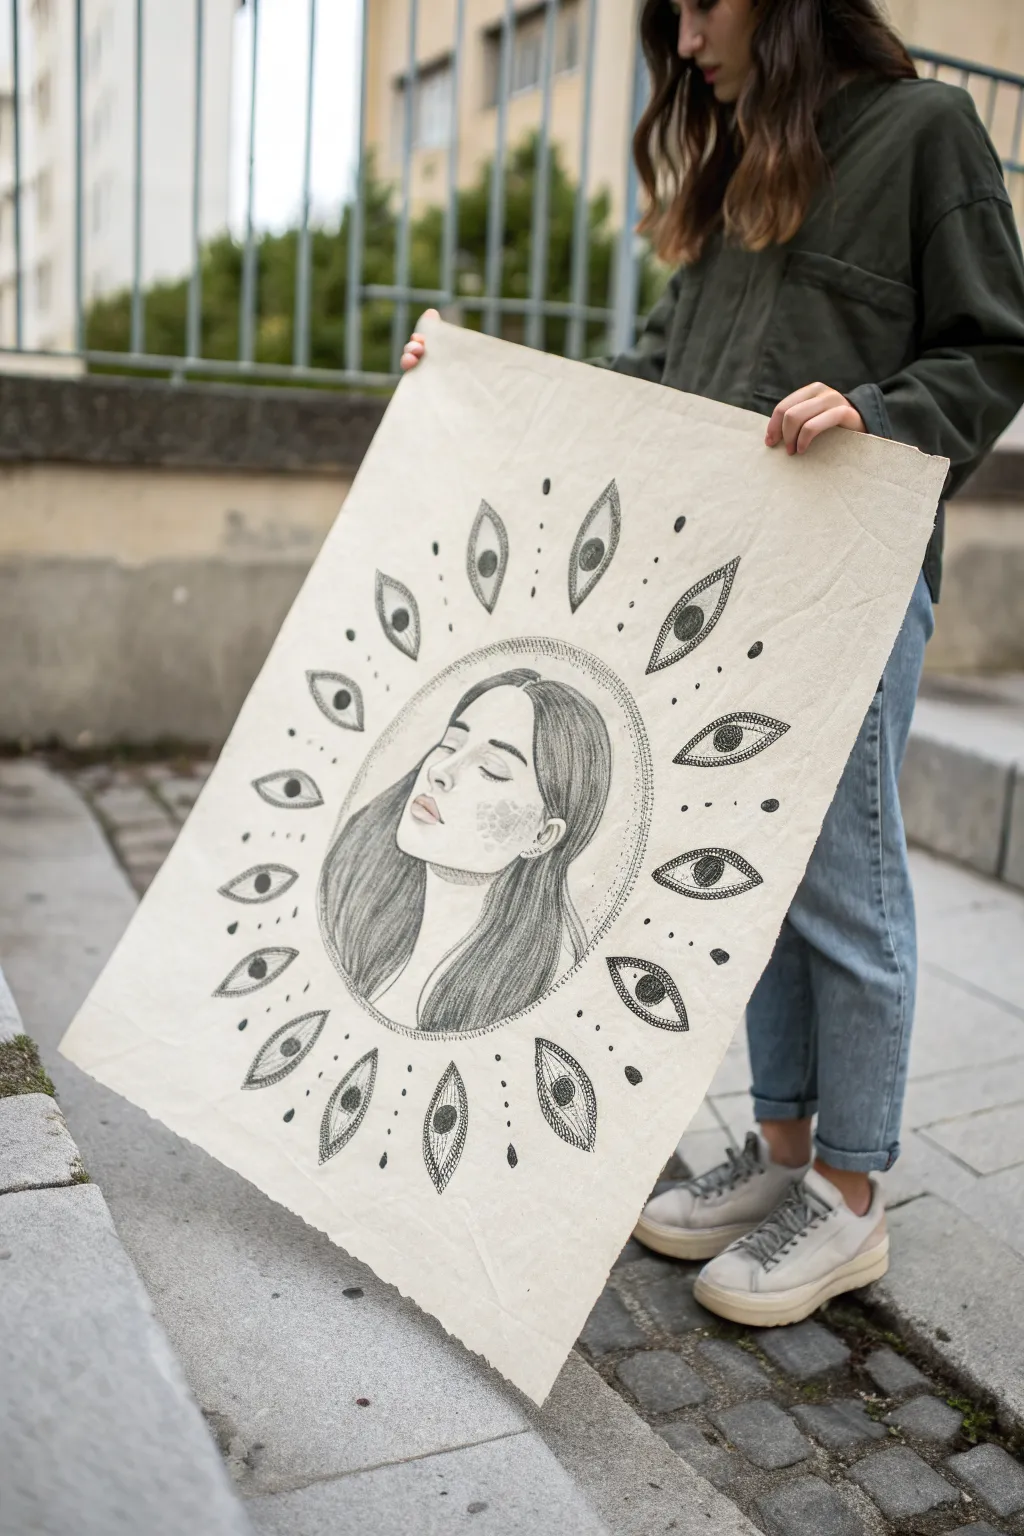
This captivating large-scale drawing features a serene, dreamlike portrait encircled by a radiant halo of mystical eyes. Using graphite and ink on a textured, parchment-like canvas creates a blend of soft shading and crisp, surreal symbolism.
Step-by-Step Guide
Materials
- Large sheet of textured cream drawing paper or primed canvas (approx. A1 or A2 size)
- Graphite pencils (HB, 2B, 4B, 6B)
- Fine liner pens (0.1mm, 0.3mm, 0.5mm, 0.8mm)
- Kneaded eraser
- Large compass or string and tack for circles
- Ruler
- Blending stump or tortillon
- Workable fixative spray
Step 1: Drafting the Celestial Layout
-
Establish the center:
Begin by finding the exact center of your large sheet. Mark this lightly with an HB pencil, as this will be the anchor for the entire composition. -
Draw the guide circles:
Using a large compass (or a string tied to a pencil), draw a central circle about 10-12 inches in diameter for the portrait area. Draw a second, larger concentric circle about 6 inches further out to mark the outer limit of the stylized eyes. -
Sketch the portrait foundation:
Lightly sketch the basic oval shape for the woman’s face within the inner circle. Position her head slightly tilted upward and to the left to convey a sense of dreaming or transcendence. -
Map the eye placement:
Between the inner and outer circles, lightly mark roughly 14-16 points spaced evenly around the circumference. These will be the center points for the surrounding eyes. Don’t worry about perfect symmetry; slight organic variation adds character.
Step 2: Rendering the Dreamer
-
Define facial features:
Using a 2B pencil, carefully refine the nose, lips, and closed eyelids. Keep the lines delicate. The expression should be peaceful, so ensure the eyebrows are relaxed and the mouth is neutral. -
Layer the hair:
Sketch the hair flowing down around her face and neck. I like to draw long, sweeping strokes that follow the curve of the skull to build volume before filling in the darker values. -
Add graphite shading:
Switch to 4B and 6B pencils to deepen the shadows in the hair and under the jawline. Use a blending stump to smooth the graphite on the skin, keeping the cheeks and forehead light to create a glowing effect. -
Detail the skin texture:
On the cheek turned toward the viewer, lightly draw small, scale-like patterns or speckles using an HB pencil. This subtle texture hints at a transformation or a magical skin quality.
Uneven Eyes?
If your radial eyes look lopsided, cut a single eye template from cardstock. Trace this template lightly around your circle to ensure consistent size and shape before inking.
Step 3: Creating the Circle of Sight
-
Outline the surrounding eyes:
Go back to your radial guide points. Draw almond-shaped outlines for each eye, pointing them outward like rays of a sun. Vary the sizes slightly—some can be wider, others more narrow. -
Ink the irises and pupils:
With a 0.5mm fine liner, draw the circular iris and pupil in the center of each almond shape. Fill the pupils in solid black using a 0.8mm pen for high contrast. -
Stipple the details:
Instead of shading the irises with solid lines, use stippling (tiny dots). Concentrate the dots near the pupil and outer edge of the iris to create depth and dimension. -
Add the radiating lines:
Inside the almond shapes, draw fine, straight lines radiating from the iris to the outer corners of the eye. A 0.1mm pen works best here to keep the lines crisp and delicate. -
Ink the halos:
Draw a secondary, dashed or dotted outline around each eye and the central portrait circle. This creates a vibrating, energetic border that separates the elements from the background.
Add Gold Leaf
Apply gold leaf to the irises of the surrounding eyes or the halo ring around the portrait. The metallic shine adds a sacred, iconographic feel to the surreal drawing.
Step 4: Final Atmosphere and Touches
-
Incorporate cosmic dust:
Scatter small dots and tiny circles of varying sizes in the negative space between the radiating eyes. This fills the gaps and connects the ring into a cohesive celestial object. -
Enhance the contrast:
Review the central portrait. If the graphite looks too grey next to the black ink, carefully re-darken the deepest shadows in the hair and nostrils with your 6B pencil. -
Clean up guidelines:
Once the ink is completely dry, gently erase any visible pencil guidelines from the initial layout phase. use a kneaded eraser to lift graphite without damaging the paper texture. -
Adding the tear edge:
To mimic the found-object look of the photo, you can carefully tear the edges of your paper against a ruler. This gives it a raw, ancient manuscript feel. -
Seal the artwork:
Spray a thin coat of workable fixative over the piece. This prevents the heavy graphite areas from smudging and keeps the ink crisp.
Hang your finished piece in a well-lit area to let the thousand eyes watch over your space


Shadow Self That Follows
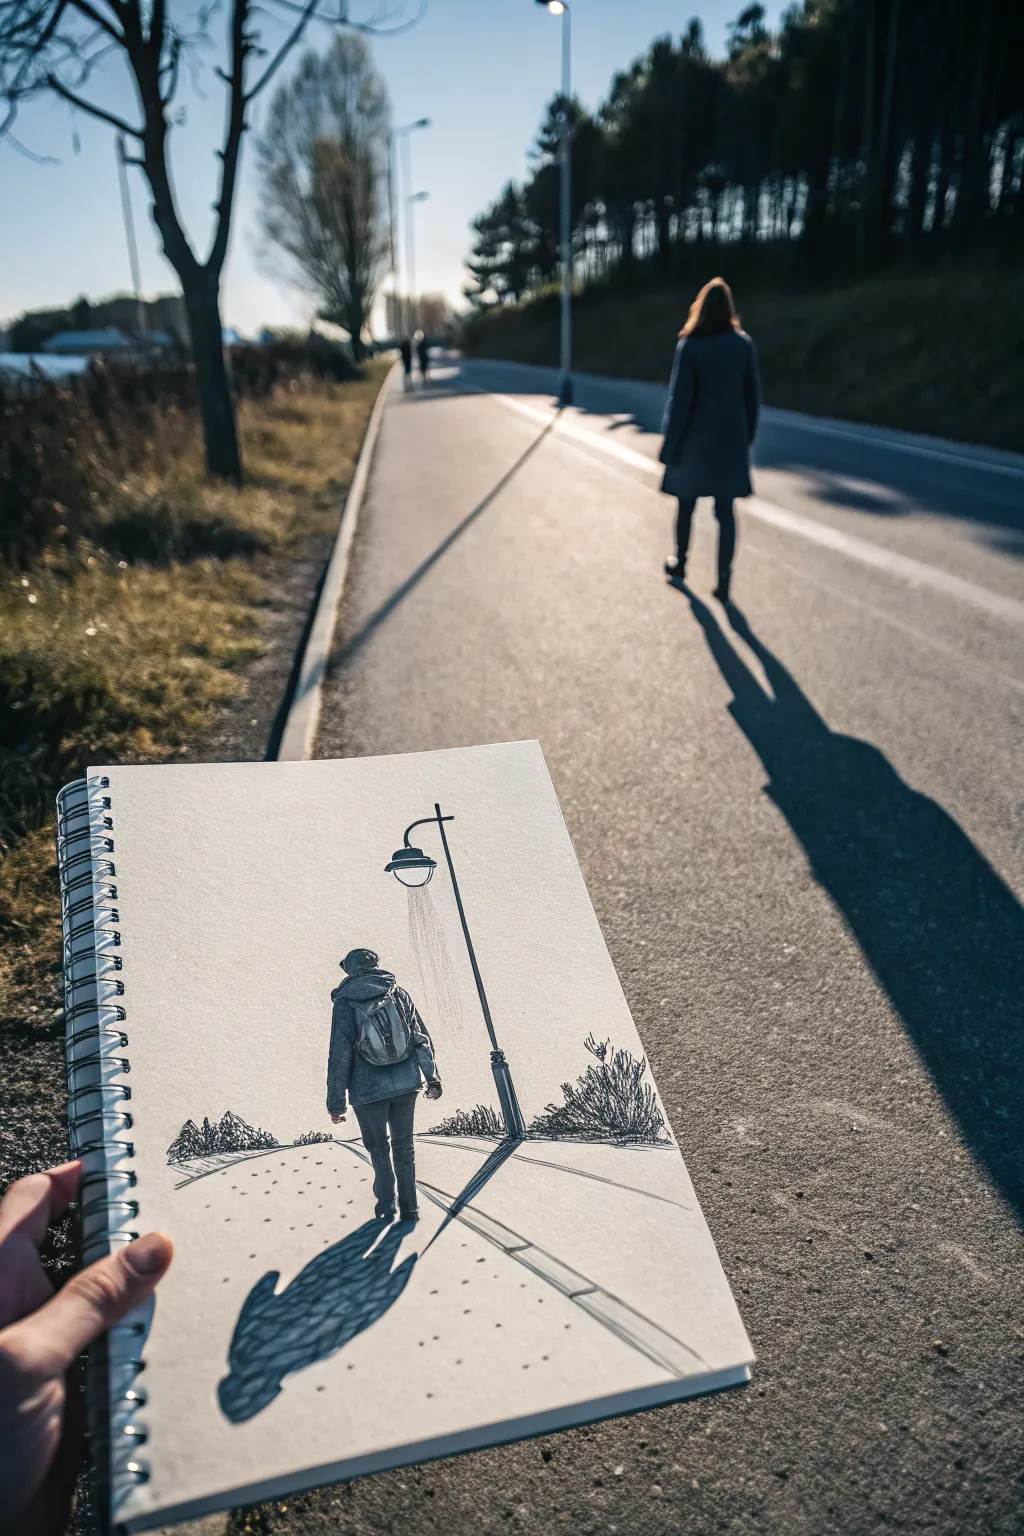
Create a surreal and contemplative pencil drawing that blends reality with imagination using a forced perspective technique. This sketch captures a solitary figure and their elongated shadow under a streetlamp, designed to align visually with the real world when held at just the right angle.
Step-by-Step Tutorial
Materials
- Spiral-bound sketchbook (A4 or A5 size)
- Graphite pencils (HB, 2B, 4B, 6B)
- Fine liner pen (Black, 0.3mm or 0.5mm)
- Kneaded eraser
- blending stump or tortillon
- Ruler or straight edge
Step 1: Setting the Scene
-
Establish the horizon line:
Hold your sketchbook up to your chosen scene to gauge where the real road fits. Draw a faint horizon line about one-third up from the bottom of the page to match the perspective. -
Map the perspective lines:
Using your ruler and an HB pencil, lightly sketch the converging lines of the road or path, ensuring they widen towards the bottom of the page to create depth. -
Draft the streetlamp:
Place a vertical line for the lamp post on the right side. Add the curved arm and the lamp housing near the top center, keeping the lines light for now.
Tip: Aligning Reality
Take a photo of the empty road first. Display it on your phone while sketching to ensure your drawn perspective lines match the real world perfectly.
Step 2: Drawing the Figure
-
Sketch the figure’s gesture:
Draw the basic shape of a person walking away from the viewer in the center of your path. Focus on the tilt of the shoulders and the stride of the legs. -
Add cloting details:
Flesh out the figure with a heavy winter coat, a backpack, and pants. Use slightly jagged strokes to suggest fabric texture. -
Refine the outline:
Switch to a 2B pencil to darken the outline of the figure, paying attention to the folds in the coat and the straps of the backpack.
Step 3: The Shadow Work
-
Outline the main shadow:
Draw a long, distorted shape stretching from the figure’s feet towards the bottom left corner. This is the ‘shadow self’ and should look elongated. -
Fill the shadow:
Using a 4B or 6B pencil, fill in the shadow shape. Don’t make it solid black; use a cross-hatching technique to give it a textured, ethereal feel. -
Connect the source:
Draw faint, straight lines radiating from the streetlamp down toward the figure to indicate the cone of light. This justifies the shadow’s placement.
Troubleshooting: Smudges
Graphite smudges easily, especially with dark shadows. Place a scrap piece of paper under your drawing hand to protect the clean white space while you work.
Step 4: Environment and Details
-
Add roadside vegetation:
Scribble loose, organic shapes on the left and right sides of the horizon line to represent bushes or distant trees. Keep these sketchy and loose. -
Detail the lamp post:
Darken the lamp post with a 4B pencil. Add a small base where it meets the ground and shade the side facing away from the light source. -
Ground texture:
Dot the ground area with random stippling and small dashes to suggest pavement texture or gravel.
Step 5: Shading and Final Touches
-
Shade the figure:
Add value to the coat and backpack using a 2B pencil. Leave the top of the shoulders lighter to suggest the light hitting them from above. -
Blend the tones:
Take your blending stump and gently smudge the graphite on the coat and the shadow to soften the harsh pencil strokes, creating a smoother gradient. -
Deepen the contrast:
Go back in with your 6B pencil and darken the darkest areas: the deep folds of the coat, the center of the shadow, and the base of the lamp post. -
Clean up highlights:
Use the kneaded eraser to tap out highlights on the lamp’s bulb area and the figure’s shoulders, ensuring the light source feels active. -
Final alignment check:
Hold the sketchbook up against the real background one last time. If the perspective lines need adjusting to match the real road better, extend them slightly to the page edge.
Now you have a unique sketch that bridges the gap between your imagination and the world around you
Gravity Glitch Collage Dream
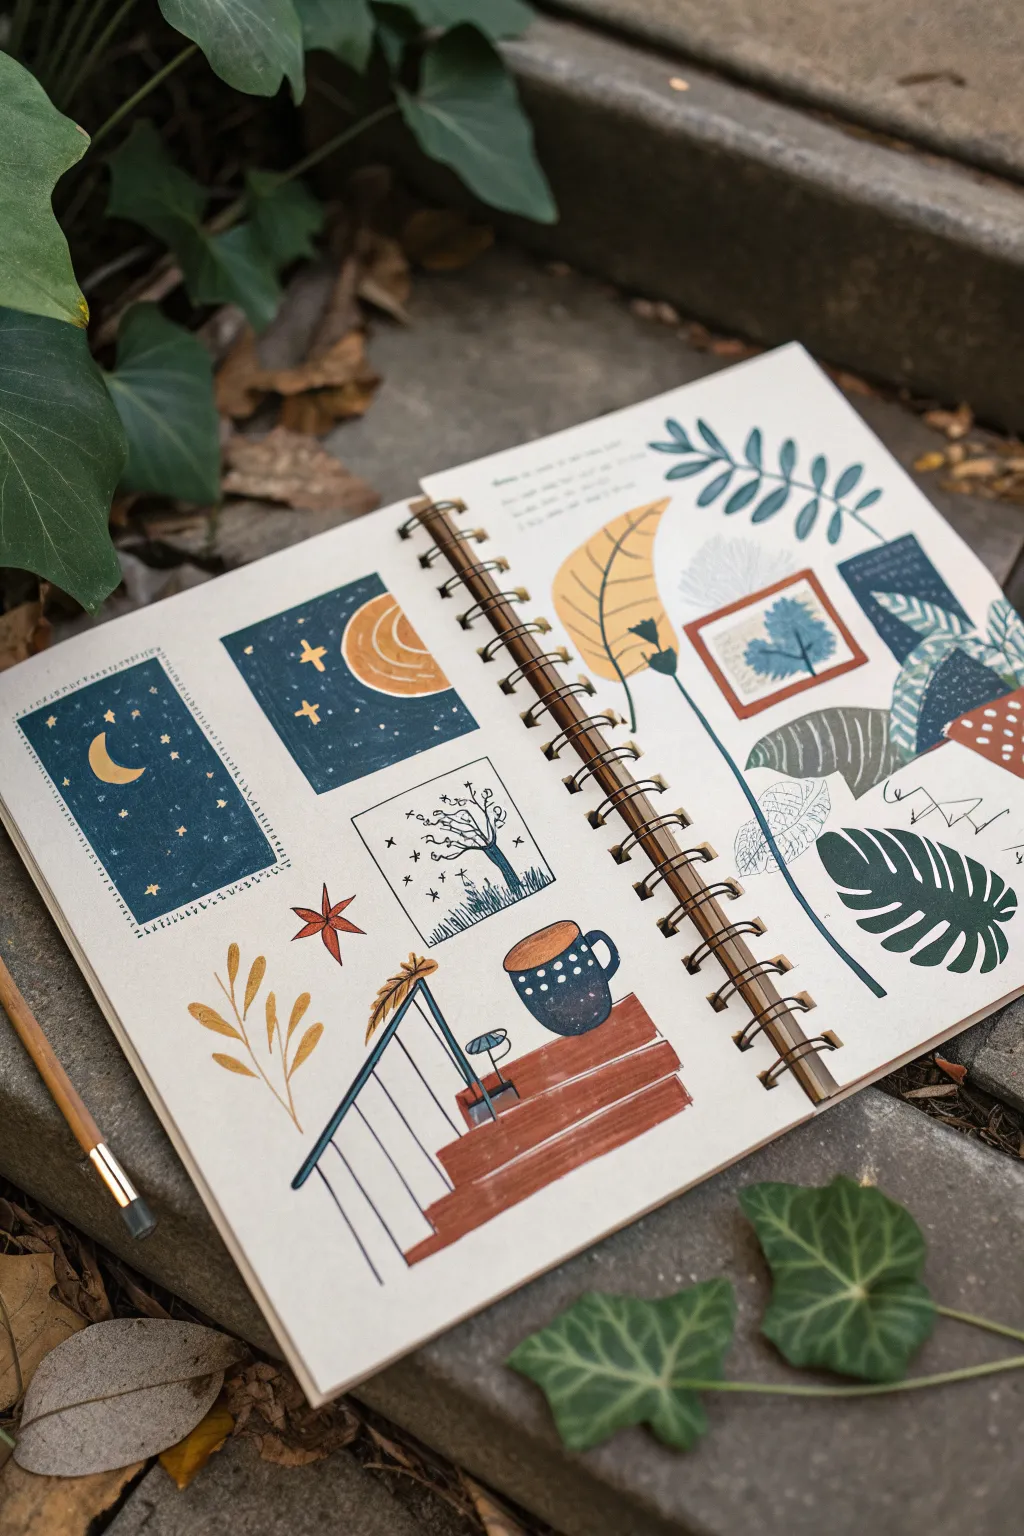
Capture the surreal logic of dreams with this charmingly disjointed sketchbook layout, blending celestial motifs with ordinary objects. Using a mix of gouache or markers on cream paper, you’ll create a gravity-defying collection of stamps, leaves, and cozy stairs that float in whitespace.
How-To Guide
Materials
- Spiral-bound sketchbook with heavy cream or mixed-media paper
- Gouache paints (Navy Blue, Burnt Sienna, Yellow Ochre, White, Slate Blue)
- Fine liner pens (Black, 0.1mm and 0.5mm)
- Flat shader brush (size 6 or 8)
- Small round detail brush (size 0 or 1)
- Pencil and eraser for sketching
- Ruler
Step 1: Setting the Scene
-
Plan the layout:
Begin by lightly sketching the placement of your elements with a pencil. Think of the page as a sticker sheet; space out two rectangular ‘stamp’ shapes on the left, a large leaf shape on the right, and a staircase structure at the bottom center. -
Define the rectangular blocks:
Using a ruler, sharpen the outlines of the celestial rectangles on the left page. The top one is a square, while the bottom is a vertical rectangle. Leave space between them for breathing room. -
Sketch organic shapes:
Lightly draw the large monstera leaf contour on the bottom right and the floating autumn leaf near the top spine. Sketch the outline of the staircase leading nowhere at the bottom center.
Clean Edges Trick
For the crisp rectangles, apply washi tape or masking tape around the borders before painting. Peel it off only when the paint is 100% dry for perfect lines.
Step 2: Blocking in Color
-
Paint the night sky:
Mix a deep Navy Blue gouache. Fill in the square and vertical rectangle on the left page solid, leaving them opaque. Also, paint the smaller rectangular stamp on the right page with this dark hue. -
Create the golden accents:
Using Yellow Ochre, paint the crescent moon inside the vertical blue rectangle. On the square block above it, paint a section of a large moon or planet in the corner. -
Paint the floating leaf:
Fill in the large, curved leaf shape near the spine with a mix of Yellow Ochre and a touch of white for a pale mustard tone. -
Anchor the staircase:
Mix Burnt Sienna with a tiny bit of red for a warm brick color. Carefully paint the horizontal steps of the staircase at the bottom. I like to let this dry briefly before trying to add any details near it to avoid smudging. -
Add the coffee cup:
Paint the mug sitting on the stairs in a dark Slate Blue. Make the oval of the coffee inside a warm brown tone. -
Fill the tropical leaves:
For the monstera leaf on the bottom right, mix a deep hunter green. Paint the leaf solid, ensuring the edges are crisp and the distinctive notches are visible.
Opacity Issues
If your navy blue looks streaky, gouache likely needs a second coat. Let the first layer dry completely, then apply a thicker, creamier consistency for the second pass.
Step 3: Linework and Details
-
Add celestial sparkles:
Once the blue paint is completely dry, use a small brush and watered-down Yellow Ochre or a gold gel pen to add tiny stars, crosses, and dots to the night sky rectangles. -
Draw the tree vignette:
In the white space below the square night scene, use a fine liner to draw a delicate square box. Inside, sketch a sparse, wind-blown tree with simple line art. -
Detail the staircase texturing:
Using a fine black pen, draw the railings for the staircase. Keep the lines straight and parallel. Add a tiny table and chair silhouette sitting on the steps for a surreal touch. -
Pattern the mug:
With a white gel pen or very fine brush with white gouache, add rows of tiny dots to the dark blue mug. -
Outline the golden leaf:
Take your black fine liner and draw the veins on the mustard-colored leaf. Keep the lines loose and organic. -
Create the stamp borders:
Around the vertical blue night sky rectangle, draw a decorative border consisting of tiny tick marks or text-like squiggles to mimic the edge of a postage stamp or a bookplate. -
Incorporate handwritten text:
In the upper right corner area, write a few lines of illegible ‘dream script’ or actual poetry. Keep the handwriting small and spaced out to act as a texture rather than a focal point. -
Add final botanical touches:
Paint a small, loose sprig of leaves in gold/ochre on the bottom left. Finally, draw a simple line-art stem connecting to the large painted leaf on the right.
Close your sketchbook and let the pages dry fully before capturing your own dreamscape photo
Have a question or want to share your own experience? I'd love to hear from you in the comments below!