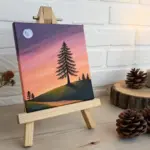
If you’re hunting for easy to draw pictures for kids, I’ve got you covered with simple, copy-right-now ideas that feel fun instead of frustrating. In my studio, I lean on basic shapes and cute details so kids can jump from “I can’t” to “I did!” really fast.
Cute Cat From Circles and Triangles
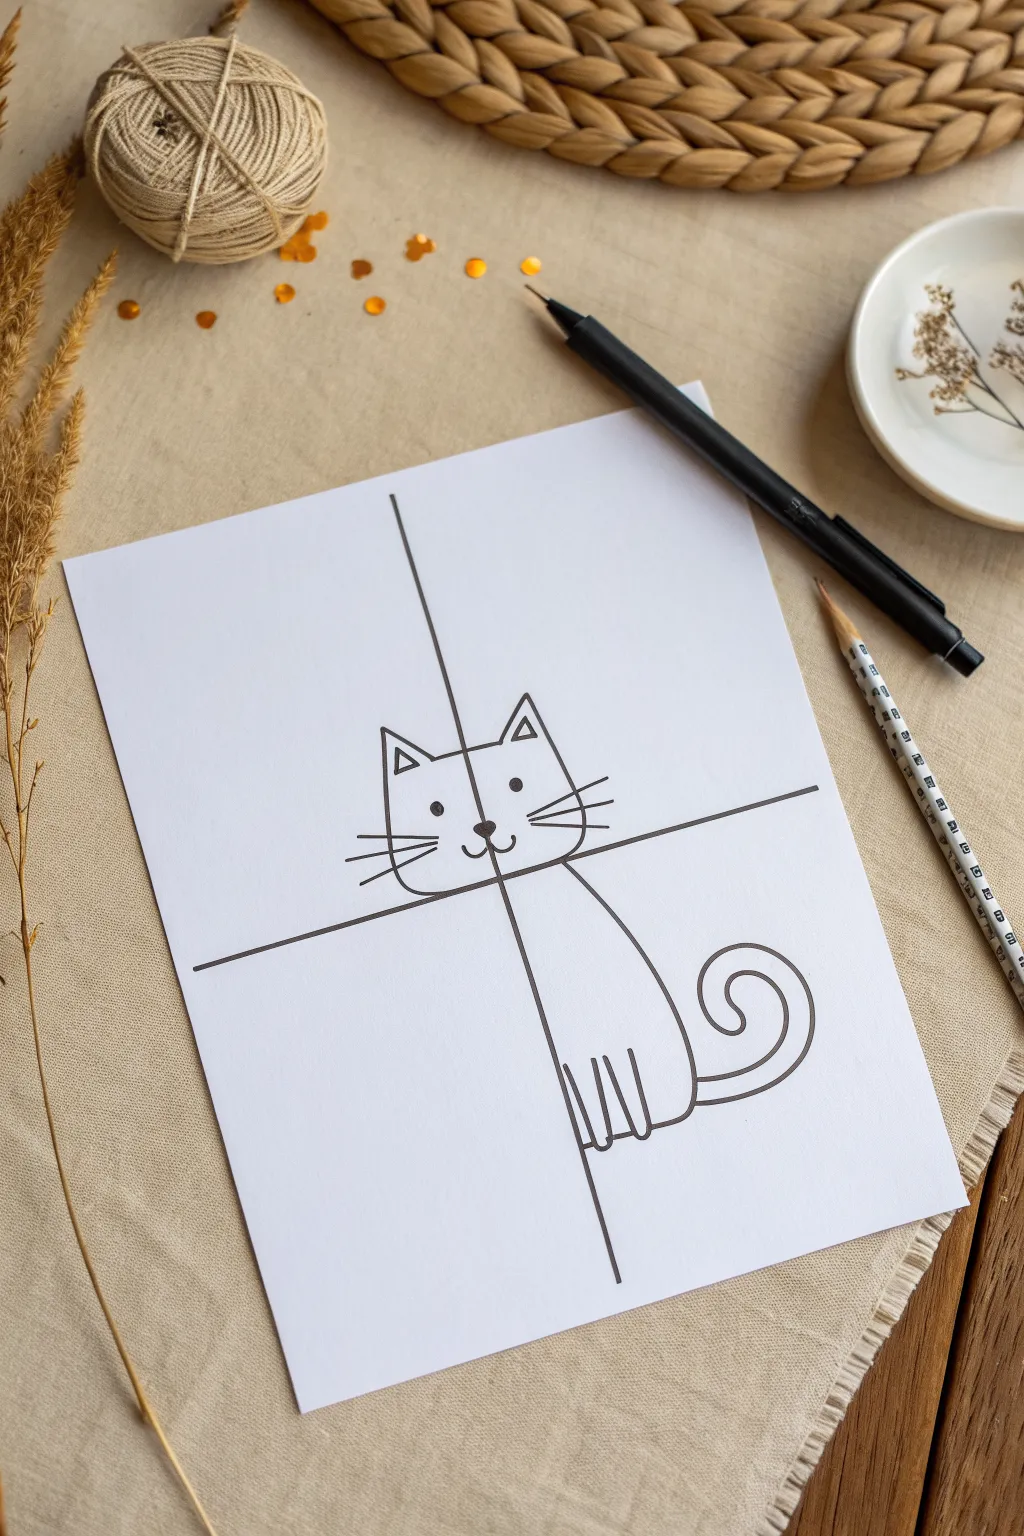
This clever drawing activity turns a simple cross on a page into a cute, cartoon cat peering over a ledge. It’s a fantastic exercise for understanding spatial relationships and basic shapes while creating a playful piece of art.
Step-by-Step
Materials
- White drawing paper or cardstock
- Fine-tip black marker or drawing pen
- Ruler or straight edge
- Pencil (optional for sketching)
- Eraser
Step 1: Setting the Grid
-
Draw the vertical line:
Start by positioning your ruler vertically in the center of your paper. Draw a long, straight line from nearly the top edge down to the bottom, leaving just a bit of margin. -
Add the horizontal line:
Place your ruler horizontally across the page, slightly below the halfway point. Visualizing where the cat’s ‘chin’ will rest helps here. Draw a straight line intersecting the vertical one, creating a large cross shape.
Step 2: Drawing the Head
-
Outline the face shape:
In the upper two quadrants, draw a wide U-shape or semi-circle for the bottom of the cat’s head. The flat bottom of the head should rest directly on your horizontal line. -
Add the ears:
Draw two triangular shapes on top of the head. Make them slightly tall and pointy. Inside each ear, draw a smaller triangle to add depth. -
Place the eyes:
Draw two solid black circles for eyes. Space them out evenly on either side of the central vertical line, keeping them in the upper half of the face area. -
Draw the nose:
Right where the vertical line passes through the face, draw a small, filled-in triangle or oval for the nose. It should sit just below the level of the eyes. -
Create the mouth smile:
From the bottom of the nose, draw two small curved lines swooping upward—one to the left and one to the right—making a classic ‘w’ mouth shape. -
Add whiskers:
Flick three straight lines outward from each cheek area. Keep them light and playful to give the cat personality.
Steady Lines Tip
Don’t press too hard with fine-liners. A light, fluid hand creates smoother curves, especially for the tail and face shape.
Step 3: Drawing the Body
-
Start the back curve:
Move to the bottom right quadrant. Starting from the horizontal line (just to the right of the head), draw a long, smooth curved line extending downward. -
Form the paws:
At the bottom of that body curve, draw three small, vertical oval shapes or loops that touch the central vertical line. These are the front paws ‘holding on’ to the invisible wall. -
Connect the body:
Ensure the line from the paws connects back up to the vertical line, closing off the body shape.
Uneven Eyes?
If the eyes look lopsided, lightly mark two dots with a pencil first to check the spacing relative to the center line before inking.
Step 4: Finishing Touches
-
Sketch the tail:
From the lower right side of the body curve, extend a line outward and curl it into a spiral shape. -
Complete the tail thickness:
Follow that spiral line back toward the body, keeping the width consistent, to create a fluffy, curled tail. -
Review and refine:
Check your lines. If you sketched with pencil first, carefully trace over everything with your black marker now. -
Erase guidelines:
I usually wait a minute for the ink to fully dry before doing this. Gently erase any pencil marks, though you want to keep the main cross lines as part of the design.
Now you have a charming cat drawing that plays with lines and space perfectly
Simple Dog With Floppy Ears
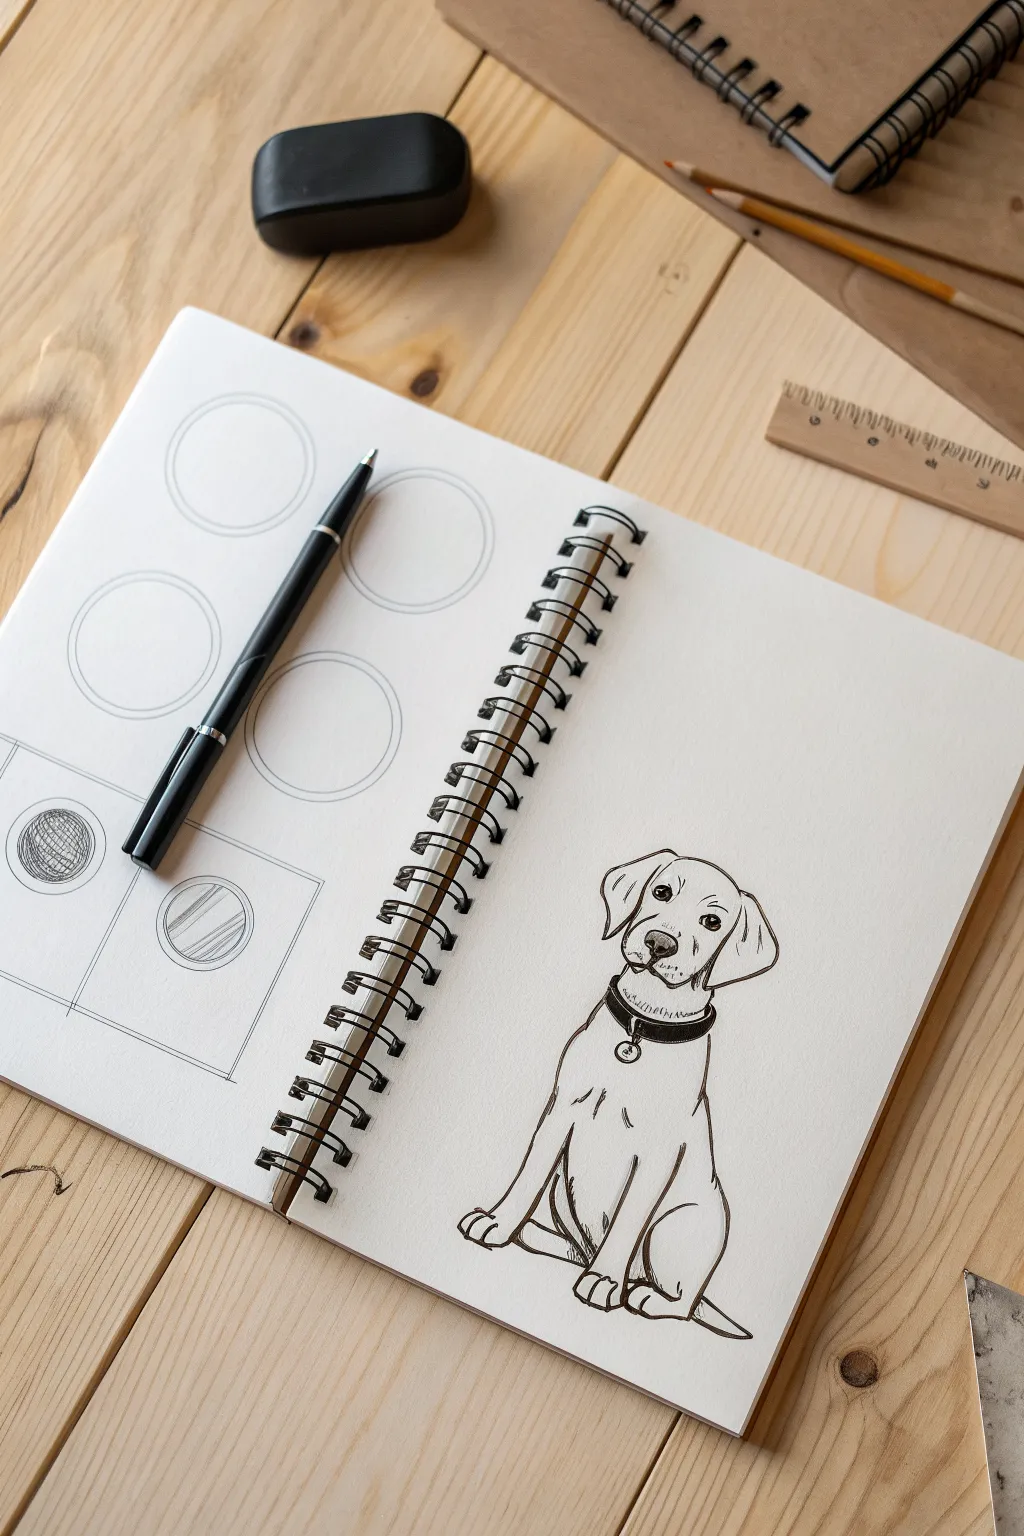
Learn to capture the friendly expression of a sitting dog using simple, confident ink lines. This tutorial guides you through sketching this adorable floppy-eared pup, perfect for practicing your proportions and line quality.
Step-by-Step Tutorial
Materials
- Spiral-bound sketchbook or drawing paper
- Fine-tipped black drawing pen or fineliner
- Pencil (HB or 2B) for initial sketching
- Eraser
Step 1: Drafting the Basic Shapes
-
Map out the head:
Start by drawing a soft, rounded square shape near the top center of your page. This will become the dog’s head. Keep your pencil pressure extremely light so these lines can be erased later. -
Add the body structure:
Below the head, sketch a larger, slightly elongated oval that tapers downward to form the chest and torso. It should overlap slightly with the bottom of the head shape. -
Position the legs:
Sketch two vertical lines descending from the chest for the front legs. For the back haunches, add curved, C-shaped lines on either side of the lower body to indicate where the dog is sitting.
Step 2: Refining the Face
-
Outline the floppy ears:
Switching to your black pen (or pressing firmly with pencil), draw two large, triangular shapes with rounded tips hanging down from the top corners of the head. Let them fold slightly for that classic floppy look. -
Draw the eyes:
Place two small oval eyes wide apart on the face. Leave a tiny white dot in each pupil as a highlight before filling in the rest with black ink to make the eyes look lively. -
Add the nose and mouth:
Draw a rounded triangle for the nose just below the eyes. Add a center line dropping down from the nose that splits into two curves for the mouth. Add a few dots on the muzzle for whisker spots. -
Define the head shape:
Trace over the top of the head with a smooth ink line, connecting the ears. I prefer to use slightly broken or sketchy lines here to suggest fur texture rather than a solid, rigid outline.
Loose Lines Look Best
Don’t connect every single line perfectly. Leaving small gaps in the outline, especially around furry areas like the chest, makes the drawing feel more organic.
Step 3: Drawing the Body and Details
-
Create the collar:
Draw a curved band just below the head for the collar. Add a small circle hanging from the center for the dog’s ID tag. -
Ink the chest and front legs:
Draw the lines for the front legs, making them straighter at the top and widening into paws at the bottom. Add small curved lines on the paws to separate the toes. -
Form the back legs:
Draw the curved lines of the hind legs tucked behind the front ones. The back paws should peek out slightly from behind the front legs. -
Add the tail:
Sketch a short, pointed tail shape extending from the bottom right side of the seated dog. -
Suggest fur details:
Add small, short strokes inside the chest area, on the elbows, and near the ears to mimic folds of skin and tufts of fur. Less is more here; you just want a suggestion of texture.
Wobbly Lines?
If your long lines are shaky, try drawing from your shoulder instead of just your wrist. This helps create smoother, more confident strokes for the legs.
Step 4: Final Touches
-
Deepen the shadows:
Use your pen to darken the nose (leaving a highlight) and the collar. If you want more contrast, slightly thicken the lines on the underside of the ears and belly. -
Clean up the sketch:
Once the ink is completely dry—wait at least one full minute to avoid smudging—gently erase all the underlying pencil guidelines to leave a crisp, clean drawing.
You now have a charming dog sketch ready to be colored or kept as a classic ink drawing

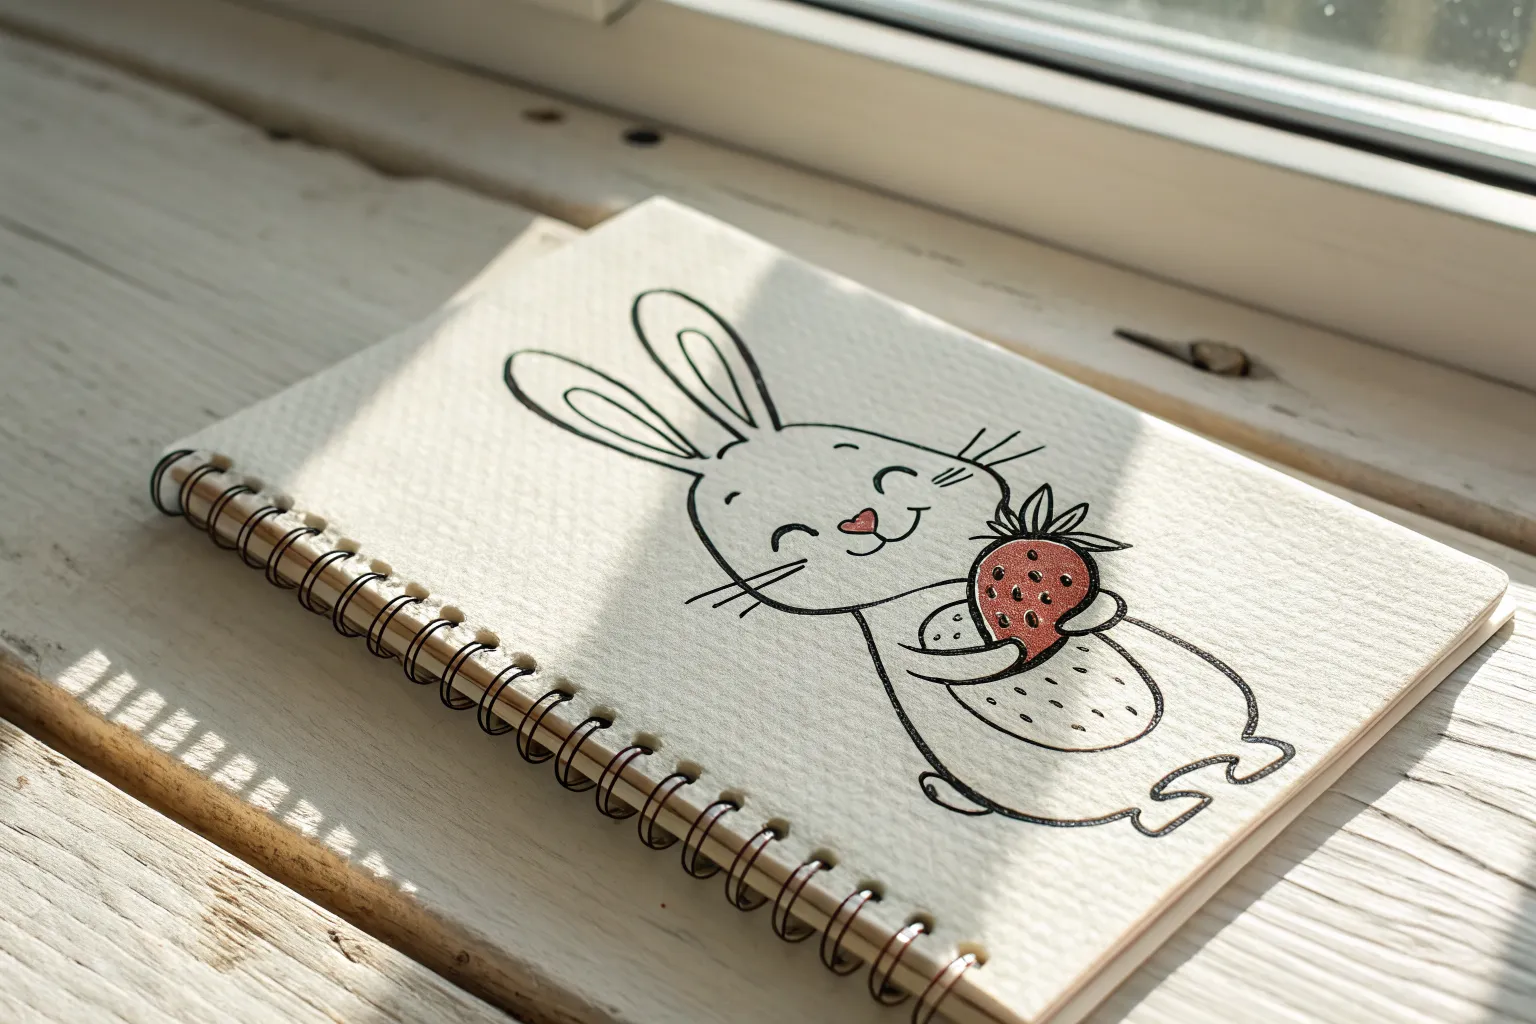
Easy Bunny With Long Ears
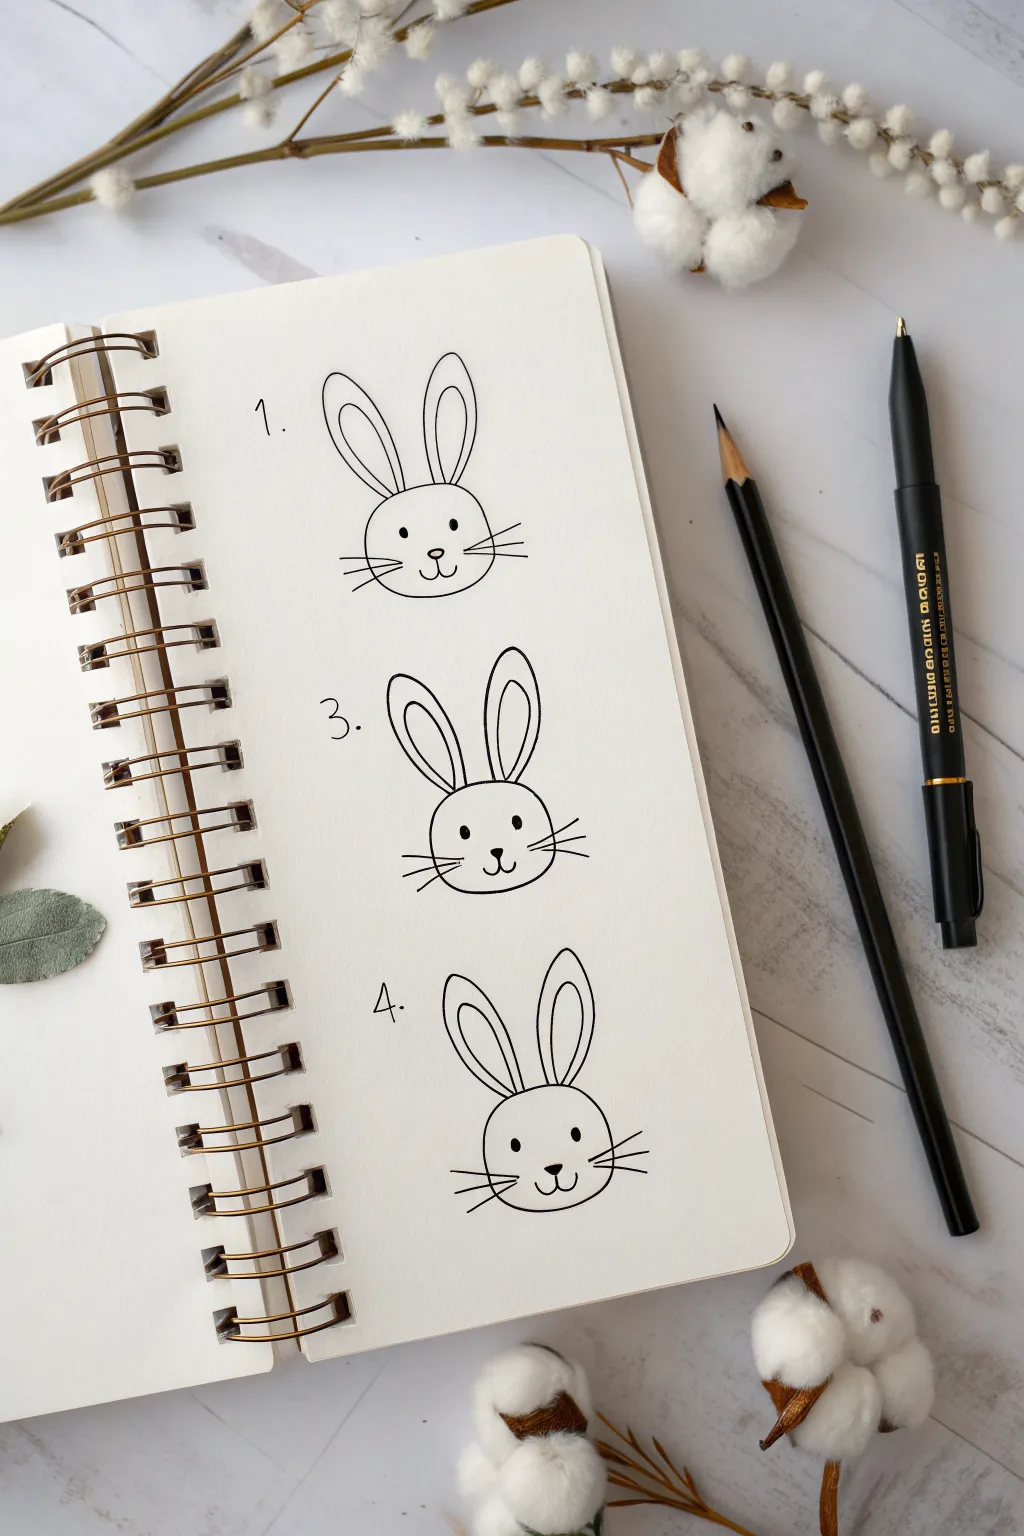
Learn to draw an adorable bunny face in just a few simple lines, perfect for beginners or quick doodles in your bullet journal. This minimal style captures the sweetness of a rabbit with tall ears and a twitchy nose without complicated shading.
How-To Guide
Materials
- Spiral-bound sketchbook or drawing paper
- Fine-tipped black pen (like a Pigma Micron or fine-liner)
- Pencil (optional for sketching)
- Eraser
Step 1: Drawing the Head Shape
-
Draw the base oval:
Start by drawing a wide, slightly flattened oval shape near the middle of your page. This will be the bunny’s head. Keep the bottom curve slightly fuller than the top. -
Check the symmetry:
Ensure the left and right sides of your oval look relatively balanced. If you’re using a pencil first, keep your lines light so they are easy to refine later.
Keep It Steady
Rest your wrist on a clean piece of scrap paper while drawing to prevent smudging your fresh ink lines.
Step 2: Adding the Ears
-
Position the left ear:
Starting from the top left curve of the head, draw a tall, elongated loop reaching upwards. The shape should be like a stretched-out teardrop. -
Position the right ear:
Draw a matching loop on the right side. Leave a small gap between the two ears at the base on top of the head. -
Draw the inner ear detail:
Inside the left ear, draw a smaller, similar loop shape that mimics the outer contour. This creates the inner ear detail. -
Complete the inner ear:
Repeat this step for the right ear, adding a smaller loop inside to give the ears depth and character.
Step 3: Creating the Face
-
Place the eyes:
In the middle of the head oval, draw two small, solid black circles for eyes. Space them widely apart for a cuter, more innocent look. -
Add highlights:
I like to leave a tiny speck of white uncolored in each eye if the pen allows, but solid black works perfectly for this simple style too. -
Draw the nose:
Centered below the eyes, draw a small, inverted triangle with rounded corners. Fill it in solid black. -
Create the mouth:
From the bottom point of the nose, draw a short vertical line straight down. From the end of that line, curve outwards to the left to make a small ‘u’ shape. -
Finish the smile:
Draw a matching curve to the right side, connecting to the center line, creating a classic bunny anchor-shaped mouth.
Make It Yours
Add personality by drawing accessories like a bow around one ear, glasses, or a tiny carrot next to the face.
Step 4: Whiskers and Finishing Touches
-
Add left whiskers:
On the left cheek area, draw three straight lines fanning outwards horizontally. Vary their lengths slightly for interest. -
Add right whiskers:
Draw three corresponding lines on the right cheek, mirroring the placement of the first set. -
Refine the lines:
If you sketched with pencil, go over your lines confidently with your black pen now. Ensure the connections between lines are clean. -
Erase guidelines:
Once the ink is completely dry, gently erase any visible pencil marks underneath to leave a crisp, clean illustration.
You now have a charming bunny sketch ready to decorate your notes or greeting cards

Chubby Dinosaur With a Big Smile
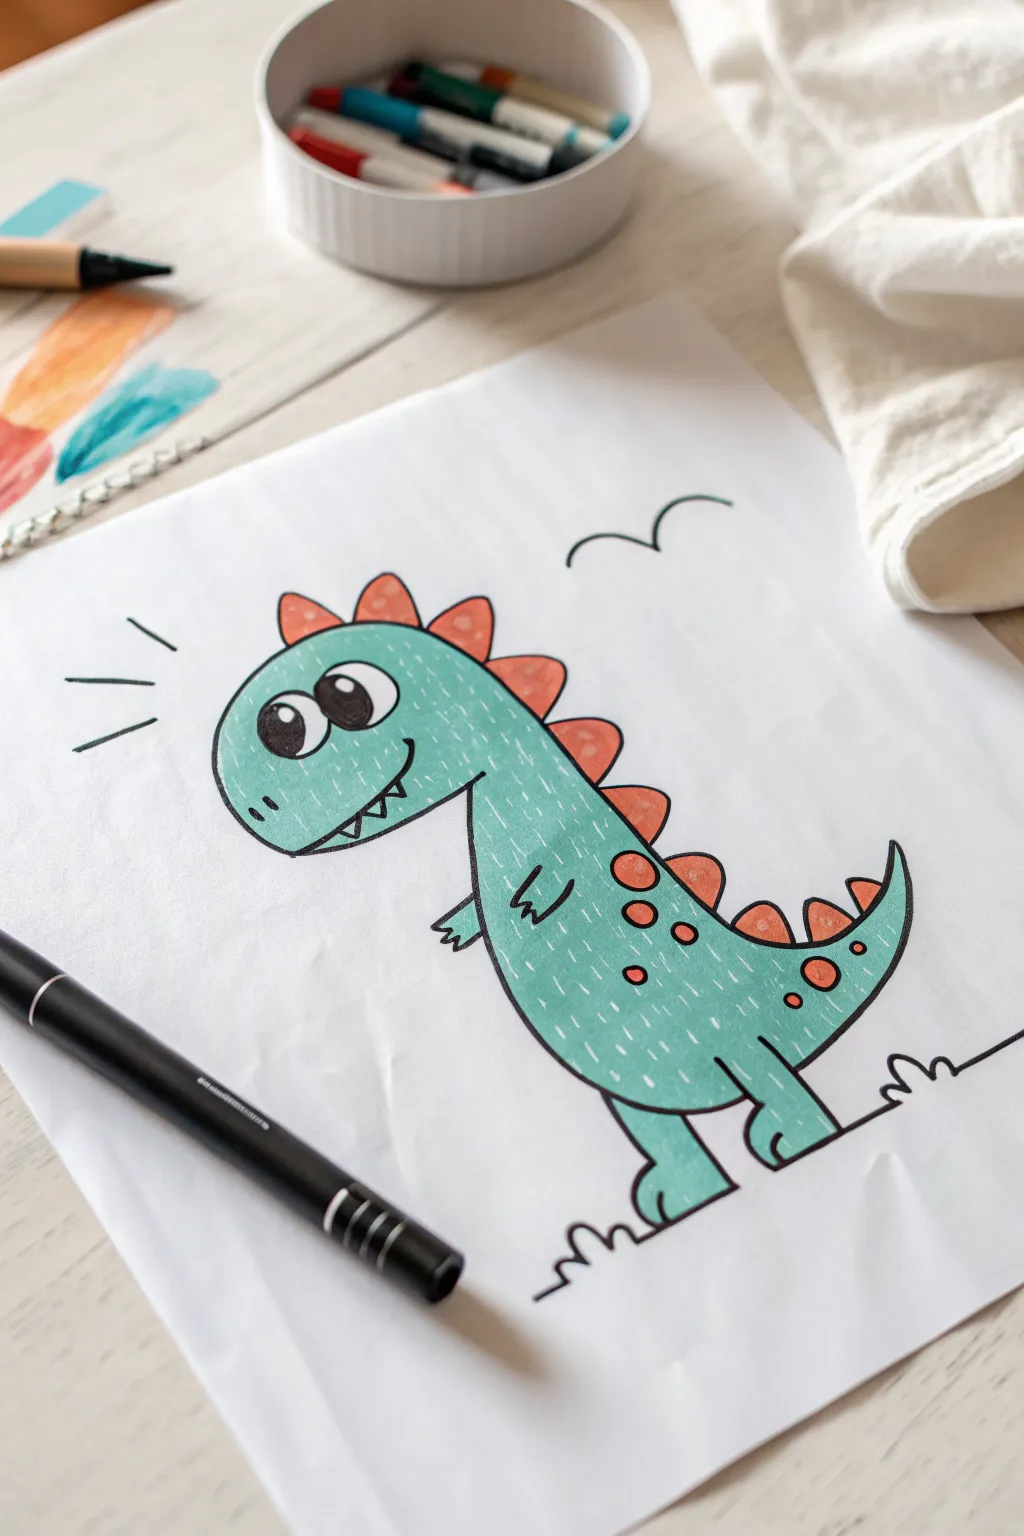
This cheerful little dinosaur is full of personality with its wide grin and bumpy orange spine. It’s a perfect beginner project that uses simple markers and pens to create a clean, sticker-like illustration.
Step-by-Step Tutorial
Materials
- Sheet of white drawing paper
- Pencil and eraser
- Black fine-liner pen (0.5mm or similar)
- Teal or mint green marker (alcohol-based or water-based)
- Orange marker
- White gel pen or fine white paint marker
Step 1: Sketching the Outline
-
Start with the head:
Begin by sketching a large, rounded oval shape for the head. Keep the bottom left side slightly flatter for the snout area. -
Connect the body:
Drawing downward from the back of the head, sketch a curved line that sweeps out for the tummy and back in for the tail. It should look a bit like a padded jellybean. -
Add the face details:
Draw two large oval eyes near the front of the face. Inside these, draw dark pupils but leave a small white circle in each for a sparkle reflection. -
Draw the mouth and teeth:
Sketch a long, curved smile line running from the snout back toward the cheek. Add three small, triangular teeth pointing downward from the top lip. -
Sketch the arms and legs:
Add two short, stubby legs at the bottom. The front leg should overlap the tummy slightly. Then, sketch tiny T-Rex arms; draw one on the body and a hint of the other peeking from the other side. -
Add the spikes:
Starting from the top of the head, draw a series of triangular bumps running all the way down the back to the tail tip. Make them get gradually smaller as you reach the tail. -
Include texture spots:
Sketch a few random circles on the back and tail area to represent scaly spots.
Smudged Ink?
If your black fineliner smears when you erase or color, switch to a waterproof archival ink pen. Let it sit for at least 5 minutes before erasing.
Step 2: Inking and Coloring
-
Trace with black pen:
Go over your pencil lines with a black fine-liner. Use a steady hand to create smooth clean lines. Don’t forget to color in the pupils black, leaving the white highlights empty. -
Draw background elements:
Add a squiggle line under the feet to ground the dinosaur and a simple ‘m’ shape in the sky for a flying bird. -
Erase pencil marks:
Wait a moment for the ink to dry completely, then gently erase all the underlying pencil sketches so your paper is clean. -
Color the body green:
Take your teal or mint green marker and fill in the entire body, head, arms, and legs. avoid coloring the spikes, teeth, or spots. -
Color the accents orange:
Use the orange marker to fill in all the triangular spikes along the spine and the circular spots on the body. -
Add motion lines:
Draw three short black lines radiating from the back of the head to show surprise or excitement.
Step 3: Final Textures
-
Create white dashes:
Using a white gel pen, draw short, vertical dashed lines all over the green parts of the body. This gives the dinosaur a cool, textured look. -
Highlight the shapes:
Add small white curved lines or dots inside the orange spots and on the tips of the spikes to make them look shiny and dimensional. -
Final check:
Review your drawing for any missed spots. I usually like to thicken the outer outline just a tiny bit to make the character pop off the page.
Style Variation
Change the dinosaur’s mood by altering the eyebrows. Point them down for ‘angry’, remove them for ‘surprised’, or make them curved for ‘happy’.
Now you have a smiling dinosaur friend ready for any prehistoric adventure you can imagine
BRUSH GUIDE
The Right Brush for Every Stroke
From clean lines to bold texture — master brush choice, stroke control, and essential techniques.
Explore the Full Guide
Butterfly Made With Symmetry
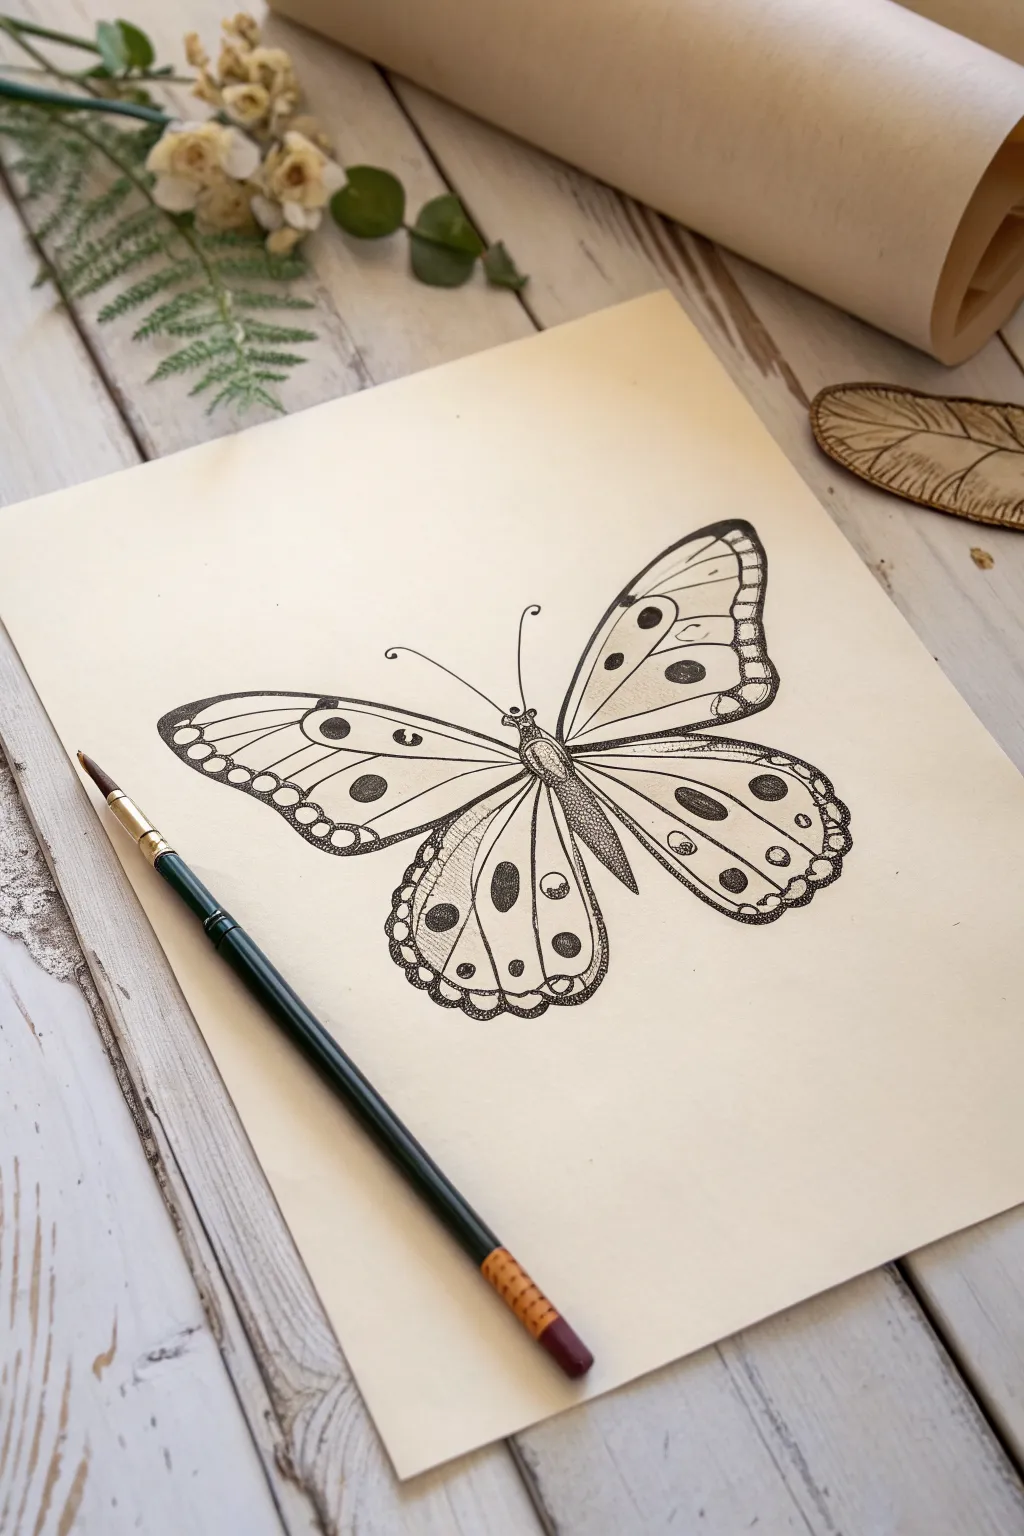
Capture the delicate beauty of nature with this elegant black ink butterfly illustration. Using fine lines and careful symmetry, you will create a stunning piece of artwork on cream-colored paper that looks like a vintage botanical print.
Step-by-Step
Materials
- Cream or off-white textured drawing paper
- Pencil (HB or H for light sketching)
- Eraser
- Fine liner pens (0.1mm, 0.3mm, and 0.5mm)
- Brush pen or small round paintbrush with black ink (optional for thicker lines)
- Ruler (optional for symmetry)
Step 1: Sketching the Framework
-
Mark the center:
Start by lightly drawing a vertical line down the center of your paper using your pencil. This axis line is crucial for keeping your butterfly perfectly symmetrical. -
Define the body:
Sketch a long, narrow oval along the center line for the body. Break it into three parts: a small circle for the head, a slightly wider oval for the thorax (middle), and a longer, tapered shape for the abdomen. -
Outline the wings:
Lightly sketch the large upper wings first. They should curve outward from the thorax and sweep up and out. Mirror this shape as best as you can on the opposite side. -
Add lower wings:
Draw the lower wings, starting from beneath the upper ones. These should be more rounded and extend downwards, curving back toward the abdomen at the bottom. -
Refine the shapes:
Go over your sketch to ensure both sides look balanced. It helps to step back from your drawing occasionally to check the symmetry.
Step 2: Inking the Outlines
-
Trace the main lines:
Using a 0.3mm or 0.5mm fine liner, carefully go over the main outline of the wings. Use a confident, consistent stroke to create a smooth edge. -
Ink the body:
Outline the body segments. For the head, add tiny details for eyes. On the thorax and abdomen, use short, small strokes to suggest a slightly fuzzy texture. -
Draw the antennae:
With a 0.5mm pen, draw two long, slender curves extending from the head, curling just slightly at the very ends. -
Create wing sections:
Draw the major veins inside the wings. These lines radiate from the body out toward the wing edges, dividing the wings into large cells. -
Clean up:
Once the ink is completely dry, gently erase all your initial pencil guidelines, including the center axis.
Symmetry Hack
Draw one wing in pencil, then fold the paper along the center line and rub the back. The graphite transfers lightly to the other side for a mirror image guide.
Step 3: Adding Details and Patterns
-
Draw the scallops:
Along the outer edges of the wings, draw a scalloped or wavy border inside the main outline. This creates a decorative edge typical of many butterfly species. -
Place the spots:
Lightly sketch circular spots within the wing cells patterns. Focus on the distinct ‘eyes’—large circles with smaller ones inside—on the lower wings. -
Ink the patterns:
Go over your spot sketches with your pen. Don’t just draw outlines; use your pen to fill in some spots solidly black, while leaving others open. -
Thicken the borders:
Go back to the very outer edge of the wing and thicken the line significantly or add a double line, filling the gap with small hash marks or dots for texture. -
Stipple shading:
Using your finest pen (0.1mm), add shading near the body and along the veins. Do this by stippling—creating clusters of tiny dots. Densely pack dots for darker shadows and spread them out for lighter areas. -
Line texture:
Add very fine, closely spaced lines inside some of the wing sections to differentiate them from the patterned spots. This directional hatching adds depth. -
Darken the body:
Return to the butterfly’s body and add more ink to darken it, leaving small slivers of white paper to act as highlights, giving it a 3D cylindrical form. -
Final touches:
Inspect your drawing for balance. If one side looks ‘heavier’ with black ink, add a few more dots or line weights to the opposite side to even it out.
Try a Wash
After the waterproof ink dries, use thinned watercolor or diluted coffee to paint soft washes over the wings for a warm, vintage parchment look.
You now have a beautifully detailed butterfly that looks ready to take flight from the page
Bumblebee With Stripes and Ovals

Create a charming nature study page featuring three distinct bumblebees, each with its own personality and level of detail. This project combines simple line drawing with bold pops of yellow to create an educational and artistic illustration perfect for a sketchbook or wall art.
Step-by-Step Guide
Materials
- Heavyweight drawing paper or mixed media paper
- Fine liner pen (black, 0.5mm or 0.3mm)
- Pencil (HB for sketching)
- Yellow colored pencil or watercolor pencil
- Eraser
- Ruler (optional)
Step 1: Layout and Sketching
-
Plan the composition:
Visualize three evenly spaced areas on your vertical paper for the bees. You want them arranged in a loose column down the center-left. -
Sketch the first bee’s body:
Starting near the top, lightly pencil two touching ovals: a smaller one for the thorax (chest) and a larger, longer one for the abdomen. Add a tiny circle at the top for the head. -
Add wing outlines:
Sketch two teardrop shapes extending from the thorax on each side. The top wings should be larger than the bottom ones. -
Repeat for the other bees:
Move down the page and sketch the basic oval structures for the second and third bees. Try slightly tilting their bodies to make them look like they are flying in different directions. -
Add the numbered circles:
On the right side of the paper, opposite the bees or spaces between them, lightly sketch small circles. You can add faint numbers (1, 2, 4, 5, etc.) inside them to mimic a scientific diagram.
Ink Smearing?
Wait at least 5-10 minutes before erasing pencil lines. If ink looks shiny, it’s still wet. Test an edge with your finger first.
Step 2: Inking the Outlines
-
Outline the bodies:
Take your fine liner pen and trace over your pencil lines for the bee bodies. Don’t worry if the line isn’t perfectly smooth; a little jitter adds to the insect texture. -
Detail the wings:
Draw the wing outlines with a very light touch. Inside the wings, add thin, delicate veins radiating from the body outward. -
Add legs and antennae:
Draw two thin antennae curving from each head. Add small, spindly legs peeking out from under the thorax. -
Draw the stripes:
Across the abdomen of each bee, draw curved lines to separate the black and yellow sections. Make sure these lines curve with the shape of the body to show volume. -
Erase pencil marks:
Once the ink is completely dry, gently erase all your initial pencil sketches to leave a clean black outline.
Make it Organic
Instead of perfect circles for the side numbers, draw loose concentric circles. It makes the sheet look like a vintage field journal.
Step 3: Adding Color and Texture
-
Color the yellow stripes:
Use your yellow colored pencil to fill in the designated bands on the abdomen and the top of the thorax. Apply firm pressure for a bright, solid color. -
Fill the black areas:
Use your black fine liner or a black colored pencil to fill in the dark stripes and the head. Use short, hatching strokes instead of solid block coloring to simulate fuzzy hair. -
Shade the yellow:
I like to add a tiny bit of orange or darker yellow to the bottom edges of the yellow stripes to give the bee roundness and dimension. -
Final touches:
Go over the numbered circles with your pen, perhaps using a double line for a sketchy border effect. Carefully ink the numbers inside. -
Labeling:
Add small handwritten numbers (2, 4) next to the bees themselves to coordinate with your side bubbles.
You now have a beautiful page of bumblebee studies that captures the buzz of nature

PENCIL GUIDE
Understanding Pencil Grades from H to B
From first sketch to finished drawing — learn pencil grades, line control, and shading techniques.
Explore the Full Guide
Flower With Five Rounded Petals
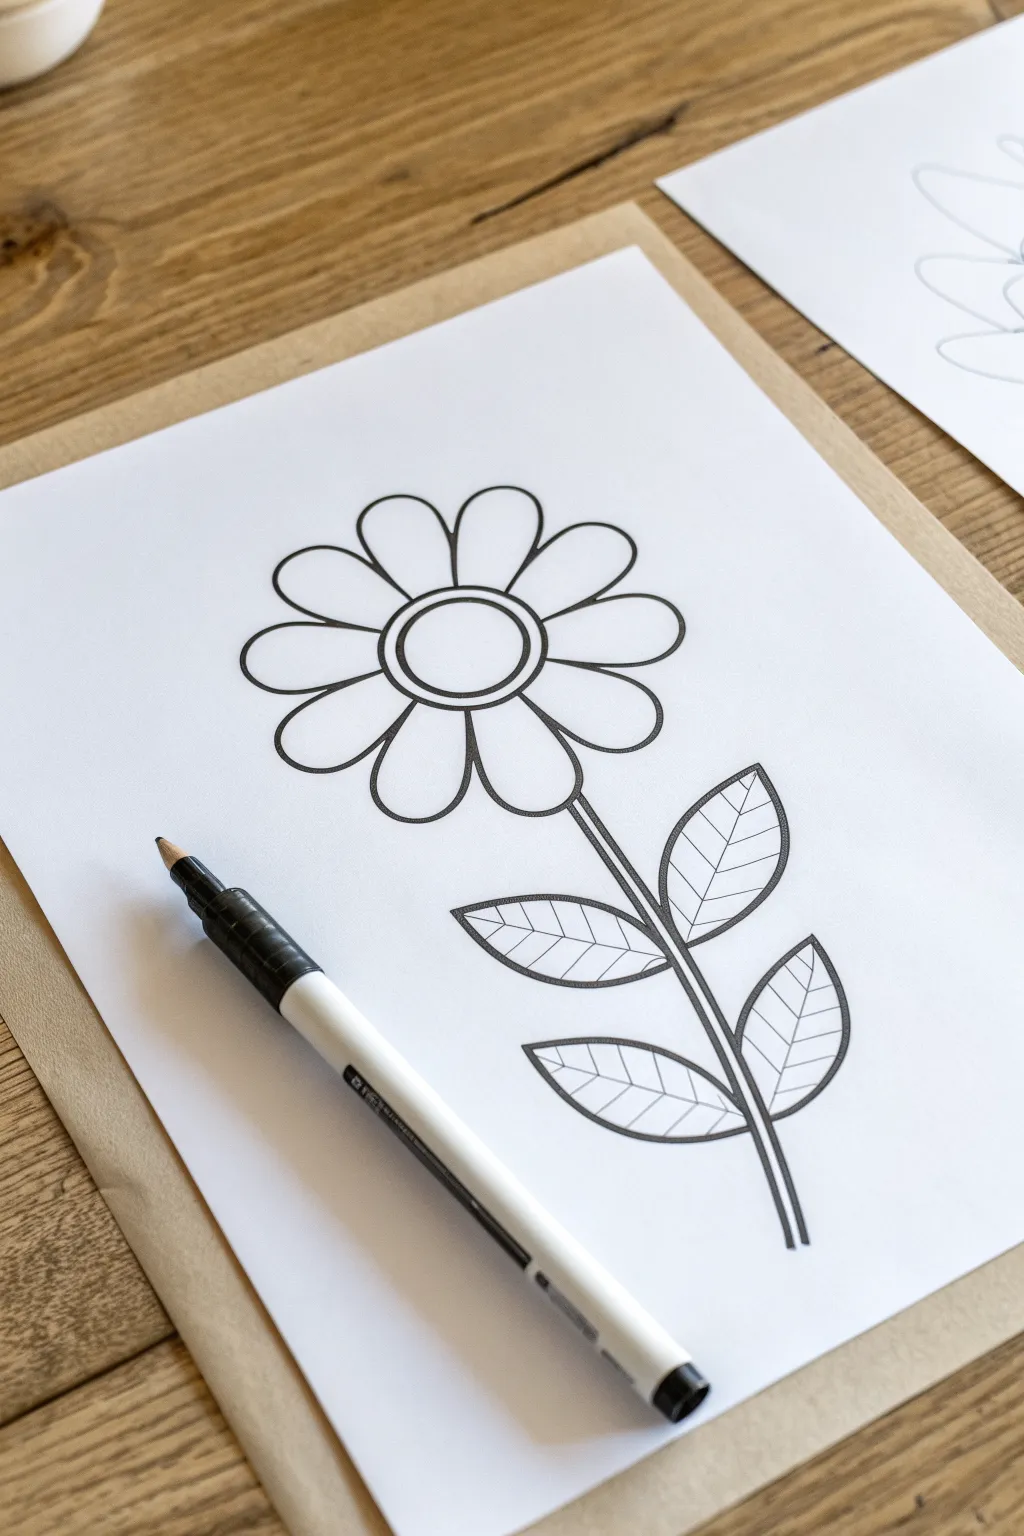
This charming flower illustration features clean, easy-to-follow lines that make it perfect for beginners or kids wanting to practice symmetry. The drawing captures a classic daisy-like bloom with large, gentle petals and detailed leaf veins for a polished finish.
Step-by-Step Tutorial
Materials
- White drawing paper or cardstock
- Pencil (for initial sketching)
- Eraser
- Fine-tip black marker or drawing pen (e.g., fineliner)
- Ruler (optional)
Step 1: Drawing the Base Structure
-
Center circle:
Begin by drawing a small, perfect circle near the upper third of your page. This will be the heart of your flower. -
Outer ring:
Sketch a second, slightly larger circle around the first one to create a ring-like border for the center. -
Top and bottom petals:
To keep things symmetrical, draw the first petal pointing straight up 12 o’clock and the second pointing straight down at 6 o’clock. Make them long oval shapes. -
Side petals:
Add a petal pointing directly right (3 o’clock) and one directly left (9 o’clock), aiming to keep them the same size as your vertical petals. -
Filling the gaps:
Draw four more petals in the empty spaces between your main four petals. You should now have a complete flower head with eight evenly spaced petals. -
Drawing the stem:
Starting from the bottom gap between two petals, draw two long, parallel lines stretching downward. Curve them slightly to the right at the bottom for a natural look.
Keep it Symmetrical
Draw faint “crosshairs” (a lightly penciled plus sign) through your center circle before starting the petals. This guides you to place the top, bottom, and side petals perfectly.
Step 2: Adding Leaves and Detail
-
Stem leaves outline:
Draw the outline of four leaves attached to the stem—two on the left and two on the right. Make them pointed ovals, slightly angled upwards. -
Leaf spines:
Draw a central line down the middle of each leaf, connecting from the stem to the leaf’s pointed tip. -
Adding veins:
Sketch small diagonal lines branching out from the central spine of each leaf to the outer edges to create the vein texture. -
Refining the sketch:
Take a moment to look over your pencil lines. Erase any overlapping lines where the stem meets the petals if you drew through them by accident.
Step 3: Inking and Finalizing
-
Tracing the center:
Using your black marker, carefully trace the two circles in the center of the flower first to establish your anchor point. -
Inking the petals:
Go around the perimeter of each petal with steady confidence. I find it helps to rotate the paper as I work so my hand is always in a comfortable position. -
Inking the stem:
Trace the parallel lines of the stem, stopping where the leaves connect. -
Final leaf details:
Ink the outlines of the leaves and their internal vein details carefully. -
Cleanup:
Wait about 60 seconds to ensure the ink is completely dry, then gently erase all visible pencil marks underneath to leave a crisp, clean black-and-white image.
Color it In
This line art is effectively a DIY coloring page. Use watercolors for a soft look, or bright markers to make it pop. Try shading the inner parts of the petals darker for depth.
Now you have a neat botanical drawing ready to be framed or colored
Happy Sun With Simple Rays
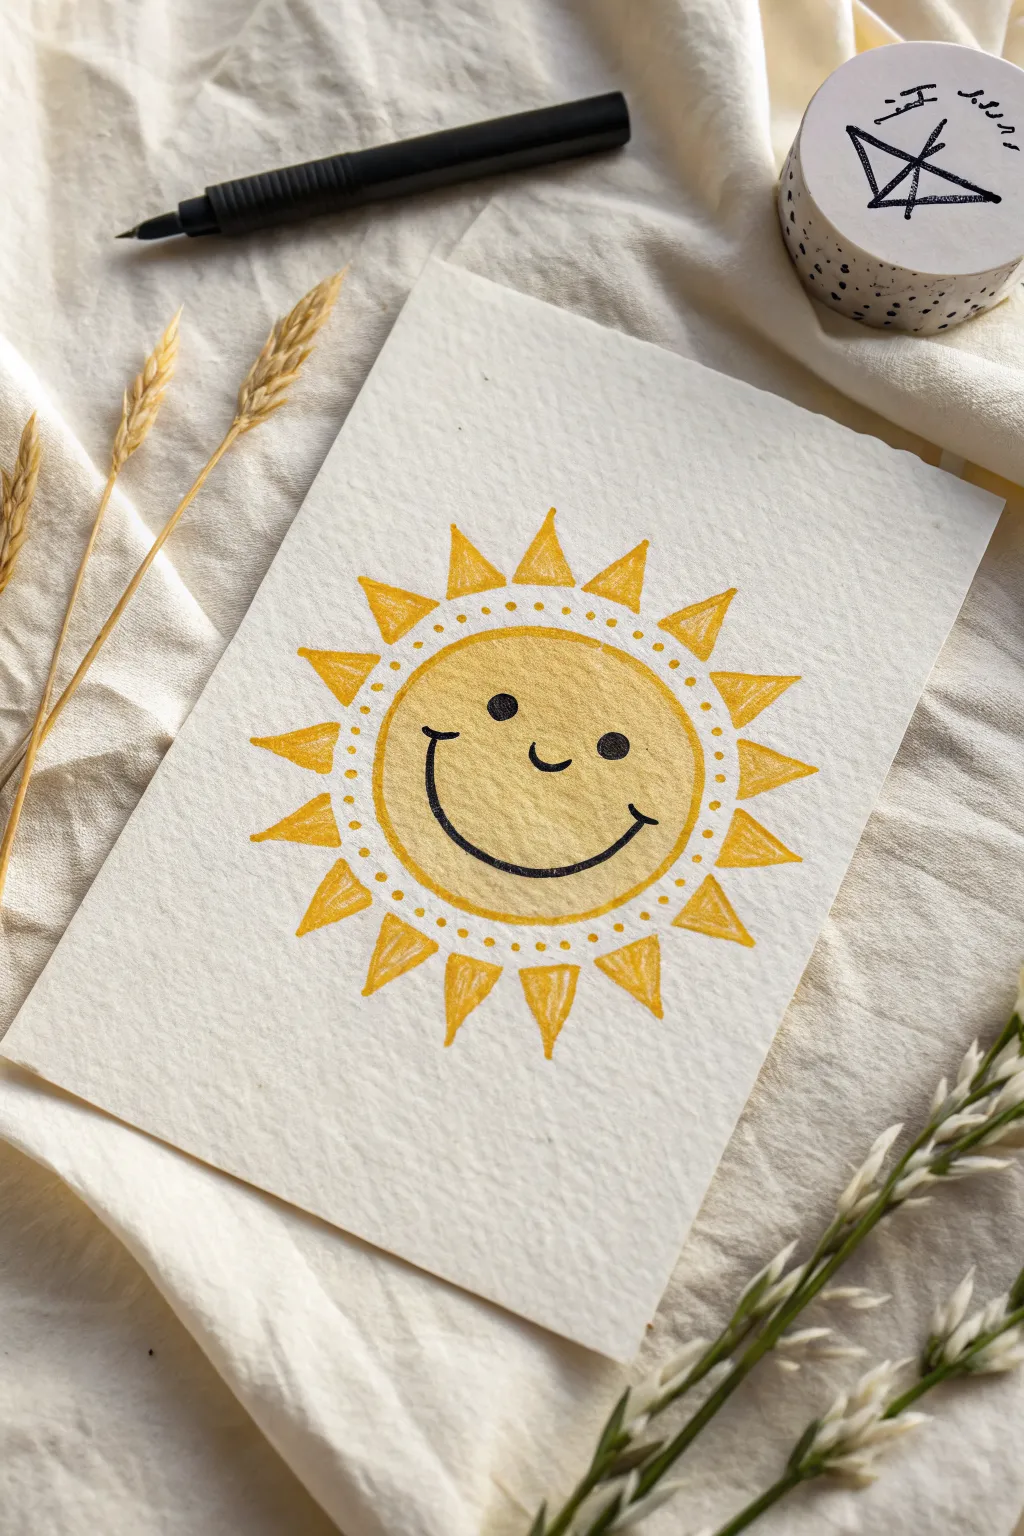
Brighten someone’s day with this cheerful sun illustration that beams with happy energy. Using warm yellows and simple lines, this project creates a textured, heartwarming image perfect for greeting cards or wall art.
Step-by-Step Guide
Materials
- Textured watercolor paper or heavy cardstock (creamy off-white works best)
- Yellow markers or watercolor brush pens (two shades: a lighter lemon yellow and a darker golden yellow)
- Black fine-liner pen or gel pen (waterproof)
- Pencil (light H or HB)
- Eraser
- Compass or a circular object to trace (like a cup)
Step 1: Setting the Scene
-
Prepare your paper:
Start by selecting a nice piece of textured paper. If you are making a card, cut your paper to the desired size now, or fold it in half so your drawing ends up on the front. -
Sketch the center:
Using a pencil and a light hand, draw a perfect circle in the middle of your paper. If you don’t have a steady hand for circles, I definitely recommend tracing the rim of a glass or a roll of tape. -
Sketch the rays:
Lightly sketch triangular rays pointing outward all around your circle. Try to keep them somewhat evenly spaced, but remember that slight imperfections add to the handmade charm.
Step 2: Adding Color
-
Color the face base:
Take your lighter yellow marker. Fill in the central circle completely. Use circular strokes to mimic the round shape and ensure even coverage. -
Define the rim:
With the darker golden-yellow marker, draw a thick outline around the edge of that central circle you just filled. This creates a subtle border. -
Outline the rays:
Switch back to your darker yellow marker and carefully outline each triangular ray you sketched earlier. -
Fill the rays:
Color in the rays using the darker yellow. Instead of filling them solid, use quick back-and-forth strokes that leave tiny flecks of white paper showing through for a textured, artistic look. -
Add the dotted ring:
Using the dark yellow marker tip, dot a ring of small points right outside the central circle, nestled in the gaps between the rays. This decorative detail ties everything together.
Pro Tip: Texture Trick
Use cold-press watercolor paper. The bumpy texture breaks up the marker lines naturally, giving that lovely ‘sketchy’ look without extra effort.
Step 3: Bringing it to Life
-
Check dryness:
Pause for a moment to ensure your yellow marker ink is completely dry so the black pen won’t bleed. -
Draw the eyes:
Take your black fine-liner. Draw two solid black circles for eyes in the upper half of the sun’s face, spacing them comfortably apart. -
Start the smile:
Draw a small, upward-curving line (like a wide ‘U’) centered between the eyes for the nose. -
Create the grin:
Below the nose, draw a wide, sweeping curve for the main smile. Make the line slightly thicker in the middle gently tapering at the ends. -
Add cheek details:
Cap off the smile by drawing tiny vertical ticks at both ends of the mouth line to create cute dimples or smile lines. -
Erase guidelines:
Gently erase any visible pencil marks from your initial sketch, being careful not to smudge the ink if it isn’t fully set.
Level Up: Metallic Pop
Once the drawing is done, trace over the dotted ring or the tips of the sun rays with a gold glitter gel pen for extra sparkle.
Now your happy sun is ready to bring warmth to anyone who sees it


Bird Built From an Oval and a Beak
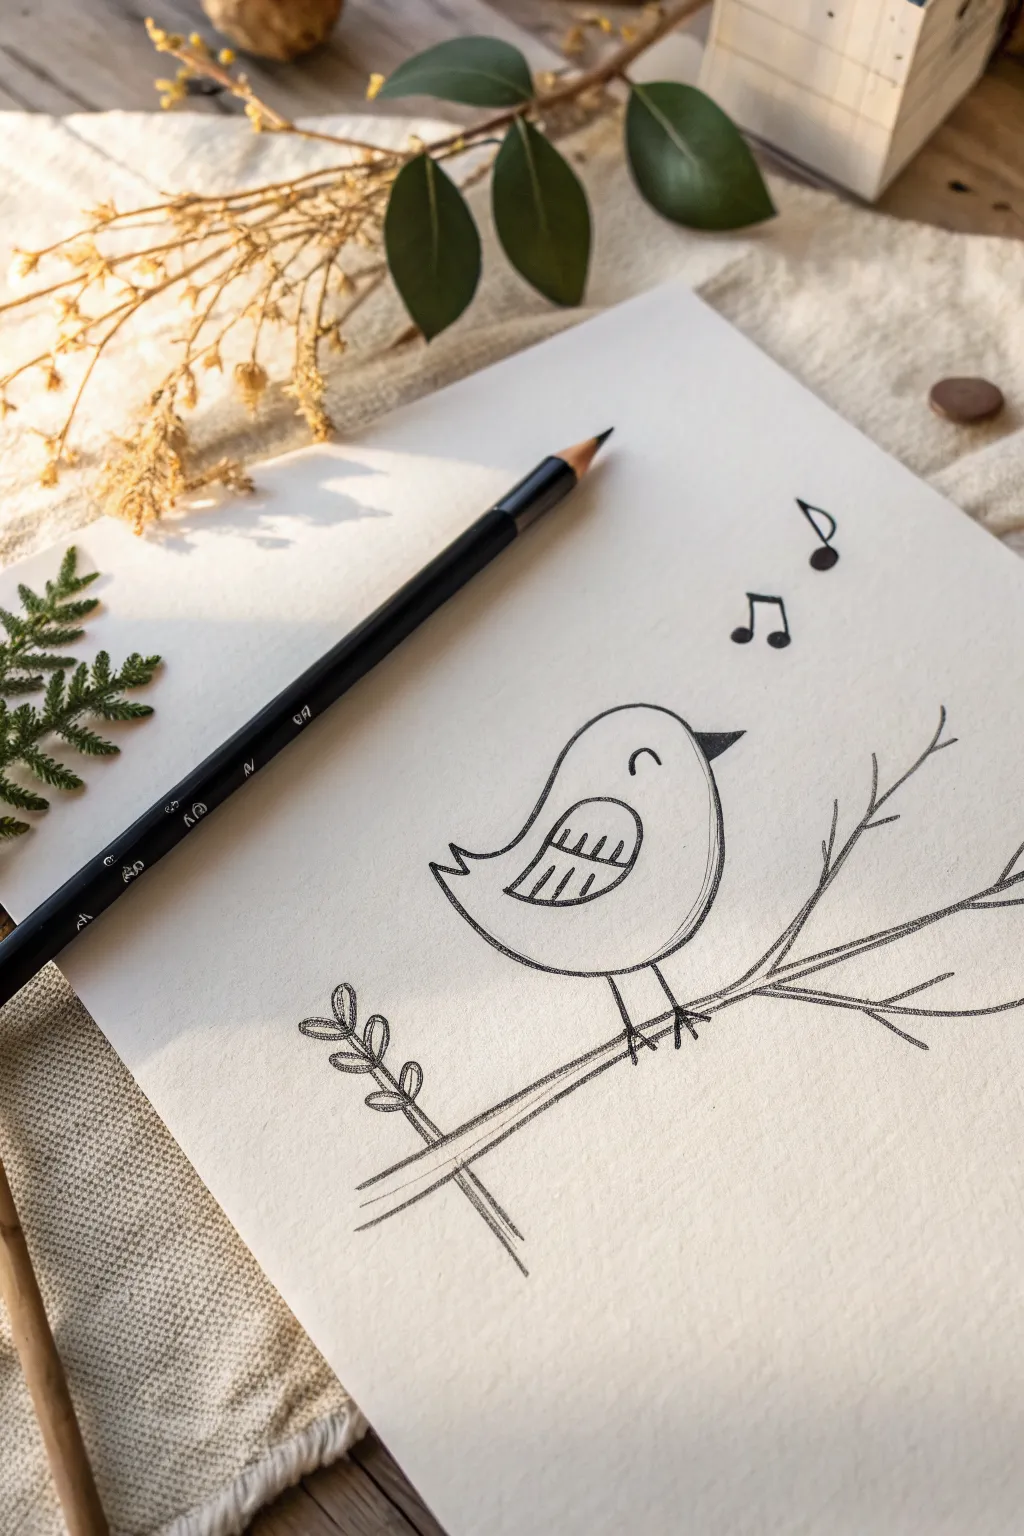
This charming little songbird starts life as a simple oval and transforms into a cheerful character with just a few confident lines. It’s a perfect warm-up sketch that focuses on clean shapes and minimalist details on textured paper.
Step-by-Step
Materials
- Sheet of textured drawing paper or sketchbook
- Soft charcoal pencil or black colored pencil
- Eraser
- Pencil sharpener
Step 1: Drawing the Bird
-
Map the body:
Start by drawing a large, rounded shape that resembles a distinctive ‘D’ lying on its curved back or a slightly flattened oval. The top should be rounder, and the bottom a bit flatter for the belly. -
Close the tail:
On the left side of your oval, extend the lines slightly outward to form points for the tail feathers, connecting them with a gentle inward curve. This creates the bird’s swept-back tail. -
Add the wing:
Inside the body, closer to the tail than the head, draw a smaller semi-circle curve facing downward to outline the wing. -
Detail the feathers:
Inside that wing shape, draw a straight horizontal line across the middle. Below this line, add three or four short vertical dashes to suggest individual wing feathers. -
Give it a beak:
On the upper right side of the head, draw a small, sharp triangle pointing outward. Color this triangle in solid black to make the beak stand out. -
Add the eye:
Just behind the beak, draw a small, upside-down ‘U’ shape. This simple curve creates a happy, closed-eye expression as if the bird is lost in song.
Smudgy Paper?
Soft pencils can smear easily. Place a scrap piece of paper under your drawing hand to protect your clean white background while you work.
Step 2: The Perch and Song
-
Draw the branch lines:
Start a long line from the bottom left of your paper, sloping gently upward toward the right edge. Draw a second line parallel to it, tapering them closer together as you reach the end to form a branch. -
Branch off:
From the main branch, extend two thinner ‘Y’ shaped twigs out to the right side to make the tree look natural and bare. -
Connect the bird:
Draw two simple straight lines extending down from the bird’s belly to touch the branch. Add three tiny toes to each leg where they grip the wood. -
Add a leafy detail:
On the lower left section of the branch, draw a small vertical stem sticking up. Add three small oval loops on each side of this stem to create a little sprig of leaves. -
Sketch the notes:
Above the beak, draw two musical notes using small black ovals connected to stems. I usually place the double eighth note (the one with the bar on top) closer to the beak. -
Add the high note:
Place a single quarter note—just an oval with a stem and a little flag—slightly higher and to the right, showing the melody drifting upward. -
Refine the lines:
Go over your main contours with slightly more pressure on your pencil. The goal is a confident, dark charcoal-like line that contrasts well with the paper.
Make it a Family
Draw a second, smaller oval bird sitting right next to the first one. Have them facing each other to create a duet instead of a solo.
You have now created a joyful, singing bird sketch that looks effortlessly artistic
Frog With Big Circle Eyes
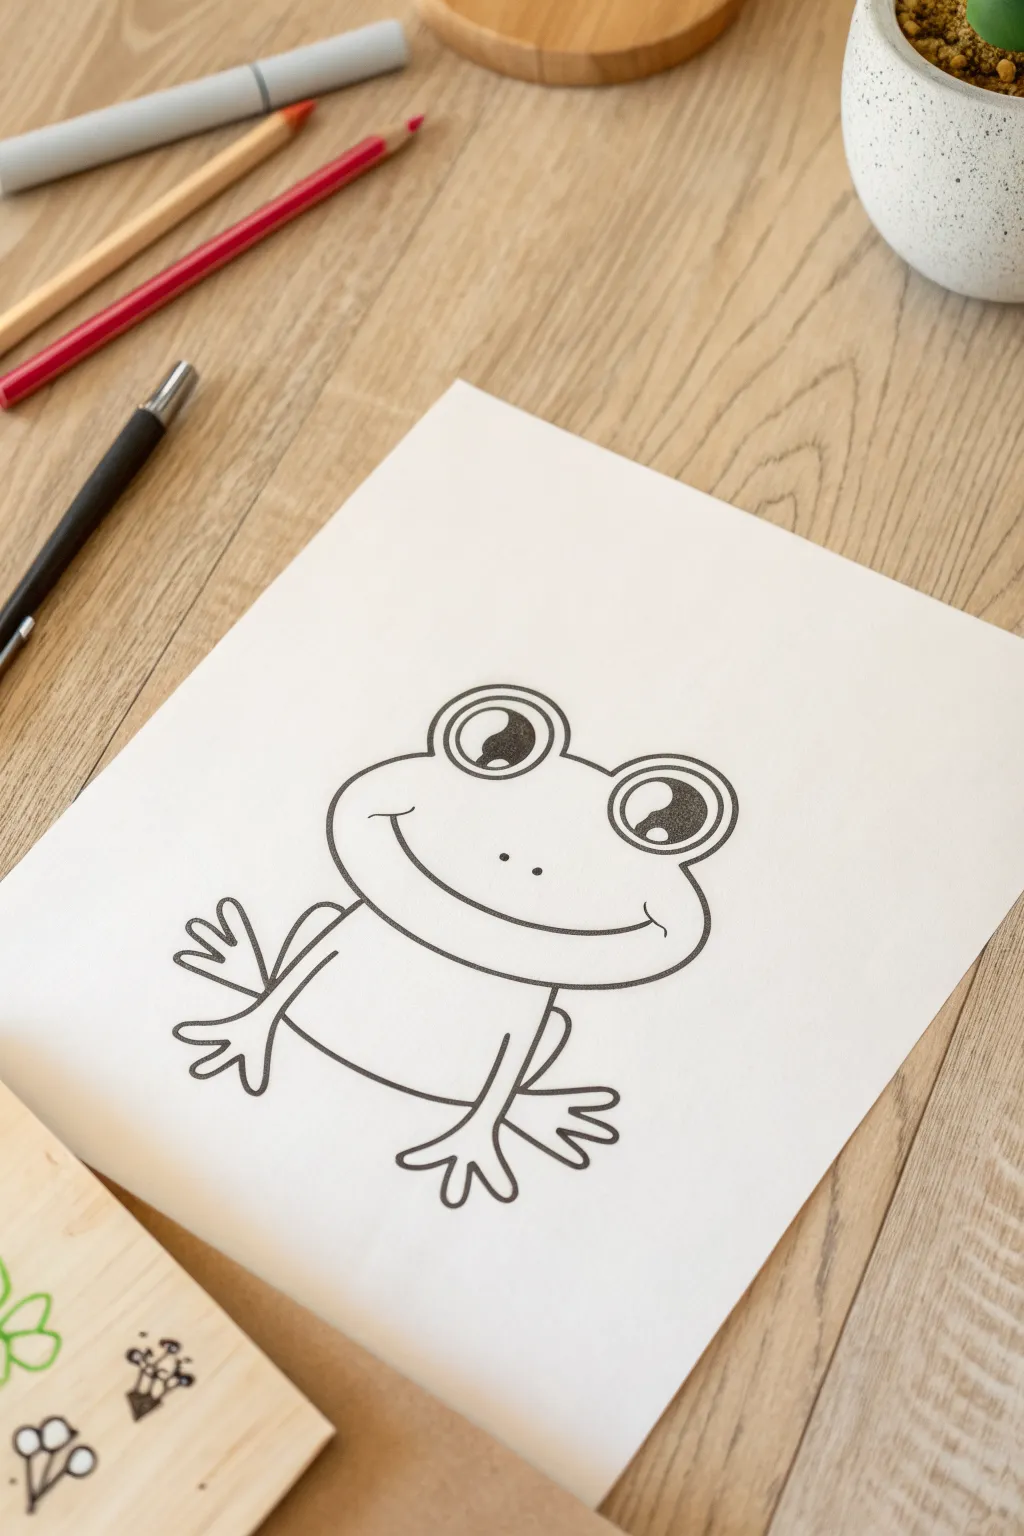
This cheerful frog sketch is perfect for beginners because it uses simple, rounded shapes to create a friendly character. With its wide circle eyes and big smile, this little amphibian is sure to jump right off the page.
How-To Guide
Materials
- White drawing paper or cardstock
- Pencil (for sketching)
- Black fine-liner pen or marker (for outlining)
- Eraser
Step 1: Drawing the Head and Eyes
-
Start with the eyes:
Begin in the upper center of your page by drawing two medium-sized circles side-by-side. Leave a small gap between them. -
Add the pupils:
Inside each circle, draw a large crescent moon shape on the right side. Fill these crescent shapes in completely black, leaving a white highlight circle if you want extra sparkle. -
Create the eyelids:
Draw an arch over the top of each eye circle. These arches act as the upper eyelids or brows and help frame the frog’s expression. -
Form the head shape:
Starting from the outer edge of the left eye, draw a curved line moving outward and down. Repeat this on the right side. -
Connect the cheeks:
Continue those side curves downward and bring them together in a wide U-shape to form the bottom of the frog’s face. -
Draw the mouth:
Inside the face area, draw a very wide, upward-curving line for a smile. Add tiny vertical tick marks at the corners of the mouth for dimples. -
Add nostrils:
Place two small dots right in the center of the face, just above the smile line, for the nose.
Uneven Eyes?
If getting circles perfect is tricky, try tracing a small coin or bottle cap. Getting the base circles even makes the whole face look balanced instantly.
Step 2: Body and Legs
-
Start the body:
Draw two slightly curved vertical lines coming down from the bottom of the head. These sketch the sides of the frog’s belly. -
Connect the bottom:
Join the two body lines with a gentle curve at the bottom to close off the stomach shape. -
Draw the left front leg:
Start near the left ‘cheek’ area. Draw two parallel lines extending diagonally downward and to the left. -
Add the left hand:
At the end of the arm, draw three rounded fingers spreading out like a fan. -
Draw the right front leg:
Mirror the previous step on the right side: draw two lines extending down and to the right from under the cheek. -
Add the right hand:
Add three rounded fingers at the end of the right arm, matching the left side. -
Sketch the back legs:
Behind the front arms, draw a large curved line on each side (like a half-oval) representing the frog’s big jumping legs tucked in. -
Add the feet:
At the bottom of those large curves, draw three-toed feet pointing outward.
Step 3: Final Touches
-
Ink the drawing:
Take your black fine-liner or marker and carefully trace over all your pencil lines. I like to keep my hand steady by resting my wrist on the table. -
Erase guidelines:
Once the ink is completely dry—wait a minute or two to avoid smudges—gently erase all the underlying pencil sketches.
Highlight Hint
When coloring the black pupils, leave a small white circle uncolored in the top corner. This ‘glint’ makes the frog look alive and shiny.
You now have a charming little frog ready to color or craft with
Elephant With a Curved Trunk
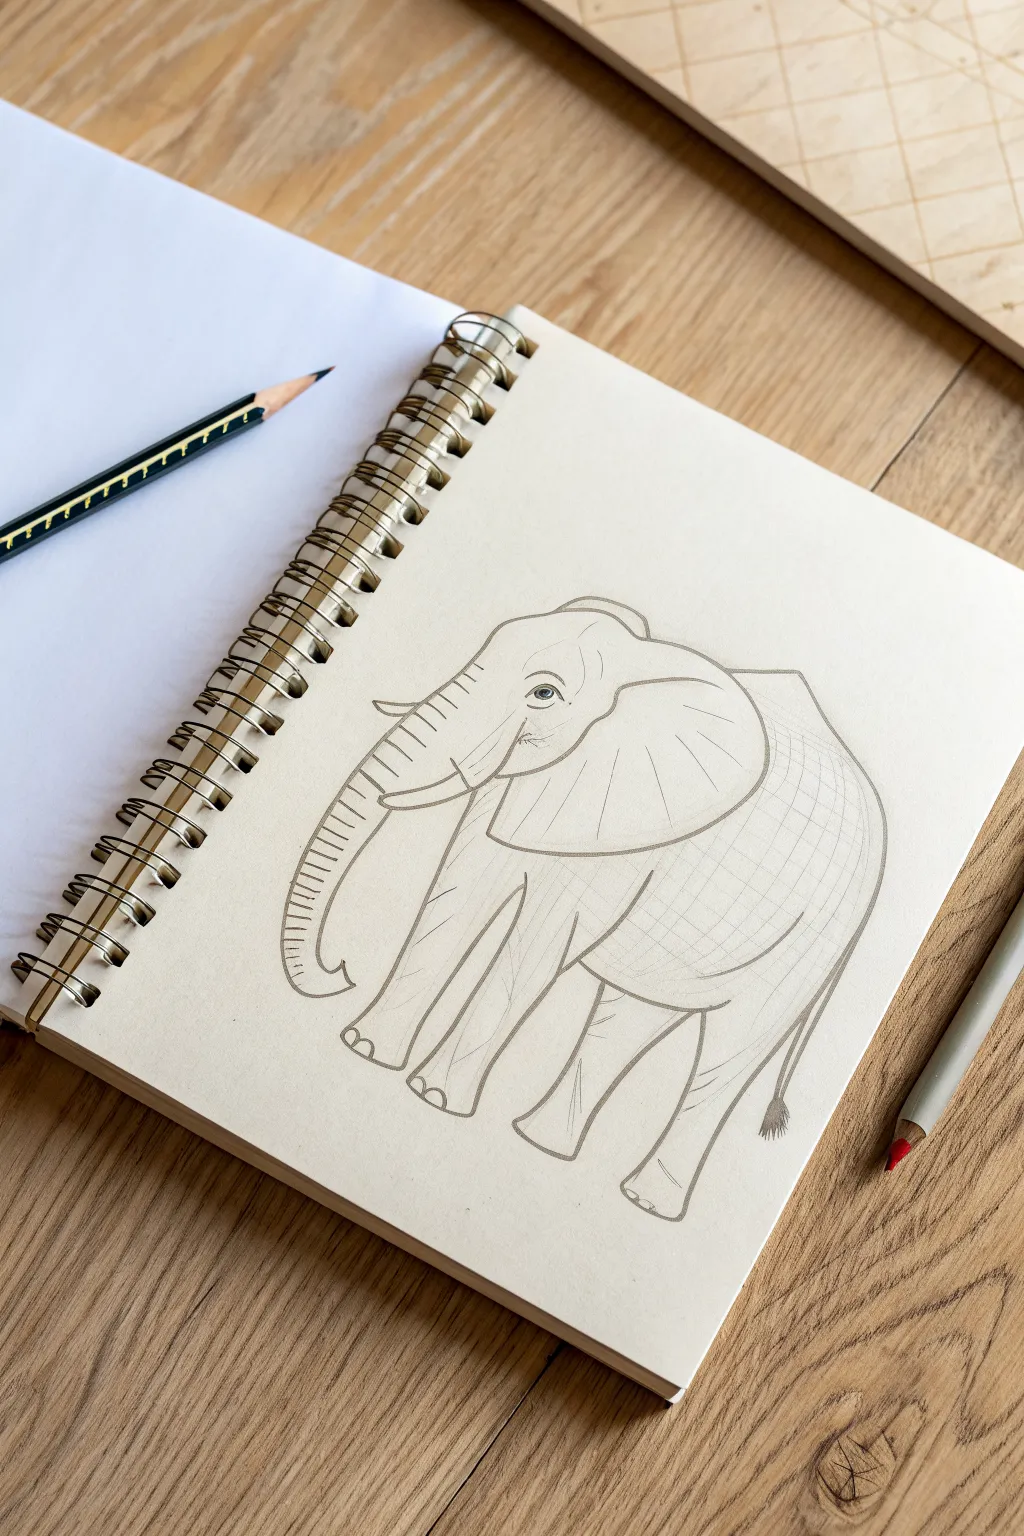
Capture the gentle spirit of the savanna with this detailed elephant sketch. The drawing features flowing lines for the trunk and ears, combined with cross-hatching textures to give the animal a solid, realistic presence.
Step-by-Step Tutorial
Materials
- Spiral-bound sketchbook (cream or off-white paper recommended)
- HB or 2B graphite pencil
- Fine-tip black drawing pen (optional for final outlines)
- Eraser
- Gray colored pencil (optional for shading)
Step 1: Building the Basic Shapes
-
Map out the body:
Start near the center of your page by drawing a large, rounded oval for the elephant’s main body. To the left and slightly higher, sketch a smaller, rounded shape for the head, connecting it seamlessly to the body with a short neck line. -
Sketch the legs:
Drop four vertical guidelines down from the body oval. Make the front legs slightly straighter and the back legs angled backward at the ‘knee’ joint. Keep the feet wide and flat at the bottom. -
Draft the trunk foundation:
From the front of the head shape, draw a long, sweeping curve that goes down and curls slightly upward at the end. This acts as the spine of the trunk. Add thickness to this line, wider near the face and tapering as it reaches the tip.
Trunk Flow
Keep your wrist loose when drawing the trunk. A stiff hand makes the trunk look like a pipe; a loose, sweeping motion makes it look like flexible muscle.
Step 2: Drawing the Head and Features
-
Outline the large ear:
Draw that signature fan-shaped ear. Start the line near the top of the head, curve it back broadly over the shoulder, and sweep it down. The bottom edge should be a gentle, wavy curve that connects back to the jawline. -
Define the eye:
Place a small almond shape on the side of the head. Draw a small circle for the iris inside, leaving a tiny white highlight for life. Add a few small wrinkles around the eye to suggest age. -
Add the tusks:
Just below the trunk’s base, draw two curved, pointed shapes for tusks. Only one might be fully visible from this angle; make it curve upward slightly like a crescent moon. -
Detail the trunk:
Refine the trunk’s outline. Along the top edge of the trunk, draw small, evenly spaced horizontal lines or ‘rings’ to show its flexible, wrinkled texture. Stop these lines about halfway down the trunk.
Step 3: Defining the Body and Legs
-
Refine the back and belly:
Go over your initial body oval with a more confident line. Create a slight dip in the back behind the head (the shoulder blades) and another curve for the rump. Draw the belly line so it connects smoothly to the legs. -
Detail the feet:
At the bottom of each leg, draw rounded toenails. Usually, three are visible on each foot from this angle. Make the base of the foot look heavy and grounded. -
Add the tail:
Draw a thin tail hanging down from the rear. Add a tuft of hair at the very end using quick, short strokes to simulate bristles.
Leg Placement
If the legs look weird, check the alignment. The two legs on the ‘far side’ of the body should be drawn slightly higher on the page than the near legs to create depth.
Step 4: Shading and Texture
-
Add ear details:
Draw long, radiating lines inside the ear shape, starting from the head and fanning out toward the edges. These represent the veins and folds of the ear skin. -
Create body volume:
Using your pencil lightly, add hatching lines. I find it effective to use cross-hatching (crisscrossed lines) on the rear flank and under the belly to show shadow and roundness. -
Texture the legs:
Add vertical lines on the legs to indicate wrinkles. Focus these lines around the knees and ankles where the skin naturally folds. -
Finalize the outlines:
Go over your main contours with a darker pencil stroke or a fine-tip pen if you prefer ink. Keep the lines slightly loose and organic rather than perfectly rigid. -
Clean up:
Gently erase any of your original stick-figure guidelines or stray marks that distract from the main form.
Now you have a majestic elephant sketch ready to be the start of your safari collection
Lion Face With a Fluffy Mane
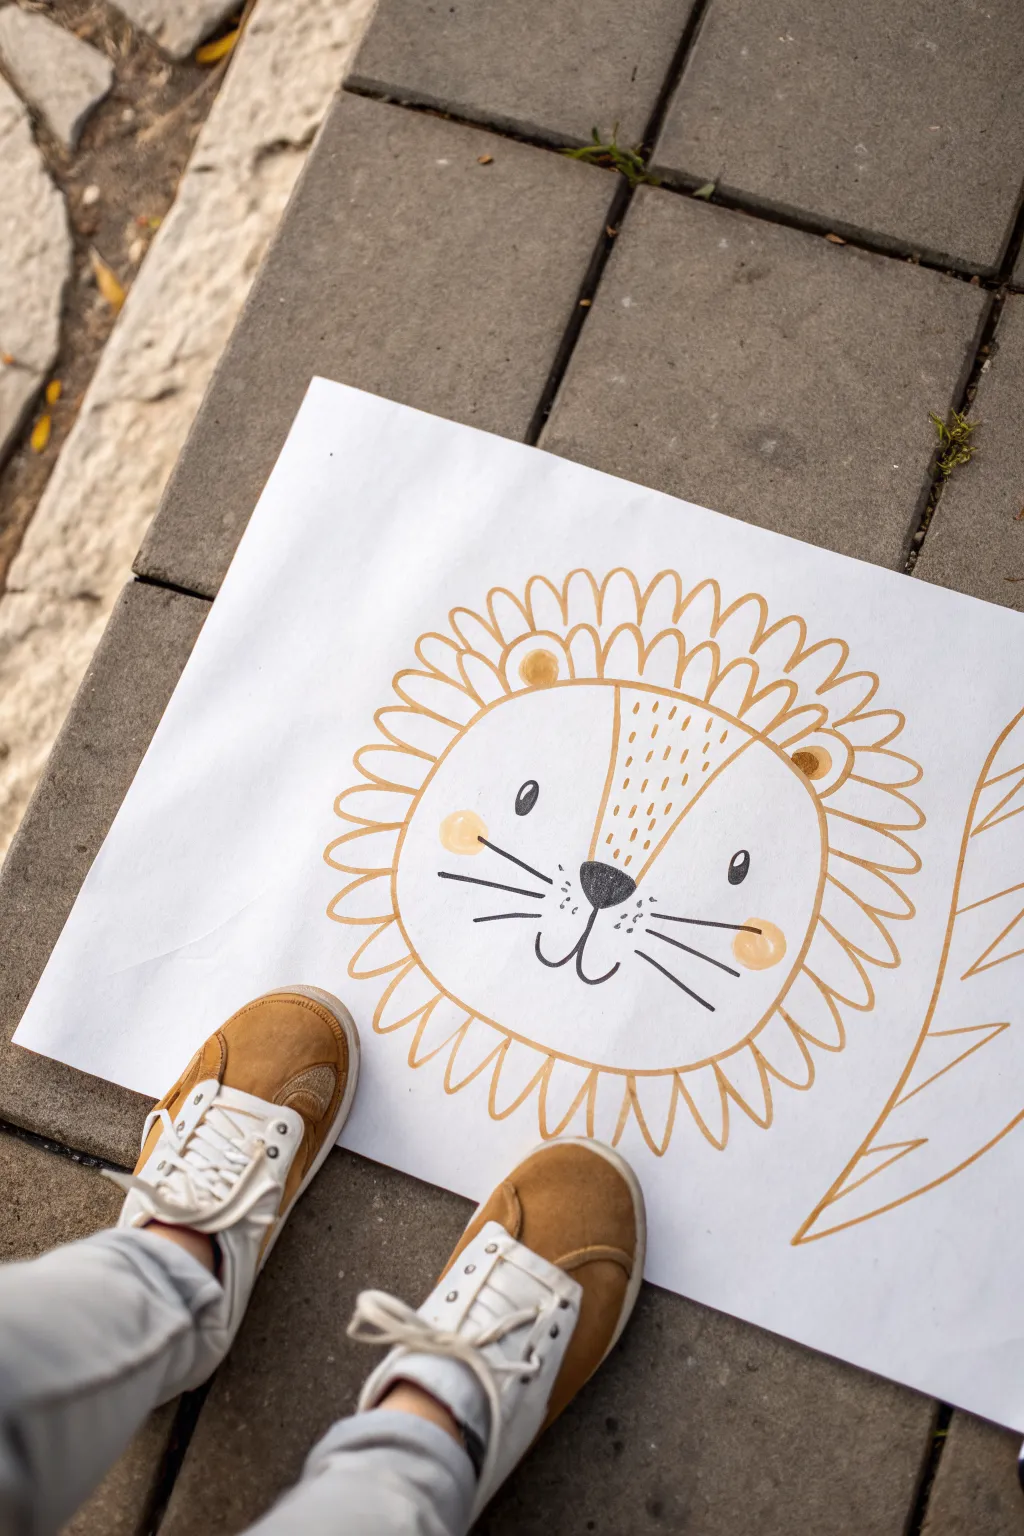
This charming, minimalist lion features a sweet face and a stylized mane made of simple loops, making it an ideal drawing project for beginners. The clean lines and gentle golden accents create a modern, nursery-style artwork that looks wonderful framed or pinned to a wall.
Step-by-Step Guide
Materials
- Large sheet of white drawing paper or easel paper roll
- Thick black marker or brush pen
- Golden-yellow or ochre marker (chisel tip works well)
- Pencil (HB or 2B)
- Eraser
- Large circular object for tracing (like a dinner plate or mixing bowl)
Step 1: Planning the Face
-
Create the base circle:
Start by lightly tracing a large circle in the center of your paper using a pencil and your circular object. This ensures the lion’s head is perfectly round and leaves enough room for the mane. -
Sketch the ears:
On the top curve of your circle, lightly sketch two small semi-circles. Think of these like little bear ears sitting at the 10 o’clock and 2 o’clock positions. -
Draw the mane guidelines:
Sketch a larger, phantom circle around the head, roughly 2-3 inches outward from the face. This faint line will help you keep the maneuver loops consistent in size later on.
Uneven Main Loops?
Don’t stress if your loops aren’t identical sizes. If you notice a gap at the end, simply widen the final two loops slightly to close the circle naturally without it looking like a mistake.
Step 2: Inking the Outline
-
Trace the ears:
Switch to your golden-yellow marker. Trace over your pencil ear sketches with a confident, steady hand. -
Outline the head:
Continuing with the gold marker, trace the main face circle. Stop your line when you reach the ears, skipping over the base of them so the ears look connected to the head, not pasted on top. -
Start the mane loops:
Beginning at the top center, draw a U-shaped loop attached to the head outline. The peak of the loop should touch your outer pencil guideline. -
Complete the mane:
Continue drawing these U-shaped petals all the way around the head. Try to keep them relatively uniform, but don’t worry if they vary slightly—it adds character. -
Erase pencil marks:
Once the marker ink is completely dry (give it a minute!), gently erase your original pencil circle and guidelines to leave a clean design.
Make It Pop
Use a white gel pen or paint marker to add extra highlights on top of the black nose and the golden cheeks after the ink dries. It brings the face to life instantly.
Step 3: Adding Features
-
Add inner ear details:
Using the gold marker, fill in a small semi-circle inside each ear to give them depth. -
Draw the cheeks:
Make two solid circles with the gold marker on the lower half of the face for rosy cheeks. I like to place these slightly wider than where the eyes will go. -
Place the nose:
Switch to your black marker. Draw an inverted triangle with rounded corners exactly in the center of the face, slightly above the cheek line. Fill it in solid black. -
Draw the mouth:
From the bottom point of the nose, draw a small vertical line down. Then, curve a line upward to the left and another upward to the right to create a classic ‘anchor’ shape smile. -
Add the eyes:
Draw two vertical ovals for eyes. Place them fairly wide apart for a cute, youthful look. Leave a tiny white dot uncolored inside each oval for a ‘sparkle’ highlight. -
Create whiskers:
Draw three straight black lines radiating outward from each side of the nose area, crossing over the cheeks slightly.
Step 4: Final Details
-
Add forehead texture:
Imagine a triangle on the forehead. Using the gold marker, make small dashed lines or dots inside this imaginary triangle to suggest fur texture. -
Detail the muzzle:
Add three tiny black dots on each side of the upper lip, right between the nose and the whiskers. -
Optional body hint:
If you have extra space on the paper, distinctively draw the tip of a tail or a curved line for the back to suggest the lion represents a larger figure.
Step back and admire your clean, modern animal portrait that’s ready for display
Unicorn Head With a Swirly Horn
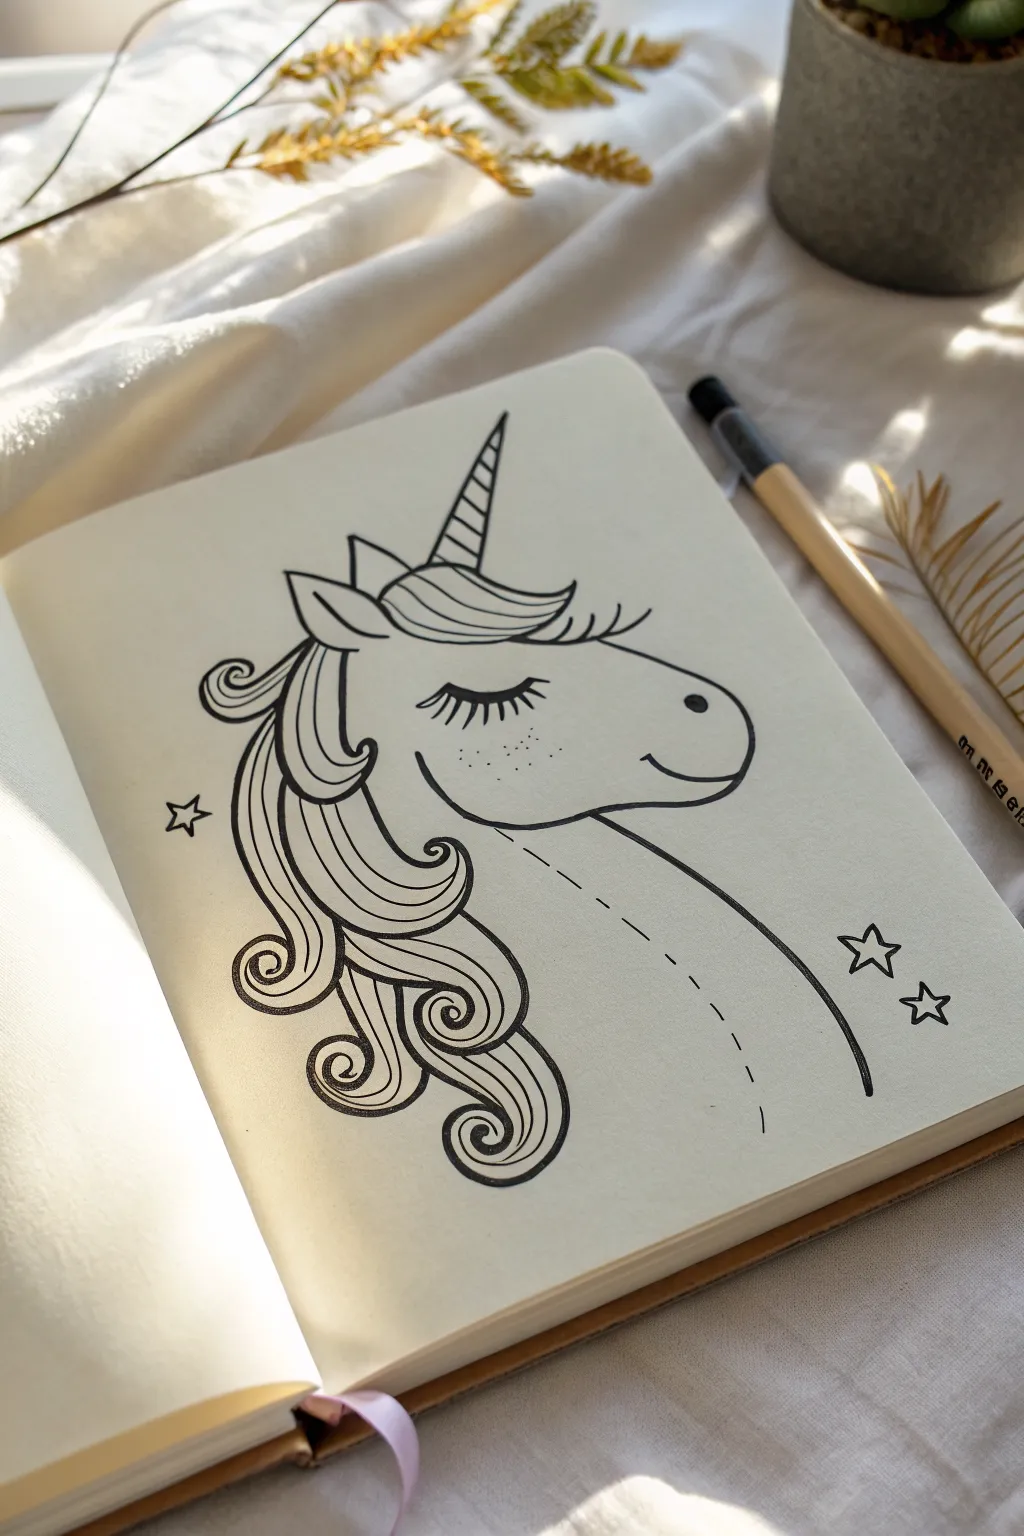
This charming line drawing captures the magic of a sleeping unicorn with flowing, curly hair and a classic spiraled horn. It’s a perfect beginner project that focuses on confident curves and simple shapes to create an enchanting character.
Step-by-Step
Materials
- Sketchbook or drawing paper
- Pencil (HB or 2B)
- Black fine-liner or drawing pen (0.5mm or 0.8mm)
- Eraser
Step 1: Drawing the Face & Horn
-
Start the snout:
Begin by drawing a gentle ‘U’ shape on its side for the unicorn’s snout. Extend the top line upward slightly to start forming the forehead. -
Add the smile:
At the rounded tip of the snout, draw a small, upward-curving line to create a sweet, subtle smile. -
Place the nostril:
Just above the smile curve, add a small, filled-in circle for the nostril. -
Draw the eye:
In the center of the head area, draw a downward arc for the closed eyelid. Add several long, thick eyelashes pointing downwards. -
Freckles:
Dot a few tiny specks under the eye to give the unicorn some cute freckles. -
Outline the ear:
Move up to the top of the head and draw a leaf-shaped ear pointing backwards. Add a smaller leaf shape inside it for depth. -
Create the horn:
Draw a tall, narrow triangle growing out of the forehead, just in front of the ear. This will be the horn. -
Detail the horn:
Add diagonal stripes across the horn to create the classic spiral effect.
Wobbly Lines?
If your curves look shaky, try drawing them faster. Moving your hand quickly usually results in smoother, more confident swirls than drawing slowly.
Step 2: The Mane & Finishing Touches
-
Front bangs:
Draw a swooping section of hair between the horn and the ear, wrapping it over the forehead like bangs. -
Top mane curl:
Starting from behind the ear, draw a long, ‘S’ shaped curve that flows downward. Hook the end into a tight spiral. -
Inner mane lines:
Add a parallel line inside that first curl to define the strand of hair, following the same spiral pattern. -
Middle mane section:
Draw a second, slightly larger wave of hair starting below the first one. Let this one cascade down further and end in another playful swirl. -
Bottom mane swirl:
Add a third section of hair at the bottom. Make this curl overlap slightly with the ones above for a voluminous look. -
Loose strands:
Add a few small, curved tick marks near the top of the mane to suggest loose hairs. -
Neck line:
Draw a long, gentle curve extending down from the chin area to suggest the unicorn’s neck. -
Dotted guide:
Draw a dashed line extending down from the middle of the jaw, parallel to the neck line, to hint at the neck’s width without closing the shape fully. -
Magical stars:
Draw two or three simple five-pointed stars floating around the unicorn to fill the empty space. -
Inking:
Go over your favorite pencil lines with a black ink pen. I find a thicker nib works best for the main outline, while a thinner one is great for the freckles and eyelashes.
Make it Sparkle
Use a glitter gel pen to trace over the stars or the spiral lines on the horn. It adds a magical touch that catches the light.
Once the ink is totally dry, erase your pencil marks to reveal your clean, magical drawing
Easy Dragon With Cloud-Like Shapes
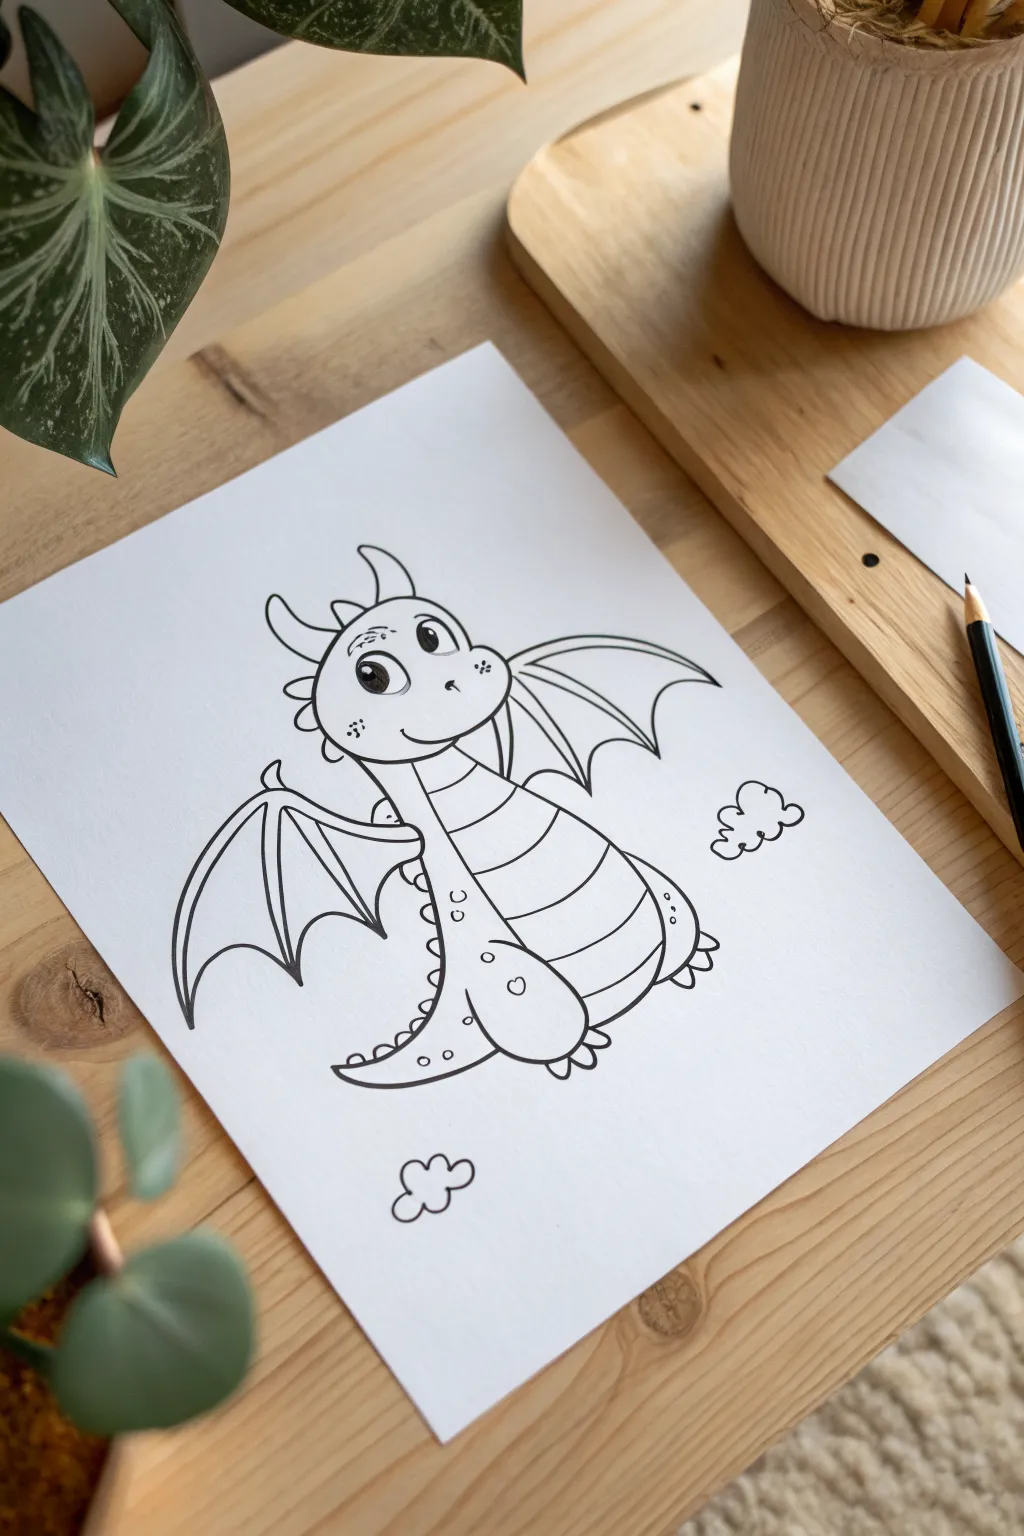
Learn how to draw this adorable, friendly dragon using simple, rounded shapes that are perfect for beginners. The clean black outlines create a charming cartoon style that looks great on its own or ready for coloring.
How-To Guide
Materials
- White drawing paper or cardstock
- Pencil (HB or 2B) for sketching
- Eraser
- Black fine-liner or marker (e.g., Micron 05 or a standard felt-tip pen)
- Ruler (optional)
Step 1: Planning the Body Structure
-
Start with the Head:
Begin by drawing a slightly squashed circle or oval near the top center of your paper. This will be the dragon’s head. Keep your pencil pressure light so you can erase guidelines later. -
Add the Body Shape:
Draw a larger, pear-shaped oval extending downwards from the head. The narrower part should connect to the head, creating a neck, while the wider bottom forms the belly. -
Sketch the Tail:
Extend a curved line from the bottom right of the body, sweeping it upwards to a point. Add another line underneath to give the tail thickness, connecting back to the body.
Step 2: Adding Dragon Features
-
Draw the Snout:
On the lower half of the head circle, draw a gentle curve to define the snout area. Add a small smile line and two tiny ovals for nostrils. -
Create the Eyes:
Draw two large ovals above the snout. Inside each, draw a smaller circle for the pupil, leaving a tiny white spot for a highlight to make the dragon look friendly. -
Add Ears and Horns:
Sketch two small, triangular horns on top of the head. Below the horns, add leaf-shaped ears pointing slightly outwards. -
Draw the Front Leg:
On the front of the body, draw a rounded, sausage-like shape for the arm. At the end, add three small bumps for fingers. -
Draw the Back Leg:
Near the bottom of the body, draw a curved line representing the thigh, followed by a foot with three toes resting on the ground.
Wobbly Lines?
If your hand shakes while inking, try drawing from your shoulder rather than your wrist. Using quicker, confident strokes often results in smoother lines than going too slow.
Step 3: Wings and Final Details
-
Outline the Wing Structure:
Draw a curved line extending out from the shoulder area on both sides. These form the top rigid bone of the dragon’s wings. -
Complete the Wing Webbing:
Connect the tip of the wing bone back to the body using scalloped, U-shaped lines. This creates the bat-like appearance. Usually, two or three scallops work best. -
Add Belly Stripes:
Draw horizontal curved lines across the dragon’s stomach area to create the classic segmented belly look. -
Spikes and Spots:
Add a row of small triangles running down the dragon’s back and tail for spikes. Sprinkle a few small circles on the skin for texture. -
Draw the Clouds:
Sketch two simple cloud shapes floating near the dragon—one smaller one near the bottom and a larger one on the right side.
Make It Magical
Instead of plain clouds, draw small stars or puffs of smoke coming from the dragon’s nose. You can also color the belly a contrasting color like yellow or pale green.
Step 4: Inking and Finishing
-
Trace with Marker:
Take your black fine-liner or marker and carefully trace over your pencil lines. I prefer to go slowly here to ensure the lines are smooth and confident. -
Fill the Eyes:
Color in the pupils of the eyes solid black, being very careful to leave those white reflection spots untouched. -
Refine the Lines:
If you want the drawing to pop, thicken the outline around the outer edge of the entire dragon slightly, leaving interior details a bit thinner. -
Erase Sketches:
Wait a minute for the ink to dry completely to avoid smudging. Then, gently erase all the underlying pencil sketch marks.
Now you have a wonderful dragon character ready to be displayed or colored in
Ice Cream Cone With a Cute Face
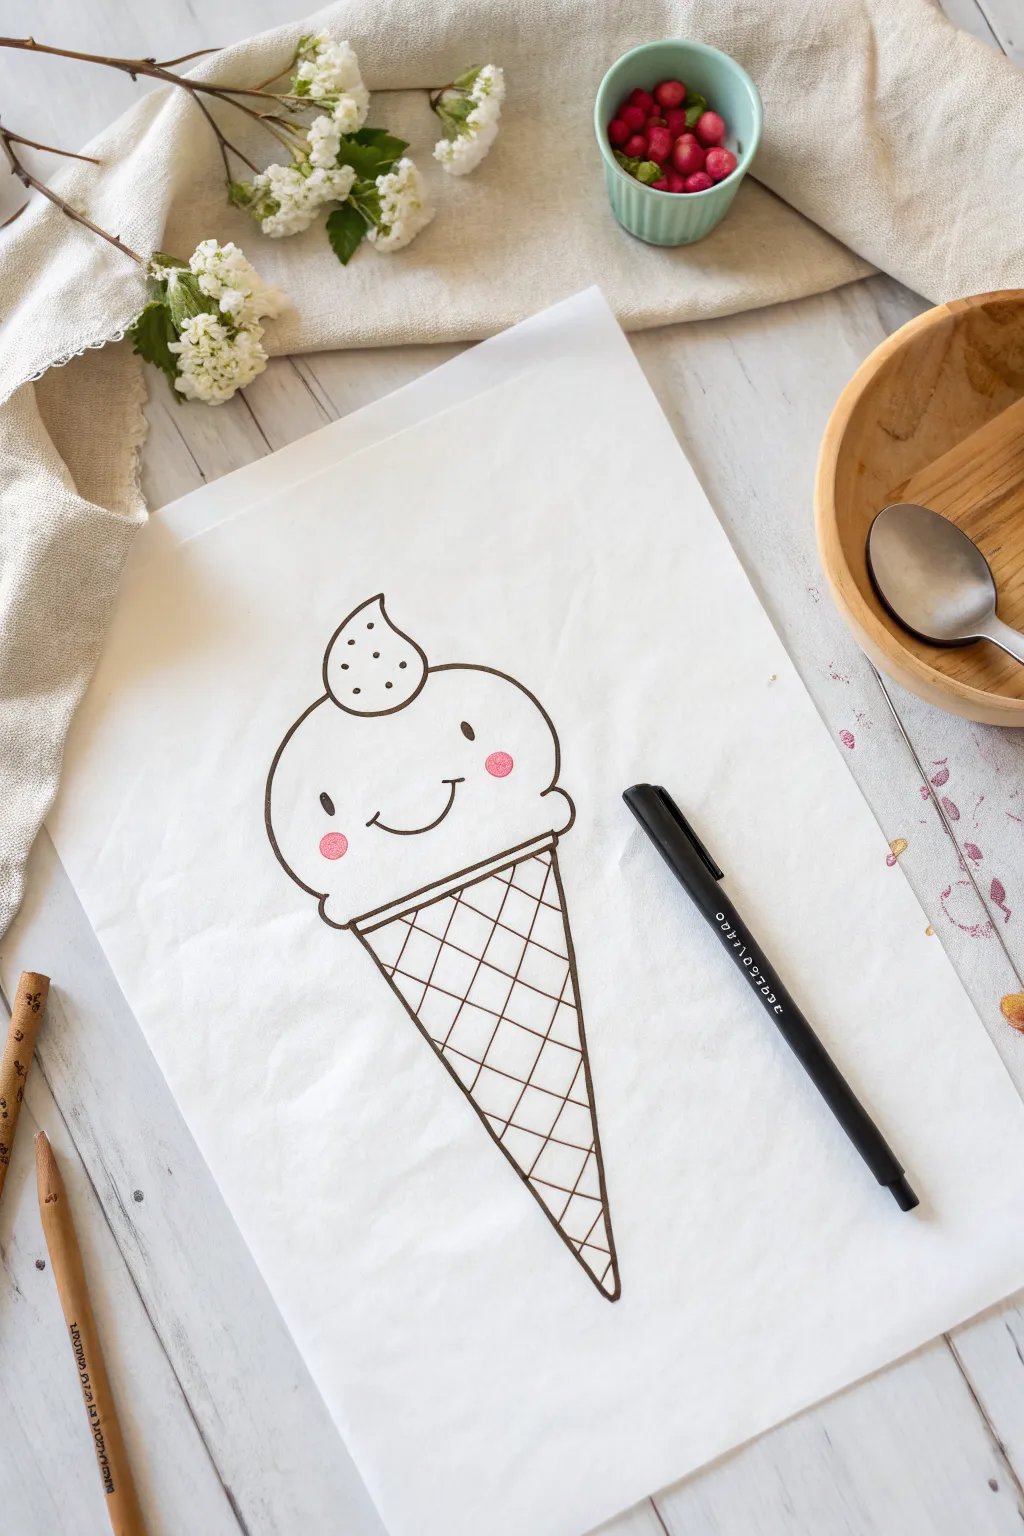
Learn to draw this adorable sweet treat that’s guaranteed to make anyone smile. With its simple shapes and gentle expression, this doodle captures the essence of kawaii style perfectly.
Step-by-Step Guide
Materials
- White drawing paper or sketchbook
- Pencil (for sketching)
- Eraser
- Fine-tip black marker or drawing pen (0.5mm or 0.8mm)
- Pink colored pencil or pastel
Step 1: Drawing the Ice Cream Scoop
-
Start with the base scoop:
Begin by drawing a wide, upside-down ‘U’ shape in the center of your paper. This forms the top of the ice cream scoop. -
Add the bottom fluff:
Connect the two ends of your ‘U’ with a gentle, wavy line. Keep the curves soft and rounded to represent the creamy texture of the ice cream resting on the cone. -
Draw the swirl top:
On the very top center of the scoop, draw a smaller, tear-drop shape that curves slightly to the side. This is the little dollop of whipped cream or soft serve finish. -
Add sprinkles:
Inside that top dollop, add three or four tiny dots to represent sprinkles or texture.
Step 2: Creating the Cone
-
Outline the cone shape:
Starting from the corners of the ice cream scoop’s bottom wavy line, draw two long, diagonal lines that meet at a sharp point at the bottom. This creates the classic ‘V’ shape of the cone. -
Divide the cone:
Draw three or four diagonal lines going in one direction across the cone. Space them out relatively evenly. -
Create the waffle pattern:
Now draw diagonal lines going in the opposite direction, crossing over the first set. This creates the diamond cross-hatch pattern typical of a waffle cone. -
Refine the tip:
Double-check that the lines meet neatly at the very bottom point of the cone.
Wobbly Lines?
If your cone’s grid lines get wiggly, don’t erase! Just turn them into a textural pattern. Imperfect lines actually make the waffle cone look crunchier and more organic.
Step 3: Adding the Cute Face
-
Position the eyes:
In the lower half of the main ice cream scoop, draw two small, solid black ovals. Space them widely apart to get that cute ‘wide-set’ look. -
Draw the smile:
Right between the eyes, draw a simple, upward-curving ‘U’. I like to place this slightly lower than the eyes to make the expression look sweeter. -
Add cheek details:
At the ends of the smile curve, add tiny little tick marks perpendicular to the smile line for dimples.
Flavor Variations
Customize your treat by coloring the scoop mint green or berry blue. You can also turn the top dollop into a cherry by making it round and adding a stem.
Step 4: Inking and Color
-
Trace your lines:
Take your black fine-tip marker and carefully trace over all your pencil lines. Go slowly on the cone’s grid to keep the lines straight. -
Thicken the outline:
Go over the main outer silhouette (the outside of the scoop and the cone edges) a second time to make the line slightly bolder than the inner details. -
Erase pencil marks:
Once the ink is completely dry, gently erase any visible pencil sketches underneath. -
Add the blush:
Using a pink colored pencil, draw a small, soft circle underneath each eye to give your ice cream rosy cheeks.
Now you have a refreshing and happy artwork perfect for a summer card or sketchbook page
Donut With Sprinkles and Blush Cheeks
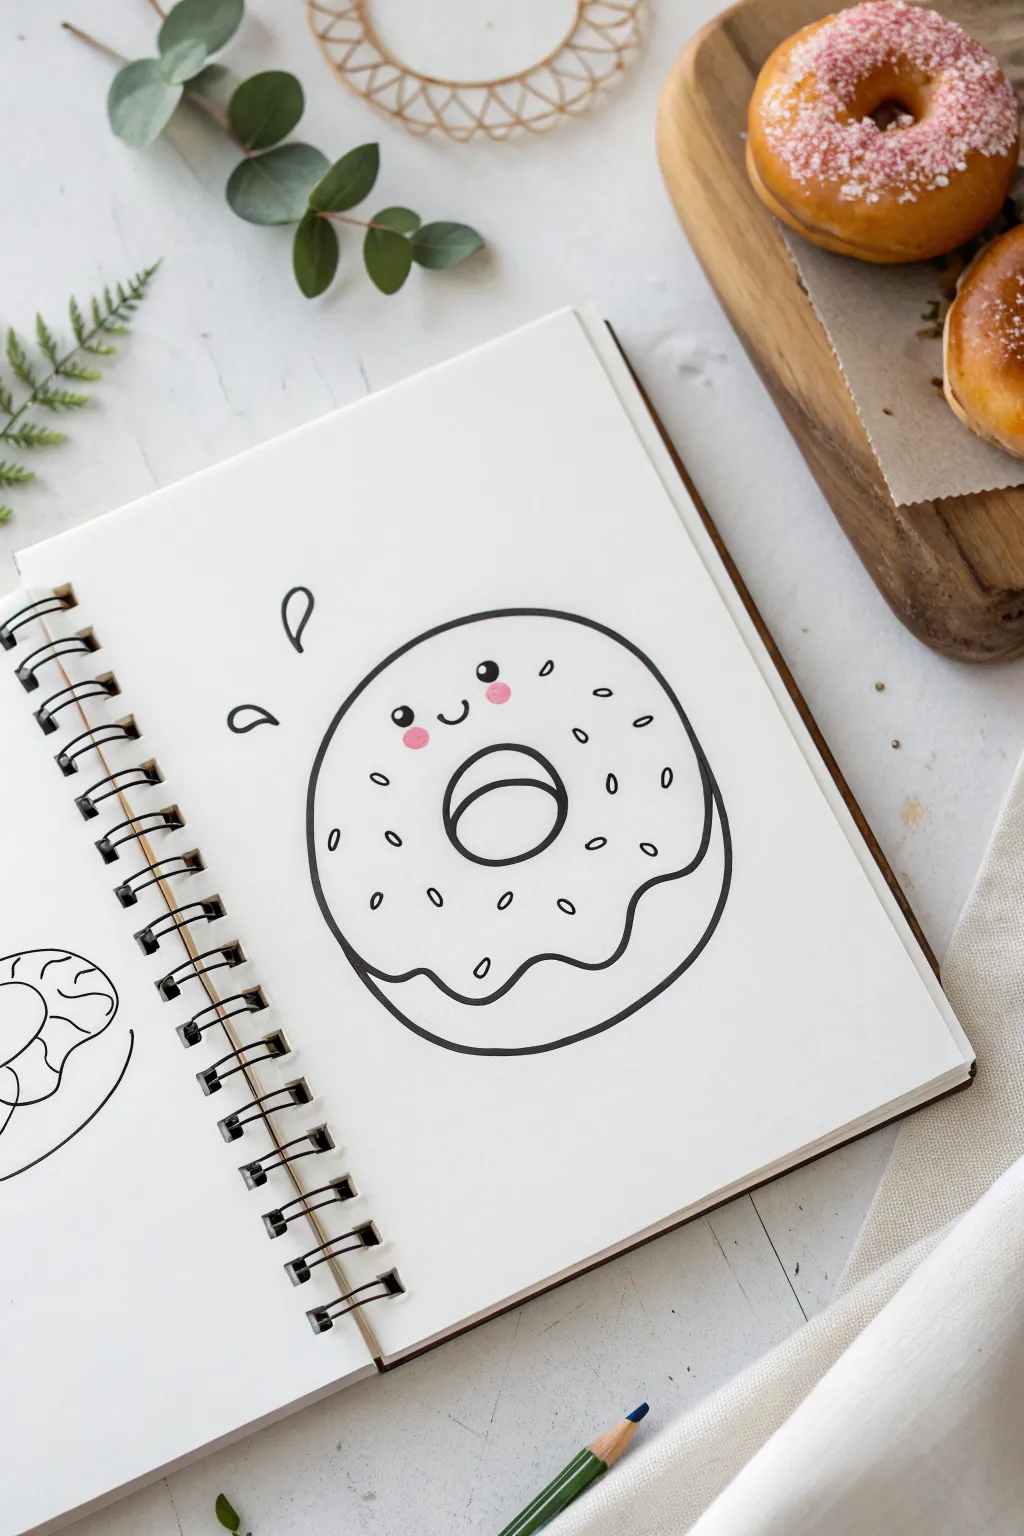
This adorable lined drawing turns a simple dessert into a cute character with just a few curves. With its wobbly icing line and kawaii blush marks, this donut drawing is perfect for filling up sketchbooks or decorating homemade cards.
Step-by-Step
Materials
- Sketchbook or white drawing paper
- Black drawing pen (fine tip or brush pen)
- Pencil (for sketching)
- Eraser
- Pink marker or colored pencil
Step 1: Shaping the Donut
-
Basic outline:
Start by drawing a large, slightly flattened circle in the center of your page. It doesn’t need to be geometrically perfect; a hand-drawn look adds charm. -
Inner circle:
Draw a smaller oval shape floating in the middle of your large circle. This will be the donut hole. -
Adding depth:
Inside that small inner oval, draw a curved line along the bottom edge. This creates a crescent moon shape that gives the donut hole some 3D dimension, showing depth. -
Icing line:
Now for the fun part! Draw a wavy, scalloped line across the bottom third of the donut. Make the waves uneven to look like dripping icing. -
Connect the icing:
Extend that wavy line all the way to the outer edges of the large circle so it looks like the icing is sitting on top of the dough.
Donut Shape Tip
Don’t worry about drawing a perfect circle. A slightly squashed or lumpy oval actually looks more like real, fluffy fried dough.
Step 2: Creating the Face
-
Eye placement:
Near the top-left area of the icing, draw two small, solid black circles for the eyes. Space them out slightly to leave room for the mouth. -
Sparkle details:
Leave a tiny speck of white uncolored inside each black eye circle. This ‘catchlight’ makes the character look alive and shiny. -
The smile:
Draw a small, simple ‘U’ shape right between the eyes. Keep it tiny to maximize the cuteness factor. -
Rosy cheeks:
Using your pink marker or pencil, draw two soft circles right under the eyes. These shouldn’t have outlines; just fill them in for a soft blush effect.
Mix Up The Toppings
Instead of oval sprinkles, try drawing tiny stars, hearts, or zig-zag lines to create different ‘flavors’ for your donut friends.
Step 3: Sprinkles and Final Details
-
Sprinkle shapes:
Scatter small ovals all over the icing area. Draw them at different angles so they look randomly tossed on. -
Inking everything:
Go over your main pencil lines with your black ink pen. I like to use a slightly thicker line for the outer circle to make the donut pop. -
Motion marks:
To the left of the donut, draw two floating teardrop shapes. These ‘sweat drops’ or ‘excitement marks’ add a bit of anime-style emotion. -
Clean up:
Once the ink is completely dry, gently erase any visible pencil sketch lines underneath. -
Bottom curve:
If your original circle sketch looks too unfinished at the very bottom, draw a curved line connecting the bottom edges of the icing to complete the dough shape.
Now you have a sweet little character ready to brighten up your page
Hand-Trace Giraffe Trick

This charming giraffe project uses a clever hand-tracing trick to form the body, making what looks complicated surprisingly accessible for kids. The result is a soft, semi-realistic illustration with lovely textured spots and gentle grass accents.
How-To Guide
Materials
- Sketchbook with cream or off-white paper
- HB or 2B graphite pencil
- Fine-tip black drawing pen (0.3mm or 0.5mm)
- Brown colored pencils (light tan and darker cocoa)
- Eraser
Step 1: Forming the Structure
-
Position the hand:
Place your hand on the paper with your fingers pointing down. Keeping your thumb extended widely to the side creates the chest and neck line, while your index and middle fingers will become the legs. Trace lightly around this shape. -
Refine the body shape:
Lift your hand and look at the outline. Smooth out the lines to connect the ‘thumb’ area into a long, sloping neck. Sketch a curved line for the back that connects to the rear leg area. -
Add the head:
At the top of the long neck line, sketch a small oval for the head. Add a slightly narrower snout pointing downwards and two small ossicones (the horn-like bumps) on top. -
Draw the legs:
Using the initial finger traces as a guide, define the front and back legs. Make them knobby at the knees and taper them down to wide, sturdy hooves. Don’t forget to sketch the back legs slightly behind the front ones for depth. -
Sketch the tail and mane:
Draw a thin tail hanging down from the rear with a tufted end. Then, run a short, bristly mane all the way down the back of the neck.
Step 2: Inking and Details
-
Ink the outline:
With your fine-tip pen, carefully trace over your graphite sketch. Use a confident but slightly broken line, especially on the mane and tail to suggest hair texture. -
Add facial features:
Place a small dark eye on the side of the head and a nostril near the snout. Draw the ears perked up just below the horns. -
Create the grass:
Ground your giraffe by drawing short, jagged spikes of grass around the hooves. Add a few faint horizontal lines under the feet to suggest the earth. -
Erase guidelines:
Wait for the ink to become bone dry so it doesn’t smudge. Gently erase all the underlying pencil marks to leave a clean, crisp drawing.
Uneven Spots?
Don’t worry if your spots are messy or uneven shapes. Real giraffes have irregular patterns like puzzle pieces, so ‘perfect’ circles actually look less realistic.
Step 3: Coloring the Coat
-
Map the spots:
Using the brown colored pencil, lightly sketch irregular polygon shapes all over the body. I find it looks best if you make them smaller on the neck and get larger towards the stomach. -
Fill the spots:
Color inside these shapes with your darker brown pencil. Use a consistent pressure to get a nice, earthy tone, leaving tiny slivers of white space inside some spots for a textured look. -
Add shading:
Take your lighter tan pencil and add very soft shading to the underside of the belly and the inside of the legs. This gives the animal a bit of roundness. -
Detail the mane and tail:
Color the mane with short strokes of the dark brown pencil. Add a matching dark tuft to the end of the tail. -
Finish the hooves:
Darken the hooves with your fine liner or the darkest brown pencil to clearly anchor the giraffe to the ground.
Pro Tip: Eye Sparkle
When inking the eye, leave a tiny white dot uncolored in the upper corner. This ‘catchlight’ makes the giraffe look alive and friendly instantly.
Now you have a gentle, grazing friend ready to roam across your sketchbook page
Silly Monster From One Blob Shape
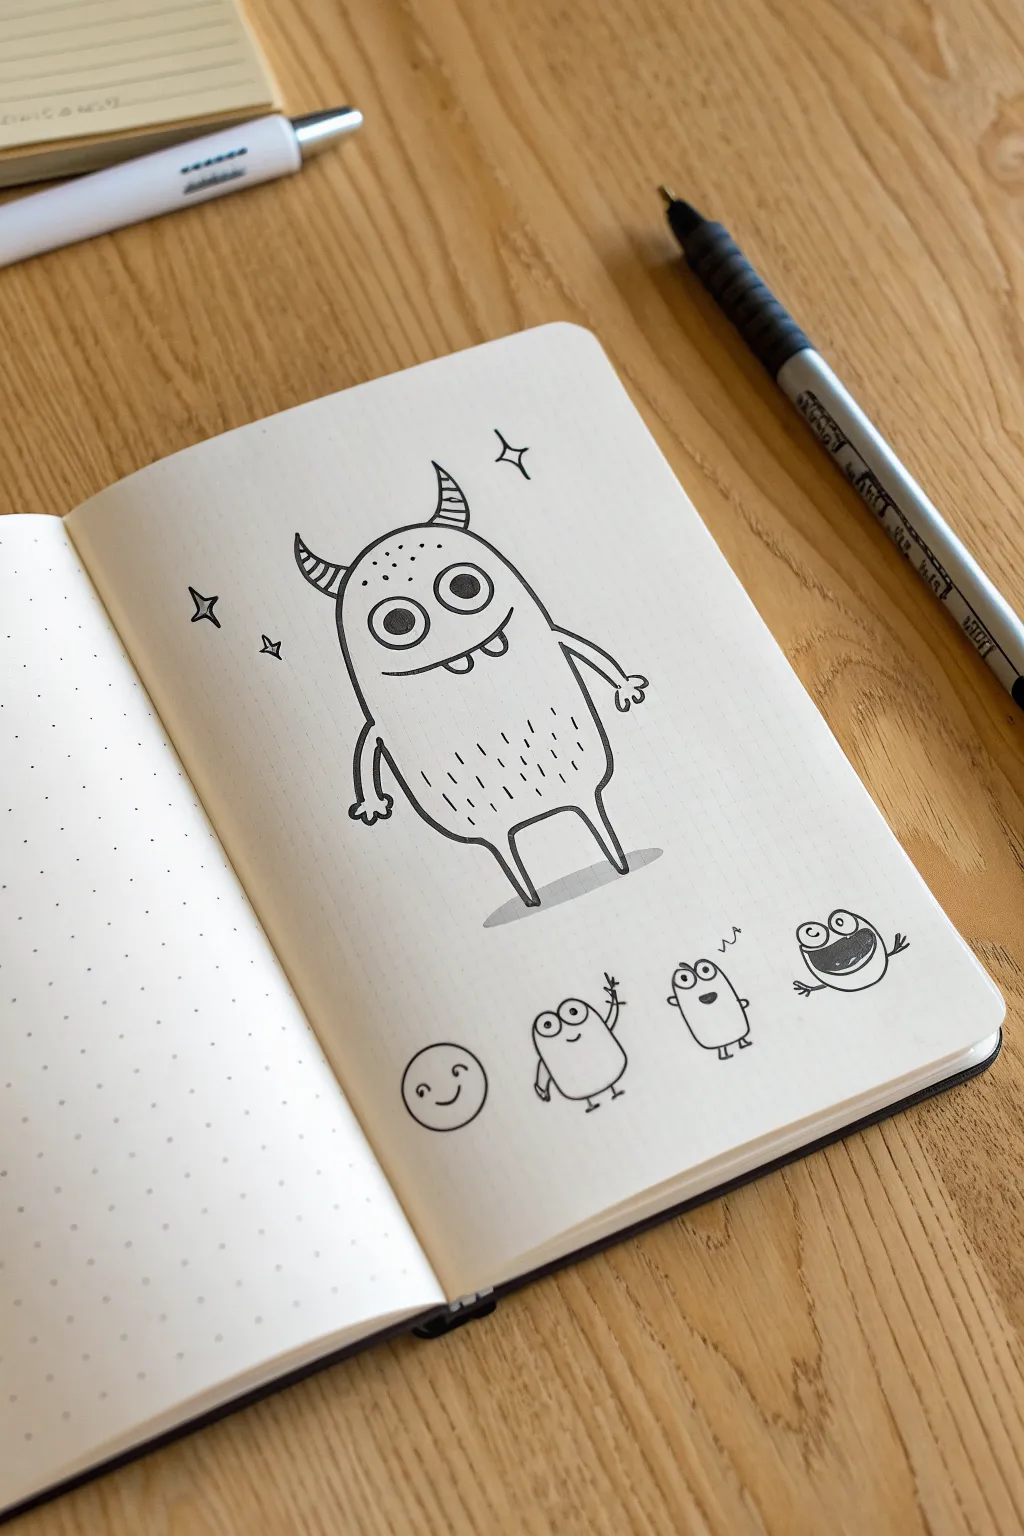
Draw a lovable monster character starting from a single, simple shape that anyone can master. This doodle sits perfectly on a dot grid page, using clean black lines to create a character full of personality without needing complex anatomy.
Detailed Instructions
Materials
- Dot grid notebook or paper
- Fine liner pen (black, size 0.5 or 0.8)
- Pencil (optional for sketching)
- Eraser
Step 1: Drawing the Main Body
-
Outline the blob shape:
Start near the top third of your page. Draw a large, inverted U-shape for the monster’s head and body. Keep the bottom open for the legs. -
Add the legs:
From the bottom left of your U-shape, draw a short line angling down and inward. Do the same on the right side. Connect these two lines with a slightly curved horizontal line to close the shape, forming the feet. -
Draw the arms:
On the left side of the body, draw a noodle-like arm hanging down, ending with three small bumps for fingers. Repeat on the right side, but angle this arm slightly outward. -
Create the horns:
At the very top of the head, draw two curved triangles pointing upward and slightly outward. Add faint curved lines inside each horn to give them a ribbed texture.
Wobbly Lines?
Don’t stress about perfect curves! If your hand shakes, just go over the line again loosely to make the monster look extra fuzzy and textured.
Step 2: Facial Features & Details
-
Position the eyes:
Draw two large circles in the upper half of the body. Make them touch each other slightly or just barely separate them. -
Fill the pupils:
Inside the eye circles, draw smaller black circles for pupils. I usually place them slightly cross-eyed or looking in different directions to make the monster look sillier. -
Draw the mouth:
Under the eyes, draw a wide, curved line for a smile. Add two small U-shapes hanging from the top lip to create snaggle teeth. -
Add freckles:
Dot a few tiny specks on the forehead area above the eyes to give the skin some texture. -
Draw body fur:
create texture on the body by drawing short, vertical dashes scattered across the monster’s tummy and sides. Keep them loose and random. -
Add shadow:
Draw a thin, flat oval shape underneath the feet using hatched lines or a light gray marker to ground your character so it doesn’t look like it’s floating. -
Sparkle details:
Draw two four-pointed stars (diamond shapes with curved sides) floating around the monster’s head.
Step 3: Mini Monster Crew
-
Draw the circular friend:
Below the main monster, start a smaller row of doodles. Draw a simple circle on the far left. -
Add faces to the circle:
Give the circle a small smile and curved eyes. -
Draw the waving bean:
Next to the circle, draw a small bean shape. Add two large eyes at the top and stick arms, with one raised high in a wave. -
Draw the tiny tall one:
Draw a small pill shape. Give it heavy-lidded eyes and a small mouth. Add a “Z” symbol above it to show it is sleepy. -
Draw the loud mouth:
Finally, draw a circle with a huge, open crescent mouth filled in black. Add big bug eyes on top and stick arms flapping out.
Make It Yours
Try changing the horn shapes to antlers or bunny ears to create different species of blob monsters for your page.
Now you have a whole page of whimsical creatures ready to greet you
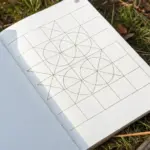
Mini Doodle Grid of 9 Kid Icons
Create a fun visual challenge or a practice sheet for budding artists with this comprehensive grid of simple, charming doodles. This project combines grid-making skills with the joy of quick, recognizable sketching, resulting in a colorful sheet perfect for sticker-making or just creative play.
Step-by-Step Guide
Materials
- White drawing paper or sketchbook page (letter size)
- Ruler or straight edge
- Fine-tip black pen (0.5mm or similar)
- Pencil and eraser (optional for layout)
- Set of colored markers or colored pencils (teal, red, yellow, green, pink)
Step 1: Setting the Grid
-
Draw vertical lines:
Start by drawing four vertical lines down the length of your paper to create five equal columns. You can use a pencil first if you want perfect spacing, or go freehand with a pen for a looser look. -
Draw horizontal lines:
Draw six horizontal lines across the page to create seven even rows. This will give you a total of 35 boxes to fill with fun icons.
Grid Master Tip
Don’t stress about perfectly straight grid lines. A hand-drawn, slightly wobbly grid adds character and emphasizes the doodle aesthetic.
Step 2: Drawing Natural Elements
-
Sketch the plants:
In the top-left box, draw a small flower with red petals. In the box next to it, sketch a simple stem with three leaves. -
Add celestial bodies:
Move to the next box and draw a crescent moon with sleepy ‘zzz’s. Beside it, create a simple sun with red radiating lines. -
Fill in the clouds:
In the final box of the first row, draw a fluffy cloud outline. -
Draw flowers:
Throughout the grid, scatter different flower designs. Try a daisy with a yellow center, a red geometric flower, and a teal flower with round petals.
Turn it into a Game
Photocopy your black and white line art before coloring. Give the copies to friends as a custom coloring page or ‘Icon Bingo’ game.
Step 3: Adding Characters and Objects
-
Create the cat:
Draw a cat face in the second row using simple geometric shapes for ears and eyes. -
Draw the bugs:
Add a teal butterfly and later, a striped bee with yellow and dark green stripes. -
Sketch food items:
Draw an ice cream cone with pink scoops and cross-hatching on the cone. Add a drink cup with a straw in another box. -
Add weather symbols:
Include a red and white striped umbrella and a squiggly line representing a wave or snake. -
Draw playful icons:
Sketch a simple sailboat, a tent, a kite, a mushroom, and a heart with concentric lines.
Step 4: Finishing Touches
-
Color accents:
Go back through your drawings and carefully fill in small sections with colored markers. Stick to a limited palette of teal, red, yellow, and soft pink for a cohesive look. -
Adding text:
In one of the blank squares, hand-letter a simple word or name like ‘HaKo’ in a playful font. -
Final details:
Use your fine-tip pen to add tiny details like dots on the mushroom cap, veins on leaves, or stripes on the socks.
Once your grid is full, you have a delightfully busy poster of tiny art pieces to display
Have a question or want to share your own experience? I'd love to hear from you in the comments below!