If you’ve ever wished your floor could feel like a giant piece of poured art, epoxy floor designs are where the magic happens. I love how epoxy resin can go from clean and minimal to totally jaw-dropping—just by changing color flow, pattern, and finish.
Classic Solid-Color Gloss
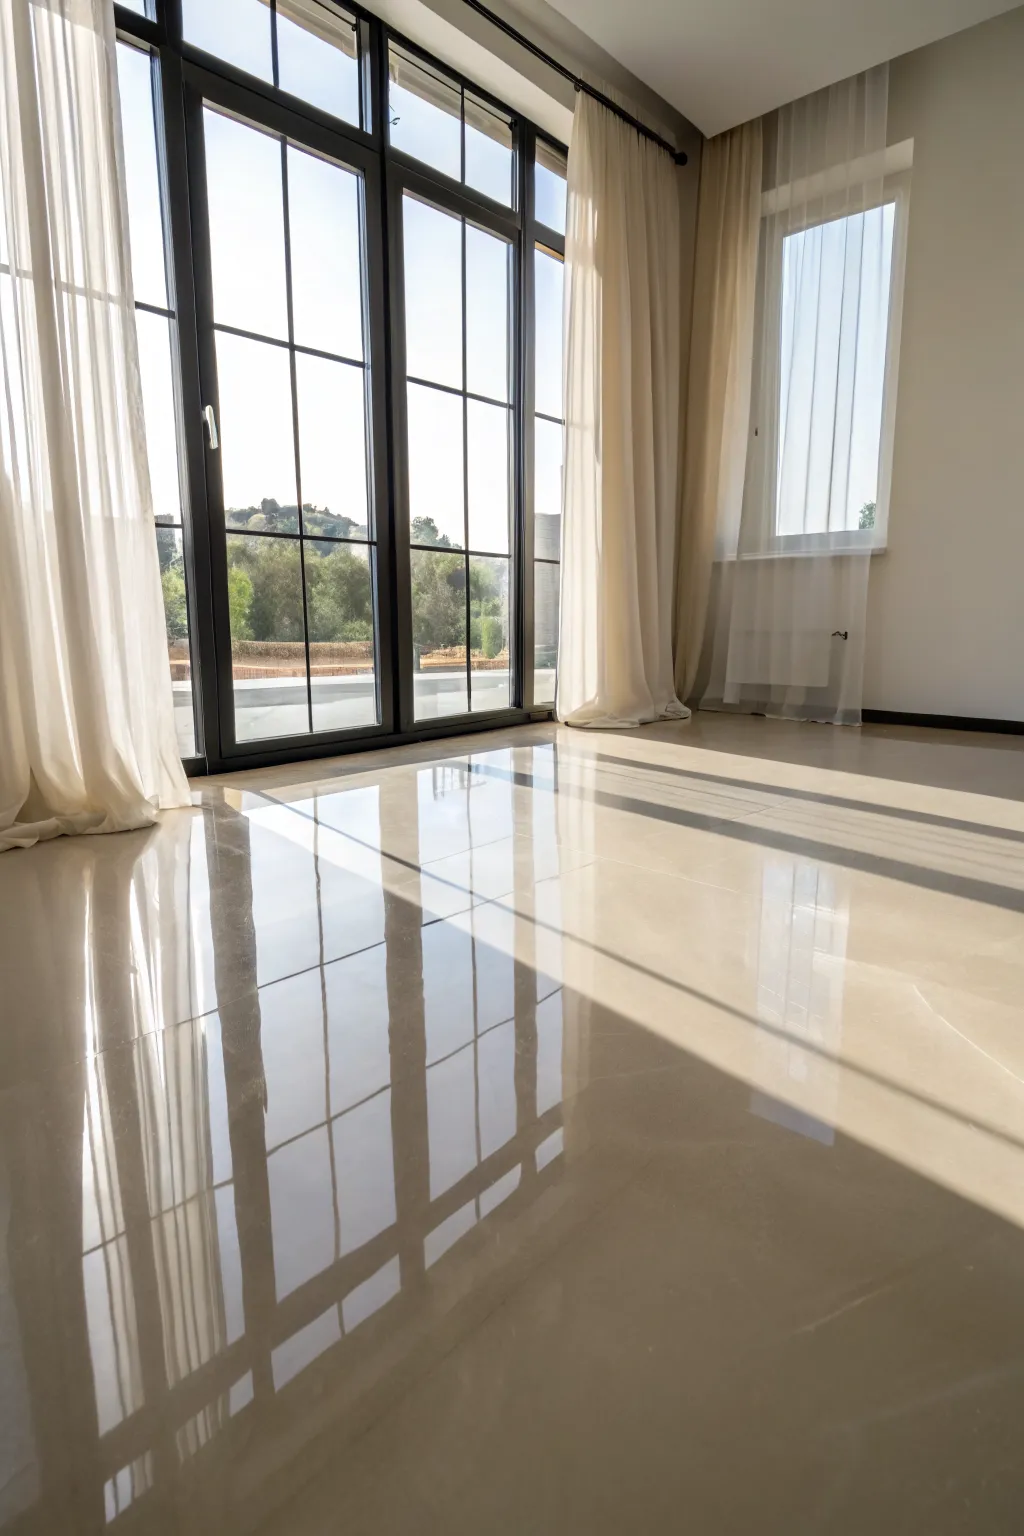
Transform a plain concrete slab into a luxurious, liquid-glass surface that floods your room with light. This classic solid-color gloss finish uses a warm beige epoxy to create a seamless, sophisticated foundation that mirrors your windows and architecture beautifully.
Step-by-Step Tutorial
Materials
- High-performance solid color epoxy kit (beige/cream)
- Clear epoxy topcoat (high gloss)
- Concrete patch/crack filler
- Diamond grinder or floor buffer with 30-grit pads
- Industrial vacuum cleaner
- Degreaser solution
- Painter’s tape and plastic sheeting
- Notched squeegee
- 18-inch epoxy roller with extension pole
- Spike shoes
- Drill with mixing paddle
- Mixing buckets
- Isopropyl alcohol spray bottle
Step 1: Surface Preparation
-
Clear and Clean:
Remove all furniture, baseboards, and doors from the room. Thoroughly sweep the concrete floor to remove loose debris, paint splatters, or existing adhesive residues. -
Assess and Repair:
Inspect the concrete carefully for cracks, divots, or spalling. Mix your concrete patch repair compound and fill these imperfections, smoothing them flush with a putty knife. Let this cure completely. -
Grind the Profile:
This is the most critical step for adhesion. Use a diamond grinder or a floor buffer equipped with aggressive 30-grit pads to grind the entire surface. You aim to remove the smooth ‘cap’ of the concrete and achieve a texture similar to 100-grit sandpaper. -
Deep Cleaning:
Vacuum the concrete dust rigorously using an industrial vac. I suggest going over the floor three times in varying directions to ensure no dust remains in the pores. -
Moisture Test:
Tape a 2×2 foot plastic sheet to the floor and leave it for 24 hours. If condensation forms underneath or the concrete darkens, you have moisture issues that need a specific vapor barrier primer before proceeding.
Cloudy Finish?
If the finish looks milky or cloudy, it’s virtually always due to high humidity during application. Only apply when relative humidity is below 85%.
Step 2: Base Coat Application
-
Tape and Protect:
Apply quality painter’s tape along the bottom edge of your walls. Drape plastic sheeting over windows and lower walls to protect from accidental splashes. -
Mixing the Base:
In clean buckets, mix Part A and Part B of your beige solid-color epoxy according to the manufacturer’s ratio. Use a drill mixer at low speed for at least 2-3 minutes to avoid whipping air bubbles into the resin. -
Pouring the Ribbon:
Pour the mixed epoxy in a long ribbon across the width of the room. Don’t dump it all in one spot, as the large mass will heat up and cure too quickly in the bucket. -
Squeegee Spread:
Use a notched squeegee to pull and push the epoxy across the floor. The teeth will regulate the thickness, ensuring an even layer that hides subtle undulations in the concrete. -
Back-Rolling:
While the epoxy is wet, walk on the floor wearing spike shoes. Use an 18-inch roller to ‘back-roll’ the surface perpendicular to your squeegee lines. This levels ridges and uniformizes the texture.
Add Subtle Depth
For a less sterile look, mix a tiny amount of metallic pearl powder into your clear topcoat. It adds a shimmering dimension without changing the color.
Step 3: The High-Gloss Finish
-
Pop the Bubbles:
As you see tiny bubbles rising to the surface during the first 10-15 minutes, lightly mist the area with isopropyl alcohol. This breaks the surface tension and pops them instantly without damaging the finish. -
Cure Time:
Allow the colored base coat to cure for the time specified by your product usually 12 to 24 hours. The floor should be tack-free and hard enough to walk on carefully. -
Light Sanding:
If I notice any trapped dust or debris in the base coat, I give the floor a very light sanding with fine-grit paper, then vacuum and wipe with a solvent cloth to ensure the topcoat bonds perfectly. -
Clear Coat Mix:
Mix your high-gloss clear urethane or epoxy topcoat. This layer provides the deep ‘wet look’ reflection seen in the image and adds scratch resistance. -
Final Application:
Pour and roll the clear coat using the ‘dip and roll’ method or a flat squeegee followed by a roller, depending on product viscosity. Keep a wet edge at all times to avoid roller marks. -
Wait:
Close the room off completely. Ensure no windows are open that could blow dust onto the wet floor. Let it cure for at least 72 hours before moving heavy furniture back in.
Now enjoy the incredible brightness your new reflective floor brings to the entire space


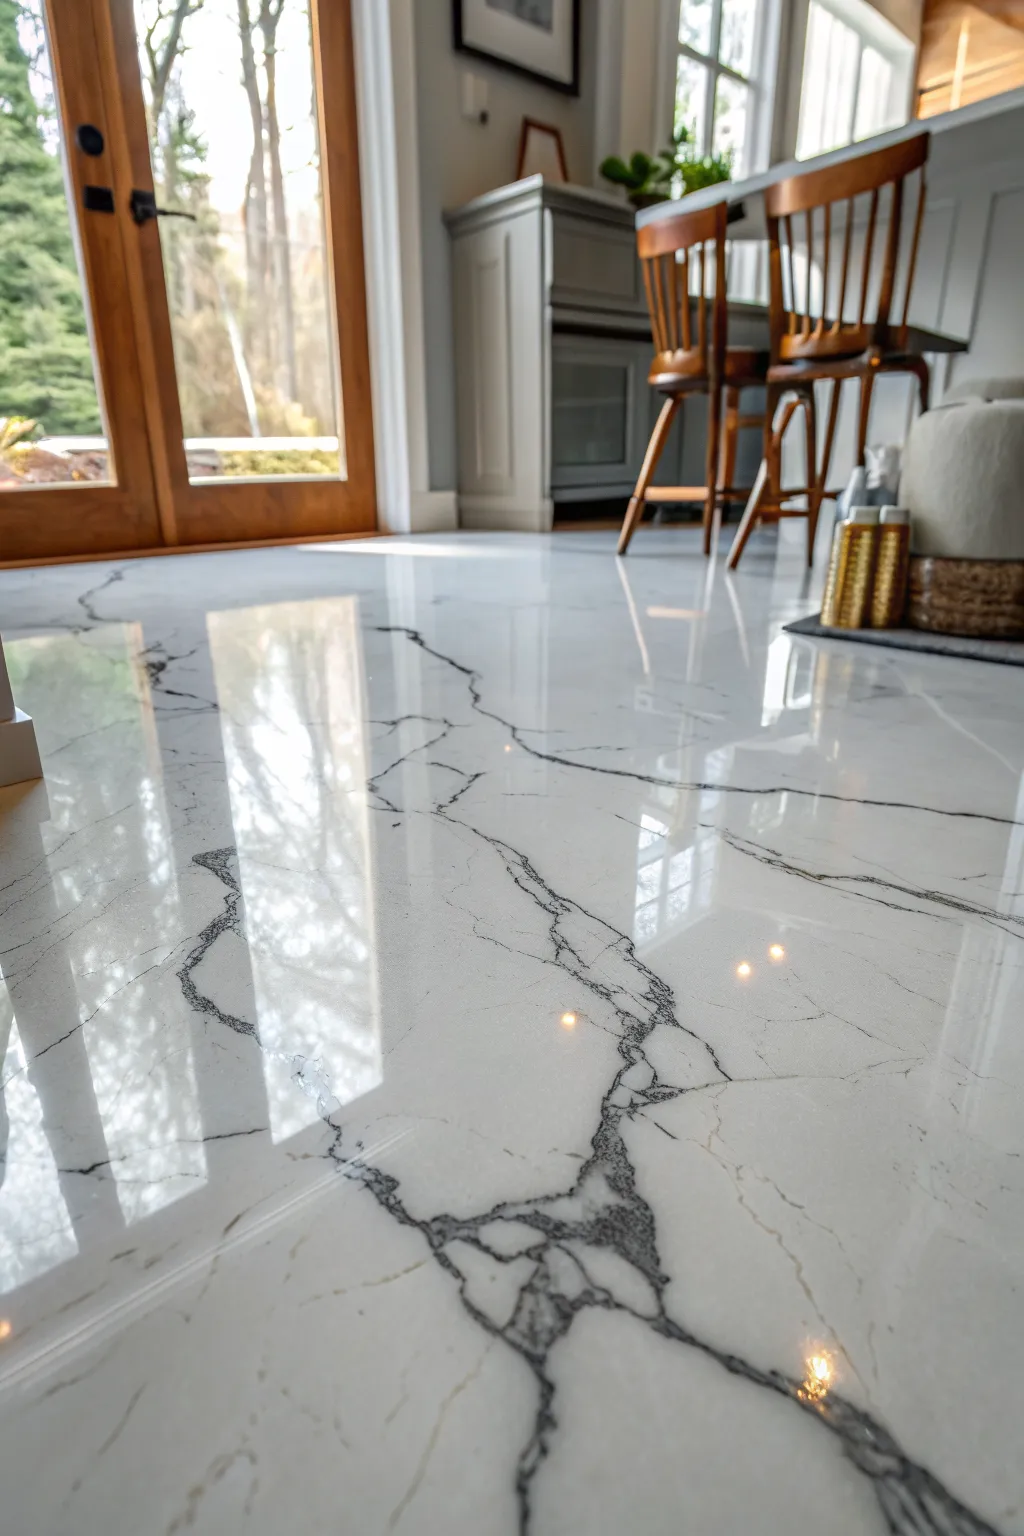
Soft Gray Minimalist Finish
Transform a plain concrete slab into a stunning, mirror-like surface with this soft gray minimalist epoxy finish. This project delivers a high-gloss, slightly clouded effect that mimics polished concrete while offering the durability and seamless look of modern resin.
Detailed Instructions
Materials
- Concrete cleaner/degreaser
- Concrete patch & repair kit
- Diamond grinder or floor sander with heavy-grit pads
- Shop vacuum with HEPA filter
- Painter’s tape
- Epoxy primer (clear or light gray)
- Epoxy base coat (light gray)
- Metallic gray pigment or pearl add-in
- Clear epoxy topcoat (high gloss)
- Spiked shoes
- Notched squeegee
- 18-inch roller and frame
- Paddle mixer and drill
- Protective gear (respirator, gloves, glasses)
Step 1: Preparation & Repair
-
Clear the Area:
Remove everything from the room. Tape off the baseboards and any wall edges where they meet the floor using painter’s tape to protect them from splashes. -
Clean the Concrete:
Scrub the floor thoroughly with a concrete degreaser to remove any oil spots or contaminants. Rinse well and allow it to dry. -
Fill Cracks:
Using a concrete patch kit, fill in any divots, cracks, or chips in the slab. Use a putty knife to smooth the patch flush with the floor surface. -
Grind the Surface:
This is crucial for adhesion. Use a diamond grinder or floor sander to roughen the entire surface. You want to achieve a texture similar to 100-grit sandpaper so the epoxy can bite into the concrete. -
Deep Vacuum:
Vacuum the floor meticulously. I like to vacuum twice—once in each direction—to ensure absolutely no dust remains, as dust will cause bumps in your final finish.
Bubble Trouble
Keep a propane torch or heat gun handy. Briefly waving the flame over wet epoxy pops trapped air bubbles instantly for a glass-smooth finish.
Step 2: Priming the Surface
-
Mix the Primer:
Combine your epoxy primer components according to the manufacturer’s mix ratio. Use a drill and paddle mixer at low speed to avoid introducing air bubbles. -
Apply Primer:
Pour the primer onto the floor in ribbons. Use a roller to spread it thinly and evenly across the entire room. This seals the concrete and prevents outgassing bubbles. -
Let it Cure:
Allow the primer to dry completely, typically overnight. Check the manufacturer’s instructions for the specific recoat window.
Level Up: Matte Finish
Prefer a modern, velvety look? Swap the high-gloss topcoat for a satin or matte polyurethane sealer to reduce glare and hide dust.
Step 3: The Gray Base Application
-
Mix the Base Coat:
Mix your main epoxy resin batch with the hardener. Add your light gray pigment at this stage, ensuring the color is fully uniform. -
Pour the Base:
Pour the mixed gray epoxy onto the floor. Unlike paint, you pour this out in puddles/lines rather than dipping a roller. -
Spread with Squeegee:
Use a notched squeegee to pull the material across the floor. This tool naturally regulates the thickness of the coating to ensure it’s level. -
Back-Roll the Floor:
After squeegeeing, use an 18-inch foam roller to cross-roll the surface. This levels out the squeegee lines and creates a uniform thickness.
Step 4: Creating the Clouded Effect
-
Mix Highlight Batch:
Mix a smaller batch of clear epoxy with a metallic silver or pearl pigment. Do not make this opaque; it just needs a shimmer. -
Drizzle the Highlight:
While wearing spiked shoes to walk on the wet gray floor, randomly drizzle thin veins or ribbons of the metallic mix onto the wet base. -
Disperse the Pigment:
Use a smaller roller or a trowel to gently swirl the metallic drizzle into the gray base. Don’t over-mix; you want soft, cloudy transitions, not a solid color. -
Final Clear Coat:
Once the gray and metallic layer has cured fully (usually 24 hours), apply a high-gloss clear urethane or epoxy topcoat to protect the design and give it that deep, wet look. -
Final Cure:
Keep all foot traffic off the floor for at least 24-48 hours, and wait a full week before moving heavy furniture back in.
Enjoy your sleek, professional-grade floor that brightens the room and feels incredibly smooth underfoot


Metallic Marble Veins
Transform dull concrete into a luxurious statement piece with this high-contrast faux marble technique. By layering crisp white epoxy with jagged, realistic charcoal veining, you can achieve the depth and elegance of high-end Italian stone right in your home.
Step-by-Step Guide
Materials
- High-solids epoxy resin kit (approx. 3 gallons per 500 sq ft)
- White epoxy pigment base
- Metallic charcoal or black epoxy pigment powder
- 99% Isopropyl alcohol
- Spray bottle (fine mist)
- Notched squeegee
- 18-inch lint-free roller with frame
- Small artist brushes or a feather
- Veining tool or simple mixing stick
- Spiked shoes
- Protective gloves and respirator mask
- Clear urethane topcoat (optional for extra durability)
Step 1: Preparation & Base Coat
-
Prepare the Substrate:
Ensure your concrete floor is perfectly clean, dry, and free of any previous sealers. If necessary, diamond grind the surface to open the pores, then vacuum thoroughly to remove every speck of dust. -
Mix Initial Batch:
Combine your Part A and Part B epoxy according to the manufacturer’s ratio. Mix vigorously for the specified time, usually about 2-3 minutes, ensuring you scrape the sides and bottom of the bucket. -
Tint the Base:
Add your solid white pigment to the mixed epoxy. Stir until the color is completely uniform and opaque; this will be the pristine canvas for your marble effect. -
Pour the Ribbon:
Pour the white epoxy onto the floor in a long ribbon. Don’t dump it all in one spot, as this generates heat and shortens your working time. -
Spread the Base:
Wearing spiked shoes, walk onto the floor and use a notched squeegee to pull the epoxy across the surface. Aim for a consistent thickness, usually around 10 to 15 mils. -
Back-Roll the Surface:
Immediately follow the squeegee work with an 18-inch roller. Roll perpendicular to the squeegee pass to smooth out lines and level the material.
Veins too thick?
If a vein looks too heavy, mist it heavily with alcohol immediately. It will disperse the pigment wider. You can also drag a clean stick through the center to split the line.
Step 2: Creating the Marble Veins
-
Mix the Vein Color:
In a small separate cup, mix a tiny amount of epoxy with your metallic charcoal or black pigment. You want this mixture to be highly concentrated but fluid. -
Plan Your Pattern:
Visualize natural stone patterns. Marble veins rarely run straight; they fork, fade, and reconnect. I usually like to keep a reference photo of real Calacatta marble nearby to stay inspired. -
Apply Major Veins:
Dip a mixing stick or a specialized veining tool into the black mixture. Drizzle thin, shaky lines across the wet white base. Let your hand tremble slightly to create jagged, organic edges rather than perfect curves. -
Add Minor Fractures:
Using a smaller stick or a fine artist brush, drag thin ‘offshoot’ veins away from the main lines. These should look like hairline fractures connecting the larger shapes. -
Disperse the Edges:
Fill a spray bottle with 99% isopropyl alcohol. Lightly mist over the black veins. This causes the pigment to disperse and ‘bloom’ slightly, softening the harsh edges and creating that floaty, natural look. -
Manipulate with Air or Brush:
For extra realism, gently blow on the wet veins or use a dry paintbrush to feather the black edges into the white finish. This blurs the line between the two colors. -
Create Depth Layers:
If you want a 3D effect, lightly mist a tiny bit of metallic silver spray paint over a few random sections of the veins, then mist with alcohol again to sink it below the surface.
Diamond Dust
Mix a tiny pinch of silver glitter dust into your alcohol spray bottle. When you mist the veins, it leaves a subtle, invisible sparkle that only shows in direct sunlight.
Step 3: Finishing Touches
-
Pop Bubbles:
Walk the floor one last time in spiked shoes. Use a propane torch held about 6 inches above the surface, moving constantly, to pop any rising air bubbles. -
Allow to Cure:
Let the floor sit undisturbed for at least 24 hours. Keep windows closed to prevent dust or bugs from landing in the wet resin. -
Apply Topcoat (Optional):
For a scratch-resistant finish, lightly sand the cured epoxy and apply a clear urethane topcoat. This protects the glossy shine shown in the photo.
Once the final coat fully hardens, you will have a stunning, glass-like floor that anchors the room with sophisticated style


Decorative Flake Terrazzo Look
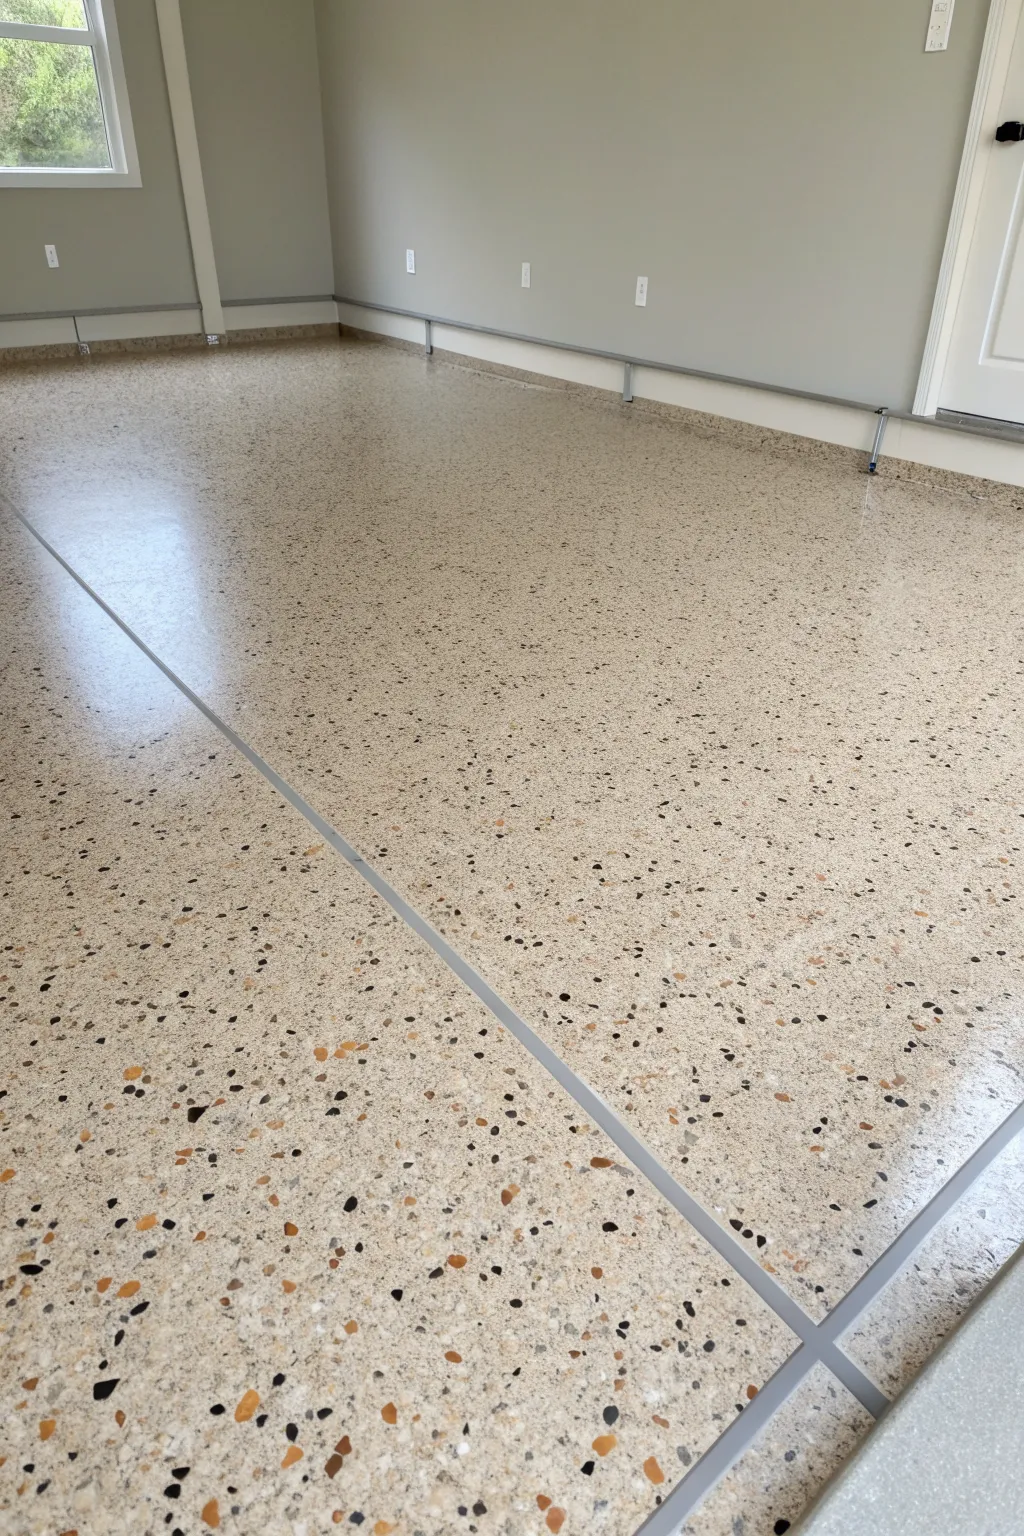
Transform a plain concrete slab into a stunning, seamless surface that mimics the classic look of high-end terrazzo without the heavy price tag. This system uses a dense broadcast of multi-colored vinyl chips over a beige base coat to create a durable, showroom-quality finish perfect for garages or studios.
Step-by-Step
Materials
- Concrete surface grinder or sander (rental)
- Industrial vacuum
- Concrete crack filler (if needed)
- Painter’s tape
- Epoxy primer kit
- Base coat epoxy (beige/tan)
- Decorative vinyl flakes (terrazzo blend: beige, black, earthy browns, white)
- Clear epoxy topcoat (polyaspartic or polyurethane)
- Flexible joint sealant (grey)
- Squeegee
- 3/8 inch nap rollers and extension pole
- Spiked shoes
- scraper or stiff broom
Step 1: Preparation & Repairs
-
Clear and clean:
Remove everything from the floor surface. Sweep thoroughly to remove loose debris, oil spots, or old paint. A clean slate is critical for adhesion. -
Grind the surface:
Use a floor grinder or heavy-duty sander to profile the concrete. This opens the pores, similar to roughing up wood before painting, ensuring the epoxy bonds mechanically. -
Repair joints and cracks:
Inspect the floor for cracks or pitting. Mix your patching compound and fill these flush with the surface. Let the compound cure according to the package instructions. -
Vacuum thoroughly:
Epoxy hates dust. Vacuum the entire floor multiple times, going in different directions to capture every particle created during grinding. -
Tape the perimeter:
Apply painter’s tape along the baseboards or walls to protect them from accidental epoxy splatters during the rolling process.
Uneven Texture?
If the dried main coat feels too rough or sharp, apply a second layer of clear topcoat. This ‘double seal’ buries the texture deeper, creating a smoother, easier-to-clean surface.
Step 2: Base Coat & Flake Broadcast
-
Mix the base epoxy:
Combine the resin and hardener for your pigmented base coat (the beige/tan color). Mix slowly to avoid whipping air bubbles into the liquid. -
Cut in edges:
Using a brush, paint the epoxy around the perimeter of the room first. This ensures full coverage where the roller might miss. -
Roll the base coat:
Pour a ribbon of epoxy onto the floor. Spread it evenly using a squeegee, then back-roll with a roller to smooth it out. Work in manageable sections. -
Broadcast the flakes:
While the base coat is still wet, toss your decorative flakes upward into the air so they rain down evenly. For this terrazzo look, you want a ‘full broadcast,’ meaning you cover the floor until you can no longer see the wet epoxy. -
Let it cure:
Allow the floor to dry completely. This usually takes 12 to 24 hours, but always check your specific product’s technical data sheet.
Step 3: Finishing the Surface
-
Scrape the flakes:
Once cured, the floor will be rough. Use a floor scraper or a stiff broom to knock down loose or vertical-standing flakes. This flattens the texture significantly. -
Vacuum (again):
Remove all the scraped flake debris. This step is crucial; any loose chip left behind will create a sharp bump in your final finish. -
Mix the topcoat:
Prepare your clear topcoat. I prefer polyaspartic coatings here because they are UV stable and cure faster than standard epoxies. -
Apply the clear coat:
Pour, squeegee, and back-roll the clear coat over the flakes. This encapsulates the chips and creates that glossy, glass-like sheen seen in the photo. -
Seal the joints:
If your floor has expansion joints like the ones in the image, carefully fill them with a flexible grey sealant. This creates the neat, grid-like pattern that finishes the professional look. -
Final cure:
Keep traffic off the floor for at least 24-48 hours to ensure the coating achieves full hardness before driving or walking on it.
Cove Base
For a true commercial look, run a mix of epoxy and tickening agent up the wall 4 inches to create a seamless rolled radius cove base before applying your flakes.
Enjoy the sleek, speckled beauty of your new durable floor that looks just like polished stone
BRUSH GUIDE
The Right Brush for Every Stroke
From clean lines to bold texture — master brush choice, stroke control, and essential techniques.
Explore the Full Guide
Geometric Tile Illusion Lines
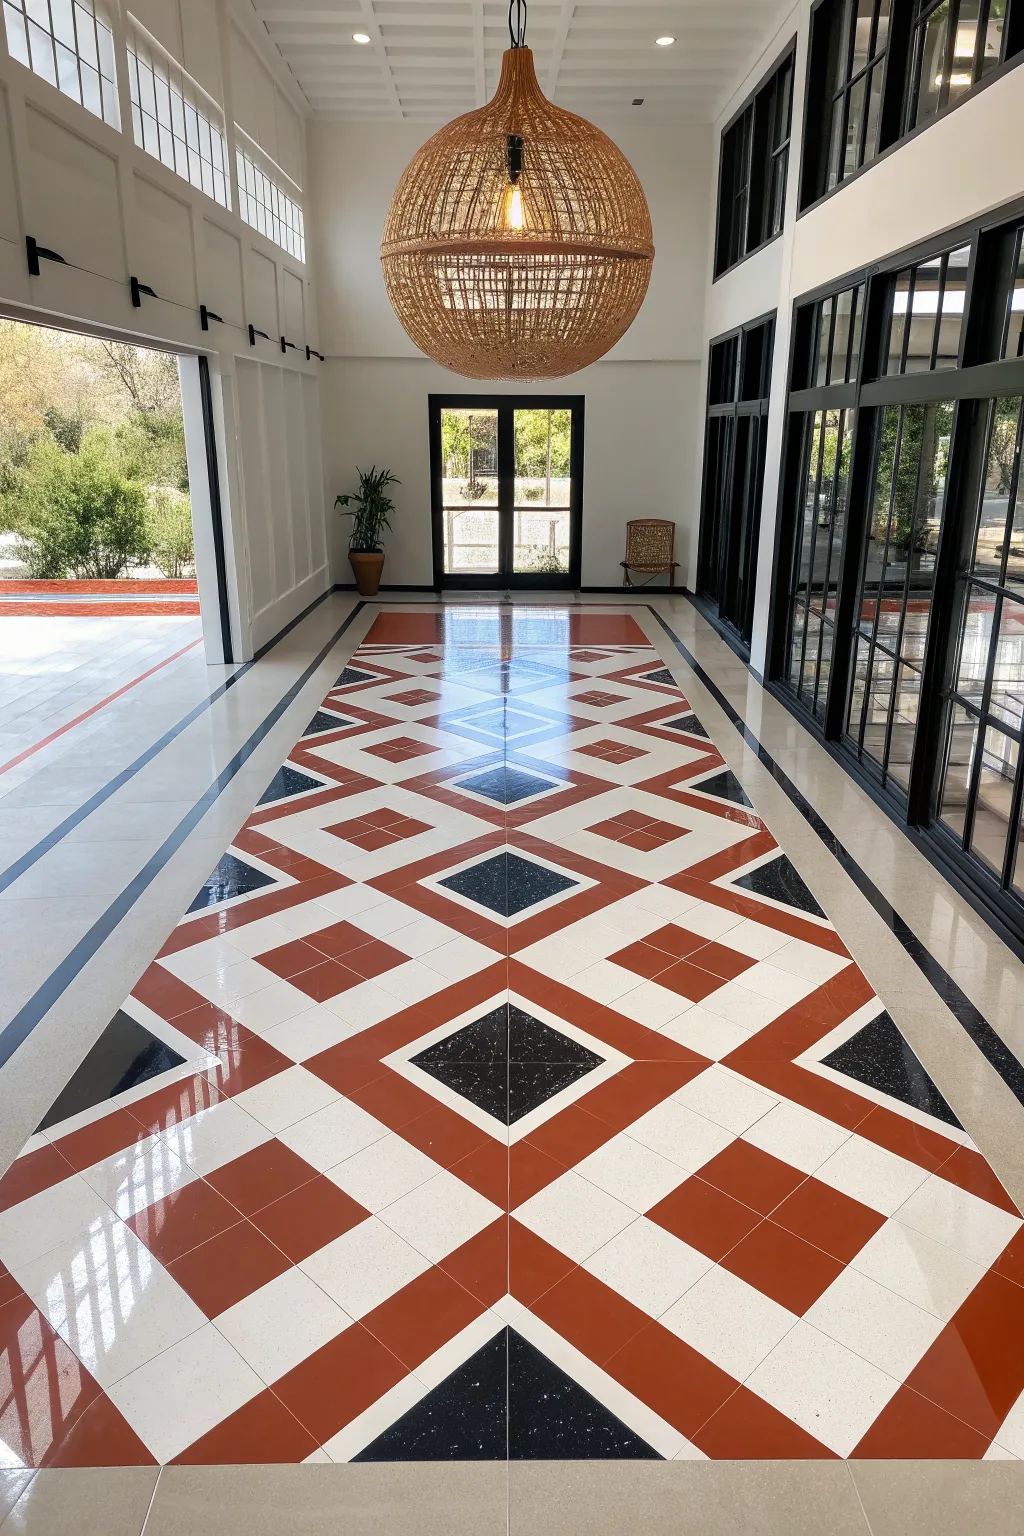
Transform a plain concrete slab into a stunning, high-gloss entryway featuring a sophisticated geometric pattern that mimics classic tiling without the grout lines. This project uses precise taping and pigmented epoxy layers to create a seamless, durable surface with striking red, black, and white contrasts.
How-To Guide
Materials
- High-solids epoxy resin kit (clear base)
- Epoxy pigments (burnt orange/terracotta, jet black, bright white)
- Concrete primer
- Painter’s tape (1/4 inch and 1 inch widths)
- Chalk line reel
- Laser level
- Measuring tape and straight edge
- Squeegee and notched trowel
- Spiked shoes (for walking on wet epoxy)
- Propane torch or heat gun
- Floor buffer/sander (120 grit)
- Protective topcoat (urethane)
Step 1: Preparation & Mapping
-
Surface Prep:
Begin by thoroughly cleaning and sanding your concrete substrate to ensuring it is level, free of cracks, and open to receive the primer. Vacuum every speck of dust. -
Prime the Floor:
Apply a clear or neutral-colored epoxy primer across the entire floor to seal the concrete and prevent outgassing bubbles later. Let this cure for 24 hours. -
Find the Center:
Project the center line of the hallway using a laser level. This central axis is crucial because the diamond pattern radiates outward from it. -
Snap the Grid:
Using a chalk line, snap a grid based on your desired tile size (e.g., 24×24 inches) rotated at a 45-degree angle to create the diamond orientation. Double-check your measurements to ensure perfect symmetry.
Bleed-Through Blues
Epoxy bleeding under tape? Firmly press all tape edges down with a hard roller before pouring. Use a tiny amount of clear epoxy to seal the tape edge first.
Step 2: Creating the Design
-
Tape the ‘Grout’ Lines:
Apply 1/8 or 1/4 inch vinyl fine-line tape exactly over your chalk lines. These taped lines will become the ‘grout’ separating your geometric shapes once peeled up later. -
Mask for First Color:
To keep colors sharp, you must apply them in stages. Mask off the areas destined for the white and black sections using wider painter’s tape, leaving only the diamond shapes for the terracotta red exposed. -
Mix and Pour Red:
Mix your epoxy with the terracotta pigment. Pour it into the exposed diamond sections, spreading it evenly with a small squeegee or trowel to the edges of the tape. -
De-gas and Let Set:
Quickly pass a propane torch over the wet red epoxy to pop air bubbles. Allow this color to cure until it is tacky but firm enough to hold its shape, usually 6-8 hours. -
Switch Masking:
Carefully remove the masking tape from the areas intended for black epoxy, and now mask over the cured red sections to protect them from splashes. -
Apply Black Accents:
Mix a smaller batch of black pigmented epoxy. Pour this into the designated central diamond accents and side triangles, spreading carefully to avoid overfilling. -
Fill the Field:
Once the red and black sections are tacky-cured, remove all protective masking (but leave the original grid lines tailored down). Pour the white epoxy into the remaining ‘field’ areas, allowing it to self-level against the other cured colors.
Step 3: Finishing Touches
-
Pull the Grid Tape:
This is the satisfying part—carefully pull up the original fine-line grid tape while the final pour is still slightly gelled (or wait until cure if using a grout-line fill method). This reveals the crisp lines between colors. -
Light Sanding:
Once fully cured (24+ hours), lightly screen the entire floor with a buffer and 120-grit screen to smooth out any ridges between the different color pours. -
Clean Up:
Vacuum the dust thoroughly and wipe the floor with a microfiber mop dampened with denatured alcohol to remove fine particles. -
Clear Coat Seal:
Pour a final, distinctive layer of clear gloss epoxy or a high-wear urethane topcoat over the entire design. This encapsulates the pattern and creates that glass-like, unified depth. -
Final Cure:
Allow the floor to cure undisturbed for at least 48 to 72 hours before allowing foot traffic, ensuring the surface is perfectly hard.
Add Metallic Flake
For extra depth, mix a small amount of pearlescent mica powder into the white epoxy batch. It adds a subtle shimmer that looks like natural stone.
Enjoy the incredible depth and durability of your custom geometric floor that looks just like luxury tile
Bold Color Statement Floor
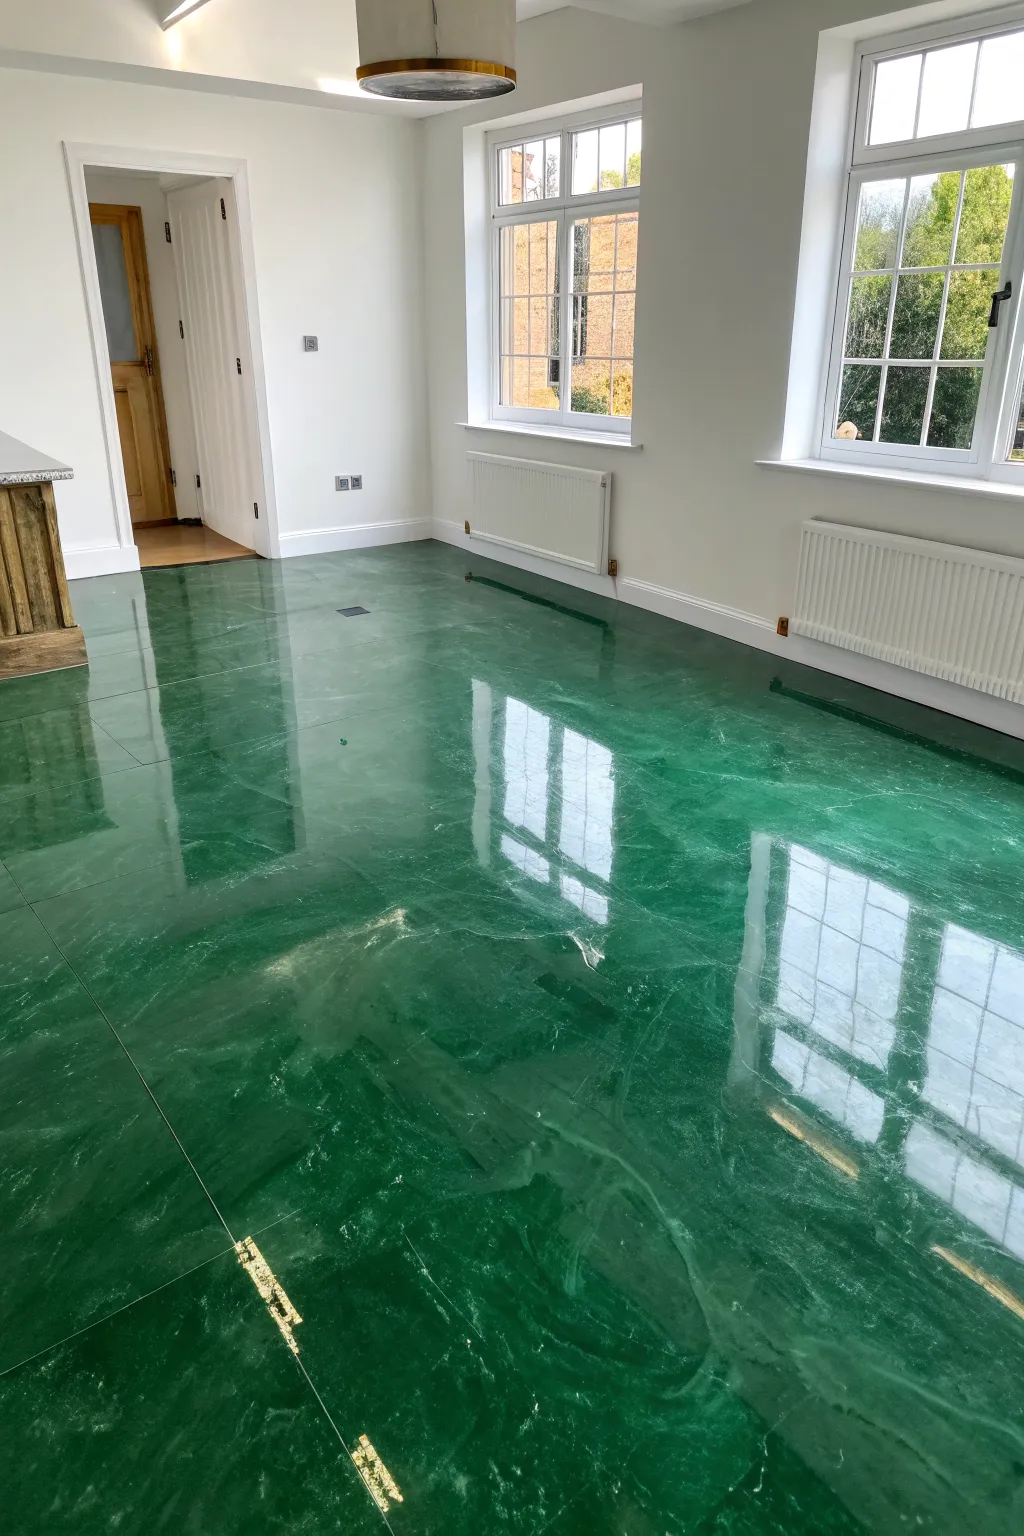
Transform a dull concrete slab into a stunning, high-gloss statement piece that mimics the depth and drama of emerald gemstone. This deep green epoxy floor features subtle marbling and metallic accents, creating a mirrored surface that reflects light beautifully across the room.
Step-by-Step
Materials
- Epoxy floor primer (clear or tinted)
- Metallic epoxy resin base (Emerald Green pigment)
- Metallic epoxy resin accent (Pearl White or Silver pigment)
- Metallic epoxy resin accent (Gold pigment for veins)
- High-gloss polyurethane topcoat (optional but recommended)
- Angle grinder with diamond cup wheel
- Shop vac
- Masking tape and plastic sheeting
- Notched squeegee
- 18-inch roller and frame
- Spiked shoes
- Spray bottle with 91% Isopropyl Alcohol
- Propane torch or heat gun
Step 1: Creation
-
Prep the Perimeter:
Clear the room entirely and remove all baseboards if possible. If you can’t remove them, tape them off meticulously with high-quality masking tape and run plastic sheeting up the walls to protect against splashes. -
Surface Grinding:
Use an angle grinder or a rented floor grinder with a diamond cup wheel to scuff the entire concrete surface. You want it to feel like 100-grit sandpaper so the epoxy bonds mechanically. -
Clean and Repair:
Vacuum the dust thoroughly—any debris left behind will show up as a bump in your smooth finish. Fill any major cracks or divots with an epoxy crack filler and sand them flush once cured. -
Apply Primer:
Mix your epoxy primer according to the manufacturer’s ratio. Pour a ribbon onto the floor and use a squeegee to spread it thin, followed by back-rolling. Let this cure for the time specified on your product, usually 12-24 hours. -
Mix the Base Coat:
Prepare your main metallic epoxy batch using the Emerald Green pigment. Mix thoroughly with a drill mixer for at least 3 minutes to ensure no unmixed resin remains. -
Mix Accent Colors:
In smaller separate buckets, mix a small amount of resin with your Pearl White and Gold pigments. Keep these ready for the marbling step. -
Pour the Emerald Base:
Pour the green resin onto the floor in a serpentine pattern. Put on your spiked shoes so you can walk on the wet resin without leaving footprints. -
Spread the Base:
Use a notched squeegee to spread the green resin evenly across the floor. You want a consistent thickness, usually around 50-80 square feet per gallon depending on the kit. -
Back-roll the Surface:
Take your roller and gently smooth out the squeegee lines. I prefer to roll in a cross-pattern (north-south, then east-west) to ensure perfect leveling. -
Add Marble Veins:
Drizzle the Pearl White and Gold accent resins randomly through the wet green base. Don’t overthink it; natural veins are irregular. Use a stick or a small roller to gently swirl these colors into the green without blending them completely. -
Disperse with Alcohol:
Lightly mist the wet surface with 91% Isopropyl Alcohol from a spray bottle. This creates unique cellular effects and breaks up the pigments slightly for a natural stone look. -
Torch the Bubbles:
Pass a propane torch quickly over the surface to pop any rising air bubbles. Keep the flame moving constantly so you don’t burn the resin. -
Final Cure:
Allow the floor to cure for 24-72 hours before light foot traffic. Keep windows closed to prevent dust or bugs from landing in the wet finish. -
Top Coat (Optional):
For extra scratch resistance, apply a clear, high-gloss polyurethane topcoat once the epoxy is hard. This preserves that wet-look shine for years.
Temperature Matters
Ensure the room is between 65-75°F (18-24°C). If it’s too cold, the epoxy won’t flow well; too hot, and it creates a ‘flash cure’ leaving you no time to work.
Level Up: Depth Effects
Add a tiny drop of black pigment to a small cup of green resin. Swirl this darker shade near the gold veins to create artificial shadows and 3D depth.
Enjoy the incredible depth and shine of your new custom floor, which is sure to be a conversation starter

PENCIL GUIDE
Understanding Pencil Grades from H to B
From first sketch to finished drawing — learn pencil grades, line control, and shading techniques.
Explore the Full Guide
Ombre Fade Across the Room
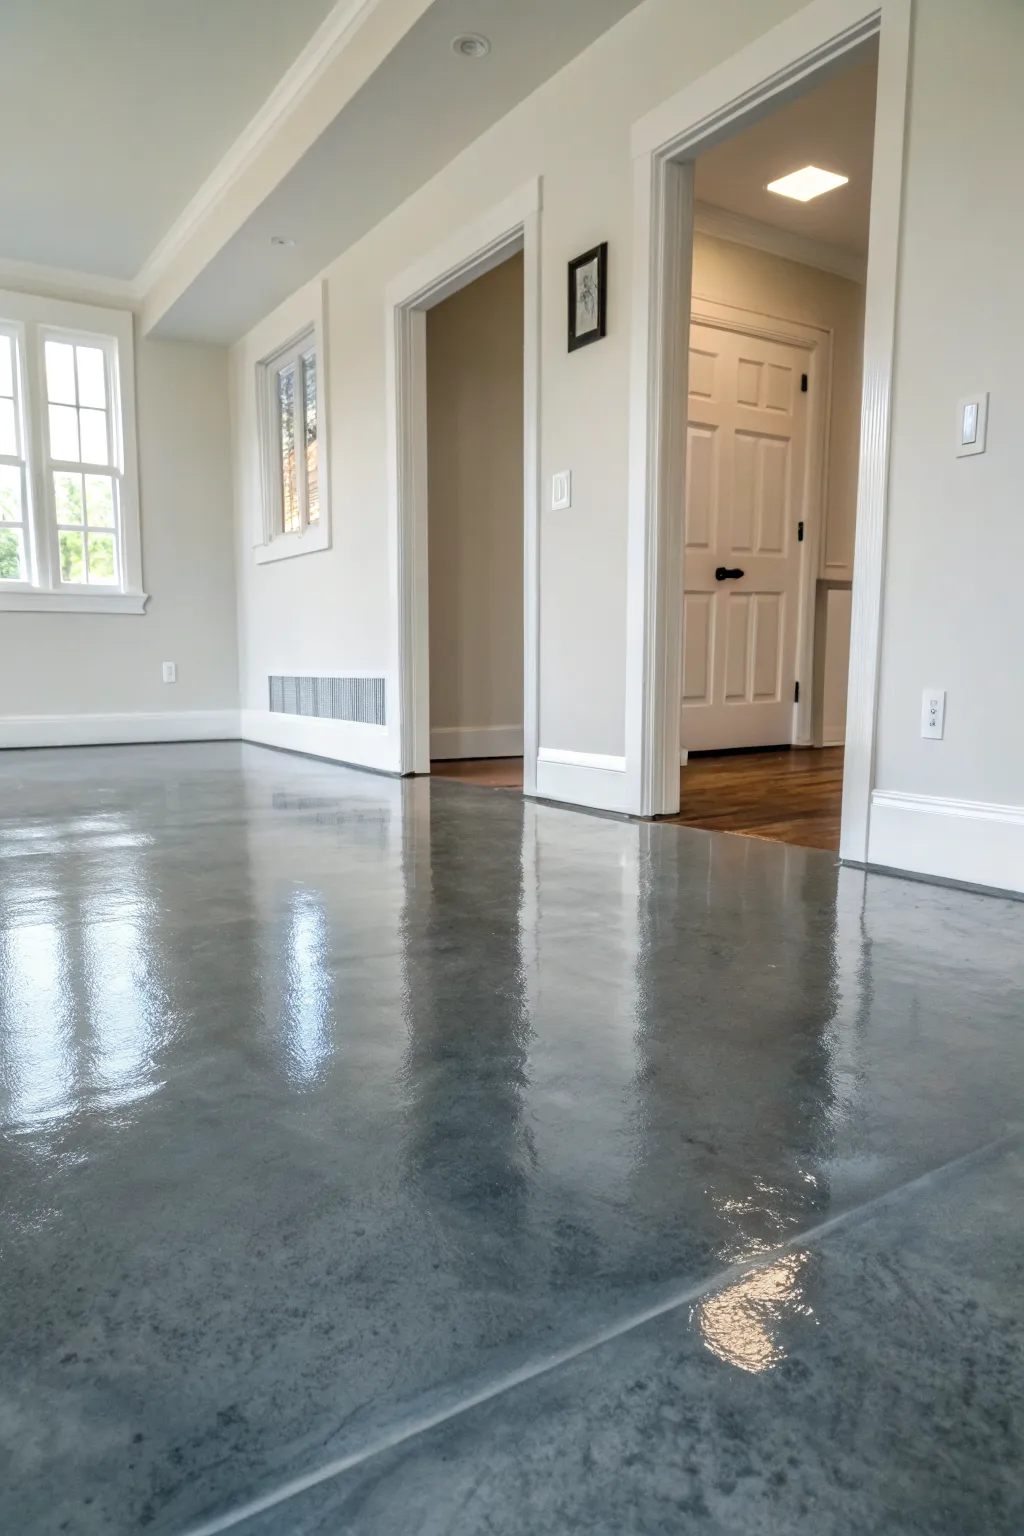
This project transforms a standard concrete slab into a stunning, high-gloss surface that mimics the depth of polished stone. The finish features a subtle, cloudy variation of grays that creates a sophisticated, seamless ombre effect across the room.
Detailed Instructions
Materials
- Concrete grinder with diamond pads
- Industrial vacuum
- Epoxy primer (clear or gray)
- Metallic epoxy base coat (dark gray)
- Metallic epoxy accent coat (silver or pearl)
- Clear urethane topcoat
- Spiked shoes
- Notched squeegee
- 18-inch roller
- Mixing drill and paddle
- Acetone or denatured alcohol (for dispersion)
- Painter’s tape and plastic sheeting
Step 1: Preparation & Priming
-
Clear the room:
Remove all furniture and baseboards from the workspace. It is critical to have unrestricted access to the entire floor area. -
Grind the concrete:
Using a concrete grinder, go over the entire surface to open the concrete pores. This mechanical profiling ensures the epoxy barely has something to grip onto. -
Repair cracks:
Inspect the floor for any divots or hairline cracks. Fill them with an epoxy patching compound and sand them flush once cured. -
Clean thoroughly:
Vacuum the floor meticulously to remove all dust and debris. Even a small amount of dust can cause adhesion failure or lumps in your finish. -
Tape edges:
Apply painter’s tape along the walls where the baseboards were removed to protect the drywall from accidental splashes. -
Mix the primer:
Combine your two-part epoxy primer according to the manufacturer’s ratio. Mix slowly with a drill to avoid introducing air bubbles. -
Apply primer coat:
Pour the primer in ribbons across the floor. Use a roller to spread it evenly, ensuring full coverage to seal the concrete. Let this cure for the recommended time (usually overnight).
Step 2: Creating the Metallic Finish
-
Mix the base coat:
Mix the metallic epoxy resin with your darker gray pigment. Ensure the metallic powder is completely dispersed without clumps. -
Pour the base layer:
Wearing spiked shoes, pour the mixed gray epoxy onto the floor. Use a notched squeegee to pull the material across the surface at a consistent depth. -
Back-roll the surface:
Immediately use an 18-inch roller to smooth out squeegee lines and ensure an even thickness across the entire room. -
Add the accent color:
While the base is still wet, drizzle ribbons of the lighter silver or pearl metallic epoxy randomly across the floor. -
Blend for the ombre effect:
Using a roller or trowel, gently swirl the two colors together. I find using figure-eight motions helps create that natural, cloudy transition rather than harsh stripes. -
Disperse with solvent:
Mist a small amount of denatured alcohol or acetone over the wet surface. This causes the metallics to separate slightly and flow, enhancing the 3D ‘movement’ in the floor. -
Let it settle:
Allow the epoxy to self-level and cure. Keep the room dust-free and ensure no airflow disturbs the surface while it hardens.
Bubbles Appearing?
If you see tiny bubbles rising in the wet epoxy, use a propane torch or heat gun. Swiftly pass the flame over the surface to pop them without burning the resin.
Step 3: Protective Topcoat
-
Sand imperfections:
Once the metallic coat is fully cured, lightly screen or sand surface nibs if necessary, then vacuum and wipe clean with a microfiber cloth. -
Mix the clear coat:
prepare the clear urethane topcoat. This layer protects the high-gloss metallic finish from scratches and UV damage. -
Apply final seal:
Roll the topcoat on thin and even using a microfiber roller. This final layer gives that glass-like reflection seen in the photo. -
Final cure:
Allow the floor to cure completely (often 24-48 hours for light foot traffic) before replacing baseboards and furniture.
Natural Lighting Tip
Plan your ‘swirl’ pattern relative to windows. Metallic pigments reflect light differently depending on the angle, so check your blending from the room’s main viewpoint.
Step back and admire the sophisticated, mirror-like depth of your new custom floor.
Pearl Lacing and Cell Effects
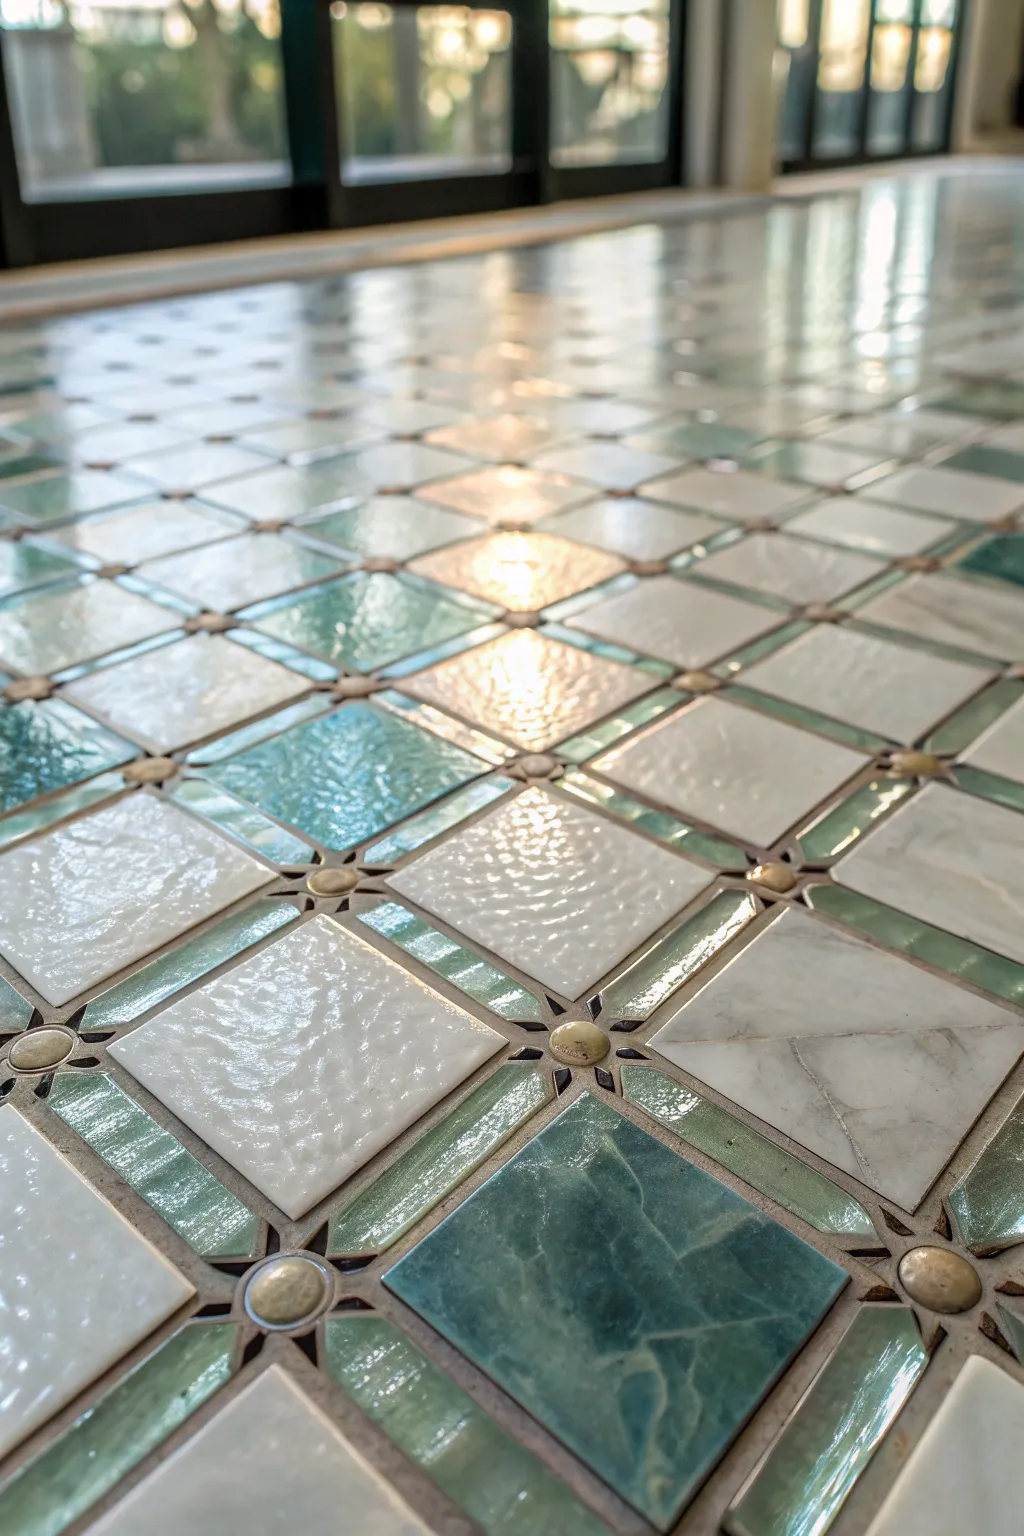
Recreate the luxurious look of hand-laid ceramic tiles and brass inlays using advanced epoxy techniques. This project captures the depth, texture, and intricate geometric patterns of a classic mosaic floor without actually laying a single tile.
Detailed Instructions
Materials
- High-gloss clear epoxy resin kit (2-part system)
- White pearl metallic pigment powder
- Teal or seafoam green translucent pigment dye
- Gold or brass metallic epoxy paint pen (thick nib)
- Painter’s tape (multiple widths: 1/4 inch and 1 inch)
- Measuring tape and straight edge
- Chalk line or laser level
- Plastic circular stencil or coin (for the studs)
- Mixing cups and stir sticks
- Notched squeegee and foam rollers
- Self-leveling primer (white)
- Heat gun or propane torch
- Sandpaper 220-grit
Step 1: Base Preparation and Layout
-
Prepare the Substrate:
Ensure your concrete or subfloor is immaculately clean, dry, and free of cracks. Apply a self-leveling white primer to create a bright, neutral canvas that will help your pearl pigments pop. -
Establish the Center:
Find the center of your room using a tape measure. Snap a chalk line or set up a laser level to create your primary crosshairs, ensuring the pattern stays symmetrical. -
Mask the Grid:
Using a straight edge, gently mark out a diagonal grid pattern. The main squares should be approximately 8-10 inches wide. Use the thin 1/4-inch tape to mask off the grid lines where the ‘grout’ would naturally be.
Step 2: Pouring the Tiles
-
Mix the Pearl Epoxy:
Mix a batch of epoxy resin and stir in the white pearl metallic powder. Aim for an almost opaque, creamy consistency that mimics ceramic glaze. -
Pour the White Squares:
Pour the pearl mixture into alternating squares on your grid, following a checkerboard pattern. Use a small spreader to push the resin to the tape edges without overflowing. -
Create Texture:
Before the white resin fully settles, tap the surface gently with a gloved finger or a texture tool to create subtle surface undulations, mimicking hand-molded tiles. -
Mix the Teal Epoxy:
Mix a second batch of fresh resin with the teal translucent dye. You want this to have depth, so add just enough pigment to color it while maintaining transparency. -
Pour the Teal Squares:
Fill the remaining empty squares with the teal mixture. I like to swirl the pour slightly as I lay it down to simulate the natural variance of stone or glass. -
Texture the Teal:
Similar to the white squares, introduce light texture to the teal resin. This step is crucial for catching the light later and selling the illusion of individual tiles. -
Remove Tape:
Once the epoxy has gelled but not fully hardened (usually 4-6 hours), carefully peel up the grid tape. This reveals the clean ‘grout’ lines from the white primer below.
Don’t rush the tape
Pull the masking tape when the epoxy is ‘tacky’ like strict gum. If it’s too liquid, it flows back; too hard, it chips. Timing is everything.
Step 3: Detailing and Accents
-
Clean the Edges:
After the floor has cured for 24 hours, use 220-grit sandpaper to gently smooth down any sharp ridges created by the tape removal. Wipe away all dust. -
Create the Border Rectangles:
Mask off small rectangles bordering each large square, using the teal resin color again but painting it manually or pouring very carefully to create the border frames seen in the image. -
Add Brass Studs:
At the intersection of every four squares and border rectangles, use a circular stencil. Paint a solid circle using the gold or brass metallic paint pen. -
Add Dimension to Studs:
To make the brass studs look three-dimensional, apply a tiny drop of clear UV resin or thick clear epoxy directly onto the gold circle. This creates a domed, physical cabochon effect. -
Initial Seal:
Apply a very thin barrier coat of clear epoxy over the entire floor to lock in the paint and texture work, protecting careful details from shifting during the final flood coat.
Faux stone veining
For the white tiles, lightly drag a toothpick with a tiny bit of grey mica through the wet resin to create delicate marble veining.
Step 4: Final Finish
-
Prepare Top Coat:
Mix a final, high-gloss clear top coat. This layer needs to be pristine, so ensure your mixing bucket and tools are dust-free. -
Flood Coat:
Pour the clear resin over the entire floor. Use a squeegee to spread it evenly, ensuring it fills any remaining low spots while maintaining the overall texture. -
Remove Bubbles:
Pass over the wet surface with a heat gun or torch. Keep the heat moving constantly to pop micro-bubbles without scorching the resin. -
Cure:
Allow the floor to cure undisturbed for at least 72 hours before walking on it. The result will be a glass-smooth surface with the visual depth of a tiled mosaic.
Enjoy the sophisticated shine of your new custom epoxy floor


Stenciled Medallion Centerpiece
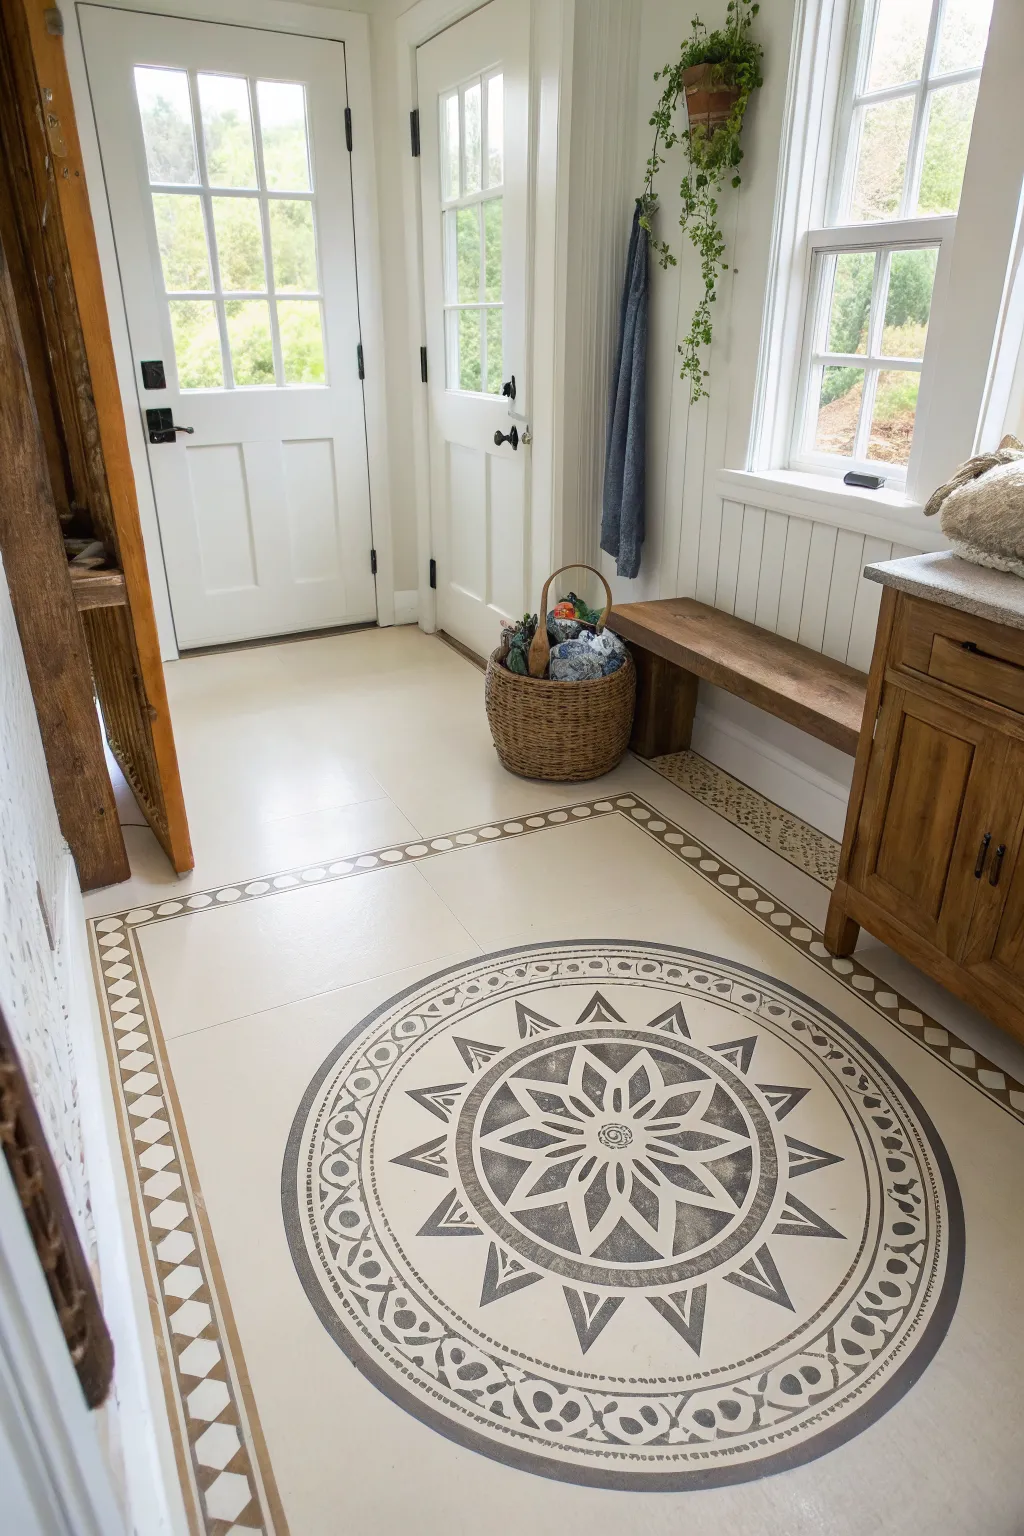
Elevate a plain entryway floor into a stunning focal point with this intricate stenciled medallion design. By layering warm neutrals and crisp geometric patterns, you can achieve a custom tile look without the heavy demolition.
Step-by-Step
Materials
- High-quality floor paint (cream/base color)
- Contrasting floor paint (taupe/grey)
- Large medallion stencil (approx. 36-40 inches)
- Rectangular border stencil set
- High-density foam rollers
- Stencil brushes (various sizes)
- Painter’s tape (low tack)
- Measuring tape and chalk line
- Laser level (optional)
- Clear water-based polyurethane sealer (matte or satin)
- Cleaning supplies (tsp substitute, rags)
Step 1: Preparation and Base Coat
-
Clean the surface:
Begin by thoroughly cleaning the existing floor surface. Use a heavy-duty degreaser or TSP substitute to remove all dirt, oil, and wax. The paint won’t adhere properly to a dirty surface, so don’t rush this step. -
Sand and prime:
Lightly sand the floor with 120-grit sandpaper to create a ‘tooth’ for the paint to grab onto. Wipe away all dust with a damp tack cloth. If you are painting over tile or laminate, apply a high-adhesion bonding primer first. -
Apply the base color:
Roll on your cream-colored base paint using a microfiber roller. Apply two even coats, allowing sufficient drying time between layers according to the manufacturer’s instructions. Let the final coat cure overnight.
Bleed Prevention Trick
Before applying the contrast color, roll a thin layer of the *base* color over the stencil first. This seals the edges so any bleed is invisible.
Step 2: Planning the Layout
-
Find the center:
Measure the width and length of your hallway or room to find the exact center point. Mark this spot lightly with a pencil. This will be the anchor for your central medallion. -
Mark the perimeter borders:
Decide how far from the wall you want your rectangular border to sit. Use a chalk line or a laser level to mark a large rectangle on the floor that frames the space evenly. -
Dry fit the stencils:
Place your medallion stencil over the center mark and your border stencils along the chalk lines to visualize the spacing. Ensure everything looks balanced before you commit to painting.
Step 3: Stenciling the Design
-
Secure the medallion stencil:
Position the main medallion stencil directly over your center mark. Secure it firmly with painter’s tape on all sides to prevent shifting. -
Load the roller:
Pour a small amount of the contrasting taupe paint onto a tray. Load a high-density foam roller and then offload almost all the paint onto a paper towel. The roller should feel nearly dry to the touch. -
Roll the center design:
Gently roll over the stencil using light pressure. Multiple thin coats are far superior to one thick coat, as thick paint will bleed under the stencil bridges. -
Add dimension:
For the intricate inner petals, I like to use a stencil brush in a stippling motion to get crisper edges than the roller might provide. -
Lift and check:
Carefully peel back one corner of the stencil to check your coverage. If it looks solid, lift the stencil straight up to remove it. Let this section dry completely. -
Tape the border:
Align your border stencil with the chalk lines you snapped utilizing the diamond pattern shown in the image. Tape it down securely. -
Stencil the border:
Using the same ‘dry roller’ technique, paint the rectangular border. Move the stencil along your chalk line, aligning the registration marks from the previous section to keep the pattern continuous. -
Connect the corners:
Use a specialized corner stencil piece or carefully mask off the ends of your straight stencil to create neat 90-degree turns at the corners of the rectangle.
Paint Peeling Up?
If paint lifts with the stencil, you likely applied it too thickly or didn’t wait long enough. Use less paint and wait 2-3 minutes before peeling.
Step 4: Finishing Touches
-
Touch up errors:
Once all paint is dry, inspect the floor for any bleed-through. Use a small artist’s brush and your base cream color to clean up any fuzzy edges. -
Seal the floor:
Protect your hard work by applying a clear water-based polyurethane sealer. Use a wide brush or pad applicator. -
Apply additional coats:
Apply at least 3-4 coats of sealer, especially in high-traffic areas like a mudroom. Allow adequate drying time between coats to ensure a durable, hard finish.
Now you have a durable, distinct entryway that welcomes guests with style and handles muddy boots with ease
Clear Depth Over Pebble Bed
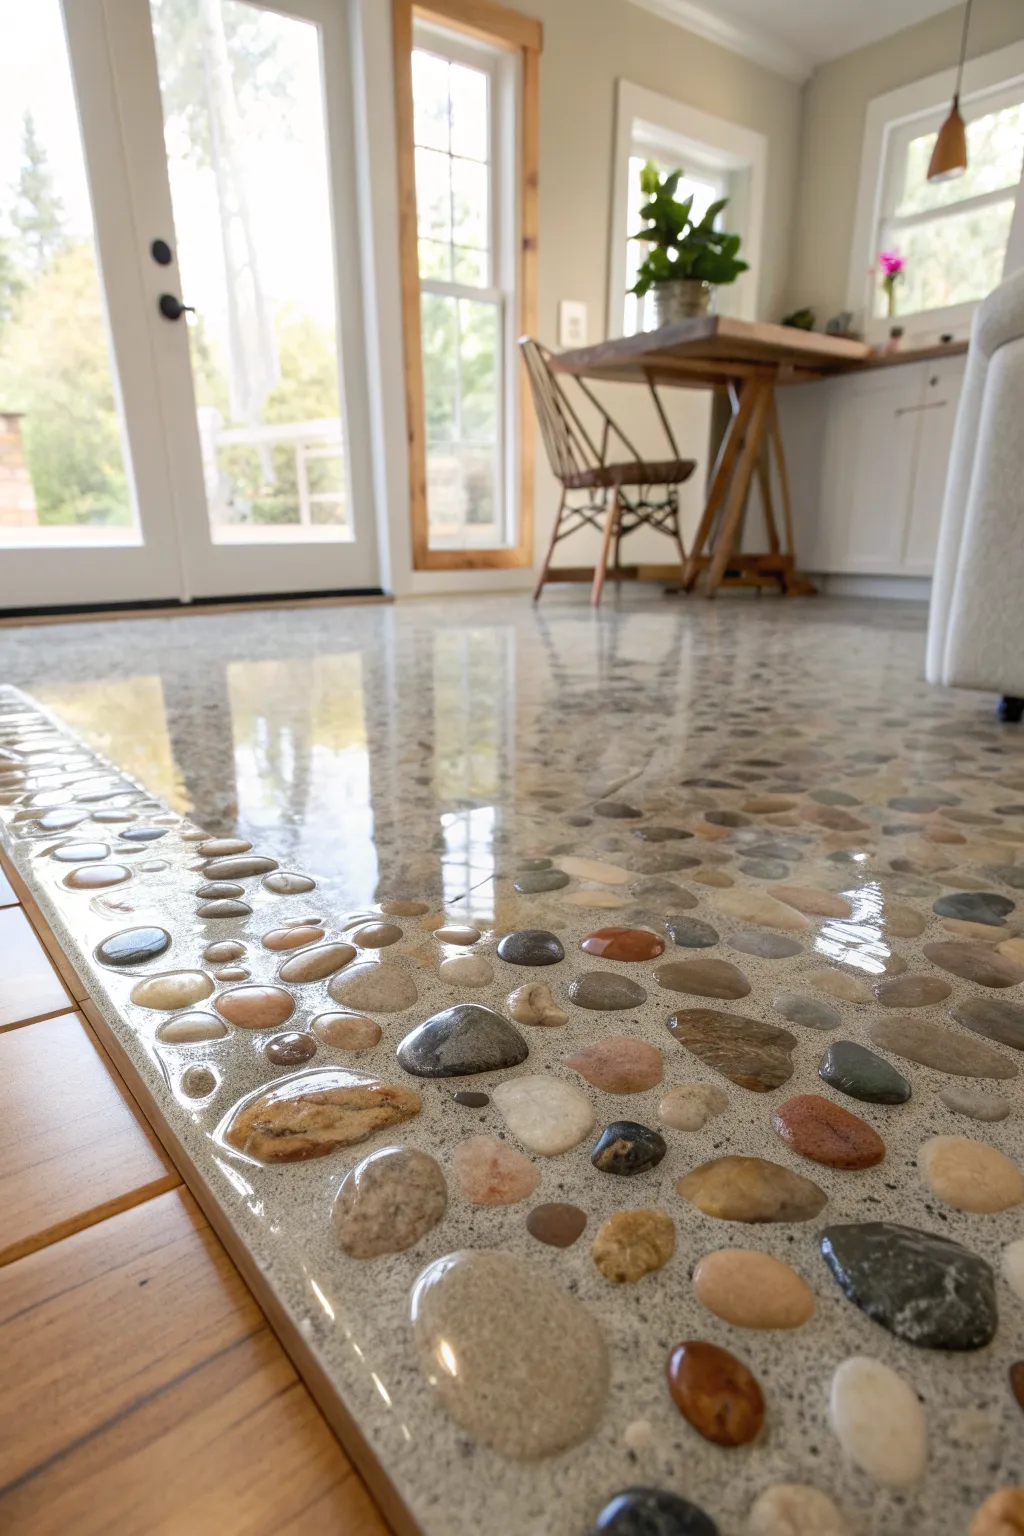
Transform an ordinary floor into a tranquil riverbed with this stunning clear epoxy project. By embedding smooth river stones in high-gloss resin, you create a durable surface with incredible visual depth and a sophisticated, spa-like atmosphere.
Step-by-Step Guide
Materials
- High-performance clear epoxy resin (flooring grade)
- Epoxy hardener
- River stones or large polished pebbles (assorted earth tones)
- Concrete primer
- Thin-set mortar or clear-drying adhesive
- Notched trowel
- Mixing buckets and paddle mixer
- Squeegee
- 3/8 inch nap roller
- Spiked shoes (for walking on wet epoxy)
- Propane torch or heat gun
- Painter’s tape and plastic sheeting
- Vacuum and mop
Step 1: Preparation & Layout
-
Clean the Substrate:
Begin by thoroughly cleaning the concrete subfloor. Remove all dust, debris, wax, or oil stains, as these can prevent the epoxy from bonding properly. -
Define the Boundary:
If you are transitioning to wood flooring as seen in the photo, masking is critical. Apply heavy-duty painter’s tape along the edge of the wood floor to create a crisp line and protect the timber. -
Prime the Surface:
Roll on a coat of epoxy primer designed for concrete. This seals the porous surface and prevents bubbles from rising up later. Let this cure according to the manufacturer’s instructions. -
Select Your Stones:
Sort through your river stones. Discard any broken or jagged pieces. You want smooth, flat-ish stones that are roughly the same thickness to keep the floor level manageable. -
Dry Run Layout:
Pour patches of stones onto the dry floor to test your density. Decide if you want them packed tight or scattered loosely. I prefer a dense packing near the edge for visual impact.
Floating Stones?
If stones start floating during the pour, the adhesive bond failed. Push them down with a stick and weigh them down with a clean heavy object until the resin gels.
Step 2: Embedding the Stones
-
Adhere the Base Layer:
Spread a thin layer of clear-drying adhesive or a very thin mix of mortar on the primed floor. You don’t need a thick bed, just enough to tack the stones in place so they don’t float. -
Place the Pebbles:
Hand-place the stones into the adhesive. Start along the taped edge to ensure a perfect fit, then work your way outward. -
Check for Height:
As you work, lay a straight edge across the stones. Any stone sticking up too high will become a tripping hazard or require excessive amounts of epoxy to cover. -
Let Adhesive Cure:
Allow the adhesive holding the stones to dry completely, usually for 24 hours. The stones must be immovable before pouring. -
Final Cleanup:
Vacuum the stone bed thoroughly. Any dust or loose grit trapped between the rocks now will be visible forever in the clear coat.
Glow Up
Mix phosphorescent (glow-in-the-dark) powder into the base epoxy layer. In daylight, it’s clear, but at night, the spaces between rocks will glow softly.
Step 3: Pouring the Resin
-
Mix the Epoxy:
Combine your resin and hardener in a clean bucket. Mix slowly with a paddle mixer to avoid whipping air bubbles into the thick liquid. Scrape the sides and bottom of the bucket often. -
First Flood Coat:
Pour the mixed epoxy directly over the stones. Use a squeegee to spread it, pushing the resin into all the gaps between the pebbles. -
Back-Roll:
Use a nap roller to gently even out the surface. Don’t overwork it; you just want to ensure even coverage over the tops of the highest stones. -
Remove Bubbles:
Pass a propane torch or heat gun quickly over the wet surface. The heat pops rising air bubbles instantly. Keep the torch moving to avoid scorching the resin. -
Assess Depth:
If the stones aren’t fully submerged after the first coat cures (which is likely given their size), you will need a second pour. Wait for the ‘re-coat window’ specified by your product. -
Top Coat Pour:
Mix a fresh batch of epoxy and pour the final layer. This one is about creating that glass-like, level surface that completely covers the texturing of the rocks. -
Final Torch & Cure:
Do one last pass for bubbles. Remove the tape along the wood edge while the epoxy is ‘tacky’ but not fully hard to get a clean line throughout.
Enjoy walking on your smooth, preserved riverbed that brings the outdoors permanently inside


Have a question or want to share your own experience? I'd love to hear from you in the comments below!