If you love that glassy, candy-like shine, epoxy resin is basically a playground that never runs out of ideas. Here are my go-to epoxy project ideas—starting with the classics everyone wants to try, then drifting into the fun, weird, “how did you make that?” stuff.
Resin Coasters With Color Swirls
These elegant coasters combine the timeless look of white marble with the glamour of suspended gold leaf. By pouring two distinct sections, you create a sophisticated split design that looks like high-end decor.
How-To Guide
Materials
- Two-part casting resin (epoxy)
- Round silicone coaster molds (4-inch diameter)
- White opacity pigment (or white alcohol ink)
- Black alcohol ink or fine pigment powder (for marble veins)
- Gold leaf flakes
- Mixing cups and stir sticks
- Heat gun or torch
- Toothpicks
- Parchment paper or silicone mat (for workspace protection)
- Gloves and respirator mask
Step 1: Preparation & Mixing
-
Set up your workspace:
Cover your work area with parchment paper or a silicone mat. Ensure the surface is perfectly level, as resin will drift if tilted. Have all your materials within easy reach. -
Clean the molds:
Double-check your silicone molds for any dust or lint. Use a piece of masking tape to lift away stubborn particles, as these will show up in the clear sections. -
Mix the resin base:
Combine your resin and hardener according to the manufacturer’s ratio (usually 1:1). Stir slowly and consistently for 3-5 minutes to minimize bubbles. Scrape the sides and bottom of the cup often. -
Divide the batch:
Pour half of your mixed resin into a second cup. You now have two cups of clear resin ready for coloring.
Don’t Rush the Pour
Wait 10-15 minutes between pouring the gold side and the white side. This slight thickening prevents the colors from muddying together.
Step 2: Creating the Gold Section
-
Add gold leaf:
In the first cup, add a generous amount of gold leaf flakes. Stir gently to break up large chunks, but don’t over-mix or the flakes might disintegrate into dust. -
Pour the gold side:
Carefully pour the clear gold-flake mixture into one half of each coaster mold. You don’t need a divider; just aim for a rough half-circle. -
Let it settle:
Allow this half to sit for about 10-15 minutes. This lets the resin thicken slightly so it won’t immediately blend when you pour the second color.
Step 3: Creating the Marble Section
-
Color the second batch:
Take your second cup of resin and add white pigment. Start with a small amount and mix until you achieve an opaque creamy white. -
Pour the white side:
Slowly pour the white resin into the empty half of the molds. Let it naturally meet the clear gold resin in the middle. It’s okay if they merge slightly; this creates an organic transition. -
Add marble veins:
Dip a toothpick into black paint or alcohol ink. Gently drag the toothpick through the white resin to create thin, wispy ‘veins.’ Use a very light touch. -
Pop bubbles:
Pass a heat gun or torch quickly over the surface to pop any air bubbles rising to the top. Keep the heat source moving to avoid scorching the mold. -
Wait for the cure:
Cover the molds with a box to prevent dust from landing on the sticky surface. Let them cure undisturbed for 24-48 hours, depending on your resin brand.
Try Rose Gold
Swap standard gold flakes for rose gold or copper leaf, and tint the white side with a tiny drop of pink for a soft, romantic palette.
Step 4: Finishing
-
Demold the coasters:
Once fully hard, gently peel back the silicone mold to release the coasters. They should pop out easily. -
Check the edges:
Inspect the edges for any sharp resin burrs or overfill. I like to use a fine-grit sandpaper or a deburring tool to smooth these down if necessary. -
Paint the rim (optional):
For an extra touch of luxury, use a gold paint pen or liquid gold leaf to paint the outer rim of the coaster, matching the gold flakes inside.
Enjoy styling your coffee table with these personalized geometric gems


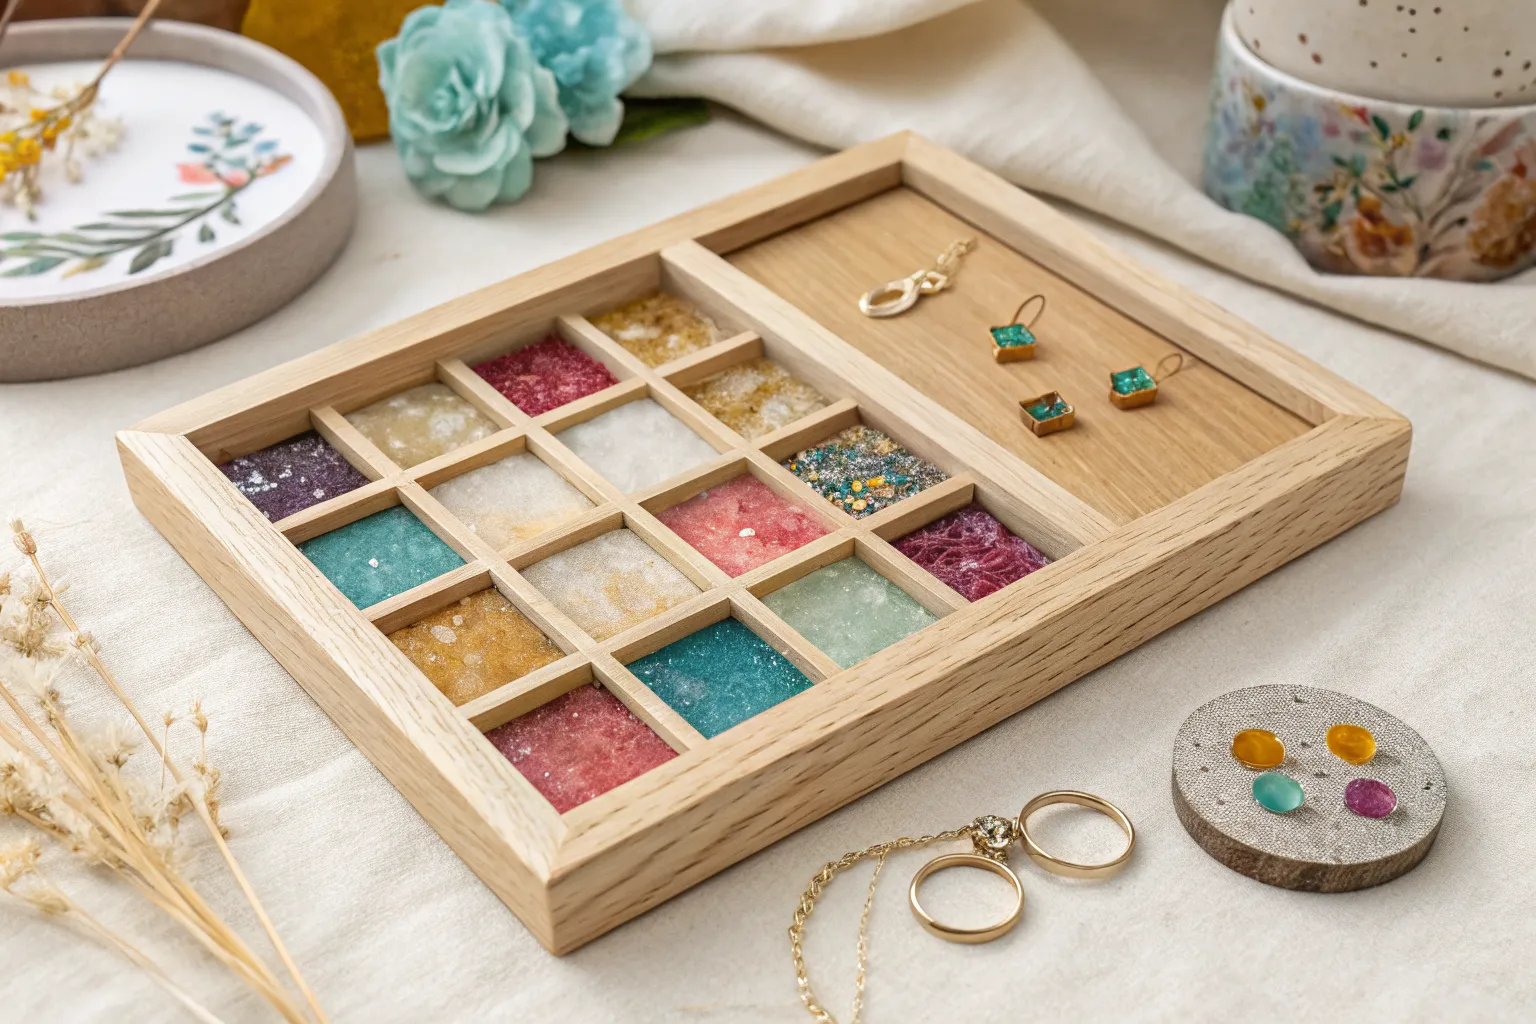
Simple Resin Jewelry Charms
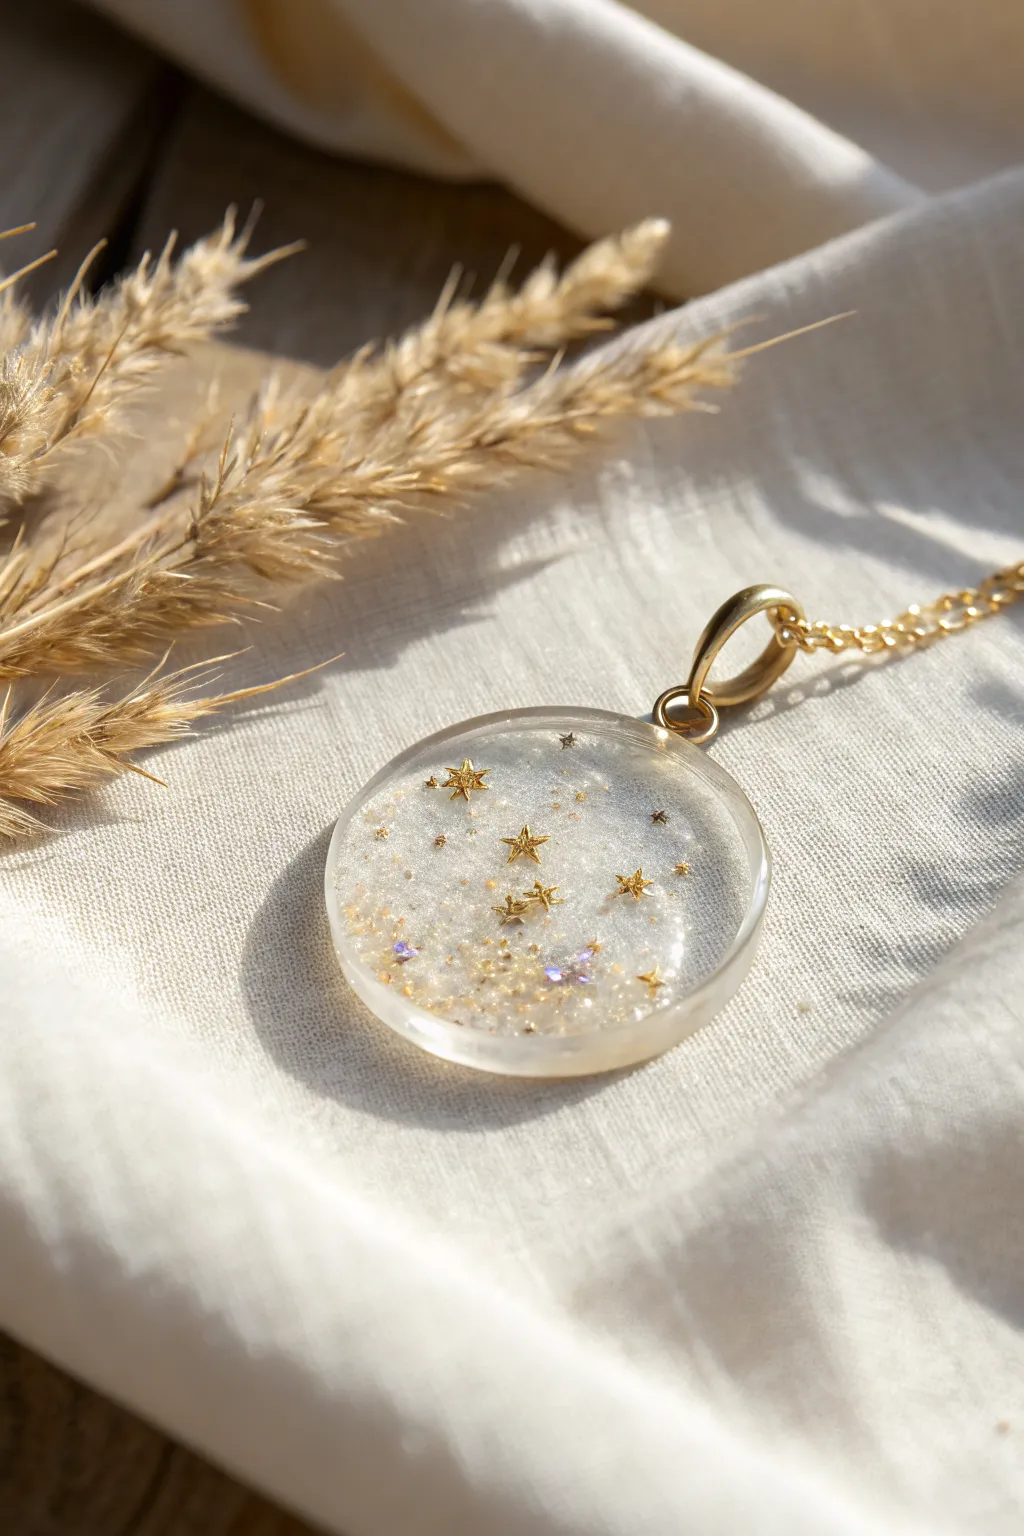
Capture the magic of a starry night sky in this elegant, minimalist resin charm. By layering translucent white shimmer and tiny metallic gold stars, you will create a floating galaxy effect that catches the light beautifully.
Step-by-Step Guide
Materials
- UV resin (hard type) or 2-part epoxy resin
- Circular silicone pendant mold (approx. 25-30mm)
- Small gold open-back bezel loop (for hanging)
- Gold metallic star confetti or micro-sequins (assorted sizes)
- Iridescent white/clear glitter dust (fine)
- A pinch of pearlescent mica powder (white or champagne)
- Tweezers
- Toothpicks or silicone dotting tool
- UV lamp (if using UV resin)
- Gold jump ring and necklace chain
- Jewelry pliers
Step 1: Preparation & Base Layer
-
Clean the mold:
Begin by ensuring your silicone mold is perfectly clean. Use a piece of masking tape to lift away any dust or lint specs, as these will show up clearly in the transparent resin. -
Mix the shimmering base:
Pour a small amount of clear resin into a mixing cup. Add a very tiny amount of the iridescent glitter dust and just a whisper of the pearlescent mica powder. You want a mixture that is mostly clear but has a subtle, milky sparkle when the light hits it. -
Pour the first layer:
Carefully pour this glittery resin mixture into the mold, filling it only about halfway. This creates depth so your stars will look suspended rather than sunk to the bottom. -
Remove bubbles:
Let the resin sit for a minute to allow bubbles to rise. Pass a lighter flame quickly over the surface or use a toothpick to pop any stubborn bubbles. -
Soft cure:
If using UV resin, cure this layer for about 30-60 seconds—just enough so it’s sticky but solid enough to hold the stars. If using epoxy, wait until it reaches a gel-like consistency (usually 3-4 hours).
Sticky Surface?
If your UV resin feels tacky after curing, wipe it with a lint-free cloth or paper towel dipped in rubbing alcohol, or leave it in direct sunlight for 15 minutes.
Step 2: Arranging the Galaxy
-
Select your stars:
Pour out some of your gold star confetti. Try to select a mix of tiny sizes and slightly larger focal stars to create a natural, non-uniform look. -
Place larger stars:
Using tweezers, dip each gold star into a drop of clear wet resin before placing it. Position roughly 3-5 larger stars into the cured base layer in a random, scattered pattern. -
Add the stardust:
Sprinkle a tiny pinch of the fine iridescent glitter directly over the stars. I find this helps blur the lines and makes the stars look more integrated into the ‘sky’. -
Layer smaller stars:
Now, place the smaller micro-stars around the larger ones. Don’t center everything; placing some near the edges adds visual interest. -
Secure the arrangement:
Place the gold bezel loop or a small jump ring into the resin at the top edge of the mold if your mold doesn’t have a pre-made hole pillar. Ensure it is submerged and straight. -
Cure the inclusions:
Place the piece under the UV lamp for another 60 seconds to lock the stars and the hanging loop in place.
Step 3: Doming & Finishing
-
The final pour:
Mix a fresh batch of perfectly clear resin (no glitter this time). Pour it over the textured star later until the mold is filled to the brim. -
Create the dome:
Add resin drop by drop until surface tension creates a slight convex curve (dome) on top. This magnifies the stars inside. -
Final cure:
Cure completely under the UV lamp for 2-3 minutes (flip it over to cure the back if the mold is translucent) or let epoxy cure for a full 24 hours. -
Demold:
Gently pop the pendant out of the silicone mold. Handle it by the edges to avoid fingerprints if it’s still warm. -
Assembly:
Using your jewelry pliers, open a gold jump ring sideways. Thread it through the loop you embedded (or the hole created by the mold). -
Add chain:
Slip your gold necklace chain through the jump ring before closing it tightly with the pliers.
Pro Tip: Depth
Dip your stars in clear resin before placing them. This prevents air bubbles from getting trapped under the metal shape, which can ruin the crystal-clear look.
Wear your new piece and enjoy the subtle sparkle of your personal galaxy


Letter and Shape Resin Keychains
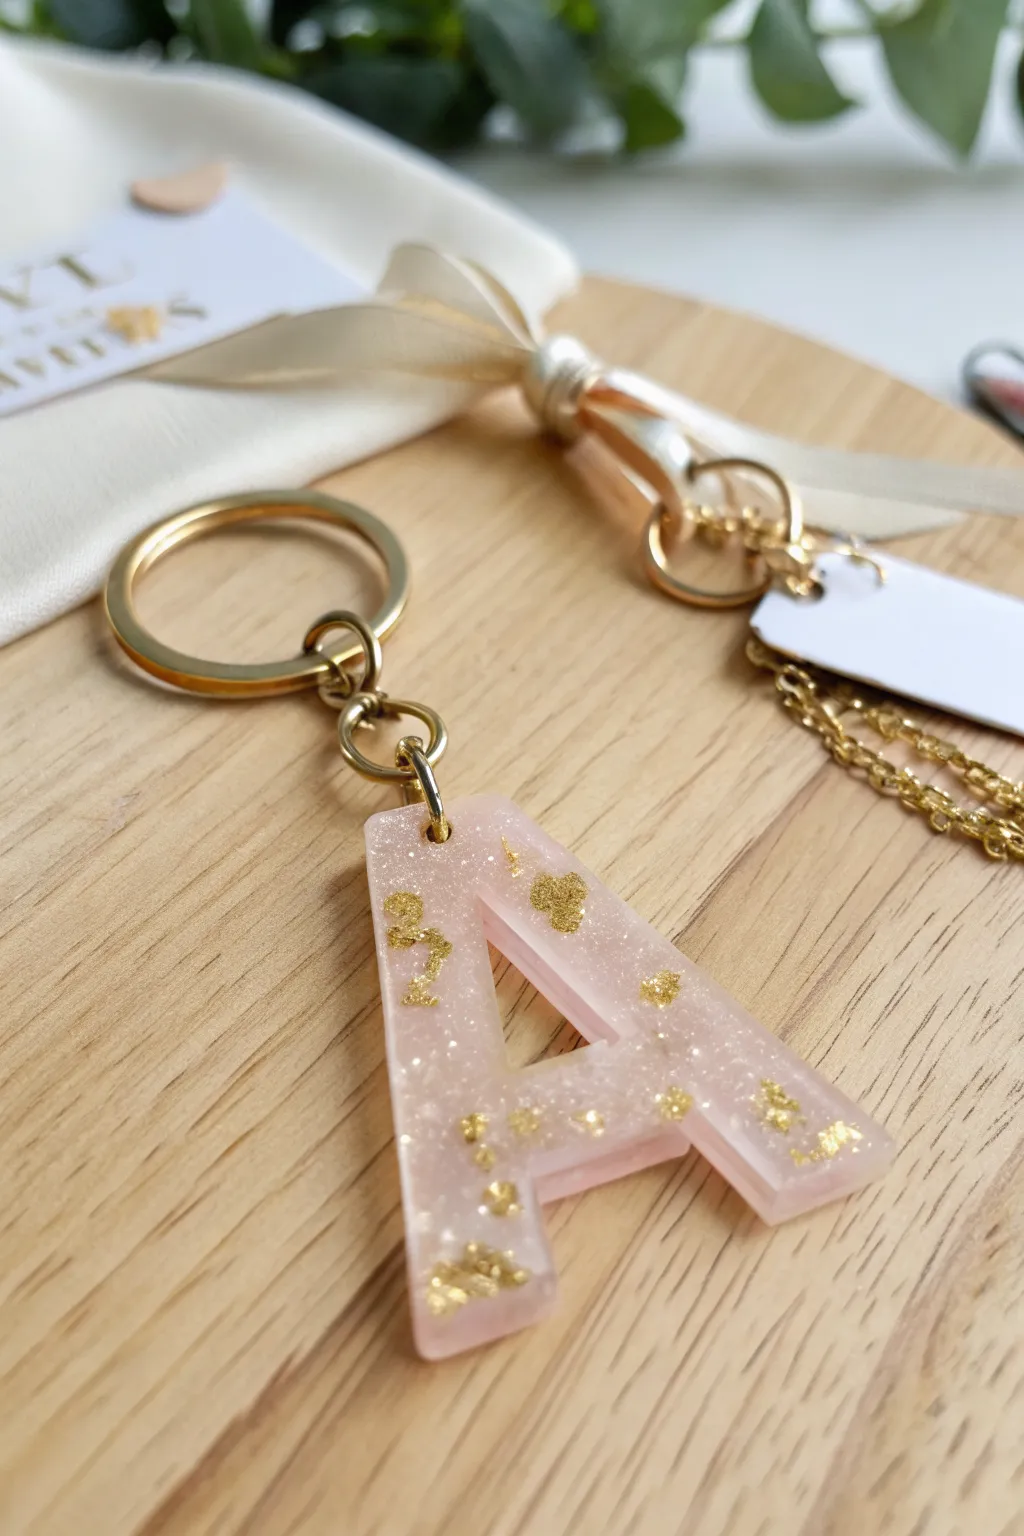
This elegant keychain project captures a soft, romantic aesthetic by combining translucent blush pink resin with the luxurious texture of suspended gold leaf. It makes for a perfect personalized gift or a bespoke accessory for your own keys.
Detailed Instructions
Materials
- Two-part epoxy resin (casting resin)
- Silicone alphabet mold
- Gold leaf flakes or foil
- Fine iridescent pink or gold mica powder
- Pale pink alcohol ink (optional)
- Gold screw eye pins
- Gold split keyrings and chain hardware
- Small hand drill or pin vise
- Needle-nose pliers
- Mixing cups and stir sticks
- Tweezers
- Gloves and respirator mask
Step 1: Preparation and Mixing
-
Safety check:
Before opening your resin bottles, ensure you are in a well-ventilated area and put on your nitrile gloves and respirator mask. -
Measure the resin:
Pour equal parts of resin (Side A) and hardener (Side B) into a measuring cup, following the specific ratio instructions for your resin brand. -
Mix thoroughly:
Stir the mixture slowly and steadily for at least 3-5 minutes, scraping the sides and bottom of the cup to ensure a complete chemical blend without whipping in too many air bubbles. -
Let it rest:
Allow the mixed resin to sit for about 2-3 minutes so any large bubbles created during stirring can rise to the surface and pop.
Sticky Situation?
If your resin is still bendy after 24 hours, the ratio was likely off or it wasn’t mixed enough. Unfortunately, you can’t re-harden it; you’ll need to re-pour.
Step 2: coloring and Filling
-
Add the shimmer:
Scoop a tiny amount of fine iridescent mica powder into the clear resin and stir gently until fully incorporated; you want a subtle sparkle, not an opaque color. -
Tint the resin:
Add just one small drop of pale pink alcohol ink or a tiny dab of pigment paste to achieve that soft blush tone seen in the photo. Keep it translucent. -
Prepare the gold leaf:
Using tweezers, tear small bits of gold leaf flakes off the main sheet. They should be irregular shapes and sizes for a natural look. -
Place the gold:
I like to place a few gold flakes directly into the dry mold first, pressing them slightly against the silicone walls so they remain visible on the surface. -
First pour:
Pour a small amount of your pink resin into the mold, filling it only about halfway. -
Embed more gold:
Drop additional gold flakes into the wet resin, using a toothpick or tweezers to submerge them slightly and push them toward the corners of the letter ‘A’. -
Final pour:
Top up the mold with the remaining pink resin until it is slightly domed above the rim, which accounts for slight shrinkage during curing.
Add a Token
Make a tiny matching resin heart or star charm using leftover resin and attach it to the keychain’s chain for extra movement and flair.
Step 3: Curing and Assembly
-
Remove bubbles:
Wait 5-10 minutes, then pass a heat gun or lighter quickly over the surface to pop any final micro-bubbles that have risen. -
Full cure:
Cover the mold with a dust cover and let it cure undisturbed for 24-48 hours, depending on your resin’s specifications. -
Demold:
Once hardened, gently peel back the silicone mold and pop the letter out. -
Drill the pilot hole:
Mark the center of the top edge of the letter. Using a manual pin vise or small hand drill, carefully drill a hole straight down about a quarter inch deep. -
Attach the eye screw:
Dip the tip of a gold screw eye pin into a tiny dot of fresh mixed resin or sturdy glue, then twist it firmly into the drilled hole. -
Connect hardware:
Use pliers to open the jump ring on your gold keychain hardware, loop it through the eye screw, and close it tightly to secure the chain.
Enjoy the gentle sparkle of your custom blush keychain


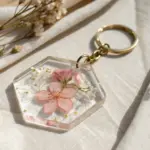
Botanical Resin Bookmarks
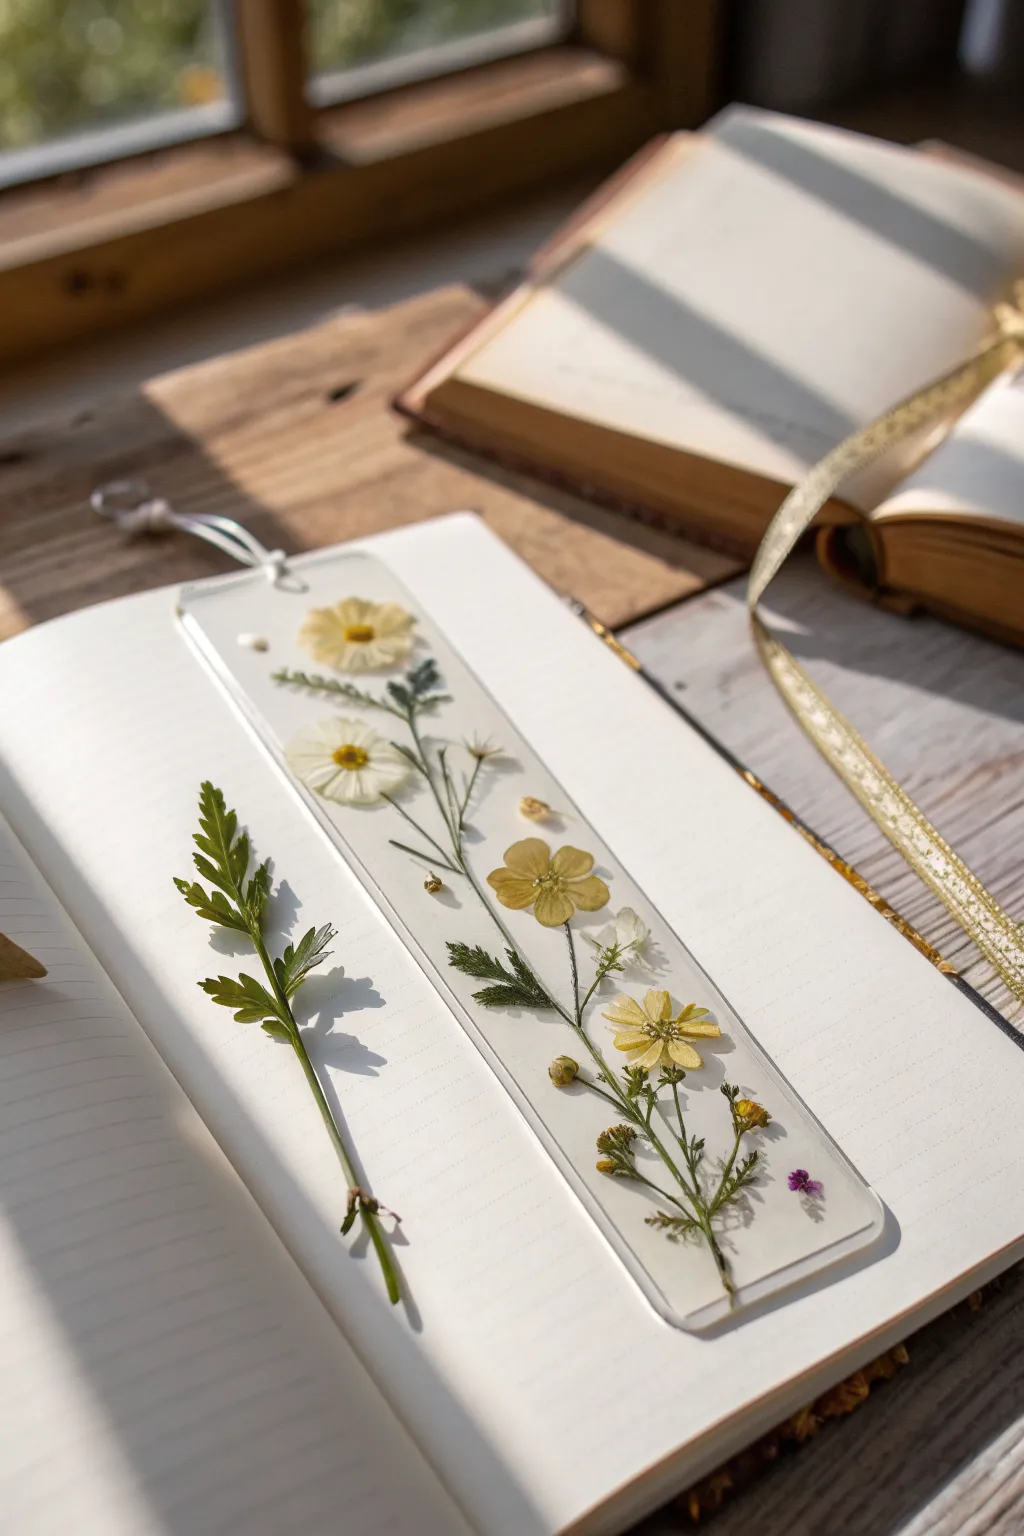
Capture the delicate beauty of a summer garden with these transparent resin bookmarks. Featuring pressed yellow buttercups, white daisies, and intricate fern-like greens, the result is a functional piece of art that looks like a suspended moment in time.
Step-by-Step
Materials
- Clear epoxy casting resin (Part A and Part B)
- Rectangular silicone bookmark mold
- Dried pressed flowers (daisies, buttercups)
- Dried pressed greenery (small ferns, stems)
- Tweezers
- Mixing cups and stir sticks
- Heat gun or long-neck lighter
- Small loose leaves or tiny buds for filler
- Gloves and protective work surface
- Tassel cord or ribbon (optional)
Step 1: Preparation and Design
-
Prepare your workspace:
Since resin is sticky and time-sensitive, set up everything beforehand. Lay down a silicone mat or wax paper to protect your table, and ensure your mold is clean and free of dust. -
Dry fit your design:
Before mixing any resin, arrange your dried flowers along the side of the mold or on a piece of paper cut to the mold’s size. This lets you finalize the composition without the time pressure of curing resin. -
Snip stems carefully:
Using small scissors, trim the stems of your pressed flowers to fit the narrow bookmark shape. You want them to look like a growing vine, so save a long main stem piece to act as the ‘spine’ of the design.
Flowers Turning Brown?
Botany needs to be bone dry! Any moisture left in petals will rot inside the resin, turning brown over time. Use silica gel sand to dry fresh flowers completely before resin use.
Step 2: First Layer Pour
-
Mix the resin:
Combine your resin and hardener according to the manufacturer’s ratios (usually 1:1) in a mixing cup. Stir slowly but thoroughly for at least 3-5 minutes, scraping the sides and bottom. -
Let bubbles rise:
Once mixed, let the cup sit for about 2 minutes. This allows the larger air bubbles created during stirring to rise to the surface and pop. -
Pour the base layer:
Pour a thin layer of resin into the mold, filling it just about halfway or slightly less. You only need enough to provide a sticky bed for the flowers. -
Remove bubbles:
Pass a heat gun or lighter quickly over the surface of the resin to pop any remaining bubbles. Don’t hold it in one spot too long, or you risk damaging the mold.
Pro Tip: Seal First
For very delicate white petals that turn transparent in resin, try sealing them first with a thin coat of Mod Podge or clear spray sealer. This keeps the color opaque.
Step 3: Botanical Arrangement
-
Place the main stems:
Using tweezers, gently pick up your long green stem and place it into the wet resin. I often like to curve it slightly to give it a more organic, natural feel rather than a rigid straight line. -
Add focal flowers:
Dip the back of your main flowers (the daisy and buttercups) slightly into leftover resin in your cup before placing them. This acts like glue and helps prevent bubbles from getting trapped underneath the petals. -
Position the blooms:
Place the white daisy near the top and the yellow buttercups lower down, following the visual flow of the stem. Use your tweezers to submerge them gently if they float up. -
Fill with details:
Tuck small sprigs of greenery, tiny buds, or loose petals into the empty spaces around the main flowers. These small details add depth and make the arrangement look lush. -
Check for trapped air:
Look closely at the underside of the clear mold if possible. If you see air pockets caught under the leaves or petals, gently press down with a toothpick or tweezers to release them. -
Let it tack:
Allow this layer to cure until it is ‘tacky’ or gelatinous (usually 2-4 hours). If you pour the next layer too soon, the flowers might float away from their positions.
Step 4: Final Encapsulation
-
Mix final batch:
Mix a fresh second batch of clear resin following the same careful stirring process as before. -
Fill the mold:
Slowly pour the resin over your tacked-down floral arrangement until the mold is filled to the brim. Pouring slowly helps avoid introducing new bubbles. -
Doming the top:
Carefully add drop by drop until you have a slight dome effect due to surface tension, which gives a professional, smooth finish. Be careful not to overflow. -
Final bubble check:
डू one last pass with your heat tool to ensure crystal clear transparency. -
Full cure:
Cover the mold with a box to protect it from dust and let it cure fully for 24-48 hours. -
Demold and finish:
Once rock hard, gently peel the silicone mold away. If the edges are sharp, you can sand them lightly with fine-grit sandpaper or a nail buffer, then attach a tassel or cord through the hole if your mold included one.
Enjoy your beautiful, durable bookmark as a perfect companion for your next reading adventure
BRUSH GUIDE
The Right Brush for Every Stroke
From clean lines to bold texture — master brush choice, stroke control, and essential techniques.
Explore the Full Guide
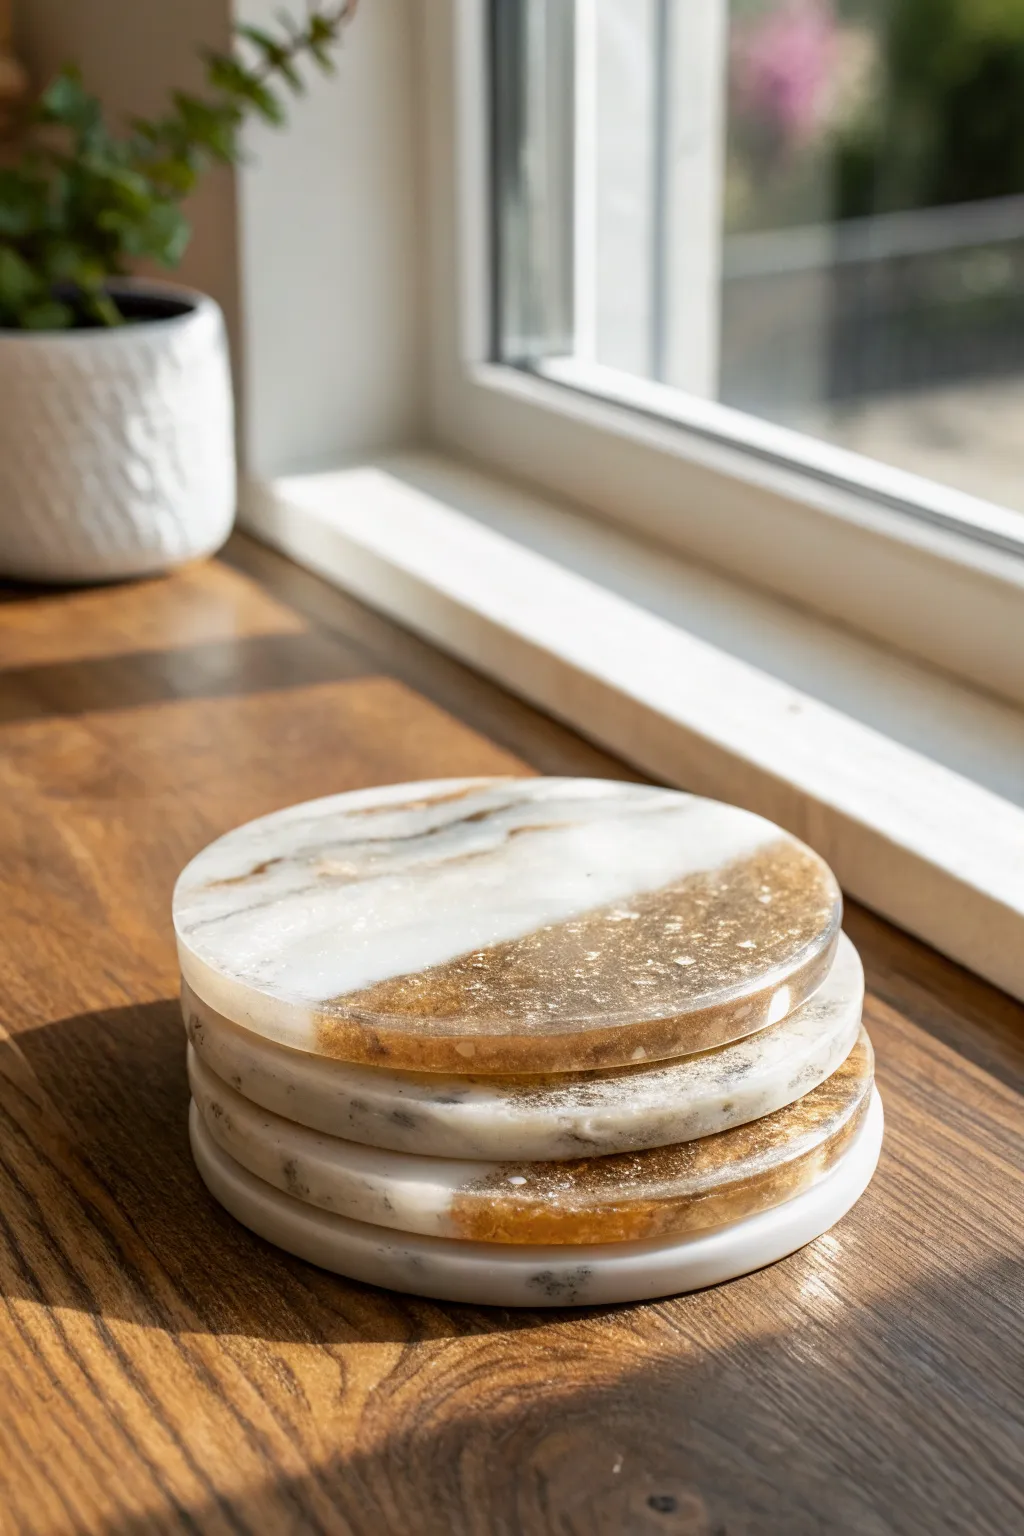
Resin Serving Tray With Metallic Veins
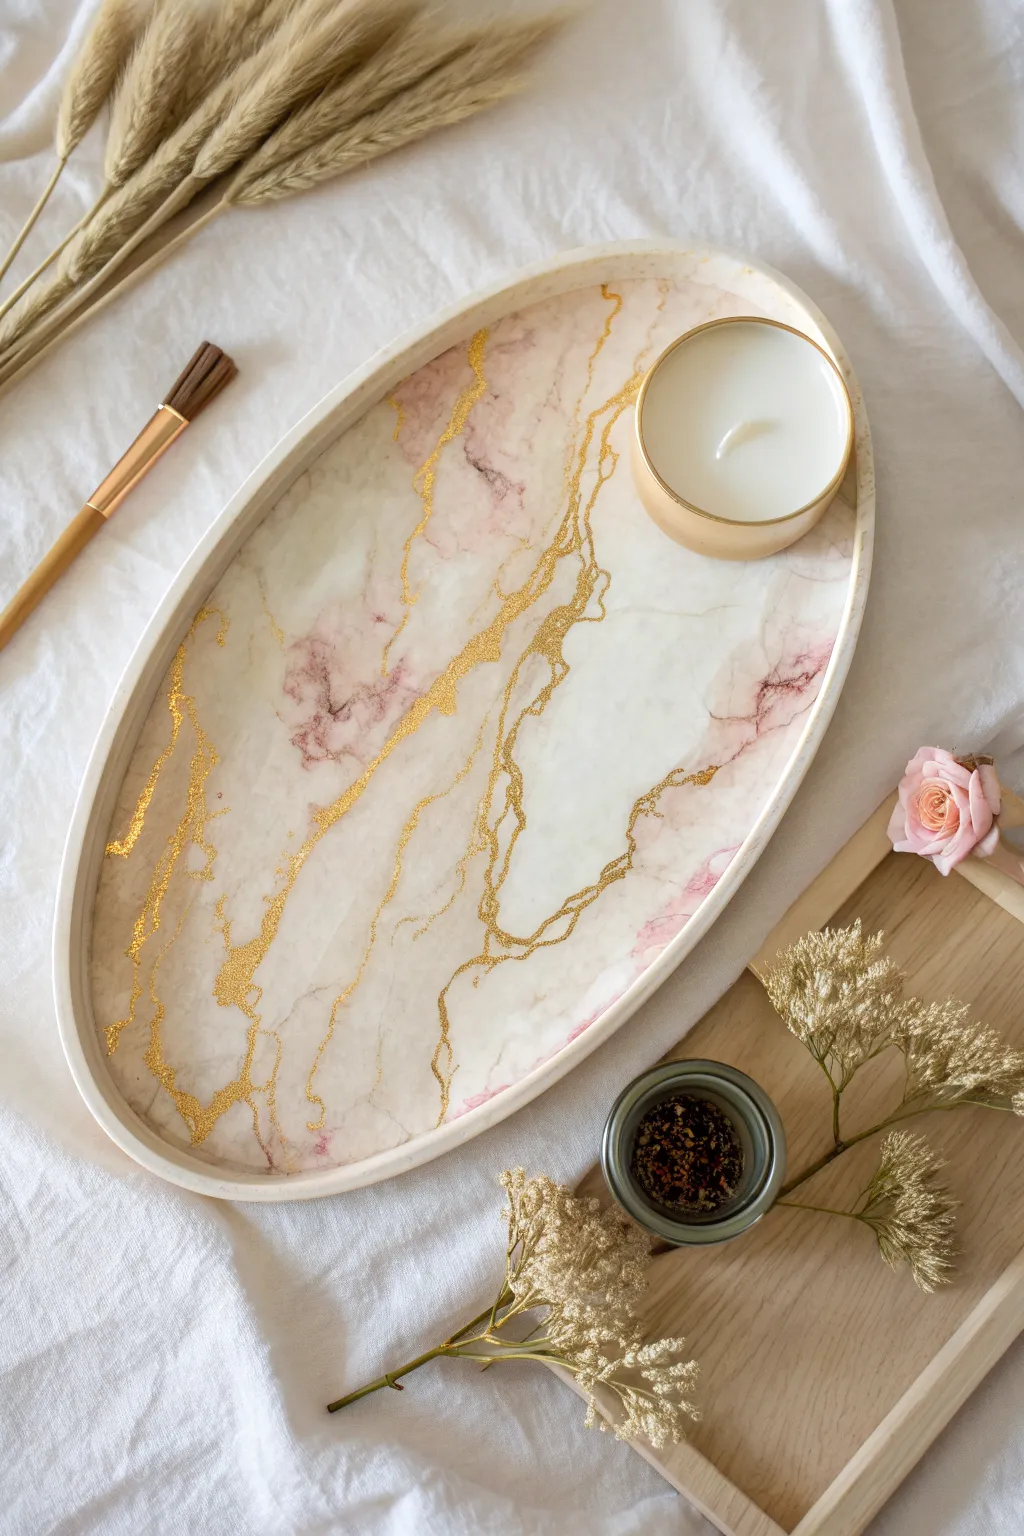
Elevate your home decor with this sophisticated oval tray that mimics the look of high-end marble with a touch of Japanese Kintsugi inspiration. The soft pink and white swirls create a dreamy base, while the striking gold metallic veins add a layer of luxury and texture.
Step-by-Step Tutorial
Materials
- Oval silicone tray mold (approx. 10-12 inches)
- Epoxy resin and hardener (casting resin recommended)
- White opaque resin pigment or alcohol ink
- Soft pink mica powder or alcohol ink
- Gold metallic leaf powder or fine glitter
- Gold paint pen or liquid gold leaf
- Heat gun or torch
- Mixing cups and stir sticks
- Disposable gloves
- Isopropyl alcohol (for cleanup)
Step 1: Preparation & Mixing
-
Prepare your workspace:
Set up in a well-ventilated, dust-free area. Cover your surface with a silicone mat or plastic sheet to catch drips. Ensure your oval mold is clean and dry. -
Measure the resin:
Calculate the volume needed for your specific mold size. Pour equal parts (or the ratio specific to your brand) of resin and hardener into a large mixing cup. -
Mix thoroughly:
Stir the mixture slowly but thoroughly for at least 3-5 minutes, scraping the sides and bottom. Pouring the mixed resin into a second clean cup and mixing again ensures no unmixed hardener remains. -
Divide the resin:
Separate your clear resin into three smaller cups. Keep the largest portion for white, a medium portion for the pink, and a very small amount for clear/gold accents.
Step 2: Creating the Marble Effect
-
Tint the resin:
Add white pigment to the largest cup until opaque. Add a small pinch of pink mica powder to the second cup for a soft, pearlescent blush tone. Leave the third cup clear or add a tiny amount of gold powder. -
Pour the base layers:
Pour puddles of the white resin into the mold first, covering about 60% of the surface area. Don’t worry about being neat; random organic shapes work best. -
Add the pink accents:
Pour the pink resin into the empty spaces and drizzle some over the white areas. This creates depth and variation in the ‘stone.’ -
Swirl the colors:
Using a heat gun on a low setting, gently push the resin around to blend the harsh lines between pink and white. You can also use a stir stick to physically swirl them, but don’t over-mix or it will turn muddy. -
Remove bubbles:
Pass a torch or heat gun quickly over the surface to pop any air bubbles that have risen to the top. Let the resin cure for 24-48 hours until fully hard.
Sticky Situation?
If your resin remains sticky after 48 hours, it likely wasn’t mixed correctly. Sadly, you can’t just dry it. Scrape off the goo and pour a fresh thin layer on top to seal it.
Step 3: Adding the Gold Veins
-
Demold the tray:
Once fully cured, carefully peel back the silicone mold to release your tray. Inspect the edges and sand down any sharp bits if necessary. -
Plan the veins:
Look at the natural organic lines created by your white and pink swirls. Identification of these natural fissures is key; you want to accentuate them, not fight them. -
Apply the gold lines:
Using a gold paint pen or a fine detail brush dipped in liquid gold leaf, draw shaky, organic lines following the swirls. I like to vary the pressure to create thick and thin sections for realism. -
Create branching:
Add smaller ‘tributary’ veins branching off the main gold lines. These delicate cracks make the marble effect look much more convincing. -
Add texture (optional):
While the paint is still tacky, you can gently tap a little extra gold powder onto the thickest parts of the veins to add dimension and sparkle. -
seal the design:
This step is crucial for food safety and durability. Mix a small batch of clear potting resin (or a top coat resin). -
Apply the top coat:
Pour the clear resin over the center of the tray and spread it to the edges with a gloved finger or silicone brush. This seals in the gold paint so it won’t scratch off. -
Final cure:
Cover the tray with a dust cover (like a cardboard box) and allow it to cure for another 24 hours. Once hard, your luxury tray is ready for display.
Make it Functional
Attach two gold cabinet handles to the short ends of the oval before the final top coat cures. This transforms the decorative piece into a fully functional serving platter.
Enjoy styling your new faux-marble tray with candles or jewelry for a touch of handmade elegance
Resin-and-Wood River Cutting Board
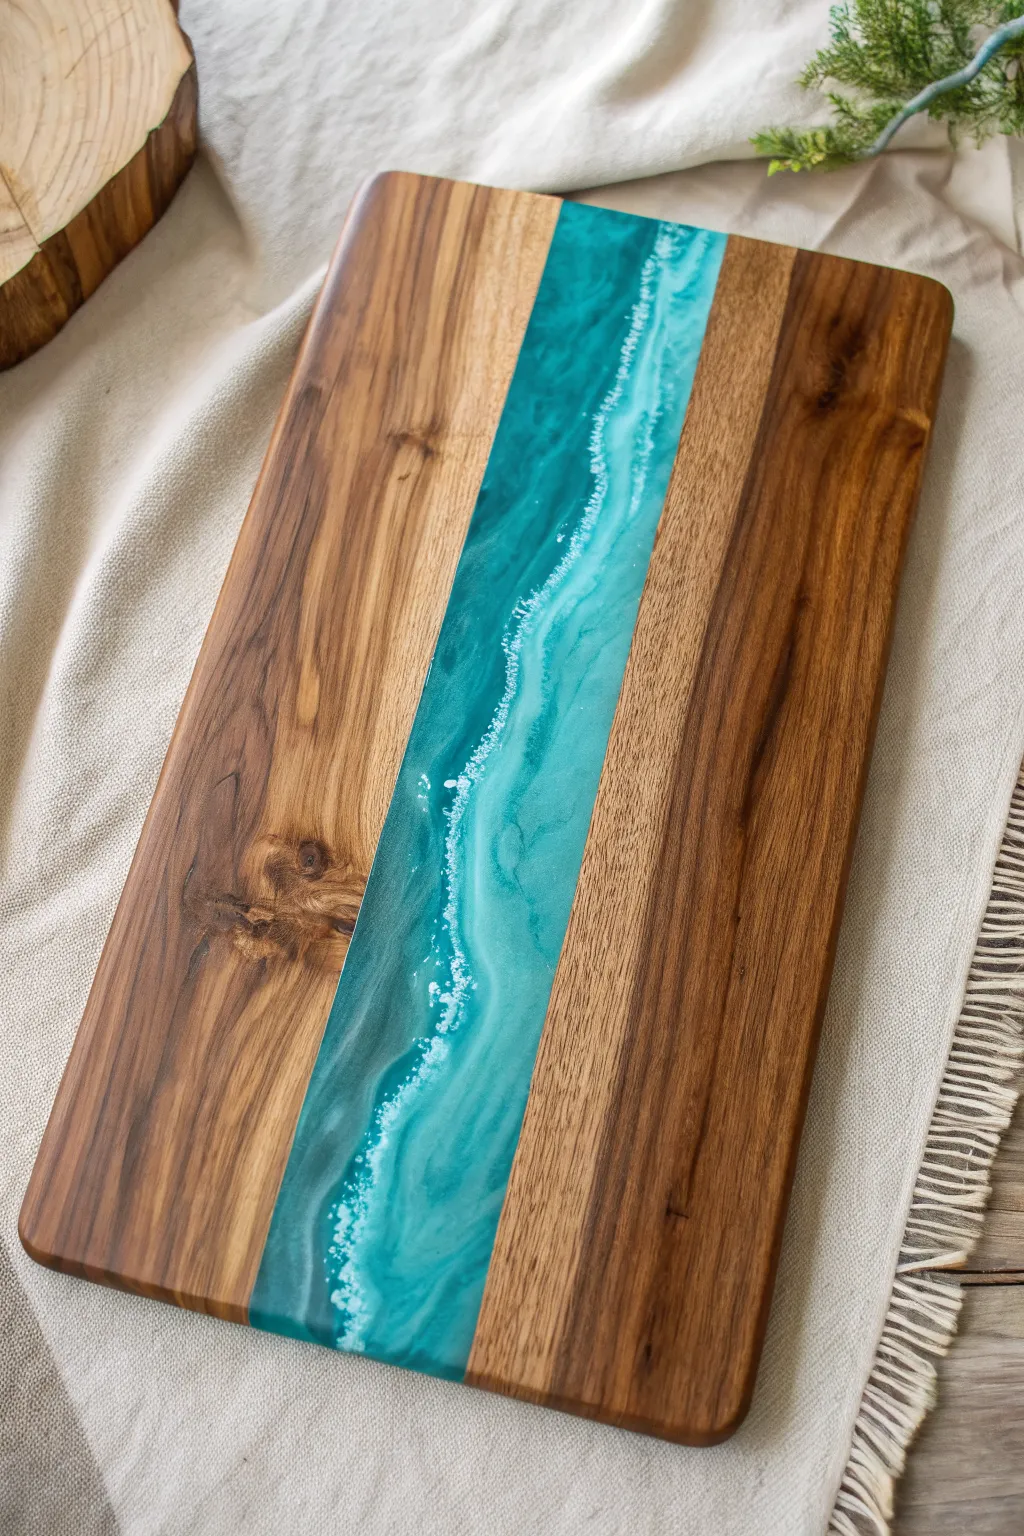
Capture the beauty of the coast with this stunning river cutting board, featuring rich walnut wood flanking a vibrant teal resin stream. The white lacing effect mimics crashing waves, creating a functional piece of art that brings a touch of the seaside to your kitchen.
Detailed Instructions
Materials
- Kiln-dried hardwood slab (Walnut, Cherry, or Olive wood)
- Deep pour epoxy resin
- Teal or turquoise mica powder
- Translucent blue alcohol ink
- Opaque white pigment paste
- Melamine board (for the mold)
- Tyvek tape or sheathing tape
- Silicone caulk and caulking gun
- Router with flattening bit and round-over bit
- Orbital sander with discs (80 to 400 grit)
- Heat gun or blowtorch
- Food-safe wood finish (mineral oil or Odie’s Oil)
- Clamps
- Mixing buckets and stir sticks
- Hot glue gun
Step 1: Wood Prep and Mold Making
-
Select and cut the wood:
Choose a piece of hardwood with an interesting live edge or grain pattern. Cut the board down the middle lengthwise to create two separate ‘banks’ for your river. -
Clean the live edges:
Use a wire brush or a Dremel tool to remove any loose bark, dirt, or debris from the live edges. This ensures the epoxy bonds securely to the wood. -
Build the mold base:
Cut a piece of melamine slightly larger than your final board dimensions. Cover the shiny surface entirely with Tyvek tape, overlapping the strips slightly to prevent leaks. -
Create the mold walls:
Cut strips of melamine for the sides. Tape the inside faces of these strips as well. Assemble the walls around your base using hot glue on the outside seams to hold them temporarily. -
Seal the mold:
Run a bead of silicone caulk along all internal seams where the walls meet the base and corners. Smooth it with your finger and let it cure fully. -
Secure the wood:
Place your wood pieces into the mold with the live edges facing inward, leaving a gap for the river. Clamp the wood down or weigh it heavily to prevent floating when you pour.
Cloudy River Rescue
If your resin looks cloudy after sanding, you simply stopped too soon. Continue sanding up to 600 or 1000 grit, then use a polishing compound to bring back the crystal-clear, wet look.
Step 2: Pouring the Ocean River
-
Mix the base epoxy:
Follow the manufacturer’s instructions for mixing your deep pour resin. Mix thoroughly for several minutes, scraping the sides and bottom of the bucket. -
Tint the resin:
Separate a small cup for your white waves. Tint the main batch with teal mica powder and a drop of blue alcohol ink for depth. Aim for a vibrant, semi-translucent turquoise color. -
Pour the river:
Slowly pour the teal resin into the gap between the wood slabs. Fill it until it is just slightly proud of the wood surface to account for shrinkage and leveling. -
Create the white mixture:
Mix your reserved small cup of resin with opaque white pigment paste. It needs to be very opaque to stand out against the blue. -
Apply the waves:
Drizzle thin lines of white resin along the edges of the river where it meets the wood. I like to let the base resin set for about 30 minutes before doing this so the white doesn’t sink immediately. -
Blow the waves:
Using a heat gun on a low setting, gently blow the white lines outward toward the center of the river. This disperses the pigment and creates the cellular, foamy ‘lacing’ effect seen in ocean waves. -
Pop bubbles and cure:
Pass a torch quickly over the surface to pop air bubbles. Cover the mold to protect it from dust and let the resin cure for the full time recommended (usually 24-72 hours).
Coastal Embellishments
Before pouring the teal resin, scatter crushed sea shells, small starfish, or real sand along the bottom of the river gap to add authentic texture and depth to your seascape.
Step 3: Finishing the Board
-
Demold the slab:
Remove the screws or break the hot glue seal to disassemble the mold walls. Use a pry bar gently to pop the slab off the taped base. -
Flatten the surface:
Secure the board to a workbench. Use a router sled with a flattening bit to plane the entire surface until the wood and epoxy are perfectly level and flat on both sides. -
Trim to size:
Use a table saw or track saw to cut the board to its final rectangular dimensions, cleaning up the rough resin ends. -
Sand thoroughly:
Begin sanding with 80-grit paper, moving through 120, 180, 220, and up to 400 grit. Wipe the board with water between grits to reveal scratches that need more work. -
Round the edges:
Use a round-over bit on your router to create a smooth, comfortable edge profile around the perimeter of the board. -
Apply finish:
Pour a generous amount of food-safe oil onto the board. Buff it in with a non-abrasive pad, let it soak, and wipe off the excess. This will make the walnut grain pop and the epoxy shine.
Place this masterpiece in your kitchen and enjoy the coastal vibes every time you prepare a meal.

PENCIL GUIDE
Understanding Pencil Grades from H to B
From first sketch to finished drawing — learn pencil grades, line control, and shading techniques.
Explore the Full Guide
Live-Edge Resin Side Table Top
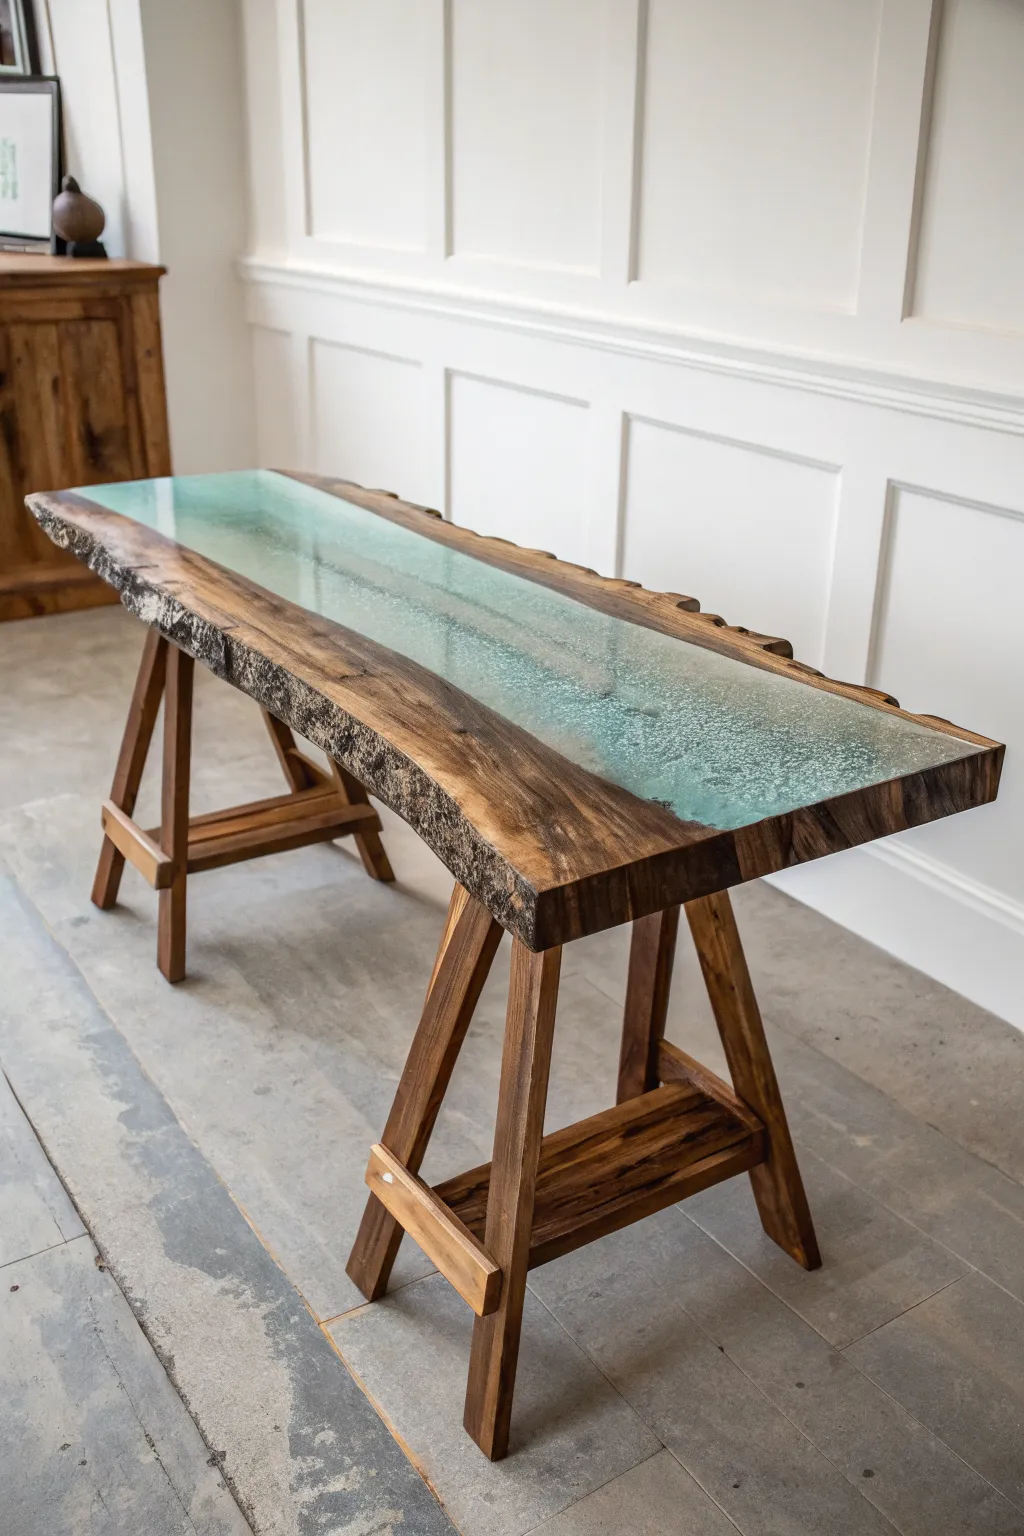
This stunning console table combines the rustic warmth of live-edge walnut with a translucent, bubbly epoxy river that mimics a flowing stream. The light aqua resin creates a beautiful contrast against the dark wood grain, making it a perfect statement piece for an entryway or hallway.
Step-by-Step Guide
Materials
- Two live-edge wood slabs (Walnut or Oak recommended)
- Deep pour epoxy resin kit
- Translucent turquoise or aqua resin dye
- Melamine board (for the mold)
- Tyvek tape or sheathing tape
- Silicone caulk and caulking gun
- Plunge router with flattening jig (or belt sander)
- Orbit sander with sandpaper (80 to 2000 grit)
- Polishing compound and buffer
- Wood finish (Osmo Polyx or similar)
- Wooden trestle legs (pre-made or custom built)
- Hot glue gun
- Mixing buckets and stir sticks
- Clamps
Step 1: Mold Construction & Wood Prep
-
Bark removal:
Using a drawknife or chisel, carefully remove all the bark from the live edge of your slabs. Any remaining bark will prevent the epoxy from bonding securely to the wood. -
Clean and sand edges:
Use a wire brush drill attachment or sandpaper to clean up the live edge, removing soft spots and debris until you have solid wood. -
Build the form base:
Cut a piece of melamine slightly larger than your final table dimensions. This will serve as the bottom of your mold. -
Apply release tape:
Cover the entire melamine surface with Tyvek or sheathing tape. Overlap the strips slightly to ensure no resin touches the melamine directly. -
Construct the sides:
Cut melamine strips for the mold walls, ensuring they are taller than the thickness of your wood slabs. Tape the inside faces of these strips as well. -
Seal the mold:
Attach the sides to the base using screws. Then, run a bead of silicone caulk along all inside seams and corners to make the mold watertight. Let the silicone cure fully.
Pro Tip: Leak Prevention
Before pouring the full river, pour a shallow 1/8″ layer of epoxy first. Let it gel to create a bottom plug that seals any tiny gaps between the wood and the mold.
Step 2: The Pour
-
Position the wood:
Place your wood slabs into the mold with the live edges facing inward, leaving a gap in the center for your river. I usually clamp a scrap board across the top to keep the wood from floating. -
Seal the wood edges:
Brush a thin seal coat of mixed epoxy onto the live edges. This prevents air bubbles from escaping the wood grain and clouding your river later. -
Mix the deep pour:
Mix your deep pour epoxy according to the manufacturer’s ratio. Mix slowly to minimize bubbles, then stir in a very small amount of translucent turquoise dye. -
Creating the bubbly texture:
To achieve the specific bubbly, icy look in the photo rather than glass-clear resin, try mixing a bit more vigorously to induce micro-bubbles or don’t use a heat gun to pop them. -
Pour the river:
Pour the resin into the central channel until it is just slightly higher than the wood surface, accounting for minor shrinkage. -
Curing time:
Cover the project to prevent dust from landing in it and allow it to cure for the full time recommended by your epoxy brand (efforts usually take 48-72 hours).
Step 3: Finishing the Top
-
Demold the slab:
Unscrew the mold walls and use a pry bar carefully to separate the melamine base from the slab, peeling away the tape. -
Flatten the surface:
Use a router on a flattening sled to level the entire slab. Run it back and forth to shave off the excess epoxy and ensure the wood and resin are perfectly flush. -
Sanding progression:
Sand the entire top, starting with 80 grit and moving up through 120, 180, 220, and 320. Wipe away dust with mineral spirits between each grit change. -
Polishing the resin:
For the resin portion solely, continue wet sanding up to 2000 or 3000 grit. Then use a buffing pad and polishing compound to bring back the clarity of the water. -
Apply finish:
Apply a high-quality oil-wax finish like Osmo Polyx to the wood. Buff it in well to protect the walnut and make the grain pop. -
Attach the base:
Center your trestle legs on the underside of the table. Pre-drill holes and attach the legs using threaded inserts and bolts for a professional, sturdy connection.
Level Up: Embedded Stones
For a realistic river bed look, scatter small, clean river pebbles at the bottom of the channel before pouring your first layer of resin.
Enjoy the incredible depth and color of your new river table every time you walk by.
Resin Wall Art Panel Over Paint
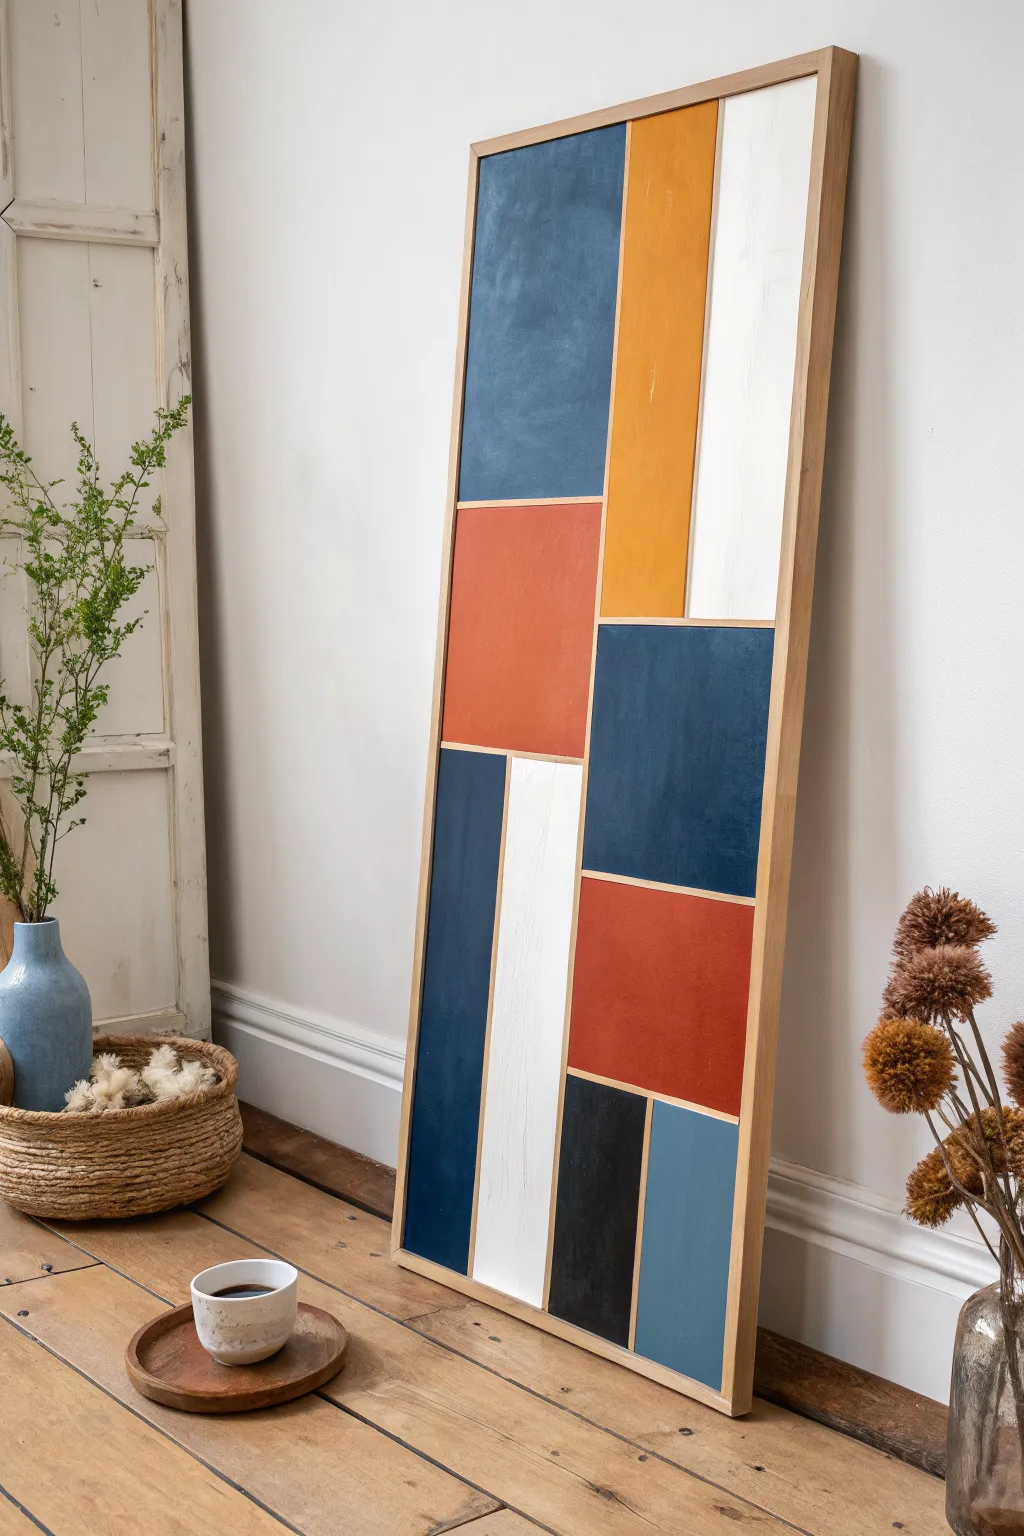
Bring modern, abstract style into your home with this tall geometric wall art panel. By combining matte acrylic paints with a high-gloss epoxy finish, you create a stunning contrast that makes the colors pop with depth and vibrancy.
How-To Guide
Materials
- Large plywood or MDF panel (approx. 24″ x 60″)
- Thin wooden trim strips (1/4″ square dowels)
- Wood glue
- Painter’s tape
- Acrylic paints (Navy, Rust, Mustard, Cream, Black, Slate Blue)
- Foam brushes and small detail brushes
- Clear casting epoxy resin kit
- Mixing cups and stir sticks
- Heat gun or torch
- Sanding block (220 grit)
- Wood stain (light oak or natural) for the frame
Step 1: Planning and Assembly
-
Map out the design:
Begin by sketching your geometric layout on a piece of paper. The design relies on large rectangular blocks of varying sizes, so plan for a balance of tall vertical sections and wider horizontal ones. -
Prep the base board:
Sand your large plywood or MDF panel until smooth. Wipe away any dust with a tack cloth or damp rag to ensure the paint and glue adhere properly. -
Cut the dividers:
Measure and cut your thin wooden trim strips to create the borders between your color blocks. You will need strips for the outer frame and internal dividers. -
Dry fit the layout:
Lay your cut strips onto the board to verify the fit. Make sure the connections are tight and the lines are straight before gluing anything down. -
Glue the dividers:
Apply a thin bead of strong wood glue to the back of each trim strip. Press them firmly into place on the board. Wipe away excess glue immediately so it doesn’t dry in the areas you plan to paint. -
Create the outer frame:
Finish the assembly by gluing the border strips around the entire perimeter of the panel. Clamp or weigh down the strips and let the glue cure completely, usually overnight.
Step 2: Painting the Sections
-
Seal the seams:
Check for any tiny gaps where the dividers meet the board. Since we are using resin later, it is smart to run a tiny bead of clear caulk or extra glue in these corners to prevent resin from leaking between sections. -
Project the wood grain:
If you want the dividers to remain natural wood, carefully apply painter’s tape to the top faces of all the trim strips to protect them from paint splashes. -
Apply base coats:
Using foam brushes, paint each rectangular section its designated color. I find it helpful to paint the lightest colors (cream, yellow) first. -
Build up opacity:
Acrylic paint often streaks on wood, so plan for 2-3 coats. Allow the paint to dry fully between layers to ensure a rich, solid color. -
Detail the edges:
Use a small detail brush to get the paint right up to the edge of the dividers without slopping onto the wood trim. If you make a mistake, wipe it quickly with a damp cloth. -
Stain the trim (optional):
Once the paint is bone dry, carefully remove the tape from the dividers. If you want a specific wood tone, stain the trim carefully with a small brush or a stain marker.
Seal the Wood First
Raw wood releases air bubbles into resin. Before the final pour, brush a thin seal coat of mixed resin or Mod Podge onto the wood dividers to stop trapped air from escaping.
Step 3: The Epoxy Pour
-
Level the artwork:
Place your artwork on a work surface raised on cups. Use a spirit level to ensure the board is perfectly flat in all directions; this is crucial for an even resin coat. -
Mix the resin:
Measure equal parts of your epoxy resin and hardener into a clean cup. Stir slowly but thoroughly for at least 3 minutes, scraping the sides and bottom to ensure a perfect chemical blend. -
Pour individual sections:
Pour the clear resin into each painted “cell.” Because you have wooden dividers, the resin should self-level within the boundaries. -
Spread the resin:
Use a clean stir stick or a gloved finger to gently guide the resin into the corners and edges of each cell. Ensure the resin completely covers the paint layer. -
Pop the bubbles:
Wait about 5-10 minutes for bubbles to rise to the surface. Pass a heat gun or torch quickly over the surface to pop these bubbles. Keep the heat source moving to avoid scorching the resin or the wood dividers. -
Cover and cure:
Place a large cardboard box or dust cover over the project to protect it from falling particles. Let it cure undisturbed for 24-48 hours until hard and glassy.
Add Metallic Accents
Before pouring the clear resin, paint thin gold or silver lines along the edges of the color blocks for a chic, high-end metallic border effect.
Once fully cured, attach heavy-duty hanging hardware to the back and enjoy the modern elegance visual depth of your new art piece


Geode-Inspired Resin Art Slice
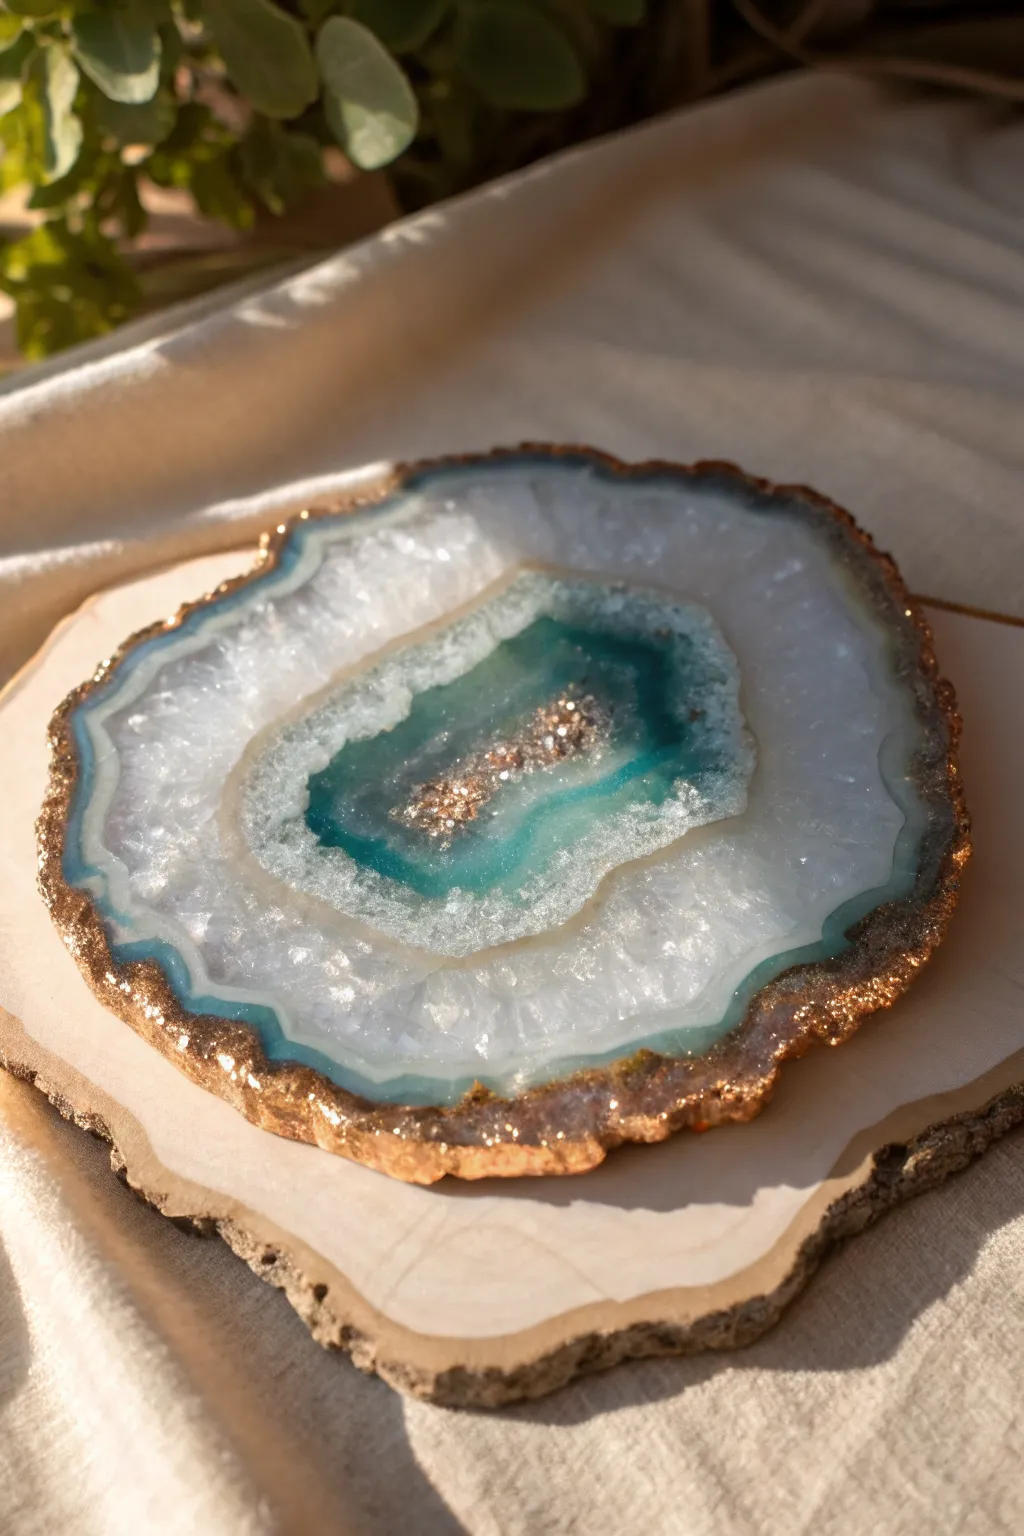
Capture the organic beauty of agate slices with this stunning resin project featuring crystalline textures and luxurious gold accents. The combination of translucent whites, deep teals, and sparkling crushed glass creates a mesmerizing depth that mimics real gemstones perfectly.
Detailed Instructions
Materials
- Epoxy resin (casting or coating resin)
- Geode silicone mold (irregular shape)
- White alcohol ink
- Teal or turquoise mica powder
- Clear crushed glass or quartz chips
- Gold leaf flakes or metallic gold crushed glass
- Gold liquid leaf paint or gold paint marker
- Heat gun or torch
- Mixing cups and stir sticks
- Tweezers
- Gloves and respirator mask
Step 1: Preparation & Center Formation
-
Prepare your workspace:
Ensure your work surface is perfectly level and covered with a silicone mat or plastic sheet. Clean your geode mold with tape to remove any dust particles. -
Mix the resin:
Mix a clear batch of epoxy resin according to the manufacturer’s instructions, ensuring equal parts are measured correctly and stirred slowly to minimize bubbles. -
Create the crystal center:
Place a small pile of clear crushed glass or quartz chips directly into the center of the mold. Add a pinch of gold flakes or metallic gold glass in the very middle for that sparkling core seen in the reference. -
Secure the center:
Pour a small amount of clear mixed resin over the glass pile just to coat it and hold it together, but don’t fill the mold yet.
Depth Trick
For a 3D effect, pour the clear base layer first, let it get tacky, and then pour your colored layers. It suspends the pigments.
Step 2: Pouring the Color Layers
-
Mix the teal pigment:
In a small cup, mix a portion of resin with teal or turquoise mica powder. Aim for a rich, semi-transparent color rather than a solid opaque look. -
Mix the white resin:
In a separate cup, mix resin with white alcohol ink. I like to add just enough ink to make it milky but still slightly translucent, which helps create depth. -
Pour the teal ring:
Carefully pour a thin ring of the teal resin around the central crystal pile. Let it flow naturally against the glass chips. -
Add the white layer:
Pour the white resin around the outside of the teal ring. Pour slowly to maintain control and prevent the colors from muddling too much. -
Create the outer clear edge:
Pour clear resin around the outermost edge of the mold to fill the remaining space. This creates that realistic ‘quartz’ border found in natural agate slices. -
Blend the transitions:
Use a toothpick or clean stir stick to very gently swirl the boundary where the teal and white meet. Less is more here; you want organic lines, not a completely mixed color.
Step 3: Curing & Finishing Details
-
Pop bubbles:
Pass a heat gun or torch quickly over the surface to pop any air bubbles that have risen to the top. check specifically around the crushed glass area where air often gets trapped. -
Allow to cure:
Cover the mold with a dust cover (like a cardboard box) and let it cure fully for 24-48 hours, depending on your resin brand. -
Demold the piece:
Once hardened, gently peel the silicone mold away from the resin. The edges might be slightly sharp or irregular. -
Sand the edges:
If there are any sharp flashing bits or rough spots on the edge, lightly sand them down with fine-grit sandpaper until smooth. -
Apply the gilded rim:
Using a small brush or a gold paint marker, paint the textured outer edge of the resin slice. This gold rim defines the shape and adds an elegant finish. -
Seal the edge:
Wait for the gold paint to dry completely. For durability, you can apply a very thin layer of UV resin or clear varnish over the gold paint to prevent tarnishing.
Cloudy Resin?
If your clear sections look milky, it’s likely humidity or micro-bubbles. Use a warm water bath for your resin bottles before mixing to reduce bubbles.
Place your finished geode slice on a coffee table or use it as a chic candle holder to show off the translucency
Pressed Flower Resin Coasters
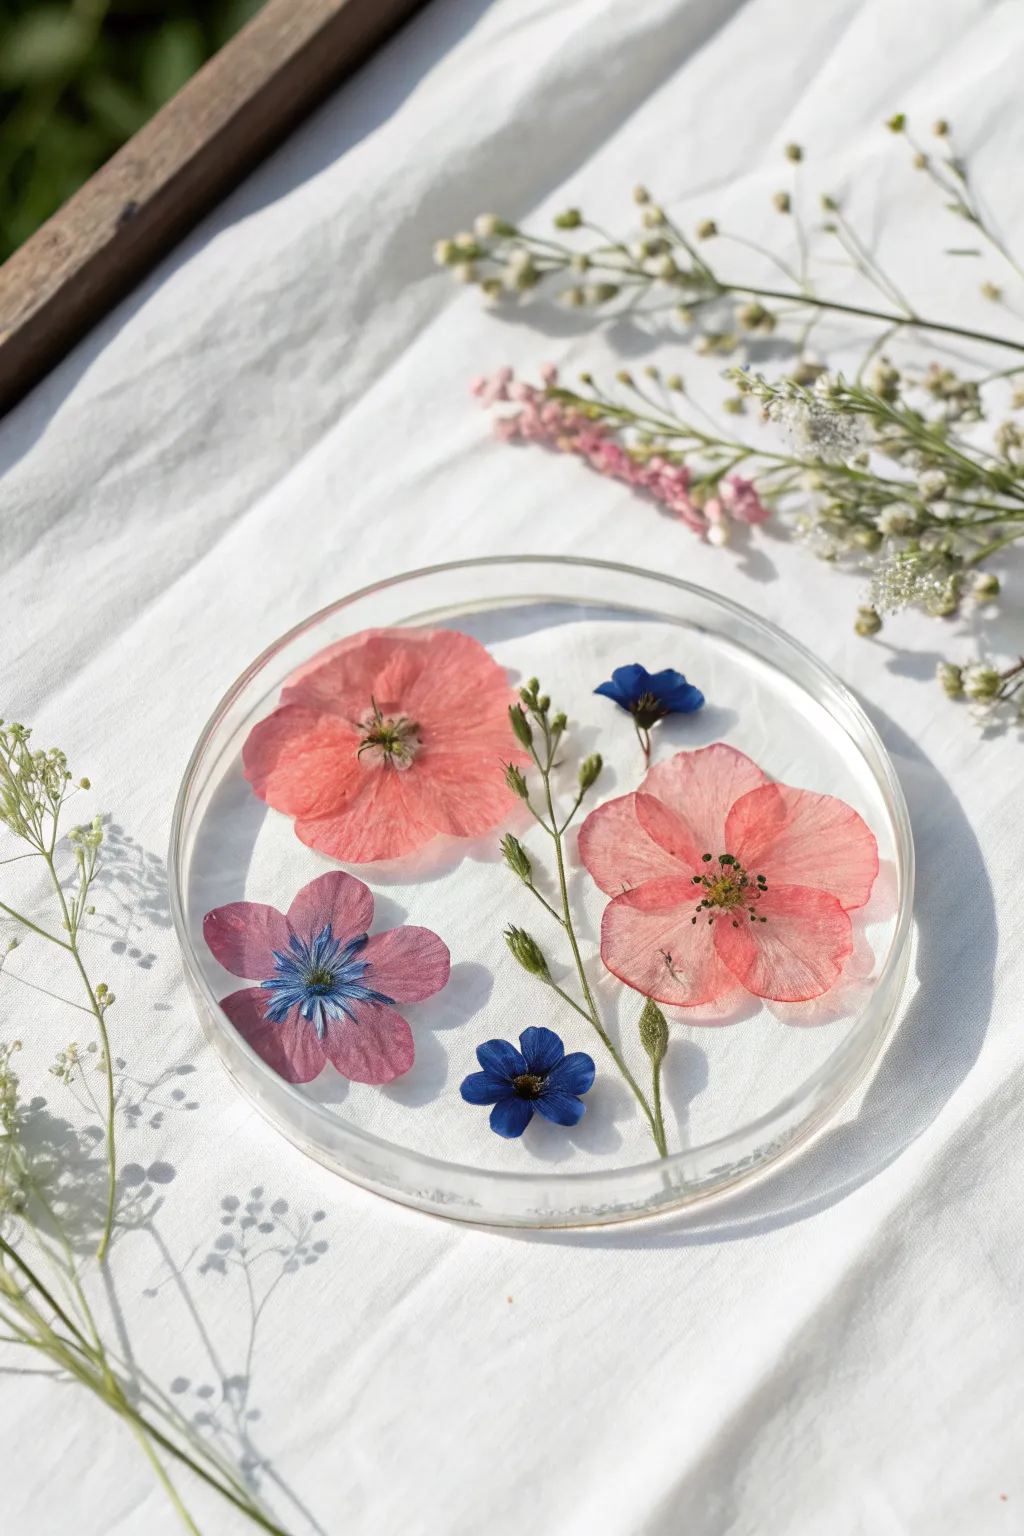
Capture the delicate beauty of a garden forever with these crystal-clear resin coasters. Featuring vibrant pressed blooms in pinks and blues suspended in glass-like epoxy, this project brings a touch of eternal spring to your coffee table.
Step-by-Step
Materials
- High-quality clear casting epoxy resin (part A and B)
- Round silicone coaster mold (with raised rim)
- Pressed dried flowers (pink poppy-style blooms, blue pincushion flowers, small blue filler flowers)
- Green pressed stems/foliage (small leaves and buds)
- Mixing cups and stir sticks
- Tweezers
- Heat gun or lighter
- Gloves and workspace protection
- Toothpicks
Step 1: Preparation & First Pour
-
Select your botanicals:
Before mixing any resin, lay out your design on a piece of paper. Choose two large pink blooms as focal points, a medium purple/pink flower, and a couple of small blue accents. This ‘dry run’ ensures your composition fits perfectly within the mold’s diameter. -
Prepare the resin:
Measure equal parts of resin and hardener (or according to your bottle’s ratio) into a mixing cup. Stir slowly but thoroughly for at least 3-5 minutes, scraping the sides and bottom to ensure a complete chemical blend. -
Let it degas:
Allow the mixed resin to sit for about 5 minutes. This rest period lets larger air bubbles rise to the surface and pop on their own, which is crucial for that glass-like finish we want. -
Pour the base layer:
Pour a thin layer of resin into your silicone mold—just enough to cover the bottom, about 1/8th of an inch deep. This acts as the ‘glue’ for your flowers. -
Pop bubbles:
Quickly pass a heat gun or lighter over the surface of this thin layer to remove any lingering air bubbles. Be careful not to hold the heat in one spot too long to avoid damaging the mold.
Moisture Warning
Ensure your flowers are 100% dry before casting. Even a tiny bit of moisture will rot inside the resin, turning your beautiful petals brown over time.
Step 2: Creating the Composition
-
Place the greenery:
Using tweezers, gently place the long green stem diagonally across the mold first. It should act as a subtle dividing line or backbone for the floral arrangement. -
Add focal flowers:
Position the two large pink blooms. One should sit near the top left, and the other towards the center-right, partially overlapping the greenery but keeping some space between them. -
Insert secondary blooms:
Place the purple-pink flower with the blue center in the lower left quadrant. I like to tuck the edge slightly under the larger pink bloom for a natural, clustered look. -
Place blue accents:
Add the vivid blue flowers. One small one goes near the top right edge, and the slightly larger blue one sits near the bottom center to balance the colors. -
Press down gently:
Use a toothpick to very gently press the flowers into the wet resin. You want to ensure the underside of each petal is fully wetted so no air gets trapped underneath. -
Check for trapped air:
Look closely at the centers of the flowers. If you see silver bubbles, gently prod them with your toothpick to release the air. -
Initial cure:
Cover the mold with a box to prevent dust from settling and let this layer cure for about 4-6 hours until it is tacky but not fully hard. This prevents flowers from floating up during the next pour.
Step 3: Encapsulation & Finish
-
Mix final resin batch:
Prepare a second batch of clear resin, following the same careful mixing and resting procedure as before. -
Top coat pour:
Slowly pour the fresh resin over the tacky layer, starting from the center and letting it flow outward. Fill the mold all the way to the rim. -
Final bubble check:
Monitor the piece for the first 10-15 minutes. New bubbles might rise from beneath the petals. Use your torch or heat gun sparingly to pop them. -
Full cure:
Cover the mold again and let it cure undisturbed for 24-48 hours, or until the resin is rock hard and no longer sticky to the touch. -
Demold:
Gently pull the silicone sides away from the resin and pop your coaster out. The bottom of the mold usually creates the glossy top surface of your coaster. -
Inspect edges:
If the back edge feels sharp (where the resin met the top of the mold), you can gently sand it with fine-grit sandpaper or do a very thin ‘doming’ top coat for a smooth finish.
Floating Flowers?
If flowers drift after the first pour, just nudge them back with a toothpick during the first 20 minutes. The resin thickens as it sets, holding them better.
Place your finished coaster on a sunny table and watch how the light illuminates the preserved garden inside
Resin Drawer Knobs With Embedded Glitter
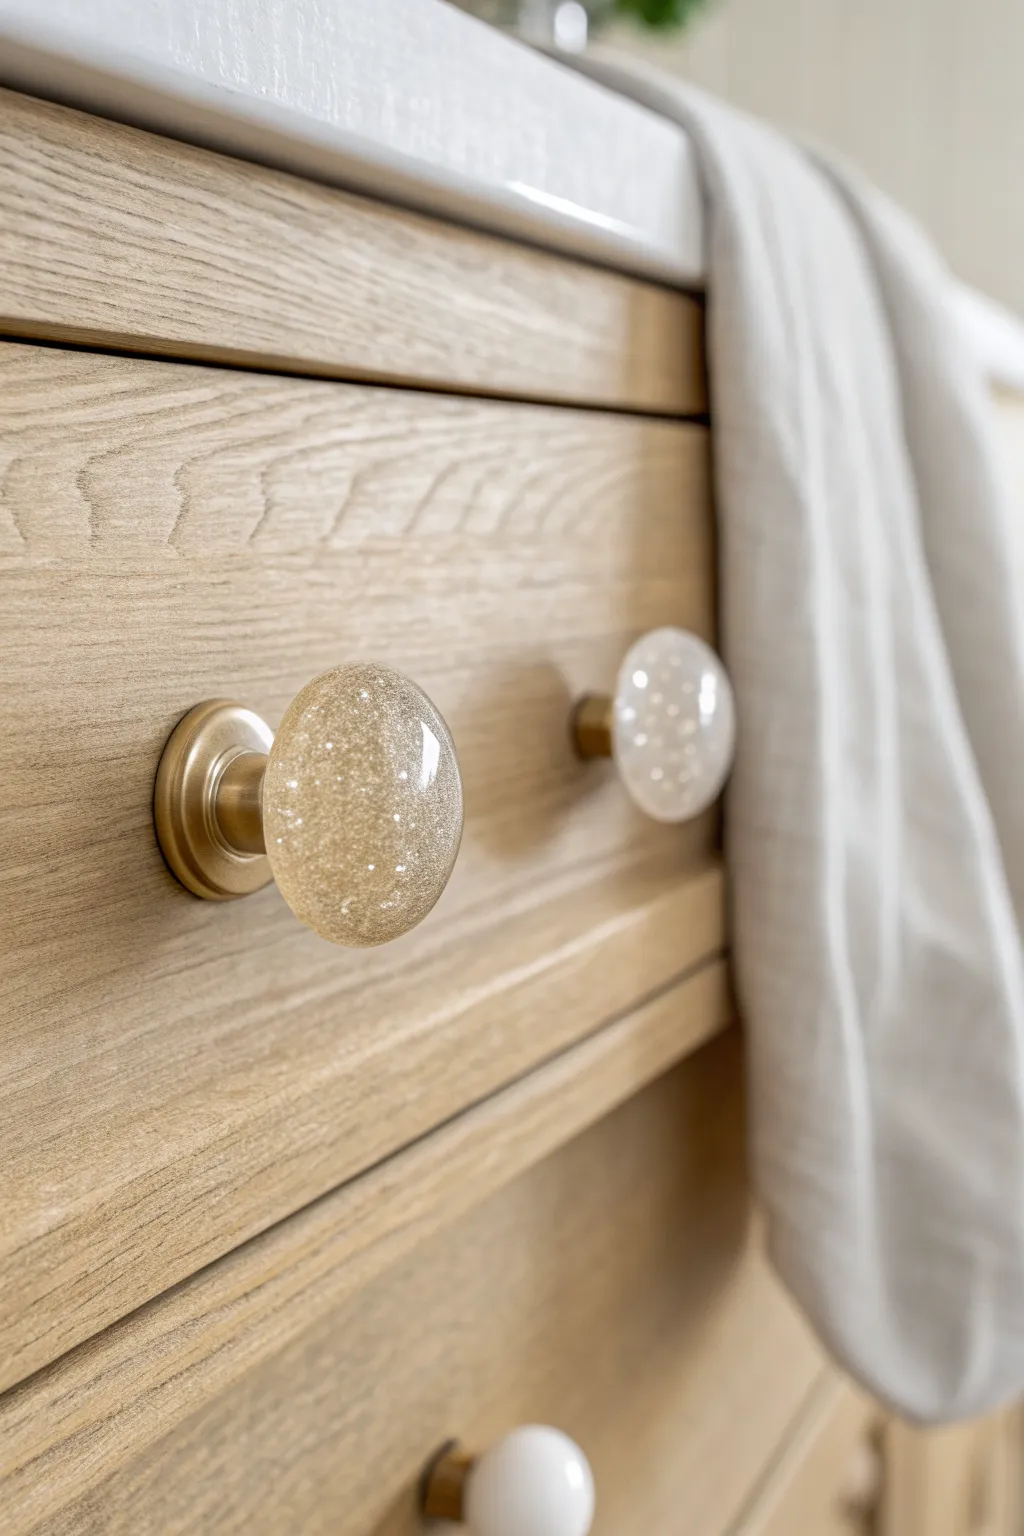
Transform ordinary furniture with these custom resin drawer knobs that capture the light beautifully. The spherical shape lends a classic feel while embedded champange and white glitter adds a modern, glamorous sparkle.
How-To Guide
Materials
- Spherical silicone knob molds (25mm or 30mm diameter)
- Epoxy casting resin (two-part system)
- Champagne gold fine glitter
- Iridescent white chunky glitter
- Knob hardware bases (brass or gold finish)
- Mixing cups and stir sticks
- Gloves and protective eyewear
- E6000 glue or strong epoxy adhesive
- Sandpaper (fine grit, 400-600)
- Heat gun or torch
- Toothpicks
Step 1: Preparation & Mixing
-
Set up your workspace:
Prepare a dust-free, well-ventilated area for casting. Lay down a silicone mat or wax paper to protect your surface from drips. Have your molds clean and dry before starting. -
Measure the resin:
Following the manufacturer’s instructions for your specific brand of casting resin, measure out equal parts of resin and hardener (or the ratio specified) into separate cups. -
Combine and stir:
Pour the two parts together into a clean mixing cup. Stir slowly and consistently for 3-5 minutes, scraping the sides and bottom to ensure a thorough blend without whipping in too many air bubbles.
Sticky Molds?
If your resin feels sticky after curing, the ratio was likely off or not mixed well enough. Unfortunately, you can’t fix this; discard and re-pour carefully.
Step 2: Creating the Glitter Mix
-
Divide the resin:
Pour the mixed resin into two smaller cups if you plan to make both gold and white knobs simultaneously. Leave a small amount of plain clear resin aside to top off the molds later. -
Add champagne loose glitter:
In the first cup, slowly sprinkle in the champagne gold fine glitter. Stir gently until the glitter is evenly suspended. Aim for a dense saturation so the knob looks solid rather than sparse. -
Mix the iridescent batch:
In the second cup, add your iridescent white chunky glitter. Mix thoroughly. I find that slightly larger glitter flakes reflect light better in clear resin, giving that dimensional, bubbly look. -
Let it rest:
Allow the mixed resin cups to sit for about 5 minutes. This helps any bubbles created during stirring to rise to the surface and pop before pouring.
Step 3: Casting and Curing
-
Pour into molds:
Carefully pour your glitter resin into the spherical silicone molds. Fill them slowly to avoid trapping air pockets at the bottom of the sphere. -
Top off the molds:
Fill the molds right to the very brim, creating a slight dome of resin held by surface tension. This minimizes the amount of sanding needed later. -
Pop bubbles:
Use a heat gun or a quick pass of a torch over the surface to pop any rising bubbles. Be careful not to overheat the silicone mold itself. -
Insert hardware (optional method):
Some molds come with a screw insert. If yours has this, place the screw directly into the wet resin, centering it perfectly. If not, you will glue the base on later. -
Cure completely:
Cover the molds with a box/dome to prevent dust from settling. Let the resin cure for 24-48 hours depending on brand instructions and room temperature.
Make It Luxe
Add a drop of translucent amber dye to the gold glitter mix. It warms up the resin tone, making the glitter look antique and expensive.
Step 4: Assembly and Finishing
-
Demold the spheres:
Once fully hard, gently peel back the silicone mold to release your resin sphere. It should be smooth and shiny. -
Sand the flat spot:
Where the mold opening was, there might be a sharp edge or uneven surface. Place a sheet of fine-grit sandpaper on a flat surface and rub the flat side of the knob against it in a circular motion until smooth. -
Prepare the hardware base:
Take your brass or gold knob bases. Scuff the flat surface of the metal slightly with sandpaper to help the glue adhere better. -
Glue the knob:
Apply a dab of E6000 or strong epoxy glue to the flat spot on your resin sphere. Press the metal hardware base firmly onto it. -
Centering verification:
Look at the knob from all angles to ensure the sphere is perfectly centered on the metal base before the glue sets. -
Final cure:
Let the adhesive cure fully (usually 24 hours) before attempting to screw the knob onto a drawer.
Now you have a set of unique, sparkling hardware that instantly upgrades your furniture
Resin Clock Face With Abstract Pour
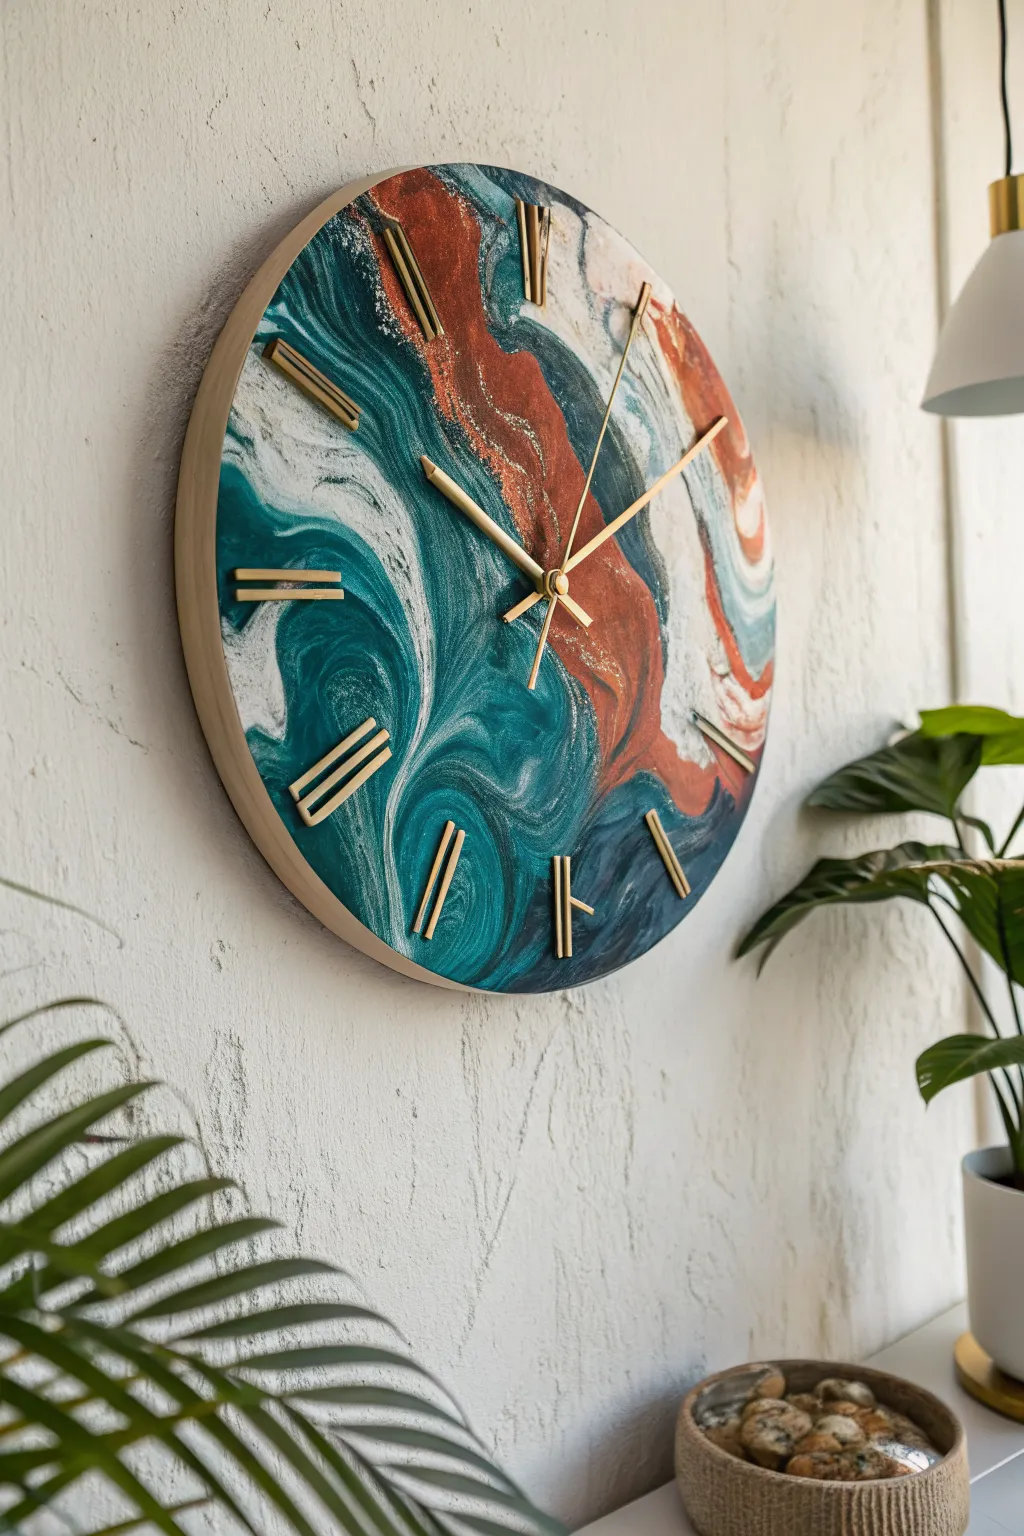
Capture the beauty of ocean waves and rocky shores with this stunning abstract clock. Combining deep teals and rich coppers in a fluid pour creates a sophisticated timepiece that serves as functional art for your wall.
Detailed Instructions
Materials
- Round wooden clock face base (12-14 inch diameter)
- Epoxy resin (casting or coating resin)
- Resin pigments: Dark teal/emerald green, white, metallic copper/bronze, navy blue
- Gold alcohol ink or metallic powder (optional for highlights)
- Heat gun or torch
- Plastic cups and stir sticks
- Gloves and workspace protection
- Gold clock hands and mechanism kit
- Gold numeric markers (batons/dashes)
- Painter’s tape
- Sandpaper (220 grit)
Step 1: Preparation and Base
-
Prep the substrate:
Begin by sanding your wooden clock base lightly to ensure good adhesion. Wipe away any dust with a damp cloth or tack cloth. Before you pour, tape the entire underside/back of the wood with painter’s tape to catch unavoidable resin drips. This makes cleanup effortless later. -
Protect the center:
Since this is a clock, preserving the center hole is crucial. Place a small piece of rolled tape or a dedicated silicone plug into the central shaft hole so resin doesn’t flow inside and block the mechanism. -
Mix the resin:
Mix your epoxy resin according to the manufacturer’s instructions, ensuring you scrape the sides and bottom of the cup thoroughly. Divide the clear resin into four cups. Leave one cup clear or white, and tint the others with your teal, navy, and metallic copper pigments.
Sticky Situation?
If your resin remains tacky after 48 hours, the mixing ratio was likely off or the room was too cold (under 70°F). You may need to pour a thin, correctly-mixed clear coat over the top to seal it.
Step 2: Creating the Pour
-
Establishing the flow:
Start by pouring a thick band of the metallic copper diagonally across the clock face; this acts as your ‘coastline’ relative to the teal waves. Don’t worry about being too neat, organic shapes are better. -
Adding depth:
Pour the navy blue alongside the copper to create a shadow effect, then flood the remaining empty spaces with your vibrant teal mixture. The colors should be touching but not completely mixed yet. -
Creating the white motion:
Drizzle thin lines of your white pigmented resin between the color boundaries, particularly where the teal meets the copper. This white layer is essential for creating the lacing or ‘cell’ effect often seen in ocean pours. -
Moving with heat:
Using a heat gun on a low setting, gently push the white resin over the darker colors. Keep the heat gun moving constantly to avoid scorching the resin. You want the colors to feather into each other, creating that marble-like transition seen in the reference photo. -
Manipulating the design:
Physically tilt the wooden board slightly to stretch the pattern. I like to guide the resin toward the edges to ensure full coverage, letting the excess drip off onto your protected surface. -
Detailing with metallics:
If you want extra sparkle akin to the veins in the example, drop a few small accents of gold alcohol ink or metallic powder into the copper sections while the resin is still fluid. -
Pop the bubbles:
Let the piece sit for about 10 minutes to allow air to rise, then quickly pass a torch or heat gun over the surface one last time to pop any remaining micro-bubbles.
Step 3: Assembly and Finishing
-
Curing process:
Cover the clock with a large box to prevent dust from settling on the wet surface. Allow it to cure fully for at least 24-48 hours in a dust-free environment. -
Clean the back:
Once fully hard, flip the clock over. You can now peel off the painter’s tape. If any resin drips managed to harden on the wood edge, carefully sand them down or heat them slightly to scrape them off. -
Positioning markers:
Lay out your gold baton markers. Use a protractor or a paper clock template to ensure perfectly even spacing for the 12, 3, 6, and 9 positions first, followed by the others. -
Attaching markers:
Adhere the gold markers to the resin surface. A strong clear adhesive, like E6000 or a tiny dab of UV resin (cured with a UV light), works best for a permanent bond. -
Installing the mechanism:
Insert the clock mechanism through the back. Secure it with the washer and nut provided in your kit on the front side. -
Setting the hands:
Press the hour hand onto the shaft first, pointing to 12 o’clock, followed by the minute hand, and finally the second hand (if included). Ensure they are parallel so they don’t catch on each other while rotating.
Level Up: Depth Charge
Pour clear resin first, then add colors. Use a toothpick to swirl them gently. This creates a ‘floating’ 3D effect where the colors look suspended within glass.
Hang your masterpiece on a well-lit wall to let the light catch those metallic shimmers
Stained-Glass Style Resin Suncatcher

Capture the morning light with this charming rainbow suncatcher that mimics the look of textured stained glass using epoxy resin. The muted, earthy tones and sturdy frame make for a sophisticated piece of decor that glows beautifully against any window.
Step-by-Step
Materials
- Epoxy casting resin (2-part system)
- Rainbow shaped silicone mold (with dividers)
- alcohol inks (clear/white shimmer, muted pink, amber, teal)
- Fine glitter or translucent mica powder
- Mixing cups and stir sticks
- Toothpicks or a fine needle tool
- UV resin (optional, for quick fixes)
- Small hand drill or pin vice
- Jute twine or macrame cord
- Metal jump ring
- Wooden bead (optional)
Step 1: Preparation & Mixing
-
Mold Prep:
Clean your rainbow silicone mold thoroughly with masking tape to lift any dust particles. Place it on a perfectly level surface so your resin cures evenly. -
Measure Resin:
Measure out your epoxy resin according to the manufacturer’s instructions (usually a 1:1 ratio by volume). You’ll need enough to fill the mold about halfway for the first layer. -
Stir Slowly:
Mix the resin and hardener slowly for 3-5 minutes. Scraping the sides and bottom is crucial to avoid sticky spots later. Let it sit for a minute to let large bubbles rise. -
Divide the Batch:
Split your mixed resin into four small cups. These will become the individual arches of your rainbow.
Step 2: Coloring & Pouring
-
Tint the Center Arc:
For the smallest, innermost arch, add a tiny drop of teal alcohol ink. You want it very translucent, just a wash of color. -
Tint the Middle Arcs:
Color your second cup with amber ink and the third with a muted pink. Add a pinch of fine glitter to each cup for that textured glass effect. -
Create the Texture:
For the outermost arch, I like to use a clear resin mixed with chunky glitter or a ‘crushed glass’ texture additive to give it that icy, textured look. -
Pour carefully:
Slowly pour each color into its respective channel in the mold. Use a toothpick to guide the resin into the corners without overflowing the dividers. -
Pop Bubbles:
Run a lighter or heat gun quickly over the surface to pop surface bubbles. Don’t linger too long or you might damage the mold. -
Initial Cure:
Cover the mold with a dust cover (like a cardboard box) and let this layer cure for 24 hours until fully hard.
Sticky Situation?
If your resin is still bendy after 24 hours, the room might be too cold. Move it to a warmer spot for another day to help it harden fully.
Step 3: Framing & Finishing
-
The Opaque Layer:
Once the colored layer is cured, mix a small batch of resin and tint it opaque white or cream. Pour a thin layer over the entire back to unify the piece, or skip this if you want full transparency. -
The Frame Effect:
To mimic the wooden frame in the photo, carefuly paint the raised dividers and edges of the cured piece with a copper or antique gold paint marker. -
Drilling:
If your mold didn’t have a pre-made hole, use a small hand drill to create a hole at the top center of the outermost arch. -
Adding Hardware:
Open a jump ring with pliers and loop it through the drilled hole. Close it securely; adding a dot of UV resin can seal the gap for extra strength. -
Stringing:
Cut a length of jute twine. Fold it in half and feed the loop through the jump ring, pulling the tails through the loop to secure it. -
Decorative Knot:
Thread a wooden bead onto the twine and tie a knot above it to hold it in place about an inch above the jump ring. -
Hanging Loop:
Tie a final loop at the top of the twine for hanging.
Level Up: Real Wood
Instead of painting the edges, laser cut a thin wooden frame or use balsa wood strips to line the mold before pouring for an authentic mixed-media look.
Hang your new creation in a sunny window and enjoy the colorful light show it casts
Terrazzo-Look Resin Tiles and Trivets
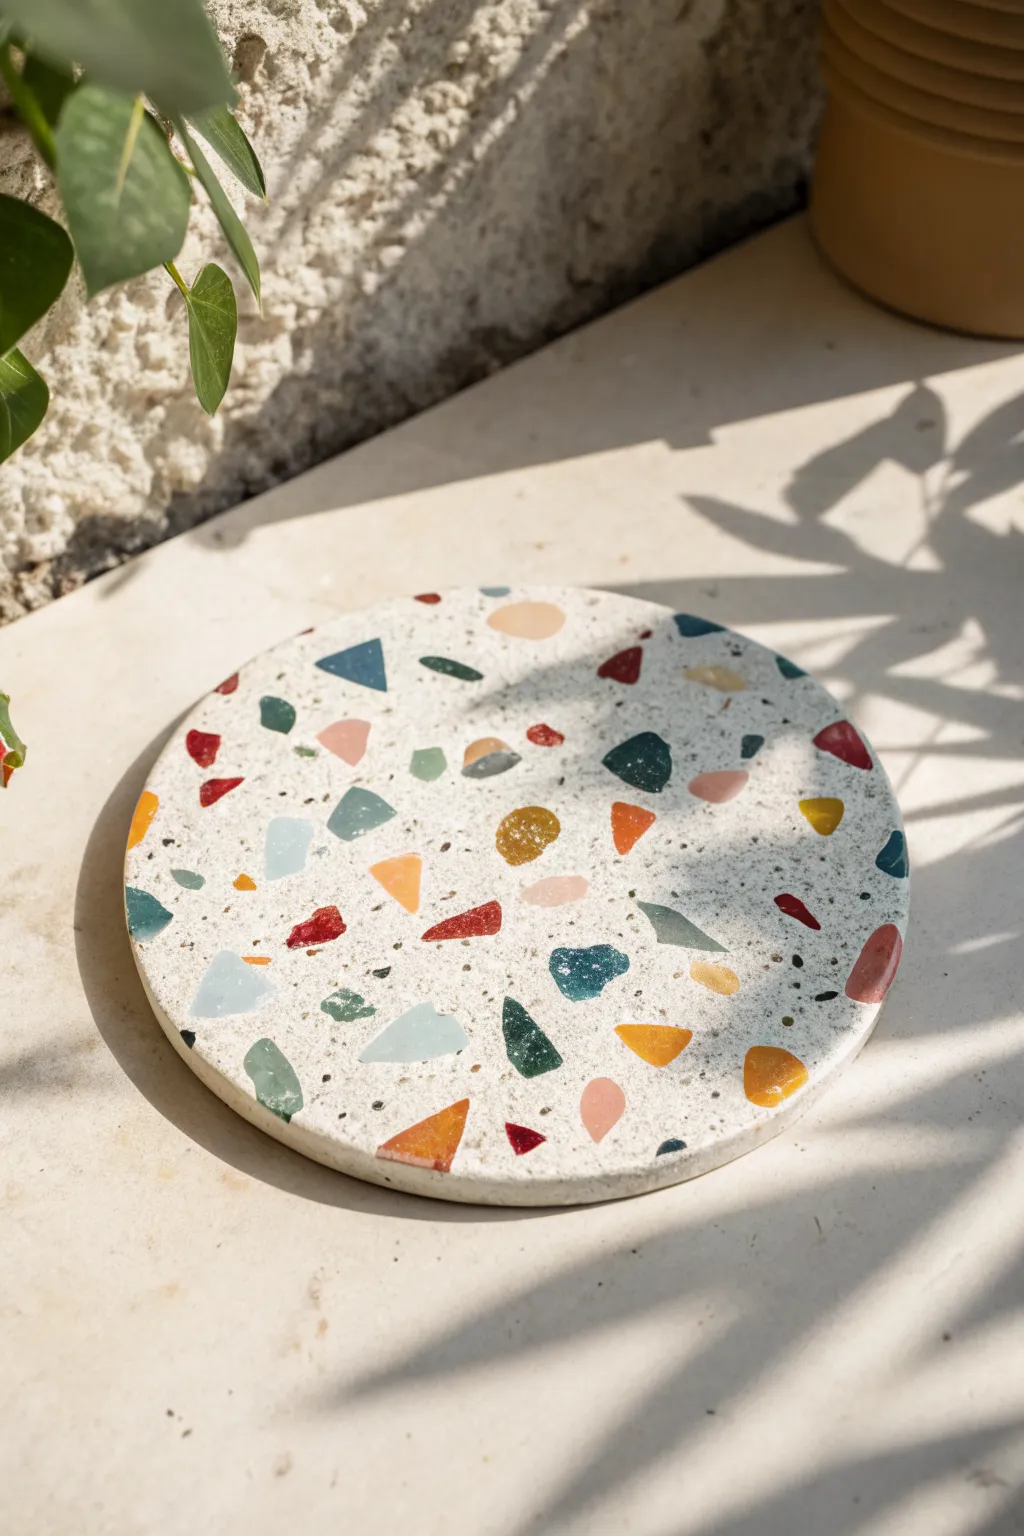
Capture the chic, speckled aesthetic of classic terrazzo without the heavy concrete work using simple epoxy resin and polymer clay. This project creates a stunning, lightweight trivet or coaster featuring a clean white base studded with colorful, custom-made chips.
How-To Guide
Materials
- White or cream polymer clay
- Assorted colored polymer clay (teal, mustard, terracotta, sage green, navy, coral)
- Circular silicone mold (coaster or trivet size)
- Two-part epoxy resin (casting resin)
- White resin pigment (opaque)
- Mixing cups and stir sticks
- Heat gun or torch
- Sandpaper (grits from 120 up to 1000)
- Polishing compound or resin polish
- Craft knife or tissue blade
- Oven and baking tray
Step 1: Creating the Chips
-
Roll out clay:
Begin by conditioning your colored polymer clays. Roll each color out into a thin sheet, aiming for a thickness of about 1-2mm. Uniformity isn’t strictly necessary here, as irregularity adds character. -
Bake the sheets:
Place your rolled sheets onto a baking tray lined with parchment paper. Bake them according to the manufacturer’s instructions—usually around 275°F (130°C) for 15-20 minutes—until they are fully cured and hard. -
Cool and crumble:
Allow the clay sheets to cool completely. Once cool, break them apart by hand into small, irregular shards. For cleaner edges resembling stone chips, you can chop them using a sturdy craft knife or tissue blade. -
Size the pieces:
Sort your chopped pieces. You want a mix of sizes—some tiny specks and some bold, larger triangular or geometric shapes. Discard any dust or excessively fine powder as this can muddy your white base.
Step 2: Casting the Base
-
Prepare the mold:
Ensure your circular silicone mold is clean and dry. Sometimes I like to wipe it with a little rubbing alcohol to ensure no dust particles are clinging to the surface. -
Arrange the chips:
Scatter a layer of your colored clay chips into the bottom of the mold. Don’t worry about covering every millimeter, but ensure an even distribution of colors. -
Mix the resin:
Measure and mix your two-part epoxy resin carefully according to the package directions. Stir slowly but thoroughly to minimize air bubbles. -
Tint the resin:
Add opaque white pigment to your mixed resin. You want a solid, milky white color that is fully opaque so it hides any chips that might sink to the bottom layer later, mimicking real stone. -
Pour the base:
Slowly pour the white resin into the mold over your scattered clay chips. Pouring in a thin stream helps prevent trapping large air pockets under the chips. -
Add more chips:
Once the resin is poured, sprinkle more clay chips on top. Gently push them down with a stir stick so they submerge and are fully coated by the white resin. -
Remove bubbles:
Let the resin sit for about 10 minutes to allow bubbles to rise. Gently pass a heat gun or torch over the surface to pop them. -
Cure:
Place the mold on a level surface and cover it to protect from dust. Allow it to cure fully for 24 to 48 hours depending on your specific resin brand.
Clean Cuts
When sanding, always use water (wet sanding). This keeps the resin cool, preventing the clay chips from smearing, and crucially keeps hazardous dust out of the air.
Step 3: Revealing the Terrazzo
-
Demold:
Once fully hard, pop the casting out of the silicone mold. At this stage, the chips on the bottom face will likely be covered by a thin skin of white resin. -
Initial sanding:
Place a sheet of coarse sandpaper (around 120 grit) on a flat surface. Wet the paper to reduce dust, then sand the top surface of your coaster in a circular motion to grind away the top layer of resin and reveal the clay chips inside. -
Refine the surface:
Move to medium grit sandpaper (400-600 grit). Continue wet sanding until the scratches from the coarse paper disappear and the clay chips look distinct and sharp against the white background. -
Smooth the edges:
Don’t forget to sand the sharp edges of the disc to slightly round them off for a more professional, finished feel. -
Fine sanding:
Progress to fine grit sandpaper (1000 grit or higher). This step removes the remaining haze and prepares the surface for polishing. -
Polish:
Apply a small amount of polishing compound to a cloth and buff the surface vigorously. This will bring back a subtle sheen, or you can leave it slightly matte for a more natural stone look.
Metallic Pop
Add crushed dried gold leaf or metallic copper flakes into the chip mix for a terrazzo look with a glamorous, modern sparkle.
Place your finished trivet on your coffee table and enjoy the modern, artisanal vibe you created from scratch


Have a question or want to share your own experience? I'd love to hear from you in the comments below!