If you love painting magical ocean vibes, a mermaid tail is one of the most satisfying subjects to play with. You can keep it super simple with bold shapes or go all-in on sparkling scales and glowing underwater light.
Beginner-Friendly U-Shape Scale Rows
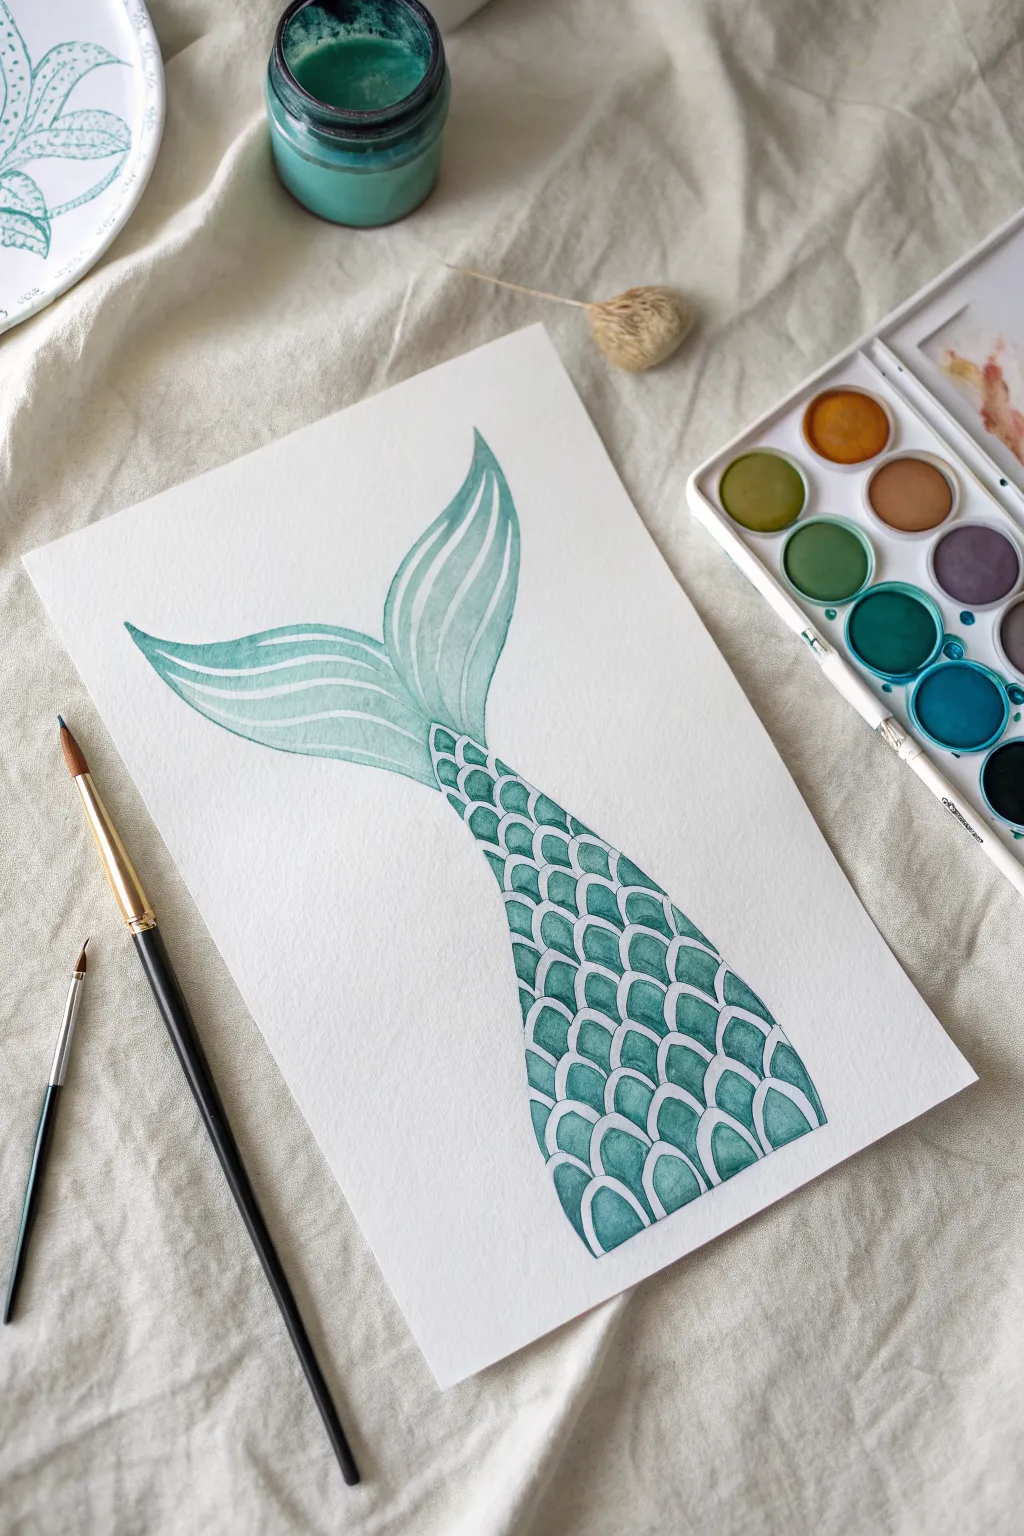
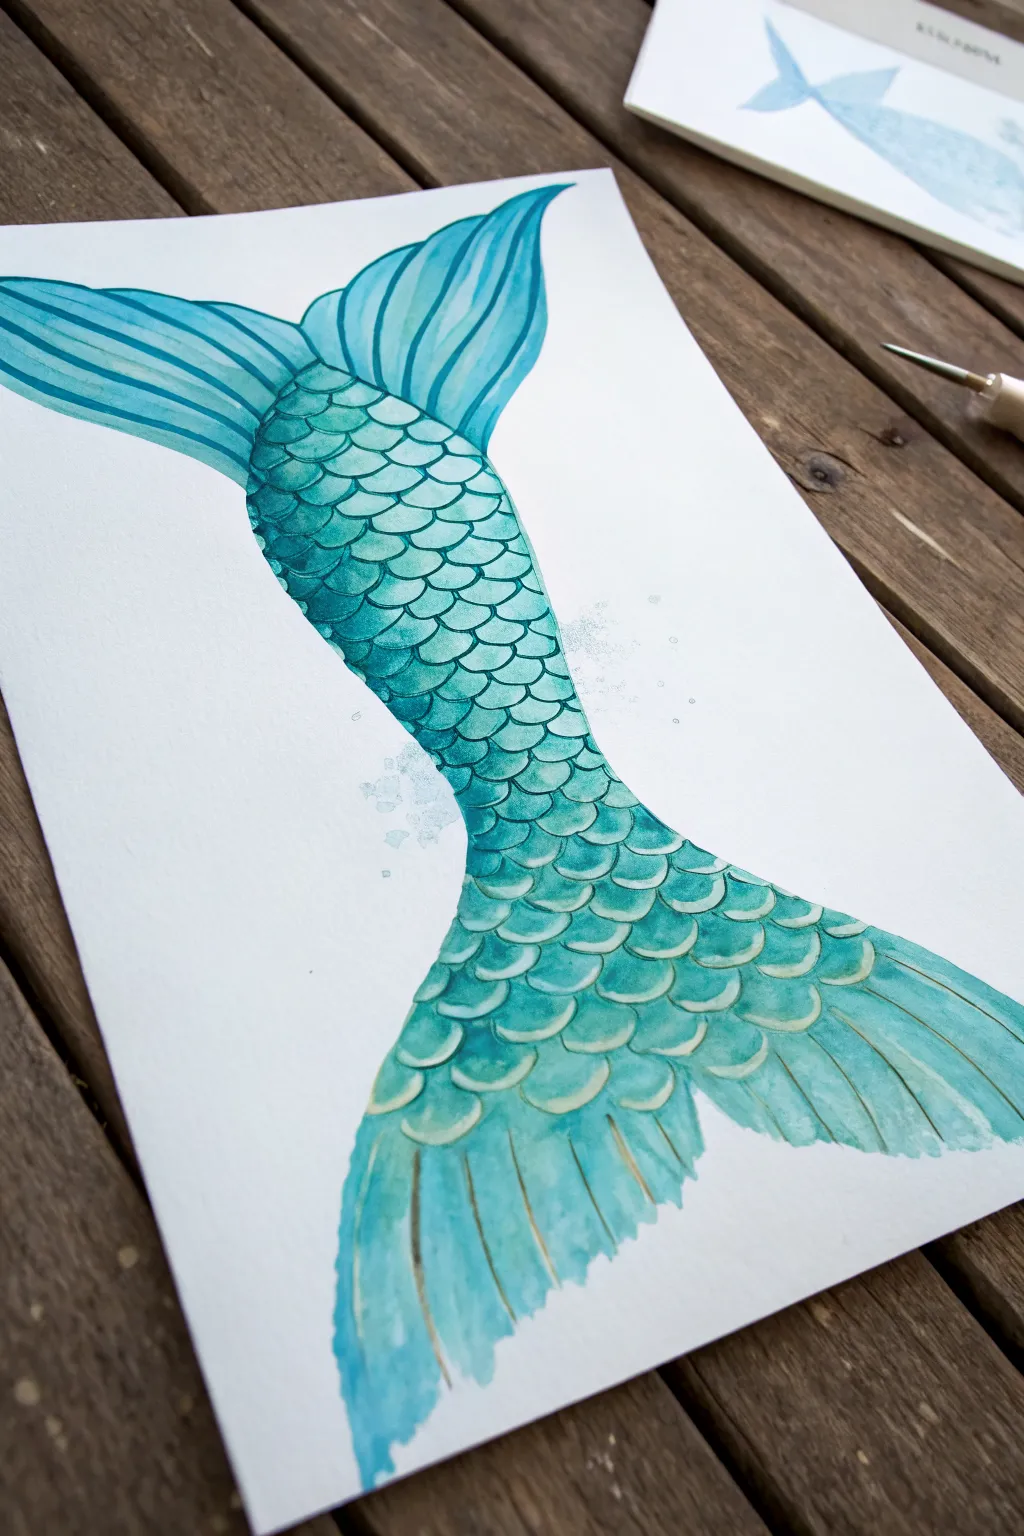
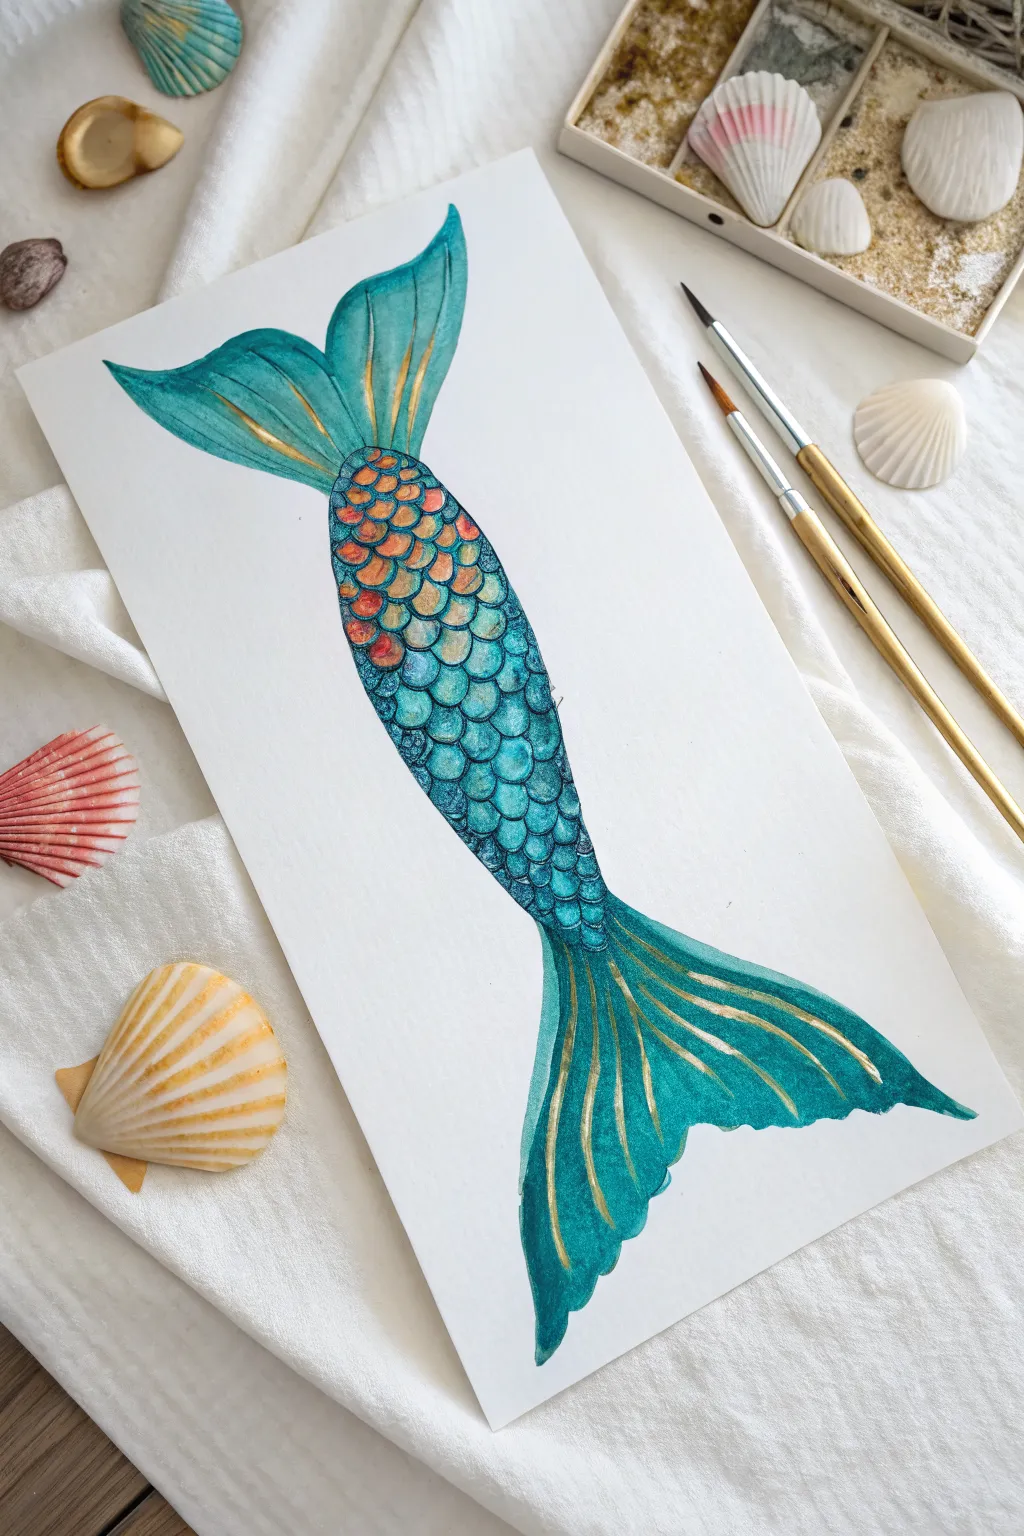
Learn to paint a serene, monochromatic mermaid tail using a simple scallop pattern that builds impressive dimension row by row. This beginner-friendly watercolor project focuses on mastering brush control and the satisfying rhythm of painting repetitive scales.
Step-by-Step Guide
Materials
- Cold press watercolor paper (A4 or similar size)
- Watercolor paints (Turquoise, Teal, or Viridian Green)
- Round paintbrush (size 6 or 8 for fills)
- Small detail brush (size 0 or 2 for outlines)
- Pencil (HB or H)
- Eraser
- Jar of clean water
- Paper towels
Step 1: Sketching the Shape
-
Outline the tail silhouette:
Begin by lightly sketching the main shape of the tail. Draw a long, tapered cone shape for the body that widens slightly at the top (the waist area, though cut off) and narrows down to the ankles. -
Draft the fins:
At the narrow bottom tip, draw two large, curving fluke shapes branching out to the left and right. Keep the tips pointed and the edges smooth. -
Create the scale grid:
Lightly sketch curved horizontal guidelines across the body of the tail. Along these lines, draw varying rows of U-shapes or scallop shapes to create the scales, making sure they overlap like roof tiles. -
Define the fin details:
Inside the two tail flukes, draw long, flowing lines that follow the curve of the fin, radiating from the center outward to mimic the fin’s ribbed texture.
Uneven Color?
If your scales look patchy, your paint might be drying too fast. Mix a larger puddle of wash before you start so you aren’t constantly remixing colors halfway through a row.
Step 2: Painting the Scales
-
Mix your teal wash:
Load your palette with a deep turquoise or teal color. Creating a puddle of medium consistency ensures you have enough pigment for consistent color, but keep it watery enough to flow. -
Outline the first scale:
Starting at the top row, carefully outline the first U-shaped scale using your smaller detail brush. This creates a crisp edge against the white paper. -
Fill with a gradient:
While the outline is wet, use your slightly larger brush to fill the inside of the scale. Add more pigment near the bottom curve of the U and use clean water to pull the color upward, fading it to white near the top. -
Repeat the process:
Move effectively across the row, outlining and filling each scale individually. I find it meditative to focus on one small shape at a time rather than rushing. -
Leave white gaps:
Crucially, leave a very thin sliver of white paper unpainted between the scales. This negative space acts as a highlight and separates the individual shapes. -
Vary vertical shading:
As you move down the rows toward the tail tip, you can slightly darken your pigment mix to give the illusion that the tail is curving away from the light.
Step 3: Finishing the flukes
-
Outline the fin segments:
Moving to the tail fin, use your detail brush to paint along the long, curved ribs you sketched earlier. -
Fill the fin channels:
Paint the spaces between the ribs with a watery wash of your teal color. Similar to the scales, deposit more pigment at the base where the fin meets the tail body. -
Blend the fin color:
Soften the paint as it moves toward the tips of the fins, creating a gentle ombre effect that looks translucent and airy. -
Clean up edges:
Once the main paint is dry, look for any ragged edges on the outer silhouette. Use the fine brush with slightly thicker paint to sharpen the outer boundary of the tail. -
Erase guidelines:
Wait until the painting is completely bone-dry—this is vital to avoid smudging. Gently run your eraser over the piece to remove any visible pencil marks from your initial sketch.
Add Sparkle
Once the watercolor is dry, use a metallic silver or gold gel pen to outline the scales or add tiny dots inside the darker areas for a magical, shimmering effect.
Step back and admire the lovely rhythm of your painted scales and the calm sea-glass colors you have created


Diving-Down Tail Breaking the Surface
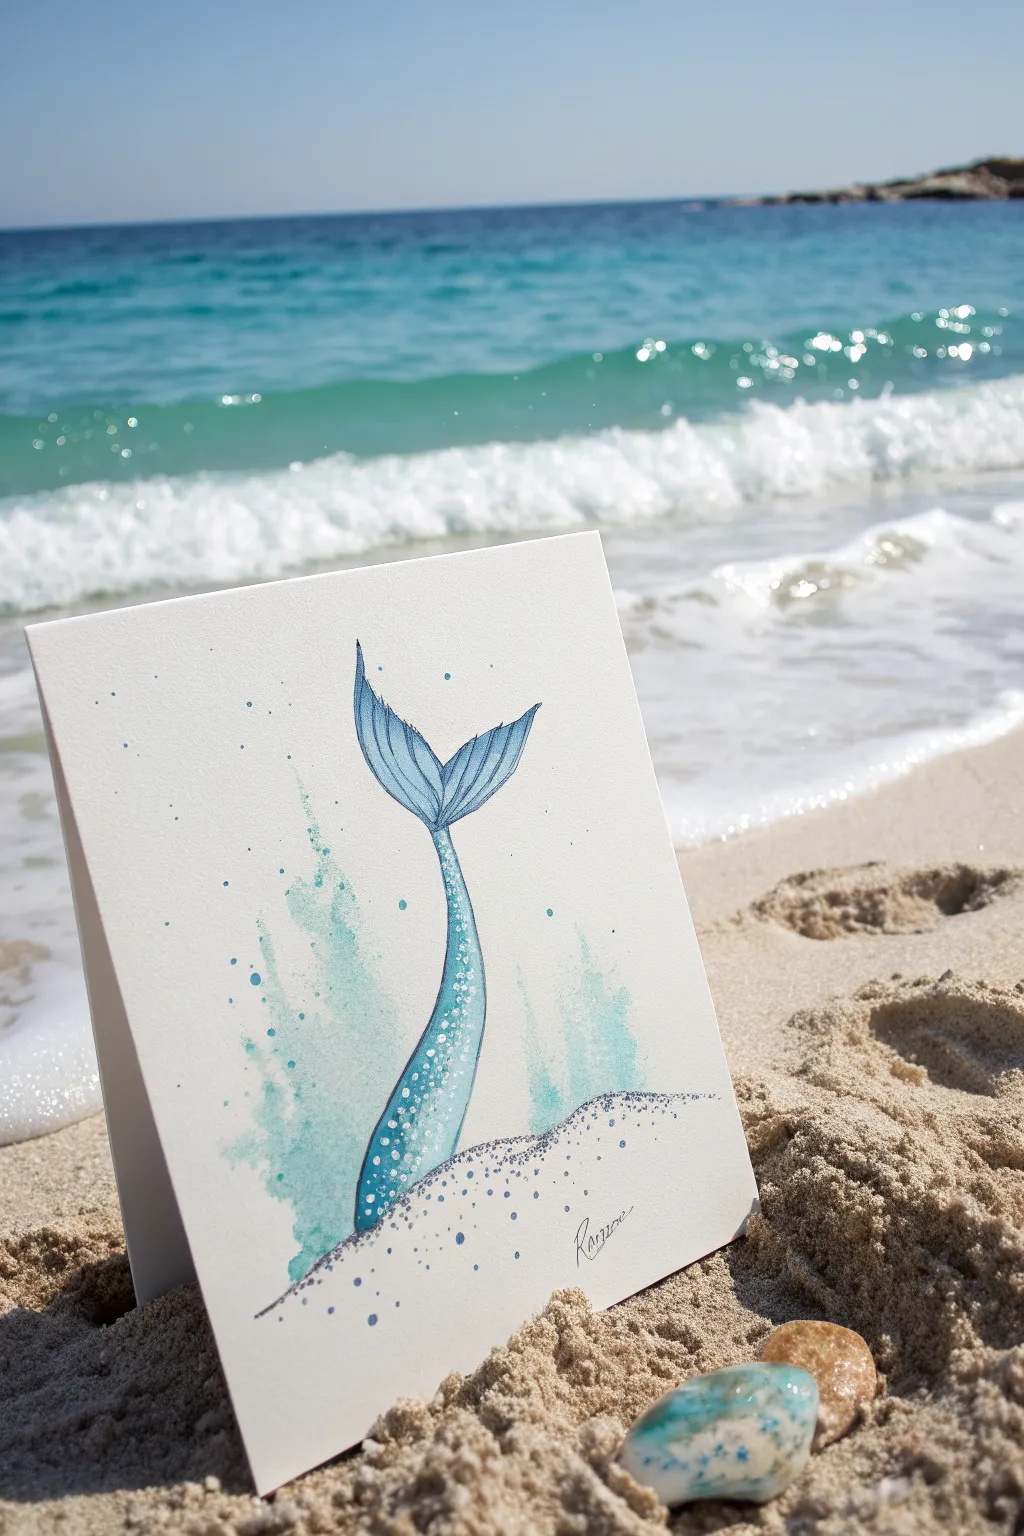
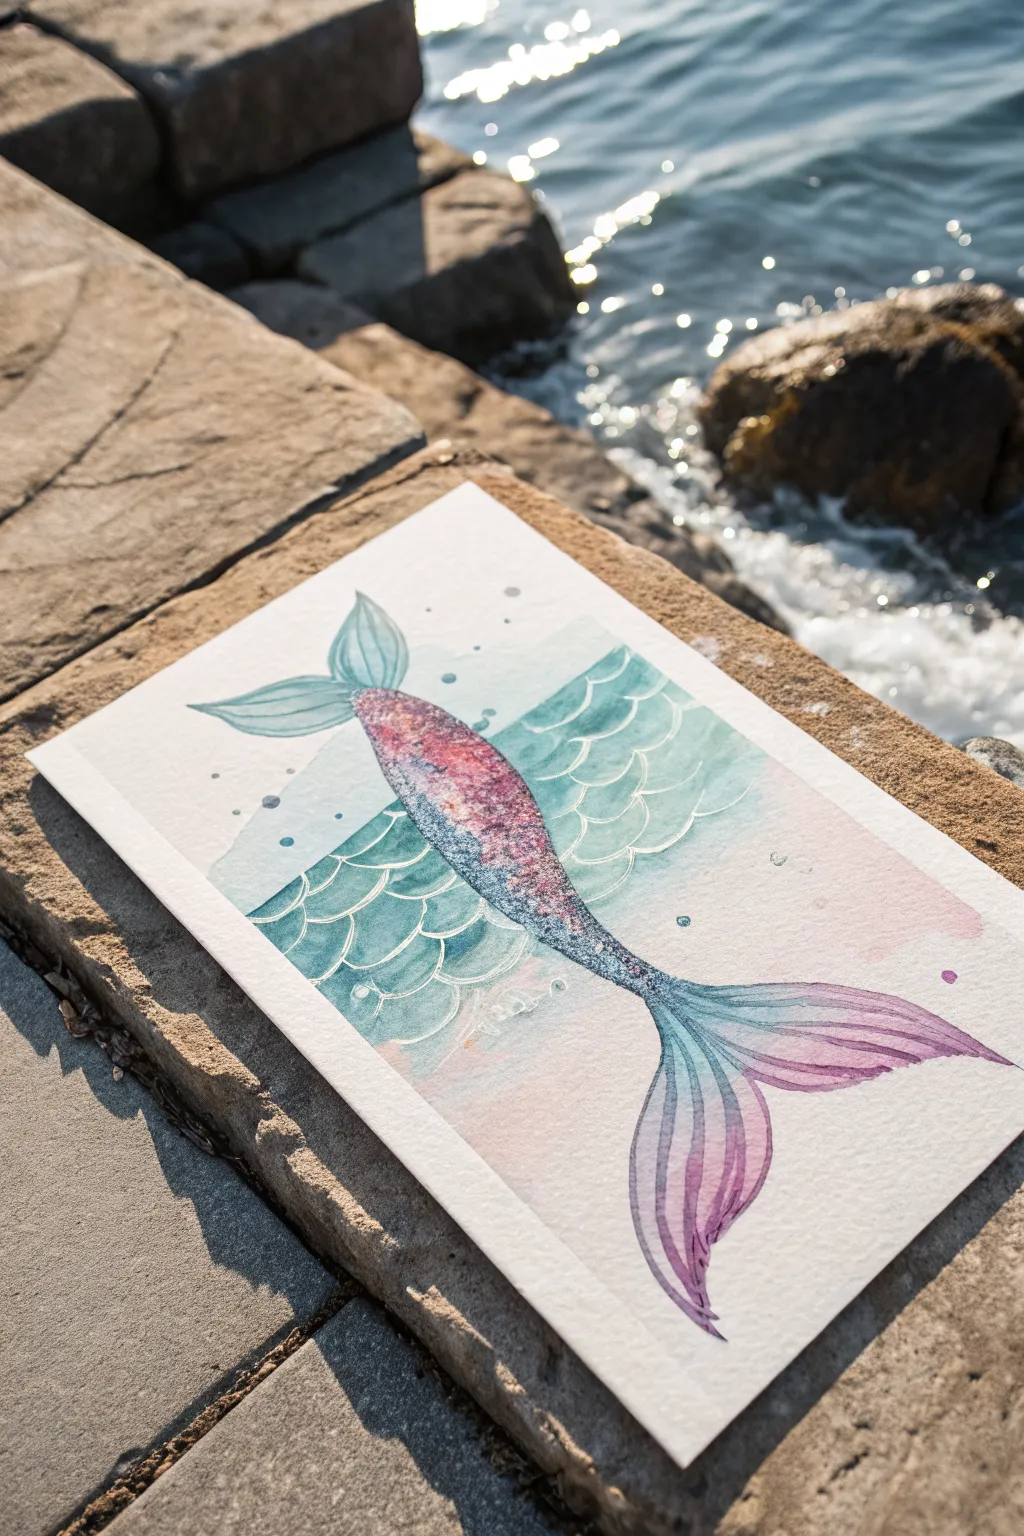
Capture the magic of the ocean with this minimalist watercolor illustration of a mermaid tail splashing beneath the surface. Using a restricted palette of cool blues and teals creates a cohesive, refreshing look perfect for greeting cards or wall art.
How-To Guide
Materials
- Cold press watercolor paper (card block or loose sheet)
- Watercolor paints (Phthalo Blue, Turquoise, Indigo)
- Round watercolor brushes (sizes 2, 6, and 8)
- White gouache or white gel pen
- Pencil (HB or H)
- Kneaded eraser
- Clean water
- Paper towels
- Pallette for mixing
Step 1: Sketching the Form
-
Establish the curve:
Start by lightly drawing a gentle ‘S’ curve or an arc in the center of your paper. This will be the spine of the mermaid’s tail as she dives downward. -
Define the tail shape:
Flesh out the tail body around your guide line, keeping it tapered at the bottom where it enters the ‘water’ and widening slightly as it goes up. -
Add the flukes:
At the top of the tail, draw the two flukes (fins). Make them elegant and leaf-shaped, curving outward and meeting at a central point. -
Refine the lines:
Add subtle lines within the flukes to indicate the ribbing or structure of the fins. Gently erase your sketch with a kneaded eraser until the graphite is barely visible, so it won’t show through the transparent paint.
Pro Tip: Masking Fluid Magic
Apply masking fluid dots on the tail before painting. Rub them off after the paint dries to reveal crisp white scales without using gouache.
Step 2: Watercolor Washes
-
Mix your base color:
Create a watery mix of Phthalo Blue and a touch of Turquoise on your palette. You want a light, airy blue for the initial wash. -
Paint the first layer:
Using a size 6 brush, fill in the tail shape with this light wash. Work quickly to keep the edges wet so the color flows smoothly. -
Drop in shadows:
While the first layer is still damp (wet-on-wet), drop a slightly more concentrated Phthalo Blue along the right edge of the tail body to create a rounded, 3D effect. -
Detail the fins:
Use a smaller size 2 brush to paint the fins. Leave tiny slivers of white paper between the ribbing sections if you can, or paint them solid light blue and darken the creases later. -
Let it dry:
Allow this base layer to dry completely before moving on. If the paper feels cool to the touch, it is still wet.
Troubleshooting: Blooms
If cauliflower-like blooms appear in the paint, your brush was too wet when adding color to damp paper. Let it dry, then gently scrub with a damp stiff brush designed for lifting.
Step 3: Creating the Splash
-
Prepare the splash wash:
Mix a very watery puddle of Turquoise and Teal. This needs to be quite fluid to create the loose, splashing effect. -
Apply the splash shape:
Using a size 8 brush, paint loose, upward-sweeping strokes on either side of the tail’s base. Don’t worry about being precise; jagged, uneven edges look more like real water. -
Splatter technique:
Load your brush with the turquoise mix and tap the handle against your finger over the paper to create droplets around the splash zone. I find covering the main tail with a scrap piece of paper helps protect it from unwanted spots. -
Add depth to the water:
Drop small dots of Indigo or darker blue into the wet splash area near the base of the tail to suggest depth and shadow.
Step 4: Finer Details & Texture
-
Re-define outlines:
Once everything is dry, clear up the edges of the tail and fins with a fine liner brush and a medium-strength blue mix. Add the rib lines in the fins if you haven’t already. -
Add darker scales:
Using the tip of your smallest brush, stipple tiny dots of darker blue along the shadowed side of the tail to suggest scales and texture. -
Texturing the sand:
At the very bottom, paint a faint, sandy mound shape. Splatter a mix of grey-blue or diluted Indigo to create the look of wet sand granules. -
Final highlights:
Use white gouache or a white gel pen to add sparkling highlights on the scales and the tips of the water splash. This really brings the wet look to life. -
Sign and finish:
Add your signature in a fine, flowing script near the sand line to balance the composition.
This serene piece captures the playful mystery of the ocean and makes a wonderful handmade gift for beach lovers
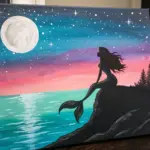
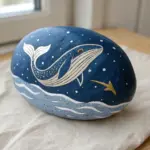
Moonlit Silhouette Tail on Dark Water
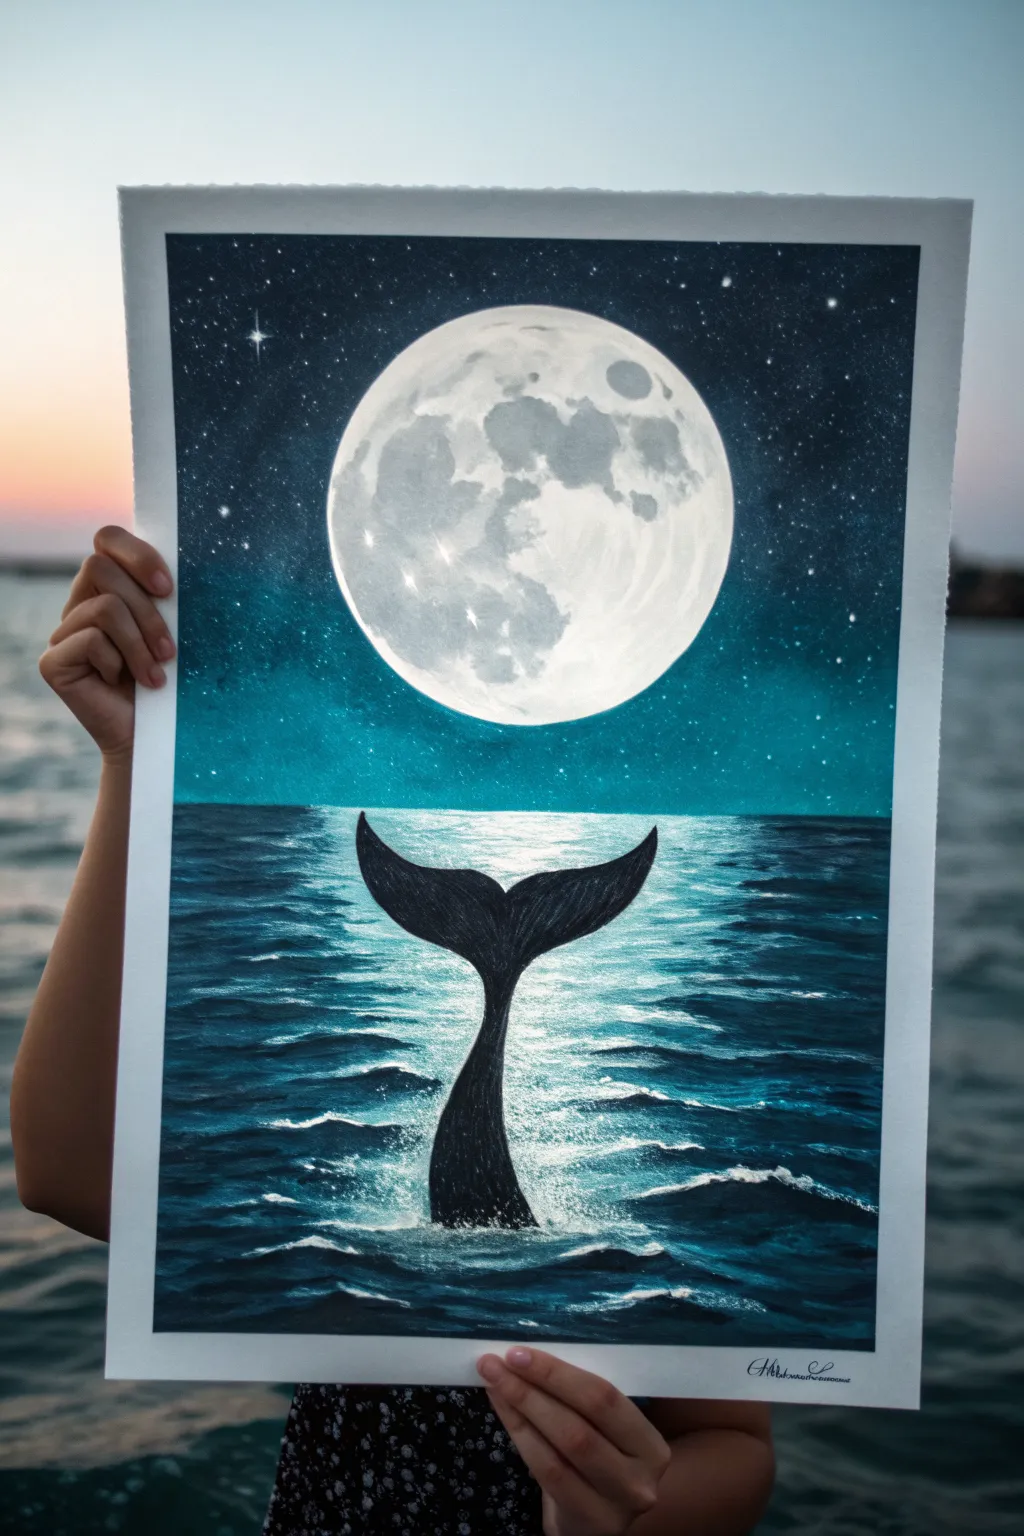
Capture the magic of a midnight swim with this striking painting featuring a luminous full moon and the elegant silhouette of a fluke rising from the sea. The contrast between the brilliant moonlight and the deep, dark ocean creates a captivating scene that feels both peaceful and powerful.
Step-by-Step Guide
Materials
- Thick painting paper (watercolor or mixed media, at least 300gsm)
- Masking tape
- Acrylic paints (black, phthalo blue, turquoise deep, titanium white, grey)
- Round plate or compass to trace a circle
- Pencil
- Large flat brush
- Medium round brush
- Fine detail brush or rigger brush
- Old toothbrush (for stars)
- White gel pen (optional)
- Mixing palette
- Paper towels
- Jar of water
Step 1: Setting the Scene
-
Prepare the canvas:
Tape down all four edges of your paper to a flat surface. This creates a clean white border and prevents the paper from buckling when wet. -
Trace the moon:
Place your circular object (like a small plate or bowl) near the top center of the paper. Lightly trace around it with a pencil to define your moon shape. -
Establish the horizon:
Lightly draw a straight horizontal line about one-third of the way up from the bottom of the page to separate the sky from the sea. -
Sketch the silhouette:
Below the moon, centered on the water, lightly sketch the shape of the whale or mermaid tail rising out of the water. Focus on the curve of the fluke; don’t worry about details yet.
Troubleshooting: Blotchy Moon?
If your grey crater details look too harsh, wait for them to dry, then apply a very thin wash of watered-down white over the whole moon to soften and unify the textures.
Step 2: Painting the Sky and Moon
-
Base layer for the moon:
Paint the entire circle inside your moon outline with pure titanium white. This needs to be opaque, so apply a second coat if needed once the first is dry. -
Create the gradient sky:
Start painting the sky around the moon. Use a mix of black and phthalo blue at the very top corners. As you move down toward the horizon, gradually mix in turquoise deep, creating a transition from deep midnight blue to a lighter teal near the water line. -
Adding atmospheric glow:
While the sky paint is still slightly wet, I like to blend a tiny bit of white around the immediate edge of the moon to create a soft, glowing halo effect. -
Moon craters:
Mix a very watery pale grey. Dab this onto the dry white moon using a scrunched-up paper towel or a dry brush to create textured, random cloud-like shapes representing craters. -
Starry night:
Cover the bottom half of your painting with a scrap paper to protect it. Dip an old toothbrush in watered-down white paint and flick the bristles to spray tiny stars across the dark upper sky. -
Highlight stars:
Use a fine brush or white gel pen to add a few larger, cross-shaped stars for emphasis in the darkest corners.
Level Up: Glow in the Dark
Mix phosphorescent medium or use glow-in-the-dark acrylic paint for the moon and the brightest water highlights. Your painting will reveal a secret magic after the lights go out
Step 3: The Ocean and Silhouette
-
Base ocean color:
Paint the water section with horizontal strokes using a mix of phthalo blue and black. Make it darker right at the horizon line and slightly lighter near the bottom foreground. -
Moonlight reflection path:
Mix white with a touch of turquoise. Paint horizontal dashes down the center of the water directly beneath the moon. Keep the strokes wider near the horizon and gradually narrower as they come forward. -
Refining the waves:
Using your medium round brush with dark blue-black paint, add undulating wave shadows in between your light reflection strokes to create depth and movement in the water. -
Painting the tail:
Fill in your pencil sketch of the tail with solid black paint. Ensure the edges are crisp and sharp against the lighter water background. -
Adding texture to the tail:
Once the black is dry, use a very dry brush with a tiny amount of grey to gently streak vertical lines down the tail, suggesting wet skin reflecting faint light. -
Splash details:
With a fine brush and pure white paint, stipple small dots and erratic lines at the base of the tail where it meets the water to simulate splashing foam and disturbed water. -
Water highlights:
Add final bright white highlights to the crests of the waves in the foreground, particularly around the splash zone, to make the water look wet and dynamic. -
The reveal:
Wait for the entire painting to be completely dry, then slowly peel away the masking tape at a 45-degree angle to reveal your crisp white border.
Hang your finished piece in a spot where it can remind you of the peaceful mystery of the ocean at night

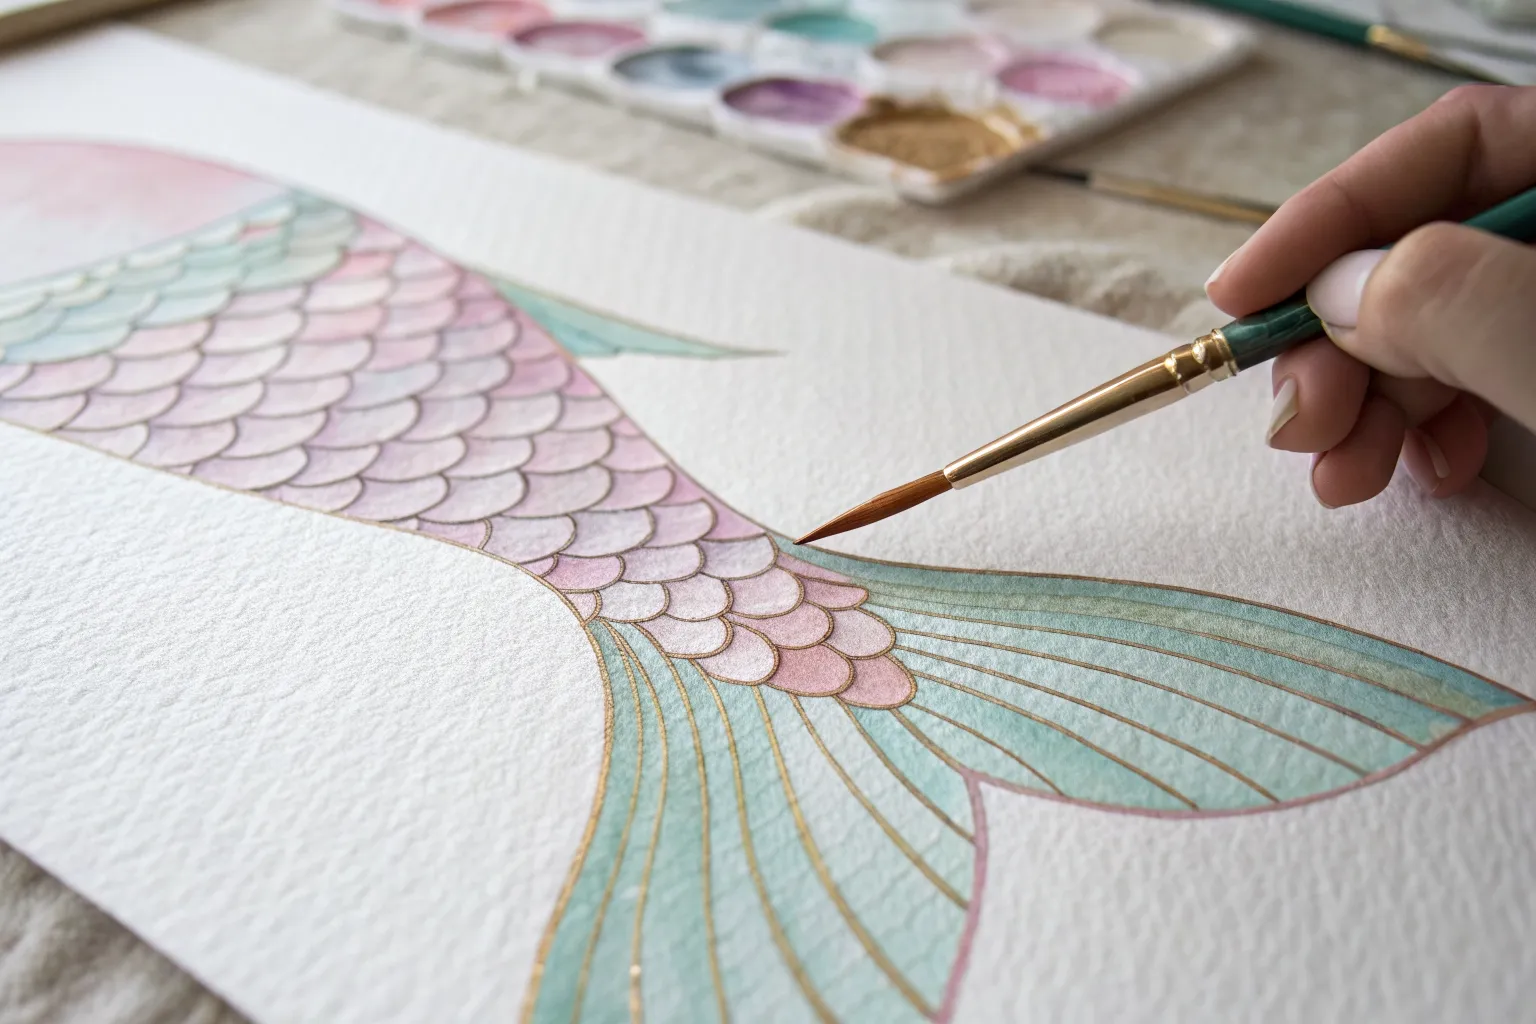
Glowing Center Highlight for 3D Scales
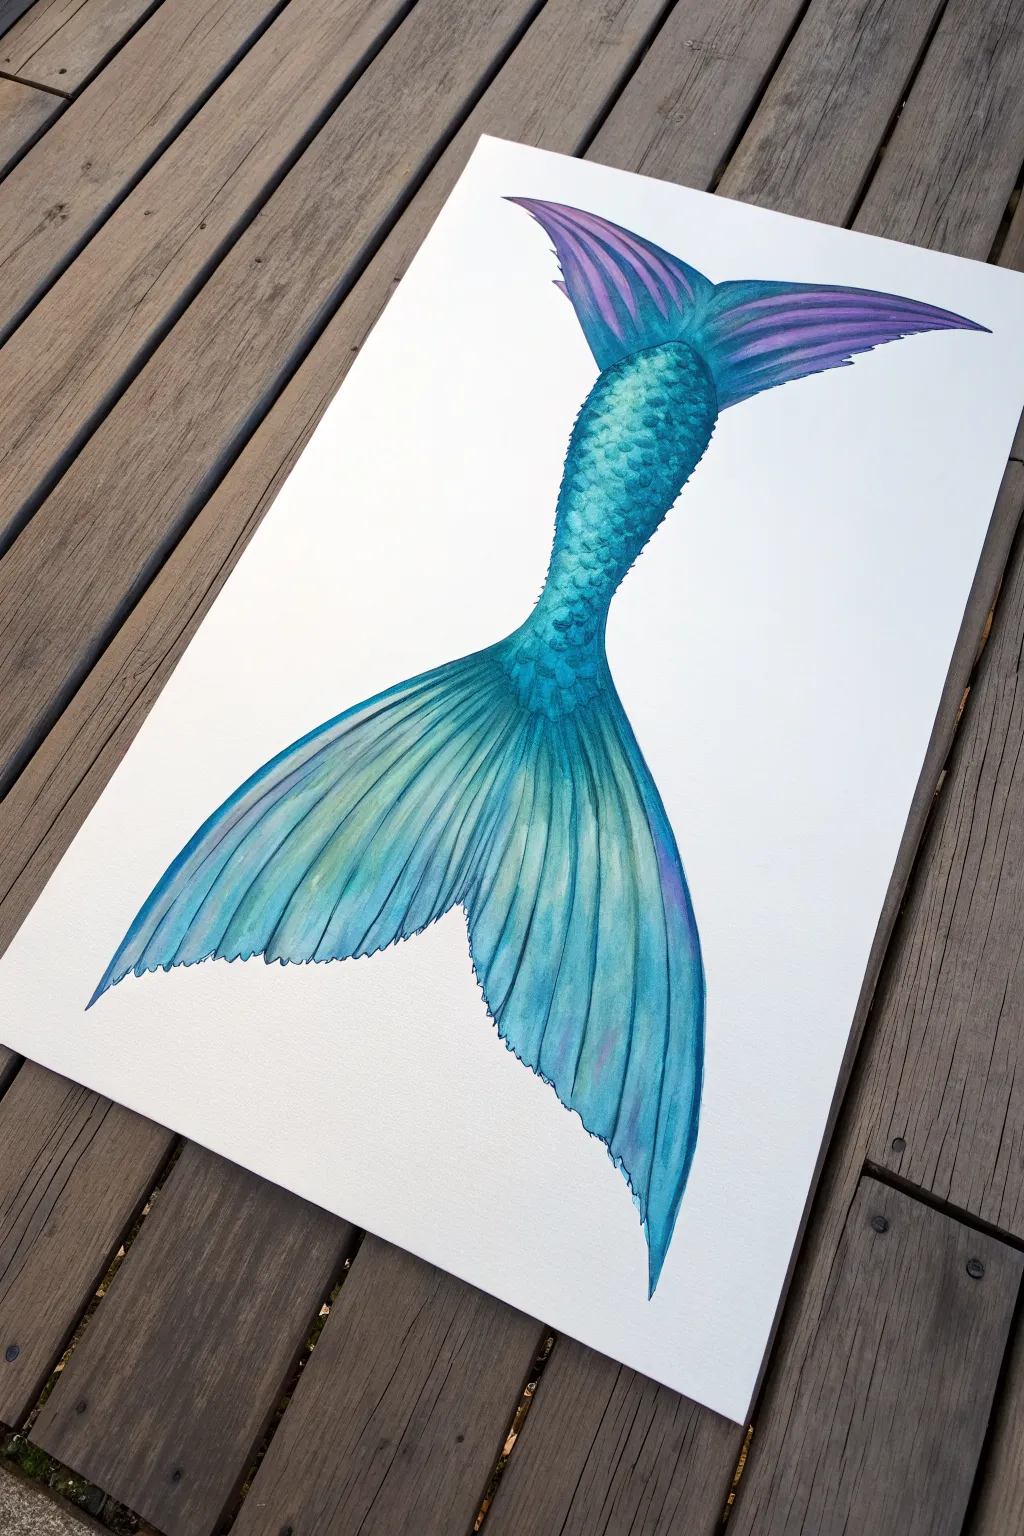
Capture the magic of the deep sea with this watercolor project that focuses on dimension and light. By carefully layering teal pigments, you’ll create scales that appear to glow from within, giving a stunning 3D effect to your mermaid tail.
Detailed Instructions
Materials
- Cold Press Watercolor Paper (300gsm)
- Watercolor Paints (Phthalo Blue, Viridian Green, Turquoise)
- Round Watercolor Brushes (Size 6 and Size 2 for details)
- Pencil (HB or H)
- Kneaded Eraser
- Clean Water & Mixing Palette
- Paper Towels
Step 1: Sketching the Form
-
Map out the curve:
Begin by lightly sketching a long, S-curve line down the center of your paper to define the flow of the mermaid tail. This gesture line helps keep the anatomy fluid. -
Define the silhouette:
Draw the outer edges of the tail, starting wide at the top (the waist area, though not shown) and tapering down towards the fluke (the fins at the bottom). Keep the lines smooth and organic. -
Sketch the fins:
Add the large fluke fins at the bottom and the smaller dorsal-style fins at the top waist area. Use long, sweeping strokes to suggest flexible, water-like movement. -
Grid the scales:
Lightly draw the scale pattern inside the tail body. Instead of drawing individual U-shapes immediately, draw diagonal intersecting lines to create a diamond grid first. This ensures the scales stay uniform in size. -
Round out the scales:
Go over your grid and round off the bottom of each diamond shape to create the classic U-shaped scale. Erase your grid lines gently with a kneaded eraser until the pencil marks are barely visible.
Muddy Scales?
If scales are bleeding into each other, you are working too fast. Use a checkerboard pattern—paint every other scale, let them dry completely, then fill in the gaps.
Step 2: Painting the Scales
-
Mix your base teal:
Create a watery pool of teal on your palette by mixing Phthalo Blue with a touch of Viridian Green and plenty of water. You want a translucent wash for the first layer. -
Apply the wet-on-dry technique:
Starting at the top of the tail, paint a single scale. Outline the U-shape with the tip of your size 6 brush, then fill the edges more heavily than the center. -
Lift the highlight:
While the paint inside the scale is still wet, rinse your brush, dab it on a paper towel so it’s damp but not dripping, and touch the center of the scale to lift up pigment. This creates the glowing white highlight. -
Repeat the process:
Continue painting individual scales, working in disconnected sections so wet scales don’t bleed into each other. I usually hop around the tail to let neighboring scales dry. -
Deepen the shadows:
Once the first layer is dry, mix a slightly darker, less watery version of your teal. Paint just the very bottom curve of each scale to cast a shadow on the scale below it, enhancing the 3D look. -
Blend the gradients:
Use a clean, damp brush to soften the upper edge of that shadow line you just painted, blending it upward into the glowing center so there are no harsh lines inside the scale itself.
Step 3: Flowing Fins & Details
-
Base wash for fins:
Paint the top and bottom fins with a very diluted, pale wash of your teal mix. Apply this quickly to cover the whole fin area. -
Add directional lines:
While the base wash is still damp but not soaking, use your size 2 brush and saturated pigment to paint long, thin lines following the curve of the fins. These represent the fin rays. -
Softening the rays:
If the lines look too stark, run a clean damp brush alongside them to bleed the color slightly into the pale background wash. -
Edge definition:
Darken the very outer edges of the fins to frame the shape, creating a nice contrast against the white paper. -
Final touches:
Check your scales for consistency. If some highlights disappeared during drying, you can gently scrub the center with a stiff, damp brush and blot with a tissue to reclaim the light.
Create Extra Magic
Once the painting is 100% dry, add tiny dots or thin lines of metallic gold watercolor or gold ink to the edges of the fins and scales for a shimmer effect.
Step back and admire the aquatic depth you have created in your painting
BRUSH GUIDE
The Right Brush for Every Stroke
From clean lines to bold texture — master brush choice, stroke control, and essential techniques.
Explore the Full Guide
Watercolor Wet-on-Wet Iridescent Tail
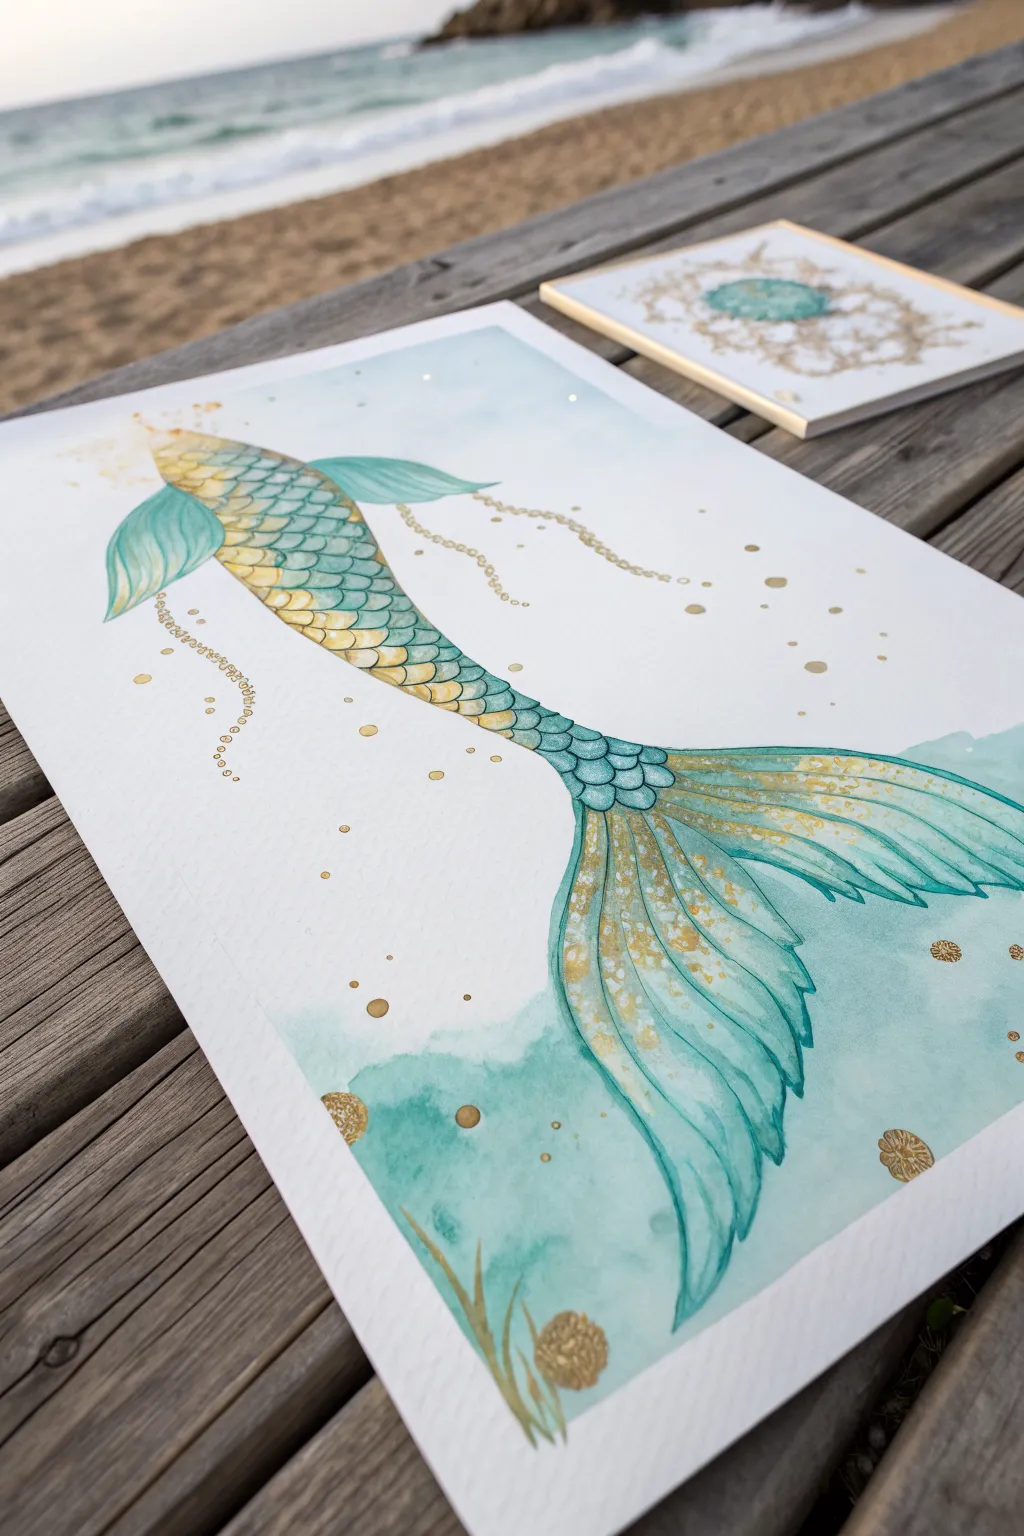
Capture the magic of the sea with this ethereal watercolor piece, featuring two interacting mermaid tails in dreamy turquoise and amethyst hues. The addition of iridescent accents brings a scales-like shimmer that catches the light beautifully.
Step-by-Step Guide
Materials
- Cold press watercolor paper (300 gsm)
- Watercolor paints (Turquoise, Teal, Indigo, Purple, Magenta)
- Iridescent watercolor medium or pearlescent paint
- White gel pen or gouache
- Round watercolor brushes (Size 4 and 8)
- Pencil and eraser
- Two jars of water
- Masking tape
Step 1: Sketching and Background
-
Secure the paper:
Tape your watercolor paper down to a hard board on all four sides. This prevents buckling when we apply the wet washes later. -
Outline the tails:
Lightly sketch the curves of two mermaid tails. Draw one tail diving downwards from the top center and another tail flipping upwards from the bottom right, creating a pleasing ‘S’ curve composition. -
Define the fins:
Add the flukes (fin ends) to both tails. Keep the lines flowy and organic, imagining how fabric moves underwater. -
Mark the horizon line:
Draw a faint horizontal line across the middle of the paper to separate the underwater section from the surface area. -
Paint the water background:
Wet the rectangular area between the tails with clean water. Drop in diluted turquoise and teal paint, allowing the colors to bloom and mix on the paper for a soft, underwater effect. Keep this wash quite pale.
Muddy colors?
If your purples and oranges are turning brown, execute the wet-on-wet stage in sections. Let the turquoise tail dry completely before painting the magenta sections nearby.
Step 2: Painting the Tails
-
Base layer for the top tail:
While the background is drying, wet the area inside the top tail sketch. Apply a mix of magenta and purple, letting it be darker at the body and fading out towards the fin. -
Base layer for the bottom tail:
Repeat the process for the bottom tail, using a blend of teal and indigo at the base, transitioning into purple near the fins to connect the color palette. -
Add texture while wet:
While the paint appears wet, drop in small touches of concentrated color (dark purple or deep teal) along the edges of the tails to create form and simple shadowing. -
Salt technique (optional):
If you want extra texture on the skin, sprinkle a few grains of table salt onto the wet tail sections. Let it sit until completely dry. -
Paint the fins:
Using a smaller brush, carefully paint the fins with a translucent wash of purple and pink. Use long, sweeping strokes that follow the curve of the fin. -
Add fin details:
Once the base fin layer is damp but not soaking, use a finer brush to add thin lines of darker purple to represent the ribs of the fin.
Step 3: Iridescence and Details
-
Apply the shimmer:
Mix your iridescent medium with a little bit of water or use a dedicated pearlescent paint. Glaze this over the main body of the tails to give them that magical, scaly shine. -
Create the heavy sparkle:
For the intense texture seen in the middle of the tails, dab thicker iridescent paint or glitter watercolor directly onto the dried paint. -
Draw the waves:
Load a fine brush with white gouache (or use a white gel pen). Draw scalloped, semi-circle lines in the turquoise background area to represent stylized waves. -
Enhance the wave pattern:
Stagger these white scallops in rows, ensuring they overlap slightly to create a rhythmic, scale-like pattern in the water. -
Add bubbles:
Paint or draw small circles floating near the tails. I like to group them in odd numbers—two small ones and one larger one—to look more natural. -
Final dry and reveal:
Ensure the entire painting is bone dry. If you used salt, gently brush it off now. Carefully peel away the masking tape at a 45-degree angle to reveal crisp, clean edges.
Make it Shine
For a dramatic 3D effect, use dimensional fabric paint or ‘Puffy Paint’ for the white wave lines. It adds a tactile texture that mimics raised foam on the water.
Your shimmering mermaid tails are now ready to bring a splash of ocean magic to your wall
Acrylic Blend Tail With No Individual Scales
Capture the magic of the ocean with this elegant mermaid tail painting, featuring a stunning gradient from deep violet to aquamarine. By focusing on smooth blends and flowing lines rather than individual scales on the main fin, you achieve a soft, dreamlike quality perfect for wall art.
Step-by-Step
Materials
- White canvas or heavy watercolor paper (rectangular format)
- Acrylic paints (Phthalo Blue, Turquoise, Teal, Purple, Violet, Titanium White)
- Medium flat brush
- Small round detail brush
- Pencil and eraser
- Palette for mixing
- Water cup and paper towels
Step 1: Sketching the Silhouette
-
Draw the basic curve:
Start by lightly sketching a long, curved ‘S’ shape down the center of your canvas. This will act as the spine of the tail to ensure movement and flow. -
Outline the waist and hips:
At the top of your ‘S’ curve, draw the waist section. It should be wider at the top and taper gradually as it moves down towards the ‘knees’ of the tail. -
Add the fluke (tail fin):
At the bottom, sketch two large, flowing fin shapes extending outwards. Make the left side curve gently upward and the right side drape down longer for a dynamic, asymmetrical look. -
Sketch the waist fins:
Add smaller, wing-like fins at the very top waistline, flaring upwards. These will eventually be purple.
Wet-on-Wet Blending
Keep a spray bottle of water nearby. Mist your paints lightly while blending the long tail fin strokes to keep the acrylics pliable for smooth gradients.
Step 2: Painting the Gradient Body
-
Base coat the waist fins:
Mix a vibrant violet with a touch of white. Paint the small upper fins using vertical strokes that follow the direction of the fin shape. -
Start the main body color:
Below the waist fins, begin painting the ‘hip’ area with a deep teal or turquoise. Use a flat brush to lay down smooth, solid color here. -
Create the scale texture:
While the teal paint is still wet, dip a small round brush into a slightly lighter turquoise mix. Dab small, U-shaped strokes overlapping each other down the length of the main body to suggest scales without painting every single detail. -
Transitioning colors:
As you move down the tapered part of the tail, gradually mix more blue into your teal. Continue the dabbing, U-shaped texture, making the ‘scales’ slightly smaller as the tail narrows.
Add Some Sparkle
Once the painting is fully dry, brush a clear iridescent glitter glaze over the main scale body and the tips of the fins for a magical, shimmering finish.
Step 3: Creating the Flowing Fin
-
Lay down the fin base:
For the large tail fin, water down your acrylics slightly or use a flow medium. Paint long, sweeping strokes starting from the narrow connection point outward to the tips. -
Blend the colors:
Use a mix of teal, light blue, and hints of white. I define the ridges of the fin with darker blue lines and fill the spaces between with lighter translucent washes to create a ribbed look. -
Add purple accents:
While the blue is still tacky, carefully streak in small amounts of purple near the edges of the fin to echo the color from the waist fins. -
Refine the fin edges:
Use your smallest brush to paint the jagged, delicate edges of the fin tips. They shouldn’t be a perfect smooth line; give them little distinct points.
Step 4: Final Details
-
Deepen the shadows:
Mix a dark navy blue. Paint thin, decisive lines between the main ribs of the large tail fin to add depth and dimension. -
Highlight the scales:
Take a very light turquoise or white. Add tiny highlights to the centers of the U-shaped scales on the main body to make them look wet and shiny. -
Highlight the fin ridges:
Add thin strokes of pure white along the highest ridges of the tail fin to simulate light catching the translucent membrane. -
Clean up outlines:
If any paint went outside your lines, use white paint to touch up the background, ensuring a crisp, clean silhouette against the canvas.
Step back and admire the fluid motion and vibrant colors of your underwater creation

PENCIL GUIDE
Understanding Pencil Grades from H to B
From first sketch to finished drawing — learn pencil grades, line control, and shading techniques.
Explore the Full Guide
Metallic and Pearly Scale Accents
Capture the magic of the deep sea with this vibrant watercolor mermaid tail, featuring brilliant metallic gold detailing. The blending of teal, turquoise, and coral hues mimics the iridescent shimmer of real fish scales, while liquid gold leaf adds a luxurious, finishing touch.
Step-by-Step Tutorial
Materials
- Cold-press watercolor paper (300gsm)
- Watercolor paints (Turquoise, Phthalo Blue, Teal, Coral, Payne’s Grey)
- Metallic gold watercolor paint or liquid gold leaf
- Round watercolor brushes (Size 4, Size 6, and a fine liner brush)
- Pencil (HB) and eraser
- Jar of clean water
- Palette for mixing
- Paper towels
Step 1: Sketching the Silhouette
-
Outline the shape:
Begin by lightly sketching the curve of the mermaid tail in the center of your paper. Avoid pressing too hard with your pencil; you want the lines to be barely visible so they disappear under the paint. -
Define the fins:
Draw the dual-fin shape at the top (the waist area) and the larger, flowing fluke at the bottom. Keep the lines fluid and organic, mimicking the movement of water. -
Draft the scale pattern:
Starting from the top waist section, sketch overlapping U-shapes to create the scales. Make them slightly larger near the top and gradually smaller as you move down the tapered body toward the tail fin.
Step 2: Painting the Base Layers
-
Apply the first wash:
Load your Size 6 brush with a diluted turquoise and lay down a wash over the top waist fins and the bottom tail fluke. Keep this layer light and watery to establish the base color. -
Start the coral gradient:
For the scales, begin at the very top section with a mix of coral and orange. Paint the first few rows of scales individually, letting the color pool slightly for texture. -
Blend into blues:
As you move down the rows of scales, start mixing teal into your coral on the palette to create a transition. By the time you reach the middle of the tail, switch primarily to teal and turquoise tones. -
Deepen the tail hues:
Continue painting the scales all the way to the bottom join, darkening the color by adding a touch of Phthalo Blue or Payne’s Grey as the tail narrows. -
Refine the fins:
Go back to the top and bottom fins with a more saturated teal. Use long, sweeping strokes that follow the curve of the fin to simulate the ribbing texture.
Muddy Colors?
If your coral and teal mix into a dull brown, let the coral section dry completely before painting the blue scales next to them. Wet paint mixes; dry layers stack cleanly.
Step 3: Adding Depth and Definition
-
Shadowing the scales:
Once the base layer is dry, mix a darker teal-blue. Use your Size 4 brush to paint a thin shadow line underneath each individual scale to make them pop and look three-dimensional. -
Darken the edges:
Add shading to the outer edges of the main tail body to create a rounded, cylindrical form. -
Intensify the fin details:
I like to use a liner brush here to paint thin, darker lines within the fins, radiating outward. This reinforces the skeletal structure of the tail fin. -
Color correction:
If any area looks too flat, glaze over it with a very transparent layer of bright turquoise to unify the colors. -
Dry completely:
Let the entire painting dry completely. This is crucial before adding metallic accents to prevent the gold from bleeding into the wet paper.
Level Up: Salt Texture
While the scale paint is still wet, sprinkle a tiny bit of table salt on the blue section. Brush it off once dry for a stunning, organic sea-foam texture on the scales.
Step 4: The Golden Touch
-
Prepare the metallic paint:
Activate your metallic gold watercolor with a drop of water or shake your liquid gold leaf well. You want a creamy, opaque consistency. -
Highlight the fins:
Using your fine liner brush, paint delicate curved gold stripes along the ridges of both the top waist fins and the large bottom fluke. Follow the dark lines you painted earlier. -
Accent the scales:
Carefully dab gold accents onto selected scales. Focus on the transition area where the coral meets the blue, and random spots lower down to simulate light catching the fish scales. -
Final touches:
Add tiny flecks of gold to the tips of the fins for a magical sparkle. Let the metallic elements dry for several hours before handling or framing.
Once the gold catches the light, your mermaid tail will look ready to splash into the ocean
Bubbles and Seaweed Framing the Tail
Capture the magic of the ocean with this elegant mermaid tail painting, featuring shimmering gold accents and gentle watercolor washes. This project combines structured scale work with loose, free-flowing elements like bubbles and seaweed.
Detailed Instructions
Materials
- Cold-press watercolor paper (300 gsm)
- Watercolor paints (Turquoise, Teal, Prussian Blue, Yellow Ochre)
- Metallic gold watercolor paint or gold ink
- Round watercolor brushes (Size 2, 6, and 10)
- Graphite pencil (HB) and eraser
- Masking tape
- Jars of clean water
Step 1: Sketching the Silhouette
-
Plan the composition:
Lightly tape your watercolor paper to a board to prevent buckling. Visualize the curve of the tail starting from the top left and sweeping down towards the bottom right, leaving space at the bottom for the fins. -
Draw the main curve:
Using your HB pencil, sketch a gentle S-curve to defining the spine of the tail. Keep your lines very faint so they won’t show through the translucent watercolor later. -
Outline the body:
Flesh out the tail’s shape, starting wider at the top (the waist area) and tapering gradually as you reach the fluke (the large fin at the end). Add small fin details near the top waistline. -
Detail the scales:
Sketch the scale pattern lightly. Start with larger U-shapes near the top and make them progressively smaller and tighter as you move down toward the fluke. You don’t need to draw every single scale perfectly; just establish the grid.
Use a rigger brush
For the long, trailing lines of bubbles or the fine ribs in the fins, use a rigger or liner brush. Its long bristles hold more paint and allow for unbroken, steady lines.
Step 2: Painting the Base Layers
-
Mix your palette:
Prepare a watery mix of Turquoise and a hint of Yellow Ochre. You want a soft, sea-green base tone. -
Apply the first wash:
With a size 10 brush, paint the upper body of the tail. Use the wet-on-dry technique for control, carefully color-blocking the scales. Vary the tone by adding more water for lighter scales and more pigment for darker ones. -
Create a gradient:
As you move down the tail, introduce more Teal and Prussian Blue into your mix. This natural gradient mimics the way light fades in deep water. -
Paint the fluke:
For the large tail fin, switch to a wet-on-wet technique. Wet the paper inside the fin outline with clean water, then drop in teal and turquoise pigment, letting it bloom and spread naturally for a soft, ethereal look. -
Add ocean bottom details:
While the tail dries, mix a very watery teal wash. Paint organic, cloud-like shapes at the bottom corners of the paper to represent the seabed environment.
Step 3: Adding Definition and Shine
-
Define the scales:
Once the base layer is completely dry, use a size 2 brush and a darker teal mix to outline the individual scales. Emphasize the bottom curve of each scale to create depth and shadow. -
Enhance the fin texture:
Paint thin, flowing lines along the length of the fluke with your darker teal mix. Follow the curve of the fin to simulate the ribbing texture found in fish fins. -
Introduce gold accents:
Activate your metallic gold paint. I like to let it get creamy rather than too watery for better opacity. Paint select scales near the top with pure gold to make them shimmer. -
Gild the fin:
Add streaks of gold specifically along the ridges of the tail fin and the smaller hip fins. The gold should look like sunlight catching the movement of the water.
Add salt for texture
While the watercolor wash on the tail fin is still wet, sprinkle a few grains of table salt on it. As it dries, the salt pushes the pigment away, creating beautiful organic blooms.
Step 4: Atmospheric Details
-
Paint the bubble chains:
Using the tip of your size 2 brush and the gold paint, create delicate chains of tiny circles rising from the tail and fins. Vary the size of the bubbles for a natural appearance. -
Add floating bubbles:
Scatter larger, singular gold circles around the composition. These standalone bubbles help fill the negative space without cluttering the main subject. -
Detail the seaweed:
At the bottom of the page, paint simple, wavy seaweed strands using a mix of gold and olive green. Let them intertwine slightly with the misty teal background you painted earlier. -
Add texture to the seabed:
Dip an old toothbrush or stiff brush into gold paint and gently flick it over the bottom corners to create a sandy texture among the seaweed. -
Final assessment:
Step back and look at the balance. If the tail needs more contrast, darken a few shadow areas between the scales with your finest brush.
Once the gold paint catches the light, you’ll have a magical piece of ocean art ready to frame.


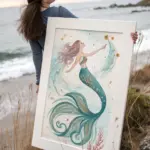
Coral Reef Colors Behind a Floating Tail
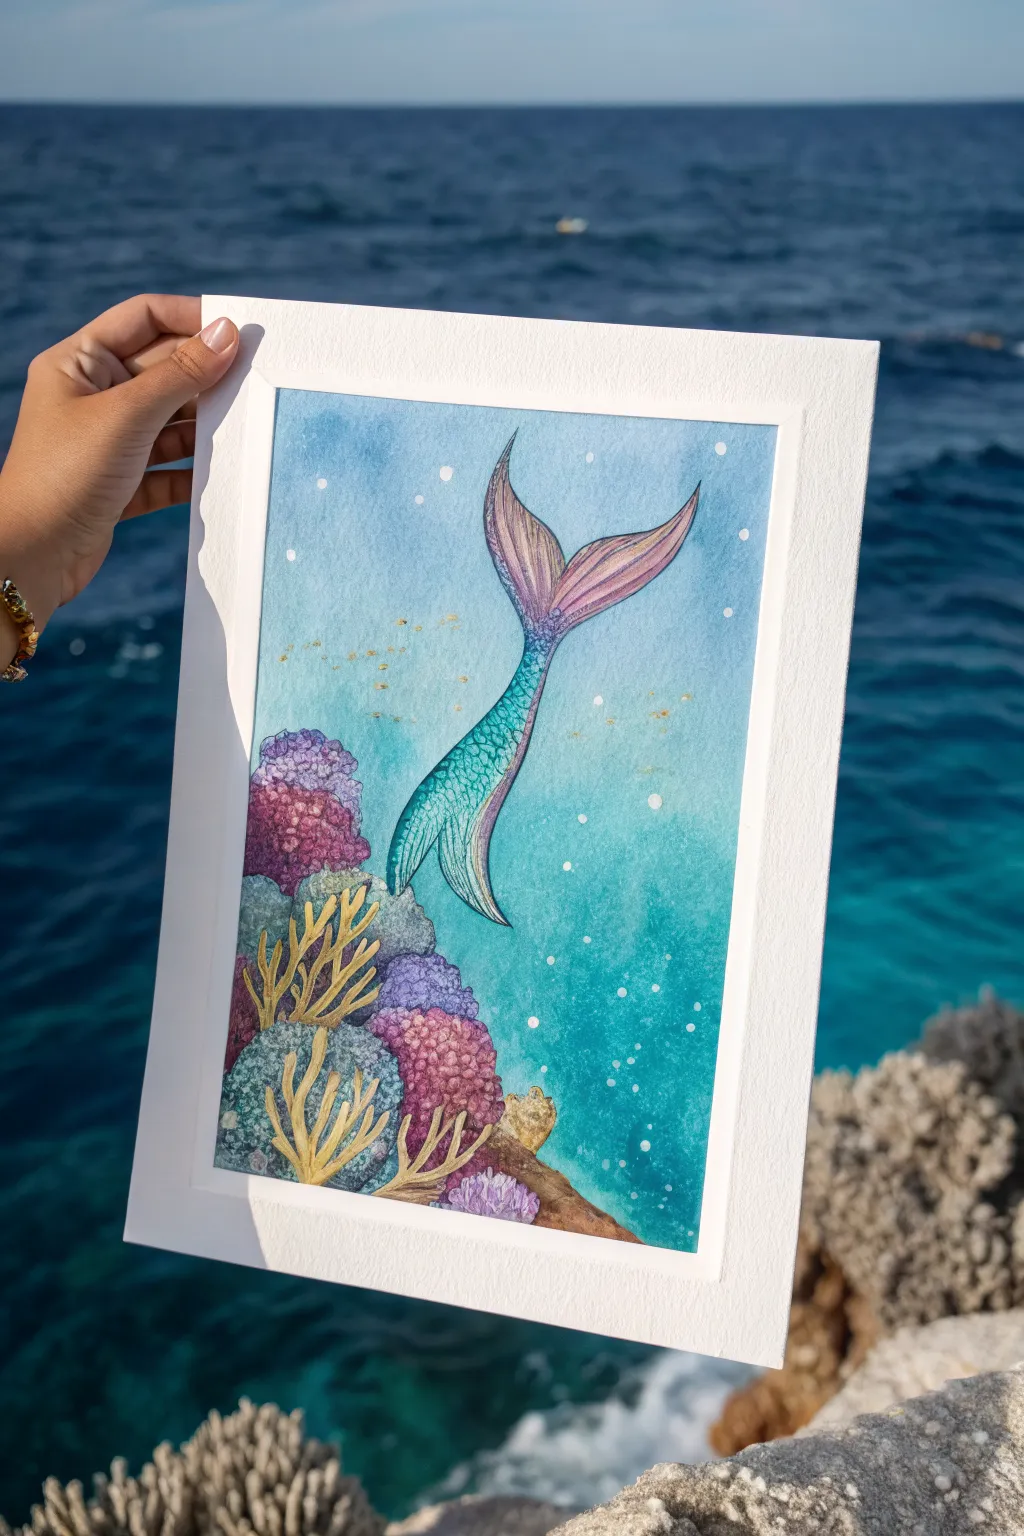
Capture the magic of the deep sea with this vibrant watercolor piece featuring a mermaid tail breaking the surface above a colorful reef. You’ll layer rich blues and purples to create depth, finishing with gold accents that make the ocean sparkle.
Step-by-Step Tutorial
Materials
- High-quality watercolor paper (cold press, 300gsm)
- Watercolor paints (teal, turquoise, indigo, violet, pink, gold)
- Round watercolor brushes (sizes 2, 6, and 10)
- Fine liner brush or gold ink pen
- Masking fluid (optional)
- Pencil and eraser
- White gel pen or white gouache
- Painter’s tape
- Two jars of water
- Paper towels
Step 1: Preparation and Sketching
-
Secure the paper:
Tape your watercolor paper down to a board or table on all four sides. This creates that clean, crisp white border you see in the final image and prevents the paper from buckling when wet. -
Sketch the composition:
Lightly sketch the outline of the mermaid tail in the center, curving gently. Below it, draw rounded mounds for the coral reef shapes on the bottom left. Keep pencil lines faint so they don’t show through the transparent paint later. -
Protect highlights (optional):
If you want to preserve pristine white spots for bubbles, apply small dots of masking fluid in the water area now. Let it dry completely before painting.
Step 2: Painting the Ocean Background
-
Wet-on-wet wash:
Using your largest brush, clean water onto the background area, avoiding the tail and the coral reef. You want the paper glistening but not swimming in puddles. -
Apply the gradient:
Starting at the bottom near the reef, drop in a deep turquoise or teal. As you move upward, dilute the paint slightly to create a lighter blue, mimicking how light penetrates water. -
Deepen the depths:
While the paper is still damp, drop concentrated indigo or dark teal into the bottom corners and around the coral edges to create atmospheric depth. -
Create texture:
Sprinkle a tiny pinch of salt onto the wet wash if you want extra texture, or simply dab a clean tissue here and there to lift pigment for a soft, mottled water effect. Allow this layer to dry completely.
Don’t rush the reef
Wait for the blue water background to be completely dry before painting the corals. If the background is damp, your coral edges will fuzz out and lose their definition.
Step 3: Detailed Coral Reef
-
Base layers for coral:
Paint the coral mounds using various shades of purple, blue, and dusty pink. Use a wet-on-dry technique here to keep the edges defined against the water background. -
Add coral texture:
Once the base shapes are dry, use a smaller brush to stipple darker dots onto the purple corals to mimic their bumpy surface. I find this creates instant dimension. -
Define the structure:
Paint distinct, smaller semi-circles or brain-coral patterns on the blue sections using a darker shade of blue-grey.
Make it shimmer
Mix a tiny bit of iridescent medium into your top layer of teal paint for the tail scales. It gives the mermaid scales a realistic, pearlescent shine.
Step 4: The Mermaid Tail
-
Painting the fluke:
Start with the fin (fluke) at the top. Use a blend of soft pink and lilac, letting the colors bleed into each other wet-on-wet. Keep the edges crisp. -
Body gradient:
Paint the main body of the tail, starting with a bright turquoise near the bottom and transitioning into the purple of the fin. Let this dry. -
Scale details:
Using your smallest brush or a fine liner with darker teal paint, carefully draw the U-shaped scales on the body of the tail. Make them smaller near the top and larger near the curve. -
Fin veins:
Paint thin, delicate lines radiating outward on the fluke using a darker purple or fine gold paint to represent the fin’s structure.
Step 5: Final Flourishes
-
Golden sea fans:
Using gold paint or a yellow ochre mix, paint branching, tree-like coral structures (sea fans) overlapping the dark coral mounds. This adds a beautiful contrast and warmth. -
Bubbles and magic:
Use white gouache or a white gel pen to add dots of varying sizes rising from the reef and around the tail. If you used masking fluid, rub it off now to reveal white paper underneath. -
Gold accents:
Add tiny flecks of gold paint into the water around the mid-section for a magical, shimmering dust effect. -
The Reveal:
Wait until the painting is 100% bone dry to avoid tearing. Then, slowly peel back the painter’s tape at a 45-degree angle to reveal your clean edges.
Frame your underwater masterpiece in a simple white mat to let those ocean colors truly pop
Sunset Palette Tail With Warm Reflections
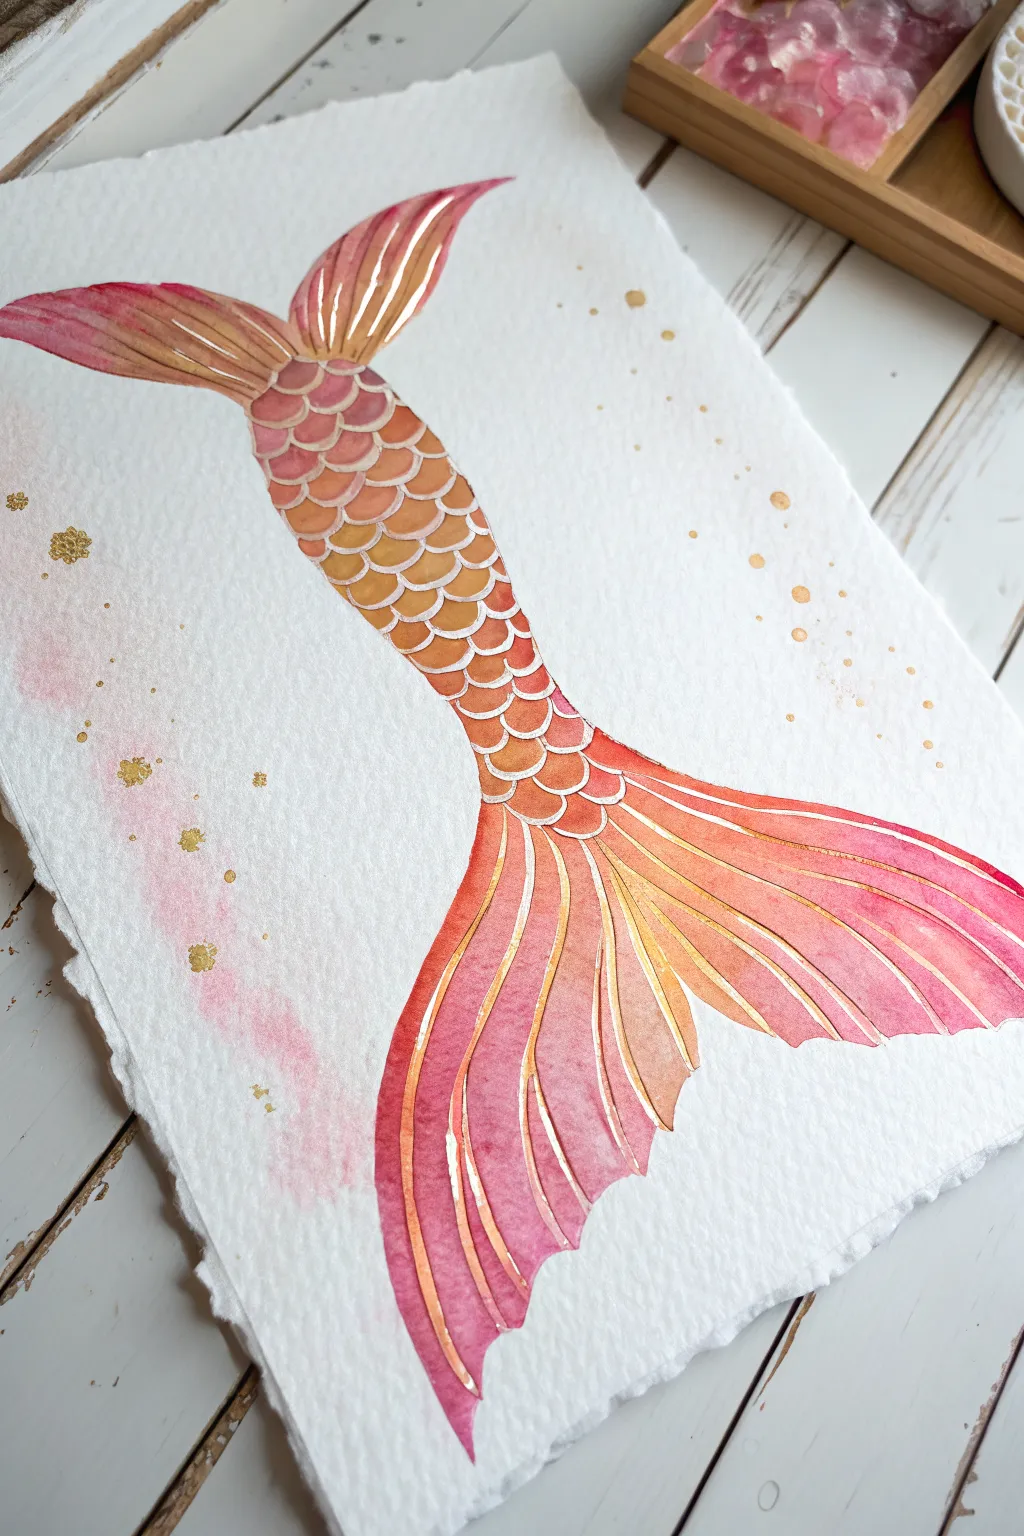
Capture the warmth of a setting sun with this elegant watercolor mermaid tail, featuring a seamless gradient of pinks and oranges accented by shimmering gold details. The piece uses negative space techniques to create delicate scales that seem to glow against the textured paper.
How-To Guide
Materials
- Cold press watercolor paper (deckled edge optional)
- Watercolor paints: Rose madder or crimson, cadmium orange, yellow ochre
- Metallic gold watercolor paint or gold ink
- Round watercolor brush (size 6 or 8)
- Fine liner brush (size 0 or 1)
- Pencil and eraser
- Palette for mixing
- Clean water jar
- Paper towels
Step 1: Planning the Sketch
-
Outline the shape:
Begin by lightly sketching the mermaid tail’s curve with your pencil. Draw a gentle ‘S’ curve for the body leading down into a wide, fanned-out fluke at the bottom. -
Define the sections:
At the top of your curve, sketch a smaller, secondary fin for the waist. Then, draw light guidelines across the main body to help you place the scales evenly later. -
Map the scales:
Sketch the scale pattern on the body section. Instead of drawing individual scales, think of them as overlapping ‘U’ shapes. Keep the lines very faint so they don’t show through the final paint.
Muddy Gradients?
If your orange and pink are turning brown where they meet, let the first color dry slightly before adding the second. This prevents over-mixing directly on the paper.
Step 2: Painting the Gradient Base
-
Mix your sunset colors:
Prepare three puddles of paint: a deep pinkish-red, a vibrant orange, and a warm yellow-gold. Make sure they are watery and fluid. -
Start the body gradient:
Painting the scaled section requires negative space. Using your fine brush, paint *inside* each scale shape, leaving a tiny gap of white paper between them. Start with the pink at the waist. -
Transition the colors:
As you move down the body, rinse your brush slightly and pick up the orange paint. Blend it into the wet pink scales or start new orange scales, creating a smooth transition. -
Finish body details:
Continue painting the scales until you reach the tail fluke, transitioning from orange to the yellow-gold tone near the bottom of the scales. Let this section dry completely.
Step 3: The Flowing Fluke
-
Wet the fluke area:
For the large tail fin, use a clean, wet brush to moisten the paper inside your sketched outline. This wet-on-wet technique will help colors bleed softly. -
Apply the main wash:
Drop in your deep pink color at the edges and tips of the tail fin. While it’s still wet, add orange towards the center closer to the body, letting them merge naturally. -
Create defined ribs:
While painting the fin, try to leave thin, curved strips of white paper unpainted to represent the structural ribs of the fin. If the paint spreads too much, we can fix it with gold later, but preserving the white creates a lovely glow. -
Add floating accents:
While you have paint on your palette, add a soft, watery wash of pink to the left side of the tail as a background splash. Add tiny dots of gold and orange around the tail to mimic bubbles or magic dust. -
Allow specifically for drying:
This is crucial: verify that the entire painting is bone dry before moving to the metallics. If the paper is cool to the touch, it’s still damp.
Pro Tip: Deckled Edges
To get the torn look shown in the photo, wet a ruler and place it on your paper edge. Tear the excess paper against the ruler. The water softens the fibers for a feathery tear.
Step 4: Golden Embellishments
-
Outline the scales:
Load your fine liner brush with metallic gold paint. Carefully trace the white gaps you left between the scales on the body. This defines the pattern and adds shimmer. -
Highlight the fin ribs:
Paint thin gold lines down the length of the tail fluke, following the curves where you left white space. I find that varying the thickness of these lines adds extra movement. -
Detail the waist fin:
Don’t forget the small fin at the top! Add delicate gold strokes to define its shape, matching the style of the large tail fil. -
Final splatters:
Dip a toothbrush or stiff brush into the gold paint and flick it gently over the paper to create a constellation of golden speckles around the tail.
Now step back and admire how the gold catches the light on your beautiful sunset creation
Geometric Mermaid Tail With Faceted Scales
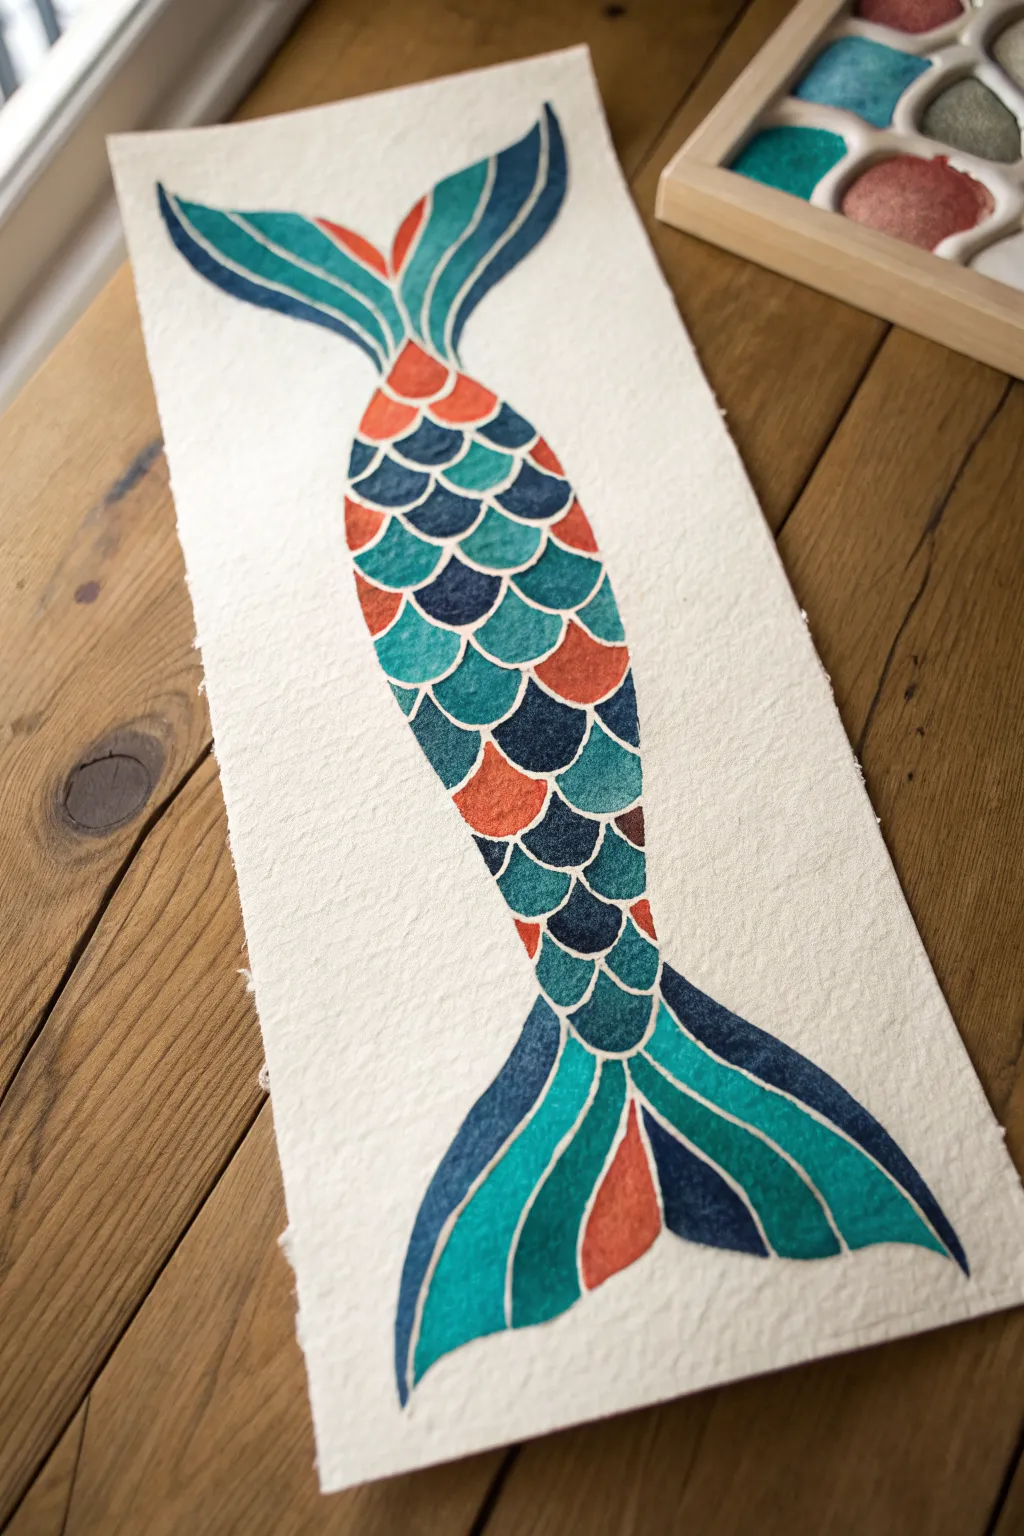
Capture the magic of the sea with this vibrant, scale-patterned mermaid tail that balances bold colors with delicate negative space. The geometric, almost stained-glass effect is achieved by carefully leaving thin white lines between each painted segment, creating a crisp and modern aquatic design.
Detailed Instructions
Materials
- Cold press watercolor paper (textured, 300 gsm)
- Pencil (HB or H)
- Kneaded eraser
- Watercolor paints (Dark indigo blue, teal/turquoise, coral orange)
- Round watercolor brush (size 4 or 6)
- Fine liner brush (size 0 or 1)
- Jar of clean water
- Paper towels
- Masking fluid (optional but recommended for beginners)
Step 1: Drafting the Design
-
Center the composition:
Begin by lightly marking the top and bottom boundaries of the tail on your paper. Draw a faint vertical centerline to ensure symmetry as you build the shape. -
Outline the silhouette:
Sketch the main body of the tail, starting wide at the top (the waist area) and tapering gently down to the ‘peduncle’ (the narrow part before the fin). Keep the curves smooth and organic. -
Sketch the fins:
Draw the large caudal fin at the bottom, flaring it out with elegant curves. Add two smaller, stylized fins at the very top of the waist, mirroring the bottom shape for balance. -
Grid the scales:
Lightly sketch the scale pattern inside the body. Instead of perfect semi-circles, give them slightly squared or pointed edges to match the ‘faceted’ look of the reference. Ensure the rows are staggered like bricks. -
Detail the fin segments:
Divide the top and bottom fins into curved segments. These should flow with the shape of the fin, radiating outward like a fan.
Step 2: Planning the Colors
-
Lighten the sketch:
Roll your kneaded eraser gently over the entire drawing. You want the pencil lines to be barely visible guides so graphite doesn’t muddy your bright watercolors. -
Select your palette:
Prepare your three main colors: a deep indigo for contrast, a bright turquoise or teal for the main body, and a warm coral orange for pops of accent color. -
Plan the negative space:
Decide now if you will paint freehand or use masking fluid. If you are worried about unsteady hands, carefully apply thin lines of masking fluid over your pencil lines to preserve the white paper. Let it dry completely.
Crisp White Lines
To keep the white gaps consistent without masking fluid, paint every other scale first. Let them dry fully, then paint the neighbors. This prevents wet paint from bleeding across the boundary.
Step 3: Painting the Scales
-
Start with the accents:
Dip your round brush into the coral orange. Paint scattered scales randomly throughout the body pattern, focusing on the middle and upper sections. Leave a tiny gap of dry paper between the paint and your pencil line. -
Add the deep tones:
Switch to your dark indigo. Fill in several scales, particularly near the edges of the tail to create a sense of rounded form and shadow. Remember to maintain those white borders. -
Fill with teal:
Use the turquoise/teal mixture to paint the remaining majority of the scales. Vary the water-to-paint ratio slightly for some scales to create natural texturing and depth within the same hue. -
Work on the top fins:
Paint the segmented fins at the waist using an alternating pattern of teal and indigo, with a small coral accent in the center V-shape.
Add Some Sparkle
Once the watercolor is bone dry, use a metallic gold or pearlescent watercolor paint to glaze over the coral scales. It mimics the shimmer of a real fish tail in the sun.
Step 4: Finishing the Caudal Fin
-
Paint the outer segments:
For the large bottom fin, use the indigo blue on the outermost segments to frame the shape. -
Fill the inner fan:
Paint the large, sweeping inner sections with your teal. I find using a size 6 brush here helps create smooth, long strokes that follow the curve of the fin. -
Add the coral anchor:
Paint the central, bottom-most segment in coral orange. This anchors the color scheme and draws the eye down. -
Refine edges:
Once the paint is damp but not soaking, you can drop a tiny bit of darker pigment into the corners of the wet scales to enhance the faceted, jewel-like effect. -
Final cleanup:
Allow the painting to dry completely—give it at least an hour. If you used masking fluid, gently rub it away with your finger or a rubber pickup tool to reveal the crisp white lines.
Now you have a stunning, geometric piece of ocean art ready to be framed
Negative Space Tail With a Minimal Ocean Wash
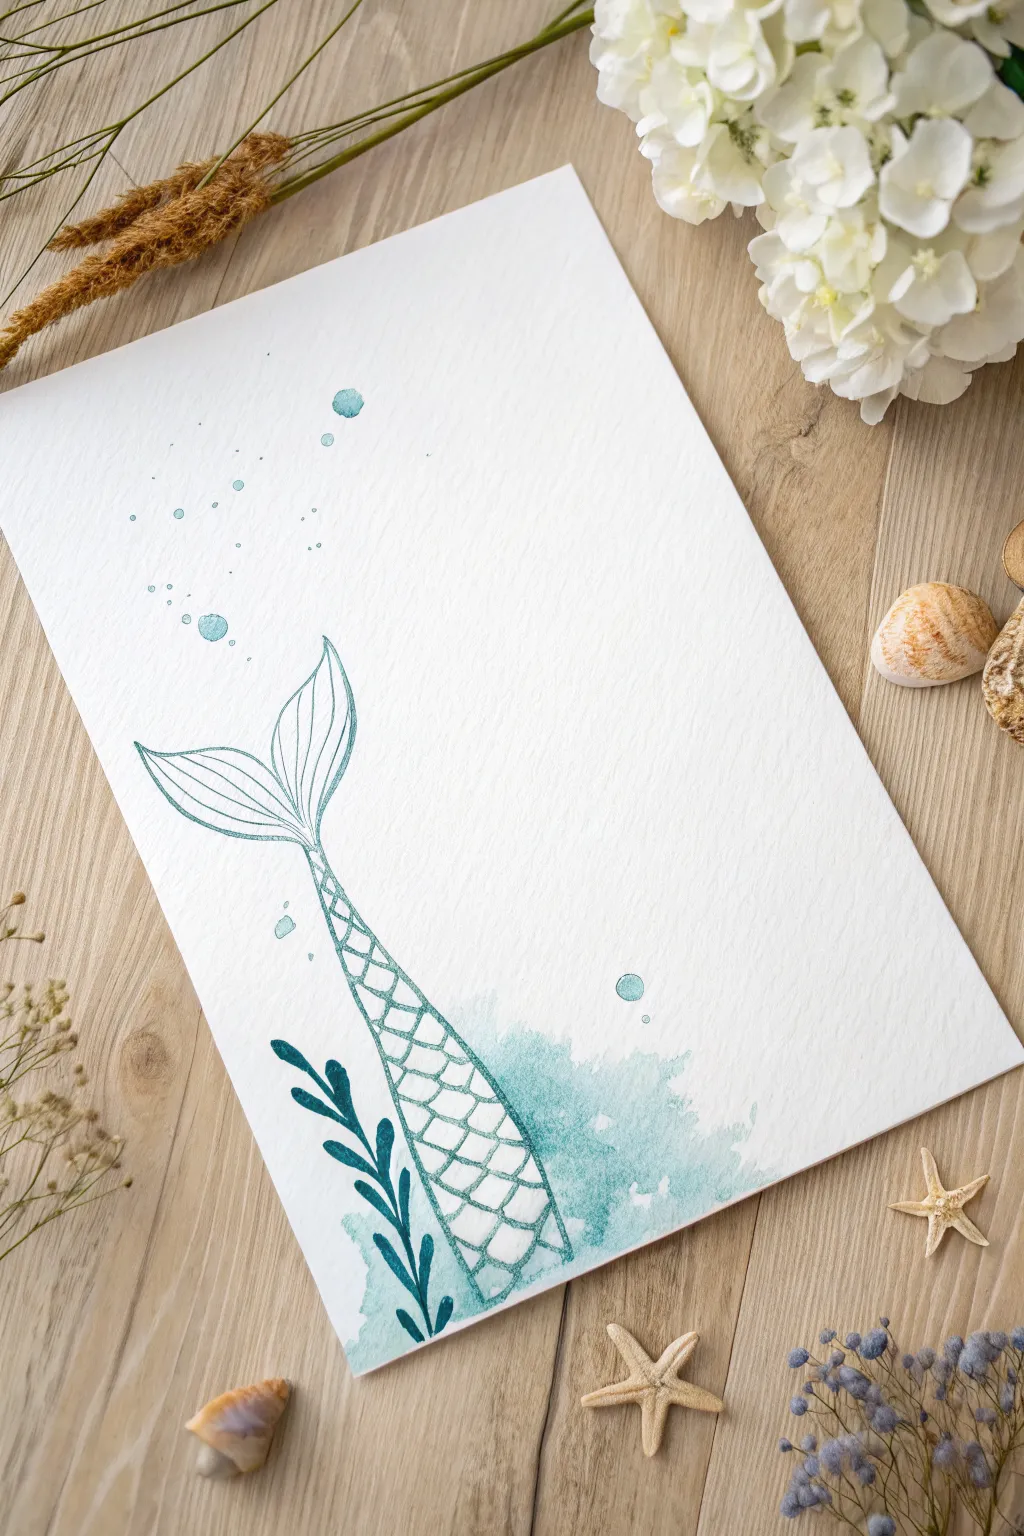
Elegance meets simplicity in this mermaid tail project, which combines delicate contour line drawing with a soft, abstract watercolor wash. The design focuses on negative space within the scales to create a light, airy feel perfect for coastal decor.
Step-by-Step Guide
Materials
- Cold press watercolor paper (A4 or A5 size)
- Teal or turquoise watercolor paint
- Fine liner brush (size 0 or 00) or a teal fine-tip pen
- Round watercolor brush (size 4 or 6)
- Pencil (HB)
- Clean water
- Paper towels
- Eraser
Step 1: Sketching the Form
-
Lightly pencil the curve:
Begin by drawing a faint ‘S’ curve on the lower left side of your paper. This will serve as the spine of the mermaid tail, guiding the motion of the body. -
Outline the tail body:
Flesh out the tail by drawing two tapering lines on either side of your guide curve. Keep the bottom wider where it meets the ground and taper it narrowly as it moves upward toward the fluke. -
Shape the fluke:
At the top of the tapered body, sketch the flukes (the fins). Use two large, leaf-like shapes that curve outward and meet in the center. Keep your pencil pressure very light so it can be erased later. -
Draft the scales:
Start from the bottom and lightly sketch a grid of overlapping ‘U’ shapes to form the scales. You don’t need to fill the entire tail; let the scales fade out as they move higher up the body for a minimalist look.
Scale sizing pro-tip
Make the scales larger at the base of the tail and gradually smaller as you move up toward the waist. This simple perspective trick adds instant depth and volume to your drawing.
Step 2: Inking the Details
-
Outline the main shape:
Using a fine liner brush loaded with teal paint (or a teal fine-tip pen), carefully trace over your pencil outline of the tail body and the flukes. -
Define the fluke ribs:
Draw delicate internal lines inside the flukes, fanning out from the center base toward the edges. These should be thin and graceful to mimic the texture of a fish fin. -
Trace the scales:
Go over your scale sketches with the fine liner. Ensure each scale connects to the neighbors. I like to vary line thickness slightly here to give it an organic feel. -
Erase pencil marks:
Once your ink or paint lines are completely dry—wait at least 10 minutes to be safe—gently erase all the visible pencil guidelines.
Step 3: Adding the Ocean Wash
-
Prepare a watery mix:
Dilute your teal watercolor paint significantly with water on your palette. You want a very transparent, light wash rather than a saturated block of color. -
Paint the background wash:
Apply this watery wash loosely around the base of the tail. Allow the edges to be irregular and ‘messy’ to simulate splashing water or sea foam. Don’t worry about staying inside the lines for this part. -
Create a gradient:
While the wash is still wet, drop a tiny bit of more concentrated teal paint into the area closest to the tail base. Let it bleed outward naturally. -
Paint the seaweed:
Using a slightly darker mix of teal and a size 4 brush, paint a simple seaweed frond on the left side of the tail base. Use a ‘press and lift’ motion: press down for the leaf width and lift for the tip. -
Blend the bottom:
Let the seaweed stem disappear into the wet ocean wash at the bottom, integrating the plant life with the abstract water effect.
Uneven wash?
If your ocean wash dries with hard edges you didn’t want, re-wet the edge with a clean, damp brush and gently scrub to soften it back into the paper texture.
Step 4: Finishing Touches
-
Splatter texture:
Load your brush with watery teal paint and gently tap the handle against your finger over the paper. This creates tiny droplets that look like bubbles rising around the tail. -
Add larger bubbles:
Paint a few distinct, small circles near the top of the tail specifically where the bubbles would rise. Keep them hollow or fill them very lightly. -
Final assessment:
Step back and check the balance. If the scales look too stark, add a barely-there wash of clear water over them to soften the lines without blurring them.
Frame this serene piece in white or light wood to complete the breezy, oceanic vibe you have created

Have a question or want to share your own experience? I'd love to hear from you in the comments below!