Eyes are basically tiny storytelling machines—change the shape, lashes, or highlights, and the whole mood shifts instantly. Here are my favorite eyes art style ideas to help you explore everything from realistic rendering to bold, imaginative stylization.
Photorealistic Eye Study
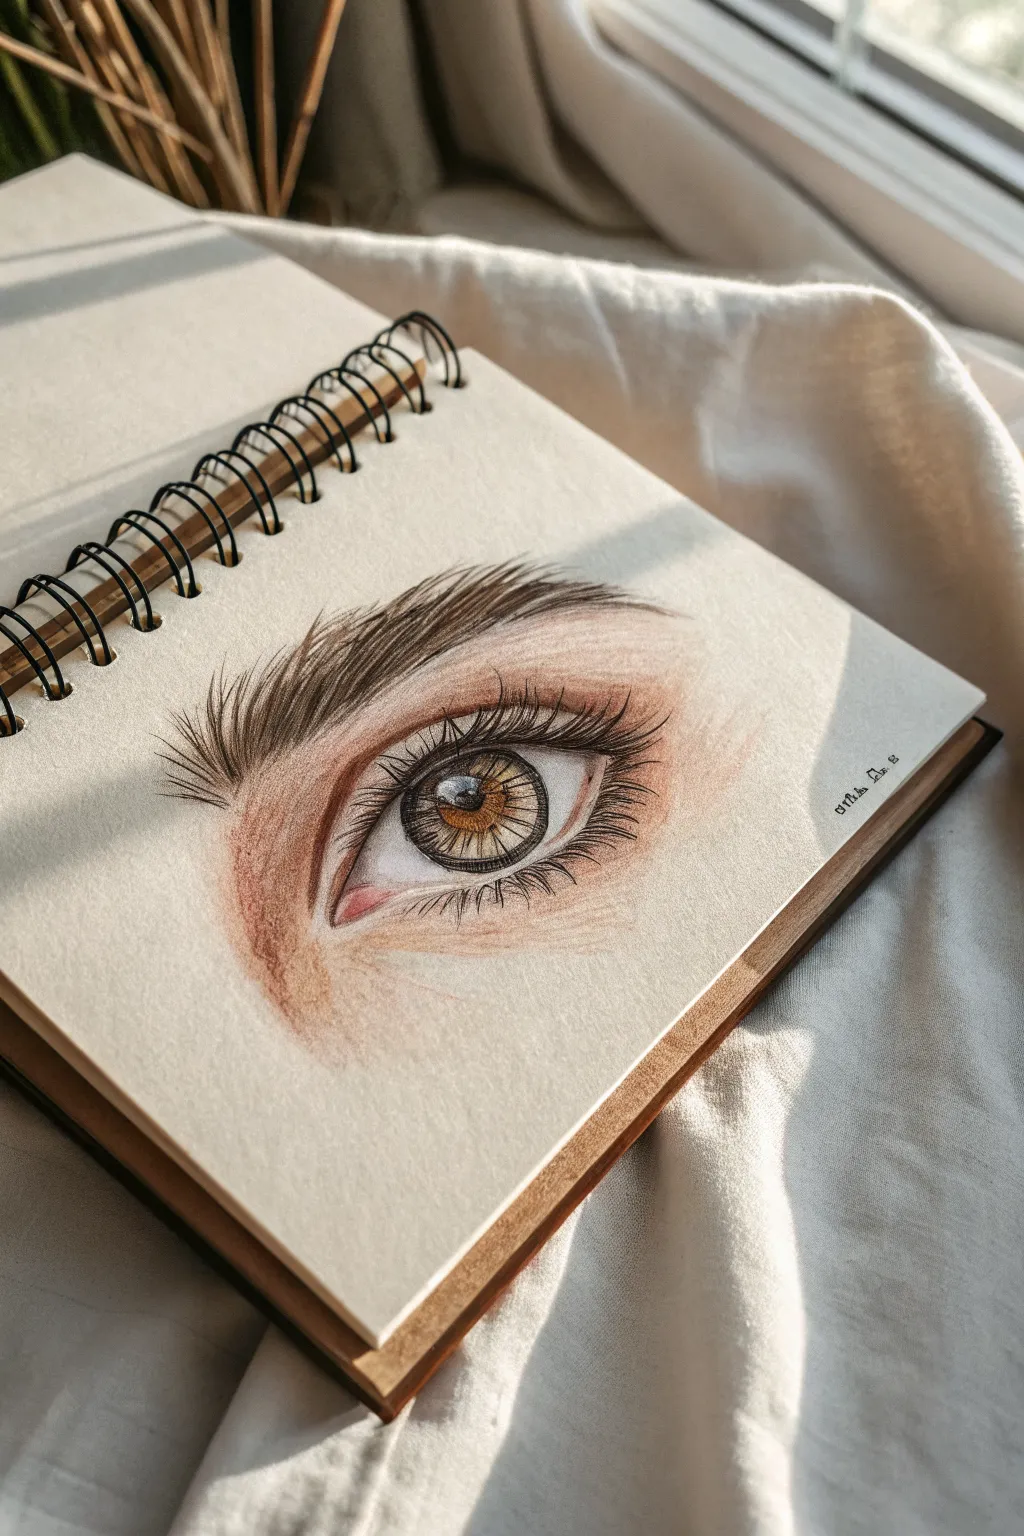
This project captures the delicate beauty of a realistic eye, focusing on warm, golden-brown tones and intricate lash details. It’s a fantastic exercise in layering colored pencils to achieve depth and skin-like texture on toned or textured paper.
Detailed Instructions
Materials
- Spiral-bound sketchbook (medium tooth paper)
- High-quality colored pencils (wax or oil-based)
- H or HB graphite pencil for outlining
- Fine-point white gel pen or white gouache
- Kneaded eraser
- Pencil sharpener
Step 1: The Foundation
-
Outline delicate shapes:
Begin by sketching the basic almond shape of the eye lightly with your graphite pencil. Mark the position of the iris, pupil, and the curve of the eyelid crease above. Keep these lines faint so they don’t show through the color later. -
Define the iris boundary:
Carefully draw the circle of the iris, ensuring the top is slightly covered by the upper lid. Mark the pupil in the center and lightly map out where the key highlight reflections will sit—preserving the white of the paper here is crucial. -
Erase excess graphite:
Roll your kneaded eraser gently over the entire sketch. You want to lift up most of the graphite, leaving only the faintest ‘ghost’ lines to guide your coloring.
Muddy colors?
If your pencil layers look waxy or dull, you’ve likely burnished too early. Keep pressure light for the first few layers. Use a colorless blender pencil to mix pigment without crushing the paper tooth.
Step 2: Layering the Iris
-
Base layer of the iris:
Select a warm golden-yellow pencil. Fill in the iris area, radiating your strokes outward from the pupil like spokes on a wheel, skipping over the highlight areas. -
Deepening the pupil:
Using a sharp black or dark charcoal pencil, fill in the pupil perfectly solid. create a dark ring around the outer edge of the iris (the limbal ring), pressing firmly for contrast. -
Adding iris details:
Take a medium brown pencil and draw fine lines radiating from the pupil outward. These lines mimic the muscle fibers of the eye. Add shorter lines coming inward from the outer ring to create depth. -
Warm highlights:
Layer a burnt sienna or rust color near the pupil to warm up the brown tone. If the white highlights got smudged, carefully reclaim them with an electric eraser or leave them be for the gel pen later.
Level Up: Reflection
Instead of a generic white square highlight, draw a tiny ‘window frame’ shape inside the pupil reflection. This suggests the eye is looking out a window and adds incredible narrative depth.
Step 3: Skin Tones and Shading
-
Sclera shadows:
The ‘white’ of the eye isn’t pure white. Lightly shade the corners and the area under the top lid with a cool grey or muted lavender pencil to create spherical volume. -
Pink caruncular area:
For the inner corner (the tear duct), use a soft pink or flesh tone. Add a tiny touch of red for realism, blending it softly so it doesn’t look irritated. -
Base skin tone:
Select a light peach or beige pencil. Shade the skin around the eye, focusing on the upper lid crease and the under-eye area. Use circular motions to build up a smooth, non-streaky layer. -
Deepening creases:
Use a darker brown or terracotta pencil to deepen the crease of the eyelid and the shadow beneath the lower lash line. This establishes the three-dimensional form of the eye socket. -
Refining skin texture:
Layer a slightly textured reddish-brown lightly over the darker skin areas. I like to hatch very lightly in the direction of the skin tension to simulate tiny pores and wrinkles.
Step 4: Lashes and Brows
-
Mapping the brow:
Using a light brown pencil, flick upward strokes to map the general shape of the eyebrow. Follow the natural growth direction—upward at the front, turning sideways toward the tail. -
Thickening the brow:
Switch to a dark brown pencil. Add individual hairs with quick, confident flicks. Press down at the start of the stroke and lift up at the end to create a tapered hair. -
Upper lashes:
Sharpen your black pencil to a needle point. Draw the upper lashes starting from the waterline, curving them forward and up. Group them slightly; lashes rarely stick straight out individually. -
Lower lashes:
Draw the lower lashes, making them shorter and sparser than the top ones. Include the reflection of the lashes visible in the highlight of the eye for a pro-level touch.
Step 5: Final Polishing
-
Intensify contrast:
Go back with your blackest pencil and darken the pupil, the limbal ring, and the roots of the lashes. High contrast is what makes the drawing look glossy and real. -
The sparkle:
Using a white gel pen or a fine brush with white gouache, place a sharp, crisp dot on the main highlight of the eye. Add tiny dots on the wet lower waterline (the tear meniscus) for a wet look.
Step back and admire how a few simple pencils have created such a soulful gaze

Classic Pencil Shading Eye

Master the fundamentals of classic drawing with this detailed pencil study of a human eye. You will learn to build depth through layering graphite, creating a striking balance between the sharp details of the iris and the soft transitions of the skin.
How-To Guide
Materials
- Spiral-bound sketchbook (medium tooth paper)
- Graphite pencil (HB or 2B for initial lines)
- Graphite pencil (4B or 6B for dark shading)
- Precision eraser or kneaded eraser
- Blending stump or cotton swab (optional)
Step 1: Basic Structure & Outline
-
Establish the curve:
Begin by lightly sketching the upper arch of the eyelid. It shouldn’t be a perfect semi-circle; aim for a slightly flattened curve that dips closer to the tear duct on the left. -
Define the lower lid:
Draw the bottom curve of the eye to meet the top arch. Keep this line much lighter than the top one, leaving a small gap at the outer corner to suggest the thickness of the waterline. -
Place the iris:
Sketch a circle for the iris. Notice how the top eyelid cuts off the upper part of the circle—rarely is the full iris visible unless the eye is wide open. -
Add the pupil and highlight:
mark the pupil in the brilliant center of the iris. Before you start shading, draw a small, crisp rectangle or oval overlapping the pupil and iris to reserve the white of the paper for the reflection. -
Indicate the crease:
Draw a parallel line above the upper eye line to form the eyelid crease. This line should be thicker and darker in the middle and fade out toward the edges.
Don’t Outline
Avoid drawing a hard outline around the entire almond shape of the eye. Real eyes rely on shadows and lashes to define the edges, not solid lines.
Step 2: Shading the Iris
-
Darken the pupil:
Using a softer pencil (like a 4B), fill in the pupil completely black, being careful to preserve the sharp edges of your highlight box. -
Radiating lines:
From the center pupil outward, and from the outer ring inward, draw fine, spoke-like lines for the iris texture. Leave the area immediately around the pupil slightly lighter. -
Define the limbal ring:
Darken the outer circumference of the iris. This ring shouldn’t be a hard outline but a soft, dark gradient that blends inward toward the center. -
Add depth to the iris:
Add a shadow under the upper eyelid that falls across the top third of the iris. I find this specific shadow crucial for making the eye look spherical rather than flat.
Try Sepia or Charcoal
Once you master this in graphite, try the same technique with a sepia-toned pencil for a vintage look, or charcoal for intense, dramatic contrast.
Step 3: Skin Texture & Shading
-
Shade the eyeball (sclera):
The white of the eye isn’t pure white. Lightly shade the corners of the eyeball, fading to white as you approach the iris, to give the globe volume. -
Contour the eyelid:
Apply soft shading in the crease of the upper lid. The darkest part should be deep in the fold, graduating to a lighter grey as it moves up toward the brow bone. -
Under-eye volume:
Add very faint, subtle shading beneath the lower lash line. This suggests the small roll of skin often found there without creating dark circles. -
Create the eyebrow shape:
Don’t draw individual hairs yet. Instead, lightly shade the general shape of the eyebrow arch, focusing on where the hair growth is densest.
Step 4: Details & Lashes
-
Upper eyelashes:
Draw the upper lashes using quick, curved strokes that flick upward. Start at the lash line and lift your pencil at the end of the stroke to create a tapered tip. -
Cluster the lashes:
Make the lashes vary in direction slightly; they shouldn’t look like a picket fence. Group slight clumps of two or three hairs together for a natural look. -
Lower lashes:
Draw shorter, sparser lashes on the bottom lid. Ensure these originate from the outer edge of the waterline, not directly from the eyeball itself. -
Eyebrow texture:
Over your base shading, draw short, directional strokes for the eyebrow hairs. The hairs near the nose should point upward, gradually slanting sideways as you move toward the temple. -
Refining the highlight:
Check your reserved white highlight. If it looks too perfect, you can add a tiny reflection line within it, like a window pane, to mimic a light source. -
Final contrast check:
Go back with your darkest pencil and deepen the pupil, the lash line, and the darkest part of the crease to make the drawing pop off the page.
Now you have a soulful, realistic eye study that captures both light and form beautifully
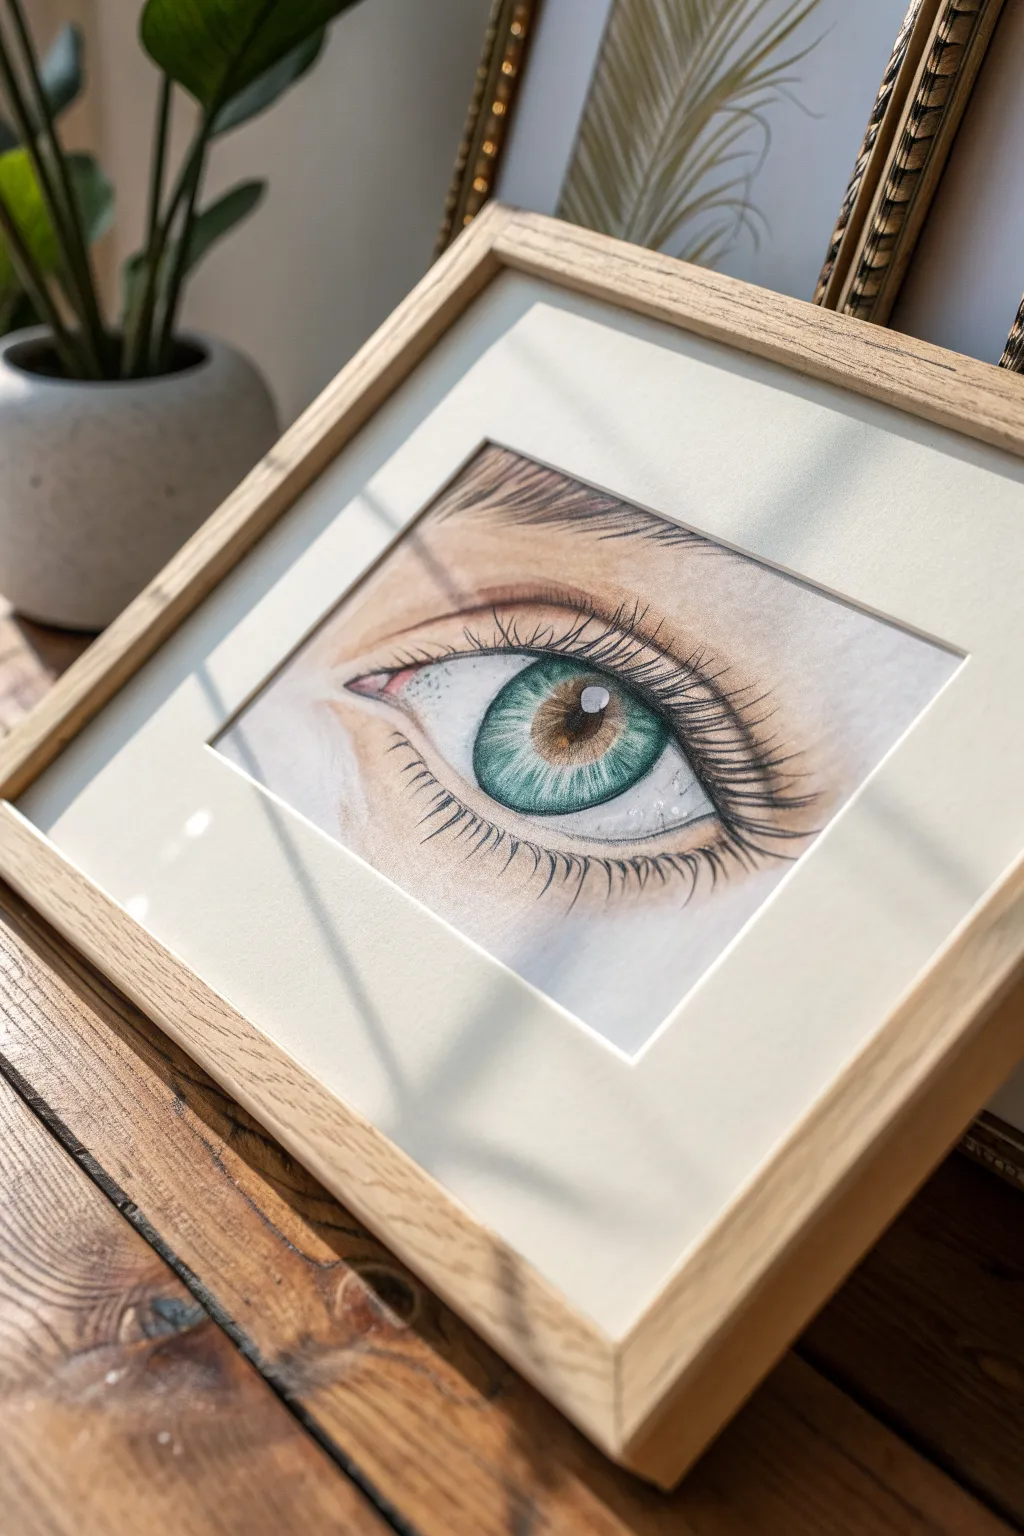
Clean Ink Linework Eye
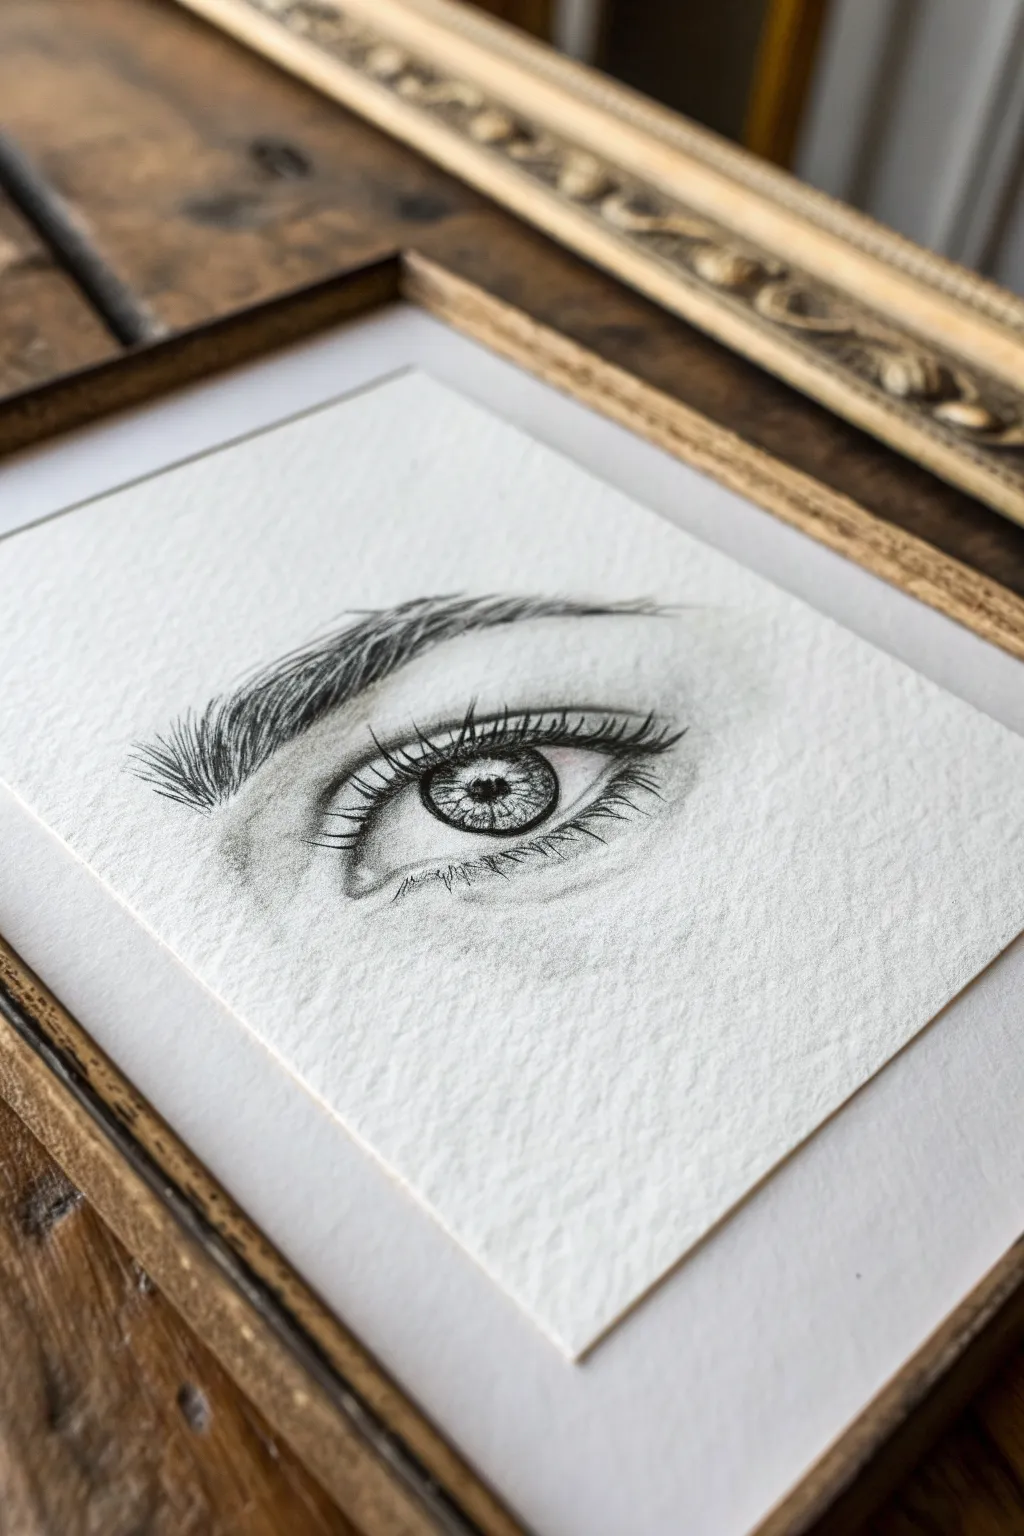
Capture the soul of a subject with this minimalist yet detailed ink drawing project that emphasizes clean lines and subtle shading. The final piece showcases a stunningly realistic eye rendered on textured paper, framed to create a timeless piece of wall art.
Step-by-Step
Materials
- Heavyweight textured paper (cold press watercolor or mixed media paper, 140lb/300gsm)
- Fine liner pens (sizes 0.05, 0.1, 0.3, and 0.5)
- Graphite pencil (HB or 2H for sketching)
- Kneaded eraser
- Ruler
- Wooden picture frame with mount/matting
Step 1: Conceptualizing and Sketching
-
Paper Preparation:
Begin by trimming your textured paper to fit slightly larger than the opening of your chosen frame’s mount. Using a ruler, lightly mark the center point to help align your composition. -
Basic Shapes:
With an HB or 2H pencil, sketch the fundamental almond shape of the eye. Keep your pressure extremely light so these lines can be erased later without damaging the paper’s tooth. -
Iris Guide:
Draw a perfect circle for the iris, letting the top portion be slightly cut off by the upper eyelid to create a relaxed, natural gaze. -
Pupil Placement:
Mark the pupil in the dead center of the iris. Don’t fill it in yet; just outline the shape. -
Highlight Mapping:
Crucial step: gently outline a small, irregular shape within the iris or pupil to represent the reflection of light. You must preserve this white space throughout the entire inking process. -
Brows and Creases:
Sketch the arch of the eyebrow above the eye and add the subtle crease line of the eyelid. Don’t draw individual hairs yet; just map out the shape and flow.
Step 2: Inking the Details
-
The Darkest Point:
Switch to your 0.5 fine liner. Carefully fill in the pupil, being absolutely certain to leave your mapped highlight completely white. -
Iris Texture:
Using a 0.05 or 0.1 pen, draw lines radiating outward from the pupil toward the edge of the iris, like spokes on a wheel. I find that varying the length of these lines creates a more organic look. -
Iris Definition:
Darken the outer ring of the iris (the limbal ring) with a 0.3 pen, using a slightly sketchy, broken line rather than a solid perfect circle. -
Upper Eyelash Base:
Thicken the upper lash line. Instead of straight spikes, draw lashes that curve downward slightly at the root and then swoop up. -
Lash Grouping:
Cluster the eyelashes together slightly at the tips using the 0.3 pen. Real lashes tend to stick together rather than splaying out perfectly evenly. -
Lower Lashes:
Switch to your finest 0.05 pen for the lower lashes. Keep these sparse, short, and curved, originating from the outer edge of the lower waterline. -
Shading with Stippling:
Add depth to the white of the eye (sclera) by adding tiny dots (stippling) in the corners and just under the upper eyelid. This casts a subtle shadow without using heavy lines.
Preserve the Highlights
Work from the center outward. Smudging ink into the tiny white highlight of the eye ruins the illusion of wetness immediately. If you’re right-handed, work left-to-right to keep your hand off wet ink.
Step 3: Brows and Finishing
-
Eyebrow Foundations:
Start the eyebrow hairs using a 0.1 pen. Begin at the nose bridge with upward strokes, gradually transition to horizontal strokes in the arch, and angle them downward at the tail. -
Building Brow Density:
Layer more hair strokes over the first pass using a 0.3 pen to add volume. Ensure the strokes follow the natural growth direction you mapped out earlier. -
Skin Texture:
Use extremely light stippling or broken hatching with your 0.05 pen around the eyelid crease and under the eye to suggest skin texture and shadow. -
Cleanup:
Wait at least 15 minutes for the ink to fully cure. Gently roll a kneaded eraser over the entire drawing to lift the original graphite sketch lines. -
Framing:
Center your artwork within the mount and secure it from the back with acid-free tape. Place it into the wooden frame to complete the presentation.
Add a Pop of Color
For a striking modern twist, use a diluted watercolor wash or a single colored pencil tone just within the iris, leaving the rest of the drawing in strict monochromatic black and white.
Hang your framed eye study in a well-lit spot where the texture of the paper can really shine through
Soft Watercolor Eye Wash
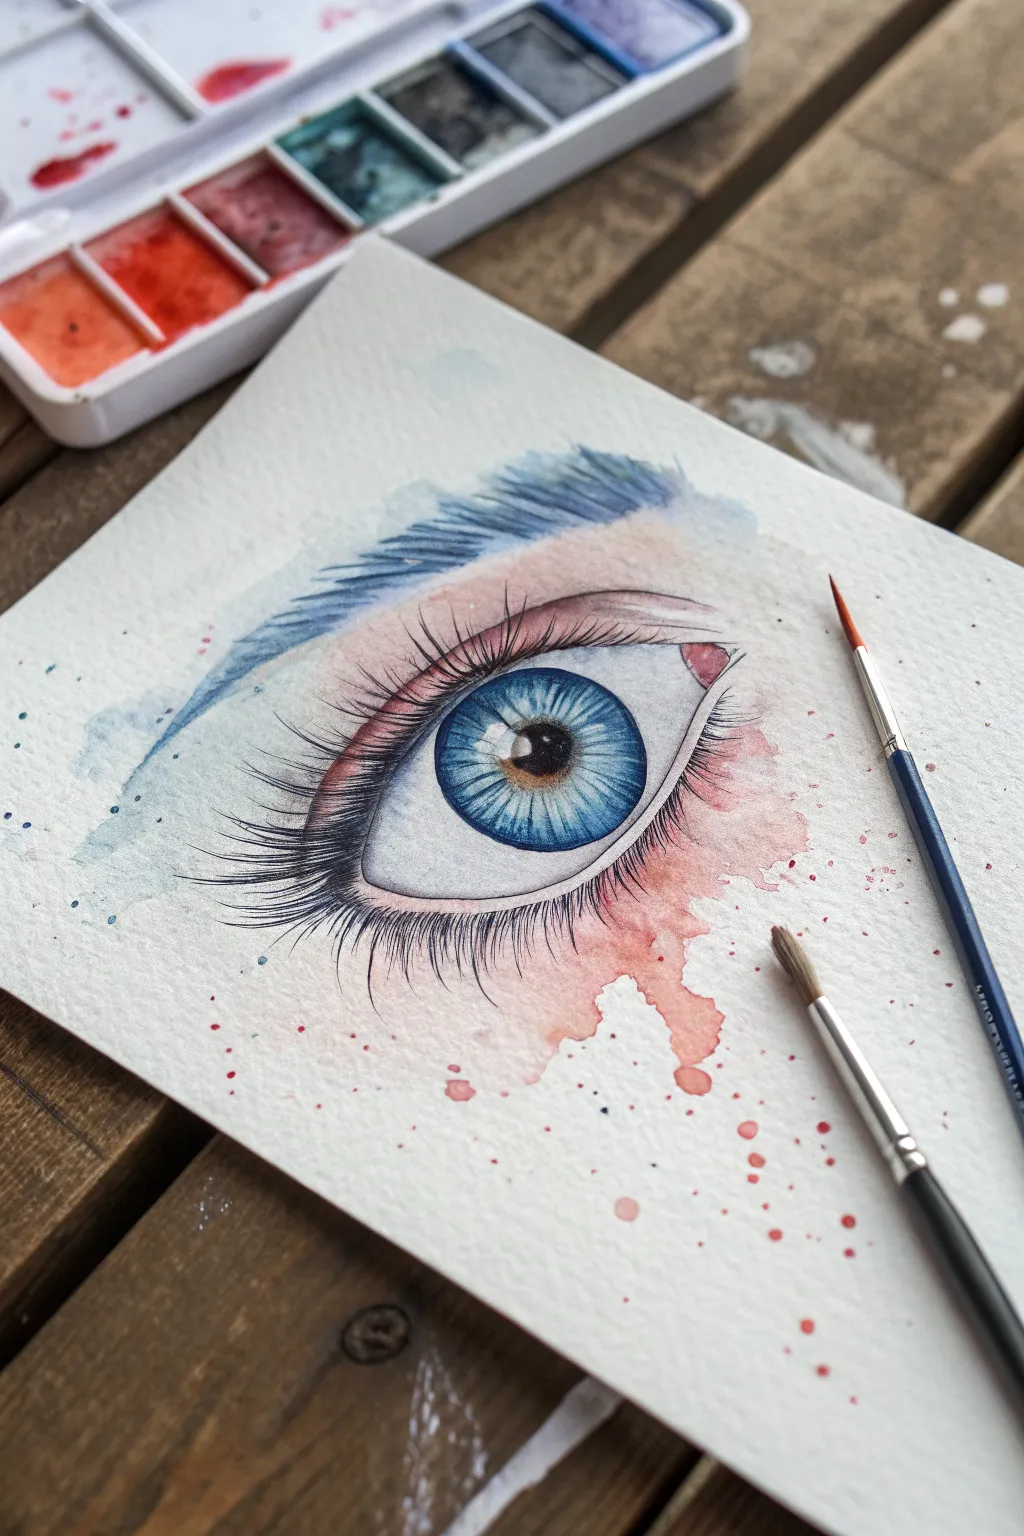
This project captures the delicate balance between realism and abstract expressionism, featuring a piercing blue eye surrounded by soft, flowing washes of color. It explores the interplay of precise detailed ink work for the lashes against the loose, organic nature of watercolor splatters.
Step-by-Step Tutorial
Materials
- Cold press watercolor paper (300gsm/140lb)
- Watercolor paint set (Ultramarine Blue, Burnt Sienna, Alizarin Crimson, Lamp Black)
- Round brushes (flats for washes, fine liners for details)
- Pency (HB or 2H for sketching)
- Micron pen or very fine liner brush with black ink/gouache
- Water cups and paper towels
- White gouache or white gel pen for highlights
Step 1: Sketch and Base Washes
-
Light Sketching:
Begin by lightly sketching the outline of the eye on your cold-press paper. Focus on the almond shape of the lids, the perfect circle of the iris (partially hidden by the upper lid), and the pupil. Keep your pencil lines extremely faint so they disappear under the paint. -
Wet-on-Wet Skin Tones:
Pre-wet the area around the eye with clean water. While shiny, drop in a very diluted mix of Alizarin Crimson and a touch of Burnt Sienna around the tear duct and the lower lid area to create a soft, fleshy flush. Let the pigment bloom naturally. -
Cool Tones Above:
While the paper is still slightly damp above the eye, introduce a watery wash of blue mixed with a tiny bit of grey. Sweep this upward where the eyebrow would sit, letting the edges fade into the white of the paper rather than painting a hard line. -
Iris Base Layer:
Paint the entire iris area with a light wash of clear water, avoiding the highlight reflection. Drop in a bright sky blue, concentrating the color on the outer ring, leaving the center lighter near the pupil.
Step 2: Deepening Values
-
Defining the Pupil:
Once the iris base is dry, mix a strong black using Lamp Black or a mix of Ultramarine and Burnt Sienna. Paint the pupil carefully, ensuring the edges are crisp. -
Iris Texture:
Using a smaller round brush, add radiating lines inside the iris with a darker blue. Start from the pupil and flick outward, then from the outer rim flicking inward, leaving a lighter halo around the pupil for depth. -
Shadowing the Sclera:
The white of the eye is never truly white. Add a very faint, watery grey-blue shadow underneath the upper eyelid, curving it to match the spherical shape of the eyeball. -
Tear Duct Detail:
Enhance the tear duct with a slightly more saturated pink (Alizarin red). Dab a tiny bit of color in the corner to give it that realistic, moist appearance. -
Creating the Splatter:
Mix a juicy puddle of diluted red or pink paint. Load your brush, hold it over the bottom right section of your painting, and tap the handle to create splatters. Allow some splatters to bleed into the still-damp skin wash for a cohesive look.
Muddy Colors?
If your blue iris bleeds into the pink skin tones and turns grey, ensure your layers are completely dry before painting adjacent areas. Patience is key with wet media.
Step 3: The Fine Details
-
Upper Lashes:
Switch to your finest liner brush or a black fine-tip pen. Start the upper lashes from the tightline (the water line of the upper lid). Use quick, confident flicking motions that curve upward and cluster together slightly. -
Layering Lashes:
I like to go back over the lashes to thicken the base. Make the roots of the lashes thicker and darker, tapering them into wispy, fine points. -
Lower Lashes:
Paint the lower lashes, keeping them shorter, sparser, and more spaced out than the upper set. Ensure they curve downward and slightly outward. -
Eyebrow Impression:
Return to the blue wash area above the eye. Using a semi-dry brush with darker blue pigment, flick in some hair-like strokes to suggest the texture of an eyebrow without drawing every individual hair. -
Deepening Shadows:
Add a thin line of dark violet or black along the crease of the upper eyelid to define the fold of the skin. -
Final Highlights:
Use white gouache or a gel pen to add the primary reflection in the pupil and iris. You can also add tiny white dots to the tear duct and lower waterline to make the eye look wet and alive.
Control the Flow
For the splatter effect, practice tapping your brush on a scrap piece of paper first. The amount of water on the brush dictates the size of the droplets.
Step back and admire how the sharp details of the iris contrast with the dreamy washes around it

PENCIL GUIDE
Understanding Pencil Grades from H to B
From first sketch to finished drawing — learn pencil grades, line control, and shading techniques.
Explore the Full Guide
Glassy Digital-Style Eye
Capture the striking depth and clarity of a human eye with this detailed colored pencil project. Though the finished look mimics the smooth, high-contrast style of digital art, you will achieve it using traditional soft-core pencils and careful layering techniques.
How-To Guide
Materials
- Heavyweight drawing paper (smooth or vellum finish)
- Soft-core colored pencils (Teal, Green, Ochre, Brown, Black, White)
- Hard graphite pencil (HB or H) for sketching
- White gel pen or gouache for highlights
- Blending stump or colorless blender pencil
- Precision eraser
- Ruler
- Pencil sharpener
Step 1: The Basic Framework
-
Map the outline:
Begin with a very faint sketch using your H or HB graphite pencil. Draw the almond shape of the eye, paying attention to the tear duct on the left. Don’t press too hard; you want these lines to disappear under the color later. -
Position the iris:
Lightly draw a perfect circle for the iris. Since the upper lid usually covers the top part of the iris, ensure the circle extends slightly above the upper lash line essentially ‘tucked’ underneath. -
Define the pupil and highlights:
Draw a smaller circle in the absolute center for the pupil. Immediately mark out the rectangular or trapezoidal shapes of the window reflection highlights near the pupil—preserving these white spaces now is crucial for that glassy look.
Step 2: Coloring the Iris
-
Base layer of color:
Start with a light teal or aqua pencil. Gently shade the entire iris area, avoiding the pupil and the highlighted reflection spots. Keep your strokes radiating outward from the pupil like spokes on a wheel. -
Add warmth to the center:
Around the pupil, layer in a golden ochre or light brown. Use short, flicking strokes that move away from the center to create a ‘sunburst’ effect that blends into the teal. -
Deepen the outer ring:
Take a darker teal or pine green and shade around the outer edge of the iris (the limbal ring). Feather this color inward so it doesn’t look like a harsh outline but rather a soft shadow. -
Intensify the pupil:
Fill in the pupil with black pencil. Press firmly to get a solid, void-like darkness, but be incredibly careful not to slip into your preserved white highlight areas. -
Create texture details:
Sharpen a dark green or charcoal pencil to a fine point. Draw delicate, squiggly lines radiating from the pupil through the iris to mimic the muscle fibers. Vary the pressure to create depth.
Fixing Waxy Buildup
If layers stop sticking, the paper tooth is full (wax bloom). Lightly mist with fixative to add texture, or gently blot with odorless mineral spirits to blend existing wax.
Step 3: Skin and Sclera
-
Shadow the eyeball:
The white of the eye (sclera) isn’t purely white. Use a very light grey or muted peach to shade the corners and the area directly under the upper eyelid, giving the eyeball a spherical form. -
Flesh tones base:
Lay down a pale beige or peach tone for the skin surrounding the eye. I find circular motions work best here to get smooth coverage without directional streaks. -
Detail the tear duct:
Use a pink or rose pencil for the inner corner (tear duct). Add a tiny touch of red for depth in the creases, keeping it moist-looking by leaving tiny specks of white paper showing for wetness. -
Crease definition:
Deepen the eyelid crease above the eye with a light brown. This fold needs to be soft but defined to give the eye its structural socket shape.
Pro Tip: Contrast is Key
The ‘glassy’ digital look comes from high contrast. Don’t fear the blackest blacks next to pure white highlights; this range creates the illusion of a reflective surface.
Step 4: Lashes and Final Details
-
Drafting the lash line:
thickening the upper lash line with a dark brown or black pencil. This acts as the root bed for your eyelashes. -
Drawing upper lashes:
With a freshly sharpened black pencil, draw the upper lashes. Start at the lash line and flick your wrist upward and curved. Make them glump slightly together rather than spacing them perfectly evenly. -
Lower lashes:
Draw the lower lashes, which should be shorter, thinner, and more sparse than the top ones. Ensure they originate from the outer edge of the lower lid rim (the waterline), not directly from the eye white. -
Pop the highlights:
Now, take your white gel pen or gouache. Fill in the preserved highlight area in the iris to make it brilliant white. Add tiny white dots to the tear duct and the lower waterline to simulate moisture. -
Refine contrast:
Step back and assess your values. Darken the pupil if needed and ensure the shadow cast by the upper eyelashes falls slightly onto the iris, enhancing the 3D realism.
Place your finished piece in a simple wooden frame to let the vibrant eye truly command the attention it deserves
Semi-Realistic Stylized Eye
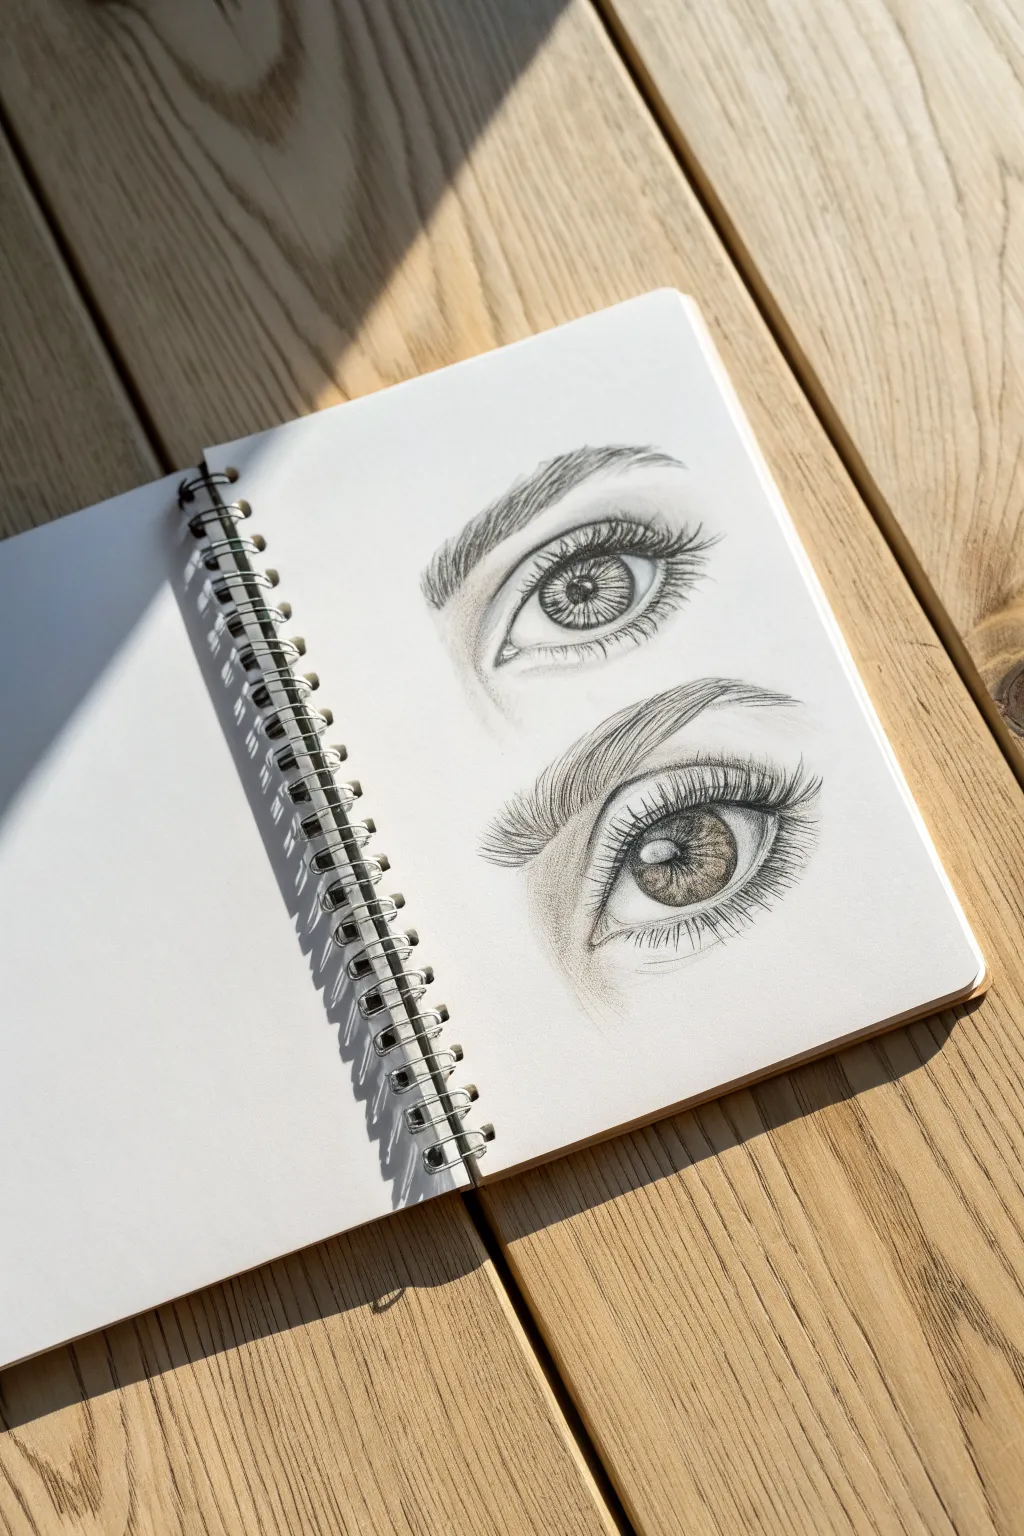
Master the art of semi-realistic eyes with this dual study, focusing on crisp linework and dramatic shading. This project teaches you to balance illustrative clarity with realistic textures like lashes and iris details.
Step-by-Step Tutorial
Materials
- Spiral-bound sketchbook (smooth or vellum bristol paper recommended)
- H or HB pencil (for initial sketching)
- 2B and 4B pencils (for shading and details)
- Mechanical pencil (0.5mm or 0.3mm HB for fine lashes)
- Kneaded eraser
- Precision white gel pen (optional for highlights)
- Blending stump or tortillon
Step 1: Planning and Basic Shapes
-
Placement guidelines:
Begin by lightly marking the position for two separate eyes on your page, leaving ample vertical space between them. Draw a horizontal line for the axis of each eye to ensure they stay level. -
Outline the top eye:
Using an H pencil, sketch the almond shape of the top eye. Since this is a front-facing view, keep the curve of the upper and lower lids relatively symmetrical, tapering to sharp tear duct corners. -
Outline the bottom eye:
Sketch the bottom eye, but modify the shape for a slight three-quarter turn. Make the inner corner dip slightly deeper and the outer corner lift higher, creating a more dynamic, angled almond shape. -
Iris placement:
Lightly draw perfect circles for the irises in both eyes. For the top eye, center the circle, slightly covered by the upper lid. For the bottom eye, shift the iris slightly to the left to match the angled perspective.
Fixing Flat Eyes
If the eye looks flat, the sclera (white part) is likely too bright. Shade the corners and under the upper lid with a blending stump to turn the form.
Step 2: Refining the Top Eye
-
Pupil and shine:
Draw a small, dark circle in the exact center of the iris for the pupil. Immediately adjacent to the pupil, sketch a small rectangle or square shape to reserve the white of the paper for the primary highlight. -
Iris detailing:
Switch to a 2B pencil. Radiate distinct, spokelike lines outward from the pupil toward the iris edge. I like to vary the pressure here, making some lines darker and thicker than others to create depth in the muscle fibers. -
Defining the crease:
Draw a firm, arched line well above the upper lash line to define the eyelid crease. This line should mimic the curve of the eye but extend slightly further outward. -
Lash mapping:
Using a mechanical pencil for precision, flick curved strokes upward from the top lid line. Group the lashes into small clumps rather than drawing individual equidistant spikes. -
Brow architecture:
Sketch the eyebrow shape above the eye. Outline the brow lightly, focusing on a clean arch that tapers toward the temple.
Step 3: Refining the Bottom Eye
-
Highlight shaping:
For the bottom eye, draw a larger, more organic ‘window pane’ style highlight that overlaps both the pupil and the iris, giving it a glossier, wetter look. -
Iris gradient:
Instead of just radial lines, shade the iris with a gradient. Make the top third of the iris quite dark (where the lid casts a shadow) and fade it into lighter gray as you move downward. -
Lower lashes:
Draw the lower lashes with shorter, sparser strokes. Remember that lower lashes originate from the outer edge of the waterling, not directly from the eyeball. -
Brow texture:
For the bottom brow, use quick, short strokes that follow the direction of hair growth—upward at the inner corner, then angling sideways toward the tail. Make the hairs look dense and groomed.
Cross-Hatching Trick
Add subtle cross-hatching to the skin surrounding the eye instead of smooth blending. This adds the stylized ‘sketchy’ texture seen in the reference.
Step 4: Shading and Final Polish
-
Deepen the darks:
Take your 4B pencil and darken the pupil, the upper lash line, and the subtle shadow cast by the upper eyelid onto the eyeball itself. -
Sclera shading:
Lightly shade the corners of the ‘white’ of the eye (the sclera) with an H pencil or a dirty blending stump to make the eyeball look spherical rather than flat. -
Skin shading:
Add soft graphite shading into the inner corner of the eye socket (near the nose bridge) and under the brow bone to create skeletal structure. -
Lash volume:
Go back over the upper lashes with the 4B pencil, thickening the roots where they meet the lid. This creates a natural eyeliner effect. -
Final highlights:
Use a kneaded eraser to lift out any graphite smudges on the highlights to ensure they are bright white. If needed, add a tiny dot of white gel pen for extra sparkle.
Close your sketchbook knowing you have captured two distinct expressions and deepened your understanding of facial anatomy
BRUSH GUIDE
The Right Brush for Every Stroke
From clean lines to bold texture — master brush choice, stroke control, and essential techniques.
Explore the Full Guide
Simple Cartoon Almond Eye
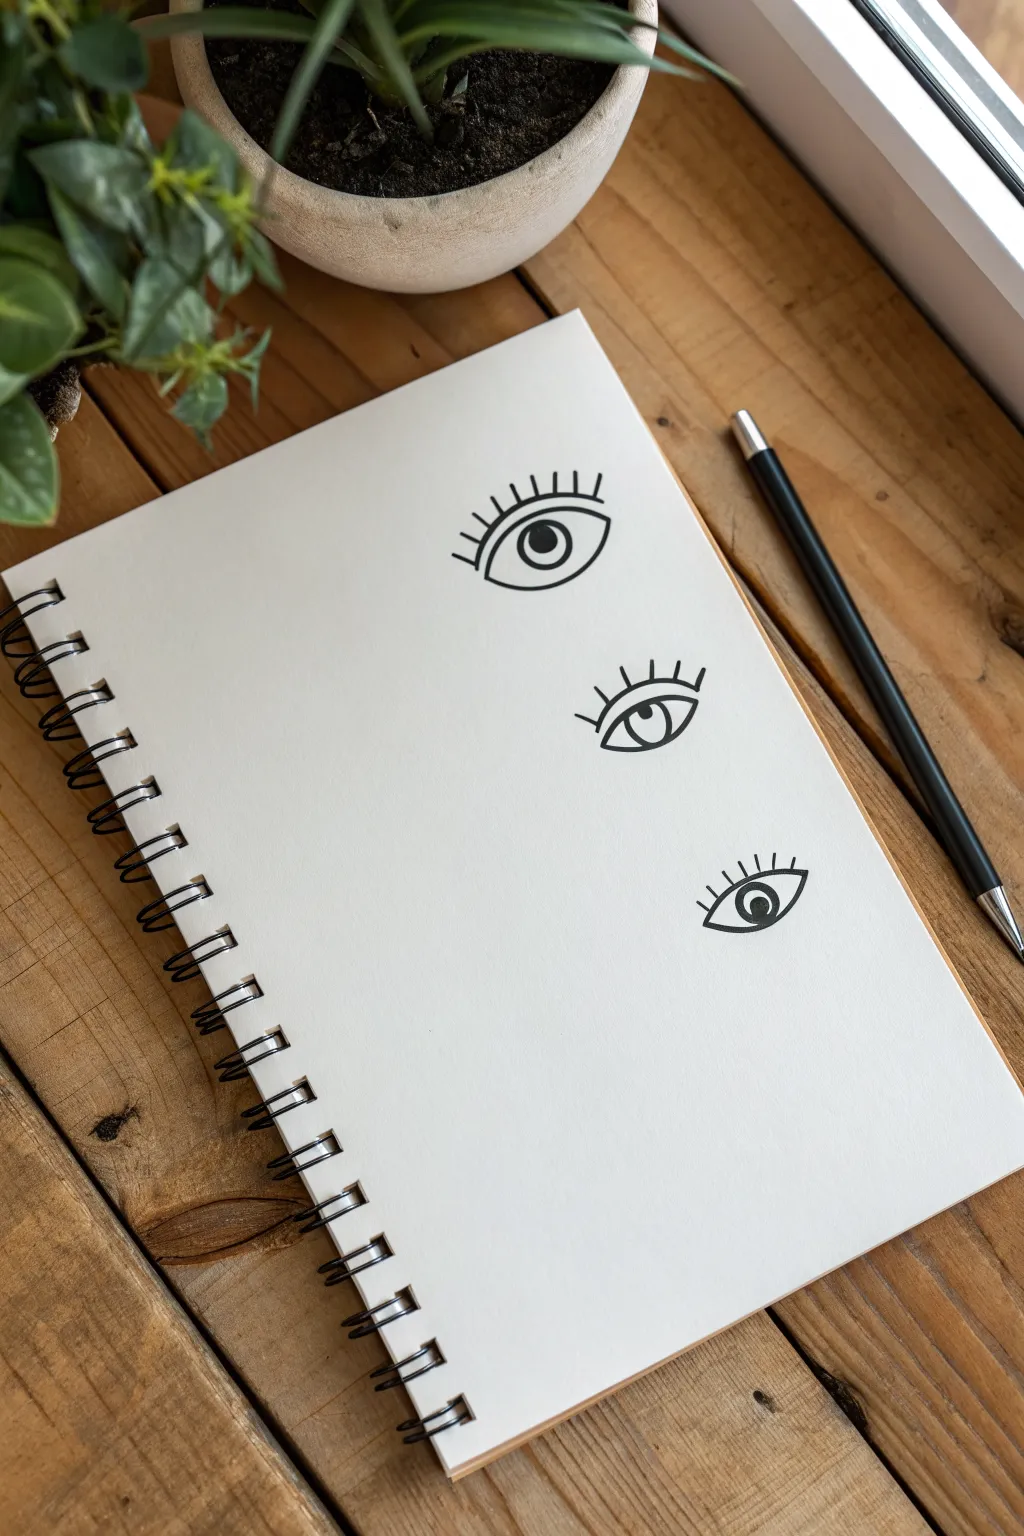
Master the art of clean, simple linework with this trio of wide-open eyes. This project focuses on balance and negative space to create a striking, modern cartoon look that fits perfectly in any minimalist sketchbook page.
Detailed Instructions
Materials
- Spiral-bound sketchbook or smooth drawing paper
- Fine-point black fineliner pen (0.5mm or 0.8mm recommended)
- Pencil (HB or H)
- Eraser
- Ruler (optional, for spacing)
Step 1: Planning and Layout
-
Assess the spacing:
Visualize three invisible horizontal zones on your page to distribute the eyes evenly from top to bottom. You can use a ruler to lightly mark these center points if you want perfect symmetry. -
Draft the top curve:
Using your pencil with very light pressure, sketch an arched line for the upper eyelid. Aim for a smooth, consistent rainbow shape, not too steep but clearly curved. -
Draft the bottom curve:
Connect the ends of your top arch with a slightly flatter, upward-curving line at the bottom. The corners should meet sharply to form that classic almond shape. -
Repeat the process:
Move down the page and sketch the second and third eye shapes, trying to keep the proportions consistent with your first drawing. I find that stepping back from the paper helps check if the sizes match.
Step 2: Drawing the Iris and Pupil
-
Sketch the iris outline:
Inside the almond shape, draw a perfect circle for the iris. Ensure the top of the circle is slightly cut off by the upper eyelid, which gives the eye a natural, relaxed look, while the bottom touches or hovers just above the lower lid. -
Add the pupil:
Draw a smaller circle directly in the center of your iris. -
Mark the highlight:
Before filling anything in, draw a tiny circle or oval overlapping the edge of the pupil and the iris. This reflection spot brings the eye to life. -
Replicate down the page:
Add these internal details to your other two eye outlines.
Wobbly Lines?
If your circles look shaky, rotate the paper as you draw the curve. Your hand has a natural arc, so moving the page to meet that arc creates smoother lines.
Step 3: Inking the Final Lines
-
Trace the main shape:
Switch to your black fineliner. Carefully trace the upper and lower eyelid lines. Keep your wrist loose to maintain a steady fluid stroke rather than a shaky one. -
Ink the iris:
Trace the outer circle of the iris carefully. -
Fill the pupil:
Ink the pupil’s outline, then color it in solid black, being extremely careful to preserve the white space of the highlight you marked earlier. -
Thicken the upper lid:
Go back to the upper eyelid line and re-trace it slightly to add line weight. This mimics the thickness of eyelashes and adds definition.
Make It Pop
Add a second, very thin ring around the pupil or use a white gel pen to add a secondary, smaller highlight dot after the black ink is dry for extra shine.
Step 4: Lashes and Finishing Touches
-
Position the center lash:
Draw a short, straight vertical line extending directly up from the center of the top eyelid. -
Fan out the lashes:
Add about 3-4 lines on either side of that center lash. As you move outward, angle them slightly more away from the center to create a radial, sun-ray effect. -
Add lower lashes:
On the outer corner of the lower lid, draw two very short, subtle ticks for lower lashes. Keep them minimal to maintain the clean aesthetic. -
Clean up:
Wait at least five minutes for the ink to fully cure. Once safe, gently erase all your underlying pencil sketches to leave a crisp, high-contrast illustration.
Now you have a trio of striking eyes ready to stare back from your sketchbook pages
Anime-Inspired Sparkle Eye
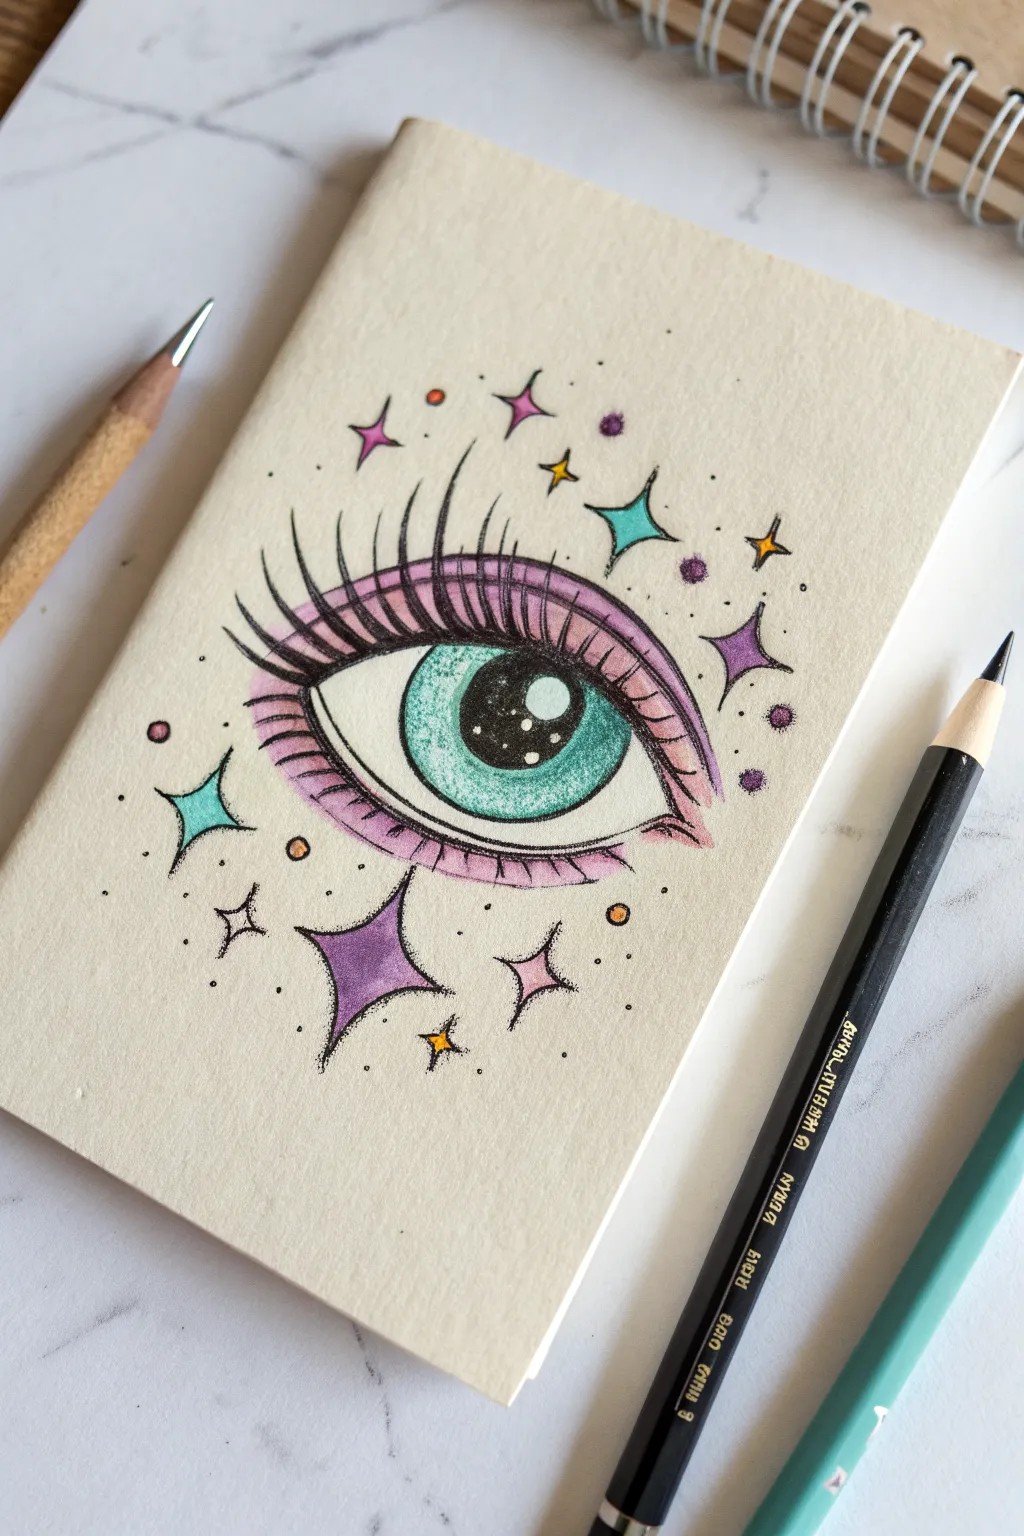
Capture the magic of the cosmos in a single gaze with this vibrant, anime-inspired eye drawing. Using simple colored pencils and bold ink lines, you’ll create a stylized, sparkling pupil surrounded by celestial doodles.
How-To Guide
Materials
- Small sketchbook or heavyweight drawing paper (cream or off-white works best)
- Graphite pencil (HB or 2B) for sketching
- Soft eraser
- Fine-liner pen (black, 0.3mm or 0.5mm)
- Black brush pen or thicker marker
- Colored pencils (teal/turquoise, purple, pink, orange, yellow)
- White gel pen
Step 1: Basic Shape & Outline
-
Draft the Eye Shape:
Start with your graphite pencil. Draw a wide, almond-shaped curve for the upper lash line and a slightly flatter curve for the lower lash line. Don’t connect them fully at the corners; leave a small gap for a stylized look. -
Add the Iris and Pupil:
Draw a large, perfect circle in the center for the iris. Inside that, place a smaller oval for the pupil. Sketch in two circular highlights within the pupil now so you remember not to color over them later—one larger circle at the top right and a tiny speck below it. -
Sketch Key Details:
Lightly pencil in the double eyelid crease above the eye and a small line below representing the lower lid. Map out where your largest sparkles will go around the eye. -
Inking the Main Lines:
Take your fine-liner pen and trace your pencil lines. For the upper lash line, thicken the line significantly to create that heavy, mascara-like anime effect. -
Drawing Lashes:
Flick your wrist to create long, distinct eyelashes coming off the upper line. They should curve outward. Add smaller, spaced-out lashes on the bottom line. -
Inking the Pupil:
Use a thicker black marker or carefully fill in the pupil with your fine-liner. Be very carful to leave the white highlight circles completely empty—this contrast is crucial for the sparkling effect.
Smudge Alert
Black ink and colored pencils can smear easily. Place a spare piece of paper under your drawing hand to act as a shield while you work on the details.
Step 2: Adding Color
-
Base Teal Iris:
Take a teal or turquoise colored pencil. Fill in the entire iris area lightly first, ensuring an even coat. -
Iris Shading:
Press harder with the same teal pencil around the outer edges of the iris and near the top, creating a gradient that gets lighter toward the bottom center. -
Eyelid Shadow:
Using a soft pink or light purple pencil, color the skin area immediately above the upper lash line (the eyelid) and just below the lower lash line. Keep this soft and blended. -
Deepening the crease:
Layer a slightly darker purple into the crease of the eyelid to give the drawing dimension. -
Coloring the Stars:
Choose a variety of colors (purple, teal, yellow-orange) for the surrounding stars. For the four-pointed diamond stars, fill them in solidly. For the smaller circles, just a dot of color works well.
Step 3: Final Details & Magic
-
Adding Star Outlines:
Go back with your black fine-liner and outline all your colored stars. Give the diamond-shaped stars sharp, pointy tips. -
Stippling Texture:
To create a magical ‘dust’ effect, use the fine-liner to add tiny black dots (stippling) around the stars and the outer corners of the eye. Don’t overdo it; just a light scattering adds texture. -
Enhancing Lashes:
If the colored pencil dulled your black lash lines, re-trace them now to make them pop again. -
White Gel Highlights:
This is the most important step. Use a white gel pen to add crisp white dots inside the teal iris for extra shimmer. You can also add tiny white dots inside the black pupil if your initial paper highlights weren’t bright enough. -
Final Cleanup:
Wait for all ink to be completely dry, then gently erase any visible pencil sketch lines to reveal your clean, comic-style artwork.
Make it Metallic
Swap the standard yellow or orange pencil for a gold metallic gel pen or paint marker for the stars to make the drawing literally shine in the light.
Enjoy the dreamy vibe of your new celestial eye illustration


Chibi Round Button Eyes

Capture the essence of sweetness with this minimalistic ink drawing featuring oversized, glimmering anime eyes. Using stippling techniques on textured paper, you’ll create a charmingly expressive face that pops with personality.
Step-by-Step
Materials
- Heavyweight textured paper (watercolor or mixed media paper)
- Black fineliner pens (sizes 005, 01, and 05)
- Pencil (HB or 2H)
- Soft eraser
- Ruler (optional)
Step 1: Drafting the Layout
-
Paper preparation:
Cut your textured paper into a small rectangle, roughly postcard size or slightly smaller. Tearing the edges against a ruler gives it that lovely deckled look shown in the reference. -
Positioning the eyes:
Lightly sketch two large circles in the center of the paper using your pencil. Space them close enough to look cute, but with roughly one eye-width of distance between them. -
Drafting details:
Inside the circles, lightly mark out two smaller ovals near the top left of each eye for the main highlights. Add a small curve for the smile centered below the eyes, and mark the eyebrows and blush lines.
Step 2: Inking the Eyes
-
Outlining dimensions:
Switch to your 05 fineliner. Carefully trace the outer perimeter of the large eye circles. Keep your hand steady to ensure the circles are smooth and round. -
Defining the pupils:
Inside the eye, draw a large inner circle for the pupil, but leave the highlight ovals completely untouched. The pupil should take up most of the eye space. -
Filling the darks:
Using the 05 pen, color in the pupil area solid black. Be very careful to preserve the white highlight circles; these are crucial for that sparkling look. -
Adding texture:
Switch to the 005 or 01 fineliner for the iris area (the space between the pupil and the outer ring). Instead of solid coloring, use a stippling technique. -
Stippling gradient:
Dot the pen repeatedly in the iris area. Concentrate the dots heavily near the top and outer edges to create a shadow, and space them out as you move toward the bottom to create a gradient effect.
Ink Smudging?
Textured paper absorbs ink slowly. If you erase too soon, outlines will smear. Test dryness by tapping a scrap paper over the ink first before erasing.
Step 3: Facial Features & Cleanup
-
Lashes:
With the 05 pen, draw three distinct eyelashes on the upper outer corner of each eye. Curve them upwards and thicken the base slightly where they touch the eye outline. -
Eyebrows:
Draw short, curved floating eyebrows above each eye using the 01 pen. Keep them small and high up to maintain the surprised, innocent expression. -
The smile:
Ink the tiny, U-shaped mouth in the center. I prefer to make this line slightly thicker in the middle and tapered at the ends. -
Blush marks:
Add three small angled dashes under each eye using the 01 pen to represent blush. These should follow the curve of the cheek. -
Secondary highlights:
If you want extra sparkle, add a tiny white gel pen dot in the bottom right of the black pupil area (optional, but cute). -
Erasing:
Wait at least 15 minutes for the ink to fully bond with the paper fibers. Once dry, gently erase the visible pencil guidelines.
Add Color
Use a cotton swab with a tiny amount of pink pastel chalk or real blush makeup to gently dust pink circles over the drawn cheek lines for a soft glow.
Now you have a sweet little character card ready to brighten someone’s day
Eye Expression Mini Sheet
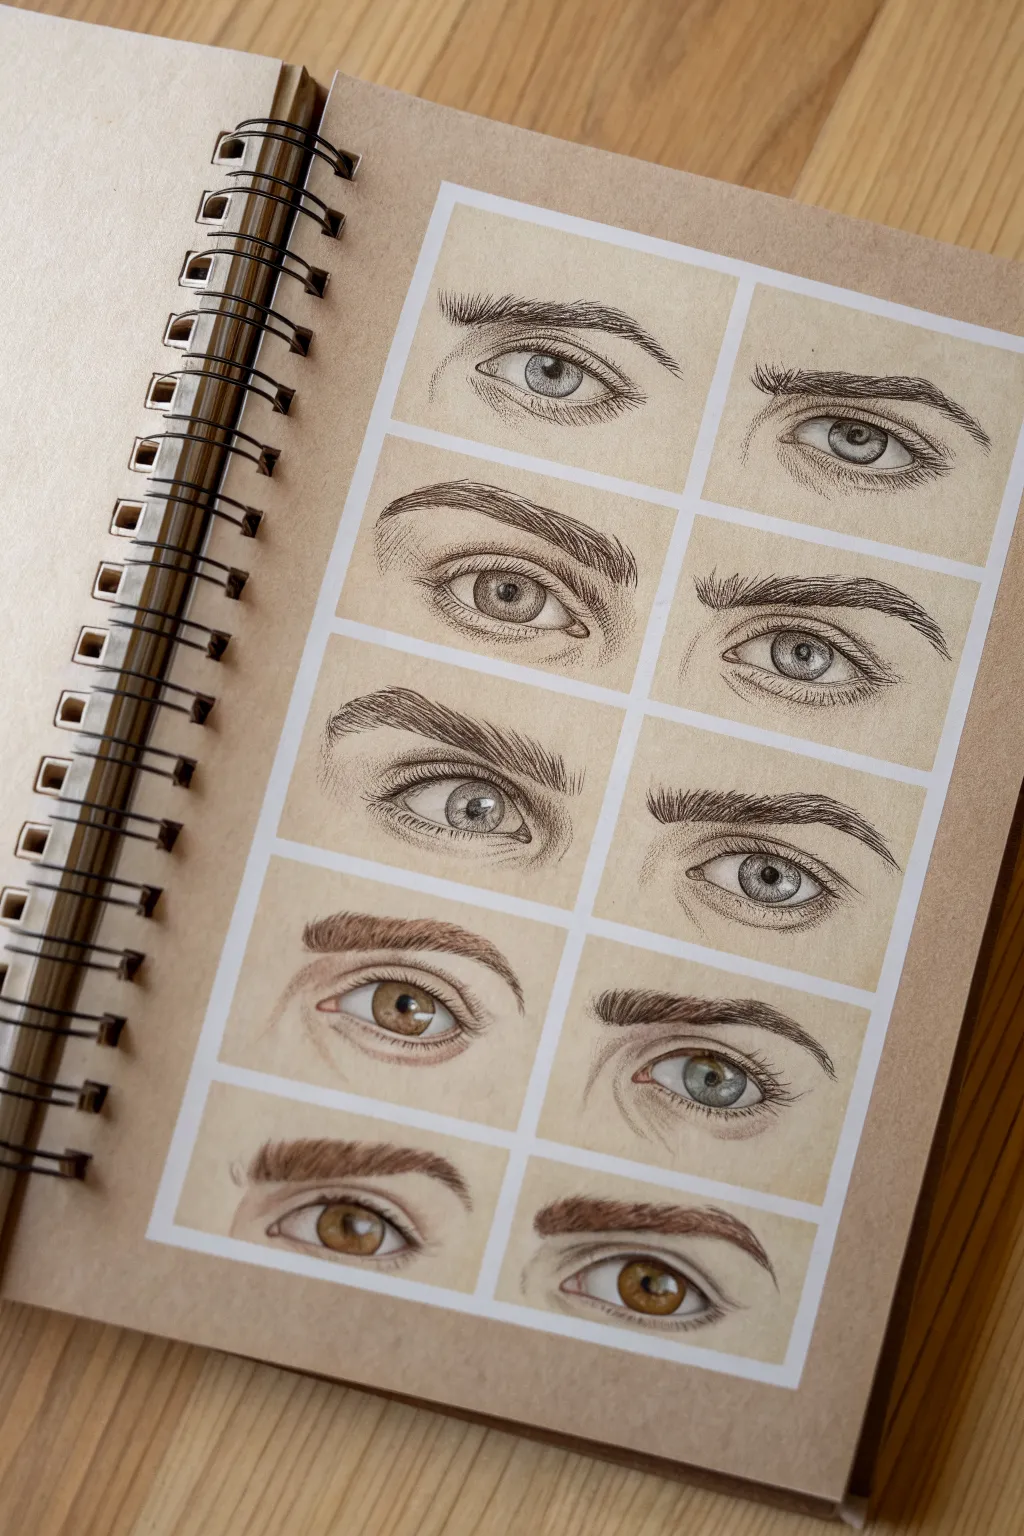
Master the subtleties of the human gaze with this practiced grid of eye studies, transitioning from precise ink cross-hatching to soft, realistic colored pencil work. This mini-sheet approach allows you to explore different brow shapes, iris textures, and emotions without the pressure of a full portrait.
How-To Guide
Materials
- Spiral-bound sketchbook with tanned or toned paper
- Fine liner pens (0.05mm, 0.1mm, and 0.3mm)
- Graphite pencils (HB and 2B)
- Colored pencils (wax or oil-based)
- White gel pen or white gouache
- Ruler
- White masking tape or artist tape
- Blending stump or cotton swab
Step 1: Setting the Grid
-
Prepare the page:
Begin with a clean page in your tanned sketchbook. Using a ruler and a light graphite pencil, mark out a large rectangle that fills most of the page, leaving a uniform border around the edges. -
Create the individual boxes:
Divide your large rectangle into two vertical columns and five horizontal rows to create ten equal rectangular spaces. Keep your lines incredibly faint, as these are just guides. -
Tape the borders:
Apply white artist tape along all your grid lines. Place tape over the pencil lines to create clean white gaps between the drawings later. Press the edges down firmly so no ink or pigment bleeds underneath.
Uneven Taping?
If your tape tears the paper, heat it briefly with a hairdryer before peeling. This softens the adhesive. Always peel slowly and away from your drawing area.
Step 2: The Ink Studies (Top Rows)
-
Sketch the outlines:
In the top six boxes, lightly sketch the basic almond shapes of the eyes and the arches of the eyebrows using an HB pencil. Vary the expressions: make some wide and alert, others slightly narrowed or relaxed. -
Outline the iris and pupil:
Draw the circular iris within each eye, noting that the upper lid usually covers the top part of the circle. Mark the pupil in the center and lightly outline a small shape for the highlight. -
Inking the lashes:
Switch to a 0.1mm fineliner. Draw the upper eyelashes with quick, curved flicking motions, grouping them slightly rather than drawing individual picket-fence lines. Keep the lower lashes sparser and shorter. -
Detailing the iris:
Use your finest 0.05mm pen to draw radial lines coming from the pupil outward like bicycle spokes. Add darker shading around the outer rim of the iris and near the top where the lid casts a shadow. -
Defining the brows:
For the eyebrows, use short, directional strokes that mimic hair growth. I find it helpful to start near the nose with upward strokes, gradually angling them sideways as you move toward the temple. -
Shading with hatching:
Add dimension to the skin using careful cross-hatching or stippling. Focus on the crease of the eyelid and the corners of the eye. Keep the touch light to let the tanned paper serve as the mid-tone.
Step 3: The Color Studies (Bottom Rows)
-
Lay down base skin tones:
In the bottom four boxes, start your pencil sketch as before. Then, use a creamy beige or light peach colored pencil to lightly shade the skin area, avoiding the white of the eyeball (sclera). -
Deepen the shadows:
Use a light brown or terracotta pencil to deepen the eye crease, the side of the nose bridge, and the lower lash line. Layer gently rather than pressing hard. -
Coloring the iris:
Select your eye colors—hazel, brown, or blue-grey. Fill in the iris, layering darker shades around the rim and pupil, and lighter shades near the bottom of the iris to simulate light passing through the cornea. -
Adding texture to brows:
Sharpen a dark brown pencil to a fine point. Draw individual hair strokes for the eyebrows, layering different shades of brown to create realistic density and volume. -
The sclera and details:
Lightly shade the corners of the ‘white’ of the eye with a cool grey or very pale blue to give it a spherical form; it shouldn’t be stark white. Add a touch of pink to the tear duct. -
Final highlights:
Using a white gel pen or a dot of white gouache, add a crisp reflection in the pupil/iris area. This ‘catchlight’ brings the eye to life immediately.
Level Up: Emotion Study
Instead of neutral expressions, assign a specific emotion (fear, joy, suspicion, fatigue) to each box to practice how the eyelids and brows deform with movement.
Step 4: The Reveal
-
Peel the tape:
Once all ink is dry and pencil work is set, slowly peel away the masking tape. Pull the tape away from the drawing area at a 45-degree angle to prevent tearing the paper. -
Clean up borders:
If any pencil lines remain in the white borders, gently erase them to ensure a crisp, gallery-style presentation.
Enjoy your collection of expressive eyes and the satisfying clean lines of your finished grid
Monochrome Color-Locked Eye
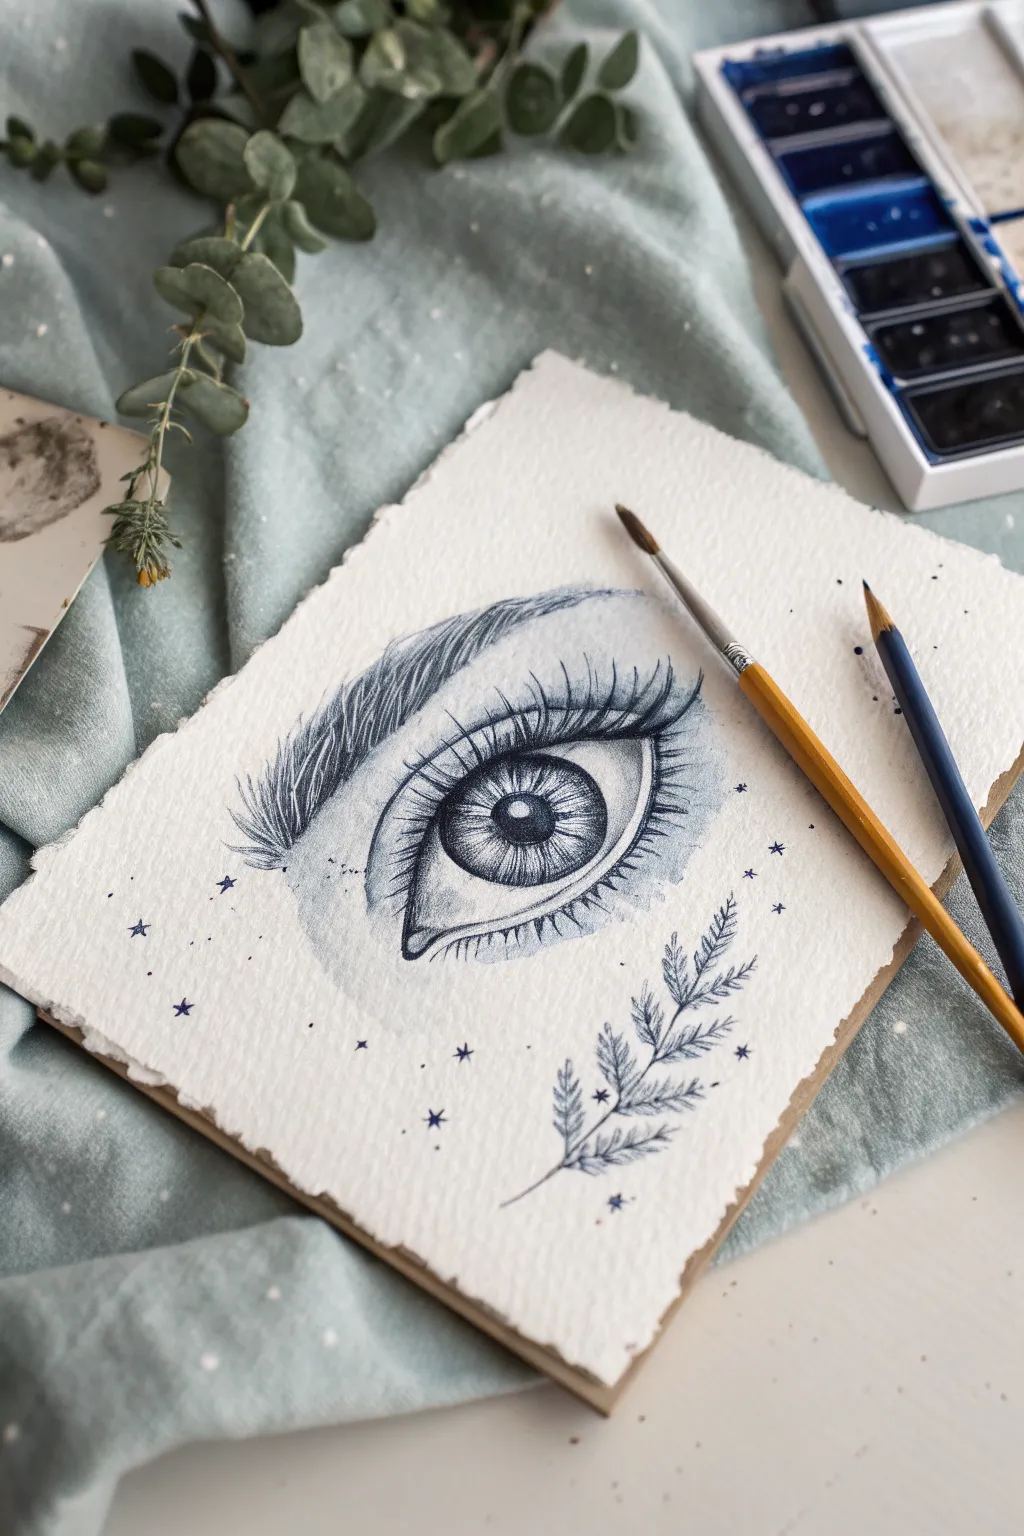
This ethereal artwork combines the focus of a realistic eye study with dreamy celestial elements, all rendered in a single moody shade of indigo. The monochromatic palette allows you to focus purely on value and texture, creating a striking piece that feels both grounded and magical.
Step-by-Step
Materials
- Cold press watercolor paper (deckled edge optional)
- Indigo or Payne’s Grey watercolor paint
- Small round watercolor brush (size 2 or 4)
- Fine liner brush or rigger brush (size 0 or 00)
- Indigo colored pencil (sharpened to a fine point)
- HB graphite pencil for sketching
- Kneaded eraser
- Paper towel
- Jar of clean water
- Wooden board for mounting (optional)
Step 1: Sketching the Foundation
-
Outline the eye shape:
Begin by lightly sketching the almond shape of the eye in the center of your paper using an HB pencil. Keep your lines faint so they won’t show through the watercolor later. -
Map the iris and pupil:
Draw a perfect circle for the iris, partially tucked under the upper eyelid. Inside that, draw a smaller circle for the pupil, and crucially, mark out a small white rectangle or circle for the highlight reflection. -
Sketch the eyebrow:
Lightly outline the general shape of the eyebrow above the eye, ensuring it follows the natural curve of the brow bone. -
Add decorative elements:
Pencil in the leafy branch curving along the bottom right and scatter tiny star shapes around the composition to frame the eye.
Preserve the Highlight
The white reflection in the eye is crucial for realism. If you accidentally paint over it, use a tiny dab of white gouache or a white gel pen at the very end to bring the sparkle back.
Step 2: Building Watercolor Layers
-
First wash:
Dilute your indigo paint with plenty of water to create a very pale, transparent wash. Apply this to the skin areas around the eye to build soft shadows, particularly in the crease of the eyelid and under the brow. -
Painting the iris base:
Using a slightly stronger mix of indigo, fill in the iris, carefully painting around the highlight you marked earlier. The paper white must remain untouched here for a realistic shine. -
Define the pupil:
Load your brush with concentrated indigo paint (less water) to make it dark and opaque. Fill in the pupil, making it the darkest point of the painting. -
Soften the edges:
Before the paint dries completely, use a clean, slightly damp brush to soften the outer edges of the iris so it blends slightly into the white of the eye.
Step 3: Adding Detail and Texture
-
Detailing the iris:
Switch to your smallest brush. With a medium-tone indigo, paint fine lines radiating from the pupil outward to the edge of the iris to create the texture of the eye muscle. -
Darkening the limpbal ring:
Carefully outline the outer edge of the iris with a dark indigo mix to create the limbal ring, blending it slightly inward toward the center. -
Lashes and liners:
Use the tip of your fine brush or a rigger brush to flick the eyelashes. Start at the lash line and lift your brush quickly at the end of the stroke to get a tapered, hair-like tip. -
Creating the eyebrow:
Paint the eyebrow hairs individually. Start with lighter, diluted strokes for the base layer, following the direction of hair growth—upward near the nose, then curving outward. -
Refining with pencil:
Once the watercolor is bonedry, use your indigo colored pencil to add ultra-fine definition. I like to re-emphasize the darkest lashes and add individual hair strokes to the brow for extra crispness.
Wobbly Lines?
If you struggle with painting fine eyelashes, practice flicking your wrist on a scrap piece of paper first. Speed is key—slower strokes tend to be shakier and thicker.
Step 4: Celestial Embellishments
-
Painting the branch:
With your small brush, paint the stem of the branch using a single confident stroke. Add small, fern-like leaves branching off, keeping the paint jagged and organic rather than perfect. -
Adding texture to the branch:
While the branch is damp, drop a tiny bit of concentrated paint into the base of the leaves to create a natural gradient. -
Drawing the stars:
Use your fine liner brush or the colored pencil to draw the small five-point stars and dots scattered around the eye. Vary their sizes for a magical, twinkling effect. -
Splatter effect:
Load a brush with watery paint and tap it against another brush handle over the paper to create tiny, random speckles that tie the composition together. -
Final assessment:
Step back and check your values. If the painting looks too flat, deepen the darkest areas—like the pupil, crease, and roots of the lashes—with one last layer of concentrated indigo.
Now you have a soulful, mystical eye study that proves you only need one color to make a powerful statement
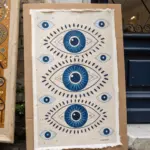
Bold Graphic Poster Eye

Channel mid-century modern aesthetics with this striking lino-cut style poster featuring a central eye motif balanced by bold geometric blocks. The textured, slightly distressed look gives it a vintage feel, perfect for adding a touch of intrigue to any wall.
How-To Guide
Materials
- Heavyweight mixed media paper or cardstock (beige/cream, A2 or 18×24 size)
- Acrylic paints (Terracotta Orange, Navy Blue, Black, White)
- Flat shader brushes (medium and large)
- Fine liner brush or black acrylic paint marker
- Ruler and pencil
- Painter’s tape or masking tape
- Texturing sponge or rag
- Compass or circular object (for tracing)
- Wooden frame (light oak or unfinished wood)
Step 1: Layout and Composition
-
Prepare the paper:
Begin with a high-quality beige or cream heavyweight paper. If your paper is bright white, you can give it an aged look by applying a very thin wash of watered-down tea or diluted ochre paint, then letting it dry completely flat. -
Mark the margins:
Using a ruler, lightly mark a consistent border around the edge of the paper where the art will stop. This ensures your design stays centered and fits well within a frame later. -
Draft the geometric zones:
At the top and bottom of your composition, draw two horizontal bands where the colored shapes will go. Divide these bands to create the specific shapes seen: a square on the left, a central rectangle for the triangles, and a square on the right. -
Sketch the center eye:
Find the true center of the paper between your top and bottom geometric bands. Use a compass to sketch the central circle for the iris, then draw the almond-shaped eyelids around it. -
Refine the eye details:
Sketch the pupil in the center of the iris, leaving a small circle for the highlight. Lightly mark the radiating lines for the eyelashes on both the upper and lower lids.
Bleeding Lines?
If paint bleeds under tape, wait for it to dry. Then, use a small brush with the background paper color (beige) to carefully touch up and straighten the edge.
Step 2: Geometric Color Block Painting
-
Tape the top shapes:
Use painter’s tape to mask off the top-left square. Ensure the edges are pressed down firmly to prevent bleed. -
Paint the terracotta block:
Mix a warm terracotta orange acrylic paint. Apply it to the masked square using a flat brush. To achieve the textured ‘print’ look, dab the paint slightly unevenly or blot it with a dry sponge before it dries. -
Create the blue geometry:
Once the orange is dry and tape removed, mask off the top-right square. Paint this deep navy blue. Repeat the texturing technique to keep the style consistent. -
Paint the central triangles:
Mask off the triangular sections in the middle block. Paint the left-pointing triangle in navy blue and the opposing ones in a lighter orange or mustard tone if desired, though the image uses the main palette colors. -
Repeat for the bottom:
Replicate this process for the bottom band of shapes, but invert the color placement: paint the bottom-left square navy blue and the bottom-right square terracotta orange.
Step 3: The Central Eye Motif
-
Outline the eye:
Switch to black acrylic paint and a steady hand (or a bold paint marker). Carefully outline the main almond shape of the eye, making the line thick and deliberate. -
Paint the iris background:
Fill the large circle of the iris with black paint. Leave a clean circle of the beige paper showing for the pupil’s highlight, or paint it white later if you accidentally cover it. -
Add iris texture:
I find that using a stippling technique here works best. Use a very fine brush or a dotting tool to add tiny beige or white dots into the black iris area to create depth and texture. -
Draw the lower lashes:
Paint vertical strokes radiating downward from the lower lid. Keep the spacing consistent but allow slight variations in length for a hand-drawn feel. -
Add the upper lashes:
Paint the upper eyelashes, making them slightly longer and thicker than the bottom ones. They should radiate outwards like sun rays. -
Fill the pupil:
Paint the solid black pupil in the center of the textured iris, ensuring the highlight spot remains crisp and bright.
Pro Tip: Texture Trick
To get that gritty, vintage lithograph texture on the color blocks, mix a tiny pinch of cornstarch or sand into your acrylic paint before applying.
Step 4: Finishing Touches
-
Add artificial weathering:
To mimic the worn print effect, take a dry bristle brush with a tiny amount of off-white paint and lightly scuff over the solid color blocks. This makes the surface look less like fresh plastic and more like ink on paper. -
Clean uphand-lettering:
If you want to replicate the signature, use a very fine pen to add small, cryptic script or a date at the bottom right corner of the print. -
Final erase:
Once all paint is completely dry to the touch, gently erase any visible pencil sketch lines from the initial drafting phase. -
Frame the artwork:
Place your finished piece into a light oak or raw wood frame to complement the warm tones of the design.
Hang your new geometric eye poster in a sunny spot and enjoy the retro-modern vibe it brings to your space
Retro Rubber-Hose Oval Eye
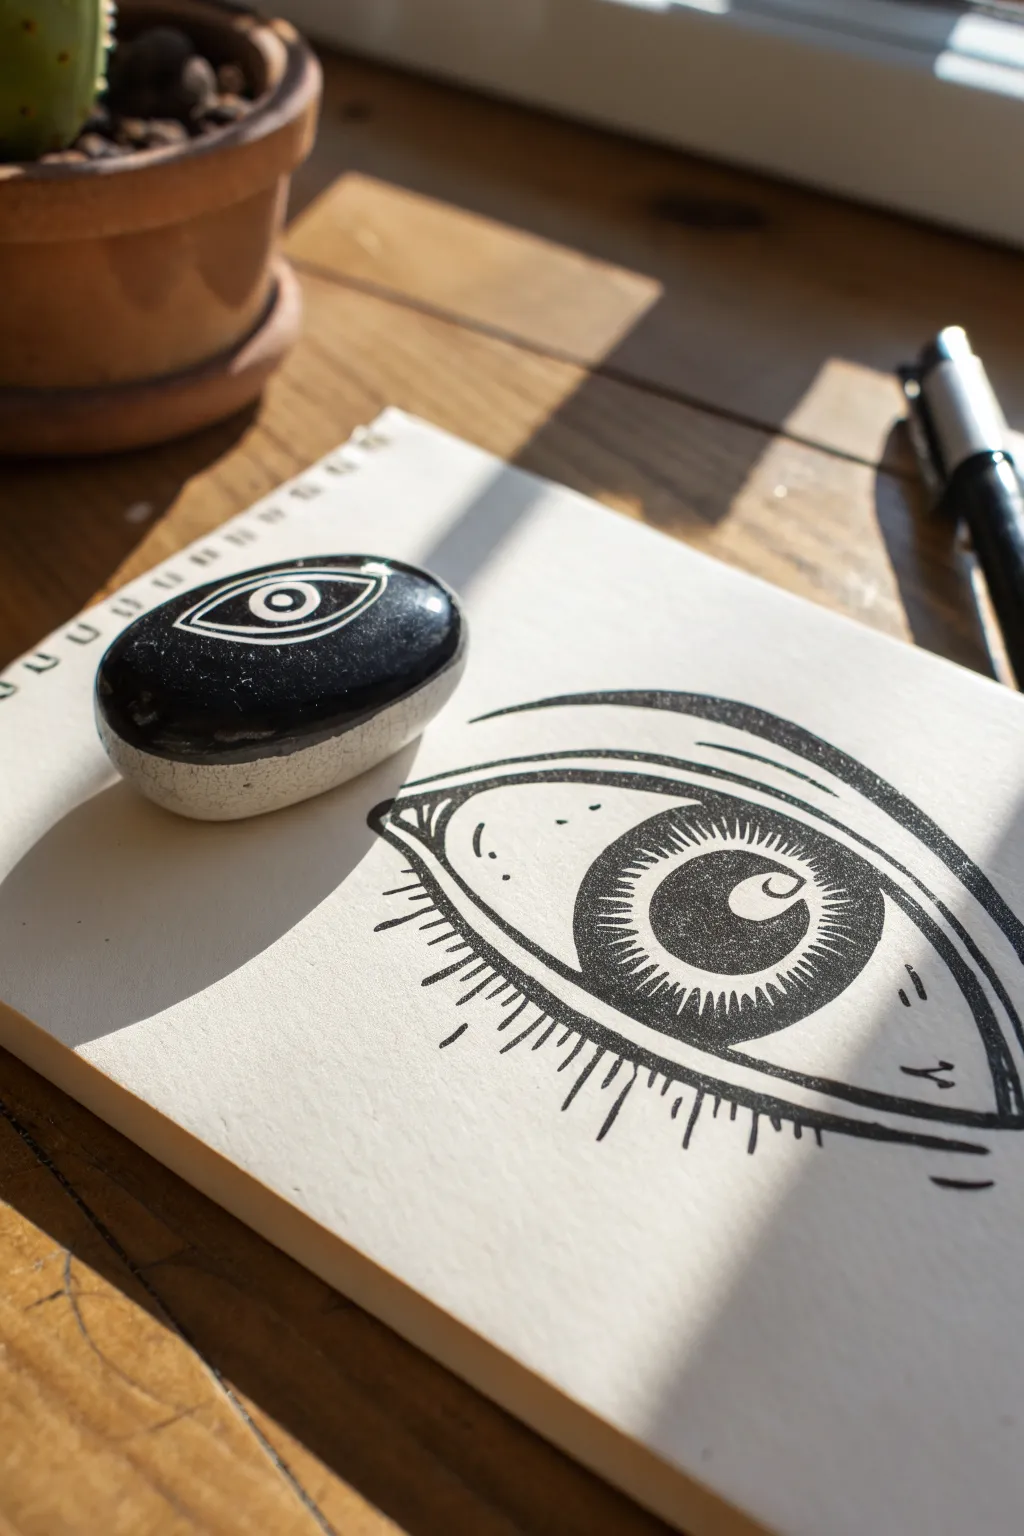
Capture the mystic appeal of a classic eye motif in two distinct mediums: a bold ink illustration and a matching painted stone paperweight. This dual project combines high-contrast linework with tactile object art for a cohesive and stylish desk set.
Step-by-Step Guide
Materials
- Smooth river stone (oval shape)
- White sketchbook paper (heavyweight/mixed media)
- Black acrylic paint
- White acrylic paint or gesso
- Fine liner pens (black, various nib sizes)
- Medium brush marker or India ink with brush
- Small flat synthetic brush
- Fine detail brush (size 0 or 00)
- Pencil (HB)
- Eraser
- Matte spray varnish (optional)
Step 1: Painting the Stone Eye
-
Prep the Stone:
Begin by washing your stone with soap and water to remove any dirt or oils. Let it dry completely before starting to ensure the paint adheres properly. -
Base Coat:
Apply a coat of black acrylic paint over the entire top surface of the stone. Depending on the opacity of your paint, you may need two coats for a solid, deep black finish. -
Sketching the Shape:
Once the black base is bone dry, lightly sketch a classic almond eye shape directly onto the black paint using a white colored pencil or chalk. This guide will help you keep the proportions symmetrical. -
Painting the Sclera:
Using your fine detail brush and white acrylic paint, carefully fill in the almond shape, leaving a thin black border around the edge. You want the black background to frame the white eye. -
Adding the Iris:
Paint a solid black circle in the center of the white area. Take your time to get the curve smooth. If the edges feel shaky, you can refine them later with white touch-ups. -
The Pupil Detail:
Place a small white dot or ring right in the center of the black iris. This simple addition gives the stone eye its distinct, staring quality. -
Sealing:
Allow the stone to cure for several hours. A light mist of matte spray varnish will protect your new paperweight from scratches.
Uneven Paint Coverage?
If your white paint looks streaky over the black base, don’t keep brushing wet paint. Let the first layer dry fully, then apply a second thin layer for solid opacity.
Step 2: Drawing the Paper Eye
-
Pencil Outline:
On your sketchbook paper, lightly sketch a large, wide almond shape. Add a crease line above the eye that mimics the curve of the upper lid. -
Drafting the Iris:
Draw a large circle for the iris. It should be partially covered by the upper lid, giving the eye a relaxed or heavy-lidded expression. -
Blocking the Pupil:
Inside the iris, mark out the pupil and a distinct wedge-shaped highlight. This ‘pac-man’ style highlight is key to the retro aesthetic. -
Inking the Outline:
Using a medium-thickness pen or brush marker, trace over your main pencil lines. Vary your pressure to create a line that is thicker in the middle of the curves and tapers at the corners. -
Thickening the Lid:
Make the upper lash line significantly bolder than the bottom line. I like to double up on the ink here to give it visual weight. -
filling the Pupil:
Fill in the pupil with solid black, being careful to preserve the white highlight shape you sketched earlier. -
Iris Details:
For the iris texture, use a fine liner to draw short, radial lines extending outward from the pupil and inward from the iris edge, leaving a lighter band in the middle. -
Adding Lashes:
Draw the lower lashes as straight, evenly spaced lines dropping down from the bottom rim. Keep them simple and graphic rather than realistic. -
Final Textures:
Add small imperfections or textural dots to the skin area and the sclera to give the drawing a gritty, vintage print feel. -
Cleanup:
Wait until the ink is completely dry to the touch, then gently erase all remaining pencil guidelines to reveal the crisp high-contrast design.
Pro Tip: Steady Hand
When painting fine details on the stone, rest your pinky finger on the table or the dry part of the stone to stabilize your brush hand for smoother curves.
Place your finished stone atop your sketchbook for a striking display of your graphic design skills
Geometric Iris Pattern Eye
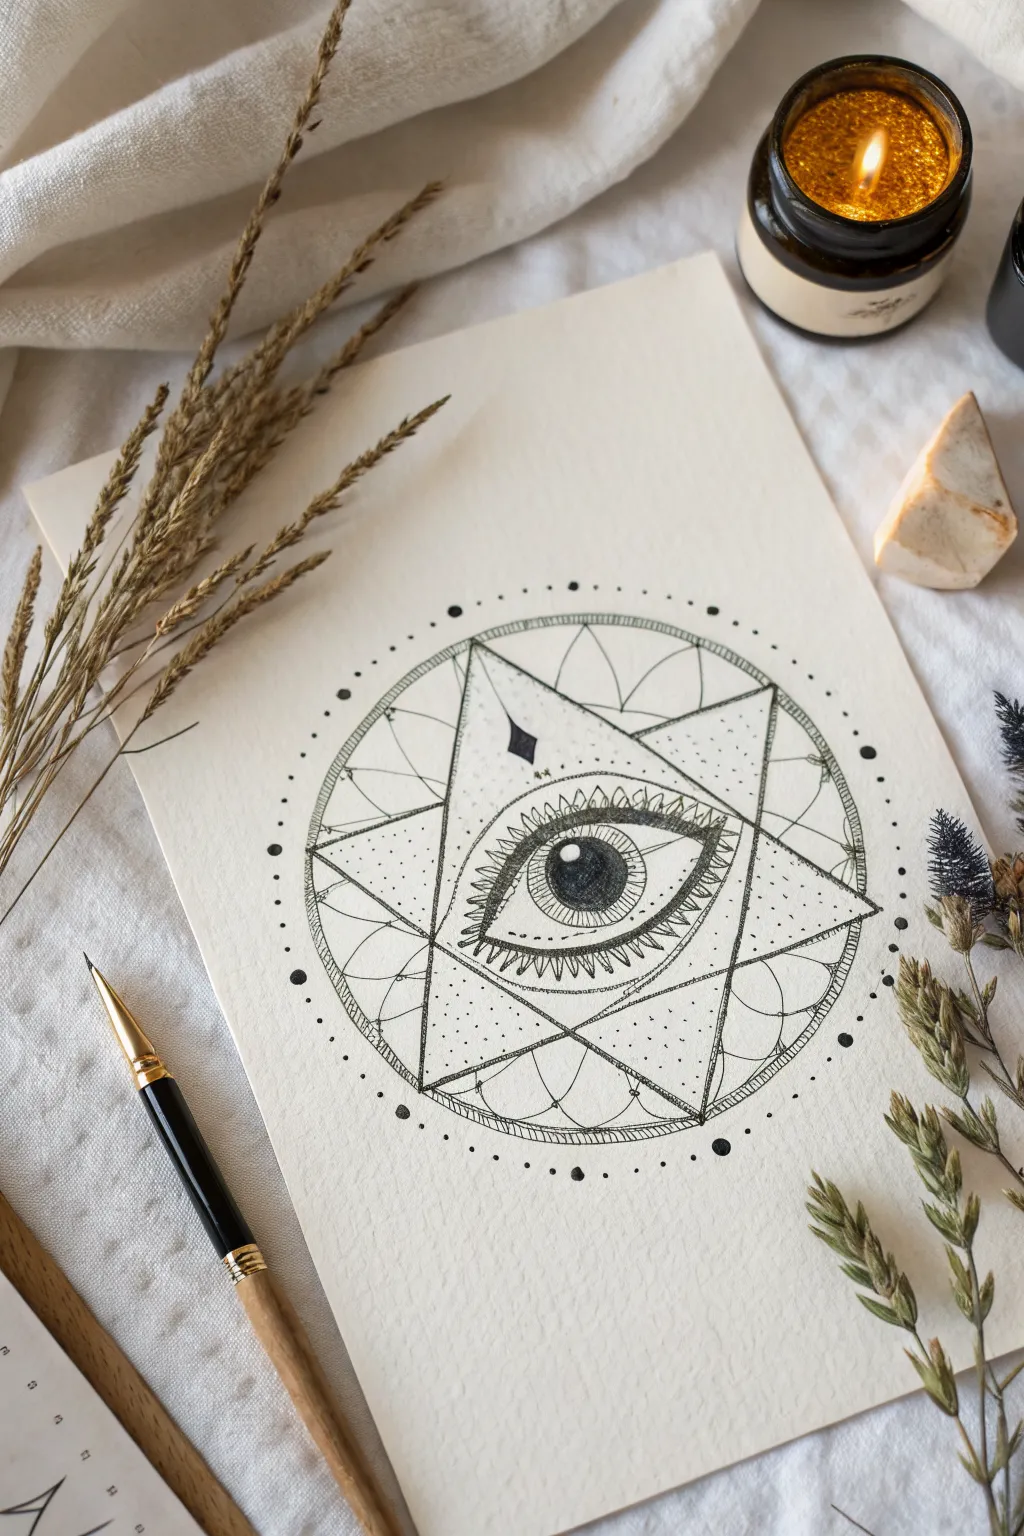
This striking illustration combines the organic beauty of a realistic eye with the precision of sacred geometry. Using fine liners and stippling techniques, you’ll create a mesmerizing focal point surrounded by a celestial six-pointed star framework.
Step-by-Step Tutorial
Materials
- Heavyweight textured drawing paper (vellum or cold press)
- Pencil (HB or 2H)
- Compass
- Ruler
- Eraser (kneaded preferred)
- Black fineliner pens (sizes 005, 01, 03, and 05 or brush tip)
Step 1: Planning the Geometry
-
Find the center:
Begin by lightly marking the direct center of your paper. This will be the anchor point for the pupil and the entire geometric web. -
Establish the main circle:
Using your compass, draw a large circle centered on your mark. This defines the outer boundary of the main design. Keep the pressure light, as some lines will be erased later. -
Draw the inner circle:
Adjust the compass to a slightly smaller radius (about 1cm less) and draw an inner concentric circle. This creates the band where the triangles’ points will rest. -
Construct the six-pointed star:
To create the hexagram, first draw an equilateral triangle pointing upwards within the inner circle. Then, draw an inverted equilateral triangle overlapping it. The points of both triangles should touch the inner circle’s edge. -
Sketch the eye placement:
In the central hexagon formed by the overlapping triangles, sketch the almond shape of the eye. Center the iris and pupil directly on your initial center mark. Draw the upper eyelid crease following the curve of the top triangle’s base.
Smudge Prevention
Place a scrap piece of paper under your drawing hand as you work. This prevents oils from your skin transferring to the paper and stops you from accidentally smearing wet ink.
Step 2: Inking the Structure
-
Outline the main geometry:
Switch to your 03 fineliner. Carefully trace the straight lines of the two large triangles. Instead of just tracing the circles, add a ‘rope’ or ‘hatched’ texture to the bands between the two circles to give it an antiquated feel. -
Ink the eye contours:
Use an 01 pen for the delicate lines of the eye. Outline the iris, pupil, and the eyelids. I like to thicken the upper lash line slightly to add weight and realism. -
Add the sun-ray details:
In the negative space between the star points and the outer circle, draw curved, petal-like arcs connecting the triangle corners. Ink these with a steady hand.
Step 3: Shading and Texturing
-
Fill the pupil:
Using your 05 or brush pen, fill in the pupil completely black, leaving a small, crisp white circle for the highlight (catchlight) to make the eye look wet and alive. -
Detail the iris:
With the 005 pen, draw fine lines radiating from the pupil to the edge of the iris. Add a darker rings of ink around the outer edge of the iris for depth. -
Create the lashes:
Instead of realistic hair, create a stylized look by drawing small, jagged triangles along the upper and lower lids. Fill these triangles with vertical hatching lines. -
Stipple shading:
This step requires patience. Using the 01 pen, add dots (stippling) to shade the corners of the triangles and the edges of the eye whites. Concentrate dots closer together for darker shadows and spread them out for highlights. -
Add the diamond accent:
Draw a small, elongated diamond shape floating just above the eye, centered vertically. Fill it in solid black.
Gold Leaf Accent
Apply a tiny amount of gold leaf or metallic gold watercolor to the iris or the outer geometric ring. The contrast between matte black ink and metallic shine is stunning.
Step 4: Final Touches
-
Outer lattice work:
Lightly sketch and then ink delicate arcs connecting the outer tips of the star, creating a soft, web-like effect behind the main hard geometry. -
The dot halo:
Create the final border by placing evenly spaced dots around the entire exterior of the main circle. Vary the dot sizes—larger dots at the cardinal points and smaller ones in between. -
Erase and refine:
Once you are absolutely certain the ink is dry, gently erase all pencil guidelines. Check for any areas that need a bit more stippling density to balance the contrast.
Step back and admire the mystical symmetry you have created on the page
Celestial Galaxy Iris Eye
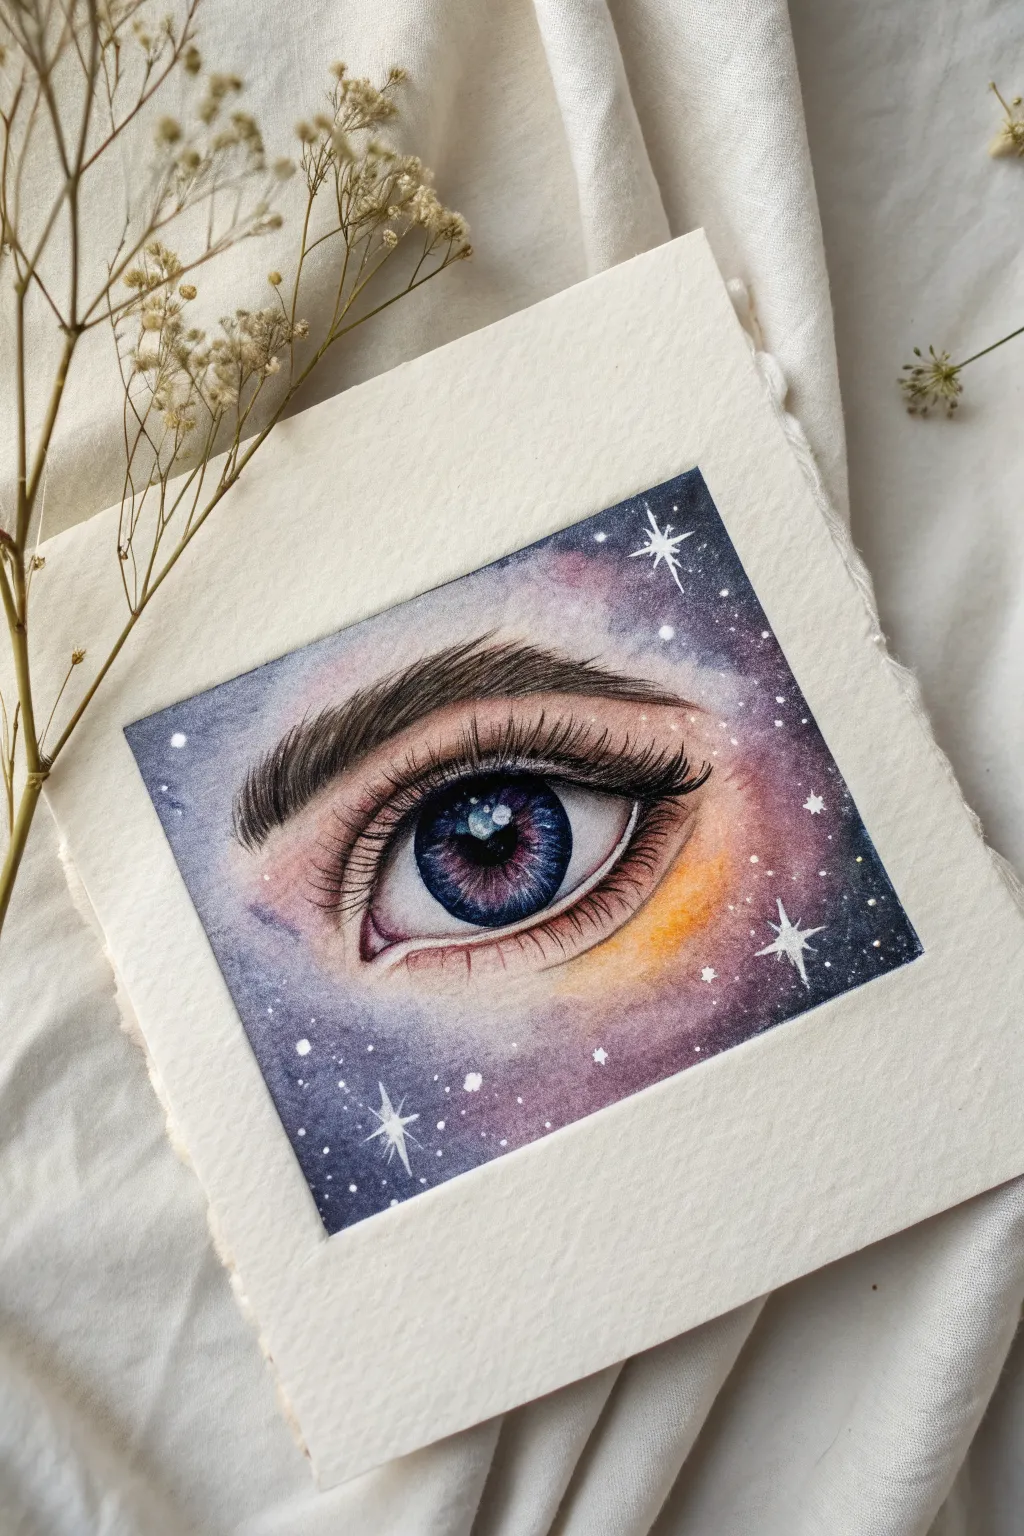
This enchanting project captures the window to the soul set within a cosmic dreamscape. By blending deep, starry violets with warm ambers and a realistic iris, you’ll create a surreal juxtaposition between human connection and the infinite universe.
Detailed Instructions
Materials
- Cold press watercolor paper (300 gsm)
- Masking tape or washi tape
- Watercolor paints (Indigo, Purple, Magenta, Burnt Sienna, Payne’s Grey, Black)
- White gouache or white gel pen
- Watercolor brushes (Medium round size 6, small round size 2, fine liner size 00)
- Pencil (HB) and kneaded eraser
- Palette for mixing
- Jar of clean water
- Paper towels
Step 1: Sketching Boundaries
-
Tape the Frame:
Begin by taping off a perfect square in the center of your watercolor paper using masking tape. Press the edges down firmly to ensure crisp, clean lines later. -
Outline the Eye:
Ideally, lightly sketch the almond shape of the eye in the center of the square. Draw the circular iris, making sure the top is slightly covered by the upper eyelid, and mark the position of the pupil. -
Define the Highlights:
Lightly outline where the brightest reflections will be on the iris; preserving these white spaces now is easier than adding them back later.
Muddy Galaxy?
If your purples and oranges are turning grey where they meet, let the first color dry completely before adding the second adjacent color.
Step 2: The Cosmic Background
-
Base Wash:
Wet the area outside the eye (the skin and background) with clean water. Drop in diluted washes of purple and magenta around the outer edges, blending them softly toward the center. -
Deepening the Cosmos:
While the paper is still damp, charge the outer corners with darker hues like indigo and Payne’s grey to create a night-sky effect. Leave the area immediately under the eye slightly warmer with hints of burnt sienna. -
Skin Tones:
Around the tear duct and eyelids, mix a watered-down burnt sienna for a soft, realistic skin tone that fades effortlessly into the galaxy colors. -
Let it Dry:
Allow this background layer to dry completely. If you paint the iris now, the colors might bleed into the damp surroundings.
Make It Pop
For a true 3D effect, lightly glaze a tiny amount of diluted pink or red along the bottom waterline of the eye to make it look fleshy and alive.
Step 3: Painting the Iris
-
First Iris Layer:
Fill the iris with a light wash of blue-violet, carefully avoiding the mapped-out highlight shapes. -
Adding Depth:
Using a smaller brush, dab darker purples and blues around the outer rim of the iris and near the pupil. Use small, radiating strokes that point toward the center. -
The Pupil:
Fill the pupil with concentrated black or Payne’s grey. It needs to be the darkest point on the page to anchor the gaze. -
Iris Details:
Once dry, use a fine liner brush to add thin, intricate lines radiating from the pupil in dark blue or black to mimic the texture of the iris muscles.
Step 4: Fine Details & Stars
-
Eyelid Crease:
Mix a warm brown and paint the crease of the upper eyelid. Soften the upper edge with a damp brush so it doesn’t look like a harsh line. -
The Sclera:
The white of the eye isn’t pure white. Add very faint shading in the corners using a highly diluted grey-purple to give the eyeball a 3D spherical form. -
Lashes:
I prefer to use a size 00 liner brush with a thick mixture of black paint for this. Use quick, flicking motions to paint the eyelashes, ensuring they curve naturally and vary in length. -
The Eyebrow:
Paint the eyebrow using short, individual strokes that follow the direction of hair growth. Start with a lighter brown and layer darker hairs on top for volume. -
Starry Highlights:
Using white gouache or a gel pen, add tiny dots for stars in the dark purple background. Draw a few larger four-pointed stars for a magical sparkle effect. -
Final Reflections:
Enhance the reflection in the pupil with a touch of pure white gouache to make the eye look wet and glossy.
Step 5: The Reveal
-
Peel the Tape:
Wait until the painting is 100% dry to the touch. Slowly peel the tape away at a 45-degree angle to reveal those satisfying crisp edges.
Step back and admire how the cosmos now resides within a single glance
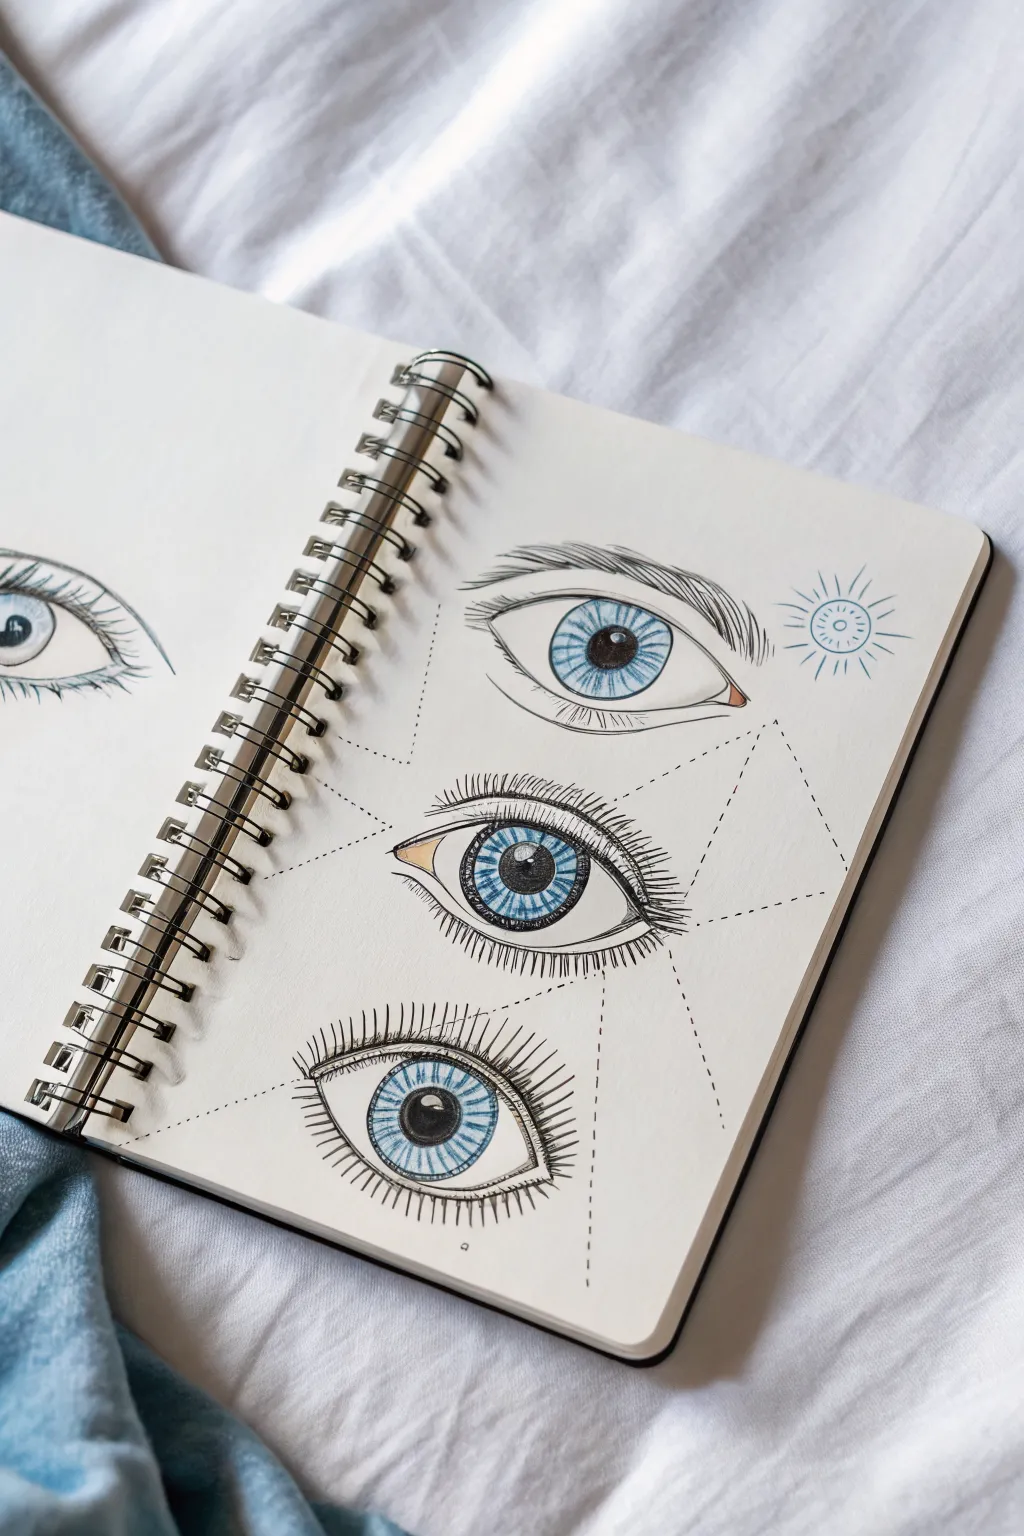
Glitch and Fantasy Pupils

This sketchbook page combines precise anatomical details with abstract geometric elements to create a surreal, interconnected study of eyes. Using fine liners and pops of blue, you’ll practice drawing different eye shapes while linking them together with a minimalist dotted constellation.
Step-by-Step
Materials
- Sketchbook with smooth, heavy paper
- HB or 2B graphite pencil
- Eraser
- Fine liner pens (sizes 0.1, 0.3, and 0.5)
- Blue colored pencil (e.g., cerulean or sky blue)
- Ruler or straight edge
Step 1: Drafting the Layout
-
Establish the curve:
Begin by lightly sketching a gentle vertical curve down the center of your page with a pencil. This will act as the spine for your three main eye drawings. -
Mark eye positions:
Along this curve, mark three evenly spaced points where the pupils will sit. Leave plenty of room between them for eyelashes and the geometric lines later. -
Outline the top eye:
Sketch the almond shape of the top eye. Keep the upper lid arch distinct and add a crease line just above it. Sketch a simple circle for the iris and a smaller one for the pupil. -
Draft the middle eye:
For the middle eye, create a slightly wider, more open shape. Draw the iris circle, ensuring the top is slightly covered by the upper lid to create a natural gaze. -
Draft the bottom eye:
Sketch the bottom eye looking slightly upward or straight on. Make the lower lid line curve gently. Add the iris and pupil, keeping them centered. -
Add the sun motif:
To the right of the top eye, lightly sketch a small sun-like circle with radiating lines to balance the composition.
Step 2: Inking the Outlines
-
Trace main shapes:
Switch to your 0.3 fine liner. Carefully trace the outlines of the eyelids and the creases you sketched. Use confident, single strokes rather than feathery ones. -
Define the iris:
Outline the outer circles of the irises. Do not ink the pupils perfectly black yet; establish the ring first. -
Draw the pupils:
Using a 0.5 pen or by filling in with the 0.3, color the center pupils solid black. Leave a tiny white highlight circle in each if you want a glossy look, though the reference uses solid centers. -
Eyelashes – Top Eye:
For the top eye, use the 0.1 pen to flick quick, curved strokes for the eyebrows above the lid. Keep the lashes on the lid itself minimal or very short. -
Eyelashes – Middle Eye:
On the middle eye, draw defined upper and lower lashes. Group them slightly, making the upper lashes longer and darker. -
Eyelashes – Bottom Eye:
Give the bottom eye dramatic, straight, almost spiky lashes on both the top and bottom lids to differentiate the style. I find it helps to start the stroke at the lid and lift the pen quickly.
Uneven Circles?
If your hand-drawn irises look wobbly, use a circle template or a stencil for the initial pencil sketch. It builds a perfect foundation before you add organic details.
Step 3: Adding Color and Texture
-
Iris detailing:
Take your blue colored pencil and fill in the irises. Apply more pressure near the outer ring and the pupil to create depth, leaving the center slightly lighter. -
Radial lines:
With a very sharp blue pencil or a blue fine liner, draw tiny radial lines engaging from the pupil outward toward the edge of the iris to mimic muscle fibers. -
Sun detail:
Ink the sun motif on the right using the blue fine liner or pencil for the circle, and black ink for the radiating rays. -
Erase pencil marks:
Once the ink is completely dry, gently erase all your graphite sketch lines to clean up the page.
Add Surrealism
Swap the realistic pupil for a slit pupil, a heart shape, or a keyhole to lean harder into the ‘fantasy’ aspect of the style.
Step 4: The Geometric Web
-
Plan the constellation:
Using a ruler and pencil, lightly map out straight lines connecting the corners of the eyes or specific points on drawings (like the sun) to create a web structure. -
Ink the dashed lines:
Go over your pencil ruler lines with a 0.1 fine liner using a dotted or dashed stroke. Keep the dashes consistent in length. -
Connect elements:
Ensure the lines connect the tear ducts and outer corners of the stacked eyes, creating a triangular framework that anchors the illustrations together. -
Final touches:
Check for any gaps in your inking or spots where the blue pencil needs intensifying. Add a tiny touch of shading to the corners of the whites of the eyes with a very light pencil touch if desired.
Now you have a striking sketchbook page that turns simple eye studies into a connected piece of art


Have a question or want to share your own experience? I'd love to hear from you in the comments below!